Embed Size (px)
Citation preview

TREND MICRO™ Mobile Security 12.0
for Android - Product Guide
V1.0
Trend Micro, Incorporated—US Headquarters 224 E. John Carpenter Freeway, Suite 1500 Irving, Texas 75062 U.S.A. Phone: +1 (817) 569-8900 Toll-free: (888) 762-8763
www.trendmicro.com H

Trend Micro™ Mobile Security 12.0 for Android – Product Guide v1.0
2
Trend Micro Incorporated reserves the right to make changes to this document and to the service described herein without notice. Before implementing the service, please review the readme file and the latest version of the applicable user documentation.
Trend Micro and the Trend Micro t-ball logo are trademarks or registered trademarks of Trend Micro, Incorporated. All other product or company names may be trademarks or registered trademarks of their owners.
Copyright © 2020 Trend Micro Incorporated, Consumer Technical Product Marketing. All rights reserved.
Trend Micro™ Mobile Security 12 for Android - Product Guide provides help for analysts, reviewers, potential customers, and users who are evaluating, reviewing, or using Trend Micro Mobile Security for Android.
This product guide can be read in conjunction with its companion guides, which can be accessed from the Home Support/Product Support dropdown menu, as well as from the individual links below:
• Trend Micro™ Mobile Security for iOS Product Guide
• Trend Micro™ Security for Windows Product Guide
• Trend Micro™ Antivirus for Mac® Product Guide
• Trend Micro™ Password Manager for Windows and Android Product Guide
• Trend Micro™ Password Manager for Mac and iOS Product Guide
DOCUMENT PROFILE:
Product Name: Trend Micro™ Mobile Security for Android
Document Title: Trend Micro™ Mobile Security 12.0 for Android - Product Guide
Document Filename: PG - TM Mobile Security 12 for Android - Product Guide v1.0
Document Release Date: November 2, 2020
Team: Consumer Technical Product Marketing

Trend Micro™ Mobile Security 12.0 for Android – Product Guide v1.0
3
Table of Contents
Trend Micro Mobile Security – Quick Overview ............................................................. 4 Chapter 1: Introducing Trend Micro™ Mobile Security ............................................................... 6
Key Features........................................................................................................................... 7 System Requirements ............................................................................................................ 9 Incompatible Software ........................................................................................................... 9 Internet | 3G-4G Connection .................................................................................................. 9 Recommended Environment .................................................................................................. 9 Target Market ........................................................................................................................ 9 Availability ............................................................................................................................. 9 Contacting Trend Micro ........................................................................................................ 10 Consumer Support Line ........................................................................................................ 10 Email and Chat Support ........................................................................................................ 10 Premium Services ................................................................................................................. 10
Chapter 2: Getting Started with Trend Micro™ Mobile Security ............................................... 11 Install and Activate Trend Micro™ Mobile Security .............................................................. 11
Chapter 3: Exploring Trend Micro™ Mobile Security ................................................................ 18 Device Scan .......................................................................................................................... 19 Security Report .................................................................................................................... 35 Security Scan ........................................................................................................................ 41 Web Guard ........................................................................................................................... 48 Wi-Fi Checker ....................................................................................................................... 52 Pay Guard Mobile ................................................................................................................. 54 System Tuner ....................................................................................................................... 56 App Manager ....................................................................................................................... 63 Parental Controls ................................................................................................................. 65 Social Network Privacy ......................................................................................................... 70 Lost Device Protection and Uninstall Protection ................................................................... 73
Lost Device Protection Portal ........................................................................................... 80 Demos: See How Mobile Security Protects You .................................................................... 83 Settings ................................................................................................................................ 84 Mobile Security on Your Android Tablet ............................................................................... 86
About Trend Micro .......................................................................................................... 88

Trend Micro™ Mobile Security 12.0 for Android – Product Guide v1.0
4
Trend Micro Mobile Security – Quick Overview
Trend Micro™ Mobile Security for Android™ (v12.0) provides comprehensive protection for smartphones and tablets so you can enjoy your digital life safely. It safeguards against malicious apps, fraudulent websites, and identity theft, and includes performance-boosting tools. Also, it secures your data by allowing you to find, lock, or erase your device if it’s lost or stolen. Installing easily from the Google Play Store onto your Android smartphone or tablet, Trend Micro Mobile Security provides the following essential features (Red = new or recently updated; F = Free, P = Premium (Paid):
• Refreshed User Interface in Mobile Security Console provides easier access to all functions. (F, P)
• Device Scan. Scans your device for things to fix, providing easy-to-use results to help you fix them. (F, P)
• Security Report. Protection Summary for last 7, 14, or 30 days for app installs and updates, browsing activities, Wi-Fi network connections, email, social media, banking/shopping activities, and others. (F, P)
• Security Scan. Remove apps with security, vulnerability, or privacy issues. Stop installation of fake banking apps and install the real ones. (F, P) Pre-Installation Scan alerts the user of bad apps and malware on Google Play before they’re installed. (P)
• Web Guard. Protects you from explicit or unwanted websites when you are using a mobile browser or apps that offer in-app browsing. (P)
• Wi-Fi Checker. Alerts you of unsecured or suspicious Wi-Fi hotspots showing sign of interference. (P)
• Pay Guard Mobile. Protects your online transactions from data and identity theft when using mobile browsers or financial apps. (P)
Figure 1: Console Scrolled Down

Trend Micro™ Mobile Security 12.0 for Android – Product Guide v1.0
5
• System Tuner. Optimize your device’s Battery and Memory use. Just-a-Phone Mode and Smart Power Saver. Shortcut for quick tuning. (F, P)
• App Manager. Save valuable storage space by viewing Apps by usage, uninstalling rarely used and unused Apps and Setup Files. (P)
• Parental Controls. Lock Apps from kids’ use or filter inappropriate websites. Uninstall protection protects Mobile Security from unauthorized uninstallation. (P)
• Social Network Privacy. Fix your Facebook™ and Twitter™ privacy settings to protect you from spying or identity theft. (F, P)
• Lost Device Protection. With the online portal, locate a lost device, trigger an alarm, remotely lock, or even wipe your device to protect your personal information. Secret Snap takes a photo of whoever’s found or stolen your device after a specified number of failed attempts to log into it. (P)
• In-app Demos. Provides easy-to-understand in-app demos, to teach you about the Pre-Installation Scan, Web Guard, and Wi-Fi Checker. (F, P)
• Tools. Configure Mobile Security to your preferred usage Settings, Renew / Activate, get Help, use Chat Support, Try More Apps, Share a link to the app, or Send Feedback. (F, P)
Figure 2: Console Scrolled Up

Trend Micro™ Mobile Security 12.0 for Android – Product Guide v1.0
6
Chapter 1: Introducing Trend Micro™ Mobile Security
This chapter introduces you to Trend Micro™ Mobile Security 12.0 for Android. The topics discussed in this chapter include:
• Key Features
• System Requirements
• Incompatible Software
• Internet | 3-G-4G Connection
• Recommended Environment
• Target Market
• Availability
• Contacting Trend Micro

Trend Micro™ Mobile Security 12.0 for Android – Product Guide v1.0
7
Key Features All features of Trend Micro Mobile Security for each platform are available during the Free Trial. Various free functions are always available regardless of Trial or Paid (Premium) status. Free Trial availability and details are described within the app. Premium licenses can be purchased within the app, or by logging into your Trend Micro Account and assigning an available seat. (Red = updated or new feature.)
Table 1. Trend Micro Mobile Security (12.0) for Android
Android Security Features Free Paid
Security Console: Refreshed User Interface – Provides easy access to all functions.
✓ ✓
Device Scan: Scans your devices for things to fix, providing easy-to-use results to help you fix them.
✓ ✓
Security Report. Protection Summary for last 7, 14, or 30 days for app installs and updates, browsing activities, Wi-Fi network connections, email, social media, banking/shopping activities, and others.
✓ ✓
Security Scan: Enhanced Scanning Engine - Enhanced scanning engine provides superior virus, vulnerability, and privacy protection for your device.
✓ ✓
Security Scan: Real-time Scan - Scans apps you download and install to filter out viruses and malware that can steal your information and cost you money.
✓ ✓
Security Scan: Pre-Installation Scan - Alerts you of viruses and malware before they’re downloaded and installed.
✓
Security Scan: Trusted Apps – Create a list of trusted apps that do not need to be scanned.
✓
Security Scan: Updates - Unlimited updates to virus protection files. ✓ ✓
Security Scan: Cloud – Cloud scan connection ensures continuous protection.
✓ ✓
Security Scan: Fake Banking Apps - Mobile App Reputation helps you stop the installation of fake banking apps and install the real ones instead.
✓ ✓
Security Scan: Malware / Ransomware Cleaner - Removes malware and ransomware from your device
✓ ✓
Security Scan: Privacy Scanner - Detects spyware by scanning all apps with Mobile App Reputation to identify ones that collect and potentially steal private information.
✓
Web Guard - Protects you from inappropriate or unwanted websites when you are using a browser app or apps that offer in-app browsing. Enables a high- performance local VPN for a wider selection of app protections.
✓
Wi-Fi Checker – Protects you from unsecured or dangerous Wi-Fi hotspots. ✓

Trend Micro™ Mobile Security 12.0 for Android – Product Guide v1.0
8
Android Security Features Free Paid
Pay Guard Mobile - Protects your online transactions from data and identity theft when using mobile browsers or financial apps.
✓
System Tuner: Memory Status and Optimizer - Helps free up memory and CPU to maximize performance. Shortcut for quick tuning.
✓ ✓
System Tuner: Battery Optimizer - Maximizes your battery’s life. ✓ ✓
System Tuner: Just-a-Phone - Turns off power-draining features and apps. ✓ ✓
System Tuner: Auto Just-a-Phone / Auto Power Saver - Turns off power-draining features and apps automatically.
✓
System Tuner: Smart Power Saver - Intelligently manages and disables the network connection when it is not in use to maximize the battery life.
✓
App Manager - Saves valuable storage space by showing you Apps by usage and size, letting you uninstall rarely used and unused Apps and Setup Files.
✓
Parental Controls: App Lock - Locks Apps from use, requiring password, pattern, or PIN to open
✓
Parental Controls: Wi-Fi Filter - Filters inappropriate websites with age-based restrictions.
✓
Social Networking Privacy - Scan your Facebook™ and Twitter™ privacy settings to protect you from spying and identity theft.
✓ ✓
Lost Device Protection: Remote Locate / Alarm - Helps you find your devices on a Google map using GPS, cell towers, or Wi-Fi / Enables you to trigger an alarm on your device – even if it is in silent mode.
✓
Lost Device Protection: Remote Lock / Wipe - Remotely lock your device (accessing the phone again will require that you insert your Trend Micro password or a unique unlock code). Perform a factory reset of the device from the web portal to erase all your personal data.
✓
Lost Device Protection: Secret Snap - Takes a photo of whoever’s found or stolen your device after a specified number of failed attempts to log into it.
✓
Lost Device Protection: SIM Card Protection - Automatically locks your device if the SIM card is removed (Accessing the phone again will require that you insert your Trend Micro password or a unique unlock code). Automatically locates your device when the following actions take place: SIM removal, SIM replacement, Phone Restart.
✓
Lost Device Protection: Last Known Location - Automatically locates your device when the following actions take place: SIM removal, SIM replacement, Phone Restart.
✓
Lost Device Protection: Low Power Location - Records the location of your device just before it runs out of power.
✓
Uninstall Protection - Prevents unauthorized removal of the app. ✓

Trend Micro™ Mobile Security 12.0 for Android – Product Guide v1.0
9
Android Security Features Free Paid
Online Technical Support - Online forums, knowledgebase, and email. ✓
In-app Demos. Provides easy-to-understand in-app demos to teach you about Pre-Installation Scan, Web Guard, and Wi-Fi Checker.
✓ ✓
System Requirements Table 2. Trend Micro Mobile Security 12 for Android - System Requirements
Requirements Description
Operating System Android OS 4.1 or later
Incompatible Software To identify software that you should remove from the device before installing Trend Micro Mobile Security, please refer to the following Web site:
http://esupport.trendmicro.com/support/consumer/consumerhome.do?locale=en_US
Internet | 3G-4G Connection Trend Micro Mobile Security uses a Wi-Fi Internet or 3G-4G connection for activating the program online, checking the expiration date, downloading updates, sending Trend Micro URL/web queries and logs to the portal, logging into the management portal, and browsing knowledge-based pages on the Trend Micro Web site.
3G-4G data connections fees are usually charged on a monthly basis, using a fixed allocation with an upper limit. If you exceed this limit, you will be charged additional fees for the amount of time connected or for the amount of data downloaded. Testers are therefore encouraged to use a Wi-Fi router-based connection to the Internet whenever possible.
Recommended Environment This Product Guide assumes that you are using Trend Micro Mobile Security in conjunction with a PC or Mac, so you can log in to the Trend Micro Mobile Security Portal easily at http://www.trendmicro.com/LostDevice and review your Lost Device Protection settings and execute certain actions.
Target Market Trend Micro Mobile Security is targeted to mobile users who wish to secure their Android and iOS smart phones and tablets from malicious applications, web threats to them and their family, unwanted calls and messages, and device loss.
Availability v12.1.0, October 21, 2020 – Google Play Store

Trend Micro™ Mobile Security 12.0 for Android – Product Guide v1.0
10
Contacting Trend Micro Trend Micro Incorporated 225 E. John Carpenter Freeway, Suite 1500 Irving, Texas 75062 U.S.A. Phone: +1 (817) 569-8900 Toll-free: (888) 762-8763 www.trendmicro.com
Consumer Support Line (800) 864-6027 Monday - Friday, 5:00AM - 8:00PM Pacific
Email and Chat Support Paid users of Mobile Security may obtain free email, chat, and community forum support. For more information, contact eSupport at: https://helpcenter.trendmicro.com/en-us/product-support/mobile-security-for-android/.
Premium Services Trend Micro offers Premium Services for a wide variety of technical issues including installation, virus and spyware removal, PC Tune-ups, and more. For more information, visit https://www.trendmicro.com/en_us/forHome/products/premium-services.html#premium-service-bundle-tm-anchor.

Trend Micro™ Mobile Security 12.0 for Android – Product Guide v1.0
11
Chapter 2: Getting Started with Trend Micro™ Mobile Security
This chapter gets you started with Trend Micro™ Mobile Security. Topics discussed in this chapter include:
• Downloading and Installing Trend Micro Mobile Security from Google Play
• Activating Your Subscription
• Update and Device Scan
Note: Trend Micro Mobile Security is also included with Trend Micro Maximum Security. To download the bundled software, users can simply launch the Trend Micro Maximum Security Console. A “Protect Another Device” link to the Mobile Security installer is available from the Console.
Install and Activate Trend Micro™ Mobile Security To install and activate Trend Micro Mobile Security from the Google Play Store:
1. Tap the Google Play Store app on your Android device. The Google Play Store screen appears.
2. Search for “Trend Micro Mobile Security” in the search field.
3. Trend Micro Mobile Security & Antivirus will appear at the top of the app list.
4. Tap it to load the app install screen. The Trend Micro Mobile Security & Antivirus install screen appears.
Figure 3. Google Play Store
Figure 4: Search Google Play

Trend Micro™ Mobile Security 12.0 for Android – Product Guide v1.0
12
5. Tap Install. Trend Micro Mobile Security & Antivirus downloads and installs.
6. When installation is complete, tap Open. A Privacy and Personal Data Collection Disclosure notice appears.
Figure 5. Trend Micro Mobile Security
Figure 6: Installing
Figure 7. Open
Figure 8. Privacy and Personal Data Collection Disclosure

Trend Micro™ Mobile Security 12.0 for Android – Product Guide v1.0
13
7. Read the Privacy and Personal Data Collection Disclosure. If you agree to the terms, check I agree to share user usage data to help improve this app, then tap Accept and Continue.
8. The Welcome screen appears, with a link to the Trend Micro License Agreement.
9. Read the License Agreement by tapping the link. If you accept the terms of the license agreement, tap Accept and Continue.
Figure 9. Privacy and Personal Data Collection Disclosure
Figure 10. Welcome
10. A screen appears inviting you to Secure Your Digital Life. You can activate the app by tapping Already Purchased? or Try for Free.
11. In this example, we tap Already Purchased? A popup menu appears, allowing you to Sign Into Your Account or Provide Activation Code.
Figure 11. Secure Your Digital Life
Figure 12. Activation Options

Trend Micro™ Mobile Security 12.0 for Android – Product Guide v1.0
14
12. Tap Provide Activation Code if you already have the code, enter it in, then click OK to activate.
13. Or tap Sign Into Your Account, if you wish to use an existing subscription, then enter the email address and password to sign into your Trend Micro Account and tap Sign In.
Figure 13. Use an Activation Code
Figure 14. Sign In
14. Once you’re in your Trend Micro Account, a popup appears, letting you Use Available Subscription.
15. Tap Next. A list of available subscriptions appears.
16. Tap the subscription dropdown menu you wish to use. You can transfer a seat or use an unused seat. If you transfer a seat, the subscription will be cancelled on that device.
17. Once you’ve chosen, tap Use this subscription to use the seat.
Figure 15. Use Available Subscription
Figure 16. Use This Subscription

Trend Micro™ Mobile Security 12.0 for Android – Product Guide v1.0
15
18. A Switch to Another Subscription popup appears for you to cancel or continue.
19. Tap OK to use the seat in the subscription. Trend Micro Mobile Security activates and updates its protection.
Figure 17. Switch to Another Subscription
Figure 18. Subscription Updated
20. When the Update is complete, Trend Micro Mobile Security conducts a Device Scan and returns the result.
Figure 19. Updating
Figure 20. Scanning
Trend Micro™ Mobile Security 12.0 for Android – Product Guide v1.0
16
21. In this example, Device Scan found 9 things to fix. These are typically Set Ups or Settings adjustments, which “fix” an Android setting so the feature can work properly in Mobile Security.
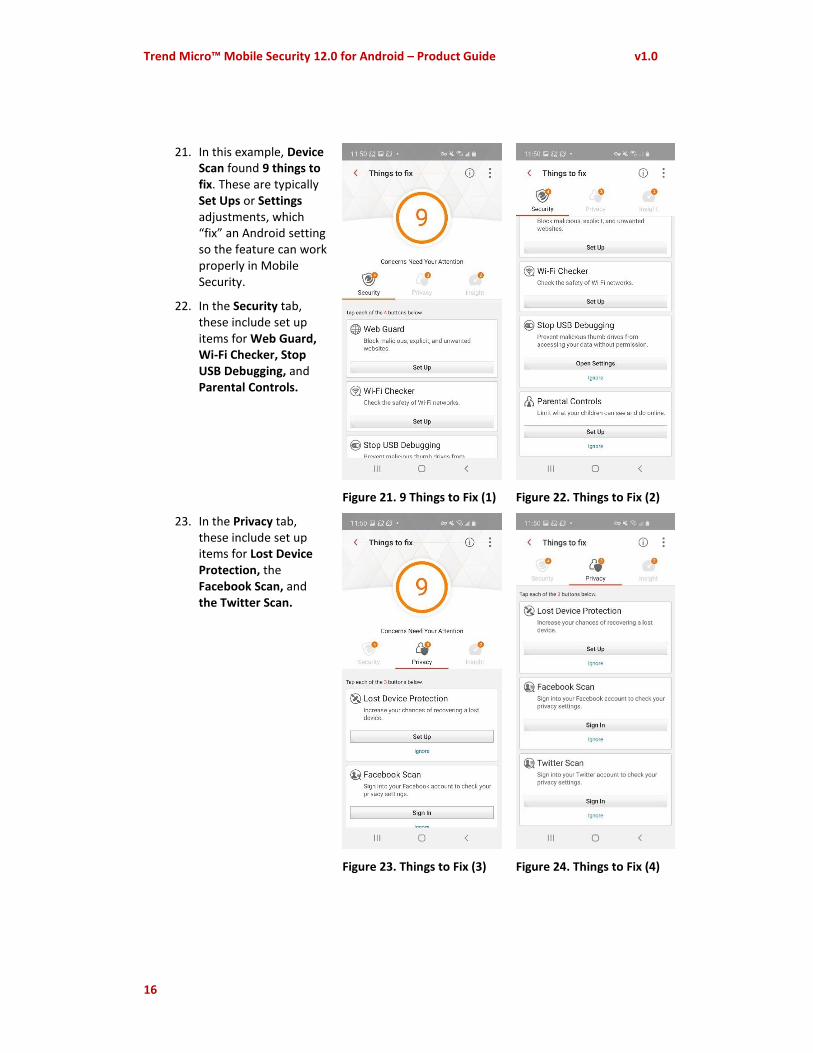
22. In the Security tab, these include set up items for Web Guard, Wi-Fi Checker, Stop USB Debugging, and Parental Controls.
Figure 21. 9 Things to Fix (1)
Figure 22. Things to Fix (2)
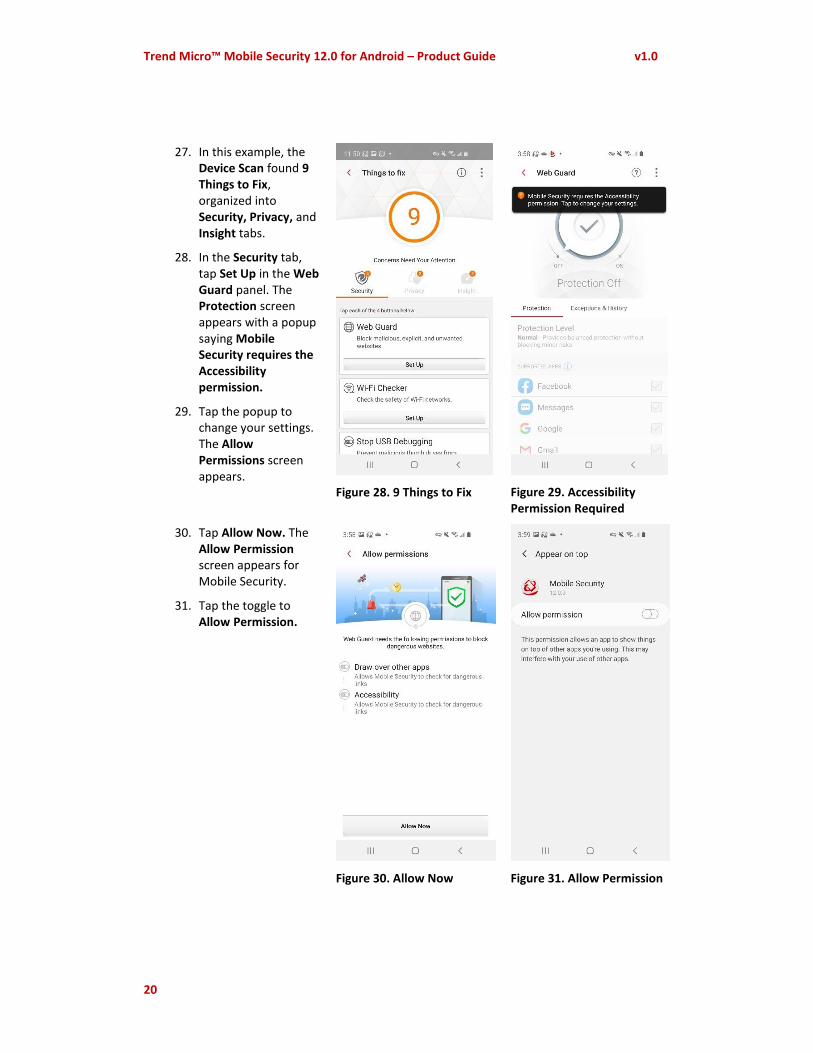
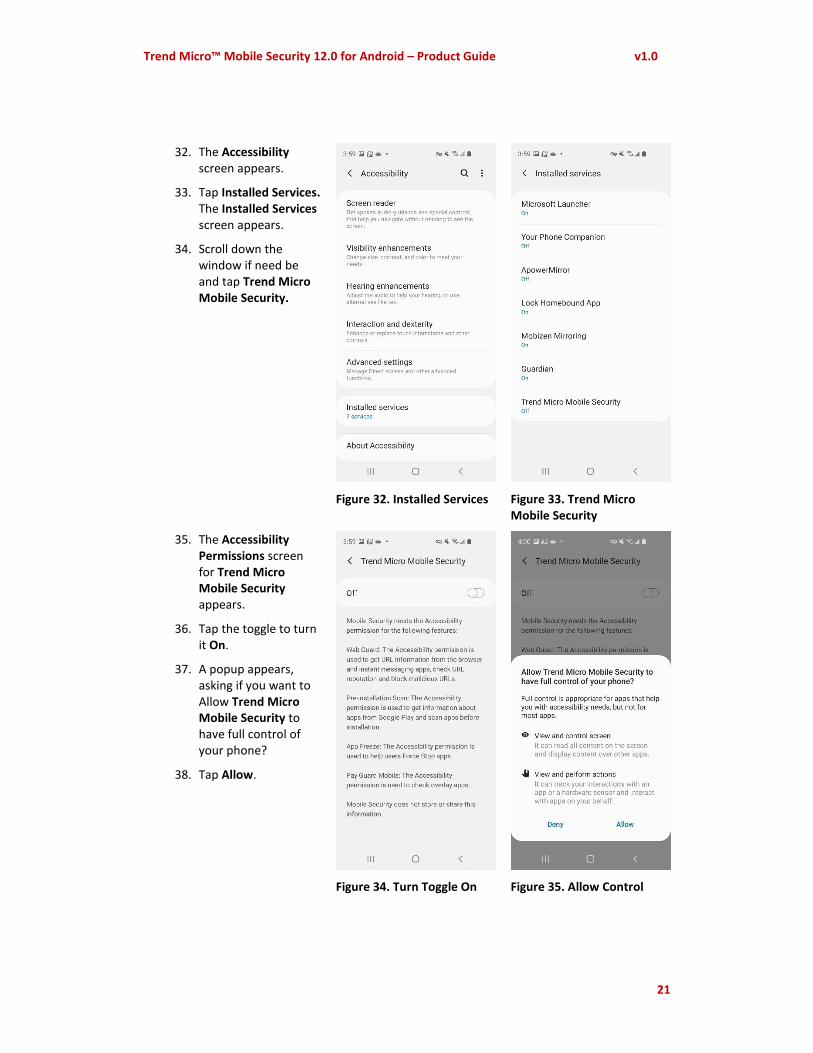
23. In the Privacy tab, these include set up items for Lost Device Protection, the Facebook Scan, and the Twitter Scan.
Figure 23. Things to Fix (3)
Figure 24. Things to Fix (4)

Trend Micro™ Mobile Security 12.0 for Android – Product Guide v1.0
17
24. In the Insight tab, these include set up items for Security Scan Notifications and Display Over Other Apps.
25. We’ll address these Things to fix in the Device Scan section in this guide.
26. Congratulations! You may now begin using Trend Micro Mobile Security.
Figure 25. Things to Fix (5)

Trend Micro™ Mobile Security 12.0 for Android – Product Guide v1.0
18
Chapter 3: Exploring Trend Micro™ Mobile Security
This chapter provides an overview of Trend Micro Mobile Security (TMMS). Topics discussed in this chapter include:
• Device Scan
• Security Report
• Security Scan (Includes Pre-Installation Scan)
• Web Guard
• Wi-Fi Checker
• Pay Guard Mobile
• System Tuner
• App Manager
• Network Protection
• Parental Controls
• Secret Snap
• Social Network Privacy
• Lost Device Protection
• Demo
• Settings
• Mobile Security on your Android Tablet

Trend Micro™ Mobile Security 12.0 for Android – Product Guide v1.0
19
Device Scan Once installed, Trend Micro™ Mobile Security (TMMS) appears in your Applications list on your Android mobile device and a shortcut appears on the home screen of your device. Once installed, Mobile Security automatically updates and begins a Device Scan, as given in the previous section of this guide.
Continue from the previous section or conduct a Device Scan now to get started with Trend Micro Mobile Security. This examines your device for problems that need fixing and for preliminary permissions that need to be set up for Mobile Security to work properly.
To conduct a Device Scan:
1. Tap the Trend Micro Mobile Security icon on your mobile device and the Mobile Security Console appears.
2. Tap the Scan wheel to conduct a Device Scan. The scan begins, showing the progress of the scan. When complete, it shows x Things to Fix.
Figure 26. Console > Device Scan
Figure 27. Scanning…
Trend Micro™ Mobile Security 12.0 for Android – Product Guide v1.0
20
27. In this example, the Device Scan found 9 Things to Fix, organized into Security, Privacy, and Insight tabs.
28. In the Security tab, tap Set Up in the Web Guard panel. The Protection screen appears with a popup saying Mobile Security requires the Accessibility permission.
29. Tap the popup to change your settings. The Allow Permissions screen appears.
Figure 28. 9 Things to Fix
Figure 29. Accessibility Permission Required
30. Tap Allow Now. The Allow Permission screen appears for Mobile Security.
31. Tap the toggle to Allow Permission.
Figure 30. Allow Now
Figure 31. Allow Permission
Trend Micro™ Mobile Security 12.0 for Android – Product Guide v1.0
21
32. The Accessibility screen appears.
33. Tap Installed Services. The Installed Services screen appears.
34. Scroll down the window if need be and tap Trend Micro Mobile Security.
Figure 32. Installed Services
Figure 33. Trend Micro Mobile Security
35. The Accessibility Permissions screen for Trend Micro Mobile Security appears.
36. Tap the toggle to turn it On.
37. A popup appears, asking if you want to Allow Trend Micro Mobile Security to have full control of your phone?
38. Tap Allow.
Figure 34. Turn Toggle On
Figure 35. Allow Control

Trend Micro™ Mobile Security 12.0 for Android – Product Guide v1.0
22
39. The Permission Allowed screen appears.
40. Back in the Web Guard Protection tab, a popup indicates You Are Now Protected.
Figure 36. Permission Allowed
Figure 37. You Are Now Protected
41. Tap the back arrow to return to Things to Fix.
42. Tap Set Up for Wi-Fi Checker.
43. The Wi-Fi Checker screen appears, with a popup indicating Mobile Security needs permissions to use this feature.
44. Tap the popup or toggle to turn on Wi-Fi Checker. The Allow Permissions screen appears.
Figure 38. Wi-Fi Checker
Figure 39. Turn Toggle On

Trend Micro™ Mobile Security 12.0 for Android – Product Guide v1.0
23
45. Tap Allow Now. A popup appears, with the options to Allow all the time, or Allow only while using the app.
46. In this example, tap Allow all the time.
Figure 40. Allow Now
Figure 41. Allow All The Time
47. The Permission Allowed screen appears.
48. Back in the Wi-Fi Checker screen, the Wi-Fi Checker toggle is now On.
49. Use the back-arrow to return to Things to fix.
Figure 42. Permission Allowed
Figure 43. Wi-Fi Checker Toggle is On

Trend Micro™ Mobile Security 12.0 for Android – Product Guide v1.0
24
50. Tap Open Settings to Stop USB Debugging.
51. Scroll down to the USB Debugging toggle and turn it Off.
Figure 44. Stop USB Debugging
Figure 45. Toggle USB Debugging Off
52. Tap the back arrow to exit the Developer Options screen.
53. Back in Things to fix, tap Set Up for Parental Controls. The Lock Screen appears.
Figure 46. USB Debugging Off
Figure 47. Parental Controls Set Up
Trend Micro™ Mobile Security 12.0 for Android – Product Guide v1.0
25
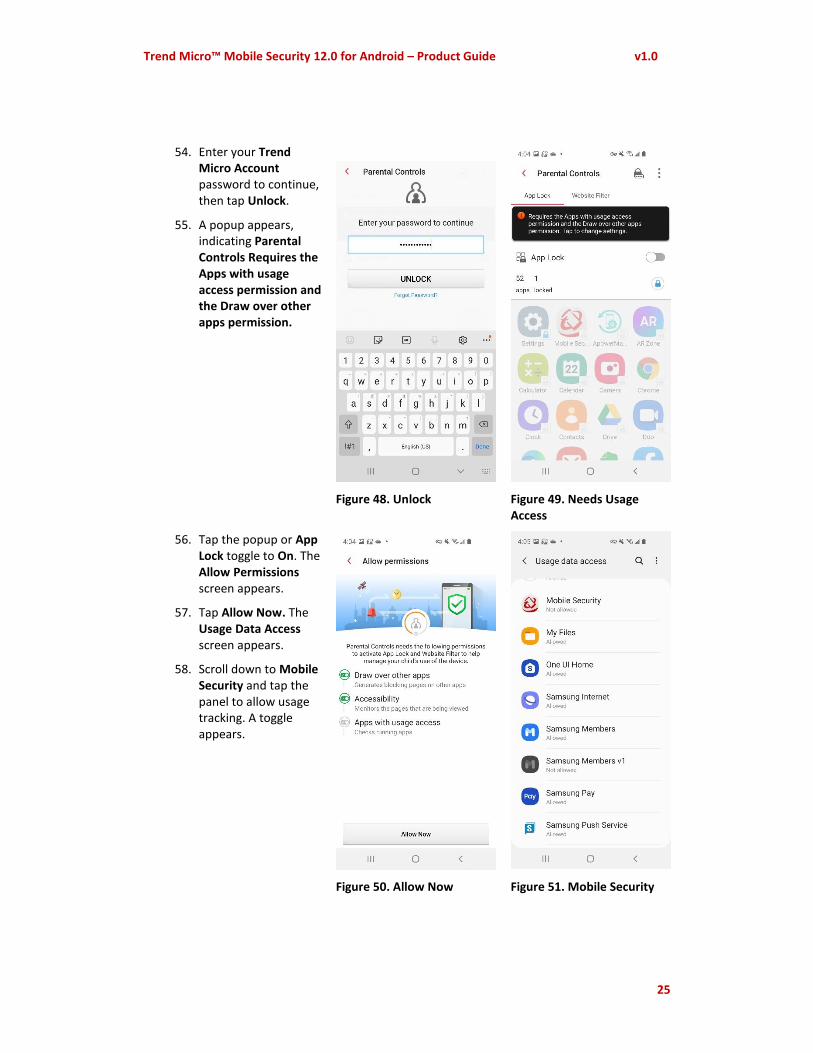
54. Enter your Trend Micro Account password to continue, then tap Unlock.
55. A popup appears, indicating Parental Controls Requires the Apps with usage access permission and the Draw over other apps permission.
Figure 48. Unlock
Figure 49. Needs Usage Access
56. Tap the popup or App Lock toggle to On. The Allow Permissions screen appears.
57. Tap Allow Now. The Usage Data Access screen appears.
58. Scroll down to Mobile Security and tap the panel to allow usage tracking. A toggle appears.
Figure 50. Allow Now
Figure 51. Mobile Security

Trend Micro™ Mobile Security 12.0 for Android – Product Guide v1.0
26
59. In the Usage Data Access screen, toggle the Allow Usage Tracking to On.
60. The Permission Allowed screen appears.
Figure 52. Turn Toggle On
Figure 53. Permission Allowed
61. An instruction screen then appears, indicating that App Lock is On. Locked apps require a password to open.
62. Tap OK to close the instruction screen.
63. App Lock is toggled On.
64. Tap the Website Filter tab to access the control.
Figure 54. Instruction Screen
Figure 55. App Lock On

Trend Micro™ Mobile Security 12.0 for Android – Product Guide v1.0
27
65. Tap the Website Filter toggle to On. An instruction screen appears, indicating how to select the Protection Level you want.
66. Tap Close to close the instructions screen.
Figure 56. Turn Toggle On
Figure 57. Select an Age
67. Here, we use the default Teen Protection Level selected. This completes the Parental Controls Website Filter setup for this child’s phone.
68. Back in the Things to Fix, the Security tab shows Good News. You have no concerns additional Security concerns to fix.
Figure 58. Teen Level On
Figure 59. Good News

Trend Micro™ Mobile Security 12.0 for Android – Product Guide v1.0
28
69. Tap the Privacy tab to see Set Up for Lost Device Protection, Facebook Scan, and Twitter Scan.
70. Tap Set Up in the Lost Device Protection panel. The Lock screen appears.
71. Enter your Trend Micro Account Password to continue, then tap Unlock.
Figure 60. Lost Device Protection
Figure 61. Unlock
72. A popup appears for you to Activate Device Administrator. This allows you to remotely delete all data from a lost device, take a photo when someone tries to access your locked areas, and prevents Mobile Security from being uninstalled without your permission.
73. Tap I got it. The Find My Android tab opens.
74. Permission is required. Tap Find My Android to toggle it On.
Figure 62. Activate Device Administrator
Figure 63. Find My Android Permission Required

Trend Micro™ Mobile Security 12.0 for Android – Product Guide v1.0
29
75. The Allow Permissions screen appears.
76. Tap Allow Now to proceed.
77. The Activate Device Admin App screen appears.
78. Tap Activate to activate Device Administrator. You’re then presented with a series of screens to allow the various permissions
Figure 64. Allow Now
Figure 65. Activate Device Admin
79. Tap Allow to allow Mobile Security to make and manage phone calls.
80. Tap Allow to allow Mobile Security to take pictures and record video.
Figure 66. Allow Phone Calls
Figure 67. Allow Pictures and Videos

Trend Micro™ Mobile Security 12.0 for Android – Product Guide v1.0
30
81. Tap Allow to allow Mobile Security to access photos, media, and files on your device.
82. Once complete, the Permission Allowed screen appears.
Figure 68. Allow Photos, Media, and Files
Figure 69. Permission Allowed
83. Tap the back arrow to return to the Things to Fix screen.
84. You may now check your Facebook and Twitter privacy settings. Otherwise, tap Insights to skip to Security Scan Notifications set up at the end of this section.
85. Tap Sign In to conduct a Facebook Scan.
86. Tap Sign Into Facebook to sign in.
Figure 70. Facebook and Twitter Scans
Figure 71. Sign Into Facebook

Trend Micro™ Mobile Security 12.0 for Android – Product Guide v1.0
31
87. Enter your mobile number or email address and password, then tap Log In.
88. Mobile Security scans your Social Network Privacy settings for Facebook.
Figure 72. Facebook Log In
Figure 73. Checking Facebook
89. In this example, no privacy concerns were found.
90. Tap the back arrow to initiate a Twitter Scan, then tap Sign In.
Figure 73. No Privacy Concerns Found
Figure 74. Twitter Scan

Trend Micro™ Mobile Security 12.0 for Android – Product Guide v1.0
32
91. A screen appears; tap Sign Into Twitter.
92. Enter your phone, email, or username, then your password and tap Log In.
Figure 75. Sign Into Twitter
Figure 76. Log In To Twitter
93. Mobile Security checks your Social Network Privacy settings for Twitter.
94. In this example, no privacy concerns were found.
95. Check the Social Network Privacy section in this guide for more details about editing privacy settings when privacy concerns are found.
Figure 77. Checking Twitter
Figure 78. No Privacy Concerns Found

Trend Micro™ Mobile Security 12.0 for Android – Product Guide v1.0
33
96. Tap the back arrow to return to Things to Fix.
97. The Privacy screen shows Good News. You have no privacy concerns to fix.
98. Tap the Insight tab to address the remaining Things to Fix.
99. Tap Set Up for Security Scan Notifications.
Figure 79. Good News
Figure 80. Security Scan Notifications
100. The Notifications Access screen appears.
101. Tap Mobile Security to toggle it On. A popup appears, asking you to Allow Mobile Security to read your notifications.
102. Tap Allow to allow the settings. The toggle shows On.
103. Tap the back arrow to return to the Things to Fix screen.
Figure 81. Notification Access
Figure 82. Allow Mobile Security to Read Notifications

Trend Micro™ Mobile Security 12.0 for Android – Product Guide v1.0
34
104. The Insight tab shows Good News. You have no remaining concerns to fix.
105. Tap the back arrow to return to the main Console.
106. The Scan button shows you’re now completely Protected.
Figure 83. Good News
Figure 84. Protected

Trend Micro™ Mobile Security 12.0 for Android – Product Guide v1.0
35
Security Report Trend Micro Mobile Security provides a Security Report, giving you a Protection Summary for the various kinds of protections used during the last 7, 14, or 30 days.
To view the Security Report:
1. Tap the Security Report icon to the right of the Scan wheel. The Security Report appears, with the Protection Summary at the top, showing activity bars over a given timespan.
Figure 85. Security Report Icon
Figure 86. Security Report

Trend Micro™ Mobile Security 12.0 for Android – Product Guide v1.0
36
2. Tap the Protection Summary drop-down menu to set the Security Report filter for the Last 7, 14, or 30 days.
3. Proceed down through the list of panels to view the various categories for which Mobile Security has protected you.
4. Orange Alerts in the upper left corner of a panel indicate that issues have been discovered or settings need to be applied.
5. Protect buttons indicate you need to turn on the function.
Figure 87. Security Report Timespan
Figure 88. App Installations & Updates
6. For example, tap App Installations & Updates, then the popup Turn on Security Scan to get protection. A Security Scan popup appears.
7. Check Pre-Installation Scan, then tap OK.
8. The Allow Permissions screen appears, indicating that the Pre-Installation Scan needs Accessibility and Draw over other apps enabled to operate properly
NOTE: The previous Device Scan section may have already set these permissions. Skip to step 16 if so.
9. Tap Allow Now.
Figure 89. Turn On Security Scan
Figure 90. Allow Now

Trend Micro™ Mobile Security 12.0 for Android – Product Guide v1.0
37
10. When the Accessibility screen appears, scroll down and tap Installed Services, then Trend Micro Mobile Security to toggle it On.
Figure 91. Installed Services
Figure 92. Turn Trend Micro Mobile Security On
11. A screen appears, indicating Trend Micro Mobile Security needs Accessibility permission for WebGuard, the Pre-Installation Scan, App Freeze, and Pay Guard Mobile. No information is stored or shared.
12. Tap the toggle to On. A popup appears, indicating that Trend Micro Mobile Security wants permission to View and Control Screen and View and Perform Actions.
13. Tap Allow.
Figure 93. Toggle Accessibility On
Figure 94. Allow Full Control

Trend Micro™ Mobile Security 12.0 for Android – Product Guide v1.0
38
14. The Appear on Top permission screen appears.
15. Tap Allow Permission to toggle it On. The Permission Allowed screen appears.
Figure 95. Toggle Mobile Security On
Figure 96. Permission Allowed
16. Tap the back-arrow back to the App Installations & Updates screen, which indicates the types of scans and number of apps Mobile Security has scanned for each type (Pre-installation Scan, Real-Time Scan, and Scan On Demand.)
17. Tap the remaining Security Report panels for more details on each protection, or to turn on the various functions by tapping Protect.
Figure 96. App Installations & Updates
Figure 97. Security Report Panels

Trend Micro™ Mobile Security 12.0 for Android – Product Guide v1.0
39
18. Browsing Activities, for example, displays the number of websites scanned by Web Guard in your browsers or for apps with in-app browsing.
19. Wi-Fi Network Connections displays the number of Wi-Fi connections scanned by Wi-Fi Checker.
Figure 98. Browsing Activities
Figure 99. Wi-Fi Network Connections
20. Email Activities displays the number of websites scanned by Web Guard within Gmail.
21. Social Media Activities displays the number of websites scanned by Web Guard within your various social media apps.
Figure 100. Email Activities
Figure 101. Social Media Activities

Trend Micro™ Mobile Security 12.0 for Android – Product Guide v1.0
40
22. Banking/Shopping Activities displays the number of activities protected by Pay Guard Mobile.
23. Other displays the number of websites scanned by Web Guard within other applications, such as news aggregators or in the example app, the Samsung Accessory Service.
24. Again, tap Protect to turn on Web Guard protection for the various apps.
Figure 102. Banking / Shopping Activities
Figure 103. Other
25. A popup appears for you to Select Apps to let Web Guard scan and notify you about suspicious links.
26. Tap the checkbox for the apps you wish to protect, then tap OK. A popup appears to Allow Connection: Mobile Security is requesting permission to set up a VPN to monitor network traffic.
27. Tap OK to enable the VPN.
Figure 104. Selected Apps
Figure 105. Allow Connection

Trend Micro™ Mobile Security 12.0 for Android – Product Guide v1.0
41
28. Once you use the apps, Other displays the number of websites scanned and the date they were scanned.
Figure 106. Websites Scanned
Security Scan To use the Security Scan:
1. Tap the Security Scan panel in the Console. The Security Scan settings screen appears, with the Settings tab active by default.
2. Tap Scan Now to conduct a security scan. The Security Scan performs a combination security, vulnerability, and privacy scan and returns the result.
3. In the example shown, “Citibank” has been detected as a fake banking app, present on the device before Mobile Security was installed.
Figure 107. Security Scan
Figure 108. Scan Now

Trend Micro™ Mobile Security 12.0 for Android – Product Guide v1.0
42
Apps are also recommended for you to remove (or to trust).
4. Tap Uninstall to uninstall the fake app. A Details screen defines the security threats.
5. Tap Uninstall again. A popup will ask if you want to uninstall the app; tap Uninstall once more to uninstall it.
6. Tap the panel for Apps Removal Recommended to show the list of apps recommended for removal.
7. In the Removal Recommended list (not shown), check apps to Remove or Trust.
Figure 109. Security Scan Results
Figure 111. Uninstall App
Figure 110. Fake App Details
8. Back in the Security Scan > Settings screen, view the Settings options to configure them.
Protection Strength. Choose the level for alerts:
-Low. Receive alerts only for apps confirmed as fraudulent or dangerous.
-Normal. Receive alerts for regular daily use, without notifications about minor risks.
-High. Receive alerts for apps that show any signs of fraud or danger.
Real-Time Scan. Option is checked by default and provides a real-time scan of all downloaded apps.
Figure 112. Security Scan Settings (1)

Trend Micro™ Mobile Security 12.0 for Android – Product Guide v1.0
43
Pre-Installation Scan. Disabled by default. Blocks malware from Google Play before it’s installed.
Scan Memory Card. This option, unchecked by default, checks the memory card for security threats.
Scan Option.
-Scan all files or
-Scan only apps (default)
9. Trusted Apps. Tap Trusted Apps > App.
Figure 113. Security Scan Settings (2)
Figure 114. Trusted Apps
10. Then tap Remove from the Trusted List to remove an app from the list.
Figure 115. Remove from the Trusted List

Trend Micro™ Mobile Security 12.0 for Android – Product Guide v1.0
44
To enable and use the Pre-installation Scan:
NOTE: If you’ve already allowed Accessibility permission for Pre-Installation Scan, skip to step 10 below.
1. Tap the Pre-installation Scan panel in the Security Scan > Settings screen. The Pre-installation Scan toggle screen appears.
2. Note that the Pre-Installation Scan requires the Accessibility permission for Mobile Security to be turned on.
3. Tap the Pre-installation Scan toggle from Off to On. The Allow permissions screen for turning on Accessibility appears.
Figure 116. Security Scan Settings
Figure 117. Pre-Installation Scan
4. Tap Allow Now. The Accessibility screen appears.
5. Scroll down the screen and tap the panel for Trend Micro Mobile Security. The screen to enable Mobile Security Accessibility screen appears.
Figure 118. Allow Permissions > Accessibility
Figure 119. Accessibility

Trend Micro™ Mobile Security 12.0 for Android – Product Guide v1.0
45
6. As noted previously, Accessibility permission is needed for Web Guard, Pre-installation Scan, App Freeze, and Pay Guard Mobile.
7. Tap the toggle from Off to On. A dialog appears, describing the permissions needed for Trend Micro Mobile Security.
- Monitor your actions
- Retrieve window content.
8. Tap OK.
Figure 120. Mobile Security Accessibility
Figure 121. Use Trend Micro Mobile Security?
9. The Permission Allowed screen appears. The Pre-Installation Scan is now active. Apps downloaded from Google Play will now be automatically scanned for safety before they’re installed.
10. Test the Pre-Installation Scan by downloading an Antivirus Test app from Google Play.
11. Enter “antivirus test” into the Google Play Search field.
12. When the search results appear, pick an antivirus test for download.
Figure 122. Permission Allowed
Figure 123. Antivirus Test

Trend Micro™ Mobile Security 12.0 for Android – Product Guide v1.0
46
13. For example, tap Test your antivirus.
14. Mobile Security’s Pre-Installation Scan scans the app and presents a popup saying Test your antivirus is dangerous.
15. Do not install the app, as it presents dangers to your device.
16. Use the back-arrow on your device to back out of the Install screen.
Figure 124. “Test Your Antivirus” is Dangerous
Updates and History:
1. Tap the Update tab in the Security Scan screen. The Update options appear.
2. Tap the Update button to manually update the pattern file. Mobile Security updates. If Automatic Scan is checked, a scan is conducted after an update.
3. Variously check Auto Update, Auto Updates require Wi-Fi.
4. Tap Auto Update Schedule.
Figure 125. Security Scan > Update
Figure 126. Security Scan > Post-Update Scan

Trend Micro™ Mobile Security 12.0 for Android – Product Guide v1.0
47
5. A popup appears, letting you choose the Update Interval: Daily, Weekly, or Monthly.
6. Tap the History tab, then the Security Scan or Updates panels to obtain a history of threats found or updates conducted.
Figure 127. Update Interval
Figure 128. Security Scan > History
7. Select individual items in either the Security Scan or Updates History, then tap the Trashcan > Delete to delete them.
Figure 129. Delete History Items

Trend Micro™ Mobile Security 12.0 for Android – Product Guide v1.0
48
Web Guard Mobile Security’s Web Guard protects from explicit or unwanted websites when using a browser app, apps that offer in-app browsing, and instant messengers. For some apps, Web Guard turns on a local VPN that won’t slow down bandwidth performance. To use Web Guard, you’ll first enable the Accessibility option for Mobile Security in your phone settings. In this example, Accessibility is already turned on.
To use Web Guard:
1. Tap Web Guard in the Mobile Security Console. The Web Guard screen appears, with the dial showing Protection On in this example.
2. Tap Protection Level to set the level of protection you want:
-Low. Blocks only sites confirmed as fraudulent or dangerous.
-Normal. Provides balanced protection without blocking minor risks.
-High. Blocks sites showing any signs of fraud or malicious software.
Figure 130. Web Guard
Figure 131. Web Guard Dial
3. Supported Apps. Check the apps that should notify you of suspicious links.
4. VPN Supported Apps. Tap the toggle to turn on VPN Support Apps. A popup appears for you to Allow Connection.
5. Tap OK to turn on VPN Supported Apps.
Figure 132. Supported Apps
Figure 133. Allow Connection
Trend Micro™ Mobile Security 12.0 for Android – Product Guide v1.0
49
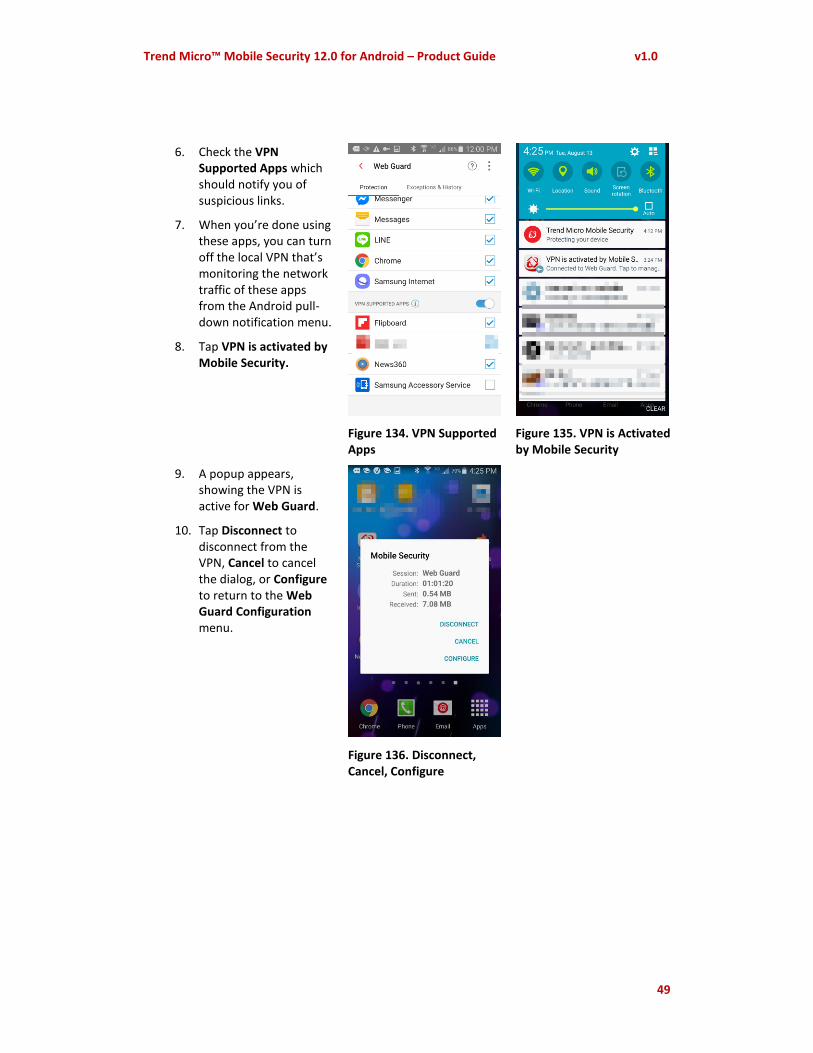
6. Check the VPN Supported Apps which should notify you of suspicious links.
7. When you’re done using these apps, you can turn off the local VPN that’s monitoring the network traffic of these apps from the Android pull-down notification menu.
8. Tap VPN is activated by Mobile Security.
Figure 134. VPN Supported Apps
Figure 135. VPN is Activated by Mobile Security
9. A popup appears, showing the VPN is active for Web Guard.
10. Tap Disconnect to disconnect from the VPN, Cancel to cancel the dialog, or Configure to return to the Web Guard Configuration menu.
Figure 136. Disconnect, Cancel, Configure

Trend Micro™ Mobile Security 12.0 for Android – Product Guide v1.0
50
11. Note that when the local VPN is On the icon at the pointer is darkened in the Web Guard Protection wheel.
12. Select Exceptions & History to view these additional options.
13. Tap Blocked List or Approved List to remove or add websites to either list.
14. When adding sites, an Add popup appears for you to enter the Name and Website URL, then tap Save.
Figure 137. Web Guard > Blocked / Approved List
Figure 138. Add Dialog
15. When removing sites, tap the Blocked or Approved List panel, then select the site you wish to remove in the list, then tap the Trashcan > Delete. If you tap the Trashcan without selecting any sites, you can Delete All sites at once.
16. If you browse to a site in the Blocked List, you’ll be presented with a Suspicious Page message to close the page.
Figure 139. Delete Dialog
Figure 140. Suspicious Page

Trend Micro™ Mobile Security 12.0 for Android – Product Guide v1.0
51
17. Tap History to view the history of the threatening sites Web Guard has protected you from.
18. Tap an item(s) from the list, then tap the Trashcan to delete the item(s) in the Web Guard History.
Figure 141. Web Guard History

Trend Micro™ Mobile Security 12.0 for Android – Product Guide v1.0
52
Wi-Fi Checker Wi-Fi Checker checks Wi-Fi connections and hotspots for security risks, including any evidence of suspicious interference and for Wi-Fi routers unprotected by passwords.
To use Wi-Fi Checker:
1. Tap Wi-Fi Checker in the Mobile Security Console. The Wi-Fi Checker screen appears.
2. Use the toggle to turn Wi-Fi Checker On or Off.
3. When Wi-Fi Checker is On, it scans the Wi-Fi network for security risks. In this example risks have been found on xfinitywifi network.
4. Tap See Scan Results for details.
Figure 142. Wi-Fi Checker
Figure 143. Security Risks Found on xfinitywifi
5. Wi-Fi Scan Results screen appears, showing here you’re connected to the xfinitywifi network with Risks Found.
>No suspicious interference found.
>This Wi-Fi network does not require a password. Data sent using this Wi-Fi network is vulnerable to attack.
6. You can Switch to another Wi-Fi, or Use 3G/4G instead.
Figure 144. Risks Found
Figure 145. Trust This Wi-Fi?

Trend Micro™ Mobile Security 12.0 for Android – Product Guide v1.0
53
7. You can tap the link Trust this Wi-Fi despite the risks.
8. Tap the Trust Wi-Fi button to add it to the Approved List.
9. Back in the Wi-Fi Checker screen, simply tap Approved List to open it and to delete any Wi-Fi connections you have added.
10. Check the Wi-Fi connection in question and tap Delete.
11. A dialog appears, asking Remove Wi-Fi?
12. Tap Remove to remove the Wi-Fi connection from the Approved List.
Figure 146. Wi-Fi Checker > Approved List
Figure 147. Remove Wi-Fi?

Trend Micro™ Mobile Security 12.0 for Android – Product Guide v1.0
54
Pay Guard Mobile Pay Guard Mobile protects you when you’re banking or buying in your favorite financial or shopping apps, as well as others you use to purchase goods. It scans the apps before you use them to ensure they’re not fake or infected by malware, which could lead to data theft.
To use Pay Guard Mobile:
1. Tap Pay Guard Mobile to open the function. It scans your devices for financial and shopping apps and detects if they contain risks. Finance and Shopping apps are loaded into Pay Guard Mobile automatically.
2. A popup appears the first time, so you can add a shortcut to your home screen. Just tap it to add it.
Figure 148. Pay Guard Mobile
Figure 149. Pay Guard Mobile > Apps
3. To bank or buy, just tap the Finance or Shopping app you wish to use in the Pay Guard Mobile screen. The app is scanned for risks, then displayed for use if it’s safe.
4. You can now sign into your account using the app, knowing it’s not fake or infected.
Figure 150. Checking for Risks
Figure 151. Amazon Sign In
Trend Micro™ Mobile Security 12.0 for Android – Product Guide v1.0
55
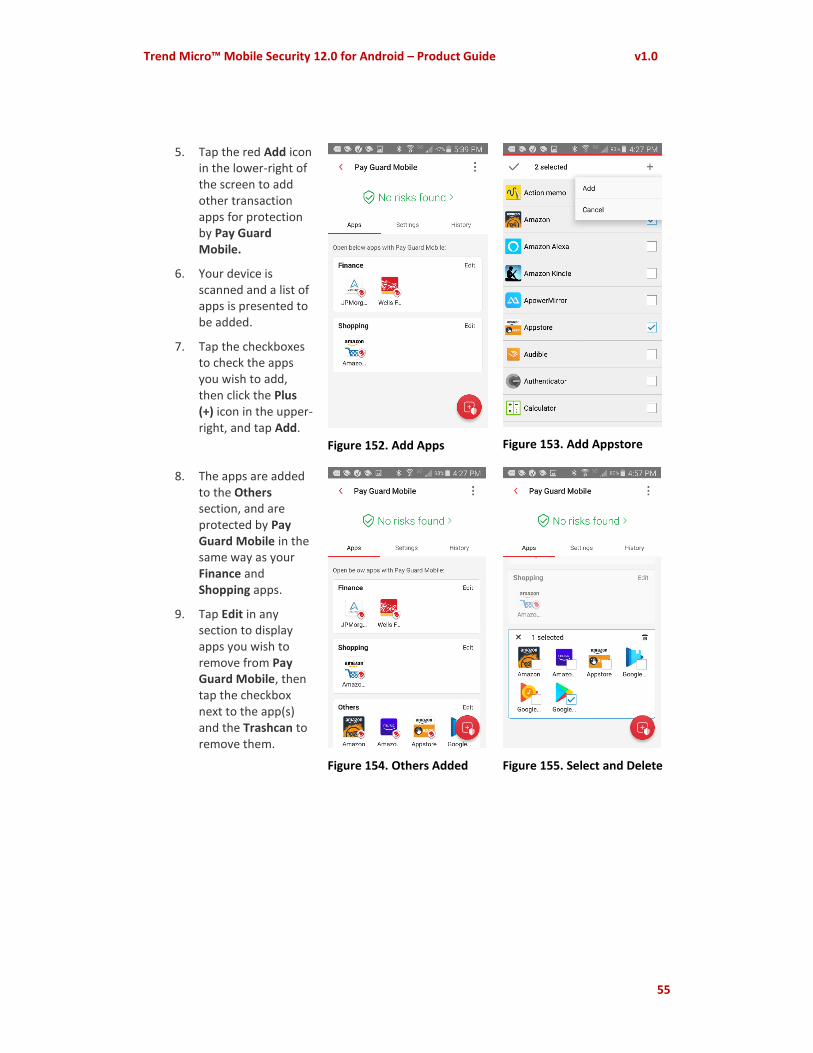
5. Tap the red Add icon in the lower-right of the screen to add other transaction apps for protection by Pay Guard Mobile.
6. Your device is scanned and a list of apps is presented to be added.
7. Tap the checkboxes to check the apps you wish to add, then click the Plus (+) icon in the upper-right, and tap Add.
Figure 152. Add Apps
Figure 153. Add Appstore
8. The apps are added to the Others section, and are protected by Pay Guard Mobile in the same way as your Finance and Shopping apps.
9. Tap Edit in any section to display apps you wish to remove from Pay Guard Mobile, then tap the checkbox next to the app(s) and the Trashcan to remove them.
Figure 154. Others Added
Figure 155. Select and Delete

Trend Micro™ Mobile Security 12.0 for Android – Product Guide v1.0
56
System Tuner Mobile Security’s System Tuner lets you optimize the battery and memory settings on your device, as well as to clean up your clipboard data, web browser and Google Play search histories. Battery optimization tools include Just-a-Phone Mode, to manually or automatically turn off many settings to save battery power when it’s especially low; and the Smart Power Saver, to automatically change Wi-Fi, 3G/4G, and Bluetooth connections upon idle to also save power. You need to set Permissions before you can use all of the System Tuner features.
To use System Tuner:
1. Tap System Tuner in the Mobile Security Console. The System Tuner screen appears.
2. Tap Add a shortcut to homescreen to add a shortcut for future quick optimization of your phone, saving memory and battery.
3. The popup banner at the top tells you that Mobile Security needs more permissions before you can use all of the System Tuner features.
NOTE: If you’ve already given Accessibility permissions, skip to Step 10.
4. Tap the popup. The Allow Permissions screen appears.
Figure 156. System Tuner
Figure 157. System Tuner Features

Trend Micro™ Mobile Security 12.0 for Android – Product Guide v1.0
57
5. Tap Allow Now. The Accessibility screen appears.
6. Scroll down and tap Trend Micro Mobile Security to allow permissions.
Figure 158. Allow Permissions
Figure 159. Accessibility > Trend Micro Mobile Security
7. Tap the toggle turn the Accessibility permission from Off to On. A popup appears to turn it on.
8. Tap OK to Use Trend Micro Mobile Security.
Figure 160. Accessibility Toggle
Figure 161. Use Trend Micro Mobile Security?

Trend Micro™ Mobile Security 12.0 for Android – Product Guide v1.0
58
9. A Permissions Allowed screen appears, showing you’ve given Mobile Security the permissions it needs.
10. Now, to optimize your system, do one of two things:
Tap Optimize for a quick optimization.
Tap Apps in Use link in the Optimize wheel, check those apps you wish to keep running, then tap Optimize.
Figure 162. Permissions Allowed
Figure 163. System Tuner > Optimize | Apps in Use
11. Mobile Security optimizes your system.
Figure 164. Apps in Use
Figure 165. Optimizing

Trend Micro™ Mobile Security 12.0 for Android – Product Guide v1.0
59
12. When it’s done, you’re presented with a Device Optimized screen that calculates the extra memory and battery time saved.
13. To further optimize your system by doing a Force Stop on selected apps, tap Open App Freeze. The App Freeze screen opens.
14. Check apps you want to freeze, then tap Stop Apps.
Figure 166. Open App Freeze
Figure 167. Stop Apps
15. Selected apps will be force stopped, optimizing memory and battery. Reopen the app to restart all of its functions at any time.
16. Note that you cannot multi-task while this operation is in progress; i.e., when Mobile Security is freezing a number of apps. Tap Cancel to back out, if so desired.
17. When the App Freeze is complete, tap Close to close the screen.
Figure 168. Stopping Apps
Figure 169. App Freeze Complete

Trend Micro™ Mobile Security 12.0 for Android – Product Guide v1.0
60
To use Just-a-Phone Mode:
1. Tap the Just-a-Phone Mode toggle to the right to turn it on. The Ready for Just-a-Phone Mode screen appears.
2. Tap Turn On to enable Just-a-Phone Mode. The Just-a-Phone Mode is enabled according to the default Just-a-Phone Options.
Figure 170. Just-a-Phone Mode
Figure 171. Ready for Just-a-Phone Mode
3. To adjust those options, tap Auto Just-a-Phone. The Auto Just-a-Phone screen appears.
4. Tap Auto Activate and Auto Activate Threshold to enable those auto-activate functions.
5. Tap Set Schedule to adjust the schedule Start and Stop times, and tap OK.
Figure 172. Auto Just-a-Phone
Figure 173. Set Schedule Time

Trend Micro™ Mobile Security 12.0 for Android – Product Guide v1.0
61
6. Tap Set Threshold to set the battery power threshold at which Auto Just-a-Phone is activated.
7. By default, the Just-a-Phone Options section shows all four items checked:
Switch off 3G/4G
Switch off Wi-Fi
Switch off Bluetooth
Stop any running apps
8. Uncheck any options you wish to keep active during Just-a-Phone, whether on-demand or auto-activated, and tap Save.
Figure 174. Battery Power Threshold
Figure 175. Just-a-Phone Options
To enable Smart Power Saver:
1. Tap the Smart Power Saver panel to access its settings.
2. Check Turn on Smart Power Saver to turn it on.
3. The option to maintain your 3G/4G connection, so you can receive instant messages and email, is checked by default. Uncheck it if you wish.
4. Check/uncheck the various settings in Smart Standby and Smart Wi-Fi to enable the changes to W-Fi, 3G/4G, and Bluetooth to save power.
Figure 176. Battery > Smart Power Saver
Figure 177. Turn On Smart Power Saver

Trend Micro™ Mobile Security 12.0 for Android – Product Guide v1.0
62
5. For Smart Standby, set how long after the screen darkens to switch-off 3G/4G and Bluetooth.
6. Also for Smart Standby, set at what intervals 3G/4G will switch on again to make a connection for email/text messages.
Figure 178. Switch Off 3G/4G and Bluetooth
Figure 179. Switch On 3G/4G
7. For Smart Wi-Fi, set the interval to switch off Wi-Fi.
8. Again, for Smart Wi-Fi, set the interval when it will switch on again to make a connection.
Figure 180. Switch off Wi-Fi
Figure 181. Switch on Wi-Fi

Trend Micro™ Mobile Security 12.0 for Android – Product Guide v1.0
63
App Manager App Manager lets you remove unwanted files and apps, including setup files, which can take up unnecessary memory and space on your device.
To use App Manager:
1. Tap App Manager to manage your apps. The App Manager Uninstall tab displays.
2. Using the Sort menu in the upper right, sort by Size, Date, Name, or Last used, if you wish.
3. Scroll down to view apps you might want to uninstall, then simply check the checkbox for it, then Uninstall.
Figure 182. App Manager
Figure 183. Sort Menu
4. A popup appears to complete the uninstall. Tap Uninstall to uninstall the app(s).
5. At the top, you can also tap Pre-installed apps. A screen appears where you can Turn On or Disable Pre-installed Apps.
Figure 184. Uninstall Updates
Figure 185. Pre-installed Apps

Trend Micro™ Mobile Security 12.0 for Android – Product Guide v1.0
64
6. A popup appears asking “Turn off built-in apps? Tap OK to turn it off. Note that turning off built-in apps may case errors in other apps.
7. Finally, tap the Setup Files tab to delete APK files. Lists of Installed and Not Installed APK files appear.
8. Check those you wish to delete, then tap Delete to delete the APK setup files. The files are deleted.
Figure 186. Turn off built-in apps?
Figure 187. Delete Installed or Not-installed Apps
Trend Micro™ Mobile Security 12.0 for Android – Product Guide v1.0
65
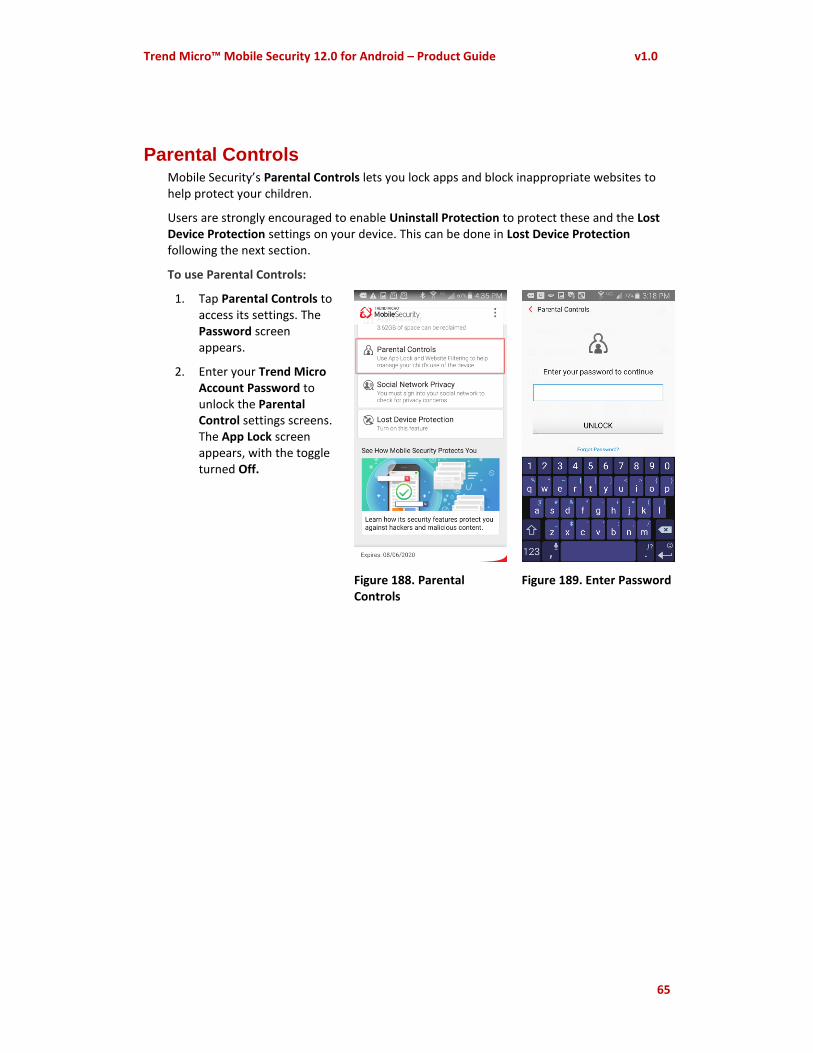
Parental Controls Mobile Security’s Parental Controls lets you lock apps and block inappropriate websites to help protect your children.
Users are strongly encouraged to enable Uninstall Protection to protect these and the Lost Device Protection settings on your device. This can be done in Lost Device Protection following the next section.
To use Parental Controls:
1. Tap Parental Controls to access its settings. The Password screen appears.
2. Enter your Trend Micro Account Password to unlock the Parental Control settings screens. The App Lock screen appears, with the toggle turned Off.
Figure 188. Parental Controls
Figure 189. Enter Password

Trend Micro™ Mobile Security 12.0 for Android – Product Guide v1.0
66
3. If you wish, tap the Lock Settings icon in the upper right corner of the screen to change your Password to a Pattern or a PIN, which may be easier to remember. The Lock Settings screen appears.
4. Tap Pattern if you wish to create a Pattern Lock.
Figure 190. App Lock
Figure 191. Lock Settings
5. Draw a Pattern and when prompted, draw it again to confirm it and tap OK.
NOTE: Use a less obvious, more complicated pattern than the one shown, to increase your protection.
Your password changes to the unlock pattern you’ve specified.
Figure 192. Set Pattern
Figure 193. Pattern Created Successfully

Trend Micro™ Mobile Security 12.0 for Android – Product Guide v1.0
67
6. Similarly, tap PIN if you wish to use a 4-digit PIN. The Set PIN screen appears.
7. Type in a 4-digit PIN, then enter it again to confirm it, and tap OK. Your PIN is created successfully.
8. You’ll use the Pattern or PIN when you want to make non-critical changes to your Mobile Security settings. For changes Trend Micro deems critical, you’ll still need your Trend Micro Account Password.
Figure 194. Set Up a 4-digit PIN
Figure 195. PIN Created Successfully
To configure App Lock:
1. Tap the App Lock toggle to turn the function On. A demo screen appears; tap OK to close it. App Lock is turned on and your device Settings app is locked by default.
2. Tap Apps you wish to lock. The apps you add to the App Lock list will prompt you to enter the unlock key when you open them for use.
3. Note the Lock icon below the App Lock On/Off toggle. When selected, those apps you’ve locked appear at the top, sorted alphabetically. Tap the lock Off to return to a basic alphabetical sort ordered by all the apps on your device.
Figure 196. App Lock > Lock Sort
Figure 197. Apps Locked > Alphabetical Sort

Trend Micro™ Mobile Security 12.0 for Android – Product Guide v1.0
68
To configure Website Filter:
1. Tap the Website Filter toggle to turn it On. A demo screen appears; tap Close to close it. The Protection Level is Teen by default.
2. Set your Protection Level by tapping the selection button for the preferred level:
Child. Provides filtering for children 9 or younger.
Pre-teen. Provides filtering for children between 10 and 13.
Teen. Provides filtering for young adults between 14 and 18.
3. Tap Blocked List to add a website you wish to block. The Blocked List appears.
Figure 198. Website Filter
Figure 199. Website Filter Demo
4. Tap Add. The Lock screen appears.
5. Enter your Trend Micro Password, PIN, or Pattern and tap OK. The Add popup appears.
6. Type a Name for the website block, then enter the actual URL for the Website and tap Save. The website is added to the Blocked List.
7. You can now test for web threats and filtered websites. (The settings apply to your Native Android browser and Chrome only.)
Figure 200. Password Required
Figure 201. Blocked List

Trend Micro™ Mobile Security 12.0 for Android – Product Guide v1.0
69
8. Enter a URL into your browser’s search field that you know or suspect is dangerous.
9. OR: Enter a URL that is inappropriate for the Protection Level you’ve designated for your children.
10. OR: Enter a URL you’ve put on the Blocked List.
11. In each case, Mobile Security will block the website and display a warning.
Figure 202. Dangerous Page
Figure 203. Off Limits
12. Tap Approved List to add a website to the Approved List; then repeat the instructions given above for adding the URL.
13. Tap History to view a history of blocked webpages.
Figure 204. Approved List
Figure 205. Parental Controls History

Trend Micro™ Mobile Security 12.0 for Android – Product Guide v1.0
70
Social Network Privacy Trend Micro Mobile Security also includes a Social Network Privacy scanner to help edit your Facebook and Twitter Privacy Settings.
To access Facebook Privacy Scanner:
1. Tap Social Network Privacy in the main Mobile Security Console. The Remove Privacy Risks screen appears, with the Facebook tab selected by default, right alongside the Twitter tab.
2. Tap Sign into Facebook to check your privacy settings. The Facebook Login screen appears.
Figure 206. Scan Facebook
Figure 207. Remove Privacy Risks
3. Enter the email address and password you use to sign into Facebook and tap Log In. Facebook Privacy Scanner checks your privacy settings.
4. When it’s done checking, it presents you with the result.
Figure 208. Enter Facebook Email Address and Password
Figure 209. Checking Your Privacy Settings

Trend Micro™ Mobile Security 12.0 for Android – Product Guide v1.0
71
5. Tap the recommended concern or simply Improve Now.
6. In this example, a popup appears to Improve All Concerns, to change the setting from Everyone to Friends to increase your privacy
7. Tap Improve.
Figure 210. 1 Privacy Concern
Figure 211. Editing Privacy Settings
8. Privacy Scanner presents an Improving screen, makes the change, and returns the result, saying Nice Work! You don’t have any privacy concerns.
9. Since Facebook periodically changes its privacy policies or adds new features to the social network, you should periodically rescan your privacy settings to ensure your privacy.
Figure 212. Improving
Figure 213. Nice Work! No Privacy Concerns
Trend Micro™ Mobile Security 12.0 for Android – Product Guide v1.0
72
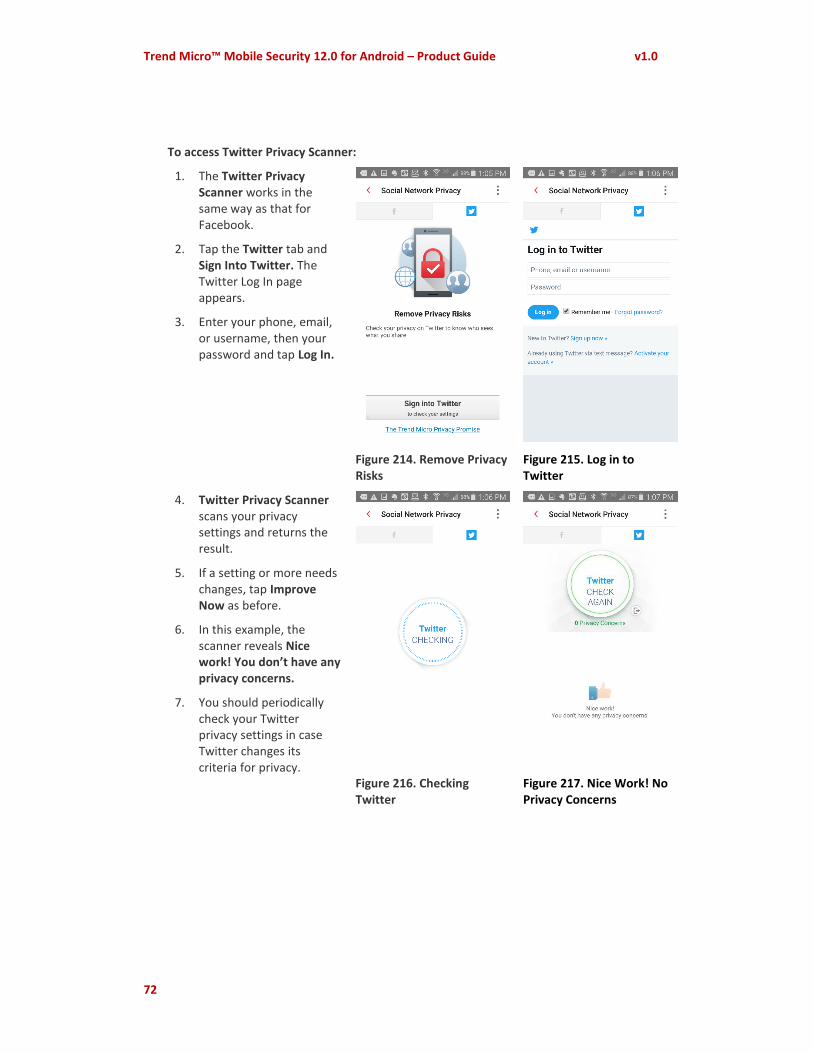
To access Twitter Privacy Scanner:
1. The Twitter Privacy Scanner works in the same way as that for Facebook.
2. Tap the Twitter tab and Sign Into Twitter. The Twitter Log In page appears.
3. Enter your phone, email, or username, then your password and tap Log In.
Figure 214. Remove Privacy Risks
Figure 215. Log in to Twitter
4. Twitter Privacy Scanner scans your privacy settings and returns the result.
5. If a setting or more needs changes, tap Improve Now as before.
6. In this example, the scanner reveals Nice work! You don’t have any privacy concerns.
7. You should periodically check your Twitter privacy settings in case Twitter changes its criteria for privacy.
Figure 216. Checking Twitter
Figure 217. Nice Work! No Privacy Concerns
Trend Micro™ Mobile Security 12.0 for Android – Product Guide v1.0
73
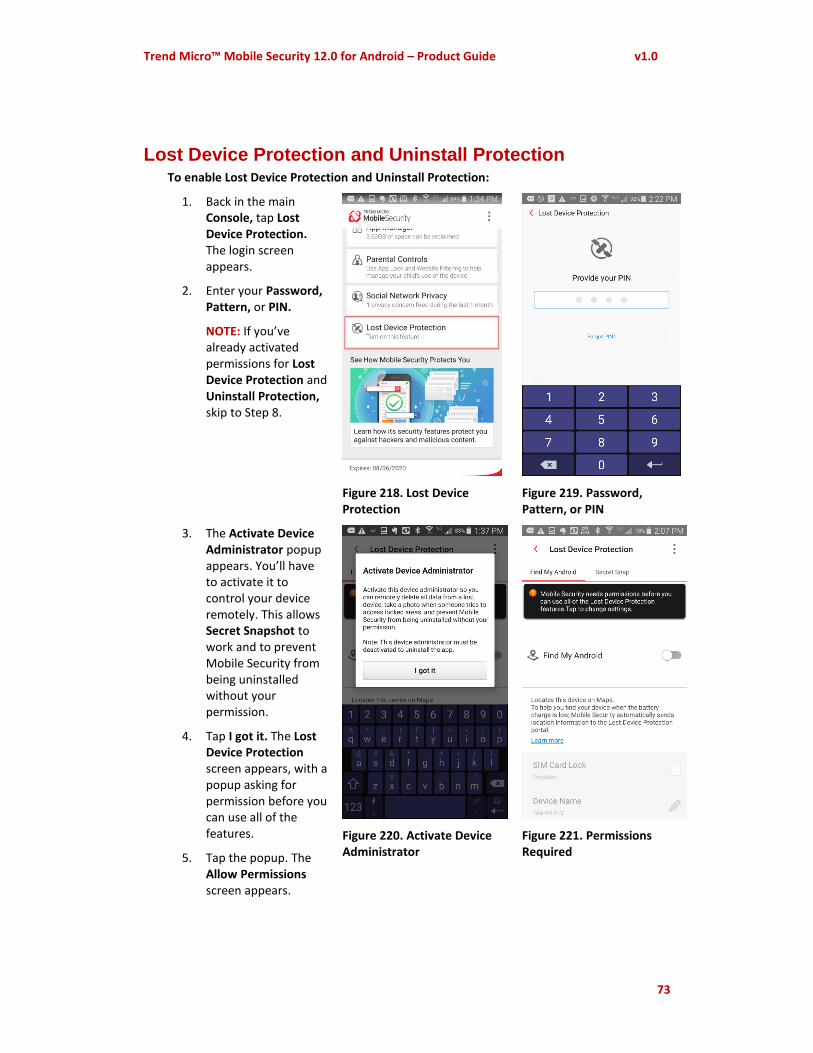
Lost Device Protection and Uninstall Protection To enable Lost Device Protection and Uninstall Protection:
1. Back in the main Console, tap Lost Device Protection. The login screen appears.
2. Enter your Password, Pattern, or PIN.
NOTE: If you’ve already activated permissions for Lost Device Protection and Uninstall Protection, skip to Step 8.
Figure 218. Lost Device Protection
Figure 219. Password, Pattern, or PIN
3. The Activate Device Administrator popup appears. You’ll have to activate it to control your device remotely. This allows Secret Snapshot to work and to prevent Mobile Security from being uninstalled without your permission.
4. Tap I got it. The Lost Device Protection screen appears, with a popup asking for permission before you can use all of the features.
5. Tap the popup. The Allow Permissions screen appears.
Figure 220. Activate Device Administrator
Figure 221. Permissions Required

Trend Micro™ Mobile Security 12.0 for Android – Product Guide v1.0
74
6. Tap Allow Now. The Activate Phone Administrator screen appears.
7. Tap Activate. The Phone Administrator permission for Mobile Security is activated.
Figure 222. Allow Permissions
Figure 223. Activate Phone Administrator
8. Back in the Lost Device Protection screen, tap the toggle Find My Android to turn it on.
9. You now have five options displayed:
10. Tap SIM Card Lock if you wish to lock your device when the SIM card is changed or removed. A screen appears, requiring your Password, Pattern, or PIN.
11. Enter it and tap OK. SIM Card Lock is enabled.
Figure 224. Find My Android
Figure 225. Find My Android Toggle On

Trend Micro™ Mobile Security 12.0 for Android – Product Guide v1.0
75
12. Tap the Device Name panel edit pencil to change your device’s name, make your changes in the edit window, and tap Save.
13. Tap Remote Lock to edit the message displayed after locking your device. The Edit Message screen appears.
Figure 226. Edit Device Name
Figure 227. Remote Lock
14. Make your changes in the Edit Message screen, and tap Save. Your message changes are saved.
15. Remote Wipe lets you delete all content from the Lost Device Protection website in the event your device is lost or stolen. Remote Wipe is enabled when Phone Administrator is turned on.
Using Uninstall Protection
16. Tap Uninstall Protection to toggle it on.
Figure 228. Edit Message
Figure 229. Uninstall Protection Toggle

Trend Micro™ Mobile Security 12.0 for Android – Product Guide v1.0
76
17. A popup appears, Using Uninstall Protection, which will prevent this app from being removed without your account password, so your Parental Controls and Lost Device remain safe.
18. Read the popup carefully, so you can turn off Uninstall Protection if you need to later.
19. Tap OK to turn it on. Now a Trend Micro Account Password is required to uninstall Mobile Security.
Figure 230. Using Uninstall Protection
Figure 231. Uninstall Protection Toggled On
To Use Secret Snap:
1. Tap Secret Snap to set your device to take a photo after a number of incorrect attempts to unlock your device. The Secret Snap editor appears.
2. Tap the toggle to turn Secret Snap from Off to On.
NOTE: If you’ve already Activated Phone Administrator, skip to Step 5.
3. If you haven’t activated the phone administrator before, Activate Phone Administrator screen appears.
Figure 232. Secret Snap
Figure 233. Activate Phone Administrator

Trend Micro™ Mobile Security 12.0 for Android – Product Guide v1.0
77
4. Tap Activate.
5. The Password, Pattern, or PIN screen appears.
6. In this example, provide your PIN and Secret Snap is turned on.
7. Tap the panel to set the number of incorrect attempts to access your device before a photo is taken.
Figure 234. Provide your PIN
Figure 235. Secret Snap
8. Choose 3, 5, or 7 attempts and tap Save.
9. Tap the Notification Email pencil to change the email address where the photo notification will be sent, then tap Save. You’ll be able to view the photos taken in this email.
Figure 236. Incorrect Attempts
Figure 237. Email for Notification

Trend Micro™ Mobile Security 12.0 for Android – Product Guide v1.0
78
10. After you’ve recovered your phone, you can review any photos stored on your device by tapping the Secret Snap Photos panel. The photo list appears.
11. Tap a photo to view it, or tap the Trashcan to delete it.
Figure 238. Secret Snap Photos
Figure 239. Secret Snap Photos List
12. As mentioned, you can also view the photo in the notification email sent to you by Mobile Security. This can be used with the Lost Device Protection Portal’s location feature to help locate the person who has found or stolen your device.
Figure 240. Individual Secret Snap Photo

Trend Micro™ Mobile Security 12.0 for Android – Product Guide v1.0
79
13. Click the link To Locate Your Device using the Lost Device Protection Portal.
14. To obtain assistance, visit www.trendmicro.com/mobilehelp.
Figure 241. Secret Snap Email Notification with Photo

Trend Micro™ Mobile Security 12.0 for Android – Product Guide v1.0
80
Lost Device Protection Portal
To access the Lost Device Protection Portal:
1. Launch your browser on your PC and type https://mobilesecurity.trendmicro.com/ into the search field, and hit Enter. The Lost Device Protection Portal webpage appears.
2. Tap Find Now or Sign in to sign into your Trend Micro account. The Sign In page appears.
3. Type the email address and password you used to create your Trend Micro account and click Sign in. The Lost Device Protection Portal appears.
4. You’re presented with a Device List on the left, a Bing Map on the right with a GPS/Bing estimate of your location, and a toolbox to perform various operations regarding your lost or stolen device.
Figure 242. Lost Device Protection Portal Sign In
Figure 243. Sign In

Trend Micro™ Mobile Security 12.0 for Android – Product Guide v1.0
81
5. In the Device List, click Hide to hide any device in the main list. Click the down-arrow to see Hidden Devices.
6. Click Share to share the device’s location with a trusted friend.
7. Click Alarm to sound a one-minute alarm on your missing mobile device, even if it has been set to silent mode.
8. Click Locate to locate the phone on the map.
9. Click Reset to force stop apps and to Reset the Lock Screen Password.
10. Click Lock to stop anyone from using your missing mobile device. When you recover your device, click Unlock to unlock it, then use the Unlock Key provided or your Trend Micro password to complete the unlock.
Figure 244. Lost Device Protection Options
11. Click Device Details (below the device icon in the list) to view the unlock key that can be entered into the device interface to unlock the device instead of the master account password. This key can also be emailed to you at your account email address by taping Email Yourself an Unlock Key on the device once it’s found.
Figure 245. Device Details
Figure 246. Device Unlock

Trend Micro™ Mobile Security 12.0 for Android – Product Guide v1.0
82
12. Click Wipe to permanently delete all the data stored on your missing mobile device.
13. A warning appears. If you wish to wipe your device, click OK.
Warning: Using this feature will perform a factory reset of your device. For testing or review purposes, please ensure you are using a test device or have a complete backup of your information. Once reset, TMMS will be removed from the device and the location feature will no longer function.
Figure 247. Wipe Warning

Trend Micro™ Mobile Security 12.0 for Android – Product Guide v1.0
83
Demos: See How Mobile Security Protects You Trend Micro Mobile Security provides periodically-updated demos, to show you how the various features of the app works. Current demos include Pre-Installation Scan, Web Guard, and Wi-Fi Checker. Here’s the demo showing how Web Guard works.
To view a demo:
1. Tap See How Mobile Security Protects You. The Experience Web Guard demo page appears
2. Tap the test link shown at the bottom of the screen.
Figure 248. Demo: See How Mobile Security Protects You
Figure 249. Test Protection With Web Guard
3. Your default browser is loaded and the test website is blocked by Trend Micro Mobile Security’s Web Guard, indicating that it’s a Dangerous Page.
4. Tap Back to Mobile Security to return to the app.
Figure 250. Dangerous Page Blocked

Trend Micro™ Mobile Security 12.0 for Android – Product Guide v1.0
84
Settings Trend Micro Mobile Security provides system settings for app management.
5. Tap Mobile Security on your device to open the Console.
6. Tap the Settings menu on your device to open the popup.
7. Here, you have access to various options.
Settings. Access various system-level settings.
Renew / Activate. Renew or activate a subscription.
Chat Support. Get chat support with Mobile Security.
Try More Apps. Provides easy access to Trend Micro Apps available on Google Play Store.
Share. Send friends or associates a recommendation to use Trend Micro Mobile Security.
Send Feedback. Provide a rating and review on Google Play Store and send feedback to Trend Micro.
Figure 251. Settings Popup Manu (Device)
8. Tap Settings to access system-level options. The Settings screen appears, with the list of options available. Scroll down to view the options.
ACCOUNT & SUBSCRIPTION
Trend Micro Account. Account you’re registered to.
Expiration Date/Monthly Subscription. Date your subscription expires, or indicates the monthly subscription URL.
Activation Code. 20-character serial number.
Renew / Activate or Next Payment Date Purchase/renew or activate a subscription / or Check your subscription details.
Sign Out. Disconnect your Trend Micro account.
Check your Trend Micro Account. Manage your account and subscriptions.
Figure 252. Settings (1)

Trend Micro™ Mobile Security 12.0 for Android – Product Guide v1.0
85
Settings (continued)
APPLICATION
Set up alternate email addresses. Send from an unlock key from the lock screen to your Trend Micro account and the email address you set up here.
Display the app icon on the status bar. Check here to show Mobile Security on the status bar.
Uninstall. Uninstall Mobile Security with your Trend Micro Account password when Uninstall Protection is turned on.
Notifications.
-Notify me when 80% of the memory is used.
-Notify me before my protection expires
-Notify me when a survey is available
ABOUT AND HELP
About. Product details and version number.
Help. Access Online Help.
Chat Support. Get chat support for using Mobile Security.
Collect logs. Collect logs to send to Trend Micro.
Log history. Logs sent to Trend Micro.
Report a Suspicious Website. Provides form to send the URL of a suspicious website that should have been blocked to Trend Micro, along with a link to visit the Site Safety Center later to check on the rating.
Help Improve This App. Anonymously share device information with Trend Micro.
Figure 253. Settings (2)
Figure 254. Settings (3)

Trend Micro™ Mobile Security 12.0 for Android – Product Guide v1.0
86
Mobile Security on Your Android Tablet Trend Micro Mobile Security works much the same way on your Android Wi-Fi-capable tablet as it does on your Android smartphone, minus Just-a-Phone settings, which are specific functions for smartphones and call-enabled tablets.
Whether you’re holding your tablet vertically or horizontally, the Mobile Security Console displays the same functions, it just distributes them differently.
Figure 255. Mobile Security on Tablet (Vertical View)

Trend Micro™ Mobile Security 12.0 for Android – Product Guide v1.0
87
Figure 256. Mobile Security on Tablet (Horizontal View)

Trend Micro™ Mobile Security 12.0 for Android – Product Guide v1.0
88
About Trend Micro
Trend Micro Incorporated, a global leader in cyber security solutions, helps to make the world safe for exchanging digital information. Our innovative solutions for consumers, businesses, and governments provide layered security for data centers, cloud environments, networks, and endpoints. All our products work together to seamlessly share threat intelligence and provide a connected threat defense with centralized visibility and control, enabling better, faster protection. With more than 6,000 employees in over 50 countries and the world’s most advanced global threat intelligence, Trend Micro enables users to enjoy their digital lives safely. For more information, visit www.trendmicro.com.

Trend Micro™ Mobile Security 12.0 for Android – Product Guide v1.0
89