Embed Size (px)
DESCRIPTION
hpsm pd
Citation preview
HP Service Manager – Process DesignerContent PackFor the for supported Windows® and UNIX® operating systems
Software Version: 9.30.3
Administrator’s Guide
Document Release Date: June, 2013
Software Release Date: June, 2013

Legal Notices
WarrantyThe only warranties for HP products and services are set forth in the express warranty statementsaccompanying such products and services. Nothing herein should be construed as constituting anadditional warranty. HP shall not be liable for technical or editorial errors or omissions containedherein.
The information contained herein is subject to change without notice.
Restricted Rights LegendConfidential computer software. Valid license from HP required for possession, use or copying.Consistent with FAR 12.211 and 12.212, Commercial Computer Software, Computer SoftwareDocumentation, and Technical Data for Commercial Items are licensed to the U.S. Governmentunder vendor's standard commercial license.
Copyright Notice© Copyright 2013 Hewlett-Packard Development Company, L.P.
Trademark NoticesAdobe® is a trademark of Adobe Systems Incorporated.
Microsoft® andWindows® are U.S. registered trademarks of Microsoft Corporation.
UNIX® is a registered trademark of TheOpenGroup.
HP ServiceManager – Process Designer Content Pack (9.30.3) Page 2 of 196
Administrator’s Guide
Documentation UpdatesThe title page of this document contains the following identifying information:
l Software Version number, which indicates the software version.
l Document Release Date, which changes each time the document is updated.
l Software Release Date, which indicates the release date of this version of the software.
To check for recent updates or to verify that you are using themost recent edition of a document, goto:
http://h20230.www2.hp.com/selfsolve/manuals
This site requires that you register for an HP Passport and sign in. To register for an HP PassportID, go to:
http://h20229.www2.hp.com/passport-registration.html
Or click theNew users - please register link on the HP Passport login page.
You will also receive updated or new editions if you subscribe to the appropriate product supportservice. Contact your HP sales representative for details.
HP ServiceManager – Process Designer Content Pack (9.30.3) Page 3 of 196
Administrator’s Guide
SupportVisit the HP Software Support Online web site at:
http://www.hp.com/go/hpsoftwaresupport
This web site provides contact information and details about the products, services, and supportthat HP Software offers.
HP Software online support provides customer self-solve capabilities. It provides a fast andefficient way to access interactive technical support tools needed tomanage your business. As avalued support customer, you can benefit by using the support web site to:
l Search for knowledge documents of interest
l Submit and track support cases and enhancement requests
l Download software patches
l Manage support contracts
l Look up HP support contacts
l Review information about available services
l Enter into discussions with other software customers
l Research and register for software training
Most of the support areas require that you register as an HP Passport user and sign in. Many alsorequire a support contract. To register for an HP Passport ID, go to:
http://h20229.www2.hp.com/passport-registration.html
To findmore information about access levels, go to:
http://h20230.www2.hp.com/new_access_levels.jsp
HP ServiceManager – Process Designer Content Pack (9.30.3) Page 4 of 196
Administrator’s Guide
ContentsContents 5
Introduction 11
Prerequisites 11
Installation 11
Download 11
What’s new in Process Designer Content Pack 9.30.0? 11
What’s new in Process Designer Content Pack 9.30.1? 13
What’s new in Process Designer Content Pack 9.30.2? 13
What's New in Process Designer Content Pack 9.30.3? 14
Process Designer Security Model 16
Multiple roles 18
Add a role 18
Roles in the operator record 19
Assign a role or roles to an operator 19
Add an area 20
Add a setting within an area 20
Validation script for a new setting 22
Update a setting within an area 22
Localize an additional setting 24
Modify the rights for a role within an area 24
Update rights to display allowed categories and allowed statuses 25
Modify allowed categories and allowed statuses 26
Check security rights using Java Script or variables 26
Check security rights using Java Script 27
Check record right with variables 28
Process Designer 29
Create a Rule Set 31
Clone an existing Rule Set 32
Adding a rule 32
Add a JavaScript Validation rule 34
HP ServiceManager – Process Designer Content Pack (9.30.3) Page 5 of 196
Add a Launch a URL rule 35
Add a Run aMacro rule 36
Add a Call a Process rule 37
Add a Run aWizard rule 38
Add a Clear Fields rule 39
Add a Set Mandatory Fields rule 40
Add a Set Mandatory Variables rule 41
Add a Send Notifications rule 42
Add a Launch a Script rule 43
Add a Send HTMLEmail rule 43
Add a Start or Stop Clock rule 45
Add a Set Field rule 46
Add a Set Field from Number rule 47
Add a Validate Date rule 48
Add a Validate against List rule 49
Add Validate Text/Number rule 50
Add a Validate against Table rule 52
Group rules 53
Using the Condition Editor 54
Launch the Condition Editor 55
Build a condition 57
Add a group with a condition 61
Enable deprecated fields and system fields for Condition Editor 61
Negating condition groups 62
Process DesignerWorkflows 62
Create a workflow 63
Copy an existing workflow 64
Export aWorkflow 65
Workflow phases 66
Add a phase 66
Workflow transitions 71
HP ServiceManager – Process Designer Content Pack (9.30.3)Page 6 of 196
Administrator’s GuideContents
Create amanual workflow transition 72
Create an automatic workflow transition 74
Create a default workflow transition 75
Workflow Viewer 76
View aworkflow inWorkflow Viewer 76
View theWorkflow Properties 77
IntegrateWorkflow Viewer into kmdocument form 77
Workflow-based Rule Sets, Actions, and Transitions 79
Workflow-based RuleSets 79
Workflow-based Actions 80
Workflow-based Transitions 80
Upgrades 81
Upgrading to the new KnowledgeManagement workflow 81
Upgrading to the new ChangeManagement 82
Change Management 91
Change workflow 91
Create a change category 91
Add a new subcategory 92
Add a new subcategory from change category 93
Add workflow from change category 94
Create a change task 95
Use task planner to plan change tasks in a change record 96
Cancel multiple opened tasks for a change record 99
Changemodel 100
Create a new changemodel 100
Add a task to a changemodel 102
Apply changemodel to existing change record 106
Map changemodel fields into change record 107
Use changemodels in Service Catalog connector 109
Create a new change request 110
Approvals in ChangeManagement 111
HP ServiceManager – Process Designer Content Pack (9.30.3) Page 7 of 196
Administrator’s GuideContents
ChangeManagement administration 113
Configure a ChangeManagement environment record 113
Change settings 114
Change group 115
ChMMembership 116
Security 116
Setting rights to changes and tasks 116
Change security areas 117
Add security roles and settings 118
User roles 120
Enabling approval delegation 123
Add folder permissions to a security role in ChangeManagement 124
Service Desk 126
Service Desk workflow 126
Example: Service Desk Workflow 127
Close a first time Service Desk interaction 129
Callback mechanism 131
Service Catalog support 131
Order from Service Catalog 131
Service Desk administration 133
Configure Service Desk environment 133
Configure Service Desk settings 133
Service Desk configuration 134
Create an interaction category 134
Add a new interaction subcategory 136
Add a new interaction area 137
Service Desk solutionmatching 138
Security 138
Setting rights to interactions 138
Service Desk security areas 139
Service Desk security roles and settings 141
HP ServiceManager – Process Designer Content Pack (9.30.3)Page 8 of 196
Administrator’s GuideContents
Service Desk user roles 145
Incident Management 147
Incident workflow 147
Example: Incident Workflow 148
Create an incident task 150
Cancel an opened task for an incident record 151
Close an opened task for an incident record 152
Incident administration 153
Configure the Incident Management environment 153
Configure Incident Management settings 153
Incident configuration 154
Create an incident category 154
Create an incident task category 155
Add a new subcategory for an incident category 156
Add a new area for an incident subcategory 157
Incident solutionmatching 157
Incident management downtime record 158
Add a downtime record 158
Security 159
Incident security areas 159
Incident security roles and settings 162
Incident management user roles 169
Problem Management 173
ProblemWorkflow 173
Example: ProblemWorkflow 174
Create a problem task 176
ProblemManagement Administration 178
Configure the ProblemManagement Environment 178
Configure the ProblemManagement Settings 178
ProblemManagement Configuration 179
Create a Problem Category 179
HP ServiceManager – Process Designer Content Pack (9.30.3) Page 9 of 196
Administrator’s GuideContents
Create a Problem Task Category 180
Add a new subcategory to a problem category 181
Add a new problem area to a subcategory 181
ProblemManagement solutionmatching 182
ProblemManagement Security 182
ProblemManagement Security Areas 183
ProblemManagement Security Roles and Settings 185
ProblemManagement User Roles 190
Usability improvements 191
Switching between theGroup and Tab styles for a Notebook control 191
Related Records 192
Link an existing record 193
Link a new record 193
Unlink a related record 193
Appendix A. Out-of-box role rights in the Common Configuration area 195
HP ServiceManager – Process Designer Content Pack (9.30.3)Page 10 of 196
Administrator’s GuideContents
Chapter 1
IntroductionThe Process Designer (PD)Content Pack 9.30.3 enhances the ChangeManagement and Help Deskmodules for ServiceManager. The features are delivered as optional content available in theServiceManager Community on HP Live Network. This document describes all the ProcessDesigner capabilities introduced in ServiceManager 9.31 and in Process Designer Content Pack9.30.3.
Because Process Designer Content Pack 9.30.3 is applied to an existing system, please payparticular attention to Upgrading to new ChangeManagement.
PrerequisitesFor the prerequisites of Process Designer Content Pack 9.30.2, see the Installation Notes sectionin the Release Notes for this content pack.
InstallationApplications PatchManager is used to install this package. This is the same tool used to installServiceManger Cumulative Application patches but has been enhanced to install Content. Notethat the content install is independent of Application Patches installs. Follow the Installation Notessection in the Release Notes for this content pack and the Applications PatchManager Guideprovided in the content package for installation instructions.
DownloadFormore information and to download the installation and documentation, visithttp://www.hp.com/go/livenetwork and navigate to the ServiceManager Community StandardContent Area.
What’s new in Process Designer Content Pack9.30.0?
Process Designer Content Pack 9.30.0 contains several new and enhanced features. The followingtable outlines the features supported in this content pack.
Page 11 of 196HP ServiceManager – Process Designer Content Pack (9.30.3)
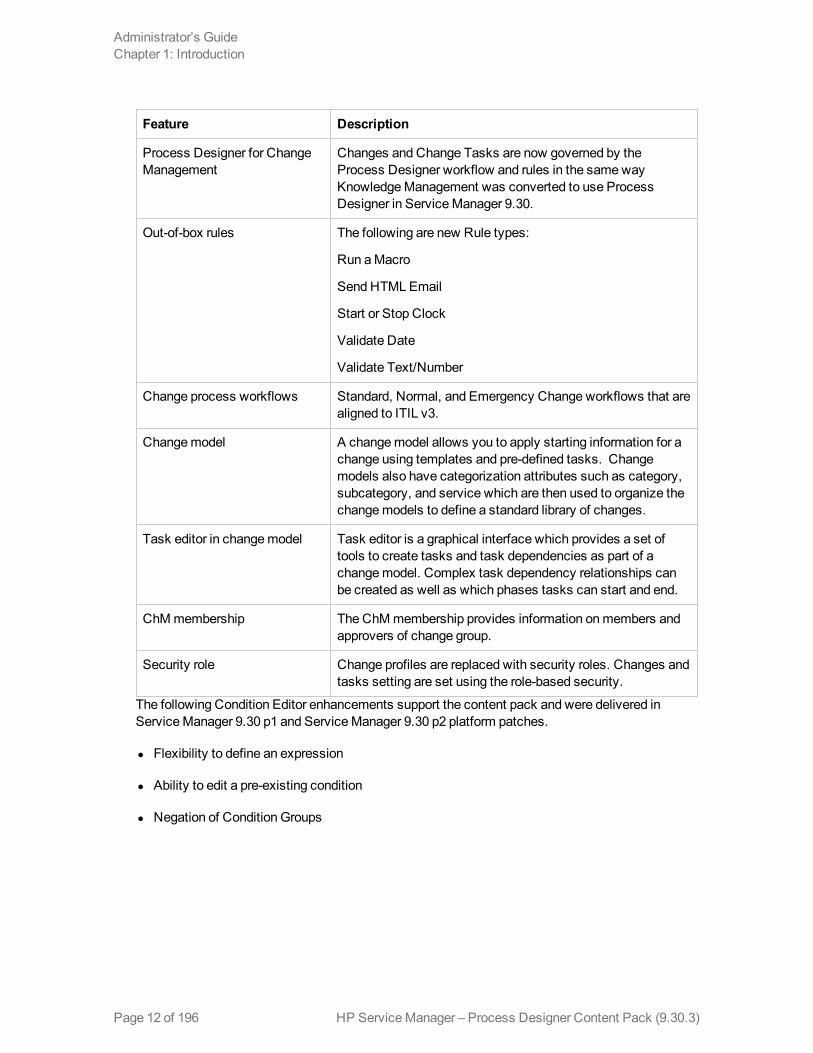
Feature Description
Process Designer for ChangeManagement
Changes and Change Tasks are now governed by theProcess Designer workflow and rules in the samewayKnowledgeManagement was converted to use ProcessDesigner in ServiceManager 9.30.
Out-of-box rules The following are new Rule types:
Run aMacro
Send HTMLEmail
Start or Stop Clock
Validate Date
Validate Text/Number
Change process workflows Standard, Normal, and Emergency Change workflows that arealigned to ITIL v3.
Changemodel A changemodel allows you to apply starting information for achange using templates and pre-defined tasks. Changemodels also have categorization attributes such as category,subcategory, and service which are then used to organize thechangemodels to define a standard library of changes.
Task editor in changemodel Task editor is a graphical interface which provides a set oftools to create tasks and task dependencies as part of achangemodel. Complex task dependency relationships canbe created as well as which phases tasks can start and end.
ChMmembership The ChMmembership provides information onmembers andapprovers of change group.
Security role Change profiles are replaced with security roles. Changes andtasks setting are set using the role-based security.
The following Condition Editor enhancements support the content pack and were delivered inServiceManager 9.30 p1 and ServiceManager 9.30 p2 platform patches.
l Flexibility to define an expression
l Ability to edit a pre-existing condition
l Negation of Condition Groups
HP ServiceManager – Process Designer Content Pack (9.30.3)Page 12 of 196
Administrator’s GuideChapter 1: Introduction
What’s new in Process Designer Content Pack9.30.1?
Process Designer Content Pack 9.30.1 provides the following enhancements in addition to those inProcess Designer Content Pack 9.30.0:
l Compatibility with ServiceManager 9.30 Application Patch 1 (SM9.30 ap1)
l Support of the ServiceManager integrations that are part of the CCRM solution (SM-OO, SM-RC, and SM-UCMDB).
What’s new in Process Designer Content Pack9.30.2?
Process Designer Content Pack 9.30.2 provides the following enhancements in addition to those inProcess Designer Content Pack 9.30.0 and 9.30.1:
l Support of applying changemodel to existing change records. In addition, you can configurewhether or not this “Apply ChangeModel” option is available for a specific workflow phase.
l Task planner (was called “task editor” before this release) has been enhanced:
n Support of adding conditions for task creation by using the Condition Editor embedded in thetask planner in changemodel.
n Support of creatingmandatory tasks in the task planner in changemodel.
n Task planner now is also available in change records for you to view or plan change tasks.
l The Service Catalog connector "Open a Change" is enhanced to support the use of changemodel to open a change record.
l Support of configurable filtering of changemodels by using script function.
l Support of configuring custom fields to be copied from a changemodel to a change record byusing link file.
l You can now useMass Cancel to cancel all the opened tasks for a change record.
l Security improvement: somemappings between the old profiles and the new Process Designersecurity rights are corrected.
HP ServiceManager – Process Designer Content Pack (9.30.3) Page 13 of 196
Administrator’s GuideChapter 1: Introduction
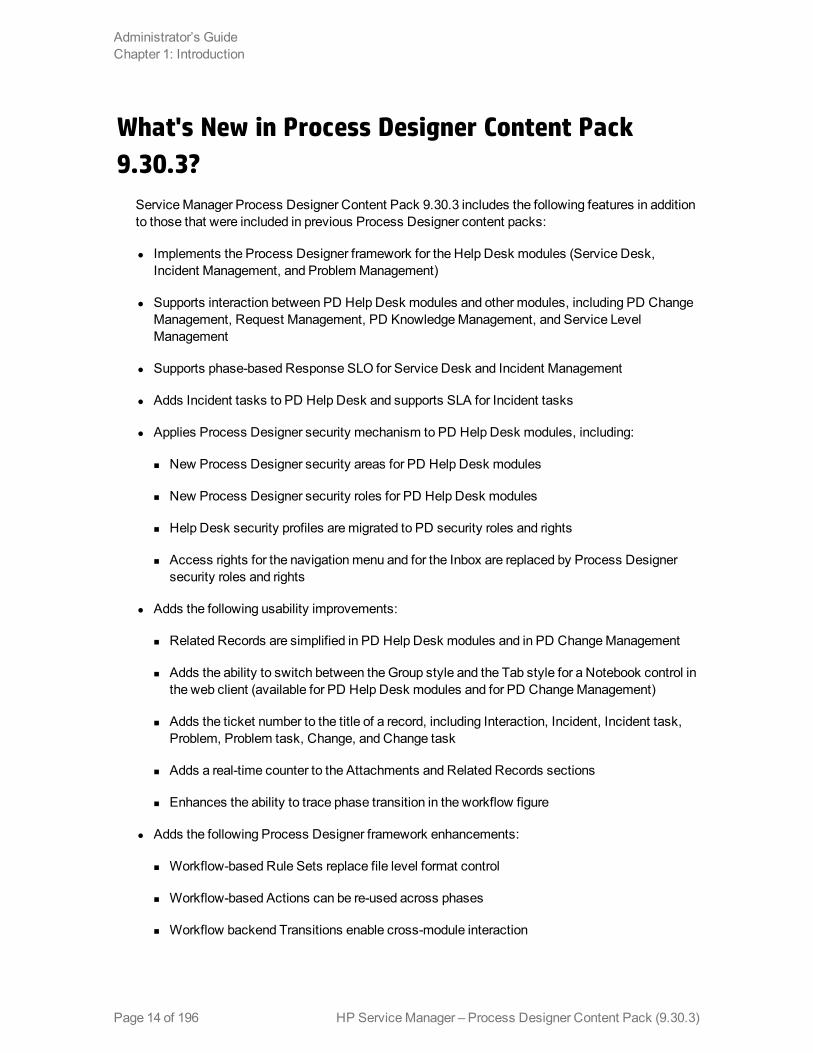
What's New in Process Designer Content Pack9.30.3?
ServiceManager Process Designer Content Pack 9.30.3 includes the following features in additionto those that were included in previous Process Designer content packs:
l Implements the Process Designer framework for the Help Desk modules (Service Desk,Incident Management, and ProblemManagement)
l Supports interaction between PD Help Desk modules and other modules, including PD ChangeManagement, Request Management, PD KnowledgeManagement, and Service LevelManagement
l Supports phase-based Response SLO for Service Desk and Incident Management
l Adds Incident tasks to PD Help Desk and supports SLA for Incident tasks
l Applies Process Designer security mechanism to PD Help Desk modules, including:
n New Process Designer security areas for PD Help Desk modules
n New Process Designer security roles for PD Help Desk modules
n Help Desk security profiles aremigrated to PD security roles and rights
n Access rights for the navigationmenu and for the Inbox are replaced by Process Designersecurity roles and rights
l Adds the following usability improvements:
n Related Records are simplified in PD Help Desk modules and in PD ChangeManagement
n Adds the ability to switch between theGroup style and the Tab style for a Notebook control inthe web client (available for PD Help Desk modules and for PD ChangeManagement)
n Adds the ticket number to the title of a record, including Interaction, Incident, Incident task,Problem, Problem task, Change, and Change task
n Adds a real-time counter to the Attachments and Related Records sections
n Enhances the ability to trace phase transition in the workflow figure
l Adds the following Process Designer framework enhancements:
n Workflow-based Rule Sets replace file level format control
n Workflow-based Actions can be re-used across phases
n Workflow backend Transitions enable cross-module interaction
HP ServiceManager – Process Designer Content Pack (9.30.3)Page 14 of 196
Administrator’s GuideChapter 1: Introduction
n A new tool exports Workflows into an unload file, so that you can copy Workflows from onePD-based system to another PD-based system
n Phase orders specify the sequences for Response SLO calculation
HP ServiceManager – Process Designer Content Pack (9.30.3) Page 15 of 196
Administrator’s GuideChapter 1: Introduction
Chapter 2
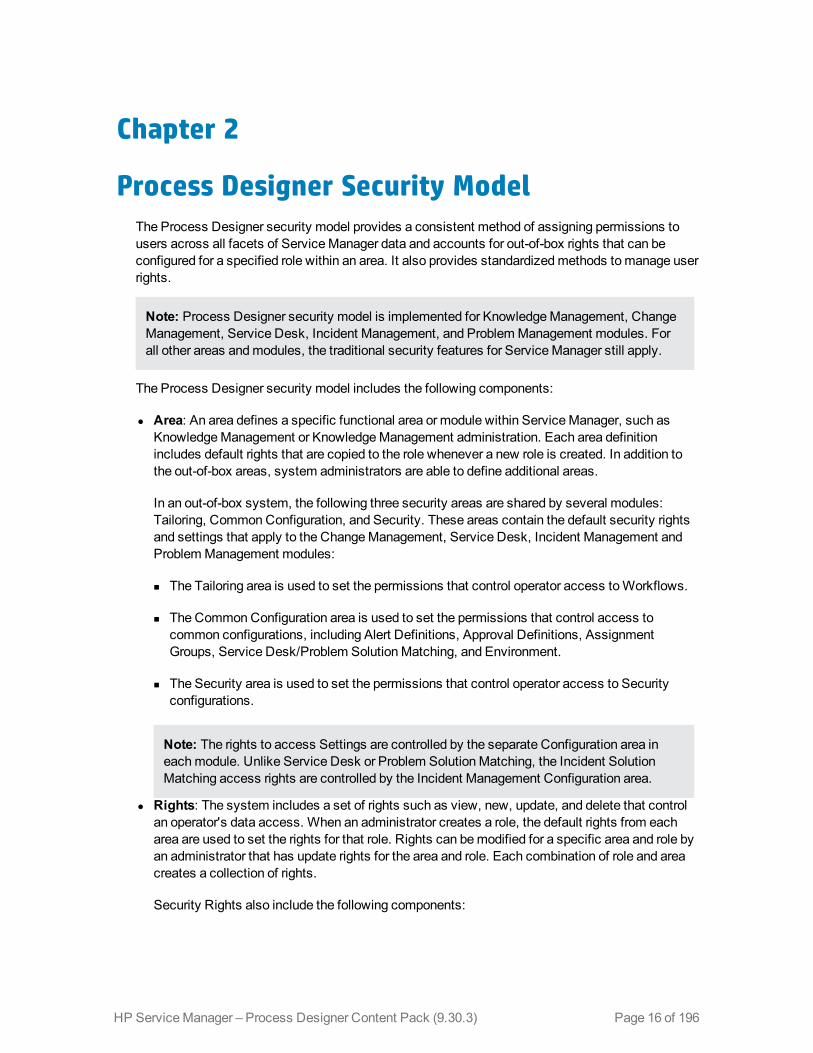
Process Designer Security ModelThe Process Designer security model provides a consistent method of assigning permissions tousers across all facets of ServiceManager data and accounts for out-of-box rights that can beconfigured for a specified role within an area. It also provides standardizedmethods tomanage userrights.
Note: Process Designer security model is implemented for KnowledgeManagement, ChangeManagement, Service Desk, Incident Management, and ProblemManagement modules. Forall other areas andmodules, the traditional security features for ServiceManager still apply.
The Process Designer security model includes the following components:
l Area: An area defines a specific functional area or module within ServiceManager, such asKnowledgeManagement or KnowledgeManagement administration. Each area definitionincludes default rights that are copied to the role whenever a new role is created. In addition tothe out-of-box areas, system administrators are able to define additional areas.
In an out-of-box system, the following three security areas are shared by several modules:Tailoring, CommonConfiguration, and Security. These areas contain the default security rightsand settings that apply to the ChangeManagement, Service Desk, Incident Management andProblemManagement modules:
n The Tailoring area is used to set the permissions that control operator access toWorkflows.
n The CommonConfiguration area is used to set the permissions that control access tocommon configurations, including Alert Definitions, Approval Definitions, AssignmentGroups, Service Desk/Problem SolutionMatching, and Environment.
n The Security area is used to set the permissions that control operator access to Securityconfigurations.
Note: The rights to access Settings are controlled by the separate Configuration area ineachmodule. Unlike Service Desk or Problem SolutionMatching, the Incident SolutionMatching access rights are controlled by the Incident Management Configuration area.
l Rights: The system includes a set of rights such as view, new, update, and delete that controlan operator's data access. When an administrator creates a role, the default rights from eacharea are used to set the rights for that role. Rights can bemodified for a specific area and role byan administrator that has update rights for the area and role. Each combination of role and areacreates a collection of rights.
Security Rights also include the following components:
Page 16 of 196HP ServiceManager – Process Designer Content Pack (9.30.3)
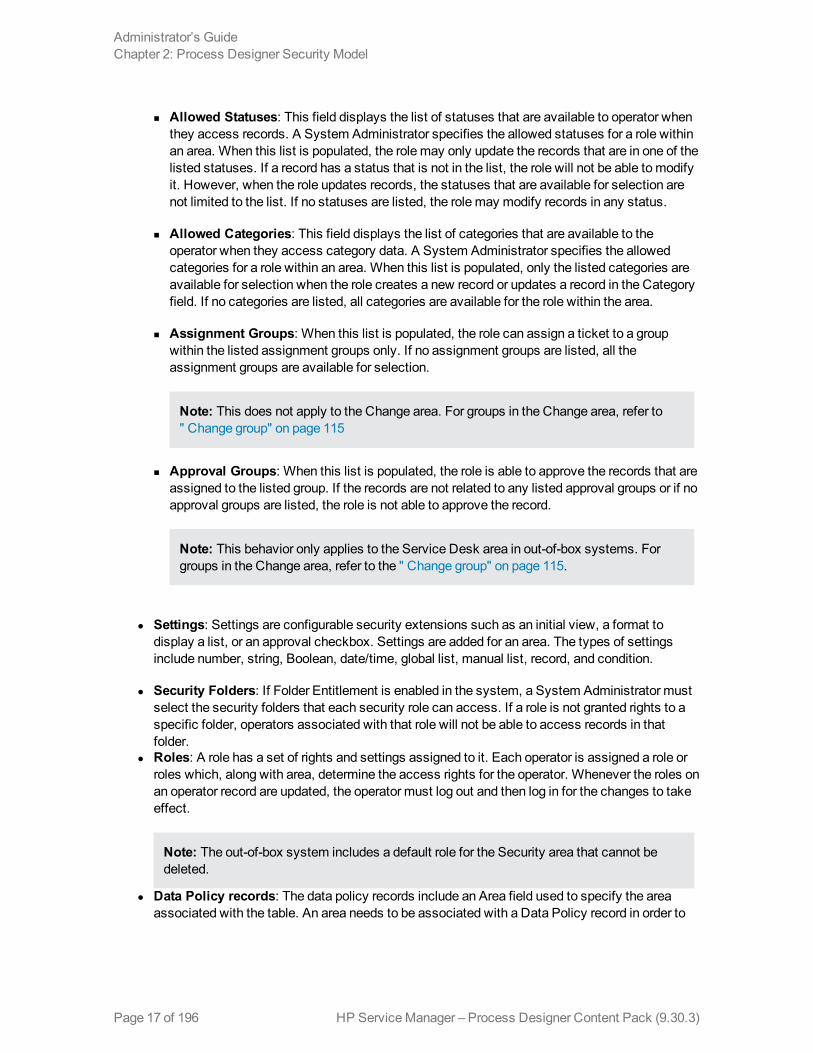
n Allowed Statuses: This field displays the list of statuses that are available to operator whenthey access records. A System Administrator specifies the allowed statuses for a role withinan area. When this list is populated, the role may only update the records that are in one of thelisted statuses. If a record has a status that is not in the list, the role will not be able tomodifyit. However, when the role updates records, the statuses that are available for selection arenot limited to the list. If no statuses are listed, the role may modify records in any status.
n Allowed Categories: This field displays the list of categories that are available to theoperator when they access category data. A System Administrator specifies the allowedcategories for a role within an area. When this list is populated, only the listed categories areavailable for selection when the role creates a new record or updates a record in the Categoryfield. If no categories are listed, all categories are available for the role within the area.
n Assignment Groups: When this list is populated, the role can assign a ticket to a groupwithin the listed assignment groups only. If no assignment groups are listed, all theassignment groups are available for selection.
Note: This does not apply to the Change area. For groups in the Change area, refer to" Change group" on page 115
n Approval Groups: When this list is populated, the role is able to approve the records that areassigned to the listed group. If the records are not related to any listed approval groups or if noapproval groups are listed, the role is not able to approve the record.
Note: This behavior only applies to the Service Desk area in out-of-box systems. Forgroups in the Change area, refer to the " Change group" on page 115.
l Settings: Settings are configurable security extensions such as an initial view, a format todisplay a list, or an approval checkbox. Settings are added for an area. The types of settingsinclude number, string, Boolean, date/time, global list, manual list, record, and condition.
l Security Folders: If Folder Entitlement is enabled in the system, a System Administrator mustselect the security folders that each security role can access. If a role is not granted rights to aspecific folder, operators associated with that role will not be able to access records in thatfolder.
l Roles: A role has a set of rights and settings assigned to it. Each operator is assigned a role orroles which, along with area, determine the access rights for the operator. Whenever the roles onan operator record are updated, the operator must log out and then log in for the changes to takeeffect.
Note: The out-of-box system includes a default role for the Security area that cannot bedeleted.
l Data Policy records: The data policy records include an Area field used to specify the areaassociated with the table. An area needs to be associated with a Data Policy record in order to
HP ServiceManager – Process Designer Content Pack (9.30.3)Page 17 of 196
Administrator’s GuideChapter 2: Process Designer Security Model
access the information from the table.
Related concepts
Multiple roles
Related tasks
Add a role
Add an area
Multiple rolesWhen an operator has multiple roles, the operator's data access rights are combined to give theoperator the greatest data access.
When the rights do not include specific allowed statuses and allowed categories, all statuses andcategories are available for the role within the area.
l Example, if an operator has view rights for one role in an area and update rights for another role inthat area, then the operator has view and update rights for the area.
l Example, if an operator has allowed statuses and allowed categories specified in one role andnot in another role, then the operator is able to access all categories and statuses for the area.
l Example, if an operator has multiple roles that include different allowed statuses and allowedcategories, the allowed statuses and allowed categories aremerged so that the operator has allallowed categories and allowed statuses. No allowed statuses and allowed categories areduplicated.
l Example, if an operator has multiple settings because the operator has been assignedmultipleroles, the operator only has the actual settings for the first settings in the operator record.
Related tasks
Add a role
Add an area
Add a roleUser Role: System Administrator
When you create a role, the rights from each area defined in the system are used to set the rights forthat role record.
To add a role record:
HP ServiceManager – Process Designer Content Pack (9.30.3) Page 18 of 196
Administrator’s GuideChapter 2: Process Designer Security Model
1. Click System Administration > Security > Roles.
2. Click New.
3. Type the name for the role.
4. Type a description for the role.
5. Click Save & Exit.
Related concepts
Process Designer security model
Roles in the operator record
Related tasks
Assign a role or roles to an operator
Roles in the operator recordSystem Administrators assign roles to an operator in the Security Roles field of the operator record.When a System Administrator creates an operator record, the system assigns the default role to theoperator if the System Administrator does not add a role for the operator. The System Administratorcan update the operator record to change a role or add additional roles.
When an operator has multiple roles, the operator has the rights that provide the greatest dataaccess. However, if each role has additional settings, the rights from the first role listed in theSecurity Rights field are used to determine an operator's access rights.
Related concepts
Process Designer security model
Related tasks
Assign a role or roles to an operator
Assign a role or roles to an operatorUser Role: System Administrator
You assign a role or multiple roles to an operator to provide the operator access to ServiceManagerdata. You can also update the operator's role in the operator record.
To assign a role or roles to an operator record:
1. Click System Administration > Ongoing Maintenance > Operators.
2. Enter the applicable search criteria to find an operator record and then click Search.
HP ServiceManager – Process Designer Content Pack (9.30.3)Page 19 of 196
Administrator’s GuideChapter 2: Process Designer Security Model
3. In Security Roles, select the role or roles you want to assign to the operator.
4. Click Save.
Related concepts
Process Designer security model
Multiple roles
Related tasks
Add a role
Add an areaUser Role: System Administrator
When you create an area and define the rights and settings for the area, all roles will inherit therights and settings for the area.
To add an area:
1. Click System Administration > Security > Areas.
2. Type the name for the role.
3. Click New.
4. Select themodule for the area.
5. Type a description for the area.
6. Define the rights for the area.
7. Define the settings for the area.
8. Click Save to add the record.
Related concepts
Process Designer security model
Roles in the operator record
Related tasks
Add a role
Assign a role or roles to an operator
Add a setting within an areaUser Role: System Administrator
HP ServiceManager – Process Designer Content Pack (9.30.3) Page 20 of 196
Administrator’s GuideChapter 2: Process Designer Security Model
You can add a new setting, such as record or format, in the area. A role inherits the new setting fromthe area when the new setting for the area is not already defined in the role. For example, this isuseful when you want to have role within an area to have additional access to system data oranother form.
When you add a new setting, it is only inherited when you add a new role.
To add a setting within an area:
1. Click System Administration > Security > Areas.
2. Add optional search criteria and then click Search.
3. Click the area to update.
4. Click More icon and then select Administration > Add New Setting.
5. On the New Setting Info wizard, provide the following:
n Id: Uniquely identifies the setting so that it can be referenced programmatically.
n Display Label: Defines display label for the setting.
n Description: Describes the setting.
n Type: Select the type of data used by the setting tomatch the type of setting you arecreating. For the type selections, the format of the field on the form depends on the type youselect. For example, if you choose Boolean, then the setting displays a check box and if youselect record, the setting displays as a text field. When you select some of the types, thesystem prompts you for additional information. For example:
o If you select Record, you are also prompted to specify the table and field name for therecord.
o If you select Manual List, you are prompted to provide a display type and a name - valuepair to display in the list. The Value is the field name in the table and Display Valueprovides the list of items in the drop-down list for the field.
o If you select Global List, you are prompted to provide aGlobal List and Display Type forthe Global List
6. Specify whether or not the setting is mandatory. When checked, a value is required for thesetting you are adding.
7. Click Next.
8. In Adding Settings Validation, add an optional validation script.
9. Click Finish.
Related concepts
Process Designer security model
HP ServiceManager – Process Designer Content Pack (9.30.3)Page 21 of 196
Administrator’s GuideChapter 2: Process Designer Security Model
Validation script for a new setting
Related tasks
Add an area
Add a role
Update a setting within an area
Validation script for a new setting
When you add an additional setting you have the ability to create simple or complex validations forthe setting using JavaScript. JavaScript automatically sets up an XML variable named “result”,which has a child node named “message”. If the value of the result node is 0 (zero), the validationhas succeeded. Any non-zero result is interpreted as a failure. When a validation fails, the contentsof themessage node display. The value of the setting being validated is set to a variable named“value.”
Example:
This example validates that the setting is a number between 1 and 10.
if ( value < 1 || value > 10 )
{
result.setValue (-1);
message.setValue(“The value must be between 1 and 10.”);
}
Related concepts
Process Designer security model
Related tasks
Add an area
Add a role
Add a setting within an area
Update a setting within an area
Update a setting within an areaUser Role: System Administrator
Once you create a setting for an area, you can update the definition of the setting or delete it. Youcan also edit any labels that have been localized.
When you add a new setting to an area, it is only inherited when you add a new role.
To edit a setting within an area:
HP ServiceManager – Process Designer Content Pack (9.30.3) Page 22 of 196
Administrator’s GuideChapter 2: Process Designer Security Model
1. Click System Administration > Security > Areas.
2. Add optional search criteria and then click Search.
3. Click the area to update.
4. Click theMore icon and then select Administration > Edit/Delete Setting.
5. Select the setting to edit or delete.
6. On the Edit Setting Info wizard, update the following:
n Id: Uniquely identifies the setting so that it can be referenced programmatically.
n Display Label: Defines a display label for the setting.
n Description: Describes the setting.
n Type: Select the type of data used by the setting tomatch the type of setting you arecreating. For the type selections, the format of the field on the form depends on the type youselect. For example, if you choose Boolean, then the setting displays a check box and if youselect record, the setting displays as a text field. When you select some of the types, thesystem prompts you for additional information. For example:
o If you select Record, you are also prompted to specify the table and field name for therecord.
o If you select Manual List, you are prompted to provide a name-value pair to display in thelist. Youmust also enter Display Type (Radio Button or Drop Down List).
o If you select Global List, you are prompted to provide aGlobal List and Display Type forthe Global List.
7. Specify whether or not the setting is mandatory.
8. Click Edit localized labels to update localized labels.
9. For each language available, you can localize the label text. After you localize the text, clickSave and thenOK to return to the wizard.
10. Click Next.
11. As an option, you can add or edit a validation script for the setting in Adding SettingsValidation.
12. Click Finish.
Related concepts
Process Designer security model
Localization process
Related tasks
HP ServiceManager – Process Designer Content Pack (9.30.3)Page 23 of 196
Administrator’s GuideChapter 2: Process Designer Security Model
Add an area
Add a role
Add a setting within an area
Localize an additional settingUser Role: System Administrator
Once you add a new setting, such as record or format, you can localize the setting for all of thelanguages that are active in the system.
To add a setting within an area:
1. Click System Administration > Security > Areas.
2. Add optional search criteria and then click Search.
3. Click the area to update.
4. Click theMore icon and then select Administration > Edit/Delete New Setting.
5. In the Edit Setting Info wizard, click Edit localized label. A list of themessages displays forthe user's current language.
6. Click the item you want to localize and then type the applicable text to localize the label youcreated for the setting.
7. Click Save.
8. Continue selecting items until you have localized all the labels for the languages active in thesystem.
9. To localize the data in the settings for global lists or manual lists, use the record tag localizationutility.
Related concepts
Localization process
See “Record tag localization utility” in ServiceManager 9.31 HelpServer topics
Related tasks
Add a setting within an area
Modify the rights for a role within an areaUser Role: System Administrator
Once a role is created and rights are configured, an administrator updates the rights for a role withinan area.
Tomodify the rights for a role within an area:
HP ServiceManager – Process Designer Content Pack (9.30.3) Page 24 of 196
Administrator’s GuideChapter 2: Process Designer Security Model
1. Click System Administration > Security > Roles.
2. Add optional search criteria and then click Search to find the role you want to modify.
3. Select the role and then select the area you want to modify.
4. Make the changes you want for default rights, folders, and settings.
5. Click Save & Exit.
6. For any other area, repeat steps 3 through 5 to update the rights for the selected role.
Related concepts
Roles in the operator record
Related tasks
Add a role
Assign a role or roles to an operator
Add an area
Update rights to display allowed categories and allowedstatuses
User Role: System Administrator
A System Administrator can add additional rights to a role within an area by adding the AllowedCategories and Allowed Statuses fields for an area. Once these fields are available, anadministrator can then specify particular categories and statuses for which the role has rights. If anarea has multiple tables that support category and status, the drop-down list in Allowed Categoriesand Allowed Statuses will have a combination of all categories and statuses from all tables.
The example below uses the data policy record for the cm3r table for ChangeManagement todemonstrate how to display the Allowed Categories and Allowed Statuses fields.
Note:When you add a new setting, it is only inherited when you add a new role.
To add a setting within an area:
1. Click Tailoring > Data Policy.
2. Use search to find the data policy record for the cm3r table.
3. Select an area from the drop-down list in the Area field. This list displays all the areas availablefor the selected data policy record.
4. Click Save.
HP ServiceManager – Process Designer Content Pack (9.30.3)Page 25 of 196
Administrator’s GuideChapter 2: Process Designer Security Model
The Allowed Categories and Allowed Statuses fields now appear in the Default Rights sectionfor the roles within the area you specified in step 3.
Related tasks
Add an area
Add a role
Modify allowed categories and allowed statusesUser Role: System Administrator
For both roles and areas, an administrator can specify in the Allowed Categories and AllowedStatuses fields the categories and statuses for which a role has rights within an area. Before youcan do this, youmust first update the applicable data policy record. These rights give a role incombination with the other rights access to the specific categories and statuses selected. When noselections aremade for Allowed Categories or Allowed Statuses, the role has access to allcategories or statuses within the area.
Youmust first ensure that the data policy record for the role within an area has been updated toinclude the Allowed Categories and Allowed Statuses fields.
Note:When you add a new setting, it is only inherited when you add a new role.
Tomodify Allowed Categories and Allowed Statuses:
1. Click System Administration > Security > Roles.
2. Use search to display a list of roles.
3. Select the role to update.
4. Select the area you want to update.
5. Select the Allowed Categories and Allowed Statuses from the drop-down lists.
6. Click Save.
Related tasks
Add an area
Add a role
Update rights to display allowed categories and allowed statuses
Check security rights using Java Script or variablesIn the Process Designer security framework, you can use Java Script functions or use variables tocheck security rights.
HP ServiceManager – Process Designer Content Pack (9.30.3) Page 26 of 196
Administrator’s GuideChapter 2: Process Designer Security Model
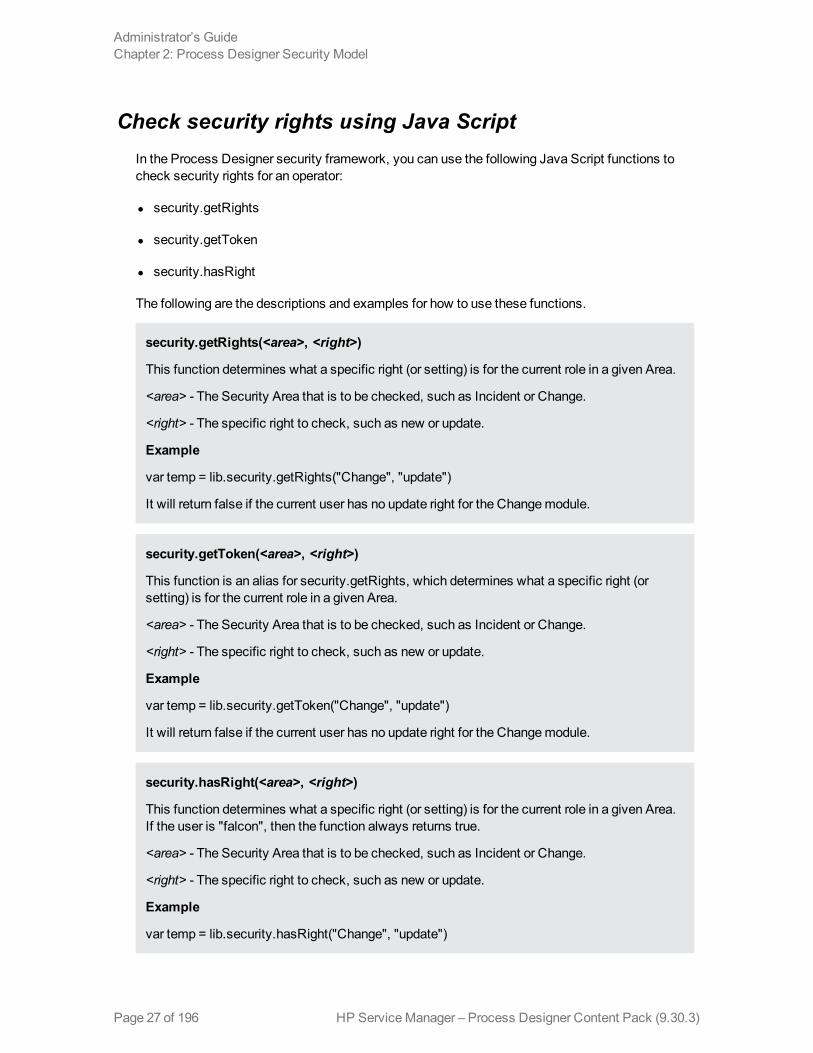
Check security rights using Java ScriptIn the Process Designer security framework, you can use the following Java Script functions tocheck security rights for an operator:
l security.getRights
l security.getToken
l security.hasRight
The following are the descriptions and examples for how to use these functions.
security.getRights(<area>, <right>)
This function determines what a specific right (or setting) is for the current role in a given Area.
<area> - The Security Area that is to be checked, such as Incident or Change.
<right> - The specific right to check, such as new or update.
Example
var temp = lib.security.getRights("Change", "update")
It will return false if the current user has no update right for the Changemodule.
security.getToken(<area>, <right>)
This function is an alias for security.getRights, which determines what a specific right (orsetting) is for the current role in a given Area.
<area> - The Security Area that is to be checked, such as Incident or Change.
<right> - The specific right to check, such as new or update.
Example
var temp = lib.security.getToken("Change", "update")
It will return false if the current user has no update right for the Changemodule.
security.hasRight(<area>, <right>)
This function determines what a specific right (or setting) is for the current role in a given Area.If the user is "falcon", then the function always returns true.
<area> - The Security Area that is to be checked, such as Incident or Change.
<right> - The specific right to check, such as new or update.
Example
var temp = lib.security.hasRight("Change", "update")
HP ServiceManager – Process Designer Content Pack (9.30.3)Page 27 of 196
Administrator’s GuideChapter 2: Process Designer Security Model
It will return false if the current user has no update right for the Changemodule. If the user is“falcon”, it will always return true.
Check record right with variablesYou can use the following variables to check whether a user can access a record. The variables arecalculated based on new, view, update, delete, allowed status, and folder setting from secRightswith each record.
l $L.tableAccess.new
l $L.tableAccess.view
l $L.tableAccess.update
l $L.tableAccess.delete
l $L.tableAccess.expert
l $L.tableAccess.admin
HP ServiceManager – Process Designer Content Pack (9.30.3) Page 28 of 196
Administrator’s GuideChapter 2: Process Designer Security Model
Chapter 3
Process DesignerProcess Designer provides a graphical interface to develop workflows that you can use to controlthe flow of a single record throughout its lifecycle within ServiceManager. The Process Designerenables an implementer to graphically create or update a workflow without being an expert in RADprogramming.
l Define a workflow process in a graphical editor.
l Create business rules in a user-friendly interface to drive the workflow logic.
l Provide a platform tomodel complex processes that require branching and looping.
l Lower Total Cost of Ownership of ServiceManager by enabling an intuitive and simplifiedconfiguration.
l Simplify future upgrades by enabling standardization and clarity of business logic.
Process Designer includes the following components:
l Workflow designer: Design and update a workflow using a graphical user interface.
l Rules editor: Create rules to enforce business logic in workflows and forms.
l Security model: Provide a common role-based security model.
A workflow is a collection of phases with transitions from one phase to another. Each phaserepresents the state of the workflow linked to a form for data capture.
Transitions
Transitions can connect phases in any manner to create a workflow with many branches and loopsback to previous phases. Transitions may bemanual, automatic, or default. A manual transitionrequires the workflow user to make amanual decision tomove to the next workflow phase. Anautomatic transitionmoves the workflow to another phase based on data in the workflow record. Adefault transition is a special case that moves the workflow automatically, when no other automatictransition condition applies.
RuleSets
The rules editor enables administrators, such as business process owners, implementers, anddevelopers, to add or remove the out-of-box rules and actions of a workflow tomatch particularbusiness requirements. You can group individual Rules into a RuleSet to allow their re-use withinthe process. You can configure a RuleSet to execute on events, such as saving or updating aworkflow record. Rules can also be set up to run on a workflow transition.
Actions
Page 29 of 196HP ServiceManager – Process Designer Content Pack (9.30.3)
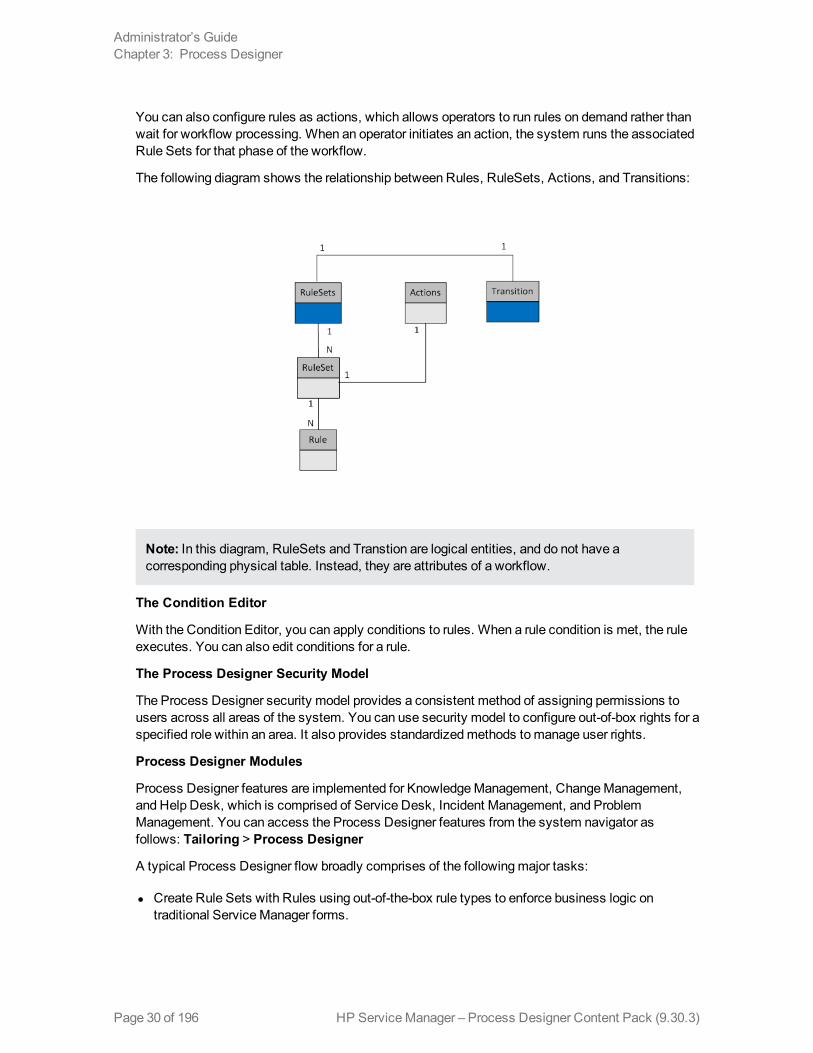
You can also configure rules as actions, which allows operators to run rules on demand rather thanwait for workflow processing. When an operator initiates an action, the system runs the associatedRule Sets for that phase of the workflow.
The following diagram shows the relationship between Rules, RuleSets, Actions, and Transitions:
Note: In this diagram, RuleSets and Transtion are logical entities, and do not have acorresponding physical table. Instead, they are attributes of a workflow.
The Condition Editor
With the Condition Editor, you can apply conditions to rules. When a rule condition is met, the ruleexecutes. You can also edit conditions for a rule.
The Process Designer Security Model
The Process Designer security model provides a consistent method of assigning permissions tousers across all areas of the system. You can use security model to configure out-of-box rights for aspecified role within an area. It also provides standardizedmethods tomanage user rights.
Process Designer Modules
Process Designer features are implemented for KnowledgeManagement, ChangeManagement,and Help Desk, which is comprised of Service Desk, Incident Management, and ProblemManagement. You can access the Process Designer features from the system navigator asfollows: Tailoring > Process Designer
A typical Process Designer flow broadly comprises of the followingmajor tasks:
l Create Rule Sets with Rules using out-of-the-box rule types to enforce business logic ontraditional ServiceManager forms.
HP ServiceManager – Process Designer Content Pack (9.30.3)Page 30 of 196
Administrator’s GuideChapter 3: Process Designer
l Create a workflow with phases and transitions to build a process flow.
l From workflow phases and transitions, associate forms, rule sets, approvals, and alerts toimplement your business process.
Related concepts
Using the Condition Editor
Upgrading to the new KnowledgeManagement workflow
Upgrading to the new ChangeManagement workflow
Create a Rule SetUser Roles: System Administrator, Implementer
A Rule Set contains a list of rules that youmay run against a record. Rules implement businesslogic to drive a workflow or a process. Rules can help perform calculations, validate fields based ondata or Rule Sets, set required fields, invoke actions, andmore. A Rule Set uses role-basedsecurity.
You can re-use Rule Sets in many processes when you require the same rules in many places.Rule Sets simplify the effort of implementing business logic. You can apply Rule Sets based onconditions, or configure them to run during an action. Rule Sets aremost often associated withspecific phases and transitions of a workflow.
To create a rule set:
1. Click Tailoring > Process Designer > Rule Sets > New.
2. Type a unique ID for the rule set. For example, kmdocument_draft.
Note: The namemust be unique within the Rule Sets records.
3. Select Available as action if you want to offer this Rule Set as an action within a workflowphase. An action is exposed as a button in the tool bar, option in theMore options, or button ona form. For example, an action can be used to preview the KM document, launch a web page,or pass data to an external system. Actions should not be confused with a transition thatmoves the record to another phase in the workflow.
4. Type the display name for the Rule Set, for example, Saving a draft.
5. Select the table(s) from the Table name list that you want the rule sets to apply to, for example,select kmdocument.
Note: If the list is blank, the Rule Set can be applied to all tables.
6. Click Save to add the Rule Set.
HP ServiceManager – Process Designer Content Pack (9.30.3) Page 31 of 196
Administrator’s GuideChapter 3: Process Designer
Note: If you want to edit an HP Proprietary Rule Set, create a copy of the HP ProprietaryRule Set. To add Rules to a Rule Set, youmust first save the Rule Set.
Related concepts
Adding a rule
Related tasks
Clone an existing Rule Set
Clone an existing Rule SetUser Roles: System Administrator, Implementer
You can create an editable copy of an existing Rule Set by using the cloning option. Cloning a readonly Rule Set marked as HP Proprietary creates an editable copy of the Rule Set.
To clone an existing Rule Set:
1. Click Tailoring > Process Designer in the System Navigator.
2. Click Rule Sets > Search.
3. Select the Rule Set you want to clone.
4. Click More > Clone.
A copy of the Rule Sets with both the ID and Name prefixed <CLONE> appears.
5. Rename both the ID and Name prefixed <CLONE> fields by typing something unique.
6. Click Save.
Related concepts
See “Process Designer security model” in ServiceManager 9.31 HelpServer topics
Related tasks
Create a Rule Set
Adding a ruleA rule defines a singular piece of functionality, such as making a field mandatory. A rule canperform calculations, validate fields based on data or lists, set required fields, andmore. Rules canalso specify conditions that determine when the rule should execute or who can execute Rules runin the order they appear in the Rule Set. The order can be changed using theMove Up andMoveDown buttons. If there is an error executing a rule, rule processing will stop. It is important to orderthe rules such that validation rules come first in the list, and then any rules that will perform actions.For example, to validate data and send an HTML email, place rules to validate data first and then
HP ServiceManager – Process Designer Content Pack (9.30.3)Page 32 of 196
Administrator’s GuideChapter 3: Process Designer
the rule to send an HTML email. If the rules were reversed, the HTML email will be sent with invaliddata or an invalid workflow state if the rules are part of a transition.
All rules in a phase, except the "On Exit" rules, run before a change proceeds from one phase toanother. The "On Exit" rules run after the next immediate transition.
The "On Exit" rules are the best place for notifications when a record leaves a phase especiallywhenmultiple transitions are used or when integration notifications are triggered. Transitions areused to add validations that are required before leaving to the current phase. For example, in achange phase, the start date and end date are entered before proceeding to the Approval phase andno input is required if you are abandoning the change. In this case, if the "On Exit" rules are runbefore the transition rules, you will be sending out notifications but the actual transition would nothave happened. Therefore, the order of execution of rule is Transaction > On Exit > On Enter.
Examples of when rules run:
l A record enters or exits a specific phase of the workflow.
l A record is created, updated, or deleted in a certain phase of the workflow because of invoking aworkflow action.
l A workflow transition is taken.
l A workflow action is invoked.
The following rule types are available in the out-of-box system:
l Launch an URL - Call an URL to launch a web page.
l JavaScript Validation - Use JavaScript to perform actions and validations.
l Run amacro - Run a ServiceManager macro.
l Call a process - Call a ServiceManager process record.
l Run awizard - Run a ServiceManager wizard.
l Clear Fields - Clear the specified field and related fields.
l Run JavaScript - Use JavaScript to perform actions and validations.
l Set Mandatory Fields - Set fields as mandatory.
l Set Mandatory Variables - Set variables as mandatory.
l Send Notifications - Send ServiceManager notifications.
l Launch a Script - Launch a ServiceManager script.
l Send HTMLEmail - Send an HTMLEmail to users or a group.
l Start and Stop Clock - Start and stop a ServiceManager clock.
HP ServiceManager – Process Designer Content Pack (9.30.3) Page 33 of 196
Administrator’s GuideChapter 3: Process Designer
l Set Fields - Set a field value using JavaScript.
l Set Field from Number - Set field based on a number record.
l Validate Date - Validate a date against a date range.
l Field Validation Against a List - Validate a field against a list (global or defined).
l Field Validation Against a Table - Validate a field against a different table.
Note:
l You cannot modify out-of-box rules because they are labeled as HP Proprietary.
l You can edit a user-defined rule, for example to add or remove a condition.
l Many of the rules have a default description that may contain tokens that should getreplaced with values. For example, the Set Mandatory Fields rule has a default description<fields> are Mandatory. The token <fields> will be replaced by the fields you select in therule when you define the rule. You can edit the default description.
l If you do not specify a condition, rule will always trigger to perform the action specified inthe rule.
Related concepts
Process Designer
Related tasks
Create a Rule Set
Add a JavaScript Validation ruleUser Roles: System Administrator, Implementer
This rule enables you to validate any JavaScript code a user enters.
To add a JavaScript Validation rule:
1. Click Tailoring > Process Designer in the System Navigator.
2. Click Rule Sets > Search to open the Rule Set page.
3. Select the Rule Set to which you want to add the rule.
4. Click Add Rule to open the Select Rule Type page.
5. Click JavaScript Validation.
6. Type the Rule Description.
HP ServiceManager – Process Designer Content Pack (9.30.3)Page 34 of 196
Administrator’s GuideChapter 3: Process Designer
7. Click Edit to add a condition.
Note: If you do not specify a condition, it will default toAlways.
Youmay reference the current record as record in the JavaScript. For example, if the field in aform is a category, it may be referred to as follows: record.category=="xyz"
n Youmay reference the original copy of the record (before any changes weremade by theuser) as oldRecord in the JavaScript (that is 'oldRecord.category').
n Youmay set the returnCode variable in the JavaScript to specify whether this rule wassuccessful or should be treated as a failed validation. A return code of 0 (zero) is consideredsuccessful (it is the default), any other code is unsuccessful. The return codemust be anumeric value.
n Youmay set themessage variable in the JavaScript to specify amessage that displays tothe user if the rule is unsuccessful (returns a non-zero return code).
n Youmay set the cursorPosition variable in the JavaScript to specify a field on the currentform where the cursor should be placed if the rule is unsuccessful.
8. Enter the JavaScript in the text box.
9. Click OK to add the rule.
Related concepts
Process Designer
See “Process Designer security model” in ServiceManager 9.31 HelpServer topics
Adding a rule
Related tasks
Create a Rule Set
Add a Launch a URL ruleUser Roles: System Administrator, Implementer
This rule enables you to launch a remote web address by its uniform resource locator (URL).Typically, this rule aids in integrating with other products.
To add a Launch a URL rule:
1. Click Tailoring > Process Designer in the System Navigator.
2. Click Rule Sets > Search to open the Rule Set page.
3. Select the Rule Set to which you want to add the rule.
HP ServiceManager – Process Designer Content Pack (9.30.3) Page 35 of 196
Administrator’s GuideChapter 3: Process Designer

4. Click Add Rule to open the Select Rule Type page.
5. Click Launch a URL.
6. Type the Rule Description: Call the URL: <URL name>
7. Click Edit to add a condition.
Note: If you do not specify a condition, it will default toAlways.
8. Type an XML string to set a condition for executing this rule.
Note: If you do not enter an XML string, the condition is set toAlways.
9. Type the URL address of the remote resource you want to launch in the URL field.
10. Click OK.
Related concepts
Process Designer
See “Process Designer security model” in ServiceManager 9.31 HelpServer topics
Adding a rule
Related tasks
Create a Rule Set
Add a Run a Macro ruleUser Roles: System Administrator and Implementer
This rule enables you to run a ServiceManager macro, which executes a distinct action. ServiceManager macros are specific actions driven by predefined conditions. For example, if you want toconfigure amacro to send an email, select the ServiceManager macro type ‘Mail 1 Person’. Youcan configure this rule to send an email to an intended recipient when an incident ticket moves fromone phase to another.
To add a Run aMacro rule:
1. Click Tailoring > Process Designer in the System Navigator.
2. Click Rule Sets > Search to open the Rule Set page.
3. Select the Rule Set to which you want to add the rule.
4. Click Add Rule to open the Select Rule Type page.
HP ServiceManager – Process Designer Content Pack (9.30.3)Page 36 of 196
Administrator’s GuideChapter 3: Process Designer
5. Click Run a Macro.
6. Type the Rule Description.
7. Click Edit to add a condition.
Note: If you do not specify a condition, it will default toAlways.
8. Select amacro name from the drop-down list.
Note: The drop-down list has macros related to the current table of the rule set.
9. Click OK to add the rule.
Related concepts
Process Designer
See “Process Designer security model” in ServiceManager 9.31 HelpServer topics
Adding a rule
Related tasks
Create a Rule Set
Add a Call a Process ruleUser Roles: System Administrator, Implementer
This rule enables users to call a ServiceManager process. You have to specify the process nameand the conditions that call the process.
Caution: You cannot call a ServiceManager process that expects an input, because there isno provision to pass the input through the rule. Calling a process that requires an input causesthe rule functionality to fail andmay generate an unrecoverable error message.
To add a Call a Process rule type:
1. Click Tailoring > Process Designer in the System Navigator.
2. Click Rule Sets > Search to open the Rule Set page.
3. Select the Rule Set to which you want to add the rule.
4. Click Add Rule to open the Select Rule Type page.
5. Click Call a Process.
HP ServiceManager – Process Designer Content Pack (9.30.3) Page 37 of 196
Administrator’s GuideChapter 3: Process Designer
6. Type the Rule Description.
7. Click Edit to add a condition.
Note: If you do not specify a condition, it will default toAlways.
8. Click Fill Field Process.
9. Select the process you want to call.
10. Click OK to add the rule.
Related concepts
Process Designer
See “Process Designer security model” in ServiceManager 9.31 HelpServer topics
Adding a rule
Related tasks
Create a Rule Set
Add a Run a Wizard ruleUser Roles: System Administrator, Implementer
This rule enables you to run a ServiceManager wizard. The form helps you to specify the wizard torun when the rule executes.
To add a Run aWizard rule:
1. Click Tailoring > Process Designer in the System Navigator.
2. Click Rule Sets > Search to open the Rule Set page.
3. Select the Rule Set to which you want to add the rule.
4. Click Add Rule to open the Select Rule Type page.
5. Click Run a wizard.
6. Type the Rule Description.
7. Click Edit to add a condition.
Note: If you do not specify a condition, it will default toAlways.
HP ServiceManager – Process Designer Content Pack (9.30.3)Page 38 of 196
Administrator’s GuideChapter 3: Process Designer

8. Click Fill Field Wizard to select a wizard to run when the rule executes.
9. Click OK to add the rule.
Related concepts
Process Designer
See “Process Designer security model” in ServiceManager 9.31 HelpServer topics
Adding a rule
Related tasks
Create a Rule Set
Add a Clear Fields ruleUser Role: System Administrator
From a rule set, you can clear the value of specified fields in a record. Optionally, the rule can alsoclear the value in fields related to the specified fields.
To add a Clear Fields rule:
1. Click Tailoring > Process Designer in the System Navigator.
2. Click Rule Sets > Search to open the Rule Set page.
3. Select the Rule Set to which you want to add the rule.
4. Click Add Rule to open the Select Rule Type page.
5. Click Clear Fields.
6. Type the Rule Description.
7. Click Edit to add a condition.
Note: If you do not specify a condition, it will default toAlways.
8. For those fields that will be part of the Clear Fields rule, select the fields in the drop-down list.
9. If you want to clear the value of related fields of the specified fields, select Yes.
10. If you do not want to clear the value of the related fields, select No.
11. Click OK to add the rule.
Related concepts
Process Designer
See “Process Designer security model” in ServiceManager 9.31 HelpServer topics
HP ServiceManager – Process Designer Content Pack (9.30.3) Page 39 of 196
Administrator’s GuideChapter 3: Process Designer
Adding a rule
Related tasks
Create a Rule Set
Add a Set Mandatory Fields ruleUser Roles: System Administrator, Implementer
This rule enables you tomake one or more fields mandatory and to specify a default value for eachfield, which will be set if themandatory fields are empty.
To add a Set Mandatory Fields rule:
1. Click Tailoring > Process Designer in the System Navigator.
2. Click Rule Sets > Search to open the Rule Set page.
3. Select the Rule Set to which you want to add the rule.
4. Click Add Rule to open the Select Rule Type page.
5. Click Set Mandatory Fields.
6. Type the Rule Description.
7. Click Edit to add a condition.
Note: If you do not specify a condition, it will default toAlways.
8. Select the error message type: Pop-up orScreen to display during validation.
9. Click theShow All Error Messages Together check box if you want to display all errormessages together during validation.
10. Select the field name you want to set as mandatory.
11. You can choose a default value, which will be set if themandatory fields are empty.
12. Click OK to add the rule.
Related concepts
Process Designer
See “Process Designer security model” in ServiceManager 9.31 HelpServer topics
Adding a rule
Related tasks
Create a Rule Set
HP ServiceManager – Process Designer Content Pack (9.30.3)Page 40 of 196
Administrator’s GuideChapter 3: Process Designer
Add a Set Mandatory Variables ruleUser Roles: System Administrator, Implementer
This rule enables you to set global and thread variables as mandatory. If mandatory variables areempty, then a default value is set if specified in the Rule.
Global or thread variables begin with the $ symbol. However, the rule does not accept localvariables beginning with $L. Global variables are set when the operator logs on and the serverautomatically cleans them upwhen the session ends.
Thread variables do not have a consistent naming scheme. They are only valid for the current RADthread. If the RAD thread terminates, the server automatically cleans up all thread variables.
To add a Set Mandatory Variables rule:
1. Click Tailoring > Process Designer in the System Navigator.
2. Click Rule Sets > Search to open the Rule Set page.
3. Select the Rule Set to which you want to add the rule.
4. Click Add Rule to open the Select Rule Type page.
5. Click Set Mandatory Variables.
6. Type the Rule Description.
7. Click Edit to add a condition.
Note: If you do not specify a condition, it will default toAlways.
8. Select the error message type: Pop-up orScreen to display during validation.
9. Click the Show All Error Messages Together check box if you want to display all errormessages together during validation.
10. Select a global or thread variable.
Note: If a mandatory variable is empty, then the rule sets it to a default value.
11. Type the variable of the default value.
12. Click OK to add the rule.
Related concepts
Process Designer
See “Process Designer security model” in ServiceManager 9.31 HelpServer topics
HP ServiceManager – Process Designer Content Pack (9.30.3) Page 41 of 196
Administrator’s GuideChapter 3: Process Designer
Adding a rule
Related tasks
Create a Rule Set
Add a Send Notifications ruleUser Roles: System Administrator, Implementer
This rule enables you to send notifications using a ServiceManager notification record. The rule istypically mapped to a workflow or workflow phase. For example, you can use the rule to send anotification when a phase is entered. The rule type links to an existing notification record. If youneed to send an email, use the Send HTMLEmail rule.
To configure a notification:
1. Click Tailoring > Process Designer in the System Navigator.
2. Click Rule Sets > Search to open the Rule Set page.
3. Select the Rule Set to which you want to add the rule.
4. Click Add Rule to open the Select Rule Type page.
5. Click Send Notifications.
6. Type the Rule Description.
7. Click Edit to add a condition.
Note: If you do not specify a condition, it will default toAlways.
8. Click Fill Field Notification Name.
9. Select the existing notification record you want to send when this rule runs.
10. Click OK to add the rule.
Related concepts
Process Designer
See “Process Designer security model” in ServiceManager 9.31 HelpServer topics
Adding a rule
Related tasks
Create a Rule Set
Add a Send HTMLEmail rule
HP ServiceManager – Process Designer Content Pack (9.30.3)Page 42 of 196
Administrator’s GuideChapter 3: Process Designer
Add a Launch a Script ruleUser Roles: System Administrator and Implementer
This rule enables you to launch a ServiceManager script. Scripts enable you to interrupt the normalscreen flow and gather the prerequisites before the form is displayed. For example, you can use ascript to automatically close an incident in five days. The script closes the incident.
To add a Launch a Script rule:
1. Click Tailoring > Process Designer in the System Navigator.
2. Click Rule Sets > Search to open the Rule Set page.
3. Select the Rule Set to which you want to add the rule.
4. Click Add Rule to open the Select Rule Type page.
5. Click Launch a Script.
6. Type the Rule Description.
7. Click Edit to add a condition.
Note: If you do not specify a condition, it will default toAlways.
8. Click the Fill Field Script icon in theScript text box to select a ServiceManager script.
Note: If you type an invalid script name, an error message appears.
9. Click OK to add the rule.
Related concepts
Process Designer
See “Process Designer security model” in ServiceManager 9.31 HelpServer topics
Adding a rule
Related tasks
Create a Rule Set
Add a Send HTML Email ruleUser Roles: System Administrator and Implementer
This rule enables you to send a formatted HTML email to intended recipients using pre-configuredHTML templates. Recipients can be particular users or a group, either explicitly named or based on
HP ServiceManager – Process Designer Content Pack (9.30.3) Page 43 of 196
Administrator’s GuideChapter 3: Process Designer
data in the form. This rule is used to send emails at specific points in a workflow as opposed tocreate a general ServiceManager notification outside of Process Designer that, for example, wouldapply for all Change Requests.
This rule requires the HTMLEmail Solution Content Pack installed on your system. Download it inthe ServiceManager section from the HP Live Network at http://www.hp.com/go/livenetwork. Youwill not be able to configure this rule without this content pack.
To add a Send HTMLEmail rule:
1. Click Tailoring > Process Designer in the System Navigator.
2. Click Rule Sets > Search to open the Rule Set page.
3. Select the Rule Set to which you want to add the rule.
4. Click Add Rule to open the Select Rule Type page.
5. Click Send HTML Email.
6. Type the Rule Description.
7. Click Edit to add a condition.
Note: If you do not specify a condition, it will default toAlways.
8. Select an HTML template from the drop-down list.
9. Select one of the four recipient options: Users, Group, Set Using Javascript, orCurrentRecord.
a. Users: Select a user typeOperators orContacts. After selecting the user type, selectoperators or contacts accordingly.
b. Group: Select one of the following group types: Assignment Group (assignment),Change Management Group (cm3groups), Knowledge Management Group (kmgroup),orRequest Management Group (ocmgroups)
o Assignment Group: Enter a group name in theGroup field. Also, select Operators,Manager, orAll from theSend To drop-down list for sending email.
o Change Management Group: Enter the group name in theGroup field. Also, selectMembers, Approvers, orAll from theSend To drop-down list for sending email.
o Knowledge Management Group: Enter the group name in theGroup field. Also,select Operators,Manager, orAll from theSend To drop-down list for sending email.
o Request Management Group: Enter the group name in theGroup field. Also, selectOperators,Manager, orAll from theSend To drop-down list for sending email.
HP ServiceManager – Process Designer Content Pack (9.30.3)Page 44 of 196
Administrator’s GuideChapter 3: Process Designer
c. Set Using Javascript: A script field appears where you can set the recipients in the usersarray variable with a valid operator login names or contact names. For example,
var users = new Array();users[0]= "jennifer";
d. Current Record: Choose a field from the current record. Also, specify if the field is the IDof operator, contact, assignment, cm3groups, kmgroup, or ocmgroup using Field Type.
If you select any field type apart fromOperator andContact, then you have to select fromSend To field. For example, if you select Assignment Group, then select Operators,Manager, orAll from theSend To drop-down list for sending email.
10. Click OK to add the rule.
Related concepts
Process Designer
See “Process Designer security model” in ServiceManager 9.31 HelpServer topics
Adding a rule
Related tasks
Create a Rule Set
Add a Start or Stop Clock ruleUser Role: System Administrator and Implementer
This rule enables you to start or stop a ServiceManager clock tomeasure the time taken to reachone phase from another phase in a workflow. For example, if you want to know the time taken for anincident ticket to move from the Validation phase to the Risk and Impact Analysis phase, configurea rule to start a clock when the ticket enters the Validation phase. Then, configure another rule tostop the same clock when the incident ticket moves to Risk and Analysis phase. The timedifference is stored in the clocks table along with start and stop times.
Note: You have to select the same clock for starting and stopping a clock in a rule set.
To add a Start or Stop Clock rule:
1. Click Tailoring > Process Designer in the System Navigator.
2. Click Rule Sets > Search to open the Rule Set page.
3. Select the Rule Set to which you want to add the rule.
4. Click Add Rule to open the Select Rule Type page.
5. Click Start or Stop Clock.
HP ServiceManager – Process Designer Content Pack (9.30.3) Page 45 of 196
Administrator’s GuideChapter 3: Process Designer
6. Type the Rule Description.
7. Click Edit to add a condition.
Note: If you do not specify a condition, it will default toAlways.
8. Select Start Clock.
9. To set a clock, select Fixed Name, underName of Clock, and then type a clock name to adda new clock or select a clock name from the drop-down list.
Note: The values in the drop-down list are names of the existing clocks in the system.
10. To set a clock name using Javascript, underName of Clock, click Set Using Javascript, andthen create a clock name using Javascript. The following is an example of a clock usingJavascript.
var clockName = ”New Clock”;
11. Click OK to add the rule.
12. Repeat steps 4 to 11 to add stop clock by selecting theStop Clock radio button in step 8 andmake sure to select the same clock as the one started.
Related concepts
Process Designer
See “Process Designer security model” in ServiceManager 9.31 HelpServer topics
Adding a rule
Related tasks
Create a Rule Set
Add a Set Field ruleUser Roles: System Administrator, Implementer
This rule enables you to set a field with the value determined by a JavaScript. From aRule Set, youcan select a common field frommultiple tables and set its value based on a JavaScript expression.
Note: Make sure that the field is set to the contents of the "value" variable. If it is not set to“value” variable, you cannot process JavaScript.
To configure a field based on JavaScript:
HP ServiceManager – Process Designer Content Pack (9.30.3)Page 46 of 196
Administrator’s GuideChapter 3: Process Designer
1. Click Tailoring > Process Designer in the System Navigator.
2. Click Rule Sets > Search to open the Rule Set page.
3. Select the Rule Set to which you want to add the rule.
4. Click Add Rule to open the Select Rule Type page.
5. Click Set Field.
6. Type the Rule Description.
7. Click Edit to add a condition.
Note: If you do not specify a condition, it will default toAlways.
8. Select an applicable field name from the drop-down list.
9. Type the JavaScript that sets the variable "value" to the desired value for the field in the textbox.
10. Click OK to add the rule.
Related concepts
Process Designer
See “Process Designer security model” in ServiceManager 9.31 HelpServer topics
Adding a rule
Related tasks
Create a Rule Set
Add a Set Field from Number ruleUser Roles: System Administrator and Implementer
This rule enables you to set a field based on a ServiceManager number record. When this ruleexecutes, unique sequential numbers for the records in the database are generated.
When a new record is added, the unique sequential number is incremented or decremented basedon the prefix or suffix provided. For example, you can create a number record for the cm3r classwith Increment By as +1 andPrefix as C, Last Number as 10. Whenever a new change requestis added in the system, it assigns the change request with a unique change ID C10, the nextchange request you add will have the change ID C11.
To add a Set Field from Number rule:
HP ServiceManager – Process Designer Content Pack (9.30.3) Page 47 of 196
Administrator’s GuideChapter 3: Process Designer

1. Click Tailoring > Process Designer in the System Navigator.
2. Click Rule Sets > Search to open the Rule Set page.
3. Select the Rule Set to which you want to add the rule.
4. Click Add Rule to open the Select Rule Type page.
5. Click Set Field from Number.
6. Type the Rule Description.
7. Click Edit to add a condition.
Note: If you do not specify a condition, it will default toAlways.
8. Select the field from the Field Name drop-down list.
9. Select the class from theClass of Number Record drop-down list.
Note: You can select theOverwrite When Record Is Saved check box to overwrite thenumber when you save a record.
10. Click OK to add the rule.
Related concepts
Process Designer
See “Process Designer security model” in ServiceManager 9.31 HelpServer topics
Adding a rule
Related tasks
Create a Rule Set
Add a Validate Date ruleUser Roles: System Administrator and Implementer
This rule enables you to validate a date field against an absolute date or a range of relative dates.For example, you can add a rule to validate whether a document expiration date is greater than orequal to the document creation date.
To add a Validate Date rule:
1. Click Tailoring > Process Designer in the System Navigator.
2. Click Rule Sets > Search to open the Rule Set page.
HP ServiceManager – Process Designer Content Pack (9.30.3)Page 48 of 196
Administrator’s GuideChapter 3: Process Designer
3. Select the Rule Set to which you want to add the rule.
4. Click Add Rule to open the Select Rule Type page.
5. Click Validate Date.
6. Type the Rule Description.
7. Click Edit to add a condition.
Note: If you do not specify a condition, it will default toAlways.
8. Select the error message type: Pop-up orScreen to display the error message duringvalidation.
9. Select the field to validate from the drop-down list.
Note: The drop-down list displays all fields with Date data type from the current table.
10. Select the comparison operator from the drop-down list.
11. Select theNot check box if you want to negate the comparison.
12. Click Relative Date/Time orAbsolute Date/Time to validate against the date field.
a. If you select Relative Date/Time, select a date field orCurrent Date/Time from the drop-down list.
b. An offset time of days, hours, andminutes can be added or subtracted from the relativedate/time by selecting + or -. For instance, an offset of +04:03:02 indicates the relativedate/time is ahead by 4 days, 3 hours, and 2minutes.
c. If you select Absolute Date/Time, click theCalendar icon to select the date and time.
13. Click OK to add the rule.
Related concepts
Process Designer
See “Process Designer security model” in ServiceManager 9.31 HelpServer topics
Adding a rule
Related tasks
Create a Rule Set
Add a Validate against List ruleUser Roles: System Administrator, Implementer
HP ServiceManager – Process Designer Content Pack (9.30.3) Page 49 of 196
Administrator’s GuideChapter 3: Process Designer
This rule enables you to select a field to validate against a list of values. This list may be global ormanually defined.
To add a Validate against List rule:
1. Click Tailoring > Process Designer in the System Navigator.
2. Click Rule Sets > Search to open the Rule Set page.
3. Select the Rule Set to which you want to add the rule.
4. Click Add Rule to open the Select Rule Type page.
5. Click Validate against List.
6. Type the Rule Description.
7. Click Edit to add a condition.
Note: If you do not specify a condition, it will default toAlways.
8. Select the error message type: Pop-up orScreen to display during validation.
9. Select the field to validate from the drop-down list.
10. If you select Global List, select the global list from the drop-down list.
11. If you selectManual List, type themanual list names in the Value table.
12. Click OK to add the rule.
Note: If the field value does not match a value in the specified list, the system displays amessage and sets the cursor to that field when the rule is not followed.
Related concepts
Process Designer
See “Process Designer security model” in ServiceManager 9.31 HelpServer topics
Adding a rule
Related tasks
Create a Rule Set
Add Validate Text/Number ruleUser Roles: System Administrator and Implementer
HP ServiceManager – Process Designer Content Pack (9.30.3)Page 50 of 196
Administrator’s GuideChapter 3: Process Designer
This rule enables you to validate a field against a range of text or number in another field of sametable. You can define fixed values or select a field from the current table to validate against a field.For example, the field to validate is Demo Number, field to validate against is Demo String1, andthe comparison operator is Is greater than or equal to.
Note: If the field to validate against is blank, the rule is ignored. If you need to enforce the rule,then use a Set Mandatory Fields rule on the filed you need to validate against.
To add a Validate Text/Number rule:
1. Click Tailoring > Process Designer.
2. Click Rule Sets > Search.
3. Select the Rule Set to which you want to add the rule.
4. Click Add Rule to open the Select Rule Type page.
5. Click Validate Text/ Number.
6. Type the Rule Description.
7. Click Edit to add a condition.
Note: If you do not specify a condition, it will default toAlways.
8. Select the error message type: Pop-up orScreen to display during validation.
9. Select the field to validate from the drop-down list.
10. Select the comparison operator from the drop-down list.
11. Select theNot check box if you want to negate the comparison.
12. To validate against a field or manually defined value:
n To validate against a field, underValues, select Field and select the field you want tovalidate against from the drop-down list.
n To validate against amanually defined value, underValues, select Custom and type thevalue to validate against the selected field. For example, to validate if the “RiskAssessment” value is between 1 and 5, select the Is between comparison operator andtype the value 1 and 5 in theCustom text box.
13. Click OK to add the rule.
Related concepts
Process Designer
See “Process Designer security model” in ServiceManager 9.31 HelpServer topics
HP ServiceManager – Process Designer Content Pack (9.30.3) Page 51 of 196
Administrator’s GuideChapter 3: Process Designer
Adding a rule
Related tasks
Create a Rule Set
Add a Validate against Table ruleUser Roles: System Administrator, Implementer
This rule enables you to validate a field against a field in another table and fill data into other fields.You can also filter the data you are validating against, and fill data into other fields.
Note: If the field value does not match a value in the specified table, the system displays apop-upmessage and sets the cursor to that field when the rule is not followed.
To add a Validate against Table rule:
1. Click Tailoring > Process Designer.
2. Click Rule Sets > Search.
3. Select the Rule Set to which you want to add the rule.
4. Click Add Rule to open the Select Rule Type page.
5. Click Validate against Table.
6. Type the Rule Description.
7. Click Edit to add a condition.
Note: If you do not specify a condition, it will default toAlways.
8. Select the error message type: Pop-up orScreen to display during validation.
9. Select the field to validate from the drop-down list.
10. Select the name of the table you want to validate against.
11. Select the name of the field you want to validate against.
12. You can filter the data you are validating against using a standard RAD query.
For Example: The following field entries will validate only for cm3r with the current field name(Demo String2 in this example) of the workflow:
Current Field Name field: Demo String2
HP ServiceManager – Process Designer Content Pack (9.30.3)Page 52 of 196
Administrator’s GuideChapter 3: Process Designer
Validate Against Table field:ModuleStatus
Validate Against Field field: Status
Filter field:module="cm3r"
13. Click Here to Add Fill Information to enter Fill From and Fill To fields.
Note: The Fill From field represents the fields of the validation table against which itvalidates. The Fill To field represents the fields in the current table being validated.
14. Click OK to add the rule.
Related concepts
Process Designer
See “Process Designer security model” in ServiceManager 9.31 HelpServer topics
Adding a rule
Related tasks
Create a Rule Set
Group rulesUser Role: System Administrator, Implementer
You can groupmultiple rules into a Rule Group with an overall condition. The system runs all therules in the Rule Group if the conditionmatches.
To group rules:
1. Click Tailoring > Process Designer.
2. Click Rule Sets > Search to open the Rule Set page.
3. Select the rule set where you want to add a group.
4. Click Add Group.
5. Type a rule group name, for example, kmrules.
6. Click Edit to add a condition.
Note: If you do not specify a condition, it will default toAlways.
7. Click OK to add the group name.
8. Highlight the group by selecting it.
HP ServiceManager – Process Designer Content Pack (9.30.3) Page 53 of 196
Administrator’s GuideChapter 3: Process Designer
9. Click Add Rule.
10. Select a rule.
11. Type the attributes in the Rule page.
12. Repeat steps 8 to 11 if you want to addmore rules.
13. Click OK to group rules.
Note: You can add one or more rule groups within another Rule Group.
Related concepts
Adding a rule
See "More Actions menu" in ServiceManager 9.31 HelpServer topics
Related tasks
Create a Rule Set
See "Remove an auto formatting rule" in ServiceManager 9.31 HelpServer topics
Using the Condition EditorThe Condition Editor enables you to build a condition without any programming languageknowledge. Conditions always evaluate to True or False. When a condition evaluates to True, thesystem runs the rule or applies an action that the condition controls. For example, you can use thecondition to determine if a workflow transition should occur or if a rule should execute.
A condition is made up of one or more expressions connected by logical operators AND or OR. Anexpression is a query built from the fields, operators, and values that returns a Boolean value (Trueor False).
After you build a condition, ServiceManager displays a user readable query describing thecondition.
You can also build complex conditions with the Condition Editor. A complex condition typically hasmany expressions nested together with groups and sub groups. A group is a collection of multipleexpressions within braces. The following is an example of a complex expression:
((description in Category = 100 OR display.name in Category = "Test") AND ((assoc.published.doc in CurrentFile !=true AND activity.mandatory.msg in Object <=20)OR error in SavedFile Starts With 101 OR ((the "edit.adaptive.learning" value inthe "Knowledge Document" Security Area <= 123 AND the "update" value in the "Tailoring" Security Area = "always") OR test!=12)))
Note:
HP ServiceManager – Process Designer Content Pack (9.30.3)Page 54 of 196
Administrator’s GuideChapter 3: Process Designer
l After you have built a condition, you can addmore expressions by linking them with OR andAND operators. If you change anOR to an AND operator, then the condition will group allexpressions using anOR operator to ensure the conditionmakes logical sense.
l Make sure to build a proper condition. For example, a string field in a condition should haveonly alphanumeric characters. Improperly built conditions will show as Never and will notevaluate to either True or False.
With the Condition Editor, you can:
l Add a condition
l Add a group
l Edit a condition
l Negate a group of expressions
l Cancel a condition
l Clear a condition
Related concepts
Process Designer
Related tasks
Build a condition
Add a group with a condition
Launch the Condition Editor
Launch the Condition EditorUser Roles: System Administrator and Implementer
You can launch the Condition Editor only in theWeb client. You can launch the Condition Editor ineither of the following ways.
To launch Condition Editor from aRule:
1. Click Tailoring > Process Designer in the System Navigator.
2. Click Rule Sets > Search to open the Rule Set page.
3. Click Add Rule.
4. Select a Rule.
5. Type the rule description.
HP ServiceManager – Process Designer Content Pack (9.30.3) Page 55 of 196
Administrator’s GuideChapter 3: Process Designer
6. Click Edit to launch the Condition Editor.
Note: If you do not specify a condition, it defaults toAlways and the rule will alwaysexecute.
To launch Condition Editor fromWorkflows:
1. From System Navigator, click Process Designer >Workflows.
2. Select an existing workflow or create a workflow.
3. Click a phase in the workflow.
4. You can launch Condition Editor from either of the following tabs:
n Details – Click Form Edit Condition to launch the Condition Editor.
n Actions– Click Add > Action Condition to launch the Condition Editor.
n Approvals – Click Reset Condition orRecalculate Condition to launch the ConditionEditor.
n Alerts – Click Reset Condition orRecalculate Condition to launch the Condition Editor.
n Transitions– From aworkflow page, click a transition > Condition inDetails tab to launchthe Condition Editor.
To launch Condition Editor from the Task Planner for changemodel:
1. Click Change Management > Configuration > Change Models in the System Navigator.
2. Click Search to select a changemodel.
Or
Click New to create a new changemodel record. Then, select category from the drop-down listto view the Task Planner button.
3. Click the Task Planner button from the Task Information section.
4. Add a new task or select an existing task, and then click Task Condition to launch theCondition Editor.
Note: To close the Condition Editor, click Cancel.
Related concepts
HP ServiceManager – Process Designer Content Pack (9.30.3)Page 56 of 196
Administrator’s GuideChapter 3: Process Designer
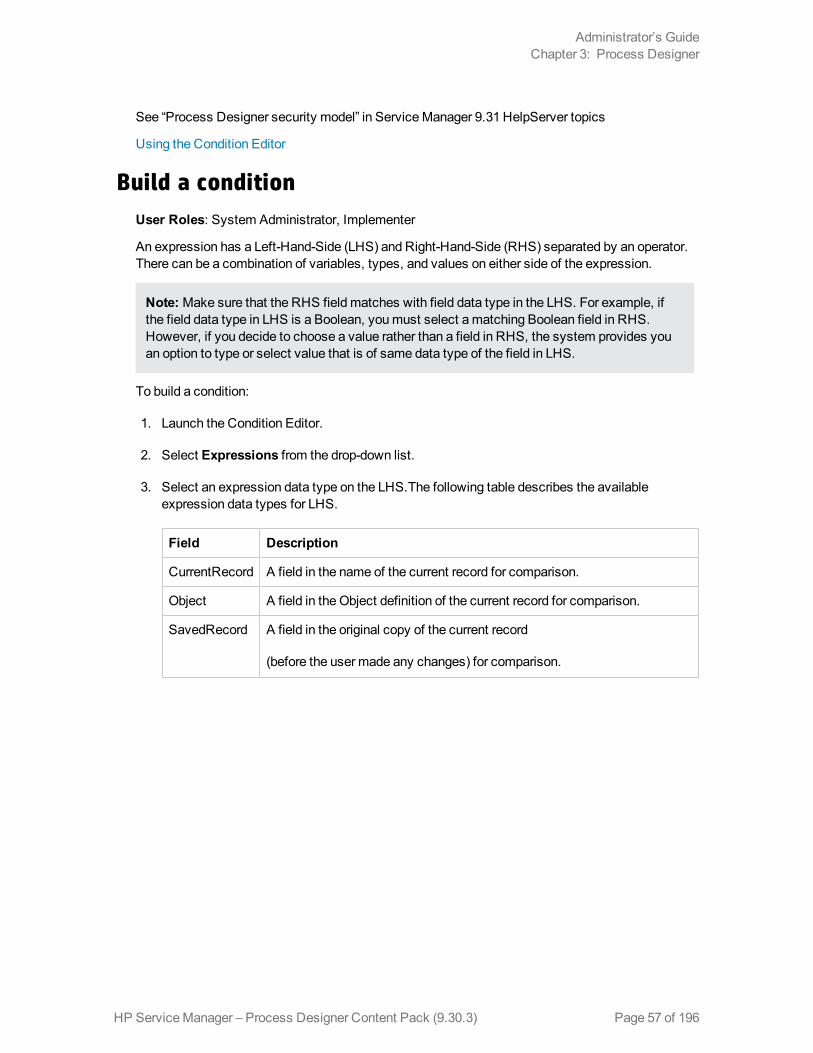
See “Process Designer security model” in ServiceManager 9.31 HelpServer topics
Using the Condition Editor
Build a conditionUser Roles: System Administrator, Implementer
An expression has a Left-Hand-Side (LHS) and Right-Hand-Side (RHS) separated by an operator.There can be a combination of variables, types, and values on either side of the expression.
Note: Make sure that the RHS field matches with field data type in the LHS. For example, ifthe field data type in LHS is a Boolean, youmust select amatching Boolean field in RHS.However, if you decide to choose a value rather than a field in RHS, the system provides youan option to type or select value that is of same data type of the field in LHS.
To build a condition:
1. Launch the Condition Editor.
2. Select Expressions from the drop-down list.
3. Select an expression data type on the LHS.The following table describes the availableexpression data types for LHS.
Field Description
CurrentRecord A field in the name of the current record for comparison.
Object A field in the Object definition of the current record for comparison.
SavedRecord A field in the original copy of the current record
(before the user made any changes) for comparison.
HP ServiceManager – Process Designer Content Pack (9.30.3) Page 57 of 196
Administrator’s GuideChapter 3: Process Designer

Field Description
RAD
Expression
Evaluates a RAD expression typed in the text area. For example:
evaluate(cls.control in $L.phase) and evaluate($L.tableAccess.delete) andopen in $L.file=true and nullsub($G.ess, false)=false and approval.status in$L.file="approved" and (category in $L.file~="KM Document" or category in$L.file="KM Document"
If you have typed a RAD expression, click OK to build a standalonecondition. You can ignore steps 4-8.
Note:
n You cannot combine this expression with any other expressiontype.
n You can use the jscall RAD function to evaluate JavaScript.
Category A field in the associated category definition of the current record forcomparison.
Phase A field in the associated phase definition of the current record forcomparison.
Security An operator's security rights. You can choose rights from the drop-down listof defined values: Change, ChangeManagement Configuration, ChangeTasks, KnowledgeManagement, Knowledge Administration, Security, orTailoring.
Note: The KnowledgeManagement value is displayed as “KnowledgeDocument” in the back-end RDBMS and after you build the condition.
Important: If you selected a security right, go to step 5.
Variable Evaluates the value of a global, local, or thread variable condition. Foexample:
$G.test
$L.testNumber
Important: If you typed a variable expression, press Tab on your keyboardand go to step 5.
4. Select a field caption.
HP ServiceManager – Process Designer Content Pack (9.30.3)Page 58 of 196
Administrator’s GuideChapter 3: Process Designer
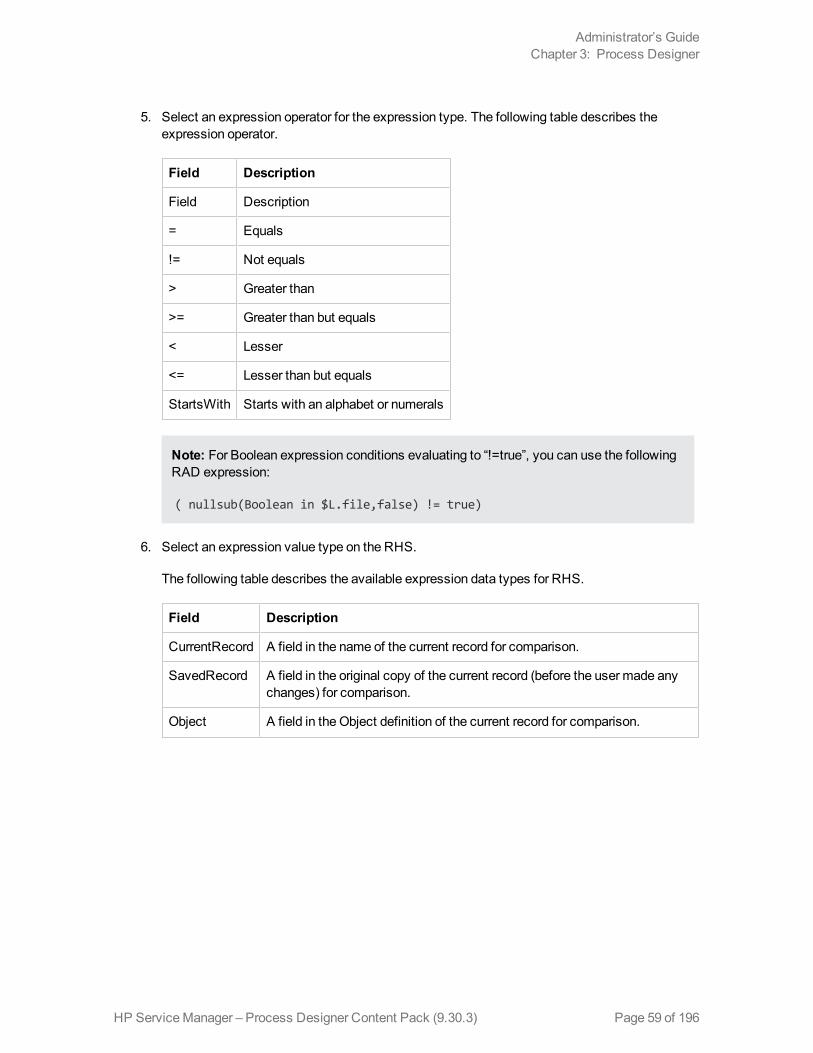
5. Select an expression operator for the expression type. The following table describes theexpression operator.
Field Description
Field Description
= Equals
!= Not equals
> Greater than
>= Greater than but equals
< Lesser
<= Lesser than but equals
StartsWith Starts with an alphabet or numerals
Note: For Boolean expression conditions evaluating to “!=true”, you can use the followingRAD expression:
( nullsub(Boolean in $L.file,false) != true)
6. Select an expression value type on the RHS.
The following table describes the available expression data types for RHS.
Field Description
CurrentRecord A field in the name of the current record for comparison.
SavedRecord A field in the original copy of the current record (before the user made anychanges) for comparison.
Object A field in the Object definition of the current record for comparison.
HP ServiceManager – Process Designer Content Pack (9.30.3) Page 59 of 196
Administrator’s GuideChapter 3: Process Designer
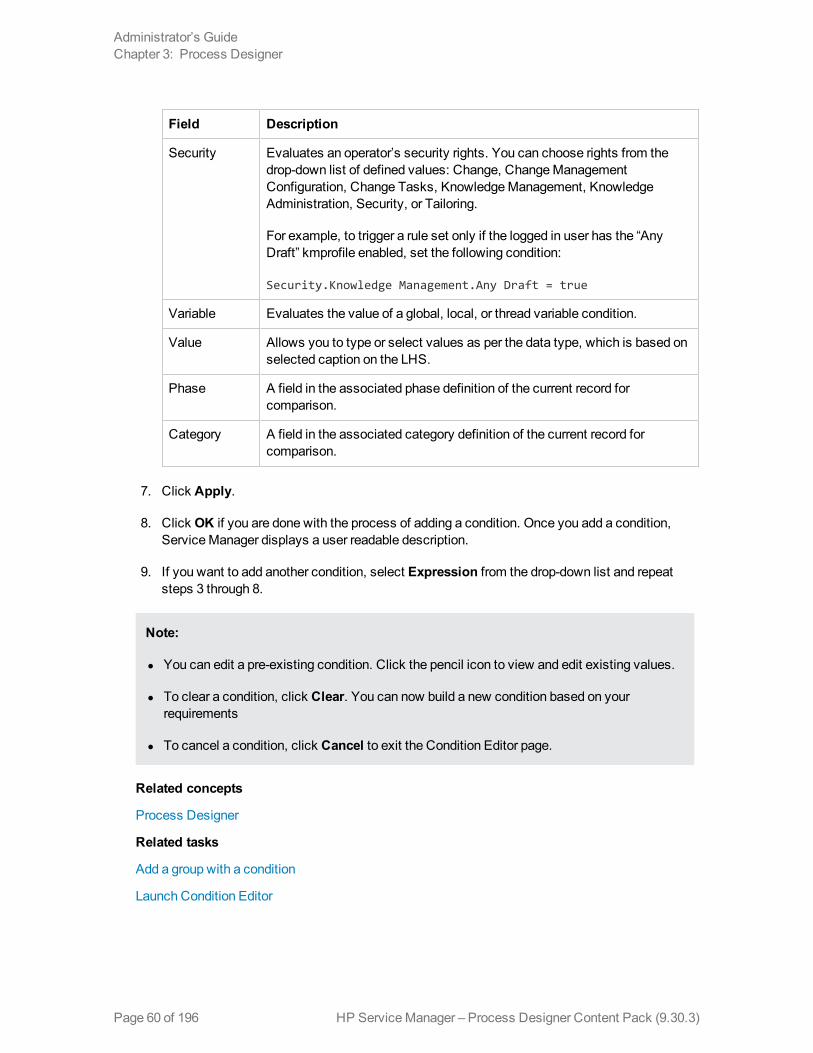
Field Description
Security Evaluates an operator’s security rights. You can choose rights from thedrop-down list of defined values: Change, ChangeManagementConfiguration, Change Tasks, KnowledgeManagement, KnowledgeAdministration, Security, or Tailoring.
For example, to trigger a rule set only if the logged in user has the “AnyDraft” kmprofile enabled, set the following condition:
Security.Knowledge Management.Any Draft = true
Variable Evaluates the value of a global, local, or thread variable condition.
Value Allows you to type or select values as per the data type, which is based onselected caption on the LHS.
Phase A field in the associated phase definition of the current record forcomparison.
Category A field in the associated category definition of the current record forcomparison.
7. Click Apply.
8. Click OK if you are done with the process of adding a condition. Once you add a condition,ServiceManager displays a user readable description.
9. If you want to add another condition, select Expression from the drop-down list and repeatsteps 3 through 8.
Note:
l You can edit a pre-existing condition. Click the pencil icon to view and edit existing values.
l To clear a condition, click Clear. You can now build a new condition based on yourrequirements
l To cancel a condition, click Cancel to exit the Condition Editor page.
Related concepts
Process Designer
Related tasks
Add a group with a condition
Launch Condition Editor
HP ServiceManager – Process Designer Content Pack (9.30.3)Page 60 of 196
Administrator’s GuideChapter 3: Process Designer
Add a group with a conditionUser Roles: System Administrator, Implementer
To add a group with a condition:
1. Launch the Condition Editor.
2. Select Add Expression > Group from the drop-down list.
3. Follow the procedure to build a condition.
A group with a condition has been added.
Related concepts
Process Designer
Related tasks
Launch Condition Editor
Enable deprecated fields and system fields forCondition Editor
User Roles: System Administrator
A deprecated field is a field that the usage type is Deprecated in the data policy. A system field is afield that the usage type is System in the data policy.
To display deprecated fields and system fields in Current Record for Condition Editor:
1. Click Tailoring > Process Designer > Configuration> Setting.
The Condition Editor Settings screen is displayed.
2. Select theDisplay Deprecated Fields in Current Record check box if you want to displaydeprecated fields in Current Record. In an out-of-box system, this option is selected by default.
3. Select theDisplay System Fields in Current Record check box if you want to displaysystem fields in Current Record.
4. Click Save.
Now, the Condition Editor can display your selected field types in Current Record.
Related concepts
Process Designer
Related tasks
HP ServiceManager – Process Designer Content Pack (9.30.3) Page 61 of 196
Administrator’s GuideChapter 3: Process Designer

Launch Condition Editor
Negating condition groupsUser Roles: System Administrator, Implementer
To negate a group, click the ! icon that appears in the group when you hover themouse at the topleft corner of a Condition Editor. Clicking this icon again will undo the negation. Negating a grouprefers to negating group of expressions bound to that group.
To negate a group of expressions, click ! icon in the Condition Builder. The icon becomes red afterthe negation. Click it again to undo the negation.
Note: ServiceManager does not support an expression combined with negate and !=. Forexample, the "Not(CurrentRecord.priority != 'high')" expression. The Condition Editor allowsbuilding such an expression, but it will always evaluate it to false.
Related concepts
Process Designer
Related tasks
Launch Condition Editor
Add a group with a condition
Process Designer WorkflowsA workflow is a collection of phases with transitions from one phase to another. Each phaserepresents the state of the workflow linked to a form for data capture. Transitions can connectphases in any manner such as creating parallel branches or loop backs to previous branches.
A workflow enables an implementer to graphically layout the entire lifecycle of a process or recordwithout any programming knowledge. The end user of the workflow views the same graphicalworkflow to see the current phase and past transitions.
Before you create a new workflow, youmust add Rules and Rule Sets to the phases and transitionsof your intended workflow.
Related concepts
Workflow phases
Workflow transitions
Related tasks
Create amanual workflow transition
Create an automatic workflow transition
Create a default workflow transition
Add a phase
HP ServiceManager – Process Designer Content Pack (9.30.3)Page 62 of 196
Administrator’s GuideChapter 3: Process Designer
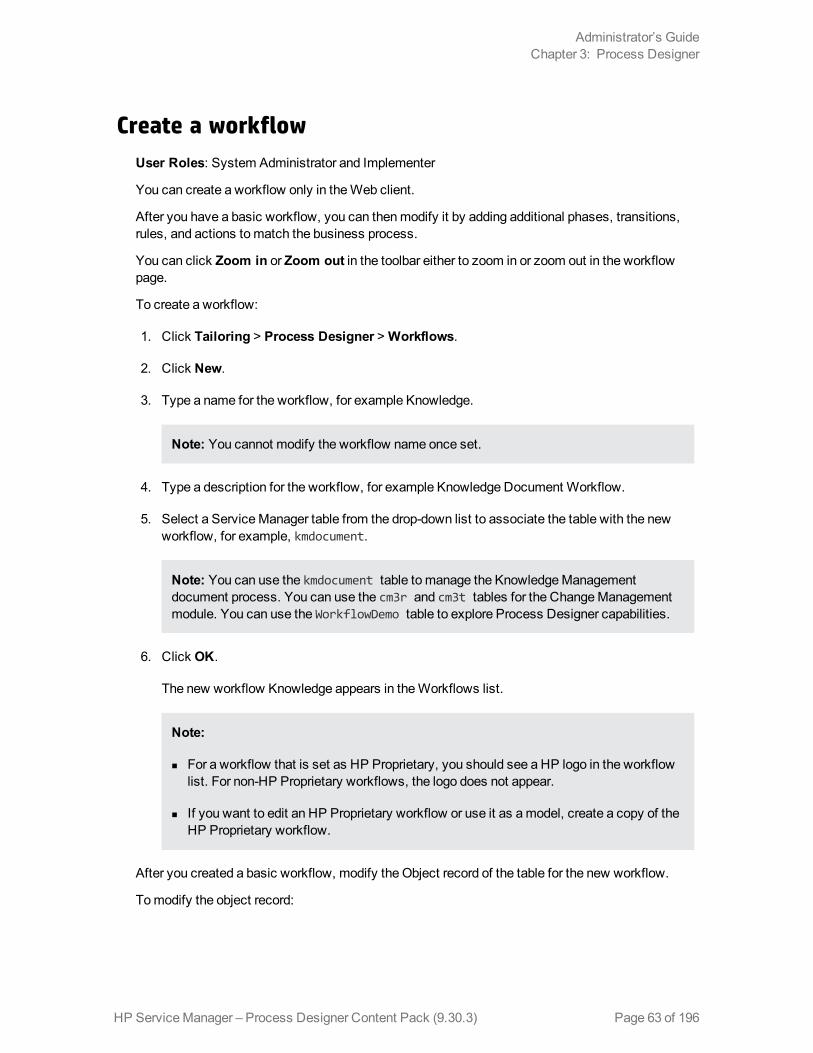
Create a workflowUser Roles: System Administrator and Implementer
You can create a workflow only in theWeb client.
After you have a basic workflow, you can thenmodify it by adding additional phases, transitions,rules, and actions tomatch the business process.
You can click Zoom in or Zoom out in the toolbar either to zoom in or zoom out in the workflowpage.
To create a workflow:
1. Click Tailoring > Process Designer >Workflows.
2. Click New.
3. Type a name for the workflow, for example Knowledge.
Note: You cannot modify the workflow name once set.
4. Type a description for the workflow, for example Knowledge Document Workflow.
5. Select a ServiceManager table from the drop-down list to associate the table with the newworkflow, for example, kmdocument.
Note: You can use the kmdocument table tomanage the KnowledgeManagementdocument process. You can use the cm3r and cm3t tables for the ChangeManagementmodule. You can use the WorkflowDemo table to explore Process Designer capabilities.
6. Click OK.
The new workflow Knowledge appears in theWorkflows list.
Note:
n For a workflow that is set as HP Proprietary, you should see a HP logo in the workflowlist. For non-HP Proprietary workflows, the logo does not appear.
n If you want to edit an HP Proprietary workflow or use it as amodel, create a copy of theHP Proprietary workflow.
After you created a basic workflow, modify the Object record of the table for the new workflow.
Tomodify the object record:
HP ServiceManager – Process Designer Content Pack (9.30.3) Page 63 of 196
Administrator’s GuideChapter 3: Process Designer

1. Click Tailoring > Database Manager.
2. TypeObject in the Table field.
3. Click Enter.
4. Under File name, provide the table name of the associated workflow, for exampleKMDOCUMENT
5. Select In Object inWorkflow Location drop-down list.
6. Select the workflow name inWorkflow drop-down list.
7. Click Save.
Note:
l For the changes to take effect in the Object record, log off and log on to ServiceManager
l By selecting In Object in theWorkflow Location drop-down list, you are associating asingle workflow to all categories in ChangeManagement. You can select By Categoryfrom theWorkflow Location drop-down list to associate workflows with their relevantcategories. For example, you can associate the Hardware category in ChangeManagementwith the Hardware workflow and theMaintenance category with theMaintenance workflow.
Related concepts
Workflow transitions
Workflow phases
Related tasks
Add a phase
Create amanual workflow transition
Copy an existing workflowUser Roles: System Administrator, Implementer
You can clone an existing workflow to use it in another business process or if you need tomakechanges to a HP Proprietary workflow. You also have an option to copy the rule sets of the existingworkflow.
To copy an existing workflow:
1. Click Process Designer > Copy Existing Workflow.
2. In the Clone aWorkflow page, select the workflow you want to copy.
3. Type a new workflow name.
HP ServiceManager – Process Designer Content Pack (9.30.3)Page 64 of 196
Administrator’s GuideChapter 3: Process Designer
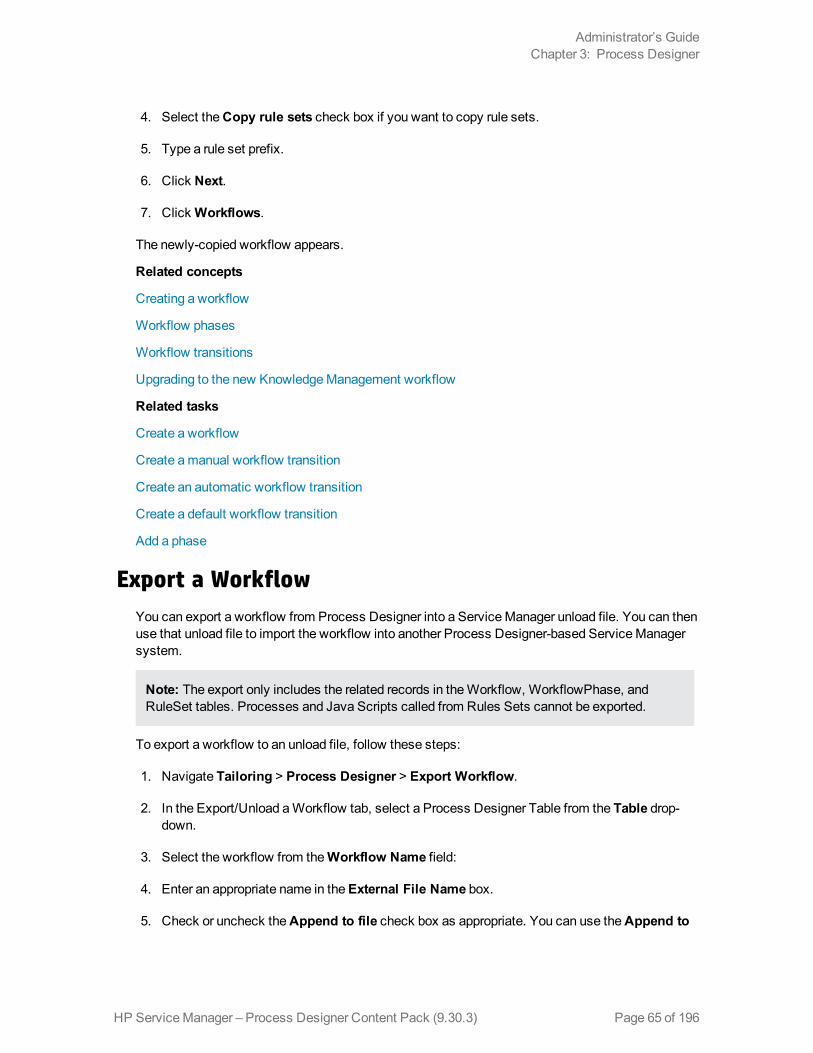
4. Select theCopy rule sets check box if you want to copy rule sets.
5. Type a rule set prefix.
6. Click Next.
7. ClickWorkflows.
The newly-copied workflow appears.
Related concepts
Creating a workflow
Workflow phases
Workflow transitions
Upgrading to the new KnowledgeManagement workflow
Related tasks
Create a workflow
Create amanual workflow transition
Create an automatic workflow transition
Create a default workflow transition
Add a phase
Export a WorkflowYou can export a workflow from Process Designer into a Service Manager unload file. You can thenuse that unload file to import the workflow into another Process Designer-based ServiceManagersystem.
Note: The export only includes the related records in theWorkflow, WorkflowPhase, andRuleSet tables. Processes and Java Scripts called from Rules Sets cannot be exported.
To export a workflow to an unload file, follow these steps:
1. Navigate Tailoring > Process Designer > Export Workflow.
2. In the Export/Unload aWorkflow tab, select a Process Designer Table from the Table drop-down.
3. Select the workflow from theWorkflow Name field:
4. Enter an appropriate name in theExternal File Name box.
5. Check or uncheck theAppend to file check box as appropriate. You can use theAppend to
HP ServiceManager – Process Designer Content Pack (9.30.3) Page 65 of 196
Administrator’s GuideChapter 3: Process Designer
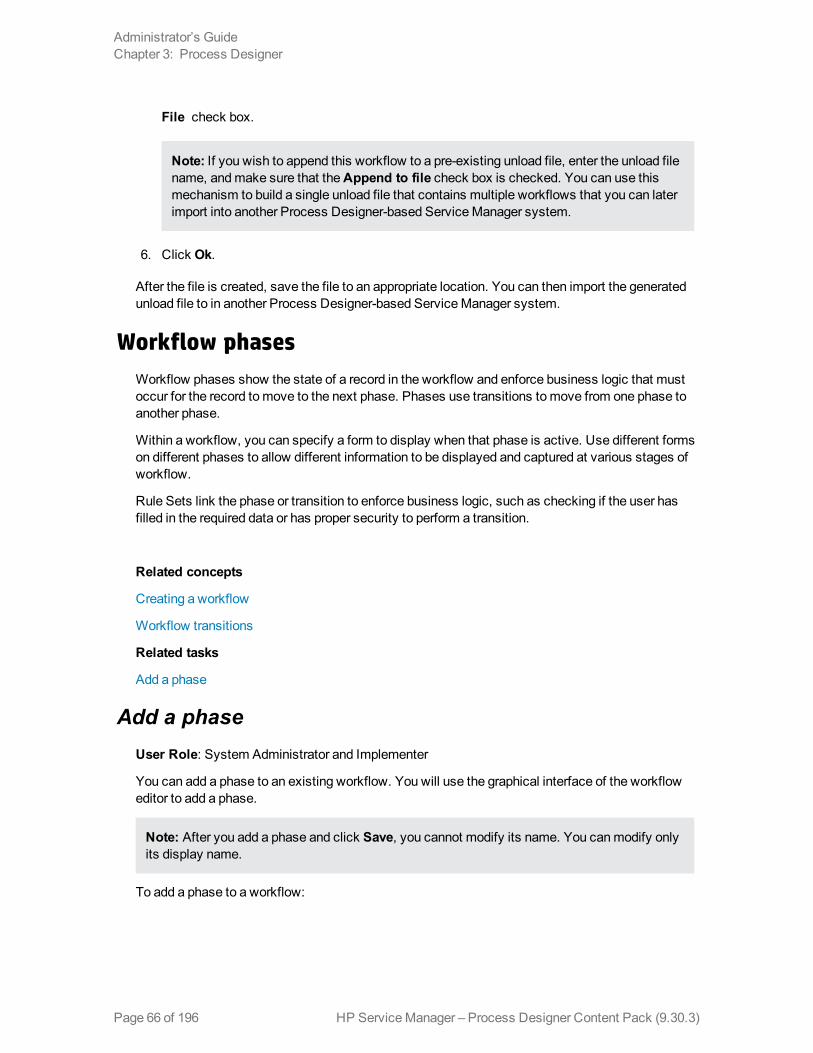
File check box.
Note: If you wish to append this workflow to a pre-existing unload file, enter the unload filename, andmake sure that theAppend to file check box is checked. You can use thismechanism to build a single unload file that contains multiple workflows that you can laterimport into another Process Designer-based ServiceManager system.
6. Click Ok.
After the file is created, save the file to an appropriate location. You can then import the generatedunload file to in another Process Designer-based ServiceManager system.
Workflow phasesWorkflow phases show the state of a record in the workflow and enforce business logic that mustoccur for the record tomove to the next phase. Phases use transitions tomove from one phase toanother phase.
Within a workflow, you can specify a form to display when that phase is active. Use different formson different phases to allow different information to be displayed and captured at various stages ofworkflow.
Rule Sets link the phase or transition to enforce business logic, such as checking if the user hasfilled in the required data or has proper security to perform a transition.
Related concepts
Creating a workflow
Workflow transitions
Related tasks
Add a phase
Add a phaseUser Role: System Administrator and Implementer
You can add a phase to an existing workflow. You will use the graphical interface of the workfloweditor to add a phase.
Note: After you add a phase and click Save, you cannot modify its name. You canmodify onlyits display name.
To add a phase to a workflow:
HP ServiceManager – Process Designer Content Pack (9.30.3)Page 66 of 196
Administrator’s GuideChapter 3: Process Designer
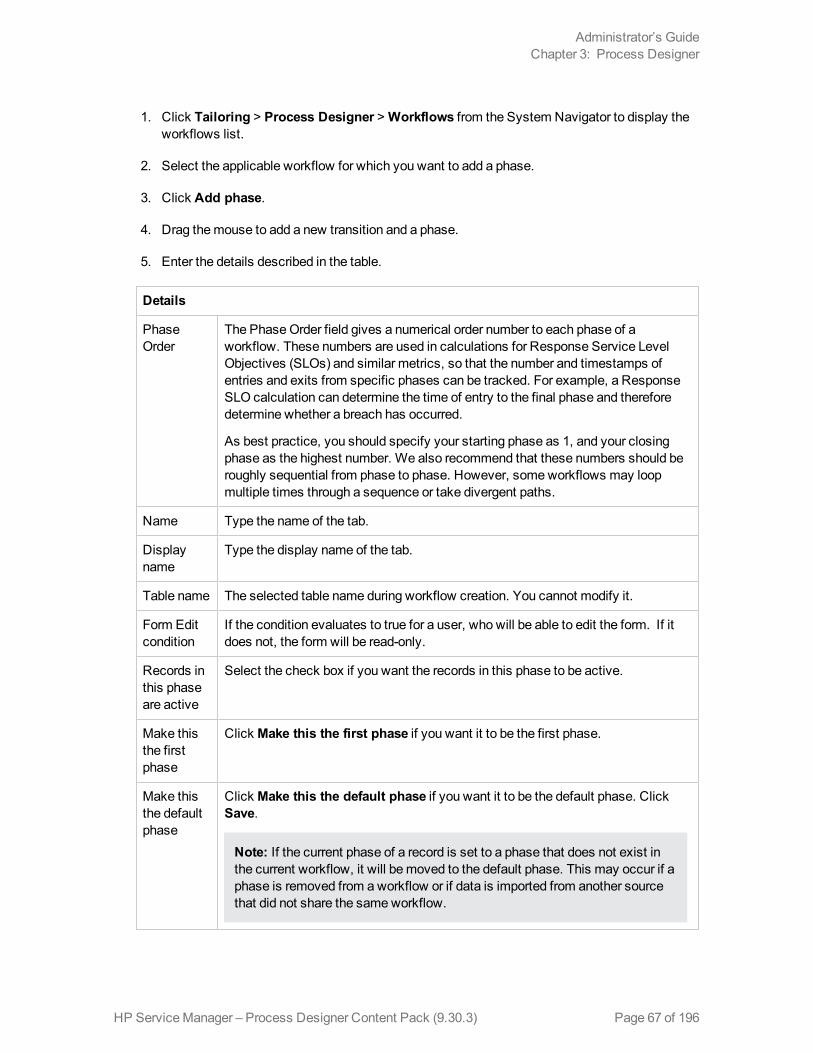
1. Click Tailoring > Process Designer >Workflows from the System Navigator to display theworkflows list.
2. Select the applicable workflow for which you want to add a phase.
3. Click Add phase.
4. Drag themouse to add a new transition and a phase.
5. Enter the details described in the table.
Details
PhaseOrder
The PhaseOrder field gives a numerical order number to each phase of aworkflow. These numbers are used in calculations for Response Service LevelObjectives (SLOs) and similar metrics, so that the number and timestamps ofentries and exits from specific phases can be tracked. For example, a ResponseSLO calculation can determine the time of entry to the final phase and thereforedetermine whether a breach has occurred.
As best practice, you should specify your starting phase as 1, and your closingphase as the highest number. We also recommend that these numbers should beroughly sequential from phase to phase. However, someworkflows may loopmultiple times through a sequence or take divergent paths.
Name Type the name of the tab.
Displayname
Type the display name of the tab.
Table name The selected table name during workflow creation. You cannot modify it.
Form Editcondition
If the condition evaluates to true for a user, who will be able to edit the form. If itdoes not, the form will be read-only.
Records inthis phaseare active
Select the check box if you want the records in this phase to be active.
Make thisthe firstphase
Click Make this the first phase if you want it to be the first phase.
Make thisthe defaultphase
Click Make this the default phase if you want it to be the default phase. ClickSave.
Note: If the current phase of a record is set to a phase that does not exist inthe current workflow, it will bemoved to the default phase. This may occur if aphase is removed from aworkflow or if data is imported from another sourcethat did not share the sameworkflow.
HP ServiceManager – Process Designer Content Pack (9.30.3) Page 67 of 196
Administrator’s GuideChapter 3: Process Designer
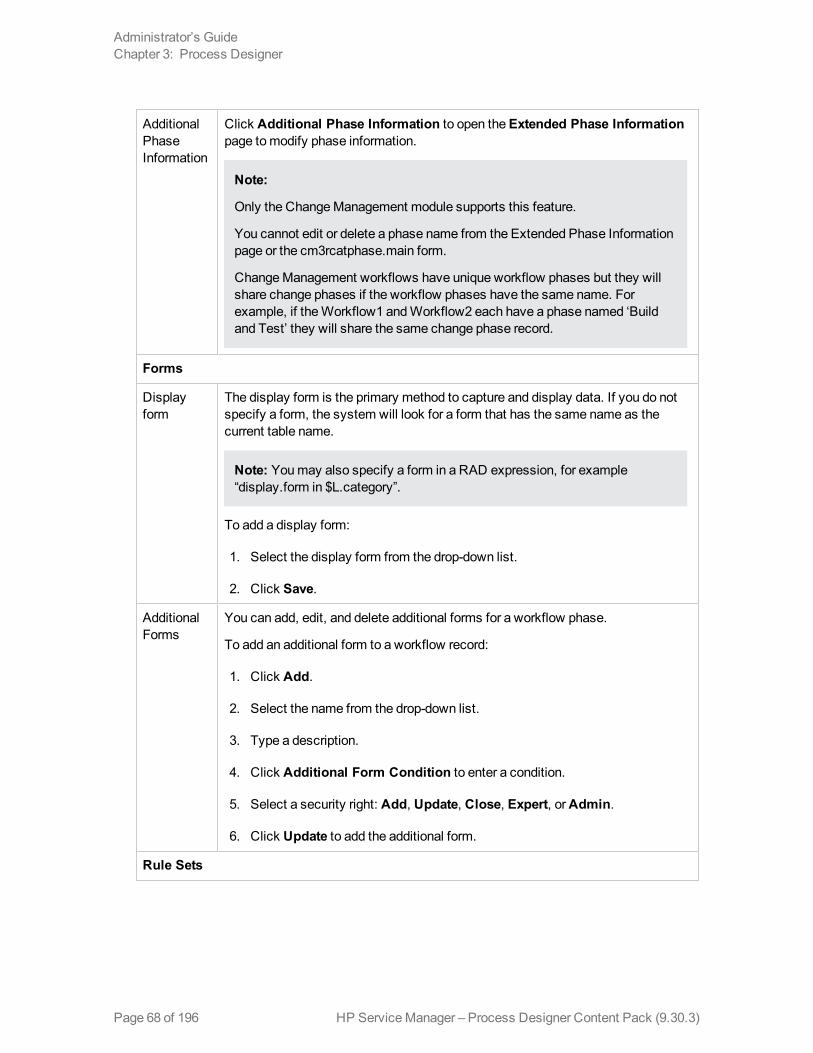
AdditionalPhaseInformation
Click Additional Phase Information to open theExtended Phase Informationpage tomodify phase information.
Note:
Only the ChangeManagement module supports this feature.
You cannot edit or delete a phase name from the Extended Phase Informationpage or the cm3rcatphase.main form.
ChangeManagement workflows have unique workflow phases but they willshare change phases if the workflow phases have the same name. Forexample, if theWorkflow1 andWorkflow2 each have a phase named ‘Buildand Test’ they will share the same change phase record.
Forms
Displayform
The display form is the primary method to capture and display data. If you do notspecify a form, the system will look for a form that has the same name as thecurrent table name.
Note: Youmay also specify a form in a RAD expression, for example“display.form in $L.category”.
To add a display form:
1. Select the display form from the drop-down list.
2. Click Save.
AdditionalForms
You can add, edit, and delete additional forms for a workflow phase.
To add an additional form to a workflow record:
1. Click Add.
2. Select the name from the drop-down list.
3. Type a description.
4. Click Additional Form Condition to enter a condition.
5. Select a security right: Add, Update, Close, Expert, orAdmin.
6. Click Update to add the additional form.
Rule Sets
HP ServiceManager – Process Designer Content Pack (9.30.3)Page 68 of 196
Administrator’s GuideChapter 3: Process Designer
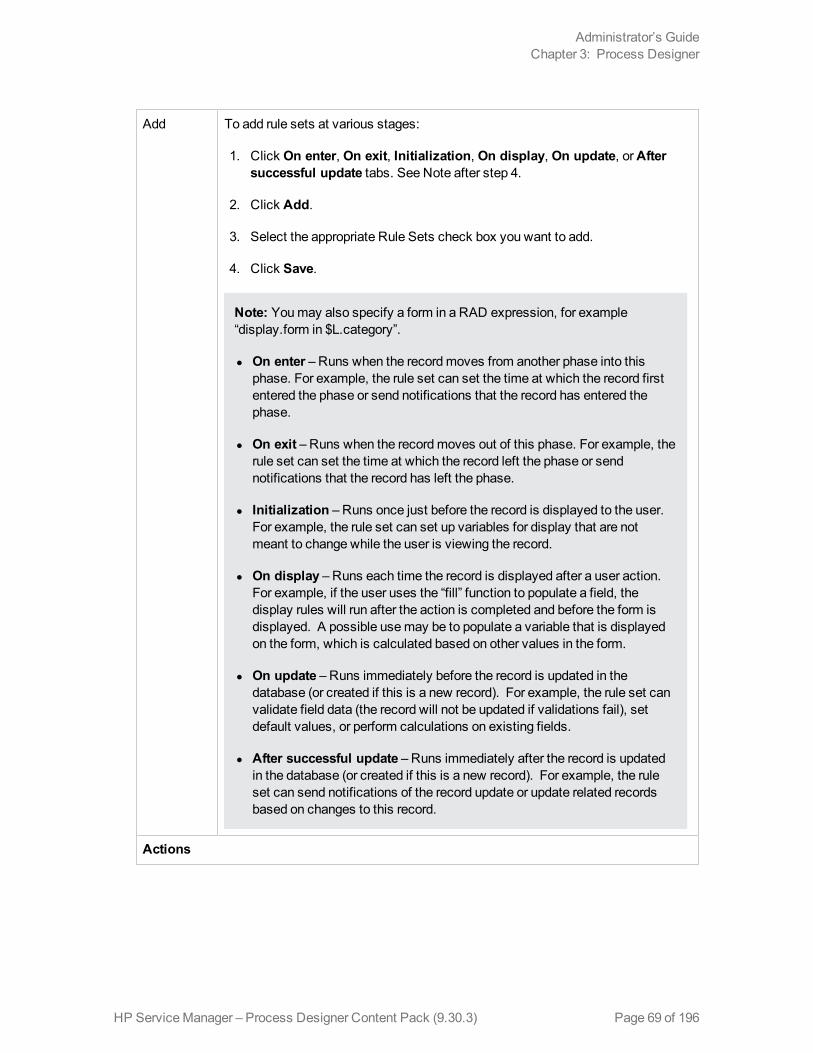
Add To add rule sets at various stages:
1. Click On enter, On exit, Initialization, On display, On update, orAftersuccessful update tabs. See Note after step 4.
2. Click Add.
3. Select the appropriate Rule Sets check box you want to add.
4. Click Save.
Note: Youmay also specify a form in a RAD expression, for example“display.form in $L.category”.
l On enter – Runs when the recordmoves from another phase into thisphase. For example, the rule set can set the time at which the record firstentered the phase or send notifications that the record has entered thephase.
l On exit – Runs when the recordmoves out of this phase. For example, therule set can set the time at which the record left the phase or sendnotifications that the record has left the phase.
l Initialization – Runs once just before the record is displayed to the user. For example, the rule set can set up variables for display that are notmeant to change while the user is viewing the record.
l On display – Runs each time the record is displayed after a user action. For example, if the user uses the “fill” function to populate a field, thedisplay rules will run after the action is completed and before the form isdisplayed. A possible usemay be to populate a variable that is displayedon the form, which is calculated based on other values in the form.
l On update – Runs immediately before the record is updated in thedatabase (or created if this is a new record). For example, the rule set canvalidate field data (the record will not be updated if validations fail), setdefault values, or perform calculations on existing fields.
l After successful update – Runs immediately after the record is updatedin the database (or created if this is a new record). For example, the ruleset can send notifications of the record update or update related recordsbased on changes to this record.
Actions
HP ServiceManager – Process Designer Content Pack (9.30.3) Page 69 of 196
Administrator’s GuideChapter 3: Process Designer
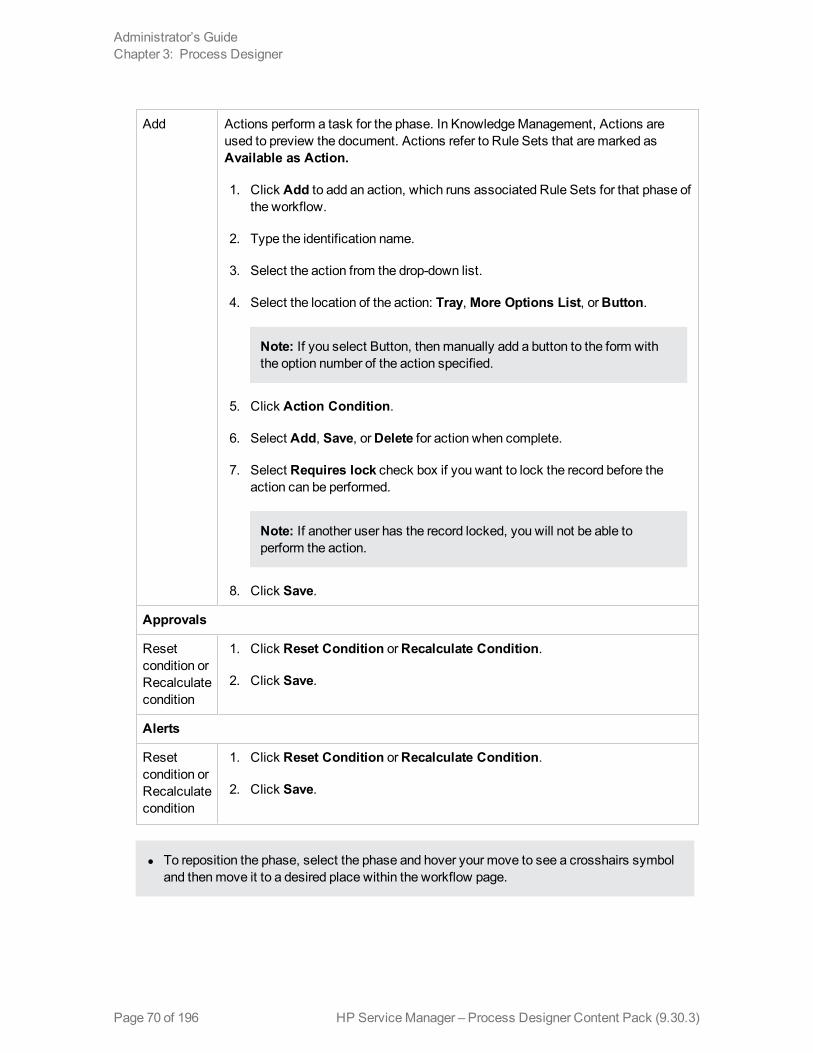
Add Actions perform a task for the phase. In KnowledgeManagement, Actions areused to preview the document. Actions refer to Rule Sets that aremarked asAvailable as Action.
1. Click Add to add an action, which runs associated Rule Sets for that phase ofthe workflow.
2. Type the identification name.
3. Select the action from the drop-down list.
4. Select the location of the action: Tray,More Options List, orButton.
Note: If you select Button, thenmanually add a button to the form withthe option number of the action specified.
5. Click Action Condition.
6. Select Add, Save, orDelete for action when complete.
7. Select Requires lock check box if you want to lock the record before theaction can be performed.
Note: If another user has the record locked, you will not be able toperform the action.
8. Click Save.
Approvals
Resetcondition orRecalculatecondition
1. Click Reset Condition orRecalculate Condition.
2. Click Save.
Alerts
Resetcondition orRecalculatecondition
1. Click Reset Condition orRecalculate Condition.
2. Click Save.
l To reposition the phase, select the phase and hover your move to see a crosshairs symboland thenmove it to a desired place within the workflow page.
HP ServiceManager – Process Designer Content Pack (9.30.3)Page 70 of 196
Administrator’s GuideChapter 3: Process Designer
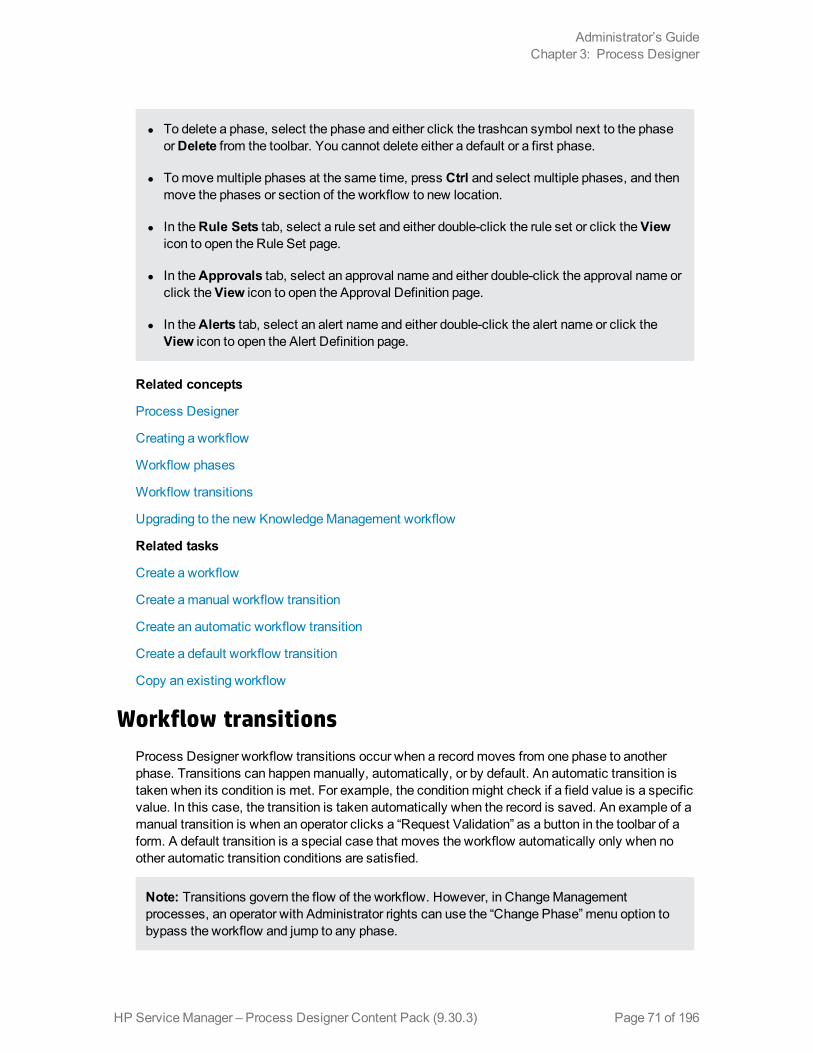
l To delete a phase, select the phase and either click the trashcan symbol next to the phaseorDelete from the toolbar. You cannot delete either a default or a first phase.
l Tomovemultiple phases at the same time, press Ctrl and select multiple phases, and thenmove the phases or section of the workflow to new location.
l In theRule Sets tab, select a rule set and either double-click the rule set or click theViewicon to open the Rule Set page.
l In theApprovals tab, select an approval name and either double-click the approval name orclick theView icon to open the Approval Definition page.
l In theAlerts tab, select an alert name and either double-click the alert name or click theView icon to open the Alert Definition page.
Related concepts
Process Designer
Creating a workflow
Workflow phases
Workflow transitions
Upgrading to the new KnowledgeManagement workflow
Related tasks
Create a workflow
Create amanual workflow transition
Create an automatic workflow transition
Create a default workflow transition
Copy an existing workflow
Workflow transitionsProcess Designer workflow transitions occur when a recordmoves from one phase to anotherphase. Transitions can happenmanually, automatically, or by default. An automatic transition istaken when its condition is met. For example, the conditionmight check if a field value is a specificvalue. In this case, the transition is taken automatically when the record is saved. An example of amanual transition is when an operator clicks a “Request Validation” as a button in the toolbar of aform. A default transition is a special case that moves the workflow automatically only when noother automatic transition conditions are satisfied.
Note: Transitions govern the flow of the workflow. However, in ChangeManagementprocesses, an operator with Administrator rights can use the “Change Phase” menu option tobypass the workflow and jump to any phase.
HP ServiceManager – Process Designer Content Pack (9.30.3) Page 71 of 196
Administrator’s GuideChapter 3: Process Designer
After you add a transition, you can reposition it to avoid transitions overlapping with phases or othertransitions. To reposition the transition, select the transition andmove the green rectangular dot toachieve a desired layout.
You can alsomove a transition from one phase to another. Tomove the transition, select thetransition, hover your mouse near the blue rectangular dot to see a hand symbol and now move it toanother phase.
Related concepts
Creating a workflow
Workflow phases
Create a manual workflow transitionUser Roles: System Administrator, Implementer
In setting up a workflow, an administrator can require operator action tomove a record from onephase to another. This type of transition, in which an operator must press a button or otherwisetrigger an action, is amanual transition.
To create amanual workflow transition:
1. Click Tailoring > Process Designer >Workflows.
2. Open the applicable workflow from theWorkflows list.
3. Click the phase where themanual transition will begin
4. Hover your mouse until you see a hand symbol and then drag themouse to add another phase.
HP ServiceManager – Process Designer Content Pack (9.30.3)Page 72 of 196
Administrator’s GuideChapter 3: Process Designer
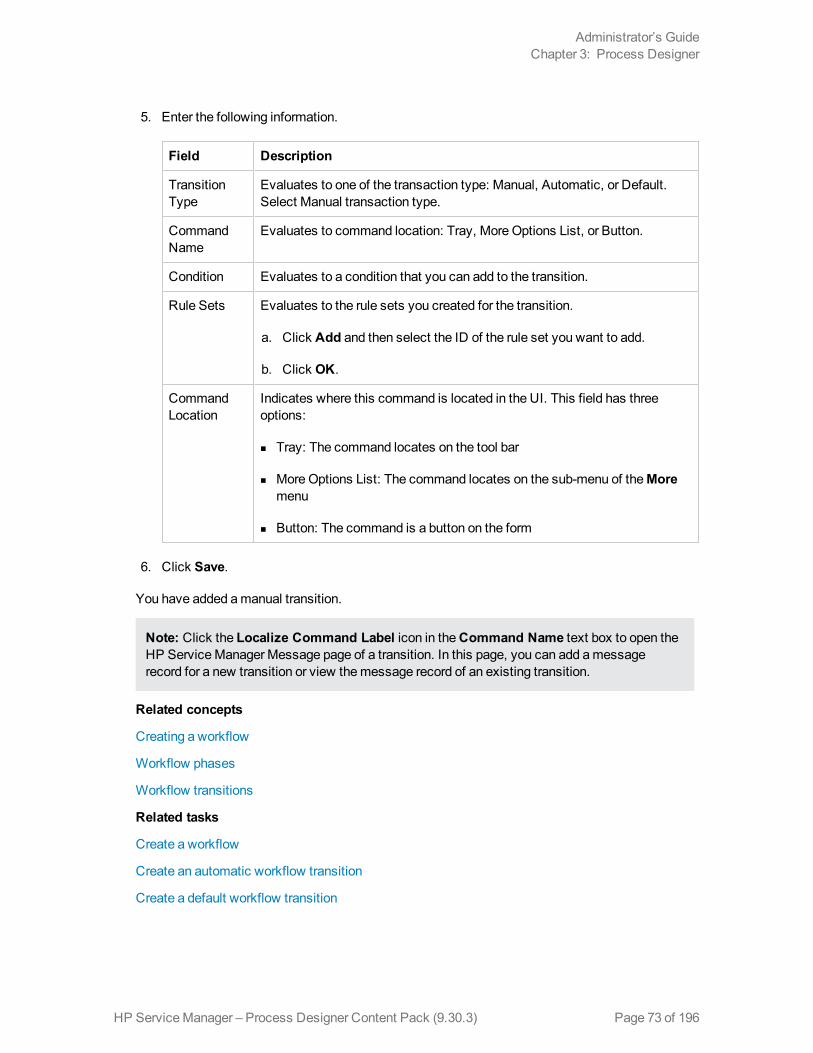
5. Enter the following information.
Field Description
TransitionType
Evaluates to one of the transaction type: Manual, Automatic, or Default.Select Manual transaction type.
CommandName
Evaluates to command location: Tray, More Options List, or Button.
Condition Evaluates to a condition that you can add to the transition.
Rule Sets Evaluates to the rule sets you created for the transition.
a. Click Add and then select the ID of the rule set you want to add.
b. Click OK.
CommandLocation
Indicates where this command is located in the UI. This field has threeoptions:
n Tray: The command locates on the tool bar
n MoreOptions List: The command locates on the sub-menu of theMoremenu
n Button: The command is a button on the form
6. Click Save.
You have added amanual transition.
Note: Click the Localize Command Label icon in theCommand Name text box to open theHP ServiceManager Message page of a transition. In this page, you can add amessagerecord for a new transition or view themessage record of an existing transition.
Related concepts
Creating a workflow
Workflow phases
Workflow transitions
Related tasks
Create a workflow
Create an automatic workflow transition
Create a default workflow transition
HP ServiceManager – Process Designer Content Pack (9.30.3) Page 73 of 196
Administrator’s GuideChapter 3: Process Designer
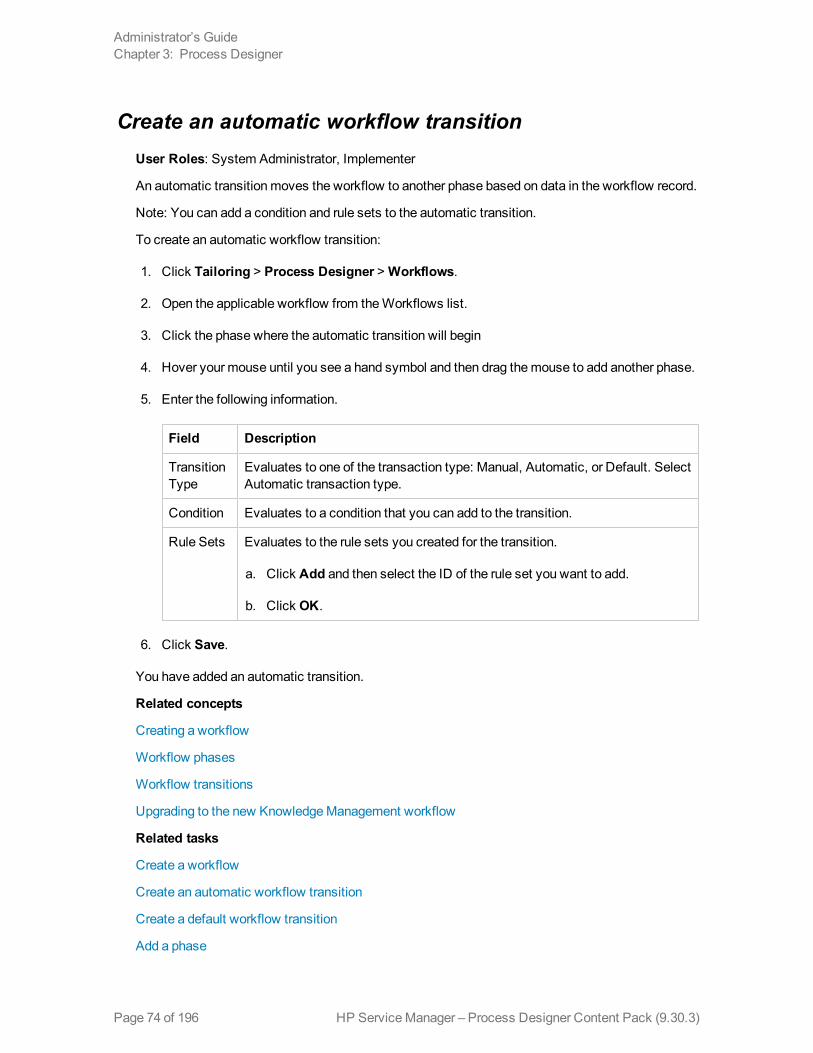
Create an automatic workflow transitionUser Roles: System Administrator, Implementer
An automatic transitionmoves the workflow to another phase based on data in the workflow record.
Note: You can add a condition and rule sets to the automatic transition.
To create an automatic workflow transition:
1. Click Tailoring > Process Designer >Workflows.
2. Open the applicable workflow from theWorkflows list.
3. Click the phase where the automatic transition will begin
4. Hover your mouse until you see a hand symbol and then drag themouse to add another phase.
5. Enter the following information.
Field Description
TransitionType
Evaluates to one of the transaction type: Manual, Automatic, or Default. SelectAutomatic transaction type.
Condition Evaluates to a condition that you can add to the transition.
Rule Sets Evaluates to the rule sets you created for the transition.
a. Click Add and then select the ID of the rule set you want to add.
b. Click OK.
6. Click Save.
You have added an automatic transition.
Related concepts
Creating a workflow
Workflow phases
Workflow transitions
Upgrading to the new KnowledgeManagement workflow
Related tasks
Create a workflow
Create an automatic workflow transition
Create a default workflow transition
Add a phase
HP ServiceManager – Process Designer Content Pack (9.30.3)Page 74 of 196
Administrator’s GuideChapter 3: Process Designer
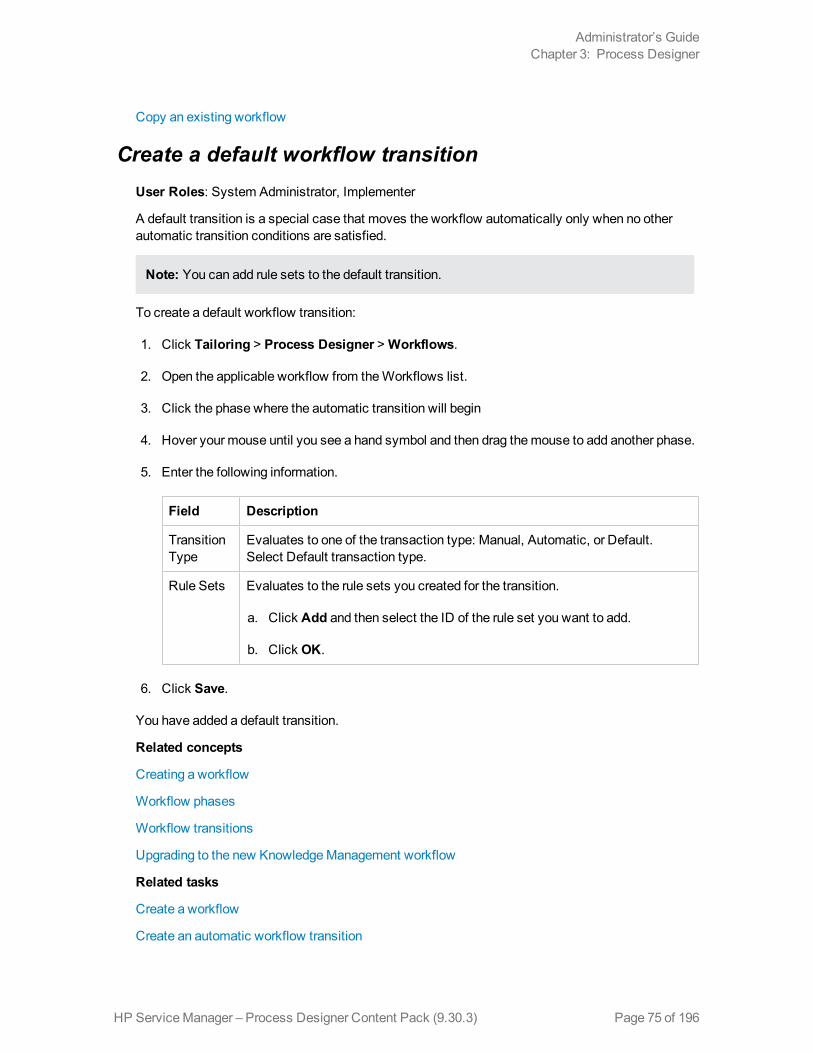
Copy an existing workflow
Create a default workflow transitionUser Roles: System Administrator, Implementer
A default transition is a special case that moves the workflow automatically only when no otherautomatic transition conditions are satisfied.
Note: You can add rule sets to the default transition.
To create a default workflow transition:
1. Click Tailoring > Process Designer >Workflows.
2. Open the applicable workflow from theWorkflows list.
3. Click the phase where the automatic transition will begin
4. Hover your mouse until you see a hand symbol and then drag themouse to add another phase.
5. Enter the following information.
Field Description
TransitionType
Evaluates to one of the transaction type: Manual, Automatic, or Default.Select Default transaction type.
Rule Sets Evaluates to the rule sets you created for the transition.
a. Click Add and then select the ID of the rule set you want to add.
b. Click OK.
6. Click Save.
You have added a default transition.
Related concepts
Creating a workflow
Workflow phases
Workflow transitions
Upgrading to the new KnowledgeManagement workflow
Related tasks
Create a workflow
Create an automatic workflow transition
HP ServiceManager – Process Designer Content Pack (9.30.3) Page 75 of 196
Administrator’s GuideChapter 3: Process Designer
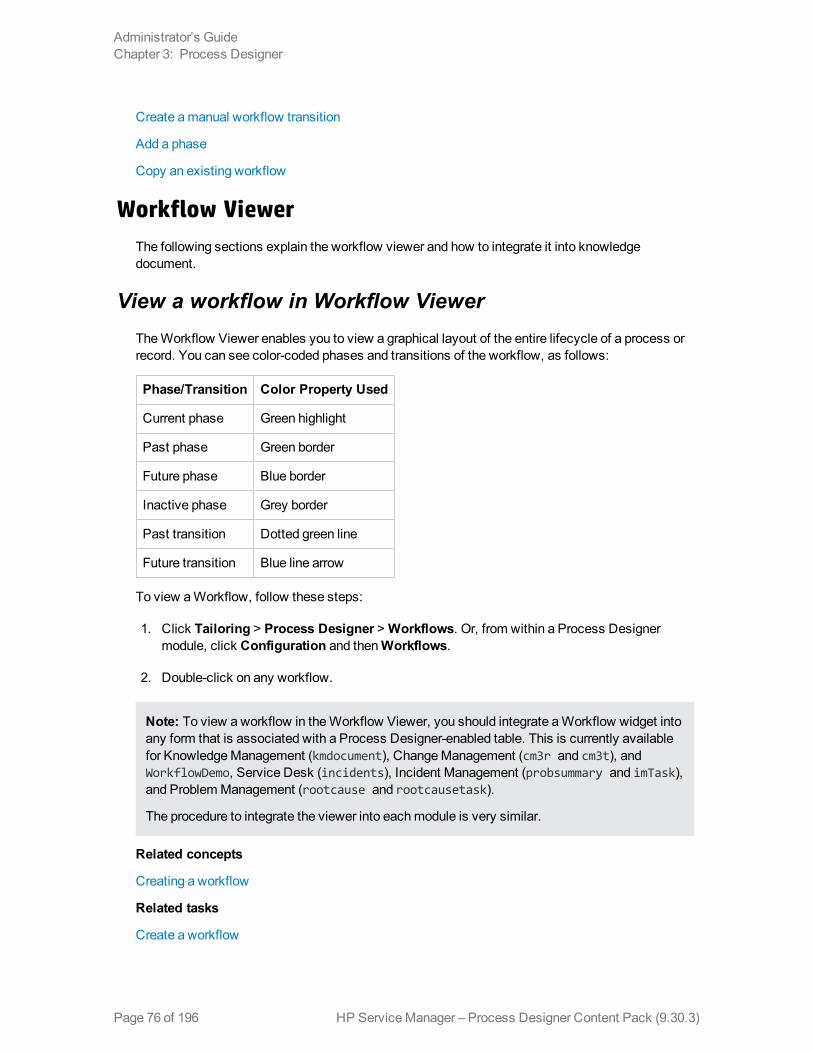
Create amanual workflow transition
Add a phase
Copy an existing workflow
Workflow ViewerThe following sections explain the workflow viewer and how to integrate it into knowledgedocument.
View a workflow in Workflow ViewerTheWorkflow Viewer enables you to view a graphical layout of the entire lifecycle of a process orrecord. You can see color-coded phases and transitions of the workflow, as follows:
Phase/Transition Color Property Used
Current phase Green highlight
Past phase Green border
Future phase Blue border
Inactive phase Grey border
Past transition Dotted green line
Future transition Blue line arrow
To view aWorkflow, follow these steps:
1. Click Tailoring > Process Designer > Workflows. Or, from within a Process Designermodule, click Configuration and thenWorkflows.
2. Double-click on any workflow.
Note: To view aworkflow in theWorkflow Viewer, you should integrate aWorkflow widget intoany form that is associated with a Process Designer-enabled table. This is currently availablefor KnowledgeManagement (kmdocument), ChangeManagement (cm3r and cm3t), andWorkflowDemo, Service Desk (incidents), Incident Management (probsummary and imTask),and ProblemManagement (rootcause and rootcausetask).
The procedure to integrate the viewer into eachmodule is very similar.
Related concepts
Creating a workflow
Related tasks
Create a workflow
HP ServiceManager – Process Designer Content Pack (9.30.3)Page 76 of 196
Administrator’s GuideChapter 3: Process Designer
View the Workflow PropertiesYou can use theWorkflow Properties button to view the properties that are related to an entireworkflow. You can see all the workflow-based Rule Sets, Actions, and Backend Transitions thatare related to that workflow.
To view theWorkflow properties, follow these steps:
1. Click Tailoring > Process Designer > Workflows. Or, from within a Process Designermodule, click Configuration and thenWorkflows.
2. Double-click on any workflow.
3. After theWorkflow tab opens, click theWorkflow Properties button.
4. Click on any of the following tabs:
n Workflow Properties
n Workflow Based Rule Sets
n Workflow Based Actions
n Workflow Backend Transitions
Caution: If youmodify a Rule Set that you have accessed through theWorkflow Propertiesbutton, those changes are applied to the Rule Set directly. Therefore, any other workflow thatalso uses this Rule Set will also be affected.
Integrate Workflow Viewer into kmdocument formUser Roles: System Administrator and Implementer
A new iconWorkflow Viewer is available in Forms Designer. The following example will help you tointegrate theWorkflow Viewer widget into the kmdocument.document form. After the integration,you can see a graphical view of the workflow in theContribute Knowledge > External >Workflow tab. Using similar steps, you can integrate theWorkflow Viewer with other forms.
To integrate theWorkflow Viewer widget into the kmdocument form:
1. Log on as a System Administrator and open Forms Designer in theWindows client (In theSystem Navigator, click Tailoring > Forms Designer). For information on accessing FormsDesigner and updating a form, see the following topics in the Help server: "Access FormsDesigner" and "Update a form".
2. In the Form field, type kmdocument.external and click Search. The Contribute Knowledgeform opens with the External Document Upload tab selected.
3. Add 'Workflow' tab in the form.
HP ServiceManager – Process Designer Content Pack (9.30.3) Page 77 of 196
Administrator’s GuideChapter 3: Process Designer

4. Set the visible condition to [$showWF]=true in theWorkflow tab.
Note: The condition hides the tab in theWindows client, but is visible in theWeb client.
5. Add theWorkflow Viewer component to the new Workflow tab.
6. In theWorkflow Viewer component, set the following variables in the properties.
Workflow Name: $L.wfgWFName
Workflow Table: $L.wfgWFTable
Workflow RecordID: $L.wfgWFRecId
Workflow Current Phase: $L.wfgWFPhase
7. Add four text boxes at the bottom of theWorkflow Viewer.
8. Set their input values in the properties to:
$L.wfgWFName
$L.wfgWFTable
$L.wfgWFRecId
$L.wfgWFPhase
Note: The four text boxes display workflow name, table name, document id, and phase ofthe record.
9. Set theWorkflow Viewer variables in theMain > Initialization tab of display screens forkmdocFlow.open and kmdocFlow.view:
$L.wfgWFName=workflowName in $L.wfPhase
$L.wfgWFTable=tableName in $L.wfPhase
$L.wfgWFPhase=phaseName in $L.wfPhase
$L.wfgWFRecId=id in $L.file
if (sysinfo.get("environment")~="scguiwswt") then ($showWF="true") else($showWF="false")
Note: To go to display screen, type ds in ServiceManager command prompt and search
HP ServiceManager – Process Designer Content Pack (9.30.3)Page 78 of 196
Administrator’s GuideChapter 3: Process Designer
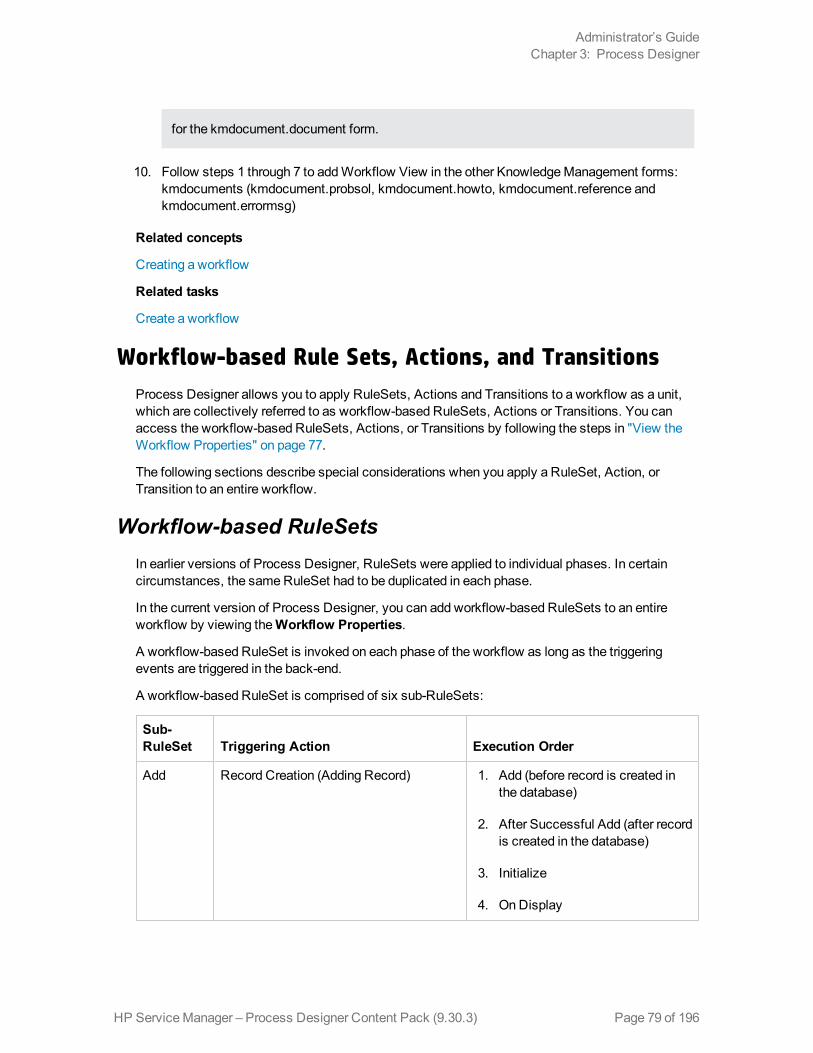
for the kmdocument.document form.
10. Follow steps 1 through 7 to addWorkflow View in the other KnowledgeManagement forms:kmdocuments (kmdocument.probsol, kmdocument.howto, kmdocument.reference andkmdocument.errormsg)
Related concepts
Creating a workflow
Related tasks
Create a workflow
Workflow-based Rule Sets, Actions, and TransitionsProcess Designer allows you to apply RuleSets, Actions and Transitions to a workflow as a unit,which are collectively referred to as workflow-based RuleSets, Actions or Transitions. You canaccess the workflow-based RuleSets, Actions, or Transitions by following the steps in "View theWorkflow Properties" on page 77.
The following sections describe special considerations when you apply a RuleSet, Action, orTransition to an entire workflow.
Workflow-based RuleSetsIn earlier versions of Process Designer, RuleSets were applied to individual phases. In certaincircumstances, the sameRuleSet had to be duplicated in each phase.
In the current version of Process Designer, you can add workflow-based RuleSets to an entireworkflow by viewing theWorkflow Properties.
A workflow-based RuleSet is invoked on each phase of the workflow as long as the triggeringevents are triggered in the back-end.
A workflow-based RuleSet is comprised of six sub-RuleSets:
Sub-RuleSet Triggering Action Execution Order
Add Record Creation (Adding Record) 1. Add (before record is created inthe database)
2. After Successful Add (after recordis created in the database)
3. Initialize
4. On Display
HP ServiceManager – Process Designer Content Pack (9.30.3) Page 79 of 196
Administrator’s GuideChapter 3: Process Designer
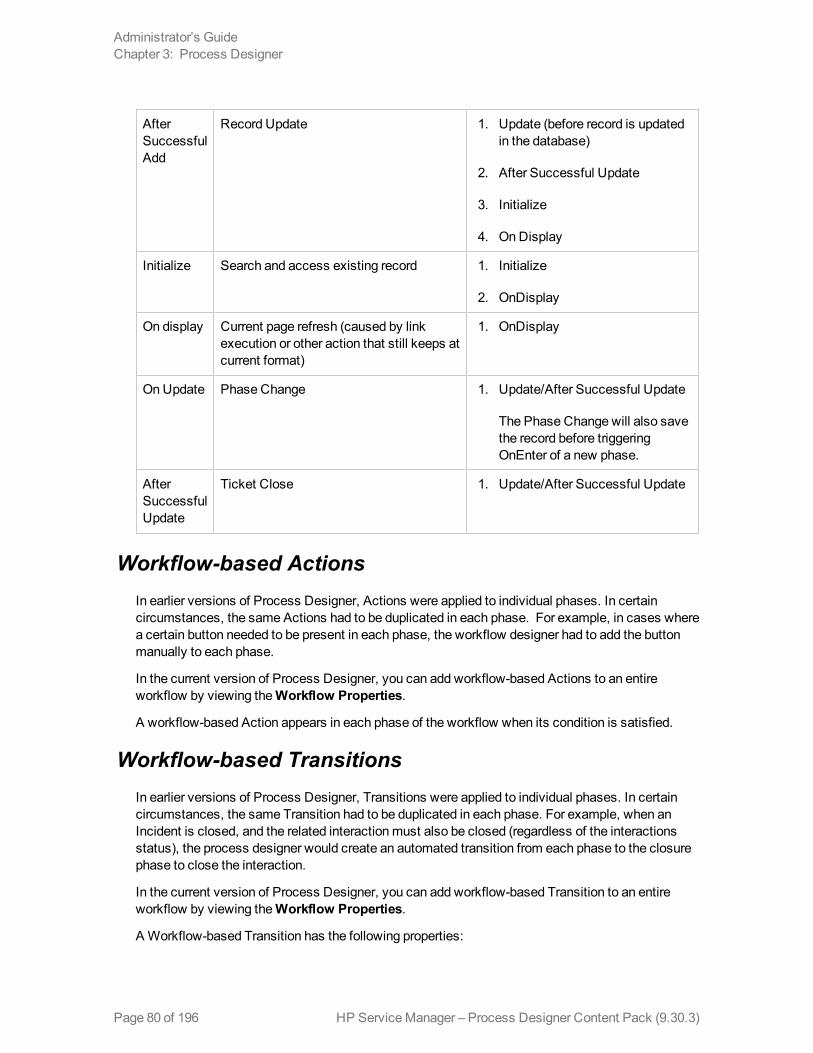
AfterSuccessfulAdd
Record Update 1. Update (before record is updatedin the database)
2. After Successful Update
3. Initialize
4. On Display
Initialize Search and access existing record 1. Initialize
2. OnDisplay
On display Current page refresh (caused by linkexecution or other action that still keeps atcurrent format)
1. OnDisplay
OnUpdate Phase Change 1. Update/After Successful Update
The Phase Change will also savethe record before triggeringOnEnter of a new phase.
AfterSuccessfulUpdate
Ticket Close 1. Update/After Successful Update
Workflow-based ActionsIn earlier versions of Process Designer, Actions were applied to individual phases. In certaincircumstances, the same Actions had to be duplicated in each phase. For example, in cases wherea certain button needed to be present in each phase, the workflow designer had to add the buttonmanually to each phase.
In the current version of Process Designer, you can add workflow-based Actions to an entireworkflow by viewing theWorkflow Properties.
A workflow-based Action appears in each phase of the workflow when its condition is satisfied.
Workflow-based TransitionsIn earlier versions of Process Designer, Transitions were applied to individual phases. In certaincircumstances, the same Transition had to be duplicated in each phase. For example, when anIncident is closed, and the related interactionmust also be closed (regardless of the interactionsstatus), the process designer would create an automated transition from each phase to the closurephase to close the interaction.
In the current version of Process Designer, you can add workflow-based Transition to an entireworkflow by viewing theWorkflow Properties.
A Workflow-based Transition has the following properties:
HP ServiceManager – Process Designer Content Pack (9.30.3)Page 80 of 196
Administrator’s GuideChapter 3: Process Designer
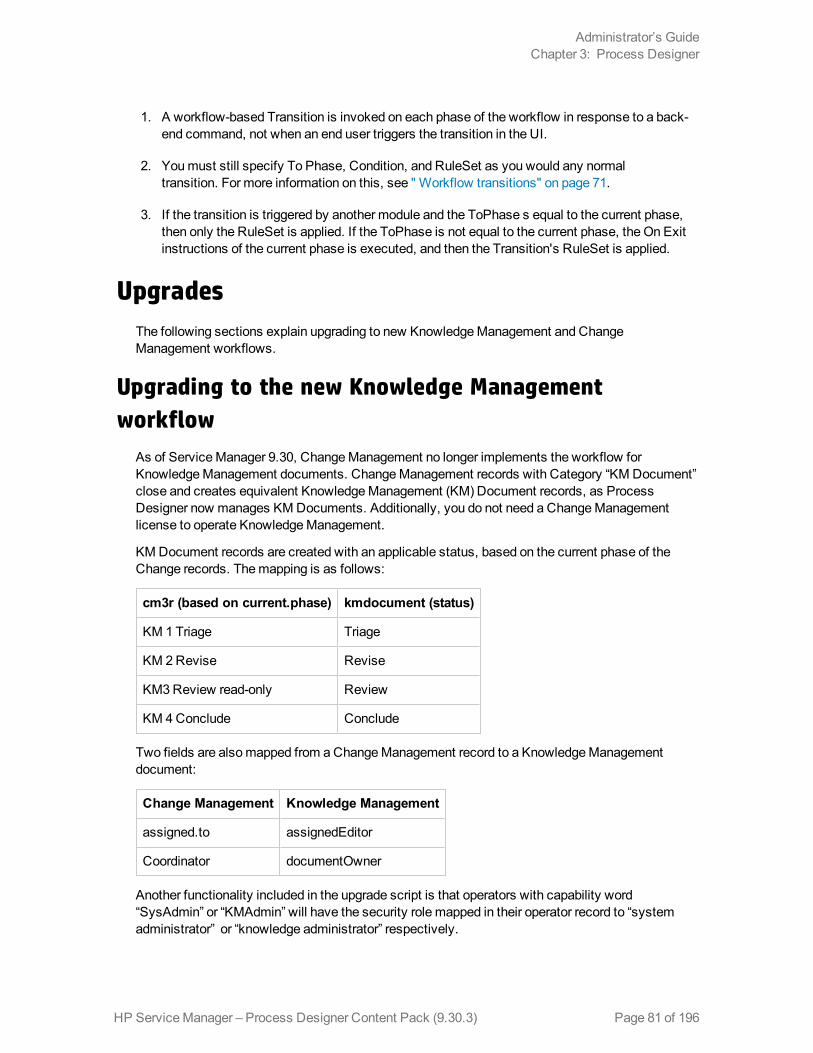
1. A workflow-based Transition is invoked on each phase of the workflow in response to a back-end command, not when an end user triggers the transition in the UI.
2. Youmust still specify To Phase, Condition, and RuleSet as you would any normaltransition. For more information on this, see " Workflow transitions" on page 71.
3. If the transition is triggered by another module and the ToPhase s equal to the current phase,then only the RuleSet is applied. If the ToPhase is not equal to the current phase, the On Exitinstructions of the current phase is executed, and then the Transition's RuleSet is applied.
UpgradesThe following sections explain upgrading to new KnowledgeManagement and ChangeManagement workflows.
Upgrading to the new Knowledge Managementworkflow
As of ServiceManager 9.30, ChangeManagement no longer implements the workflow forKnowledgeManagement documents. ChangeManagement records with Category “KM Document”close and creates equivalent KnowledgeManagement (KM) Document records, as ProcessDesigner now manages KM Documents. Additionally, you do not need a ChangeManagementlicense to operate KnowledgeManagement.
KM Document records are created with an applicable status, based on the current phase of theChange records. Themapping is as follows:
cm3r (based on current.phase) kmdocument (status)
KM 1 Triage Triage
KM 2Revise Revise
KM3Review read-only Review
KM 4Conclude Conclude
Two fields are alsomapped from aChangeManagement record to a KnowledgeManagementdocument:
Change Management Knowledge Management
assigned.to assignedEditor
Coordinator documentOwner
Another functionality included in the upgrade script is that operators with capability word“SysAdmin” or “KMAdmin” will have the security role mapped in their operator record to “systemadministrator” or “knowledge administrator” respectively.
HP ServiceManager – Process Designer Content Pack (9.30.3) Page 81 of 196
Administrator’s GuideChapter 3: Process Designer
Note:When using the new Process Designer workflow, the following applies:
l All open change records of category ‘KM Document’ close with the completion code ‘1’ –Successful.
l The corresponding KM document status changes from working copy to the status based onthe current phase of the change record.
l The upgrade to Process Designer for KnowledgeManagement is mandatory.
Related concepts
Creating a workflow
Related tasks
Create a workflow
Upgrading to the new Change ManagementAfter you apply Process Designer Content Pack, note the following about the ChangeManagementmodule:
l All existing ChangeManagement workflows will be available and editable as Process Designerworkflows. They will be linear and youmay need to adjust the layout to accommodate largephase name labels if they overlap the phase boundaries. For example, if you had a ChangeCategory calledMaintenance, it would be available as a workflow calledMaintenance. Fromwithin Process Designer, if you select a phase, and then click the Additional Phase Informationlink in the workflow phase details tab, you will see the previous change phase information. Theconfiguration here is still functional, but it is strongly recommended you use ChangeModels andnewer features to implement business logic.
l Each category has an associated workflow that is built using theWorkflow Editor, as part ofProcess Designer. The workflow defines the phases and business logic for the process. It is nolonger specified in the Change Category table as it was with the earlier versions of ServiceManager. The existing change categories will still use the Change Category table.
l A new phase, Closed, will be added at end the of all existing ChangeManagement workflows.
l Process Designer workflow controls the phase transitions of a Change and Task. Theworkflows of Change and Task are specified in their associated change category record andtask category record respectively. When you open a new Change or Task, thePhase field is setto the current phase of the workflow. TheNext Phase button in the change request form isreplaced with the name of transition.
l Existing change phases and task phases will still function as they did. One difference is that if achange task is in theWithdrawn or Cancelled status, this task is considered as finished and youdo not need tomanually close it to move the change to the next phase.
HP ServiceManager – Process Designer Content Pack (9.30.3)Page 82 of 196
Administrator’s GuideChapter 3: Process Designer
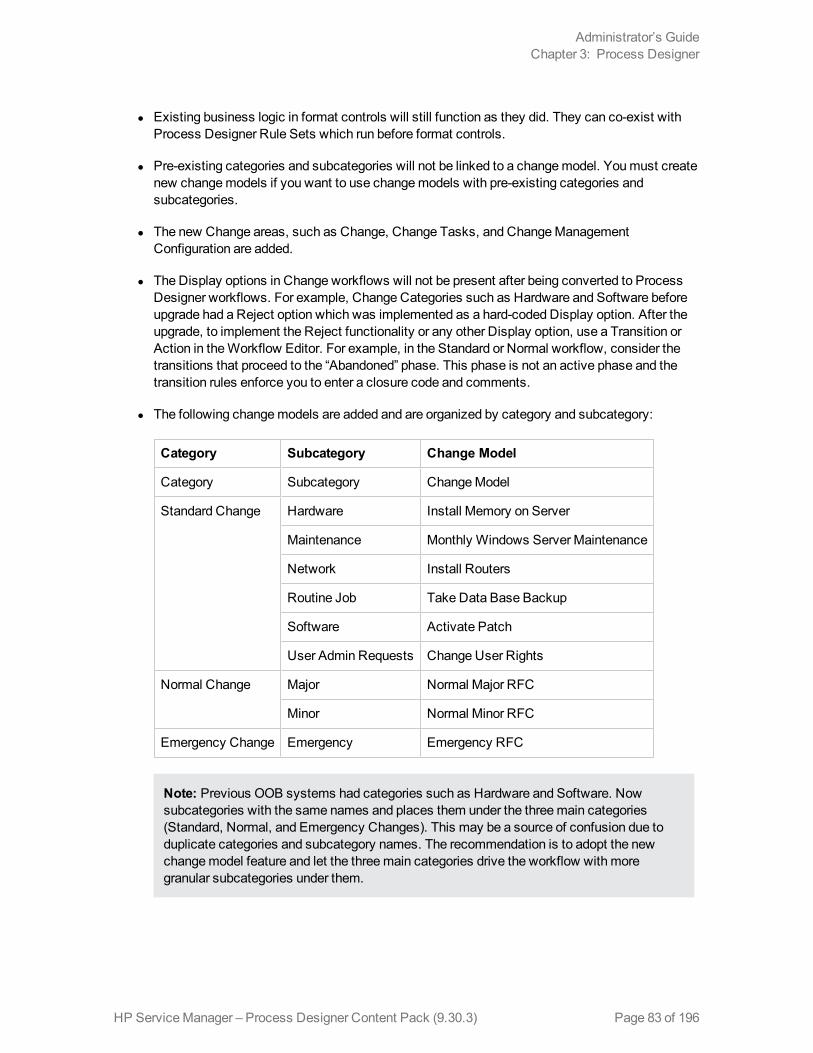
l Existing business logic in format controls will still function as they did. They can co-exist withProcess Designer Rule Sets which run before format controls.
l Pre-existing categories and subcategories will not be linked to a changemodel. Youmust createnew changemodels if you want to use changemodels with pre-existing categories andsubcategories.
l The new Change areas, such as Change, Change Tasks, and ChangeManagementConfiguration are added.
l The Display options in Change workflows will not be present after being converted to ProcessDesigner workflows. For example, Change Categories such as Hardware and Software beforeupgrade had a Reject option which was implemented as a hard-coded Display option. After theupgrade, to implement the Reject functionality or any other Display option, use a Transition orAction in theWorkflow Editor. For example, in the Standard or Normal workflow, consider thetransitions that proceed to the “Abandoned” phase. This phase is not an active phase and thetransition rules enforce you to enter a closure code and comments.
l The following changemodels are added and are organized by category and subcategory:
Category Subcategory Change Model
Category Subcategory ChangeModel
Standard Change Hardware Install Memory on Server
Maintenance Monthly Windows Server Maintenance
Network Install Routers
Routine Job Take Data Base Backup
Software Activate Patch
User Admin Requests Change User Rights
Normal Change Major Normal Major RFC
Minor Normal Minor RFC
Emergency Change Emergency Emergency RFC
Note: Previous OOB systems had categories such as Hardware and Software. Nowsubcategories with the same names and places them under the threemain categories(Standard, Normal, and Emergency Changes). This may be a source of confusion due toduplicate categories and subcategory names. The recommendation is to adopt the newchangemodel feature and let the threemain categories drive the workflow with moregranular subcategories under them.
HP ServiceManager – Process Designer Content Pack (9.30.3) Page 83 of 196
Administrator’s GuideChapter 3: Process Designer
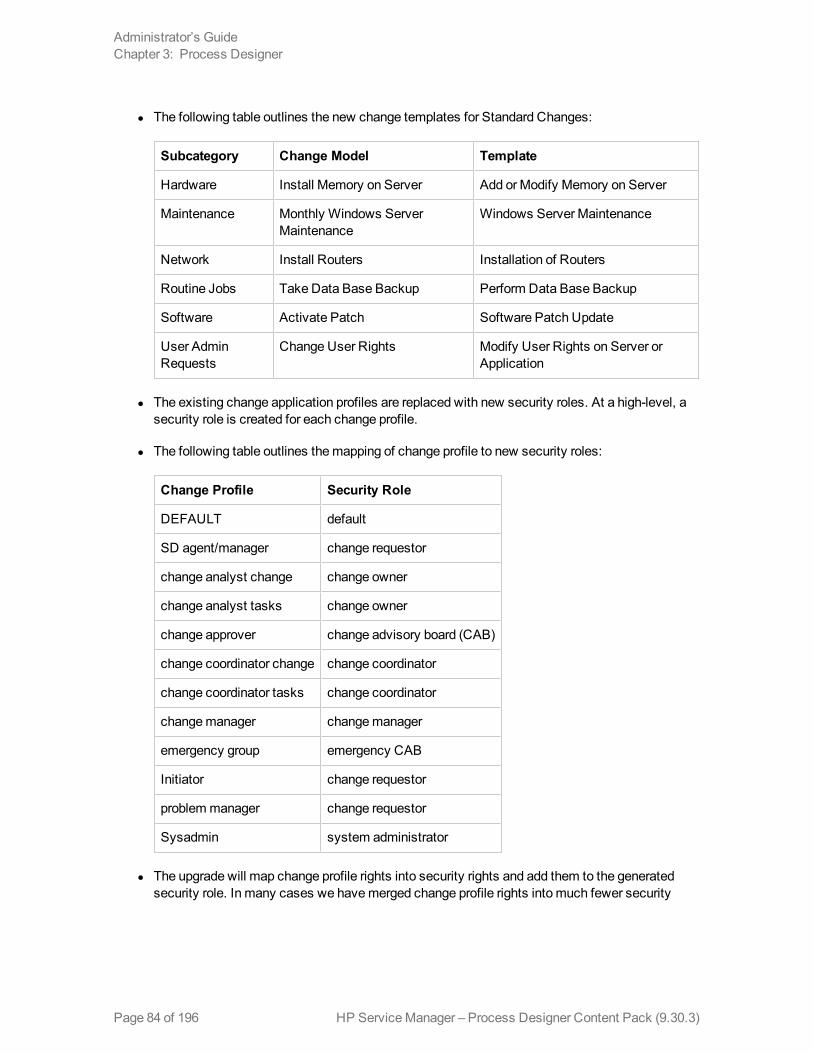
l The following table outlines the new change templates for Standard Changes:
Subcategory Change Model Template
Hardware Install Memory on Server Add or Modify Memory on Server
Maintenance Monthly Windows ServerMaintenance
Windows Server Maintenance
Network Install Routers Installation of Routers
Routine Jobs Take Data Base Backup Perform Data Base Backup
Software Activate Patch Software Patch Update
User AdminRequests
Change User Rights Modify User Rights on Server orApplication
l The existing change application profiles are replaced with new security roles. At a high-level, asecurity role is created for each change profile.
l The following table outlines themapping of change profile to new security roles:
Change Profile Security Role
DEFAULT default
SD agent/manager change requestor
change analyst change change owner
change analyst tasks change owner
change approver change advisory board (CAB)
change coordinator change change coordinator
change coordinator tasks change coordinator
changemanager changemanager
emergency group emergency CAB
Initiator change requestor
problemmanager change requestor
Sysadmin system administrator
l The upgrade will map change profile rights into security rights and add them to the generatedsecurity role. In many cases we havemerged change profile rights into much fewer security
HP ServiceManager – Process Designer Content Pack (9.30.3)Page 84 of 196
Administrator’s GuideChapter 3: Process Designer
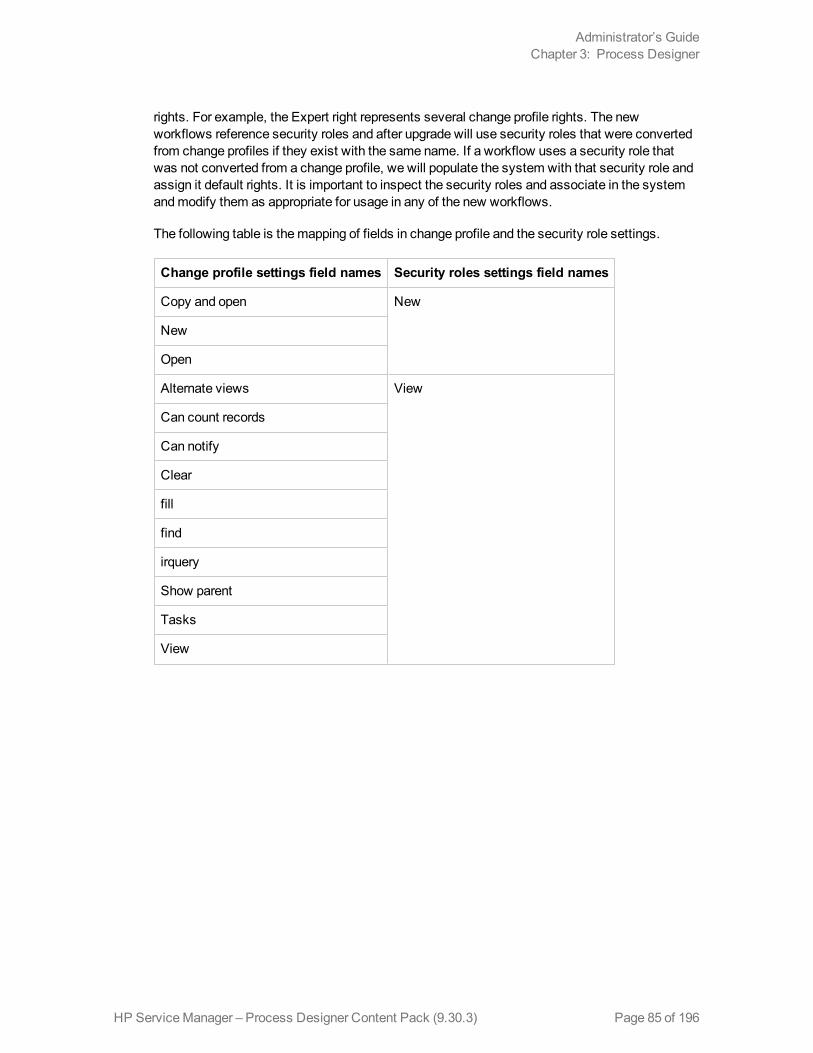
rights. For example, the Expert right represents several change profile rights. The newworkflows reference security roles and after upgrade will use security roles that were convertedfrom change profiles if they exist with the same name. If a workflow uses a security role thatwas not converted from a change profile, we will populate the system with that security role andassign it default rights. It is important to inspect the security roles and associate in the systemandmodify them as appropriate for usage in any of the new workflows.
The following table is themapping of fields in change profile and the security role settings.
Change profile settings field names Security roles settings field names
Copy and open New
New
Open
Alternate views View
Can count records
Can notify
Clear
fill
find
irquery
Show parent
Tasks
View
HP ServiceManager – Process Designer Content Pack (9.30.3) Page 85 of 196
Administrator’s GuideChapter 3: Process Designer
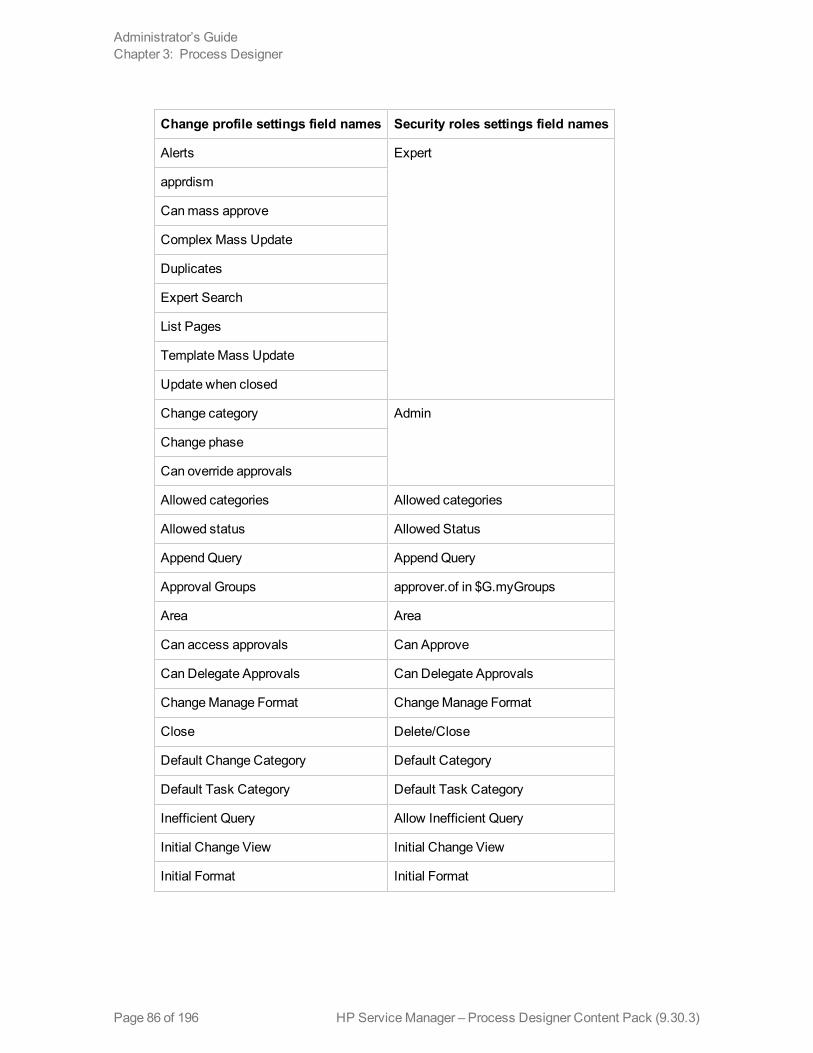
Change profile settings field names Security roles settings field names
Alerts Expert
apprdism
Canmass approve
Complex Mass Update
Duplicates
Expert Search
List Pages
TemplateMass Update
Update when closed
Change category Admin
Change phase
Can override approvals
Allowed categories Allowed categories
Allowed status Allowed Status
AppendQuery AppendQuery
Approval Groups approver.of in $G.myGroups
Area Area
Can access approvals Can Approve
Can Delegate Approvals Can Delegate Approvals
ChangeManage Format ChangeManage Format
Close Delete/Close
Default Change Category Default Category
Default Task Category Default Task Category
Inefficient Query Allow Inefficient Query
Initial Change View Initial Change View
Initial Format Initial Format
HP ServiceManager – Process Designer Content Pack (9.30.3)Page 86 of 196
Administrator’s GuideChapter 3: Process Designer
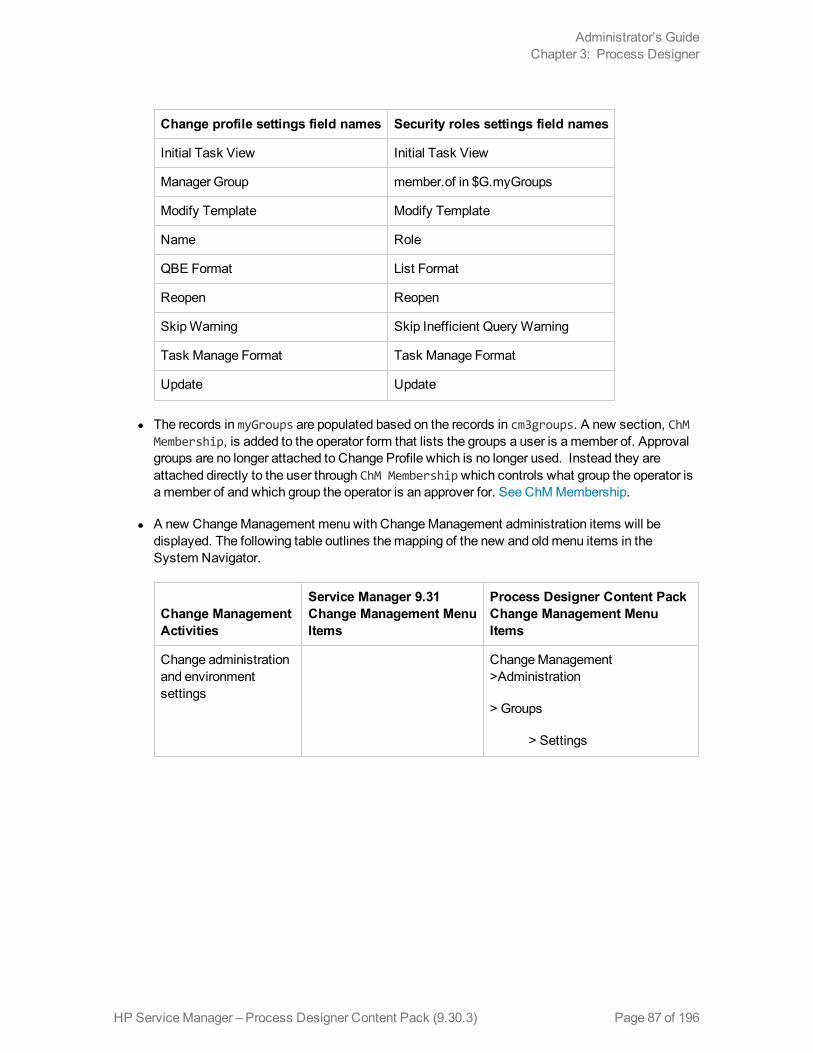
Change profile settings field names Security roles settings field names
Initial Task View Initial Task View
Manager Group member.of in $G.myGroups
Modify Template Modify Template
Name Role
QBE Format List Format
Reopen Reopen
SkipWarning Skip Inefficient Query Warning
Task Manage Format Task Manage Format
Update Update
l The records in myGroups are populated based on the records in cm3groups. A new section, ChMMembership, is added to the operator form that lists the groups a user is amember of. Approvalgroups are no longer attached to Change Profile which is no longer used. Instead they areattached directly to the user through ChM Membershipwhich controls what group the operator isamember of and which group the operator is an approver for. See ChMMembership.
l A new ChangeManagement menu with ChangeManagement administration items will bedisplayed. The following table outlines themapping of the new and oldmenu items in theSystem Navigator.
Change ManagementActivities
Service Manager 9.31Change Management MenuItems
Process Designer Content PackChange Management MenuItems
Change administrationand environmentsettings
ChangeManagement >Administration
> Groups
> Settings
HP ServiceManager – Process Designer Content Pack (9.30.3) Page 87 of 196
Administrator’s GuideChapter 3: Process Designer
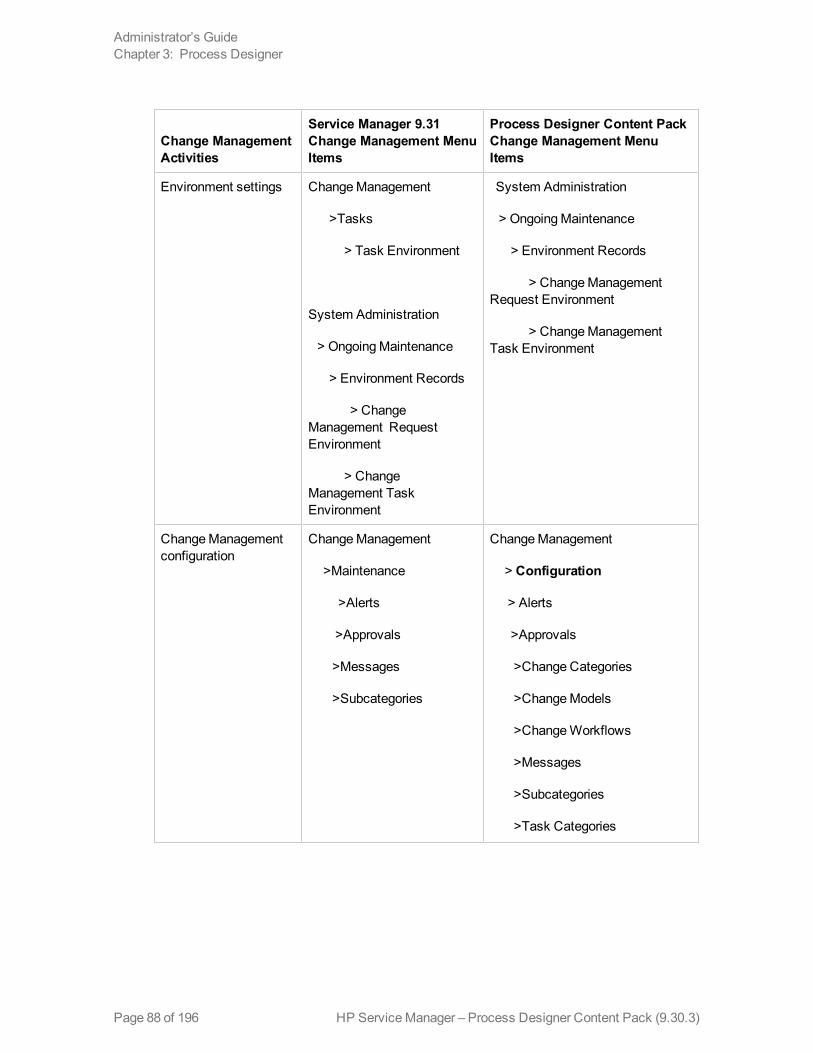
Change ManagementActivities
Service Manager 9.31Change Management MenuItems
Process Designer Content PackChange Management MenuItems
Environment settings ChangeManagement
>Tasks
> Task Environment
System Administration
> OngoingMaintenance
> Environment Records
> ChangeManagement RequestEnvironment
> ChangeManagement TaskEnvironment
System Administration
> OngoingMaintenance
> Environment Records
> ChangeManagement Request Environment
> ChangeManagementTask Environment
ChangeManagementconfiguration
ChangeManagement
>Maintenance
>Alerts
>Approvals
>Messages
>Subcategories
ChangeManagement
> Configuration
> Alerts
>Approvals
>Change Categories
>ChangeModels
>ChangeWorkflows
>Messages
>Subcategories
>Task Categories
HP ServiceManager – Process Designer Content Pack (9.30.3)Page 88 of 196
Administrator’s GuideChapter 3: Process Designer
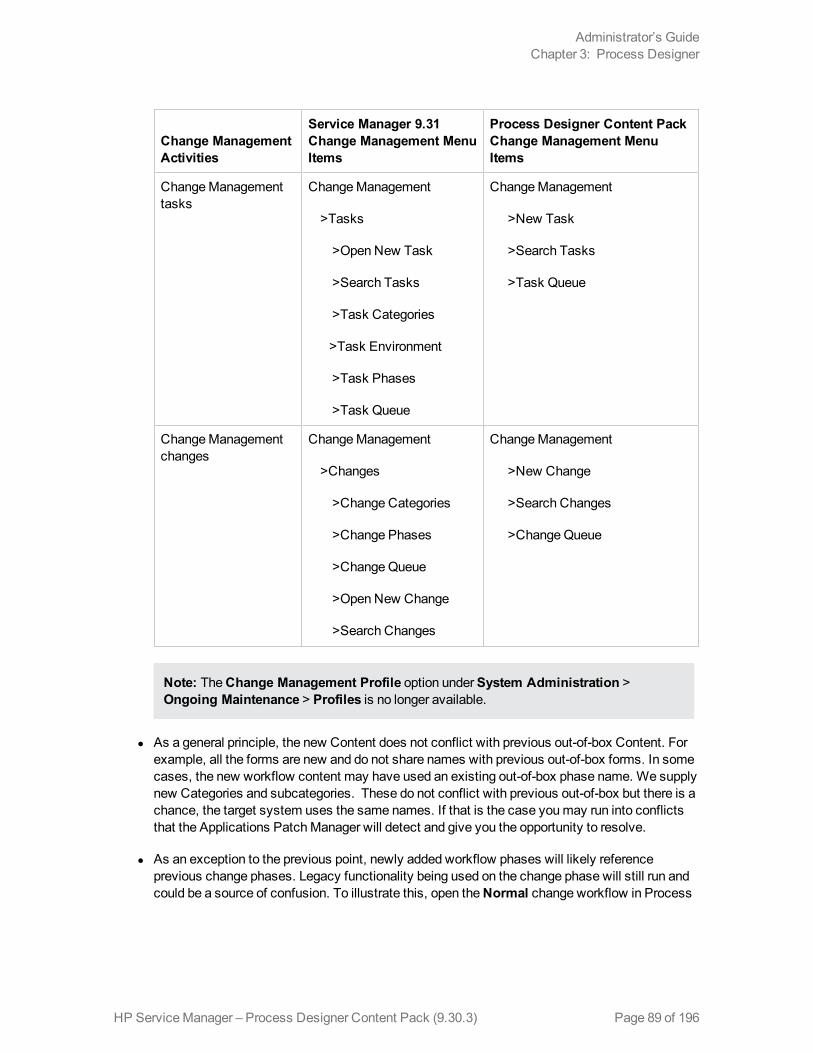
Change ManagementActivities
Service Manager 9.31Change Management MenuItems
Process Designer Content PackChange Management MenuItems
ChangeManagementtasks
ChangeManagement
>Tasks
>Open New Task
>Search Tasks
>Task Categories
>Task Environment
>Task Phases
>Task Queue
ChangeManagement
>New Task
>Search Tasks
>Task Queue
ChangeManagementchanges
ChangeManagement
>Changes
>Change Categories
>Change Phases
>ChangeQueue
>Open New Change
>Search Changes
ChangeManagement
>New Change
>Search Changes
>ChangeQueue
Note: TheChange Management Profile option underSystem Administration >Ongoing Maintenance > Profiles is no longer available.
l As a general principle, the new Content does not conflict with previous out-of-box Content. Forexample, all the forms are new and do not share names with previous out-of-box forms. In somecases, the new workflow content may have used an existing out-of-box phase name. We supplynew Categories and subcategories. These do not conflict with previous out-of-box but there is achance, the target system uses the same names. If that is the case youmay run into conflictsthat the Applications PatchManager will detect and give you the opportunity to resolve.
l As an exception to the previous point, newly added workflow phases will likely referenceprevious change phases. Legacy functionality being used on the change phase will still run andcould be a source of confusion. To illustrate this, open theNormal change workflow in Process
HP ServiceManager – Process Designer Content Pack (9.30.3) Page 89 of 196
Administrator’s GuideChapter 3: Process Designer
Designer and select theBuild and Test phase. From phase details tab, select theExtendedPhase Information link and it will open theBuild and Test change phase. Legacy functionalitysuch as auto opening of tasks may be defined previously and still run. Most of this functionalityshould bemoved to Process Designer capabilities.
l The setting “Require update if an activity record is NOT generated?” on theActivities tab ofthe cm3r Object record is unchecked. Previous out-of-box content had this setting checked. Thecontent pack unchecked it so that the new workflows would function better as updates are notalways required. Youmay change this setting back to require updates.
l Process Designer Content Pack has been tested with Release Control 9.13. If you intend to usethe new workflows (Standard, Normal, Emergency), the Release Control Service Desk Adapterfor ServiceManager (pd4sm93-adapter) will needmodification. The convertChange.js scriptreferences previous out-of-box phases to set the RC status. This script will need to bemodifiedto refer to the corresponding new phase names in the new flows. For example, “Change Logging”has been renamed “Registration and Categorization”.
HP ServiceManager – Process Designer Content Pack (9.30.3)Page 90 of 196
Administrator’s GuideChapter 3: Process Designer
Chapter 4
Change ManagementThe following sections explain the changes and enhancements in the ChangeManagement moduleafter you upgrade the ServiceManager to Process Designer Content Pack 9.30.3.
Change workflowThe change workflow is a sequence of connected steps in the life cycle of a change request. In theworkflow, a change request goes through several phases to complete the life cycle. Workflowphases consist of one or multiple tasks to be completed to proceed to the next phase.
Process Designer Content Pack 9.30.3 includes out-of-box change workflows and task workflows.
The following are the out-of-box change workflows:
l Emergency Change
l Standard Change
l Normal Change
l Generic Task
The change and task workflows are applied to change and task records when you create changeand task categories respectively.
Related concepts
Process Designer
Creating a workflow
Related tasks
Create a workflow
Create a change categoryUser Roles: System Administrator
If you are an HP ServiceManager Administrator, youmay want to create new change or taskcategories. You can create new category records by copying andmodifying an existing record, orby creating a new record. HP ServiceManager provides out-of-box category records that you canuse or modify.
To create new category record:
Page 91 of 196HP ServiceManager – Process Designer Content Pack (9.30.3)
1. Click Change Management.
2. Do one of the following:
n Click Configuration > Change Categories.
n Click Configuration > Task Categories.
3. Click New.
4. Type the name of the category.
5. Type the category description.
6. Type the availability value.
7. Select a workflow for the category.
8. Select template for the category.
9. Click Save to view theWorkflow tab and other associated tabs.
10. For change category, click Subcategories tab to create subcategories for the changecategory.
11. For task category, click theAvailable Phases tab and select a change phase from the drop-down list to associate the task category with the change phases. The newly created taskcategory definition will be applied to the change workflow phases.
If you leave Available Phases blank for a task category, then you can use this task category inall change phases.
12. Click Save.
Related concepts
See “Managing categories and phases” in ServiceManager 9.31 HelpServer topics
See “Search for a record” in ServiceManager 9.31 HelpServer topics
Related tasks
See “View a change category record” in ServiceManager 9.31 HelpServer topics
Add a new subcategoryUser Roles: System Administrator and Implementer
Subcategories are a way to refine a Change Category into smaller groups. For example, ChangeCategory Hardware can have Install Hardware andMove Hardware subcategories.
To add a subcategory:
HP ServiceManager – Process Designer Content Pack (9.30.3)Page 92 of 196
Administrator’s GuideChapter 4: ChangeManagement
1. Click Change Management > Configuration in the System Navigator.
2. Click Subcategories.
3. Type a category name in the Category text box.
Or
Click the Fill Field Category icon to select a change category.
4. Type the subcategory name in theSubcategory text box.
5. Type the subcategory description.
6. Click the Fill Field icon in theCompany text box to associate a company record with thesubcategory.
7. Click Save to add the new subcategory of a change category.
Related tasks
Add a new subcategory from change category
Create a change category
Add a new subcategory from change categoryUser Roles: System Administrator and Implementer
You can add a new subcategory directly from a change category. This reduces the number ofaccess points required for you to have access in order to create a subcategory. You can view a listof subcategories and their record details associated with the current category.
1. Click Change Management > Configuration in the System Navigator.
2. Click Change Categories > Search.
3. Select the Change Category for which you want to add a subcategory.
4. In the Change Category Definition page, click theSubcategories tab.
5. Click Add subcategory.
6. Type a subcategory name.
7. Type a description for the subcategory.
8. Click the Fill Field icon in theCompany text box to associate a company record with thesubcategory.
9. Click Save to add the new subcategory.
Related tasks
HP ServiceManager – Process Designer Content Pack (9.30.3) Page 93 of 196
Administrator’s GuideChapter 4: ChangeManagement
Add a new subcategory
Create a change category
Add workflow from change categoryUser Roles: System Administrator and Implementer
You can create a new workflow record directly from a change category.
To add workflow from aChange Category:
1. Click Change Management > Configuration in the System Navigator.
2. Click Change Categories > Search.
3. Select the change category for which you want to add a workflow.
4. In the Change Category Definition page, remove the currently assigned workflow from theWorkflow text box.
5. Click More > Add new workflow.
6. Type the new workflow name in the New Workflow Definition page.
7. Select a table name to associate the workflow.
8. Type a start phase name.
9. Click Next.
10. Click Save to add the new workflow.
11. Click OK to return to the Change Category definition page.
12. Type the workflow name inWorkflow text box.
Or
Click Fill Field Workflow and then select the workflow.
13. Click Save to associate the workflow to the change category.
Related tasks
Add a new subcategory
Add a new subcategory from change category
Create a change category
HP ServiceManager – Process Designer Content Pack (9.30.3)Page 94 of 196
Administrator’s GuideChapter 4: ChangeManagement
Create a change taskUser Role: Change Coordinator
After a change is scheduled, you can create the tasks for building, testing, and implementing thechange. You have several ways to create a change task for a change record.
To create a change task from New Task in the System Navigator:
1. Click Change Management > New Task.
2. Double-click the change record for which you want to create a task.
3. Select a category for the new task.
Note: If the current phase of the change is listed in theAvailable Phases tab of a changetask category, then this task category will appear here for your selection.
If Available Phases is left blank in a change task category, then this task category isvisible for all changes phases.
ServiceManager opens a task information form.
4. Complete the form with all required information.
5. Click Save.
To create a change task from theMoremenu:
1. Do one of the following in the System Navigator:
a. Click Change Management > Change Queue.
b. Click Change Management > Search Changes, enter your search criteria, and then clickSearch.
2. Find the change request you want to create tasks from, and then double-click the record toopen it.
3. Click More and then click Open New Task.
Note: TheOpen New Task option will be available only for the change phases that matchthe phases in theAvailable Phases tab of change task category. For example, if thecurrent phase of the change request is “Change Review”, then theOpen New Task optionwill list all the task categories which have the “Change Review” phase listed under theAvailable Phases tab.
HP ServiceManager – Process Designer Content Pack (9.30.3) Page 95 of 196
Administrator’s GuideChapter 4: ChangeManagement
If Available Phases is blank in task category, then this task category is visible for allphases.
4. Select a category for the new task.
ServiceManager opens a task information form.
5. Complete the form with all required information.
6. Click Save.
Related tasks
Use task planner to plan change tasks in a change record
Cancel multiple opened tasks for a change record
See “Close a change task” in ServiceManager 9.31 HelpServer topics
See “Search for a record” in ServiceManager 9.31 HelpServer topics
Related references
See “Coordinate change implementation” in ServiceManager 9.31 HelpServer topics
Use task planner to plan change tasks in a changerecord
User Roles: Change Coordinator, ChangeManager
By using the task planner in the change record, you can plan change tasks for current or futurephases in the ongoing change.
To plan a change task in the task planner from a change record:
1. Do one of the following in the System Navigator:
a. Click Change Management > Change Queue
b. Click Change Management > Search Changes, enter your search criteria, and then clickSearch.
2. Find the change request you want to create tasks from, and then double-click the record toopen it.
3. Click the Task Planner button in the Tasks section.
4. Click Add Task, and then do the following:
HP ServiceManager – Process Designer Content Pack (9.30.3)Page 96 of 196
Administrator’s GuideChapter 4: ChangeManagement
a. Type task description in theDescription text box.
b. Select task category from the drop-down list.
c. Select a task template from the drop-down list. (Optional)
d. Select a change phase to start the task from the drop-down list.
e. Select a change phase to end the task from the drop-down list. (Optional)
Note: The end phasemust be no earlier than the start phase. If left blank, the endphase will match the start phase.
5. Click Add Task to add another task.
Or
To create a sequential task, hover themouse on the new task added in the graphical interfaceuntil you see a hand symbol, and then drag themouse pointer to add a new task.
6. Click OK to save the planned tasks.
If the Start Phase in the change task you just planned is the same as the current phase of thechange record, the change task is created with a Task Number assigned. Otherwise, the taskwill be in the planned status until the change reaches the Start Phase defined for this task.
l Once a task is created, you cannot delete this task or modify its properties in the task planner.You can click the task number in graphical interface tomodify the details of a created task.
l If you see a red dot on the top left corner of a task, it means that this task cannot bemodified ordeleted in the task planner of the change record, because the “Mark as required/Set propertiesas read-only in change” option is selected for this task in the changemodel.
l The “Task Condition” and “Mark as required/Set properties as read-only in change” fieldscan only be set for the tasks defined in the task planner in changemodel. These fields are read-only here in the task planner in change for your reference.
l If a task is not marked as required in changemodel and has not been created, you can clickDelete to remove this planned task, or you canmodify its properties. However, you cannotmove the start phase of a planned task to a phase prior to the current phase of the change.
l If you open the task planner before a change has been created or after a change has beenclosed, the task planner will be read-only. TheAdd Task andSave buttons are invisible.
l In the graphical interface of the task planner, you can specify tasks as dependent on other tasksby adding a connector between two tasks.
HP ServiceManager – Process Designer Content Pack (9.30.3) Page 97 of 196
Administrator’s GuideChapter 4: ChangeManagement
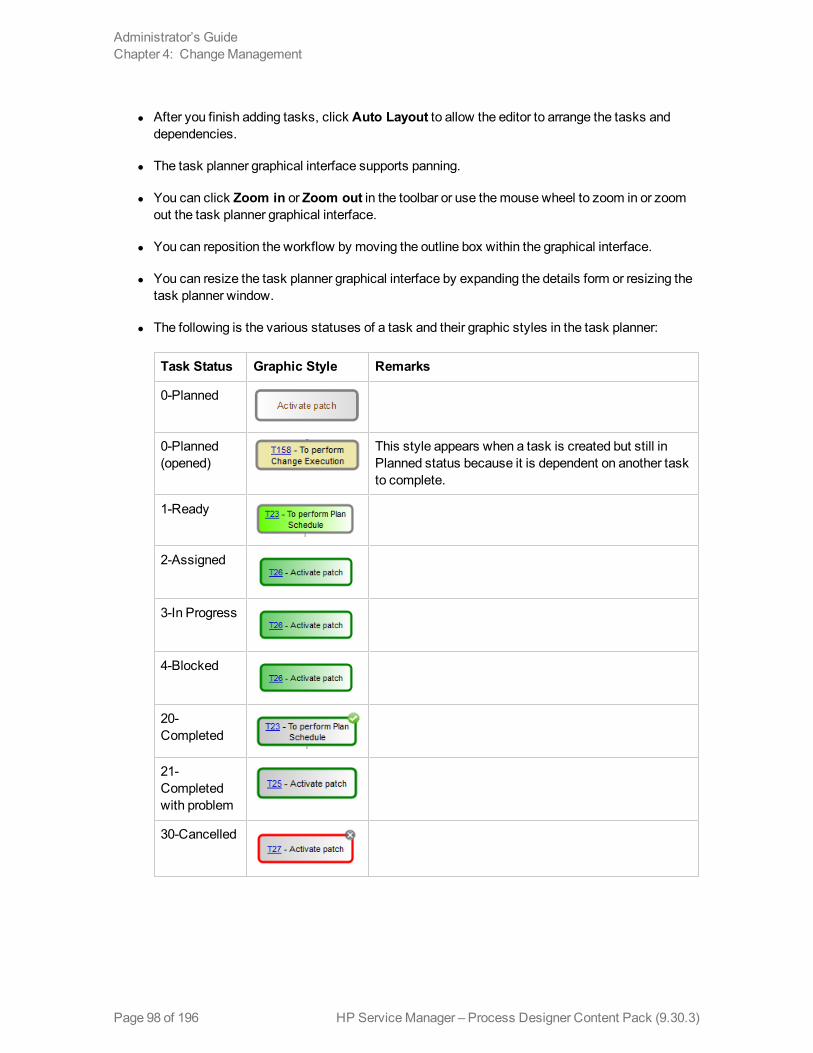
l After you finish adding tasks, click Auto Layout to allow the editor to arrange the tasks anddependencies.
l The task planner graphical interface supports panning.
l You can click Zoom in or Zoom out in the toolbar or use themouse wheel to zoom in or zoomout the task planner graphical interface.
l You can reposition the workflow by moving the outline box within the graphical interface.
l You can resize the task planner graphical interface by expanding the details form or resizing thetask planner window.
l The following is the various statuses of a task and their graphic styles in the task planner:
Task Status Graphic Style Remarks
0-Planned
0-Planned(opened)
This style appears when a task is created but still inPlanned status because it is dependent on another taskto complete.
1-Ready
2-Assigned
3-In Progress
4-Blocked
20-Completed
21-Completedwith problem
30-Cancelled
HP ServiceManager – Process Designer Content Pack (9.30.3)Page 98 of 196
Administrator’s GuideChapter 4: ChangeManagement
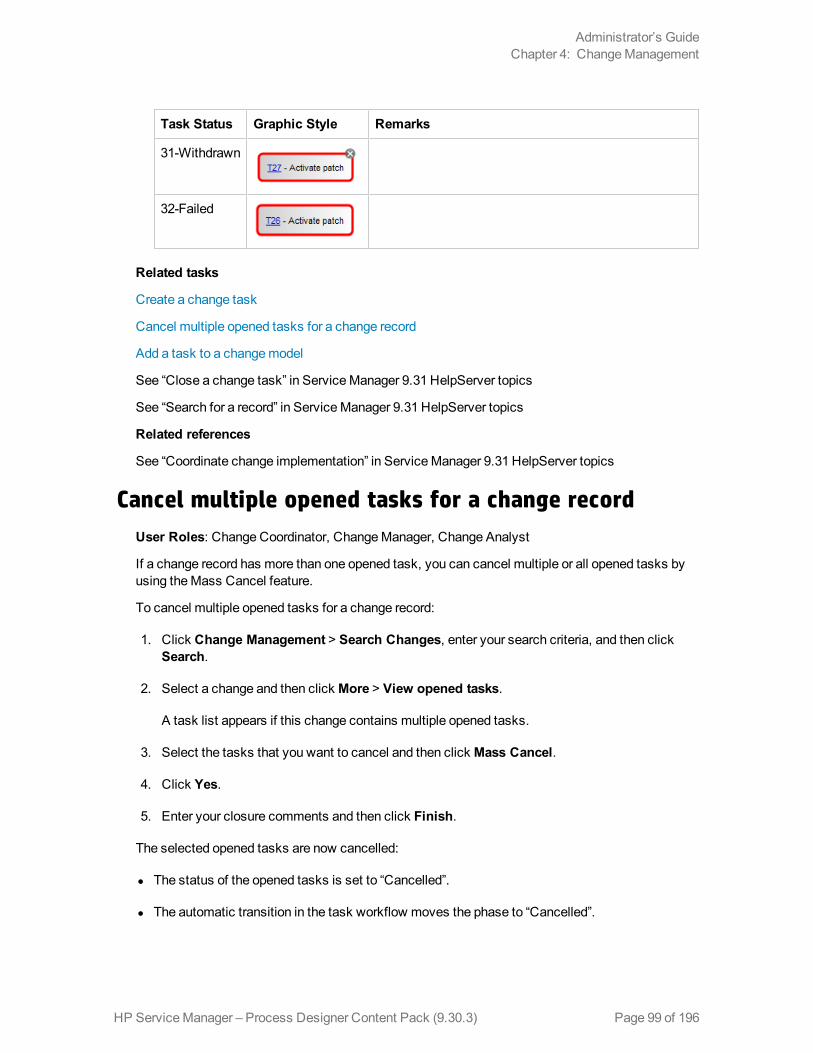
Task Status Graphic Style Remarks
31-Withdrawn
32-Failed
Related tasks
Create a change task
Cancel multiple opened tasks for a change record
Add a task to a changemodel
See “Close a change task” in ServiceManager 9.31 HelpServer topics
See “Search for a record” in ServiceManager 9.31 HelpServer topics
Related references
See “Coordinate change implementation” in ServiceManager 9.31 HelpServer topics
Cancel multiple opened tasks for a change recordUser Roles: Change Coordinator, ChangeManager, Change Analyst
If a change record has more than one opened task, you can cancel multiple or all opened tasks byusing theMass Cancel feature.
To cancel multiple opened tasks for a change record:
1. Click Change Management > Search Changes, enter your search criteria, and then clickSearch.
2. Select a change and then click More > View opened tasks.
A task list appears if this change contains multiple opened tasks.
3. Select the tasks that you want to cancel and then click Mass Cancel.
4. Click Yes.
5. Enter your closure comments and then click Finish.
The selected opened tasks are now cancelled:
l The status of the opened tasks is set to “Cancelled”.
l The automatic transition in the task workflow moves the phase to “Cancelled”.
HP ServiceManager – Process Designer Content Pack (9.30.3) Page 99 of 196
Administrator’s GuideChapter 4: ChangeManagement
l The Closure Code is set to “6 – Cancelled”.
Related tasks
Create a change task
See “Close a change task” in ServiceManager 9.31 HelpServer topics
See “Search for a record” in ServiceManager 9.31 HelpServer topics
Change modelA changemodel is a record that is used to pre-define the contents of a specific type of Request forChange (RFC), including the information used to populate the RFC and tasks needed to completethe change. When you open a change request using a changemodel, all information is addedautomatically to the change without any action needed by the operator.
When creating a new changemodel, you can define the tasks to be completed and thedependencies betweenmultiple tasks. When you create a new change, a list of changemodeltemplates appears. In the changemodel template, changemodels are grouped by category andsubcategory. You can apply a changemodel to a change using the changemodel template.
Create a new change modelUser Roles: Change Coordinator, ChangeManager
To create a new changemodel:
1. Click Change Management > Configuration > Change Models in the System Navigator.
2. Click New.
3. Type the changemodel ID.
4. Type the changemodel name.
5. Type the change description.
6. Click the Fill Field Category icon in theCategory text box to select a change category.
7. Click the Fill Field Subcategory icon in theSubcategory text box to select a changesubcategory.
8. Select a change template from the drop-down list.
If needed, you can specify more than one template. When users open a new change from thismodel, ServiceManager automatically applies all specified templates in the order listed by
HP ServiceManager – Process Designer Content Pack (9.30.3)Page 100 of 196
Administrator’s GuideChapter 4: ChangeManagement
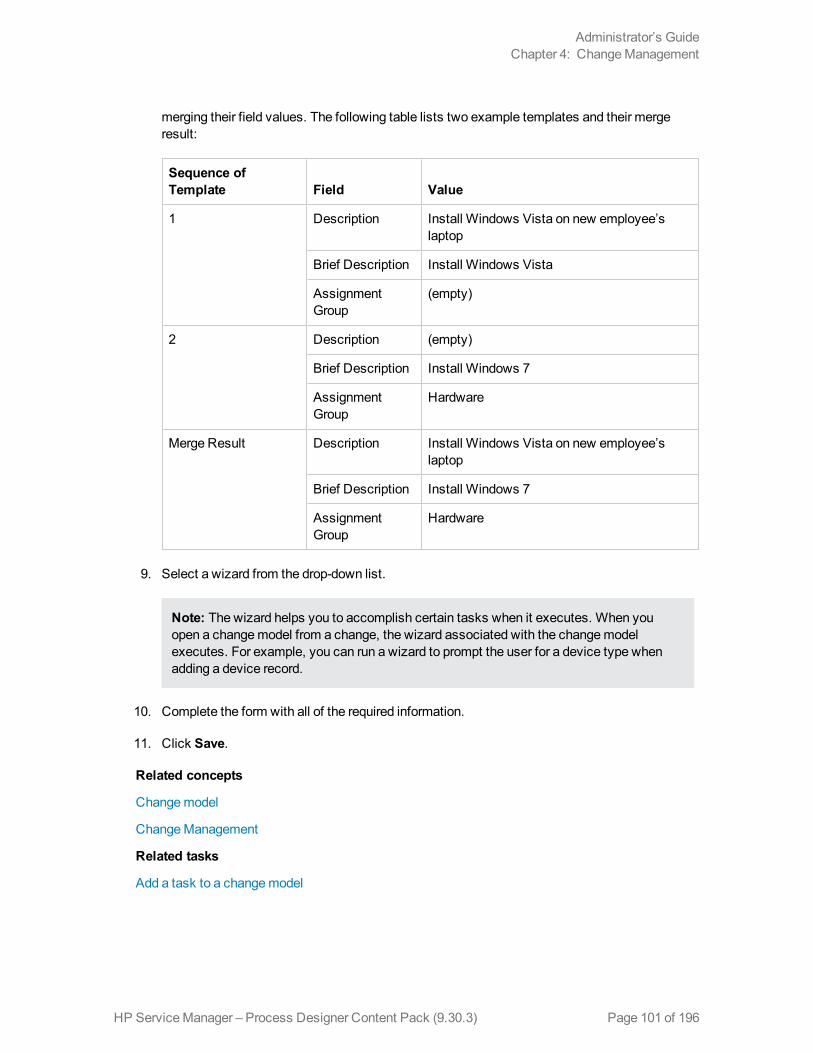
merging their field values. The following table lists two example templates and their mergeresult:
Sequence ofTemplate Field Value
1 Description Install Windows Vista on new employee’slaptop
Brief Description Install Windows Vista
AssignmentGroup
(empty)
2 Description (empty)
Brief Description Install Windows 7
AssignmentGroup
Hardware
Merge Result Description Install Windows Vista on new employee’slaptop
Brief Description Install Windows 7
AssignmentGroup
Hardware
9. Select a wizard from the drop-down list.
Note: The wizard helps you to accomplish certain tasks when it executes. When youopen a changemodel from a change, the wizard associated with the changemodelexecutes. For example, you can run a wizard to prompt the user for a device type whenadding a device record.
10. Complete the form with all of the required information.
11. Click Save.
Related concepts
Changemodel
ChangeManagement
Related tasks
Add a task to a changemodel
HP ServiceManager – Process Designer Content Pack (9.30.3) Page 101 of 196
Administrator’s GuideChapter 4: ChangeManagement
Add a task to a change modelUser Roles: System Administrator and Implementer
Using the task planner, you can add, edit, or delete tasks, which are part of changemodel record. Inthe graphical interface, you can specify tasks as dependent on other tasks by adding a connectorbetween two tasks. Tasks that do not have dependencies may be open in parallel but are stillgoverned by the Start and End Phase attributes, as well as the task condition.
When adding a task to amodel, specify the following attributes:
l Description
l Task Category
l Task Template
l Start Phase – A task opens at this change phase. If the task is dependent on another task, it willbe in the ‘Planned’ status.
l End Phase – Specifies what change phase the task must end. If there are still open tasks for aphase, the change will not be allowed to go to the next phase. If left blank, the end phase willmatch the start phase.
l Mark as required/Set properties as read-only in change – Specifies whether or not this task canbe re-planned or removed when you plan tasks using the task planner from a change record.
l Task Condition – Defines the conditions for task creation.
n The task condition is evaluated at each update of the change record when the change is in theStart Phase defined for this task.
n If you leave this field blank, the condition will be evaluated as true.
n When the condition is evaluated as true after a change update, the task is created and linkedwith the change record.
n Once a task has been created and linked with the change, the condition for this task will notbe re-evaluated anymore.
n When the condition is true in the first instance but false after the change is updated, thesystem does not automatically close the task and you need to close it manually.
n The condition of the planned tasks is shown as read-only in the task planner from the changerecord.
n If a task is dependent on a conditional task that has not been created because its condition isevaluated as false, this task will still be created (in Ready status) when the change reachesthe Start Phase defined for this task.
HP ServiceManager – Process Designer Content Pack (9.30.3)Page 102 of 196
Administrator’s GuideChapter 4: ChangeManagement
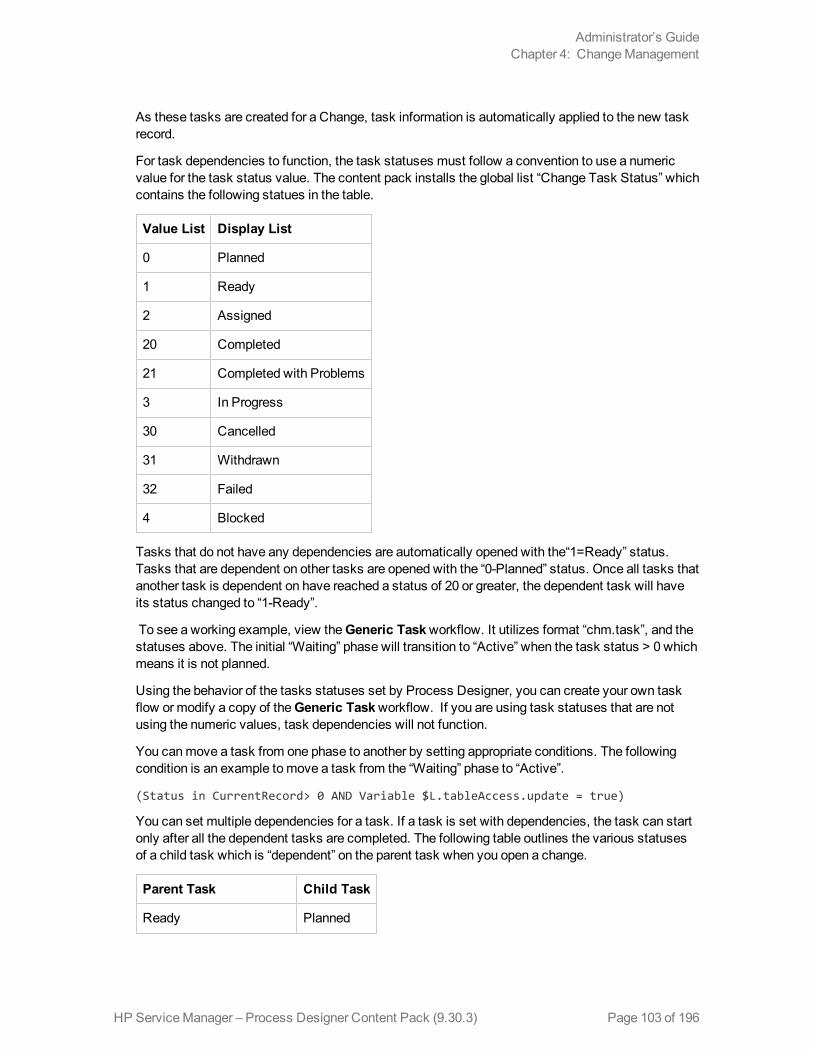
As these tasks are created for a Change, task information is automatically applied to the new taskrecord.
For task dependencies to function, the task statuses must follow a convention to use a numericvalue for the task status value. The content pack installs the global list “Change Task Status” whichcontains the following statues in the table.
Value List Display List
0 Planned
1 Ready
2 Assigned
20 Completed
21 Completed with Problems
3 In Progress
30 Cancelled
31 Withdrawn
32 Failed
4 Blocked
Tasks that do not have any dependencies are automatically opened with the“1=Ready” status.Tasks that are dependent on other tasks are opened with the “0-Planned” status. Once all tasks thatanother task is dependent on have reached a status of 20 or greater, the dependent task will haveits status changed to “1-Ready”.
To see a working example, view theGeneric Taskworkflow. It utilizes format “chm.task”, and thestatuses above. The initial “Waiting” phase will transition to “Active” when the task status > 0 whichmeans it is not planned.
Using the behavior of the tasks statuses set by Process Designer, you can create your own taskflow ormodify a copy of theGeneric Taskworkflow. If you are using task statuses that are notusing the numeric values, task dependencies will not function.
You canmove a task from one phase to another by setting appropriate conditions. The followingcondition is an example tomove a task from the “Waiting” phase to “Active”.
(Status in CurrentRecord> 0 AND Variable $L.tableAccess.update = true)
You can set multiple dependencies for a task. If a task is set with dependencies, the task can startonly after all the dependent tasks are completed. The following table outlines the various statusesof a child task which is “dependent” on the parent task when you open a change.
Parent Task Child Task
Ready Planned
HP ServiceManager – Process Designer Content Pack (9.30.3) Page 103 of 196
Administrator’s GuideChapter 4: ChangeManagement
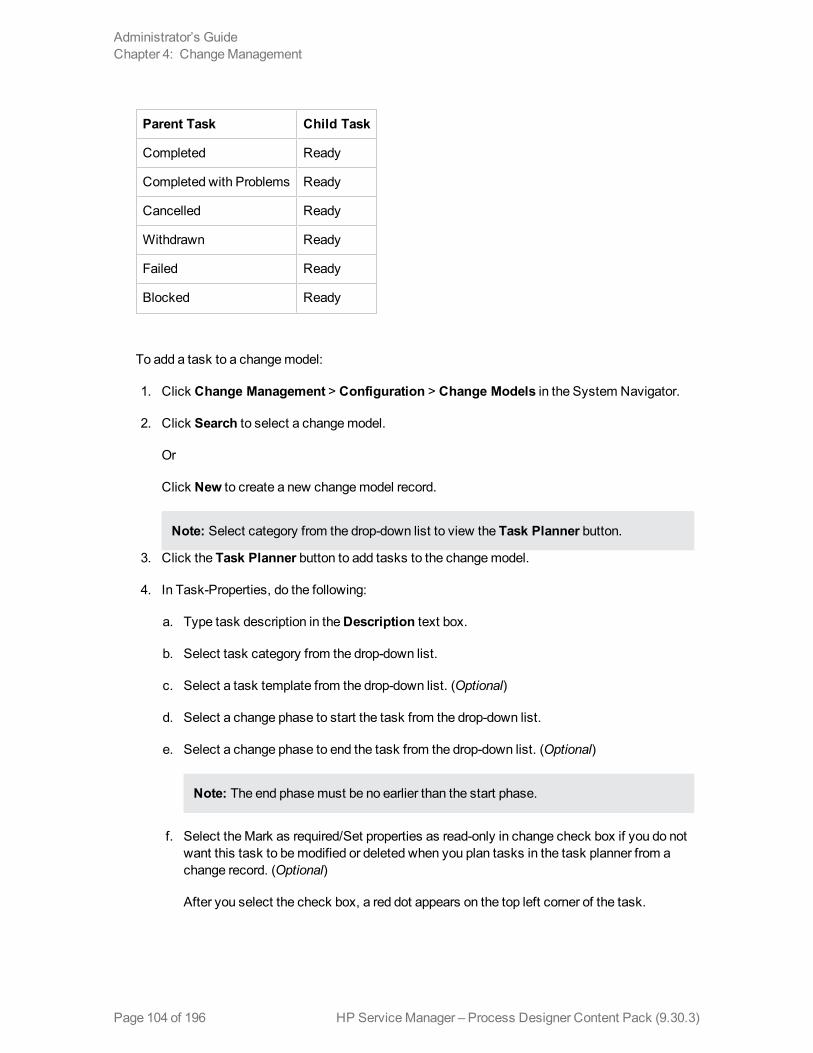
Parent Task Child Task
Completed Ready
Completed with Problems Ready
Cancelled Ready
Withdrawn Ready
Failed Ready
Blocked Ready
To add a task to a changemodel:
1. Click Change Management > Configuration > Change Models in the System Navigator.
2. Click Search to select a changemodel.
Or
Click New to create a new changemodel record.
Note: Select category from the drop-down list to view the Task Planner button.
3. Click the Task Planner button to add tasks to the changemodel.
4. In Task-Properties, do the following:
a. Type task description in theDescription text box.
b. Select task category from the drop-down list.
c. Select a task template from the drop-down list. (Optional)
d. Select a change phase to start the task from the drop-down list.
e. Select a change phase to end the task from the drop-down list. (Optional)
Note: The end phasemust be no earlier than the start phase.
f. Select theMark as required/Set properties as read-only in change check box if you do notwant this task to bemodified or deleted when you plan tasks in the task planner from achange record. (Optional)
After you select the check box, a red dot appears on the top left corner of the task.
HP ServiceManager – Process Designer Content Pack (9.30.3)Page 104 of 196
Administrator’s GuideChapter 4: ChangeManagement
g. Define the task conditions if you want to add conditions to create the task. (Optional)
Note: The “CurrentRecord” in the condition editor here refers to the Change record.
5. Click Add Task to add another task.
Or
Hover themouse on the new task added in the graphical interface until you see a hand symbol,and then drag themouse pointer to add a new task.
6. Click OK to save the changemodel tasks.
l You cannot add a new task until you definemandatory details of the previous task in thetask planner window.
l You can click Delete in the toolbar to delete a task.
l You can edit a task by selecting the task in graphical interface andmodify its properties.
l After you finish adding tasks, click Auto Layout to allow the editor to arrange the tasks anddependencies.
l The task planner graphical interface supports panning.
l You can click Zoom in or Zoom out in the toolbar or use themouse wheel to zoom in orzoom out the task planner graphical interface.
l You can reposition the workflow by moving the outline box within the graphical interface.
l You can resize the task planner graphical interface by expanding the details form or resizingthe task planner window.
Related concepts
Changemodel
ChangeManagement
Using the Condition Editor
Related tasks
Create a new changemodel
Use task planner to plan change tasks in a change record
HP ServiceManager – Process Designer Content Pack (9.30.3) Page 105 of 196
Administrator’s GuideChapter 4: ChangeManagement
Apply change model to existing change recordUser Roles: ChangeManager, Change Coordinator, Change Requester
You can apply a changemodel to an existing change record that does not have a changemodelapplied or you can apply a changemodel to replace the changemodel previously applied.
In the out-of-box setting, the “Apply ChangeModel” option is only available for the change recordsusing the Emergency Change, Normal Change, or Standard Change workflows when the change isin the phases before Approval (or before Execution for Standard Change).
After you apply a new changemodel to a change record:
l The change will automatically go back to the first phase of the workflow.
l The field values defined in the changemodel will overwrite the values in the change record.
l All the tasks in waiting phase are automatically cancelled as these tasks have not been workedon; the tasks after waiting phasemust bemanually cancelled before the changemodel isapplied, so that you are aware applying the new changemodel will disrupt your original changeprocess as youmight have already started working on some tasks.
To apply a changemodel to a change record:
1. Do one of the following in the System Navigator:
a. Click Change Management > Search Change, and then click Search.
b. Click Change Management > Change Queue.
2. Open the change record to which you want to apply a new changemodel.
3. Click More > Apply Change Model.
Note: In the out-of-box setting, the “Apply ChangeModel” option is only available for thechange records using the Emergency Change, Normal Change, or Standard Changeworkflows when the change is in the phases before Approval (or before Execution forStandard Change).
If the change record has opened tasks, you will be prompted to cancel all the opened tasksmanually before applying a changemodel.
4. Select the desired changemodel from the list.
5. Click Yes to apply the changemodel.
The selected changemodel is applied to the change record and the change phase is changedto the first phase in the workflow.
HP ServiceManager – Process Designer Content Pack (9.30.3)Page 106 of 196
Administrator’s GuideChapter 4: ChangeManagement
If you want to configure whether the “Apply ChangeModel” option is available for a phase of aworkflow, you can add or remove the chm.apply.change.model action in the workflow phase.
To add the “Apply ChangeModel” option for a phase of your workflow:
Note: If you want to edit an HP Proprietary workflow or use it as amodel, create a copy of theHP Proprietary workflow.
1. Click Change Management > Configuration > Change Workflows from the SystemNavigator to display all the change workflows.
2. Open the workflow that you want to configure.
3. Click a phase in the workflow and then click theActions tab.
4. Click Add to add an action with the following settings:
n Id: Apply ChangeModel
n Action: chm.apply.change.model
n Location: More Options List
n Action Condition: $L.tableAccess.update=true
n Requires lock: true
5. Click Save.
Related concepts
Changemodel
Workflow phases
Related tasks
Add a phase
Map change model fields into change recordUser Roles: System Administrator and Implementer
By configuring the link file, you can customize the fields to be copied from a changemodel to achange record. You canmodify the global link file used as the default for all changemodels or youcan specify a link file for an individual changemodel. If a link file is specified for a specific changemodel, it takes precedence over the global link file.
To configure the default changemodel field mapping for all the changemodels:
HP ServiceManager – Process Designer Content Pack (9.30.3) Page 107 of 196
Administrator’s GuideChapter 4: ChangeManagement
1. Click Change Management > Administration > Settings in the System Navigator.
The Change Setting screen appears. The default link file for all the changemodels is specifiedin theDefault Open/Apply Link text box.
2. Click the Find Related Information icon on the right of theDefault Open/Apply Link textbox to open the link file.
3. Click the line containing themapping information in the table, and then click More > SelectLine.
4. Modify the fields mapping in theSource Field (Fill To/Post From) column and the TargetField (Fill From/Post To) column.
Note: Enter the field names of the changeModel table in theSource Field (Fill To/PostFrom) column, and enter the field names of the cm3r table in the Target Field (FillFrom/Post To) column. The fields mapping each should be in the same data type.
5. Click Save.
Note: If you want to use a different link file, enter the name of your link file in theDefaultOpen/Apply Link text box.
To configure the fields mapping for one specific changemodel:
1. Click Tailoring > Tailoring Tools > Links in the System Navigator.
2. In theName field, type the name of the form or file. If desired, type a descriptive name or phasein theDescription field.
3. Click New to create the new link record.
4. Click a line in the table, and then click More > Select Line.
5. Type the descriptive relationship information in the appropriate text boxes.
6. Configure themapping using theSource Field (Fill To/Post From) column and the TargetField (Fill From/Post To) column.
Note: Enter the field names of the changeModel table in theSource Field (Fill To/PostFrom) column, and enter the field names of the cm3r table in the Target Field (FillFrom/Post To) column. The fields mapping each should be in the same data type.
7. Click Save to add the new link record.
8. Click Change Management > Configuration > Change Models in the System Navigator.
HP ServiceManager – Process Designer Content Pack (9.30.3)Page 108 of 196
Administrator’s GuideChapter 4: ChangeManagement
9. Click Search to select a changemodel.
Or
Click New to create a new changemodel record.
10. Click the Fill Field Open/Apply Link icon in theOpen/Apply Link text box to select the linkfile you created.
11. Click Save.
Related concepts
Changemodel
Change settings
See “Understanding links” in ServiceManager 9.31 HelpServer topics
Use change models in Service Catalog connectorUser Roles: System Administrator and Implementer
When adding a new Service Catalog item using the “Open a Change” connector, you can select achangemodel to open a change.
To use a changemodel when creating a service catalog item using the “Open a Change” connector:
1. Click Service Catalog > Administration >Manage Catalog in the System Navigator.
2. Click Add New Service Catalog Item.
The New Service Catalog ItemWizard appears.
3. Enter the information as needed for the new Service Catalog item, and then click Next.
4. Select Open a Change as the connector type and specify the parent category this new itembelongs to.
5. Click Next.
6. Select change category, change subcategory, and changemodel, and then click Next.
7. Specify all the fields to define the initial state of the change request this item creates.
Note: All these fields aremandatory for creating the change requests. They must bespecified either here or in the selected changemodel. If you leave any of these fieldsempty here, make sure this field has been defined in the selected changemodel.
HP ServiceManager – Process Designer Content Pack (9.30.3) Page 109 of 196
Administrator’s GuideChapter 4: ChangeManagement
Otherwise, the change will not be created automatically after a request is approved.
The values specified here take precedence over those defined in the selected changemodel (or in the change templates used by the changemodel).
8. Click Finish.
After completing these steps, a Service Catalog item is created with the “Open a Change”connector. When a user orders this Service Catalog item and the request gets approved by theapprover, a change record using the selected changemodel will be created.
Related concepts
Changemodel
See “Service Catalog connectors” in ServiceManager 9.31 HelpServer topics
Related tasks
See “Add a Service Catalog item” in ServiceManager 9.31 HelpServer topics
Create a new change requestUser Roles: ProblemManager, Change Coordinator, ReleaseManager
Sometimes you will need to create a new change request that is not based on an existinginteraction or known error.
To create a new change request:
1. Click Change Management > New Change in the System Navigator.
2. Drill down the change categories to select a changemodel for a new change request. ServiceManager displays a new form and populates the following fields based on your previousselections.
n Change ID
n Phase
n Category
n Subcategory
Note: To create a new change request based on a changemodel, click ChangeManagement > Administration > Settings. Click Change Model underSelect onOpen. You can group the changemodel based on category, subcategory, or up to four
HP ServiceManager – Process Designer Content Pack (9.30.3)Page 110 of 196
Administrator’s GuideChapter 4: ChangeManagement
changemodel fields by specifying them in theGroup Change Model by text box.
3. Complete the form with all of the required information and any additional information.
4. If you are logged in as a ProblemManager and want to associate an existing known error withthis change, use theMore button to associate a known error record with this change.
5. Click Save. A notification of the change is sent to the selected change initiator.
l The toolbar in the change request form contains a button with the name of the transition.You can navigate a change workflow using this button. You can use theMoremenu forother workflow actions that you can perform, such as Abandon. If you are creating newChange, youmust click Save first before any transitions buttons or options appear.
l The Tasks section in the change request form lists the tasks associated with their phasesin the workflow. You can click the Task Planner button to view or plan the tasks for thecurrent change record.
l TheApprovals section in the change request form lists the approvals associated with thecurrent phase in the workflow.
l You can also create a new task from a change request by using theOpen New Task optionin theMoremenu. This option is available only for the phases that match with the changephases under theAvailable Phases tab in task category. If you leaveAvailable Phasesblank for a task category, then you can use this task category in all change phases.
l You cannot reopen a Standard, Emergency, and Normal change category request.
Related tasks
See “Create change request from user interaction” in ServiceManager 9.31 HelpServer topics
See “Update a change request” in ServiceManager 9.31 HelpServer topics
See “Withdraw a change request” in ServiceManager 9.31 HelpServer topics
Approvals in Change ManagementChangeManagement requires approvals to be complete before the change request canmove to thenext logical phase. Approvals are based on associated Service Level Agreements (SLA). Managersand sponsors associated with the SLA must be listed as approvers for each phase.
After the approvals are complete, you canmove the request to any desired phase by settingcondition in condition editor of transitions. You can set the transition condition tomove the changerequest to another phase or remain in the current phase by setting the statuses to “Denied” and
HP ServiceManager – Process Designer Content Pack (9.30.3) Page 111 of 196
Administrator’s GuideChapter 4: ChangeManagement
“Pending” respectively. For example, you can set the following conditions for the transitions in the“ECAB Approval” phase tomove the change request to different phases.
Condition Action Performed
Set the following condition in the transition from the “ECAB Approval” phase to the “Build and Test”phase
Approval Status in CurrentRecord=approved AND Build Test Required inCurrentRecord= true
Change request moves from the “ECABApproval” phase to the next phase, “Buildand Test”.
Set the following condition in the transition from“ECAB Approval” to “Implementation”
Approval Status in CurrentRecord=approved AND Build Test Required inCurrentRecord= false
Change request moves from the “ ECABApproval” phase to “Implementation”.
Set the following condition in the transition from“ECAB Approval” to “Risk and Impact Analysis”.
Approval Status in CurrentRecord= denied
Change request moves from the “ECABApproval” phase to the previous phase,“Risk and Impact Analysis”.
A change request may require other approvals, depending on the category listed in thecategorization field:
l Change requests with an impact of 3 (Major Impact) also require approval by an IT director.
l Change requests with an impact other than 1 (Minor Impact) must be approved by amember ofthe Change Advisory Board (CAB).
Related concepts
See “ChangeManagement” in ServiceManager 9.31 HelpServer topics
See “What is an approval?” in ServiceManager 9.31 HelpServer topics
See “What is an approval sequence?” in ServiceManager 9.31 HelpServer topics
See “What is approval status?” in ServiceManager 9.31 HelpServer topics
See “Approval options in ChangeManagement” in ServiceManager 9.31 HelpServer topics
Related tasks
See “Approve, deny, or retract a change” in ServiceManager 9.31 HelpServer topics
See “Approvemultiple change requests” in ServiceManager 9.31 HelpServer topics
HP ServiceManager – Process Designer Content Pack (9.30.3)Page 112 of 196
Administrator’s GuideChapter 4: ChangeManagement

Change Management administrationChangeManagement administration provides the capability to control the ConfigurationManagement application functionality, manage change groups, and create change request basedon changemodel, category, or subcategory.
ChangeManagement administration consists of the following:
l Change Environment: ChangeManagement contains an environment record for changes. Thisrecord contains an option that defines the functionality of the ChangeManagement applicationfor all ChangeManagement users.
l Groups: This enables you to group operators to be amember or approver of change groups.
l Settings: You can create a change request based on the changemodel or category by selectingthe appropriate option in the Change Settings page. You can also enable sending emailnotifications through Event Messages to Changemanagement.
l Task Environment: ChangeManagement contains an environment record for tasks. This recordcontains an option that defines the functionality of ChangeManagement application for allChangeManagement users.
Related concepts
ChangeManagement
Changemodel
Configure a Change Management environment recordUser Role: System Administrator
To configure a ChangeManagement environment record:
1. Click System Administration > Ongoing Maintenance > Environment Records > ChangeManagement Request Environment orChange Management Task Environment.
2. Choose the parameters for the entire change system.
Setting Description
Allow Operator Accesswithout Profile Record
Permit users without anOperator profile for ChangeManagement to access the application using the default profile.
ChangeManager Enables you to specify the changemanager.
3. Click Save.
HP ServiceManager – Process Designer Content Pack (9.30.3) Page 113 of 196
Administrator’s GuideChapter 4: ChangeManagement
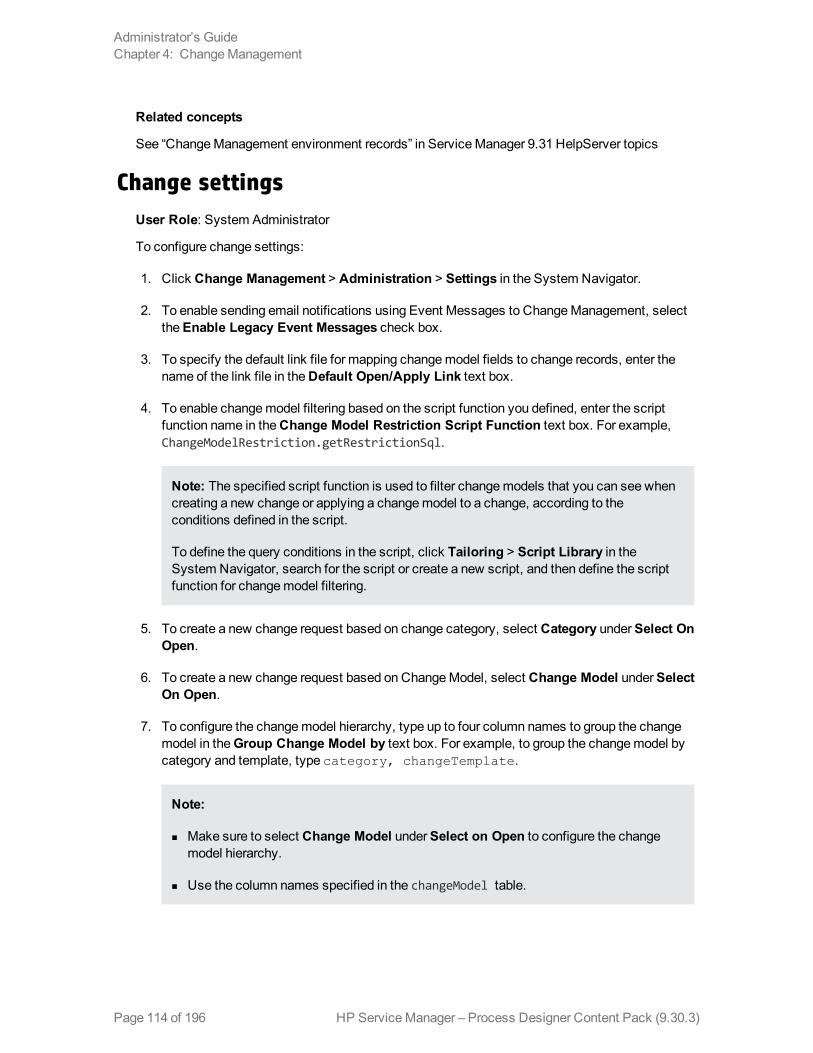
Related concepts
See “ChangeManagement environment records” in ServiceManager 9.31 HelpServer topics
Change settingsUser Role: System Administrator
To configure change settings:
1. Click Change Management > Administration > Settings in the System Navigator.
2. To enable sending email notifications using Event Messages to ChangeManagement, selecttheEnable Legacy Event Messages check box.
3. To specify the default link file for mapping changemodel fields to change records, enter thename of the link file in theDefault Open/Apply Link text box.
4. To enable changemodel filtering based on the script function you defined, enter the scriptfunction name in theChange Model Restriction Script Function text box. For example,ChangeModelRestriction.getRestrictionSql.
Note: The specified script function is used to filter changemodels that you can see whencreating a new change or applying a changemodel to a change, according to theconditions defined in the script.
To define the query conditions in the script, click Tailoring > Script Library in theSystem Navigator, search for the script or create a new script, and then define the scriptfunction for changemodel filtering.
5. To create a new change request based on change category, select Category underSelect OnOpen.
6. To create a new change request based on ChangeModel, select Change Model underSelectOn Open.
7. To configure the changemodel hierarchy, type up to four column names to group the changemodel in theGroup Change Model by text box. For example, to group the changemodel bycategory and template, type category, changeTemplate.
Note:
n Make sure to select Change Model underSelect on Open to configure the changemodel hierarchy.
n Use the column names specified in the changeModel table.
HP ServiceManager – Process Designer Content Pack (9.30.3)Page 114 of 196
Administrator’s GuideChapter 4: ChangeManagement
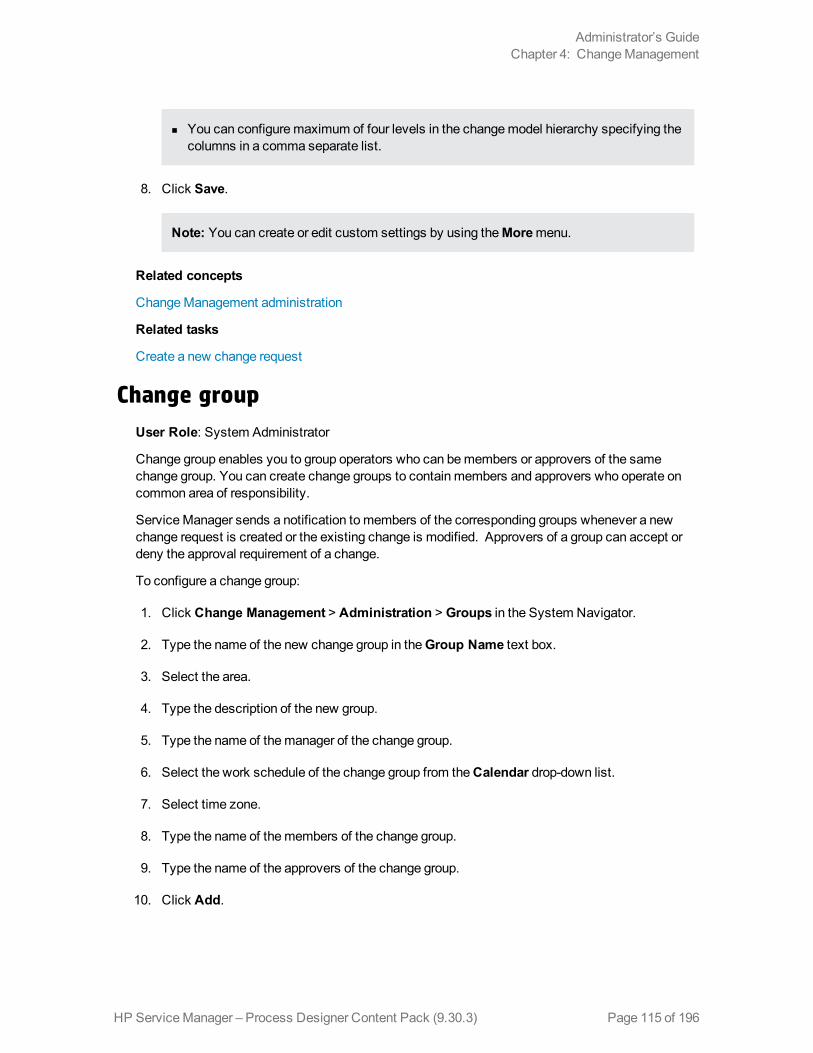
n You can configuremaximum of four levels in the changemodel hierarchy specifying thecolumns in a comma separate list.
8. Click Save.
Note: You can create or edit custom settings by using theMoremenu.
Related concepts
ChangeManagement administration
Related tasks
Create a new change request
Change groupUser Role: System Administrator
Change group enables you to group operators who can bemembers or approvers of the samechange group. You can create change groups to contain members and approvers who operate oncommon area of responsibility.
ServiceManager sends a notification tomembers of the corresponding groups whenever a newchange request is created or the existing change is modified. Approvers of a group can accept ordeny the approval requirement of a change.
To configure a change group:
1. Click Change Management > Administration > Groups in the System Navigator.
2. Type the name of the new change group in theGroup Name text box.
3. Select the area.
4. Type the description of the new group.
5. Type the name of themanager of the change group.
6. Select the work schedule of the change group from theCalendar drop-down list.
7. Select time zone.
8. Type the name of themembers of the change group.
9. Type the name of the approvers of the change group.
10. Click Add.
HP ServiceManager – Process Designer Content Pack (9.30.3) Page 115 of 196
Administrator’s GuideChapter 4: ChangeManagement
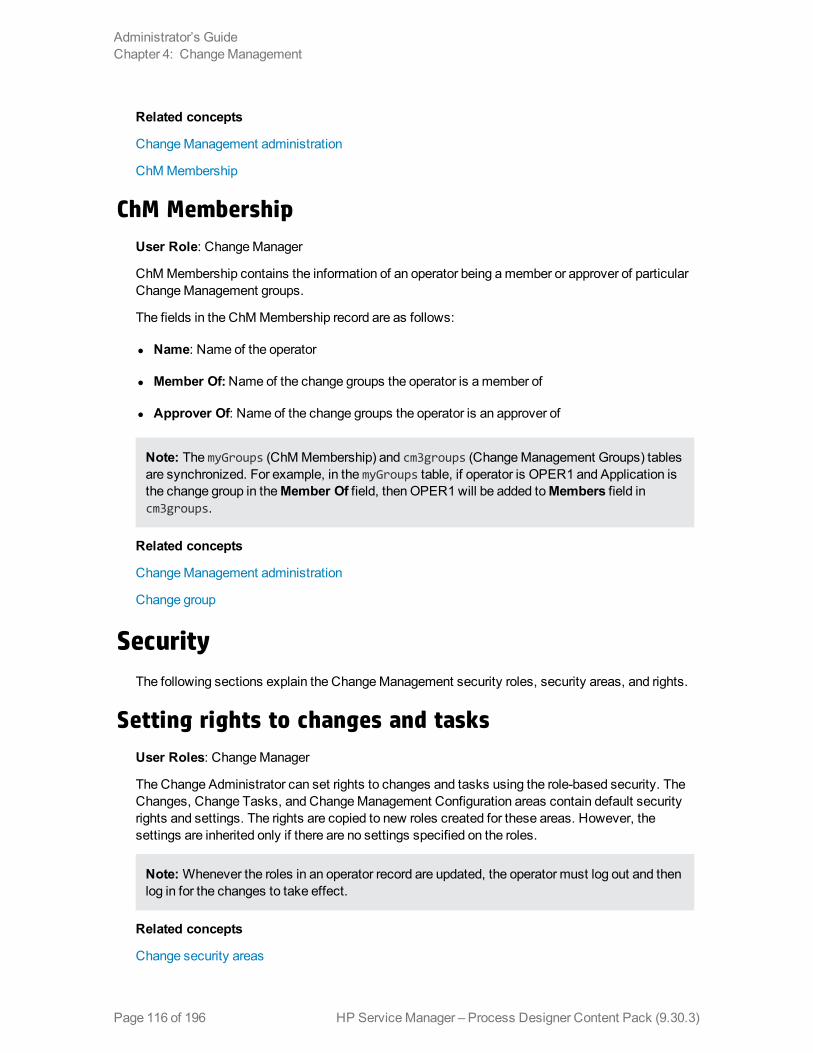
Related concepts
ChangeManagement administration
ChMMembership
ChM MembershipUser Role: ChangeManager
ChMMembership contains the information of an operator being amember or approver of particularChangeManagement groups.
The fields in the ChMMembership record are as follows:
l Name: Name of the operator
l Member Of:Name of the change groups the operator is amember of
l Approver Of: Name of the change groups the operator is an approver of
Note: The myGroups (ChMMembership) and cm3groups (ChangeManagement Groups) tablesare synchronized. For example, in the myGroups table, if operator is OPER1 and Application isthe change group in theMember Of field, thenOPER1will be added toMembers field incm3groups.
Related concepts
ChangeManagement administration
Change group
SecurityThe following sections explain the ChangeManagement security roles, security areas, and rights.
Setting rights to changes and tasksUser Roles: ChangeManager
The Change Administrator can set rights to changes and tasks using the role-based security. TheChanges, Change Tasks, and ChangeManagement Configuration areas contain default securityrights and settings. The rights are copied to new roles created for these areas. However, thesettings are inherited only if there are no settings specified on the roles.
Note:Whenever the roles in an operator record are updated, the operator must log out and thenlog in for the changes to take effect.
Related concepts
Change security areas
HP ServiceManager – Process Designer Content Pack (9.30.3)Page 116 of 196
Administrator’s GuideChapter 4: ChangeManagement
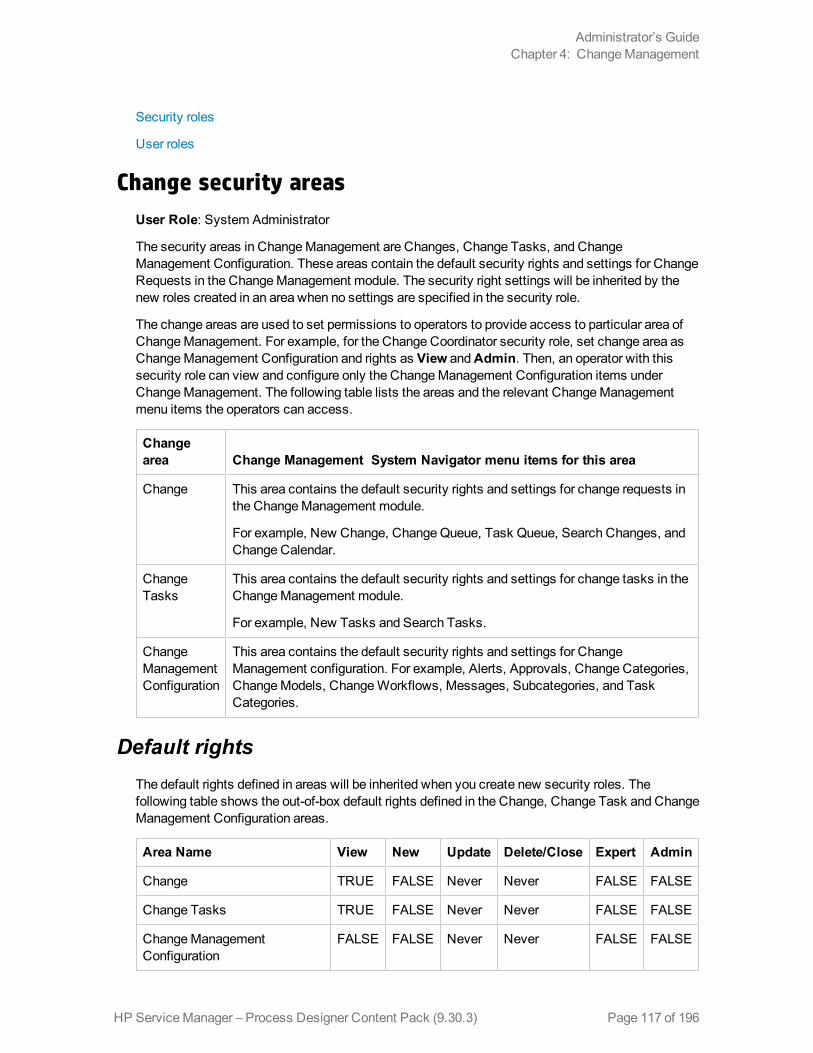
Security roles
User roles
Change security areasUser Role: System Administrator
The security areas in ChangeManagement are Changes, Change Tasks, and ChangeManagement Configuration. These areas contain the default security rights and settings for ChangeRequests in the ChangeManagement module. The security right settings will be inherited by thenew roles created in an area when no settings are specified in the security role.
The change areas are used to set permissions to operators to provide access to particular area ofChangeManagement. For example, for the Change Coordinator security role, set change area asChangeManagement Configuration and rights as View andAdmin. Then, an operator with thissecurity role can view and configure only the ChangeManagement Configuration items underChangeManagement. The following table lists the areas and the relevant ChangeManagementmenu items the operators can access.
Changearea Change Management System Navigator menu items for this area
Change This area contains the default security rights and settings for change requests inthe ChangeManagement module.
For example, New Change, ChangeQueue, Task Queue, Search Changes, andChange Calendar.
ChangeTasks
This area contains the default security rights and settings for change tasks in theChangeManagement module.
For example, New Tasks and Search Tasks.
ChangeManagementConfiguration
This area contains the default security rights and settings for ChangeManagement configuration. For example, Alerts, Approvals, Change Categories,ChangeModels, ChangeWorkflows, Messages, Subcategories, and TaskCategories.
Default rightsThe default rights defined in areas will be inherited when you create new security roles. Thefollowing table shows the out-of-box default rights defined in the Change, Change Task and ChangeManagement Configuration areas.
Area Name View New Update Delete/Close Expert Admin
Change TRUE FALSE Never Never FALSE FALSE
Change Tasks TRUE FALSE Never Never FALSE FALSE
ChangeManagementConfiguration
FALSE FALSE Never Never FALSE FALSE
HP ServiceManager – Process Designer Content Pack (9.30.3) Page 117 of 196
Administrator’s GuideChapter 4: ChangeManagement
Note:While setting permission for security roles, if you grant Admin rights, then the operatorscan perform the administrative activities listed under theAdministrationmenu of ChangeManagement.
Related concepts
Security roles
User roles
Add security roles and settingsUser Role: System Administrator
To create a security role and assign rights and settings:
1. Click System Administration > Security > Roles.
2. Click New.
The security role form is displayed.
3. Type the security role name.
4. Type the security role description.
5. Click Save.
6. Select the security area.
The security rights and settings form is displayed.
7. UnderRights, select the rights to be assigned to the security role.
For example, set Expert rights for the security role. TheExpert security right enables theoperator to view alert log, opened tasks, affected services, and clocks of change request. Italso enables you to set reminders, send notifications, create hot news, and associate changerequest to changes, incidents, interactions, quotes, and know errors.
8. UnderSettings, add required settings.
9. Under Folders, add folder permissions to the security role.
The out-of-box security folders available in ServiceManager are DEFAULT and advantage.You can also create security folders tomeet your business needs. By default, all securityfolders are assigned to a new security role created. Once a role is created and rights areconfigured, you canmodify the security rights for a role within an area.
Related concepts
HP ServiceManager – Process Designer Content Pack (9.30.3)Page 118 of 196
Administrator’s GuideChapter 4: ChangeManagement

Change security areas
User roles
HP ServiceManager – Process Designer Content Pack (9.30.3) Page 119 of 196
Administrator’s GuideChapter 4: ChangeManagement
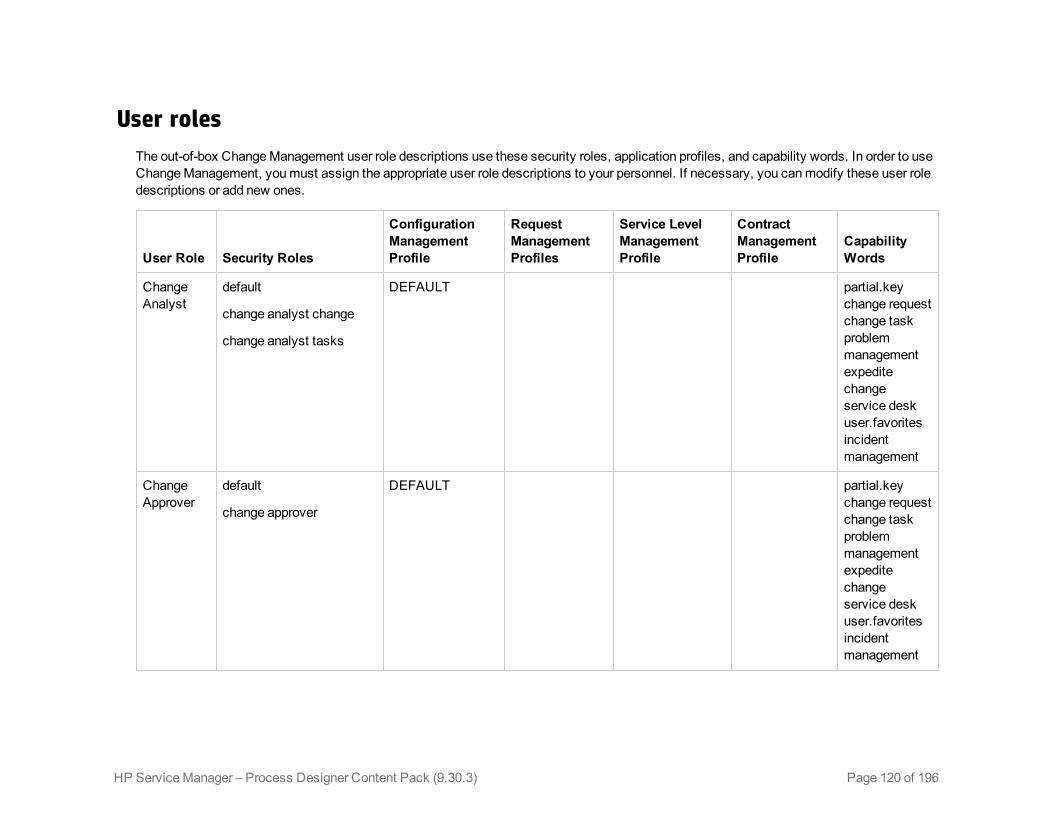
User rolesThe out-of-box ChangeManagement user role descriptions use these security roles, application profiles, and capability words. In order to useChangeManagement, youmust assign the appropriate user role descriptions to your personnel. If necessary, you canmodify these user roledescriptions or add new ones.
User Role Security Roles
ConfigurationManagementProfile
RequestManagementProfiles
Service LevelManagementProfile
ContractManagementProfile
CapabilityWords
ChangeAnalyst
default
change analyst change
change analyst tasks
DEFAULT partial.keychange requestchange taskproblemmanagementexpeditechangeservice deskuser.favoritesincidentmanagement
ChangeApprover
default
change approver
DEFAULT partial.keychange requestchange taskproblemmanagementexpeditechangeservice deskuser.favoritesincidentmanagement
Page 120 of 196HP ServiceManager – Process Designer Content Pack (9.30.3)
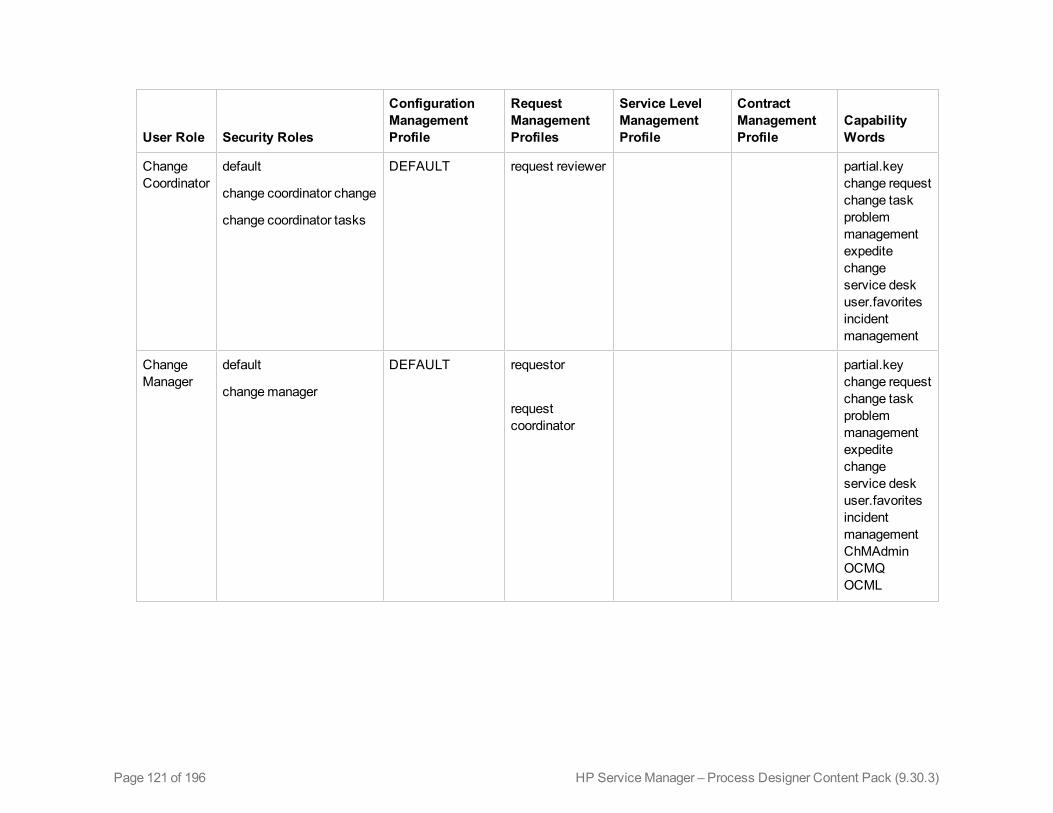
User Role Security Roles
ConfigurationManagementProfile
RequestManagementProfiles
Service LevelManagementProfile
ContractManagementProfile
CapabilityWords
ChangeCoordinator
default
change coordinator change
change coordinator tasks
DEFAULT request reviewer partial.keychange requestchange taskproblemmanagementexpeditechangeservice deskuser.favoritesincidentmanagement
ChangeManager
default
changemanager
DEFAULT requestor
requestcoordinator
partial.keychange requestchange taskproblemmanagementexpeditechangeservice deskuser.favoritesincidentmanagementChMAdminOCMQOCML
Page 121 of 196 HP ServiceManager – Process Designer Content Pack (9.30.3)

User Role Security Roles
ConfigurationManagementProfile
RequestManagementProfiles
Service LevelManagementProfile
ContractManagementProfile
CapabilityWords
E-CAB default
emergency group
DEFAULT DEFAULT DEFAULT DEFAULT partial.keychange requestchange taskproblemmanagementexpeditechangeservice deskuser.favoritesincidentmanagementEditContactsdataadministratorpublic.favoritesdataadministratorOCMQOCMOOCML
Related concepts
Change security areas
Security roles
Page 122 of 196HP ServiceManager – Process Designer Content Pack (9.30.3)
Enabling approval delegationTo enable other operators to delegate approval authority, a System Administrator must make thefollowing changes to an application profile of an operator.
To delegate approval authority for thisapplication
Requires enabling this application profileoption
ChangeManagement Can Delegate Approvals
Request Management Delegate Approvals
Service Catalog(controlled by Service Desk profiles)
Delegate Approvals
The Delegate Approvals or Can Delegate Approvals profile option only controls whether an operatorcan view the Approval Delegation wizard. Separate application profile options control whether anoperator can view or approve objects in an application.
The following example illustrates how to enable approval delegation for the ChangeManagementapplication:
To edit the application profile record to which you want to grant approval delegation authority:
1. Log in to ServiceManager with a System Administrator account.
2. Click System Administration > Security > Roles.
ServiceManager displays your custom ChangeManagement security roles form.
3. In Role text box, type the name of the security role you want to grant approvals, for example“change approver”.
4. Click Search.
ServiceManager displays the current ChangeManagement Security Roles.
5. UnderSettings, select Can Delegate Approvals.
6. Click Save.
Note: It is a best practice to only enable theDelegate Approvals orCan DelegateApprovals option for operators who can also view and approve objects in the application.
Related concepts
See “Approval delegation” in ServiceManager 9.31 HelpServer topics
See “Enabling approval delegation” in ServiceManager 9.31 HelpServer topics
HP ServiceManager – Process Designer Content Pack (9.30.3) Page 123 of 196
Administrator’s GuideChapter 4:
See “Example: Enabling Approval Delegation for custom ProblemManagement approvals” inServiceManager 9.31 HelpServer topics
See “Example: Enabling custom approvals for ProblemManagement” in ServiceManager 9.31HelpServer topics
See “Temporary rights of an approval delegate” in ServiceManager 9.31 HelpServer topics
See “What happens when I delegate approval authority?” in ServiceManager 9.31 HelpServertopics
See “What happens when I receive delegated approval authority?” in ServiceManager 9.31HelpServer topics
Related tasks
See “Copy an approval delegation” in ServiceManager 9.31 HelpServer topics
See “Delegate approvals to another operator” in ServiceManager 9.31 HelpServer topics
See “Disable an active approval delegation” in ServiceManager 9.31 HelpServer topics
See “Update an active approval delegation” in ServiceManager 9.31 HelpServer topics
Related references
See “Approval delegate qualifications” in ServiceManager 9.31 HelpServer topics
See “Global variables available for approval delegation” in ServiceManager 9.31 HelpServer topics
See “Views available for approval delegation” in ServiceManager 9.31 HelpServer topics
Add folder permissions to a security role in ChangeManagement
User Role: System Administrator
To add folder permissions to a security role in ChangeManagement:
1. Click System Administration > Security > Roles.
2. Click Search to select a security role from the record list.
3. Click the security role to be viewed.
4. UnderRights, select the applicable default rights parameters for the security role.
5. UnderSecurity Folders, select folders.
6. Click Save.
Related concepts
See “Folder entitlement” in ServiceManager 9.31 HelpServer topics
HP ServiceManager – Process Designer Content Pack (9.30.3)Page 124 of 196
Administrator’s GuideChapter 4:
See “ChangeManagement” in ServiceManager 9.31 HelpServer topics
Related tasks
See “Enable folder entitlement” in ServiceManager 9.31 HelpServer topics
See “Disable folder entitlement” in ServiceManager 9.31 HelpServer topics
See “Add a folder” in ServiceManager 9.31 HelpServer topics
See “Delete a folder” in ServiceManager 9.31 HelpServer topics
HP ServiceManager – Process Designer Content Pack (9.30.3) Page 125 of 196
Administrator’s GuideChapter 4:
Chapter 5
Service DeskThe following sections explain the changes and enhancements in the Service Desk module afteryou upgrade the ServiceManager to Process Designer Content Pack 9.30.3.
Service Desk workflowThe Service Desk workflow is a sequence of connected steps in the life cycle of a support orservice request. In the workflow, a Service Desk request goes through several phases to completethe life cycle.
Process Designer Content Pack 9.30.3 includes the following out-of-box workflows in the ServiceDesk module:
l Service Desk
l Service Catalog
The workflows are applied to Service Desk records when you create categories for the ServiceDesk module
Related concepts
Process Designer
Creating a workflow
Related tasks
Create a workflow
Page 126 of 196HP ServiceManager – Process Designer Content Pack (9.30.3)
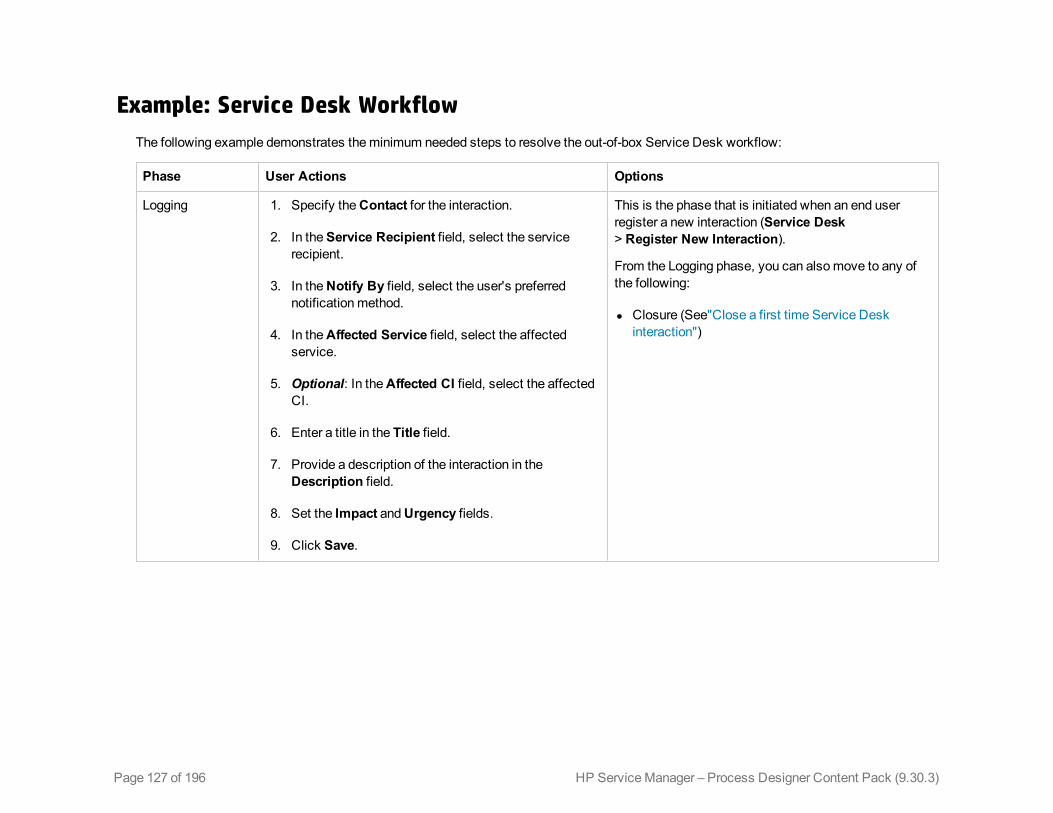
Example: Service Desk WorkflowThe following example demonstrates theminimum needed steps to resolve the out-of-box Service Desk workflow:
Phase User Actions Options
Logging 1. Specify theContact for the interaction.
2. In theService Recipient field, select the servicerecipient.
3. In theNotify By field, select the user's preferrednotificationmethod.
4. In theAffected Service field, select the affectedservice.
5. Optional: In theAffected CI field, select the affectedCI.
6. Enter a title in the Title field.
7. Provide a description of the interaction in theDescription field.
8. Set the Impact andUrgency fields.
9. Click Save.
This is the phase that is initiated when an end userregister a new interaction (Service Desk> Register New Interaction).
From the Logging phase, you can alsomove to any ofthe following:
l Closure (See"Close a first time Service Deskinteraction")
Page 127 of 196 HP ServiceManager – Process Designer Content Pack (9.30.3)
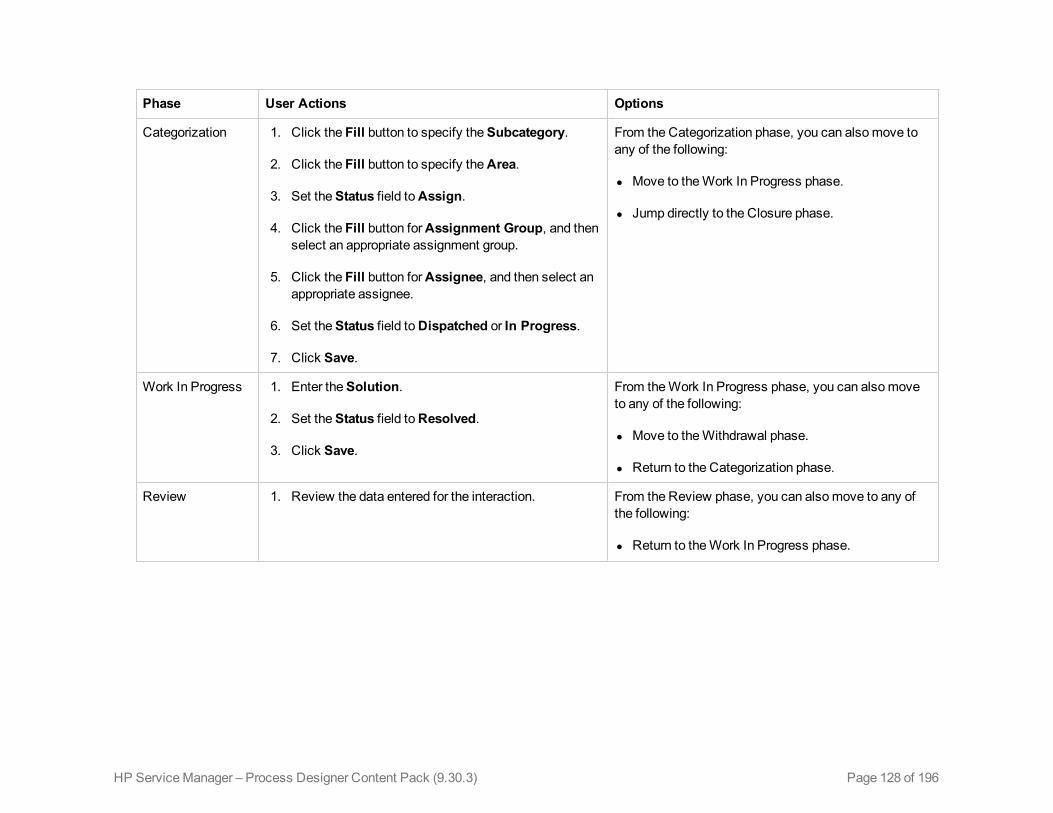
Phase User Actions Options
Categorization 1. Click the Fill button to specify theSubcategory.
2. Click the Fill button to specify theArea.
3. Set theStatus field toAssign.
4. Click the Fill button forAssignment Group, and thenselect an appropriate assignment group.
5. Click the Fill button forAssignee, and then select anappropriate assignee.
6. Set theStatus field toDispatched or In Progress.
7. Click Save.
From the Categorization phase, you can alsomove toany of the following:
l Move to theWork In Progress phase.
l Jump directly to the Closure phase.
Work In Progress 1. Enter theSolution.
2. Set theStatus field toResolved.
3. Click Save.
From theWork In Progress phase, you can alsomoveto any of the following:
l Move to theWithdrawal phase.
l Return to the Categorization phase.
Review 1. Review the data entered for the interaction. From the Review phase, you can alsomove to any ofthe following:
l Return to theWork In Progress phase.
Page 128 of 196HP ServiceManager – Process Designer Content Pack (9.30.3)
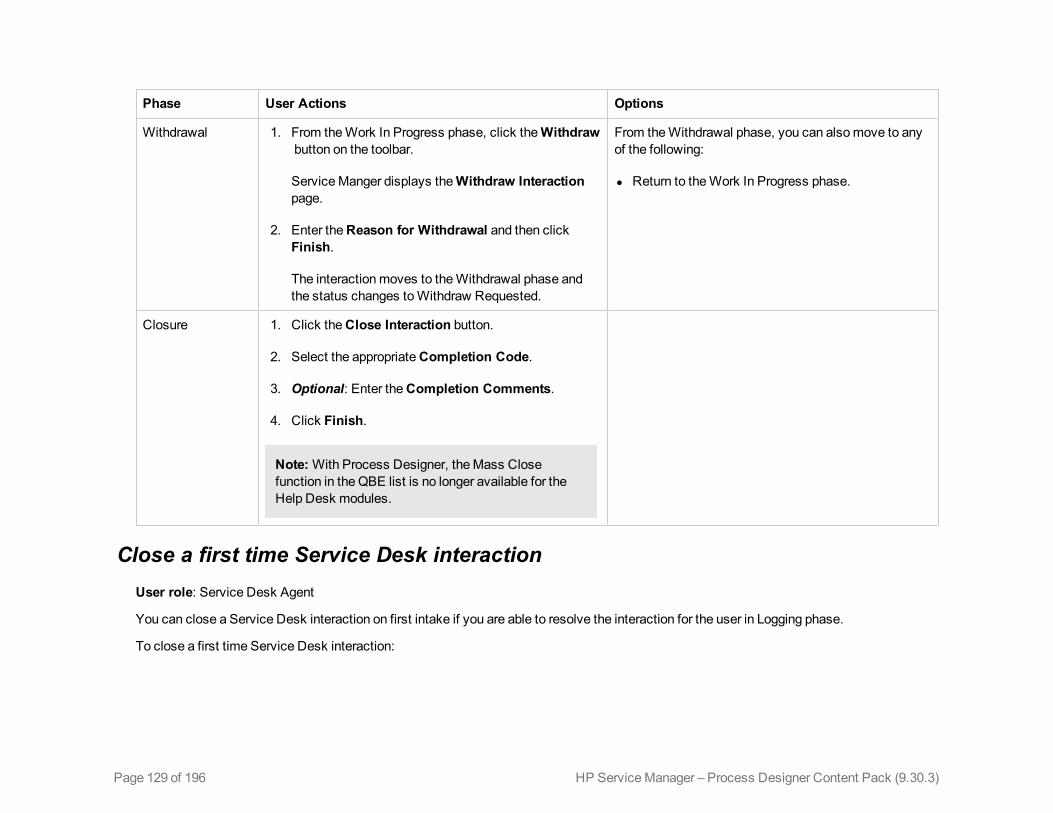
Phase User Actions Options
Withdrawal 1. From theWork In Progress phase, click theWithdrawbutton on the toolbar.
ServiceManger displays theWithdraw Interactionpage.
2. Enter theReason for Withdrawal and then clickFinish.
The interactionmoves to theWithdrawal phase andthe status changes toWithdraw Requested.
From theWithdrawal phase, you can alsomove to anyof the following:
l Return to theWork In Progress phase.
Closure 1. Click theClose Interaction button.
2. Select the appropriateCompletion Code.
3. Optional: Enter theCompletion Comments.
4. Click Finish.
Note:With Process Designer, theMass Closefunction in the QBE list is no longer available for theHelp Desk modules.
Close a first time Service Desk interactionUser role: Service Desk Agent
You can close a Service Desk interaction on first intake if you are able to resolve the interaction for the user in Logging phase.
To close a first time Service Desk interaction:
Page 129 of 196 HP ServiceManager – Process Designer Content Pack (9.30.3)
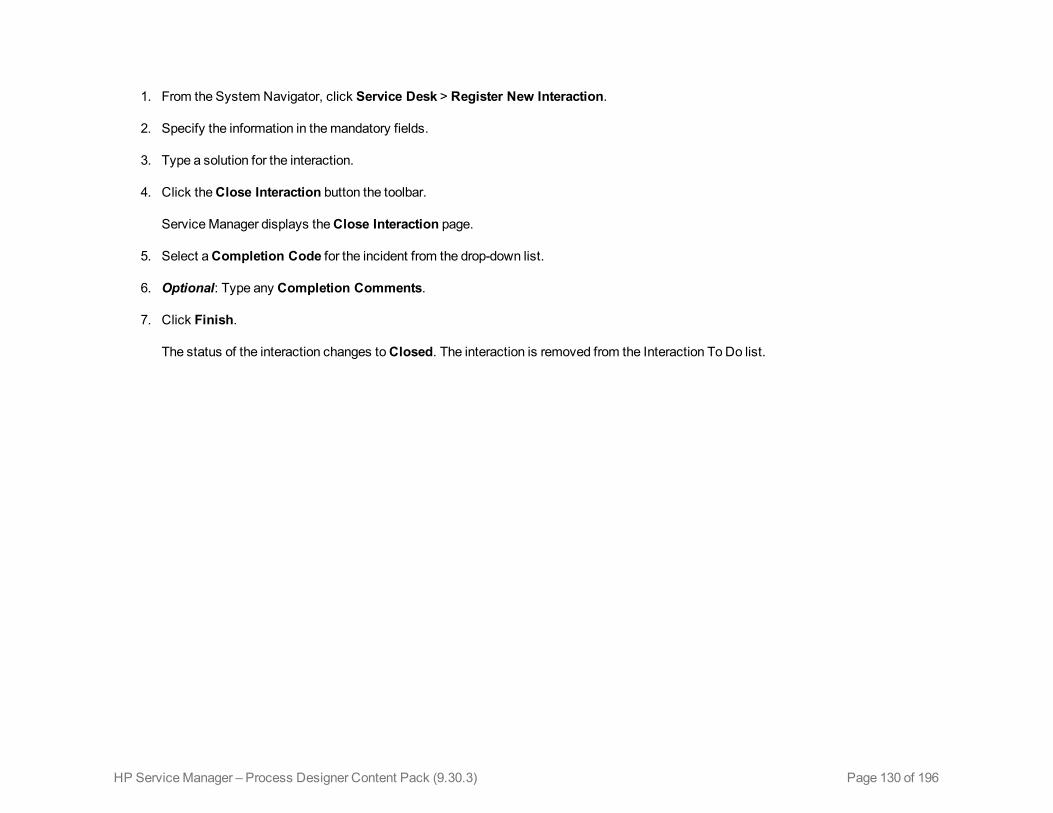
1. From the System Navigator, click Service Desk > Register New Interaction.
2. Specify the information in themandatory fields.
3. Type a solution for the interaction.
4. Click theClose Interaction button the toolbar.
ServiceManager displays theClose Interaction page.
5. Select aCompletion Code for the incident from the drop-down list.
6. Optional: Type any Completion Comments.
7. Click Finish.
The status of the interaction changes toClosed. The interaction is removed from the Interaction To Do list.
Page 130 of 196HP ServiceManager – Process Designer Content Pack (9.30.3)
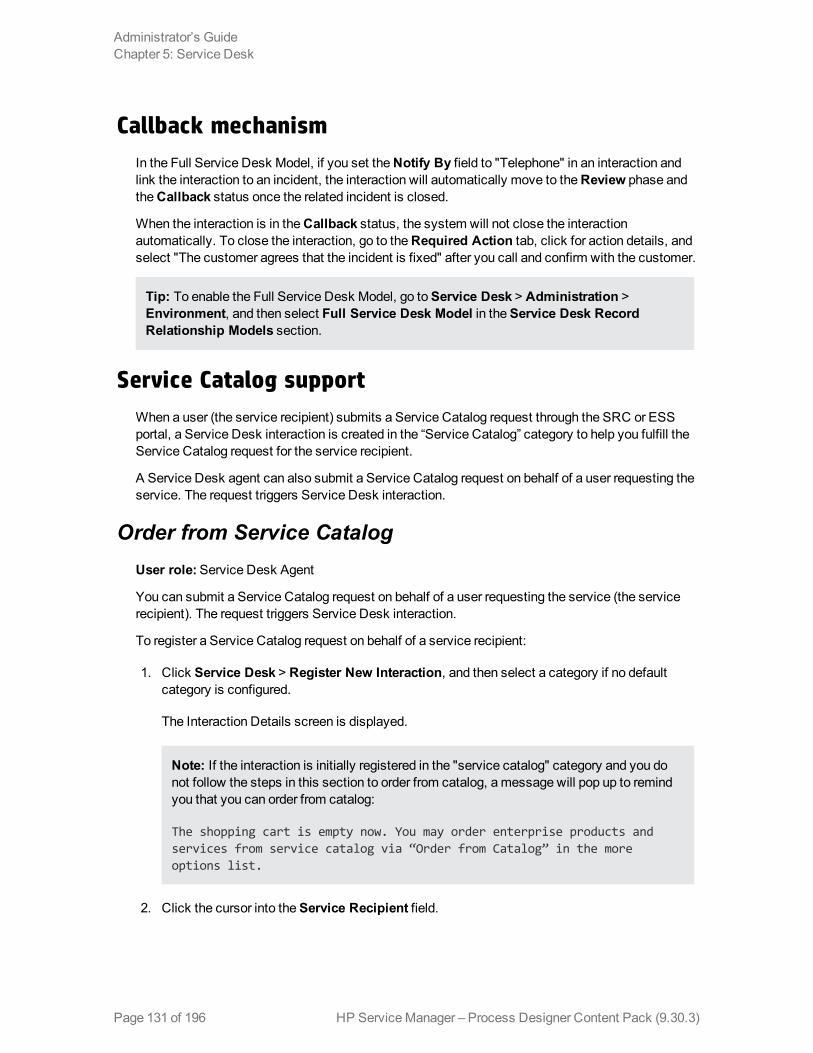
Callback mechanismIn the Full Service Desk Model, if you set theNotify By field to "Telephone" in an interaction andlink the interaction to an incident, the interaction will automatically move to theReview phase andtheCallback status once the related incident is closed.
When the interaction is in theCallback status, the system will not close the interactionautomatically. To close the interaction, go to theRequired Action tab, click for action details, andselect "The customer agrees that the incident is fixed" after you call and confirm with the customer.
Tip: To enable the Full Service Desk Model, go toService Desk > Administration >Environment, and then select Full Service Desk Model in theService Desk RecordRelationship Models section.
Service Catalog supportWhen a user (the service recipient) submits a Service Catalog request through the SRC or ESSportal, a Service Desk interaction is created in the “Service Catalog” category to help you fulfill theService Catalog request for the service recipient.
A Service Desk agent can also submit a Service Catalog request on behalf of a user requesting theservice. The request triggers Service Desk interaction.
Order from Service CatalogUser role:Service Desk Agent
You can submit a Service Catalog request on behalf of a user requesting the service (the servicerecipient). The request triggers Service Desk interaction.
To register a Service Catalog request on behalf of a service recipient:
1. Click Service Desk > Register New Interaction, and then select a category if no defaultcategory is configured.
The Interaction Details screen is displayed.
Note: If the interaction is initially registered in the "service catalog" category and you donot follow the steps in this section to order from catalog, amessage will pop up to remindyou that you can order from catalog:
The shopping cart is empty now. You may order enterprise products andservices from service catalog via “Order from Catalog” in the moreoptions list.
2. Click the cursor into theService Recipient field.
HP ServiceManager – Process Designer Content Pack (9.30.3)Page 131 of 196
Administrator’s GuideChapter 5: Service Desk
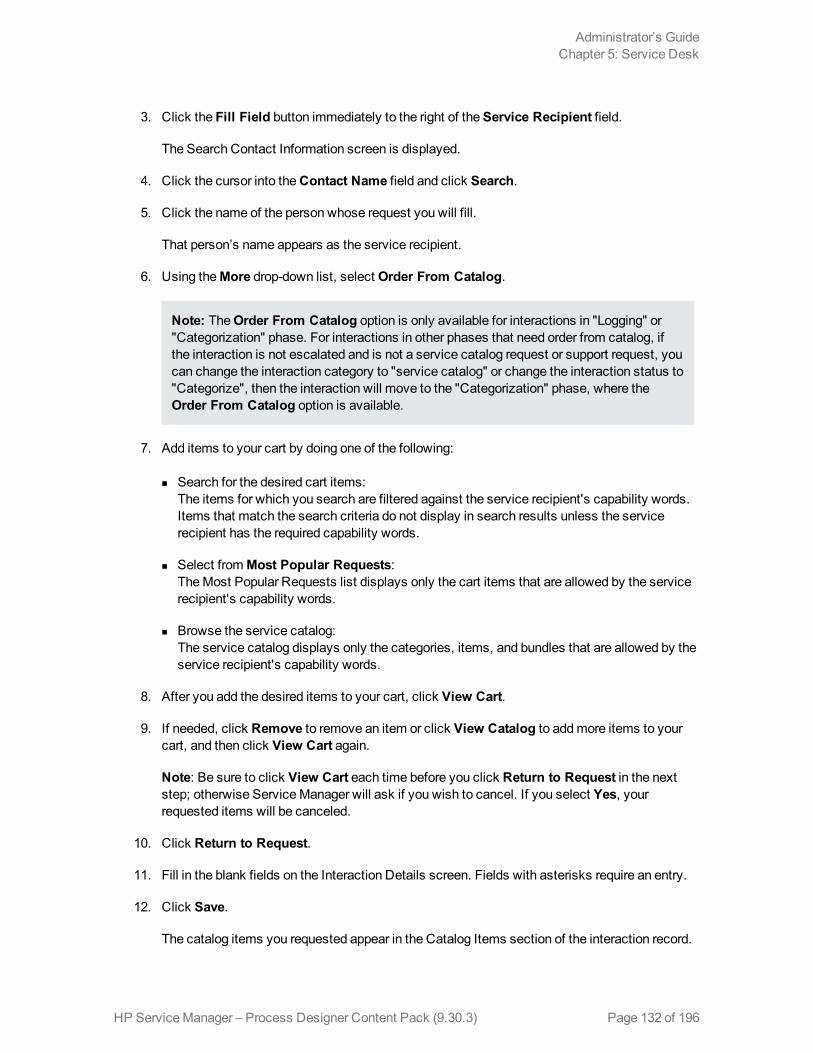
3. Click the Fill Field button immediately to the right of theService Recipient field.
The Search Contact Information screen is displayed.
4. Click the cursor into theContact Name field and click Search.
5. Click the name of the person whose request you will fill.
That person’s name appears as the service recipient.
6. Using theMore drop-down list, select Order From Catalog.
Note: TheOrder From Catalog option is only available for interactions in "Logging" or"Categorization" phase. For interactions in other phases that need order from catalog, ifthe interaction is not escalated and is not a service catalog request or support request, youcan change the interaction category to "service catalog" or change the interaction status to"Categorize", then the interaction will move to the "Categorization" phase, where theOrder From Catalog option is available.
7. Add items to your cart by doing one of the following:
n Search for the desired cart items:The items for which you search are filtered against the service recipient's capability words.Items that match the search criteria do not display in search results unless the servicerecipient has the required capability words.
n Select fromMost Popular Requests:TheMost Popular Requests list displays only the cart items that are allowed by the servicerecipient's capability words.
n Browse the service catalog:The service catalog displays only the categories, items, and bundles that are allowed by theservice recipient's capability words.
8. After you add the desired items to your cart, click View Cart.
9. If needed, click Remove to remove an item or click View Catalog to addmore items to yourcart, and then click View Cart again.
Note: Be sure to click View Cart each time before you click Return to Request in the nextstep; otherwise ServiceManager will ask if you wish to cancel. If you select Yes, yourrequested items will be canceled.
10. Click Return to Request.
11. Fill in the blank fields on the Interaction Details screen. Fields with asterisks require an entry.
12. Click Save.
The catalog items you requested appear in the Catalog Items section of the interaction record.
HP ServiceManager – Process Designer Content Pack (9.30.3) Page 132 of 196
Administrator’s GuideChapter 5: Service Desk
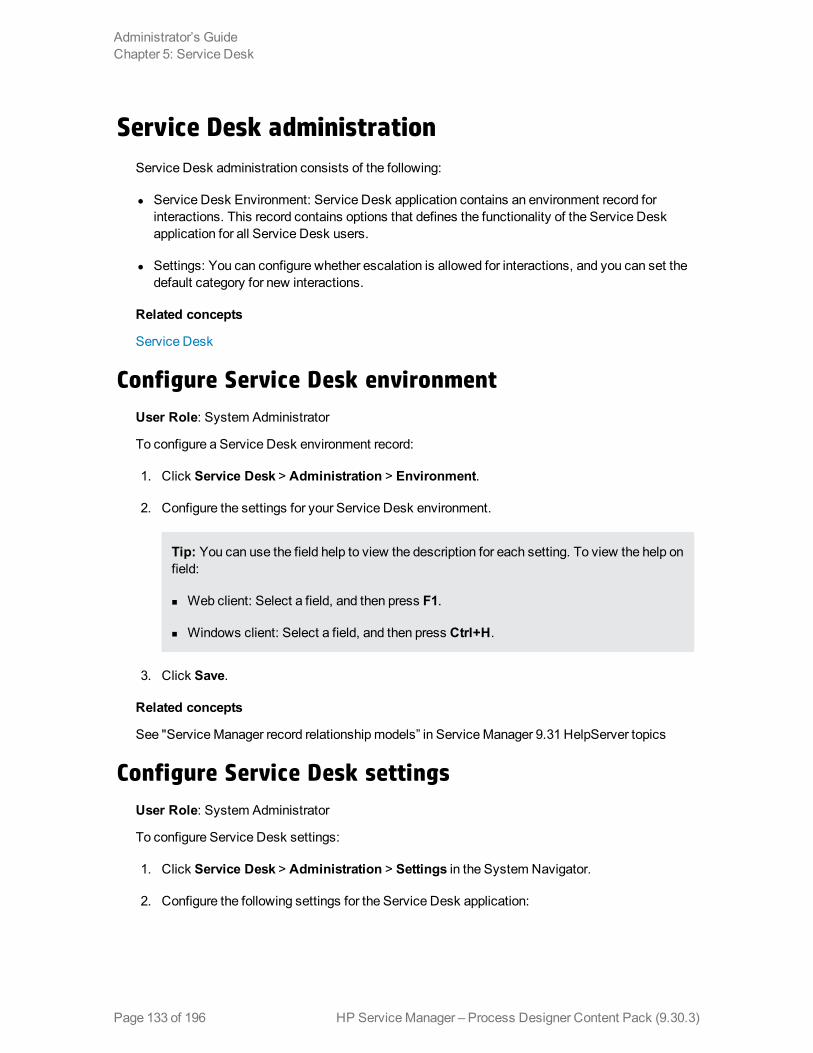
Service Desk administrationService Desk administration consists of the following:
l Service Desk Environment: Service Desk application contains an environment record forinteractions. This record contains options that defines the functionality of the Service Deskapplication for all Service Desk users.
l Settings: You can configure whether escalation is allowed for interactions, and you can set thedefault category for new interactions.
Related concepts
Service Desk
Configure Service Desk environmentUser Role: System Administrator
To configure a Service Desk environment record:
1. Click Service Desk > Administration > Environment.
2. Configure the settings for your Service Desk environment.
Tip: You can use the field help to view the description for each setting. To view the help onfield:
n Web client: Select a field, and then press F1.
n Windows client: Select a field, and then press Ctrl+H.
3. Click Save.
Related concepts
See "ServiceManager record relationship models” in ServiceManager 9.31 HelpServer topics
Configure Service Desk settingsUser Role: System Administrator
To configure Service Desk settings:
1. Click Service Desk > Administration > Settings in the System Navigator.
2. Configure the following settings for the Service Desk application:
HP ServiceManager – Process Designer Content Pack (9.30.3)Page 133 of 196
Administrator’s GuideChapter 5: Service Desk
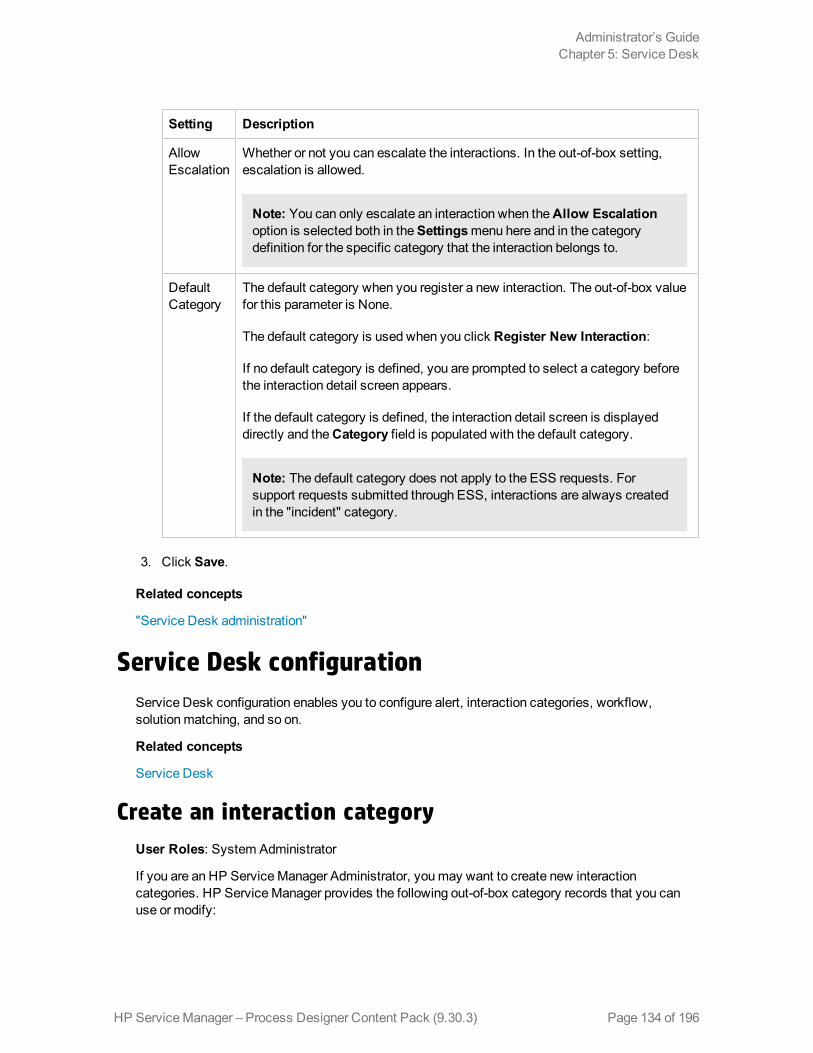
Setting Description
AllowEscalation
Whether or not you can escalate the interactions. In the out-of-box setting,escalation is allowed.
Note: You can only escalate an interaction when theAllow Escalationoption is selected both in theSettingsmenu here and in the categorydefinition for the specific category that the interaction belongs to.
DefaultCategory
The default category when you register a new interaction. The out-of-box valuefor this parameter is None.
The default category is used when you click Register New Interaction:
If no default category is defined, you are prompted to select a category beforethe interaction detail screen appears.
If the default category is defined, the interaction detail screen is displayeddirectly and theCategory field is populated with the default category.
Note: The default category does not apply to the ESS requests. Forsupport requests submitted through ESS, interactions are always createdin the "incident" category.
3. Click Save.
Related concepts
"Service Desk administration"
Service Desk configurationService Desk configuration enables you to configure alert, interaction categories, workflow,solutionmatching, and so on.
Related concepts
Service Desk
Create an interaction categoryUser Roles: System Administrator
If you are an HP ServiceManager Administrator, youmay want to create new interactioncategories. HP ServiceManager provides the following out-of-box category records that you canuse or modify:
HP ServiceManager – Process Designer Content Pack (9.30.3) Page 134 of 196
Administrator’s GuideChapter 5: Service Desk
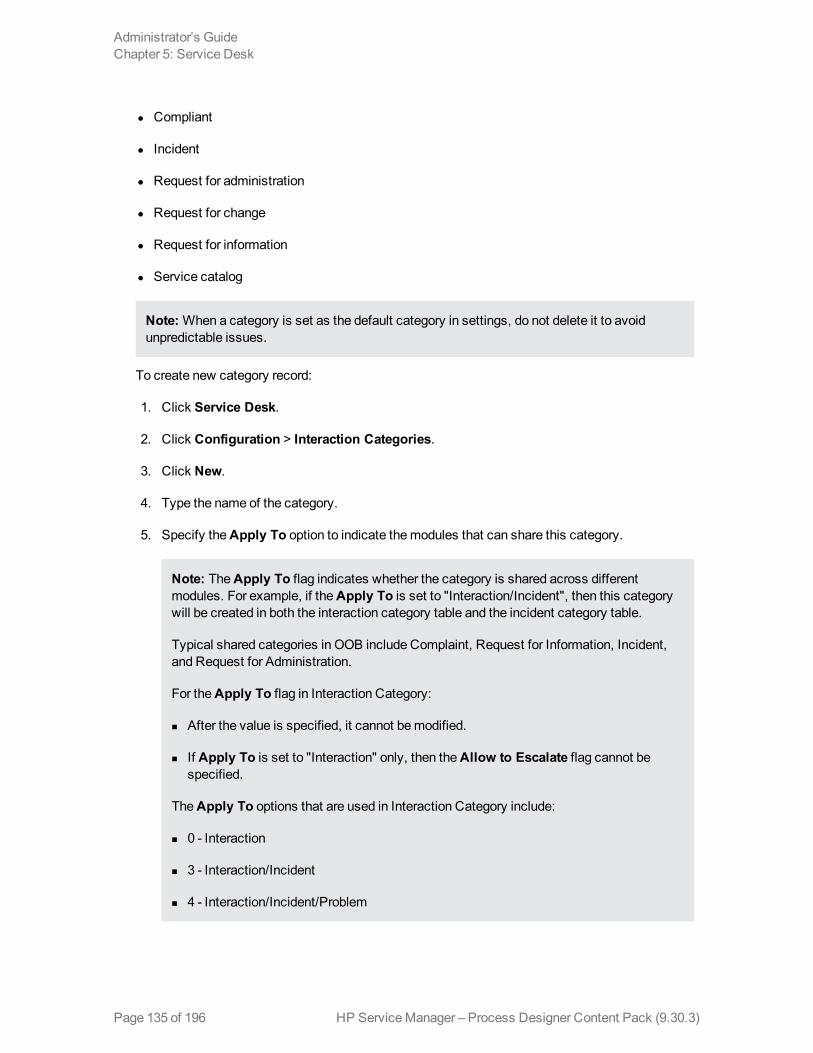
l Compliant
l Incident
l Request for administration
l Request for change
l Request for information
l Service catalog
Note:When a category is set as the default category in settings, do not delete it to avoidunpredictable issues.
To create new category record:
1. Click Service Desk.
2. Click Configuration > Interaction Categories.
3. Click New.
4. Type the name of the category.
5. Specify theApply To option to indicate themodules that can share this category.
Note: TheApply To flag indicates whether the category is shared across differentmodules. For example, if theApply To is set to "Interaction/Incident", then this categorywill be created in both the interaction category table and the incident category table.
Typical shared categories in OOB include Complaint, Request for Information, Incident,and Request for Administration.
For theApply To flag in Interaction Category:
n After the value is specified, it cannot bemodified.
n If Apply To is set to "Interaction" only, then theAllow to Escalate flag cannot bespecified.
TheApply To options that are used in Interaction Category include:
n 0 - Interaction
n 3 - Interaction/Incident
n 4 - Interaction/Incident/Problem
HP ServiceManager – Process Designer Content Pack (9.30.3)Page 135 of 196
Administrator’s GuideChapter 5: Service Desk
6. Specify whether the category is active and whether escalation is allowed.
Note: If theActive check box is unchecked, you cannot use this category when creating anew record.
7. Type the category description.
8. Select a workflow for the category.
9. Click Save to view theWorkflow tab and other associated tabs.
10. Click Subcategories tab to create subcategories for the interaction category.
11. Click Service Desk Approval tab to configure approval settings.
Note: The settings in theService Desk Approval tab are only for service catalogapproval. That is, in the out-of-box system, they are only valid for the service catalogcategory.
12. Click Save.
Note: Interaction category name is read-only after the category is created.
Related tasks
"Add a new interaction subcategory"
"Add a new interaction area"
Add a new interaction subcategoryUser Roles: System Administrator
Subcategories are a way to refine a Service Desk category into smaller groups. For example, thecomplaint category can have service delivery and support subcategories.
To add a subcategory:
1. Click Service Desk.
2. Click Configuration > Interaction Categories.
3. Click New to create a new category or click Search to select an existing category.
4. In theSubcategories section, click the Link New Subcategories button.
5. Type a subcategory name.
HP ServiceManager – Process Designer Content Pack (9.30.3) Page 136 of 196
Administrator’s GuideChapter 5: Service Desk
6. Type a description for the subcategory.
7. Click Save to add the new subcategory.
Related concepts
See “Search for a record” in ServiceManager 9.31 HelpServer topics
Related tasks
"Create an interaction category"
"Add a new interaction area"
Add a new interaction areaUser Roles: System Administrator
Areas are a way to further refine a Service Desk subcategory. For example, the supportsubcategory in the complaint category can have availability, functionality, and performance areas.
To add an area:
1. Click Service Desk.
2. Click Configuration > Interaction Categories.
3. Click New to create a new category or click Search to select an existing category.
4. In theSubcategories section, click the Link New Subcategories button to create a newsubcategory or select an existing subcategory from the list.
5. In theAreas section, click the Link New Areas button.
6. Type a name for the area.
7. Type a description for the area.
8. Click Save to add the new area.
Related concepts
See “Search for a record” in ServiceManager 9.31 HelpServer topics
Related tasks
"Create an interaction category"
"Add a new interaction subcategory"
HP ServiceManager – Process Designer Content Pack (9.30.3)Page 137 of 196
Administrator’s GuideChapter 5: Service Desk
Service Desk solution matchingWhen you escalate an interaction record to incident, a list of incidents, problems, or known errorsappears based on the pre-defined solutionmatching configuration. You can then select thematchedrecords and link them to the interaction. Alternatively, you can specify the ID of the existing incidentor problem (known error), and then link it to the interaction. The linked records are shown in theRelated Record section of the interaction.
Note:When you escalate from interaction to incident, instead of selecting the assignmentgroup through a wizard, the assignment group of the escalated incident is populated accordingto the following rules:
1. If an interaction is escalated to an incident of the incident category, theConfig admingroup field defined in affected service or affected CI of the interaction is used.
2. If an interaction is escalated to an incident of other categories, the Service Desk group inthe Service Desk environment is used.
In an out-of-box system, the following configurations are provided for Service Desk interactionsolutionmatching:
l Find an incident with amatching configuration item
l Find an incident with amatching service
l Find an incident with amatching title
l Find a known error with amatching configuration item
l Find a known error with amatching service
l Find a known error with amatching title
l Find a problem with amatching configuration item
l Find a problem with amatching service
l Find a problem with amatching title
Tomodify the out-of-box solutionmatching configurations, navigate toService Desk> Configuration > Solution Matching.
SecurityThe topics in this section explain the Service Desk security roles, security areas, and rights.
Setting rights to interactionsUser Roles: Service Desk Manager
HP ServiceManager – Process Designer Content Pack (9.30.3) Page 138 of 196
Administrator’s GuideChapter 5: Service Desk
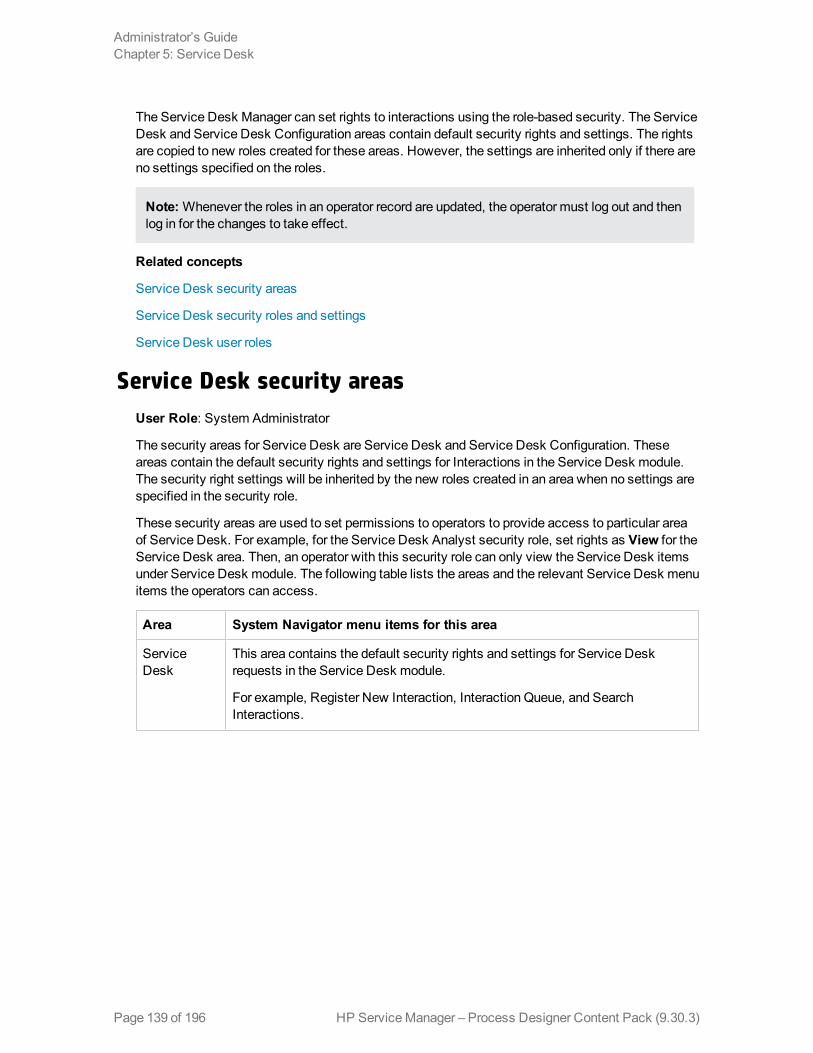
The Service Desk Manager can set rights to interactions using the role-based security. The ServiceDesk and Service Desk Configuration areas contain default security rights and settings. The rightsare copied to new roles created for these areas. However, the settings are inherited only if there areno settings specified on the roles.
Note:Whenever the roles in an operator record are updated, the operator must log out and thenlog in for the changes to take effect.
Related concepts
Service Desk security areas
Service Desk security roles and settings
Service Desk user roles
Service Desk security areasUser Role: System Administrator
The security areas for Service Desk are Service Desk and Service Desk Configuration. Theseareas contain the default security rights and settings for Interactions in the Service Desk module.The security right settings will be inherited by the new roles created in an area when no settings arespecified in the security role.
These security areas are used to set permissions to operators to provide access to particular areaof Service Desk. For example, for the Service Desk Analyst security role, set rights as View for theService Desk area. Then, an operator with this security role can only view the Service Desk itemsunder Service Desk module. The following table lists the areas and the relevant Service Desk menuitems the operators can access.
Area System Navigator menu items for this area
ServiceDesk
This area contains the default security rights and settings for Service Deskrequests in the Service Desk module.
For example, Register New Interaction, Interaction Queue, and SearchInteractions.
HP ServiceManager – Process Designer Content Pack (9.30.3)Page 139 of 196
Administrator’s GuideChapter 5: Service Desk
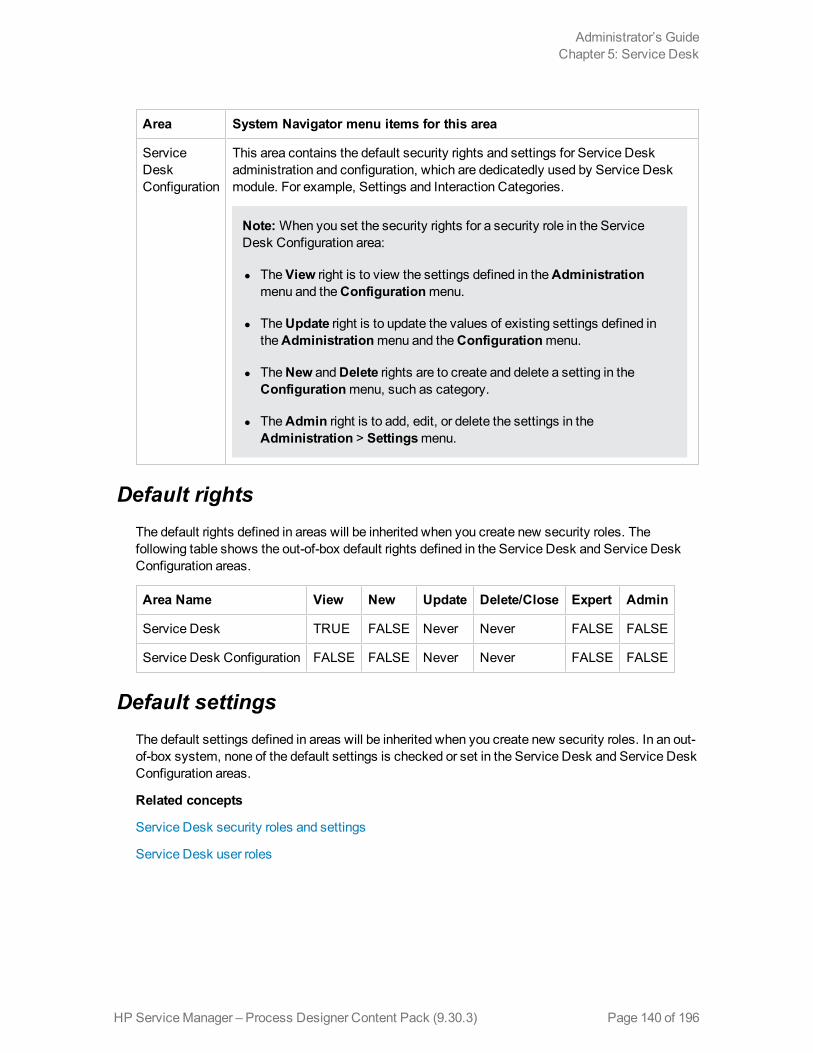
Area System Navigator menu items for this area
ServiceDeskConfiguration
This area contains the default security rights and settings for Service Deskadministration and configuration, which are dedicatedly used by Service Deskmodule. For example, Settings and Interaction Categories.
Note:When you set the security rights for a security role in the ServiceDesk Configuration area:
l TheView right is to view the settings defined in theAdministrationmenu and theConfigurationmenu.
l TheUpdate right is to update the values of existing settings defined intheAdministrationmenu and theConfigurationmenu.
l TheNew andDelete rights are to create and delete a setting in theConfigurationmenu, such as category.
l TheAdmin right is to add, edit, or delete the settings in theAdministration > Settingsmenu.
Default rightsThe default rights defined in areas will be inherited when you create new security roles. Thefollowing table shows the out-of-box default rights defined in the Service Desk and Service DeskConfiguration areas.
Area Name View New Update Delete/Close Expert Admin
Service Desk TRUE FALSE Never Never FALSE FALSE
Service Desk Configuration FALSE FALSE Never Never FALSE FALSE
Default settingsThe default settings defined in areas will be inherited when you create new security roles. In an out-of-box system, none of the default settings is checked or set in the Service Desk and Service DeskConfiguration areas.
Related concepts
Service Desk security roles and settings
Service Desk user roles
HP ServiceManager – Process Designer Content Pack (9.30.3) Page 140 of 196
Administrator’s GuideChapter 5: Service Desk
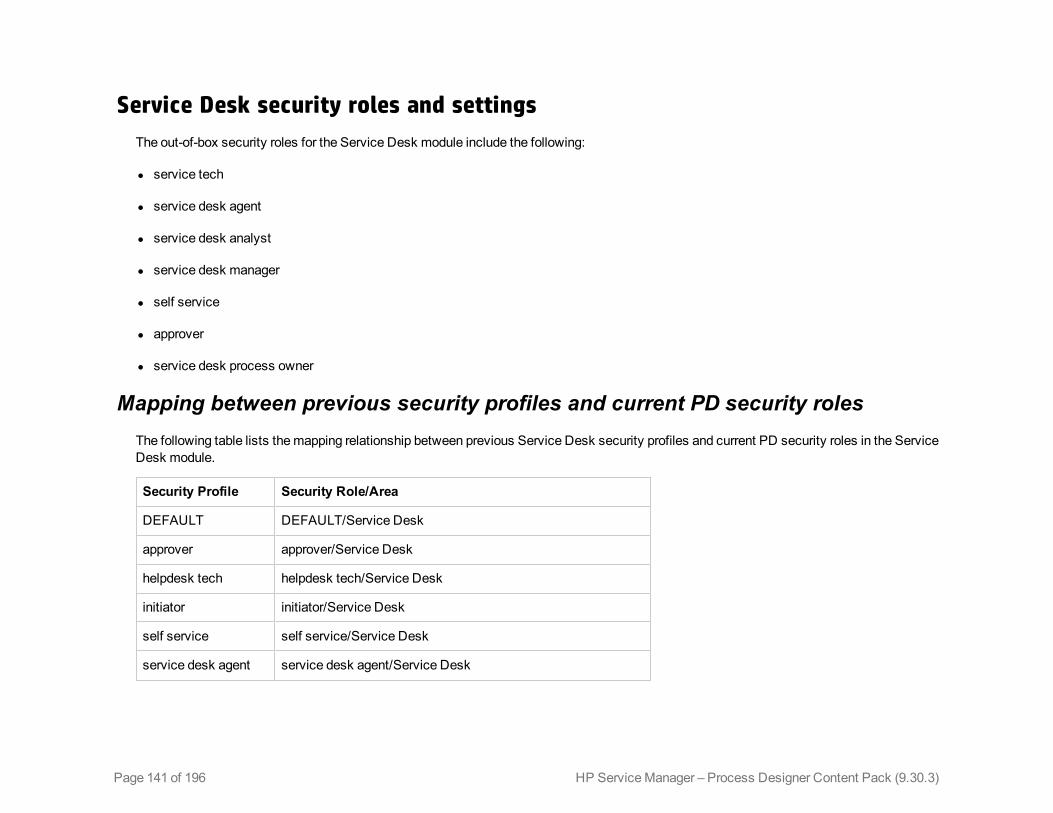
Service Desk security roles and settingsThe out-of-box security roles for the Service Desk module include the following:
l service tech
l service desk agent
l service desk analyst
l service desk manager
l self service
l approver
l service desk process owner
Mapping between previous security profiles and current PD security rolesThe following table lists themapping relationship between previous Service Desk security profiles and current PD security roles in the ServiceDesk module.
Security Profile Security Role/Area
DEFAULT DEFAULT/Service Desk
approver approver/Service Desk
helpdesk tech helpdesk tech/Service Desk
initiator initiator/Service Desk
self service self service/Service Desk
service desk agent service desk agent/Service Desk
Page 141 of 196 HP ServiceManager – Process Designer Content Pack (9.30.3)
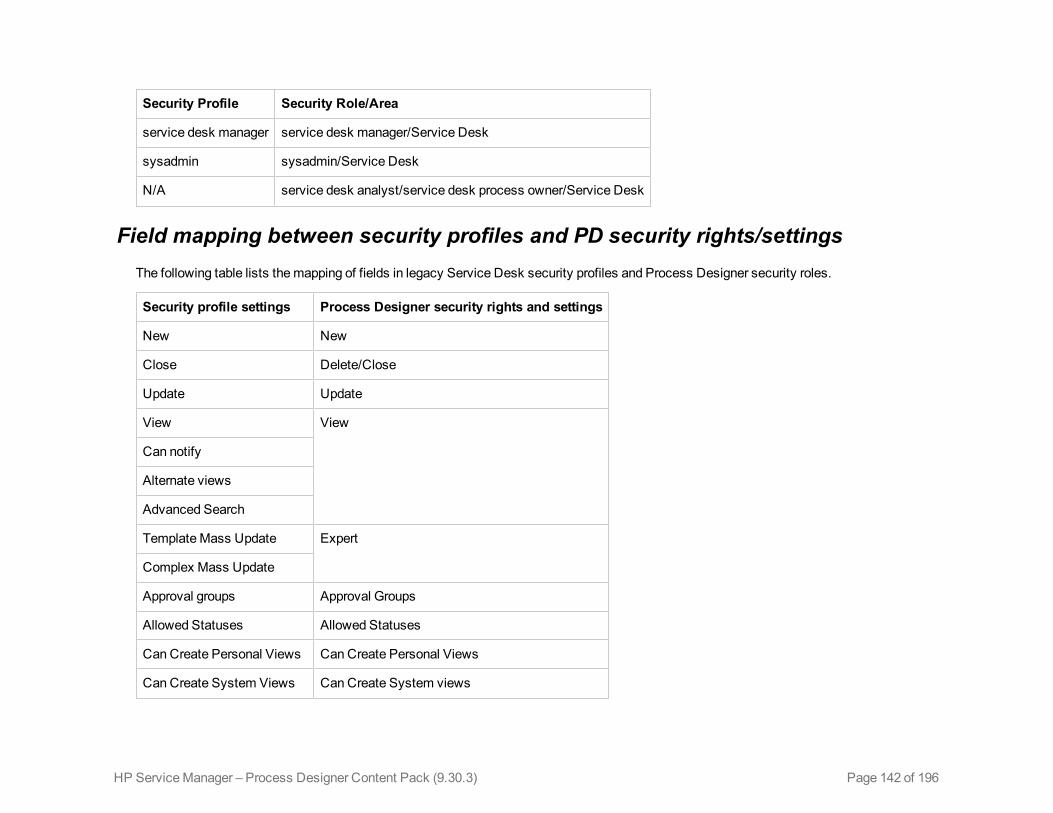
Security Profile Security Role/Area
service desk manager service desk manager/Service Desk
sysadmin sysadmin/Service Desk
N/A service desk analyst/service desk process owner/Service Desk
Field mapping between security profiles and PD security rights/settingsThe following table lists themapping of fields in legacy Service Desk security profiles and Process Designer security roles.
Security profile settings Process Designer security rights and settings
New New
Close Delete/Close
Update Update
View View
Can notify
Alternate views
Advanced Search
TemplateMass Update Expert
Complex Mass Update
Approval groups Approval Groups
Allowed Statuses Allowed Statuses
Can Create Personal Views Can Create Personal Views
Can Create System Views Can Create System views
Page 142 of 196HP ServiceManager – Process Designer Content Pack (9.30.3)
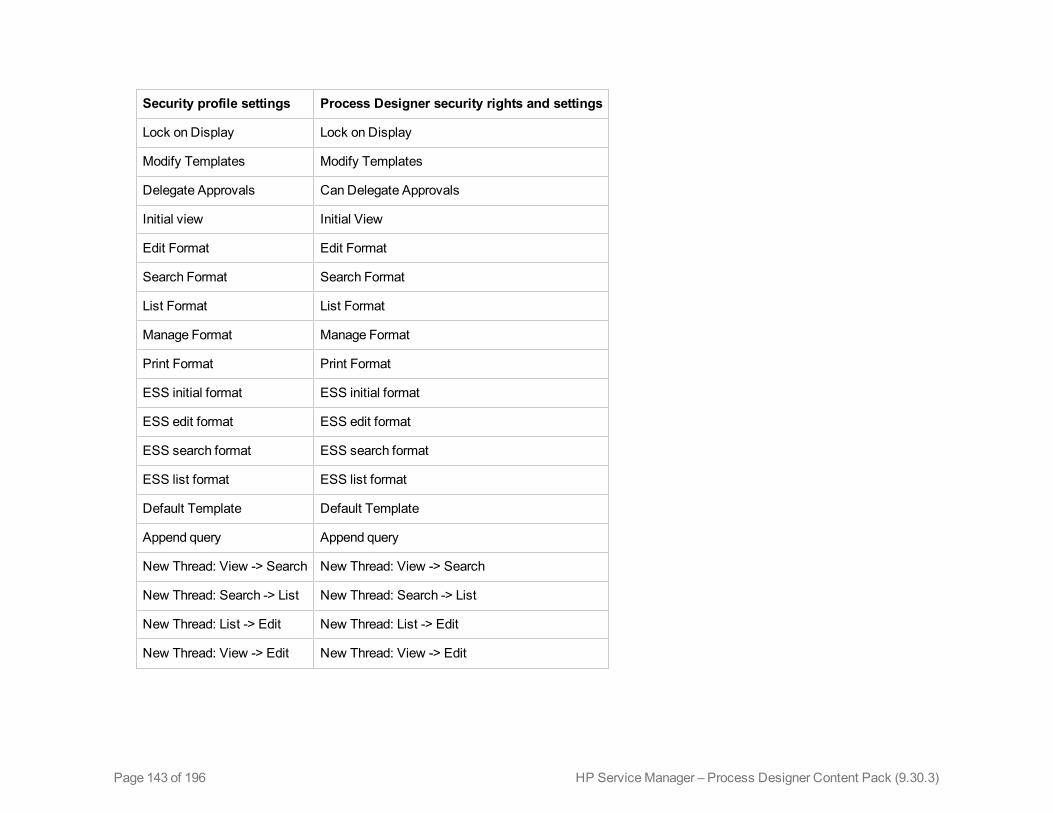
Security profile settings Process Designer security rights and settings
Lock on Display Lock on Display
Modify Templates Modify Templates
Delegate Approvals Can Delegate Approvals
Initial view Initial View
Edit Format Edit Format
Search Format Search Format
List Format List Format
Manage Format Manage Format
Print Format Print Format
ESS initial format ESS initial format
ESS edit format ESS edit format
ESS search format ESS search format
ESS list format ESS list format
Default Template Default Template
Append query Append query
New Thread: View -> Search New Thread: View -> Search
New Thread: Search -> List New Thread: Search -> List
New Thread: List -> Edit New Thread: List -> Edit
New Thread: View -> Edit New Thread: View -> Edit
Page 143 of 196 HP ServiceManager – Process Designer Content Pack (9.30.3)
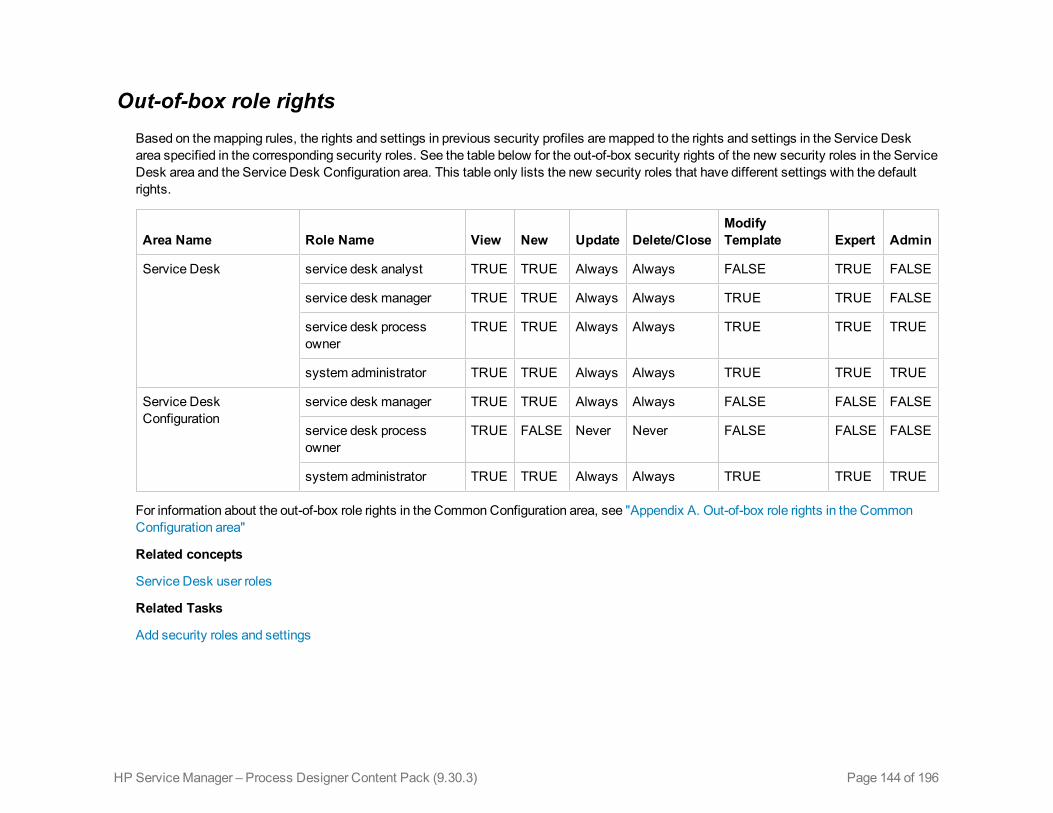
Out-of-box role rightsBased on themapping rules, the rights and settings in previous security profiles aremapped to the rights and settings in the Service Deskarea specified in the corresponding security roles. See the table below for the out-of-box security rights of the new security roles in the ServiceDesk area and the Service Desk Configuration area. This table only lists the new security roles that have different settings with the defaultrights.
Area Name Role Name View New Update Delete/CloseModifyTemplate Expert Admin
Service Desk service desk analyst TRUE TRUE Always Always FALSE TRUE FALSE
service desk manager TRUE TRUE Always Always TRUE TRUE FALSE
service desk processowner
TRUE TRUE Always Always TRUE TRUE TRUE
system administrator TRUE TRUE Always Always TRUE TRUE TRUE
Service DeskConfiguration
service desk manager TRUE TRUE Always Always FALSE FALSE FALSE
service desk processowner
TRUE FALSE Never Never FALSE FALSE FALSE
system administrator TRUE TRUE Always Always TRUE TRUE TRUE
For information about the out-of-box role rights in the CommonConfiguration area, see "Appendix A. Out-of-box role rights in the CommonConfiguration area"
Related concepts
Service Desk user roles
Related Tasks
Add security roles and settings
Page 144 of 196HP ServiceManager – Process Designer Content Pack (9.30.3)
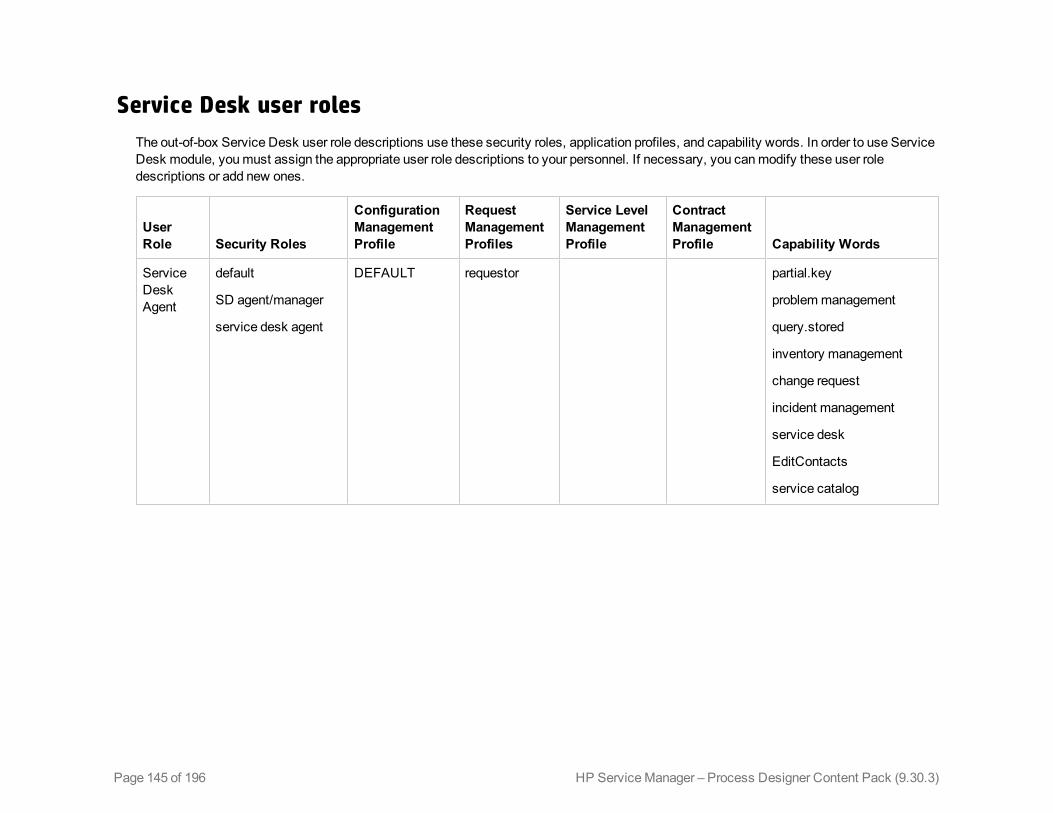
Service Desk user rolesThe out-of-box Service Desk user role descriptions use these security roles, application profiles, and capability words. In order to use ServiceDesk module, youmust assign the appropriate user role descriptions to your personnel. If necessary, you canmodify these user roledescriptions or add new ones.
UserRole Security Roles
ConfigurationManagementProfile
RequestManagementProfiles
Service LevelManagementProfile
ContractManagementProfile Capability Words
ServiceDeskAgent
default
SD agent/manager
service desk agent
DEFAULT requestor partial.key
problemmanagement
query.stored
inventory management
change request
incident management
service desk
EditContacts
service catalog
Page 145 of 196 HP ServiceManager – Process Designer Content Pack (9.30.3)
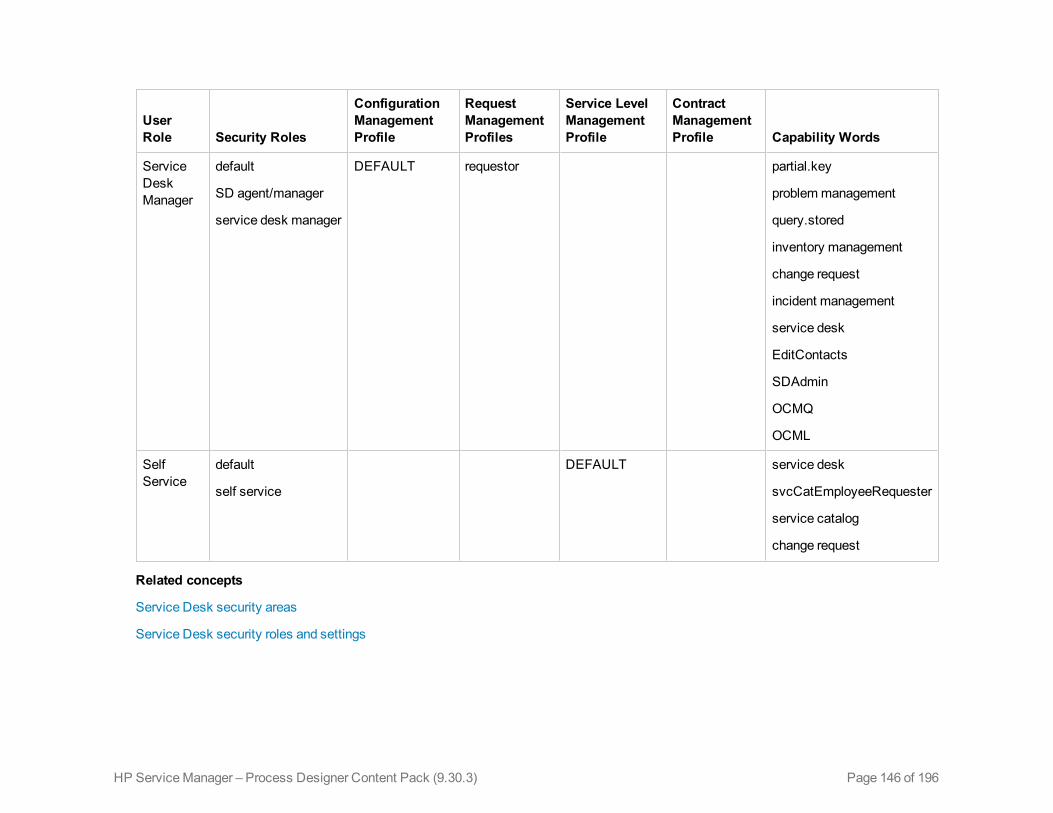
UserRole Security Roles
ConfigurationManagementProfile
RequestManagementProfiles
Service LevelManagementProfile
ContractManagementProfile Capability Words
ServiceDeskManager
default
SD agent/manager
service desk manager
DEFAULT requestor partial.key
problemmanagement
query.stored
inventory management
change request
incident management
service desk
EditContacts
SDAdmin
OCMQ
OCML
SelfService
default
self service
DEFAULT service desk
svcCatEmployeeRequester
service catalog
change request
Related concepts
Service Desk security areas
Service Desk security roles and settings
Page 146 of 196HP ServiceManager – Process Designer Content Pack (9.30.3)
Chapter 6
Incident ManagementThe following sections explain the changes and enhancements in the Incident Management moduleafter you upgrade the ServiceManager to Process Designer Content Pack 9.30.3.
Incident workflowThe incident workflow is a sequence of connected steps in the life cycle of an incident . In theworkflow, an incident goes through several phases to complete the life cycle. Workflow phases canconsist of one or multiple tasks to be completed to proceed to the next phase.
Process Designer Content Pack 9.30.3 includes out-of-box incident workflows and task workflows.
The following are the out-of-box incident workflows:
l Incident
l Incident Task
The incident workflows are applied to incident records when you create incident categories.
Related concepts
Process Designer
Creating a workflow
Related tasks
Create a workflow
Page 147 of 196HP ServiceManager – Process Designer Content Pack (9.30.3)
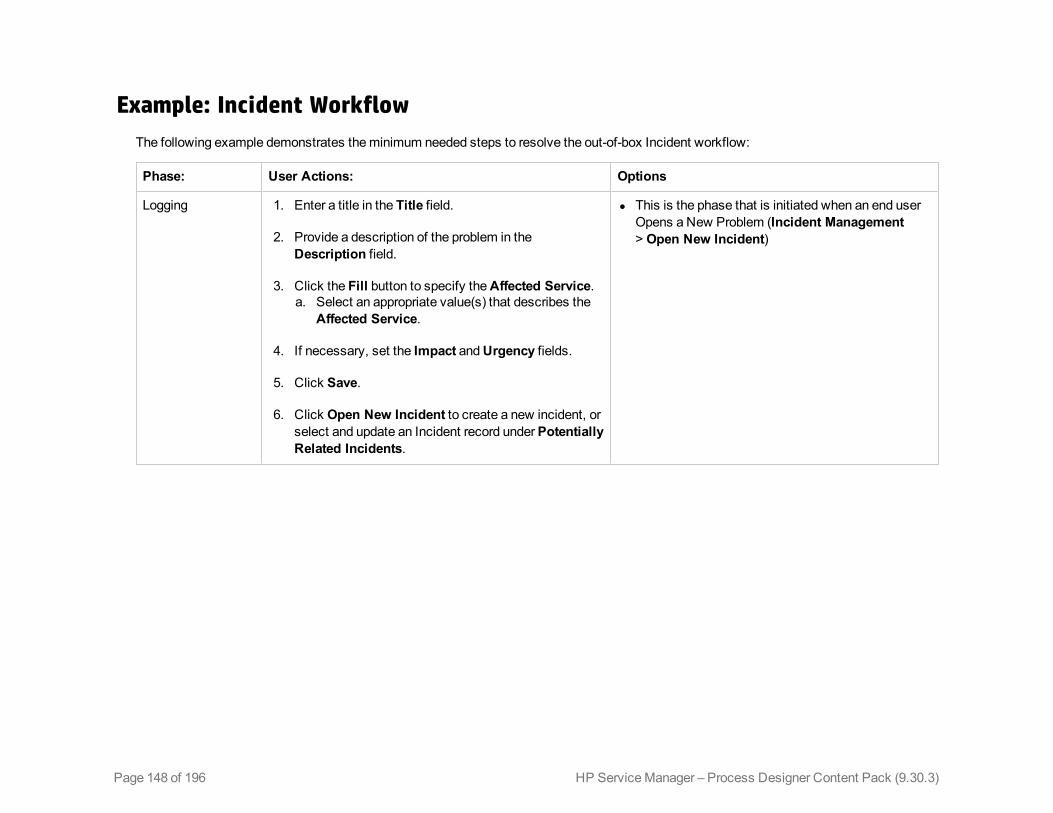
Example: Incident WorkflowThe following example demonstrates theminimum needed steps to resolve the out-of-box Incident workflow:
Phase: User Actions: Options
Logging 1. Enter a title in the Title field.
2. Provide a description of the problem in theDescription field.
3. Click the Fill button to specify theAffected Service.a. Select an appropriate value(s) that describes the
Affected Service.
4. If necessary, set the Impact andUrgency fields.
5. Click Save.
6. Click Open New Incident to create a new incident, orselect and update an Incident record underPotentiallyRelated Incidents.
l This is the phase that is initiated when an end userOpens a New Problem (Incident Management> Open New Incident)
Page 148 of 196 HP ServiceManager – Process Designer Content Pack (9.30.3)
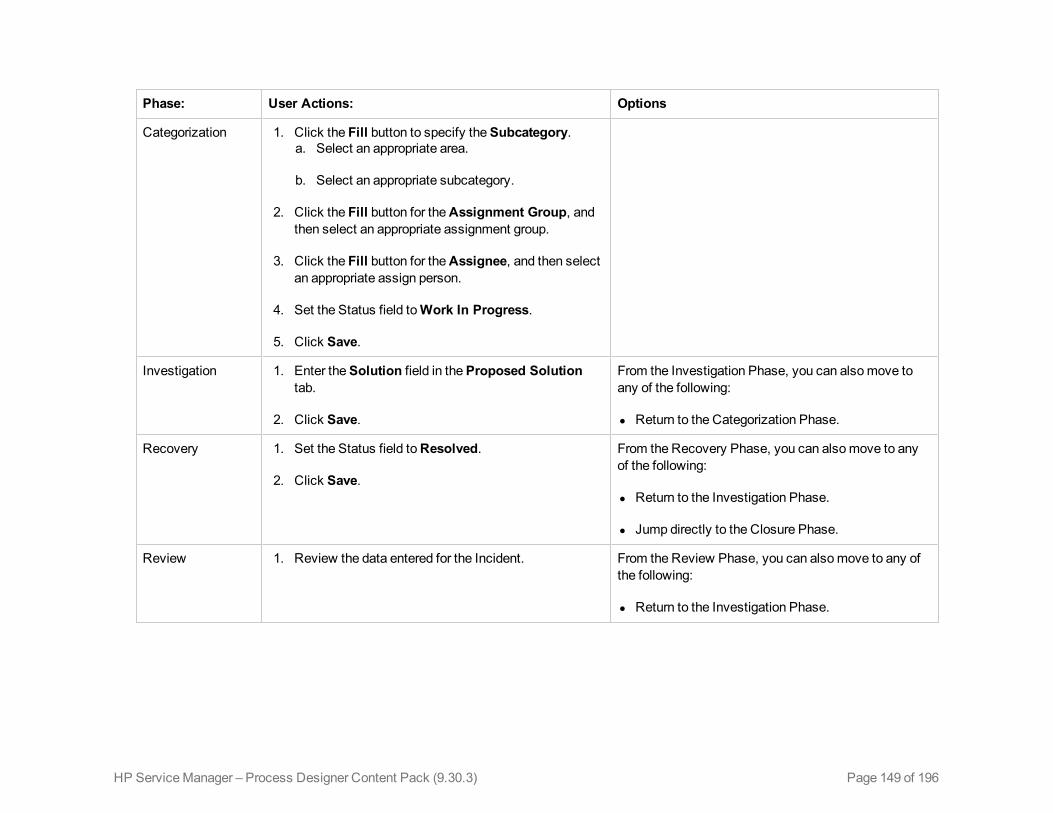
Phase: User Actions: Options
Categorization 1. Click the Fill button to specify theSubcategory.a. Select an appropriate area.
b. Select an appropriate subcategory.
2. Click the Fill button for theAssignment Group, andthen select an appropriate assignment group.
3. Click the Fill button for theAssignee, and then selectan appropriate assign person.
4. Set the Status field toWork In Progress.
5. Click Save.
Investigation 1. Enter theSolution field in theProposed Solutiontab.
2. Click Save.
From the Investigation Phase, you can alsomove toany of the following:
l Return to the Categorization Phase.
Recovery 1. Set the Status field toResolved.
2. Click Save.
From the Recovery Phase, you can alsomove to anyof the following:
l Return to the Investigation Phase.
l Jump directly to the Closure Phase.
Review 1. Review the data entered for the Incident. From the Review Phase, you can alsomove to any ofthe following:
l Return to the Investigation Phase.
Page 149 of 196HP ServiceManager – Process Designer Content Pack (9.30.3)
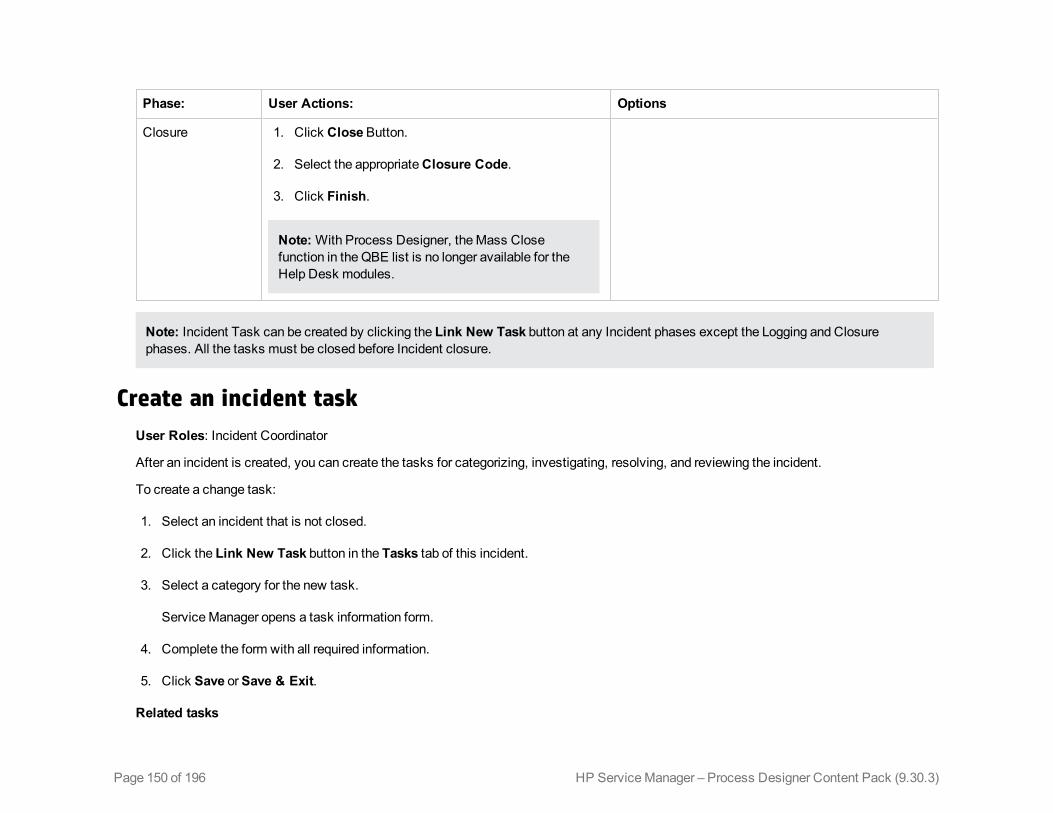
Phase: User Actions: Options
Closure 1. Click CloseButton.
2. Select the appropriateClosure Code.
3. Click Finish.
Note:With Process Designer, theMass Closefunction in the QBE list is no longer available for theHelp Desk modules.
Note: Incident Task can be created by clicking the Link New Task button at any Incident phases except the Logging and Closurephases. All the tasks must be closed before Incident closure.
Create an incident taskUser Roles: Incident Coordinator
After an incident is created, you can create the tasks for categorizing, investigating, resolving, and reviewing the incident.
To create a change task:
1. Select an incident that is not closed.
2. Click the Link New Task button in the Tasks tab of this incident.
3. Select a category for the new task.
ServiceManager opens a task information form.
4. Complete the form with all required information.
5. Click Save orSave & Exit.
Related tasks
Page 150 of 196 HP ServiceManager – Process Designer Content Pack (9.30.3)
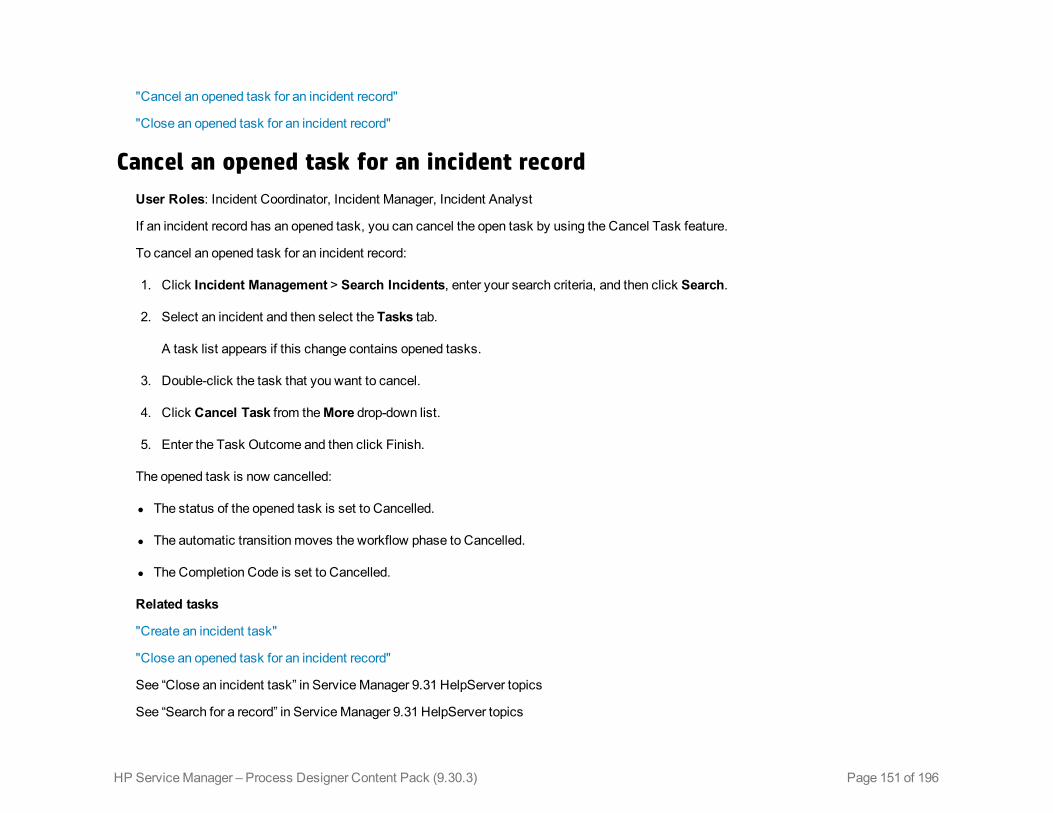
"Cancel an opened task for an incident record"
"Close an opened task for an incident record"
Cancel an opened task for an incident recordUser Roles: Incident Coordinator, Incident Manager, Incident Analyst
If an incident record has an opened task, you can cancel the open task by using the Cancel Task feature.
To cancel an opened task for an incident record:
1. Click Incident Management > Search Incidents, enter your search criteria, and then click Search.
2. Select an incident and then select the Tasks tab.
A task list appears if this change contains opened tasks.
3. Double-click the task that you want to cancel.
4. Click Cancel Task from theMore drop-down list.
5. Enter the Task Outcome and then click Finish.
The opened task is now cancelled:
l The status of the opened task is set to Cancelled.
l The automatic transitionmoves the workflow phase to Cancelled.
l The Completion Code is set to Cancelled.
Related tasks
"Create an incident task"
"Close an opened task for an incident record"
See “Close an incident task” in ServiceManager 9.31 HelpServer topics
See “Search for a record” in ServiceManager 9.31 HelpServer topics
Page 151 of 196HP ServiceManager – Process Designer Content Pack (9.30.3)
Close an opened task for an incident recordUser Roles: Incident Coordinator, Incident Manager, Incident Analyst
If an incident record has opened tasks, you can close them by using the Close Task feature.
Note: You cannot close a high priority (priority is High or Critical) incident task if this incident task is not in the Review phase.
To close an opened task for an incident record:
1. Click IncidentManagement > Search Incidents, enter your search criteria, and then click Search.
2. Select an incident and then select the Tasks tab.
A task list appears if this change contains opened tasks.
3. Double-click the task that you want to cancel.
4. Click Close Task.
5. Enter the Completion Code and Task Outcome, and then click Finish.
The opened task is now closed:
l The status of the opened task is set to Closed.
l The automatic transitionmoves the workflow phase to Closure.
l The Completion Code is set to the value you provided.
Related tasks
"Create an incident task"
"Cancel an opened task for an incident record"
See “Cancel an incident task” in ServiceManager 9.31 HelpServer topics
See “Search for a record” in ServiceManager 9.31 HelpServer topics
Page 152 of 196 HP ServiceManager – Process Designer Content Pack (9.30.3)
Incident administrationIncident administration consists of the following:
l Incident Environment: Incident application contains an environment record for incidents. Thisrecord contains an option that defines the functionality of the Incident application for all Incidentusers.
l Settings: You can disable SolutionMatching for escalated Incident, and you can set the defaultcategory for new Incident tickets.
Configure the Incident Management environmentUser role:System Administrator
Incident Management provides an environment record in which you define the operationalenvironment for the application by allowing or disallowing specific operator actions. Administratorscanmodify the environment parameters tomatch the operational requirements of their organization.
To configure the Incident Management environment:
1. Click Incident Management > Administration > Environment in the System Navigator.
2. Select or clear the parameters for your Incident Management environment.
Tip: You can use the field help to view the description for each setting. To view the help onfield:
n Web client: Select a field, and then press F1.
n Windows client: Select a field, and then press Ctrl+H.
3. Click Save.
4. Click OK.
Configure Incident Management settingsUser Role: System Administrator
To configure Incident settings:
1. Click Incident Management > Administration > Settings in the System Navigator.
2. Configure the following settings for the Incident application:
HP ServiceManager – Process Designer Content Pack (9.30.3) Page 153 of 196
Administrator’s GuideChapter 6: Incident Management
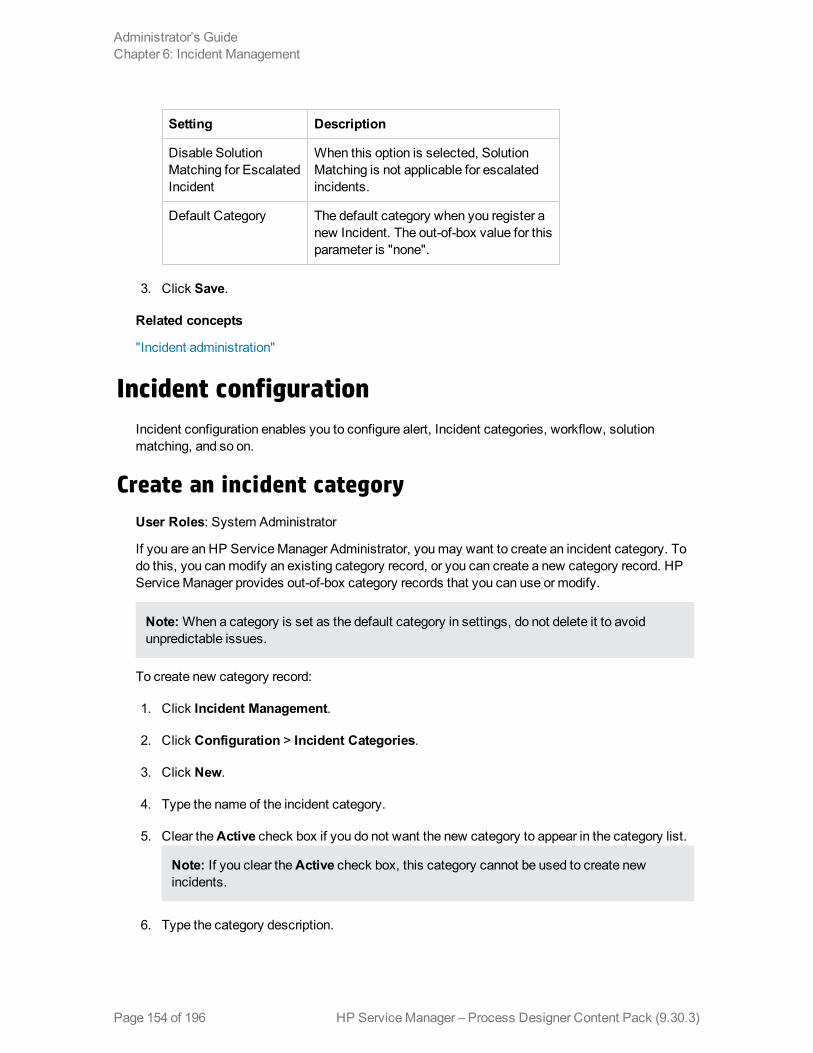
Setting Description
Disable SolutionMatching for EscalatedIncident
When this option is selected, SolutionMatching is not applicable for escalatedincidents.
Default Category The default category when you register anew Incident. The out-of-box value for thisparameter is "none".
3. Click Save.
Related concepts
"Incident administration"
Incident configurationIncident configuration enables you to configure alert, Incident categories, workflow, solutionmatching, and so on.
Create an incident categoryUser Roles: System Administrator
If you are an HP ServiceManager Administrator, youmay want to create an incident category. Todo this, you canmodify an existing category record, or you can create a new category record. HPServiceManager provides out-of-box category records that you can use or modify.
Note:When a category is set as the default category in settings, do not delete it to avoidunpredictable issues.
To create new category record:
1. Click Incident Management.
2. Click Configuration > Incident Categories.
3. Click New.
4. Type the name of the incident category.
5. Clear theActive check box if you do not want the new category to appear in the category list.
Note: If you clear theActive check box, this category cannot be used to create newincidents.
6. Type the category description.
HP ServiceManager – Process Designer Content Pack (9.30.3)Page 154 of 196
Administrator’s GuideChapter 6: Incident Management

7. Select a workflow for the category.
8. Click Save.
9. Optional: Click the Link New Subcategories button to create a new subcategory for theincident category.
Note: TheApply To flag indicates whether the category is shared across different modules.
For example, if theApply To is set to "Interaction/Incident", then this category will be createdin both the interaction category table and the incident category table.
Typical shared categories in OOB include Complaint, Request for Information, Incident, andRequest for Administration.
For theApply To flag in Incident Category:
When creating an incident category, theApply To option is predefined as "Incident" only andcannot bemodified. However, an incident category can also be created when creating aninteraction category with theApply To option set as "Interaction/Incident" or"Interaction/Incident/Problem".
When searching for an incident category, all theApply To values that include Incident can beused.
The following list is used in Incident Category:
1 - Incident
3 - Interaction/Incident
4 - Interaction/Incident/Problem
Note: Incident category name is read-only after the category is created.
Related tasks
"Add a new subcategory for an incident category"
"Add a new area for an incident subcategory"
Create an incident task categoryUser Roles: System Administrator
If you are an HP ServiceManager Administrator, youmay want to create an incident task category.To do this, you canmodify an existing category record, or you can create a new category record.HP ServiceManager provides out-of-box category records that you can use or modify.
To create a new incident task category record:
HP ServiceManager – Process Designer Content Pack (9.30.3) Page 155 of 196
Administrator’s GuideChapter 6: Incident Management
1. Click Incident Management.
2. Double-click Configuration > Incident Task Categories.
3. Click New.
4. Type the name of the incident task category.
5. Type a description of the problem task category.
6. Clear theActive check box if you do not want the new category to appear in the category list.
Note: If you clear theActive check box, this category cannot be used to create newincident tasks.
7. Select a workflow for the category. TheWorkflow tab is displayed.
8. Click Save.
Note: Incident task category name is read-only after the category is created.
Add a new subcategory for an incident categoryUser Roles: System Administrator and Implementer
You can add a new subcategory directly for an incident category.You can view a list ofsubcategories and their record details associated with the current category.
To add a new subcategory for an incident category:
1. Click Incident Management > Configuration in the System Navigator.
2. Click Incident Categories > Search.
3. Select the Incident Category for which you want to add a subcategory.
4. Under theSubcategories section in the Incident Category Definition page, click the Link NewSubcategories button.
5. Type a subcategory name.
6. Type a description for the subcategory.
7. Click Save to add the new subcategory.
8. Optional: Click the Link New Areas button to create areas for the incident subcategories.When you have finished, click Save.
Related concepts
See “Search for a record” in ServiceManager 9.30/9.31 HelpServer topics
HP ServiceManager – Process Designer Content Pack (9.30.3)Page 156 of 196
Administrator’s GuideChapter 6: Incident Management
Related tasks
"Create an incident category"
"Add a new area for an incident subcategory"
Add a new area for an incident subcategoryUser Roles: System Administrator and Implementer
You can add a new area directly for an incident subcategory.You can view a list of areas and theirrecord details associated with the current subcategory.
To add a new area for an incident subcategory:
1. Click Incident Management > Configuration in the System Navigator.
2. Click Incident Categories > Search.
3. Select the Incident Category for which you want to add an area.
4. Under theSubcategories section in the Incident Category Definition page, select thesubcategory for which you want to add an area.
5. Type an area name.
6. Type a description for the area.
7. Click Save to add the new area.
Related concepts
See “Search for a record” in ServiceManager 9.30/9.31 HelpServer topics
Related tasks
"Create an incident category"
"Add a new subcategory for an incident category"
Incident solution matchingWhen you create an incident, a list of potentially related incidents appears based on the pre-definedsolutionmatching configuration. You can then select thematched records and update them directly.
In an out-of-box system, the following options are provided for Incident solutionmatching:
l Check incident duplicates on CI
l Check incident duplicates on related configuration items
l Check similar incidents
HP ServiceManager – Process Designer Content Pack (9.30.3) Page 157 of 196
Administrator’s GuideChapter 6: Incident Management
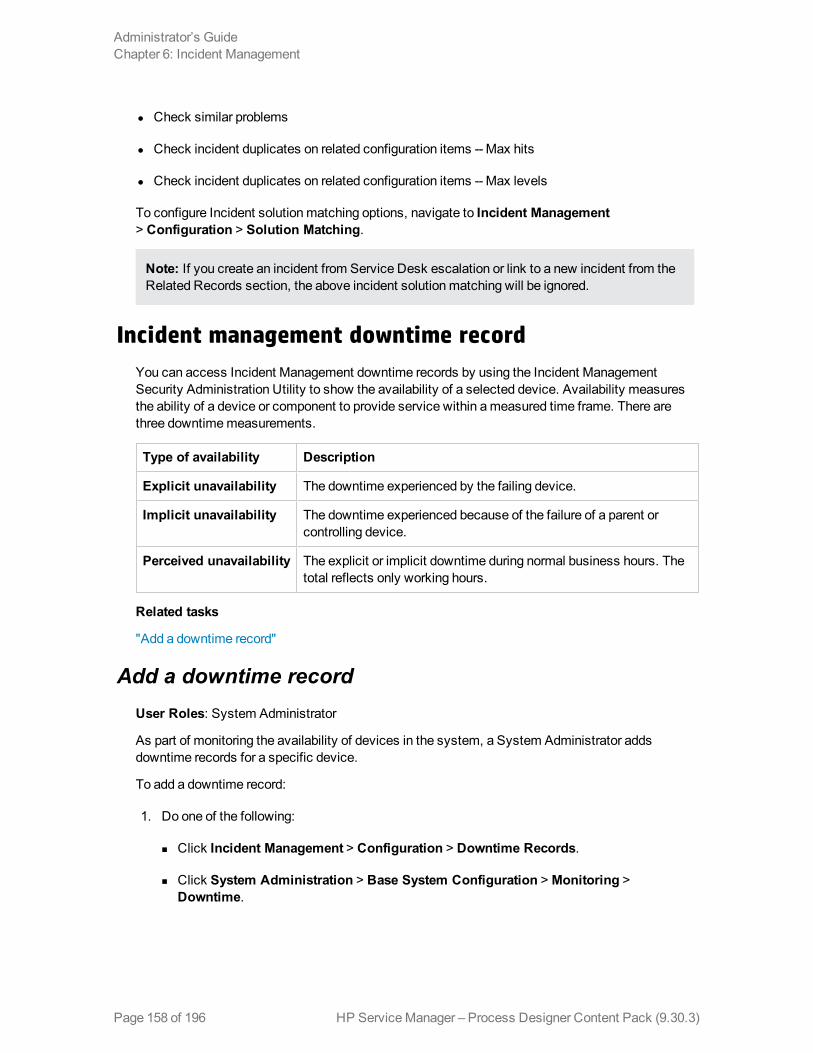
l Check similar problems
l Check incident duplicates on related configuration items -- Max hits
l Check incident duplicates on related configuration items -- Max levels
To configure Incident solutionmatching options, navigate to Incident Management> Configuration > Solution Matching.
Note: If you create an incident from Service Desk escalation or link to a new incident from theRelated Records section, the above incident solutionmatching will be ignored.
Incident management downtime recordYou can access Incident Management downtime records by using the Incident ManagementSecurity Administration Utility to show the availability of a selected device. Availability measuresthe ability of a device or component to provide service within ameasured time frame. There arethree downtimemeasurements.
Type of availability Description
Explicit unavailability The downtime experienced by the failing device.
Implicit unavailability The downtime experienced because of the failure of a parent orcontrolling device.
Perceived unavailability The explicit or implicit downtime during normal business hours. Thetotal reflects only working hours.
Related tasks
"Add a downtime record"
Add a downtime recordUser Roles: System Administrator
As part of monitoring the availability of devices in the system, a System Administrator addsdowntime records for a specific device.
To add a downtime record:
1. Do one of the following:
n Click Incident Management > Configuration > Downtime Records.
n Click System Administration > Base System Configuration >Monitoring >Downtime.
HP ServiceManager – Process Designer Content Pack (9.30.3)Page 158 of 196
Administrator’s GuideChapter 6: Incident Management
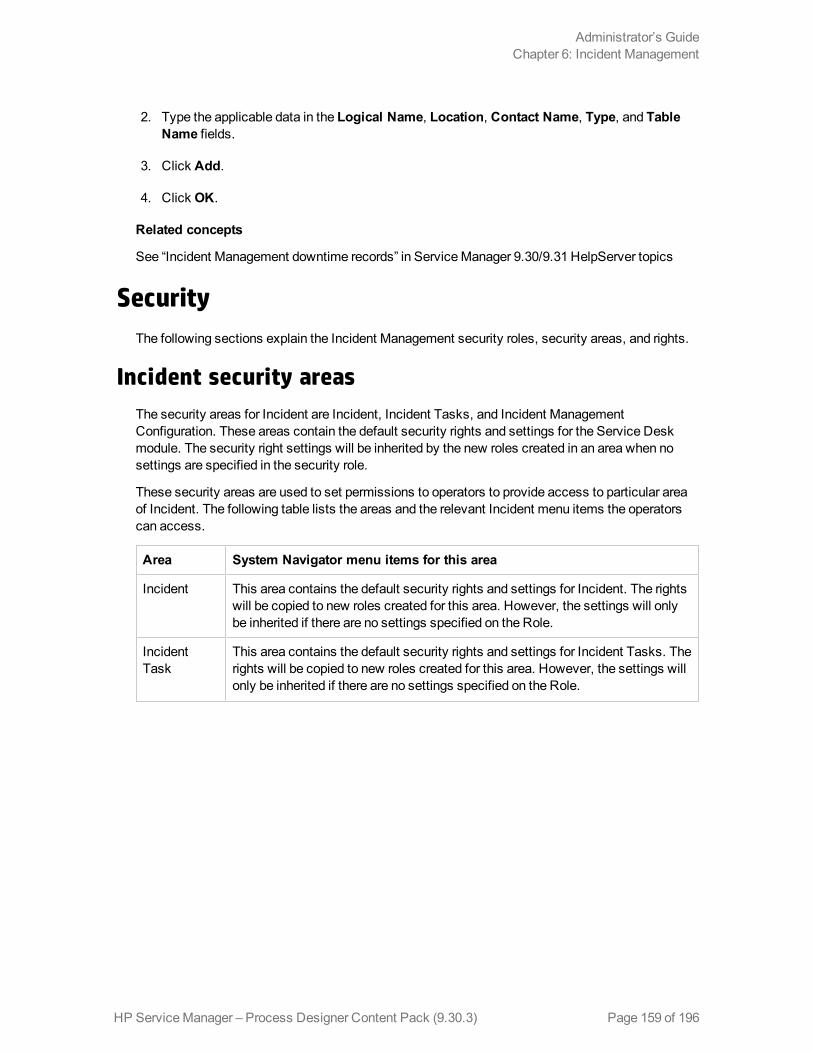
2. Type the applicable data in the Logical Name, Location, Contact Name, Type, and TableName fields.
3. Click Add.
4. Click OK.
Related concepts
See “Incident Management downtime records” in ServiceManager 9.30/9.31 HelpServer topics
SecurityThe following sections explain the Incident Management security roles, security areas, and rights.
Incident security areasThe security areas for Incident are Incident, Incident Tasks, and Incident ManagementConfiguration. These areas contain the default security rights and settings for the Service Deskmodule. The security right settings will be inherited by the new roles created in an area when nosettings are specified in the security role.
These security areas are used to set permissions to operators to provide access to particular areaof Incident. The following table lists the areas and the relevant Incident menu items the operatorscan access.
Area System Navigator menu items for this area
Incident This area contains the default security rights and settings for Incident. The rightswill be copied to new roles created for this area. However, the settings will onlybe inherited if there are no settings specified on the Role.
IncidentTask
This area contains the default security rights and settings for Incident Tasks. Therights will be copied to new roles created for this area. However, the settings willonly be inherited if there are no settings specified on the Role.
HP ServiceManager – Process Designer Content Pack (9.30.3) Page 159 of 196
Administrator’s GuideChapter 6: Incident Management
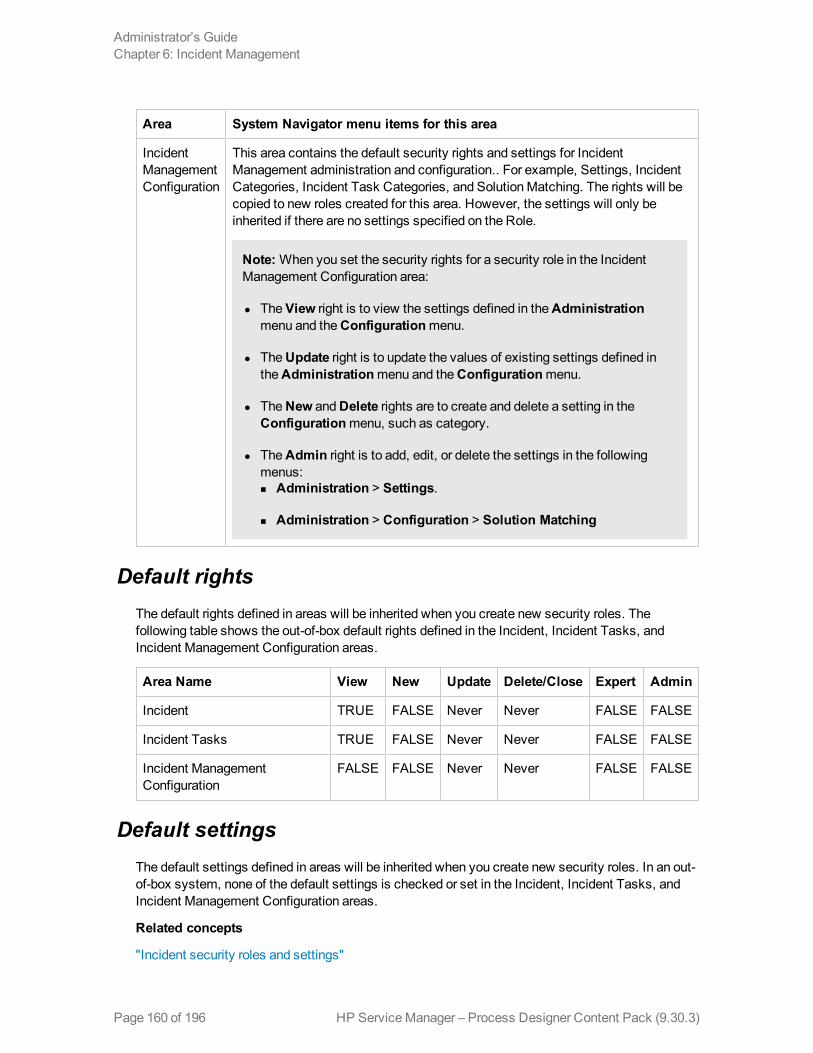
Area System Navigator menu items for this area
IncidentManagementConfiguration
This area contains the default security rights and settings for IncidentManagement administration and configuration.. For example, Settings, IncidentCategories, Incident Task Categories, and SolutionMatching. The rights will becopied to new roles created for this area. However, the settings will only beinherited if there are no settings specified on the Role.
Note:When you set the security rights for a security role in the IncidentManagement Configuration area:
l TheView right is to view the settings defined in theAdministrationmenu and theConfigurationmenu.
l TheUpdate right is to update the values of existing settings defined intheAdministrationmenu and theConfigurationmenu.
l TheNew andDelete rights are to create and delete a setting in theConfigurationmenu, such as category.
l TheAdmin right is to add, edit, or delete the settings in the followingmenus:n Administration > Settings.
n Administration > Configuration > Solution Matching
Default rightsThe default rights defined in areas will be inherited when you create new security roles. Thefollowing table shows the out-of-box default rights defined in the Incident, Incident Tasks, andIncident Management Configuration areas.
Area Name View New Update Delete/Close Expert Admin
Incident TRUE FALSE Never Never FALSE FALSE
Incident Tasks TRUE FALSE Never Never FALSE FALSE
Incident ManagementConfiguration
FALSE FALSE Never Never FALSE FALSE
Default settingsThe default settings defined in areas will be inherited when you create new security roles. In an out-of-box system, none of the default settings is checked or set in the Incident, Incident Tasks, andIncident Management Configuration areas.
Related concepts
"Incident security roles and settings"
HP ServiceManager – Process Designer Content Pack (9.30.3)Page 160 of 196
Administrator’s GuideChapter 6: Incident Management

"Incident management user roles"
HP ServiceManager – Process Designer Content Pack (9.30.3) Page 161 of 196
Administrator’s GuideChapter 6: Incident Management

Incident security roles and settingsThe out-of-box security roles for the Incident module include the following:
l Incident process owner
l Incident coordinator
l Incident analyst
l Incident manager
l Incident task assignee
l Configuration auditor
l Operator
Mapping between previous security profiles and current PD security rolesThe following table lists themapping relationship between previous Incident security profiles and current PD security roles in the Incidentmodule.
Security Profile Security Role/Area
DEFAULT DEFAULT/Incident
configuration auditor configuration auditor/Incident
incident analyst incident analyst/Incident
incident coordinator incident coordinator/Incident
incident manager incident manager/Incident
initiator initiator/Incident
Page 162 of 196 HP ServiceManager – Process Designer Content Pack (9.30.3)
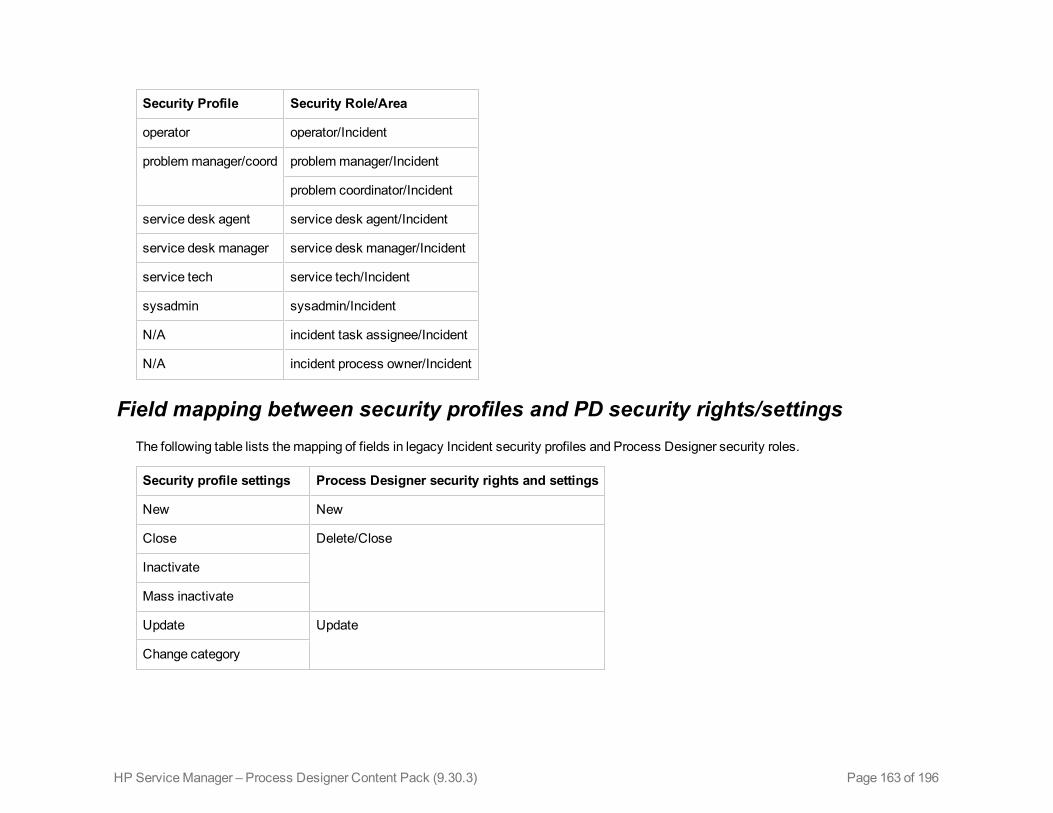
Security Profile Security Role/Area
operator operator/Incident
problemmanager/coord problemmanager/Incident
problem coordinator/Incident
service desk agent service desk agent/Incident
service desk manager service desk manager/Incident
service tech service tech/Incident
sysadmin sysadmin/Incident
N/A incident task assignee/Incident
N/A incident process owner/Incident
Field mapping between security profiles and PD security rights/settingsThe following table lists themapping of fields in legacy Incident security profiles and Process Designer security roles.
Security profile settings Process Designer security rights and settings
New New
Close Delete/Close
Inactivate
Mass inactivate
Update Update
Change category
Page 163 of 196HP ServiceManager – Process Designer Content Pack (9.30.3)
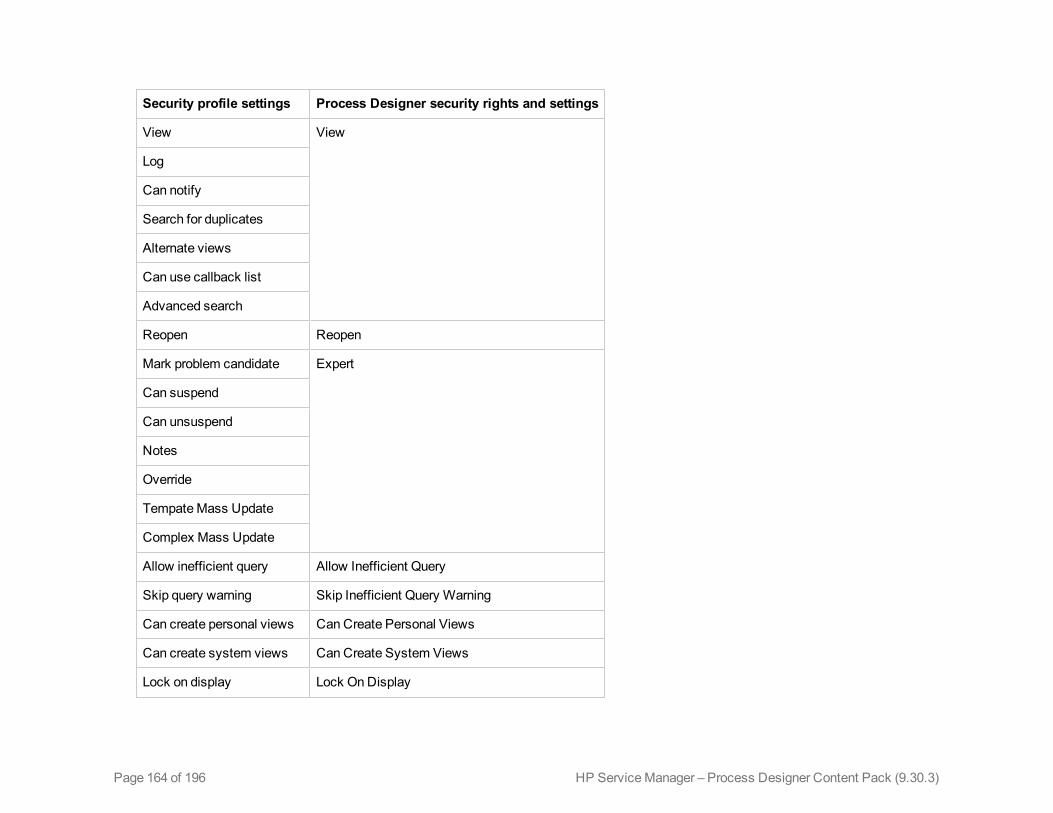
Security profile settings Process Designer security rights and settings
View View
Log
Can notify
Search for duplicates
Alternate views
Can use callback list
Advanced search
Reopen Reopen
Mark problem candidate Expert
Can suspend
Can unsuspend
Notes
Override
TempateMass Update
Complex Mass Update
Allow inefficient query Allow Inefficient Query
Skip query warning Skip Inefficient Query Warning
Can create personal views Can Create Personal Views
Can create system views Can Create System Views
Lock on display Lock OnDisplay
Page 164 of 196 HP ServiceManager – Process Designer Content Pack (9.30.3)
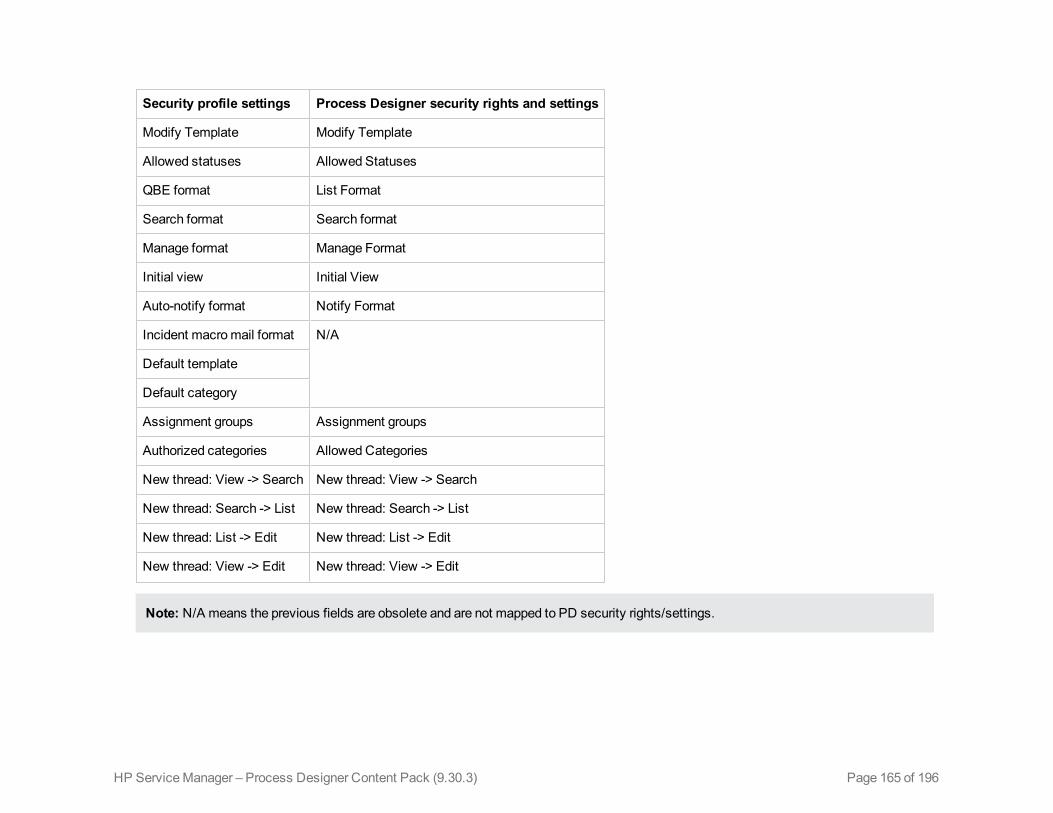
Security profile settings Process Designer security rights and settings
Modify Template Modify Template
Allowed statuses Allowed Statuses
QBE format List Format
Search format Search format
Manage format Manage Format
Initial view Initial View
Auto-notify format Notify Format
Incident macromail format N/A
Default template
Default category
Assignment groups Assignment groups
Authorized categories Allowed Categories
New thread: View -> Search New thread: View -> Search
New thread: Search -> List New thread: Search -> List
New thread: List -> Edit New thread: List -> Edit
New thread: View -> Edit New thread: View -> Edit
Note: N/A means the previous fields are obsolete and are not mapped to PD security rights/settings.
Page 165 of 196HP ServiceManager – Process Designer Content Pack (9.30.3)
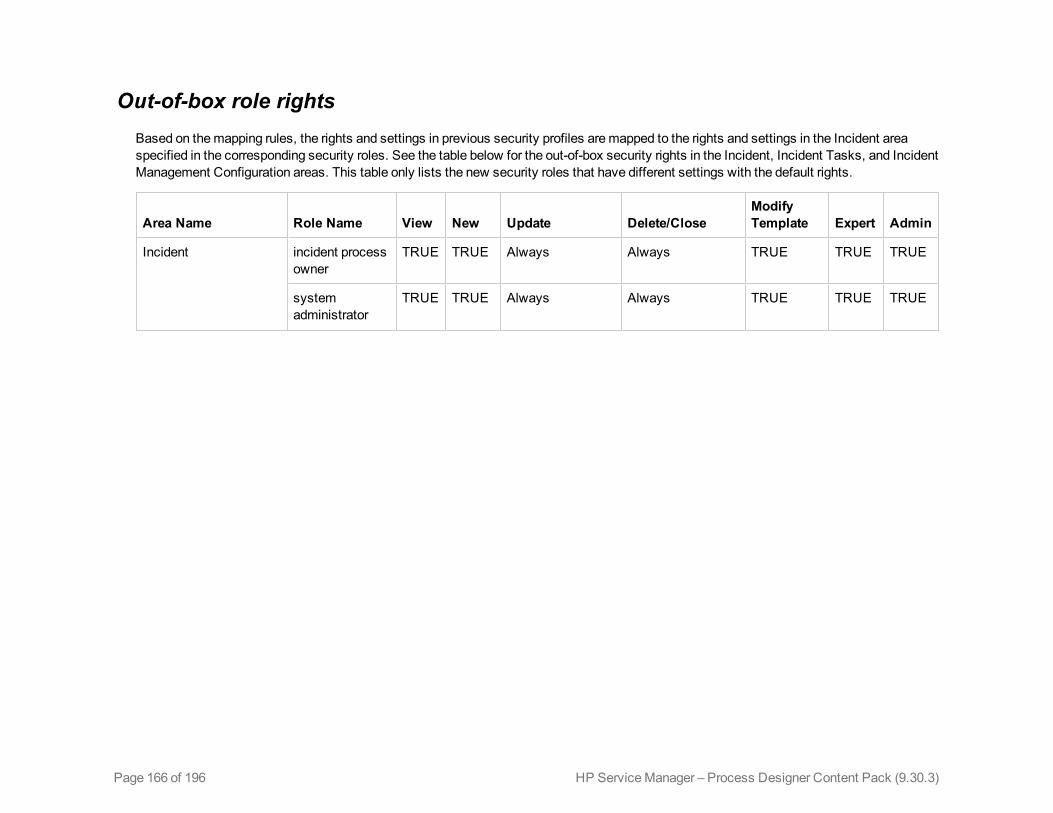
Out-of-box role rightsBased on themapping rules, the rights and settings in previous security profiles aremapped to the rights and settings in the Incident areaspecified in the corresponding security roles. See the table below for the out-of-box security rights in the Incident, Incident Tasks, and IncidentManagement Configuration areas. This table only lists the new security roles that have different settings with the default rights.
Area Name Role Name View New Update Delete/CloseModifyTemplate Expert Admin
Incident incident processowner
TRUE TRUE Always Always TRUE TRUE TRUE
systemadministrator
TRUE TRUE Always Always TRUE TRUE TRUE
Page 166 of 196 HP ServiceManager – Process Designer Content Pack (9.30.3)
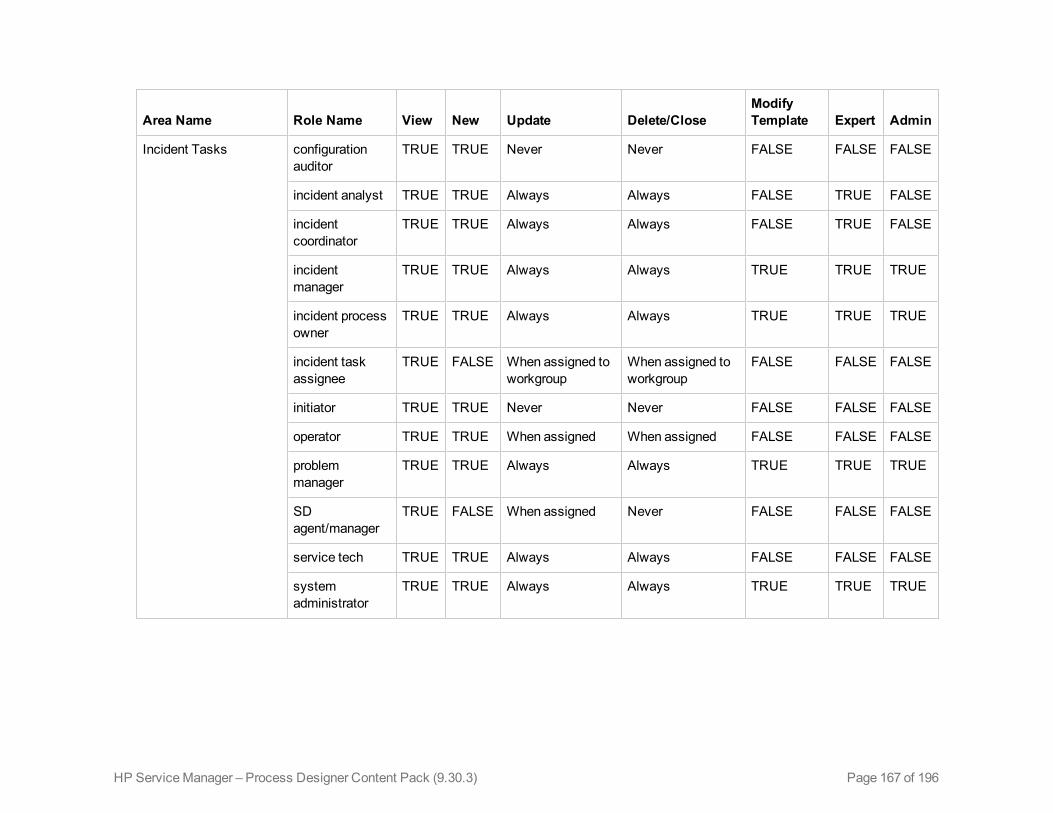
Area Name Role Name View New Update Delete/CloseModifyTemplate Expert Admin
Incident Tasks configurationauditor
TRUE TRUE Never Never FALSE FALSE FALSE
incident analyst TRUE TRUE Always Always FALSE TRUE FALSE
incidentcoordinator
TRUE TRUE Always Always FALSE TRUE FALSE
incidentmanager
TRUE TRUE Always Always TRUE TRUE TRUE
incident processowner
TRUE TRUE Always Always TRUE TRUE TRUE
incident taskassignee
TRUE FALSE When assigned toworkgroup
When assigned toworkgroup
FALSE FALSE FALSE
initiator TRUE TRUE Never Never FALSE FALSE FALSE
operator TRUE TRUE When assigned When assigned FALSE FALSE FALSE
problemmanager
TRUE TRUE Always Always TRUE TRUE TRUE
SDagent/manager
TRUE FALSE When assigned Never FALSE FALSE FALSE
service tech TRUE TRUE Always Always FALSE FALSE FALSE
systemadministrator
TRUE TRUE Always Always TRUE TRUE TRUE
Page 167 of 196HP ServiceManager – Process Designer Content Pack (9.30.3)
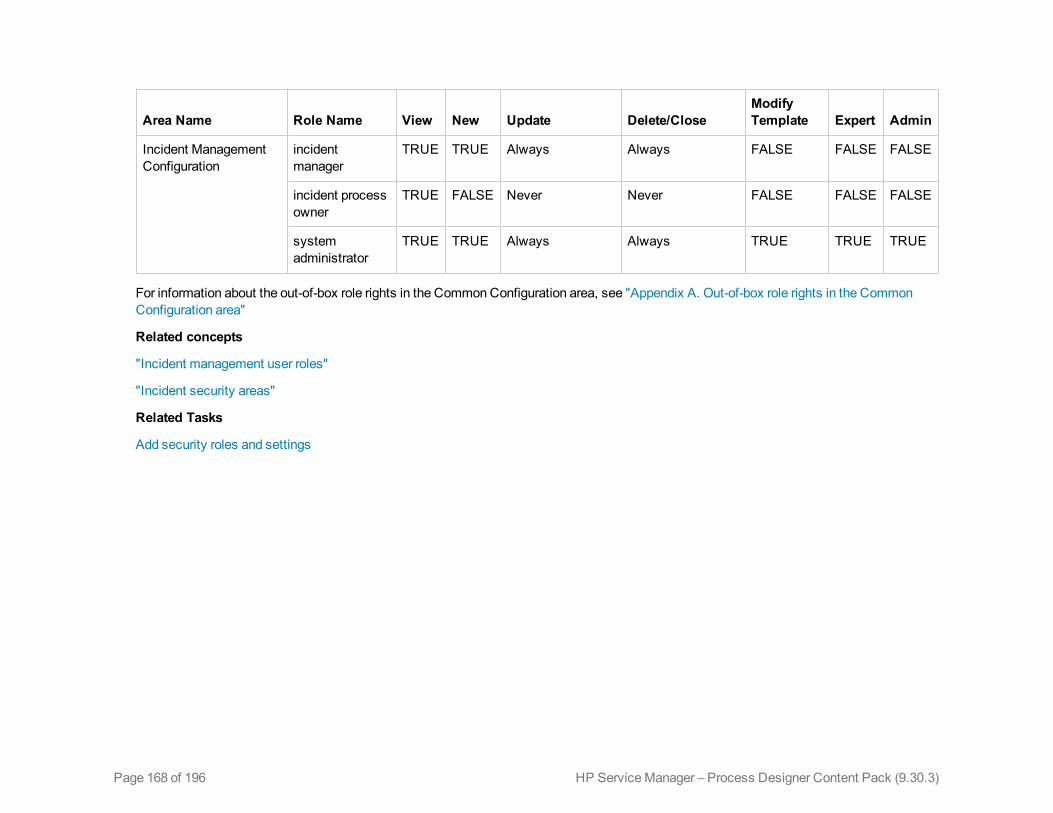
Area Name Role Name View New Update Delete/CloseModifyTemplate Expert Admin
Incident ManagementConfiguration
incidentmanager
TRUE TRUE Always Always FALSE FALSE FALSE
incident processowner
TRUE FALSE Never Never FALSE FALSE FALSE
systemadministrator
TRUE TRUE Always Always TRUE TRUE TRUE
For information about the out-of-box role rights in the CommonConfiguration area, see "Appendix A. Out-of-box role rights in the CommonConfiguration area"
Related concepts
"Incident management user roles"
"Incident security areas"
Related Tasks
Add security roles and settings
Page 168 of 196 HP ServiceManager – Process Designer Content Pack (9.30.3)
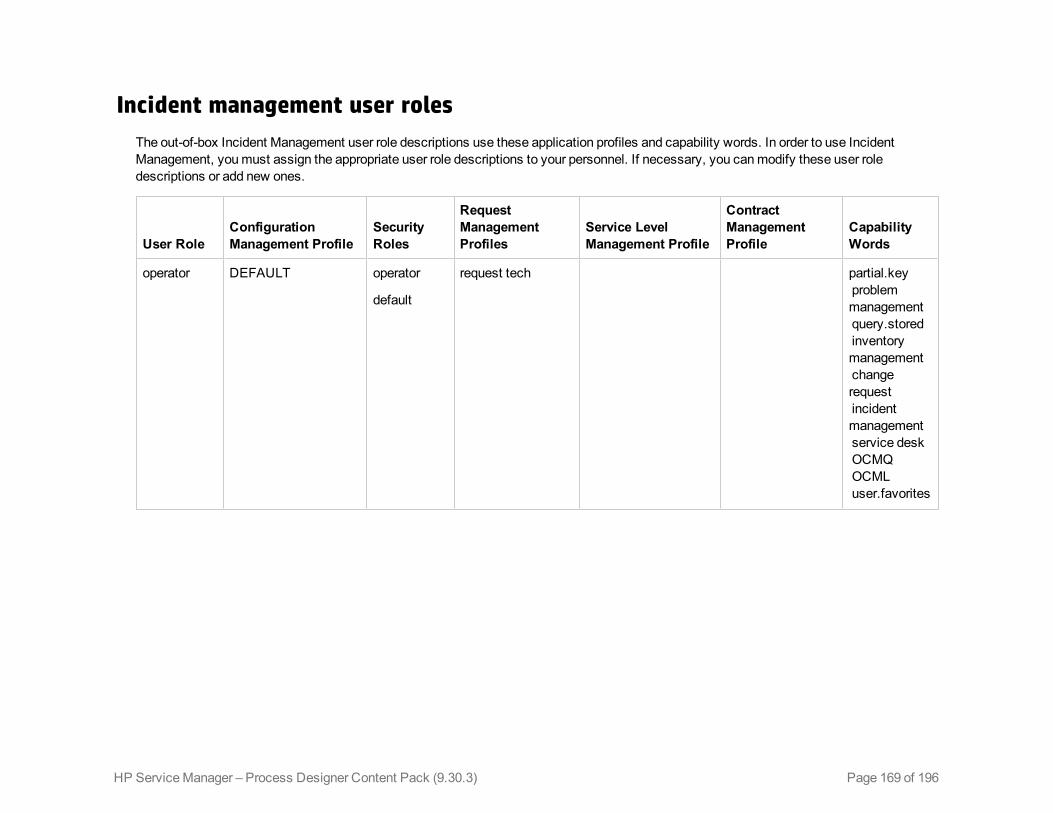
Incident management user rolesThe out-of-box Incident Management user role descriptions use these application profiles and capability words. In order to use IncidentManagement, youmust assign the appropriate user role descriptions to your personnel. If necessary, you canmodify these user roledescriptions or add new ones.
User RoleConfigurationManagement Profile
SecurityRoles
RequestManagementProfiles
Service LevelManagement Profile
ContractManagementProfile
CapabilityWords
operator DEFAULT operator
default
request tech partial.keyproblemmanagementquery.storedinventorymanagementchangerequestincidentmanagementservice deskOCMQOCMLuser.favorites
Page 169 of 196HP ServiceManager – Process Designer Content Pack (9.30.3)
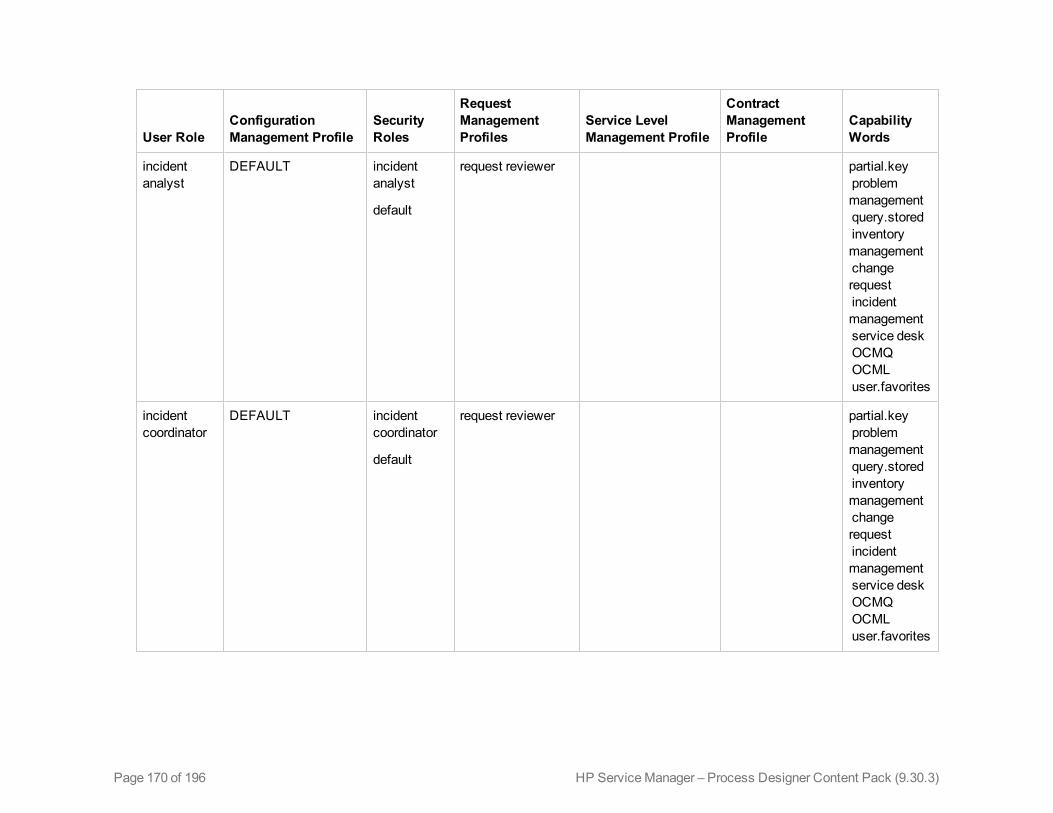
User RoleConfigurationManagement Profile
SecurityRoles
RequestManagementProfiles
Service LevelManagement Profile
ContractManagementProfile
CapabilityWords
incidentanalyst
DEFAULT incidentanalyst
default
request reviewer partial.keyproblemmanagementquery.storedinventorymanagementchangerequestincidentmanagementservice deskOCMQOCMLuser.favorites
incidentcoordinator
DEFAULT incidentcoordinator
default
request reviewer partial.keyproblemmanagementquery.storedinventorymanagementchangerequestincidentmanagementservice deskOCMQOCMLuser.favorites
Page 170 of 196 HP ServiceManager – Process Designer Content Pack (9.30.3)

User RoleConfigurationManagement Profile
SecurityRoles
RequestManagementProfiles
Service LevelManagement Profile
ContractManagementProfile
CapabilityWords
incidentmanager
DEFAULT incidentmanager
default
requestor partial.keyproblemmanagementquery.storedinventorymanagementchangerequestincidentmanagementservice desk
IncidentAdminOCMQOCMLuser.favorites
service deskmanager
DEFAULT service deskmanager
default
requestor partial.keyproblemmanagementquery.storedinventorymanagementchangerequestincidentmanagementservice deskEditContactsSDAdminOCMQOCMLuser.favorites
Page 171 of 196HP ServiceManager – Process Designer Content Pack (9.30.3)
Related concepts
Change security areas
Security roles
Page 172 of 196 HP ServiceManager – Process Designer Content Pack (9.30.3)
Chapter 7
Problem ManagementThe following sections explain the changes and enhancements in the ProblemManagement moduleafter you upgrade the ServiceManager to Process Designer Content Pack 9.30.3.
Problem WorkflowThe problem workflow is a sequence of connected steps in the life cycle of a problem. In theworkflow, a problem goes through several phases to complete the life cycle. Workflow phases canconsist of one or multiple tasks that must be completed to proceed to the next phase.
Process Designer Content Pack 9.30.3 includes out-of-box problem workflows and task workflows.
The following are the out-of-box problem workflows:
l Problem
l Problem Task
The problem workflow is applied to problem records when you create a problem category.
Related concepts
Process Designer
Creating a workflow
Related tasks
Create a workflow
Page 173 of 196HP ServiceManager – Process Designer Content Pack (9.30.3)
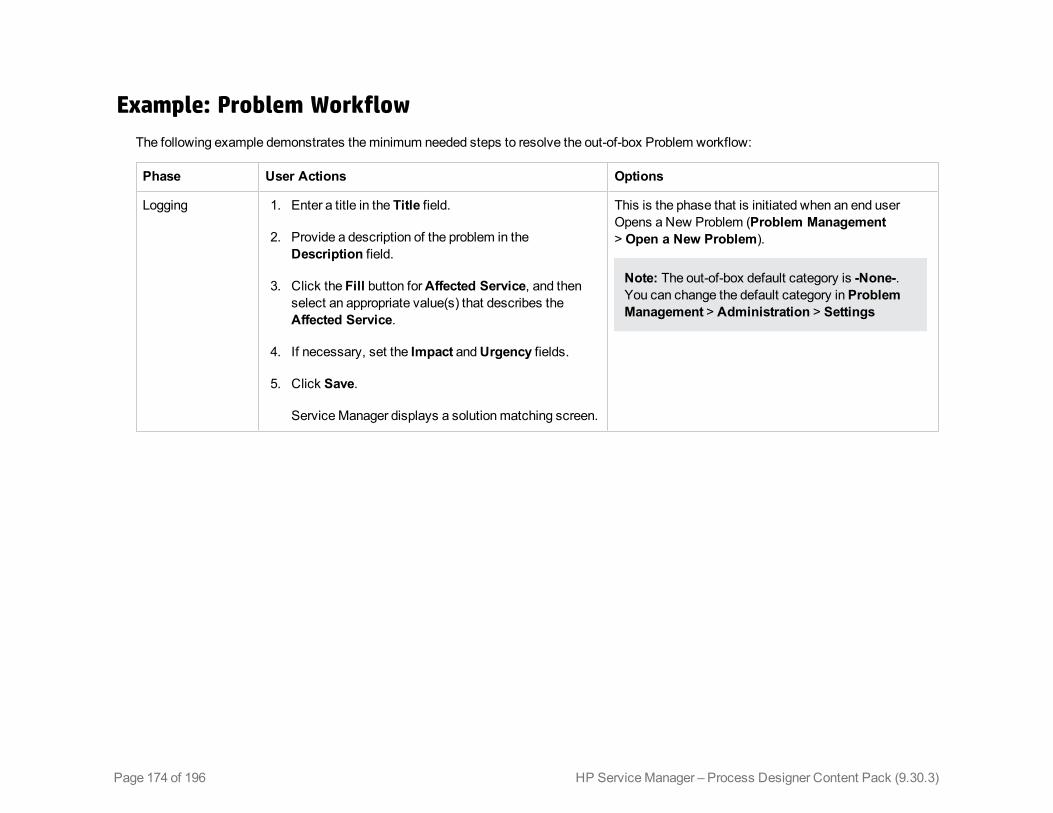
Example: Problem WorkflowThe following example demonstrates theminimum needed steps to resolve the out-of-box Problem workflow:
Phase User Actions Options
Logging 1. Enter a title in the Title field.
2. Provide a description of the problem in theDescription field.
3. Click the Fill button forAffected Service, and thenselect an appropriate value(s) that describes theAffected Service.
4. If necessary, set the Impact andUrgency fields.
5. Click Save.
ServiceManager displays a solutionmatching screen.
This is the phase that is initiated when an end userOpens a New Problem (Problem Management> Open a New Problem).
Note: The out-of-box default category is -None-.You can change the default category inProblemManagement > Administration > Settings
Page 174 of 196 HP ServiceManager – Process Designer Content Pack (9.30.3)
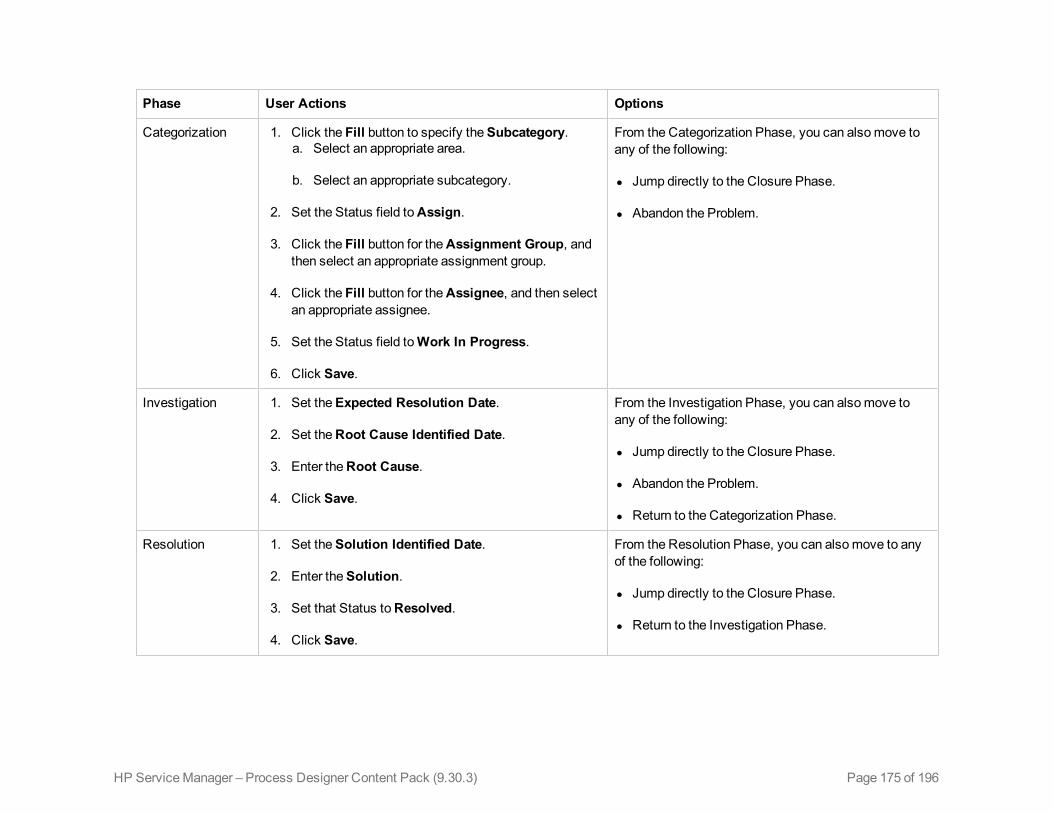
Phase User Actions Options
Categorization 1. Click the Fill button to specify theSubcategory.a. Select an appropriate area.
b. Select an appropriate subcategory.
2. Set the Status field toAssign.
3. Click the Fill button for theAssignment Group, andthen select an appropriate assignment group.
4. Click the Fill button for theAssignee, and then selectan appropriate assignee.
5. Set the Status field toWork In Progress.
6. Click Save.
From the Categorization Phase, you can alsomove toany of the following:
l Jump directly to the Closure Phase.
l Abandon the Problem.
Investigation 1. Set theExpected Resolution Date.
2. Set theRoot Cause Identified Date.
3. Enter theRoot Cause.
4. Click Save.
From the Investigation Phase, you can alsomove toany of the following:
l Jump directly to the Closure Phase.
l Abandon the Problem.
l Return to the Categorization Phase.
Resolution 1. Set theSolution Identified Date.
2. Enter theSolution.
3. Set that Status toResolved.
4. Click Save.
From the Resolution Phase, you can alsomove to anyof the following:
l Jump directly to the Closure Phase.
l Return to the Investigation Phase.
Page 175 of 196HP ServiceManager – Process Designer Content Pack (9.30.3)
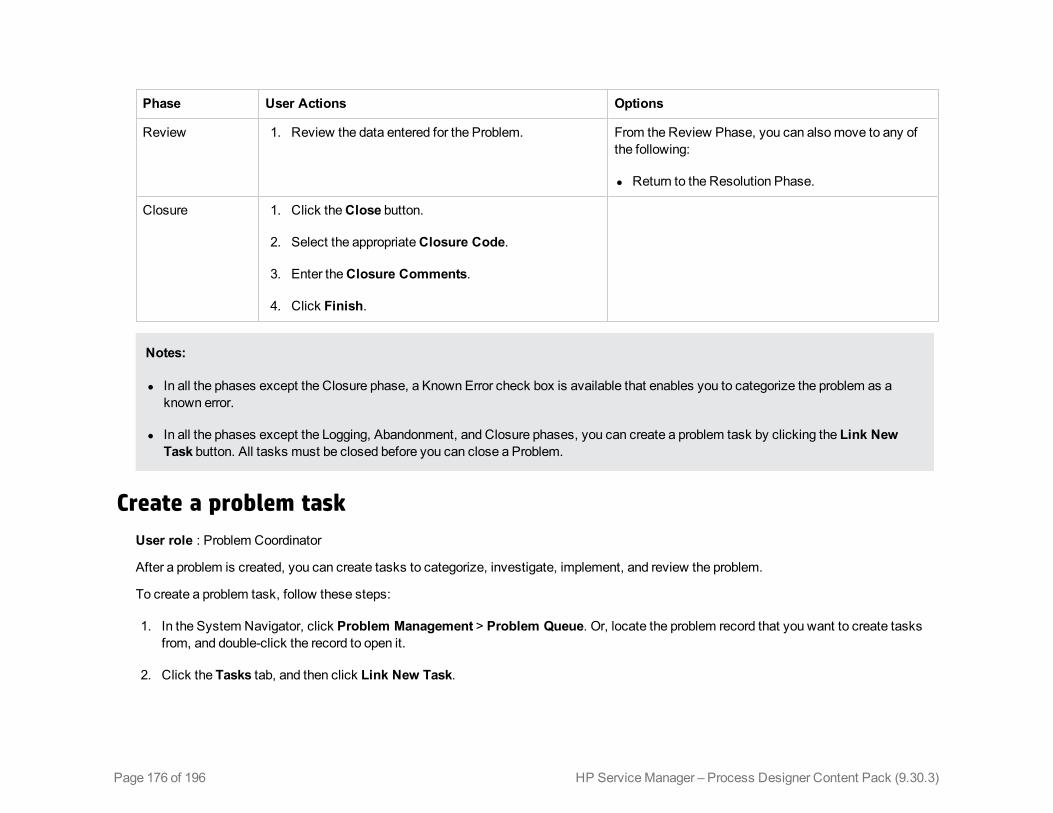
Phase User Actions Options
Review 1. Review the data entered for the Problem. From the Review Phase, you can alsomove to any ofthe following:
l Return to the Resolution Phase.
Closure 1. Click theClose button.
2. Select the appropriateClosure Code.
3. Enter theClosure Comments.
4. Click Finish.
Notes:
l In all the phases except the Closure phase, a Known Error check box is available that enables you to categorize the problem as aknown error.
l In all the phases except the Logging, Abandonment, and Closure phases, you can create a problem task by clicking the Link NewTask button. All tasks must be closed before you can close a Problem.
Create a problem taskUser role : Problem Coordinator
After a problem is created, you can create tasks to categorize, investigate, implement, and review the problem.
To create a problem task, follow these steps:
1. In the System Navigator, click Problem Management > Problem Queue. Or, locate the problem record that you want to create tasksfrom, and double-click the record to open it.
2. Click the Tasks tab, and then click Link New Task.
Page 176 of 196 HP ServiceManager – Process Designer Content Pack (9.30.3)
3. Select a category for the new task.ServiceManager opens a task information form.
4. Complete the form with all the required information, and then click Save.
Page 177 of 196HP ServiceManager – Process Designer Content Pack (9.30.3)
Problem Management AdministrationProblemManagement administration consists of the following:
l ProblemManagement Environment: ProblemManagement application contains an environmentrecord for problems. This record contains options that defines the functionality of the ProblemManagement application for all ProblemManagement users.
l Settings: You can set the default category for new problems and problem tasks.
Related concepts
ProblemManagement
Configure the Problem Management EnvironmentUser Role: System Administrator
System Administrators canmodify the ProblemManagement environment parameters tomatch theoperational requirements of their organization.
To configure a ProblemManagement environment, follow these steps:
1. Click Problem Management > Administration > Environment.
2. Select or clear the parameters and populate the required fields as appropriate to the ProblemManagement environment.
3. Configure the settings for your Problem environment.
Tip: You can use the field help to view the description for each setting. To view the help onfield:
n Web client: Select a field, and then press F1.
n Windows client: Select a field, and then press Ctrl+H.
4. Click Save.
Configure the Problem Management SettingsUser Role: System Administrator
To configure the ProblemManagement settings, follow these steps:
1. Click Problem Management > Administration > Settings.
2. In the topmost pane, select Problem orProblem Task.
HP ServiceManager – Process Designer Content Pack (9.30.3)Page 178 of 196
Administrator’s GuideChapter 7: ProblemManagement
3. Configure theDefault Category setting for the Problem or Problem Task. This setting definesthe default category that is used when you register a new Problem or Problem Task. The out-of-box value for this setting is None.
4. Click Save.
Problem Management ConfigurationProblemManagement configuration enables you to configure alert, problem categories, workflow,solutionmatching, and so on.
Related concepts
ProblemManagement
Create a Problem CategoryUser Roles: System Administrator
If you are an HP ServiceManager Administrator, youmay want to create a problem category. To dothis, you canmodify an existing category record, or you can create a new category record. HPServiceManager provides out-of-box category records that you can use or modify.
Note:When a category is set as the default category in settings, do not delete it to avoidunpredictable issues.
To create a new problem category record, follow these steps:
1. Click Problem Management.
2. Click Configuration > Problem Categories.
3. In themenu of theProblem Category pane, click New.
4. Type the name of the problem category.
5. Clear theActive check box if you do not want the new category to appear in the category list. IftheActive check box is cleared, the new category is not available when you create a newticket.
6. Type a description of the problem category.
7. Select a workflow for the category.TheWorkflow tab is displayed.
8. Click Save.TheSubcategories tab is displayed.
9. Optional: Click theSubcategories tab to create subcategories for the problem category.When you have finished, click Save.
HP ServiceManager – Process Designer Content Pack (9.30.3) Page 179 of 196
Administrator’s GuideChapter 7: ProblemManagement
Note: TheApply To flag indicates whether the category is shared across different modules.
For example, if theApply To is set to "Interaction/Incident", then this category will be createdin both the interaction category table and the incident category table.
Typical shared categories in OOB include Complaint, Request for Information, Incident, andRequest for Administration.
For theApply To flag in Problem Category:
When creating a problem category, theApply To option is predefined as "Problem" only andcannot bemodified. However, an problem category can also be created when creating aninteraction category with theApply To option set as "Interaction/Incident/Problem".
When searching for a problem category, all theApply To values that include Problem can beused.
The following list is used in Problem Category:
2 - Problem
4 - Interaction/Incident/Problem
Note: Problem category name is read-only after the category is created.
Create a Problem Task CategoryUser Roles: System Administrator
If you are an HP ServiceManager Administrator, youmay want to create a problem task category.To do this, you canmodify an existing category record, or you can create a new category record.HP ServiceManager provides out-of-box category records that you can use or modify.
To create a new problem task category record, follow these steps:
1. Click Problem Management.
2. Click Configuration > Problem Task Categories.
3. In themenu of theProblem Task Category pane, click New.
4. Type the name of the problem task category.
5. Clear theActive check box if you do not want the new category to appear in the category list. IftheActive check box is cleared, the new category is not available when you create a newticket.
6. Type a description of the problem task category.
7. Select a workflow for the category.
HP ServiceManager – Process Designer Content Pack (9.30.3)Page 180 of 196
Administrator’s GuideChapter 7: ProblemManagement
TheWorkflow tab is displayed.
8. Click Save.
Note: To avoid unpredictable issues, it is highly recommended that you do not change theproblem task category name after it is created.
Add a new subcategory to a problem categoryUser Roles: System Administrator
You can add a new subcategory to a problem category directly. Additionally, you can view a list ofthe subcategories that are associated with the current category, together with the record details foreach subcategory.
To add a new subcategory for a problem category, follow these steps:
1. Click Problem Management > Configuration in the system navigator.
2. Click Problem Categories > Search.
3. Select the problem category to which you want to add a subcategory.
4. Under theSubcategories tab, click the Link New Subcategories button.
5. Type a name for the new subcategory.
6. Type a description for the subcategory.
7. Click Save to add the new subcategory.
8. Optional: Click the Link New Areas button to create problem areas for the subcategory.
9. Click Save.
Related tasks
Create a problem category
Add a New Problem Area To a Subcategory
Add a new problem area to a subcategoryUser Roles: System Administrator
You can add a new problem area to a subcategory directly. Additionally, you can view a list of theareas that are associated with the current subcategory, together with the record details for eacharea.
To add a new problem area to a subcategory, follow these steps:
HP ServiceManager – Process Designer Content Pack (9.30.3) Page 181 of 196
Administrator’s GuideChapter 7: ProblemManagement
1. Click Problem Management > Configuration in the system navigator.
2. Click Problem Categories > Search.
3. Select the problem category with which the subcategory is associated.
4. Under theSubcategories tab, select the subcategory to which you want to add a new area.
5. Click theLink New Areas button.
6. Type a name for the new area.
7. Type a description for the area.
8. Click Save to add the new area.
Related tasks
Create a problem category
Add a New Subcategory To a Problem Category
Problem Management solution matchingWhen you create a new problem, ServiceManager enables you to link that problem to an existingproblem. ServiceManager includes the following out-of-box queries, with which you can search forexisting problems:
l Find a problem or known error with amatching configuration item
l Find a problem or known error with amatching service
l Find a problem or known error with amatching title
Tomodify an out-of-box Problemmanagement solutionmatching query, follow these steps:
1. Click Problem Management > Configuration > Solution Matching.
2. In the topmost pane, select the query that you want to modify.
3. Modify theName,Match, andWith fields as appropriate to your needs, and then click Save.
Related concepts
Create a New Problem
Problem Management SecurityThe topics in this section explain the ProblemManagement security roles, security areas, andrights.
HP ServiceManager – Process Designer Content Pack (9.30.3)Page 182 of 196
Administrator’s GuideChapter 7: ProblemManagement
Problem Management Security AreasUser Role: System Administrator
The security areas for ProblemManagement are Problem, Problem Task, and ProblemManagement Configuration. These areas contain the default security rights and settings forInteractions in the ProblemManagement module. The security rights settings will be inherited bythe new roles created in an area when no settings are specified in the security role.
Area System navigator menu items for this area
Problem This area contains the default security rights and settings for Problem. The rightswill be copied to new roles created for this area. However, the settings will onlybe inherited if there are no settings specified on the Role.
ProblemTasks
This area contains the default security rights and settings for Problem Tasks.The rights will be copied to new roles created for this area. However, the settingswill only be inherited if there are no settings specified on the Role.
ProblemManagementConfiguration
This area contains the default security rights and settings for ProblemManagement Configuration. The rights will be copied to new roles created for thisarea. However, the settings will only be inherited if there are no settings specifiedon the Role.
Note:When you set the security rights for a security role in the ProblemManagement Configuration area:
l TheView right is to view the settings defined in theAdministrationmenu and theConfigurationmenu.
l TheUpdate right is to update the values of existing settings defined intheAdministrationmenu and theConfigurationmenu.
l TheNew andDelete rights are to create and delete a setting in theConfigurationmenu, such as category.
l TheAdmin right is to add, edit, or delete the settings in theAdministration > Settingsmenu.
Default rightsWhen you create new security roles, they inherit the default rights that are defined in the securityarea. The following table describes the out-of-box rights that are defined in the Problem, ProblemTasks, and ProblemManagement Configuration areas.
Area Name View New Update Delete/Close Expert Admin
Problem TRUE FALSE Never Never FALSE FALSE
HP ServiceManager – Process Designer Content Pack (9.30.3) Page 183 of 196
Administrator’s GuideChapter 7: ProblemManagement
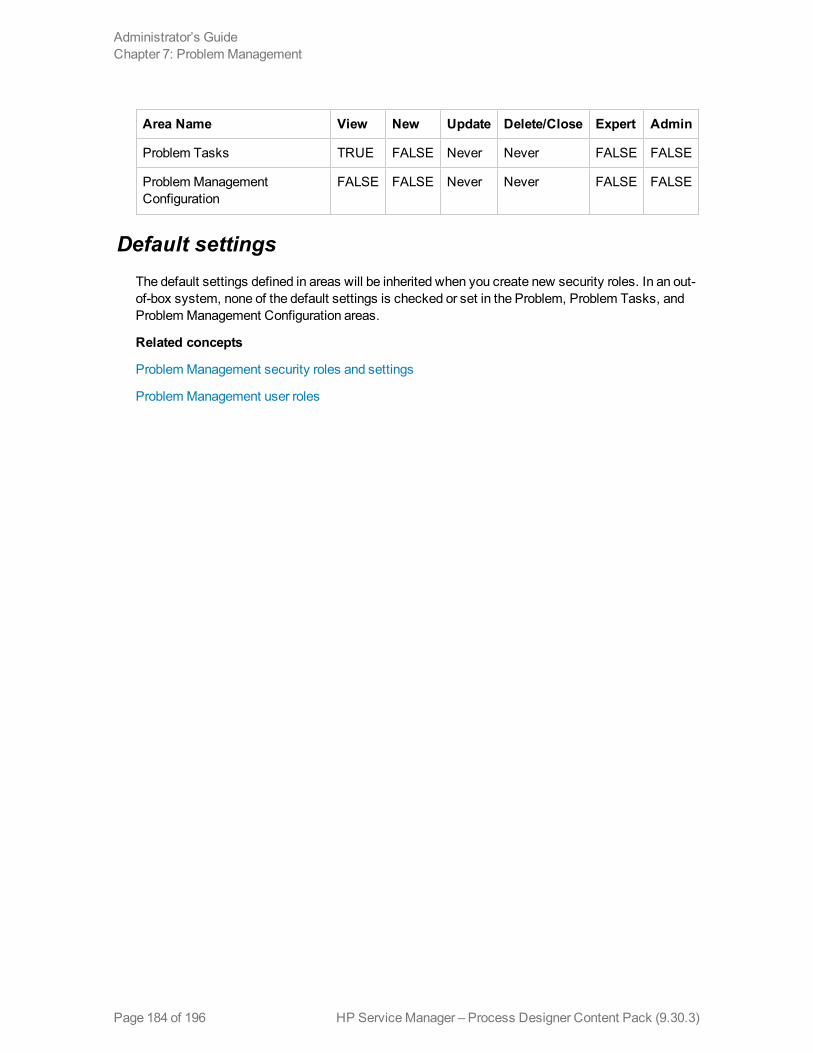
Area Name View New Update Delete/Close Expert Admin
Problem Tasks TRUE FALSE Never Never FALSE FALSE
ProblemManagementConfiguration
FALSE FALSE Never Never FALSE FALSE
Default settingsThe default settings defined in areas will be inherited when you create new security roles. In an out-of-box system, none of the default settings is checked or set in the Problem, Problem Tasks, andProblemManagement Configuration areas.
Related concepts
ProblemManagement security roles and settings
ProblemManagement user roles
HP ServiceManager – Process Designer Content Pack (9.30.3)Page 184 of 196
Administrator’s GuideChapter 7: ProblemManagement
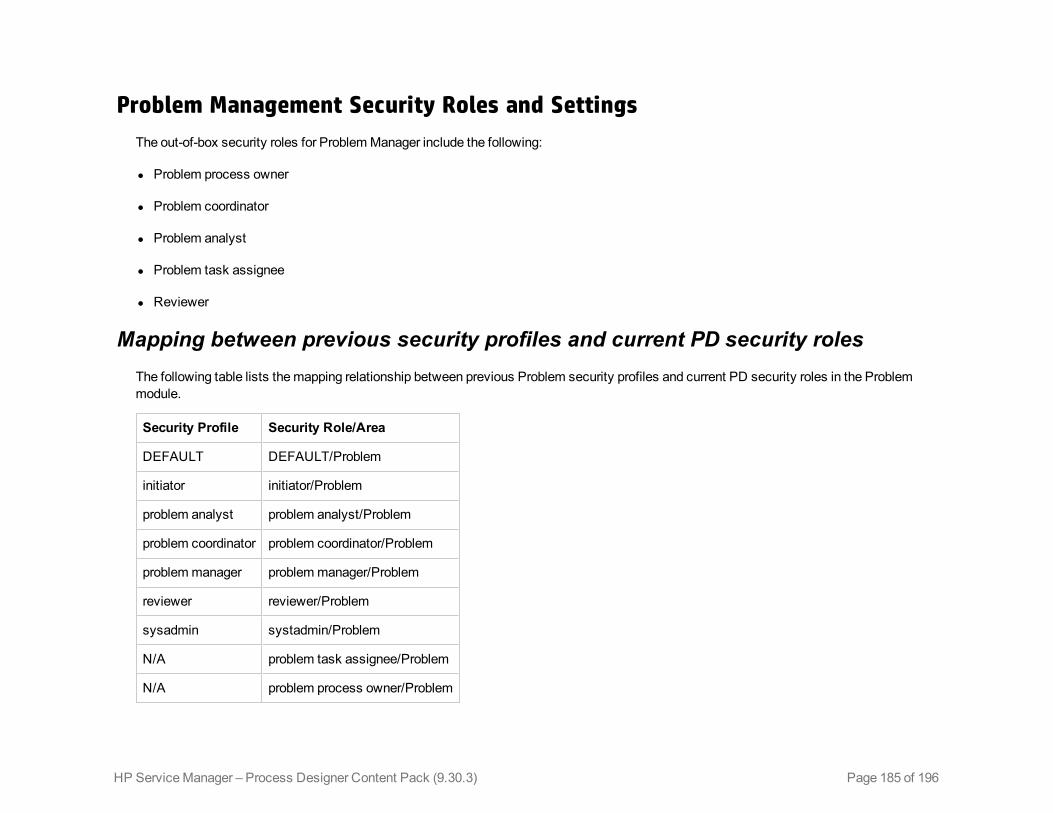
Problem Management Security Roles and SettingsThe out-of-box security roles for ProblemManager include the following:
l Problem process owner
l Problem coordinator
l Problem analyst
l Problem task assignee
l Reviewer
Mapping between previous security profiles and current PD security rolesThe following table lists themapping relationship between previous Problem security profiles and current PD security roles in the Problemmodule.
Security Profile Security Role/Area
DEFAULT DEFAULT/Problem
initiator initiator/Problem
problem analyst problem analyst/Problem
problem coordinator problem coordinator/Problem
problemmanager problemmanager/Problem
reviewer reviewer/Problem
sysadmin systadmin/Problem
N/A problem task assignee/Problem
N/A problem process owner/Problem
Page 185 of 196HP ServiceManager – Process Designer Content Pack (9.30.3)
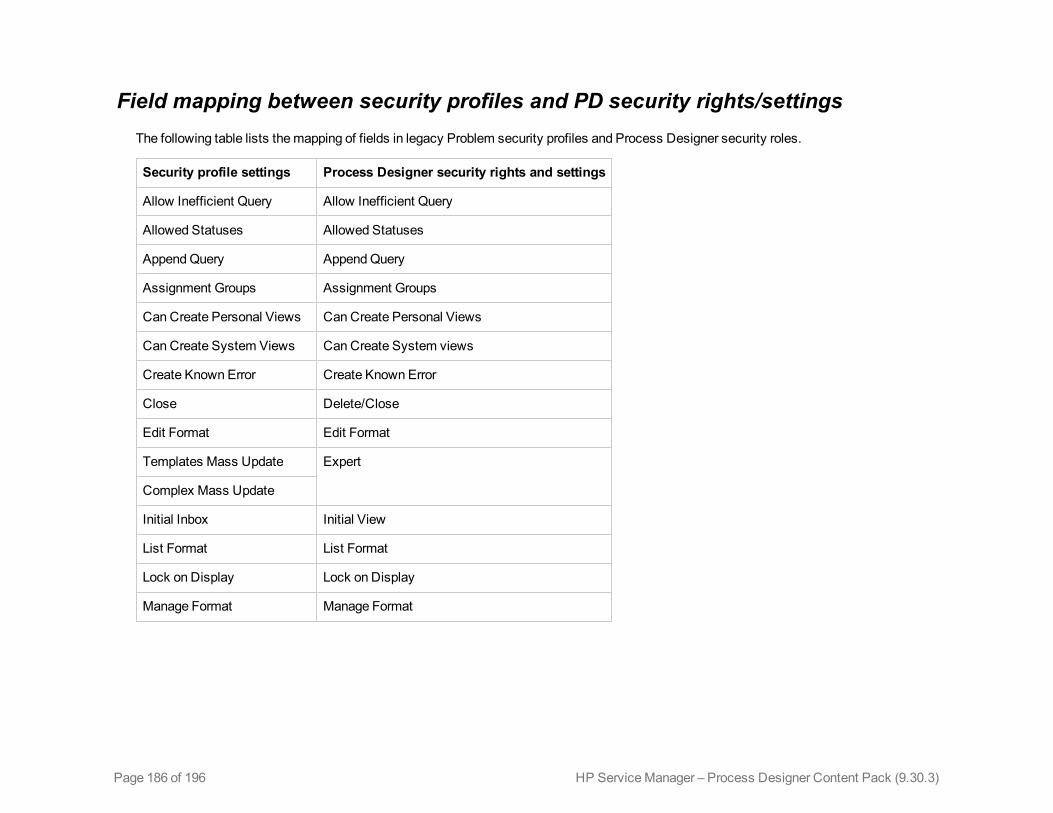
Field mapping between security profiles and PD security rights/settingsThe following table lists themapping of fields in legacy Problem security profiles and Process Designer security roles.
Security profile settings Process Designer security rights and settings
Allow Inefficient Query Allow Inefficient Query
Allowed Statuses Allowed Statuses
AppendQuery AppendQuery
Assignment Groups Assignment Groups
Can Create Personal Views Can Create Personal Views
Can Create System Views Can Create System views
Create Known Error Create Known Error
Close Delete/Close
Edit Format Edit Format
Templates Mass Update Expert
Complex Mass Update
Initial Inbox Initial View
List Format List Format
Lock on Display Lock on Display
Manage Format Manage Format
Page 186 of 196 HP ServiceManager – Process Designer Content Pack (9.30.3)
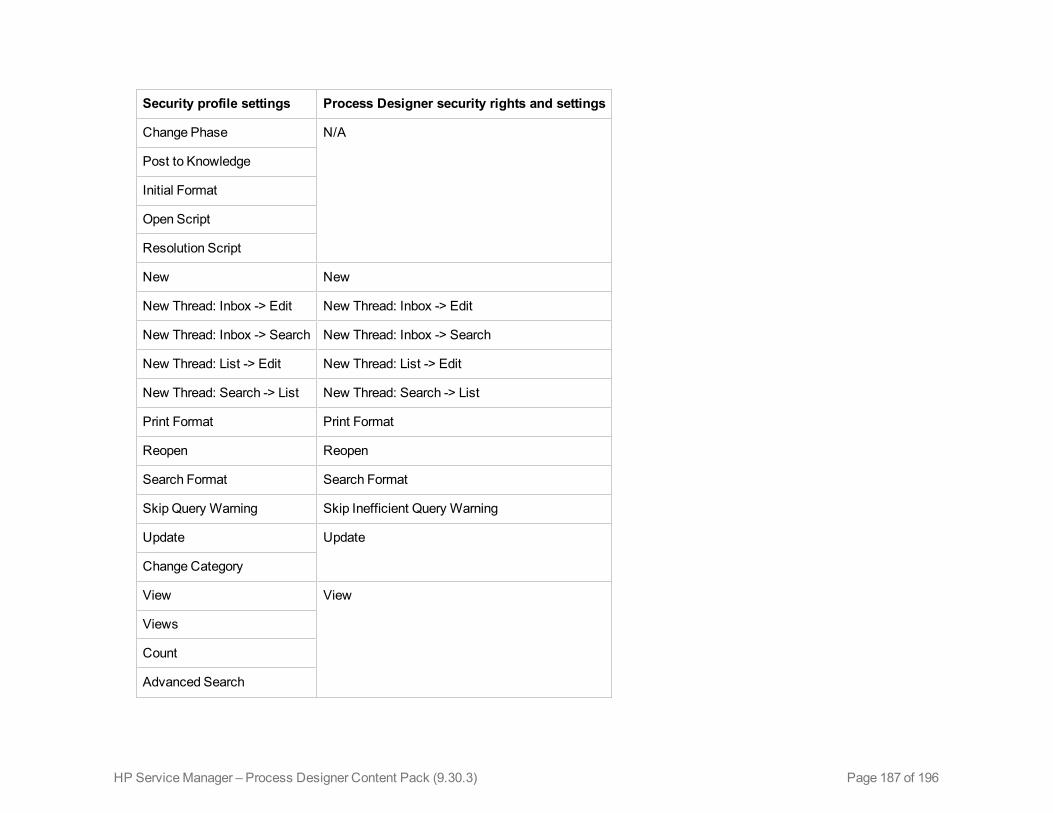
Security profile settings Process Designer security rights and settings
Change Phase N/A
Post to Knowledge
Initial Format
Open Script
Resolution Script
New New
New Thread: Inbox -> Edit New Thread: Inbox -> Edit
New Thread: Inbox -> Search New Thread: Inbox -> Search
New Thread: List -> Edit New Thread: List -> Edit
New Thread: Search -> List New Thread: Search -> List
Print Format Print Format
Reopen Reopen
Search Format Search Format
Skip Query Warning Skip Inefficient Query Warning
Update Update
Change Category
View View
Views
Count
Advanced Search
Page 187 of 196HP ServiceManager – Process Designer Content Pack (9.30.3)
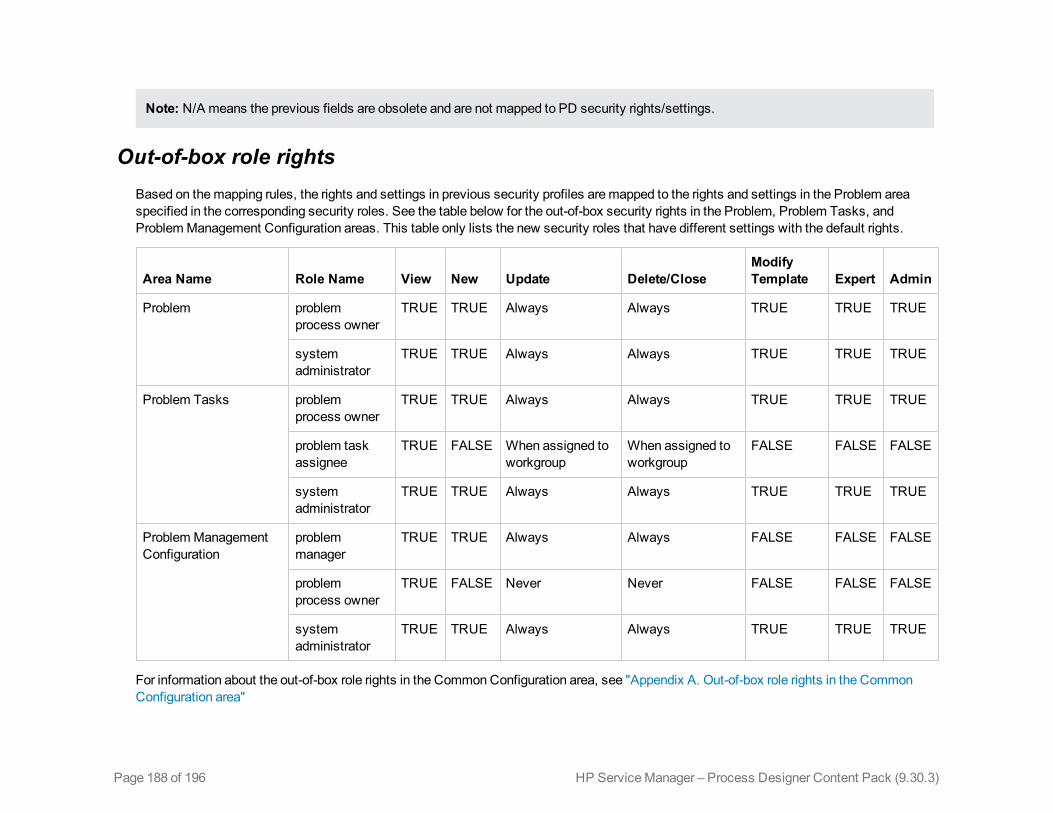
Note: N/A means the previous fields are obsolete and are not mapped to PD security rights/settings.
Out-of-box role rightsBased on themapping rules, the rights and settings in previous security profiles aremapped to the rights and settings in the Problem areaspecified in the corresponding security roles. See the table below for the out-of-box security rights in the Problem, Problem Tasks, andProblemManagement Configuration areas. This table only lists the new security roles that have different settings with the default rights.
Area Name Role Name View New Update Delete/CloseModifyTemplate Expert Admin
Problem problemprocess owner
TRUE TRUE Always Always TRUE TRUE TRUE
systemadministrator
TRUE TRUE Always Always TRUE TRUE TRUE
Problem Tasks problemprocess owner
TRUE TRUE Always Always TRUE TRUE TRUE
problem taskassignee
TRUE FALSE When assigned toworkgroup
When assigned toworkgroup
FALSE FALSE FALSE
systemadministrator
TRUE TRUE Always Always TRUE TRUE TRUE
ProblemManagementConfiguration
problemmanager
TRUE TRUE Always Always FALSE FALSE FALSE
problemprocess owner
TRUE FALSE Never Never FALSE FALSE FALSE
systemadministrator
TRUE TRUE Always Always TRUE TRUE TRUE
For information about the out-of-box role rights in the CommonConfiguration area, see "Appendix A. Out-of-box role rights in the CommonConfiguration area"
Page 188 of 196 HP ServiceManager – Process Designer Content Pack (9.30.3)
Related concepts
ProblemManager user roles
Related Tasks
Add security roles and settings
Page 189 of 196HP ServiceManager – Process Designer Content Pack (9.30.3)
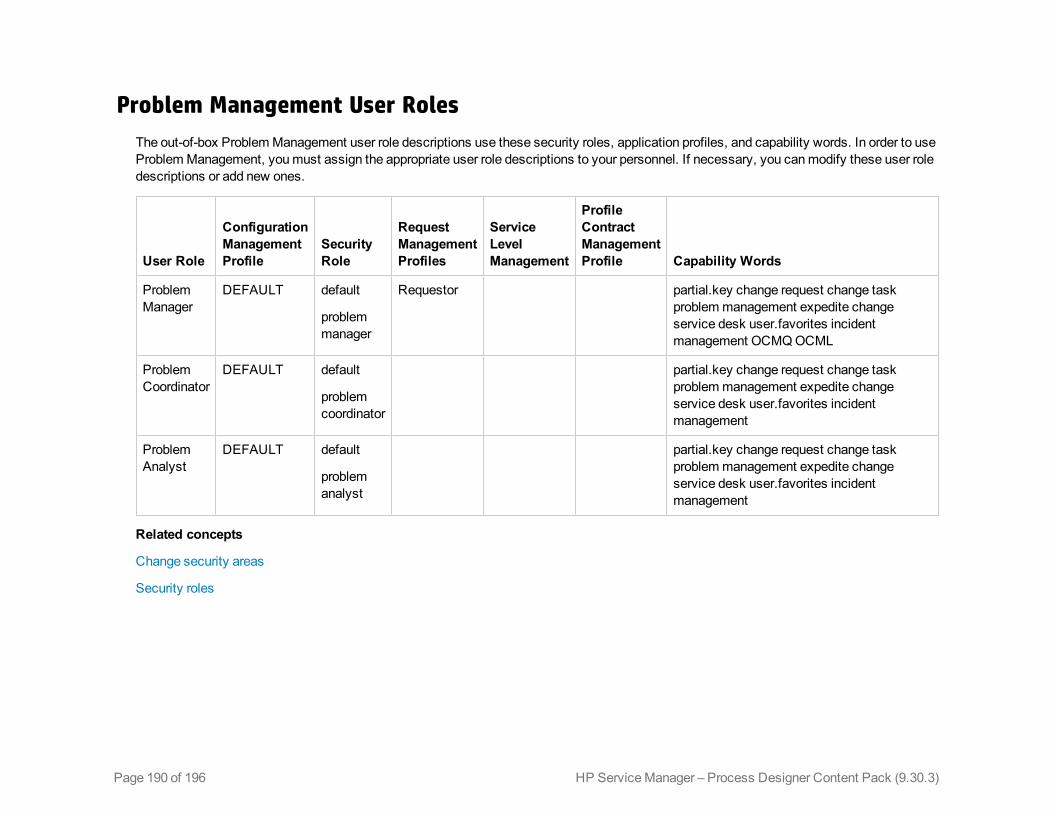
Problem Management User RolesThe out-of-box ProblemManagement user role descriptions use these security roles, application profiles, and capability words. In order to useProblemManagement, youmust assign the appropriate user role descriptions to your personnel. If necessary, you canmodify these user roledescriptions or add new ones.
User Role
ConfigurationManagementProfile
SecurityRole
RequestManagementProfiles
ServiceLevelManagement
ProfileContractManagementProfile Capability Words
ProblemManager
DEFAULT default
problemmanager
Requestor partial.key change request change taskproblemmanagement expedite changeservice desk user.favorites incidentmanagement OCMQOCML
ProblemCoordinator
DEFAULT default
problemcoordinator
partial.key change request change taskproblemmanagement expedite changeservice desk user.favorites incidentmanagement
ProblemAnalyst
DEFAULT default
problemanalyst
partial.key change request change taskproblemmanagement expedite changeservice desk user.favorites incidentmanagement
Related concepts
Change security areas
Security roles
Page 190 of 196 HP ServiceManager – Process Designer Content Pack (9.30.3)
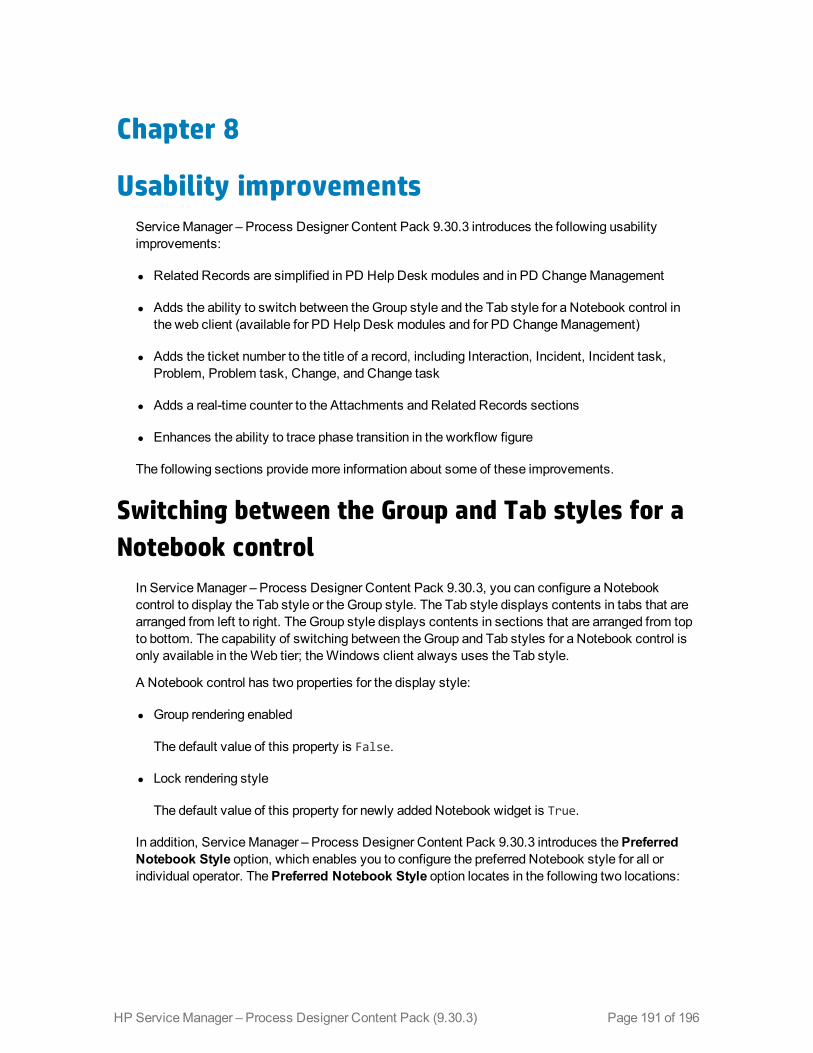
Chapter 8
Usability improvementsServiceManager – Process Designer Content Pack 9.30.3 introduces the following usabilityimprovements:
l Related Records are simplified in PD Help Desk modules and in PD ChangeManagement
l Adds the ability to switch between theGroup style and the Tab style for a Notebook control inthe web client (available for PD Help Desk modules and for PD ChangeManagement)
l Adds the ticket number to the title of a record, including Interaction, Incident, Incident task,Problem, Problem task, Change, and Change task
l Adds a real-time counter to the Attachments and Related Records sections
l Enhances the ability to trace phase transition in the workflow figure
The following sections providemore information about some of these improvements.
Switching between the Group and Tab styles for aNotebook control
In ServiceManager – Process Designer Content Pack 9.30.3, you can configure a Notebookcontrol to display the Tab style or the Group style. The Tab style displays contents in tabs that arearranged from left to right. TheGroup style displays contents in sections that are arranged from topto bottom. The capability of switching between theGroup and Tab styles for a Notebook control isonly available in theWeb tier; theWindows client always uses the Tab style.
A Notebook control has two properties for the display style:
l Group rendering enabled
The default value of this property is False.
l Lock rendering style
The default value of this property for newly added Notebook widget is True.
In addition, ServiceManager – Process Designer Content Pack 9.30.3 introduces thePreferredNotebook Style option, which enables you to configure the preferred Notebook style for all orindividual operator. ThePreferred Notebook Style option locates in the following two locations:
Page 191 of 196HP ServiceManager – Process Designer Content Pack (9.30.3)
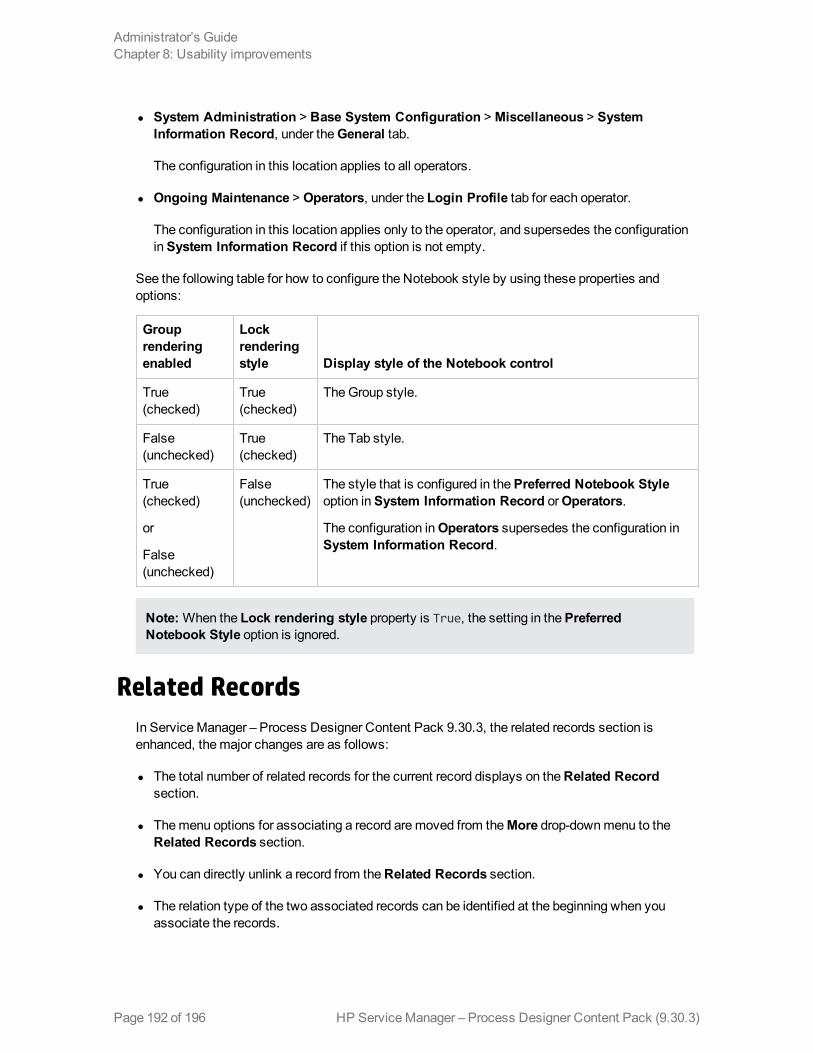
l System Administration > Base System Configuration >Miscellaneous > SystemInformation Record, under theGeneral tab.
The configuration in this location applies to all operators.
l Ongoing Maintenance > Operators, under the Login Profile tab for each operator.
The configuration in this location applies only to the operator, and supersedes the configurationinSystem Information Record if this option is not empty.
See the following table for how to configure the Notebook style by using these properties andoptions:
Grouprenderingenabled
Lockrenderingstyle Display style of the Notebook control
True(checked)
True(checked)
TheGroup style.
False(unchecked)
True(checked)
The Tab style.
True(checked)
or
False(unchecked)
False(unchecked)
The style that is configured in thePreferred Notebook Styleoption inSystem Information Record orOperators.
The configuration inOperators supersedes the configuration inSystem Information Record.
Note:When the Lock rendering style property is True, the setting in thePreferredNotebook Style option is ignored.
Related RecordsIn ServiceManager – Process Designer Content Pack 9.30.3, the related records section isenhanced, themajor changes are as follows:
l The total number of related records for the current record displays on theRelated Recordsection.
l Themenu options for associating a record aremoved from theMore drop-downmenu to theRelated Records section.
l You can directly unlink a record from theRelated Records section.
l The relation type of the two associated records can be identified at the beginning when youassociate the records.
HP ServiceManager – Process Designer Content Pack (9.30.3)Page 192 of 196
Administrator’s GuideChapter 8: Usability improvements
After you apply the ServiceManager – Process Designer Content Pack 9.30.3, the enhancement tothe Related Records section is applied to the ChangeManagement module even if the ProcessDesigner is disabled. For others modules, the enhancement is applied when the Process Designeris enabled.
Link an existing recordTo link an existing record:
1. Open a record and go to theRelated Record section.
2. Select the Link Type.
3. Click the Link Existing Record button.
4. Enter the record number, or search and select the target record.
5. Click OK.
Link type specifies which record type you want to associate and the relationship type between twoassociated records. For example, you open an incident record, you chooseCaused Changes, andthen you link an existing change record. This means the incident causes the change.
Link a new recordTo link a new record:
1. Open a record and go to theRelated Record section.
2. Select the Link Type.
3. Click the Link New Record button.
4. Follow the normal procedures of creating a new record.
Link type specifies which record type you want to associate and the relationship type between twoassociated records. For example, you open an incident record, you chooseCaused Changes, andthen you link a new change record. This means the incident causes the change.
When you link a new record, the new record uses the category of the current record. If the categoryof the current record does not exist in themodule of the new record, the new record uses the defaultcategory of themodule if it is set; otherwise, you will be prompted with the category selection pageto choose a category for the new record.
Unlink a related recordTo unlink a related record:
HP ServiceManager – Process Designer Content Pack (9.30.3) Page 193 of 196
Administrator’s GuideChapter 8: Usability improvements

1. Go to theRelated Record section.
2. Select the record you want to unlink.
3. Click theUnlink Record button.
4. Click Yes.
HP ServiceManager – Process Designer Content Pack (9.30.3)Page 194 of 196
Administrator’s GuideChapter 8: Usability improvements

Appendix A. Out-of-box role rights in the CommonConfiguration area
The CommonConfiguration area is used to set the permissions that control access to common configurations, including Alert Definitions,Approval Definitions, Assignment Groups, Service Desk/Problem SolutionMatching, and Environment.
Based on themapping rules, the rights and settings in previous security profiles aremapped to the rights and settings in the CommonConfiguration area specified in the corresponding security roles. See the table below for the out-of-box security rights in the CommonConfiguration area. This table only lists the new security roles that have different settings with the default rights.
Area Role View New Update Delete/Close Modify Template Expert Admin
CommonConfiguration change analyst change TRUE TRUE Always Always FALSE FALSE FALSE
change analyst tasks TRUE TRUE Always Always FALSE FALSE FALSE
change approver TRUE TRUE Always Always FALSE FALSE FALSE
change coordinator change TRUE TRUE Always Always FALSE FALSE FALSE
change coordinator tasks TRUE TRUE Always Always FALSE FALSE FALSE
changemanager TRUE TRUE Always Always FALSE FALSE FALSE
configuration auditor TRUE TRUE Always Always FALSE FALSE FALSE
emergency group TRUE TRUE Always Always FALSE FALSE FALSE
incident analyst TRUE TRUE Always Always FALSE FALSE FALSE
incident coordinator TRUE TRUE Always Always FALSE FALSE FALSE
incident manager TRUE TRUE Always Always FALSE FALSE FALSE
initiator TRUE TRUE Always Always FALSE FALSE FALSE
Page 195 of 196HP ServiceManager – Process Designer Content Pack (9.30.3)
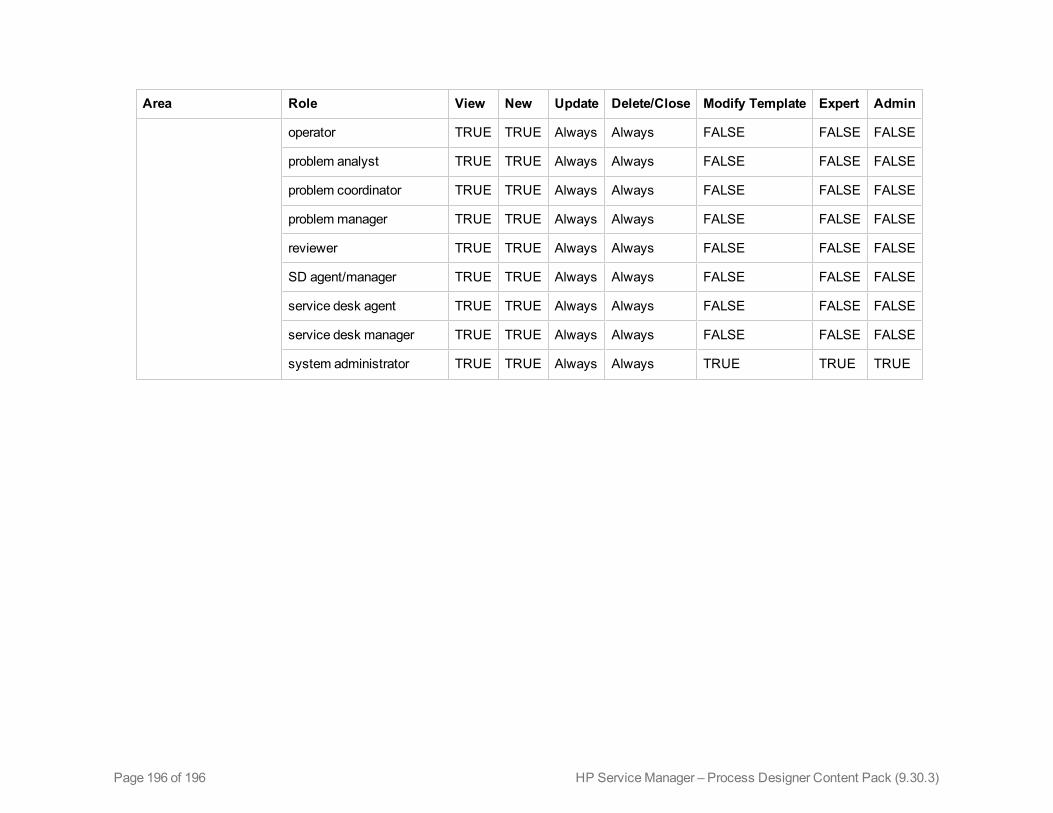
Area Role View New Update Delete/Close Modify Template Expert Admin
operator TRUE TRUE Always Always FALSE FALSE FALSE
problem analyst TRUE TRUE Always Always FALSE FALSE FALSE
problem coordinator TRUE TRUE Always Always FALSE FALSE FALSE
problemmanager TRUE TRUE Always Always FALSE FALSE FALSE
reviewer TRUE TRUE Always Always FALSE FALSE FALSE
SD agent/manager TRUE TRUE Always Always FALSE FALSE FALSE
service desk agent TRUE TRUE Always Always FALSE FALSE FALSE
service desk manager TRUE TRUE Always Always FALSE FALSE FALSE
system administrator TRUE TRUE Always Always TRUE TRUE TRUE
Page 196 of 196 HP ServiceManager – Process Designer Content Pack (9.30.3)