Embed Size (px)
Citation preview
Honeywell Process Solutions
Process Instrument Explorer Configuration Software
User Manual
51-52-25-137 January 2009
January 2009 Process Instrument Explorer Configuration Software User Manual ii
Notices and Trademarks
Copyright 2006 by Honeywell Revised January 2009
WARRANTY/REMEDY
Honeywell warrants goods of its manufacture as being free of defective materials and faulty workmanship. Contact your local sales office for warranty information. If warranted goods are returned to Honeywell during the period of coverage, Honeywell will repair or replace without charge those items it finds defective. The foregoing is Buyer's sole remedy and is in lieu of all other warranties, expressed or implied, including those of merchantability and fitness for a particular purpose. Specifications may change without notice. The information we supply is believed to be accurate and reliable as of this printing. However, we assume no responsibility for its use.
While we provide application assistance personally, through our literature and the Honeywell web site, it is up to the customer to determine the suitability of the product in the application.
Honeywell Process Solutions Honeywell
2500 W. Union Hill Drive Phoenix, Arizona 85027
Process Instrument Explorer is a U.S. registered trademark of Honeywell
Other brand or product names are trademarks of their respective owners.
January 2009 Process Instrument Explorer Configuration Software User Manual 1
About This Document
Abstract This document provides descriptions and procedures for the installation and operation of Process Instrument Explorer software.
Contacts
World Wide Web The following lists Honeywell’s World Wide Web sites that will be of interest to our customers.
Honeywell Organization WWW Address (URL)
Corporate http://www.honeywell.com
Honeywell Process Solutions http://www.honeywell.com/ps
Telephone Contact us by telephone at the numbers listed below. Organization Phone Number
United States and Canada Honeywell 1-800-423-9883 Tech. Support 1-800-525-7439 Service
2 Process Instrument Explorer Configuration Software User Manual January 2009
Contents
1 INTRODUCTION ................................................................................................... 4 1.1 Overview ........................................................................................................................................ 4
1.1.1 Features................................................................................................................................ 4
2 INSTALLATION .................................................................................................... 6 2.1 System Requirements ..................................................................................................................... 6 2.2 Install/Upgrade Procedure .............................................................................................................. 7 2.3 Uninstall Procedure ........................................................................................................................ 9
3 OPERATIONS..................................................................................................... 10 3.1 Overview ...................................................................................................................................... 10
3.1.1 Communications Setup...................................................................................................... 13 3.1.2 Upload ............................................................................................................................... 14 3.1.3 Offline Configuration ........................................................................................................ 15 3.1.4 Download .......................................................................................................................... 16 3.1.5 Online Configuration......................................................................................................... 17 3.1.6 Maintenance Data .............................................................................................................. 18 3.1.7 Infrared checklist ............................................................................................................... 19 3.1.8 Ethernet Q&A.................................................................................................................... 20
4 SERVICES .......................................................................................................... 22 4.1 Overview ...................................................................................................................................... 22
4.1.1 Pocket PC Services Menu.................................................................................................. 22 4.1.2 PC Services Menu ............................................................................................................. 22
4.2 Export Configuration (PC only) ................................................................................................... 24 4.3 Transfer Configuration ................................................................................................................. 24 4.4 Manage Configuration Files ......................................................................................................... 25 4.5 Install Descriptive File (PC only)................................................................................................. 25 4.6 Transfer Descriptive File (PC only) ............................................................................................. 26 4.7 Transfer Healthwatch Data (Pocket PC only, UDC3500 only).................................................... 26 4.8 Enable Descriptive Name Support ............................................................................................... 26 4.9 Import Database............................................................................................................................ 27 4.10 Export Database........................................................................................................................ 28
5 INDEX.................................................................................................................. 29
January 2009 Process Instrument Explorer Configuration Software User Manual 3
Tables Table 3-1 Operations Icons____________________________________________________________ 11 Table 3-2 Operations Menu ___________________________________________________________ 12 Table 4-1 Service menu ______________________________________________________________ 23
Figures Figure 1-1 Screen capture of Process Instrument Explorer running on a Pocket PC _________________ 4
Introduction
January 2009 Process Instrument Explorer Configuration Software User Manual 1
1 Introduction
1.1 Overview Process Instrument Explorer (P.I.E.) lets you configure specified process instruments such as controllers and analyzers using a PC (desktop/laptop) or Pocket PC.
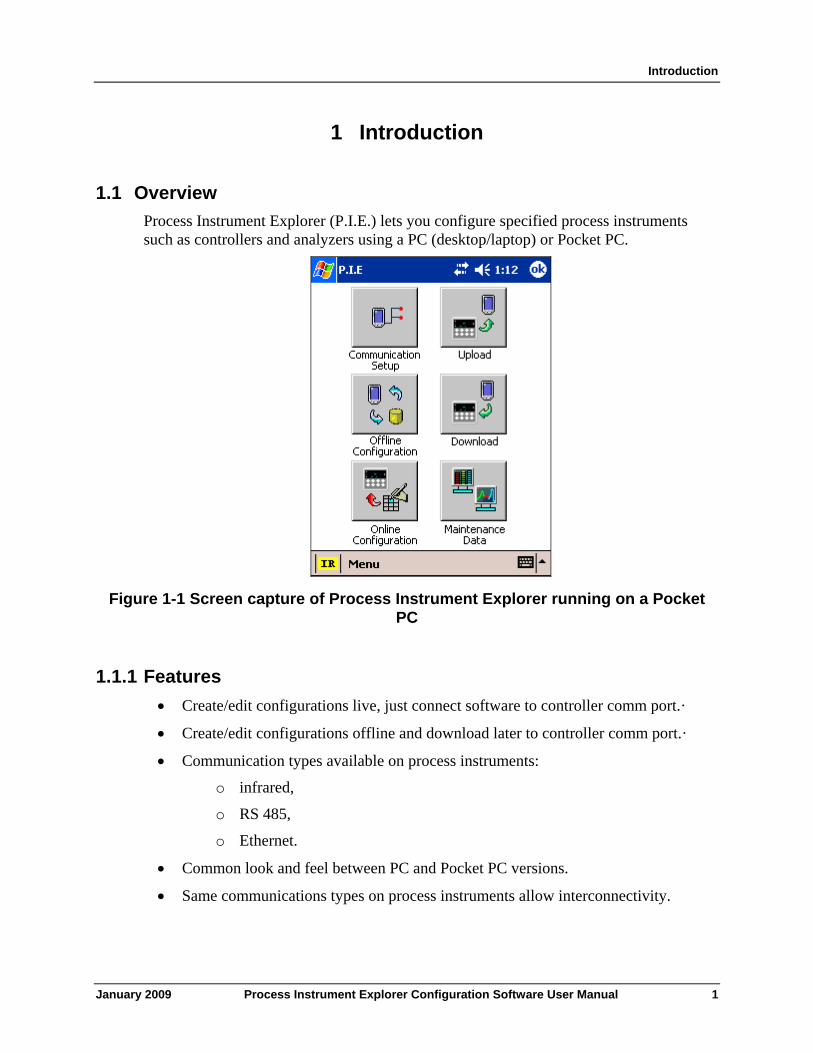
Figure 1-1 Screen capture of Process Instrument Explorer running on a Pocket PC
1.1.1 Features • Create/edit configurations live, just connect software to controller comm port.·
• Create/edit configurations offline and download later to controller comm port.·
• Communication types available on process instruments:
o infrared,
o RS 485,
o Ethernet.
• Common look and feel between PC and Pocket PC versions.
• Same communications types on process instruments allow interconnectivity.
Introduction
2 Process Instrument Explorer Configuration Software User Manual January 2009
• The infrared connection provides a non-intrusive wireless connection with the instrument and maintains NEMA4X AND IP66 integrity.
• No need to get access to the back of the instrument to communicate with the instrument, no need to take your screw driver to wire the communication cable, no wiring mistake possible. You can now duplicate an instrument’s configuration, upload or download a new configuration in a matter of seconds, just by pointing your Pocket PC in the direction of the instrument.
It takes just a few seconds to upload a configuration from an instrument. You can then save the configuration file onto your PC or pocket PC for review, modification or archiving. Furthermore, this software also gives you important maintenance information on the instrument: instantly get information on the current operating parameters, digital inputs and alarm status, identify internal or analog input problems.
Installation
January 2009 Process Instrument Explorer Configuration Software User Manual 3
2 Installation
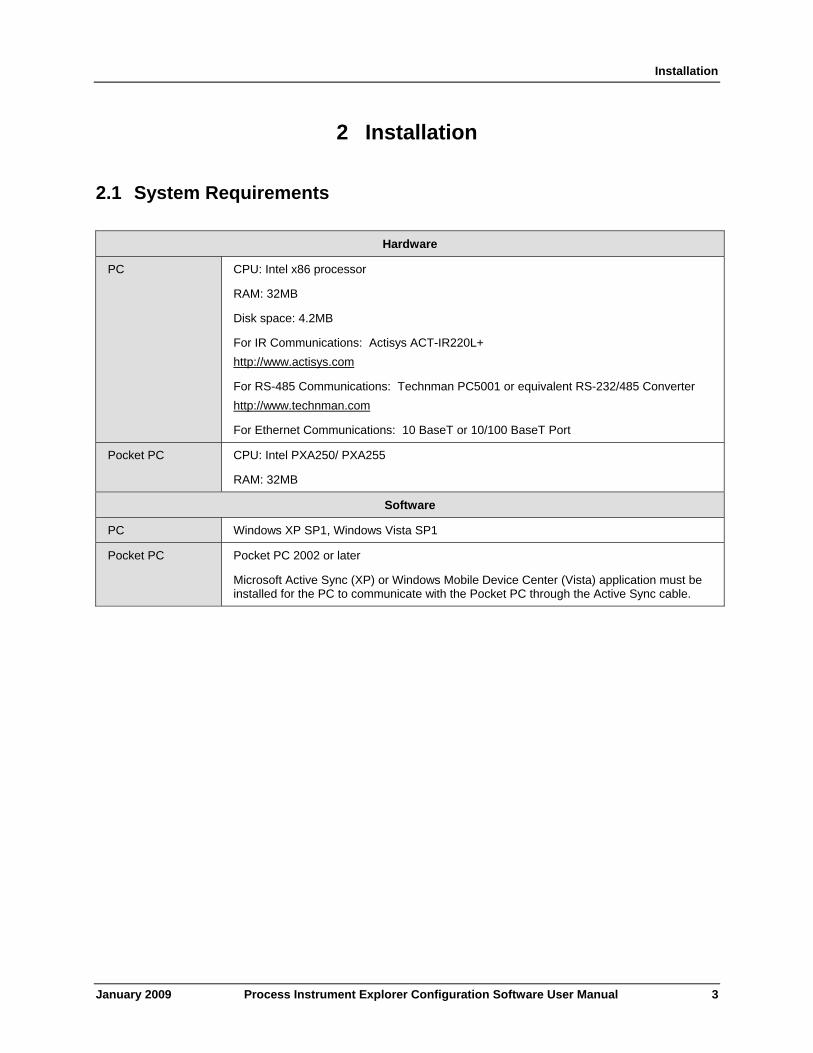
2.1 System Requirements
Hardware
PC CPU: Intel x86 processor
RAM: 32MB
Disk space: 4.2MB
For IR Communications: Actisys ACT-IR220L+ http://www.actisys.com
For RS-485 Communications: Technman PC5001 or equivalent RS-232/485 Converter http://www.technman.com
For Ethernet Communications: 10 BaseT or 10/100 BaseT Port
Pocket PC CPU: Intel PXA250/ PXA255
RAM: 32MB
Software
PC Windows XP SP1, Windows Vista SP1
Pocket PC Pocket PC 2002 or later
Microsoft Active Sync (XP) or Windows Mobile Device Center (Vista) application must be installed for the PC to communicate with the Pocket PC through the Active Sync cable.
Installation
4 Process Instrument Explorer Configuration Software User Manual January 2009
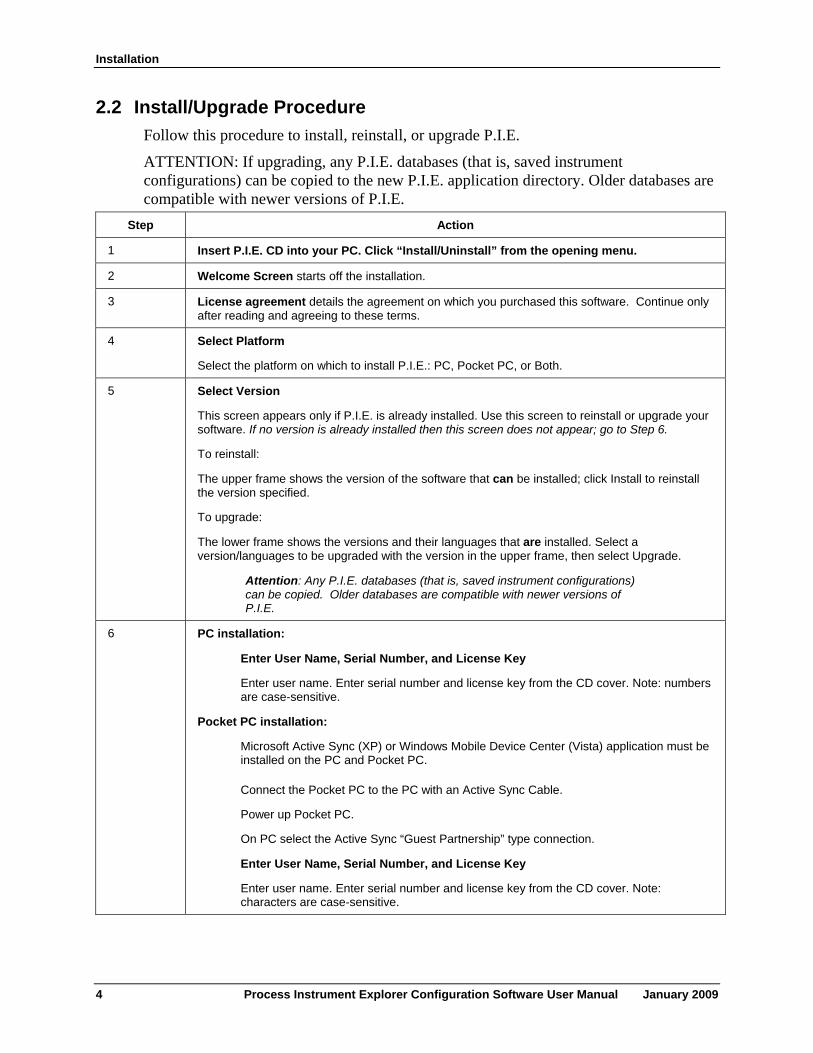
2.2 Install/Upgrade Procedure Follow this procedure to install, reinstall, or upgrade P.I.E.
ATTENTION: If upgrading, any P.I.E. databases (that is, saved instrument configurations) can be copied to the new P.I.E. application directory. Older databases are compatible with newer versions of P.I.E.
Step Action
1 Insert P.I.E. CD into your PC. Click “Install/Uninstall” from the opening menu.
2 Welcome Screen starts off the installation.
3 License agreement details the agreement on which you purchased this software. Continue only after reading and agreeing to these terms.
4 Select Platform
Select the platform on which to install P.I.E.: PC, Pocket PC, or Both.
5 Select Version
This screen appears only if P.I.E. is already installed. Use this screen to reinstall or upgrade your software. If no version is already installed then this screen does not appear; go to Step 6.
To reinstall:
The upper frame shows the version of the software that can be installed; click Install to reinstall the version specified.
To upgrade:
The lower frame shows the versions and their languages that are installed. Select a version/languages to be upgraded with the version in the upper frame, then select Upgrade.
Attention: Any P.I.E. databases (that is, saved instrument configurations) can be copied. Older databases are compatible with newer versions of P.I.E.
6 PC installation:
Enter User Name, Serial Number, and License Key
Enter user name. Enter serial number and license key from the CD cover. Note: numbers are case-sensitive.
Pocket PC installation:
Microsoft Active Sync (XP) or Windows Mobile Device Center (Vista) application must be installed on the PC and Pocket PC.
Connect the Pocket PC to the PC with an Active Sync Cable.
Power up Pocket PC.
On PC select the Active Sync “Guest Partnership” type connection.
Enter User Name, Serial Number, and License Key
Enter user name. Enter serial number and license key from the CD cover. Note: characters are case-sensitive.
Installation
January 2009 Process Instrument Explorer Configuration Software User Manual 5
Step Action
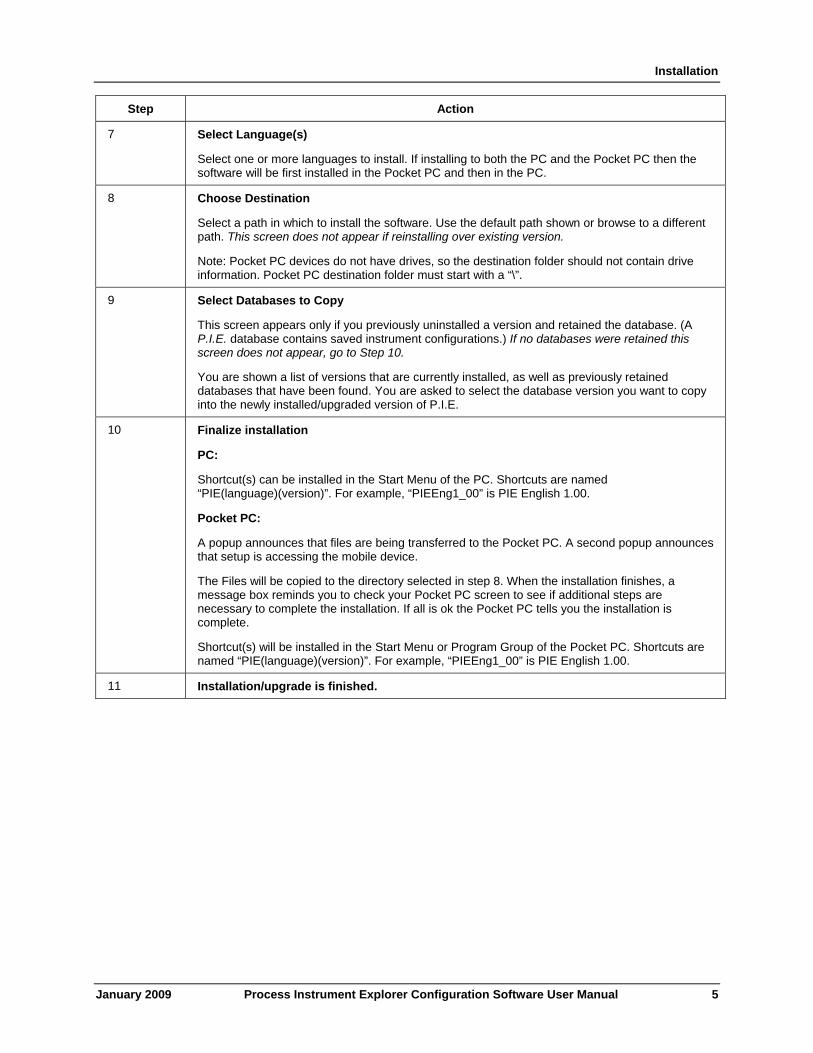
7 Select Language(s)
Select one or more languages to install. If installing to both the PC and the Pocket PC then the software will be first installed in the Pocket PC and then in the PC.
8 Choose Destination
Select a path in which to install the software. Use the default path shown or browse to a different path. This screen does not appear if reinstalling over existing version.
Note: Pocket PC devices do not have drives, so the destination folder should not contain drive information. Pocket PC destination folder must start with a “\”.
9 Select Databases to Copy
This screen appears only if you previously uninstalled a version and retained the database. (A P.I.E. database contains saved instrument configurations.) If no databases were retained this screen does not appear, go to Step 10.
You are shown a list of versions that are currently installed, as well as previously retained databases that have been found. You are asked to select the database version you want to copy into the newly installed/upgraded version of P.I.E.
10 Finalize installation
PC:
Shortcut(s) can be installed in the Start Menu of the PC. Shortcuts are named “PIE(language)(version)”. For example, “PIEEng1_00” is PIE English 1.00.
Pocket PC:
A popup announces that files are being transferred to the Pocket PC. A second popup announces that setup is accessing the mobile device.
The Files will be copied to the directory selected in step 8. When the installation finishes, a message box reminds you to check your Pocket PC screen to see if additional steps are necessary to complete the installation. If all is ok the Pocket PC tells you the installation is complete.
Shortcut(s) will be installed in the Start Menu or Program Group of the Pocket PC. Shortcuts are named “PIE(language)(version)”. For example, “PIEEng1_00” is PIE English 1.00.
11 Installation/upgrade is finished.
Installation
6 Process Instrument Explorer Configuration Software User Manual January 2009
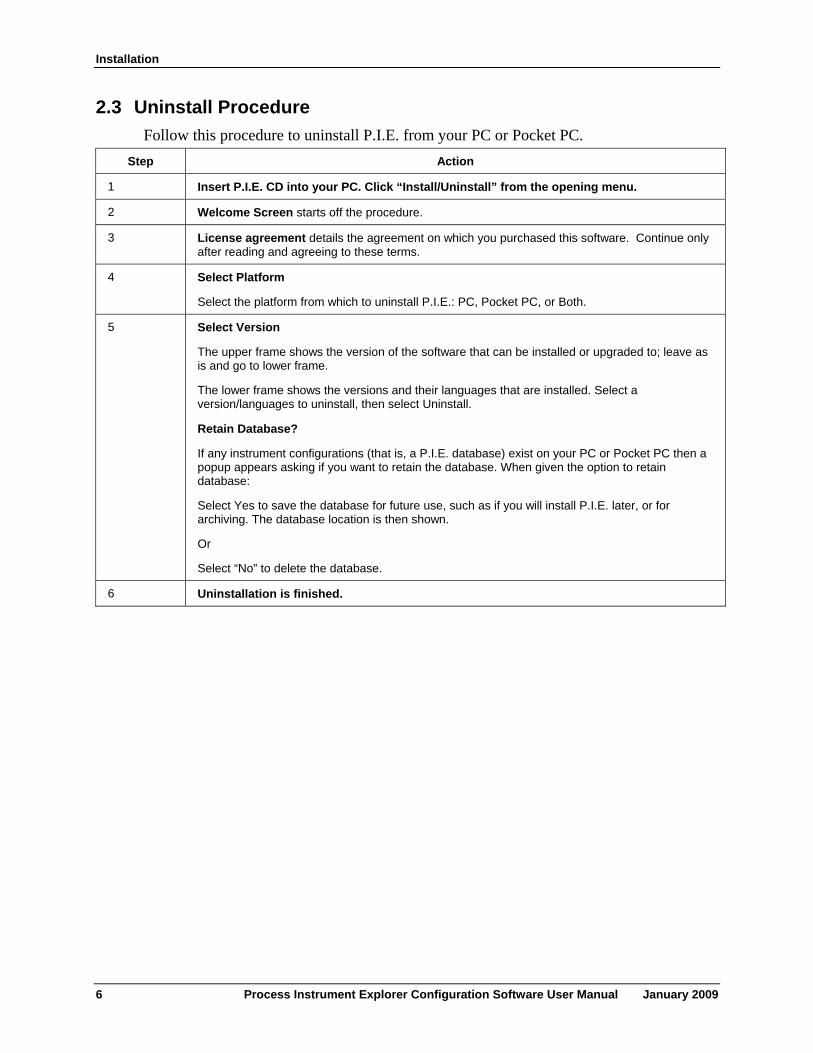
2.3 Uninstall Procedure Follow this procedure to uninstall P.I.E. from your PC or Pocket PC.
Step Action
1 Insert P.I.E. CD into your PC. Click “Install/Uninstall” from the opening menu.
2 Welcome Screen starts off the procedure.
3 License agreement details the agreement on which you purchased this software. Continue only after reading and agreeing to these terms.
4 Select Platform
Select the platform from which to uninstall P.I.E.: PC, Pocket PC, or Both.
5 Select Version
The upper frame shows the version of the software that can be installed or upgraded to; leave as is and go to lower frame.
The lower frame shows the versions and their languages that are installed. Select a version/languages to uninstall, then select Uninstall.
Retain Database?
If any instrument configurations (that is, a P.I.E. database) exist on your PC or Pocket PC then a popup appears asking if you want to retain the database. When given the option to retain database:
Select Yes to save the database for future use, such as if you will install P.I.E. later, or for archiving. The database location is then shown.
Or
Select “No” to delete the database.
6 Uninstallation is finished.
Operations
January 2009 Process Instrument Explorer Configuration Software User Manual 7
3 Operations
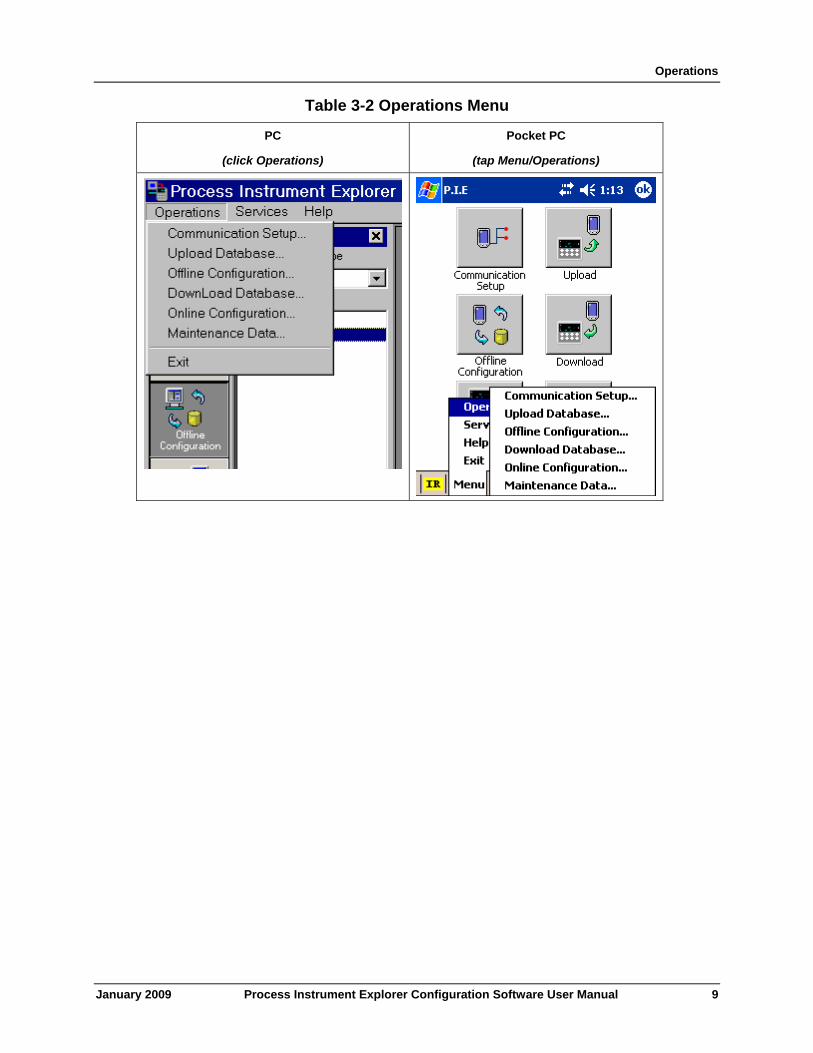
3.1 Overview The PC and Pocket PC Operations are virtually identical. Any differences will be indicated. Operations choices are:
Communications Setup—Before uploading or downloading instrument configurations you must set up communications.
Upload Database—Uploads instrument configuration to PC/Pocket PC.
Offline Configuration—Edits an instrument configuration for later downloading.
Download—Downloads an instrument configuration to an instrument.
Online Configuration—Edits and downloads one instrument setting at a time.
Maintenance Data—Displays key operating parameters and status parameters of the instrument without switching between the instrument screens. Some of the information presented here is not visible through the instrument display panel. Used primarily for diagnostics.
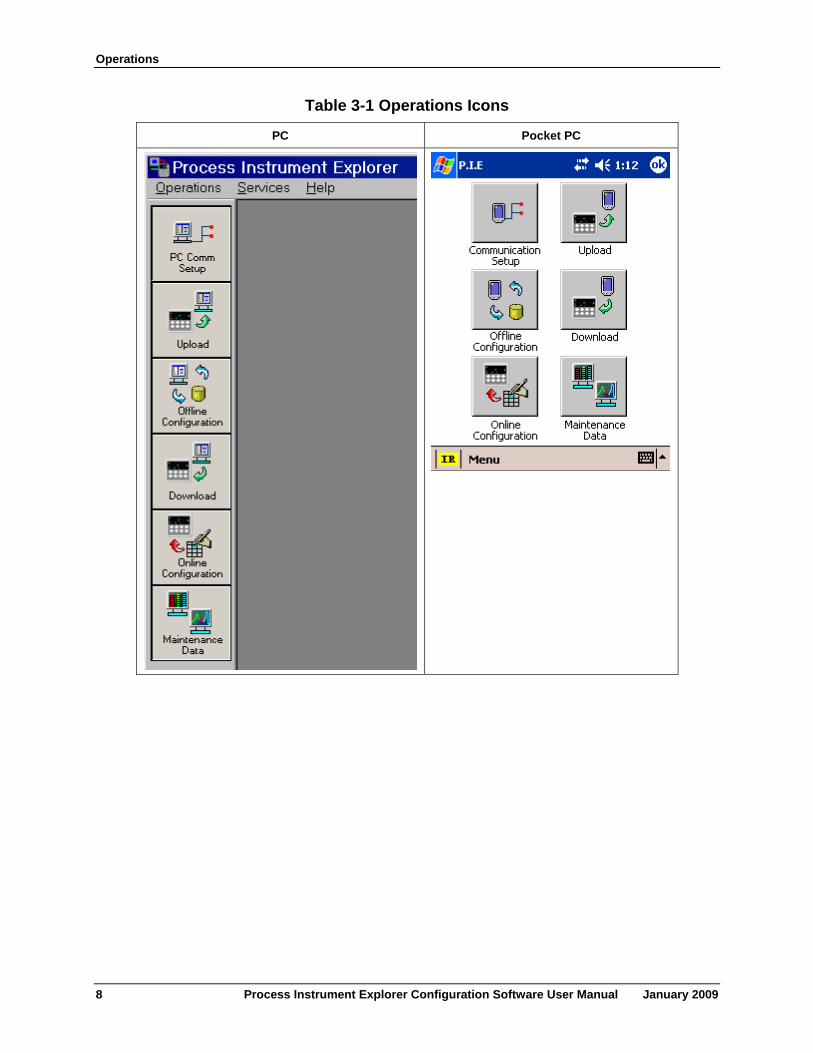
The Operations features are accessed using icons (Table 3-1) or the Menu (Table 3-2).
Operations
8 Process Instrument Explorer Configuration Software User Manual January 2009
Table 3-1 Operations Icons
PC Pocket PC
Operations
January 2009 Process Instrument Explorer Configuration Software User Manual 9
Table 3-2 Operations Menu
PC
(click Operations)
Pocket PC
(tap Menu/Operations)
Operations
10 Process Instrument Explorer Configuration Software User Manual January 2009
3.1.1 Communications Setup Before transferring data between P.I.E. and instrument you must set up your PC or Pocket PC communication parameters using this procedure.
Step Action
1 Select “Communication Setup” or “PC Comm Setup” icon or menu item.
2 Select “Communication type” to be used with the process instrument: Infrared, RS485, or Ethernet. The status bar at the bottom of the screen indicates your choice.
Note 1: Ethernet feature is not supported in Pocket PC.
Note 2: IPAQ Pocket PCs do not support serial communication.
3 “Select Type to set up”
Infrared:
Device address: Enter address of the process instrument. Default 3.
Serial Port (PC only): Your PC requires an Infrared cable to communicate with the instrument. This cable must be plugged into the PC’s Serial Port. Enter that port number here.
IR Port (Pocket PC only): Your Pocket PC will attempt to automatically determine the IR port address during the installation process. If successful, the IR port will be automatically set and cannot be changed. If unsuccessful, you must specify the IR port address using the drop down menu. Contact your supplier for assistance.
RS485
Device address: Enter address of the process instrument. Default 3.
Serial Port (PC only): Your PC requires a RS232/RS485 converter to communicate with the instrument. This cable must be plugged into the PC’s Serial Port. Enter that port number here.
Serial Port (Pocket PC only): Your Pocket PC will attempt to automatically determine the serial port address during the installation process. If successful, the serial IR port will be automatically set and cannot be changed. If unsuccessful, you must specify the IR port address using the drop down menu. Contact your supplier for assistance.
Your Pocket PC requires a RS232/RS485 converter to communicate with the instrument. This cable must be plugged into the Pocket PC’s Serial Port.
See your instrument’s manual for wiring details.
Ethernet
IP address: Enter instrument’s IP address. Default 10.0.0.2 UDC. Default 192.168.1.254 (UDA)
Timeout (1 – 20 sec): Enter number of seconds of non-response before timeout. As network traffic increases this will need to be increased.
Retries (2 to 60): Enter number of attempts to connect. As network traffic increases this will need to be increased.
See your instrument’s manual for wiring details.
4 Pocket PC only: For Infrared communication, verify that the beam settings checkbox in the Pocket PC system software is UNCHECKED. This checkbox is located at: Start\Settings\Connections\Beam. Infrared communications will not work with if this box is checked.
Operations
January 2009 Process Instrument Explorer Configuration Software User Manual 11
3.1.2 Upload Upload copies your instrument’s configuration into P.I.E. where it can be saved, edited, and downloaded back to the instrument or other instruments.
Attention Infrared users: Before transferring data between your instrument and PC/Pocket PC, see Infrared checklist on page 19.
Step Action
1 Select Upload icon or menu item. Upload Configuration box appears.
2 Click Start. If using Infrared, first press any instrument button to activate infrared, then aim the beam at the instrument, then click Start.
3 Status of upload (% complete) is shown. Also, at bottom of display a green Transmission Status icon flashes during transmission.
To terminate upload, select Abort. If upload is successful you are given option to save the configuration or cancel.
If infrared upload failed see Infrared checklist on page 19.
Operations
12 Process Instrument Explorer Configuration Software User Manual January 2009
3.1.3 Offline Configuration Offline Configuration lets you edit an instrument’s configuration file for later downloading to an instrument. . This operation is mostly used during initial configuration where the configuration from one instrument is copied, duplicated, or modified and then downloaded to other instruments.
Step Action
1 Select “Offline Configuration” icon or menu item. 2 Available Device Types (process instruments) are shown. Select Device Type whose
configuration you want to edit, for example, UDC2500. 3 Previously saved configurations are shown in the File List.
Double-click/double-tap a configuration to edit. The prompts are organized exactly as on the instrument itself. For details on functions and their settings, refer to that instrument’s manual.
4 UDC Ethernet users have an additional Group: Ethernet & Email. You can set up an email to be sent when a rising edge (off-to-on) alarm is detected. Alarm status is checked every 30 seconds, so only one rising edge will be detected per 30 seconds. Attention: -In controllers, updates to Ethernet parameters may take up to 60 seconds to take effect. After you change the instrument’s IP address, to make it recognized you must execute the “arp-d” command at a DOS prompt. For more info see Ethernet Q&A on page 20. Ethernet Setup
IP Address: IP address of the instrument. Subnet Mask: Subnet mask of the instrument Default Gateway: Default gateway of the instrument
Email Setup—use the following parameters to configure an email notification during an alarm.
Select Email: Select which email to configure. To Email: Enter email address of person to be emailed SMTP Address (for outgoing): Enter exchange server address From Email: This is the e-mail ID that appears in the “From” field when the recipient receives an e-mail from the instrument. It can be any e-mail ID of the user’s choice, basically to help identify the device. (e.g: [email protected]) Select Alarms: Select an alarm whose activation will send the email. To select none, click on the highlighted alarm. Email Subject: Enter email subject text.
5 To view or edit a configuration’s Properties, in the File List right-click on the File name (PC) or select “Properties” (Pocket PC). - File name - Device type - Uploaded date and time - Last modified date and time - Author name
- Description
Operations
January 2009 Process Instrument Explorer Configuration Software User Manual 13
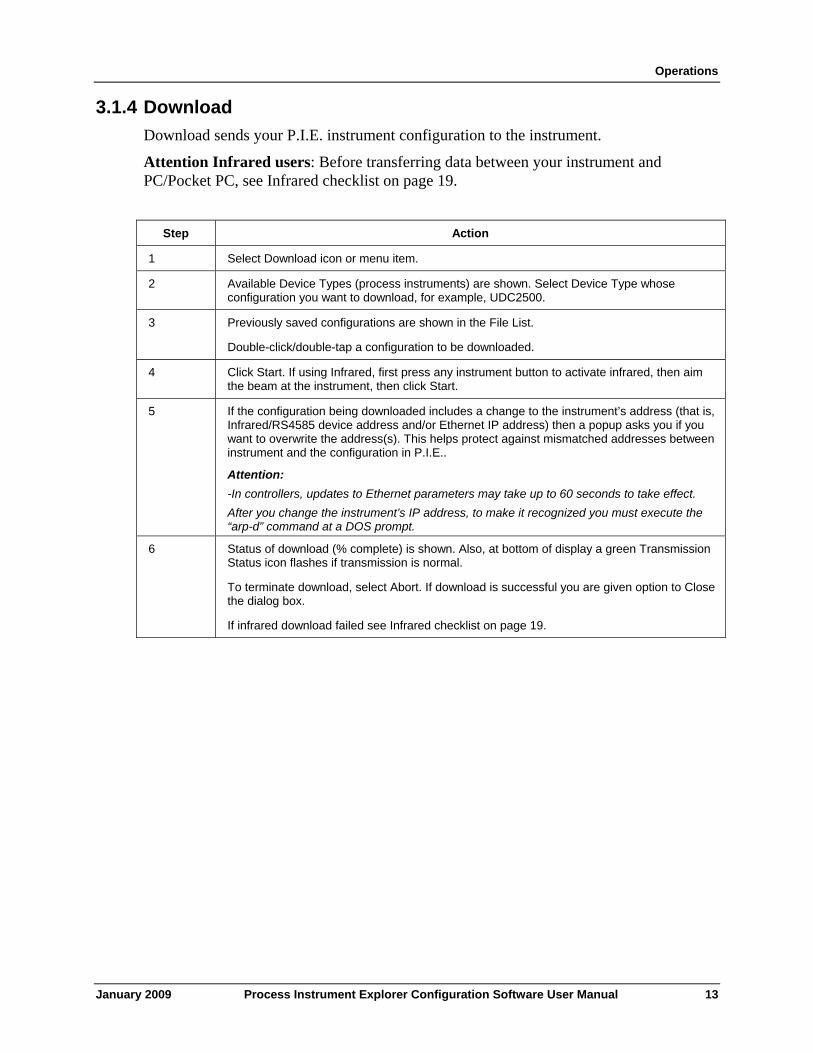
3.1.4 Download Download sends your P.I.E. instrument configuration to the instrument.
Attention Infrared users: Before transferring data between your instrument and PC/Pocket PC, see Infrared checklist on page 19.
Step Action
1 Select Download icon or menu item.
2 Available Device Types (process instruments) are shown. Select Device Type whose configuration you want to download, for example, UDC2500.
3 Previously saved configurations are shown in the File List.
Double-click/double-tap a configuration to be downloaded.
4 Click Start. If using Infrared, first press any instrument button to activate infrared, then aim the beam at the instrument, then click Start.
5 If the configuration being downloaded includes a change to the instrument’s address (that is, Infrared/RS4585 device address and/or Ethernet IP address) then a popup asks you if you want to overwrite the address(s). This helps protect against mismatched addresses between instrument and the configuration in P.I.E..
Attention: -In controllers, updates to Ethernet parameters may take up to 60 seconds to take effect. After you change the instrument’s IP address, to make it recognized you must execute the “arp-d” command at a DOS prompt.
6 Status of download (% complete) is shown. Also, at bottom of display a green Transmission Status icon flashes if transmission is normal.
To terminate download, select Abort. If download is successful you are given option to Close the dialog box.
If infrared download failed see Infrared checklist on page 19.
Operations
14 Process Instrument Explorer Configuration Software User Manual January 2009
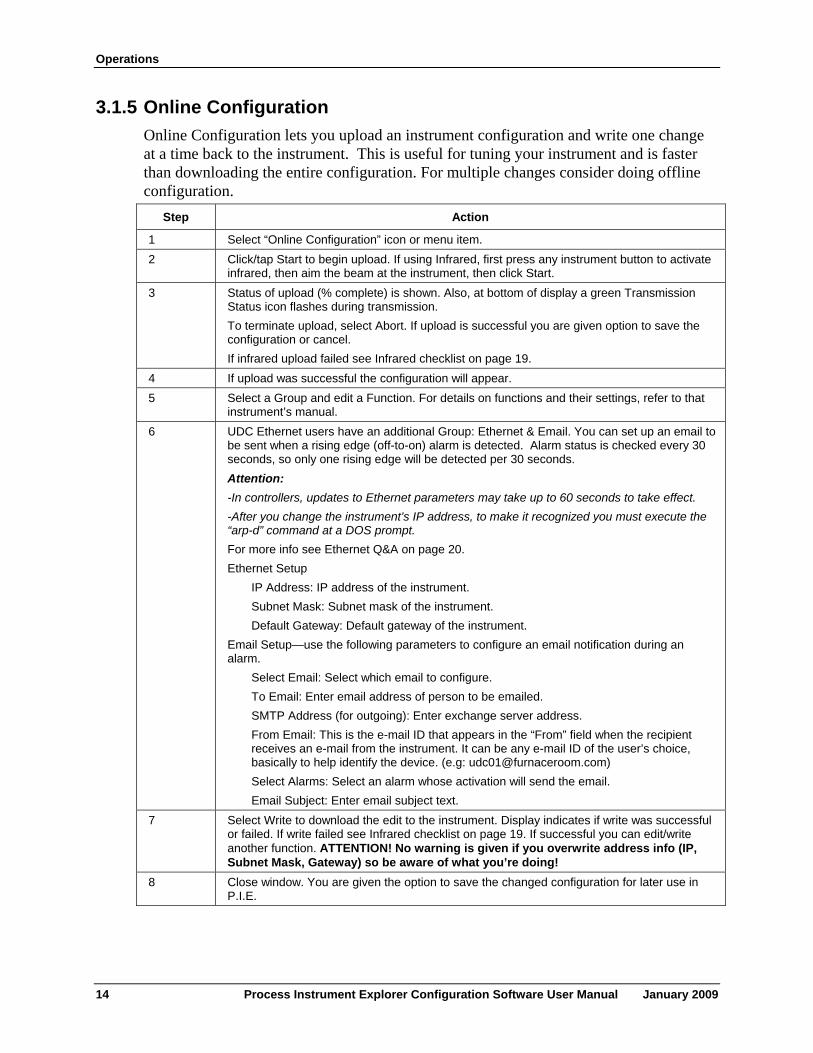
3.1.5 Online Configuration Online Configuration lets you upload an instrument configuration and write one change at a time back to the instrument. This is useful for tuning your instrument and is faster than downloading the entire configuration. For multiple changes consider doing offline configuration.
Step Action
1 Select “Online Configuration” icon or menu item. 2 Click/tap Start to begin upload. If using Infrared, first press any instrument button to activate
infrared, then aim the beam at the instrument, then click Start. 3 Status of upload (% complete) is shown. Also, at bottom of display a green Transmission
Status icon flashes during transmission. To terminate upload, select Abort. If upload is successful you are given option to save the configuration or cancel. If infrared upload failed see Infrared checklist on page 19.
4 If upload was successful the configuration will appear. 5 Select a Group and edit a Function. For details on functions and their settings, refer to that
instrument’s manual. 6 UDC Ethernet users have an additional Group: Ethernet & Email. You can set up an email to
be sent when a rising edge (off-to-on) alarm is detected. Alarm status is checked every 30 seconds, so only one rising edge will be detected per 30 seconds. Attention: -In controllers, updates to Ethernet parameters may take up to 60 seconds to take effect. -After you change the instrument’s IP address, to make it recognized you must execute the “arp-d” command at a DOS prompt. For more info see Ethernet Q&A on page 20. Ethernet Setup
IP Address: IP address of the instrument. Subnet Mask: Subnet mask of the instrument. Default Gateway: Default gateway of the instrument.
Email Setup—use the following parameters to configure an email notification during an alarm.
Select Email: Select which email to configure. To Email: Enter email address of person to be emailed. SMTP Address (for outgoing): Enter exchange server address. From Email: This is the e-mail ID that appears in the “From” field when the recipient receives an e-mail from the instrument. It can be any e-mail ID of the user’s choice, basically to help identify the device. (e.g: [email protected]) Select Alarms: Select an alarm whose activation will send the email. Email Subject: Enter email subject text.
7 Select Write to download the edit to the instrument. Display indicates if write was successful or failed. If write failed see Infrared checklist on page 19. If successful you can edit/write another function. ATTENTION! No warning is given if you overwrite address info (IP, Subnet Mask, Gateway) so be aware of what you’re doing!
8 Close window. You are given the option to save the changed configuration for later use in P.I.E.
Operations
January 2009 Process Instrument Explorer Configuration Software User Manual 15
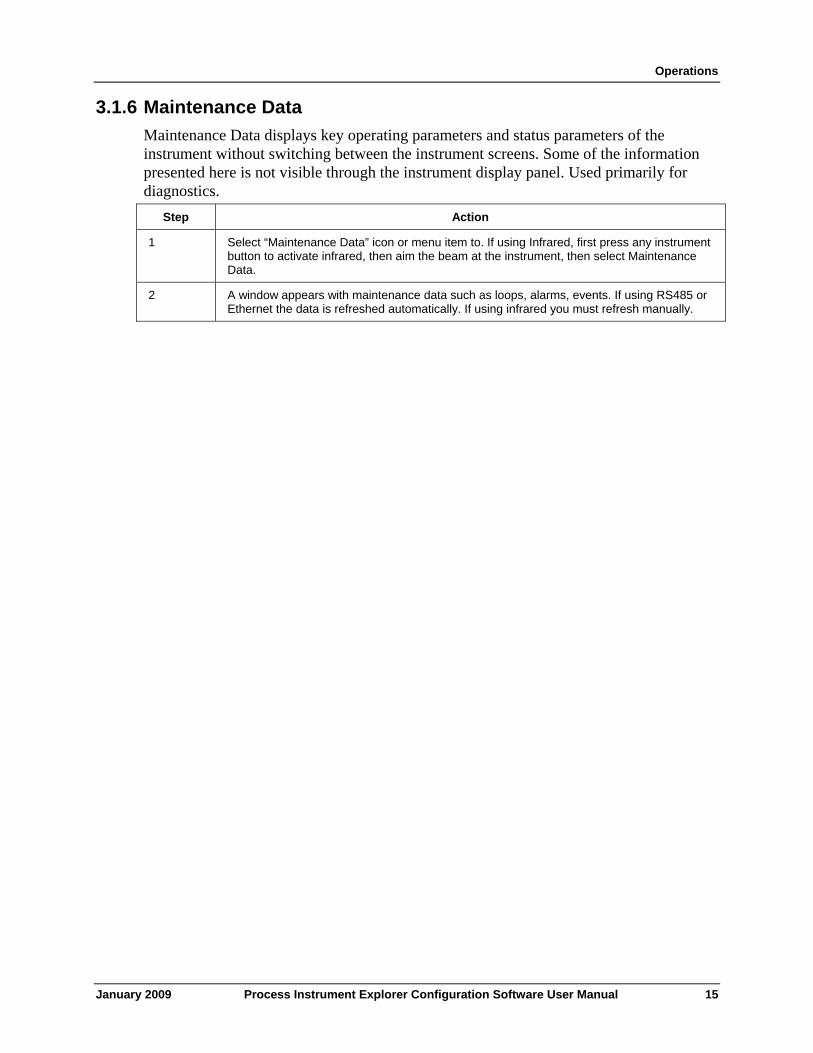
3.1.6 Maintenance Data Maintenance Data displays key operating parameters and status parameters of the instrument without switching between the instrument screens. Some of the information presented here is not visible through the instrument display panel. Used primarily for diagnostics.
Step Action
1 Select “Maintenance Data” icon or menu item to. If using Infrared, first press any instrument button to activate infrared, then aim the beam at the instrument, then select Maintenance Data.
2 A window appears with maintenance data such as loops, alarms, events. If using RS485 or Ethernet the data is refreshed automatically. If using infrared you must refresh manually.
Operations
16 Process Instrument Explorer Configuration Software User Manual January 2009
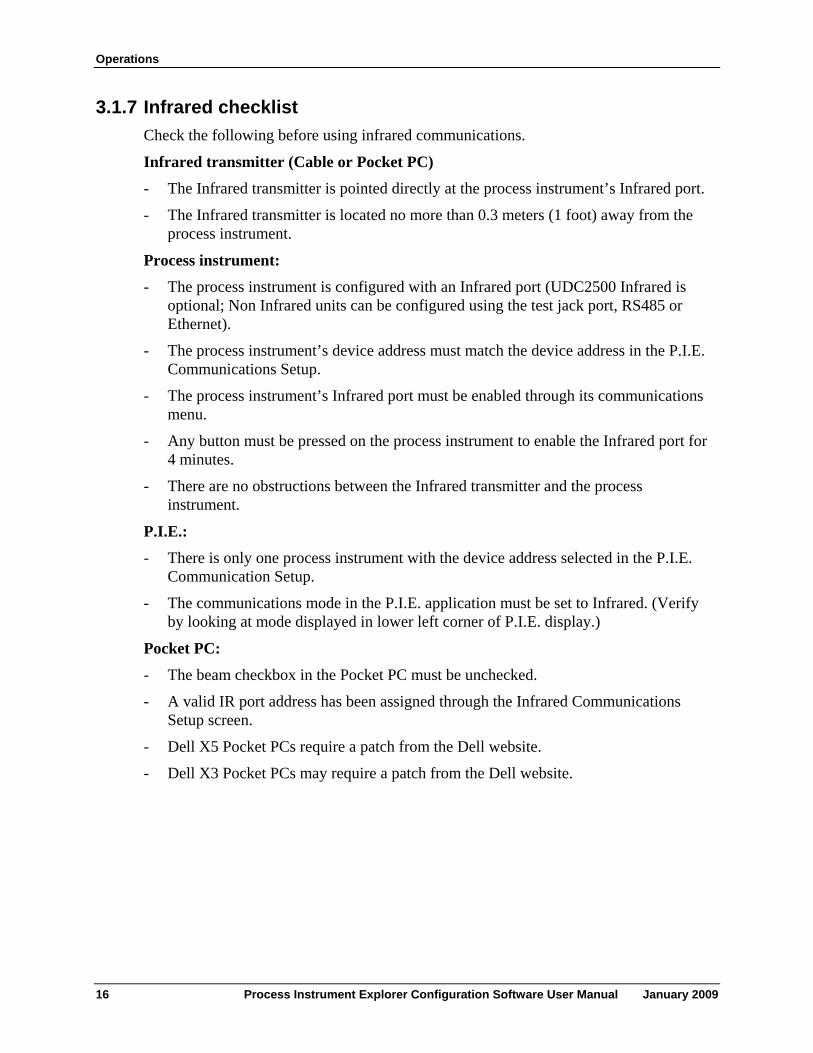
3.1.7 Infrared checklist Check the following before using infrared communications.
Infrared transmitter (Cable or Pocket PC)
- The Infrared transmitter is pointed directly at the process instrument’s Infrared port.
- The Infrared transmitter is located no more than 0.3 meters (1 foot) away from the process instrument.
Process instrument:
- The process instrument is configured with an Infrared port (UDC2500 Infrared is optional; Non Infrared units can be configured using the test jack port, RS485 or Ethernet).
- The process instrument’s device address must match the device address in the P.I.E. Communications Setup.
- The process instrument’s Infrared port must be enabled through its communications menu.
- Any button must be pressed on the process instrument to enable the Infrared port for 4 minutes.
- There are no obstructions between the Infrared transmitter and the process instrument.
P.I.E.:
- There is only one process instrument with the device address selected in the P.I.E. Communication Setup.
- The communications mode in the P.I.E. application must be set to Infrared. (Verify by looking at mode displayed in lower left corner of P.I.E. display.)
Pocket PC:
- The beam checkbox in the Pocket PC must be unchecked.
- A valid IR port address has been assigned through the Infrared Communications Setup screen.
- Dell X5 Pocket PCs require a patch from the Dell website.
- Dell X3 Pocket PCs may require a patch from the Dell website.
Operations
January 2009 Process Instrument Explorer Configuration Software User Manual 17
3.1.8 Ethernet Q&A Q: How can I find the address of my UDC? A: The Ethernet address information that has been set in the instrument can be retrieved by using P.I.E. to upload a product configuration upload using IR communication. After the upload you can view the Ethernet group and see the Ethernet information. An alternate way is to use P.I.E. and initiate an online configuration through IR communication. This function does an initial upload of the current configuration from the instrument and displays the groups. The Ethernet information can be viewed from the Ethernet group. The above cannot be done through RS485 communication because when the Ethernet board is plugged in, the RS485 option is not available. The default Ethernet information for a factory UDC is IP 10.0.0.2, Mask 255.255.255.0, Gateway 0.0.0.0. Q: How can I find the address of my UDA? The Ethernet address information that has been set in the instrument can be retrieved by using the UDA front panel. The address is visible in the communication status menu. The address can also be retrieved by using P.I.E. to upload a product configuration upload using IR or RS485 communication. After the upload you can view the Ethernet communication setup group and see the Ethernet information. An Alternate way is to use the P.I.E. and initiate an online configuration through IR or RS485 communication. This function does an initial upload of the current configuration from the instrument and displays the groups. The Ethernet information can be viewed from the Ethernet communication setup group. If the Ethernet port is configured for DHCP, then you must use the UDA front panel communication status menu to view the address. The default Ethernet information for a factory UDA2182 is: IP 192.168.1.254 Mask 255.255.255.0 Gateway 1.0.0.0.0 Q: How do I know what IP Address to use? A: The default IP address provided from the factory is 10.0.0.2 on the UDC and 192.168.1.254 on the UDA2182. Since IP addresses must be unique, you will need to reset the IP address for multiple instruments or if the instrument is going to be placed on a LAN. Multiple instruments on a local net could be set at 10.0.0.2, 10.0.0.3, 10.0.0.4, etc. If you want to put the instrument on a LAN, you need to obtain available IP addresses from your IT group. Q: How do I know what Mask to use? A: The mask on the UDC and UDA is normally set to 255.255.255.0 since the first (3) numbers in the IP address are typically the same for instruments on the same subnet.
Operations
18 Process Instrument Explorer Configuration Software User Manual January 2009
Q: How do I know what Gateway to use? A: The gateway information is the IP address of the router which would route the TCP/IP traffic to the appropriate destination IP address. Every network has a gateway routing device that holds the routing table for that network which specifies how to route TCP/IP packets between network devices. In the P.I.E. and UDC/UDA case, if the PC on which the P.I.E. is running and UDC/UDA are connected to a LAN, then the gateway should have the IP Address of the router that manages the LAN subnetwork. In the case of the PC on which the P.I.E. is running being connected directly to the UDC with a crossed Ethernet cable, then the gateway IP address can be set to "0.0.0.0". In the case of the PC, on which the P.I.E. is running, being connected directly to the UDA2182 with a crossed or straight through Ethernet cable then the Gateway IP Address can be set to 1.0.0.0. The normal procedure is to copy the first three bytes of the IP address from the PC and set the last byte to 1. For example, if the IP address of the PC is set to 10.2.3.4 then set the gateway IP address to be 10.2.3.1. Q: How do I know what SMTP address to use? A: The SMTP address is used for outgoing emails. This address is specific to your LAN configuration and can be obtained from your IT group. Q: Why can’t I communicate with my controller after I changed the controller’s IP address? A: The arp table in your desktop PC needs to be reset by typing “arp-d” in the DOS command window. Also, changes to Ethernet parameters may take up to 60 seconds to take effect.
Services
January 2009 Process Instrument Explorer Configuration Software User Manual 19
4 Services
4.1 Overview Services lets you manage your files through the following menus.
4.1.1 Pocket PC Services Menu Transfer Configuration - Lets you copy device configurations saved in the Pocket PC to the PC. Transferred files may then be opened, edited, saved and downloaded from the PC.
Manage Configuration Files - Lets you copy, delete, rename and view the properties of saved configuration files.
Transfer Healthwatch Data – For future release. This feature transfers Healthwatch data to the desktop PC. Available only for the UDC3500 controller.
Enable Descriptive Name Support - When enabled, Descriptive Name uses 16 characters to describe your configuration groups, functions and parameters in more detail than the instrument’s 8-character display. The descriptive names come from the descriptive file).
Import Database – Lets you add all or part of another database to your current configuration database. You may import configurations created on other PCs and Pocket PCs.
Export Database – Lets you save all or part of the current database so that it may later be imported.
4.1.2 PC Services Menu Export Configuration - Lets you write a configuration file to a .csv formatted file which can be read into spreadsheet software.
Transfer Configuration - Lets you copy device configurations saved in the PC to the Pocket PC application. Transferred files may then be opened, edited, saved and downloaded from the Pocket PC.
Manage Configuration Files - Lets you copy, delete, rename and view the properties of saved configuration files.
Install Descriptive File - Lets you attach a new 16-character descriptive file to the desktop/laptop tool. Descriptive files are specific to instrument version and type. See Enable Descriptive Name Support.
Transfer Descriptive File - Lets you transfer a new 16-character descriptive file from the desktop/laptop to the Pocket PC. See Enable Descriptive Name Support.
Services
20 Process Instrument Explorer Configuration Software User Manual January 2009
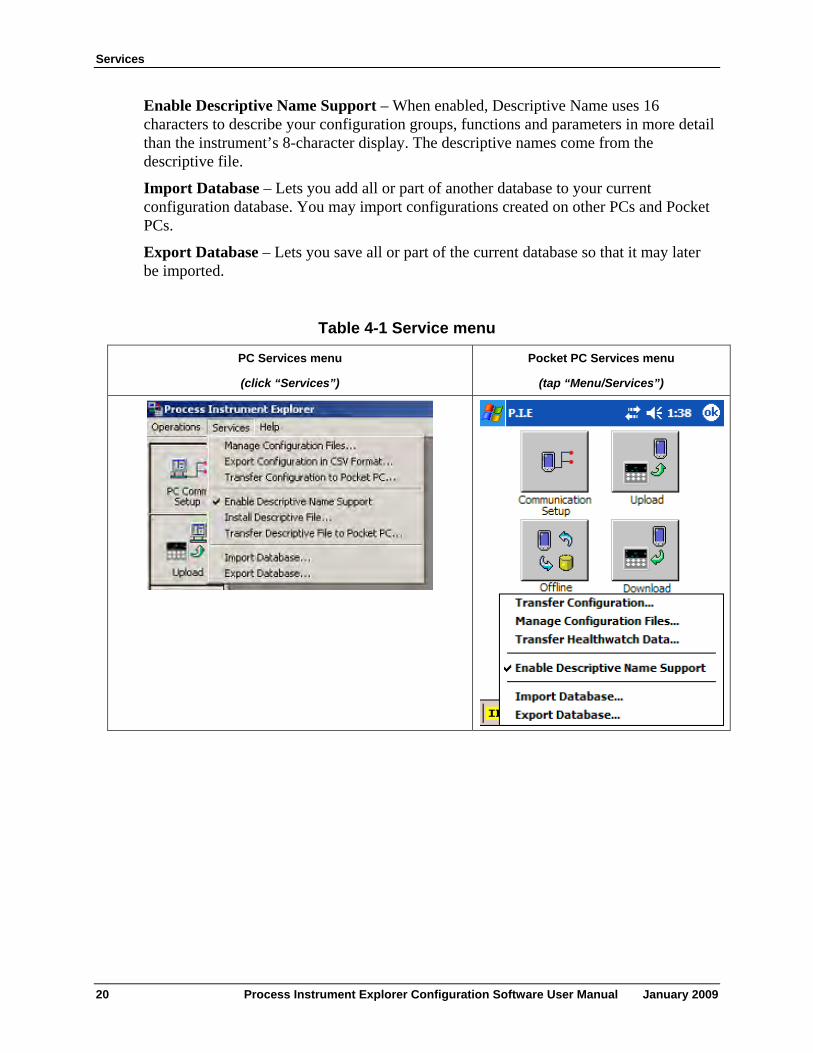
Enable Descriptive Name Support – When enabled, Descriptive Name uses 16 characters to describe your configuration groups, functions and parameters in more detail than the instrument’s 8-character display. The descriptive names come from the descriptive file.
Import Database – Lets you add all or part of another database to your current configuration database. You may import configurations created on other PCs and Pocket PCs.
Export Database – Lets you save all or part of the current database so that it may later be imported.
Table 4-1 Service menu
PC Services menu
(click “Services”)
Pocket PC Services menu
(tap “Menu/Services”)
Services
January 2009 Process Instrument Explorer Configuration Software User Manual 21
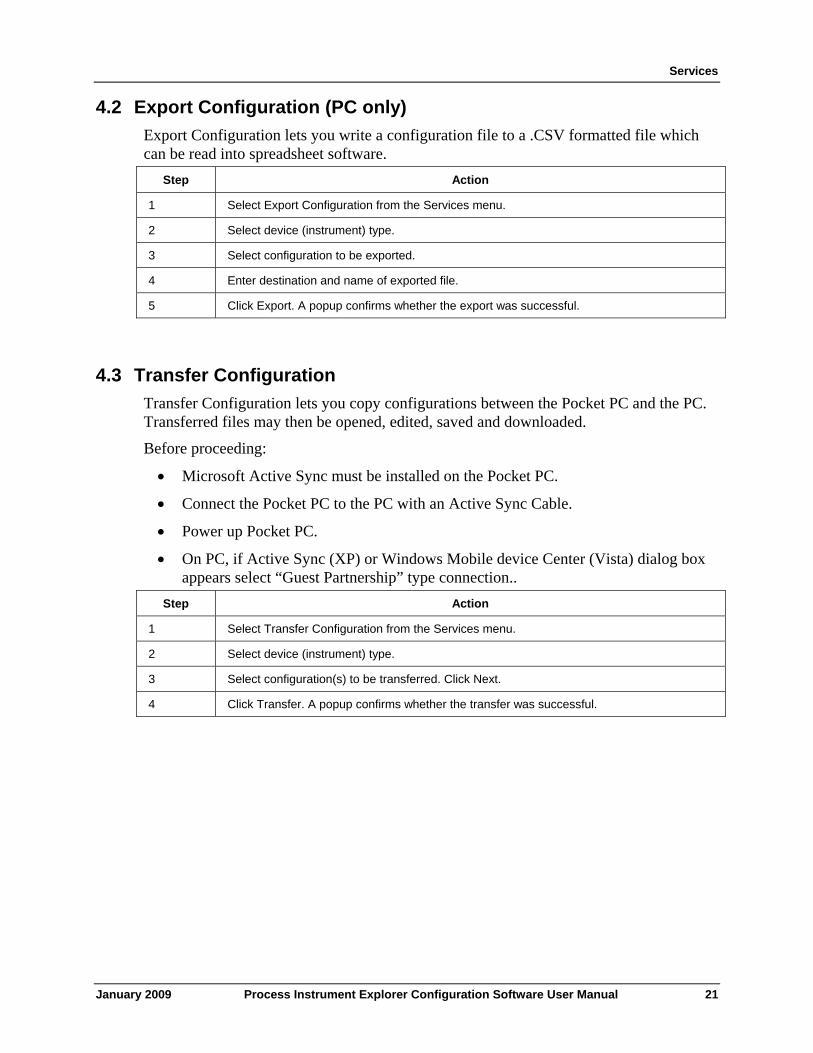
4.2 Export Configuration (PC only) Export Configuration lets you write a configuration file to a .CSV formatted file which can be read into spreadsheet software.
Step Action
1 Select Export Configuration from the Services menu.
2 Select device (instrument) type.
3 Select configuration to be exported.
4 Enter destination and name of exported file.
5 Click Export. A popup confirms whether the export was successful.
4.3 Transfer Configuration Transfer Configuration lets you copy configurations between the Pocket PC and the PC. Transferred files may then be opened, edited, saved and downloaded.
Before proceeding:
• Microsoft Active Sync must be installed on the Pocket PC.
• Connect the Pocket PC to the PC with an Active Sync Cable.
• Power up Pocket PC.
• On PC, if Active Sync (XP) or Windows Mobile device Center (Vista) dialog box appears select “Guest Partnership” type connection..
Step Action
1 Select Transfer Configuration from the Services menu.
2 Select device (instrument) type.
3 Select configuration(s) to be transferred. Click Next.
4 Click Transfer. A popup confirms whether the transfer was successful.
Services
22 Process Instrument Explorer Configuration Software User Manual January 2009
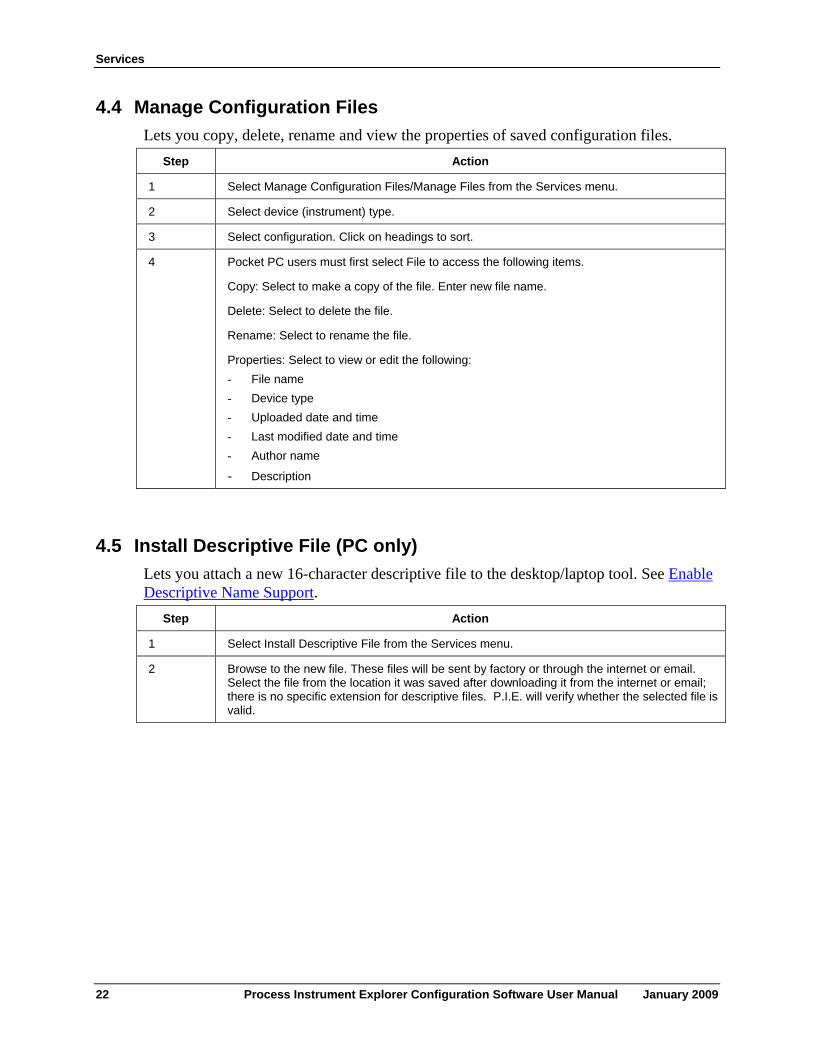
4.4 Manage Configuration Files Lets you copy, delete, rename and view the properties of saved configuration files.
Step Action
1 Select Manage Configuration Files/Manage Files from the Services menu.
2 Select device (instrument) type.
3 Select configuration. Click on headings to sort.
4 Pocket PC users must first select File to access the following items.
Copy: Select to make a copy of the file. Enter new file name.
Delete: Select to delete the file.
Rename: Select to rename the file.
Properties: Select to view or edit the following: - File name - Device type - Uploaded date and time - Last modified date and time - Author name
- Description
4.5 Install Descriptive File (PC only) Lets you attach a new 16-character descriptive file to the desktop/laptop tool. See Enable Descriptive Name Support.
Step Action
1 Select Install Descriptive File from the Services menu.
2 Browse to the new file. These files will be sent by factory or through the internet or email. Select the file from the location it was saved after downloading it from the internet or email; there is no specific extension for descriptive files. P.I.E. will verify whether the selected file is valid.
Services
January 2009 Process Instrument Explorer Configuration Software User Manual 23
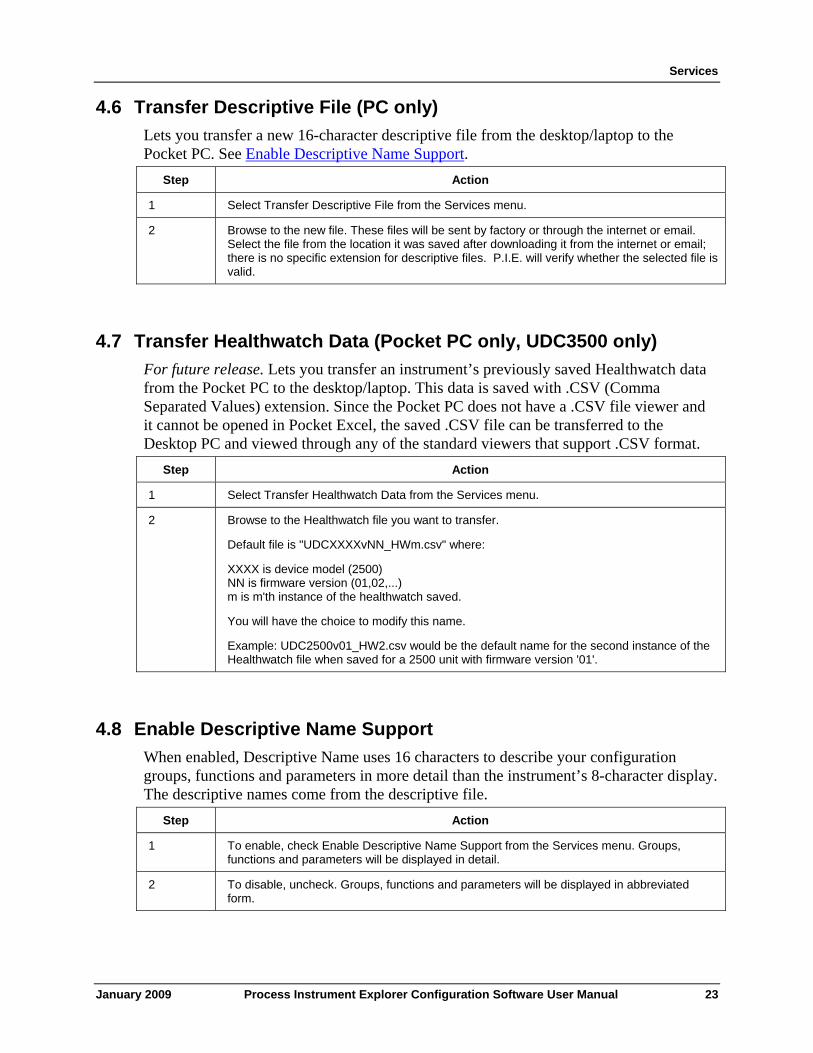
4.6 Transfer Descriptive File (PC only) Lets you transfer a new 16-character descriptive file from the desktop/laptop to the Pocket PC. See Enable Descriptive Name Support.
Step Action
1 Select Transfer Descriptive File from the Services menu.
2 Browse to the new file. These files will be sent by factory or through the internet or email. Select the file from the location it was saved after downloading it from the internet or email; there is no specific extension for descriptive files. P.I.E. will verify whether the selected file is valid.
4.7 Transfer Healthwatch Data (Pocket PC only, UDC3500 only) For future release. Lets you transfer an instrument’s previously saved Healthwatch data from the Pocket PC to the desktop/laptop. This data is saved with .CSV (Comma Separated Values) extension. Since the Pocket PC does not have a .CSV file viewer and it cannot be opened in Pocket Excel, the saved .CSV file can be transferred to the Desktop PC and viewed through any of the standard viewers that support .CSV format.
Step Action
1 Select Transfer Healthwatch Data from the Services menu.
2 Browse to the Healthwatch file you want to transfer.
Default file is "UDCXXXXvNN_HWm.csv" where:
XXXX is device model (2500) NN is firmware version (01,02,...) m is m'th instance of the healthwatch saved.
You will have the choice to modify this name.
Example: UDC2500v01_HW2.csv would be the default name for the second instance of the Healthwatch file when saved for a 2500 unit with firmware version '01'.
4.8 Enable Descriptive Name Support When enabled, Descriptive Name uses 16 characters to describe your configuration groups, functions and parameters in more detail than the instrument’s 8-character display. The descriptive names come from the descriptive file.
Step Action
1 To enable, check Enable Descriptive Name Support from the Services menu. Groups, functions and parameters will be displayed in detail.
2 To disable, uncheck. Groups, functions and parameters will be displayed in abbreviated form.
Services
24 Process Instrument Explorer Configuration Software User Manual January 2009
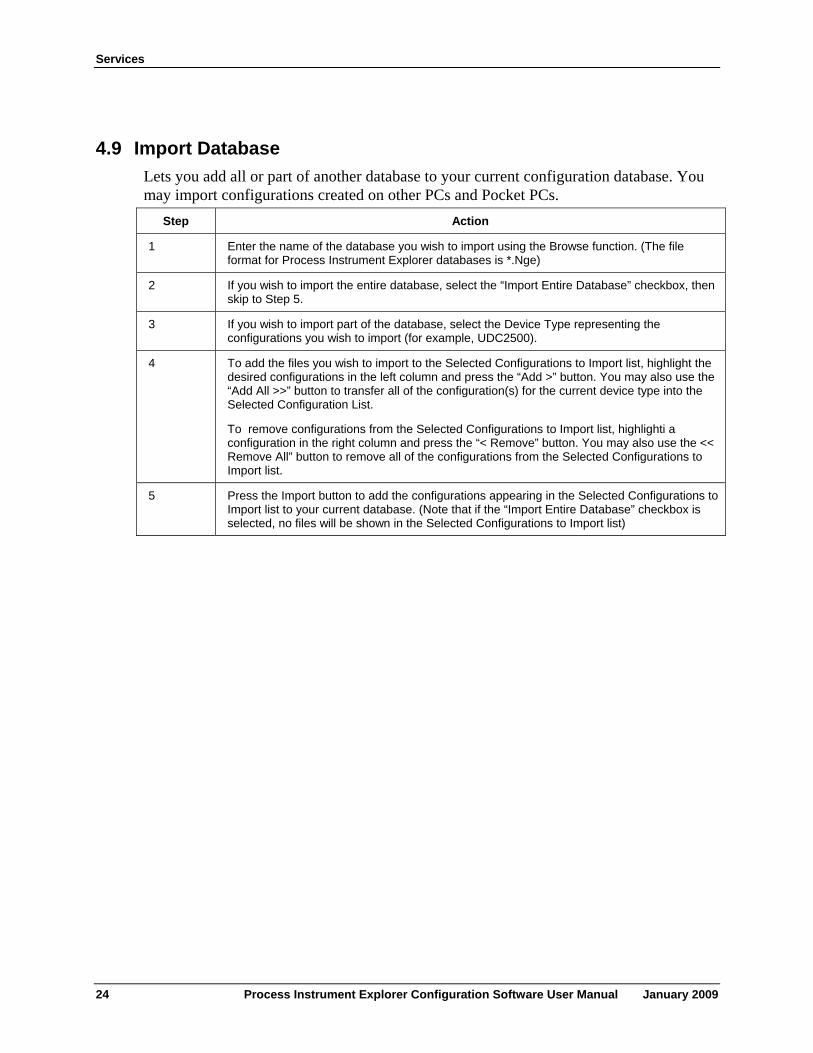
4.9 Import Database Lets you add all or part of another database to your current configuration database. You may import configurations created on other PCs and Pocket PCs.
Step Action
1 Enter the name of the database you wish to import using the Browse function. (The file format for Process Instrument Explorer databases is *.Nge)
2 If you wish to import the entire database, select the “Import Entire Database” checkbox, then skip to Step 5.
3 If you wish to import part of the database, select the Device Type representing the configurations you wish to import (for example, UDC2500).
4 To add the files you wish to import to the Selected Configurations to Import list, highlight the desired configurations in the left column and press the “Add >” button. You may also use the “Add All >>” button to transfer all of the configuration(s) for the current device type into the Selected Configuration List.
To remove configurations from the Selected Configurations to Import list, highlighti a configuration in the right column and press the “< Remove” button. You may also use the << Remove All” button to remove all of the configurations from the Selected Configurations to Import list.
5 Press the Import button to add the configurations appearing in the Selected Configurations to Import list to your current database. (Note that if the “Import Entire Database” checkbox is selected, no files will be shown in the Selected Configurations to Import list)
Services
January 2009 Process Instrument Explorer Configuration Software User Manual 25
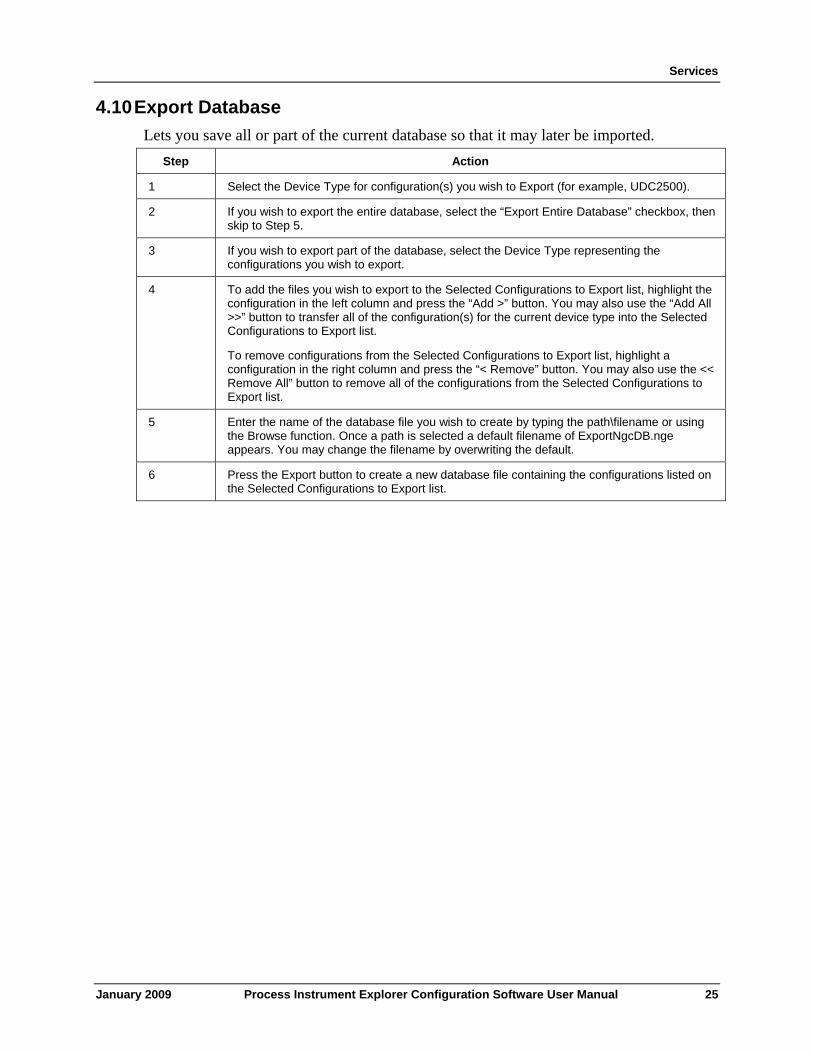
4.10 Export Database Lets you save all or part of the current database so that it may later be imported.
Step Action
1 Select the Device Type for configuration(s) you wish to Export (for example, UDC2500).
2 If you wish to export the entire database, select the “Export Entire Database” checkbox, then skip to Step 5.
3 If you wish to export part of the database, select the Device Type representing the configurations you wish to export.
4 To add the files you wish to export to the Selected Configurations to Export list, highlight the configuration in the left column and press the “Add >” button. You may also use the “Add All >>” button to transfer all of the configuration(s) for the current device type into the Selected Configurations to Export list.
To remove configurations from the Selected Configurations to Export list, highlight a configuration in the right column and press the “< Remove” button. You may also use the << Remove All” button to remove all of the configurations from the Selected Configurations to Export list.
5 Enter the name of the database file you wish to create by typing the path\filename or using the Browse function. Once a path is selected a default filename of ExportNgcDB.nge appears. You may change the filename by overwriting the default.
6 Press the Export button to create a new database file containing the configurations listed on the Selected Configurations to Export list.


Index
26 Process Instrument Explorer Configuration Software User Manual January 2009
5 Index alarm
email, 12, 14 Communications setup, 10 Device Types, 12, 13 Download, 13 email, 12, 14 Enable Descriptive Name Support, 22 Ethernet
Q&A, 17 Ethernet & Email, 12, 14 Export Configuration, 20 Export Database, 24 Import Database, 23 Infrared checklist, 16 Install Descriptive File, 21 Install/Upgrade, 4 Manage Configuration Files, 21 Offline Configuration, 12 Online Configuration, 14, 15 Operations, 7
Communications setup, 10 Download, 13 icons, 8, 19 menu, 9 Offline Configuration, 12 Online Configuration, 14, 15 Upload, 11
PC Comm Setup, 10 Properties, 12 Services, 18
Enable Descriptive Name Support, 22 Export Configuration, 20 Export Database, 24 Import Database, 23 Install Descriptive File, 21 Manage Configuration Files, 21 Transfer Configuration, 20 Transfer Descriptive File, 22 Transfer Healthwatch Data, 22
System Requirements, 3 Transfer Configuration, 20 Transfer Descriptive File, 22 Transfer Healthwatch Data, 22 Uninstall, 6 Upload, 11

January 2009 Process Instrument Explorer Configuration Software User Manual 27

Honeywell Process Solutions Honeywell 51-52-25-137 2500 W. Union Hill Drive January 2009 Phoenix, Arizona 85027 ©2009 Honeywell International Inc. www.honeywell.com/ps
Sales and Service
For application assistance, current specifications, pricing, or name of the nearest Authorized Distributor, contact one of the offices below.
ASIA PACIFIC Control Products Asia Pacific Headquarters Phone: +(65) 6355-2828 Fax: +(65) 6445-3033 Asia Pacific Global Technical Support Field Instruments Phone: +65 6580 3156 Fax: +65 6445-3033 Process Instruments Phone: (603) 76950 4777 Fax: (603) 7958 8922 Australia Honeywell Limited Phone: +(61) 7-3846 1255 FAX: +(61) 7-3840 6481 Toll Free 1300-36-39-36 Toll Free Fax: 1300-36-04-70 China – PRC - Beijing Honeywell China Inc. Phone: +(86-10) 8458-3280 Fax: +(86-10) 8458-4650 China – PRC - Shanghai Honeywell China Inc. Phone: (86-21) 5257-4568 Fax: (86-21) 6237-2826 China – PRC - Chengdu Honeywell China Inc. Phone: +(86-28) 8678-6348 Fax: +(86-28) 8678-7061 China – PRC - Xi’an Honeywell China Ltd - Xi’an. Phone: +(86-29) 8833-7490 Fax: +(86-29) 8833-7489 China – PRC - Shenzhen- Honeywell China Inc. Phone: +(86) 755-2518-1226 Fax: +(86) 755-2518-1221
Indonesia PT Honeywell Indonesia Phone: +(62) 21-535-8833 FAX: +(62) 21-5367 1008 India Automation India Ltd. Honeywell Ltd. Phone:+(91) 5603-9400 Fax: +(91) 5603-9600 Japan Honeywell Inc. Phone: +(81) 3 6730 7150 Fax: +(81) 3 6730 7228
Malaysia Honeywell Engineering Sdn Bhd Phone: +(60-3) 7950-4776 Fax: +(60-3) 7958-8922 New Zealand Honeywell Limited Phone: +(64-9) 623-5052 Fax: +(64-9) 623-5060 Toll Free (0800) 202-088 Philippines Honeywell Systems (Philippines) Inc. Phone: +(63-2) 633-2830-31/ 636 1661-62 Fax: +(63-2) 638-4013 Singapore Honeywell Pte Ltd. Phone: +(65) 6580 3278 Fax: +(65) 6445-3033 South Korea Honeywell Korea Co Ltd Phone: +(822) 799 6315 Fax: +(822) 792 9015 Thailand Honeywell Systems (Thailand) Ltd. Phone: +(662) 693-3099 FAX: +(662) 693-3089 Taiwan R.O.C. Honeywell Taiwan Ltd. Phone: +(886-2) 2245-1000 FAX: +(886-2) 2245-3241 SE Asia Countries see Honeywell Pte Ltd (Singapore) for: Pakistan, Cambodia, Guam, Laos, Myanmar, Vietnam, East Timor SE Asia Countries see Honeywell Automation India Ltd for: Bangladesh Nepal Sri Lanka EUROPE Austria Honeywell Austria GmbH Phone: +43 (316)400123 FAX: +43 (316)40017 Belgium Honeywell SA/NV Phone: +32 (0) 2 728 24 07
FAX: +32 (0) 2 728 22 45
Bulgaria Honeywell EOOD Phone: +(359) 2 40 20 900 FAX: +(359) 2 40 20 990 Czech Republic Honeywell spol. s.r.o. Phone: +420 242 442 232 FAX: +420 242 442 131 Denmark Honeywell A/S Phone: +(45) 39 55 55 55 FAX: +(45) 39 55 55 58 Finland Honeywell OY Phone: +358 (0)20752 2753 FAX: +358 (0) 20752 2751 France Honeywell SA Phone: +33 (0)1 60198075 FAX: +33 (0)1 60198201 Germany Honeywell AG Phone: +49 (69)8064-299 FAX: +49 (69)806497336 Hungary Honeywell Kft. Phone: +36-1-451 4300 FAX: +36-1-451 4343 Italy Honeywell S.p.A. Phone:+390292146307 FAX: +39 0292146377 The Netherlands Honeywell B.V. Phone: +31 (0) 20 5656200 FAX: +31 (0) 20 5656210 Norway Honeywell A/S Phone: (45) 39 55 55 55 Poland Honeywell Sp. zo.o Phone: +48-22-6060900 FAX: +48-22-6060901 Portugal Honeywell Portugal Lda Phone: +351 21 424 5000 FAX: +351 21 424 50 99 Romania Honeywell Bucharest Phone: +40 (0) 21 2316437 FAX: +40 (0) 21 2316439 Russian Federation (RF), ZAO "Honeywell" Phone: +7 (095) 796 98 00 FAX: +7 (495) 797 99 64
Slovak Republic Honeywell s.r.o. Phone: +421-2-58247 410 FAX: +421-2-58247 415 Spain Honeywell S.A. Phone: +34 (0)91313 61 00 FAX: +34 (0)91313 61 30 Sweden Honeywell AB Phone: +(46) 8 775 55 00 FAX: +(46) 8 775 56 00 Switzerland Honeywell AG Phone: +41 18552448 FAX: +(41) 1 855 24 45 Turkey Honeywell Turkey A.S. Phone: +90 216 578 71 00 FAX: +90 216 575 66 35 Ukraine Honeywell Tel: +380-44-201 44 74 Fax: +380-44-201-44-75 United Kingdom Honeywell Control Systems Ltd. Phone: +44 (0)1344 655251 FAX: +44 (0) 1344 655554 MIDDLE EAST Abu Dhabi U A E Middle East Headquarters Honeywell Middle East Ltd. Phone: +971 2 4041246 FAX: +971 2 4432536 Sultanate of Oman Honeywell & Co Oman LLC Phone: +968 24 701153/ Ext.33 FAX +968 24 787351 Saudia Arabia Honeywell Turki Arabia Ltd Jubail Office Phone: +966-3-341-0140 Fax: +966-3-341-0216 Honeywell - ATCO Dammam Office Phone: 0096638304584 Fax: 0096638338059 Kuwait Honeywell Kuwait KSC Phone: +965 242 1327 to 30 Fax: +965 242 8315 And Phone: +965 326 2934/1821Fax: +965 326 1714
AFRICA Mediterranean & African Distributors Honeywell SpA Phone: +39 (02) 250 10 604 FAX: +39 (02) 250 10 659 South Africa (Republic of) and sub saharan Honeywell Southern Africa Honeywell S.A. Pty. Ltd. Phone: +27 11 6958000 FAX +27 118051504
NORTH AMERICA Canada Honeywell LTD Phone: 1-800-737-3360 FAX: 1-800-565-4130 USA Honeywell Process Solutions, Phone: 1-800-343-0228 FAX: 1-717-771-8251 Email:sc-cp-appssales@ honeywell.com LATIN AMERICA Argentina Honeywell S.A.I.C. Phone: +(54-11) 4383-3637 FAX: +(54-11) 4325-6470 Brazil Honeywell do Brasil & Cia Phone: +(55-11) 7266-1900 FAX: +(55-11) 7266-1905 Chile Honeywell Chile, S.A. Phone: +(56-2) 233-0688 FAX: +(56-2) 231-6679 Mexico Honeywell S.A. de C.V. Phone: +(52) 55 5259-1966 FAX: +(52) 55 5570-2985 Puerto Rico Honeywell Inc. Phone: +(809) 792-7075 FAX: +(809) 792-0053 Trinidad Honeywell Inc. Phone: +(868) 624-3964 FAX: +(868) 624-3969 Venezuela Honeywell CA Phone: +(58-2) 238-0211 FAX: +(58-2) 238-3391