Embed Size (px)
Citation preview
MY FlexiTank Industries Malaysia [email protected]
PROCEDURE & GUIDE MANUALPROCEDURE & GUIDE MANUAL
��Container SelectionContainer Selection
��Flexitank Installation / FittingFlexitank Installation / Fitting
�� Flexitank LoadingFlexitank Loading
Composite Bolted Design FlexitankComposite Bolted Design Flexitank™™

MY FlexiTank Industries Malaysia [email protected]
1. All 20 ft. ISO dry freight containers shall be five (5) years of age or less.
2. The containers shall be manufactured completely from Corten steel. If a Corten
container is not available, at a minimum, the side panels shall be of Corten steel.
3. All containers supplied shall be suitable for the safe and legal transport of up to
30,000 kg of non - hazardous bulk liquid in flexitanks and shall conform to the
latest edition of.the IICL repair criteria.
4. All containers supplied shall be manufactured in accordance with all the relevant
ISO requirements defining design, testing, identification and markings, corner
fittings, dimensions and ratings and operational requirements.
5. All containers shall be supplied in a suitable condition for transport by road, rail or
sea.
6. Each container shall have vertical recess in rear corner post assemblies to accept
end cap support bars.
7. Each container shall have two fully operative locking bars on each door.
8. Containers shall not have Decal/Marker panels.
9. Containers shall be 30ton rated.
10. Containers shall be free of any “hazardous cargo” markings/labels.
11. All containers shall be fitted with the following decals:
Warning against opening the left-hand door
while the flexitank is under load
Warning against loose or hump shunting.
Container supplied to transport flexitanks shall be free of:
1. Any debris 2. Sharp edges 3. Floor splinters 4. Proud or loose floor screws
Note:
All interior surfaces shall be free of transferable stains and other sources of contamination
that may react with the flexitank material and/or leach into the liquid cargo.
2020’’ Ocean CONTAINER Selection GuideOcean CONTAINER Selection Guide
CHOOSING A SUITABLE CONTAINERCHOOSING A SUITABLE CONTAINERThe container chosen must always meet the requirements of the The container chosen must always meet the requirements of the
current Container Specification.current Container Specification.
MY FlexiTank Industries Malaysia [email protected]
FLEXITANK FLEXITANK
FITTING / INSTALLATIONFITTING / INSTALLATION
GUIDEGUIDE
MY FlexiTank Industries Malaysia [email protected]
FLEXITANK INSTALLATION / FITTING GuideFLEXITANK INSTALLATION / FITTING Guide
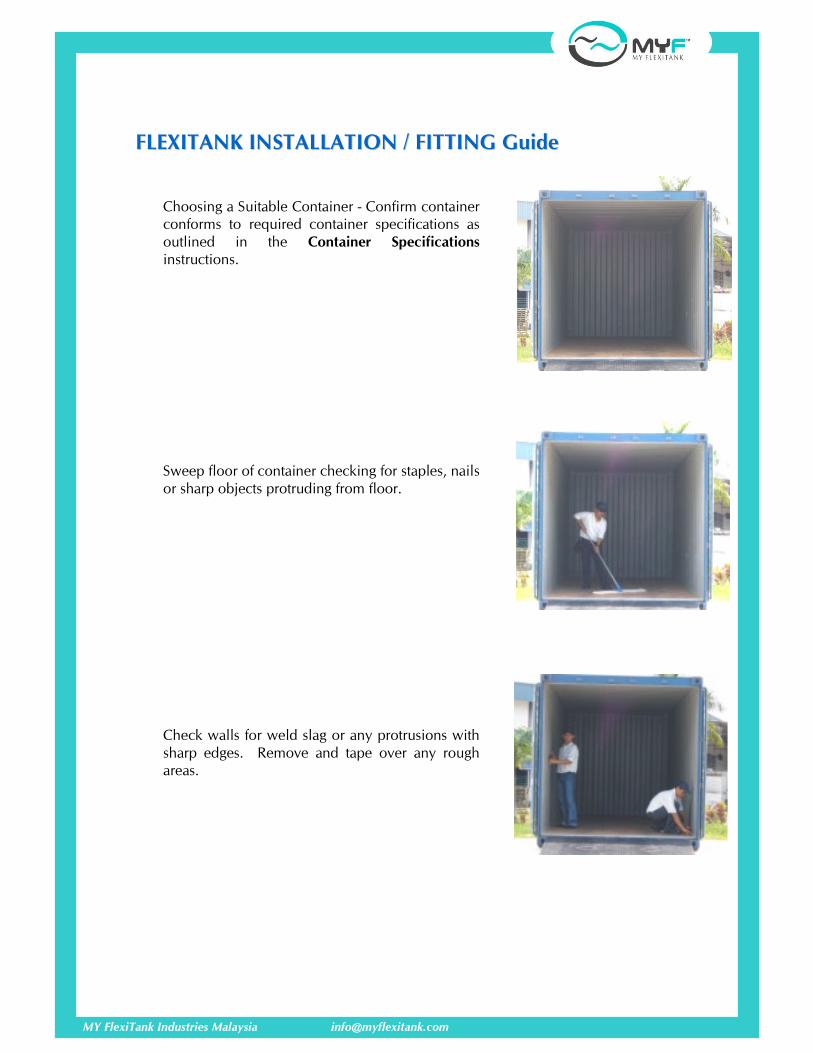
Choosing a Suitable Container - Confirm container
conforms to required container specifications as
outlined in the Container Specifications
instructions.
Sweep floor of container checking for staples, nails
or sharp objects protruding from floor.
Check walls for weld slag or any protrusions with
sharp edges. Remove and tape over any rough
areas.

MY FlexiTank Industries Malaysia [email protected]
FLEXITANK INSTALLATION / FITTING Guide FLEXITANK INSTALLATION / FITTING Guide (cont(cont’’d)d)
SKIP Step 4 if Heater Pad and/or Container Insulation is NOT required, and
proceed to Step 5 – Install flexitank.
If heater pad and/or insulation is required, heater
pad should be unrolled and installed first. (skip
Step 5 if heater pad and/or insulation is NOT
required)
a) Install insulation foam on wall & floor of
container (skip this step if insulation is not required).
b) Unroll the floor heater pad and locate the input
manifold approximately 14” to 16” inside the door
recess. Use the rubber string tied to the back
manifold as indicator to place the heater pad in
the container – the end of the string should be in
line with the back wall of container.
c) Unroll and install the side wall heater pads (skip this step if side wall heater pad is NOT required).
Rubber string as indicator
to position the heater pad
floor model in the container
Back of container
Container installed with 1) full floor foam insulation,
2) 4ft ht side wall foam insulation, 3) heater pad floor model and
4) heater pad side wall model.
MY FlexiTank Industries Malaysia [email protected]
FLEXITANK INSTALLATION / FITTING Guide FLEXITANK INSTALLATION / FITTING Guide (cont(cont’’d)d)
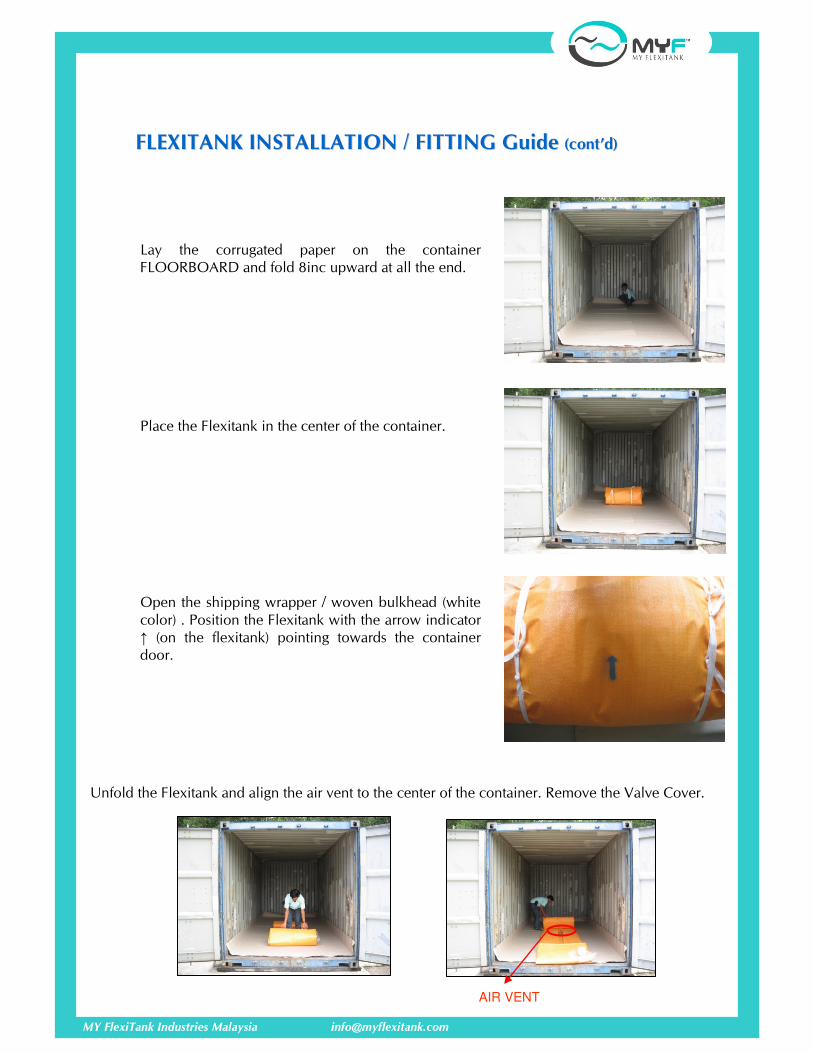
Lay the corrugated paper on the container
FLOORBOARD and fold 8inc upward at all the end.
Place the Flexitank in the center of the container.
Open the shipping wrapper / woven bulkhead (white
color) . Position the Flexitank with the arrow indicator
↑ (on the flexitank) pointing towards the container
door.
AIR VENT
Unfold the Flexitank and align the air vent to the center of the container. Remove the Valve Cover.
MY FlexiTank Industries Malaysia [email protected]
FLEXITANK INSTALLATION / FITTING Guide FLEXITANK INSTALLATION / FITTING Guide (cont(cont’’d)d)
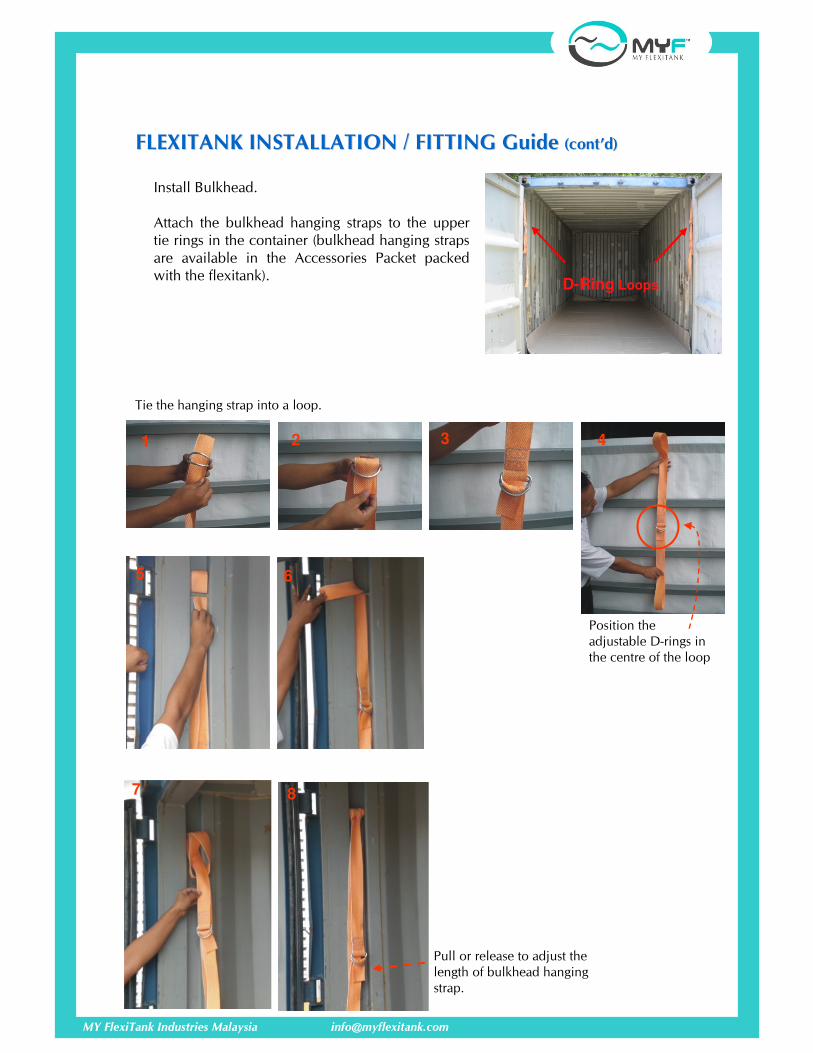
Install Bulkhead.
Attach the bulkhead hanging straps to the upper
tie rings in the container (bulkhead hanging straps
are available in the Accessories Packet packed
with the flexitank).
Tie the hanging strap into a loop.
1 2 3 4
Position the
adjustable D-rings in
the centre of the loop
5 6
7 8
Pull or release to adjust the
length of bulkhead hanging
strap.
D-Ring Loops
MY FlexiTank Industries Malaysia [email protected]
FLEXITANK INSTALLATION / FITTING Guide FLEXITANK INSTALLATION / FITTING Guide (cont(cont’’d)d)
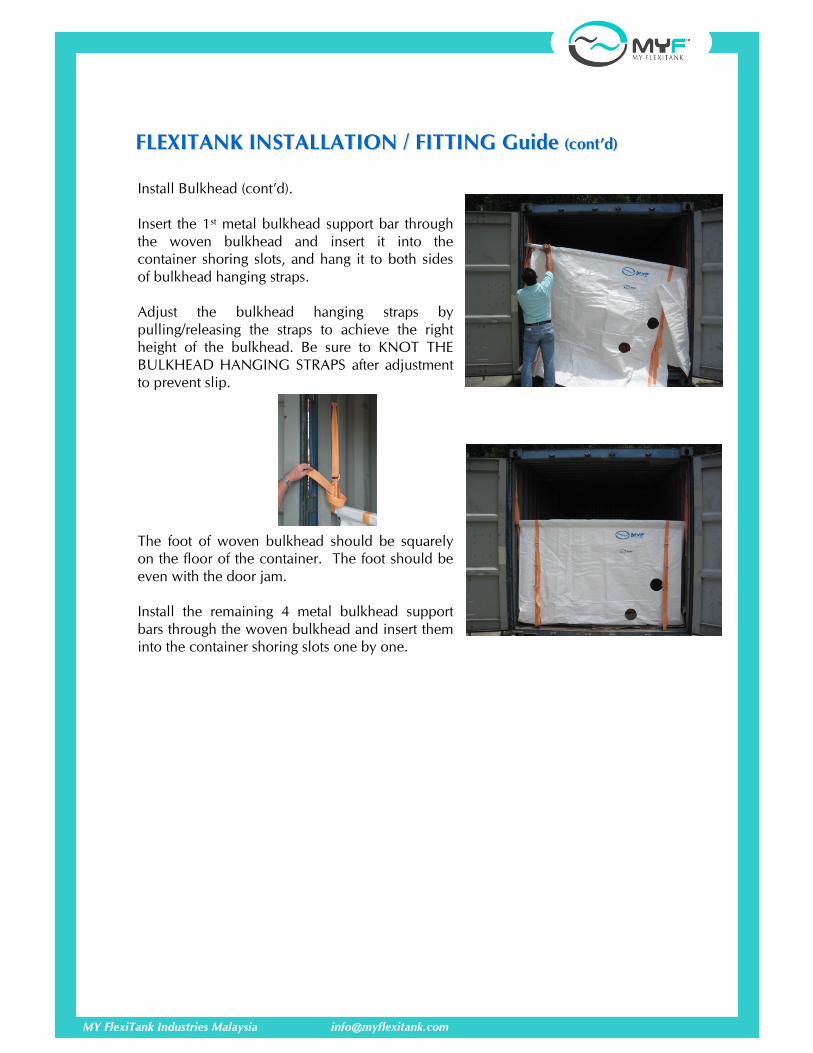
Install Bulkhead (cont’d).
Insert the 1st metal bulkhead support bar through
the woven bulkhead and insert it into the
container shoring slots, and hang it to both sides
of bulkhead hanging straps.
Adjust the bulkhead hanging straps by
pulling/releasing the straps to achieve the right
height of the bulkhead. Be sure to KNOT THE
BULKHEAD HANGING STRAPS after adjustment
to prevent slip.
The foot of woven bulkhead should be squarely
on the floor of the container. The foot should be
even with the door jam.
Install the remaining 4 metal bulkhead support
bars through the woven bulkhead and insert them
into the container shoring slots one by one.
MY FlexiTank Industries Malaysia [email protected]
FLEXITANK INSTALLATION / FITTING Guide FLEXITANK INSTALLATION / FITTING Guide (cont(cont’’d)d)
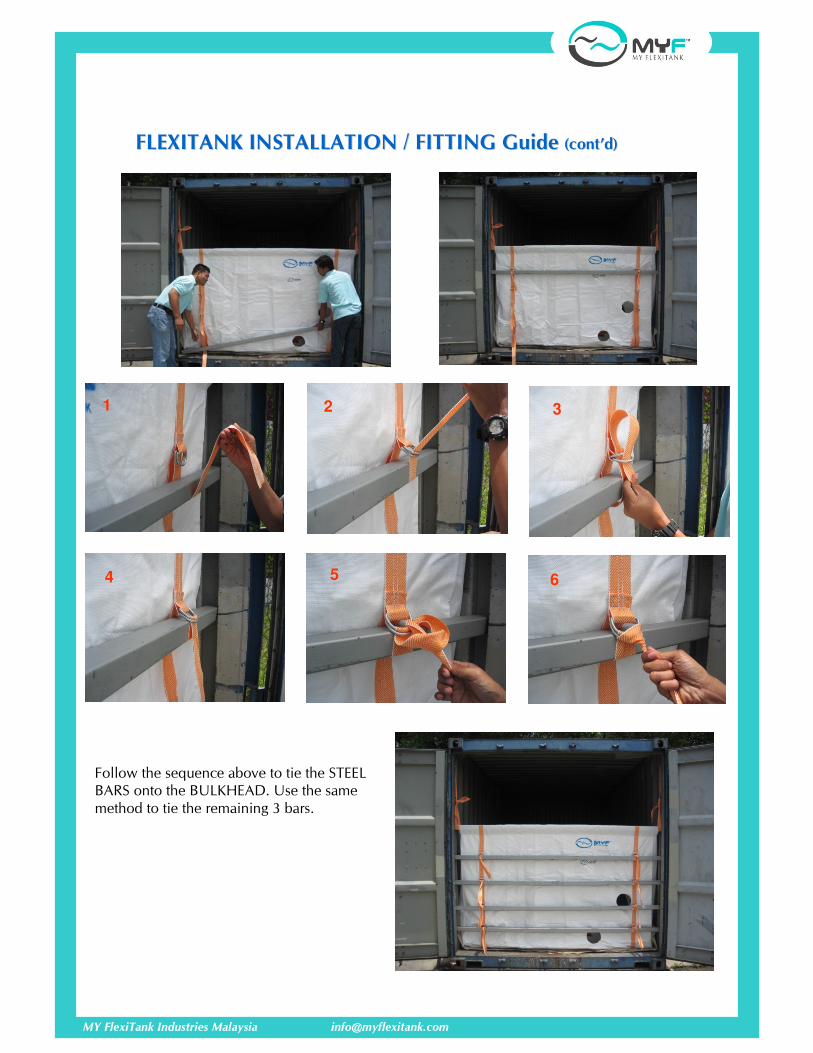
1 2 3
4 5 6
Follow the sequence above to tie the STEEL
BARS onto the BULKHEAD. Use the same
method to tie the remaining 3 bars.
MY FlexiTank Industries Malaysia [email protected]
FLEXITANK INSTALLATION / FITTING Guide FLEXITANK INSTALLATION / FITTING Guide (cont(cont’’d)d)
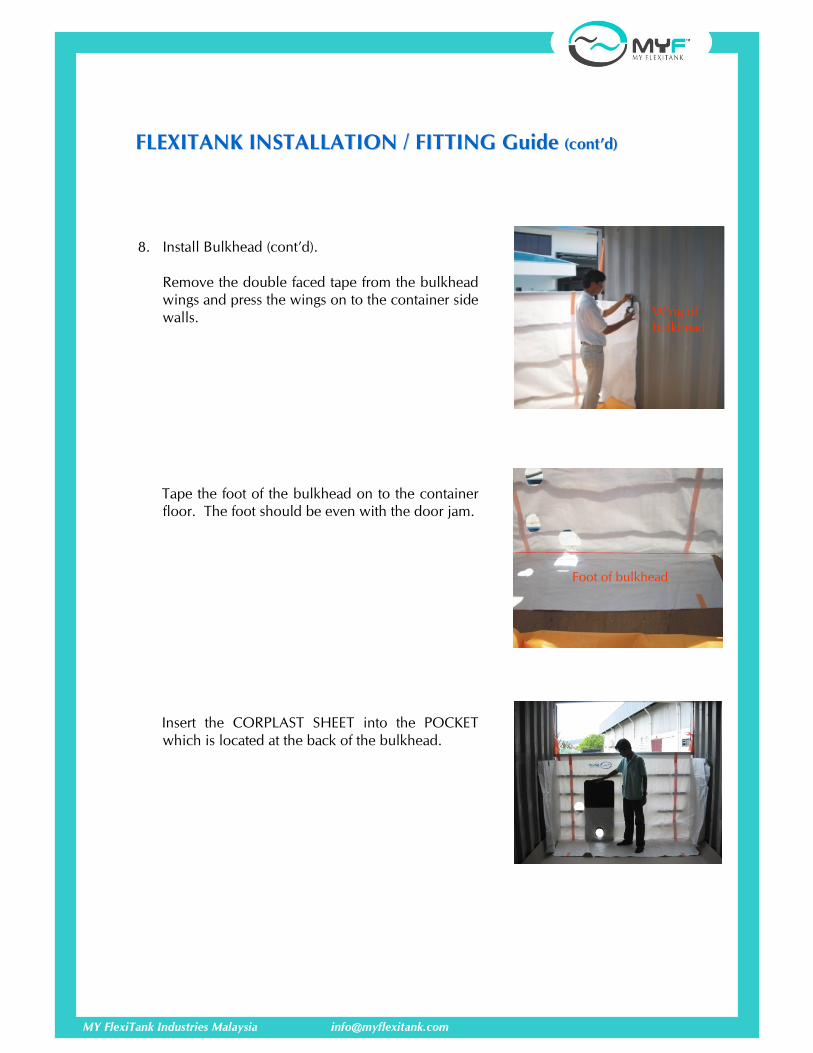
Foot of bulkhead
Wing of
bulkhead
8. Install Bulkhead (cont’d).
Remove the double faced tape from the bulkhead
wings and press the wings on to the container side
walls.
Tape the foot of the bulkhead on to the container
floor. The foot should be even with the door jam.
Insert the CORPLAST SHEET into the POCKET
which is located at the back of the bulkhead.
MY FlexiTank Industries Malaysia [email protected]
FLEXITANK INSTALLATION / FITTING Guide FLEXITANK INSTALLATION / FITTING Guide (cont(cont’’d)d)
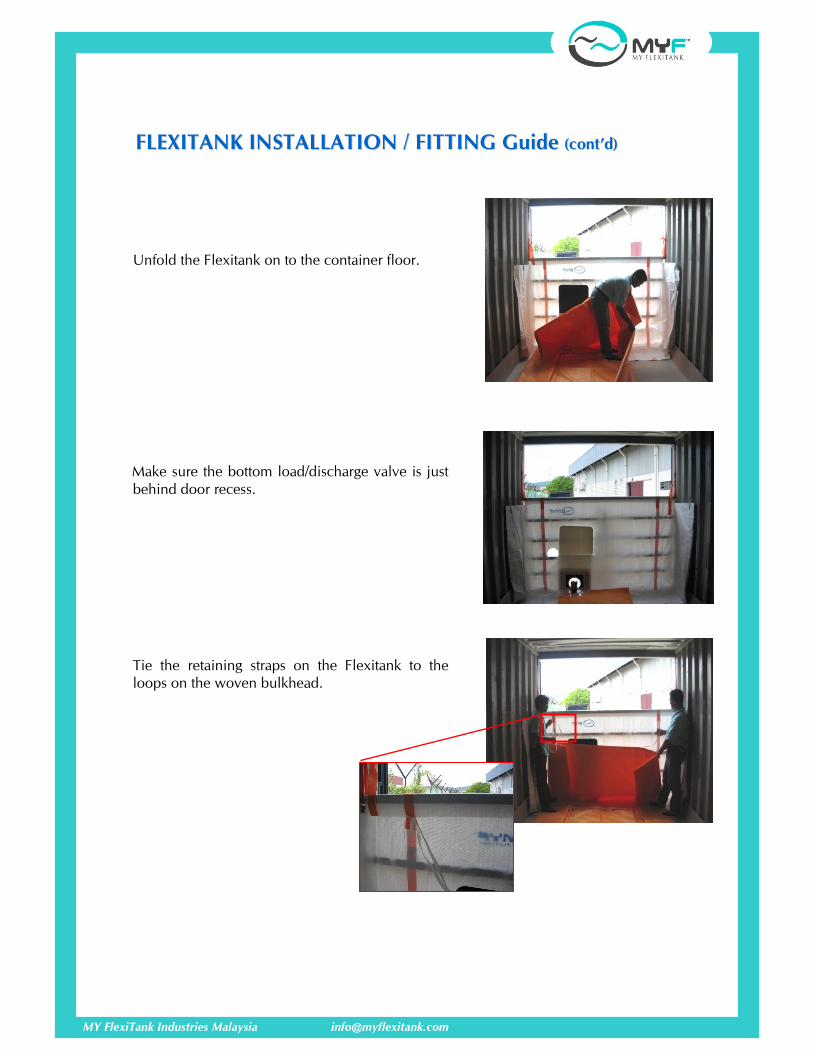
Unfold the Flexitank on to the container floor.
Make sure the bottom load/discharge valve is just
behind door recess.
Tie the retaining straps on the Flexitank to the
loops on the woven bulkhead.
MY FlexiTank Industries Malaysia [email protected]
FLEXITANK INSTALLATION / FITTING Guide FLEXITANK INSTALLATION / FITTING Guide (cont(cont’’d)d)
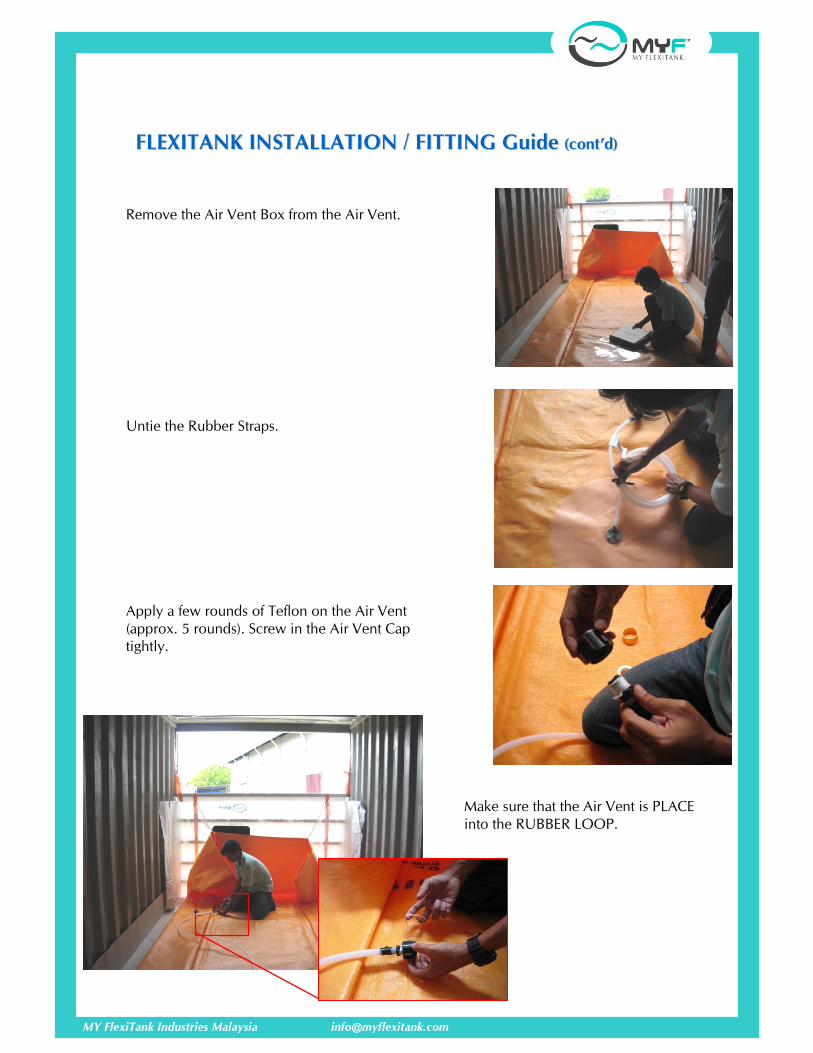
Remove the Air Vent Box from the Air Vent.
Untie the Rubber Straps.
Apply a few rounds of Teflon on the Air Vent
(approx. 5 rounds). Screw in the Air Vent Cap
tightly.
Make sure that the Air Vent is PLACE
into the RUBBER LOOP.
MY FlexiTank Industries Malaysia [email protected]
FLEXITANK INSTALLATION / FITTING Guide FLEXITANK INSTALLATION / FITTING Guide (cont(cont’’d)d)
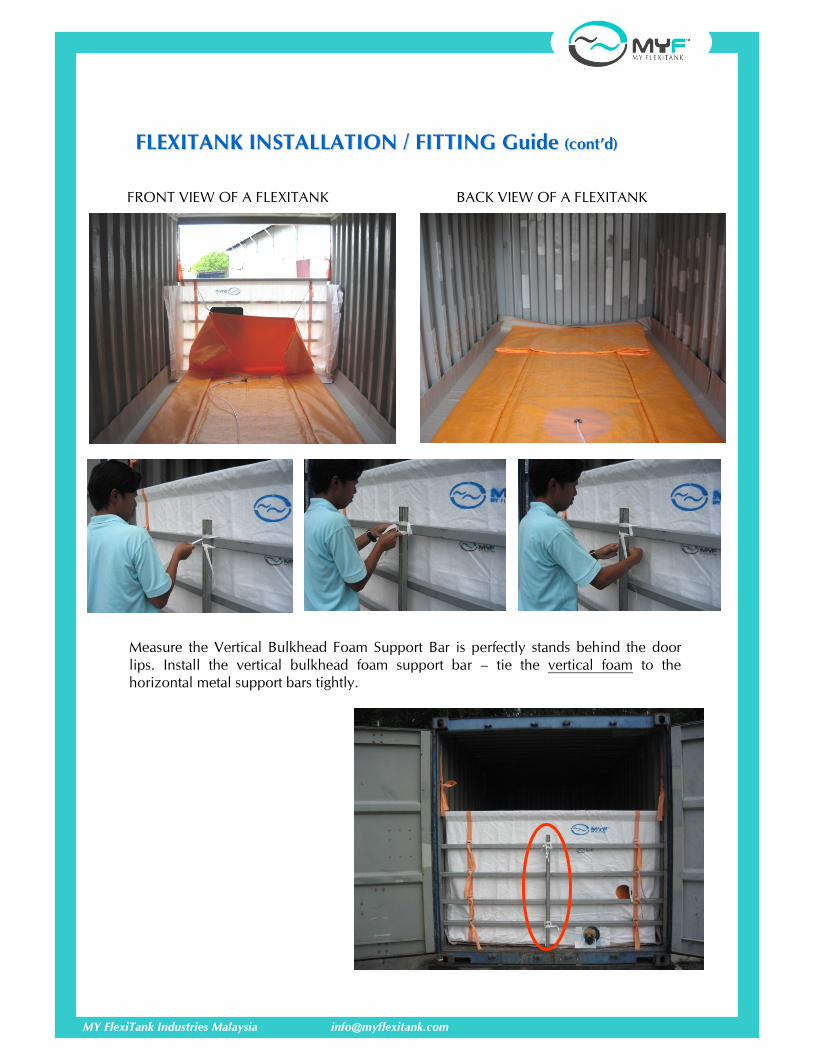
Measure the Vertical Bulkhead Foam Support Bar is perfectly stands behind the door
lips. Install the vertical bulkhead foam support bar – tie the vertical foam to the
horizontal metal support bars tightly.
FRONT VIEW OF A FLEXITANK BACK VIEW OF A FLEXITANK
MY FlexiTank Industries Malaysia [email protected]
FLEXITANK INSTALLATION / FITTING Guide FLEXITANK INSTALLATION / FITTING Guide (cont(cont’’d)d)
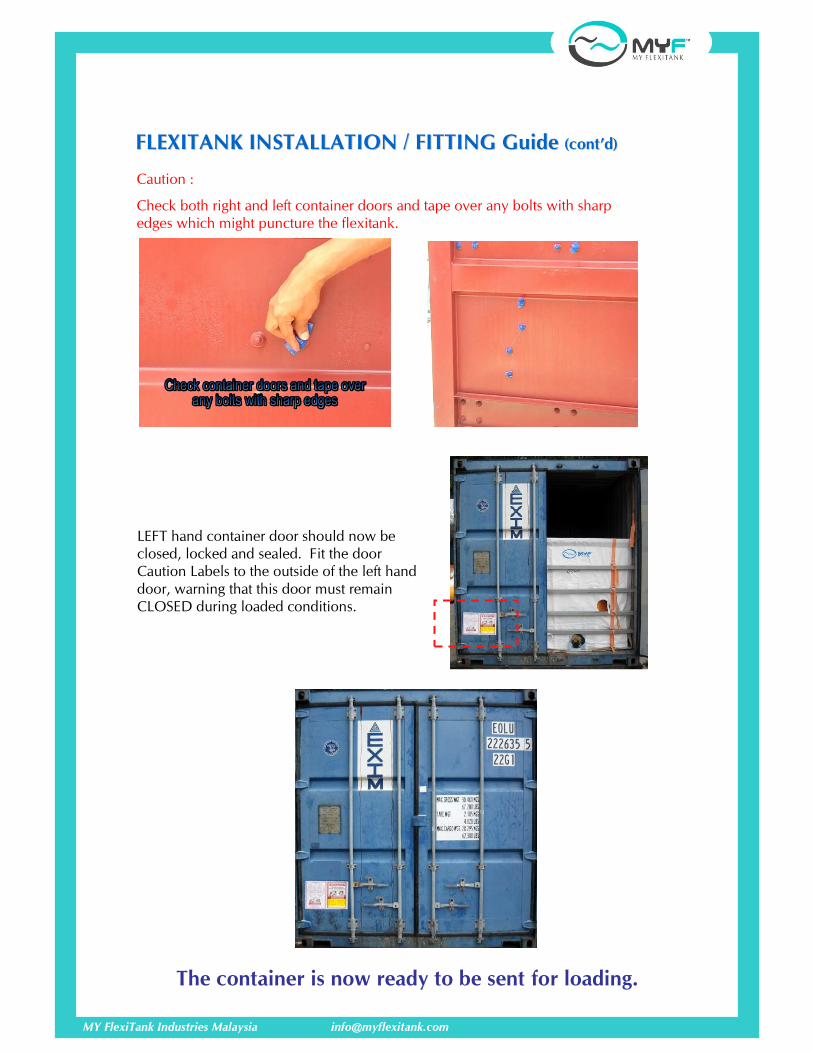
LEFT hand container door should now be
closed, locked and sealed. Fit the door
Caution Labels to the outside of the left hand
door, warning that this door must remain
CLOSED during loaded conditions.
The container is now ready to be sent for loading.
Caution :
Check both right and left container doors and tape over any bolts with sharp
edges which might puncture the flexitank.

MY FlexiTank Industries Malaysia [email protected]
Safety Guide during Loading ProcessSafety Guide during Loading Process
1. The container LEFT hand door should be kept CLOSE, LOCKED and SEALED during
loading and loaded conditions, until the flexitank is completely discharged.
2. The operation/loading area for parking of the container must be LEVEL.
3. If the flexitank arrives for loading on a short chassis, a ladder must be used for loading
workers to reach to the container and flexitank and observe the loading.
4. If the container with fitted flexitank arrives on a long chassis, a ladder must be used for
loading workers to reach to the container and flexitank. Plywood should be placed on the
long chassis as a platform for the workers to stand on safely. Caution the workers on fall
danger.
5. Before loading commences, the load/discharge valve must be opened after the loading
hose is properly attached.
6. Workers who are required to enter the container should ensure that :-
a) their shoes are clean and free from nails or any sharp objects.
b) no sharp objects should be brought inside the container with them – empty pockets
c) no loose objects falling out from their pockets and left inside the container – empty
pockets
7. During loading, no workers should remain inside the container.
8. LLDPE liner can take up to a maximum temperature of 82°C. However, for safety
consideration, MYF recommended Safety Loading Temperature of 60°C and below.
Should the product loading temperature falls between 60°C and 70°C, the laden
flexitank must remain static for at least 8 hours after loading is completed.
9. Maximum weight of your laden product is not to exceed 24.5ton in 20’ container. MYF
is not responsible for container bulging.
10. MYF allows a maximum of +/-500 liters overloading/underloading of your products
within the flexitank capacity.
11. The loading must be supervised to prevent over-loading.
12. The load/discharge valve must be closed before loading hose is disconnected.
13. Final Checklist After Loading
a) Check and ensure that you have replaced the valve cap properly and lock the cams
and secured it with plastic strap.
b) Check and ensure that the vent cap is replaced properly and tightly.
c) Check and ensure that the container right door is locked and sealed.
d) Check and ensure that the left hand door warning label is fitted.
MY FlexiTank Industries Malaysia [email protected]
FLEXITANK LOADING GuideFLEXITANK LOADING Guide
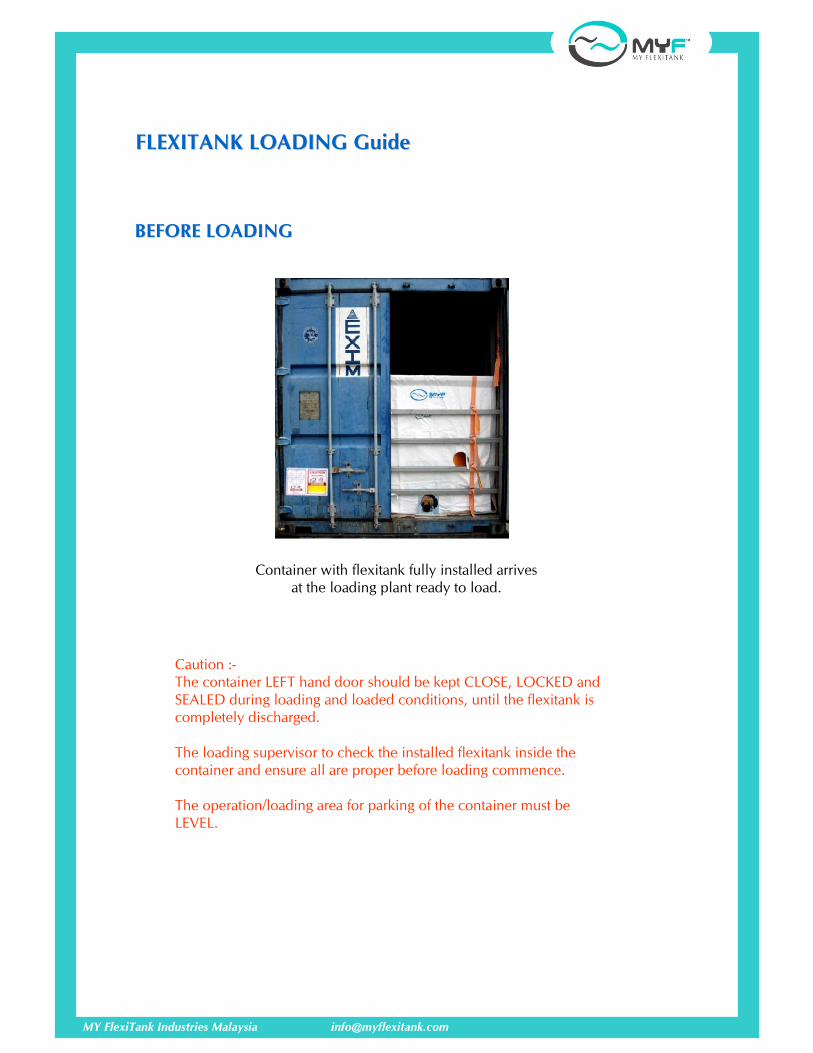
Container with flexitank fully installed arrives
at the loading plant ready to load.
Caution :-
The container LEFT hand door should be kept CLOSE, LOCKED and
SEALED during loading and loaded conditions, until the flexitank is
completely discharged.
The loading supervisor to check the installed flexitank inside the
container and ensure all are proper before loading commence.
The operation/loading area for parking of the container must be
LEVEL.
BEFORE LOADINGBEFORE LOADING
MY FlexiTank Industries Malaysia [email protected]
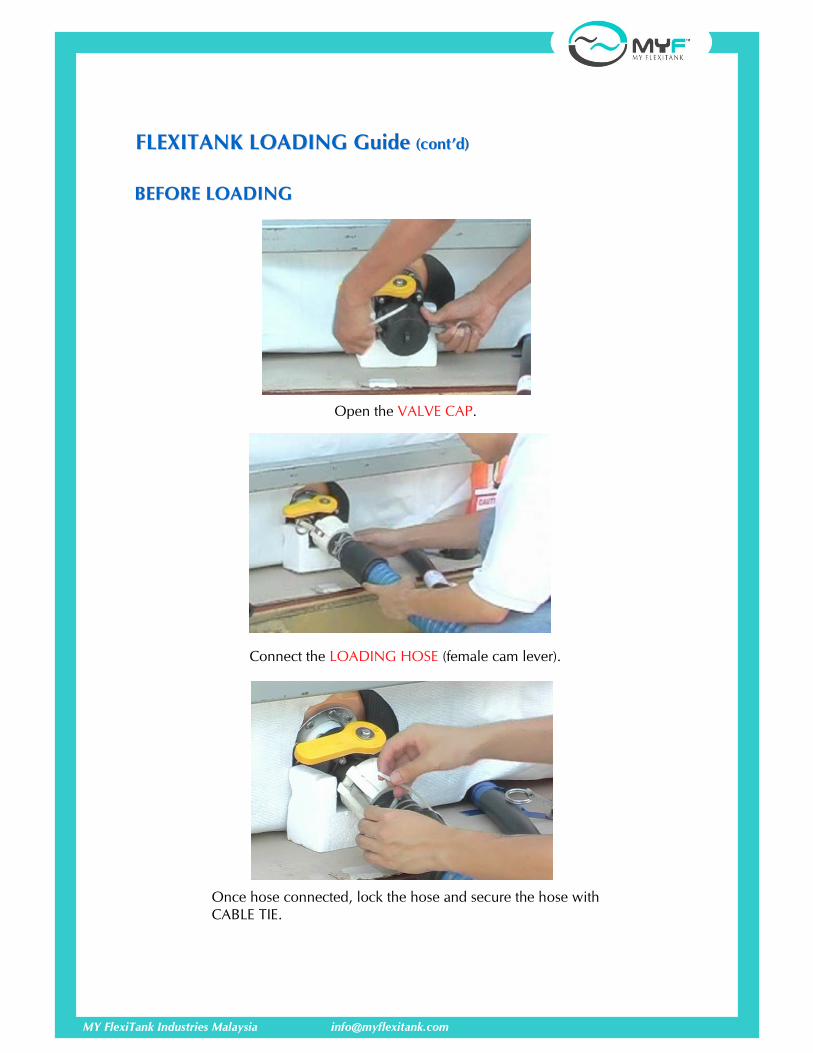
FLEXITANK LOADING Guide FLEXITANK LOADING Guide (cont(cont’’d)d)
Open the VALVE CAP.
Connect the LOADING HOSE (female cam lever).
Once hose connected, lock the hose and secure the hose with
CABLE TIE.
BEFORE LOADINGBEFORE LOADING

MY FlexiTank Industries Malaysia [email protected]
FLEXITANK LOADING Guide FLEXITANK LOADING Guide (cont(cont’’d)d)
Before loading commences, the valve must be opened
after the loading hose is properly attached.
BEFORE LOADINGBEFORE LOADING
Tie a strap to the hose to hold it in
position during loading.

MY FlexiTank Industries Malaysia [email protected]
FLEXITANK LOADING Guide FLEXITANK LOADING Guide (cont(cont’’d)d)
• Make sure that the left hand door is CLOSED throughout the whole LOADING
process.
• During loading, no workers should remain inside the container.
• The loading must be supervised to prevent over-loading.
• MYF allows a maximum of +/-500 liters overloading/underloading of your products
within the flexitank capacity.
• LLDPE liner can take up to a maximum temperature of 82°C. However, for safety
consideration, MYF recommended Safety Loading Temperature of 60°C and below.
Should the product loading temperature falls between 60°C and 70°C, the laden
flexitank must remain static for at least 8 hours after loading is completed.
• Maximum weight of your laden product is not to exceed 24.5ton in 20’ container.
MYF is not responsible for container bulging.
LOADING COMPLETED
Use of Air-Vent Assembly to discharge the air
inside the flexitank during loading – when the
flexitank is about 80% loaded (the flexitank has
risen to the 4th steel bar), open the air-vent cap to
release the air inside the flexitank. Close the cap
immediately when you see product flow to the air-
vent tube.
Caution : Make sure that the air-vent cap is tightly
closed.
DURING LOADINGDURING LOADING
MY FlexiTank Industries Malaysia [email protected]
FLEXITANK LOADING Guide FLEXITANK LOADING Guide (cont(cont’’d)d)
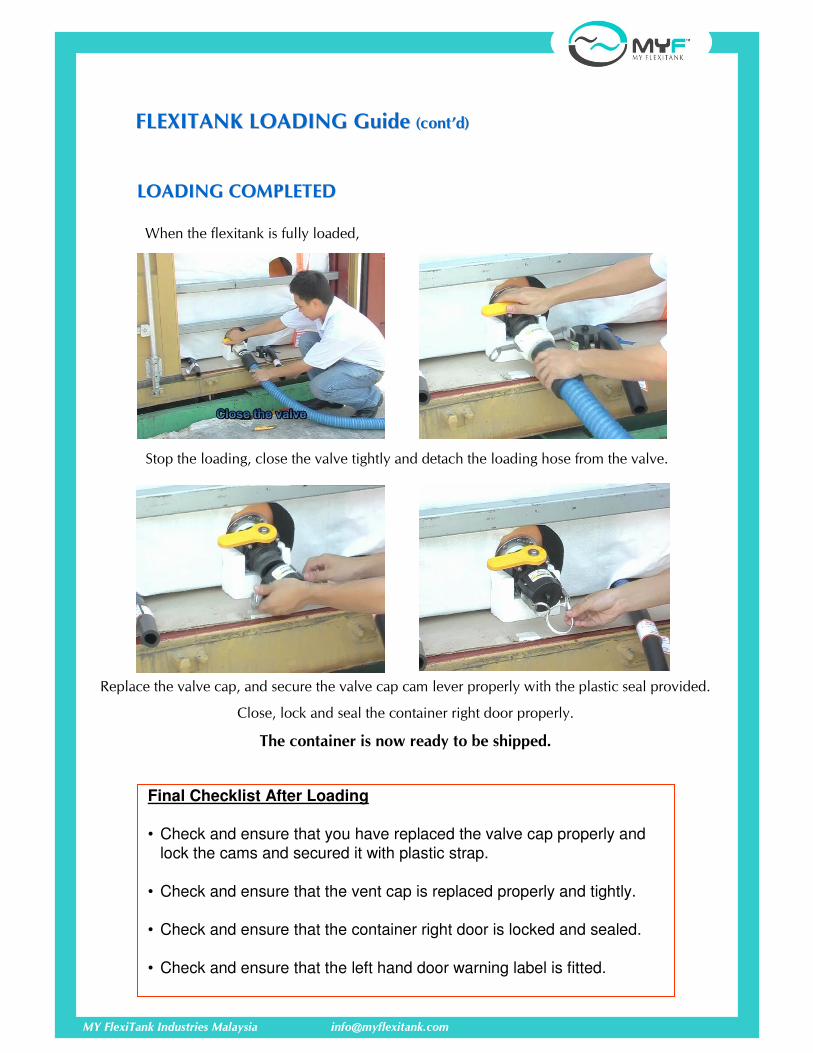
LOADING COMPLETEDLOADING COMPLETED
When the flexitank is fully loaded,
Final Checklist After Loading
• Check and ensure that you have replaced the valve cap properly and
lock the cams and secured it with plastic strap.
• Check and ensure that the vent cap is replaced properly and tightly.
• Check and ensure that the container right door is locked and sealed.
• Check and ensure that the left hand door warning label is fitted.
Stop the loading, close the valve tightly and detach the loading hose from the valve.
Replace the valve cap, and secure the valve cap cam lever properly with the plastic seal provided.
Close, lock and seal the container right door properly.
The container is now ready to be shipped.
MY FlexiTank Industries Malaysia [email protected]
FLEXITANK FLEXITANK
UNLOADING/DISCHARGINGUNLOADING/DISCHARGING
GUIDEGUIDE

MY FlexiTank Industries Malaysia [email protected]
FLEXITANK UNLOADING GuideFLEXITANK UNLOADING Guide
Open the container right hand door slowly and
carefully.
You will find the cap and valve in locking
position.
Caution :-
The container LEFT hand door should be kept
CLOSE, LOCKED and SEALED during loaded
conditions, until the flexitank is completely
discharged.
Connect the unloading hose (hose ended with female cam lever).
Secure the cams in locked position and tie them with a cable tie.
Remove the valve cap.
MY FlexiTank Industries Malaysia [email protected]
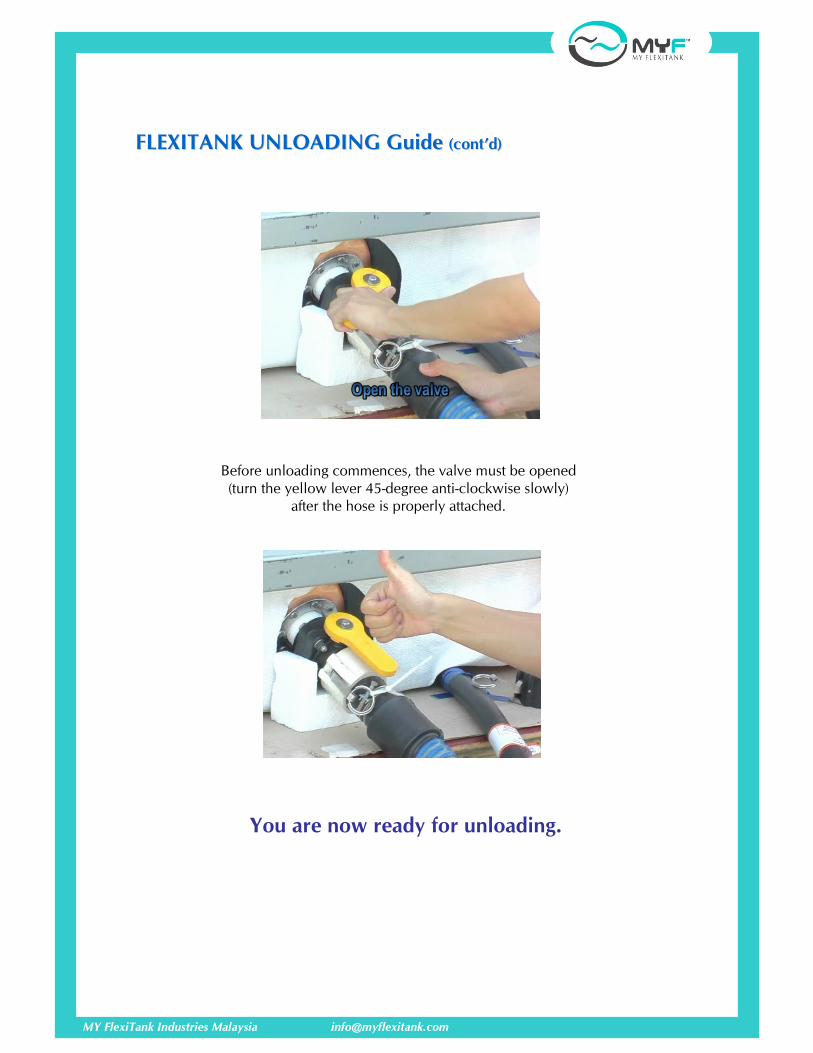
FLEXITANK UNLOADING Guide FLEXITANK UNLOADING Guide (cont(cont’’d)d)
You are now ready for unloading.
Before unloading commences, the valve must be opened
(turn the yellow lever 45-degree anti-clockwise slowly)
after the hose is properly attached.
MY FlexiTank Industries Malaysia [email protected]
FLEXITANK UNLOADING Guide FLEXITANK UNLOADING Guide (cont(cont’’d)d)
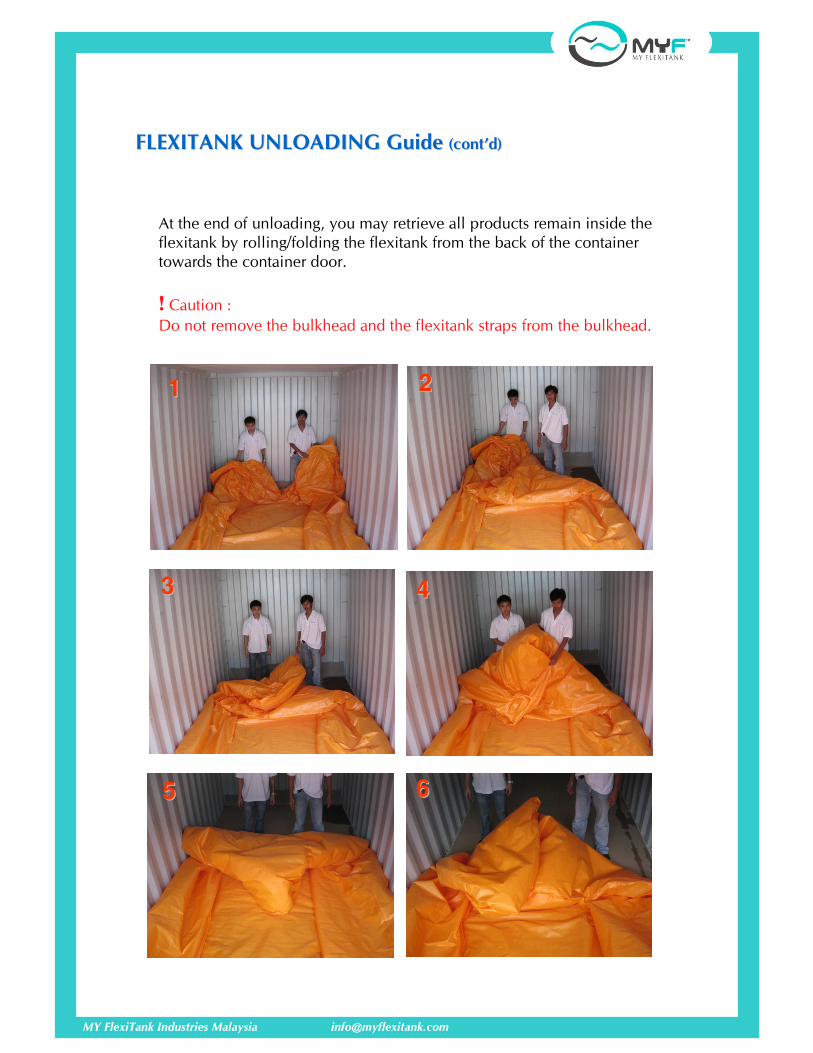
At the end of unloading, you may retrieve all products remain inside the
flexitank by rolling/folding the flexitank from the back of the container
towards the container door.
! Caution :
Do not remove the bulkhead and the flexitank straps from the bulkhead.
11 22
33 44
55 66

MY FlexiTank Industries Malaysia [email protected]
FLEXITANK UNLOADING Guide FLEXITANK UNLOADING Guide (cont(cont’’d)d)
Unloading completed.
When unloading is fully completed,
Close the valve tightly by turning the yellow lever to lock position and
detach the hose from the valve.
Replace the valve cap.
The bulkhead and flexitank can now be dismantled and
removed from the container for disposal.