Embed Size (px)
Citation preview

Pro Tools Creative Collection™
Plug-ins Guide
Version 1.0

Legal Notices
This guide is copyrighted ©2008 by Digidesign, a division of Avid Technology, Inc. (hereafter “Digidesign”), with all rights reserved. Under copyright laws, this guide may not be duplicated in whole or in part without the written consent of Digidesign.
003, 96 I/O, 96i I/O, 192 Digital I/O, 192 I/O, 888|24 I/O, 882|20 I/O, 1622 I/O, 24-Bit ADAT Bridge I/O, AudioSuite, Avid, Avid DNA, Avid Mojo, Avid Unity, Avid Unity ISIS, Avid Xpress, AVoption, Axiom, Beat Detective, Bomb Factory, Bruno, C|24, Command|8, Control|24, D-Command, D-Control, D-Fi, D-fx, D-Show, D-Verb, DAE, Digi 002, DigiBase, DigiDelivery, Digidesign, Digidesign Audio Engine, Digidesign Intelligent Noise Reduction, Digidesign TDM Bus, DigiDrive, DigiRack, DigiTest, DigiTranslator, DINR, D-Show, DV Toolkit, EditPack, Eleven, HD Core, HD Process, Hybrid, Impact, Interplay, LoFi, M-Audio, MachineControl, Maxim, Mbox, MediaComposer, MIDI I/O, MIX, MultiShell, Nitris, OMF, OMF Interchange, PRE, ProControl, Pro Tools M-Powered, Pro Tools, Pro Tools|HD, Pro Tools LE, QuickPunch, Recti-Fi, Reel Tape, Reso, Reverb One, ReVibe, RTAS, Sibelius, Smack!, SoundReplacer, Sound Designer II, Strike, Structure, SYNC HD, SYNC I/O, Synchronic, TL Aggro, TL AutoPan, TL Drum Rehab, TL Everyphase, TL Fauxlder, TL In Tune, TL MasterMeter, TL Metro, TL Space, TL Utilities, Transfuser, Trillium Lane Labs, Vari-Fi Velvet, X-Form, and XMON are trademarks or registered trademarks of Digidesign and/or Avid Technology, Inc. Xpand! is Registered in the U.S. Patent and Trademark Office. All other trademarks are the property of their respective owners.
Product features, specifications, system requirements, and availability are subject to change without notice.
Guide Part Number 9329-59262-00 REV A 11/08
Documentation Feedback
At Digidesign, we're always looking for ways to improve our documentation. If you have comments, corrections, or suggestions regarding our documentation, email us at [email protected].

Contents iii
contents
Part I Introduction
Chapter 1. Introduction . . . . . . . . . . . . . . . . . . . . . . . . . . . . . . . . . . . . . . . . . . . . . . . . . . . . . . 3
System Requirements . . . . . . . . . . . . . . . . . . . . . . . . . . . . . . . . . . . . . . . . . . . . . . . . . . . . . 4
Working with Plug-ins . . . . . . . . . . . . . . . . . . . . . . . . . . . . . . . . . . . . . . . . . . . . . . . . . . . . . 4
Conventions Used in This Guide . . . . . . . . . . . . . . . . . . . . . . . . . . . . . . . . . . . . . . . . . . . . . . 4
About www.digidesign.com . . . . . . . . . . . . . . . . . . . . . . . . . . . . . . . . . . . . . . . . . . . . . . . . . 5
Chapter 2. Installation . . . . . . . . . . . . . . . . . . . . . . . . . . . . . . . . . . . . . . . . . . . . . . . . . . . . . . . 7
Installing Pro Tools Creative Collection . . . . . . . . . . . . . . . . . . . . . . . . . . . . . . . . . . . . . . . . . 7
Removing Pro Tools Creative Collection. . . . . . . . . . . . . . . . . . . . . . . . . . . . . . . . . . . . . . . . . 7
Chapter 3. Quick Start . . . . . . . . . . . . . . . . . . . . . . . . . . . . . . . . . . . . . . . . . . . . . . . . . . . . . . . 9
Inserting a Creative Collection Instrument on a Pro Tools Instrument Track. . . . . . . . . . . . . . . . 9
Inserting a Creative Collection Effects Plug-in on a Pro Tools Track . . . . . . . . . . . . . . . . . . . . 10
Using the MIDI Learn Function . . . . . . . . . . . . . . . . . . . . . . . . . . . . . . . . . . . . . . . . . . . . . . 10

Pro Tools Creative Collection Plug-ins Guideiv
Part II Instruments
Chapter 4. Boom . . . . . . . . . . . . . . . . . . . . . . . . . . . . . . . . . . . . . . . . . . . . . . . . . . . . . . . . . . . 15
Introduction . . . . . . . . . . . . . . . . . . . . . . . . . . . . . . . . . . . . . . . . . . . . . . . . . . . . . . . . . . . 15
Matrix Display . . . . . . . . . . . . . . . . . . . . . . . . . . . . . . . . . . . . . . . . . . . . . . . . . . . . . . . . . 16
Instrument Section . . . . . . . . . . . . . . . . . . . . . . . . . . . . . . . . . . . . . . . . . . . . . . . . . . . . . . 16
Global Controls . . . . . . . . . . . . . . . . . . . . . . . . . . . . . . . . . . . . . . . . . . . . . . . . . . . . . . . . 17
Transport Controls . . . . . . . . . . . . . . . . . . . . . . . . . . . . . . . . . . . . . . . . . . . . . . . . . . . . . . 17
Kit Selector . . . . . . . . . . . . . . . . . . . . . . . . . . . . . . . . . . . . . . . . . . . . . . . . . . . . . . . . . . . 18
Speed Switches . . . . . . . . . . . . . . . . . . . . . . . . . . . . . . . . . . . . . . . . . . . . . . . . . . . . . . . . 18
Edit Mode Switch . . . . . . . . . . . . . . . . . . . . . . . . . . . . . . . . . . . . . . . . . . . . . . . . . . . . . . . 19
Event Bar. . . . . . . . . . . . . . . . . . . . . . . . . . . . . . . . . . . . . . . . . . . . . . . . . . . . . . . . . . . . . 19
Info Display and Setup Button . . . . . . . . . . . . . . . . . . . . . . . . . . . . . . . . . . . . . . . . . . . . . . 19
Creating a Drum Pattern . . . . . . . . . . . . . . . . . . . . . . . . . . . . . . . . . . . . . . . . . . . . . . . . . . 20
Saving a Preset . . . . . . . . . . . . . . . . . . . . . . . . . . . . . . . . . . . . . . . . . . . . . . . . . . . . . . . . 20
Playing with Patterns . . . . . . . . . . . . . . . . . . . . . . . . . . . . . . . . . . . . . . . . . . . . . . . . . . . . 20
Controlling Boom with MIDI . . . . . . . . . . . . . . . . . . . . . . . . . . . . . . . . . . . . . . . . . . . . . . . . 21
Pattern Chains . . . . . . . . . . . . . . . . . . . . . . . . . . . . . . . . . . . . . . . . . . . . . . . . . . . . . . . . . 22
Setup Page . . . . . . . . . . . . . . . . . . . . . . . . . . . . . . . . . . . . . . . . . . . . . . . . . . . . . . . . . . . 23
Chapter 5. DB-33 . . . . . . . . . . . . . . . . . . . . . . . . . . . . . . . . . . . . . . . . . . . . . . . . . . . . . . . . . . 25
Introduction . . . . . . . . . . . . . . . . . . . . . . . . . . . . . . . . . . . . . . . . . . . . . . . . . . . . . . . . . . . 25
Organ Page . . . . . . . . . . . . . . . . . . . . . . . . . . . . . . . . . . . . . . . . . . . . . . . . . . . . . . . . . . . 26
Cabinet Page . . . . . . . . . . . . . . . . . . . . . . . . . . . . . . . . . . . . . . . . . . . . . . . . . . . . . . . . . . 28
Info Display and Organ/Cabinet Switches . . . . . . . . . . . . . . . . . . . . . . . . . . . . . . . . . . . . . . 30
Chapter 6. Mini Grand . . . . . . . . . . . . . . . . . . . . . . . . . . . . . . . . . . . . . . . . . . . . . . . . . . . . . . 31
Introduction . . . . . . . . . . . . . . . . . . . . . . . . . . . . . . . . . . . . . . . . . . . . . . . . . . . . . . . . . . . 31
Mini Grand Main Controls . . . . . . . . . . . . . . . . . . . . . . . . . . . . . . . . . . . . . . . . . . . . . . . . . 32
Info Display and Setup Button . . . . . . . . . . . . . . . . . . . . . . . . . . . . . . . . . . . . . . . . . . . . . . 33
Shaping Mini Grand’s Sound . . . . . . . . . . . . . . . . . . . . . . . . . . . . . . . . . . . . . . . . . . . . . . . 33

Contents v
Chapter 7. Structure Free . . . . . . . . . . . . . . . . . . . . . . . . . . . . . . . . . . . . . . . . . . . . . . . . . . . 35
Introduction . . . . . . . . . . . . . . . . . . . . . . . . . . . . . . . . . . . . . . . . . . . . . . . . . . . . . . . . . . . 35
Getting Started . . . . . . . . . . . . . . . . . . . . . . . . . . . . . . . . . . . . . . . . . . . . . . . . . . . . . . . . . 35
Structure Free Parameters . . . . . . . . . . . . . . . . . . . . . . . . . . . . . . . . . . . . . . . . . . . . . . . . . 38
Patch List . . . . . . . . . . . . . . . . . . . . . . . . . . . . . . . . . . . . . . . . . . . . . . . . . . . . . . . . . . . . . 39
Main Page . . . . . . . . . . . . . . . . . . . . . . . . . . . . . . . . . . . . . . . . . . . . . . . . . . . . . . . . . . . . 43
Patch Edit Sub-Pages . . . . . . . . . . . . . . . . . . . . . . . . . . . . . . . . . . . . . . . . . . . . . . . . . . . . 44
Browser Page . . . . . . . . . . . . . . . . . . . . . . . . . . . . . . . . . . . . . . . . . . . . . . . . . . . . . . . . . . 45
Chapter 8. Vacuum . . . . . . . . . . . . . . . . . . . . . . . . . . . . . . . . . . . . . . . . . . . . . . . . . . . . . . . . . 47
Introduction . . . . . . . . . . . . . . . . . . . . . . . . . . . . . . . . . . . . . . . . . . . . . . . . . . . . . . . . . . . 47
VTO One and Two . . . . . . . . . . . . . . . . . . . . . . . . . . . . . . . . . . . . . . . . . . . . . . . . . . . . . . . 48
Mixer . . . . . . . . . . . . . . . . . . . . . . . . . . . . . . . . . . . . . . . . . . . . . . . . . . . . . . . . . . . . . . . . 49
Filters . . . . . . . . . . . . . . . . . . . . . . . . . . . . . . . . . . . . . . . . . . . . . . . . . . . . . . . . . . . . . . . 49
Envelopes. . . . . . . . . . . . . . . . . . . . . . . . . . . . . . . . . . . . . . . . . . . . . . . . . . . . . . . . . . . . . 50
Arp . . . . . . . . . . . . . . . . . . . . . . . . . . . . . . . . . . . . . . . . . . . . . . . . . . . . . . . . . . . . . . . . . 53
Setup Page. . . . . . . . . . . . . . . . . . . . . . . . . . . . . . . . . . . . . . . . . . . . . . . . . . . . . . . . . . . . 54
Chapter 9. Xpand!2 . . . . . . . . . . . . . . . . . . . . . . . . . . . . . . . . . . . . . . . . . . . . . . . . . . . . . . . . . 55
Introduction . . . . . . . . . . . . . . . . . . . . . . . . . . . . . . . . . . . . . . . . . . . . . . . . . . . . . . . . . . . 55
Smart Knobs. . . . . . . . . . . . . . . . . . . . . . . . . . . . . . . . . . . . . . . . . . . . . . . . . . . . . . . . . . . 56
Part Controls . . . . . . . . . . . . . . . . . . . . . . . . . . . . . . . . . . . . . . . . . . . . . . . . . . . . . . . . . . 56
Patch Edit Parameter Switches. . . . . . . . . . . . . . . . . . . . . . . . . . . . . . . . . . . . . . . . . . . . . . 57
Play (Main) Parameters . . . . . . . . . . . . . . . . . . . . . . . . . . . . . . . . . . . . . . . . . . . . . . . . . . . 57
Mod (Modulation) Parameters . . . . . . . . . . . . . . . . . . . . . . . . . . . . . . . . . . . . . . . . . . . . . . 58
Arp (Arpeggiator) Parameters . . . . . . . . . . . . . . . . . . . . . . . . . . . . . . . . . . . . . . . . . . . . . . . 60
FX (Effects) Parameters . . . . . . . . . . . . . . . . . . . . . . . . . . . . . . . . . . . . . . . . . . . . . . . . . . . 61
Info Display . . . . . . . . . . . . . . . . . . . . . . . . . . . . . . . . . . . . . . . . . . . . . . . . . . . . . . . . . . . 61

Pro Tools Creative Collection Plug-ins Guidevi
Part III Effects
Chapter 10. Effects . . . . . . . . . . . . . . . . . . . . . . . . . . . . . . . . . . . . . . . . . . . . . . . . . . . . . . . . 65
Overview . . . . . . . . . . . . . . . . . . . . . . . . . . . . . . . . . . . . . . . . . . . . . . . . . . . . . . . . . . . . . 65
Chorus . . . . . . . . . . . . . . . . . . . . . . . . . . . . . . . . . . . . . . . . . . . . . . . . . . . . . . . . . . . . . . 66
Distortion . . . . . . . . . . . . . . . . . . . . . . . . . . . . . . . . . . . . . . . . . . . . . . . . . . . . . . . . . . . . 66
Dynamic Delay . . . . . . . . . . . . . . . . . . . . . . . . . . . . . . . . . . . . . . . . . . . . . . . . . . . . . . . . . 68
Enhancer . . . . . . . . . . . . . . . . . . . . . . . . . . . . . . . . . . . . . . . . . . . . . . . . . . . . . . . . . . . . . 70
Ensemble . . . . . . . . . . . . . . . . . . . . . . . . . . . . . . . . . . . . . . . . . . . . . . . . . . . . . . . . . . . . 71
Filter Gate . . . . . . . . . . . . . . . . . . . . . . . . . . . . . . . . . . . . . . . . . . . . . . . . . . . . . . . . . . . . 72
Flanger . . . . . . . . . . . . . . . . . . . . . . . . . . . . . . . . . . . . . . . . . . . . . . . . . . . . . . . . . . . . . . 73
Frequency Shifter . . . . . . . . . . . . . . . . . . . . . . . . . . . . . . . . . . . . . . . . . . . . . . . . . . . . . . . 75
Fuzz-Wah. . . . . . . . . . . . . . . . . . . . . . . . . . . . . . . . . . . . . . . . . . . . . . . . . . . . . . . . . . . . . 76
Kill EQ . . . . . . . . . . . . . . . . . . . . . . . . . . . . . . . . . . . . . . . . . . . . . . . . . . . . . . . . . . . . . . . 77
Lo Fi . . . . . . . . . . . . . . . . . . . . . . . . . . . . . . . . . . . . . . . . . . . . . . . . . . . . . . . . . . . . . . . . 78
MultiChorus . . . . . . . . . . . . . . . . . . . . . . . . . . . . . . . . . . . . . . . . . . . . . . . . . . . . . . . . . . . 80
Multi-Delay . . . . . . . . . . . . . . . . . . . . . . . . . . . . . . . . . . . . . . . . . . . . . . . . . . . . . . . . . . . 81
Non-Linear Reverb . . . . . . . . . . . . . . . . . . . . . . . . . . . . . . . . . . . . . . . . . . . . . . . . . . . . . . 82
Phaser . . . . . . . . . . . . . . . . . . . . . . . . . . . . . . . . . . . . . . . . . . . . . . . . . . . . . . . . . . . . . . 83
Reverb . . . . . . . . . . . . . . . . . . . . . . . . . . . . . . . . . . . . . . . . . . . . . . . . . . . . . . . . . . . . . . 85
Spring Reverb . . . . . . . . . . . . . . . . . . . . . . . . . . . . . . . . . . . . . . . . . . . . . . . . . . . . . . . . . 88
Stereo Width . . . . . . . . . . . . . . . . . . . . . . . . . . . . . . . . . . . . . . . . . . . . . . . . . . . . . . . . . . 89
Talkbox . . . . . . . . . . . . . . . . . . . . . . . . . . . . . . . . . . . . . . . . . . . . . . . . . . . . . . . . . . . . . . 90
Vintage Filter . . . . . . . . . . . . . . . . . . . . . . . . . . . . . . . . . . . . . . . . . . . . . . . . . . . . . . . . . . 92
Index . . . . . . . . . . . . . . . . . . . . . . . . . . . . . . . . . . . . . . . . . . . . . . . . . . . . . . . . . . . . . . . . . . . . . 95

1
Part I: Introduction

Pro Tools Creative Collection Plug-ins Guide2

Chapter 1: Introduction 3
Chapter 1: Introduction
Pro Tools Creative Collection™ is a set of RTAS® (Real Time Audiosuite) instruments and effects plug-ins included with Pro Tools HD, LE,® and M-Powered™ 8.0 and higher.
This guide describes the following Pro Tools Creative Collection plug-ins:
Instruments
• Boom drum computer with pattern sequencer
• DB-33 tonewheel organ simulator
• Mini Grand acoustic grand piano
• Structure Free sample player
• Vacuum tube emulation synthesizer
• Xpand2 multitimbral workstation
Effects
• Chorus
• Distortion
• Dynamic Delay
• Enhancer
• Ensemble
• Filter Gate
• Flanger
• Frequency Shifter
• Fuzz-Wah
• Kill EQ
• Lo-Fi
• Multi-Chorus
• Multi-Delay
• Non-Linear Reverb
• Phaser
• Reverb
• Spring Reverb
• Stereo Width
• Talkbox
• Vintage Filter

Pro Tools Creative Collection Plug-ins Guide4
System RequirementsTo use Pro Tools Creative Collection, you need the following:
• One of the following:
• A Digidesign®-qualified Pro Tools|HD®, Pro Tools LE, or Pro Tools M-Powered system
• A Digidesign-qualified Pro Tools system and a third-party software application that supports the Digidesign RTAS plug-in standard
• DVD drive for Installation disc
Digidesign can only assure compatibility and provide support for hardware and software it has tested and approved.
For complete system requirements and a list of Digidesign-qualified computers, operating sys-tems, hard drives, and third-party devices, refer to the latest information on the Digidesign web-site:
www.digidesign.com/compatibility
Working with Plug-insSee the Pro Tools Reference Guide for general information on working with plug-ins in Pro Tools, including:
• Inserting plug-ins on tracks
• Clip indicators
• Plug-in window
• Adjusting plug-in controls
• Automating Plug-ins
• Monitoring and recording audio from instrument plug-ins
• Using Plug-in Presets
Conventions Used in This GuideAll Digidesign guides use the following conven-tions to indicate menu choices and key com-mands:
The names of Commands, Options, and Settings that appear on-screen are in a different font.
The following symbols are used to highlight im-portant information:
Convention Action
File > Save Choose Save from the File menu
Control+N Hold down the Control key and press the N key
Control-click Hold down the Control key and click the mouse button
Right-click Click with the right mouse button
User Tips are helpful hints for getting the most from your Pro Tools system.
Important Notices include information that could affect your Pro Tools session data or the performance of your Pro Tools system.
Shortcuts show you useful keyboard or mouse shortcuts.
Cross References point to related sections in the Pro Tools Guides.

Chapter 1: Introduction 5
About www.digidesign.comThe Digidesign website (www.digidesign.com) is your best online source for information to help you get the most out of your Pro Tools system. The following are just a few of the services and features available.
Product Registration Register your purchase on-line.
Support and Downloads Contact Digidesign Technical Support or Customer Service; down-load software updates and the latest online manuals; browse the Compatibility documents for system requirements; search the online An-swerbase or join the worldwide Pro Tools com-munity on the Digidesign User Conference.
Training and Education Study on your own using courses available online or find out how you can learn in a classroom setting at a certified Pro Tools training center.
Products and Developers Learn about Digidesign products; download demo software or learn about our Development Partners and their plug-ins, applications, and hardware.
News and Events Get the latest news from Digidesign or sign up for a Pro Tools demo.
Pro Tools Accelerated Videos Watch the series of free tutorial videos. Accelerated Videos are de-signed to help you get up and running with Pro Tools and its plug-ins quickly.
To learn more about these and other resources available from Digidesign, visit the Digidesign website (www.digidesign.com).

Pro Tools Creative Collection Plug-ins Guide6

Chapter 2: Installation 7
Chapter 2: Installation
Installing Pro Tools Creative CollectionPro Tools Creative Collection is automatically installed when you install Pro Tools 8.0 or higher, unless you specify otherwise.
If you did not install Pro Tools Creative Collec-tion during Pro Tools installation, you can do so at any time.
To install Pro Tools Creative Collection if it was not installed during Pro Tools installation”
1 Insert the Pro Tools Installer disc and double-click the Installer icon.
2 When prompted, select Custom Install, select the Pro Tools Creative Collection, and complete the installation, following on-screen instruc-tions.
Removing Pro Tools Creative CollectionIf you need to remove Pro Tools Creative Collec-tion from your system, follow the instructions below for your computer platform.
Mac OS X
To remove Pro Tools Creative Collection:
1 Launch the Installer for the plug-in you want to uninstall.
2 Follow the on-screen instructions and select Uninstall from the Install pop-up menu.
3 Click Uninstall.
4 When uninstallation is complete, click Quit.
Windows Vista
To remove the Pro Tools Creative Collection:
1 Choose Control Panel.
2 Under Programs, click Uninstall a Program.
3 Select the Pro Tools Creative Collection from the list of installed applications.
4 Click Uninstall.
5 Follow the on-screen instructions to remove the software.

Pro Tools Creative Collection Plug-ins Guide8
Windows XP
To remove Pro Tools Creative Collection:
1 From the Start menu, choose Settings > Con-trol Panel and double-click Add or Remove Pro-grams.
2 Select Pro Tools Creative Collection from the list of installed applications and click the Change/Remove button.
3 Follow the on-screen instructions to remove Pro Tools Creative Collection.

Chapter 3: Quick Start 9
Chapter 3: Quick Start
This chapter takes you through the basics of in-serting Pro Tools Creative Collection plug-ins onto tracks in Pro Tools, and assigning MIDI controllers to Creative Collection instrument parameters..
But, first things first, do the following:
• Launch Pro Tools.
– and –
• Create a new Pro Tools session or open an existing session.
Inserting a Creative Collection Instrument on a Pro Tools Instrument TrackTo use one of the Creative Collection’s instru-ments to its best advantage, insert it on a stereo Instrument track in your Pro Tools session.
To insert an instrument plug-in on an Instrument track:
1 Create a new stereo Instrument track (recom-mended) in your Pro Tools session:
• Choose Track > New.
• Select 1 new Stereo Instrument track in Ticks.
• Click Create.
See the Pro Tools Reference Guide for in-structions on how to create and access pre-sets on plug-ins in Pro Tools.

Pro Tools Creative Collection Plug-ins Guide10
2 Click the Pro Tools Track Insert selector and select one of the Creative Collection instru-ments..
3 If needed, you can now record-enable the in-strument track to enable the use of a MIDI con-troller to play the instrument and/or help in creating MIDI sequences within the sequencer in Pro Tools..
Inserting a Creative Collection Effects Plug-in on a Pro Tools TrackTo use one of the Creative Collection’s effects plug-ins, insert it on an Audio track, Auxiliary input, or Instrument track in your Pro Tools ses-sion.
To insert an effects plug-in on a track:
1 Select the track on which you would like to in-sert the effect.
2 Click the Pro Tools Track Insert selector and select one of the Creative Collection effects plug-ins..
Using the MIDI Learn Function
In addition to pre-assigned MIDI controllers (such as Sustain Pedal and Volume), you can as-sign MIDI controllers to parameters within Pro Tools Creative Collection’s instrument plug-ins for automation or real-time control from a MIDI keyboard or control surface. MIDI assign-ments are saved with the session.
Inserting an instrument on a stereo Instrument track
See the Pro Tools Reference Guide for in-structions on how to use the MIDI sequencer in Pro Tools.
See the Digidesign Plug-ins Guide for fur-ther instructions on how to utilize effects plug-ins in Pro Tools.

Chapter 3: Quick Start 11
To assign a Pro Tools Creative Collection Instrument parameter to a MIDI controller:
Control-click or Right-click (Mac) or Right-click (Windows) the control, select Assign and choose a controller number from the pop-up MIDI CC list.
-or-
Control-click or Right-click (Mac) or Right-click (Windows) the control, select Learn from the menu and move the desired knob or control-ler on your MIDI keyboard or sequencer. The in-strument plug-in will set this MIDI controller to the parameter you have chosen.
Some MIDI continuous controllers are pre-as-signed and cannot be learned, as follows:
To remove a MIDI controller assignment:
Control-click or Right-click (Mac) or Right-click (Windows) an assigned control and choose Forget to remove its MIDI controller assignment.
Set Min/Max
These options let you scale incoming MIDI con-troller data so that the chosen control does not go below or above a certain value.
This is useful, for example, when you want to keep the Cutoff control on Vacuum from going above a certain amount, but you don’t want to have to pay close attention to how you move the MIDI controller knob you’ve assigned to it.
To set the Min/Max level:
Control-click or Right-click (Mac) or Right-click (Windows) a control, choose Set Min or Set Max, and select the desired lower or upper limit for the current control.
Invert Range
This option lets you invert incoming MIDI con-troller data so that the chosen control reacts in inverse proportion to the assigned MIDI con-troller.
This is useful, for example, when you’re assign-ing the drawbars in DB-33 to a set of MIDI fader controls, but you want the action to be reversed, so that the faders work like the drawbars on a physical organ.
To invert a control’s response:
Control-click or Right-click (Mac) or Right-click (Windows) a control, and select Invert Range.
MIDI CC Function
120 All Sound Off
121 Reset Controllers
123 All Notes Off
124 Omni Off (Not used in Plug-ins)
125 Omni On (Not used in Plug-ins)
126 Mono On (Not used in Plug-ins)
127 Mono Off (Not used in Plug-ins)
All Pro Tools Creative Collection plug-ins have pre-defined parameter assignments for Digidesign and supported third party hard-ware control surfaces.

Pro Tools Creative Collection Plug-ins Guide12

13
Part II: Instruments

14

Chapter 4: Boom 15
Chapter 4: Boom
IntroductionBoom is a virtual drum machine featuring a broad range of electronic percussion sounds, paired with a simple, drum-machine-style pat-tern sequencer.
Drum patterns can be created from scratch, or adapted from one of the included preset pat-terns. Patterns can be triggered and switched in real time with the mouse or using MIDI data, fa-cilitating the rapid creation of evolving drum patterns.
Boom comes with 10 drum kits inspired by clas-sic electronic drum machines. Each individual sound in a kit can have its volume, pan, pitch, and decay manipulated and automated in real time.
Sounds can be shaped to fit the needs of your production, and even given further animation over time using automation.
Each pattern is one bar long, with sixteen 16th-note steps. Up to 16 patterns, along with kit and control settings, can be saved with each Preset.
Operating Boom
The intuitive control layout for Boom lets you quickly get a feel for various sections within the interface. Within no time, you'll be well on your way to creating fresh and exciting new drum parts.
See Chapter 3, “Quick Start.” for details on how to set up Boom in a Pro Tools session.
Boom plug-in window, main controls and sections
Matrixdisplay
Globalcontrols
Instrumentsection
Eventbar
Kitselector
Speedswitches
Setupbutton
Transportcontrols
Patterncopy/clear
Speedswitches
Edit Modeswitch

Pro Tools Creative Collection Plug-ins Guide16
Matrix DisplayThe Matrix display provides a visual overview of the current pattern in Boom’s sequencer, and is a quick way to keep track of the pattern’s rhythm and velocity, as well as what step Boom is playing at any given time.
Each horizontal row corresponds with one of Boom’s 10 instrument channels, and each verti-cal column represents one of the 16 rhythmic steps that make up a pattern.
When an LED in the grid is dark, no note is se-quenced to play the indicated instrument on that step.
When an LED in the grid is lit red, the corre-sponding instrument is sequenced to play at that step. The brighter the LED is lit, the higher that step’s velocity has been set.
You can click each LED directly to add or re-move a note on that step. When a dark LED is first clicked, that step is set to play at high veloc-ity. Clicking it a 2nd or 3rd time will cycle that step through two levels of lowered velocity, re-ducing that step’s volume. Clicking the LED again will silence that step, and turn off its light. Right-clicking an LED will toggle its on-off state, preserving the current velocity setting.
The Pattern display above the Matrix shows which of the 16 patterns in the current preset is being shown in the Matrix display.
The Copy and Clear buttons above the Matrix are used to copy or erase patterns when in Pattern Select mode.
Instrument SectionEach of Boom’s 10 instruments has a set of con-trols that set its pan position, volume level, tun-ing (pitch), and decay (length).
Pan Sets the current instrument’s pan position in the stereo field.
Level Sets the current instrument’s volume.
Tuning Sets the current instrument’s pitch.
Decay Sets the current instrument’s length.
Matrix display
See “Creating a Drum Pattern” on page 20. and “Playing with Patterns” on page 20 for more information on using the Copy and Clear buttons.
Three instrument strips
Pan position
Volume Level
Decay (length)
M (mute)S (solo)
Sample selector
Instrument name
Tuning (pitch)
Adjuster
Chapter 4: Boom 17
S Solos the selected instrument, letting it play while temporarily silencing the other instru-ments. More than one instrument can be soloed at a time.
M Mutes the selected instrument, silencing it until the M button is pressed again.
Adjuster Calibrates the sound of the current in-strument in varying ways.
Sample Selector Sets the current instrument’s sample (10 samples available for each instru-ment).
Global ControlsThe Global Controls affect all instruments at once.
Shuffle Adds a variable amount of rhythmic swing to the currently playing pattern.
Volume Controls the plug-in’s overall output volume.
Dynamics Scales the difference in volume be-tween the pattern sequencer’s three possible Ve-locity levels.
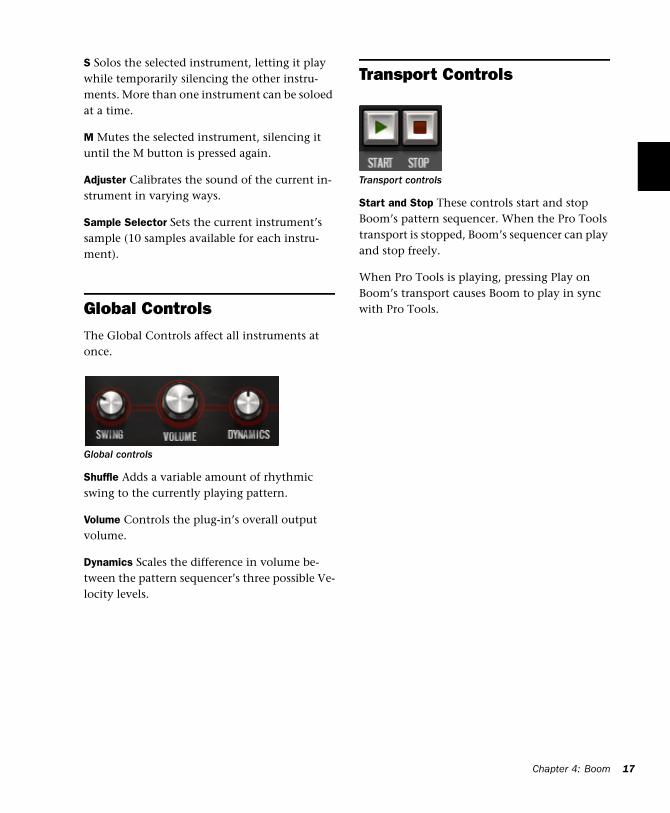
Transport Controls
Start and Stop These controls start and stop Boom’s pattern sequencer. When the Pro Tools transport is stopped, Boom’s sequencer can play and stop freely.
When Pro Tools is playing, pressing Play on Boom’s transport causes Boom to play in sync with Pro Tools.
Global controls
Transport controls

Pro Tools Creative Collection Plug-ins Guide18
Kit Selector
The Kit Selector menu gives you access to the 10 preset drum kits in Boom.
The available kits are as follows:
Speed Switches
The Speed switches change Boom’s rhythmic re-lationship with the current tempo set in Pro Tools.
The switch on the left has three modes. In X1 mode, Boom’s sequencer plays at the same tempo as the master tempo in Pro Tools. In X2 mode, Boom plays twice as fast. In X1/2 mode, Boom plays half as fast.
The switch on the right enables Triplet mode. In Triplet mode, Boom plays only the first 12 steps in the sequence. The last 4 steps turn grey, indi-cating that they will not be played.
The 12 steps play in the same amount of time Boom would normally play all 16, for the cre-ation of triplet grooves.
Trying different combinations of Speed switch settings on-the-fly can create interesting rhyth-mic variations.
Kit Selector menu
Name Description
Urban 1 R&B-style sounds: Fat kicks, cracking snares.
Urban 2 Variations of the above.
Dance 1 Classic club-style drums: Fat, electronic, and punchy.
Dance 2 As above, but more organic, loopy and percussive.
Electro Electronic, noisy, distorted sounds.
Eight-O A classic analog drum machine kit.
Nine-0 A classic analog/digital drum machine kit.
Fat-8 A more processed version of Eight-0. Aggressive and com-pressed, with a lot of impact.
Fat-9 A more processed version of Nine-0. Fatter and crunchier.
Retro Classic array of analog drum machine sounds.
Speed switches

Chapter 4: Boom 19
Edit Mode Switch
The Edit Mode switch lets you select whether to edit the current pattern, or choose between the 16 available patterns in the current preset.
Pat Edit Lets you create and edit drum patterns.
Pat Sel Lets you switch between the patterns in the current preset.
Event BarThe Event Bar is where most of the work of cre-ating and playing patterns in Boom is done.
In Pattern Edit mode, the sixteen numbered Event switches that make up the Event Bar each correspond with a 16th note step in the current pattern. The rhythm of the currently selected in-strument is shown. By default, in an empty pat-tern, all of the Event switches will be dark, indi-cating that the selected instrument will not play on any of the 16 steps.
When an Event switch is selected, it lights to show that the selected instrument will play at that step in the pattern.
Clicking (or triggering via MIDI or a control sur-face) a step’s switch a 2nd or 3rd time will cycle it through two levels of lowered velocity, reduc-ing that step’s volume. Clicking the switch again will silence that step, and turn off its light.
Right-clicking an Event switch will toggle its on-off state, preserving the current velocity setting.
In Pattern Select mode, the Event switches choose between the 16 patterns in the current preset.
Info Display and Setup Button
Like all plug-ins in the Creative Collection, Boom has an Info display that shows the setting of the currently selected control.
To the right of the Info display is the Setup but-ton, which opens the Setup page, which offers control of Boom’s synchronization behavior and of the Pattern Chain function.
Edit Mode switch
Patterns can be selected using MIDI notes at any time, regardless of Edit Mode switch po-sition.
Event Bar, showing the 16 Event switches, in various states
Info display and Setup button

Pro Tools Creative Collection Plug-ins Guide20
Creating a Drum PatternThis section will get you started on the process of creating beats with Boom. First, you’ll need an empty pattern to edit.
To clear a pattern
1 Set the Edit Mode switch to Pattern Select mode.
2 Click one of the Event switches to select the pattern you want to clear. For now, click the Event switch marked 1.
3 Click the Clear button above the Matrix dis-play. All notes in the selected pattern will be cleared.
To create a new pattern
1 Set the Edit Mode switch to Pattern Edit mode.
2 Press play on Boom’s transport.
3 In the Instrument Section, find the first in-strument whose pattern you want to edit, and click its Instrument Name area. The selected In-strument Strip’s background color will become highlighted, indicating that it is selected.
4 In the Event Bar, try out various rhythms by toggling the Event switches on and off.
5 When you have a satisfying rhythm created for your first instrument (such as Bass Drum), se-lect the next instrument you want to add to the pattern (such as Snare Drum), and repeat the above process.
6 Continue adding parts until you’re satisfied with the pattern.
Saving a PresetBoom, like all Pro Tools plug-ins, can save its settings, (in this case, your drum patterns and instrument settings) as plug-in settings files (.tfx), or presets.
To save the pattern you’ve created, open the Plug-in Settings menu, and choose “Save Set-tings As...”, choose a name for your preset, and click “Save”.
Playing with PatternsNow that you’ve started creating patterns, let’s take a look at how to switch between and create variations of them.
To switch between patterns on-the-fly
1 Press Play on Boom’s transport.
2 Set the Edit Mode switch to Pattern Select mode.
3 Click the Event switch marked 2. A different pattern will start to play, and its notes will ap-pear in the Matrix display.
4 Press Event switch 1, and you’ll see and hear your original pattern return. Make a copy of it, so that you can create a variation of the pattern.
Preset management area

Chapter 4: Boom 21
To copy a pattern
1 Click the Copy button above the Matrix dis-play. Event switch 1 lights up red, and Event switches 2–16 blink, indicating that they are available to receive a copy of the selected pat-tern.
2 Click Event switch 2. The Event Bar returns to its normal state, and pattern 1 will be copied to pattern 2.
3 If you decide before doing so that you don’t want to copy the pattern after all, just press any other button or move any other control besides the Event switches, and the Copy action will be cancelled.
4 Press Event switch 2, then set the Edit Mode switch back to Pattern Edit mode. You’ll see that you now have an identical copy of pattern 1 to work with. Make a simple edit to the pattern, by adding a rhythmic fill.
To create a simple fill
1 Select Snare Drum, and toggle Event switches 13–16 to on. This will give you a simple 4-note snare roll at the end of the pattern.
2 Try switching between patterns 1 and 2 to hear the new pattern and the fill you’ve added.
Controlling Boom with MIDIBoom becomes much more powerful when con-trolled using MIDI. Boom responds to two main ranges of MIDI notes:
C1–D#2 •Plays each of the instruments in the current drum kit. Used primarily when using Pro Tools MIDI or instrument tracks to con-trol Boom, rather than Boom’s built-in pat-tern sequencer. These mappings closely match the General MIDI standard, for ease of use with pre-existing MIDI sequences.
Event switches 13–16, toggled on to create a roll
MIDI Note Instrument Played
C1 Kick
C#1 Rim
D1 Snare
D#1 Clap
E1 Snare
F1 Lo Tom
F#1 Clsd Hat
G1 Lo Tom
G#1 Clsd Hat
A1 Hi Tom
A#1 Open Hat
B1 Hi Tom
C2 Hi Tom
C#2 Crash
D2 Hi Tom
D#2 Ride

Pro Tools Creative Collection Plug-ins Guide22
C3–D#4 •Each note triggers one of the 16 pat-terns in the current preset, switching between them on the fly
The first set of notes lets you play and sequence Boom’s sounds directly like any other software instrument. The second set lets you switch be-tween and create sequences of Boom’s patterns.
Playing Patterns using MIDI
Much like you can switch between patterns by clicking on various Event switches, you can play and switch between patterns using MIDI data.
This lets you create interactive changes in your beat over time, and record the MIDI data so that the same sequence can be played back and ed-ited once it’s been recorded.
To play patterns using a MIDI controller
1 Record-enable the Instrument track on which Boom is inserted.
2 Use the octave switches on your MIDI control-ler to make sure you have access to MIDI notes C3–C4. You may need to play a number of notes to find the right range, but once you have, you’ll notice that Boom plays a pattern each time you play a note.
3 If you press and hold a note, the correspond-ing pattern plays until you release the note.
4 If you play legato within that range while holding down the first note, Boom switches pat-terns, starting the new pattern at the same rhythmic step where the previous pattern left off.
This MIDI data can be recorded and edited using the MIDI sequencer in Pro Tools, letting you cre-ate complex sequences of drum patterns.
If you do not have a MIDI controller, you can use the Pencil tool in Pro Tools to create a se-quence of MIDI notes to trigger patterns over time.
Pattern ChainsPattern Chains let you to create sequences of drum patterns in real time, either with the mouse and keyboard, or with MIDI notes.
To create a pattern chain with the mouse and keyboard
1 Press Play on Boom’s transport.
2 Switch Boom into Pattern Select mode.
3 Click the Event switch that corresponds with the pattern you want to start the chain with.
4 Hold Control on the computer keyboard and click the Event switches that correspond with each pattern you want to add to the chain.
5 Boom will play the patterns you’ve chosen in the order they were added to the chain.
6 To remove a pattern from the chain, hold Control and click its Event switch.
See Chapter 3, “Quick Start.” for details on how to assign MIDI controllers to Boom’s control parameters.
See the Pro Tools Reference Guide for in-structions on how to use the MIDI and in-strument tracks in Pro Tools.
See the Pro Tools Reference Guide for in-structions on how to use MIDI and instru-ment tracks in Pro Tools to control instru-ment plug-ins.

Chapter 4: Boom 23
7 To go back to playing patterns individually, click any Event switch without holding down Control.
To create a pattern chain with MIDI notes
1 Press and hold a MIDI note between C3 and D3 on your MIDI controller, triggering a pat-tern.
2 Press and hold a second note in that range along with the first. A Pattern Chain will be cre-ated, and Boom will alternate between playing the first pattern you chose, and the second.
3 Press and hold another note, and it will be added to the chain. Boom will play all three pat-terns in sequence. If you hold down more notes, their patterns will be added to the chain.
4 If you let go of a note, its pattern will be re-moved from the chain. If you let go of all but one note, the chain will stop, and Boom will go back to playing one pattern repeatedly.
This MIDI data can be recorded and edited using the MIDI sequencer in Pro Tools, let you more easily create sequences of drum patterns.
If you do not have a MIDI controller, you can use the Pencil tool in Pro Tools to create a se-quence of MIDI notes that can trigger Pattern Chains.
Setup Page
Click the Setup button to view the Setup page. It has two parameters you can set that change Boom’s behavior.
Sync Mode
This sets the way Boom synchronizes with Pro Tools when patterns are triggered using MIDI notes. The modes are as follows:
Beat Boom starts playing the selected pattern from the step that corresponds with the incom-ing MIDI note’s place in the current bar.
1/16 Boom starts playing the selected pattern from one of the first five steps in the pattern, corresponding with the incoming MIDI note’s place in the current quarter-note.
Notes played on the first or third quarter note of the current bar will trigger the current pattern from step 1. Notes played on the 2nd or 4th quarter note will trigger the pattern from step 5.
Off Boom starts playing the selected pattern in sync whenever triggered by a MIDI note, with-out synchronizing to the Pro Tools transport.
Pattern Chaining On/Off
This lets you turn the Pattern Chain function on or off.
Pattern chaining can be turned on and off in the Setup Page. When off, the above key-board and MIDI behavior does not occur.
Setup button

Pro Tools Creative Collection Plug-ins Guide24

Chapter 5: DB-33 25
Chapter 5: DB-33
IntroductionDB-33 is a virtual organ plug-in that recreates the sounds and controllability of classic tone-wheel organs, and the rotary-speaker cabinets they are often played through.
Operating DB-33
DB-33’s control layout has two main pages. The Play page contains most of the main tonal con-trols, and the Cabinet page contains the con-trols concerning the rotating-speaker cabinet. Once you’ve got a feel for the various sections within the interface, you’ll soon be creating classic vintage organ sounds.
See Chapter 3, “Quick Start.” for details on how to set up DB-33 in a Pro Tools session and assign MIDI controllers to DB-33’s control parameters.
DB-33 Organ page overview

Pro Tools Creative Collection Plug-ins Guide26
Organ PageThe Organ page holds the controls that effect the tone of the organ itself. These controls are also the most likely to be manipulated while the instrument is played.
Tonewheels
Tonewheel organs are based on a system of spin-ning, serrated metal wheels whose motion is translated into sound by magnetic pickups. Their condition effects the overall tone of the organ.
The Tonewheels control sets the condition of the tonewheels, and even provides a couple of non-standard choices.
Scanner Vibrato
Like many vintage organs, DB-33 features vi-brato/chorus to animate the organ sound.
On-Off Turns the chorus/vibrato effect on and off.
Vibrato and Chorus Sets the chorus/vibrato ef-fect’s mode. The following options are available:
Tonewheels control
Tonewheel Description
Dirty Worn-out tone generator. Drifting pitch, leaking
Used Like Dirty, but not as extreme
New Brand-new tonewheels. Clean tone
Syn 1 Triangle wave, for emulating syn-thesized organ sounds
Syn 2 Square wave, for emulating syn-thesized organ sounds
Scanner Vibrato controls
Wave Shape Description
V1, V2, V3 Vibrato (pitch modulation) effect. Higher numbered modes offer stronger modulation
C1, C2, C3 Chorus (timbral modulation) effect. Higher numbered modes offer stronger modulation

Chapter 5: DB-33 27
Drawbars
The most often-used set of controls on most tonewheel organs, drawbars are used to manip-ulate the mixture between the various harmon-ics generated by the tonewheel mechanism.
From left to right, each drawbar controls a dif-ferent part of the harmonic spectrum, ranging from low fundamentals to high harmonics.
When a drawbar is pulled out (downward), the volume of the corresponding harmonic is in-creased. When pushed in, (upward) it is de-creased.
Key Click
Originally an artifact of the mechanical nature of tonewheel organs, DB-33 gives you control over the clicking sound made when a key is played.
Turn the knob to set the level of click, from zero to full.
Percussion
DB-33’s percussion feature adds a short burst of additional harmonics at the beginning of each note played.
On/Off Turns the percussion feature on and off.
Loud/Soft Sets the volume of the added har-monic burst.
Short/Long Sets the length of the harmonic burst.
3rd/2nd Sets the harmonic that is added, either the 3rd or 2nd harmonic.
Master Level
This control sets the overall volume level. To control the level of signal going to the rotary speaker simulation (thus affecting tonal charac-ter), use the Organ control in the Input section of the Cabinet page. See “Cabinet Page” on page 28. for more information.
Turn this knob to set the overall output volume. This control is set, by default, the MIDI CC 7.
Drawbars
Key Click control
Percussion controls
Master Level control

Pro Tools Creative Collection Plug-ins Guide28
Rotation Speed Switch
This control switches the speed of rotation for the rotating speaker cabinet.
Move this switch to the left (Slow) to set the ro-tating speaker cabinet to slow rotation. Move the switch to the right (Fast) for fast rotation. Move it to the center (Brake) to stop the rota-tion, or to slow it temporarily before switching to another speed.
The exact speed of each of the Rotation Speed switch’s modes is set in the Speed Control sec-tion in the Cabinet page.
Cabinet PageTo access the Cabinet page, click the Cabinet button. The Cabinet page provides the controls pertaining to the rotating speaker cabinet and the organ’s tube preamp. These controls deter-mine the overall tone of the instrument.
Input
The Input section contains the level controls for the external input (using the preamp and rotat-ing speaker simulation as an effect for other sig-nals in Pro Tools) and the organ’s signal.
Increasing either of these inputs to very high levels drives the tube pre-amp harder, some-times leading to pleasant (or not-so-pleasant) distortion.
External Sets the volume of incoming signal when DB-33 is used as an insert effect.
Organ Sets the volume of the tone generator sig-nal before it enters the pre-amp. If you’re hear-ing unwanted distortion, try turning this con-trol down.The control is set to MIDI CC 11, an expression pedal, to emulate the volume pedal used for expressive purposes on many classic or-gans.
Rotation Speed switch
Cabinet page overview
Input controls
For instructions on using DB-33 as an in-sert effect, See “Inserting a Creative Collec-tion Effects Plug-in on a Pro Tools Track” on page 10..

Chapter 5: DB-33 29
Tube Pre-Amp
The Tube Pre-amp section offers control over the preamplifier that precedes the rotating speaker cabinet.
Character Effects the tonal balance of the signal. Turned to the left, the lows are cut, and high and midrange harmonics are emphasized. Turned to the right, lows are boosted and highs are cut.
Drive Sets the amount of gain in the pre-amp, ranging from clean to distorted.
High Cut Sets the amount of treble roll-off. Used in conjunction with the Character control (set to a low value), it creates a mid-heavy but not treble-boosted tone.
Mics
The Mics section controls the balance between the high and low-end speakers in the rotating speaker cabinet, and the stereo separation of the rotating speaker’s movement.
Drum/Horn Controls the mix between the low-end speaker (drum) and the high-end speaker (horn).
Spread Sets the angle, and thus, the stereo re-sponse of the two virtual “mics” that pick up the organ’s signal. Fully left, the mics are placed at 90 degrees from each other. Fully right, the mics are placed at 180 degrees from each other, ac-centuating the motion of the signal as the horn spins.
Speed Control
The Speed Control section affects the rotating speaker cabinet’s speed of rotation, and the time it takes to change between speed modes.
Rotation Speed Switch A duplicate of the switch on the Organ page, it is present here for ease of testing speed modes while setting other param-eters.
Slow Rate Sets the speed of speaker rotation when the rotation speed switch is set to Slow mode.
Fast Rate Sets the speed of speaker rotation when the rotation speed switch is set to Fast mode.
Acc/Dec Sets the amount of time it takes for the rotating speaker to move from one speed to an-other.
Tube Pre-Amp controls
Mics controls
Speed controls

Pro Tools Creative Collection Plug-ins Guide30
Info Display and Organ/Cabinet Switches
Like all instruments in the Creative Collection, DB-33 has an Info display that shows the setting of the currently selected control. To the left of the Info display are the switches that toggle the main window between the Organ and Cabinet pages.
Info display and Organ/Cabinet switches

Chapter 6: Mini Grand 31
Chapter 6: Mini Grand
IntroductionMini Grand is a simple virtual piano instrument with seven different acoustic piano sounds to suit a range of styles.
Six selectable models of room ambience can be used to place Mini Grand’s sound into an opti-mum spatial environment.
By familiarizing yourself with the main con-trols, you’ll be well on your way to creating per-fect piano parts for every occasion.
Operating Mini Grand
The main panel contains controls for choosing the desired piano model, type and amount of room simulation, dynamic response, and overall output level.
You can use the onscreen keyboard to audition the sound, if a MIDI controller is not within reach.
See Chapter 3, “Quick Start.” for details on how to operate and assign MIDI controllers to Mini Grand’s control parameters.
Mini Grand plug-in window, with main controls
Dynamicresponse
Roomcontrols
Keyboard
Modelselector
Outputlevel knob
Setupbutton
Tuningscale

Pro Tools Creative Collection Plug-ins Guide32
Mini Grand Main Controls
Model
This knob selects between seven different piano models that range from dark and mellow (Atmo) to bright and aggressive (Dance).
Dynamic Response
This control adjusts the response of the piano sound to incoming MIDI velocity data. Higher settings give more dynamic sensitivity, and lower settings create a more even dynamic re-sponse.
If you’re using a MIDI keyboard that tends to output high velocities without much effort, turning this control down can help compensate creating a more natural feel.
Tuning Scale
This control toggles between Equal tuning, where the piano’s relative pitch is normal, and Stretched, where the piano’s higher notes are tuned slightly higher, so they are more in tune with the overtones of the lower note.
Room
This control switches between various room am-biences. Effects range from natural reverbs to special effects.
Mix
The Mix knob blends the desired amount of room ambience, selected using the Room knob, into the piano tone.

Chapter 6: Mini Grand 33
Level
Turn this knob to control the overall output vol-ume of Mini Grand.
Info Display and Setup Button
Like all instruments in the Creative Collection, Mini Grand has an Info display that shows the setting of the currently selected control.
To the right of the Info display is the Setup but-ton, which opens the Setup page. The Setup page offers control of Mini Grand’s Eco Mode, which reduces CPU load by deactivating string resonances, and the polyphony selector, which sets Mini Grand’s maximum polyphony.
Shaping Mini Grand’s SoundMini Grand offers a wide range of tones that can fit into many genres of music. It is helpful, when familiarizing yourself with the plug-in, to try various combinations of sounds and ambience settings.
Piano Models
Info display and Setup Button
Model Description
Atmo Quiet and dark, accentuated low-mids and muted highs
Soft Mellow and rounded, with accen-tuated lows and low-mids, and mellow highs
Ballad Dynamic, but understated, warm lows
Real Natural and dynamic, little pro-cessing
Bright Controlled and percussive, low-ered bass and low-mids
Hard Loud, pointed, with accentuated highs, lowered bass and low-mids
Dance Loud, aggressive and gritty, strong upper mid and treble presence, scooped lows

Pro Tools Creative Collection Plug-ins Guide34
Room Ambiences
Room Description
Soft Mellow, sweet reverb
Bright Heavier early reflections, accentu-ated highs
Studio Controlled, tight ambience
Chamber Longer reverb time with more dif-fused reflections
Hall Longest reverb time, biggest-sounding room
Ambient Few reflections, very spatial
See the Pro Tools Reference Guide for in-structions on how to access and save Presets within Mini Grand.

Chapter 7: Structure Free 35
Chapter 7: Structure Free
IntroductionStructure Free is an RTAS (Real Time Audio Suite) plug-in for Pro Tools.
Structure Free brings the world of Structure com-patible sample libraries to any Pro Tools system and delivers superior performance and reliabil-ity thanks to its direct integration with the Pro Tools audio engine. Structure Free comes with its own 600 MB sample library to get you started.
Structure Free Features
64-voice multitimbral sound engine
Loads all Structure compatible sample librar-ies (native Structure, SampleCell, SampleCell II, Kontakt, Kontakt 2, and EXS 24)
Full compatibility with all Structure versions (Structure, Structure LE), you can easily upgrade and still use your Pro Tools sessions created with Structure Free. You can also open sessions which originally used Structure or Structure LE with Structure Free
Sample playback using disk streaming or RAM
Support of all common bit depths and sample rates up to 192 kHz
Easy real-time sound manipulation using Smart Knobs
Getting StartedThe following section helps you to explore Structure Free’s basic concepts with a hands-on approach. You will touch the most important functions, understand the basic concepts and make the first guided steps to get Structure Free to sound.
Loading Structure Free1 Create a new stereo Instrument track in Pro Tools.
2 Click the track’s Insert selector and choose Structure Free from the list..
Inserting Structure Free on a stereo Instrument track

Pro Tools Creative Collection Plug-ins Guide36
Making Sound1 If you have a MIDI keyboard available and prefer to use it, connect it to Structure Free’s MIDI input, and route it to Structure Free on MIDI channel 1. If there is no MIDI keyboard available, you can play Structure Free by clicking the keyboard on screen, or using MIDI input from the Instrument track in Pro Tools.
2 Play some notes on your MIDI keyboard. If all is well so far, you are hearing a sine wave signal from the default Sine Wave Patch at the top of the Patch list.
Loading a Patch1 Click the Browser tab in the Parameter panel to display the Browser page.
2 Click your way through the folders to access the QuickStart content folder. If you chose the suggested path during installation, it is located here, depending on your OS:
Windows Program Files\Digidesign\Structure\Structure QuickStart
Mac OS X /Applications/Digidesign/Structure/Structure QuickStart
3 Drag the Patch named 01 Six String Guitar.patch onto the Sine Wave Patch to load it and replace the Sine Wave patch. A red frame around the patch when dragging indicates that you are replacing the existing patch with the new one. Wait until the Loading message in the display beneath the Parameter panel disappears.
4 After loading, the multi-purpose display shows a short description of the Patch, and the Parameter panel above displays its Patch param-eters.
5 Play some notes and chords. Adjust the Patch volume using the horizontal fader on the Patch module in the Patch list.
The default Sine Wave patch
Browsing for patches

Chapter 7: Structure Free 37
Finding Missing Samples
If a loaded patch does not find its samples be-cause folders have been renamed or moved to another location, you can use the Find Missing Samples file dialog to point Structure Free to the new location of the samples. Patches which are missing samples are indicated by a red exclama-tion mark symbol.
To find the missing samples for a patch:
1 In the Patch menu, select Find Missing Sam-ples.
2 In the following dialog, navigate to the new sample location and click OK.
Using Smart Knobs1 Every Patch has six Smart Knob assignments which are (in the factory content) pre-assigned to useful parameters. You can use them to easily adjust a patch to fit your session. Select the patch to display its Smart Knob assignments in the Keyboard section.
2 Set the Smart Knob for Delay Mix to 30%.
3 Set the Smart Knob for Chorus Mix to 65%.
4 Play some notes and chords. Set the other Smart Knobs at will.
Using Key Switches
Key Switches are special MIDI notes or keys that are assigned to switch control values instead of triggering notes. For example, they can switch between different Smart Knob settings for a Patch or mute certain parts within a patch.
1 Load Patch 04 Electronic Drum Kit.patch, and play with it on your keyboard.
2 The different Effects in this specific Patch are not audible initially. Their Smart Knobs are as-signed to Key Switches so you can mix them in by just clicking or playing a Key Switch. All available Key Switches appear blue on the screen keyboard. The currently activated Key Switch is green. After activating a Key Switch, a short de-scription is shown in the multi-purpose display. A Key Switch does not trigger samples that are mapped in the corresponding key range.
3 Click the second Key Switch C#0, or play the corresponding key to add dirt to the kit’s sound.
4 Try out the other Key Switches.
5 The synth pad patch has Key Switches too. Check them out!
Missing samples
Smart Knob
Key Switches

Pro Tools Creative Collection Plug-ins Guide38
Structure Free Parameters
Keyboard Section
The Keyboard section provides 88 keys for play-ing Structure Free, six Smart Knobs, and a con-text sensitive Info display, as well as the Master volume control for the whole plug-in. You can play and control Structure Free by clicking the keys, using MIDI input from a MIDI keyboard, or using MIDI data in an Instrument or MIDI track in Pro Tools. When Structure Free receives MIDI data, the keys reflect the MIDI note input.
Smart Knobs
The Smart Knobs are special controls which can be assigned to one or more Structure Free param-eters in the currently selected patch. These pa-rameters can then be remote controlled at the same time by moving the Smart Knob. This comes in handy for easily designing complex sounds or quickly adjusting a patch to suit your session in terms of feel, timbre, enveloping, or any other sensible sound shaping parameter. In
Structure Free’s factory content, each patch has Smart Knobs pre-assigned to important parame-ters. The Smart Knob can be named in the field above each knob.
Key Switches
Key Switches are special MIDI notes or keys that are assigned to controls and act as a switch. For example, they can switch between different Smart Knob settings for a patch.
Master (Output Volume)
The Master control adjusts the volume of all Structure Free outputs to Pro Tools. All patches are mixed down to the Main output by default, and then output to the Instrument, Auxiliary In-put, or Audio track on which Structure Free is in-serted.
Keyboard section
Keyboard Master VolumeSmart Knobs
Smart Knob
Adjusting the Master output control

Chapter 7: Structure Free 39
Info Display
The Info display above the Keyboard section is a context-sensitive text display. When you load something into Structure Free, it displays a progress bar. When loading a commented patch, it displays the Patch comment. When editing controls, it displays parameter name and value.
To display the control’s current value:
Click the control without moving the mouse.
To edit the patch comment:
1 Select a patch.
2 Double-click into the Info display.
3 Type in your comment.
4 Press Enter.
Patch List
In the Patch list on the left side of Structure Free, you can create, select, mix, MIDI-assign, route, and group patches.
Click a Patch module to select it for editing in the Parameter panel. The handle on the left of the selected patch is lit. When a patch is selected all of its parameters are displayed in the Param-eter panel on the right and assorted into sub-pages.
Info display
The Display does not show parameter values of incoming automation, as multiple parameters in different patches could be changing simultaneously. Only values ed-ited using the mouse are shown.
Patch list
Patch module
Patch menu

Pro Tools Creative Collection Plug-ins Guide40
Patch Module Controls
Quick Browse Menu for Favorite Folders Gives quick access to the factory content folders and folders that have been added to the favorites. Click the double arrow to bring up the favorite folders menu from which you can directly select Structure Free Patches. See “Browser Page” on page 45 for more information on how to add a folder to your favorites.
Mute Button Mutes the patch.
Solo Button Solos the patch.
Volume Fader Adjusts the Patch volume.
Panorama Fader Adjusts the patch’s position in the stereo panorama.
MIDI Channel Selector Selects the channel on which the patch receives MIDI data.
Patch Menu
Load New Patch
The Load Patch entry brings up a dialog for se-lecting a patch that will be added below the cur-rently selected patch in the Patch list.
Add Patch
The Add Patch submenu lets you add a new patch to the end of the Patch list. Like the Quick Browse Menu, it gives access to your Favorite folders for loading patches.
Duplicate Patch
The duplicate Patch entry adds an exact copy of the selected patch below it in the Patch list.
Remove Patch
The Remove Patch entry unloads the selected patch removing it from the Patch list.
Remove All Patches
The Remove All Patches entry clears the Patch list of all loaded patches. Click OK in the prompted security dialog if you really want to clear the whole Patch list.
Patch module
Quick Browse menu
Panorama fader

Chapter 7: Structure Free 41
Cut Patch
The Cut Patch entry copies the selected patch to the clipboard and removes it from the Patch list.
Copy Patch
The Copy Patch entry copies the selected patch to the clipboard.
Paste Patch
The Paste Patch entry inserts the copied patch on the clipboard at the end of the Patch list.
Paste Patch Parameter
The Paste Patch Parameter entry inserts only the parameter settings of the copied patch to the se-lected patch.
Automation Channel
Structure Free automatically assigns an automa-tion channel to each patch, each of which pro-vides automation for the most important Patch parameters like level, solo, mute, and Smart Knobs. In the Pro Tools plug-in automation dia-log, the automatable parameters for each chan-nel are distinguishable by the corresponding let-ter. For example, A Level for the Volume fader of the patch assigned to automation channel A. Automation channels are assigned subsequent to the patches in the Patch list by default. The currently selected patch’s assignment is dis-played in the Patch menu.
Find Missing Samples
If a loaded patch does not find its samples be-cause folders have been renamed or moved to another location, you can use the Find Missing Samples file dialog to point Structure Free to the new location of the samples. Patches which are missing samples are indicated by a red exclama-tion mark symbol.
To find the missing samples for a patch:
1 Click the Patch menu and select Find Missing Samples from the menu.
2 In the following dialog, navigate to the new sample location and click OK.
Full Recursive Search Searches for missing sam-ples in the specified folder and all its subfolders.
Copy Samples to Session Folder
If you have loaded patches from removable media like a CD, DVD, or over the network into Structure Free, a yellow exclamation mark sym-bol indicates the affected patches. Use the Copy Samples to Session Folder function to transfer the loaded samples to your computer’s disk. After transferring the samples, Structure Free can load the concerned patches without requir-ing the source CD, DVD, or network folder.
Selected Patch copies the samples of the se-lected patch to disk.
All Patches copies the samples of all patches of the Structure Free instance to disk.
Session copies the samples of all patches of all Structure Free instances in your session to disk.
Missing samples

Pro Tools Creative Collection Plug-ins Guide42
Loading Patches
You can load patches using the Patch menu or browser.
To load a patch from the menu:
1 Go to the Patch menu and click Load Patch.
2 In the following file dialog, locate and select a patch.
3 Click OK.
To load a patch from the browser:
1 Go to the Browser page.
2 Navigate to the desired folder.
3 Click and drag the patch file into the Patch list.
Adding Additional Structure Free Patches
Additional factory patches for Structure Free can be downloaded from Digidesign’s website (www.digidesign.com).
To access additional Structure Free patches through the Quick Browse Menu, you must manually add them to the “Structure Quick-Start” folder.
To add Structure Free patches:
1 Download the Structure Free patches from the Digidesign website (www.digidesign.com). After downloading, make sure the patches are uncom-pressed.
2 Drag the uncompressed downloaded patches into the Structure QuickStart folder, located on your computer at the following location:
• Applications/Digidesign/Structure/Struc-ture QuickStart (Mac)
– or –
• Applications/Digidesign/Structure/Struc-ture QuickStart (Windows)
Patches can not be saved individually with Structure Free. The status of the plug-in can be saved as a Settings file or with the ses-sion only.

Chapter 7: Structure Free 43
Main Page
After inserting Structure Free, the Main page is selected by default. Coming from the Browser page, click the Main tab to access the parameters for patches. The Main page provides easy access to all useful parameters like transposition and filter within two sub-pages. If a patch gets selected Structure Free switches automatically to the Main page.
To access the Edit sub-pages for the selected patch:
Click the sub-page tabs in the Parameter panel.
A patch’s parameters on Main page
Sub-page tabsPage tabs Patch name
Selecting the Edit 1 sub-page

Pro Tools Creative Collection Plug-ins Guide44
Patch Edit Sub-Pages
Edit 1 Sub-Page
Octave Transposes the incoming MIDI notes for the patch in octave steps.
Semi Transposes the incoming MIDI notes for the patch in semitone steps.
Fine Tune Tunes the patch up and down in cents.
Pitch Bend Up Sets the upward pitch bend range for the patch in semitones.
Pitch Bend Down Sets the downward pitch bend range for the patch in semitones.
Max Polyphony Sets the maximum number of voices available for the patch.
Key Range Sets the key range in which the patch plays. You can define the upper and lower bor-ders and a transition.
FX Send On Activates the Effect Send for the patch.
FX Send Level Adjusts the level sent from the patch to the Effect Send.
Edit 2 Sub-Page
Filter Section
Filter Type Selects a filter type.
Cutoff Adjusts the filter cutoff frequency.
Envelope Level Adjusts how strongly the filter envelope modulates filter cutoff.
Filter Envelope Section
Attack Sets the time needed for the filter enve-lope to reach its maximum value.
Hold Adjusts the length of the Filter envelope’s Hold time.
Decay Adjusts the time for the filter envelope needed to fall from hold level to sustain level.
Sustain Adjusts the level of the sustain segment. The envelope’s signal remains on this level as long as the note is held.
Release Adjusts the time for the envelope’s re-lease segment to fall to zero when the note is re-leased. Use shorter times for an immediate clos-ing of the filter. Longer times cause the filter cutoff to decay slowly.
Amplifier Section
Vel Sens (Velocity Sensitivity) Adjusts the enve-lope velocity sensitivity (range in dB between lowest and highest velocity).

Chapter 7: Structure Free 45
Amp Envelope Section
Attack Softens the attack phase of Instruments by applying an amplitude envelope to the start of each Instrument hit. Move the control to the right to increase the time needed for the attack to rise to full amplitude.
Hold Adjusts the length of the Amp envelope’s Hold time at the end of the attack phase.
Decay Shortens the played instrument hits by applying an amplitude decay after the hold time.
Sustain Adjusts the level of the sustain segment. The envelope’s signal remains at this level as long as the note is held.
Release Adjusts the time for the release segment to fall to zero when the note is released. Use shorter times for an immediate stop of the sound. Longer times cause the sound to fade out.
Browser Page
The Browser lets you search and display the lo-cal file system. Patches can comfortably be loaded from here using drag and drop. The Browser is not supposed to be a file manager. Modifying operations like copying, moving, or deleting are not available.
Common operations in the Browser:
Drag a patch into the Patch list to load it.
Drag a patch onto another in the Patch list to replace it at the same position using the previ-ous settings for MIDI input, Individual output, and Automation channel.
Drag one or more audio files into the Patch list to load; a new patch is created.
Browser page
Page tabs
Browser Controls

Pro Tools Creative Collection Plug-ins Guide46
Browser Controls
Patch Activates the displaying of only patches.
Parts Activates the displaying of only parts.
Sample Activates the displaying of only samples.
Show All Activates the displaying of all file types.
Previous Directory Navigates to the previous folder.
Next Directory Navigates to the next folder.
Directory Up Navigates one folder level up.
Show Favorites Shows your Favorite folders.
Add to Favorites Adds the selected folder to your Favorite folders (accessible through the up and down arrows in the patch module).
New Folder Creates a new folder.
Delete Deletes the selected file or folder.
Folder History Shows the 20 last selected folders.
Browser controls
Previous directory
Next directory
Refresh view
Directory up Show favorites folders
Add folder to favorites
New folder
Delete
Folder history
Chapter 8: Vacuum 47
Chapter 8: Vacuum
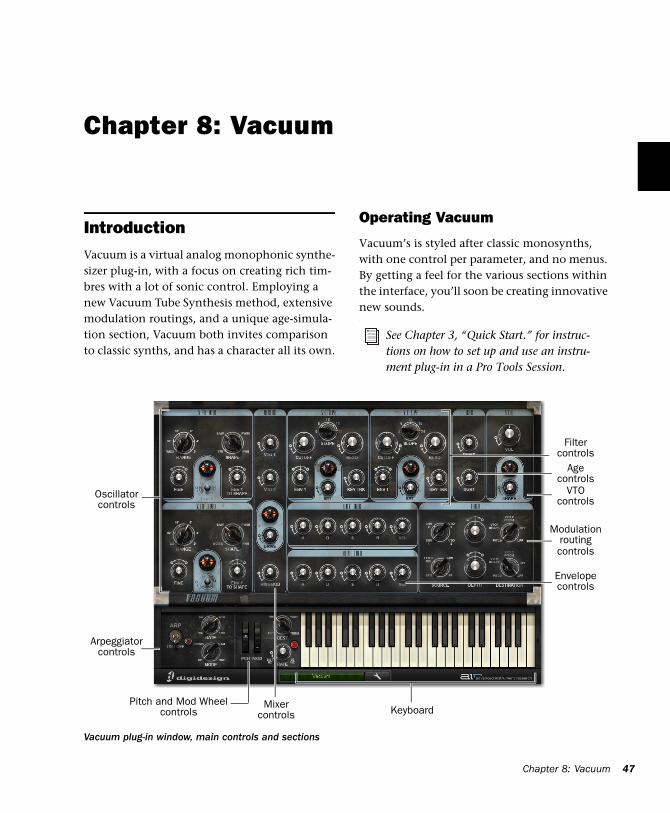
IntroductionVacuum is a virtual analog monophonic synthe-sizer plug-in, with a focus on creating rich tim-bres with a lot of sonic control. Employing a new Vacuum Tube Synthesis method, extensive modulation routings, and a unique age-simula-tion section, Vacuum both invites comparison to classic synths, and has a character all its own.
Operating Vacuum
Vacuum’s is styled after classic monosynths, with one control per parameter, and no menus. By getting a feel for the various sections within the interface, you’ll soon be creating innovative new sounds..
See Chapter 3, “Quick Start.” for instruc-tions on how to set up and use an instru-ment plug-in in a Pro Tools Session.
Vacuum plug-in window, main controls and sections
Oscillatorcontrols
Arpeggiatorcontrols
Pitch and Mod Wheelcontrols
Mixercontrols
Envelopecontrols
Modulationroutingcontrols
Filtercontrols
Agecontrols
VTOcontrols
Keyboard

Pro Tools Creative Collection Plug-ins Guide48
VTO One and TwoVacuum features two VTOs (Vacuum Tube Os-cillators). These modules are where Vacuum’s sound originates from, before it goes through the rest of the processing chain.
Each VTO has its own set of controls, labelled “VTO One” and “VTO Two.”
Range Sets the octave at which the current VTO plays. This is helpful when creating sounds where the two oscillators must play an octave or more apart, and also for easily changing the range a sequence is playing in after the MIDI note data has already been recorded.
Each Range knob also has a special setting. The “Wide” setting for VTO 1 changes its Fine knob into a wide-ranging pitch control that is contin-uously variable up or down as many as 5 oc-taves. The “Lo” setting changes VTO 2 into an LFO (low-frequency oscillator). In this mode, its pitch is too low to be heard, but instead, it can be routed using the Modulation Routing section to modulate other parameters in the synth.
Fine Continuously varies the current VTO pitch up or down as much as 7 semitones. Subtle changes can create thick, detuned sounds. Larger amounts can create intervallic splits be-tween the two VTOs, for chordal effects.
Shape Continuously morphs the current VTO oscillation between several types of wave shapes.
Env 1 to Shape Controls the modulation of the current VTO wave shape by Envelope 1.
As one of the Env knobs is moved to the right, more and more modulation occurs, offsetting the value of the Shape control upward when a MIDI note is received, then down, following the envelope over time.
As the control is moved left of center, the same occurs, only the modulation is negative instead of positive, so the effect is inverted.
VTO controls
Wave Shape Description
Tri Generates a Triangle wave, with a mellow, yet slightly edgy sound. This is the first option for VTO 1 Shape control.
Noise Generates random white noise. This is the first option for VTO 2 Shape control.
Saw Generates a Sawtooth wave, which is brighter than Tri, and rich in even harmonics.
PW50–PW0 Generates a Pulse wave, which can be swept through a contin-uum between a standard, 50% on, 50% off wave and a thinner, more modulated type. Pulse wave sounds are rich in odd harmonics, with a “reedy” character.
Clicking the missing Drive knob will create a new patch at random.

Chapter 8: Vacuum 49
MixerThe Vacuum Mixer is where the signals from the two oscillators are mixed together, their levels balanced relative to one another. Also, an effect called Ring Modulation can be added, and Drive can be applied to the sum of both signals.=
VTO 1 and VTO 2 Sets the relative volume of the two oscillators. One (or even both) oscillators can be reduced to silence, if needed.
Drive Adds a variable amount of distortion to the mixed signal.
Ringmod Adds a variable amount of the VTO 1 and VTO 2 signals, multiplied together. This is called Ring Modulation, and can create interest-ing metallic or abrasive effects.
FiltersVacuum features two separate filters, one a high-pass filter (HPF), the other a low-pass filter (LPF). The sound of each filter is affected by volume of incoming oscillator signals. Lower mixer levels give the filters a clean response and a sharper resonant peak. Increasing mixer gain can over-drive the filters, adding character and de-em-phasizing resonance.
Each filter has its own set of controls.
Cutoff Sets the frequency at which the given fil-ter begins to “cut off” part of the signal’s fre-quency spectrum. In the HPF, frequencies below the chosen frequency are affected. In the LPF, frequencies above the chosen frequency are af-fected.
Slope Sets the curve of the filter slope. At higher settings, the slope is steeper, and more of the spectrum is cut off. At lower Settings, the slope is more shallow, and more of the spectrum is al-lowed to pass.
Reso Affects the filter resonance, which is the amount of signal fed back into the filter circuit around the chosen frequency. At higher values, a pronounced peak is created, which can range from a subtle “edge,” all the way to a sine-wave-like tone. At lower values, the filter simply cuts off the specified frequencies.
Mixer section
HPF controls

Pro Tools Creative Collection Plug-ins Guide50
Env 1 Controls the amount that the filter cutoff frequency is modulated by Envelope 1. At its center, no modulation occurs.
As the control is moved to the right, more and more modulation occurs, moving the cutoff fre-quency up when a MIDI note is received, then down, following the envelope’s movement over time.
When the control is moved left of center, the same occurs, only the modulation is negative in-stead of positive, so the envelope’s effect is in-verted.
Key Trk Sets the amount that the currently play-ing MIDI note’s pitch affects the filter’s cutoff frequency. At zero, there is no effect. At 100%, the frequency moves in direct relationship with the keys played.
This is most apparent with high Res values, as the tone created may be made to move in tan-dem, harmonically, with the notes that are played, thus acting almost as an additional oscil-lator, with interesting sonic possibilities.
Sat Adds saturation to the resonant feedback loop, changing the tonal quality of the current filter from soft to aggressive and distorted.
EnvelopesVacuum has two modulation envelopes. By de-fault, Env One modulates each filters’ cutoff fre-quency over time, and Env Two is used to do the same to the amplitude of Vacuum’s output. The envelopes can modulate other parameters, as well. See “Modulation Routing” on page 51. for more information.
Vacuum’s modulation envelopes have four main controls, A (Attack), D (Decay), S (Sustain) and R (Release).
Attack The amount of time it takes for the enve-lope’s modulation to reach its highest point when a MIDI note is received.
Decay The amount of time it takes for the enve-lope’s modulation to move from the top of the Attack phase to the level set by the Sustain con-trol.
Sustain The level at which the envelope stops while the current MIDI note is held. At zero, the envelope drops to zero by the end of the decay period, whether the note is held or not. At 100%, the envelope holds at its highest point until the note is released.
Env One controls
Example Modulation Envelope

Chapter 8: Vacuum 51
Release The amount of time it takes for the en-velope’s modulation to drop back to zero after a note is released. This control has no effect when sustain is at zero.
Vel Varies the effect that incoming MIDI note velocity has on the envelope's destination(s) (by default Filter Cutoff for Env One and overall vol-ume for Env Two). All the way to the left, no change in modulation occurs.
As the Vel control is moved to the right, more and more modulation occurs relative to incom-ing note velocity.
Modulation Routing
The Modulation Routing section gives you the ability to go beyond the default modulation routings, and get deeper into designing sounds.
There are two modulation paths, each with three controls.
Source Sets what signal is used to modulate the chosen parameter. The choices are:
Destination Sets which parameter is modulated. The choices are:
Depth Sets the amount of modulation that oc-curs. At its center, no modulation will occur. To the right, modulation increases, and to the left, modulation also increases, but with reversed po-larity.
Modulation Routing controls
Source Description
Env 1 Envelope 1 modulation signal
Env 2 Envelope 2modulation signal
VTO 1 Oscillator 1 signal
VTO 2 Oscillator 2 signal
LFO The LFO controlled in the Pitch and Mod Wheel section’s signal
LFO X MW The LFO controlled in the Pitch and Mod Wheel section’s signal, attenuated by the Mod wheel
MW The position of the Mod wheel
AT The amount of Aftertouch, if sup-ported by your MIDI controller
Destination Description
Pitch Pitch of both oscillators
VTO 1 Wave Oscillator 2wave shape
VTO 2 Pitch Oscillator 2 pitch parameter
VT HPF High-pass filter cutoff frequency
VT LPF Low-pass filter cutoff frequency
Source Description

Pro Tools Creative Collection Plug-ins Guide52
Age
The Age section lets you explore the tonal effects of aging internal circuitry and years of dust and dirt.
Drift Adds a variable amount of pitch drift to the oscillators. At mild settings, the sound is thick-ened slightly. At more extreme settings, the sound becomes more detuned and unpredict-able, like a poorly-maintained analog synthe-sizer.
Dust Adds glitches and noise to the signal, emu-lating the worn and dusty contacts often found on older synths.
VTA
The VTA (Vacuum Tube Amplifier) section acts as the master volume control for Vacuum, and is the final place where saturation and distortion can be introduced to the signal.
Vol Sets the overall volume.
Shape Adds a variable amount of tube saturation to the final output signal.
Age controls VTA controls

Chapter 8: Vacuum 53
ArpThe Arp section controls the Arpeggiator: a fea-ture that creates rhythmic arpeggios when one or more MIDI notes are played and held down.
On/Off Turns the arpeggiator on and off.
Speed Sets the speed of the arpeggio in rhyth-mic values that are synchronized to the session tempo.
In between each setting, there are two unlabeled settings for triplet and dotted rhythms. Experi-ment with different settings until you find the rhythm you want.
Mode Sets the direction of the arpeggiator.
Arpeggiator controls
Speed Description
1/4 Quarter notes
1/8 Eighth notes
1/16 Sixteenth notes
1/32 Thirty-second notes
Mode Description
Up The arpeggio moves up from the lowest note held. Once all notes have been played, the pattern repeats.
Down The arpeggio moves down from the highest note held. Once all notes have been played, the pat-tern repeats.
U&D The arpeggio moves up from the lowest note held. When the high-est note is reached, the arpeggia-tor runs in reverse, moving down. Once the lowest note is reached, the pattern repeats.
RND The arpeggiator will play through the held notes, randomly.

Pro Tools Creative Collection Plug-ins Guide54
Pitch and Mod Wheel Controls
Pitch and Modulation wheels are the most com-mon controllers on almost any electronic key-board. The pitch wheel shifts the pitch up or down a specified amount, for pitch-bending ef-fects.
The modulation wheel is traditionally used as an expressive tool. In most cases, it controls the modulation of one or more parameters using an LFO (low frequency oscillator).
Pch and Mod Onscreen wheels move along with incoming pitch bend and modulation MIDI messages. They can also be clicked and dragged like other controls.
Dest Sets what parameter is modulated when the Mod wheel is moved upward.
Rate Sets the modulation speed from 0.01–20 Hz.
Setup Page
Click the Setup button to view the Setup page. The Setup page provides three controls that af-fect Vacuum’s behavior.
Glide
The Time control sets the amount of slewing (or Portamento) applied to the pitch of the VTOs. When set to 0s, the VTOs will play as normal. When set to a higher setting, the VTOs will take the number of seconds chosen to glide up or down to the next note played.
The Mode menu provides the following options:
Off No Glide.
Held Only apply glide when more than one note is held at once.
On apply glide to every note.
Pitch Bend Range
This sets the range of the Pitch wheel, in semi-tones.
Envelope Retrigger
When set to On, each note played in a legato phrase will retrigger the actions of Vacuum’s en-velopes. When set to Off, legato notes will not re-trigger the envelopes until all notes are released and a new note is struck.
Pitch and Mod Wheel controls
Dest Description
Off No modulation occurs
Vib Pitch is modulated, creating a vibrato effect
Wah LPF cutoff frequency is modu-lated, creating a wah-wah effect
Trem Overall volume is modulated, cre-ating a tremolo effect
Setup button

Chapter 9: Xpand!2 55
Chapter 9: Xpand!2
IntroductionXpand!2 is a virtual workstation synthesizer fea-turing a broad range of sound generation possi-bilities including multi-sampled instruments as well as FM, wavetable, and virtual analog syn-thesis.
Getting started with Xpand!2 is easy, especially if you are already familiar with virtual instru-ments or hardware workstations.
Xpand!2 is multi-timbral, providing four syn-thesizer slots, each with individual MIDI chan-nel, Mix, Arpeggiator, Modulation and Effects settings. A slot can hold one of 1200 synthesizer presets, called Parts.
The settings of all four slots and their respective Parts can be saved as a single Patch. Xpand!2 comes with a set of over 2300 Patches, created by renowned sound designers. Browse through these Patches to get an impression of the versa-tility of Xpand!2.
Patch is another name for the plug-in set-tings. Refer to the Pro Tools Reference Guide for information on working with RTAS plug-ins.
See Chapter 3, “Quick Start.” for details on how to set up Xpand!2 in a Pro Tools ses-sion, and assign MIDI controllers to con-trols in Xpand!2.
Xpand!2 plug-in window, main controls and sections
Partslots
Smartdisplay
Effects controls
Smartknobs
Part controls
Levelcontrol
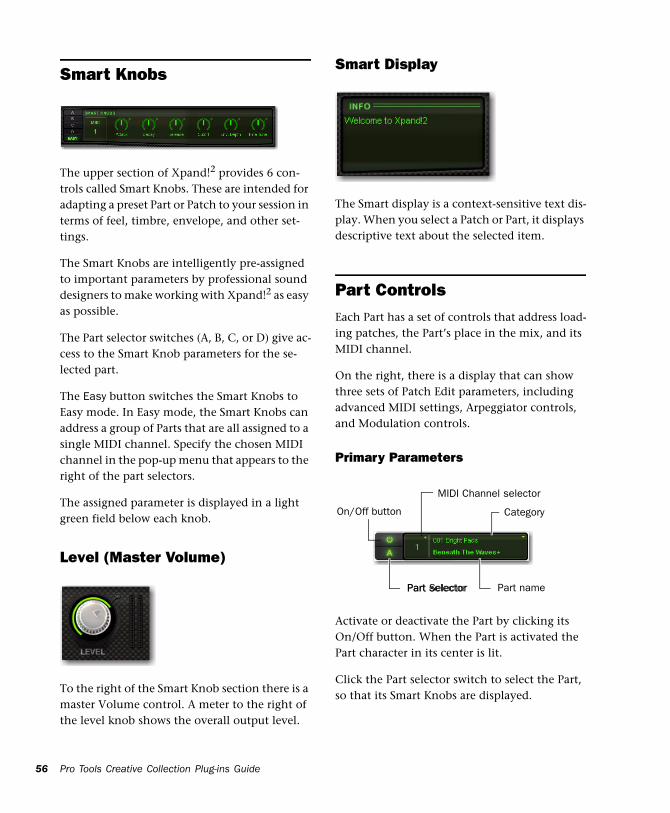
Pro Tools Creative Collection Plug-ins Guide56
Smart Knobs
The upper section of Xpand!2 provides 6 con-trols called Smart Knobs. These are intended for adapting a preset Part or Patch to your session in terms of feel, timbre, envelope, and other set-tings.
The Smart Knobs are intelligently pre-assigned to important parameters by professional sound designers to make working with Xpand!2 as easy as possible.
The Part selector switches (A, B, C, or D) give ac-cess to the Smart Knob parameters for the se-lected part.
The Easy button switches the Smart Knobs to Easy mode. In Easy mode, the Smart Knobs can address a group of Parts that are all assigned to a single MIDI channel. Specify the chosen MIDI channel in the pop-up menu that appears to the right of the part selectors.
The assigned parameter is displayed in a light green field below each knob.
Level (Master Volume)
To the right of the Smart Knob section there is a master Volume control. A meter to the right of the level knob shows the overall output level.
Smart Display
The Smart display is a context-sensitive text dis-play. When you select a Patch or Part, it displays descriptive text about the selected item.
Part ControlsEach Part has a set of controls that address load-ing patches, the Part’s place in the mix, and its MIDI channel.
On the right, there is a display that can show three sets of Patch Edit parameters, including advanced MIDI settings, Arpeggiator controls, and Modulation controls.
Primary Parameters
Activate or deactivate the Part by clicking its On/Off button. When the Part is activated the Part character in its center is lit.
Click the Part selector switch to select the Part, so that its Smart Knobs are displayed.
Part Selector
On/Off button Category
MIDI Channel selector
Part selector Part name

Chapter 9: Xpand!2 57
To choose the MIDI channel that the current part responds to, click the MIDI Channel Selec-tor and select the channel from the pop-up menu.
To load a Part into the slot, click the Part Name field and select a Part from the pop-up menu.
Level
Move the slider to set the Part volume level, in-creasing volume to the right and decreasing to the left. The meter above shows the slot’s audio output.
Pan (Panning)
Move to the right or left to set the Part’s position in the stereo field.
FX1 & FX2
The FX1 and FX2 knobs control the current Part’s send amount to the effects processors FX1 and FX2.
Patch Edit Parameter Switches
The Patch Edit parameter switches give access to additional sets of controls where you can edit the current patch in more detail. Click one of the three buttons to display the respective pa-rameters.
Play (Main) Parameters
The Play controls let you set basic parameters for the current part, including pitch transposition, keyboard splits, voicing behavior, and pitch bend range.
Tr/Fine
The Tr/Fine (Transpose/Fine Tune) section in-cludes two different controls for transposing in-coming MIDI notes. The Semitone control (the upper control) transposes incoming notes up or down in semitones. For finer control, use the Cents control (the lower control), which trans-poses notes up or down in cents.
Button Controls
Play Mixer, Panning, FX Sends, MIDI
Arp Arpeggiator Settings
Mod Modulation Settings
Play (Main) Parameters
Arpeggiator Parameters
Modulation Parameters

Pro Tools Creative Collection Plug-ins Guide58
Click the control and drag up or down to in-crease or decrease its value.
Hi/Lo Key
Use the Hi/Lo Key controls to assign Parts to dif-ferent keyboard ranges. This can be useful for splitting your keyboard across different Parts. For example, Part A holding a bass sound could be assigned C-1 to B2 and Part 2 your synth lead assigned C3 to G8.
To assign a Part to a certain key range do the following:
Click the Upper/Lower key range limit control and drag up or down to increase or decrease its value.
-or-
Do the following:
• Right-click the control and choose Learn.
• Then press the appropriate key on your MIDI keyboard.
Voice Mode
The Voice Mode section controls the voice be-havior of each Part. The Mono/Poly selector (the upper control) chooses between Monophonic (one note playable at a time) and Polyphonic (more than one note playable at a time) modes.
The lower control’s function is different in each mode. In Mono mode, it selects the key priority (Last, First, High, Low), which defines which note is played when more than one note is played at once. In Poly mode, it selects how many notes of polyphony are available (1–64).
PB Range
Use the PB Range control to select how many semitones the given Part can be bent up or down by pitch bend controller data.
Mod (Modulation) Parameters
The Mod parameters let you easily create sophis-ticated modulation settings for shaping a Part. Modulation wheel and pressure (aftertouch) can be used as modulation sources.
Normally, the modulation wheel provides a pe-riodically repeating modulation such as vibrato, and aftertouch provides a static offset to the se-lected destination such as volume or filter swells.
Many Xpand!2 Patches and Parts have pre-as-signed settings for modulation wheel and after-touch. With the following controls you can adapt them or create your own.
Modulation Wheel Controls
Shape and Destination
Select the waveform shape for the modulation from the upper pop-up menu—an LFO wave-form used to modulate the selected destination. For most waveforms there is a choice of a freely adjustable and a tempo-synchronized setting (Sync), except for “Const” and “Random.” If the pop-up is set to Const the movements of the modulation wheel will directly modulate the destination without a time varying waveform.

Chapter 9: Xpand!2 59
Select a destination for the modulation by your MIDI keyboard’s modulation wheel from the lower pop-up menu:
Rate
Move this knob to set the speed or rate of the modulation wheel’s modulation. When using a synchronized shape (such as Saw Sync), the Rate control sets the speed in fixed, tempo synchro-nized steps. When using other shapes (such as Sine, Tri, and Saw), the LFO speed is freely ad-justable.
Depth
This knob sets the strength or amount of how much the signal is affected by the modulation. Depth is a bipolar control, which means that it can be set to positive or negative values.
Pressure Controls
Many MIDI keyboards provide pressure (also called aftertouch) to generate a MIDI control sig-nal which depends on how hard you press down held keys after the initial “note on.”
With Xpand!2 you can use this control signal to modulate a number of useful controls.
Destination
Select a destination for the modulation using af-tertouch from the pop-up menu:
Destination Description
Pitch Affects the Part’s pitch.
Wave Changes the sound in different ways, depending on the selected Part. For example, shaping waveforms, FM modula-tion depth, sample start point offset, detuning.
Filter Affects the Part’s filter cutoff fre-quency.
Volume Affects the Part’s volume level.
Pan Affects the Part’s position in the stereo field.
For example, with the modulation wheel’s shape set to Const and destination to Pan, moving the mod wheel up makes the signal go to the left (negative Depth value) or to the right (positive Depth value).
Destination Description
Pitch Affects the Part’s pitch.
Wave Changes the sound in different ways, depending on the selected Part. For example, shaping waveforms, FM modula-tion depth, sample start point offset, detuning.
Filter Affects the Part’s filter cutoff fre-quency.
Volume Affects the Part’s volume level.

Pro Tools Creative Collection Plug-ins Guide60
Depth
This knob sets how much the signal is affected by the pressure control signal. Depth is a bipolar control, which means that it can be set to posi-tive and negative values.
Arp (Arpeggiator) Parameters
The arpeggiator automatically triggers the notes that are played simultaneously in pre-defined rhythmical patterns. Each Part has its own Ar-peggiator.
Some Parts, such as Action Pads and Loops, au-tomatically switch on the Arpeggiator as it forms an integral part of their sound.
On
Click this button to activate or deactivate the Ar-peggiator. The Arpeggiator will trigger the input notes in the selected pattern as long as the notes are held. When the Arpeggiator is activated the button is lit.
Latch
Click the Latch button to activate Latch mode playback. In this mode, the Part’s Arpeggiator will continue to play after releasing keys until playback is stopped. Released keys are only re-moved from the arpeggio when new keys are pressed. When Latch mode is activated, the but-ton is lit.
Mode
Click the Mode display to select an Arpeggiator mode from the appearing pop-up menu. An Ar-peggiator Mode is a pre-defined rhythmic pat-tern that the Arpeggiator uses to trigger held notes.
Rate
Click the Rate display to select the Arpeggiator's Rate (or speed) from the list. For example “1” stands for a whole note and “32” stands for a 32nd note. Dotted and triplet timing are indi-cated by an asterisk (*) or “T” respectively.
For example, with destination set to Filter, applying aftertouch increases (positive Depth value) or decreases (negative Depth value) the filter cutoff frequency. When the Arpeggiator is switched on, the
Sustain pedal acts as a temporary Latch switch, overriding the displayed setting.

Chapter 9: Xpand!2 61
FX (Effects) Parameters
Xpand!2 provides two FX (effects). Send controls for each Part are located on the Mix and FX pages.
On/Off
Click the button to activate or deactivate the ef-fect. The button is lit when the effect is acti-vated.
Type
Click the FX type display to select an effect from the pop-up menu.
Parameters 1 & 2
Edit the selected effect by two parameters. The parameters are varying and depend on the type of effect.
To FX2 (FX2 Send to FX1)
This control lets you send a percentage of the FX2 output signal into FX1, instead of directly to the output. At 0%, no signal is sent to FX1. At 100%, all of the FX2 output signal is sent to FX1. This is useful for cascading a delay effect into a reverb for a more ambient effect, for example.
Info Display
Like all instruments in the Creative Collection, Xpand!2 has an Info display that shows the set-ting of the currently selected control.
Info display

Pro Tools Creative Collection Plug-ins Guide62

63
Part III: Effects

64

Chapter 10: Effects 65
Chapter 10: Effects
OverviewPro Tools Creative Collection comes with a wide variety of effects plug-ins:
• Chorus
• Distortion
• Dynamic Delay
• Enhancer
• Ensemble
• Filter Gate
• Flanger
• Frequency Shifter
• Fuzz-Wah
• Kill EQ
• Lo-Fi
• Multi Chorus
• Multi-Tap Delay
• Non-Linear Reverb
• Phaser
• Reverb
• Spring Reverb
• Stereo Width
• Talkbox
• Vintage Filter
This chapter covers each of these plug-ins and their various controls and functions.
See the Pro Tools Reference Guide for infor-mation on using plug-in effect controls.

Pro Tools Creative Collection Plug-ins Guide66
ChorusUse the Chorus plug-in to apply a short modu-lated delay to give depth and space to the audio signal.
Rate
This controls sets the rate for the oscillation of the LFO in Hertz.
Depth
This control sets the depth of LFO modulation of the audio signal.
Chorus Section
Feedback Sets the Feedback amount.
Pre-Delay Delays the chorused signal, in milli-seconds.
LFO Section
The LFO section’s controls let you select the waveform, phase, rate, and depth of modula-tion.
Waveform Selects either a Sine wave or a Triangle wave for the LFO.
L/R Phase Sets the relative phase of the LFO’s modulation in the left and right channels.
Mix
This control adjusts the Mix between the “wet” (processed) and “dry” (unprocessed) signal. 0% is all dry, and 100% is all wet, while 50% is an equal mix of both.
DistortionUse the Distortion plug-in to color the audio sig-nal with various types and varying amounts of distortion.
Drive
The Drive control lets you increase the drive (in-put volume) of the signal from 0 dB (no distor-tion) to 60 dB (way too much distortion!) Some-times an increase or decrease of just 1 of 2 decibels can make a big difference on the amount and quality of distortion.
Output
The Output control lets you lower the Output level of the distorted signal from 0–100%. At 0%, no distorted signal passes through the out-put. At 100%, the distorted signal passes through the output at full volume.
Figure 1. Chorus plug-in window
Figure 2. Distortion plug-in window

Chapter 10: Effects 67
Tone Section
The Tone controls let you shape the timbral quality of the distortion.
Pre-Shape
The Pre-Shape control lets you increase or de-crease a broad gain boost (or attenuation) of tre-ble frequencies in the processed signal. Pre-Shape is essentially a pre-distortion tone control that makes the distortion bite at different frequencies.
Set to 0%, the Pre-Shape control doesn’t affect the tone at all. Higher settings provide a boost in the high end of the distorted signal (more treble distortion), while lower setting suppress the high end, with some mid-range boost, for a darker less distorted tone.
High Cut
The High Cut control lets you adjust the fre-quency for the High Cut filter. To attenuate the high-end of the processed signal, lower the fre-quency.
Clipping Section
DC Bias
The DC Bias control lets you change clipping from being symmetrical to being asymmetrical, which makes it sound richer, and nastier at high settings. The difference is most noticeable at lower Drive settings.
Threshold
The Threshold control lets you adjust the head-room for the dynamic range of the distorted sig-nal between –20.0 dBFS and 0.0 dBFS. Rather than using the Drive to adjust the signal level relative to a fixed clipping level, use the Head-room control to adjust the clipping level with-out changing the signal level.
Stereo
When Stereo is enabled, the left and right channels of the incoming stereo signal are processed separately. When it is disabled, the incoming stereo signal is summed and processed as mono. The Stereo button is lit when it is enabled
Mode
Select one of the following options for the Distortion Mode:
Hard Provides a sharp, immediate distortion of the signal.
Soft Provides a softer, more gradual distortion of the signal.
Warp Wraps the waveform back on itself for a complex distortion tone that changes quickly from soft to harsh.
Mix
The Mix control lets you balance the amount of dry signal with the amount of wet (distorted) signal. At 50%, there are equal amounts of dry and wet signal. At 0%, the output is all dry and at 100% it is all wet.

Pro Tools Creative Collection Plug-ins Guide68
The Mix control can be used in conjunction with the Output control to find just the right balance of the distorted signal with the input (dry) signal. For example, with Mix set to 50%, equal amounts of the dry and wet signal pass to the output. You can then lower the Output con-trol to decrease the amount of distorted signal being passed to the output until you get exactly the right mix between the two signals, and just the right overall level.
Dynamic DelayUse the Dynamic Delay Plug-in for a delay line that can synchronize to the Pro Tools session tempo and be modulated by an Envelope fol-lower.
Sync
When Sync is enabled, the delay time synchro-nizes to the Pro Tools session tempo. When Sync is disabled, you can set the delay time in milliseconds independently of the Pro Tools session tempo. The Sync button is lit when it is enabled.
Delay
When Sync is enabled, the Delay control lets you select a rhythmic subdivision or multiple of the beat (based on the Pro Tools session tempo) for the delay time.
Select from the following rhythmic values:
• 16 (sixteenth note)
• 8T (eighth-note triplet)
• 16D (dotted sixteenth-note)
• 8 (eighth note)
• 4T (quarter-note triplet)
• 8D (dotted eighth-note)
• 4 (quarter note)
• 2T (half-note triplet)
• 4D (dotted quarter-note)
• 2 (half note)
• 1T (whole-note triplet)
• 3/4 (dotted half note)
• 4/4 (whole note)
• 5/4 (five tied quarter notes)
• 6/4 (dotted whole note)
• 7/4 (seven tied quarter notes)
• 8/4 (double whole note)
When Sync is disabled, the Time control lets you set the delay time in milliseconds and seconds (1 ms to 4.00 seconds).
Feedback
The Feedback control lets you adjust the amount of delay feedback. At 0% the delayed signal repeats only once. As you increase the feedback, the number of times the delay repeats increases. At 100%, the delay doesn’t repeat in-definitely, but it does last a very long time!
Note that each Delay mode produces a different feedback pattern, especially when the L/R Ratio control is not centred.
Figure 3. Dynamic Delay plug-in window

Chapter 10: Effects 69
Delay Section
L/R Ratio
The Left/Right Ratio control lets you set the ra-tio of left to right delay times. Move the control all the way to the left (50:100) and the left chan-nel delay time is half the right channel delay time. Move the control all the way to the right (100:50) the right channel delay time is half the left channel delay time.
Stereo Width
The Stereo Width control lets you adjust the width of the delay effect in the stereo field.
EQ Section
Low Cut
The Low Cut control lets you adjust the fre-quency for the Low Cut filter. For less bass, raise the frequency.
High Cut
The High Cut control lets you adjust the fre-quency for the High Cut filter. For less treble, lower the frequency.
Env Mod (Envelope Modulation) Section
The Dynamic Delay plug-in provides an Enve-lope follower that can control various parame-ters in real time.
Rate
Adjust the Rate control to determine how quickly the Feedback and Mix parameters re-spond to input from the Envelope follower.
Fbk
Adjust the Feedback control to determine how much the Envelope follower affects the Feed-back amount.
Mix
Adjust the Mix control to determine how much the Envelope follower affects the wet/dry mix.
At 0%, the Envelope follower has no effect on the given parameter.
At +100%, the parameter’s value is increased in direct proportion to the incoming signal’s amplitude envelope.
At –100%, the parameter’s value is decreased in direct proportion to the incoming signal’s am-plitude envelope.
Feedback Mode
Select one of the following options for the Feed-back Mode:
Mono Sums the incoming stereo signal to mono, then offers separate left and right delay output taps from that signal.
Stereo Processes the left and right channels of the incoming stereo signal independently and outputs the processed signal on the correspond-ing left and right channels.
Cross Processes the left and right channels of the incoming stereo signal independently, and feeds the each side’s delayed signal back to the opposite channel.

Pro Tools Creative Collection Plug-ins Guide70
Mix
The Mix control lets you balance the amount of dry signal with the amount of wet (delayed) sig-nal. At 50%, there are equal amounts of dry and wet signal. At 0%, the output is all dry and at 100% it is all wet.
EnhancerUse the Enhancer plug-in to enhance the low and high broadband frequencies of the audio signal.
High Gain
Adjust the High Gain control to boost the high end.
Low Gain
Adjust the Low Gain control to boost the low end.
Tune Section
The Tune controls let you set the center fre-quency for low and high-end enhancement.
Low
Adjust the Low control to set the center fre-quency for the bass boost.
High
Adjust the High control to set the center fre-quency for the treble boost.
Harmonic Generation Section
The Harmonic Generation controls let you gen-erate additional high-frequency harmonics, which can brighten up dull signals.
Depth
Adjust the Depth control to generate additional high frequency harmonics in the signal (0.0–12.0 dB).
Phase
Toggle the Phase control to change the polarity of the generated harmonics, changing their phase relationship with the dry signal.
Output
The Output control lets you lower the Output level from 0.0 dB to –INF dB.
Figure 4. Enhancer plug-in window

Chapter 10: Effects 71
EnsembleUse the Ensemble plug-in to apply fluid, shim-mering modulation effects to the audio signal.
Rate
The Rate control changes the frequency of the modulating LFO (0.01–10.0 Hz).
Depth
The Depth control lets you adjust the amount of modulation applied to the Delay time.
Modulation Section
The Modulation controls let you adjust and/or randomize the delay time.
Delay
The Delay control lets you adjust the Delay time.
Shimmer
The Shimmer control lets you randomize the Delay time, adding texture to the effect.
Stereo Width
The Stereo Width control lets you widen or nar-row the effect’s stereo field.
Mix
The Mix control lets you balance the amount of dry signal with the amount of wet signal. At 50%, there are equal amounts of dry and wet sig-nal. At 0%, the output is all dry and at 100% it is all wet.
Figure 5. Ensemble plug-in window

Pro Tools Creative Collection Plug-ins Guide72
Filter GateUse the Filter Gate effect to chop up the audio signal into staccato rhythmic patterns with vari-able filtering, amplitude, and panning.
Pattern
The Pattern control let you select from a number of preset rhythmic patterns that the gate will fol-low.
Gate Section
The Gate controls let you adjust the Attack, Hold, and Release amounts for the Gater step se-quencer pattern. At the maximum settings, the gating provides a smooth morphing effect.
Attack
The Attack control lets you adjust the duration of the attack as a percentage of the step dura-tion.
Hold
The hold control lets you adjust the duration of the hold (or sustain) as a percentage of the step duration.
Release
The Release control lets you adjust the duration of the release as a percentage of the step dura-tion.
Filter Section
The Filter controls provide controls for the se-lected filter type.
Mode
The Filter Mode selector lets you select the type of Filter.
Off Provides no filtering.
LP Provides a Low Pass filter.
BP Provides a Band Pass filter.
HP Provides a High Pass filter.
Phaser Provides a Phaser.
Cutoff
The Cutoff control lets you adjust the Filter Cut-off frequency.
Res
The Res control lets you adjust the Resonance at the Cutoff frequency.
Figure 6. Filter Gate plug-in window

Chapter 10: Effects 73
Modulation Section
Env
The Env control lets you adjust how much an Envelope Follower affects the Cutoff frequency. Note that the Cutoff is fixed for the duration of each step, so it will not respond to a peak in the envelope until the start of the next step.
LFO Mod
The LFO Mod control lets you adjust the amount of LFO modulation of the Cutoff fre-quency.
LFO Steps Sets the duration of one cycle of the LFO to the selected number of steps. Changes to the Step Rate consequently affect the durations of cycles of the LFO. When set to Random mode, the level of the LFO changes randomly every step, for a “sample and hold” waveform.
Rate
The Rate selector lets you select the duration, or
frequency of the Low Frequency Oscillator
(LFO). The duration of one cycle of the LFO is
measured in Steps.
Swing
The Swing control sets the amount of rhythmic swing applied to the chosen gating pattern.
Mix
The Mix control lets you adjust the Mix between the “wet” (filtered) and “dry” (unfiltered) signal. 0% is all dry, and 100% is all wet, while 50% is an equal mix of both.
FlangerUse the Flanger plug-in to apply a short modu-lating delay to the audio signal.
Sync
When Sync is enabled, the Flanger Rate control synchronizes to the Pro Tools session tempo. When Sync is disabled, you can set the delay time in milliseconds independently of the Pro Tools session tempo. The Sync button is lit when it is enabled.
Figure 7. Flanger plug-in window

Pro Tools Creative Collection Plug-ins Guide74
Rate
When Sync is enabled, the Rate control lets you select a rhythmic subdivision or multiple of the beat for the Flanger Modulation Rate. Select from the following rhythmic values:
• 16 (sixteenth note)
• 8T (eighth-note triplet)
• 16D (dotted sixteenth-note)
• 8 (eighth note)
• 4T (quarter-note triplet)
• 8D (dotted eighth-note)
• 4 (quarter note)
• 2T (half-note triplet)
• 4D (dotted quarter-note)
• 2 (half note)
• 1T (whole-note triplet)
• 3/4 (dotted half note)
• 4/4 (whole note)
• 5/4 (five tied quarter notes)
• 6/4 (dotted whole note)
• 8/4 (double whole note)
When Sync is disabled, the Rate control lets you the modulation rate in independently of the Pro Tools session tempo.
Depth
The Depth control lets you adjust the amount of modulation applied to the Delay time.
Pre-Delay
The Pre-Delay control sets the minimum delay time in milliseconds.
LFO Section
The LFO section provides controls for the Low Frequency Oscillator (LFO) used to modulate the Delay time.
Wave
The Wave control lets you interpolate between a triangle wave and a sine wave for the modulating LFO.
L/R Offset
The L/R Offset control lets you adjust the phase offset for the LFO waveform applied to the left and right channels.
Retrigger
Click the Retrigger button to reset the LFO phase. This lets you manually start the filter sweep from that specific point in time (or using automation, at a specific point in your arrange-ment). Clicking the Trig button also forces the Mix control up if it is too low while the button is held; this ensures that the sweep is audible.
EQ Section
The EQ section provides controls for cutting lows from the Flanger signal, and inverting phase.
Low Cut
The Low Cut control lets you adjust the Low Cut frequency for the Flanger, to limit the Flanger effects to higher frequencies.
Phase Invert
When Phase Invert is enabled, the wet signal’s polarity is flipped, which changes the harmonic structure of the effect.

Chapter 10: Effects 75
Feedback
The Feedback control lets you adjust the amount of delay feedback for the Flanger. At 0%, the delay repeats only once. At +/–100%, the Flanger feeds back on itself.
Mix
The Mix control lets you balance the amount of dry signal with the amount of wet (flanged) sig-nal. At 50%, there are equal amounts of dry and wet signal. At 0%, the output is all dry and at 100% it is all wet.
The Mix control can be used to create an “infi-nite phaser” effect between the dry and shifted signals, which is always rising or always falling (depending on the direction of shift)
Frequency ShifterUse the Frequency Shifter plug-in to shift the au-dio signal’s individual frequencies inharmoni-cally, creating a unique effect.
Freq
The Freq control sets the amount of frequency shifting.
Shifter Section
The Shifter section provides control over the di-rection of frequency shift, and feedback of the signal through the algorithm.
Mode
The Mode control sets the direction of the frequency shifting effect.
Up Shifts frequencies up.
Down Shifts frequencies down.
Up & Down Shifts frequencies equally up and down, and the two shifted signals are heard si-multaneously.
Stereo Shifts the right channel frequencies up, and the left channel down.
Feedback
The Feedback control lets you run the signal through the pitch shifting algorithm multiple times, creating a cascading, layered effect.
Mix
The Mix control lets you balance the amount of dry signal with the amount of wet (pitch-shifted) signal. At 50%, there are equal amounts of dry and wet signal. At 0%, the output is all dry and at 100% it is all wet.
Figure 8. Flanger Plug-in window

Pro Tools Creative Collection Plug-ins Guide76
Fuzz-WahUse the Fuzz-Wah plug-in to color the audio sig-nal with various types and varying amounts of transistor-like distortion.
Fuzz
Click the Fuzz button to turn the distortion ef-fect on and off.
Drive
The Drive control sets the level of gain in the Fuzz algorithm.
Mix
The Mix control lets you balance the amount of dry signal with the amount of wet (distorted) signal. At 50%, there are equal amounts of dry and wet signal. At 0%, the output is all dry and at 100% it is all wet.
Post Wah
The Post Wah control lets you place the Fuzz section before the Wah section, or vice versa.
Fuzz Section
The Fuzz section provides tonal and volume control over the plug-in.
Tone
The Tone control lets you change the brightness of the Fuzz algorithm.
Output
The Output control sets the overall output vol-ume of the Fuzz section.
Pedal Min and Pedal Max Sections
Freq Sets the low (Pedal Min) and high (Pedal Max) limits of the wah filter’s frequency sweep.
Res Sets the low (Pedal Min) and high (Pedal Max) limits of the wah filter’s resonance.
Modulation Section
The Modulation section provides controls for the Low Frequency Oscillator (LFO) and Enve-lope Follower (ENV) that can be used to modu-late the wah filter’s sweep.
Rate
The Rate control sets either the LFO frequency, or the response time of the envelope follower, depending on the setting of the Mode control.
Type
The Type control lets you select either the LFO or the Envelope follower as the modulation source for the wah filter.
Depth
The Depth control sets the amount of modula-tion sent by the LFO or envelope follower.
Figure 9. Fuzz-Wah plug-in window

Chapter 10: Effects 77
Wah
Click the Wah button to turn the wah filter on and off.
Pedal
The Pedal control sweeps the wah center fre-quency up and down.
Filter
The Filter control switches the wah filter be-tween LP (lowpass), BP (bandpass), and HP (highpass) modes.
Mix
The Mix control lets you balance the amount of dry signal with the amount of wet (wah-pro-cessed) signal. At 50%, there are equal amounts of dry and wet signal. At 0%, the output is all dry and at 100% it is all wet
Mix (Overall)
The overall Mix control lets you balance the amount of fuzz-processed signal with the amount of wah-processed signal. At 50%, there are equal amounts of fuzz and wah signal. At 0%, the output is all fuzz, and at 100% it is all wah.
Kill EQUse the Kill EQ plug-in to zap out the Low, Mid, or High broadband frequency range from an au-dio signal. This is a popular effect with DJs and is commonly used in electronic music production (especially in dance music).
Kill Switches
The High, Mid, and Low switches toggle their re-spective frequency bands on and off.
Gain
The Low, Mid, and High gain knobs control the relative volume of the three frequency bands.
Freq
The Low and High freq controls set the cross-over frequencies of the low and high pass filters. The Sweep control changes both the low and high-band cutoff frequencies simultaneously. When the high and low bands are killed, manip-ulating this control creates a swept bandpass fil-ter effect.
Output
The Output control sets the final output vol-ume.
Figure 10. Kill EQ plug-in window

Pro Tools Creative Collection Plug-ins Guide78
Lo FiUse the Lo Fi plug-in to bit-crush, down-sample, clip, rectify, and mangle the input signal.
Sample Rate
The Sample Rate control resamples the audio signal at another sample rate.
Anti-Alias Section
The Anti-Alias section provides control over anti-aliasing filters that can be used before and after downsampling to reduce aliasing in the re-sampled audio signal.
Pre
The Pre control adjusts the anti-aliasing filter cutoff applied to the audio signal before resam-pling. The filter is applied as a multiplier of the sample frequency (Fs) between 0.12 Fs and 2.00 Fs.
Post
The Post control adjusts the range of anti-alias-ing filter cutoff applied to the audio signal after resampling. The filter is applied as a multiplier of the sample frequency (Fs) between 0.12 Fs and 2.00 Fs.
On
For a much grittier sound, disable the Anti-Alias filter. The Anti-Alias button is lit when the filter is enabled.
LFO Section
The LFO controls let you apply a Low Frequency Oscillator to modulate the Sample Rate.
Rate
When Sync is enabled, the Rate control lets you select a rhythmic subdivision or multiple of the beat for the LFO Rate. Select from the following rhythmic values:
• 16 (sixteenth note)
• 8T (eighth-note triplet)
• 16D (dotted sixteenth-note)
• 8 (eighth note)
• 4T (quarter-note triplet)
• 8D (dotted eighth-note)
• 4 (quarter note)
• 2T (half-note triplet)
• 4D (dotted quarter-note)
• 2 (half note)
• 1T (whole-note triplet)
• 3/4 (dotted half note)
• 4/4 (whole note)
• 5/4 (five tied quarter notes)
• 6/4 (dotted whole note)
• 8/4 (double whole note)
Figure 11. Lo Fi Plug-in window

Chapter 10: Effects 79
When Sync is disabled, the Rate control lets you change the modulation rate independently of the Pro Tools session tempo.
Wave
Select from the following waveforms for the LFO.
Depth
The Depth control lets you adjust the amount of modulation applied to the Sample Rate.
Sync
Enable Sync to synchronize the LFO Rate to the Pro Tools session tempo. When Sync is disabled, you can set the Rate time in Hertz indepen-dently of the Pro Tools session tempo. The Sync button is lit when it is enabled.
Env Mod (Envelope Modulation) Section
The Env Mod section provides control over an Envelope follower that can affect the Sample Rate. This is useful for accentuating and enhanc-ing signal peaks (such as in drum loops) with ar-tificially generated high-frequency aliasing.
Attack
Adjust the Attack control to set the time it takes to respond to increases in the audio signal level.
Release
Adjust the Release control to set the time it takes to recover after the signal level falls.
Depth
Adjust the Depth control to determines how much the Envelope follower affects the Sample Rate.
At 0%, the Envelope follower has no affect on the Sample Rate.
At +100%, the Attack ramps up to the Sample Rate setting; and the Release starts from the Sample Rate setting and ramps down.
At –100%, the Attack starts from the Sample Rate setting and ramps down; and the Release ramps up to the Sample Rate setting.
Distortion Section
The Distortion section provides controls for adding dirt and grunge to the signal
Clip Adds transistor-like distortion to the signal.
Noise Adds a buzzy, noisy edge to the signal
Rectify Acts as a waveshaper, adding aggressive, harsh distortion to the signal
Name Description
Sine Provides a sine wave
Tri Provides a triangle wave
Saw Provides a saw-tooth wave
Square Provides a square wave
Morse Provides a Morse code-like rhythmic effect
S&H Provides Sample and Hold (S&H) modulation
Random Provides random modulation

Pro Tools Creative Collection Plug-ins Guide80
Bit Depth
The Bit Depth control lets you truncate the bit depth of the incoming signal from 16 bits all the way down to 1 bit
Mix
The Mix control adjusts the Mix between the “wet” (processed) and “dry” (unprocessed) sig-nal. 0% is all dry, and 100% is all wet, while 50% is an equal mix of both.
MultiChorusUse the MultiChorus plug-in to apply a thick, complex Chorus effect to the audio signal.
Rate
The Rate control sets the rate for the oscillation of the LFO in Hertz.
Depth
The Depth control sets the depth of LFO modulation of the audio signal in milliseconds.
Chorus Section
The Chorus section provides control over the low-frequency content and stereo width of the MultiChorus effect.
Low Cut
The Low Cut control lets you adjust the Low Cut frequency for the Flanger, to limit the Flanger effects to higher frequencies.
Width
The Width control lets you widen or narrow the effect’s stereo field
Mod Section
The Mod section controls let you set the Pre-De-lay amount, and the waveform of the LFO.
Pre-Delay Sets the Pre-Delay in milliseconds.
Waveform Selects either a Sine wave or a Triangle wave for the LFO.
Voices
The Voices control sets the number of layered chorus effects that are applied to the audio sig-nal. The more Voices that are used, the thicker the effect.
Mix
The Mix control lets you adjust the Mix between the “wet” (processed) and “dry” (unprocessed) signal. 0% is all dry, and 100% is all wet, while 50% is an equal mix of both.
Figure 12. MultiChorus Plug-in window

Chapter 10: Effects 81
Multi-DelayUse the Multi-Delay plug-in to apply up to six delay lines to the audio signal.
Sync
When Sync is enabled, the Delay time synchro-nizes to the Pro Tools session tempo. When Sync is disabled, you can set the delay time in milliseconds independently of the Pro Tools ses-sion tempo. The Sync button is lit when it is en-abled.
Delay
When Sync is enabled, the Delay control lets you set the main delay length in 16th note lengths (based on the Pro Tools session tempo).
When Sync is disabled, the Time control lets you the main delay time in milliseconds and sec-onds.
Feedback
The Feedback control lets you adjust the amount of delay feedback. At 0% the delayed signal repeats only once. As you increase the feedback, the number of times the delay repeats increases. At 100%, the delay doesn’t repeat in-definitely, but it does last a very long time!
From and To
The From and To controls let you feed signal from one delay Tap to another, or back to the main input, to create complex delay/feedback effects.
From
The From control sets the tap from which signal will be cross-routed.
To
The To control sets the tap (or the main input) that the cross-routed signal will be routed to.
Delay Taps
The Multi-Delay provides five Taps (delay lines). Each Tap provides the same set of controls. Con-trols for each Tap can be edited independently of the other Taps.
Figure 13. Multi-Delay plug-in window
If the delay time of the "To" tap is greater than the delay time of the "From" tap, then the result is "feed-forward" rather than feed-back, so only one delay repeat will be heard.

Pro Tools Creative Collection Plug-ins Guide82
Tap Controls
Each Tap provides the following controls:
Delay
Adjust the Delay control to set the length of de-lay for the tap, relative to the main Delay set-ting.
Level
Adjust the Level control to change the output level of the Tap.
Pan
Adjust the Pan control to pan the audio signal from the Tap left or right in the stereo field.
On
The On button turns the selected tap’s signal on or off.
High Cut
The High Cut control lets you adjust the fre-quency for the High Cut filter. For less treble, lower the frequency.
Low Cut
The Low Cut control lets you adjust the frequency for the Low Cut filter. For less bass, raise the frequency.
Mix
The Mix control lets you balance the amount of dry signal with the amount of wet (delayed) sig-nal. At 50%, there are equal amounts of dry and wet signal. At 0%, the output is all dry and at 100% it is all wet.
Non-Linear ReverbUse the Non-Linear Reverb plug-in to apply spe-cial gated or reversed Reverb effects to the audio signal, creating a synthetic, processed ambience.
Reverse
The Reverse button turns Reverse mode on and off. In Reverse mode, the tail of the reverb signal fades up to full volume, then disappears, rather than fading out.
Pre-Delay
The Pre-Delay control determines the amount of time that elapses between the original audio event and the onset of reverberation.
Dry Delay
The Dry Delay control applies a specified amount of delay to the dry portion of the signal, which can create a “reverse reverb” effect, where the reverb tail is heard before the dry signal.
Figure 14. Non-Linear Reverb plug-in window

Chapter 10: Effects 83
Reverb Section
The Reverb section provides control over the re-verb’s diffusion and stereo width.
Diffusion
Adjust the Diffusion control to change the rate at which the sound density of the reverb tail in-creases over time. Higher Diffusion settings cre-ate a smoother reverberated sound. Lower set-tings result in more fluttery echo.
Width
The Width control lets you widen or narrow the effect’s stereo field.
EQ Section
The EQ section provides tonal control over the reverb signal.
Low Cut
The Low Cut control lets you adjust the fre-quency for the Low Cut filter. For less bass, raise the frequency.
High Cut
The High Cut control lets you adjust the fre-quency for the High Cut filter. For less treble, lower the frequency
Reverb Time
Adjust the Reverb Time to change the length of the reverberation’s decay.
Mix
The Mix control lets you adjust the Mix between the “wet” (processed) and “dry” (unprocessed) signal. 0% is all dry, and 100% is all wet, while 50% is an equal mix of both.
PhaserUse the Phaser plug-in to apply a phaser to the audio signal for that wonderful “wooshy,” “squishy” sound.
Sync
When Sync is enabled, the Phaser Rate control synchronizes to the Pro Tools session tempo. When Sync is disabled, you can set the Rate in milliseconds independently of the Pro Tools ses-sion tempo. The Sync button is lit when it is en-abled.
Figure 15. Phaser plug-in window

Pro Tools Creative Collection Plug-ins Guide84
Rate
When Sync is enabled, the Rate control lets you select a rhythmic subdivision or multiple of the beat for the Phaser Modulation Rate. Select from the following rhythmic values:
• 16 (sixteenth note)
• 8T (eighth-note triplet)
• 16D (dotted sixteenth-note)
• 8 (eighth note)
• 4T (quarter-note triplet)
• 8D (dotted eighth-note)
• 4 (quarter note)
• 2T (half-note triplet)
• 4D (dotted quarter-note)
• 2 (half note)
• 1T (whole-note triplet)
• 3/4 (dotted half note)
• 4/4 (whole note)
• 5/4 (five tied quarter notes)
• 6/4 (dotted whole note)
• 8/4 (double whole note)
When Sync is disabled, the Rate control lets you the rate of the Phaser in independently of the Pro Tools session tempo.
Depth
The Depth control lets you adjust the depth of modulation, which in turn affects the amount of phasing applied to the audio signal.
Phaser Section
The Phaser section provides control over the ef-fect’s center frequency and number of phaser stages (or Poles).
Center
The Center control lets you change the fre-quency center (100 Hz to 10.0 kHz) for the phaser poles.
Poles
Select the number of phaser poles (stages): 2, 4, 6, or 8. The number of poles changes the charac-ter of the sound. The greater the number of poles, the thicker and squishier the sound.
LFO Section
The LFO section provides control over the wave-form and stereo offset of the LFO.
Wave
The Wave control lets you interpolate between a triangle wave and a sine wave for modulating the Phaser.
L/R Phase
The L/R Phase control lets you adjust the relative phase of the LFO modulation applied to the left and right channels.

Chapter 10: Effects 85
Low Cut
The Low Cut control lets you adjust the frequency of the Low Cut Filter in the phaser’s feedback loop. This can be useful for taming low frequency “thumping” at high feedback settings.
Feedback
The Feedback control feeds the output signal of Phaser back into the input, creating a resonant or singing tone in the phaser when set to its maximum.
Mix
The Mix control lets you adjust the Mix between the “wet” (effected) and “dry” (unprocessed) sig-nal. 0% is all dry, and 100% is all wet, while 50% is an equal mix of both.
ReverbUse the Reverb effect to apply Reverb to the au-dio signal, creating a sense of room or space. Typically, you’ll want to use Reverb on one of the Effect Send inserts or Main Effects inserts. This way you can process audio from multiple Pro Tools tracks, giving them all a sense of being in the same space.
Pre-Delay
The Pre-Delay control determines the amount of time that elapses between the original audio event and the onset of reverberation. Under nat-ural conditions, the amount of pre-delay de-pends on the size and construction of the acous-tic space, and the relative position of the sound source and the listener. Pre-Delay attempts to duplicate this phenomenon and is used to create a sense of distance and volume within an acous-tic space. Long Pre-Delay settings place the re-verberant field behind rather than on top of the original audio signal.
Figure 16. Reverb Editor

Pro Tools Creative Collection Plug-ins Guide86
Room Size
Adjust the Room Size control to change the ap-parent size of the space.
Early Reflections Section
Different physical environments have different early reflection signatures that our ears and brain use to localize sound. These reflections af-fect our perception of the size of a space as well as where an audio source sits within it. Chang-ing early reflection characteristics changes the perceived location of the reflecting surfaces sur-rounding the audio source.
Early reflections are simulated in Reverb by us-ing multiple delay taps at different levels that occur in different positions in the stereo spec-trum (through panning). Long reverberation generally occurs after early reflections dissipate.
Type
The Transfuser Reverb provides the following Types of Early Reflection models:
Booth Simulates a vocal recording booth.
Club Simulates a small, clear, natural-sounding club ambience.
Room Simulates the center of a small room with-out many reflections.
Small Chamber Simulates a bright, small-sized room.
Medium Chamber Simulates a bright, medium-sized room.
Large Chamber Simulates a bright, large-sized room.
Small Studio Simulates a small, live, empty room.
Large Studio Simulates a large, live, empty room.
Scoring Stage Simulates a scoring stage in a me-dium-sized hall.
Philharmonic Simulates the space and ambience of a large, symphonic, concert hall.
Concert Hall Simulates the space and ambience of a large concert hall.
Church Simulates a medium-sized space with natural, clear-sounding reflections.
Opera House Simulates the space and ambience of an opera house.
Vintage 1 Simulates a vintage digital reverb ef-fect.
Vintage 2 Simulates a vintage digital reverb ef-fect.
Spread
Controls the length of the early reflections.

Chapter 10: Effects 87
Reverb Section
The Reverb section provides control over the stereo width of the reverb algorithm.
In Width
Widens or narrows the stereo width of the in-coming audio signal before it enters the reverb algorithm.
Out Width
Widens or narrows the stereo width of the signal once reverb has been applied.
Delay
Sets the size of the delay lines used to build the reverb effect. Higher values create longer reverberation.
Room Section
The Room section offers control over the overall spatial feel of the simulated room.
Ambience
This control affects the attack of the reverb sig-nal. At low settings, the reverb arrives quickly, simulating a small room. At higher settings, the reverb ramps up more slowly, emulating a larger room.
Density
Adjust the Density control to change the rate at which the sound density of the reverb tail in-creases over time. Higher Density settings create a smoother reverberated sound. Lower settings result in more fluttery echo.
High Frequencies Section
The High Frequencies section provides controls that let you shape the tonal spectrum of the re-verb by adjusting the decay times of higher fre-quencies.
Time
Adjust the Time control to decrease or increase the decay time for mid- to high-range frequency bands. Higher settings provide longer decay times and lower settings provide shorter decay time. With lower settings, high frequencies de-cay more quickly than low frequencies, simulat-ing the effect of air absorption in a hall.
Freq
Adjust the Frequency control to set the fre-quency boundary between the mid- and high-range frequency bands.
Cut
The High Cut control lets you adjust the fre-quency for the High Cut filter (1.00–20.0 kHz). Adjusting the High Cut control to change the decay characteristics of the high frequency com-ponents of the Reverb. To cut the high-end of the processed signal, lower the frequency.

Pro Tools Creative Collection Plug-ins Guide88
Low Frequencies Section
The Low Frequencies section contains controls that affect the low-frequency-heavy tail of the reverb signal.
Time
Adjust the Time control to decrease or increase the decay time for the low-range frequency band. Higher settings provide longer decay times and lower settings provide shorter decay time.
Freq
Adjust the Frequency control to set the fre-quency boundary between the low and high-range frequency bands.
Reverb Time
Adjust the Reverb Time to change the rate at which the reverberation decays after the original direct signal stops. At its maximum value, infinite reverberation is produced.
Balance
Adjust the Balance control to change the output level of the early reflections. Setting the Level control to 0% produces a reverb effect that is only the reverb tail.
Mix
The Mix control lets you adjust the Mix between the “wet” (effected) and “dry” (unprocessed) sig-nal. 0% is all dry, and 100% is all wet, while 50% is an equal mix of both.
Spring ReverbUse the Spring Reverb plug-in for that classic spring reverb sound. Just don’t kick your com-puter trying to get the springs to rattle!
The Spring Reverb plug-in brilliantly models its analog namesake. The analog spring reverb is an electromechanical device much like the plate re-verb. The signal to be reverberated is fed to a transducer at the end of a long suspended metal coil spring. The transducer causes the spring to vibrate with the result that the signal reflects from one end of the spring to the other. At the other end of the spring is another transducer that converts the motion of the spring back into an electrical signal, thus creating a delayed and reverberated version of the input signal.
Pre-Delay
The Pre-Delay control determines the amount of time (0–250 ms) that elapses between the origi-nal audio event and the onset of reverberation.
Figure 17. Spring Reverb Plug-In window

Chapter 10: Effects 89
Reverb Section
The Reverb section provides control over the dif-fusion and stereo width of the reverb signal.
Diffusion
Adjust the Diffusion control to change the rate at which the sound density of the reverb tail in-creases over time. Higher Diffusion settings cre-ate a smoother reverberated sound. Lower set-tings result in more fluttery echo.
Width
Adjust the Width control to change the spread of the reverberated signal in the stereo field. A setting of 0% produces a mono reverb, but leaves the panning of the original source signal unprocessed. A setting of 100% produces a open, panned stereo image.
Low Cut
The Low Cut control lets you adjust the frequency of the Low Cut Filter (20.0 Hz–1.00 kHz). Use the Low Cut filter to reduce some of the potential “boomy-ness” you can get with longer Reverb Times.
Reverb Time
Adjust the Reverb Time to change the reverbera-tion decay time (1.0–10.0 seconds) after the original direct signal stops. Shorter times result in a tighter, more ringing and metallic reverb, such as when walking down a narrow hall with hard floors and walls. Longer times result in a larger reverberant space, such as an empty, large, concrete cistern.
Mix
The Mix control lets you adjust the Mix between the “wet” (reverbed) and “dry” (non-reverbed) signal. 0% is all dry, and 100% is all wet, while 50% is an equal mix of both.
Stereo WidthUse the Stereo Width plug-in to create a wider stereo presence for mono audio signals.
Mode
The Mode control lets you specify the method by which the Stereo Width plug-in will create the artificial stereo field. Choices include Adjust, Comb, and Phase.
Adjust Adjusts the existing stereo width of the signal by M-S encoding, equalizing the S compo-nent with the Low/Mid/High controls and boosting/attenuating it with the Width control, then M-S decoding back to stereo. The Delay control delays the right signal relative to the left for an additional widening effect (known as “Haas panning”).
Comb Adds artificial width to the signal by M-S encoding then adding a delayed version of the M component to the S component. This creates a comb filtering effect that shifts some frequen-cies to the left and others to the right.
Figure 18. Stereo Width plug-In window

Pro Tools Creative Collection Plug-ins Guide90
Phase In this mode the Low/Mid/High controls set the centre frequencies of 3 phase shifters which shift the relative phase of the left and right channels, giving a much more subtle effect than Comb mode.
Process Section
The Process controls boost or cut the Low, Mid and High-frequency bands of the generated stereo signal.
Trim Section
The Trim controls adjust the perceived cen-ter/source of the generated stereo signal.
Level
The Level control sets the volume of the per-ceived center of the stereo signal.
Pan
The Pan control sets the position left-to-right of the perceived center of the stereo signal
Delay
The Delay control lets you specify the duration of delay used in Phase mode (0–8 ms)
Width
The Width control sets the final width of the generated stereo field.
TalkboxUse the Talkbox plug-in to add voice-like reso-nances to audio signals.
Vowel
The Vowel control lets you choose the shape of the formant filter, by the vowel sound that is simulated (OO/OU/AU/AH/AA/AE/EA/EH /EE/ER/UH/OH/OO).
Env Depth
The Env Depth knob creates a positive or nega-tive offset in the setting of the Vowel control, ef-fected by the Envelope follower. At its center, the knob has no effect. Turned to the right or left of center, the Env Depth knob shifts the value of the Vowel control up or down.
When the Envelope follower is triggered, the Vowel parameter moves to its normal setting (in time with the envelope’s attack), then back to the offset value (in time with the envelope’s re-lease).
Figure 19. Talkbox Plug-in window

Chapter 10: Effects 91
LFO Section
The LFO section provides controls that let you apply a Low Frequency Oscillator to modulate the Formant setting.
Rate
When Sync is enabled, the Rate control lets you select a rhythmic subdivision or multiple of the beat for the LFO Rate. Select from the following rhythmic values:
• 16 (sixteenth note)
• 8T (eighth-note triplet)
• 16D (dotted sixteenth-note)
• 8 (eighth note)
• 4T (quarter-note triplet)
• 8D (dotted eighth-note)
• 4 (quarter note)
• 2T (half-note triplet)
• 4D (dotted quarter-note)
• 2 (half note)
• 1T (whole-note triplet)
• 3/4 (dotted half note)
• 4/4 (whole note)
• 5/4 (five tied quarter notes)
• 6/4 (dotted whole note)
• 8/4 (double whole note)
When Sync is disabled, the Rate control lets you change the modulation rate independently of the Pro Tools session tempo (0.01–10.0 Hz).
Wave
Select from the following waveforms for the LFO.
Sine Provides a sine wave.
Tri Provides a triangle wave.
Saw Provides a saw-tooth wave.
Square Provides a square wave.
S&H Provides Sample and Hold (S&H) modula-tion.
Random Provides random modulation.
Depth
The Depth control lets you adjust the amount of modulation applied to the Formant setting.
Sync
Enable Sync to synchronize the LFO Rate to the Pro Tools session tempo. When Sync is disabled, you can set the Rate time in milliseconds inde-pendently of the Pro Tools session tempo. The Sync button is lit when it is enabled.

Pro Tools Creative Collection Plug-ins Guide92
Envelope Section
The Talkbox plug-in provides an Envelope fol-lower for modulating the Formant setting. This is useful for accentuating and enhancing signal peaks in rhythmic material.
Thresh
Adjust the Thresh control to set the amplitude threshold at which the Formant setting begins to be modulated by the Envelope follower.
Attack
Adjust the Atk (attack) control to set the time (10.0 ms to 10 seconds) it takes to respond to in-creases in the audio signal level.
Release
Adjust the Rel (release) control to set the time (10.0 ms to 10 seconds) it takes to recover after the signal level falls.
Formant
The Formant control lets you shift the formant center of the processed audio up or down 12 semitones, changing the harmonic structure dramatically.
Mix
The Mix control lets you adjust the Mix between the “wet” (processed) and “dry” (unprocessed) signal. 0% is all dry, and 100% is all wet, while 50% is an equal mix of both.
Vintage FilterUse the Vintage Filter plug-in to apply a modu-lating, resonant filter to the audio signal. Have fun with filter sweeps or give your sounds that extra-resonant aura.
Cutoff
The Cutoff control lets you adjust the Cutoff frequency (20.0 Hz to 20.0 kHz) of the filter.
Resonance
The Resonance control lets you adjust the amount filter Resonance (0–100%). The filter can go into self-oscillation at high values creat-ing a sine wave-like overtone at the Cutoff fre-quency.
Fat
The Fat control lets you adjust the amount of overdrive in the resonant peak. At lower settings the signal gets quieter at high Resonance set-tings for clean distortion. At higher settings the signal is over-driven at high resonance settings.
Figure 20. Filter plug-in window

Chapter 10: Effects 93
Envelope Section
The Filter effect provides an Envelope follower for controlling the Cutoff frequency. The Enve-lope section offers control over the envelope’s shape and depth of modulation.
Attack
Adjust the Attack control to set the time (10.0 ms to 10 seconds) it takes to respond to in-creases in the audio signal level.
Release
Adjust the Release control to set the time (10.0 ms to 10 seconds) it takes to recover after the signal level falls.
Depth
Adjust the Depth control to determine how much the Envelope follower affects the Cutoff frequency.
At 0%, the Envelope follower has no effect on the Cutoff frequency.
At +100%, the Attack ramps up to the Cutoff frequency setting; and the Release starts from the Cutoff frequency setting and ramps down.
At –100%, the Attack starts from the Cutoff frequency setting and ramps down; and the Re-lease ramps up to the Cutoff frequency setting.
LFO Section
The Filter effect provides a sinusoidal Low Fre-quency Oscillator (LFO) for modulating the fil-ter cutoff frequency. The LFO section offers con-trol over the rate, depth and synchronization of the modulation.
Rate
Adjust the Rate control to increase or decrease the frequency (0.01–100.0 Hz) of the LFO. Lower settings are slower and higher settings are faster. When Sync is on, the Rate knob switches from counting in milliseconds, to rhythmic val-ues.
Depth
Adjust the Depth control to increase (or de-crease) the amount of modulation (0–100%) of the Cutoff frequency by the LFO. Lower settings create a slight vibrato (with the rate set high) and higher settings create a wide sweep of the Cutoff frequency range.
Sync
Toggle the Sync button to synchronize the LFO with the session tempo.

Pro Tools Creative Collection Plug-ins Guide94
Mode
Select one of the following options for the type of filter:
LP24 Provides a low pass filter with a 24 dB cut-off.
LP18 Provides a low pass filter with a 18 dB cut-off.
LP12 Provides a low pass filter with a 12 dB cut-off.
BP Provides a band pass filter.
HP Provides a high pass filter.
Output
The Output control lets you lower the Output level from 0.0 dB to –INF dB.

Index 95
AAge section (Vacuum) 52
Drift control 52Dust control 52
arpeggiator (Vacuum) 53modes 53speed settings 53
BBoom 15
clearing patterns 20controlling with MIDI 21Copy and Clear buttons 16copying patterns 21creating patterns 20Edit mode switch 19Event Bar 19Event switches 19Global controls 17Info display 19Instrument section 16Kit selector 18Matrix display 16Pattern Chains 22Pattern display 16patterns 15presets 20Setup page 23Speed switches 18Start and Stop buttons 17step velocity 16, 19switching between patterns 20switching patterns using MIDI 22synchronization modes 23
Browser (Structure Free) 45
CChorus 66Copy and Clear buttons (Boom) 16copying 21
DDB-33 25
Cabinet page 28drawbars 27Info display 30Key Click 27Mics controls 29Percussion 27Rotation Speed switch 28Scanner Vibrato
shapes 26Speed controls 29tonewheel settings 26Tube Pre-amp 29
Delay TapsMulti Delay 81
Distortion 66Drawbars 27Dynamic Delay 68
index

Pro Tools Creative Collection Plug-ins Guide96
EEasy button (Xpand!2) 56Easy mode (Xpand!2) 56Edit mode switch (Boom) 19effects
Chorus 66Distortion 66Dynamic Delay 68Enhancer 70Ensemble 71Filter Gate 72Flanger 73Frequency Shifter 75Fuzz-Wah 76inserting 10Kill EQ 77Lo-Fi 78MultiChorus 80Multi-Delay 81Non-Linear Reverb 82Phaser 83Reverb 85Spring Reverb 88Stereo Width 89Talkbox 90Vintage Filter 92
Enhancer 70Ensemble 71envelopes (Vacuum) 50
ADSR 50Env One 50Env Two 50
Event Bar (Boom) 19Event switches (Boom) 19
FFilter Gate 72filters (Vacuum) 49
cutoff 49high-pass (HPF) 49low-pass (LPF) 49resonance 49
Flanger 73Frequency Shifter 75Fuzz-Wah 76
GGeneral MIDI 21Global controls (Boom) 17
IInfo display 39Info display (Boom) 19Info display (DB-33) 30Info display (Structure Free) 39Instrument section (Boom) 16instruments
Boom 15DB-33 25inserting 9Structure Free 35Vacuum 47
Introduction 3
KKey Click 27Key Switches 37Key switches 38Keyboard section (Structure Free) 38Kill EQ 77Kit selector (Boom) 18
LLo-Fi 78

Index 97
MMatrix display (Boom) 16Mics (DB-33) 29MIDI
assigning parameters to controllers 11assigning parameters to MIDI controllers 11controlling Boom with 21inverting control response 11removing controller assignments 11setting min/max control values 11
MIDI learn 11Mini Grand
main controls 32piano models 33room ambience settings 34Setup button 33
mixer (Vacuum) 49modulation routing (Vacuum) 51
destinations 51sources 51
Multi-DelayDelay Taps 81
MultiChorus 80
NNon-Linear Reverb 82
PPart controls (Xpand!2) 56Part selector switches 56Patch Edit parameters (Xpand!2) 56Patch Edit sub-pages (Structure Free) 44Patch list (Structure Free) 39Pattern display (Boom) 16patterns (Boom) 15, 20, 21
chaining 22turning on and off 23via MIDI 23with the mouse and keyboard 22
clearing 20creating 20switching using MIDI 22
Pencil tool 22Percussion (DB-33) 27Phaser 83Pitch and Mod wheel controls (Vacuum) 54
mod destinations 54plug-in settings menu 20plug-ins
inserting effects 10inserting instruments 9working with plug-ins in Pro Tools 4
Rremoving plug-ins
Windows 8Reverb 85Ring Modulation 49Rotation Speed switch (DB-33) 28

Pro Tools Creative Collection Plug-ins Guide98
SScanner Vibrato
shapes 26Set 11Setup button 23Setup button (Vacuum) 54Setup page (Boom) 23Setup page (Vacuum) 54
Envelope retriggering 54glide controls 54Pitch Bend Range 54
Smart display (Xpand!2) 56Smart knobs 56Smart knobs (Structure Free) 37, 38Speed controls (DB-33) 29Speed switches (Boom) 18Spring Reverb 88Start and Stop buttons (Boom) 17step velocity (Boom) 16, 19Stereo Width 89Structure Free 35, 39
Browser 45features 35Key Switches 37Key switches 38Keyboard section 38loading patches 42Main page 43Patch Edit sub-pages 44Patch list 39Smart knobs 37, 38
switching between 20synchronization modes (Boom) 23System 4System Requirements 4
TTalkbox 90Tonewheels 26Tube Pre-amp (DB-33) 29
UUsing 10
VVacuum 47
Age 52Arp section 53envelopes 50
ADSR 50Env One 50Env Two 50
filter cutoff 49filter resonance 49filters 49mixer 49modulation routing 51
destinations 51sources 51
Pitch and Mod wheel controls 54mod destinations 54
Ring Mod 49Setup button 54Setup page 54
Envelope retriggering 54glide controls 54Pitch Bend Range 54
VTA 52VTOs 48
controls 48Vacuum Tube Synthesis 47Vintage Filter 92VTA 52VTOs 48
controls 48shapes 48
Wwebsite 5
XXpand!2
Easy button 56Easy mode 56Part controls 56Part selector switches 56Patch Edit parameters 56Smart display 56Smart knobs 56

2001 Junipero Serra Boulevard
Daly City, CA 94014-3886 USA
Tel: 650.731.6300
Fax: 650.731.6399
TECHNICAL SUPPORT (USA)Tel: 650.731.6100Fax: 650.731.6375
PRODUCT INFORMATION (USA)Tel: 800.333.2137
INTERNATIONAL OFFICESVisit the Digidesign websitefor contact information
www.digidesign.com
IIDESIGN