Embed Size (px)
Citation preview

User Guidenik
Colo
r Ef
ex P
ro!™

More from nik multimedia!
Interested in adding additional creativepower to Photoshop® and other Adobe® Plug-incompatible programs? Check out some of theother nik multimedia products available.
nik Efex! - Use nik Efex withinPhotoshop® to create unique, high-resolution,masked, CMYK separated images with just asingle mouse-click! Use color, style, frames, 3Dtext and other actions to create endlesscombinations - 126 effects in all!
nik Type Efex! - Create stunning CMYKseparated 3D text effects in a single mouse-click.Utilize the 205 professional actions to create fullymasked, high resolution CMYK-EPS files readyto place in your layout.
nik Sharpener! - Take the guesswork outof sharpening with nik multimedia’s 100% Adobecompatible plug-in. nik Sharpener enhances andsimplifies the process of sharpening images.Sharpen in RGB mode and prepare images forinkjet, color laser and offset printing.
nik Sharpener Pro! - Sharpen all of your
images optimally and consistently with nikSharpener Pro! Add multiple detail and colorprotection processes to sharpening while usingfamiliar and easy-to-determine variables to shar-pen your images. Work in RGB, CMYK,Grayscale or Lab modes, and utilize a proprieta-ry Autoscan process, enabling sharpening basedon the individual image's quality and characteris-tics. Sharpen images for all types of output usingsharpeners ranging from the Internet ImageSharpener to an adjustable lpi Offset/AutoscanSharpener.

Quick Reference
Zoom in / Zoom out
Preview Area
Filter Slider
Optimal Range
Accelerated Mode On/Off
Abort / Confirm Dialog
Advanced Information
Save and Load SettingsAcces Help Pages

Table of Contents
Welcome to nik Color Efex Pro! 4
Installing nik Color Efex Pro! 5
A Sample Application of nik Color Efex Pro! 7
Using nik Color Efex Pro! 10
Advanced Color Treatment - RGB, CMYK & Lab 12
Filter index by name 14
Filter index by filter symbol 15
nik Color Efex Pro! Overview 16
nik Abstract Efex Pro! 50
3(Der Deutsche Teil des Handbuches beginnt auf Seite 61)

4
Welcome to nik Color Efex Pro!
nik Color Efex Pro is a collectionof digital filters created specifically forgraphic design and photographic profes-sionals. Operating under any 100% Adobeplug-in compatible program, nik ColorEfex Pro provides color, light and stylizingeffects and features that make enhancingimages and creating powerful effects easy.
nik Color Efex Pro includes anumber of features not offered in the stan-dard version of Color Efex, includingCMYK compatibility, Save and Load fea-tures, a detailed Text Output Area for thecurrent image, advanced color treatment,and much more. nik Color Efex Pro alsoprovides you with an additional 21 filters(55 filters in all) that include added adjust-ments, providing greater control forenhancing and stylizing your image.
Navigating the nik Color Efex Profilters is easy whether or not you are famil-iar with Photoshop or any other plug-instandard compatible program. Once youhave installed nik Color Efex Pro intoyour image editing software (see installa-tion on pages 5 & 6) and have opened animage and selected a filter, you are provid-ed with a series of sliders. These sliderscontrol the individual adjustment within
the filter and allow you to make changesto your image.
While thisbooklet is a goodplace to start, nothingcompares to diving inand experimentingwith nik Color EfexPro. Trying a numberof different filtercombinations for eachimage is the best wayto discover the greatpotential of the pro-gram. Read thebooklet or browsethrough it, but keepthe booklet handy asa reference. However,if you have a quickquestion when using afilter, we have inte-grated individual filter help screens thatcan be accessed by clicking on the Helpbutton. These screens will provide youwith a convenient way to access basicinformation on each filter’s adjustments.

5
Installing nik Color Efex Pro!
1. Installing nik Color Efex Pro issimple. Place the nik Color Efex Pro CDin your CD-ROM drive and find thefolder "the Filters."
2. Locate the Photoshop folder onyour computer. You will want to put nikColor Efex Pro in the filters folder whereyou have installed Photoshop. If you areinstalling nik Color Efex Pro for use withanother Adobe-compatible program, besure to check the documentation forinstructions on properly installing filters.
You may want to check our web site atwww.tech-nik.com for compatibilityupdates. We cannot provide support for
host programs, but we will do our best toanswer your installation questions.
If you are not sure where your fil-ters are installed in Photoshop, followthese simple steps.
a) Open Photoshop and from thefile menu, select Preferences "Plug-Ins &Scratch Disks." The location of yourplug-ins will appear.
b) Next, click the Choose but-ton/option to locate the filters folder andscroll through the folders, checking foryour folder named "Filters".
c) Note the location of your filtersfolder and close the Preferences dialogbox by selecting "Cancel”.
d) Close Photoshop before pro-ceeding with installing nik Color EfexPro!
e) Copy the folder "the Filters”from the nik Color Efex Pro CD-ROMwith one mouse drag into the "Filters”folder you determined in step c.
3. Launch Photoshop and selectthe Filter menu (in Photoshop). Thereyou will find two new submenus: nikColor Efex Pro! and nik Abstract EfexPro!

6
nik Color Efex Pro contains all ofthe image optimizing and conventional styl-izing tools in the collection. A separatemenu item will also appear for the nikAbstract Efex Pro effects. This separatemenu item contains the more stylistic andabstract effects that modify the image in amore dramatic fashion.
If nik Color Efex Pro does notappear in the Filters menu, you may havecopied the filter folder from the CD to thewrong location on your computer. If thishappens, check to see if you have more thanone copy of Photoshop installed or if youselected a different folder location wheninstalling Photoshop. Return to step 2 a)and check the "Filters” folder location againand ensure that nik Color Efex Pro isinstalled in this folder. You may also want tocheck to be sure that you have not installednik Color Efex Pro in the "Extensions” fold-er, often located one folder up from the"Filters” folder.

7
A Sample Application ofnik Color Efex Pro!
Before you begin experimentingwith the various filters, follow this sampleapplication of nik Color Efex Pro! We haveincluded this multi-step demonstration toshow how the filters can be used together.Note that many enhancements that you willtypically make can be made with only oneor two filters. This demonstration, however,applies more filters than a typical photomay need to enhance an image. The photoin this demonstration is a bit plain, and waschosen to demonstrate the potential foradjustments of color, light and contrast thatcan be applied easily using nik Color EfexPro! As you continue thumbing throughthe book, you will find varying types ofphotos with enhancements that are morecommon and usually require only one ortwo filters for optimal enhancements.
The photo to the left was taken on abeach on a typical overcast beach day. Itdoesn't seem to have much potential; how-ever, in this demonstration we transform theimage by applying five filters: GraduatedBlue 201h, Graduated Blue 220h, the RedContrast, the Sunshine and the LightenCenter filter.

Step 1)The Graduated 201h (Sky Blue) Filter
The Graduated 201h (SkyBlue) Filter corrects the overexposedsky, a common problem where expo-sure is set using a foreground reading.
Graduated 201h (Sky Blue)Filter inks the upper area of theimage with blue, re-saturating the skyand darkening it a little. Landscapesin which top and bottom exposuresare close are easier and more pleasantto view. By darkening the sky youcan compensate for a scene pho-
tographed against the sun or onephotographed with bad light, balanc-ing the light and contrast in theimage after you've taken the photo.
Step 2)The Graduated 220h (Blue) Filter
This filter applies a very satu-rated, subtle blue. When appliedalone, the effect is unrealistic.Applied at a low value it comple-ments the Graduated 201h (SkyBlue).
Step 3)The Contrast Red Filter
Application of the ContrastRed Filter adds contrast to the image,heightening the detail of the beach.
(Original image)
8

Step 4)The Sunshine Filter
The most revolutionary filterof the series, the Sunshine Filter, usesa completely new series of light-cast-ing algorithms capable of creating theillusion of sunlight in images that
were taken with little or no sunlight.You see no specific light source, yetthe effect is a brighter image
Step 6)The Lighten Center Filter
Finally, application of theLighten Center filter draws the eye tothe center of the image while creatinggreater depth. With darker borders anda brighter center the image is moredramatic, more inviting, and more pleas-ant to look at.
(final image)
9

Using nik Color Efex Pro!
This section describes the features ofnik Color Efex Pro and provides a briefintroduction to using the program. Thisbooklet does not cover topics related tousing your image-editing software, butrather focuses on using the features of nikColor Efex Pro and applying nik ColorEfex Pro filters. To get started with nikColor Efex Pro:
1) Open an image within Photoshop(or any other compatible application).
2) Open one of the nik Color EfexPro filters from the appropriate Filters orEffects menu in your image editing soft-ware.
3) Experiment with the sliders untilyou find a suitable setting for the image andapply the changes by selecting OK. If youmake changes on the screen that you do notwish to apply to your image, simply clickthe Cancel button.
Color Mode: You can apply any ofthe nik Color Efex Pro filters to images ingrayscale, RGB, Lab and CMYK colormode. However, using filters in grayscalemode is not appropriate as most of the fil-ters and their features operate using colorinformation from the image.
Preview Area and Zoom Feature:The preview area is the area in the upper
right corner of the screen and shows theeffects of your filter adjustments beforethey are applied to the image. When open-ing the image, this area will show the entireimage. You can adjust the zoom level of thepreview by clicking on the plus or minussymbol. You can also scroll in this previewarea by clicking and holding down themouse button and moving the mouse, drag-ging the image to the area that you wantvisible in the preview window.
Sliders: The parameters of thenik Color Efex Pro filters are set bymoving the small triangular sliders foreach setting. In many cases, the optimalranges of adjustment are marked by anorange-striped area on the slider.Nevertheless, this does NOT mean thatother settings will lead to unacceptable orundesirable results. Use these optimal rangesettings only as a guide in setting the sliders.To enter the slider values using the key-board, press the Enter/Return key and enterthe value for the first slider. Hit theEnter/Return key to move on to the nextslider.
Save and Load: The Save andLoad feature allows you to save filterparameter settings to disk and loadthem at a later time. The Load featureallows you to recall any of the previouslysaved settings and apply them to an image.
10

11
Help: The Help button opens aseries of help dialog boxes for the currentfilter. These dialog boxes provide basicinformation on the current filter and itsadjustments.
The Acceleration Button: TheAcceleration Button controls theAccelerated Mode for nik Color Efex Pro,
indicated by a small car in thelower portion of the filter dialog
box. Clicking on this icon toggles between"Normal Mode” (represented by two speed
bars) and "Accelerated Mode” (represented byfour speed bars).The Normal Mode is thedefault and the recommended setting.However, nik Color Efex Pro provides anoption for faster processing with minimal lossof quality. Selecting the Accelerated Modeallows the program to run faster, but performsfewer of the more complicated calculations.The effect of the Accelerated Mode is moreapparent in some images more so than others.For high-quality images and processing, werecommend using the Normal Mode setting.
The Text Output Area: The TextOutput Area of nik Color Efex Pro providesuseful information about the current image.Located at the bottom portion of the dialogbox, this section provides information relatedto the image, such as its dimensions and colormode, as well as other filter settings andmemory warnings. Line four of the TextOutput Area alerts you if there is insufficientmemory to process the image.
Preview Hint: The preview area isrecalculated each time an adjustment is madeto the image. To see the changes as theyoccur, drag the adjustment slider with theright mouse button (Win) or by holdingdown the "alt” key (Mac) while making theadjustment. Making changes this way willupdate the preview window as you makethem.

12
Advanced Color Treatment - RGB,CMYK & Lab
If you have any experience using differentcolor modes, you will know that this is a some-what complex section. Actually, it is too complexto be explained here in its entirety, so we’ll keepthis as brief as possible.
Most users think that working withCMYK images directly during image optimiza-tion will improve the final printing quality. This isnot true. The reason is simple. While clear, math-ematical color rules exist for RGB, CMYK is dif-ferent. For example, in CMYK as cyan is printedbelow yellow, it is treated such that it needs to bea little stronger than yellow. This means that apure gray in CMYK consists of more cyan thanyellow and magenta. Increasing the saturation ofgray in CMYK will lead to a saturated blue,unlike in RGB where gray stays gray. An RGBimage can actually contain more colors thanCMYK, and therefore you lose little, if any, qual-ity when you enhance, sharpen, remove scratchesfrom an image in RGB and then convert it toCMYK directly before print. However, nikColor Efex Pro utilizes a new color treatmentmethod that treats RGB, CMYK and Lab imagesexactly the same way through a series of calcula-tions. This advanced color treatment ensures thatwhen applying a nik Color Efex Pro filter to aCMYK or Lab image, you can be absolutely cer-tain that color treatment is optimized whenworking with either RGB, CMYK or Labimages.
RGB
CMYK
Lab
Applying the same effect (suchas increasing the saturation) toan image with normal colortreatment leads to differentresults in different color modes.

In the first three samples (located tothe far left) you see three images, one in RGB,the next in CMYK, and the third in Labmode. In each of these images, the saturationwas increased using Photoshop. The resultsare clearly different, illustrating the significantdifferences in the normal processing of imagesin the individual color modes. The advancedcolor treatment in nik Color Efex Proaddresses this and moderates these differences,actually maintaining color integrity. As youcan see in the images on this page, using thenik Color Efex Pro advanced color treatment,the colors are the same in each color mode,avoiding color variations and irregularitiesbetween color modes.
When processing CMYK and Labimages in nik Color Efex Pro you may noticelonger processing time. This difference in pro-cessing time is due to the fact that numerouscolor treatment calculations need to be madeto ensure consistent color treatment. If pro-cessing time is a great concern, you canprocess the image in RGB mode and laterconvert it to CMYK.
RGB
CMYK
Lab
Using nik Color Efex Pro,images and their colors are
processed the same everytime,regardless of the color mode that
you are using.
13

14
Filter Index by name
This page provides an alpha-betical index of the filters in nikColor Efex Pro. On the followingpage we have included a photograph-er’s index of filters that uses smallglass filter icons to identify filters thatmay be familiar to those experiencedin photography. The index on page 15is designed to be a quick visual indexof the more common filters for thoseusers who are used to conventionalphotographic filters.
nik Color Efex Pro! 16
B/W Conversion 16Bicolor Filter: Brown 27Bicolor Filter: Green/Brown 27Bicolor Filter: Moss 26Bicolor Filter: User Defined 28Bicolor Filter: Violet/Pink 27Brilliance/Warmth 20Classical Blur 32Color Stylizer 34Contrast Filter: Blue 19Contrast Filter: Cyan 19Contrast Filter: Green 18Contrast Filter: Magenta 19Contrast Filter: Red 17
Contrast Filter: Yellow 18Contrast Only 33Darken Center 22Duplex 29Graduated 0h (Gray) 36Graduated 201h (Sky Blue) 37Graduated 213h (Dark Blue) 38Graduated 220h (Blue) 39Graduated 32h (Orange) 44Graduated 355h (Red) 38Graduated 33h (Coffee) 40Graduated 354h (Blood) 41Graduated 38h (Warm Yellow) 42Graduated 51h (Yellow) 42Graduated 94h (Moss) 43Graduated User Defined 45Ink 21Lighten Center 23Midnight (blue) 47Midnight (green) 47Midnight (sepia) 47Midnight (violet) 47Midnight 46Monday Morning (blue) 49Monday Morning (sepia) 49Monday Morning (violet) 49Monday Morning 48Old Photo 35Polarization 25Skylight Filter 24Sunshine(quick) 31Sunshine 30
nik Abstract Efex Pro! 50
Infrared 54Pastel 55Pop Art 53Remove Brightness 56Saturation To Brightness 50Solarization 52Stairs 56Weird Dreams 51Weird Lines 55

Polarization – 25
Darken Center – 22
Lighten Center – 23
Skylight – 24
Bicolor: Brown – 27
Bicolor: Violet/Pink – 27
Bicolor: Green/Brown – 27
Bicolor: Moss – 26
Bicolor: User Defined – 28
Graduated: 0h (Gray) – 36
Graduated 201h (Sky Blue) - 37
Graduated 220h (Blue) – 39
Graduated 51h (Yellow) – 42
Graduated 38h (Warm Yellow) - 42
Graduated 32h (Orange) – 44
B/W Conversion – 16
Contrast: Green – 18
Contrast: Yellow – 18
Contrast: Red – 17
Contrast: Magenta – 19
Contrast: Blue – 19
Contrast: Cyan – 19
Graduated 213h (Dark Blue) – 38
Graduated User defined - 45
Graduated 94h (Moss) – 43
Graduated 34h (Blood) – 39
Graduated 335h (Red) – 38
Graduated 33h (Coffee) – 40
Filter icons with a dashed border indicate that the filter has a contrast effect – theyare not intended to alter colors. Please note that filters not derived from convention-al photography are not listed on this page. For a complete list, see the previous page.
...
...
15
Filter Index by filter symbol

16
nik Color Efex Pro! Overview
B/W Conversion
The B/W Conversion filter allowsyou to convert your color images to black
and white using a classical color filter sim-ilar to the one used in conventional pho-tography. Placing a conventional coloredglass filter in front of your black and whitecamera changes the contrasts dramatically.When using a red filter, for example, theblues in a sky scenery photo would bedarkened dramatically, accentuating theclouds and making them more crisp.
The Brightness adjustment allowsyou to increase or decrease the overallbrightness in cases where the filter dark-ens the image too much. This filter willonly have an effect on color images andleaves grayscale images unaffected.
The Filter Strength slider defi-nes the degree to which the filter willaffect the final image.
The Spectrum slider defines thecolor of the filter you are using.

Contrast Filters
Contrast filters allow you to makeuse of the powerful contrast effects used inBlack and White photography. With nikColor Efex Pro, however, you can applythese effects to color photos to attain uniquecontrasts. There are six contrast filtersthat cover the entire color spectrum: Red,Magenta, Blue, Cyan, Green, and Yellow.The Contrast Filter: Red, for example, willaffect the contrast of the photo in just thesame way as a red glass filter would whenplaced in front of a still camera, but withoutturning the image red. Each of the six con-trast filters also allow the filter color used tobe altered slightly within the filter dialog.
Contrast Filter: Red
The Contrast Filter: Red is probablythe most popular contrast filter, as it dark-enes and dramatizes blue colors in the skyor blue water, and makes warm colors, suchas those found in flowers and skin, brighter.
The Brightness adjustment allowsyou to increase or decrease the overallbrightness in cases where the filter darkensthe image too much.
The Contrast slider defines thedegree to which the filter will affect thefinal image.
The Spectrum slider defines thecolor of the filter you are using.
17

18
Contrast Filter: Green
Although the Green Contrastfilter is a color filter, its applications areunique. The Green filter intensifieswarm colors such as orange, red, andviolet, darkening and adding depth tothese colors.
Contrast Filter: GreenIdeal for still and portrait photo-graphs.
Contrast Filter: YellowThe Yellow Contrast filter is appli-cable to various images, primarilylandscape and nature photography.
Contrast Filter: RedThe Red Contrast filter is the mostpopular contrast filter, ideal forlandscape photography. It is espe-cially effective for intensifying theeffect of clouds in a scenery photo.

The Contrast Filter: Magenta
The Cyan Contrast filter com-pletes the color spectrum for this filterset. It is often used for stylizing andadding a cold feel to images.
Contrast Filter: MagentaIdeal for many still photographyapplications.
Contrast Filter: BlueThe Blue Contrast filter can beused for darkening skin tones,either for extreme effects or tosimulate a suntan in portraits.
Contrast Filter: CyanVarious purposes.
19

20
Brilliance/Warmth
The Brilliance/Warmth filter isdesigned to make colors in an imagelook more saturated and warm. Becausenik Color Efex Pro uses an advancedcolor treatment system, increasing animage’s saturation is different thanincreasing the saturation usingPhotoshop or other image-editing appli-cations. Please refer to the section onAdvanced Color Treatment - RGB,CMYK, and Lab for information on thisfeature. Note that images often lookunnatural when the saturation (i. e., theBrilliance) is increased at all. In otherwords, the Brilliance/Warmth filter is astylizing filter rather than a color-cor-recting filter. If you feel that your imageis not colorful enough, try enhancing theimage with other filters or tools, such asPhotoshop’s "Levels” command, or thenik Color Efex Pro Sunshine filter.
Brilliance: The Brilliance sliderdefines the saturation of the colors inthe image.
Warmth: The Warmth sliderenables you to give the colors either acolder or a warmer impression.

21
Ink
The Ink filter changes the colorset in the image, making it appear asthough it were printed on very oldphoto paper. This effect is unique to nikColor Efex and not easily created withstandard image-editing tools. The Inkeffect is ideal for making images abstractwhile maintaining the color and detail inthe image.
Design Hint: The Ink filter isespecially effective when applied uni-formly across all images in a personalprofile, corporate identity, or promotion-al brochure.
Color Set: This slider defines thecolors used for this filter.
Strength: The Strength sliderdefines how much the colors in theimage will change. Please note that thesample shown is a little bit overdone.Depending on your style, you may wantto use lower Strength settings for thisfilter.

22
Darken Center
The Darken Center filter wasdesigned to alter a common photographiceffect. Because light reaches the marginsof the negative to a lesser degree than thecenter, most images are brighter in themiddle. The Darken Center filter altersthis effect. This filter is especially usefulwhen photographing flat objects, such aspaintings, house-fronts, graffiti, etc.. Asshown here in this sample, the effect cre-ates a flat and two-dimensional impres-sion, a desirable effect in cases such asthese. (see the two door front photos onthis page)
Distort: The Distort slider lets youcontrol whether the dark area in the mid-dle of the image is skewed horizontally(move slider left), vertically (right), or cir-cular (leave it in the middle).
Filter Opacity: The Filter Opacityslider controls the intensity of the filter.Take care not to apply this filter toomuch.
Center Size: The Center Sizeadjustment controls the size of the centerfocus of the filter that will be darkened.

Lighten Center
The complement of DarkenCenter, the Lighten Center filter increasesthe natural effect created in analog photo-graphy, where most photos are brighter inthe center than at their margins.Conventional photographic wisdom saysthat an image should have consistent lumi-nance throughout a photo. However, theeffect of lightening the center portion of animage can create a realistic, three-dimen-sional and even more dynamic effect. TheLighten Center filter is appropriate forlandscape photos as well as for indoor pho-tos where a three-dimensional effect isdesirable.
Distort: The Distort slider lets youcontrol whether the light area in the mid-dle will be skewed horizontally (move slid-er left), vertically (move slider right), orcircular (leave it in the middle).
Filter Opacity: The Filter Opacityslider controls the opacity of the filter.Take care not to apply this adjustment toomuch.
Center Size: The Center Sizeadjustment controls the size of the centerfocus of the filter that will be lightened.
23

24
Skylight Filter
The Skylight filter eliminates theblue shade that is often added to out-door photos due to the blue sky. Thisfilter removes some color obscurity thatoccurs resulting from UV light. SinceUV information is not stored in digitalimage data, nik Color Efex Pro cannotentirely undo the UV influence.However, this version of the convention-al filter does provide some color correc-tion to the image.
Strength: The Strength slideronly defines how much the effect isapplied.

25
Polarization
Requests for a digital polarizationfilter rank among the top for additions tonik Color Efex filters. Simply put, a con-ventional polarization filter is a glass filterthat filters certain light from an imagecreating different and often better colorsand contrasts.
Creating an actual digital polariza-tion filter is not an easy task; in fact, itborders on impossible, as applying a polar-ization filter to an image after it was takenis impossible. However, as a result of themany requests, we created the Polarizationfilter that combines an ensemble of rou-tines and algorithms that, while they haveabsolutely nothing to do with actualpolarization, manage to simulate theeffect. One limitation of the nik ColorEfex Pro Polarization filter is that cannotfilter away surface reflections such as glarefrom glass or water.
Rotate Filter: This slider rotatesthe virtual filter, which leads to varyingdegrees of contrast.
Strength: The Strength slider letsyou control how much this filter isapplied.

26
Bicolor Filter: Moss
The Bicolor Moss filter is one ofthe Bicolor filters in the series that inksthe image with one color at the top of theimage and a different color at the bottom.The Bicolor Moss filter applies a gradientwith two different green/turquoise huesto the image, providing a somewhat meanand rather sinister effect. Bicolor filterssuch as this provide a more pronouncedeffect when the original contains less sat-urated colors.
Rotate Horizon: The RotateHorizon slider lets you tilt the filter eitherclockwise or counter-clockwise. PleaseNote: The default setting for the RotateHorizon slider often provides an optimalsetting for this slider.
Filter Opacity: The Filter Opacityslider defines the strength of this filter.
Shift Vertical: The Shift Verticaladjustment lets you push the entire filterup or down.
Blend: The Blend slider workssimilar to a blend adjustment in conven-tional photography. By altering the blend,you can create either a soft or a definedtransition.

27
Bicolor Filter: BrownBicolor Filter: Violet/PinkBicolor Filter: Green/Brown
The three filters shown here areBicolor filters similar to the Moss filter.Each of these pre-set filters creates aunique effect with pre-set colors, whichhave a variety of applications. If you wantto create your own colors, try the filter"Bicolor: User defined”, where you canchoose two colors manually, or try the fil-ter "Bicolor Filter: Standard”, where youcan choose a pair of colors from the nikColor Efex palette.
Rotate Horizon: This slider letsyou tilt the filter clockwise or counter-clockwise. When experimenting with therotation of the horizon you will find thatany setting other than the horizontaldefault setting creates an unsettling effectin most photos.
Filter Opacity: Filter Opacitydefines the strength of this filter.
Shift Vertical: The Shift Verticalparameter lets you push the entire filterup or down.
Blend: The Blend slider workssimilar to a blend adjustment in conven-tional photography. By altering the blend,you can create either a soft or a definedtransition.

28
Bicolor Filter: User Defined
The Bicolor filter allows you tocombine two colors to apply to an image.Be selective in the combinations youchoose, since over saturated or non-com-plementary colors can create unsatisfyingresults.
Color 1: The Color 1 setting letsyou define the color for the upper regionof the image.
Color 2: The Color 2 setting letsyou define the color for the lower regionof the image.
Rotate Horizon: This slider letsyou tilt the filter clockwise or counter-clockwise.
Filter Opacity: Filter Opacitydefines the strength of this filter.
Shift Vertical: This parameter letsyou push the entire filter up or down.
Blend: The Blend slider workssimilar to a blend adjustment in conven-tional photography. By altering the blend,you can create either a soft or a definedtransition.

29
Duplex
The Duplex filter provides theeffect of a duplex print while keepingthe image in its original RGB orCMYK color mode. Users shouldremember that this filter does not createa print ready for the duplex printprocess. Since 99% of prints today areprinted in CMYK, leaving the image ineither RGB or CMYK allows you tocreate this effect while preparing yourimage for professional printing. Forthose unfamiliar with duplex prints,when experimenting with this filter, youwill notice that the filter creates a styl-ized version of the original image, color-ing it with a single hue.
Color: The Color parameter con-trols the color with which the image isinked.

30
Sunshine
The Sunshine filter is the mostsophisticated in the Color Efex Pro arrayof filters. The powerful effects of the fil-ter are controlled by a number of parame-ters, which adjust multiple light-castingalgorithms. The Sunshine filter is ideal foradding sunlight to an indoor or outdoorphoto where the original light settingswere not optimal or not "brilliant” at thetime the photo was taken. The Sunshinefilter is not only effective when applied toimages with insufficient light, it also iseffective when used to brighten andenhance images, making a good imageeven better.
Note that in the sample on thispage, the effect of the filter is not tobrighten the entire image; rather, the filterenhanced the details, such as the grass, byintensifying the light cast in the originalimage. Shadows are maintained to anequal degree, while the lake’s waterbecomes even darker. This effect is theresult of setting the parameters optimally(including the prefilter, described on page31). Setting parameters precisely is trulyessential to optimal results. Because thisfilter is among the most complex andpowerful in the collection, experience
using this filter on varying types ofimages is the key to optimizing or trans-forming an image. For quick additions ofsunlight to an image, consider using theSunshine (quick) filter discussed in thenext section.
Note: If you have an image with awashed-out gray (or even white) sky,applying one of the Graduated filters(especially Graduated Blue 201h) willhelp make the sky a deeper blue. TheSunshine filter is designed to cast andenhance light and will not regenerate skyscenery that is gray or white.

Saturation Correction: TheSaturation Correction slider controls thecorrection of some colors in the image,especially bright ones. Be careful thatthis slider is not applied too much.Optimal setting for this parameter canvary extremely from image to image.
CCR Effect: The "Cold ColorReduction Effect” makes the colors in animage appear warmer. Many images lookappealing with a strong CCR Effect set-ting. However, be careful not to over-adjust this setting, as doing so will leavean image looking too "soft”.
Light Casting Algorithm: TheSunshine filter is capable of adding andcasting light using several algorithms.Each collection of calculations has a dif-ferent method for adding light to animage. Because images and their con-tents, colors, and detail vary widely, it isnot possible to provide a "rule” for deter-mining when to use which algorithmsetting. However, setting "A” is the mostcommon and can be used in most imagesto add light. Experiment with the othersettings as well to establish the optimalsetting for each image.
Sunlight Intensity: The Sunlight
Intensity setting adjusts the intensity ofthe added sunlight using the selectedLight Casting Algorithm.
Radius: The Radius slider deter-mines the light-glowing radius in theimage, measured in pixels. In scenerythat is glowing with light, some objectscast light off their surface and ontoobjects directly beneath them. This hap-pens even more so from bright objects todark surfaces. The Sunshine filter simu-lates this effect, but the filter needs anoptimal setting for the image. One ruleto try is to use 1/80 (or .0125) of theimage’s height or width as the Radiussetting. Begin with this value and adjustit from there.
Prefilter: The Prefilter settingapplies one of a number of filtering rou-tines to an image before applying theother settings. Before adding sunshine,the filter treats the image with one ofseveral Prefilters. The Prefilter willchange the image’s contrast, affecting theway the sunlight appears when it isadded. Please note that, although thePrefilters have names such as "landscape”and "portrait”, the Prefilters can beapplied to many types of images. ThePrefilter names do not restrict the effec-tive applications of the filters.
31
Prefilter Strength: The PrefilterStrength defines how strong the prefilterwill be applied.
Sunshine (quick)The Sunshine (quick) filter pro-
vides users with a quick alternative foradding light to images. The Sunshine(quick) filter has only two parameters toadjust, allowing users to alter the CCREffect and Sunlight Intensity. This filter isoptimal for catalog production and projectswhere many images may need some addedlight. This filter was designed to provideusers with a limited number of adjust-ments in order to simplify consistent lightapplications to a number of photos. Formore extensive light adjustments, use thefull-featured Sunshine filter.
CCR Effect: The "Cold ColorReduction Effect” makes the colors in animage appear warmer. Many images areeffective with a strong CCR Effect setting.However, be careful not to over-adjust thissetting, as doing so can leave an imagelooking too "soft”.
Sunlight Intensity: The SunlightIntensity setting controls the intensity ofthe added sunlight.
32
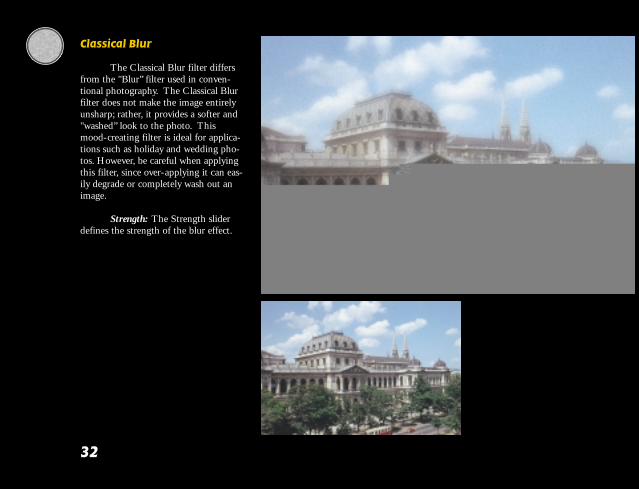
Classical Blur
The Classical Blur filter differsfrom the "Blur” filter used in conven-tional photography. The Classical Blurfilter does not make the image entirelyunsharp; rather, it provides a softer and"washed” look to the photo. Thismood-creating filter is ideal for applica-tions such as holiday and wedding pho-tos. However, be careful when applyingthis filter, since over-applying it can eas-ily degrade or completely wash out animage.
Strength: The Strength sliderdefines the strength of the blur effect.

33
Contrast Only
Just as the name implies, theContrast Only filter alters only the con-trast of an image. When making adjust-ments to contrast in an RGB or CMYKimage, colors often change automaticallyas well. Many times, this effect is desir-able. However, sometimes it is desirableto alter the contrast without changingthe color saturation. The Contrast Onlyfilter provides this option for photogra-phers and designers. If you apply thisfilter with a strong setting, you willnotice that a stylizing effect occurs.Experiment with this filter to expandyour creative arsenal.
Contrast: The Contrast slideradjusts the contrast of the image.
Brightness: The Brightness slid-er allows you to adjust the brightness inthe image. The default setting for thisadjustment often provides the optimalsetting.

34
Color Stylizer
The Color Stylizer filter allowsyou to stylize your images using certaincolors. The Color Stylizer inks theimage with a single color. Although theimage may appear to be monochrome, itis still a color image. In addition tocolor alteration, the Color Stylizeradjusts the contrast slightly to providean added stylizing adjustment.
Color: The Color slider definesthe color with which the image is inked.
Contrast: The Contrast sliderdefines how much the contrast ischanged. This adjustment only affectsthe brightness channel in the image.
Saturation: The Saturation slid-er allows you to control the number oforiginal colors that will remain in thefinal image.

35
Old Photo
With the Old Photo filter you caneasily create antique photos with variousstylized effects. The Old Photo filtertransforms a color photo to an antiquephoto, providing varying degrees of effectsfor virtually any antique layout.
Brightness: The Brightness adjust-ment adjusts the overall brightness in theimage.
Grain: The Grain slider controlsthe amount of grain in the photo.
Paper Color: The Paper Color slid-er simulates different photo paper colors,allowing you to control the paper color,from a cold blue to a warm yellow. Whenadjusting this slider, be careful not to over-colorize the image. In this application, lessis more.
Contrast: The Contrast adjustmentlets you control the contrast of the image,provided you choose one of the three chan-nels via the Use Channel slider.
Use Channel: The Use Channelslider allows you to choose whether youwant to mix one of the Red, Green, orBlue channels into the contrast, or youwant to use the existing channels as origi-nally set in the color image.

36
Graduated 0h (Gray)
This first filter in the Graduatedseries is useful for darkening the sky in ascenery photo. The Graduated 0h (Gray)filter in conventional photography is usedto make the sky darker. Please note thatthe nik Color Efex Pro 0h (Gray) digitalfilter always creates a gray effect, unlikethe analogous gray filter from classicalphotography, which sometimes makes apale blue sky more saturated.
Rotate Horizon: The RotateHorizon slider lets you tilt the filterclockwise or counter-clockwise. Thedefault setting for this slider is in mostcases the optimal setting. Keep this inmind when experimenting with thisadjustment.
Filter Opacity: The FilterOpacity adjustment defines the overallstrength of this filter.
Shift Vertical: The Shift Verticalparameter lets you adjust the entire filterup or down.
Blend: The Blend adjustmentworks the same as in conventional pho-tography. By altering the blend withinthe image, you can define color transitionfrom gradual to abrupt.

37
Graduated 201h (Sky Blue)
The Graduated: 201h (Sky Blue)filter colors the upper portion of the imagewith a pronounced blue. This filter is idealfor re-coloring a gray sky. This filter shouldnot be confused with the "Graduated 220h(Blue)” which, while it comes close to the201h (Sky Blue), the 220h filter is notoptimized for re-coloring the sky. For re-establishing a sky blue color, use theGraduated: 201h (Sky Blue) filter.
Rotate Horizon: The RotateHorizon slider lets you tilt the filter clock-wise or counter-clockwise. The defaultsetting for this slider is in most cases theoptimal setting. Keep this in mind whenexperimenting with this adjustment.
Filter Opacity: Filter Opacitydefines the strength of this filter.
Shift Vertical: The Shift Verticalparameter lets you adjust the entire filterup or down.
Blend: The Blend adjustment worksthe same as in conventional photography.By altering the blend within the image, youcan define color transition from gradual toabrupt.

38
Graduated 213h (Dark Blue)
The Graduated 213h (DarkBlue) filter provides a graduated darkblue effect, ideal for creating a stylizedand somewhat sinister image. This filteris suitable for changing the mood of aphoto or for creating a surreal effect.
Rotate Horizon: The RotateHorizon slider lets you tilt the filterclockwise or counter-clockwise. Thedefault setting for this slider is in mostcases the optimal setting. Keep this inmind when experimenting with thisadjustment.
Filter Opacity: Filter Opacitydefines the strength of this filter.
Shift Vertical: The Shift Verticalparameter lets you adjust the entire filterup or down.
Blend: The Blend adjustmentworks the same as in conventional pho-tography. By altering the blend withinthe image, you can define color transi-tion from gradual to abrupt.

39
Graduated 220h (Blue) Graduated 355h (Red)
The Graduated filters 220h (Blue)and 355h (Red) are provided for stylisticenhancements. Like the other Graduatedfilters, these two filters color the upper por-tion of the image with the specified color.Unlike filters such as the Graduated 201h(Sky Blue), these two filters were notdesigned with a specific enhancement inmind. Rather, the 220h (Blue) and 355h(Red) provide added color variety withinthe Graduated filter series.
Rotate Horizon: The RotateHorizon slider lets you tilt the filter clock-wise or counter-clockwise. The default set-ting for this slider is in most cases the opti-mal setting. Keep this in mind whenexperimenting with this adjustment.
Filter Opacity: Filter Opacitydefines the strength of this filter.
Shift Vertical: The Shift Verticalparameter lets you adjust the entire filterup or down.
Blend: The Blend adjustment worksthe same as in conventional photography.By altering the blend within the image, youcan define color transition from gradual toabrupt.
40
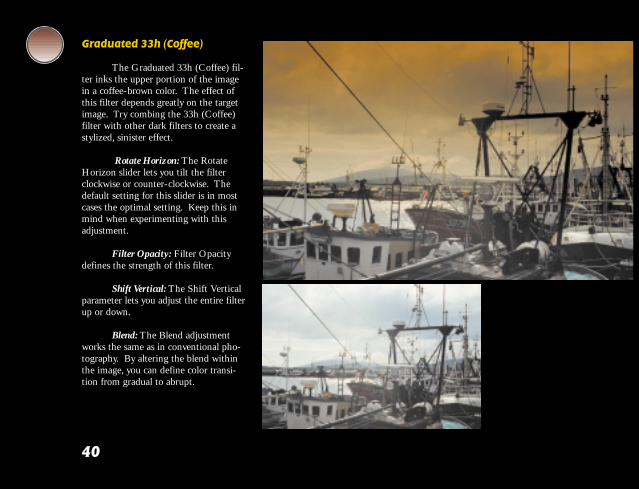
Graduated 33h (Coffee)
The Graduated 33h (Coffee) fil-ter inks the upper portion of the imagein a coffee-brown color. The effect ofthis filter depends greatly on the targetimage. Try combing the 33h (Coffee)filter with other dark filters to create astylized, sinister effect.
Rotate Horizon: The RotateHorizon slider lets you tilt the filterclockwise or counter-clockwise. Thedefault setting for this slider is in mostcases the optimal setting. Keep this inmind when experimenting with thisadjustment.
Filter Opacity: Filter Opacitydefines the strength of this filter.
Shift Vertical: The Shift Verticalparameter lets you adjust the entire filterup or down.
Blend: The Blend adjustmentworks the same as in conventional pho-tography. By altering the blend withinthe image, you can define color transi-tion from gradual to abrupt.

41
Graduated 354h (Blood)
This filter’s effect is similar to theGraduated 33h (Coffee) filter. The use ofa deep, blood red creates startling effectsin landscapes. Try applying it to create anominous sky or a stylized sunset.
Rotate Horizon: The RotateHorizon slider lets you tilt the filterclockwise or counter-clockwise. Thedefault setting for this slider is in mostcases the optimal setting. Keep this inmind when experimenting with thisadjustment.
Filter Opacity: Filter Opacitydefines the strength of this filter.
Shift Vertical: The Shift Verticalparameter lets you adjust the entire filterup or down.
Blend: The Blend adjustmentworks the same as in conventional pho-tography. By altering the blend withinthe image, you can define color transitionfrom gradual to abrupt.

42
Graduated 38h (Warm Yellow)Graduated 51h (Yellow)
The Graduated: 38h (WarmYellow) filter inks the upper portion ofthe image in a warm yellow color. Thisfilter brings out yellows in the image(see photos to the right) and is ideal forcreating a soft, romantic look. TheGraduated: 51h (Yellow) filter inks theupper portion of the image in a basic,universal yellow, similar to the filters220h (Blue) and 355h (Red).
Rotate Horizon: The RotateHorizon slider lets you tilt the filterclockwise or counter-clockwise. Thedefault setting for this slider is in mostcases the optimal setting. Keep this inmind when experimenting with thisadjustment.
Filter Opacity: Filter Opacitydefines the strength of this filter.
Shift Vertical: The Shift Verticalparameter lets you adjust the entire filterup or down.
Blend: The Blend adjustmentworks the same as in conventional pho-tography. By altering the blend withinthe image, you can define color transi-tion from gradual to abrupt.

43
Graduated 94h (Moss)
The Graduated 94h (Moss) filterinks the upper portion of the image in amoss green color. This filter is ideal forcreating an eerie effect in landscapes. TheGraduated: 94h (Moss) can also be usedas a stylizing tool to create odd and surrealcolors.
Rotate Horizon: The RotateHorizon slider lets you tilt the filter clock-wise or counter-clockwise. The defaultsetting for this slider is in most cases theoptimal setting. Keep this in mind whenexperimenting with this adjustment.
Filter Opacity: Filter Opacitydefines the strength of this filter.
Shift Vertical: The Shift Verticalparameter lets you adjust the entire filterup or down.
Blend: The Blend adjustmentworks the same as in conventional pho-tography. By altering the blend within theimage, you can define color transitionfrom gradual to abrupt.

44
Graduated 32h (Orange)
The Graduated: 32h (Orange)filter inks the upper portion in a shadedorange color. As shown in the photo tothe right, this filter can be applied tolandscape photos and is also ideal forcityscapes and indoor images to create asomewhat romantic feel. In someimages, the Graduated 32h (Orange)can be used to produce the colors of asunset.
Rotate Horizon: The RotateHorizon slider lets you tilt the filterclockwise or counter-clockwise. Thedefault setting for this slider is in mostcases the optimal setting. Keep this inmind when experimenting with thisadjustment.
Filter Opacity: Filter Opacitydefines the strength of this filter.
Shift Vertical: The Shift Verticalparameter lets you adjust the entire filterup or down.
Blend: The Blend adjustmentworks the same as in conventional pho-tography. By altering the blend withinthe image, you can define color transi-tion from gradual to abrupt.

45
Graduated User Defined
The user-defined option in theGraduated series provides you with severaloptions for creating colors. With theGraduated User Defined filter, you canselect any color from a color selectionscreen. Although this filter does allow youto choose from a number of colors, con-sider that the pre-set graduated color fil-ters were selected to provide a maximumrange of applicability for most images.
Color: The Color setting allowsyou to set the filter color. Click on one ofthe predefined colors and a window willopen where you can define a color.
Rotate Horizon: The RotateHorizon slider lets you tilt the filter clock-wise or counter-clockwise. The defaultsetting for this slider is in most cases theoptimal setting. Keep this in mind whenexperimenting with this adjustment.
Filter Opacity: Filter Opacitydefines the strength of this filter.
Shift Vertical: The Shift Verticalparameter lets you adjust the entire filterup or down.
Blend: The Blend adjustmentworks the same as in conventional pho-tography. By altering the blend within theimage, you can define color transitionfrom gradual to abrupt.

46
The Midnight Filters
The Midnight filters series is a col-lection of stylizing filters that creates a vari-ety of stylizing and mood effects. In itsmost popular application, Midnight filterscreate a day-for-night effect, creating theillusion that a photo taken in daylight wastaken at night. The advantage of using theMidnight filter in this application is itsability to control light through the applica-tion of color. Combinations of these filterscreate dark and sinister moods in a photo.There are five filters in the Midnight filterseries: Midnight, shown to the right,Midnight (blue), Midnight (sepia),Midnight (violet), and Midnight (green),which is shown on the next page.
The Midnight filters are ideal tocombine with other filters in the nik ColorEfex Pro collection. The Midnight andMidnight (blue) filters together create astylized day-for-night effect. Adding theLighten Center filter can add depth to aday-for-night scenery photo.
Midnight

47
Color: The Color slider deter-mines how intense the indicated colorwill be applied in the image. Considerusing a lower Color setting to achieve amore realistic midnight effect
Blur: The Blur slider allows youto alter the degree to which the imagecontains a “washed” look.
Brightness: The Brightness sliderdetermines the overall brightness in theimage.
Midnight (blue)
Midnight (sepia)
Midnight (violet) Midnight (green)

48
The Monday Morning Filters
The Monday Morning filter seriesis a collection of four mood filters. Thesefilters are not intended to create images tolook like a Monday morning. Instead theyare designed to create a look as people feelon a Monday morning - cool, uncomfort-able and even a little sleepy. Just as withthe Midnight series, there is one filter thatuses a "normal” color setting and threeother filters that use colors with specifiedhues.
Grain: The Grain slider controlsthe amount of grain in the photo.
Brightness: The Brightness adjust-ment controls the overall brightness in theimage.
Smear: The Smear slider controlsblur in the image.
Color: The Color slider defines thesaturation of the image. Please note that inthe three colored filters, this slider will alsoadjust the intensity of the added color.
Monday Morning

49
Monday Morning (sepia)
Monday Morning (blue)
Monday Morning (violet)

50
nik Abstract Efex Pro!
Saturation To Brightness
The Saturation to Brightness filterextracts the Saturation of each pixel andreplaces each pixel’s luminance with thesaturation. The Saturation to Brightnessfilter is not designed to enhance yourphotos in a conventional manner, butrather to intensify the colors of the targetimage with the result that even thefaintest colors in a photo can be broughtout and intensified. Applications for thisfilter are very broad and include anyimage that contains a variety of colors.Using this filter on photos with littlecolor variation often leads to less impres-sive changes.
Brightness: The Brightness slidercontrols the brightness of the image.
Saturation: The Saturation sliderlets you control the brilliance of theimage’s colors. Creative Hint: With thisadjustment, less is often more.
Nudge Colors: The Nudge Colorsslider lets you move the colors about,enabling more interesting effects.

51
Weird Dreams
The Weird Dreams filter creates asomewhat bizarre and often dazzling pat-tern from your image. This artistic effectdistorts the original image and creates abrilliant surreal version of the original.Use this filter in conjunction with otherfilters to obtain surprising effects. Thesample shown here was created with both"Weird Dreams” and various Graduatedfilters.
Size: The Size slider controls thesize of the lines that will appear.
Color Set: The Color Set slider letsyou choose the color set used in the filter.


53
Pop Art
The Pop Art filter uses anabstract line-filtering process to trans-form the colors and structure of theimage. The final result can be varied byadjusting the color slider to change thecolor intensity within the image pattern.
Saturation: The Saturation sliderlets you control the brilliance of theimage’s colors. Creative Hint: With thisadjustment, less is often more.
Brightness: The Brightness slid-er allows you to adjust the brightness inthe image. The default setting for thisadjustment often provides the optimalsetting.
Size: The Size slider defines thesize of the details in the image. Thisadjustment should be set to a low valuewhen used with small images, and ahigh value with large images.

54
Infrared
The Infrared filter simulates theview through a thermal camera – a camerathat is capable of deciphering the warmthin an image via color. Thermal effects pro-vide stylizing options for design, but aredifficult to create. While the Infrared filteronly simulates the view through an infraredcamera, it nevertheless allows users to pro-duce a good simulation that can be adjust-ed using the sliders.
Center Size: The Center Size slideradjusts the center focus of the image.
Blur: The Blur slider lets you con-trol how much the bright (warm) areas ofthe image will glow in the areas beneaththese brighter areas.
Color: With the Color slider, youcan change the overall warmth/color cali-bration. To obtain the most realistic effect,try choosing a setting where some yellow isvisible.

55
Pastel
The Pastel filter is ideal for creatingwhat we like to call a "nostalgic inno-cence”. This effect can be used to soften aforeground image or to softly white out abackground image. Using the adjustmentswith this filter also allows you to create asoft, "clean” look.
Blend: The Blend slider defines theblend of the effect throughout the detail inthe image.
Contrast: The Contrast slider con-trols the overall contrast of the image.
Brightness: The Brightness sliderlets you control the overall luminance ofthe image.
Weird Lines
Weird Lines is among the moreabstract filters. This filter incorporates oddspots and lines into the image to create anabstract effect.
Contrast: The Contrast adjustmentdefines the strength of the lines.
Size: The Size slider controls thesize of the lines that will appear.
Number of Lines: The Number ofLines adjustment sets the number of linesthat will appear.

56
Stairs
The Stairs filter (upper image)applies a stair-stepping effect to an imageover its luminosity, while making adjust-ments based on the individual colors ofthe image. The Stairs filter creates ratherimpressionistic and colorful images.
Contrast: The Contrast sliderdefines the overall image contrast.
Stair Size: The Stair Size sliderdefines the frequency and size of thestair-stepping effect.
Color: The Color slider definesthe saturation of the image.
Remove Brightness
The Remove Brightness filterprovides a very simple but useful effect: Itremoves each pixel’s brightness, so thateach pixel has the same degree of lumi-nance.
Saturation: The Saturation slidercontrols the image’s overall saturation.
Brightness: The Brightness sliderallows you to adjust the brightness in theimage.
Nothing is easier than to express something simple in a complicated manner. But to express something compli-cated simply is much more complicated.(Translated and adapted from Karl Heinrich Waggerl, 1897 - 1973; Austrian Author)

nik multimedia, Inc.2615 Camino del Rio South, Suite 110San Diego, CA 92108U. S. A.Phone: (619) 725 - 3150Fax: (619) 725 - 3151E-mail: [email protected]
© Copyright 1999, 2001 by nik multimedia. All rights reserved.
nik multimedia software is produced and distributed exclusively by
The TECHnik Group.
http://www.nikmultimedia.com
HIGH PERFORMANCE GmbHHammerbrookstrasse 93D-20097 HamburgGermanyPhone: + 49 - 40 - 25 40 48 - 0Fax: + 49 - 40 - 25 40 48 - 40E-Mail: [email protected]
nik multimedia USA nik multimedia Europe

Col
orP
ro_B
ookl
et -
D/U
S 1.
0