Embed Size (px)
Citation preview
LEE PRECISION, INC. 4275 HWY. U HARTFORD WISCONSIN 53027 www.leeprecision.com
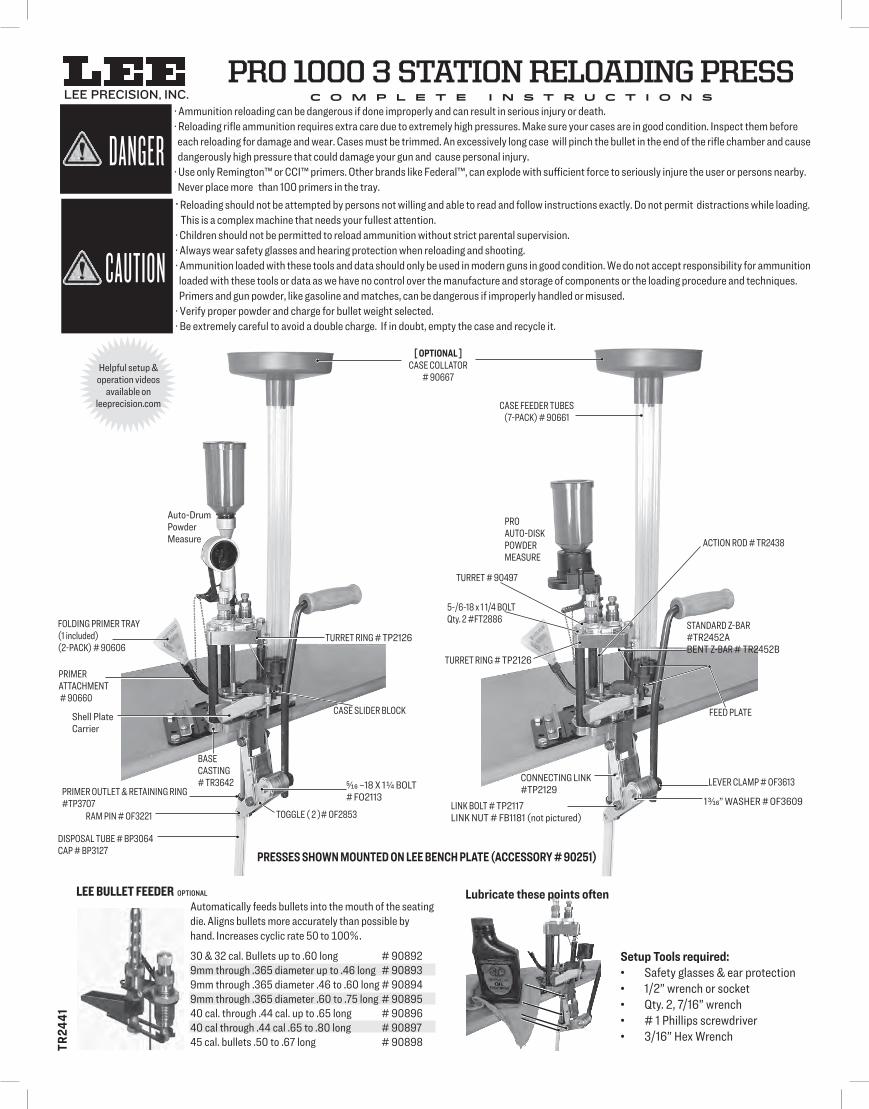
PRESSES SHOWN MOUNTED ON LEE BENCH PLATE (ACCESSORY # 90251)
TR24
41
Setup Tools required:• Safety glasses & ear protection• 1/2” wrench or socket• Qty. 2, 7/16” wrench• # 1 Phillips screwdriver• 3/16” Hex Wrench
PRO 1000 3 STATION RELOADING PRESSC O M P L E T E I N S T R U C T I O N S
Helpful setup & operation videos
available on leeprecision.com
[ OPTIONAL ]CASE COLLATOR
# 90667
Auto-Drum Powder Measure
PRO AUTO-DISKPOWDER MEASURE
CASE FEEDER TUBES (7-PACK) # 90661
TURRET # 90497
ACTION ROD # TR2438
FOLDING PRIMER TRAY (1 included)(2-PACK) # 90606
TURRET RING # TP2126
TURRET RING # TP2126
FEED PLATE
STANDARD Z-BAR #TR2452ABENT Z-BAR # TR2452B
RAM PIN # OF3221
DISPOSAL TUBE # BP3064CAP # BP3127
1 3/16” WASHER # OF36095/16 –18 X 1 1/4 BOLT# FO2113
LEVER CLAMP # OF3613
30 & 32 cal. Bullets up to .60 long # 908929mm through .365 diameter up to .46 long # 908939mm through .365 diameter .46 to .60 long # 908949mm through .365 diameter .60 to .75 long # 9089540 cal. through .44 cal. up to .65 long # 9089640 cal through .44 cal .65 to .80 long # 9089745 cal. bullets .50 to .67 long # 90898
LEE BULLET FEEDER OPTIONALAutomatically feeds bullets into the mouth of the seating die. Aligns bullets more accurately than possible by hand. Increases cyclic rate 50 to 100%.
CASE SLIDER BLOCK
CONNECTING LINK #TP2129
BASE CASTING # TR3642
PRIMER OUTLET & RETAINING RING #TP3707 LINK BOLT # TP2117
LINK NUT # FB1181 (not pictured)TOGGLE ( 2 )# OF2853
5-/6-18 x 1 1/4 BOLT Qty. 2 #FT2886
PRIMER ATTACHMENT # 90660
Shell Plate Carrier
Lubricate these points often
· Ammunition reloading can be dangerous if done im properly and can result in serious injury or death. · Reloading rifle ammunition requires extra care due to extremely high pressures. Make sure your cases are in good condition. Inspect them before each reloading for damage and wear. Cases must be trimmed. An excessively long case will pinch the bullet in the end of the rifle chamber and cause dangerously high pressure that could damage your gun and cause personal injury.· Use only Remington™ or CCI™ primers. Other brands like Federal™, can explode with sufficient force to seriously injure the user or persons nearby. Never place more than 100 primers in the tray.· Reloading should not be attempted by persons not willing and able to read and fol low instructions exactly. Do not permit distractions while loading. This is a complex machine that needs your fullest attention.· Children should not be permitted to reload ammunition without strict parental supervision. · Always wear safety glasses and hearing protection when reloading and shooting. · Ammunition loaded with these tools and data should only be used in modern guns in good condition. We do not accept responsibility for ammunition loaded with these tools or data as we have no control over the manufacture and storage of components or the loading procedure and techniques. Primers and gun powder, like gasoline and matches, can be dangerous if improperly handled or misused.· Verify proper powder and charge for bullet weight selected.· Be extremely careful to avoid a double charge. If in doubt, empty the case and recycle it.
DANGER
CAUTION
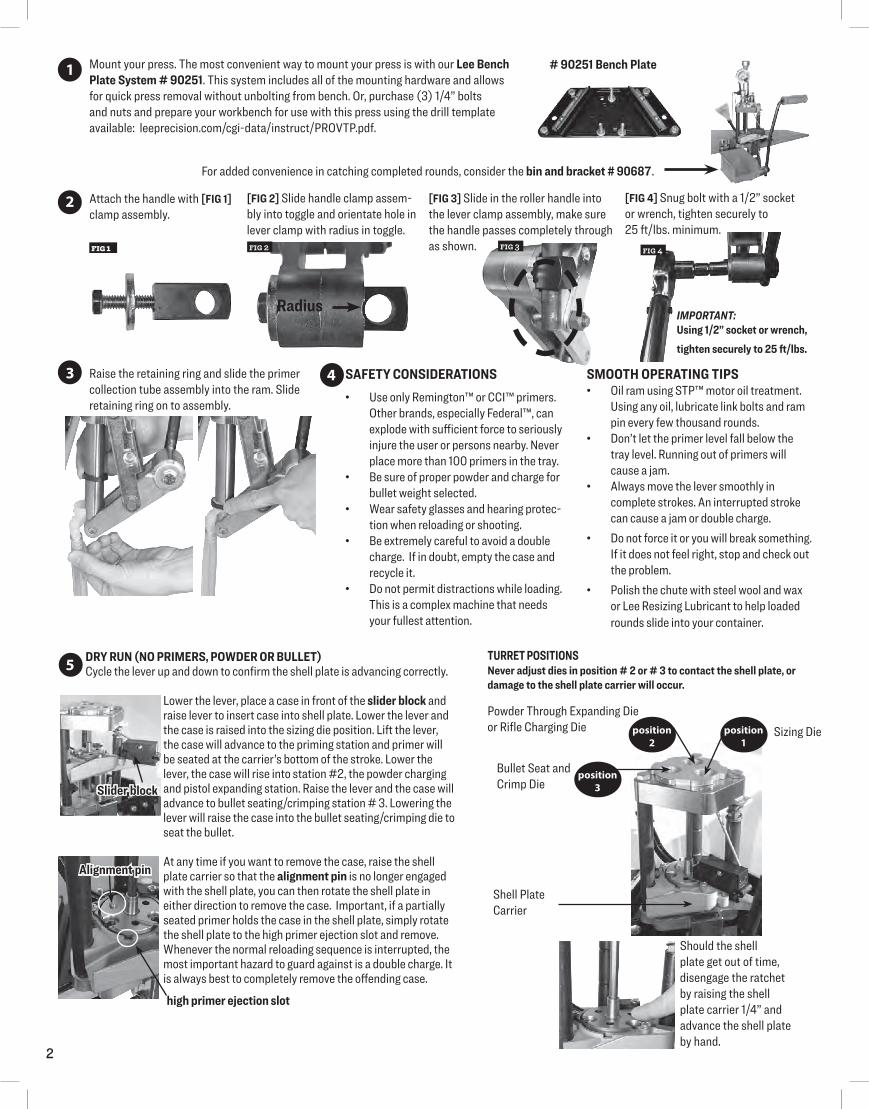
[FIG 4] Snug bolt with a 1/2” socket or wrench, tighten securely to 25 ft/lbs. minimum.
2
Sizing DiePowder Through Expanding Die or Rifle Charging Die
Bullet Seat and Crimp Die
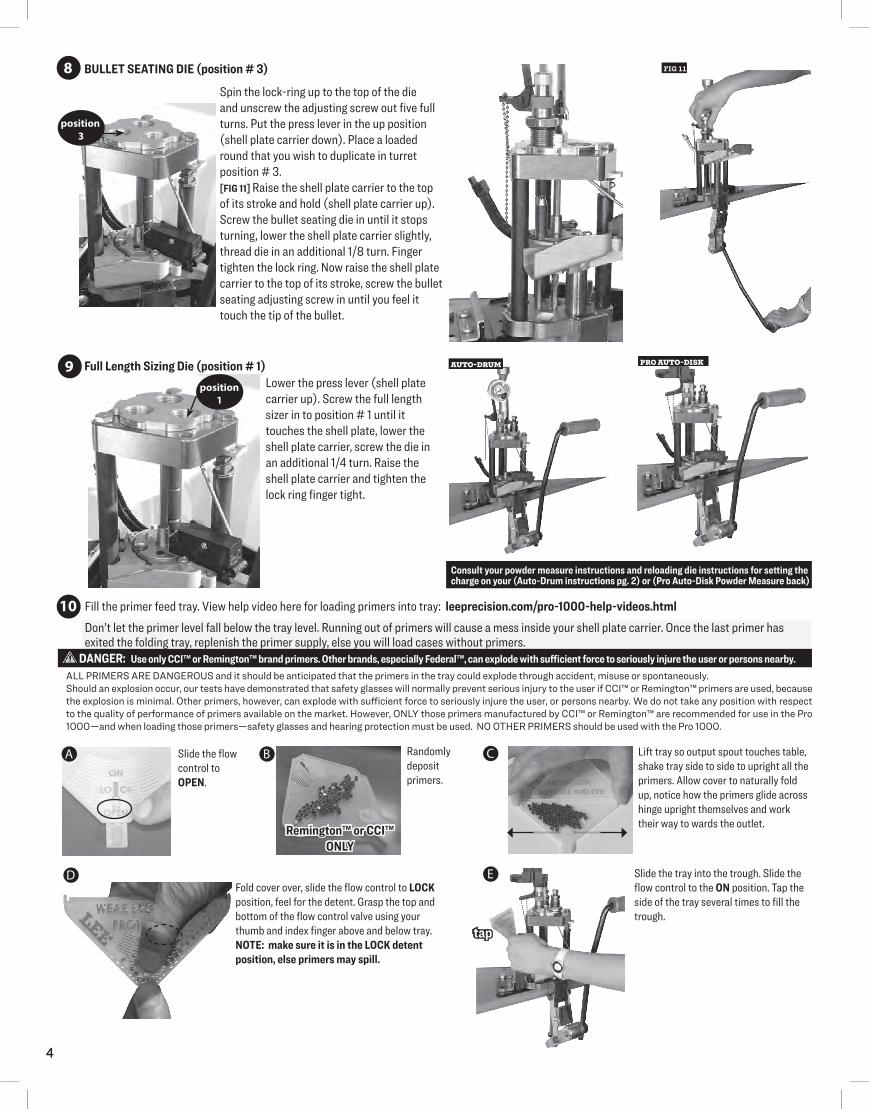
Never adjust dies in position # 2 or # 3 to contact the shell plate, or damage to the shell plate carrier will occur.
1
2
3
5
4 Raise the retaining ring and slide the primer collection tube assembly into the ram. Slide retaining ring on to assembly.
FIG 1 FIG 2 FIG 3 FIG 4
RadiusIMPORTANT: Using 1/2” socket or wrench, tighten securely to 25 ft/lbs.
Mount your press. The most convenient way to mount your press is with our Lee Bench Plate System # 90251. This system includes all of the mounting hardware and allows for quick press removal without unbolting from bench. Or, purchase (3) 1/4” bolts and nuts and prepare your workbench for use with this press using the drill template available: leeprecision.com/cgi-data/instruct/PROVTP.pdf.
DRY RUN (NO PRIMERS, POWDER OR BULLET)Cycle the lever up and down to confirm the shell plate is advancing correctly.
Lower the lever, place a case in front of the slider block and raise lever to insert case into shell plate. Lower the lever and the case is raised into the sizing die position. Lift the lever, the case will advance to the priming station and primer will be seated at the carrier’s bottom of the stroke. Lower the lever, the case will rise into station #2, the powder charging and pistol expanding station. Raise the lever and the case will advance to bullet seating/crimping station # 3. Lowering the lever will raise the case into the bullet seating/crimping die to seat the bullet.
At any time if you want to remove the case, raise the shell plate carrier so that the alignment pin is no longer engaged with the shell plate, you can then rotate the shell plate in either direction to remove the case. Important, if a partially seated primer holds the case in the shell plate, simply rotate the shell plate to the high primer ejection slot and remove. Whenever the normal reloading sequence is interrupted, the most important hazard to guard against is a double charge. It is always best to completely remove the offending case.
TURRET POSITIONS
position 2
position 3
position 1
high primer ejection slot
For added convenience in catching completed rounds, consider the bin and bracket # 90687.
Should the shell plate get out of time, disengage the ratchet by raising the shell plate carrier 1/4” and advance the shell plate by hand.
SAFETY CONSIDERATIONS• Use only Remington™ or CCI™ primers.
Other brands, especially Federal™, can explode with sufficient force to seriously injure the user or persons nearby. Never place more than 100 primers in the tray.
• Be sure of proper powder and charge for bullet weight selected.
• Wear safety glasses and hearing protec-tion when reloading or shooting.
• Be extremely careful to avoid a double charge. If in doubt, empty the case and recycle it.
• Do not permit distractions while loading. This is a complex machine that needs your fullest attention.
SMOOTH OPERATING TIPS• Oil ram using STP™ motor oil treatment.
Using any oil, lubricate link bolts and ram pin every few thousand rounds.
• Don’t let the primer level fall below the tray level. Running out of primers will cause a jam.
• Always move the lever smoothly in complete strokes. An interrupted stroke can cause a jam or double charge.
• Do not force it or you will break something. If it does not feel right, stop and check out the problem.
• Polish the chute with steel wool and wax or Lee Resizing Lubricant to help loaded rounds slide into your container.
# 90251 Bench Plate
Alignment pin
Slider block
Shell Plate Carrier
Attach the handle with [FIG 1] clamp assembly.
[FIG 2] Slide handle clamp assem-bly into toggle and orientate hole in lever clamp with radius in toggle.
[FIG 3] Slide in the roller handle into the lever clamp assembly, make sure the handle passes completely through as shown.
3
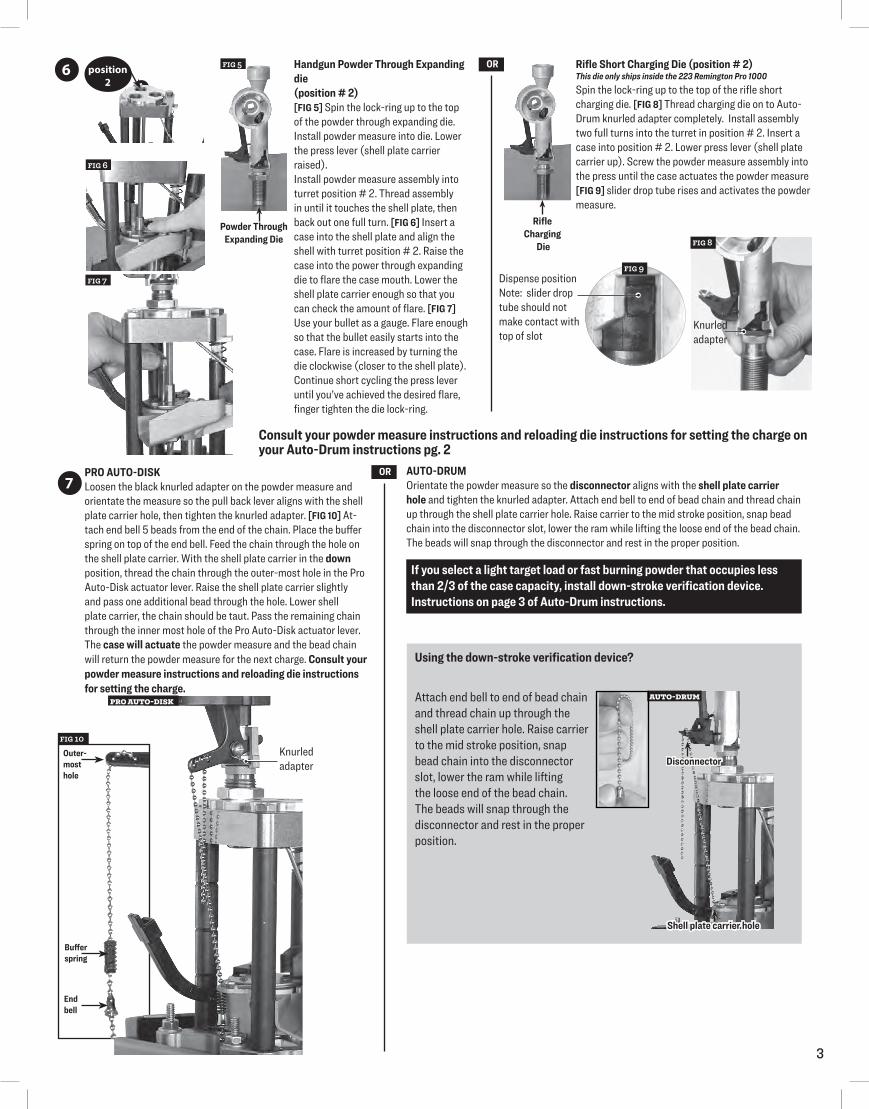
AUTO-DRUMOrientate the powder measure so the disconnector aligns with the shell plate carrier hole and tighten the knurled adapter. Attach end bell to end of bead chain and thread chain up through the shell plate carrier hole. Raise carrier to the mid stroke position, snap bead chain into the disconnector slot, lower the ram while lifting the loose end of the bead chain. The beads will snap through the disconnector and rest in the proper position.
AUTO-DRUMPRO AUTO-DISK
PRO AUTO-DISK Loosen the black knurled adapter on the powder measure and orientate the measure so the pull back lever aligns with the shell plate carrier hole, then tighten the knurled adapter. [FIG 10] At-tach end bell 5 beads from the end of the chain. Place the buffer spring on top of the end bell. Feed the chain through the hole on the shell plate carrier. With the shell plate carrier in the down position, thread the chain through the outer-most hole in the Pro Auto-Disk actuator lever. Raise the shell plate carrier slightly and pass one additional bead through the hole. Lower shell plate carrier, the chain should be taut. Pass the remaining chain through the inner most hole of the Pro Auto-Disk actuator lever. The case will actuate the powder measure and the bead chain will return the powder measure for the next charge. Consult your powder measure instructions and reloading die instructions for setting the charge.
Handgun Powder Through Expanding die (position # 2)[FIG 5] Spin the lock-ring up to the top of the powder through expanding die. Install powder measure into die. Lower the press lever (shell plate carrier raised). Install powder measure assembly into turret position # 2. Thread assembly in until it touches the shell plate, then back out one full turn. [FIG 6] Insert a case into the shell plate and align the shell with turret position # 2. Raise the case into the power through expanding die to flare the case mouth. Lower the shell plate carrier enough so that you can check the amount of flare. [FIG 7] Use your bullet as a gauge. Flare enough so that the bullet easily starts into the case. Flare is increased by turning the die clockwise (closer to the shell plate). Continue short cycling the press lever until you’ve achieved the desired flare, finger tighten the die lock-ring.
Rifle Short Charging Die (position # 2)This die only ships inside the 223 Remington Pro 1000Spin the lock-ring up to the top of the rifle short charging die. [FIG 8] Thread charging die on to Auto-Drum knurled adapter completely. Install assembly two full turns into the turret in position # 2. Insert a case into position # 2. Lower press lever (shell plate carrier up). Screw the powder measure assembly into the press until the case actuates the powder measure [FIG 9] slider drop tube rises and activates the powder measure.
FIG 7
A
FIG 5
Using the down-stroke verification device?
FIG 6
6
7
position 2
OR
OR
Powder Through Expanding Die
RifleCharging
Die
Shell plate carrier hole
Disconnector
End bell
Buffer spring
Outer-most hole
FIG 10
Dispense positionNote: slider drop tube should not make contact with top of slot
Knurled adapter
FIG 8
FIG 9
Attach end bell to end of bead chain and thread chain up through the shell plate carrier hole. Raise carrier to the mid stroke position, snap bead chain into the disconnector slot, lower the ram while lifting the loose end of the bead chain. The beads will snap through the disconnector and rest in the proper position.
If you select a light target load or fast burning powder that occupies less than 2/3 of the case capacity, install down-stroke verification device. Instructions on page 3 of Auto-Drum instructions.
Consult your powder measure instructions and reloading die instructions for setting the charge on your Auto-Drum instructions pg. 2
Knurled adapter
4
Fill the primer feed tray. View help video here for loading primers into tray: leeprecision.com/pro-1000-help-videos.htmlDon’t let the primer level fall below the tray level. Running out of primers will cause a mess inside your shell plate carrier. Once the last primer has exited the folding tray, replenish the primer supply, else you will load cases without primers.
DANGER: Use only CCI™ or Remington™ brand primers. Other brands, espec ially Federal™, can explode with sufficient force to seriously injure the user or persons nearby.ALL PRIMERS ARE DANGEROUS and it should be anticipated that the primers in the tray could explode through accident, misuse or spontaneously.Should an explosion occur, our tests have demonstrated that safety glasses will normally prevent serious injury to the user if CCI™ or Remington™ primers are used, because the explosion is minimal. Other primers, however, can explode with sufficient force to seriously injure the user, or persons nearby. We do not take any position with respect to the quality of performance of primers available on the market. However, ONLY those primers manufactured by CCI™ or Remington™ are recommended for use in the Pro 1000—and when loading those primers—safety glasses and hearing protection must be used. NO OTHER PRIMERS should be used with the Pro 1000.
Slide the flow control to OPEN.
Randomly deposit primers.
Lift tray so output spout touches table, shake tray side to side to upright all the primers. Allow cover to naturally fold up, notice how the primers glide across hinge upright themselves and work their way to wards the outlet.
Fold cover over, slide the flow control to LOCK position, feel for the detent. Grasp the top and bottom of the flow control valve using your thumb and index finger above and below tray. NOTE: make sure it is in the LOCK detent position, else primers may spill.
Slide the tray into the trough. Slide the flow control to the ON position. Tap the side of the tray several times to fill the trough.
tap
10
A B C
D E
Lower the press lever (shell plate carrier up). Screw the full length sizer in to position # 1 until it touches the shell plate, lower the shell plate carrier, screw the die in an additional 1/4 turn. Raise the shell plate carrier and tighten the lock ring finger tight.
AUTO-DRUM PRO AUTO-DISK9 position
1
Remington™ or CCI™ ONLY
Spin the lock-ring up to the top of the die and unscrew the adjusting screw out five full turns. Put the press lever in the up position (shell plate carrier down). Place a loaded round that you wish to duplicate in turret position # 3. [FIG 11] Raise the shell plate carrier to the top of its stroke and hold (shell plate carrier up). Screw the bullet seating die in until it stops turning, lower the shell plate carrier slightly, thread die in an additional 1/8 turn. Finger tighten the lock ring. Now raise the shell plate carrier to the top of its stroke, screw the bullet seating adjusting screw in until you feel it touch the tip of the bullet.
position 3
8 FIG 11
Consult your powder measure instructions and reloading die instructions for setting the charge on your (Auto-Drum instructions pg. 2) or (Pro Auto-Disk Powder Measure back)
Full Length Sizing Die (position # 1)
BULLET SEATING DIE (position # 3)
5
Learn to feel the primer seating when the lever is pushed up.
Loosen socket head cap screw and force shell plate carrier on the ram. Re-tighten clamp screw.
Check for primer on base or under shell plate carrier. Carrier should contact the base with no case in the shell holder.
Remove all oil with solvent or blow out powder or dust with compressed air.
Always keep primer trough full.
Ream or swage primer pocket.Caution, some 45 ACP cases now have small primer pocketsClean shell plate. Check tension finger. Straighten or replace tension finger as required.
Clean powder out with compressed air.
See “Primers not fully seated” problem above.
Move ejector pin to other side of screw.
Bend Z-bar down 1/8” in center to clear case feeder. Factory fitted presses have this bend.
See z-bar orientation photo below
Loosen right front column bolt with 1/2” wrench and rotate the Z-bar as needed to hold a slight inward pressure. The short end of Z-bar should enter the case slider. See orientation below:
Operator not lifting hard enough
Shell plate carrier not fully seated, or loose on ram
Obstruction to full travel
Oil or gunpowder in trough
Primer trough not full
Primer crimp not removedWrong size primer Case not fully in shell plate
Spilled powder in primer trough
Primers not fully seated
Cases wedge against ejector pin
Occurs with 45 ACP conversions because Z-bar hits case feeder
Z-bar in wrong case slider hole
Z-bar attachment not straight
PROBLEM CAUSE REMEDYPrimers not fully seated
Primer doesn’t feed onto priming punch
Primer doesn’t enter caseTipped primers
Cases don’t eject
Jerky case feeding
Case feeder doesn’t work properly
Z-Bar slips out of case slide
TROUBLESHOOTING
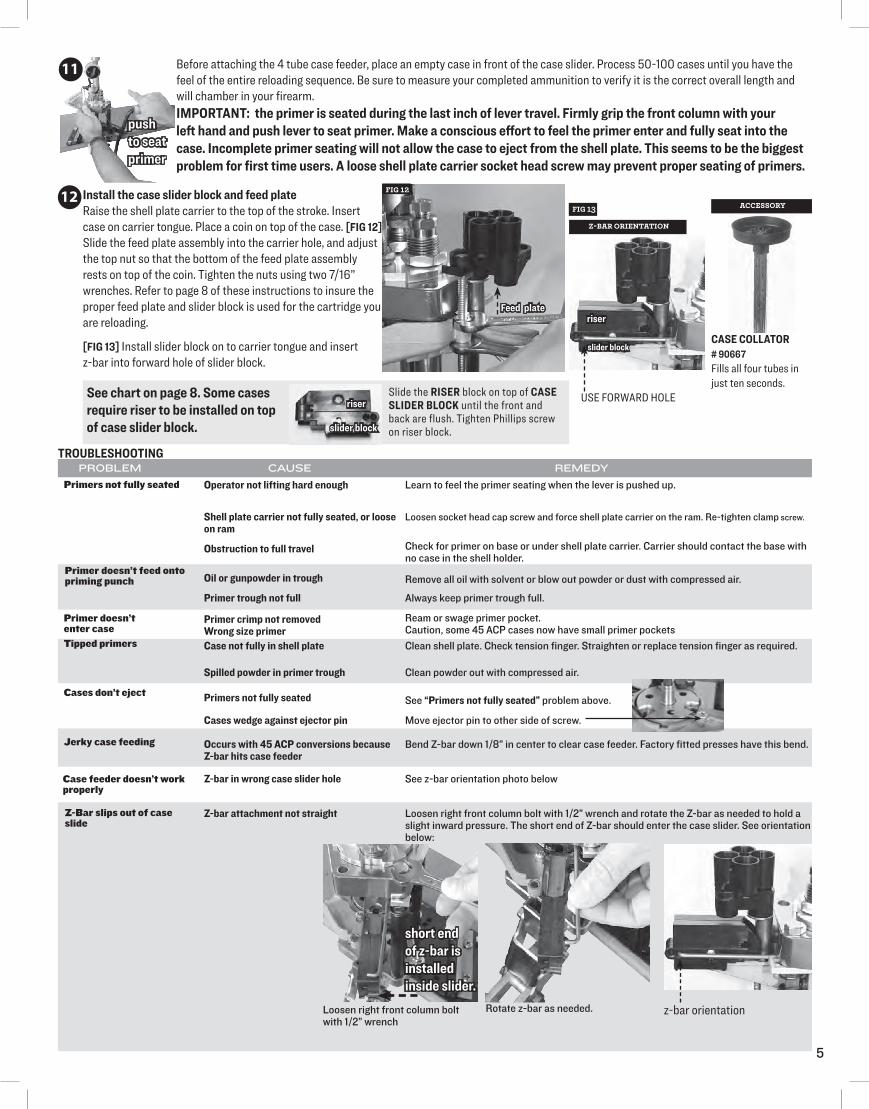
Before attaching the 4 tube case feeder, place an empty case in front of the case slider. Process 50-100 cases until you have the feel of the entire reloading sequence. Be sure to measure your completed ammunition to verify it is the correct overall length and will chamber in your firearm. IMPORTANT: the primer is seated during the last inch of lever travel. Firmly grip the front column with your left hand and push lever to seat primer. Make a conscious effort to feel the primer enter and fully seat into the case. Incomplete primer seating will not allow the case to eject from the shell plate. This seems to be the biggest problem for first time users. A loose shell plate carrier socket head screw may prevent proper seating of primers.
11
Install the case slider block and feed plate Raise the shell plate carrier to the top of the stroke. Insert case on carrier tongue. Place a coin on top of the case. [FIG 12] Slide the feed plate assembly into the carrier hole, and adjust the top nut so that the bottom of the feed plate assembly rests on top of the coin. Tighten the nuts using two 7/16” wrenches. Refer to page 8 of these instructions to insure the proper feed plate and slider block is used for the cartridge you are reloading.
[FIG 13] Install slider block on to carrier tongue and insert z-bar into forward hole of slider block.
FIG 1212
z-bar orientation
push to seat primer
Loosen right front column bolt with 1/2” wrench
Rotate z-bar as needed.
short end of z-bar is installed inside slider.
CASE COLLATOR # 90667Fills all four tubes in just ten seconds.
Z-BAR ORIENTATION
USE FORWARD HOLE
FIG 13 ACCESSORY
Feed plate
slider block
riser
See chart on page 8. Some cases require riser to be installed on top of case slider block.
Slide the RISER block on top of CASE SLIDER BLOCK until the front and back are flush. Tighten Phillips screw on riser block.
riser
slider block
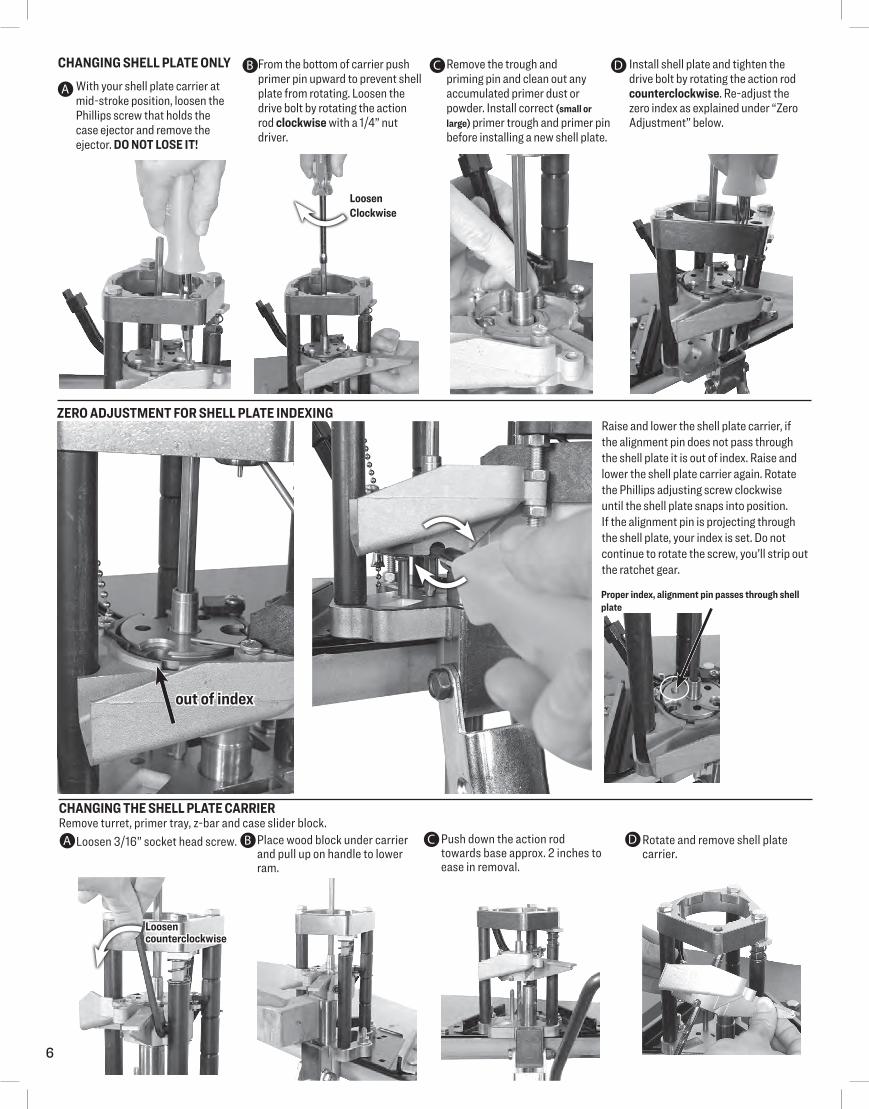
CHANGING THE SHELL PLATE CARRIERRemove turret, primer tray, z-bar and case slider block.
Loosen 3/16” socket head screw. Place wood block under carrier and pull up on handle to lower ram.
Push down the action rod towards base approx. 2 inches to ease in removal.
6
A B C D Rotate and remove shell plate carrier.
Loosen counterclockwise
CHANGING SHELL PLATE ONLYWith your shell plate carrier at mid-stroke position, loosen the Phillips screw that holds the case ejector and remove the ejector. DO NOT LOSE IT!
A
B C D From the bottom of carrier push primer pin upward to prevent shell plate from rotating. Loosen the drive bolt by rotating the action rod clockwise with a 1/4” nut driver.
Remove the trough and priming pin and clean out any accumulated primer dust or powder. Install correct (small or large) primer trough and primer pin before installing a new shell plate.
Install shell plate and tighten the drive bolt by rotating the action rod counterclockwise. Re-adjust the zero index as explained under “Zero Adjustment” below.
Loosen Clockwise
Raise and lower the shell plate carrier, if the alignment pin does not pass through the shell plate it is out of index. Raise and lower the shell plate carrier again. Rotate the Phillips adjusting screw clockwise until the shell plate snaps into position. If the alignment pin is projecting through the shell plate, your index is set. Do not continue to rotate the screw, you’ll strip out the ratchet gear.
ZERO ADJUSTMENT FOR SHELL PLATE INDEXING
out of index
Proper index, alignment pin passes through shell plate
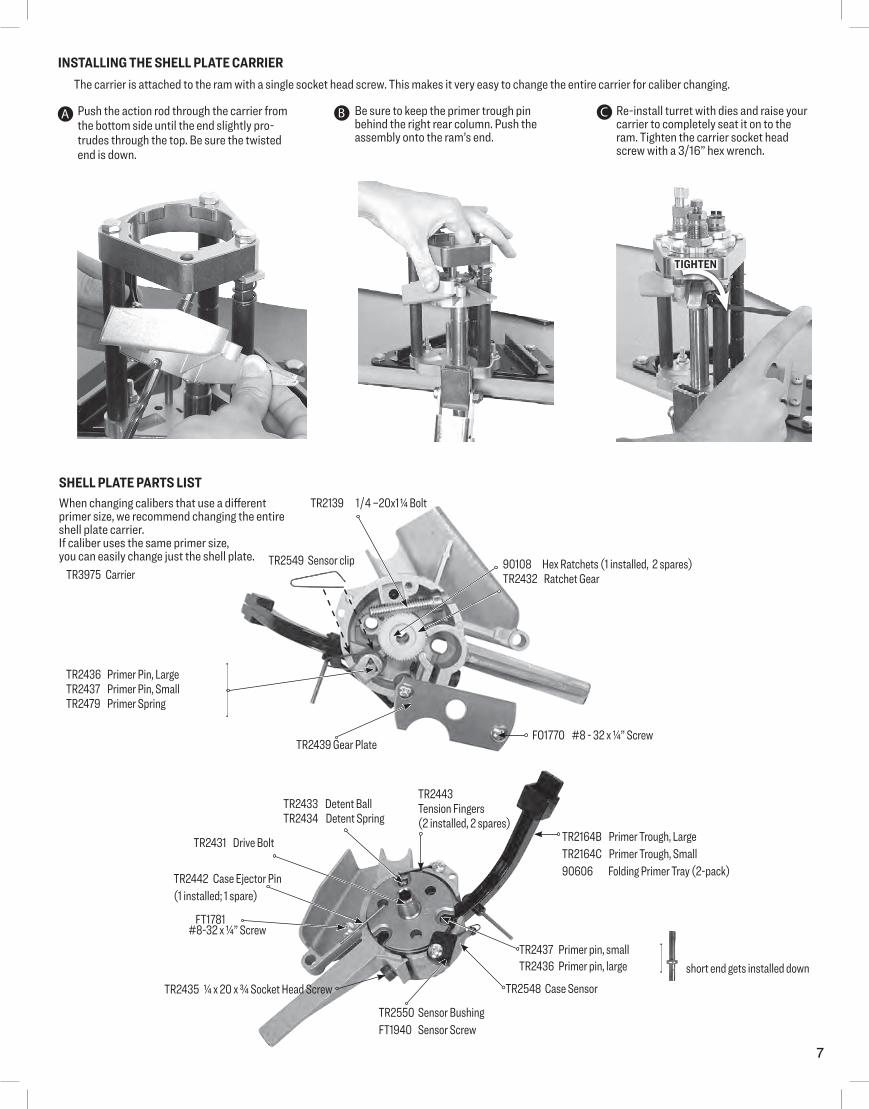
SHELL PLATE PARTS LISTWhen changing calibers that use a different primer size, we recommend changing the entire shell plate carrier. If caliber uses the same primer size, you can easily change just the shell plate.
TR2139 1/4 –20x11⁄4 Bolt
FO1770 #8 - 32 x ¼” Screw
FT1781 #8-32 x ¼” Screw
TR2439 Gear Plate
TR2433 Detent BallTR2434 Detent Spring
TR2431 Drive Bolt
TR2550 Sensor BushingFT1940 Sensor Screw
TR2548 Case SensorTR2435 ¼ x 20 x ¾ Socket Head Screw
90108 Hex Ratchets (1 installed, 2 spares)TR2432 Ratchet Gear
TR2443Tension Fingers(2 installed, 2 spares)
TR3975 Carrier
TR2164B Primer Trough, LargeTR2164C Primer Trough, Small90606 Folding Primer Tray (2-pack)
TR2436 Primer Pin, LargeTR2437 Primer Pin, SmallTR2479 Primer Spring
TR2442 Case Ejector Pin(1 installed; 1 spare)
7
INSTALLING THE SHELL PLATE CARRIERThe carrier is attached to the ram with a single socket head screw. This makes it very easy to change the entire carrier for caliber changing.
A B C
TIGHTEN
Re-install turret with dies and raise your carrier to completely seat it on to the ram. Tighten the carrier socket head screw with a 3/16” hex wrench.
Be sure to keep the primer trough pin behind the right rear column. Push the assembly onto the ram’s end.
Push the action rod through the carrier from the bottom side until the end slightly pro-trudes through the top. Be sure the twisted end is down.
TR2549 Sensor clip
TR2437 Primer pin, smallTR2436 Primer pin, large short end gets installed down
LEE PRECISION, INC. 4275 HWY. U HARTFORD WISCONSIN 53027 www.leeprecision.com
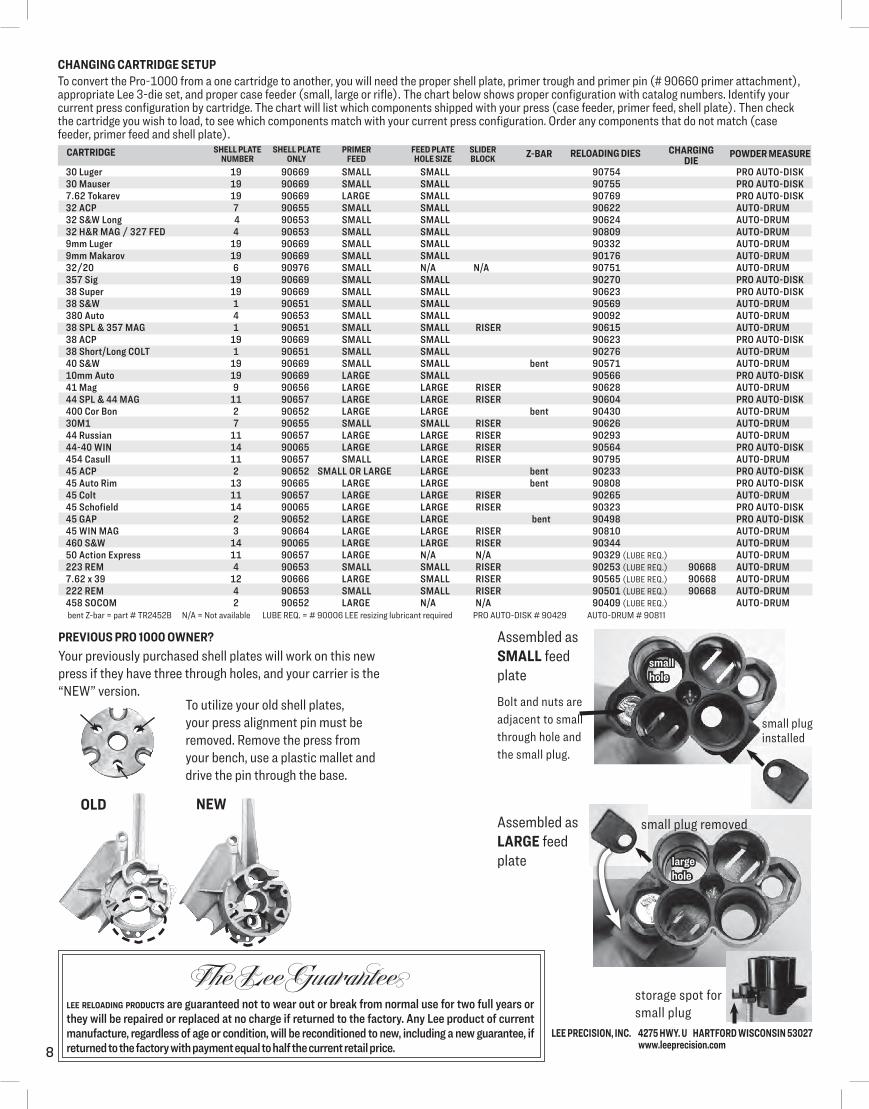
To convert the Pro-1000 from a one cartridge to another, you will need the proper shell plate, primer trough and primer pin (# 90660 primer attachment), appropriate Lee 3-die set, and proper case feeder (small, large or rifle). The chart below shows proper configuration with catalog numbers. Identify your current press configuration by cartridge. The chart will list which components shipped with your press (case feeder, primer feed, shell plate). Then check the cartridge you wish to load, to see which components match with your current press configuration. Order any components that do not match (case feeder, primer feed and shell plate).
CARTRIDGE Z-BAR SHELL PLATE SHELL PLATE PRIMER FEED PLATE SLIDER NUMBER ONLY FEED HOLE SIZE BLOCK
30 Luger 19 90669 SMALL SMALL 90754 PRO AUTO-DISK30 Mauser 19 90669 SMALL SMALL 90755 PRO AUTO-DISK7.62 Tokarev 19 90669 LARGE SMALL 90769 PRO AUTO-DISK32 ACP 7 90655 SMALL SMALL 90622 AUTO-DRUM32 S&W Long 4 90653 SMALL SMALL 90624 AUTO-DRUM32 H&R MAG / 327 FED 4 90653 SMALL SMALL 90809 AUTO-DRUM9mm Luger 19 90669 SMALL SMALL 90332 AUTO-DRUM9mm Makarov 19 90669 SMALL SMALL 90176 AUTO-DRUM32/20 6 90976 SMALL N/A N/A 90751 AUTO-DRUM357 Sig 19 90669 SMALL SMALL 90270 PRO AUTO-DISK38 Super 19 90669 SMALL SMALL 90623 PRO AUTO-DISK38 S&W 1 90651 SMALL SMALL 90569 AUTO-DRUM380 Auto 4 90653 SMALL SMALL 90092 AUTO-DRUM38 SPL & 357 MAG 1 90651 SMALL SMALL RISER 90615 AUTO-DRUM38 ACP 19 90669 SMALL SMALL 90623 PRO AUTO-DISK38 Short/Long COLT 1 90651 SMALL SMALL 90276 AUTO-DRUM40 S&W 19 90669 SMALL SMALL bent 90571 AUTO-DRUM10mm Auto 19 90669 LARGE SMALL 90566 PRO AUTO-DISK41 Mag 9 90656 LARGE LARGE RISER 90628 AUTO-DRUM44 SPL & 44 MAG 11 90657 LARGE LARGE RISER 90604 PRO AUTO-DISK400 Cor Bon 2 90652 LARGE LARGE bent 90430 AUTO-DRUM30M1 7 90655 SMALL SMALL RISER 90626 AUTO-DRUM44 Russian 11 90657 LARGE LARGE RISER 90293 AUTO-DRUM44-40 WIN 14 90065 LARGE LARGE RISER 90564 PRO AUTO-DISK454 Casull 11 90657 SMALL LARGE RISER 90795 AUTO-DRUM45 ACP 2 90652 SMALL OR LARGE LARGE bent 90233 PRO AUTO-DISK45 Auto Rim 13 90665 LARGE LARGE bent 90808 PRO AUTO-DISK45 Colt 11 90657 LARGE LARGE RISER 90265 AUTO-DRUM45 Schofield 14 90065 LARGE LARGE RISER 90323 PRO AUTO-DISK45 GAP 2 90652 LARGE LARGE bent 90498 PRO AUTO-DISK45 WIN MAG 3 90664 LARGE LARGE RISER 90810 AUTO-DRUM460 S&W 14 90065 LARGE LARGE RISER 90344 AUTO-DRUM50 Action Express 11 90657 LARGE N/A N/A 90329 (LUBE REQ.) AUTO-DRUM223 REM 4 90653 SMALL SMALL RISER 90253 (LUBE REQ.) 90668 AUTO-DRUM7.62 x 39 12 90666 LARGE SMALL RISER 90565 (LUBE REQ.) 90668 AUTO-DRUM222 REM 4 90653 SMALL SMALL RISER 90501 (LUBE REQ.) 90668 AUTO-DRUM458 SOCOM 2 90652 LARGE N/A N/A 90409 (LUBE REQ.) AUTO-DRUM bent Z-bar = part # TR2452B N/A = Not available LUBE REQ. = # 90006 LEE resizing lubricant required PRO AUTO-DISK # 90429 AUTO-DRUM # 90811
RELOADING DIES CHARGING DIE
POWDER MEASURE
8
The LeeGuaranteelee reloading products are guaranteed not to wear out or break from normal use for two full years or they will be re paired or replaced at no charge if returned to the factory. Any Lee product of current manufacture, regardless of age or condition, will be recon di tioned to new, including a new guarantee, if re turned to the factory with payment equal to half the current retail price.
CHANGING CARTRIDGE SETUP
PREVIOUS PRO 1000 OWNER? Your previously purchased shell plates will work on this new press if they have three through holes, and your carrier is the “NEW” version.
OLD NEW
To utilize your old shell plates, your press alignment pin must be removed. Remove the press from your bench, use a plastic mallet and drive the pin through the base.
Assembled as SMALL feed plateBolt and nuts are adjacent to small through hole and the small plug.
small hole
large hole
small plug removedAssembled as LARGE feed plate
small plug installed
storage spot for small plug