Embed Size (px)
Citation preview

Print Agent for Exchange
Administrator’s Guide
document version 1.9
MAPILab, November 2016
Table of contents
1. Intro ........................................................................................................ 3
2. Product Overview ..................................................................................... 4
3. Product Architecture and Basic Concepts ................................................. 5
4. System Requirements .............................................................................. 6
4.1. Minimum System Requirements .............................................................. 6
4.2. Supported Types of Messages and Attachments ......................................... 7
4.3. Supported Versions of the Microsoft Exchange Server ................................ 7
5. Product Installation and Deployment ....................................................... 8
5.1. Environment Preparation ........................................................................ 8
5.2. Print Agent for Exchange Deployment ...................................................... 8
5.3. Upgrade from the Previous Version ......................................................... 11
5.4. Installation of the Agent on an Exchange 2003 failover cluster ................... 11
5.5. Manual Agent installation ....................................................................... 11
5.6. Mail Printing Service manual installation .................................................. 12
5.7. Product Uninstall .................................................................................. 12
6. Initial Product Setup ............................................................................... 14
6.1. Creation of Rules .................................................................................. 14
6.2. Priority of Rules .................................................................................... 14
7. General Product Settings ........................................................................ 17
8. Licensing ................................................................................................. 18
9. Diagnostics of malfunctions .................................................................... 18
10. FAQ ......................................................................................................... 18
Conclusion ......................................................................................................... 20

1. Intro
This manual has been produced by MAPILab and contains the necessary
information for successful installation of Print Agent for Exchange. We ask that you read
the entire contents of all the sections of this manual carefully before installing the product.
To avoid most potential problems, please look at the FAQ on page 21!
The manual contains the following chapters:
- Chapter 1. Provides a brief description of product architecture and enables
determination of the appropriate type of deployment for your organization.
- Chapter 2. Describes system requirements of the product and allows preparing
environment for product installation by installing necessary applications and
components of the system.
- Chapter 3. Contains information you may need during the product installation and
help for deploying the product.
- Chapter 4. Contains the necessary information for initial configuration of the product.
- Chapter 5. This chapter contains descriptions of the product settings to fine tune it to
the environment of your organization.
- Chapter 6. Describes the principles of product licensing.
- Chapter 7. Contains basic information for diagnosis of malfunctions of the product.

2. Product Overview
Print Agent for Exchange is a software product that prints out email messages and
attachments automatically, according to the rules set.
Main product features:
Print Agent for Exchange tracks the organization’s mail traffic and sends documents
(messages, attached files) to a printer in compliance with the rules set.
Print Agent for Exchange operates as a service and doesn’t require an open user session.
The product allows use of several printers to perform print tasks in accordance with the
rules set.
Print Agent for Exchange is integrated into the transport service of Exchange servers and
does not reduce Exchange performance.
The flexible setup wizard of Print Agent for Exchange allows you to select only those
servers and workstations for installation of product components which are appropriate.
Print Agent for Exchange is a mass-market solution that doesn’t require sophisticated
installation or specialists with advanced skills. Product deployment is easy and safe. It
takes only a few minutes.
3. Product Architecture and Basic Concepts
The product consists of the three main components:
Print Agent for Exchange Agent. This program component integrates into the
Microsoft Exchange Transport Service and keeps track of the organization’s mail traffic
for compliance with the message processing rules.
Mail Printing Service. This component is a service which generates print tasks from the
elements selected by Print Agent for Exchange Agent.
Administrator’s console is a Microsoft Management Console 3.0 snap-in. It is designed
to manage product deployment, performance control, and the creation of message
processing rules.
The product architecture allows you to install it in various configurations. All three
program components can be deployed on one server or separately on various
workstations.

4. System Requirements
Minimum System Requirements
Since the Print Agent for Exchange Agent component integrates into the Microsoft
Exchange Transport Service, system and hardware requirements for this component are
determined by the version of Microsoft Exchange Server used in the environment.
The system requirements for the Administrator’s console are determined by Microsoft
Management Console 3.0.
The minimum system requirements for the Mail Printing Service component correspond
to physical or virtual computers with the following configurations:
- CPU: 600 MHz,
- RAM: 128 MB,
- HDD free space: 100 MB
Operating system:
- Microsoft Windows Server 2003 with SP1 and higher;
- Windows Server 2003 R2;
- Windows Server 2008;
- Windows Server 2008 R2;
- Windows Server 2012;
- Windows Server 2012 R2;
- Windows XP with SP2 and higher;
- Windows Vista;
- Windows 7;
- Windows 8.
The product may also be deployed on the following systems:
- Windows Small Business Server 2003 with SP1 and higher;
- Windows Small Business Server 2003 R2;
- Windows Small Business Server 2008;
- Windows Essential Business Server 2008.
Both 32- and 64-bit versions of the systems are supported.

The following applications and components of the operating system must be installed
before beginning the installation of the Administrator’s console:
- Microsoft .NET Framework v2.0. Included in the Microsoft Windows Server
2008, Windows Server 2008R2, Windows 7 and Windows Vista. For other operating
systems, the platform can be downloaded from the Microsoft Download Center (32-bit
version and 64-bit version).
- Microsoft Management Console v3.0. Included in the Microsoft Windows Server
2003 R2, Windows Server 2008, Windows Server 2008 R2, Windows XP SP3, Windows
Vista and Windows 7. For other operating systems, the component can be downloaded
from the Microsoft knowledge base .
- Activated DCOM service (Distributed Component Object Model). This service is
activated by default in all versions of Microsoft Windows. The activation and deactivation
procedure of this service can be found in this article.
- Microsoft Internet Explorer v7.0 and higher. Included in Microsoft Windows
Server 2008, Windows Server 2008 R2, Windows Vista, Windows 7, Windows Small
Business Server 2008 and Windows Essential Business Server 2008. For earlier
versions, it is available as part update packages, and from the Microsoft download
center.
Installation guide for these components can be found at the Microsoft Web site.
Supported Types of Messages and Attachments
Print Agent for Exchange supports all types of messages that are supported by your
version of the Microsoft Exchange Server. The printable attachments should have one
of the following formats: html, htm, txt, pdf, eml, mht, bmp, dib, jpg, jpe, jpeg, jfif, jif,
jiff, png, gif, tif, tiff, pic, img, rgb, rgba, pcd, pcx, rle, wmf, emf.
Supported Versions of the Microsoft Exchange Server
Print Agent for Exchange is completely operable on the following versions of the
Microsoft Exchange Server:
- Microsoft Exchange Server 2003;
- Microsoft Exchange Server 2007;
- Microsoft Exchange Server 2010;
- Microsoft Exchange Server 2013;
- Microsoft Exchange Server 2016.

5. Product Installation and Deployment
To install the product you will need local administration privileges on the installation
computer. Run the PrintAgent.exe and follow the Wizard’s instructions. Please note that
the installation file should be run only on those computers where the Administrator’s
console component is required. Other components of the product will be installed
remotely on the servers specified during the deployment process.
Environment Preparation
For successful software operation, you need to prepare a user profile which the Mail
Printing Service will be running as.
1. Create a domain user that will be the local administrator of the computer where
the Mail Printing Service will be deployed.
2. Login to the system using this account on the computer intended for deployment
of the Mail Printing Service.
3. Install and set up one or several printers (local or network) you plan to use for
message printing. Note that these printers should be published in the Active
Directory.
Print Agent for Exchange Deployment
To deploy the product, the user, who runs Print Agent for Exchange console, should
have the domain/enterprise administrator rights or Exchange Organization Administrator
role (for Microsoft Exchange 2007, 2010, 2013 and 2016) and be a local administrator
for computers the product components will be installed on.
Upon the product installation, please launch the Print Agent for Exchange console.
Select „Print Agent for Exchange‟ in the console tree and press „Deployment‟ in the
context menu or in the Actions pane.
The Deployment Wizard will be started to help you set up the Product in your
organization’s environment.

In Step 2, the Deployment Wizard will search the Exchange servers and check for the
possibility of installing Print Agent for Exchange Agent on them. This agent is installed
on the Backend or Hub Transport servers only; other servers will not be shown in the
list!
In Step 3 of the Deployment Wizard, you will be prompted to select the servers where
Print Agent for Exchange Agent should be deployed. Note: in some cases, remote
installation of the agent may not be possible. For example, in the case of blocking by a
firewall. In this case, you can install the agent manually (see point #4.4).

In Step 4 of the Deployment Wizard, you will be prompted to the select computers on
which the Mail Printing Service (that generates the print tasks) will be installed. Add to
the list those computers where the user profile was created and configured in accordance
with Chapter #4. In this step you may delete any previously installed copies of the Mail
Printing Service or reinstall them.
In the next step, enter the credentials of the user created in accordance with Chapter
„Environment Preparation‟ of this Guide.

In the next step, check the deployment parameters of Print Agent for Exchange, press
„Next‟ and wait for the competition of installation. Now the deployment of Print Agent for
Exchange is completed. You may change the parameters of the Print Agent components
by launching the Deployment Wizard.
Upgrade from the Previous Version
When upgrading from the previous version of the product, it is necessary to read
the installation instructions received with the given update. Generally, you will need to
launch the product’s installation program on all computers where the Administrator’s
console is installed and wait for the component upgrades. After that, the Deployment
Wizard should be started. Select „Reinstall‟ for all servers where Print Agent for
Exchange Agent and Mail Printing Service are installed. All previously created rules
and settings will be saved.
Installation of the Agent on an Exchange 2003 failover cluster
The Product supports installation of the Agent on the failover cluster of Exchange
2003 servers. Installation of the Agent on the failover cluster is performed with the help
of the Deployment Wizard. The Agent will be installed on the active cluster node only.
To install the Agent on other nodes, stop the Cluster Service on the active node. This
way, you will activate another node, where the Agent has not been installed yet. Then
perform deployment with the help of Deployment Wizard again.
Manual Agent installation
If you deploy the product using the deployment wizard, you do not need to use the
manual installation of the agent. This mode is used only in case of automatically
installation fail.
To install agent manually, copy the file AgentSetup.msi from the archive
“%ProgramFiles(x86)%\MAPILab Ltd\Print Agent for Exchange\DeploymentPackage.zip”
on the Transport server and run this cmdlet in the command prompt:
“AgentSetup.msi /Log agentSetup.log MANUALINSTALL=1 SERVICETIMEOUT=15”
where:
“agentSetup.log” - path to the installation log,
SERVICETIMEOUT – delay of transport service restart (optional, default 4 min).

Mail Printing Service manual installation
Manual Mode installation of Mail Printing Service may be used only for purposes
of fault diagnosis. If you deploy the product successfully using the deployment wizard,
you do not need to use the manual installation of the agent.
To install the agent manually, copy the file MailPrintingServiceSetup.msi from the
archive
“%Program Files(x86)%\MAPILab Ltd\Printing Tool for Exchange\MailPrintingServiceSetup.zip”
on the computer that generates the print tasks and run the command in command line:
“msiexec /i MailPrintingServiceSetup.msi SERVICEUSER=user SERVICEPASSWORD=password /L
ServiceSetup.log”,
where “ServiceSetup.log.log” is the path to the installation log.
After completing Mail Printing Service manual installation, you will need to look through
the Installer Log File, troubleshoot, and find out the cause of the failure of the installation
of the Service using the Deployment Wizard.
Please note: after troubleshooting, you will need to run installation of Mail Printing Service
by using Deployment Wizard.
Product Uninstall
Since the Product components may be installed on various computers, the product
can be uninstalled in two ways:
1. Removing of Print Agent for Exchange Agent and Mail Printing Service components
are performed through the Deployment Wizard. After that, the remaining components of
the product can be removed by through the Add or Remove Programs (Programs and
Features) applet.
2. All components can be removed through the standard „Add or Remove Programs‟
(Programs and Features) applet of the Control Panel separately on those computers
where such components were installed.
After the product’s removal, some components will remain:
- Active Directory container “CN=MAPILabPrintAgent,CN=Global
Settings,CN=[your Exchange organization name],CN=Microsoft
Exchange,CN=Services,CN=Configuration,DC=[your domain name]”;
- Log files of the Print Agent for Exchange Agent in the “%Program Files
(x86)%\MAPILab Ltd\Print Agent for Exchange Agent\Log” folder on the Exchange server;
- Log files of the Mail Printing Service in the “%Program Files (x86)%\MAPILab
Ltd\MAPILab Mail Printing Service\Log” folder on a computer where Mail Printing Service
were installed;
- Log files of the Administrator’s console in the “%Program Files (x86)%\MAPILab
Ltd\Print Agent for Exchange\” folder on a computer where Administrator’s console were
installed;
Saving these files allows updating the product with saving all of the settings through
removal and further installation of a new version in the same folder. Remove these items
manually if you don’t want to keep the settings.

6. Initial Product Setup
After completion of the deployment as described in chapter 4 of this guide, message
processing rules should be created. For this, select “New Rule…” in the “Rules” area in
the Administrative Console. After that, the Rule Wizard will be started to help you to
create message processing conditions.
Creation of Rules
Please note that the rules can be created only by those users who have
domain/enterprise administrator privileges or belong to the Exchange Organization
Administrator role (for Microsoft Exchange 2007, 2010, 2013 and 2016).
This permission limitation comes about because the product’s configuration is stored in
the AD container “CN= MAPILabPrintAgent,CN=Global Settings,CN=[your Exchange
organization name],CN=Microsoft Exchange,CN=Services,CN=Configuration,DC=[your
domain name]” during deployment. Message processing rules are also saved in this
container, for which read and write permissions are assigned by default to members of
“Domain Admins”, “Enterprise Admins” and “Exchange Organization Administrators”
groups only (if Microsoft Exchange Server 2007, 2010, 2013 or 2016 is installed in the
organization). If users without such rights need to be granted rule creation rights, you
must manually grant the “Read, Write, Create All Child Objects” and “Delete All Child
Objects” permissions for these users. This can be done by means of various editors of
Active Directory such as ADSI Edit.
Please note that only printers set up in accordance with Chapter 5, Environment
Preparation, of this Guide may be used in the rules for print messages and attachments.
Priority of Rules
Print Agent for Exchange enables adjustment in the priority of created rules. Rule
priority is determined in the process of rule creation and specified in the Priority column
of the Administrator’s console. The a lower number indicates a higher priority. The rule
priority can always be changed by moving the rule up or down in the list with the help of
the Move up and the Move down buttons in the context menu or in the Actions pane.
Please note that in case of installation of other agents from the MAPILab
Disclaimers for Exchange or Attachment Save for Exchange on the same transport
server, the rules of different agents may be applied to the same message. The order of

application will be defined by the time of the agent installation. For example, if the Print
Agent for Exchange Agent is installed first and then the MAPILab Disclaimers for
Exchange Agent from the MAPILab Disclaimers for Exchange product is installed, the
rules for Print Agent for Exchange will be applied first as the priority of this agent will be
higher. This order of execution may be particularly useful to reduce the volume of
graphics sent for printing by means of Print Agent for Exchange. At the same time, this
situation could have a negative effect when the rules of Print Agent for Exchange are
applied prior to the spam filter (if such filter is installed on the same transport server as
Print Agent for Exchange Agent) which may lead to printing of unnecessary messages.
The order of agents can be established in the following manner:
In Microsoft Exchange Server 2007, 2010, 2013 or 2016
Run Exchange Management Shell on the transport server and execute the command
“Get-TransportAgent”. The list of installed agents will be displayed in the execution
results (see figure).
The priority of agents can be changed with the command:
“Set-TransportAgent -Identity "Print Agent for Exchange Agent" -Priority 4”
where "Print Agent for Exchange Agent" is the agent name, “4” – priority. The “1” has
the highest priority. After changing the priority of agents, the transport service needs
to be restarted, e.g. with the “Restart-Service MSExchangeTransport” command.

In Microsoft Exchange Server 2003
To change the priority of agents (sinks) in Microsoft Exchange Server 2003, you need
to download the script SMTPReg.Vbs
http://msdn.microsoft.com/enus/library/ms528023%28EXCHG.10%29.aspx .
Copy the script to the transport server, open a command prompt and run:
cscript “C:\SMTPReg.vbs” /enum > “C:\sinks.txt”
where:
“C:\SMTPReg.vbs” – name of script file;
“C:\sinks.txt” - name of output file which will displays information about available sinks.
Open the file sink.txt and find the agent that you need.
To change the priority of the agent, a command such as the following can be used:
cscript “C:\SMTPReg.vbs” /setprop 1 OnPostCategorize “MAPILab Disclaimers for Exchange
Agent” Source Priority 500
where:
1 – number of virtual SMTP server (if you have several virtual servers, the agent will be
installed on each of them);
“MAPILab Disclaimers for Exchange Agent” – name of the agent (sink);
500 – priority to be given (the value can range from 0 to 32767, with 0 being the highest
priority and 32767 the lowest priority.)
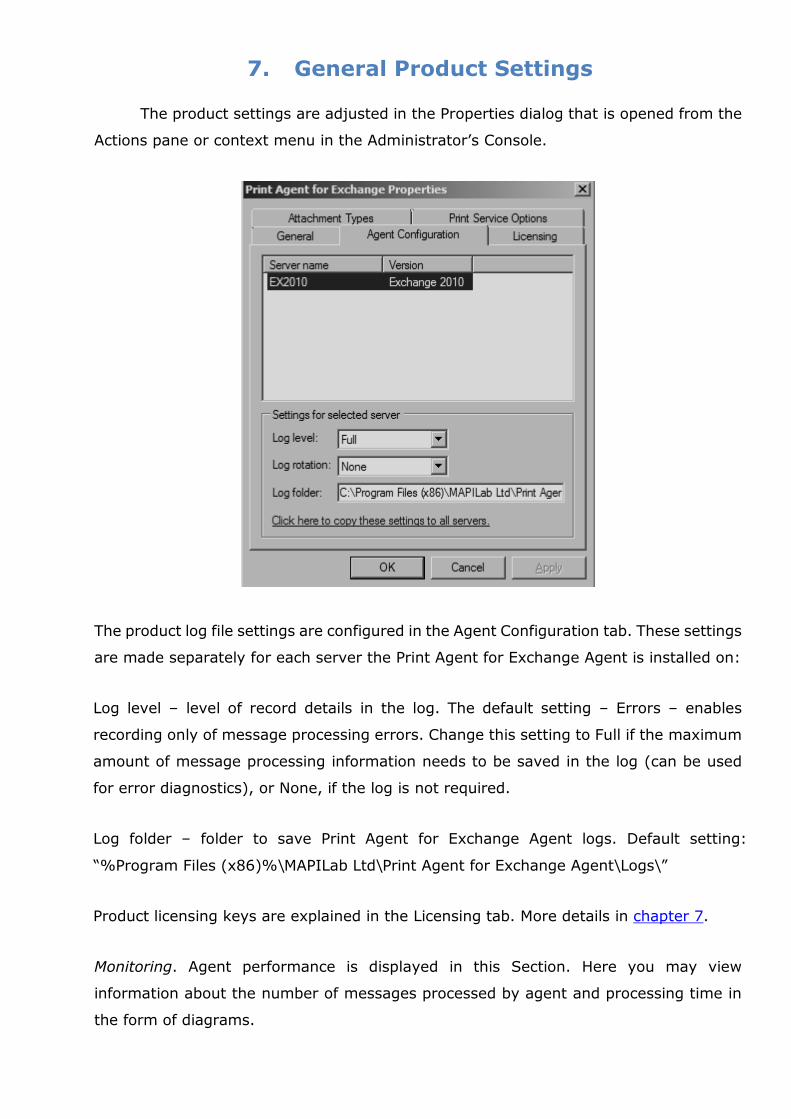
7. General Product Settings
The product settings are adjusted in the Properties dialog that is opened from the
Actions pane or context menu in the Administrator’s Console.
The product log file settings are configured in the Agent Configuration tab. These settings
are made separately for each server the Print Agent for Exchange Agent is installed on:
Log level – level of record details in the log. The default setting – Errors – enables
recording only of message processing errors. Change this setting to Full if the maximum
amount of message processing information needs to be saved in the log (can be used
for error diagnostics), or None, if the log is not required.
Log folder – folder to save Print Agent for Exchange Agent logs. Default setting:
“%Program Files (x86)%\MAPILab Ltd\Print Agent for Exchange Agent\Logs\”
Product licensing keys are explained in the Licensing tab. More details in chapter 7.
Monitoring. Agent performance is displayed in this Section. Here you may view
information about the number of messages processed by agent and processing time in
the form of diagrams.

Section “Rules”. Message processing rules can be viewed, edited and created in this
Section. When creating a new rule or editing an existing one, the Rule Setting Wizard is
started to help you create or edit the message processing rule.
8. Licensing
Licensing the product is made by purchase of license keys for the appropriate amount
of Exchange servers on which product Agent is installed. These license keys are entered
on the Licensing tab in the Properties dialog that is opened from the Actions pane or
context menu in the Administrator’s Console. Please note that after the trial period
expires, the Agent will stop the processing messages until you enter the license keys.
9. Diagnostics of malfunctions
After completing the product deployment and creating the initial message processing
rules, it is recommended to check it. For this purpose, send a text message that complies
with the rules set.
10. FAQ
Q: The Mapilab Print Agent doesn’t print. What should I do?
A: First of all, restart Mapilab Mail Printing service. In most cases the problem is in
incorrect operation of the service.
If the problem persists, please send us a “service.log” file from the workstation with
Mapilab Mail Printing service installed, the path is:
<system drive>:\Program Files (x86)\MAPILab Ltd\MAPILab Mail Printing
Service\Log
Please send the log in the computer where Mapilab Mail Printing service is deployed,
from an account which runs this service like:

Make sure this account can print documents manually from the system.
Q: Why doesn’t the Mapilab Print Agent print office documents (*.doc, *.docx, etc.)?
A: Please install an appropriate version of OpenOffice software:
PrintAgent v1.6.1552 and newer supports 3.x and 4.x versions of Open Office.
PrintAgent v1.5.1372 to v1.6.1552 supports 4.x versions of Open Office only.
PrintAgent older than v1.5.1372 supports 3.x versions of Open Office only.
Q: Why doesn’t the Mapilab Print Agent print my PDFs?
A: The PDF format does not have a consistent structure. Each document can be an
individual case. So just send us a sample of the PDF file and the “service.log” file from
the workstation with Mapilab Mail Printing service installed. The specified path is:

<system drive>:\Program Files (x86)\MAPILab Ltd\MAPILab Mail Printing
Service\Log
Conclusion
More details about the Product and its features as well as the latest updates can be
found on the MAPILab Web site http://www.mapilab.com.