Embed Size (px)
Citation preview
SUBCOURSE EDITION SS 0507 6
PRINCIPLES OF PHOTOGRAPHY
U.S. ARMY STILL PHOTOGRAPHIC SPECIALIST MOS 84B SKILL LEVELS 1 and 2 COURSE
PRINCIPLES OF PHOTOGRAPHY
SUBCOURSE NO. SS 0507
U.S. Army Signal School Fort Gordon, Georgia
Four Credit Hours
GENERAL The Principles of Photography subcourse, part of th e Still Photographic Specialist MOS 84B Skill Level 1 and 2, is designed to teach the basic knowledge necessary for performing tasks related to the principles fundamentals of photography. Information is provid ed on the Basics of Photography, Application of Optics, Fundamentals of Exposure and Focusing, and Composition. This subcourse is presented in fo ur lesson, each lesson corresponding to a terminal objective as indicated below. Lesson 1: IDENTIFY THE BASICS OF PHOTOGRAPHY TASK: Describe, identify, and list the theory and f unctions of sensitized materials, light, and optics. CONDITIONS: Given information about the basic steps in making a photograph, the behavior of light, the color of light and their wavelengths, the types of single lenses, and the purpose of lens head. STANDARDS: Demonstrate competency of the task skill s and knowledge by responding to multiple-choice test covering the bas ics of photography. This objective supports Soldier's Manual Task 113-5 78-1013, Photograph Subjects Using Various Focal Length Lenses; 113-578 -3023, Process Black and White Film Manually; 113-578-3029, Make a Black and White Projection Print; and 113-578-3026, Process Black and White Photograp hic Paper.
i

Lesson 2: DETERMINE THE APPLICATION OF OPTICS TASK: Describe, determine, select and state the the ory and application of optics. CONDITIONS: Given information about the focal lengt h of a lens and its effect on perspective, image size, and the angle of view; the terms of optical center, focal plane, and infinity; and the choice of proper focal length for a given subject. STANDARDS: Demonstrate competency of the task skill s and knowledge by responding to the multiple-choice test covering the application of optics. This objective supports Soldier's Manual Task 113-5 78-1013, Photograph Subjects Using Various Focal Length Lenses; 113-578 -1019, Prepare for Photographic Assignment; and 113-578-1025, Provide Guidance for Selecting Lens Focal Length. Lesson 3: APPLY THE FUNDAMENTALS OF EXPOSURE AND FO CUSING TASK: Calculate, determine, identify, and select th e methods and the application of the fundamentals of exposure and foc using. CONDITIONS: Given information about the light sensi tivity of film, common types of mechanical shutters, shutter durations, ap erture openings, daylight exposure, depth of field, hyperfocal distance and f ocusing. STANDARDS: Demonstrate competency of the task skill s and knowledge by responding to the multiple-choice test covering fun damentals of exposure and focusing. This objective supports Soldier's Manual Task 113-5 78-1005, Photograph Subjects with a 35mm Single Lens Reflex Camera and 113-578-1013 Photograph Subject Using Various Focal Length Lenses. Lesson 4: BASICS OF COMPOSITION TASK: Define and state the theory and application o f composing the elements at a scene to be photographed. CONDITIONS: Given information about the definition and principles of composition. STANDARDS: Demonstrate competency of the task skil ls and knowledge by responding to the multiple-choice test covering the basics of composition. This objective supports Soldier's Manual Task 113-5 78-1015, Employ Photographic Composition, and 113-578-1023, Recomme nd a Photographic Format to a Requester.
ii
TABLE OF CONTENTS Section Page TITLE PAGE ........................................ .................... i TABLE OF CONTENTS ................................. .................... iii INTRODUCTION TO PRINCIPLES OF PHOTOGRAPHY ......... .................... vi Lesson 1: IDENTIFY THE BASICS OF PHOTOGRAPHY ...... ................... 1 Learning Event 1: Describe the Basic Steps in Maki ng a Photo- graph ............................................ ................ 1 Learning Event 2: Describe the Behavior of Light . ............... 4 Learning Event 3: List the Colors of Light and the ir Wavelengths 6 Learning Event 4: Determine the Intensity of Illum ination ....... 8 Learning Event 5: Identify the Basic Types of Sing le Lenses ..... 9 Learning Event 6: Describe the Cause and the Corre ction of Lens Flare ............................................ ................ 11 Practice Exercise ................................ ................ 12 Answer to Practice Exercise ...................... ................ 14 Lesson 2: DETERMINE THE APPLICATION OF OPTICS ..... ................... 16 Learning Event 1: Describe the Optical Terms of Fo cal Length, Focal Plane, Optical Center, and Infinity ........ ................ 16 Learning Event 2: Determine the Effect on Image Si ze for a Given Focal Length Lens ................................ ................ 19 Learning Event 3: Determine the Angle of View for a Given Focal Length Lens ...................................... ................ 22 Learning Event 4: State the Effect on Perspective for a Given Focal Length Lens ................................ ................ 25 Practice Exercise ................................ ................ 28
iii
Section Page Answers to Practice Exercise ..................... ................ 30 Lesson 3: APPLY THE FUNDAMENTALS OF EXPOSURE AND FO CUSING ............ 31 Learning Event 1: Determine the Light Sensitivity of Film ....... 31 Learning Event 2: Identify the Two Common Types of Mechanical Shutters ......................................... ................ 33 Learning Event 3: Calculate Shutter Duration ..... ............... 35 Learning Event 4: Calculate Aperture Openings .... ............... 37 Learning Event 5: Calculate Shutter Speed, Apertur e, and Film Speed ............................................ ................ 39 Learning Event 6: Determine Daylight Exposure .... ............... 40 Learning Event 7: Calculate Daylight Exposure .... ............... 44 Learning Event 8: Define Focus ................... ............... 47 Learning Event 9: Define Depth of Field and Hyperf ocal Distance . 49 Learning Event 10: Calculate Hyperfocal Distance . ................ 51 Learning Event 11: Select Appropriate Focus ...... ................ 52 Learning Event 12: Calculate Depth of Field ...... ................ 54 Practice Exercise ................................ ................ 56 Answers to Practice Exercise ..................... ................ 58 Lesson 4: BASICS OF COMPOSITION ................... ................... 59 Learning Event 1: Define Composition ............. ............... 59 Learning Event 2: State the Principles of Composit ion ........... 60 Practice Exercise ................................ ................ 75 Answers to Practice Exercise ..................... ................ 77
iv

THIS PAGE INTENTIONALLY LEFT BLANK
v

INTRODUCTION TO PRINCIPLES OF PHOTOGRAPHY These four lessons on principles of Photography are designed to teach you the methods of performing visual information docume ntation within your unit. Army visual information units are becoming more tac tically oriented and will require efficient and timely documentation. Much o f this documentation will be performed in the field. Your ability to support the Army through Visual Information Combat Documentation, may well spell th e difference between mission failure or mission accomplishment.
vi
LESSON 1 IDENTIFY THE BASICS OF PHOTOGRAPHY
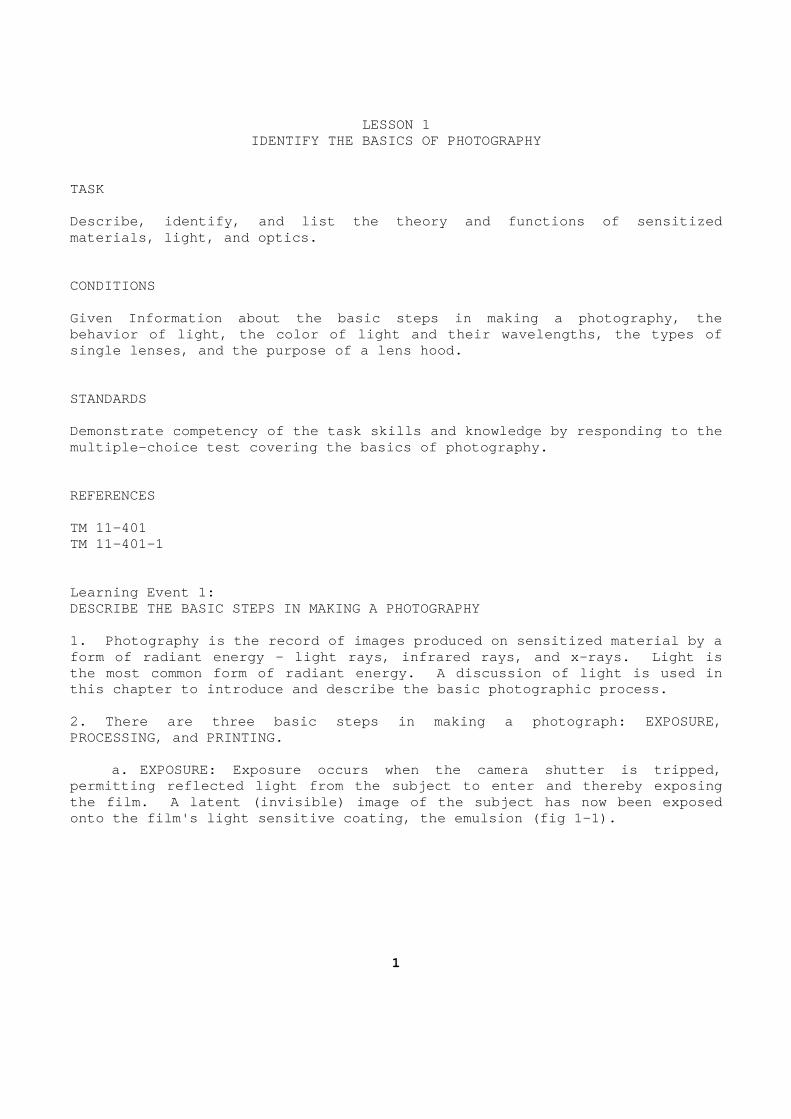
TASK Describe, identify, and list the theory and functio ns of sensitized materials, light, and optics. CONDITIONS Given Information about the basic steps in making a photography, the behavior of light, the color of light and their wav elengths, the types of single lenses, and the purpose of a lens hood. STANDARDS Demonstrate competency of the task skills and knowl edge by responding to the multiple-choice test covering the basics of photogr aphy. REFERENCES TM 11-401 TM 11-401-1 Learning Event 1: DESCRIBE THE BASIC STEPS IN MAKING A PHOTOGRAPHY 1. Photography is the record of images produced on sensitized material by a form of radiant energy - light rays, infrared rays, and x-rays. Light is the most common form of radiant energy. A discussi on of light is used in this chapter to introduce and describe the basic ph otographic process. 2. There are three basic steps in making a photogra ph: EXPOSURE, PROCESSING, and PRINTING. a. EXPOSURE: Exposure occurs when the camera shutt er is tripped, permitting reflected light from the subject to ente r and thereby exposing the film. A latent (invisible) image of the subjec t has now been exposed onto the film's light sensitive coating, the emulsi on (fig 1-1).
1

Lesson l/Learning Event 1
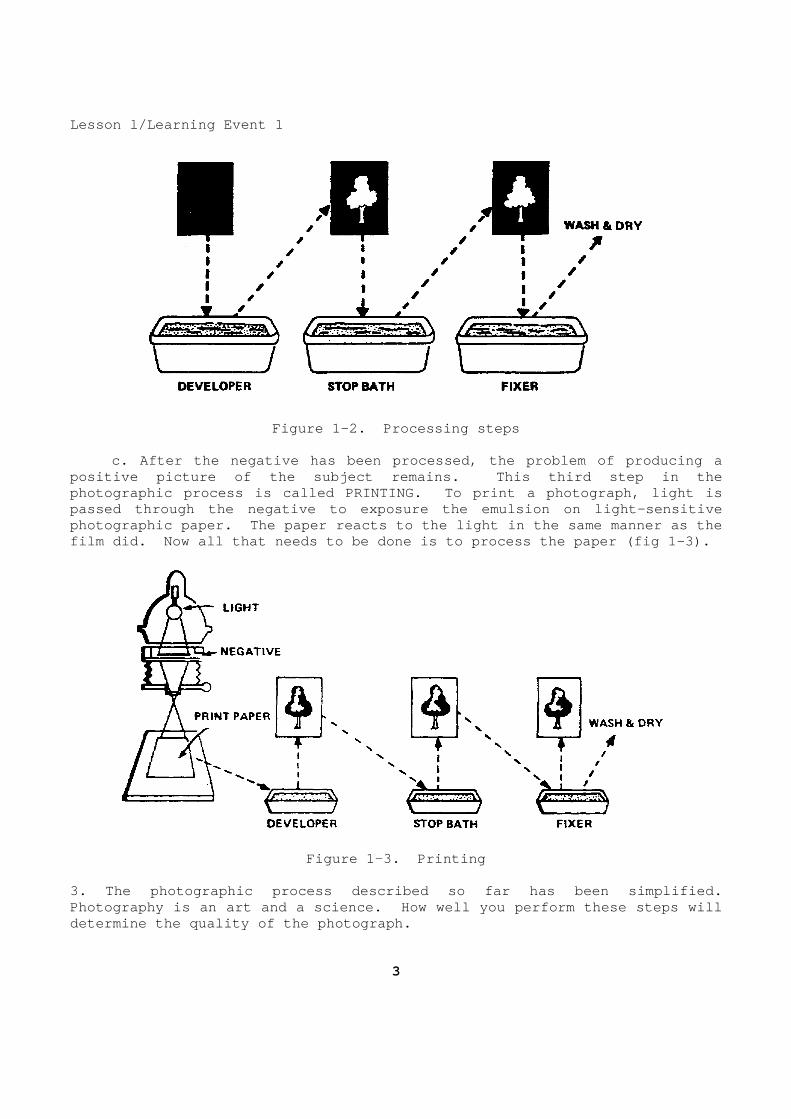
Figure 1-1. Exposure b. PROCESSING: Processing, also referred to as dev eloping consists of a series of steps that will develop the latent image into a visible image through the use of chemical solutions. These steps are: (1) Developer -- Here the exposed film is immersed in a chemical solution (developer) that will change the exposed p ortions of the film to a visible image of the subject photographed. (2) Stop Bath -- To stop the action of the develop ing agent and thus prevent over-developing, the film is rinsed in a di luted acetic acid solution. (3) Fixing -- The film is then placed in another c hemical solution which dissolves the unexposed and undeveloped parts of the emulsion. These parts are left clear. (4) Wash and Dry -- Film is washed in running wate r so that all chemicals and unwanted particles art removed. If a ny chemicals remain the image will fade over time. The film is then dried, and the result is a "negative." A negative is an image of the subject photographed in which the various tones appear reversed (fig 1-2).
2
Lesson l/Learning Event 1
Figure 1-2. Processing steps c. After the negative has been processed, the prob lem of producing a positive picture of the subject remains. This thir d step in the photographic process is called PRINTING. To print a photograph, light is passed through the negative to exposure the emulsio n on light-sensitive photographic paper. The paper reacts to the light in the same manner as the film did. Now all that needs to be done is to proc ess the paper (fig 1-3).
Figure 1-3. Printing 3. The photographic process described so far has be en simplified. Photography is an art and a science. How well you perform these steps will determine the quality of the photograph.
3
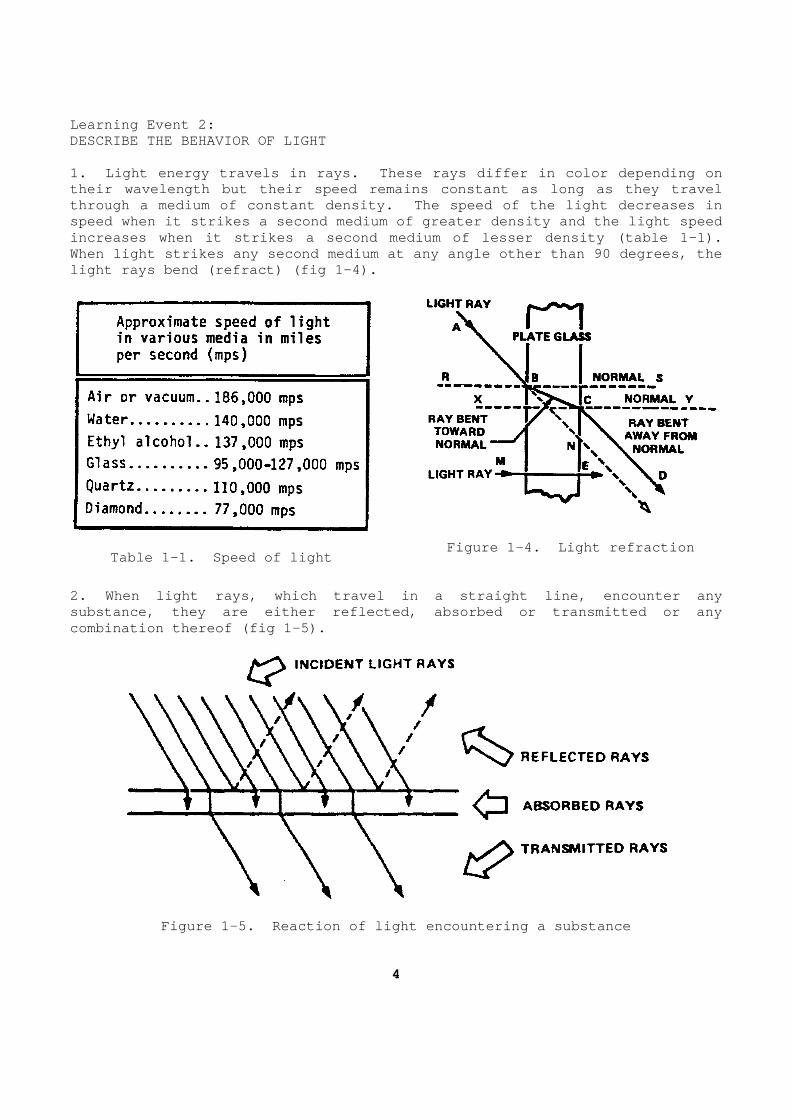
Learning Event 2: DESCRIBE THE BEHAVIOR OF LIGHT 1. Light energy travels in rays. These rays differ in color depending on their wavelength but their speed remains constant a s long as they travel through a medium of constant density. The speed of the light decreases in speed when it strikes a second medium of greater de nsity and the light speed increases when it strikes a second medium of lesser density (table 1-1). When light strikes any second medium at any angle o ther than 90 degrees, the light rays bend (refract) (fig 1-4).
Table 1-1. Speed of light
Figure 1-4. Light refraction
2. When light rays, which travel in a straight line , encounter any substance, they are either reflected, absorbed or t ransmitted or any combination thereof (fig 1-5).
Figure 1-5. Reaction of light encountering a subst ance
4
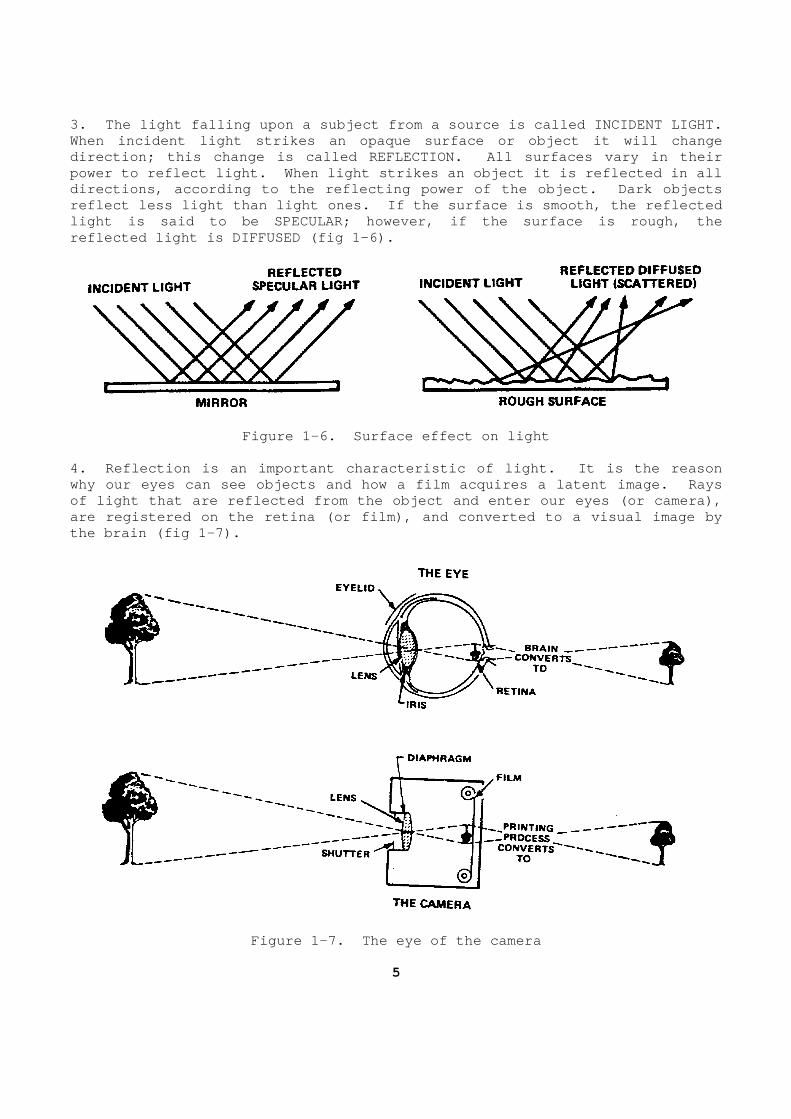
3. The light falling upon a subject from a source i s called INCIDENT LIGHT. When incident light strikes an opaque surface or ob ject it will change direction; this change is called REFLECTION. All s urfaces vary in their power to reflect light. When light strikes an obje ct it is reflected in all directions, according to the reflecting power of th e object. Dark objects reflect less light than light ones. If the surface is smooth, the reflected light is said to be SPECULAR; however, if the surfa ce is rough, the reflected light is DIFFUSED (fig 1-6).
Figure 1-6. Surface effect on light 4. Reflection is an important characteristic of lig ht. It is the reason why our eyes can see objects and how a film acquire s a latent image. Rays of light that are reflected from the object and ent er our eyes (or camera), are registered on the retina (or film), and convert ed to a visual image by the brain (fig 1-7).
Figure 1-7. The eye of the camera
5
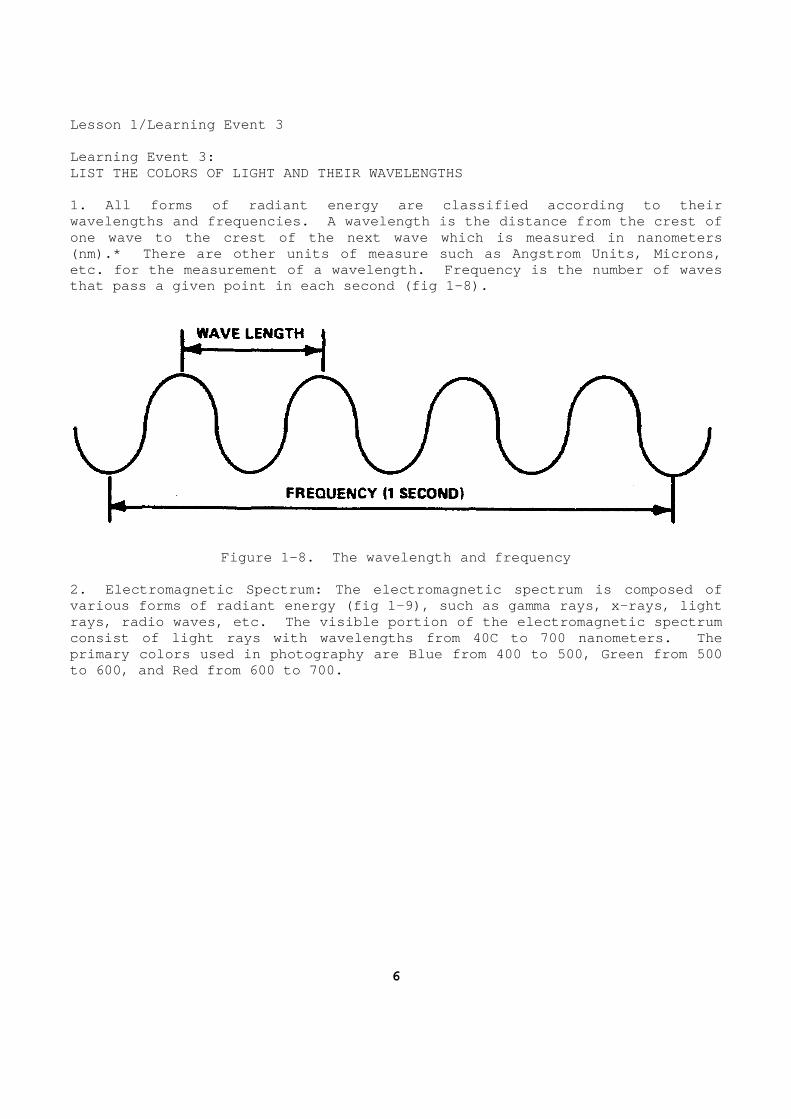
Lesson 1/Learning Event 3 Learning Event 3: LIST THE COLORS OF LIGHT AND THEIR WAVELENGTHS 1. All forms of radiant energy are classified accor ding to their wavelengths and frequencies. A wavelength is the d istance from the crest of one wave to the crest of the next wave which is mea sured in nanometers (nm).* There are other units of measure such as An gstrom Units, Microns, etc. for the measurement of a wavelength. Frequenc y is the number of waves that pass a given point in each second (fig 1-8).
Figure 1-8. The wavelength and frequency 2. Electromagnetic Spectrum: The electromagnetic sp ectrum is composed of various forms of radiant energy (fig 1-9), such as gamma rays, x-rays, light rays, radio waves, etc. The visible portion of the electromagnetic spectrum consist of light rays with wavelengths from 40C to 700 nanometers. The primary colors used in photography are Blue from 40 0 to 500, Green from 500 to 600, and Red from 600 to 700.
6
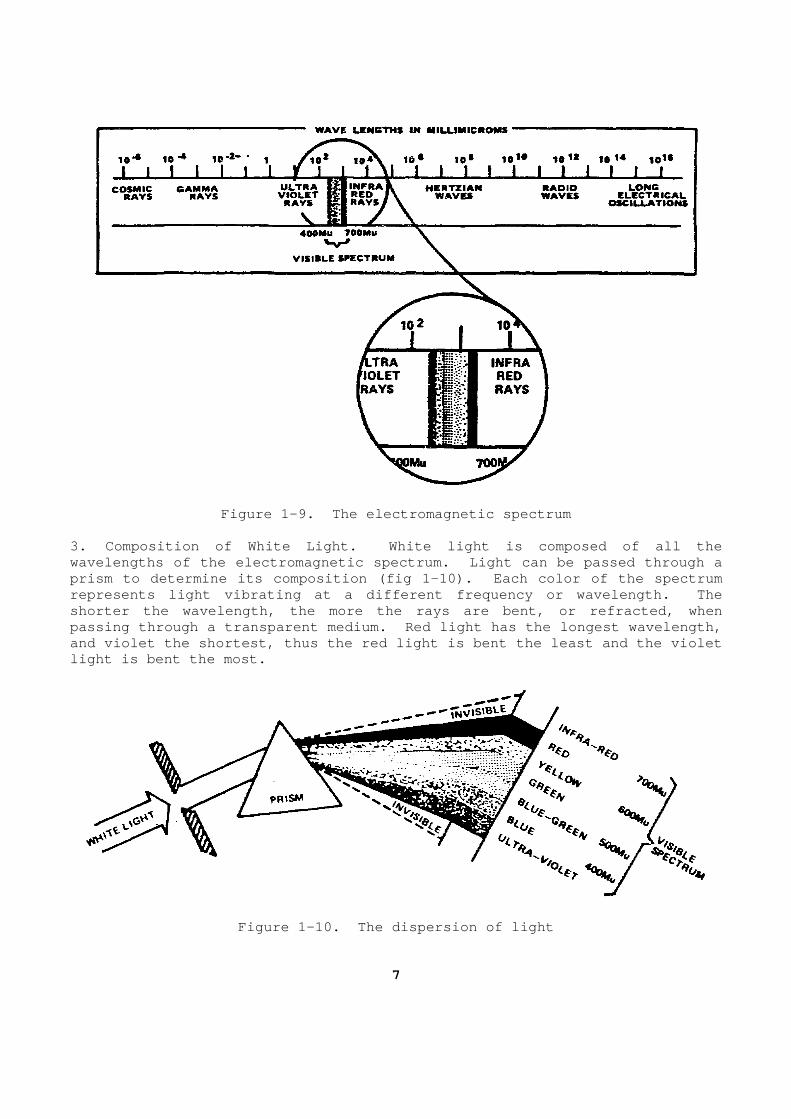
Figure 1-9. The electromagnetic spectrum 3. Composition of White Light. White light is comp osed of all the wavelengths of the electromagnetic spectrum. Light can be passed through a prism to determine its composition (fig 1-10). Eac h color of the spectrum represents light vibrating at a different frequency or wavelength. The shorter the wavelength, the more the rays are bent, or refracted, when passing through a transparent medium. Red light ha s the longest wavelength, and violet the shortest, thus the red light is bent the least and the violet light is bent the most.
Figure 1-10. The dispersion of light
7

Learning Event 4: DETERMINE THE INTENSITY OF ILLUMINATION 1. In photography, light is the most important ingr edient. The intensity of illumination on an object depends upon the stren gth of the light source in candlepower and the distance from the light sour ce to the object. Light intensity diminishes inversely with the square of t he distance from a light source to an object. 2. In figure 1-11, a card is placed 1 foot, 2 feet, 3 feet, and 4 feet from a light source. Assume the card, which is one foot from the light source, is receiving 640 foot candles of illumination. If you double the distance to two feet, the card receives 1/4 the illumination or 160 foot candles at one foot. If you move the card to 3 feet, it recei ves 1/9 the amount of light or 71 foot candles. If you move the card to four feet, it receives 1/16 as much light as it did at 1 foot.
Figure 1-11. How light loss intensity
8
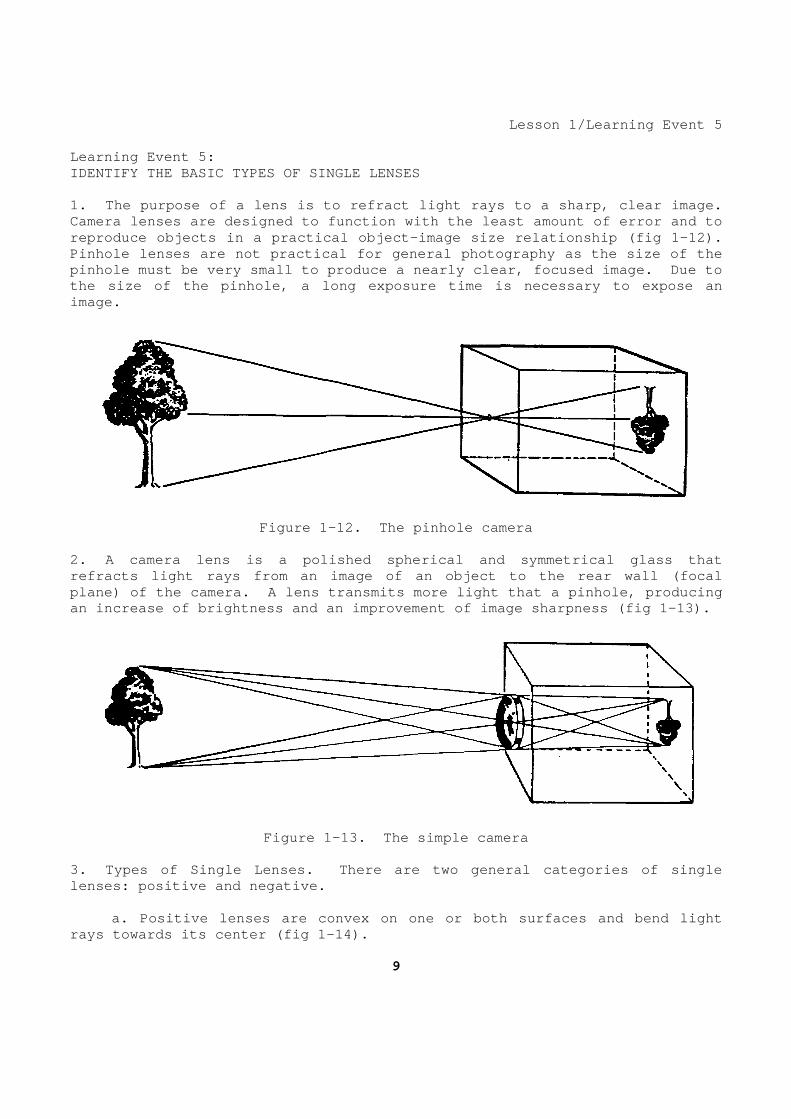
Lesson 1/Learning Event 5 Learning Event 5: IDENTIFY THE BASIC TYPES OF SINGLE LENSES 1. The purpose of a lens is to refract light rays t o a sharp, clear image. Camera lenses are designed to function with the lea st amount of error and to reproduce objects in a practical object-image size relationship (fig 1-12). Pinhole lenses are not practical for general photog raphy as the size of the pinhole must be very small to produce a nearly clea r, focused image. Due to the size of the pinhole, a long exposure time is ne cessary to expose an image.
Figure 1-12. The pinhole camera 2. A camera lens is a polished spherical and symmet rical glass that refracts light rays from an image of an object to t he rear wall (focal plane) of the camera. A lens transmits more light that a pinhole, producing an increase of brightness and an improvement of ima ge sharpness (fig 1-13).
Figure 1-13. The simple camera 3. Types of Single Lenses. There are two general c ategories of single lenses: positive and negative. a. Positive lenses are convex on one or both surfa ces and bend light rays towards its center (fig 1-14).
9
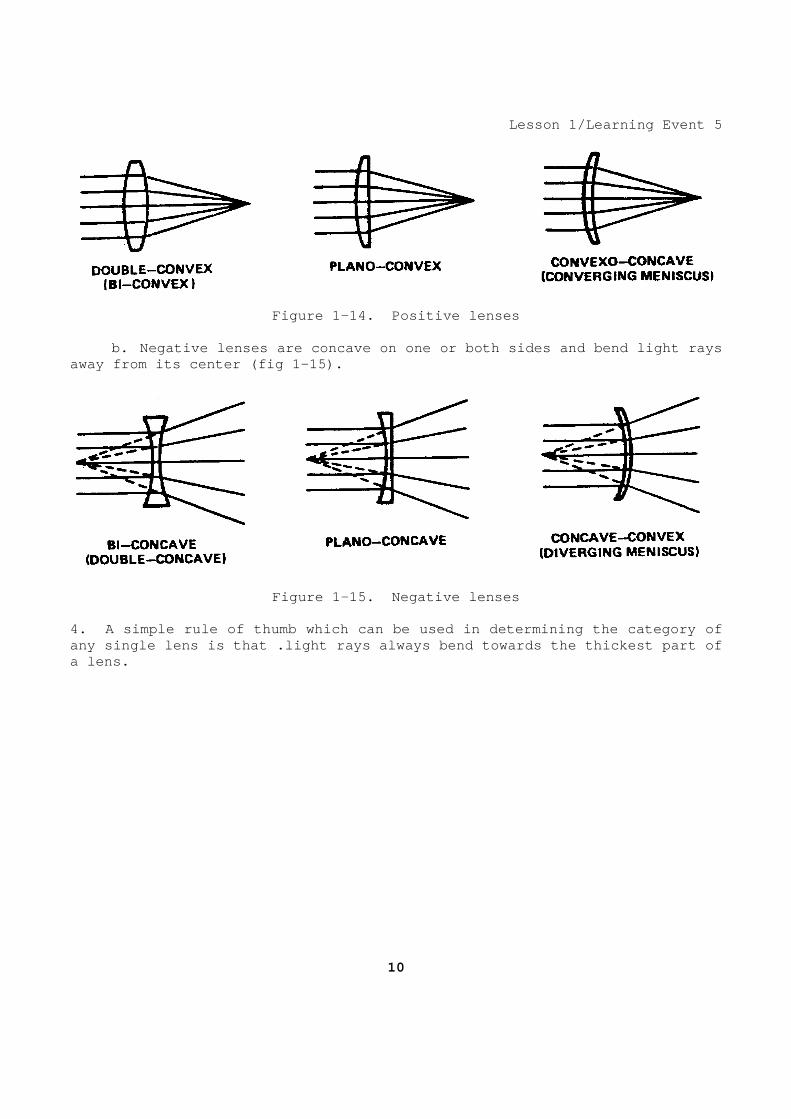
Lesson 1/Learning Event 5
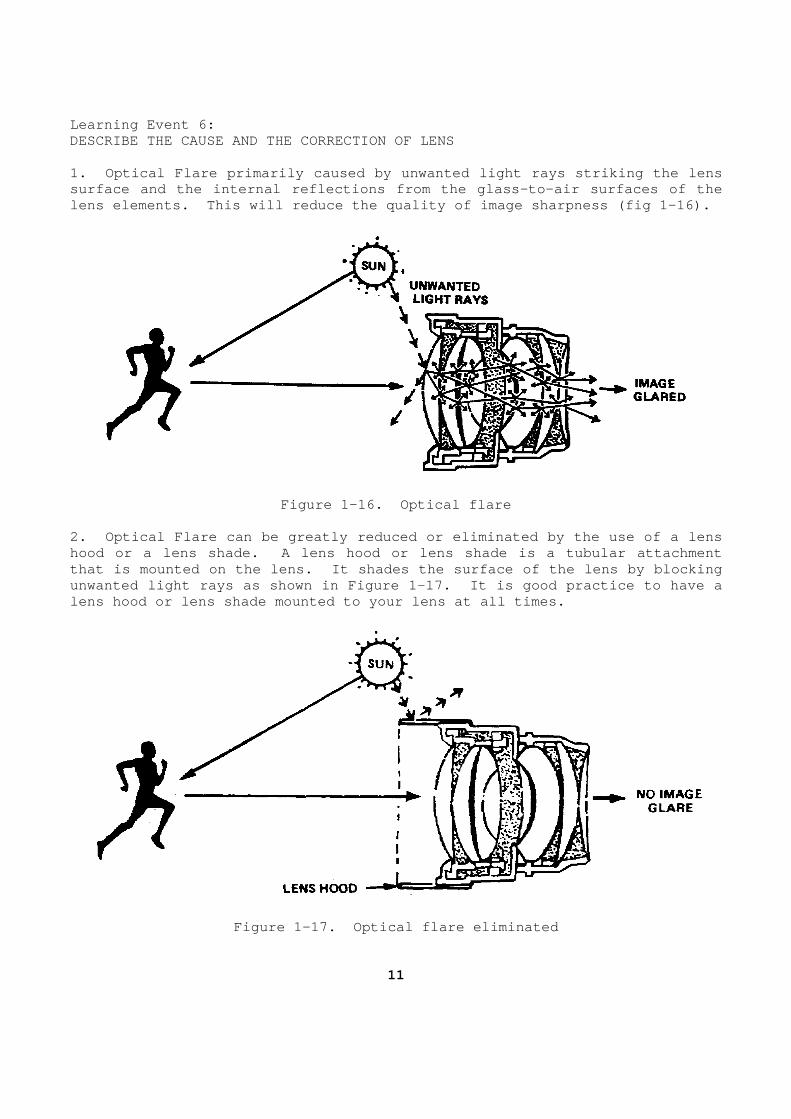
Figure 1-14. Positive lenses b. Negative lenses are concave on one or both side s and bend light rays away from its center (fig 1-15).
Figure 1-15. Negative lenses 4. A simple rule of thumb which can be used in dete rmining the category of any single lens is that .light rays always bend tow ards the thickest part of a lens.
10
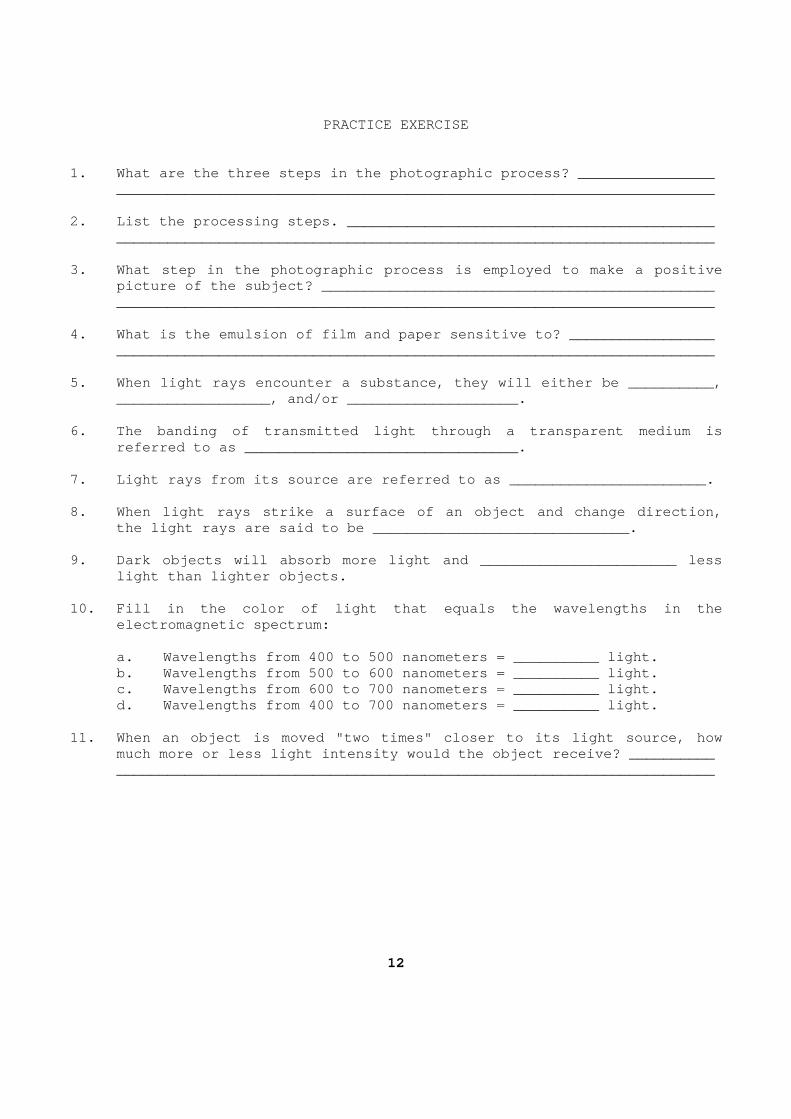
Learning Event 6: DESCRIBE THE CAUSE AND THE CORRECTION OF LENS 1. Optical Flare primarily caused by unwanted light rays striking the lens surface and the internal reflections from the glass -to-air surfaces of the lens elements. This will reduce the quality of ima ge sharpness (fig 1-16).
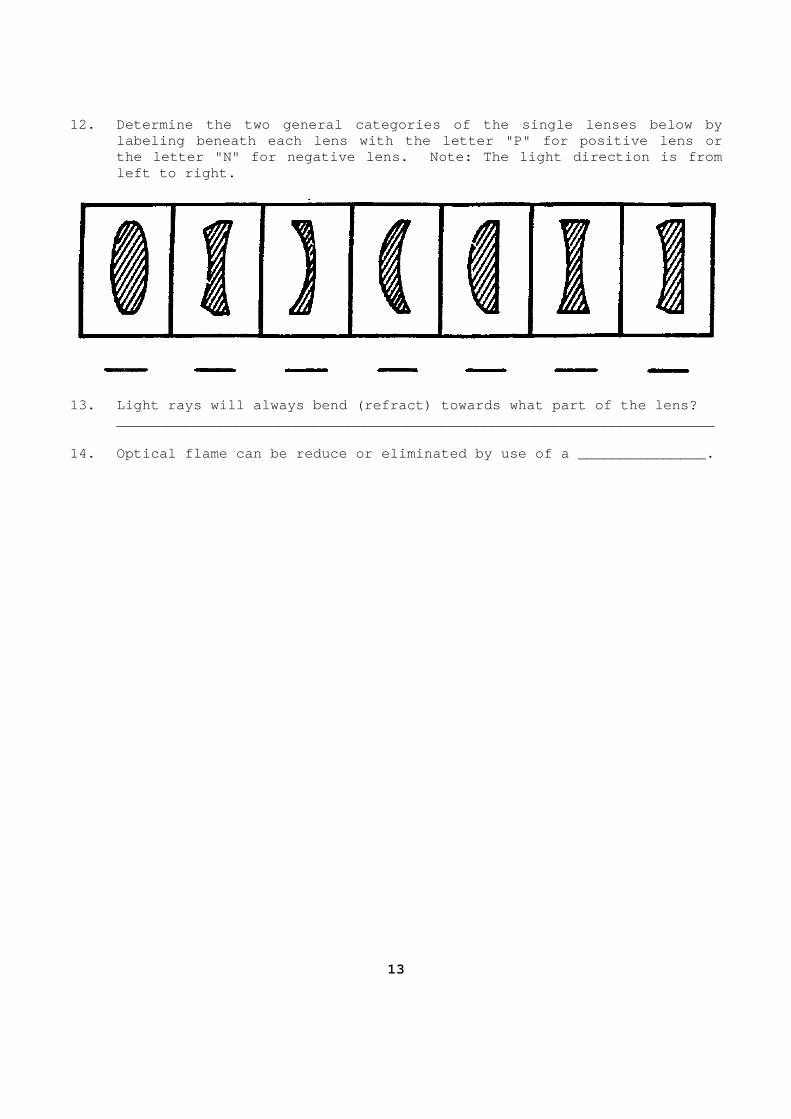
Figure 1-16. Optical flare 2. Optical Flare can be greatly reduced or eliminat ed by the use of a lens hood or a lens shade. A lens hood or lens shade is a tubular attachment that is mounted on the lens. It shades the surface of the lens by blocking unwanted light rays as shown in Figure 1-17. It is good practice to have a lens hood or lens shade mounted to your lens at all times.
Figure 1-17. Optical flare eliminated
11
PRACTICE EXERCISE 1. What are the three steps in the photographic pro cess? ________________ __________________________________________________ ____________________ 2. List the processing steps. _____________________ ______________________ __________________________________________________ ____________________ 3. What step in the photographic process is employe d to make a positive
picture of the subject? ___________________________ ___________________ __________________________________________________ ____________________ 4. What is the emulsion of film and paper sensitive to? _________________ __________________________________________________ ____________________ 5. When light rays encounter a substance, they will either be __________,
__________________, and/or ____________________. 6. The banding of transmitted light through a trans parent medium is
referred to as ________________________________. 7. Light rays from its source are referred to as __ _____________________. 8. When light rays strike a surface of an object an d change direction,
the light rays are said to be _____________________ _________. 9. Dark objects will absorb more light and ________ _______________ less
light than lighter objects. 10. Fill in the color of light that equals the wave lengths in the
electromagnetic spectrum: a. Wavelengths from 400 to 500 nanometers = ______ ____ light. b. Wavelengths from 500 to 600 nanometers = ______ ____ light. c. Wavelengths from 600 to 700 nanometers = ______ ____ light. d. Wavelengths from 400 to 700 nanometers = ______ ____ light. 11. When an object is moved "two times" closer to i ts light source, how
much more or less light intensity would the object receive? __________ __________________________________________________ ____________________
12
12. Determine the two general categories of the sin gle lenses below by labeling beneath each lens with the letter "P" for positive lens or the letter "N" for negative lens. Note: The light direction is from left to right.
13. Light rays will always bend (refract) towards w hat part of the lens? __________________________________________________ ____________________ 14. Optical flame can be reduce or eliminated by us e of a _______________.
13
ANSWERS TO PRACTICE EXERCISES 1. Exposure, processing, and printing, Lesson 1/Lea rning Event 1 Para 2. 2. Developing, stop bath and fixing, Lesson 1/Learn ing Event 1 Para 2b. 3. Printing, Lesson 1/Learning Event 1 Para 2c. 4. Light, Lesson 1/Learning Event 1 Para 2a. 5. Transmitted, reflected, and/or absorb, Lesson 1/ Learning Event 2 Para 2. 6. Refraction, Lesson 1/Learning Event 2 Para 1. 7. Incident light, Lesson 1/Learning Event 2 Para 3. 8. Reflected, Lesson 1/Learning Event 2 Para 3. 9. Reflect, Lesson 1/Learning Event 2 Para 4. 10. a. Blue b. Green c. Red d. White Lesson l/Learning Event 3 Para 2. 11. Four times more light, Lesson 1/Learning Event 4 Para 2. 12. a. P b. N c. N d. P e. P f. N g. N Lesson l/Learning Event 5 Para 3a and b.
14

13. The thickest part, Lesson l/Learning Event 5 Para 4. 14. Lens hood, Lesson 1/Learning Event 6 Para 2.
15
Lesson 2/Learning Event 1
LESSON 2 DETERMINE THE APPLICATION OF OPTICS
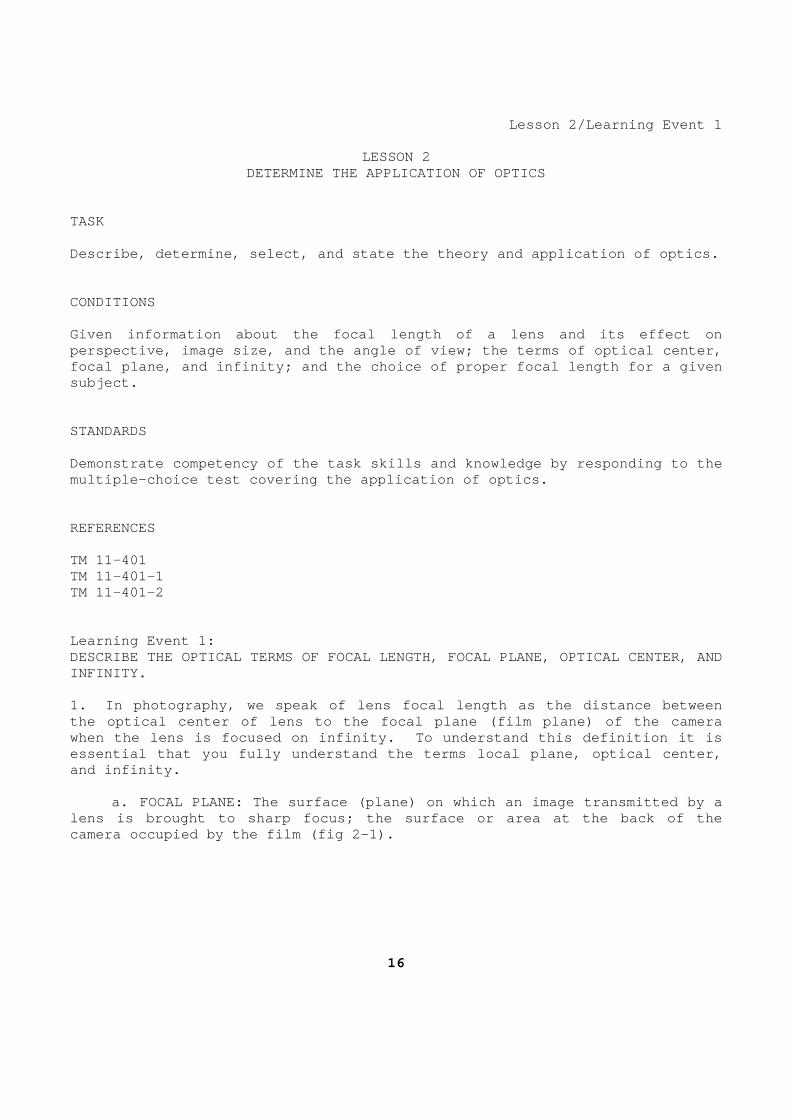
TASK Describe, determine, select, and state the theory a nd application of optics. CONDITIONS Given information about the focal length of a lens and its effect on perspective, image size, and the angle of view; the terms of optical center, focal plane, and infinity; and the choice of proper focal length for a given subject. STANDARDS Demonstrate competency of the task skills and knowl edge by responding to the multiple-choice test covering the application of op tics. REFERENCES TM 11-401 TM 11-401-1 TM 11-401-2 Learning Event 1: DESCRIBE THE OPTICAL TERMS OF FOCAL LENGTH, FOCAL P LANE, OPTICAL CENTER, AND INFINITY. 1. In photography, we speak of lens focal length as the distance between the optical center of lens to the focal plane (film plane) of the camera when the lens is focused on infinity. To understan d this definition it is essential that you fully understand the terms local plane, optical center, and infinity. a. FOCAL PLANE: The surface (plane) on which an im age transmitted by a lens is brought to sharp focus; the surface or area at the back of the camera occupied by the film (fig 2-1).
16
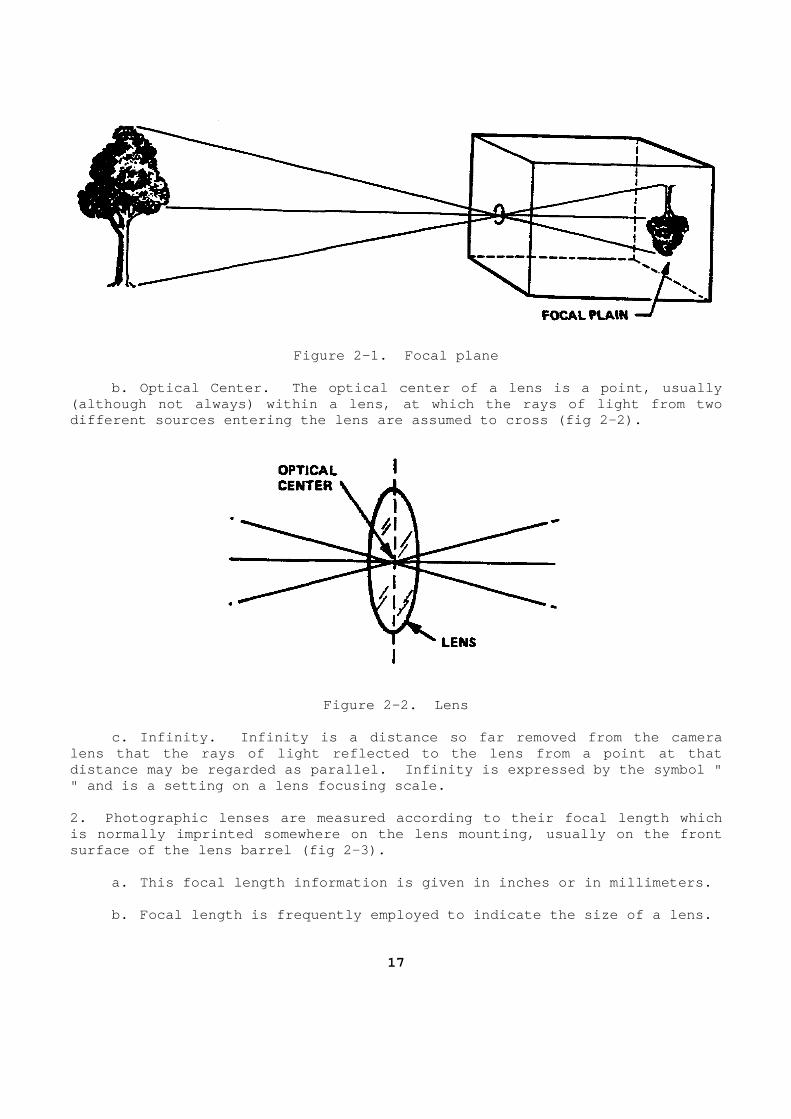
Figure 2-1. Focal plane b. Optical Center. The optical center of a lens i s a point, usually (although not always) within a lens, at which the r ays of light from two different sources entering the lens are assumed to cross (fig 2-2).
Figure 2-2. Lens c. Infinity. Infinity is a distance so far remove d from the camera lens that the rays of light reflected to the lens f rom a point at that distance may be regarded as parallel. Infinity is expressed by the symbol " " and is a setting on a lens focusing scale. 2. Photographic lenses are measured according to th eir focal length which is normally imprinted somewhere on the lens mountin g, usually on the front surface of the lens barrel (fig 2-3). a. This focal length information is given in inche s or in millimeters. b. Focal length is frequently employed to indicate the size of a lens.
17
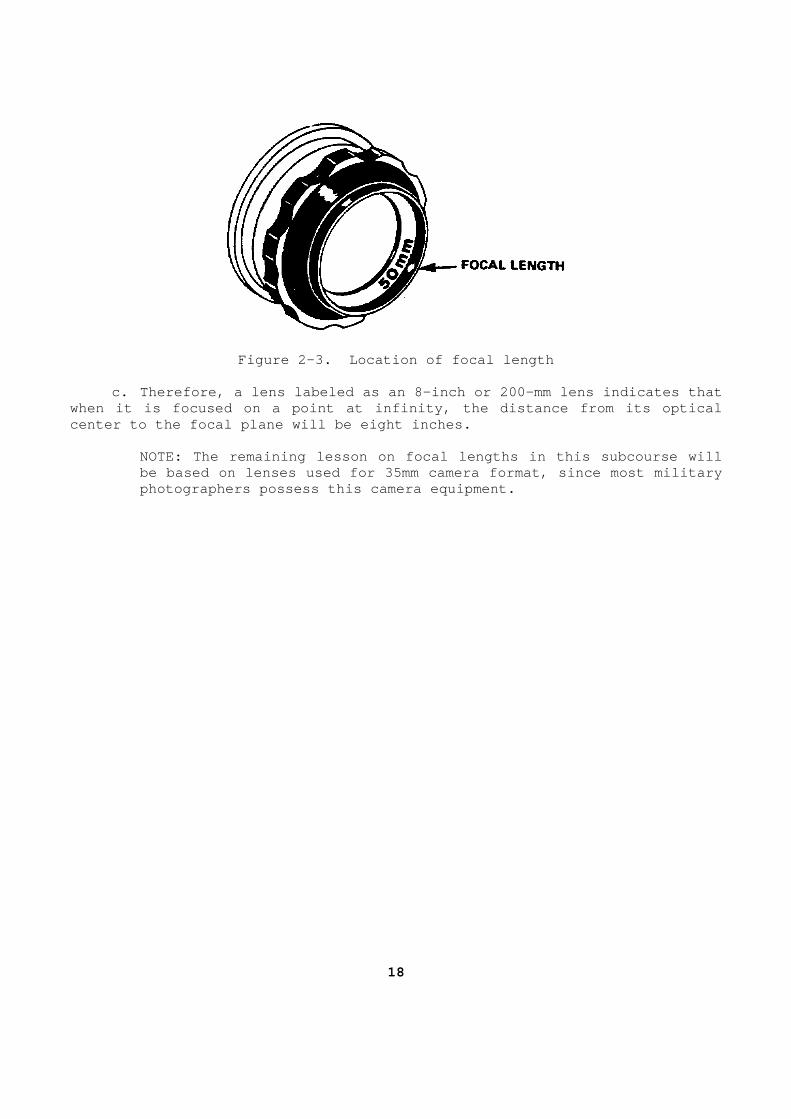
Figure 2-3. Location of focal length c. Therefore, a lens labeled as an 8-inch or 200-m m lens indicates that when it is focused on a point at infinity, the dist ance from its optical center to the focal plane will be eight inches. NOTE: The remaining lesson on focal lengths in th is subcourse will
be based on lenses used for 35mm camera format, sin ce most military photographers possess this camera equipment.
18
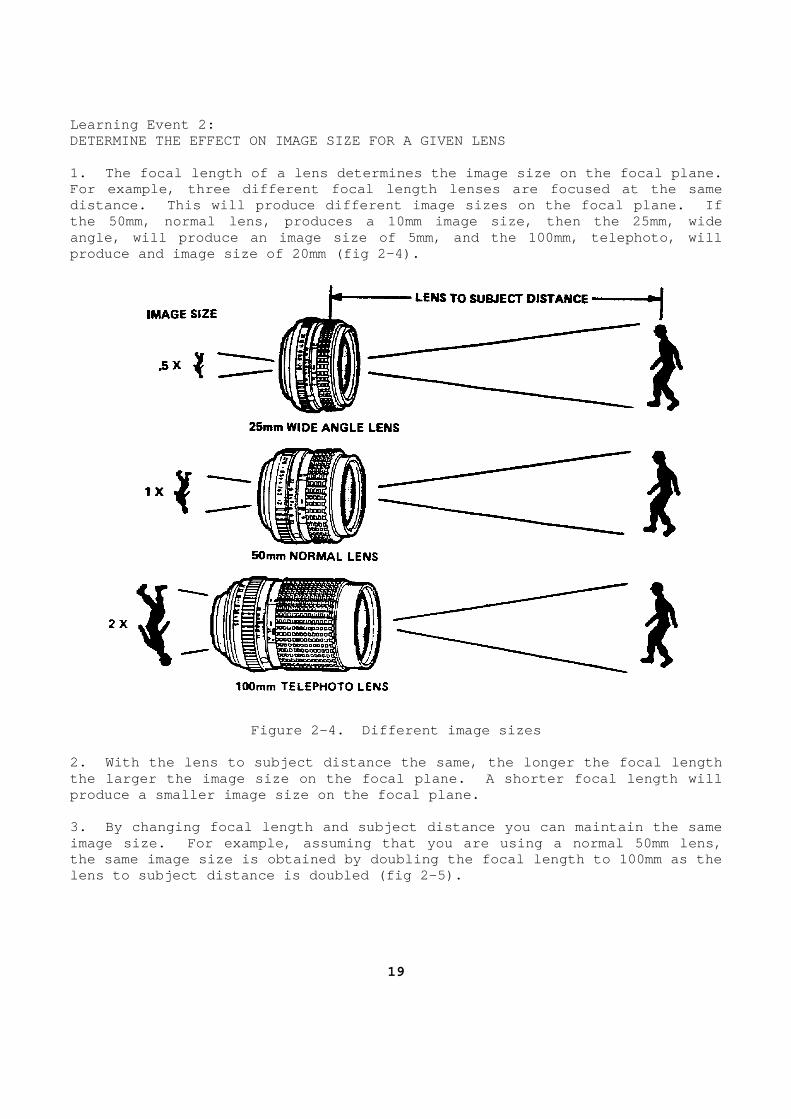
Learning Event 2: DETERMINE THE EFFECT ON IMAGE SIZE FOR A GIVEN LENS 1. The focal length of a lens determines the image size on the focal plane. For example, three different focal length lenses ar e focused at the same distance. This will produce different image sizes on the focal plane. If the 50mm, normal lens, produces a 10mm image size, then the 25mm, wide angle, will produce an image size of 5mm, and the 1 00mm, telephoto, will produce and image size of 20mm (fig 2-4).
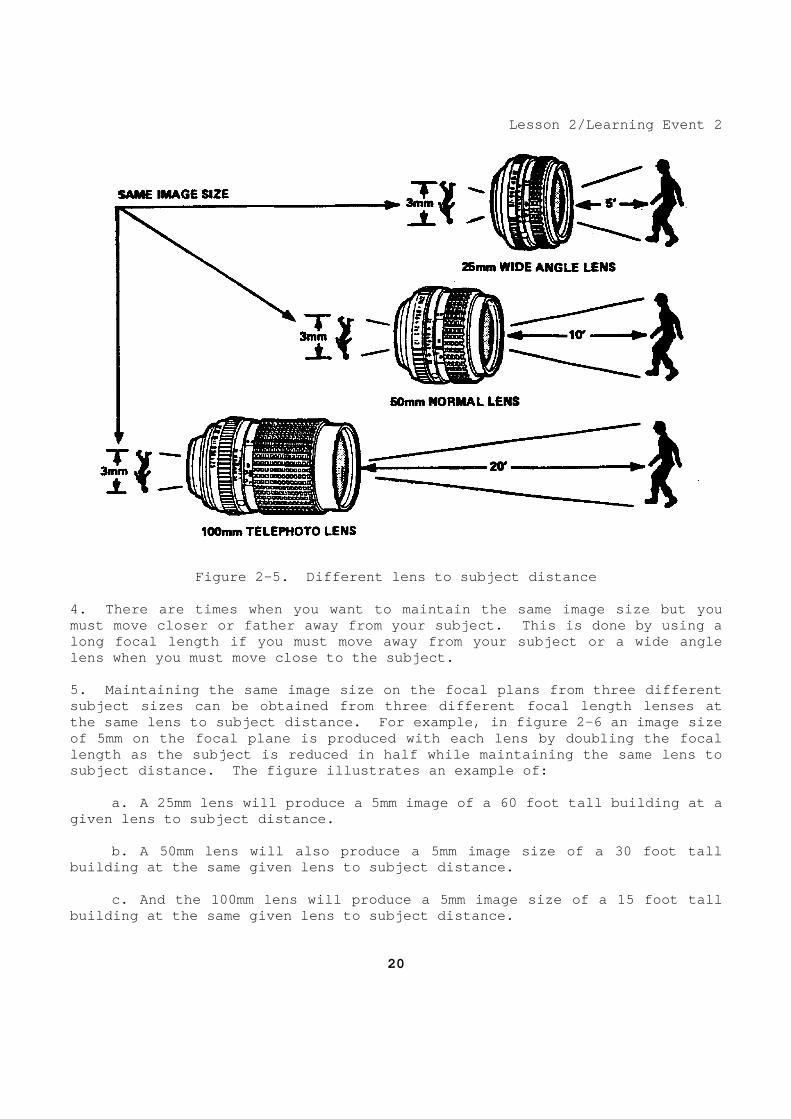
Figure 2-4. Different image sizes 2. With the lens to subject distance the same, the longer the focal length the larger the image size on the focal plane. A sh orter focal length will produce a smaller image size on the focal plane. 3. By changing focal length and subject distance yo u can maintain the same image size. For example, assuming that you are usi ng a normal 50mm lens, the same image size is obtained by doubling the foc al length to 100mm as the lens to subject distance is doubled (fig 2-5).
19
Lesson 2/Learning Event 2
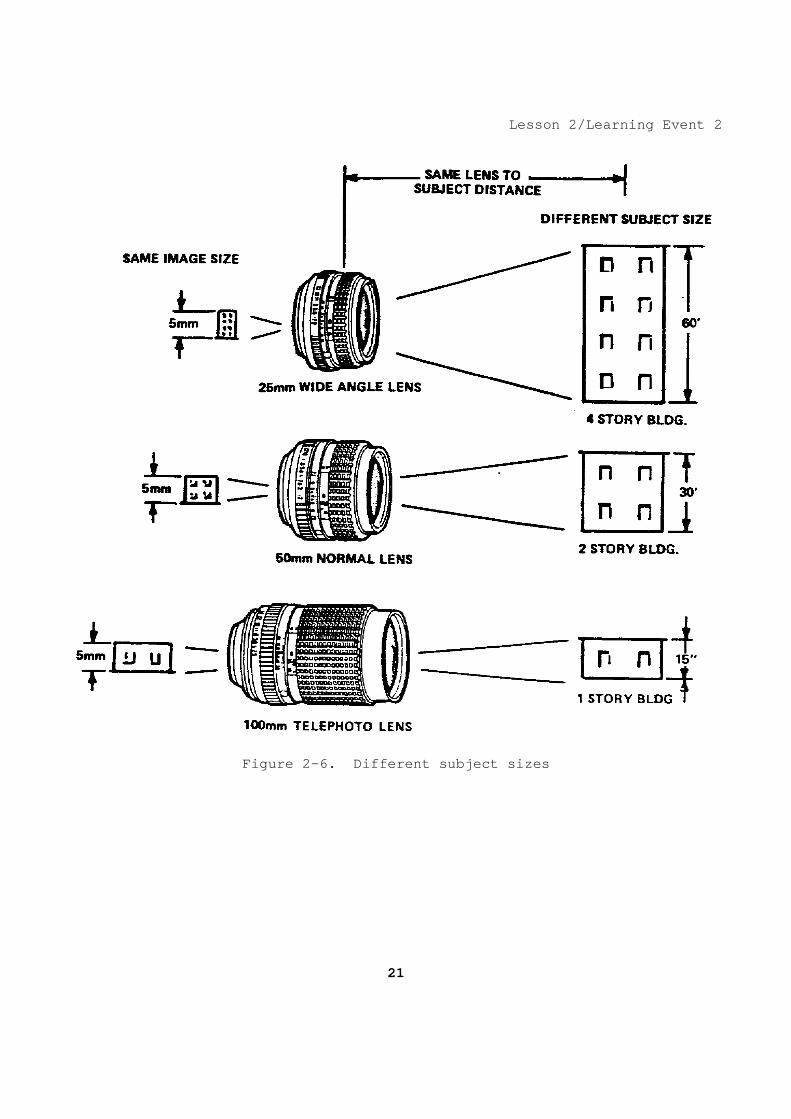
Figure 2-5. Different lens to subject distance 4. There are times when you want to maintain the sa me image size but you must move closer or father away from your subject. This is done by using a long focal length if you must move away from your s ubject or a wide angle lens when you must move close to the subject. 5. Maintaining the same image size on the focal pla ns from three different subject sizes can be obtained from three different focal length lenses at the same lens to subject distance. For example, in figure 2-6 an image size of 5mm on the focal plane is produced with each len s by doubling the focal length as the subject is reduced in half while main taining the same lens to subject distance. The figure illustrates an exampl e of: a. A 25mm lens will produce a 5mm image of a 60 fo ot tall building at a given lens to subject distance. b. A 50mm lens will also produce a 5mm image size of a 30 foot tall building at the same given lens to subject distance . c. And the 100mm lens will produce a 5mm image siz e of a 15 foot tall building at the same given lens to subject distance .
20
Lesson 2/Learning Event 2
Figure 2-6. Different subject sizes
21
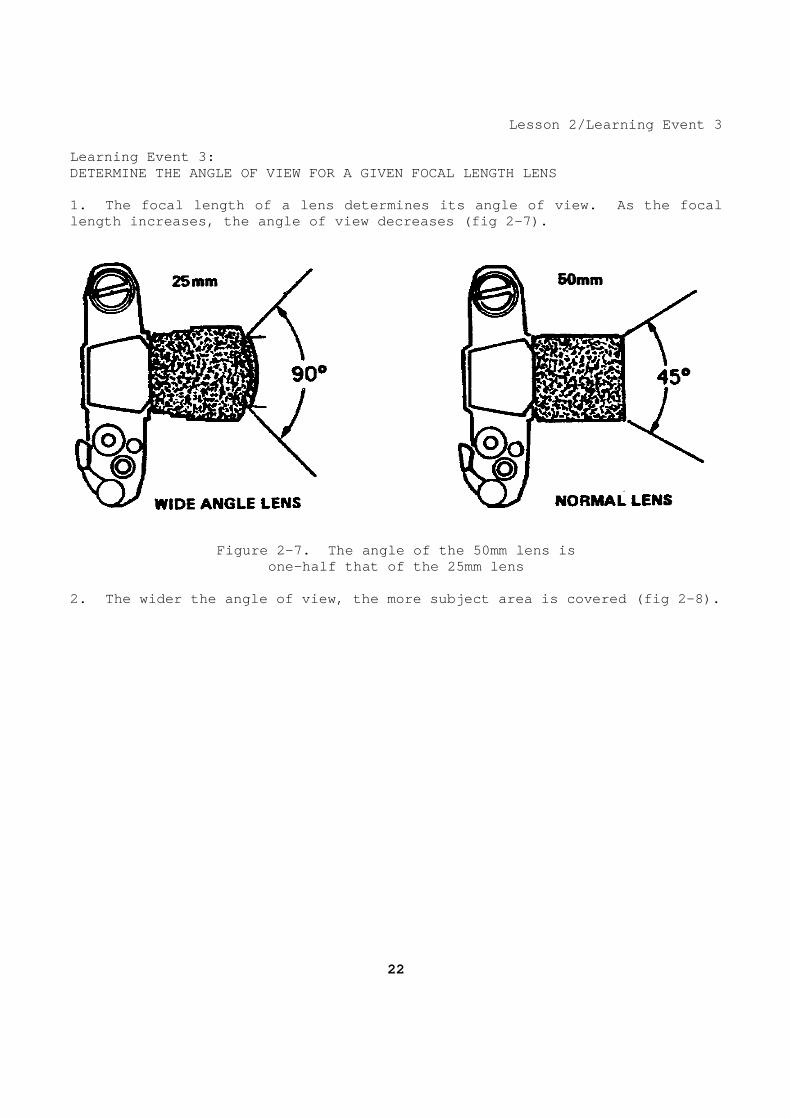
Lesson 2/Learning Event 3 Learning Event 3: DETERMINE THE ANGLE OF VIEW FOR A GIVEN FOCAL LENGT H LENS 1. The focal length of a lens determines its angle of view. As the focal length increases, the angle of view decreases (fig 2-7).
Figure 2-7. The angle of the 50mm lens is one-half that of the 25mm lens
2. The wider the angle of view, the more subject ar ea is covered (fig 2-8).
22
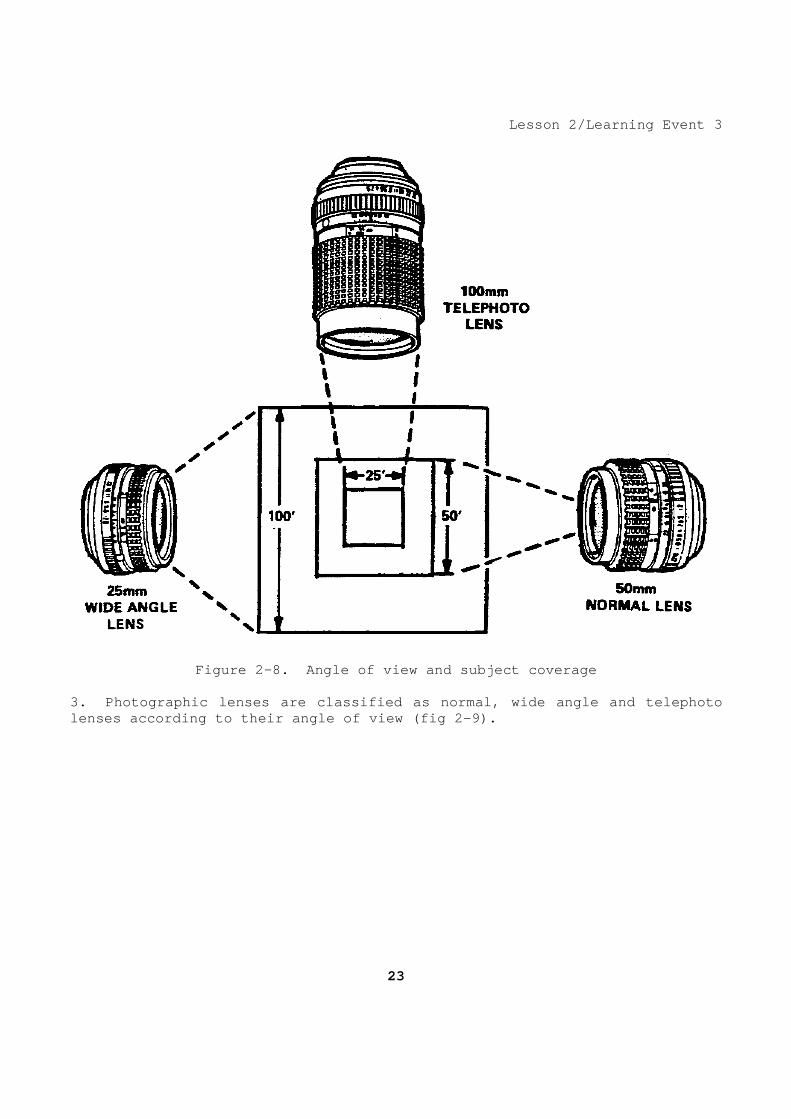
Lesson 2/Learning Event 3
Figure 2-8. Angle of view and subject coverage 3. Photographic lenses are classified as normal, wi de angle and telephoto lenses according to their angle of view (fig 2-9).
23
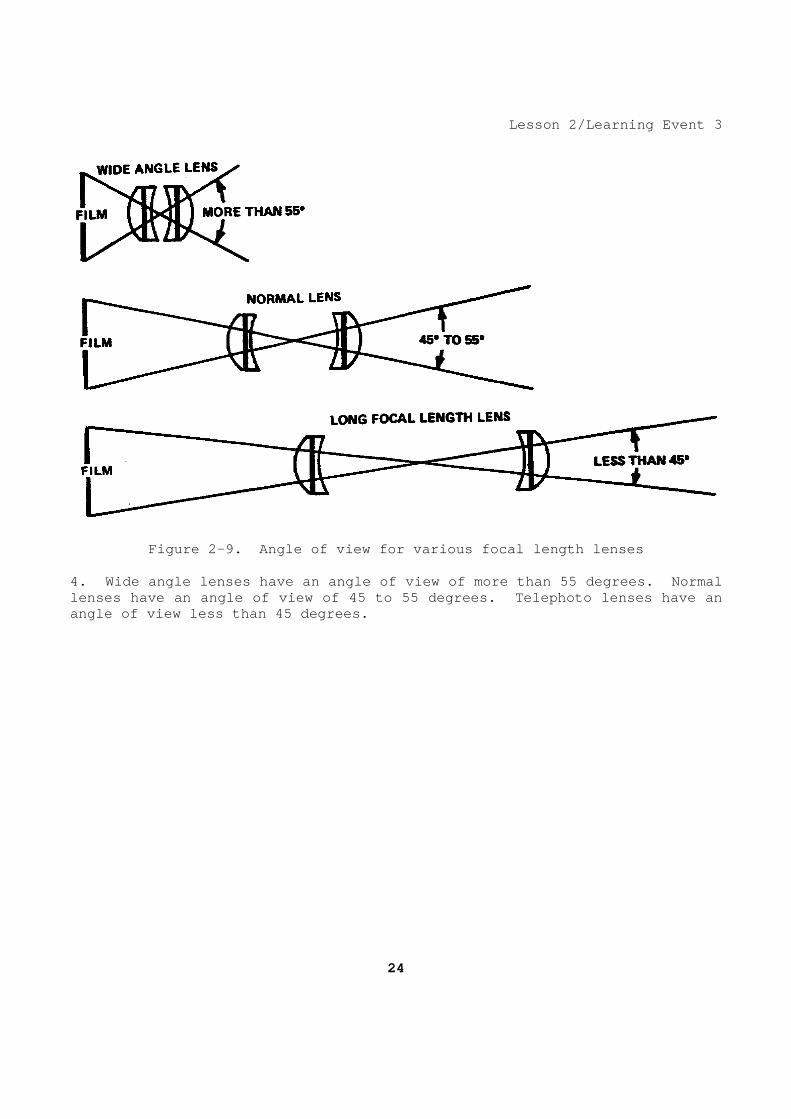
Lesson 2/Learning Event 3
Figure 2-9. Angle of view for various focal length lenses 4. Wide angle lenses have an angle of view of more than 55 degrees. Normal lenses have an angle of view of 45 to 55 degrees. Telephoto lenses have an angle of view less than 45 degrees.
24
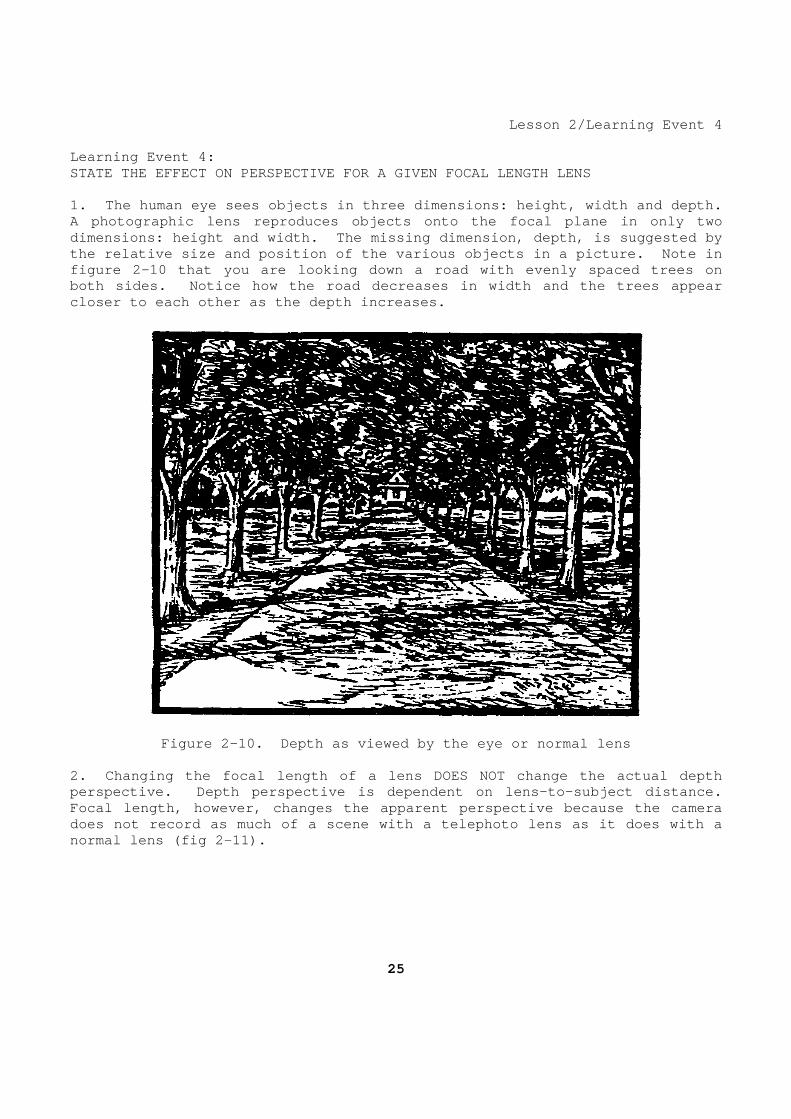
Lesson 2/Learning Event 4 Learning Event 4: STATE THE EFFECT ON PERSPECTIVE FOR A GIVEN FOCAL L ENGTH LENS 1. The human eye sees objects in three dimensions: height, width and depth. A photographic lens reproduces objects onto the foc al plane in only two dimensions: height and width. The missing dimensio n, depth, is suggested by the relative size and position of the various objec ts in a picture. Note in figure 2-10 that you are looking down a road with e venly spaced trees on both sides. Notice how the road decreases in width and the trees appear closer to each other as the depth increases.
Figure 2-10. Depth as viewed by the eye or normal lens 2. Changing the focal length of a lens DOES NOT cha nge the actual depth perspective. Depth perspective is dependent on len s-to-subject distance. Focal length, however, changes the apparent perspec tive because the camera does not record as much of a scene with a telephoto lens as it does with a normal lens (fig 2-11).
25

Figure 2-11. The apparent depth perspective of three different focal length lenses
3. A telephoto lens, as you recall, increases image size and reduces the angle of view. Thus objects in the background appe ar closer to objects in the foreground. This apparent foreshortened perspe ctive of depth is the compression of the space between the foreground and background. 4. A wide angle lens has an opposite effect on dept h perspective. Objects in the background appear further away than normal b ecause of increased angle of view and decreased image size. 5. Remember that the perspective of depth is NOT de pendent on the lens focal length. It is dependent on the lens-to-subje ct distance. A choice of lenses of different focal lengths, however, does en able you to get the desired image size at the selected distance for bes t depth perspective. For example, suppose you come across a scene (fig 2-12) . A wooded rail fence is in the foreground and a horse in the field. The ho rse is 100 feet behind the fence; you are 10
26
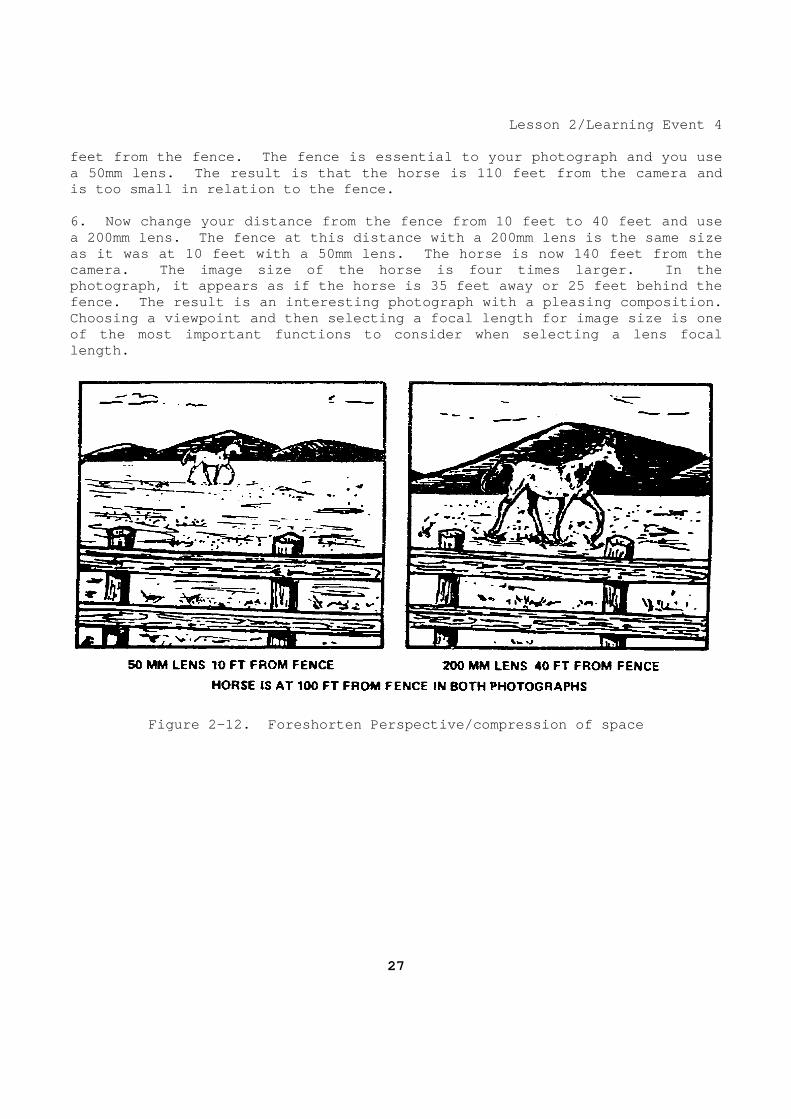
Lesson 2/Learning Event 4 feet from the fence. The fence is essential to you r photograph and you use a 50mm lens. The result is that the horse is 110 f eet from the camera and is too small in relation to the fence. 6. Now change your distance from the fence from 10 feet to 40 feet and use a 200mm lens. The fence at this distance with a 20 0mm lens is the same size as it was at 10 feet with a 50mm lens. The horse i s now 140 feet from the camera. The image size of the horse is four times larger. In the photograph, it appears as if the horse is 35 feet a way or 25 feet behind the fence. The result is an interesting photograph wit h a pleasing composition. Choosing a viewpoint and then selecting a focal len gth for image size is one of the most important functions to consider when se lecting a lens focal length.
Figure 2-12. Foreshorten Perspective/compression o f space
27

PRACTICE EXERCISE 1. The point where light rays cross in a lens assem bly is referred to as
the ________________________ of a lens. 2. The ____________________________ is where the im age is brought to a
sharp focus at the back of the camera occupied by t he film. 3. The distance from the camera lens where the ligh t rays become parallel
is referred to as _________________________. 4. The symbol " " on a camera lens indicates that the lens is focused on
what? __________________________________________________ ____________________ 5. _______________________ is the distance from the optical center of a
lens to the focal plane when the lens is focused on infinity. 6. The image size on the focal plane is determined by the size of the
subject, the lens to subject distance and the _____ _________________ of the lens.
7. What new focal length lens would you select to d ouble the image size
while maintaining the same lens to subject distance ? _________________ __________________________________________________ ____________________ 8. A 50mm lens with the subject at fifteen feet wou ld produce the same
image size as a ______mm lens with the subject dist ance at thirty feet.
9. What are the three classifications of photograph ic lenses? ___________ __________________________________________________ ____________________ __________________________________________________ ____________________ 10. The angle of view will increase as the focal le ngth _________________. 11. Write in the angle of view in degrees for the b elow listed lenses. a. Wide angle of short focal length = ____________ ____ b. Normal focal length = ______________________ c. Telephoto or long focal length = ______________ ____ 12. Name the two dimensions which objects are repro duced on the focal
plane? __________________________________________________ ____________________ 13. Depth perspective is dependent on what? _______ _______________________ __________________________________________________ ____________________
28

14. Which lens focal length type causes objects in the background to appear closer to objects in the foreground? _______ ___________________
__________________________________________________ ____________________
29
ANSWERS TO PRACTICE EXERCISE 1. Optical Center, Lesson 2/Learning Event 1 Para 1b. 2. Focal plane, Lesson 2/Learning Event 2 Para 1. 3. Infinity, Lesson 1/Learning Event 1 Para 1c. 4. Infinity, Lesson 1/Learning Event 1 Para 1c. 5. Focal length, Lesson 2/Learning Event 1 Para 1. 6. Focal length, Lesson 2/Learning Event 2 Para 1. 7. A lens twice the focal length, Lesson 2/Learning Event 2 Para 3. 8. 100mm, Lesson 2/Learning Event 1 Para 1. 9. Wide angle or short focal length, normal or norm al focal length, and
telephoto or long focal length. Lesson 2/Learning Event 2 Para 3. 10. Decreases, Lesson 2/Learning Event 4 Para 1. 11. a. Less than 45 degrees b. 45 to 55 degrees c. More than 55 degrees Lesson 2/Learning Event 3 Para 4. 12. Height and width, Lesson 2/Learning Event 4 Para 1. 13. Lens to subject distance, Lesson 2/Learning Eve nt 4 Para 5. 14. Telephoto or long focal length, Lesson 2/Learni ng Event 4 Para 2.
30
LESSON 3 APPLY THE FUNDAMENTALS OF EXPOSURE AND FOCUSING
TASK Calculate, determine, identify, and select the meth ods and the application of the fundamentals of exposure and focusing. CONDITIONS Given information about the light sensitivity of fi lm, common types of mechanical shutters, shutter durations, aperture op enings, daylight exposure, depth of field, hyperfocal distance, and focusing. STANDARDS Demonstrate competency of the task skills and knowl edge by responding to the multiple-choice test covering fundamentals of expos ure and focusing. REFERENCES TM 11-401, TM 11-401-1, TM 11-6720-253-10 Learning Event 1: DETERMINE THE LIGHT SENSITIVITY O F FILM 1. Exposure depends on the intensity of the light a nd the amount of time the light exposes light sensitive material. Light sensitive material consists of silver halides bonded in gelatin called the emulsion. This emulsion layer is supported by a base. The base ma terial is made of either film, glass or paper. 2. Photographic film comes in many different sizes, types, and formats. All films are assigned a numerical value indicating its sensitivity to light. This numerical value is referred to as "ISO " (International Standards Organization). ISO is a numerical value indicating an emulsion's specific degree of sensitivity to light, referred t o as the film speed. a. The most commonly used ISO numbers range from 2 5 to 400. The higher the number the more sensitive the film, which means less light is needed for proper exposure. The lower the number the less sen sitive the film, which requires more light for proper exposure. b. For convenience, the ISO numbers are usually cl assified into three
31

categories: slow speed (ISO 25 to 32), medium speed (ISO 50 to 125), and high speed (ISO 160 to 400). c. Higher speed films of more than ISO 400 are att ainable on the market today which are ultra high speed films. d. A doubling of the ISO number indicates a doubli ng of the sensitivity of the film. Thus, a film with an ISO of 400 ratin g needs only one half the amount of light for proper exposure than a film rat ed at ISO 200. Conversely, a film rated at ISO of 100 is half as f ast or sensitive as a film rated at ISO 200 and requires twice the amount of light for a proper exposure.
32
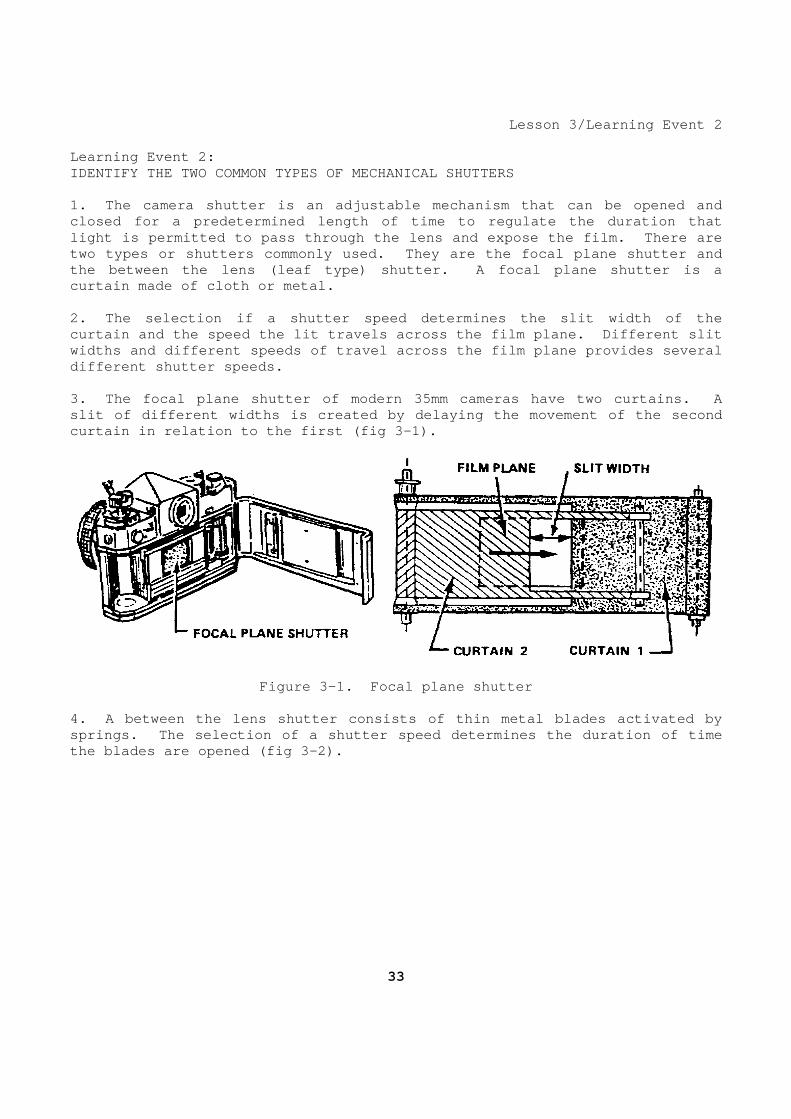
Lesson 3/Learning Event 2 Learning Event 2: IDENTIFY THE TWO COMMON TYPES OF MECHANICAL SHUTTERS 1. The camera shutter is an adjustable mechanism th at can be opened and closed for a predetermined length of time to regula te the duration that light is permitted to pass through the lens and exp ose the film. There are two types or shutters commonly used. They are the focal plane shutter and the between the lens (leaf type) shutter. A focal plane shutter is a curtain made of cloth or metal. 2. The selection if a shutter speed determines the slit width of the curtain and the speed the lit travels across the fi lm plane. Different slit widths and different speeds of travel across the fi lm plane provides several different shutter speeds. 3. The focal plane shutter of modern 35mm cameras h ave two curtains. A slit of different widths is created by delaying the movement of the second curtain in relation to the first (fig 3-1).
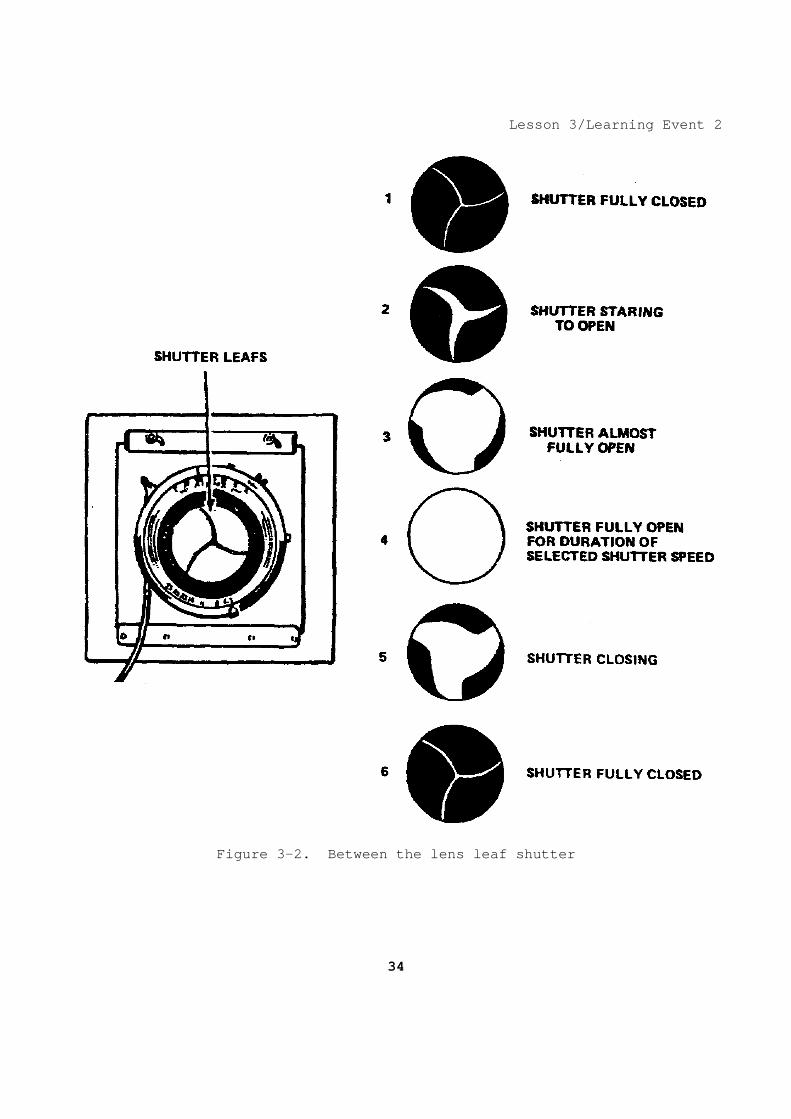
Figure 3-1. Focal plane shutter 4. A between the lens shutter consists of thin meta l blades activated by springs. The selection of a shutter speed determin es the duration of time the blades are opened (fig 3-2).
33
Lesson 3/Learning Event 2
Figure 3-2. Between the lens leaf shutter
34
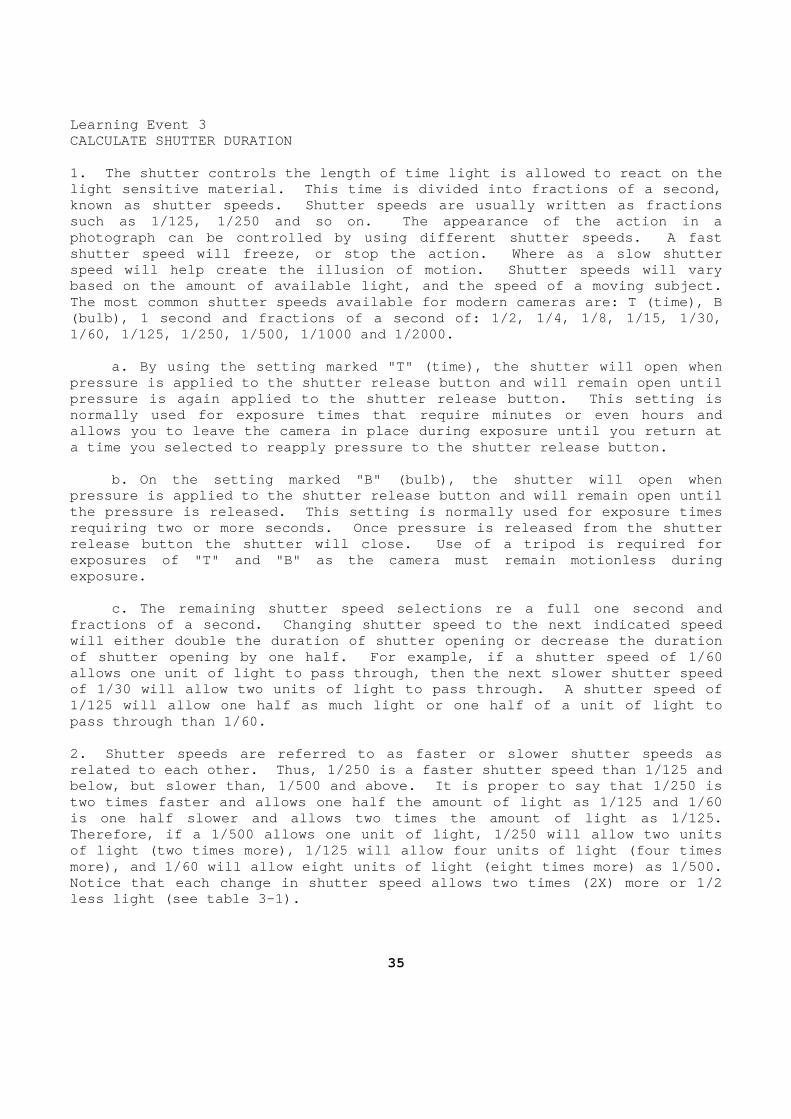
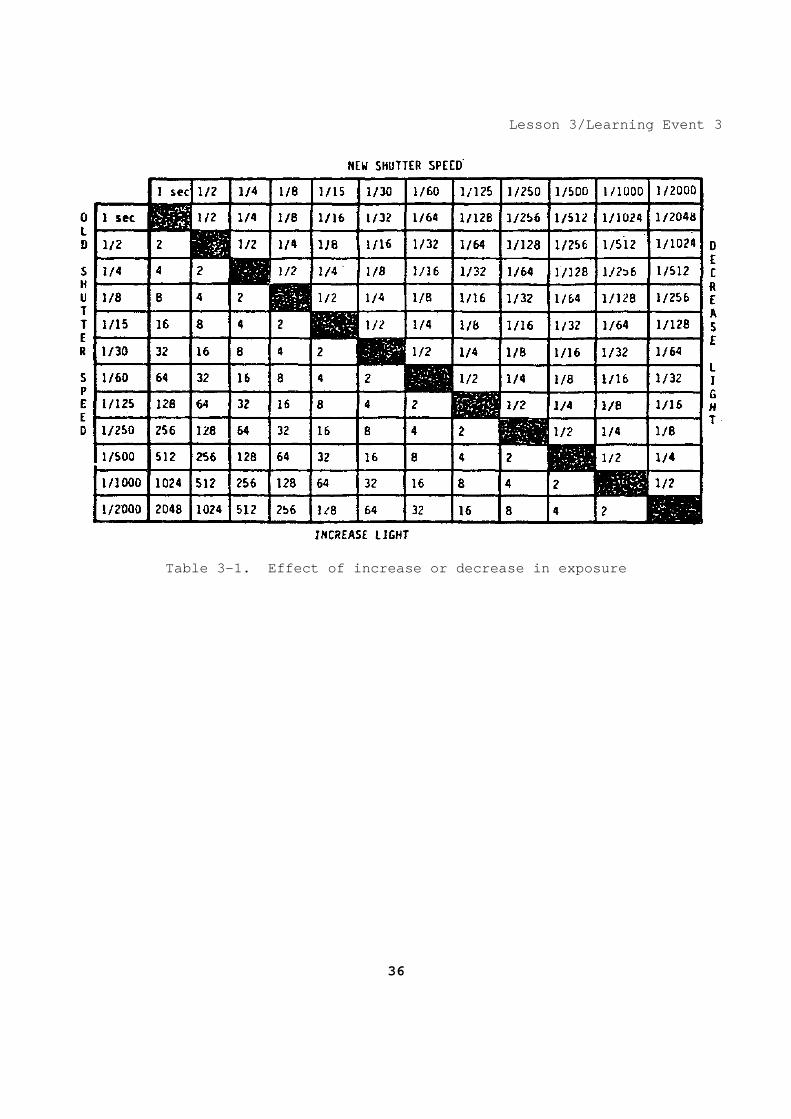
Learning Event 3 CALCULATE SHUTTER DURATION 1. The shutter controls the length of time light is allowed to react on the light sensitive material. This time is divided int o fractions of a second, known as shutter speeds. Shutter speeds are usuall y written as fractions such as 1/125, 1/250 and so on. The appearance of the action in a photograph can be controlled by using different shu tter speeds. A fast shutter speed will freeze, or stop the action. Whe re as a slow shutter speed will help create the illusion of motion. Shu tter speeds will vary based on the amount of available light, and the spe ed of a moving subject. The most common shutter speeds available for modern cameras are: T (time), B (bulb), 1 second and fractions of a second of: 1/2, 1/4, 1/8, 1/15, 1/30, 1/60, 1/125, 1/250, 1/500, 1/1000 and 1/2000. a. By using the setting marked "T" (time), the shu tter will open when pressure is applied to the shutter release button a nd will remain open until pressure is again applied to the shutter release bu tton. This setting is normally used for exposure times that require minut es or even hours and allows you to leave the camera in place during expo sure until you return at a time you selected to reapply pressure to the shut ter release button. b. On the setting marked "B" (bulb), the shutter w ill open when pressure is applied to the shutter release button a nd will remain open until the pressure is released. This setting is normally used for exposure times requiring two or more seconds. Once pressure is re leased from the shutter release button the shutter will close. Use of a tr ipod is required for exposures of "T" and "B" as the camera must remain motionless during exposure. c. The remaining shutter speed selections re a ful l one second and fractions of a second. Changing shutter speed to t he next indicated speed will either double the duration of shutter opening or decrease the duration of shutter opening by one half. For example, if a shutter speed of 1/60 allows one unit of light to pass through, then the next slower shutter speed of 1/30 will allow two units of light to pass throu gh. A shutter speed of 1/125 will allow one half as much light or one half of a unit of light to pass through than 1/60. 2. Shutter speeds are referred to as faster or slow er shutter speeds as related to each other. Thus, 1/250 is a faster shu tter speed than 1/125 and below, but slower than, 1/500 and above. It is pro per to say that 1/250 is two times faster and allows one half the amount of light as 1/125 and 1/60 is one half slower and allows two times the amount of light as 1/125. Therefore, if a 1/500 allows one unit of light, 1/2 50 will allow two units of light (two times more), 1/125 will allow four un its of light (four times more), and 1/60 will allow eight units of light (ei ght times more) as 1/500. Notice that each change in shutter speed allows two times (2X) more or 1/2 less light (see table 3-1).
35
Lesson 3/Learning Event 3
Table 3-1. Effect of increase or decrease in expos ure
36
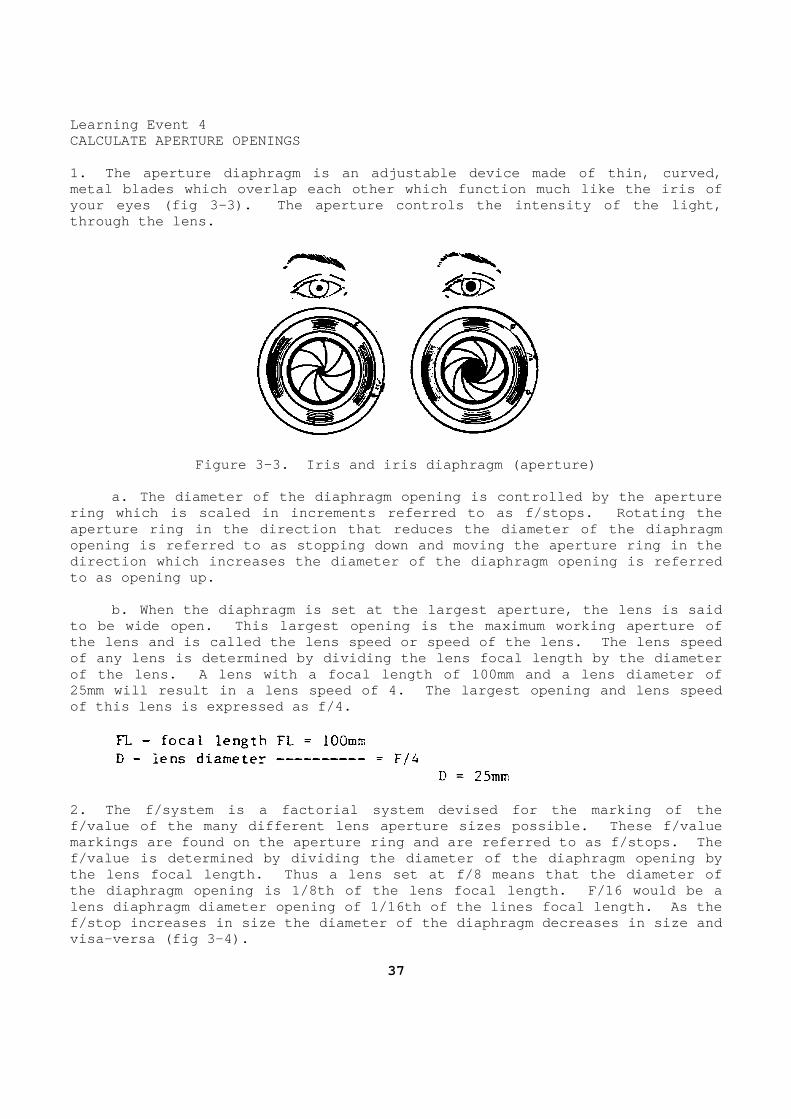
Learning Event 4 CALCULATE APERTURE OPENINGS 1. The aperture diaphragm is an adjustable device m ade of thin, curved, metal blades which overlap each other which functio n much like the iris of your eyes (fig 3-3). The aperture controls the int ensity of the light, through the lens.
Figure 3-3. Iris and iris diaphragm (aperture) a. The diameter of the diaphragm opening is contro lled by the aperture ring which is scaled in increments referred to as f /stops. Rotating the aperture ring in the direction that reduces the dia meter of the diaphragm opening is referred to as stopping down and moving the aperture ring in the direction which increases the diameter of the diaph ragm opening is referred to as opening up. b. When the diaphragm is set at the largest apertu re, the lens is said to be wide open. This largest opening is the maxim um working aperture of the lens and is called the lens speed or speed of t he lens. The lens speed of any lens is determined by dividing the lens foca l length by the diameter of the lens. A lens with a focal length of 100mm a nd a lens diameter of 25mm will result in a lens speed of 4. The largest opening and lens speed of this lens is expressed as f/4.
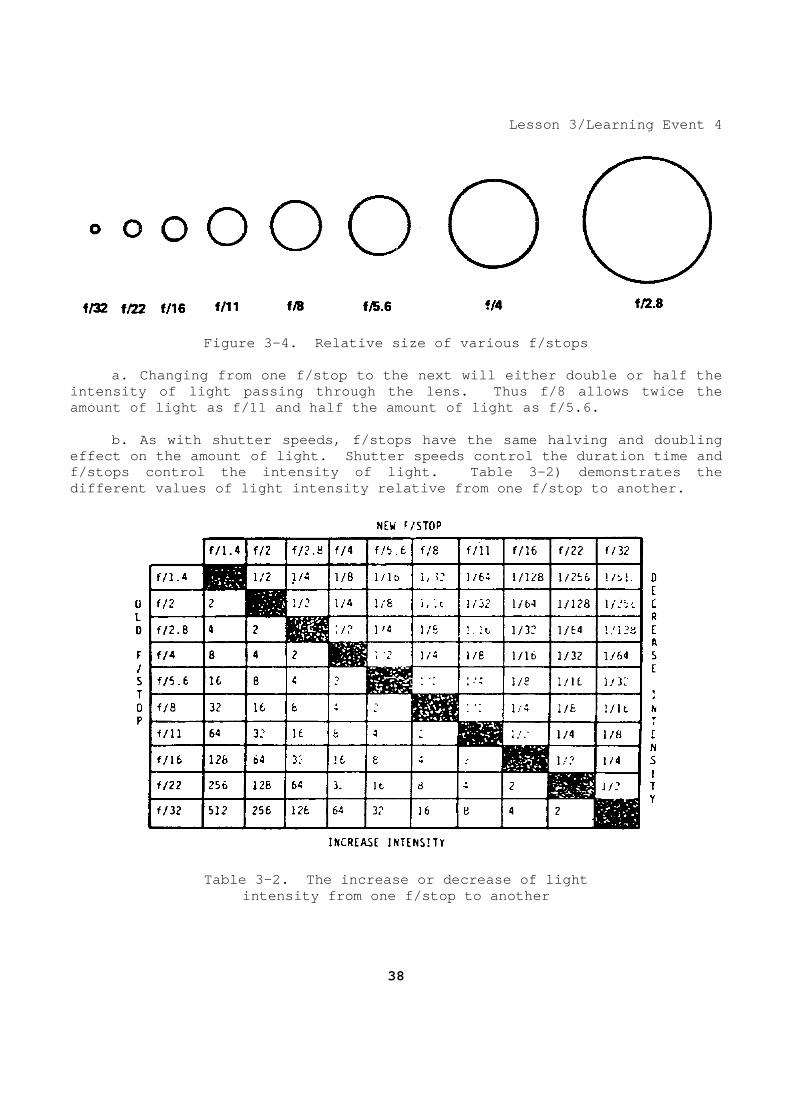
2. The f/system is a factorial system devised for t he marking of the f/value of the many different lens aperture sizes p ossible. These f/value markings are found on the aperture ring and are ref erred to as f/stops. The f/value is determined by dividing the diameter of t he diaphragm opening by the lens focal length. Thus a lens set at f/8 mean s that the diameter of the diaphragm opening is 1/8th of the lens focal le ngth. F/16 would be a lens diaphragm diameter opening of 1/16th of the li nes focal length. As the f/stop increases in size the diameter of the diaphr agm decreases in size and visa-versa (fig 3-4).
37
Lesson 3/Learning Event 4
Figure 3-4. Relative size of various f/stops a. Changing from one f/stop to the next will eithe r double or half the intensity of light passing through the lens. Thus f/8 allows twice the amount of light as f/11 and half the amount of ligh t as f/5.6. b. As with shutter speeds, f/stops have the same h alving and doubling effect on the amount of light. Shutter speeds cont rol the duration time and f/stops control the intensity of light. Table 3-2) demonstrates the different values of light intensity relative from o ne f/stop to another.
Table 3-2. The increase or decrease of light intensity from one f/stop to another
38
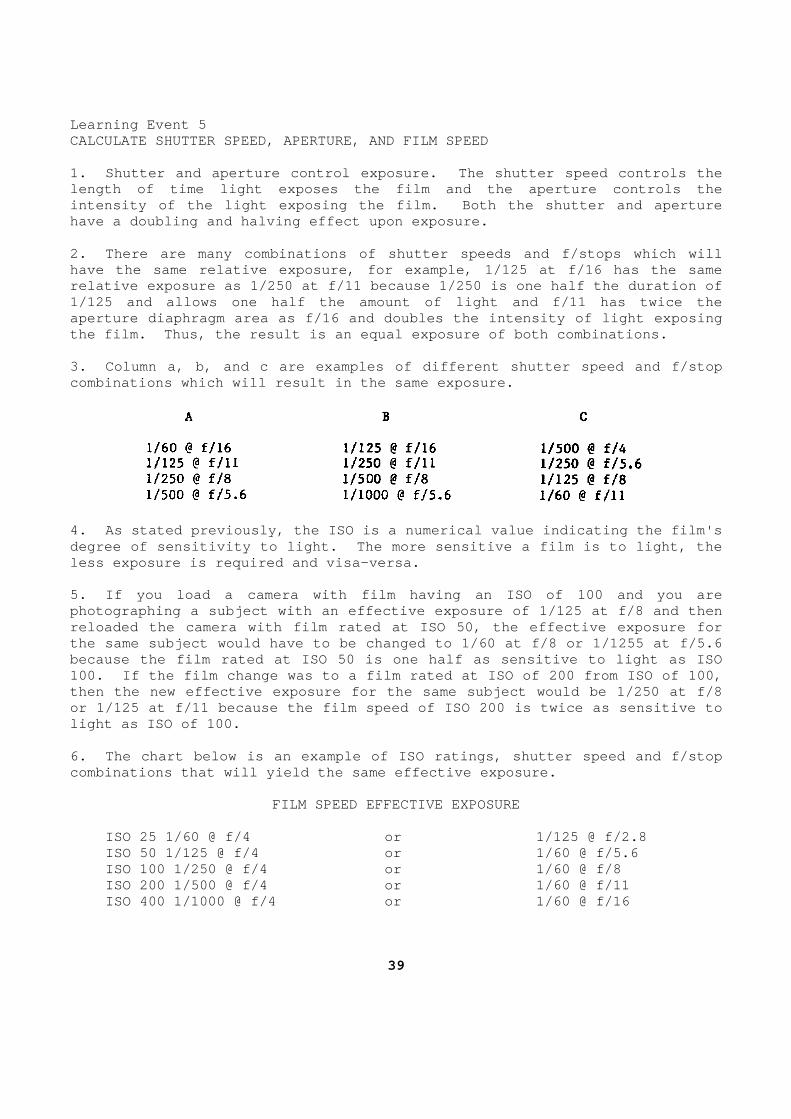
Learning Event 5 CALCULATE SHUTTER SPEED, APERTURE, AND FILM SPEED 1. Shutter and aperture control exposure. The shut ter speed controls the length of time light exposes the film and the apert ure controls the intensity of the light exposing the film. Both the shutter and aperture have a doubling and halving effect upon exposure. 2. There are many combinations of shutter speeds an d f/stops which will have the same relative exposure, for example, 1/125 at f/16 has the same relative exposure as 1/250 at f/11 because 1/250 is one half the duration of 1/125 and allows one half the amount of light and f /11 has twice the aperture diaphragm area as f/16 and doubles the int ensity of light exposing the film. Thus, the result is an equal exposure of both combinations. 3. Column a, b, and c are examples of different shu tter speed and f/stop combinations which will result in the same exposure .
4. As stated previously, the ISO is a numerical val ue indicating the film's degree of sensitivity to light. The more sensitive a film is to light, the less exposure is required and visa-versa. 5. If you load a camera with film having an ISO of 100 and you are photographing a subject with an effective exposure of 1/125 at f/8 and then reloaded the camera with film rated at ISO 50, the effective exposure for the same subject would have to be changed to 1/60 a t f/8 or 1/1255 at f/5.6 because the film rated at ISO 50 is one half as sen sitive to light as ISO 100. If the film change was to a film rated at ISO of 200 from ISO of 100, then the new effective exposure for the same subjec t would be 1/250 at f/8 or 1/125 at f/11 because the film speed of ISO 200 is twice as sensitive to light as ISO of 100. 6. The chart below is an example of ISO ratings, sh utter speed and f/stop combinations that will yield the same effective exp osure.
FILM SPEED EFFECTIVE EXPOSURE ISO 25 1/60 @ f/4 or 1/125 @ f/2.8 ISO 50 1/125 @ f/4 or 1/60 @ f/5.6 ISO 100 1/250 @ f/4 or 1/60 @ f/8 ISO 200 1/500 @ f/4 or 1/60 @ f/11 ISO 400 1/1000 @ f/4 or 1/60 @ f/16
39
Lesson 3/Learning Event 6 Learning Event 6 DETERMINE DAYLIGHT EXPOSURE 1. Exposure. Exposure calculations for exposing fi lm under daylight conditions are the intensity, direction and color q uality of the daylight. (The later for color films).
a. Intensity. From early morning until late eveni ng, even on a clear day, the intensity of daylight is constantly changi ng as the sun rises. The intensity of daylight varies throughout the day, th e time between about two hours after sunrise until about two hours before su nset is considered a time when the light intensity in a specific location rem ains constant for exposure purposes.
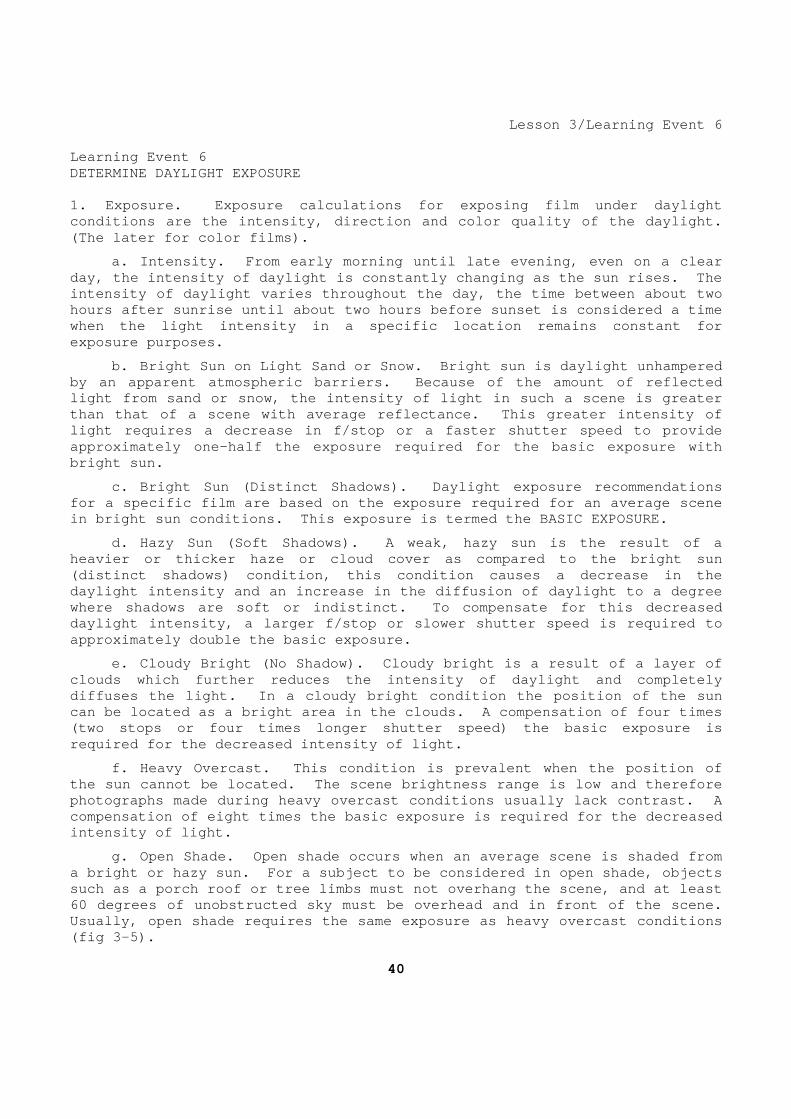
b. Bright Sun on Light Sand or Snow. Bright sun i s daylight unhampered by an apparent atmospheric barriers. Because of th e amount of reflected light from sand or snow, the intensity of light in such a scene is greater than that of a scene with average reflectance. Thi s greater intensity of light requires a decrease in f/stop or a faster shu tter speed to provide approximately one-half the exposure required for th e basic exposure with bright sun.
c. Bright Sun (Distinct Shadows). Daylight exposu re recommendations for a specific film are based on the exposure requi red for an average scene in bright sun conditions. This exposure is termed the BASIC EXPOSURE.
d. Hazy Sun (Soft Shadows). A weak, hazy sun is t he result of a heavier or thicker haze or cloud cover as compared to the bright sun (distinct shadows) condition, this condition causes a decrease in the daylight intensity and an increase in the diffusion of daylight to a degree where shadows are soft or indistinct. To compensat e for this decreased daylight intensity, a larger f/stop or slower shutt er speed is required to approximately double the basic exposure.
e. Cloudy Bright (No Shadow). Cloudy bright is a result of a layer of clouds which further reduces the intensity of dayli ght and completely diffuses the light. In a cloudy bright condition t he position of the sun can be located as a bright area in the clouds. A c ompensation of four times (two stops or four times longer shutter speed) the basic exposure is required for the decreased intensity of light.
f. Heavy Overcast. This condition is prevalent wh en the position of the sun cannot be located. The scene brightness ra nge is low and therefore photographs made during heavy overcast conditions u sually lack contrast. A compensation of eight times the basic exposure is r equired for the decreased intensity of light.
g. Open Shade. Open shade occurs when an average scene is shaded from a bright or hazy sun. For a subject to be consider ed in open shade, objects such as a porch roof or tree limbs must not overhan g the scene, and at least 60 degrees of unobstructed sky must be overhead and in front of the scene. Usually, open shade requires the same exposure as h eavy overcast conditions (fig 3-5).
40
Lesson 3/Learning Event 6
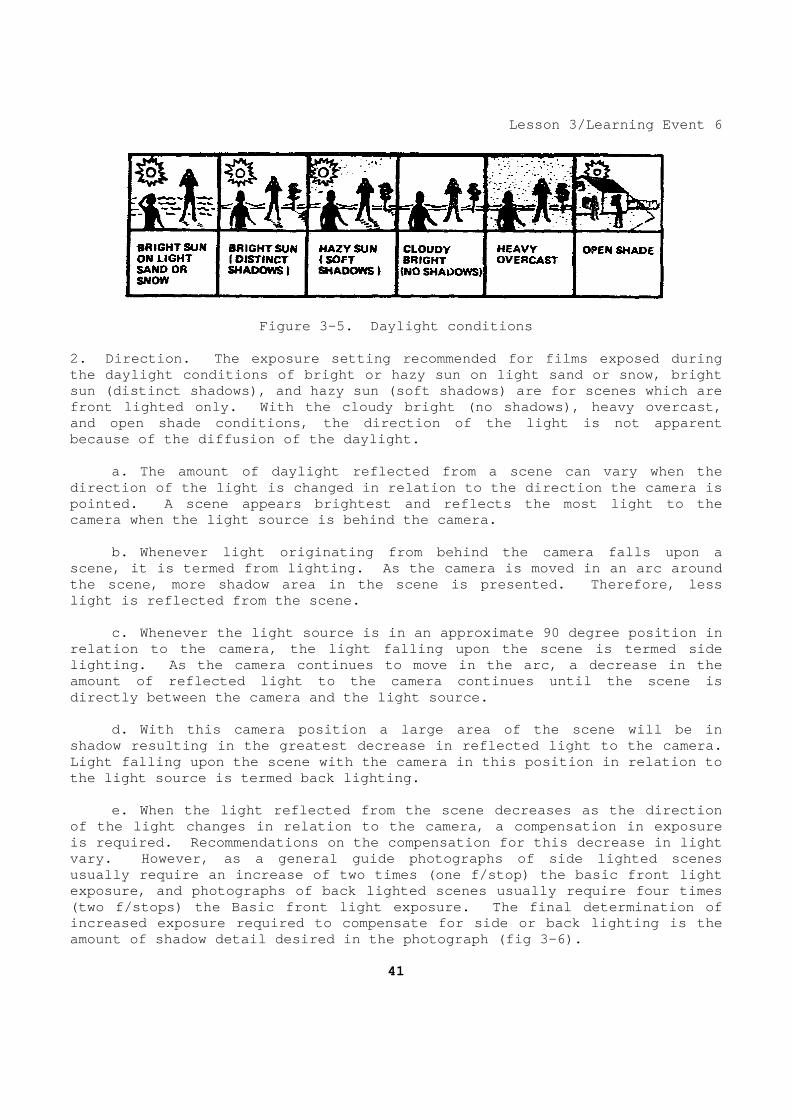
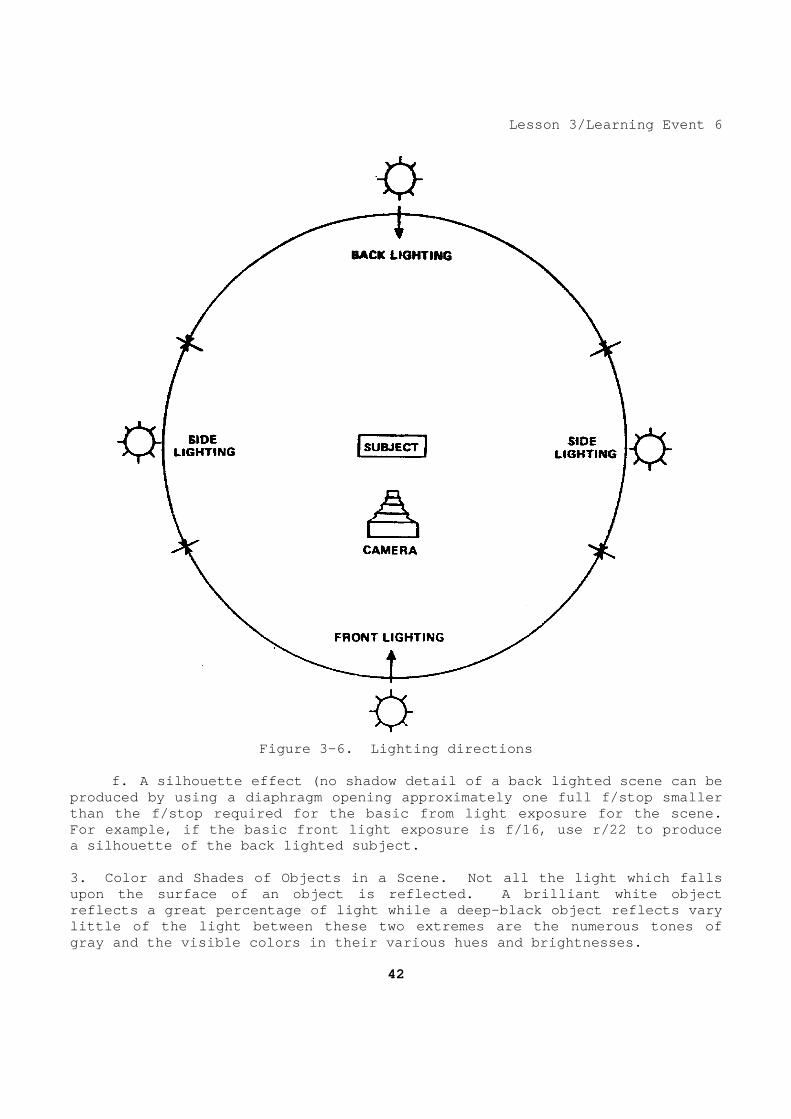
Figure 3-5. Daylight conditions 2. Direction. The exposure setting recommended for films exposed during the daylight conditions of bright or hazy sun on li ght sand or snow, bright sun (distinct shadows), and hazy sun (soft shadows) are for scenes which are front lighted only. With the cloudy bright (no sha dows), heavy overcast, and open shade conditions, the direction of the lig ht is not apparent because of the diffusion of the daylight. a. The amount of daylight reflected from a scene c an vary when the direction of the light is changed in relation to th e direction the camera is pointed. A scene appears brightest and reflects th e most light to the camera when the light source is behind the camera. b. Whenever light originating from behind the came ra falls upon a scene, it is termed from lighting. As the camera i s moved in an arc around the scene, more shadow area in the scene is present ed. Therefore, less light is reflected from the scene. c. Whenever the light source is in an approximate 90 degree position in relation to the camera, the light falling upon the scene is termed side lighting. As the camera continues to move in the a rc, a decrease in the amount of reflected light to the camera continues u ntil the scene is directly between the camera and the light source. d. With this camera position a large area of the s cene will be in shadow resulting in the greatest decrease in reflec ted light to the camera. Light falling upon the scene with the camera in thi s position in relation to the light source is termed back lighting. e. When the light reflected from the scene decreas es as the direction of the light changes in relation to the camera, a c ompensation in exposure is required. Recommendations on the compensation f or this decrease in light vary. However, as a general guide photographs of s ide lighted scenes usually require an increase of two times (one f/sto p) the basic front light exposure, and photographs of back lighted scenes us ually require four times (two f/stops) the Basic front light exposure. The final determination of increased exposure required to compensate for side or back lighting is the amount of shadow detail desired in the photograph ( fig 3-6).
41
Lesson 3/Learning Event 6
Figure 3-6. Lighting directions
f. A silhouette effect (no shadow detail of a back lighted scene can be produced by using a diaphragm opening approximately one full f/stop smaller than the f/stop required for the basic from light e xposure for the scene. For example, if the basic front light exposure is f /16, use r/22 to produce a silhouette of the back lighted subject. 3. Color and Shades of Objects in a Scene. Not all the light which falls upon the surface of an object is reflected. A bril liant white object reflects a great percentage of light while a deep-b lack object reflects vary little of the light between these two extremes are the numerous tones of gray and the visible colors in their various hues a nd brightnesses.
42
a. Each colored or gray object in a scene reflects a specific amount of light. A scene which consists primarily of light-c olored or light-toned objects will usually require a decrease in exposure as compared to the basic exposure for an average scene. b. Conversely, a scene which consists primarily of dark-colored or dark-toned objects will usually require an increase in exposure as compared to the basic exposure for an average scene. The pr imary reason light scenes and dark scenes require less exposure and more expo sure, respectively, in comparison to an average scene is to maintain detai l in the highlights of the light scenes and detail in the shadow areas of the dark scenes. c. So classifications of dark, normal and light ar e determined from the colors and shades of objects in a scene. With dark objects requiring an increase of exposure of one f/stop, normally requir e no change, and light objects requiring a decrease of exposure of one f/s top. 4. Test Exposure. The best way to ensure a correct exposure under all of these differing lighting conditions is to make test exposures. However, if exposure tests are not practical prior to making a photograph, a technique termed exposure bracketing can be used. Exposure b racketing is the exposing of film in a series of increasing or decreasing exp osures, usually in increments of one-half or full f/stops. One of the exposures in the series of bracketed exposures should yield acceptable resu lts.
43
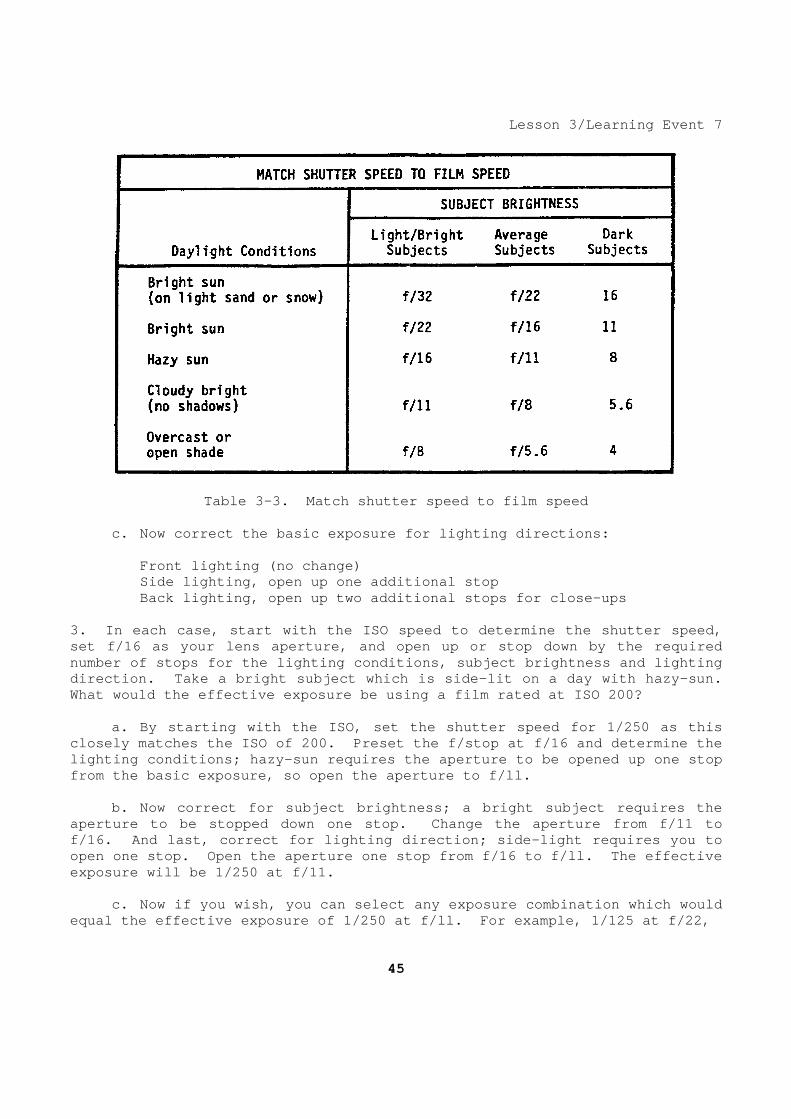
Lesson 3/Learning Event 7 Learning Event 7 CALCULATE DAYLIGHT EXPOSURE 1. A system of calculating outdoor daylight exposur e without the aid of a photoelectric exposure meter (light meter) is neces sary for determining a proper exposure for the various daylight condition, subject reflectance, lighting direction, and film sensitivity. The f/16 rule, an established practice in the Army and among many professional ph otographers, has been proven to be an accurate approach for the calculati on of daylight exposure. Many photographers use this rather than using their light meters. There are three good reasons why photographers do not rely on the automatic built-in exposure meters in their cameras. First, the photo grapher wants to control the exposure for a desired effect instead of the ca mera controlling it. Second, exposure meters can't think; it does not kn ow what the photographer's intentions are for, in the finished photograph. Third, exposure meters are mechanical and subject to failu re. They can be inconsistent, consistently wrong, or fail all toget her. Knowledge and practice of the f/16 rule will enable you to spot w hen the exposure meter is lying. This could mean the difference between the success of failure of your assignment. 2. The f/16 rule is based on the basic exposure nor ms and the ISO. The basic exposure norms are: bright sun, front lightin g, and average subjects which are all based on f/16. Hence the term "BASIC EXPOSURE." To complete the rule, set the shutter speed to match, or nearly match, the film's ISO speed rating, for example, ISO 125 and 100 set the shutter speed at 1/125, for ISO 50 and ISO 64, set the shutter speed at 1/6 0. a. The procedure then is to change the basic expos ure (f/16 for each daylight condition as follows: Bright sun on light sand or snow; f/22 Bright sun (no change); f/16 Hazy sun, soft shadows; f/11 Cloudy bright, no shadows; f/8 Heavy overcast; f/5.6 Open shade; f/5.6 b. And correct for subject brightness: Light (bright) subjects, stop down one stop. Average subjects (no change). Dark subjects, open one stop.
44
Lesson 3/Learning Event 7
Table 3-3. Match shutter speed to film speed c. Now correct the basic exposure for lighting dir ections: Front lighting (no change) Side lighting, open up one additional stop Back lighting, open up two additional stops for cl ose-ups 3. In each case, start with the ISO speed to determ ine the shutter speed, set f/16 as your lens aperture, and open up or stop down by the required number of stops for the lighting conditions, subjec t brightness and lighting direction. Take a bright subject which is side-lit on a day with hazy-sun. What would the effective exposure be using a film r ated at ISO 200? a. By starting with the ISO, set the shutter speed for 1/250 as this closely matches the ISO of 200. Preset the f/stop at f/16 and determine the lighting conditions; hazy-sun requires the aperture to be opened up one stop from the basic exposure, so open the aperture to f/ ll. b. Now correct for subject brightness; a bright su bject requires the aperture to be stopped down one stop. Change the a perture from f/11 to f/16. And last, correct for lighting direction; si de-light requires you to open one stop. Open the aperture one stop from f/1 6 to f/ll. The effective exposure will be 1/250 at f/11. c. Now if you wish, you can select any exposure co mbination which would equal the effective exposure of 1/250 at f/ll. For example, 1/125 at f/22,
45

1/500 at f/8 and so on. 4. With the practice of the f/16 rule, you will fin d that determining and setting the effective exposure will become second n ature to you and you will be using a light meter only as a tool and not as a crutch.
46
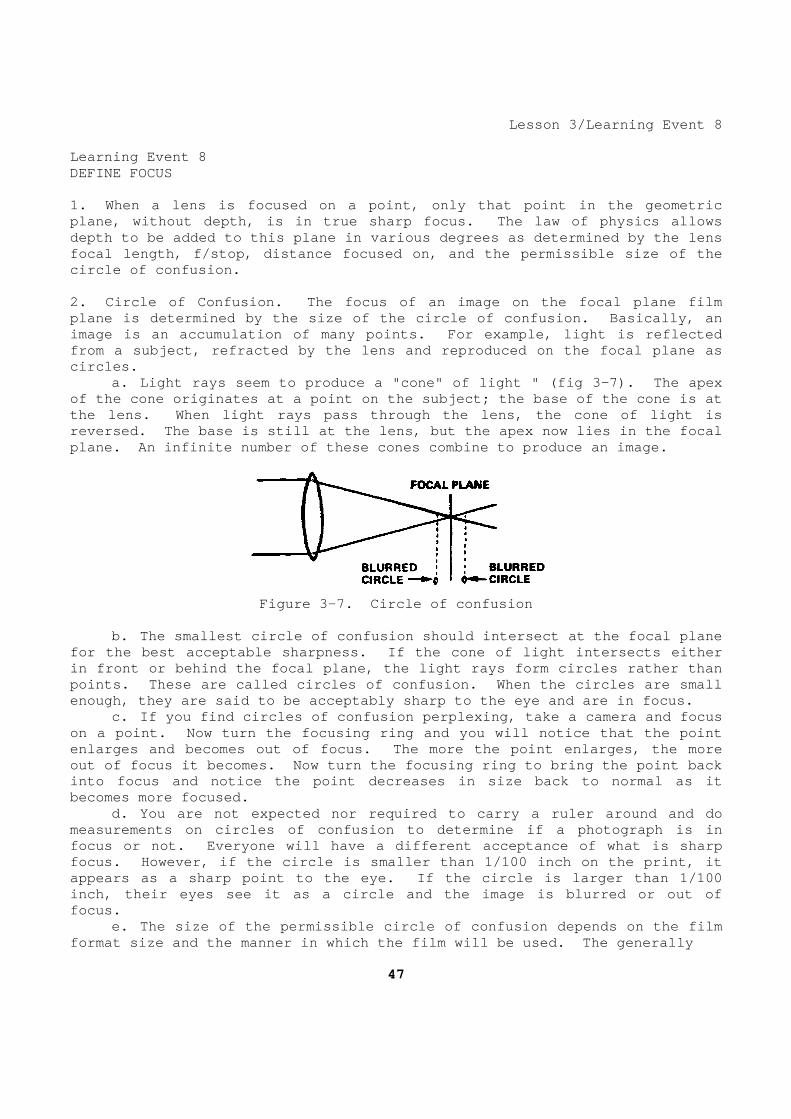
Lesson 3/Learning Event 8 Learning Event 8 DEFINE FOCUS 1. When a lens is focused on a point, only that poi nt in the geometric plane, without depth, is in true sharp focus. The law of physics allows depth to be added to this plane in various degrees as determined by the lens focal length, f/stop, distance focused on, and the permissible size of the circle of confusion. 2. Circle of Confusion. The focus of an image on t he focal plane film plane is determined by the size of the circle of co nfusion. Basically, an image is an accumulation of many points. For examp le, light is reflected from a subject, refracted by the lens and reproduce d on the focal plane as circles. a. Light rays seem to produce a "cone" of light " (fig 3-7). The apex of the cone originates at a point on the subject; t he base of the cone is at the lens. When light rays pass through the lens, t he cone of light is reversed. The base is still at the lens, but the a pex now lies in the focal plane. An infinite number of these cones combine t o produce an image.
Figure 3-7. Circle of confusion
b. The smallest circle of confusion should interse ct at the focal plane for the best acceptable sharpness. If the cone of light intersects either in front or behind the focal plane, the light rays form circles rather than points. These are called circles of confusion. Wh en the circles are small enough, they are said to be acceptably sharp to the eye and are in focus. c. If you find circles of confusion perplexing, ta ke a camera and focus on a point. Now turn the focusing ring and you wil l notice that the point enlarges and becomes out of focus. The more the po int enlarges, the more out of focus it becomes. Now turn the focusing rin g to bring the point back into focus and notice the point decreases in size b ack to normal as it becomes more focused. d. You are not expected nor required to carry a ru ler around and do measurements on circles of confusion to determine i f a photograph is in focus or not. Everyone will have a different accep tance of what is sharp focus. However, if the circle is smaller than 1/10 0 inch on the print, it appears as a sharp point to the eye. If the circle is larger than 1/100 inch, their eyes see it as a circle and the image i s blurred or out of focus. e. The size of the permissible circle of confusion depends on the film format size and the manner in which the film will b e used. The generally
47
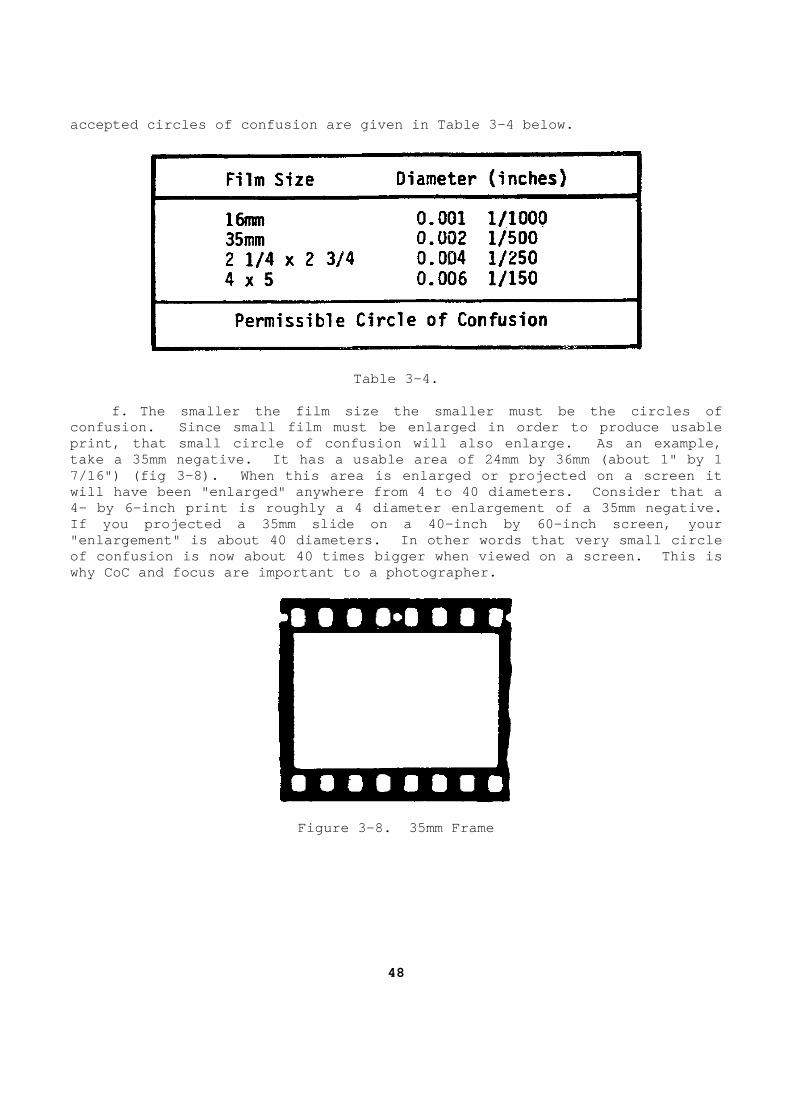
accepted circles of confusion are given in Table 3- 4 below.
Table 3-4. f. The smaller the film size the smaller must be t he circles of confusion. Since small film must be enlarged in or der to produce usable print, that small circle of confusion will also enl arge. As an example, take a 35mm negative. It has a usable area of 24mm by 36mm (about 1" by 1 7/16") (fig 3-8). When this area is enlarged or pr ojected on a screen it will have been "enlarged" anywhere from 4 to 40 dia meters. Consider that a 4- by 6-inch print is roughly a 4 diameter enlargem ent of a 35mm negative. If you projected a 35mm slide on a 40-inch by 60-in ch screen, your "enlargement" is about 40 diameters. In other word s that very small circle of confusion is now about 40 times bigger when view ed on a screen. This is why CoC and focus are important to a photographer.
Figure 3-8. 35mm Frame
48
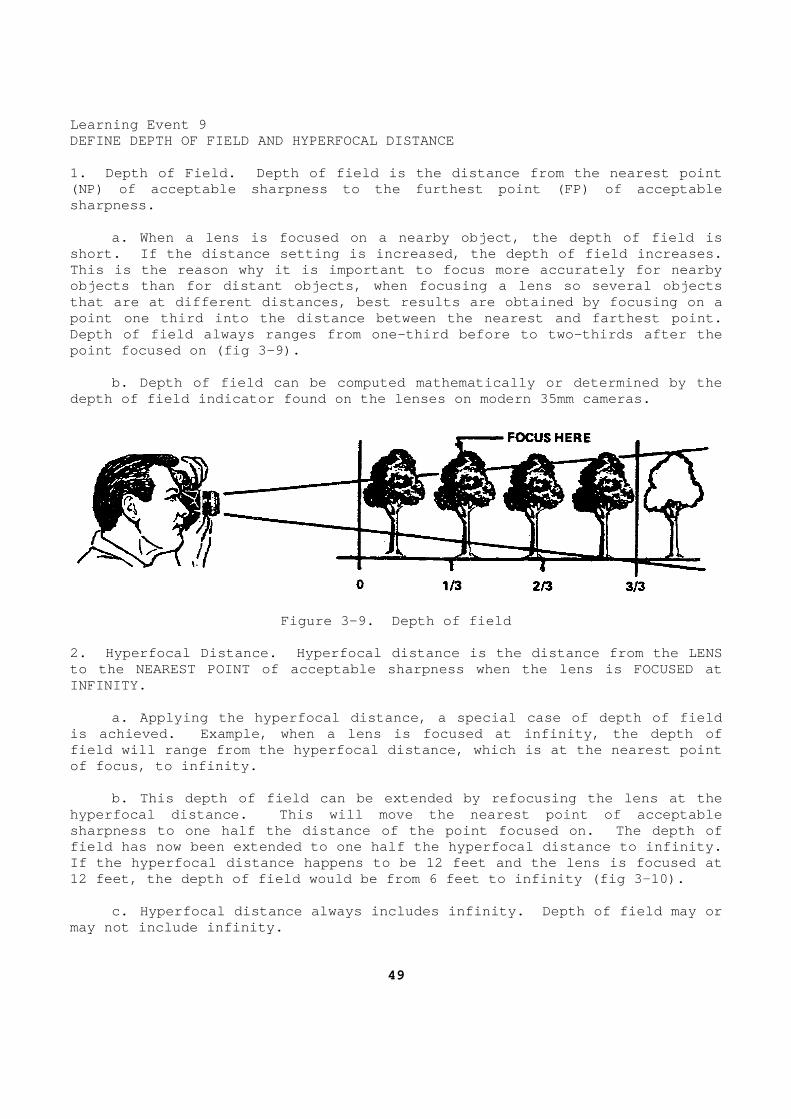
Learning Event 9 DEFINE DEPTH OF FIELD AND HYPERFOCAL DISTANCE 1. Depth of Field. Depth of field is the distance from the nearest point (NP) of acceptable sharpness to the furthest point (FP) of acceptable sharpness. a. When a lens is focused on a nearby object, the depth of field is short. If the distance setting is increased, the d epth of field increases. This is the reason why it is important to focus mor e accurately for nearby objects than for distant objects, when focusing a l ens so several objects that are at different distances, best results are o btained by focusing on a point one third into the distance between the neare st and farthest point. Depth of field always ranges from one-third before to two-thirds after the point focused on (fig 3-9). b. Depth of field can be computed mathematically o r determined by the depth of field indicator found on the lenses on mod ern 35mm cameras.
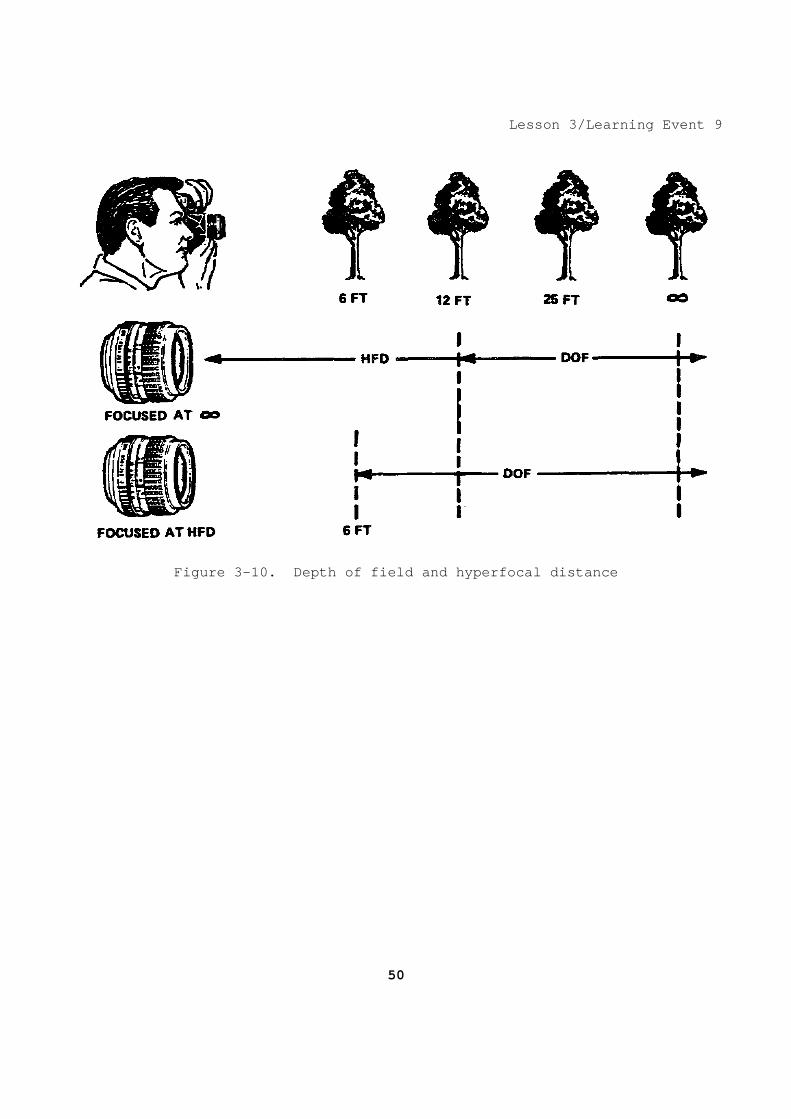
Figure 3-9. Depth of field 2. Hyperfocal Distance. Hyperfocal distance is the distance from the LENS to the NEAREST POINT of acceptable sharpness when t he lens is FOCUSED at INFINITY. a. Applying the hyperfocal distance, a special cas e of depth of field is achieved. Example, when a lens is focused at in finity, the depth of field will range from the hyperfocal distance, whic h is at the nearest point of focus, to infinity. b. This depth of field can be extended by refocusi ng the lens at the hyperfocal distance. This will move the nearest po int of acceptable sharpness to one half the distance of the point foc used on. The depth of field has now been extended to one half the hyperfo cal distance to infinity. If the hyperfocal distance happens to be 12 feet an d the lens is focused at 12 feet, the depth of field would be from 6 feet to infinity (fig 3-10). c. Hyperfocal distance always includes infinity. Depth of field may or may not include infinity.
49
Lesson 3/Learning Event 9
Figure 3-10. Depth of field and hyperfocal distanc e
50
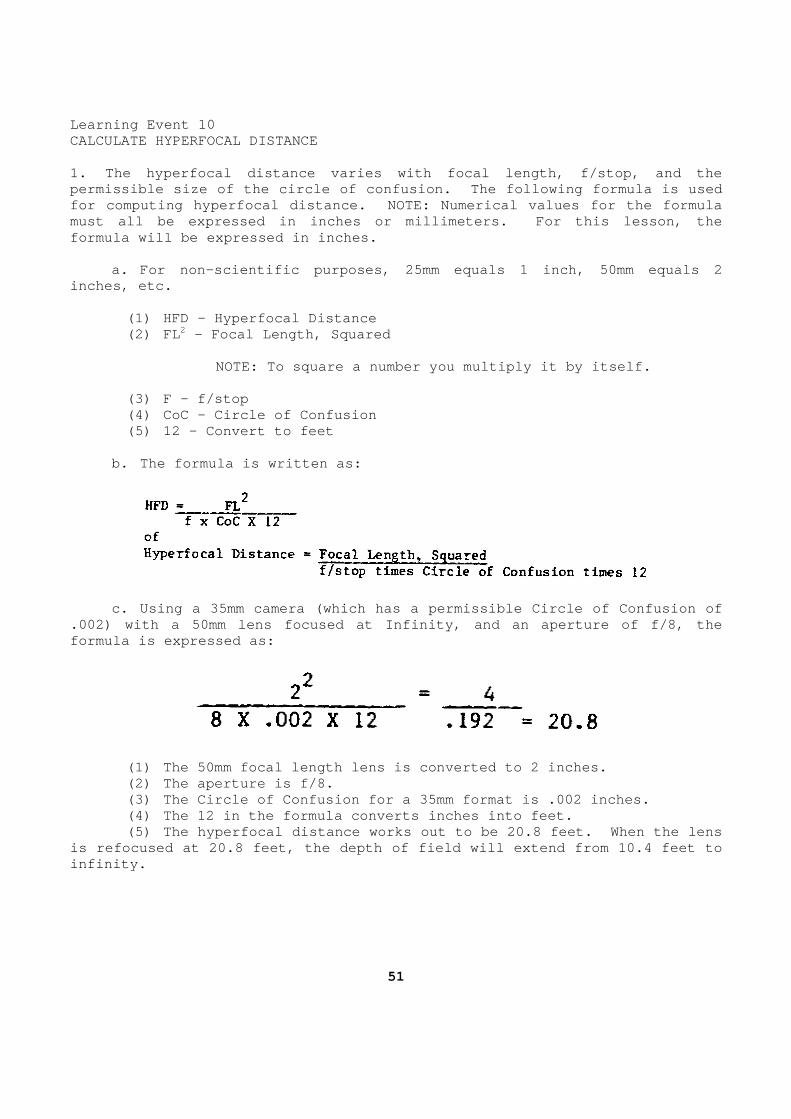
Learning Event 10 CALCULATE HYPERFOCAL DISTANCE 1. The hyperfocal distance varies with focal length , f/stop, and the permissible size of the circle of confusion. The f ollowing formula is used for computing hyperfocal distance. NOTE: Numerical values for the formula must all be expressed in inches or millimeters. Fo r this lesson, the formula will be expressed in inches. a. For non-scientific purposes, 25mm equals 1 inch , 50mm equals 2 inches, etc. (1) HFD - Hyperfocal Distance (2) FL 2 - Focal Length, Squared NOTE: To square a number you multiply it by itself . (3) F - f/stop (4) CoC - Circle of Confusion (5) 12 - Convert to feet b. The formula is written as:
c. Using a 35mm camera (which has a permissible Ci rcle of Confusion of .002) with a 50mm lens focused at Infinity, and an aperture of f/8, the formula is expressed as:
(1) The 50mm focal length lens is converted to 2 i nches. (2) The aperture is f/8. (3) The Circle of Confusion for a 35mm format is . 002 inches. (4) The 12 in the formula converts inches into fee t. (5) The hyperfocal distance works out to be 20.8 f eet. When the lens is refocused at 20.8 feet, the depth of field will extend from 10.4 feet to infinity.
51

Learning Event 11 SELECT APPROPRIATE FOCUS 1. Focusing on the hyperfocal distance is useful fo r the greater depth of field needed when photographing subjects where you have no control of their action, such as tactical sports, news events, and o ther documentary photography. When applying this technique, you hav e already preset the shutter speed, f/stop, and focused on the hyperfoca l distance. This allows you to concentrate on the subject. 2. Focusing on the hyperfocal distance will not be practical at times when the subject is closer than one half the hyperfocal distance to the camera or when you may desire to apply selective focusing. a. Selective focusing is a technique of limiting t he depth of field in the foreground and the background in order to achie ve a more vivid center of interest. This technique is commonly used for port raiture. b. Application of selective focusing requires the knowledge of the controlling factors of depth of field. c. Long depth of field can be obtained by using a short focal length (wide angle) lens, a small aperture opening, and a far point of focus. Conversely, a short depth of field can be obtained by using a long focal length (telephoto) lens, a large aperture opening, and a near point of focus. d. Figure 3-11 shows the depth of field of wide an gle and a telephoto lens. At the same aperture and focus point the wid e angle (short focal length) lens will provide greater depth of field th an a telephoto (long focal length) lens.
Figure 3-11. Depth of field
52
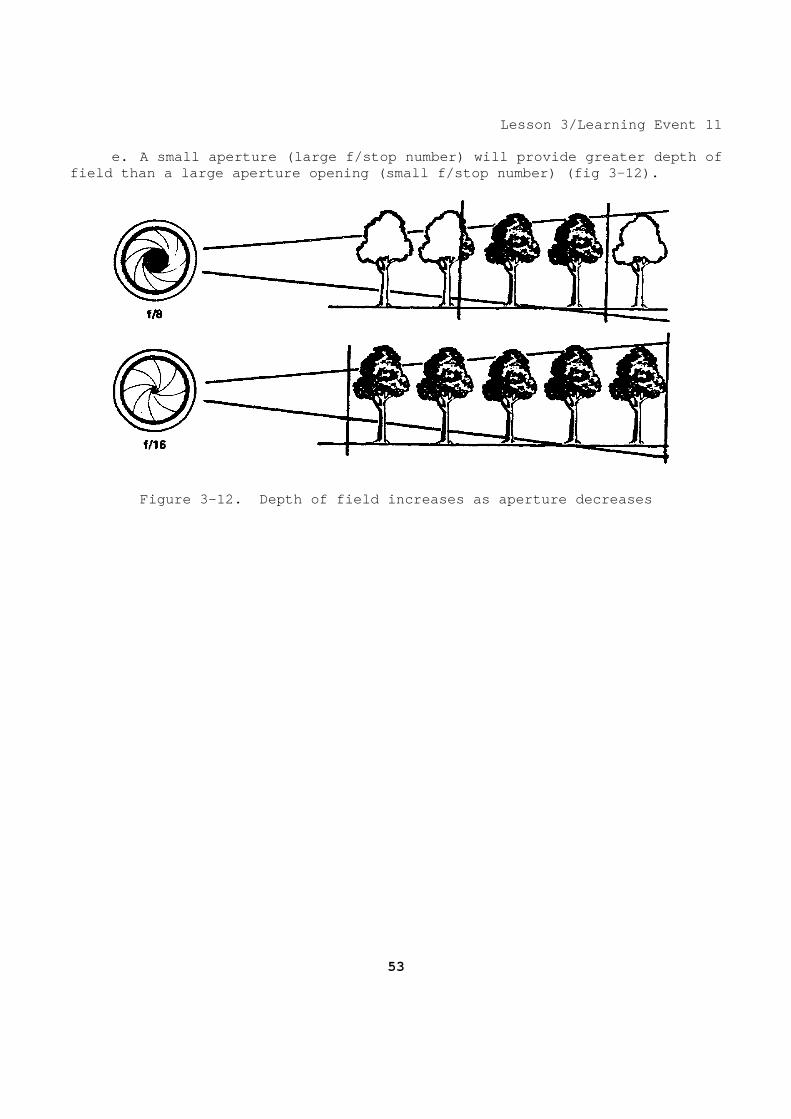
Lesson 3/Learning Event 11 e. A small aperture (large f/stop number) will pro vide greater depth of field than a large aperture opening (small f/stop n umber) (fig 3-12).
Figure 3-12. Depth of field increases as aperture decreases
53
Learning Event 12 CALCULATE DEPTH OF FIELD 1. To mathematically compute the range of the depth of field, the point which the lens is focused on and the hyperfocal dis tance is used for this calculation. 2. Using a 35mm camera, permissible Circle of Confu sion of .002, with a 75mm lens, aperture set at f/8, and the lens focuse d at 15 feet, calculate the hyperfocal distance from the formula in para 3b . a. The hyperfocal distance is 46.8 feet. b. The near and far point of acceptable sharpness are determined using the following formula.
c. The formula is expressed as:
As shown from the formula above, the range of the depth of field is 10.7 feet because the nearest point of acceptable s harpness is 11.3 feet from the lens and the farthest point is 22 feet fro m the lens (22 feet minus 11.3 feet equals 10.7 feet). Always subtract the n ear point from the far point. 3. Depth of field scale. Experience will help you predict the best aperture to get the depth of field you want. But y ou do not have to guess the correct aperture all the time or use formulas. a. Most lenses have a depth of field scale to guid e you. This scale indicates the distance range in which the subjects will be in acceptable focus at different f/stops.
54
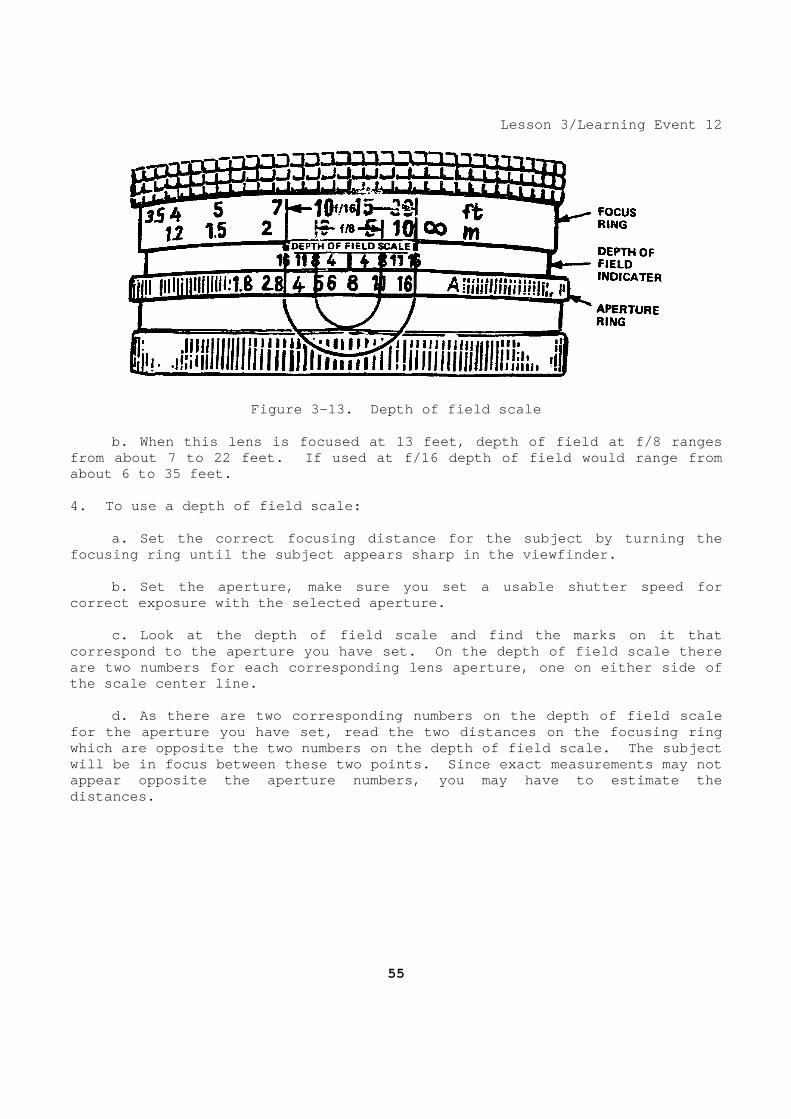
Lesson 3/Learning Event 12
Figure 3-13. Depth of field scale b. When this lens is focused at 13 feet, depth of field at f/8 ranges from about 7 to 22 feet. If used at f/16 depth of field would range from about 6 to 35 feet. 4. To use a depth of field scale: a. Set the correct focusing distance for the subje ct by turning the focusing ring until the subject appears sharp in th e viewfinder. b. Set the aperture, make sure you set a usable sh utter speed for correct exposure with the selected aperture. c. Look at the depth of field scale and find the m arks on it that correspond to the aperture you have set. On the de pth of field scale there are two numbers for each corresponding lens apertur e, one on either side of the scale center line. d. As there are two corresponding numbers on the d epth of field scale for the aperture you have set, read the two distanc es on the focusing ring which are opposite the two numbers on the depth of field scale. The subject will be in focus between these two points. Since e xact measurements may not appear opposite the aperture numbers, you may have to estimate the distances.
55
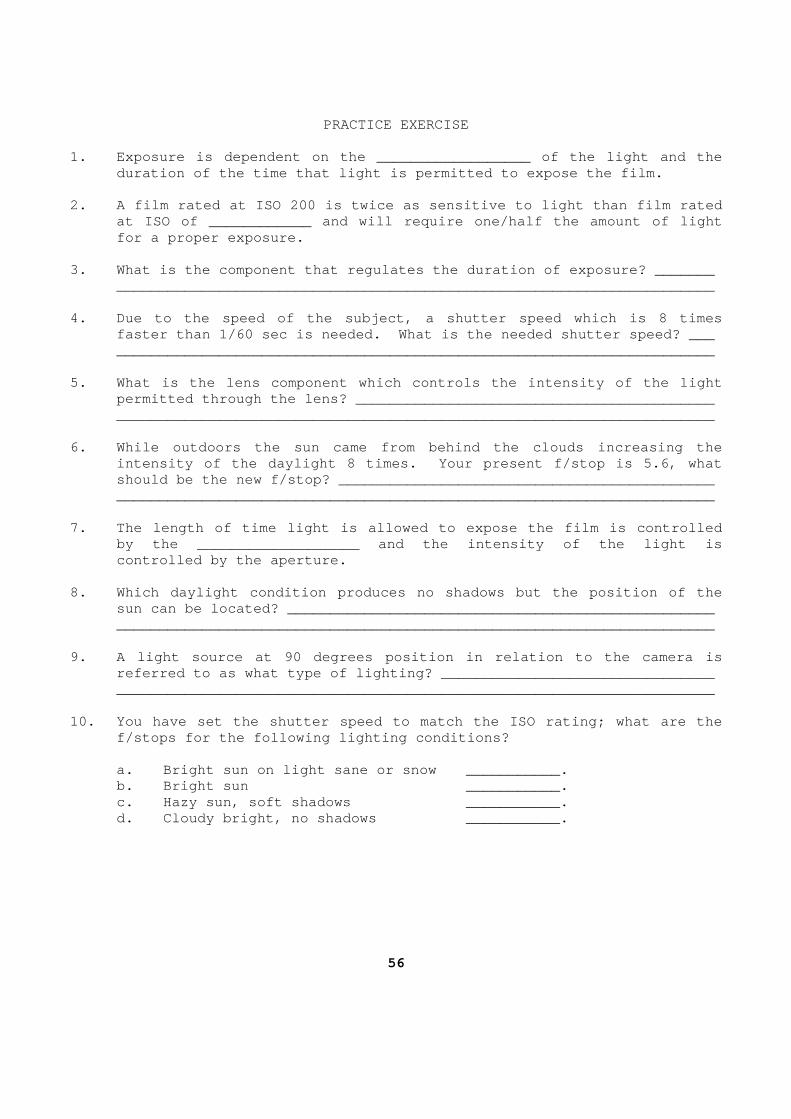
PRACTICE EXERCISE 1. Exposure is dependent on the __________________ of the light and the
duration of the time that light is permitted to exp ose the film. 2. A film rated at ISO 200 is twice as sensitive to light than film rated
at ISO of ____________ and will require one/half th e amount of light for a proper exposure.
3. What is the component that regulates the duratio n of exposure? _______ __________________________________________________ ____________________ 4. Due to the speed of the subject, a shutter speed which is 8 times
faster than 1/60 sec is needed. What is the needed shutter speed? ___ __________________________________________________ ____________________ 5. What is the lens component which controls the in tensity of the light
permitted through the lens? _______________________ ___________________ __________________________________________________ ____________________ 6. While outdoors the sun came from behind the clou ds increasing the
intensity of the daylight 8 times. Your present f/ stop is 5.6, what should be the new f/stop? _________________________ ___________________
__________________________________________________ ____________________ 7. The length of time light is allowed to expose th e film is controlled
by the ___________________ and the intensity of the light is controlled by the aperture.
8. Which daylight condition produces no shadows but the position of the
sun can be located? _______________________________ ___________________ __________________________________________________ ____________________ 9. A light source at 90 degrees position in relatio n to the camera is
referred to as what type of lighting? _____________ ___________________ __________________________________________________ ____________________ 10. You have set the shutter speed to match the ISO rating; what are the
f/stops for the following lighting conditions? a. Bright sun on light sane or snow ___________. b. Bright sun ___________. c. Hazy sun, soft shadows ___________. d. Cloudy bright, no shadows ___________.
56
e. Heavy overcast ___________. f. Open shade ___________. 11. Using film rated at ISO of 250, a shutter speed of 1/125, on a cloudy
bright day, average subject, and side lit. What is the f/stop? ______ __________________________________________________ ____________________ 12. What is the permissible size of circle of confu sion when using 35mm
film? _____________________________________________ ___________________ 13. _______________________________ is the distance from the nearest point
of acceptable sharpness to the farthest point of ac ceptable sharpness. 14. _________________________________ is the distan ce from the lens to the
nearest point of acceptable sharpness when the lens is focused at infinity.
15. What would be the range of depth of field when the lens is focused on
the hyperfocal distance? __________________________ ___________________ __________________________________________________ ____________________ 16. Using the hyperfocal distance formula, what is the hyperfocal distance
to the nearest foot, using 35mm film, 50mm lens and an aperture setting of f/11? __________________________________ ___________________
__________________________________________________ ____________________ 17. What is the range of depth of field to the near est foot with a lens
focused at 20 feet and the hyperfocal distance at 5 6 feet? ___________ __________________________________________________ ____________________
57
ANSWERS TO PRACTICE EXERCISE 1. Intensity, Lesson 3, Learning Event 1, Para 1. 2. 100, Lesson 3, Learning Event 1, Para 2d. 3. Shutter, Lesson 3, Learning Event 2, Para 1. 4. 1/500, Lesson 3, Learning Event 3, Para 1. 5. Aperture, Lesson 3, Learning Event 4, Para 1. 6. f/16, Lesson 3, Learning Event 4, Para 2. 7. Shutter, Lesson 3, Learning Event 2, Para 1. 8. Cloudy bright, Lesson 3, Learning Event 6, Para le. 9. Side lighting, Lesson 3, Learning Event 6, Para 2c. 10. a. f/22 b. f/16 c. f/11 d. f/8 e. f/5.6 f. f/5.6, Lesson 3, Learning Event 7, Para 2a. 11. f/8, Lesson 3, Learning Event 7, Para 3. 12. 1/500 inch, Lesson 3, Learning Event 8, Para 2e . 13. Depth of field, Lesson 3, Learning Event 9, Par a 1. 14. Hyperfocal distance, Lesson 3, Learning Event 9 , Para 2. 15. The depth of field will extend f-or one/half th e hyperfocal distance
to infinity, Lesson 3, Learning Event 9, Para 2b. 16. 15 feet, Lesson 3, Learning Event 10, Para a, b , & c. 17. 16 feet, Lesson 3, Learning Event 11, Para 3 & 4.
58

Lesson 4/Learning Event 1 LESSON 4 APPLY THE BASICS OF COMPOSITION TASK Define and state the theory and application of comp osing the elements of a scene to be photographed. CONDITIONS Given information about the definition and principl es of composition. STANDARDS Demonstrate competency of the task skills and knowl edge by responding to the multiple-choice test covering the basics of composi tion. REFERENCES TM 11-401-2 Learning Event 1 DEFINE COMPOSITION 1. Photographic composition is the orderly or pleas ing arrangement of the elements within the pictured area. The difference between a snapshot and a strong photograph is how well the photographer appl ies the elements and principles of composition. 2. Learning the art of good composition is similar in many respects to learning any other skill or profession. A good pho tographer does not just record whatever he sees; he puts together or compos es the picture. To do this the photographer either waits until all object s are properly related, select camera angle, or he places the objects in th eir proper relationship. 3. Good composition serves a purpose, sets a mood, and tells a story. Your camera will record whatever it sees, exactly as it sees it, without any consideration or feeling of what is happening, or w hy. It is up to you to capture the location, excitement, and attitude of t he event. If you properly place objects in the picture, you will giv e the photograph more meaning by clearly showing the situation and reflec ting the feeling of the occasion.
59
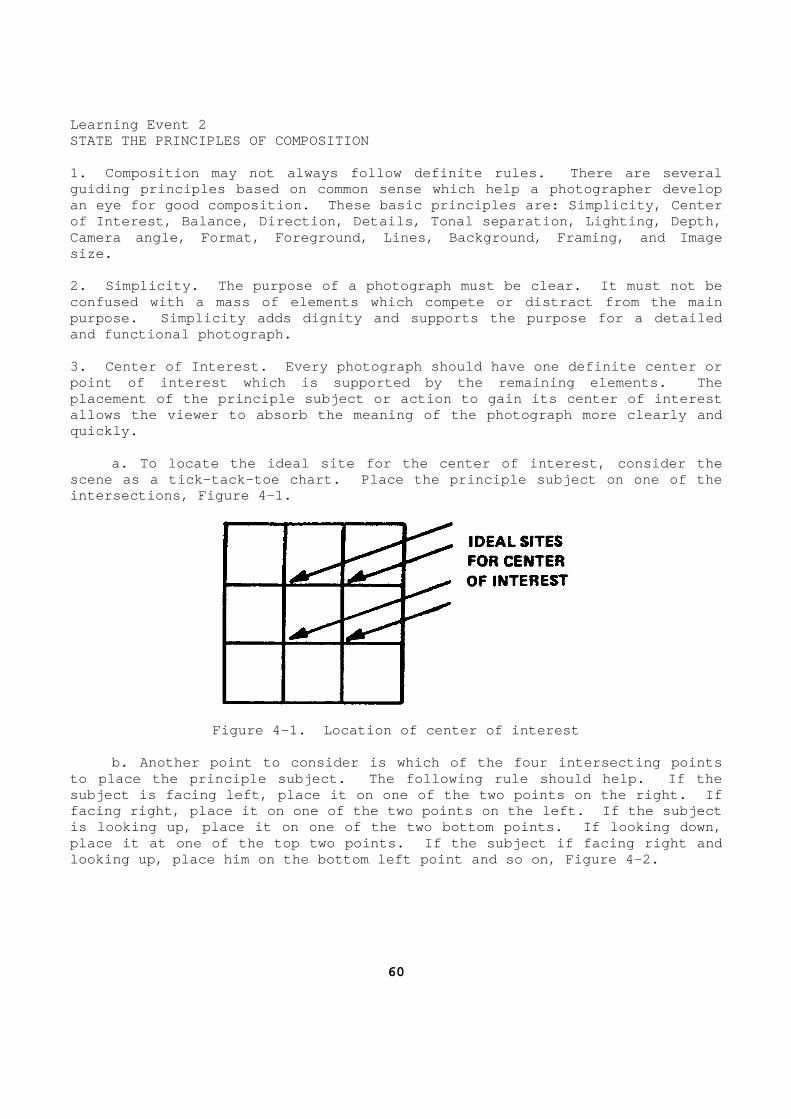
Learning Event 2 STATE THE PRINCIPLES OF COMPOSITION 1. Composition may not always follow definite rules . There are several guiding principles based on common sense which help a photographer develop an eye for good composition. These basic principle s are: Simplicity, Center of Interest, Balance, Direction, Details, Tonal sep aration, Lighting, Depth, Camera angle, Format, Foreground, Lines, Background , Framing, and Image size. 2. Simplicity. The purpose of a photograph must be clear. It must not be confused with a mass of elements which compete or d istract from the main purpose. Simplicity adds dignity and supports the purpose for a detailed and functional photograph. 3. Center of Interest. Every photograph should hav e one definite center or point of interest which is supported by the remaini ng elements. The placement of the principle subject or action to gai n its center of interest allows the viewer to absorb the meaning of the phot ograph more clearly and quickly. a. To locate the ideal site for the center of inte rest, consider the scene as a tick-tack-toe chart. Place the principl e subject on one of the intersections, Figure 4-1.
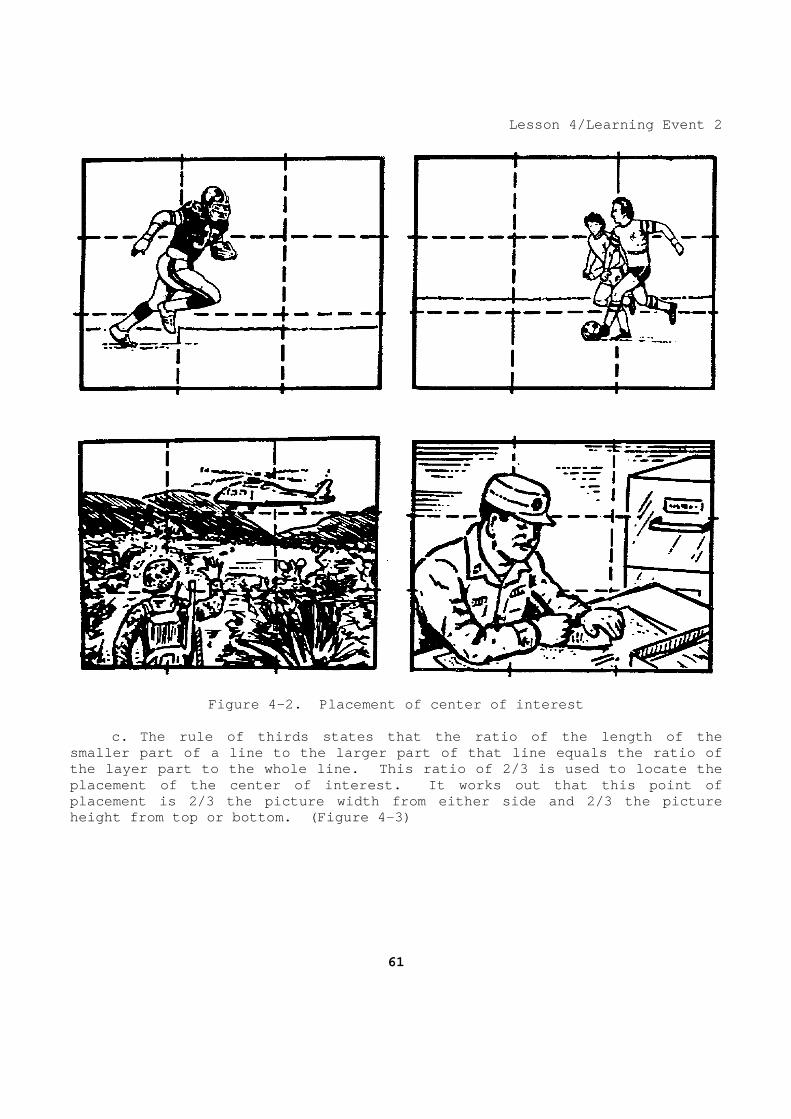
Figure 4-1. Location of center of interest b. Another point to consider is which of the four intersecting points to place the principle subject. The following rule should help. If the subject is facing left, place it on one of the two points on the right. If facing right, place it on one of the two points on the left. If the subject is looking up, place it on one of the two bottom po ints. If looking down, place it at one of the top two points. If the subj ect if facing right and looking up, place him on the bottom left point and so on, Figure 4-2.
60
Lesson 4/Learning Event 2
Figure 4-2. Placement of center of interest c. The rule of thirds states that the ratio of the length of the smaller part of a line to the larger part of that l ine equals the ratio of the layer part to the whole line. This ratio of 2/ 3 is used to locate the placement of the center of interest. It works out that this point of placement is 2/3 the picture width from either side and 2/3 the picture height from top or bottom. (Figure 4-3)
61
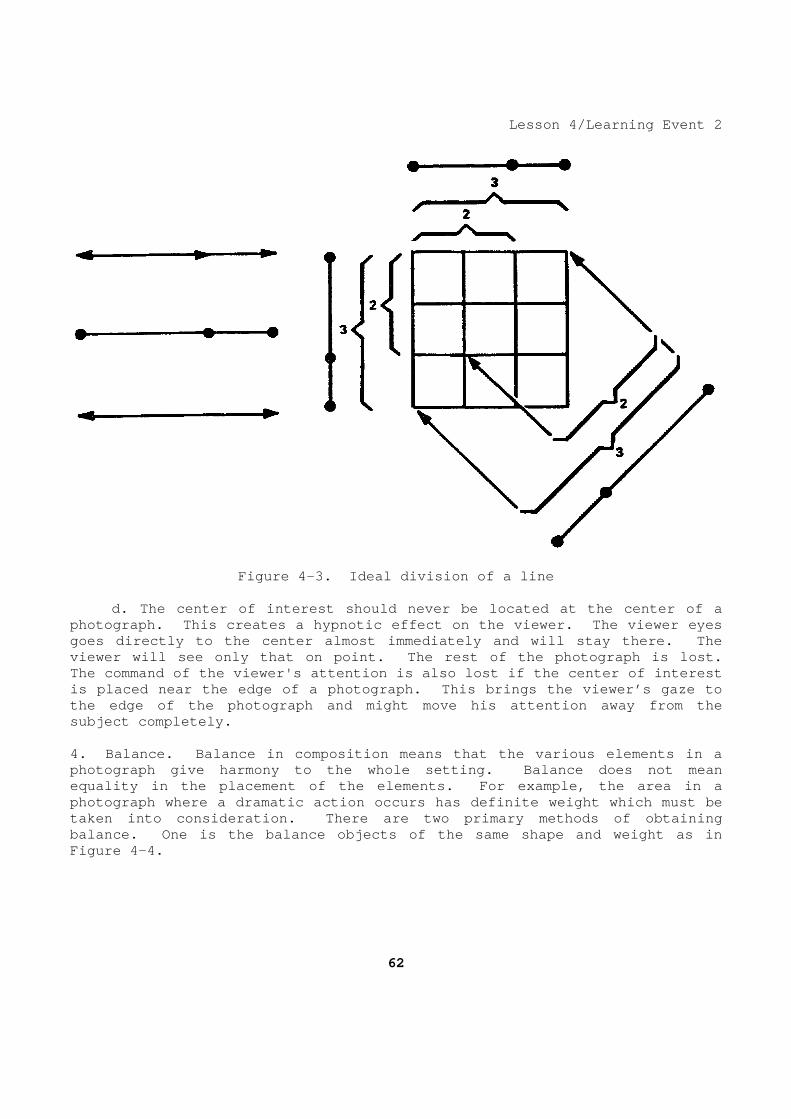
Lesson 4/Learning Event 2
Figure 4-3. Ideal division of a line d. The center of interest should never be located at the center of a photograph. This creates a hypnotic effect on the viewer. The viewer eyes goes directly to the center almost immediately and will stay there. The viewer will see only that on point. The rest of th e photograph is lost. The command of the viewer's attention is also lost if the center of interest is placed near the edge of a photograph. This brin gs the viewer’s gaze to the edge of the photograph and might move his atten tion away from the subject completely. 4. Balance. Balance in composition means that the various elements in a photograph give harmony to the whole setting. Bala nce does not mean equality in the placement of the elements. For exa mple, the area in a photograph where a dramatic action occurs has defin ite weight which must be taken into consideration. There are two primary me thods of obtaining balance. One is the balance objects of the same sh ape and weight as in Figure 4-4.
62
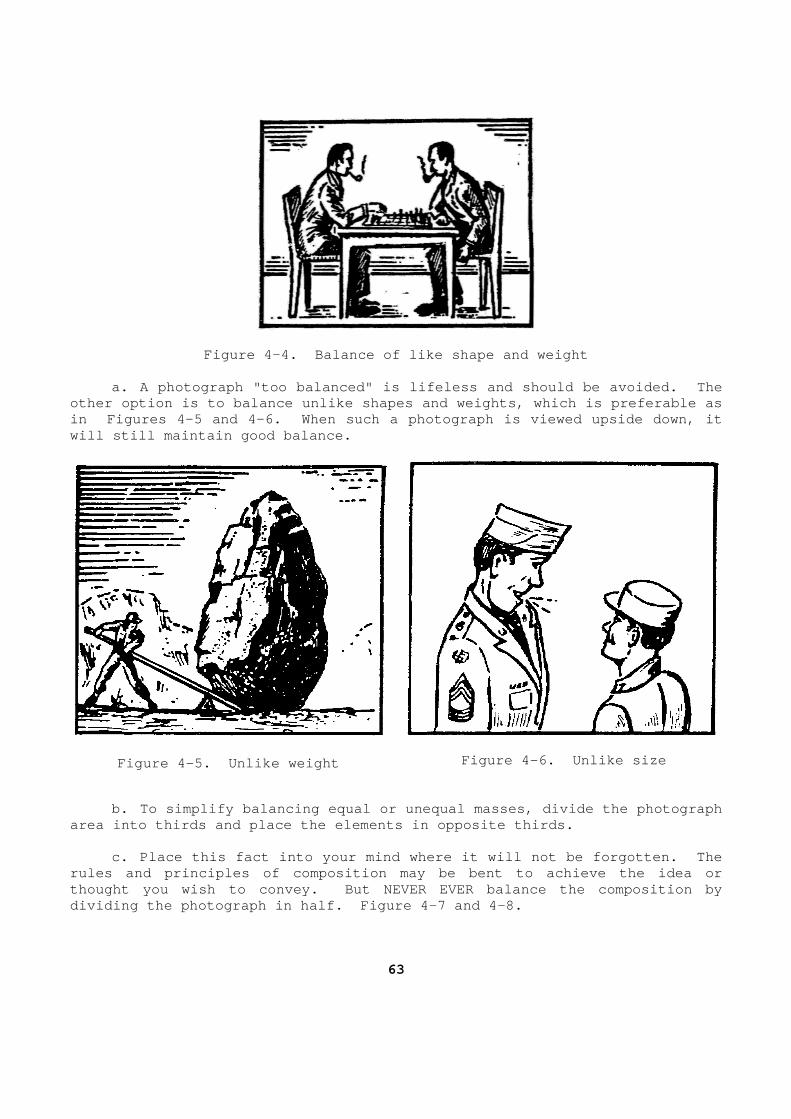
Figure 4-4. Balance of like shape and weight a. A photograph "too balanced" is lifeless and sho uld be avoided. The other option is to balance unlike shapes and weight s, which is preferable as in Figures 4-5 and 4-6. When such a photograph is viewed upside down, it will still maintain good balance.
Figure 4-5. Unlike weight
Figure 4-6. Unlike size
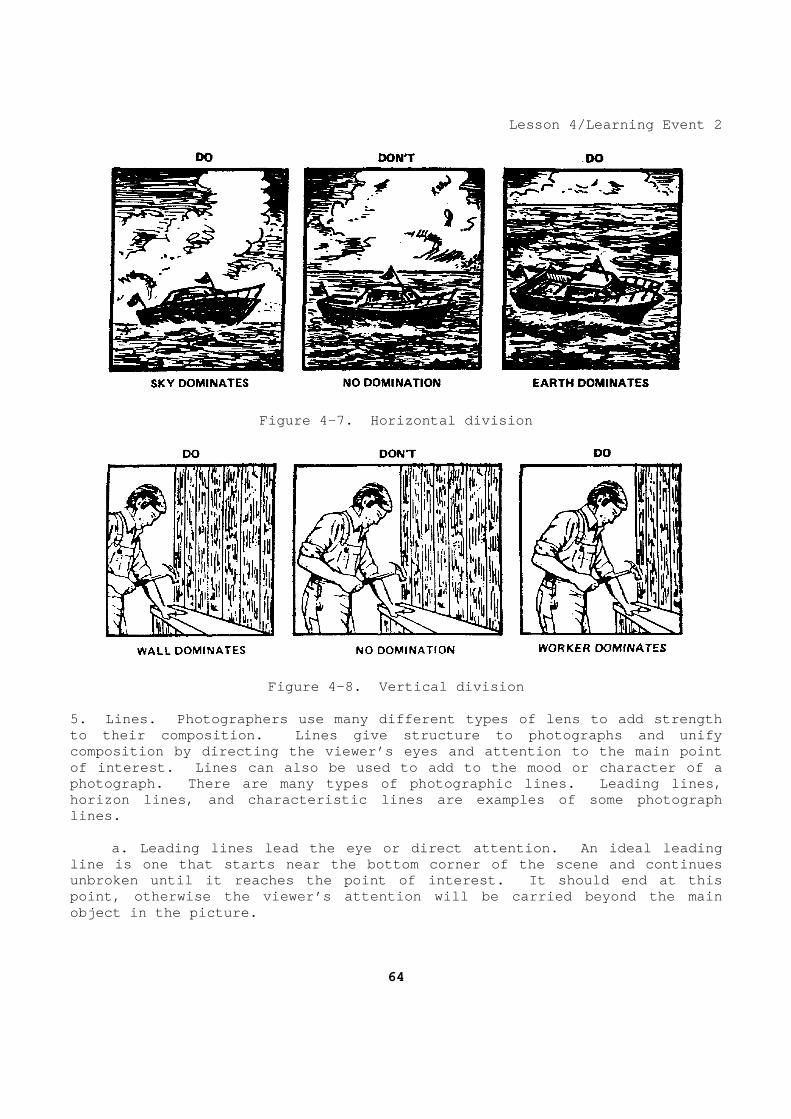
b. To simplify balancing equal or unequal masses, divide the photograph area into thirds and place the elements in opposite thirds. c. Place this fact into your mind where it will no t be forgotten. The rules and principles of composition may be bent to achieve the idea or thought you wish to convey. But NEVER EVER balance the composition by dividing the photograph in half. Figure 4-7 and 4- 8.
63
Lesson 4/Learning Event 2
Figure 4-7. Horizontal division
Figure 4-8. Vertical division 5. Lines. Photographers use many different types o f lens to add strength to their composition. Lines give structure to phot ographs and unify composition by directing the viewer’s eyes and atte ntion to the main point of interest. Lines can also be used to add to the mood or character of a photograph. There are many types of photographic l ines. Leading lines, horizon lines, and characteristic lines are example s of some photograph lines. a. Leading lines lead the eye or direct attention. An ideal leading line is one that starts near the bottom corner of t he scene and continues unbroken until it reaches the point of interest. I t should end at this point, otherwise the viewer’s attention will be car ried beyond the main object in the picture.
64
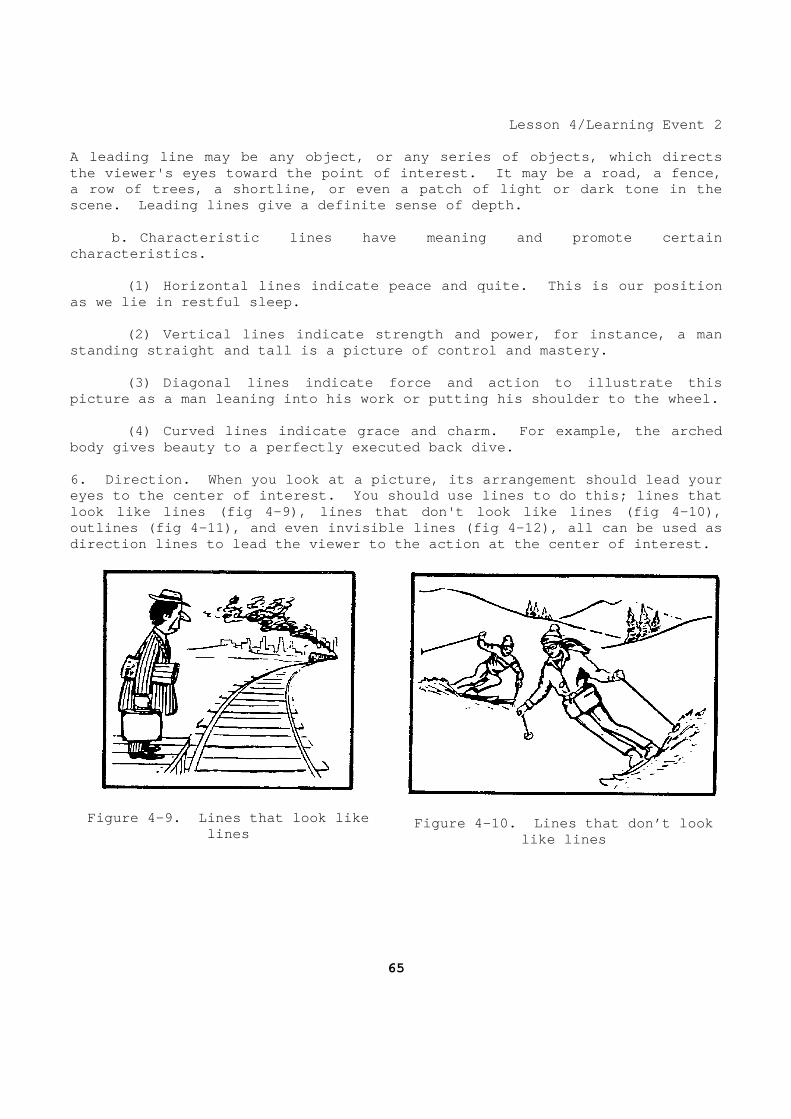
Lesson 4/Learning Event 2 A leading line may be any object, or any series of objects, which directs the viewer's eyes toward the point of interest. It may be a road, a fence, a row of trees, a shortline, or even a patch of lig ht or dark tone in the scene. Leading lines give a definite sense of dept h. b. Characteristic lines have meaning and promote c ertain characteristics. (1) Horizontal lines indicate peace and quite. Th is is our position as we lie in restful sleep. (2) Vertical lines indicate strength and power, fo r instance, a man standing straight and tall is a picture of control and mastery. (3) Diagonal lines indicate force and action to il lustrate this picture as a man leaning into his work or putting h is shoulder to the wheel. (4) Curved lines indicate grace and charm. For ex ample, the arched body gives beauty to a perfectly executed back dive . 6. Direction. When you look at a picture, its arra ngement should lead your eyes to the center of interest. You should use lin es to do this; lines that look like lines (fig 4-9), lines that don't look li ke lines (fig 4-10), outlines (fig 4-11), and even invisible lines (fig 4-12), all can be used as direction lines to lead the viewer to the action at the center of interest.
Figure 4-9. Lines that look like lines
Figure 4-10. Lines that don’t look like lines
65
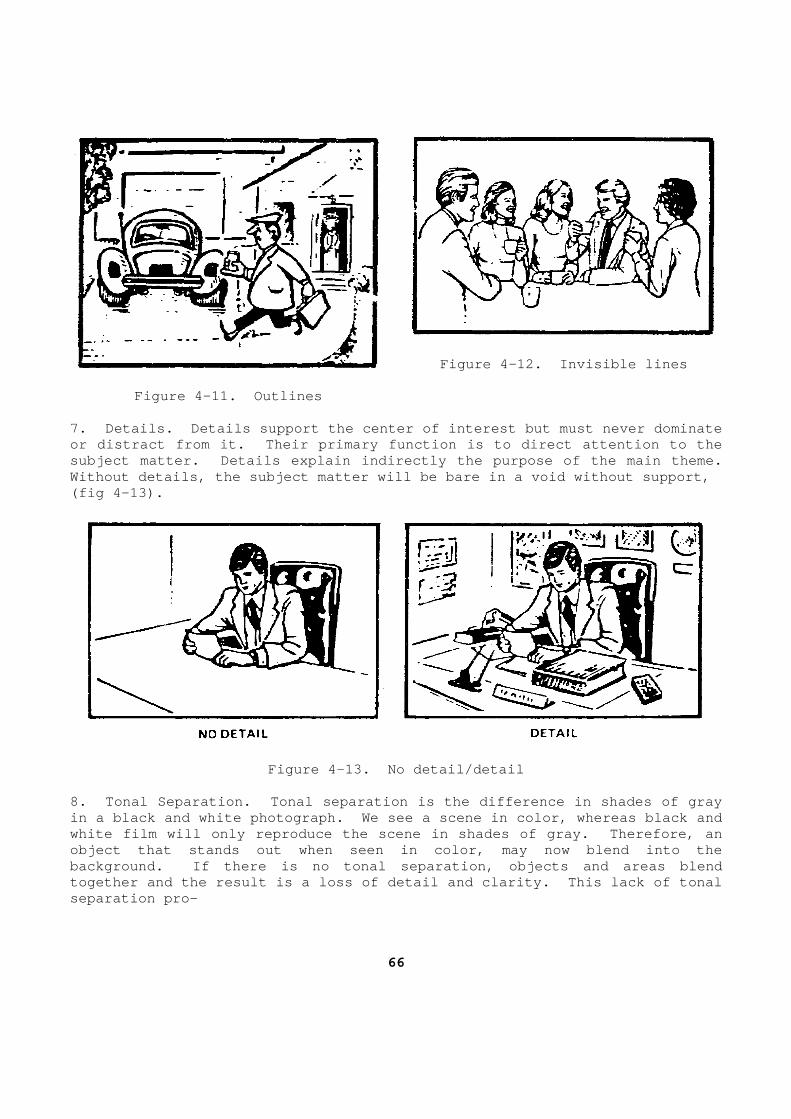
Figure 4-11. Outlines
Figure 4-12. Invisible lines
7. Details. Details support the center of interest but must never dominate or distract from it. Their primary function is to direct attention to the subject matter. Details explain indirectly the pur pose of the main theme. Without details, the subject matter will be bare in a void without support, (fig 4-13).
Figure 4-13. No detail/detail 8. Tonal Separation. Tonal separation is the diffe rence in shades of gray in a black and white photograph. We see a scene in color, whereas black and white film will only reproduce the scene in shades of gray. Therefore, an object that stands out when seen in color, may now blend into the background. If there is no tonal separation, objec ts and areas blend together and the result is a loss of detail and cla rity. This lack of tonal separation pro-
66
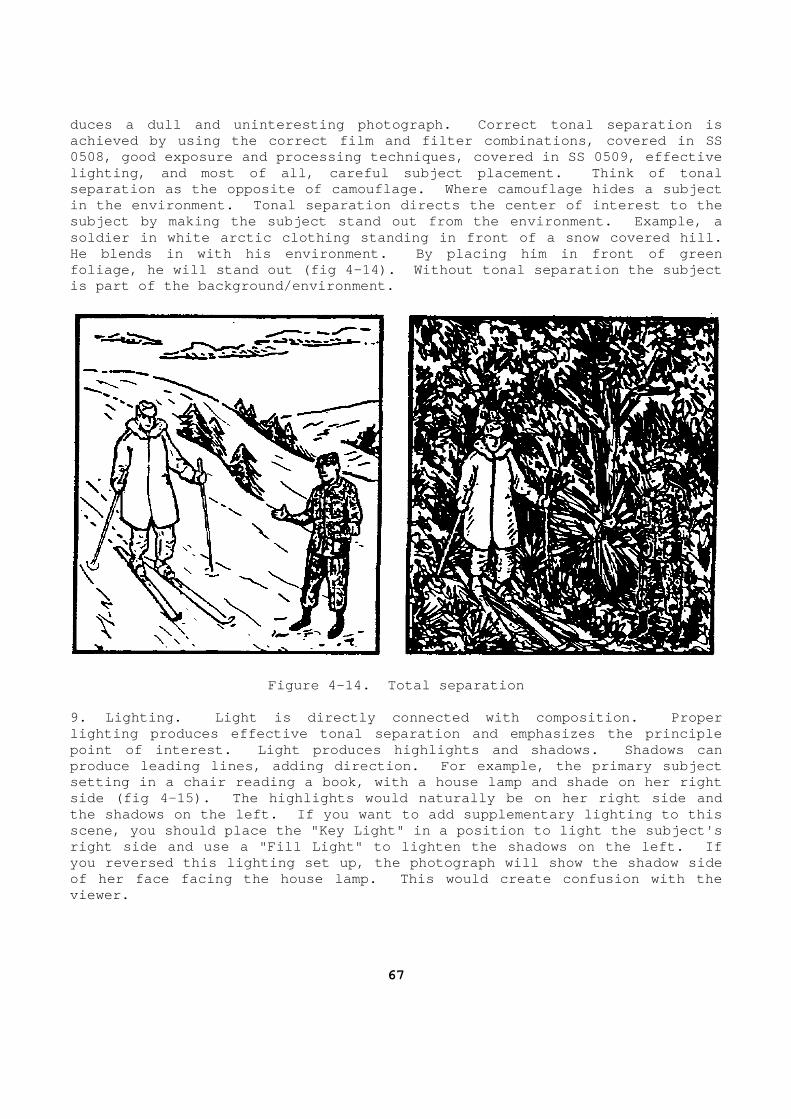
duces a dull and uninteresting photograph. Correct tonal separation is achieved by using the correct film and filter combi nations, covered in SS 0508, good exposure and processing techniques, cove red in SS 0509, effective lighting, and most of all, careful subject placemen t. Think of tonal separation as the opposite of camouflage. Where ca mouflage hides a subject in the environment. Tonal separation directs the c enter of interest to the subject by making the subject stand out from the en vironment. Example, a soldier in white arctic clothing standing in front of a snow covered hill. He blends in with his environment. By placing him in front of green foliage, he will stand out (fig 4-14). Without ton al separation the subject is part of the background/environment.
Figure 4-14. Total separation 9. Lighting. Light is directly connected with comp osition. Proper lighting produces effective tonal separation and em phasizes the principle point of interest. Light produces highlights and s hadows. Shadows can produce leading lines, adding direction. For examp le, the primary subject setting in a chair reading a book, with a house lam p and shade on her right side (fig 4-15). The highlights would naturally be on her right side and the shadows on the left. If you want to add supple mentary lighting to this scene, you should place the "Key Light" in a positi on to light the subject's right side and use a "Fill Light" to lighten the sh adows on the left. If you reversed this lighting set up, the photograph w ill show the shadow side of her face facing the house lamp. This would crea te confusion with the viewer.
67
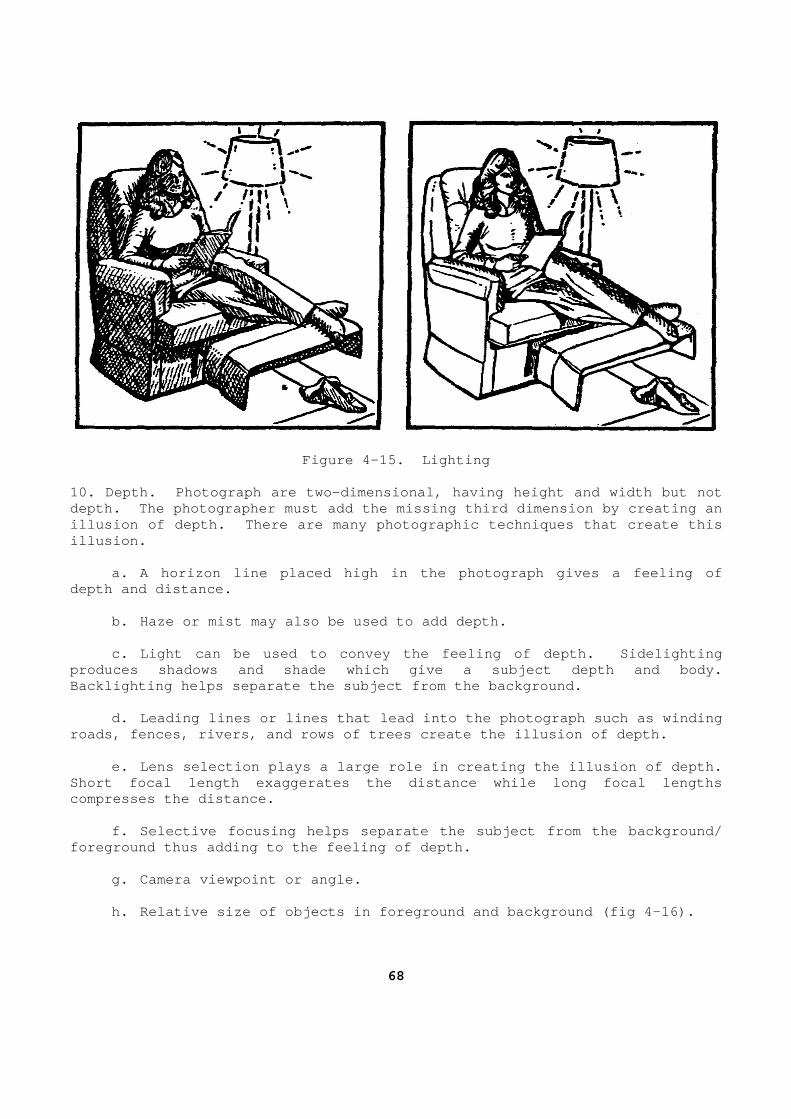
Figure 4-15. Lighting 10. Depth. Photograph are two-dimensional, having height and width but not depth. The photographer must add the missing third dimension by creating an illusion of depth. There are many photographic tec hniques that create this illusion. a. A horizon line placed high in the photograph gi ves a feeling of depth and distance. b. Haze or mist may also be used to add depth. c. Light can be used to convey the feeling of dept h. Sidelighting produces shadows and shade which give a subject dep th and body. Backlighting helps separate the subject from the ba ckground. d. Leading lines or lines that lead into the photo graph such as winding roads, fences, rivers, and rows of trees create the illusion of depth. e. Lens selection plays a large role in creating t he illusion of depth. Short focal length exaggerates the distance while l ong focal lengths compresses the distance. f. Selective focusing helps separate the subject f rom the background/ foreground thus adding to the feeling of depth. g. Camera viewpoint or angle. h. Relative size of objects in foreground and back ground (fig 4-16).
68
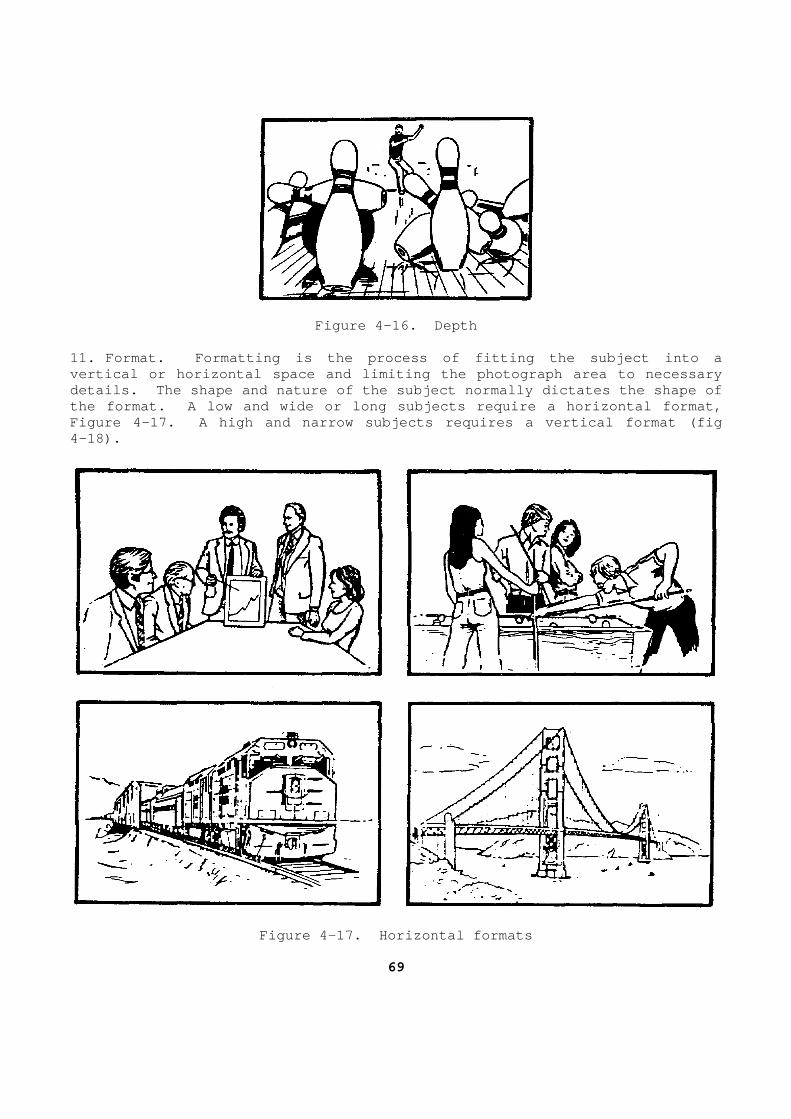
Figure 4-16. Depth 11. Format. Formatting is the process of fitting t he subject into a vertical or horizontal space and limiting the photo graph area to necessary details. The shape and nature of the subject norma lly dictates the shape of the format. A low and wide or long subjects requir e a horizontal format, Figure 4-17. A high and narrow subjects requires a vertical format (fig 4-18).
Figure 4-17. Horizontal formats
69

Figure 4-18. Vertical formats 12. Pictorial framing. Pictorial framing is a phot ographic device used to hold the viewers eye to the center of interest. Al most anything can be used as a framing device, some examples are: tree branch es, arches, parts of equipment, anything that helps hold the viewers eye within the frame. A framing device is another means of adding depth and direction (fig 4-19).
Figure 4-19. Pictorial framing
70
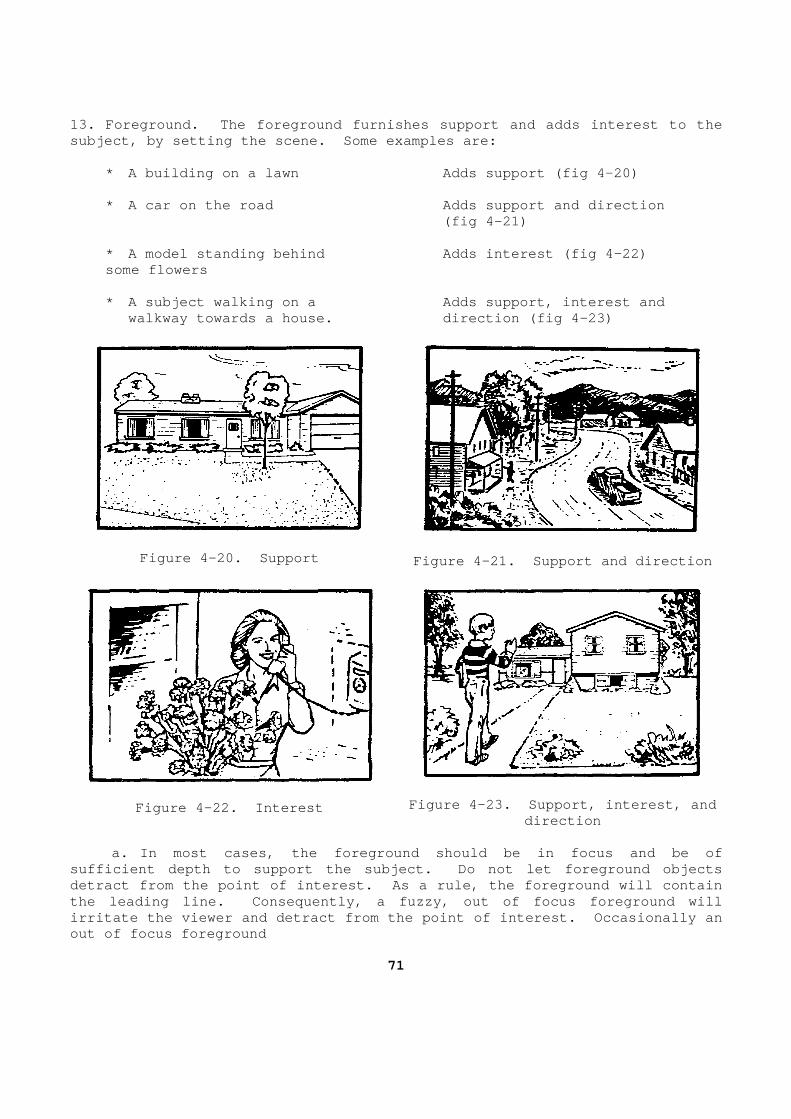
13. Foreground. The foreground furnishes support a nd adds interest to the subject, by setting the scene. Some examples are: * A building on a lawn Adds support (fig 4-20) * A car on the road Adds support and direction (fig 4-21) * A model standing behind Adds interest (fig 4-22) some flowers * A subject walking on a Adds support, interest an d walkway towards a house. direction (fig 4-23)
Figure 4-20. Support
Figure 4-21. Support and direction
Figure 4-22. Interest
Figure 4-23. Support, interest, and direction
a. In most cases, the foreground should be in focu s and be of sufficient depth to support the subject. Do not le t foreground objects detract from the point of interest. As a rule, the foreground will contain the leading line. Consequently, a fuzzy, out of fo cus foreground will irritate the viewer and detract from the point of i nterest. Occasionally an out of focus foreground
71
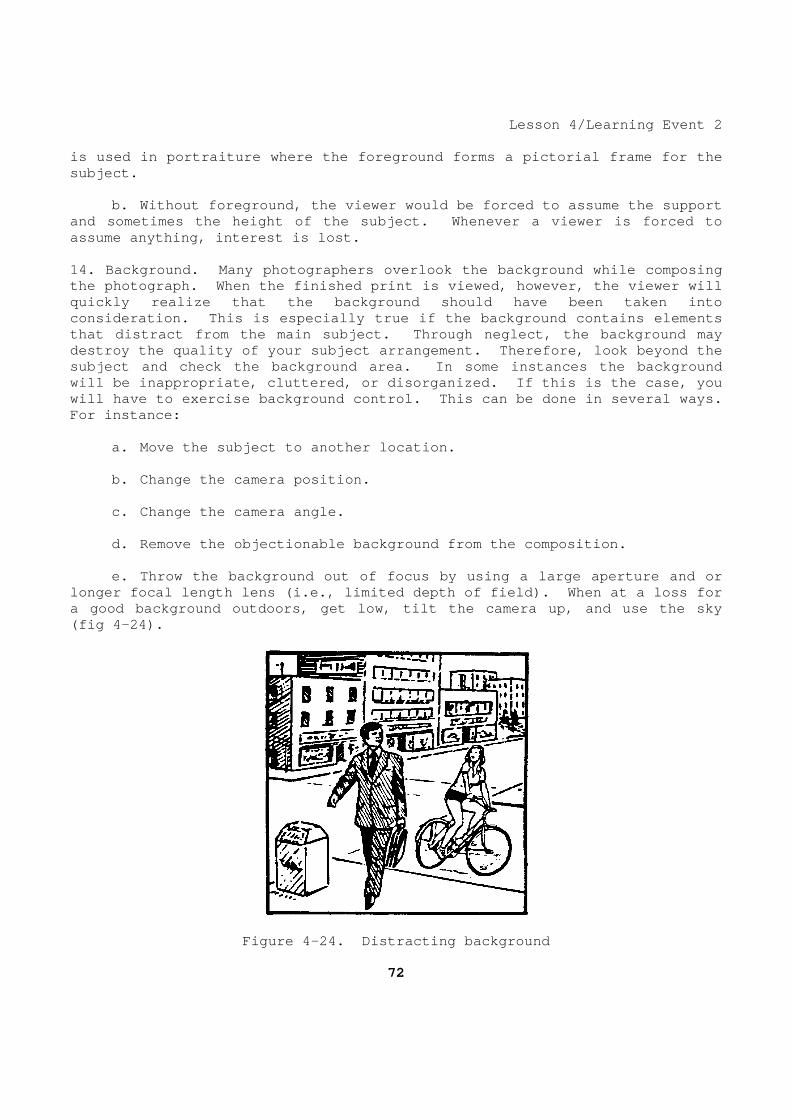
Lesson 4/Learning Event 2 is used in portraiture where the foreground forms a pictorial frame for the subject. b. Without foreground, the viewer would be forced to assume the support and sometimes the height of the subject. Whenever a viewer is forced to assume anything, interest is lost. 14. Background. Many photographers overlook the ba ckground while composing the photograph. When the finished print is viewed, however, the viewer will quickly realize that the background should have bee n taken into consideration. This is especially true if the back ground contains elements that distract from the main subject. Through negle ct, the background may destroy the quality of your subject arrangement. T herefore, look beyond the subject and check the background area. In some ins tances the background will be inappropriate, cluttered, or disorganized. If this is the case, you will have to exercise background control. This can be done in several ways. For instance: a. Move the subject to another location. b. Change the camera position. c. Change the camera angle. d. Remove the objectionable background from the co mposition. e. Throw the background out of focus by using a la rge aperture and or longer focal length lens (i.e., limited depth of fi eld). When at a loss for a good background outdoors, get low, tilt the camer a up, and use the sky (fig 4-24).
Figure 4-24. Distracting background
72
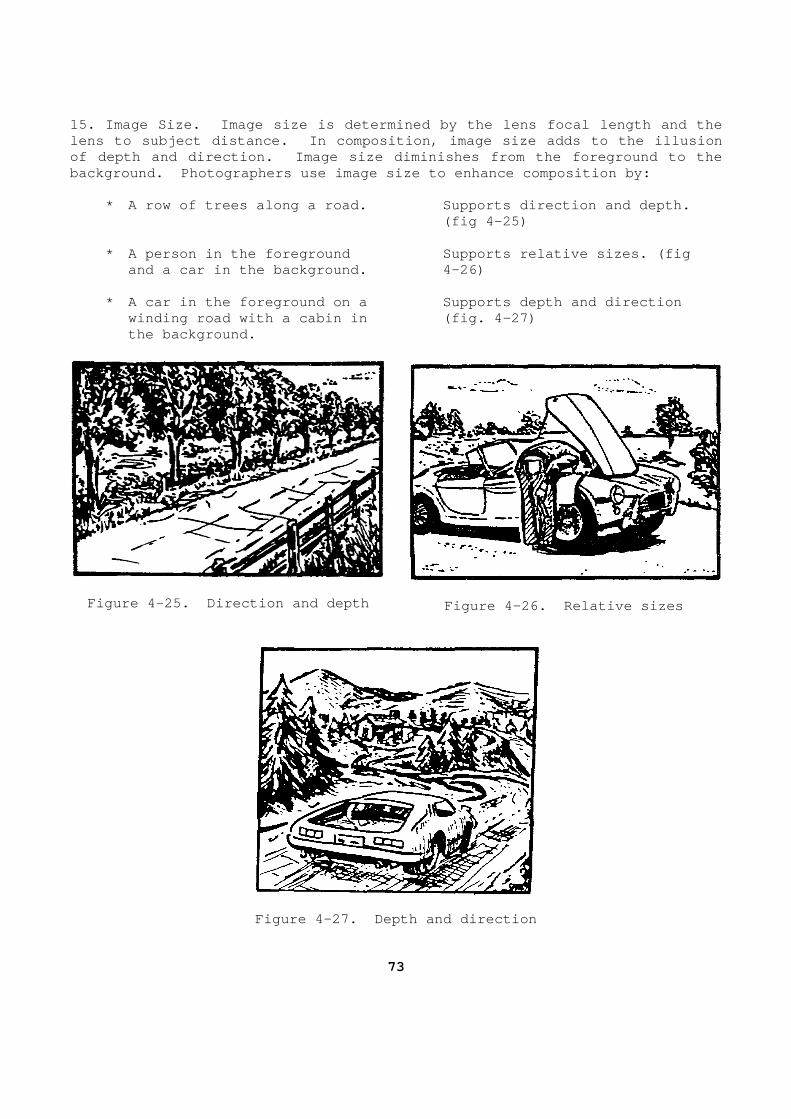
15. Image Size. Image size is determined by the le ns focal length and the lens to subject distance. In composition, image si ze adds to the illusion of depth and direction. Image size diminishes from the foreground to the background. Photographers use image size to enhanc e composition by: * A row of trees along a road. Supports direction and depth. (fig 4-25) * A person in the foreground Supports relative siz es. (fig and a car in the background. 4-26) * A car in the foreground on a Supports depth and direction winding road with a cabin in (fig. 4-27) the background.
Figure 4-25. Direction and depth
Figure 4-26. Relative sizes
Figure 4-27. Depth and direction
73
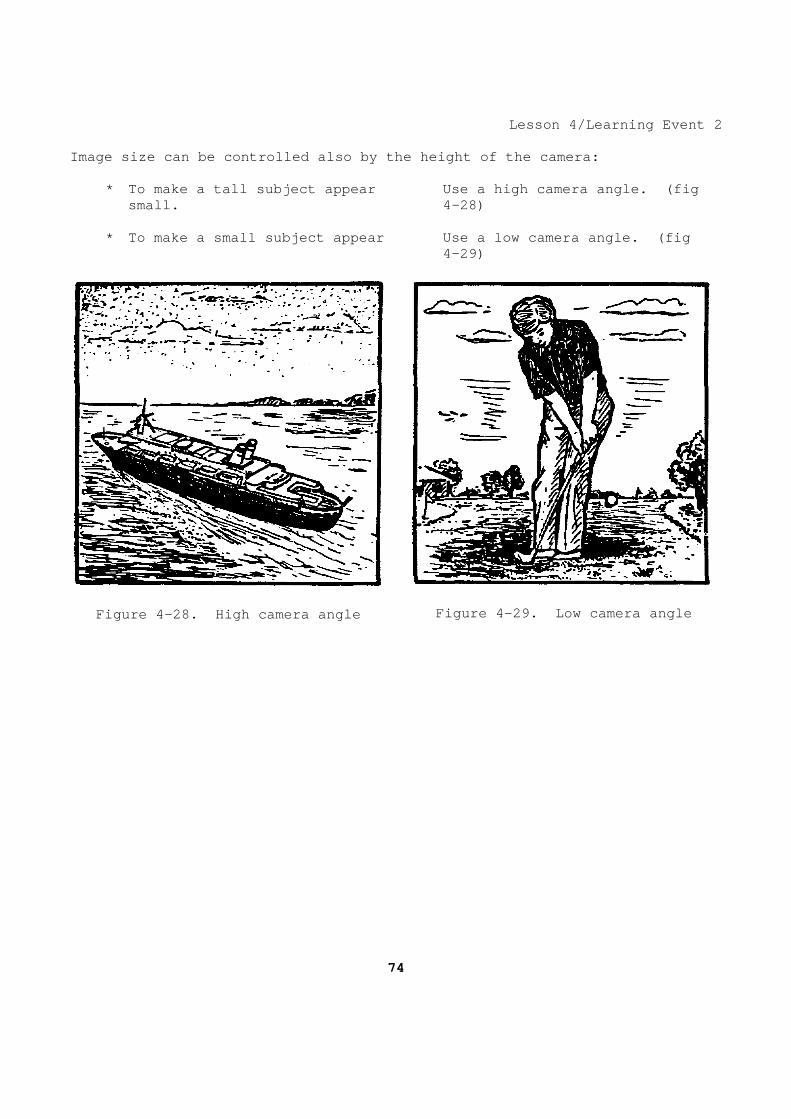
Lesson 4/Learning Event 2 Image size can be controlled also by the height of the camera: * To make a tall subject appear Use a high camera angle. (fig small. 4-28) * To make a small subject appear Use a low camera angle. (fig 4-29)
Figure 4-28. High camera angle
Figure 4-29. Low camera angle
74
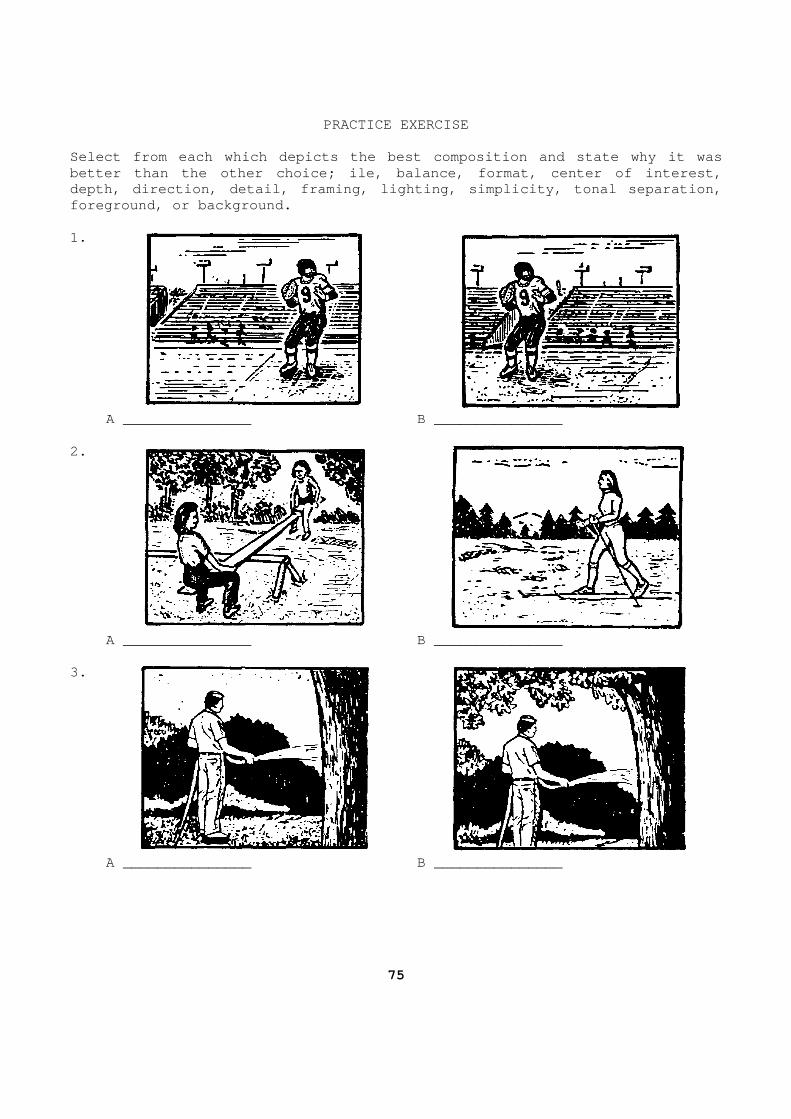
PRACTICE EXERCISE Select from each which depicts the best composition and state why it was better than the other choice; ile, balance, format, center of interest, depth, direction, detail, framing, lighting, simpli city, tonal separation, foreground, or background. 1.
A _______________ B _______________ 2.
A _______________ B _______________ 3.
A _______________ B _______________
75
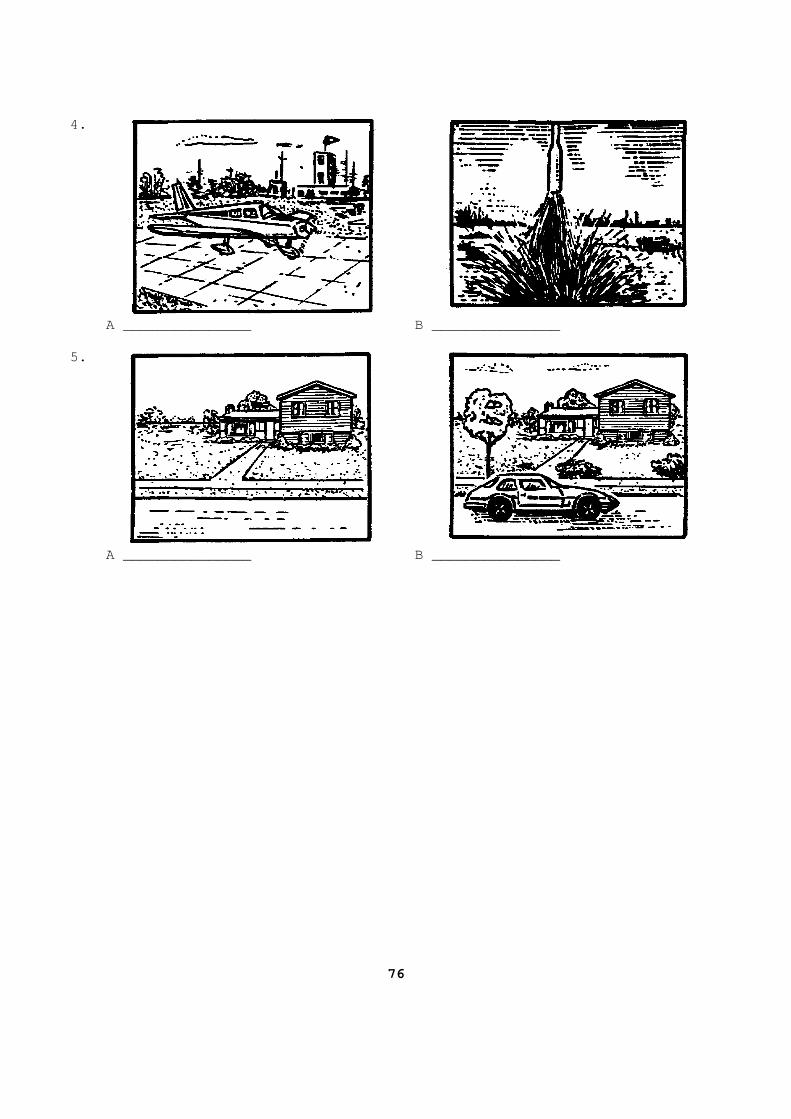
4.
A _______________ B _______________ 5.
A _______________ B _______________
76

ANSWERS TO PRACTICE EXERCISES 1. b. Center of interest, Lesson 4, Learning Event 2, Para 3. 2. a. Balance, Lesson 4, Learning Event 2, Para 4. 3. b. Pictorial framing, Lesson 4, Learning Event 2 , Para 12. 4. a. Format, Lesson 4, Learning Event 2, Para 11. 5. b. Detail, Lesson 4, Learning Event 2, Para 7.
77