Embed Size (px)
Citation preview
Cisco Prime Home 5.0.1 User GuideAugust 5, 2012
Americas HeadquartersCisco Systems, Inc.170 West Tasman DriveSan Jose, CA 95134-1706 USAhttp://www.cisco.comTel: 408 526-4000
800 553-NETS (6387)Fax: 408 527-0883
Text Part Number: OL-27464-01

THE SPECIFICATIONS AND INFORMATION REGARDING THE PRODUCTS IN THIS MANUAL ARE SUBJECT TO CHANGE WITHOUT NOTICE. ALL STATEMENTS, INFORMATION, AND RECOMMENDATIONS IN THIS MANUAL ARE BELIEVED TO BE ACCURATE BUT ARE PRESENTED WITHOUT WARRANTY OF ANY KIND, EXPRESS OR IMPLIED. USERS MUST TAKE FULL RESPONSIBILITY FOR THEIR APPLICATION OF ANY PRODUCTS.
THE SOFTWARE LICENSE AND LIMITED WARRANTY FOR THE ACCOMPANYING PRODUCT ARE SET FORTH IN THE INFORMATION PACKET THAT SHIPPED WITH THE PRODUCT AND ARE INCORPORATED HEREIN BY THIS REFERENCE. IF YOU ARE UNABLE TO LOCATE THE SOFTWARE LICENSE OR LIMITED WARRANTY, CONTACT YOUR CISCO REPRESENTATIVE FOR A COPY.
The Cisco implementation of TCP header compression is an adaptation of a program developed by the University of California, Berkeley (UCB) as part of UCB’s public domain version of the UNIX operating system. All rights reserved. Copyright © 1981, Regents of the University of California.
NOTWITHSTANDING ANY OTHER WARRANTY HEREIN, ALL DOCUMENT FILES AND SOFTWARE OF THESE SUPPLIERS ARE PROVIDED “AS IS” WITH ALL FAULTS. CISCO AND THE ABOVE-NAMED SUPPLIERS DISCLAIM ALL WARRANTIES, EXPRESSED OR IMPLIED, INCLUDING, WITHOUT LIMITATION, THOSE OF MERCHANTABILITY, FITNESS FOR A PARTICULAR PURPOSE AND NONINFRINGEMENT OR ARISING FROM A COURSE OF DEALING, USAGE, OR TRADE PRACTICE.
IN NO EVENT SHALL CISCO OR ITS SUPPLIERS BE LIABLE FOR ANY INDIRECT, SPECIAL, CONSEQUENTIAL, OR INCIDENTAL DAMAGES, INCLUDING, WITHOUT LIMITATION, LOST PROFITS OR LOSS OR DAMAGE TO DATA ARISING OUT OF THE USE OR INABILITY TO USE THIS MANUAL, EVEN IF CISCO OR ITS SUPPLIERS HAVE BEEN ADVISED OF THE POSSIBILITY OF SUCH DAMAGES.
Cisco and the Cisco logo are trademarks or registered trademarks of Cisco and/or its affiliates in the U.S. and other countries. To view a list of Cisco trademarks, go to this URL: www.cisco.com/go/trademarks. Third-party trademarks mentioned are the property of their respective owners. The use of the word partner does not imply a partnership relationship between Cisco and any other company. (1110R)
Any Internet Protocol (IP) addresses and phone numbers used in this document are not intended to be actual addresses and phone numbers. Any examples, command display output, network topology diagrams, and other figures included in the document are shown for illustrative purposes only. Any use of actual IP addresses or phone numbers in illustrative content is unintentional and coincidental.
Cisco Prime Home 5.0.1 User Guide© 2012 Cisco Systems, Inc. All rights reserved.
OL-27464-01
C O N T E N T S
Preface ix
Audience ix
Related Documentation ix
Obtaining Documentation and Submitting a Service Request x
C H A P T E R 1 Overview of Cisco Prime Home 5.0.1 1-1
TR-069 Overview 1-1
How Does TR-069 Relate to Prime Home? 1-1
User Roles 1-2
Licensing 1-2
C H A P T E R 2 System Overview 2-1
Supported Browsers 2-1
Logging Into Prime Home 2-1
Logging Out of Prime Home 2-2
User Profile 2-2
Automatically Refreshing Device Data 2-3
Viewing System Messages 2-3
Navigation Overview 2-3
Dashboard Overview 2-4
System Messages Overview 2-5
Viewing System Messages 2-5
Labels Overview 2-6
Using Labels 2-6
Domains Overview 2-6
Scripts Overview 2-6
What Can Scripts Do? 2-7
How Do Scripts Run? 2-7
iiiCisco Prime Home 5.0.1 User Guide
Contents
C H A P T E R 3 Customer Support Overview 3-1
Finding and Selecting Subscribers and Devices 3-1
How to Search 3-2
Selecting Subscribers or Devices 3-3
Applying or Removing Labels for Multiple Records 3-3
About New Accounts 3-4
Creating a Subscriber or Device Account 3-5
Assigning a Device to a Subscriber 3-6
Assigning a Subscriber to a Device 3-7
About Saving Changes 3-7
C H A P T E R 4 Working with Accounts 4-1
Displaying an Account 4-1
What Happens When You Display an Account 4-2
Working with Subscribers 4-2
Managing Subscriber Information 4-2
Managing Control Panel Access 4-3
Managing Subscriber Labels 4-4
Deleting a Subscriber 4-4
Managing Devices 4-5
Assigning a Device Alias and Icon 4-6
Working with Device Labels 4-6
Viewing Device Information 4-6
Rebooting a Device 4-7
Adding and Removing PPP Credentials 4-7
Enabling or Disabling Bulk Operations 4-7
Assigning a Device to a Domain 4-7
Removing the Association Between a Device and a Subscriber 4-8
Deleting a Device 4-8
Managing the Local Network 4-8
Viewing Local Network Status 4-8
Naming a LAN Device 4-9
Enabling Local Interface Access 4-9
Deleting a LAN Device 4-10
ivCisco Prime Home 5.0.1 User Guide
OL-27464-01
Contents
Viewing Device Status 4-10
Status 4-11
Line Information 4-11
DSL or Cable 4-11
WAN Interface Statistics 4-11
C H A P T E R 5 Working with Services 5-1
Managing Wireless Settings 5-1
About Wireless Settings 5-2
Enabling Wireless Service 5-3
Disabling Wireless Service 5-3
Managing Port Forwarding 5-3
Enabling Port Forwarding 5-4
Disabling Port Forwarding 5-4
Adding a Port Forward 5-4
Deleting a Port Forward 5-5
Managing Content Filtering 5-5
About Content Filtering Levels 5-6
How Content Filtering Works 5-7
Enabling the Content Filtering Service 5-8
Disabling the Content Filtering Service 5-8
Managing Default Content Filtering Settings 5-9
Managing Content Filtering for Specific LAN Devices 5-9
Managing Time Blocking 5-10
Enabling Time Blocking 5-10
Disabling Time Blocking 5-10
Managing Default Time Blocking Settings 5-11
Managing Time Blocking for Specific Devices 5-11
Adding Bonus Time 5-12
C H A P T E R 6 Performing Advanced Tasks 6-1
Working with Event Logs 6-1
Refreshing the Event Logs List 6-2
Viewing a Session Log 6-2
Setting the Event Logging Level 6-3
Using the Parameter Browser 6-3
Managing Device Synchronization 6-5
Resolving Synchronization Failures 6-5
vCisco Prime Home 5.0.1 User Guide
OL-27464-01
Contents
Working with Scripts 6-6
Adding a Script 6-6
Viewing Script Results 6-7
Updating Firmware 6-7
Queuing a Firmware Update 6-8
Replacing a Device 6-8
Copying Device Settings to Another Device 6-9
Setting Up Local GUI Access 6-9
C H A P T E R 7 Reports 7-1
Built-In Reports 7-1
Running an Aggregate Report 7-2
Custom Reports 7-2
Reports Tab 7-3
Finding an Existing Report 7-3
Running an Existing Report 7-4
Custom Reports 7-4
Creating a Custom Report 7-5
Working with Sort Order 7-6
Working with Filters 7-6
Working with Advanced Syntax 7-8
Using Reports to Understand Your Network 7-8
C H A P T E R 8 Administration Overview 8-1
Managing Labels 8-1
Labels Window 8-2
Managing Users 8-3
Managing Device Types 8-5
Device Type Page 8-6
Managing Firmware Versions 8-7
Firmware List Window 8-8
Managing Services 8-9
Services Window 8-10
Managing User Interface Groups 8-13
Managing Scripts 8-14
Scripts Window 8-16
viCisco Prime Home 5.0.1 User Guide
OL-27464-01
Contents
Managing Events 8-17
Events Window 8-18
Managing Announcements 8-19
Using the Announcements Editor 8-20
C H A P T E R 9 Reviewing Audit Logs 9-1
Launching the Audit Log 9-1
C H A P T E R 10 Managing Bulk Operations 10-1
Preparing for Bulk Operations 10-2
Creating Bulk Operations 10-2
Examples of Bulk Operations 10-3
Example 1: Update Firmware on All SR100G CPEs 10-3
Example 2: Enable Content Filtering on All CPEs 10-7
Best Practices for Working with Bulk Operations 10-9
Troubleshooting Failed Bulk Operations 10-9
Controlling Maximum Throughput/Throttling 10-9
Preparing to Run Firmware Update Operations 10-10
Understanding Bulk Operation Options 10-10
Action Options 10-10
Schedule Options 10-11
CPE Selection Options 10-11
C H A P T E R 11 Troubleshooting Tools 11-1
Import Subscriptions Utility 11-1
Importing Multiple Subscriptions 11-2
RESTful Service Tool 11-2
A P P E N D I X A Subscription Import Files A-1
A P P E N D I X B Common Error Messages and Fault Codes B-1
Error Messages B-1
TR-069 Fault Codes B-3
CPE Fault Codes B-3
ACS Fault Codes B-5
GL O S S A R Y
viiCisco Prime Home 5.0.1 User Guide
OL-27464-01

Contents
viiiCisco Prime Home 5.0.1 User Guide
OL-27464-01

Preface
This guide describes the structure and features of Cisco Prime Home 5.0.1 and how to use it.
This preface contains the following sections:
• Audience, page ix
• Related Documentation, page ix
• Obtaining Documentation and Submitting a Service Request, page x
AudienceThe primary audience for this guide is network operations personnel and system administrators. This guide assumes that you are familiar with the following products and topics:
• Basic internetworking terminology and concepts
• Network topology and protocols
• Telecommunication Management Network (TMN) architecture model
Related DocumentationSee also the following Prime Home guides:
• Cisco Prime Home 5.0.1 Deployment Overview
• Cisco Prime Home 5.0.1 Release Notes
Click here to access the entire Cisco Prime Home 5.0.1 documentation set.
Note We sometimes update the documentation after original publication. Therefore, you should review the documentation on Cisco.com for any updates.
ixCisco Prime Home 5.0.1 User Guide
OL-27464-01

Preface
Obtaining Documentation and Submitting a Service RequestFor information on obtaining documentation, submitting a service request, and gathering additional information, see the monthly What’s New in Cisco Product Documentation, which also lists all new and revised Cisco technical documentation, at:
http://www.cisco.com/en/US/docs/general/whatsnew/whatsnew.html
Subscribe to the What’s New in Cisco Product Documentation as an RSS feed and set content to be delivered directly to your desktop using a reader application. The RSS feeds are a free service. Cisco currently supports RSS Version 2.0.
xCisco Prime Home 5.0.1 User Guide
OL-27464-01
OL-27464-01
C H A P T E R 1
Overview of Cisco Prime Home 5.0.1Cisco Prime Home 5.0.1 offers telecommunication service providers the ability to automatically activate and configure subscribers; manage customer premises equipment (CPE); and deliver advanced services via service packages over DSL, fiber, cable, T1/E1, wireless, and satellite networks. Advanced features include services such as time blocking, content filtering, managed Wi-Fi, remote port forwarding, and IPTV. Prime Home also lets you remotely manage TR-069-compliant CPEs from a variety of vendors.
TR-069 OverviewTR-069 is a technical report published by the Broadband Forum that defines the CPE WAN Management Protocol (CWMP). The CWMP defines the application layer for remote management of end-user devices and is used by Prime Home to provide a flexible, extensible, and scalable control panel for managing systems. TR-069 is the current standard for activation of CPEs in the broadband market.
TR-069 specifies communication between the CPE and automated configuration services (ACS) such as Prime Home. It provides safe auto configuration as well as control of other CPE management functions in an integrated framework. TR-069 uses HTTP as a transport protocol and Simple Object Access Protocol (SOAP) services as its message encapsulation protocol. It also uses models that standardize the data exchanged between devices and management servers.
How Does TR-069 Relate to Prime Home?Prime Home is an enterprise application that manages and monitors TR-069-compliant subscriber devices. Prime Home provides the ability to investigate and control both individual CPEs and groups of CPEs defined by almost any characteristic. Management is driven by actions, which can select devices, communicate changes, and record status. In addition to included actions, customers can edit, create, and run actions based on CPE-related events. Prime Home fills a critical need for cutting-edge ISPs.
1-1Cisco Prime Home 5.0.1 User Guide
Chapter 1 Overview of Cisco Prime Home 5.0.1 User Roles
User RolesPrime Home includes the following roles that you can apply to a user account:
• Admin—Allows access to all functions in Prime Home, except those limited by license settings.
• Customer Support Representative (CSR)—Manages individual device and subscriber records.
Note Depending on your staffing model, you can create custom users with access to the features of your choice. When a custom user log in, the Prime Home application runs with the features mapped to that user account. Contact Cisco Advanced Services to configure custom users with specific roles.
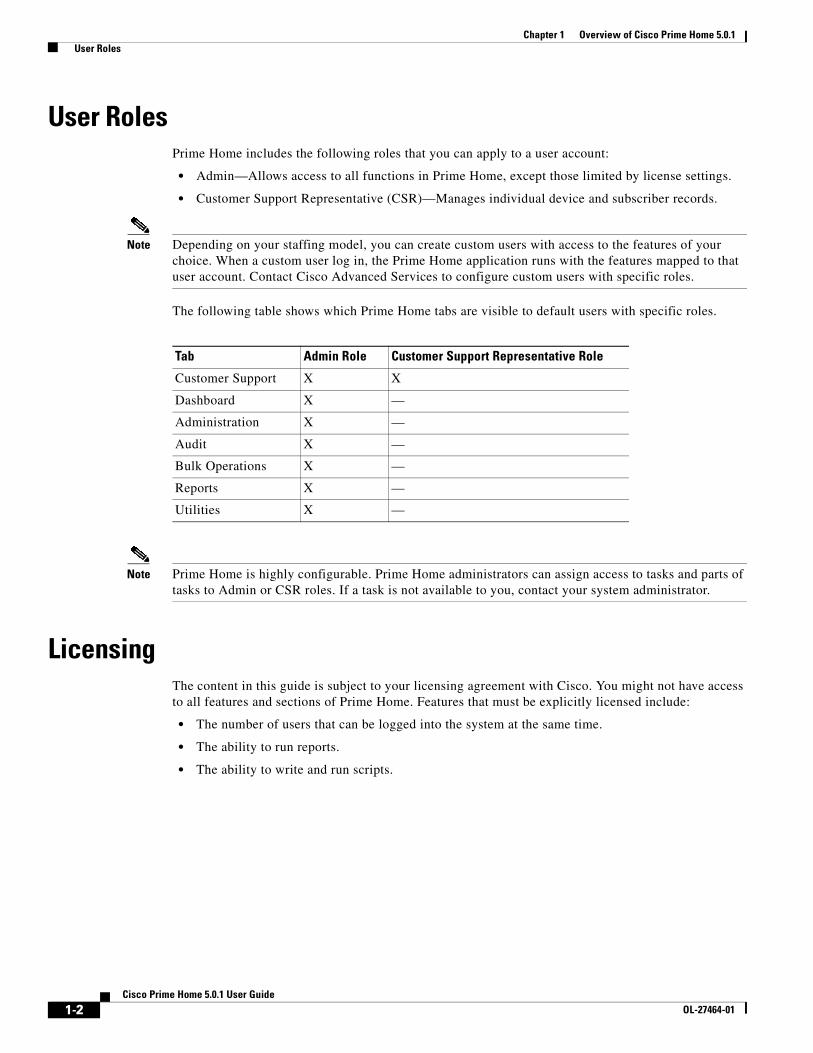
The following table shows which Prime Home tabs are visible to default users with specific roles.
Note Prime Home is highly configurable. Prime Home administrators can assign access to tasks and parts of tasks to Admin or CSR roles. If a task is not available to you, contact your system administrator.
LicensingThe content in this guide is subject to your licensing agreement with Cisco. You might not have access to all features and sections of Prime Home. Features that must be explicitly licensed include:
• The number of users that can be logged into the system at the same time.
• The ability to run reports.
• The ability to write and run scripts.
Tab Admin Role Customer Support Representative Role
Customer Support X X
Dashboard X —
Administration X —
Audit X —
Bulk Operations X —
Reports X —
Utilities X —
1-2Cisco Prime Home 5.0.1 User Guide
OL-27464-01

OL-27464-01
C H A P T E R 2
System OverviewSupported BrowsersTo access Prime Home, use one of these browsers:
• Google Chrome 5 or later
Note For optimal performance, Google Chrome is the recommended browser for Prime Home.
• Internet Explorer 8 or later
• Firefox 3.6 or later
• Safari 5 or later
Logging Into Prime HomeTo log into Prime Home:
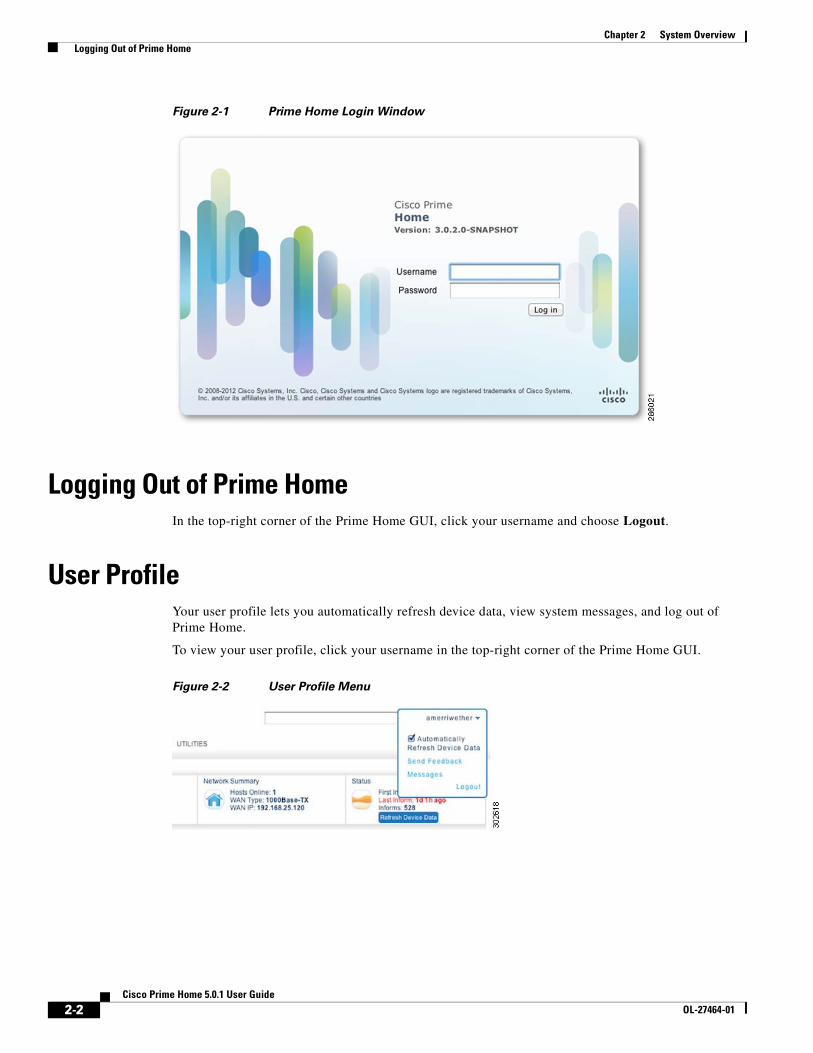
Step 1 Go to the Prime Home URL. The login window (Figure 2-1) opens.
Step 2 Enter your username and password, which are case-sensitive.
Step 3 Click Log in.
The system processes your request and displays the Customer Support page.
If you forget your username or password or receive an error message, contact your system administrator.
Note Your system might have a set limit of session logins per license. If you exceed the maximum number of simultaneous logins, you receive the message “The maximum number of users are already logged into the system. Another user must log out before you can log in.” You must wait until another user logs out, or request that a user log out.
2-1Cisco Prime Home 5.0.1 User Guide
Chapter 2 System Overview Logging Out of Prime Home
Figure 2-1 Prime Home Login Window
Logging Out of Prime HomeIn the top-right corner of the Prime Home GUI, click your username and choose Logout.
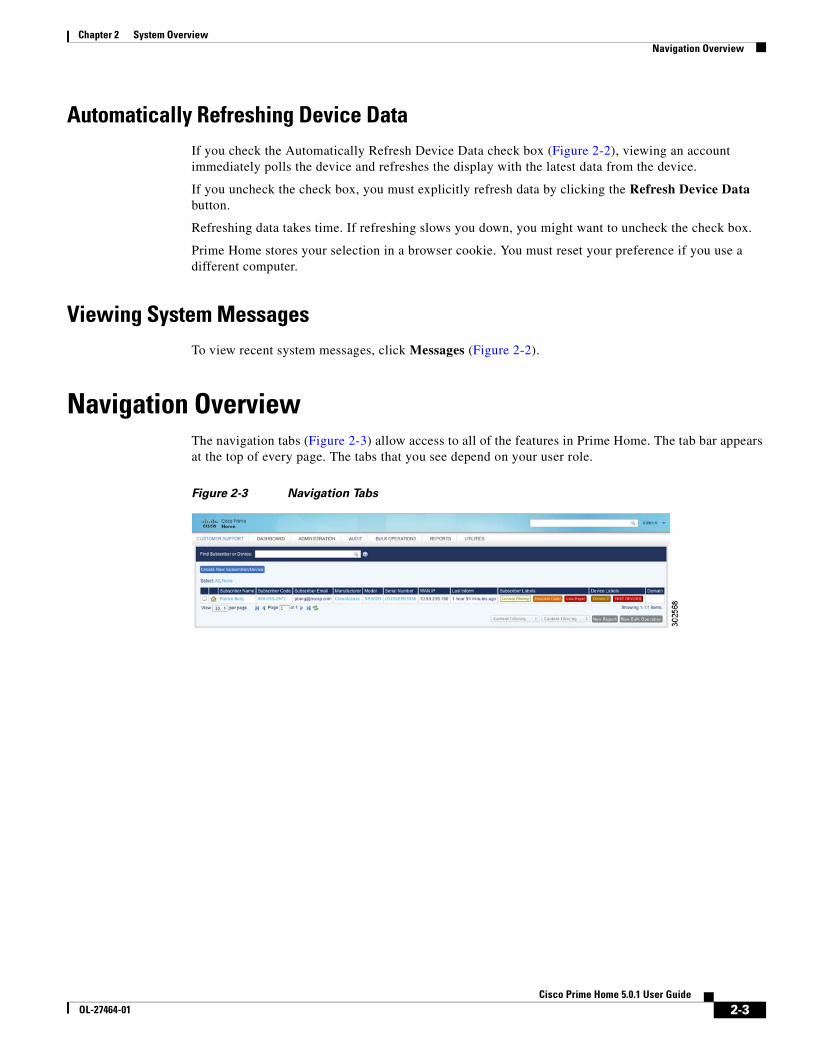
User ProfileYour user profile lets you automatically refresh device data, view system messages, and log out of Prime Home.
To view your user profile, click your username in the top-right corner of the Prime Home GUI.
Figure 2-2 User Profile Menu
2-2Cisco Prime Home 5.0.1 User Guide
OL-27464-01
Chapter 2 System Overview Navigation Overview
Automatically Refreshing Device DataIf you check the Automatically Refresh Device Data check box (Figure 2-2), viewing an account immediately polls the device and refreshes the display with the latest data from the device.
If you uncheck the check box, you must explicitly refresh data by clicking the Refresh Device Data button.
Refreshing data takes time. If refreshing slows you down, you might want to uncheck the check box.
Prime Home stores your selection in a browser cookie. You must reset your preference if you use a different computer.
Viewing System MessagesTo view recent system messages, click Messages (Figure 2-2).
Navigation OverviewThe navigation tabs (Figure 2-3) allow access to all of the features in Prime Home. The tab bar appears at the top of every page. The tabs that you see depend on your user role.
Figure 2-3 Navigation Tabs
2-3Cisco Prime Home 5.0.1 User Guide
OL-27464-01
Chapter 2 System Overview Dashboard Overview
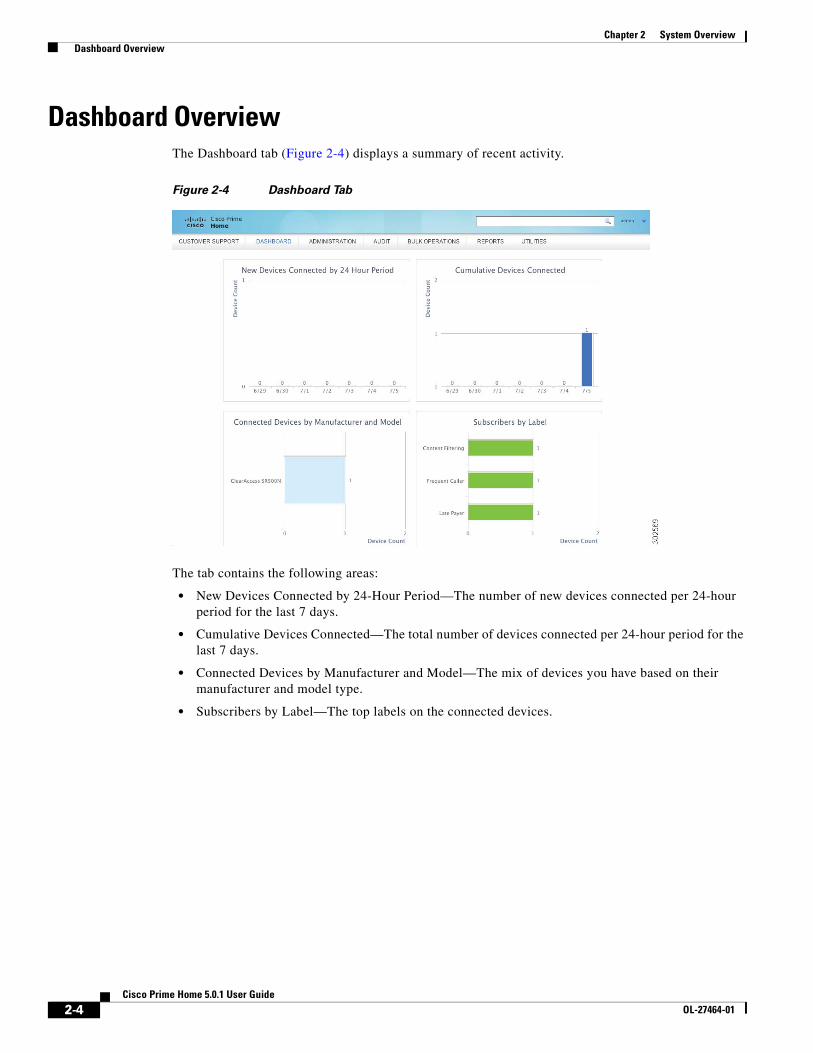
Dashboard OverviewThe Dashboard tab (Figure 2-4) displays a summary of recent activity.
Figure 2-4 Dashboard Tab
The tab contains the following areas:
• New Devices Connected by 24-Hour Period—The number of new devices connected per 24-hour period for the last 7 days.
• Cumulative Devices Connected—The total number of devices connected per 24-hour period for the last 7 days.
• Connected Devices by Manufacturer and Model—The mix of devices you have based on their manufacturer and model type.
• Subscribers by Label—The top labels on the connected devices.
2-4Cisco Prime Home 5.0.1 User Guide
OL-27464-01
Chapter 2 System Overview System Messages Overview
System Messages OverviewPrime Home displays the messages described in Table 2-1. Additionally, Prime Home constantly logs system messages that appear in the background, with no user action required.
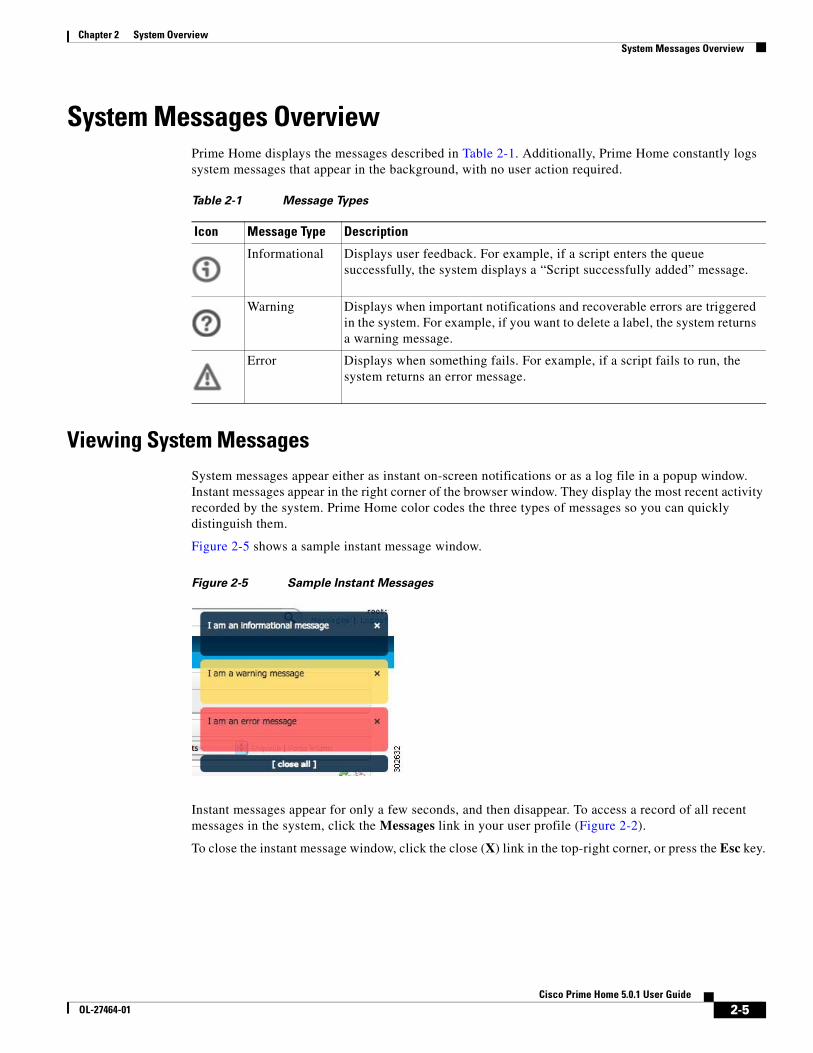
Viewing System MessagesSystem messages appear either as instant on-screen notifications or as a log file in a popup window. Instant messages appear in the right corner of the browser window. They display the most recent activity recorded by the system. Prime Home color codes the three types of messages so you can quickly distinguish them.
Figure 2-5 shows a sample instant message window.
Figure 2-5 Sample Instant Messages
Instant messages appear for only a few seconds, and then disappear. To access a record of all recent messages in the system, click the Messages link in your user profile (Figure 2-2).
To close the instant message window, click the close (X) link in the top-right corner, or press the Esc key.
Table 2-1 Message Types
Icon Message Type Description
Informational Displays user feedback. For example, if a script enters the queue successfully, the system displays a “Script successfully added” message.
Warning Displays when important notifications and recoverable errors are triggered in the system. For example, if you want to delete a label, the system returns a warning message.
Error Displays when something fails. For example, if a script fails to run, the system returns an error message.
2-5Cisco Prime Home 5.0.1 User Guide
OL-27464-01
Chapter 2 System Overview Labels Overview
Labels OverviewLabels give you a flexible, customized way of categorizing elements in your system. You can apply labels to devices, subscribers, firmware, users, scripts, events, and announcements.
Prime Home lets you create your own labels. You can think of a label as a digital bucket that holds related items. Labels keep devices, subscribers, and users grouped together for easy interaction. You can:
• Create new labels and apply them to any pre-existing device or subscriber.
• Assign multiple labels to devices or subscribers.
For example, you can create a label that groups together all devices located in the same region. Then, when you need to run a script on devices in that region, you can use the label to quickly select those devices for processing.
Using LabelsYou can use labels to:
• Group together devices, subscribers, or users so you can find them easily.
• Restrict devices to a particular operation. Use labels in conjunction with bulk operations.
• Apply to scripts. You can have the script set or remove labels for a device or subscriber.
• Alter the behavior of a script when it applies to a labeled item.
• Search for information. If you enter the label name in the Search field, everything with that label appears.
You can apply labels to group devices that become faulty, or flag devices that have certain capabilities (such as voice). Using the Customer Support tab, you can apply labels to multiple subscribers or devices. Using the Device and Subscriber panes, you can apply a label to a single device or subscriber.
Domains OverviewYou can assign devices, subscribers, and users to a specific domain. You can use domains to restrict CSR access to a specific set of accounts. For example, if your customer base is divided into regions, you can create a domain for each region.
CSR users who are assigned to domains can view and act on only those devices and subscribers assigned to the same domains. CSR users without a domain assignment can view and act on all accounts. Administrators can also view and act on all accounts.
Scripts OverviewScripts are implemented using a customized JavaScript-based environment that runs on the ACS. This environment supports complete manipulation of the CPE via TR-069, as well as access to data models for subscribers and devices stored locally on the ACS.
2-6Cisco Prime Home 5.0.1 User Guide
OL-27464-01
Chapter 2 System Overview Scripts Overview
Many scripts are bundled to run and use on your systems. However, system administrators can write customized scripts to perform specific tasks on your network. The primary script types are:
• Scheduled scripts, which run at specific times.
• Event-based scripts, which run when a specific event occurs, such as an inform or reboot.
What Can Scripts Do?You can use scripts to:
• Read and write device configuration parameters.
• Read and write subscriber information, such as phone number, physical address, IP address, and billing information.
• Update firmware on a device.
Scripts can take parameters. For example, a script can set up a wireless configuration. You can create a parameter to tell the device which SSID to use.
How Do Scripts Run?Scripts run:
• When a user tells the system to run them.
• During a scheduled time.
• During a device event.
• When enabling or disabling a subscription.
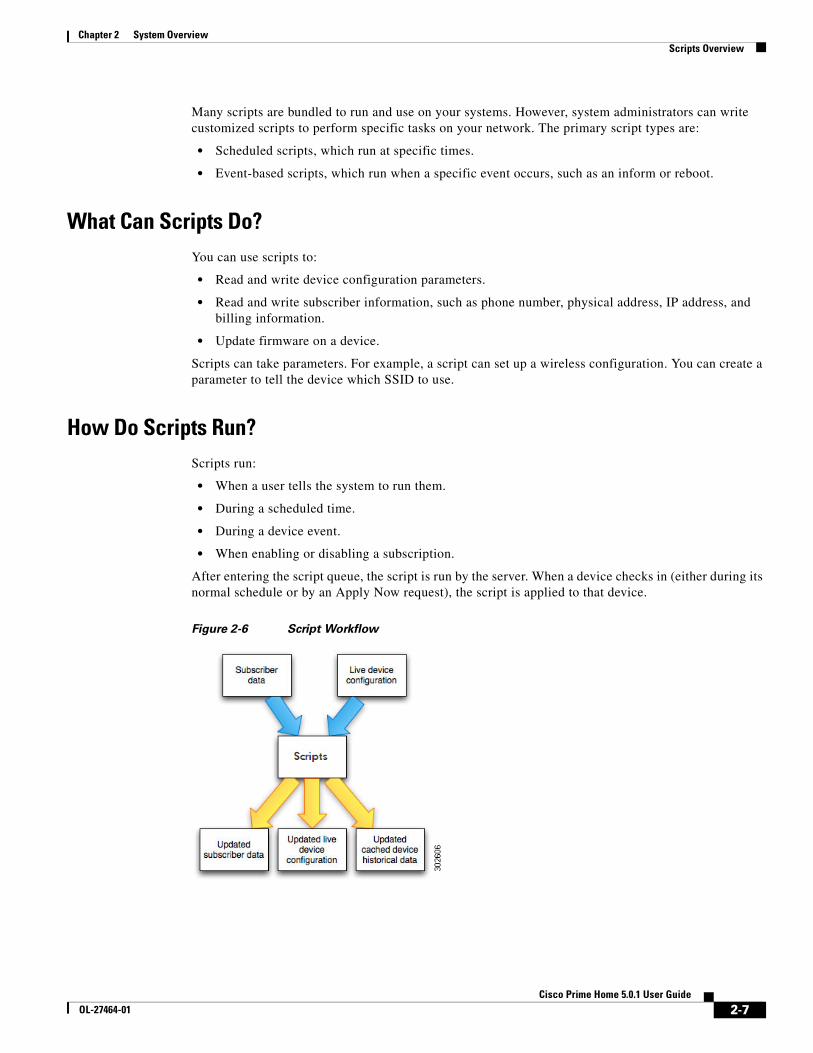
After entering the script queue, the script is run by the server. When a device checks in (either during its normal schedule or by an Apply Now request), the script is applied to that device.
Figure 2-6 Script Workflow
2-7Cisco Prime Home 5.0.1 User Guide
OL-27464-01

Chapter 2 System Overview Scripts Overview
Scripts enter the queue in one of the following ways:
• Directly (via the Scripts window or by using the search results to apply to a batch of devices).
• Through bulk operations.
• On a defined event, such as a first connect or reboot.
2-8Cisco Prime Home 5.0.1 User Guide
OL-27464-01
OL-27464-01
C H A P T E R 3
Customer Support OverviewThe Customer Support tab provides a central location for customer support representatives to manage subscribers and devices. You can perform the following customer service tasks:
• Search for subscribers or devices
– Select specific records
– Apply labels to selected subscribers or devices
• Create a new subscriber, device, or subscriber/device record
• Work with accounts (see Chapter 4, “Working with Accounts”)
• Work with services (see Chapter 5, “Working with Services”)
• Perform advanced functions (see Chapter 6, “Performing Advanced Tasks”)
Note Some tasks are restricted to users with the Admin role. The tasks available to you depend on how your Prime Home installation is configured.
Finding and Selecting Subscribers and DevicesBefore you can view or make changes to a subscriber or device, you must find the item in the Prime Home database. Prime Home provides robust search capabilities to help you locate information.
You can search for different kinds of subscriber and device data. You must enter the property terms exactly as specified below.
You can use a free-text search for some items, such as person name or subscriber code; for other items, you must precede the item by the property name.
3-1Cisco Prime Home 5.0.1 User Guide
Chapter 3 Customer Support Overview Finding and Selecting Subscribers and Devices
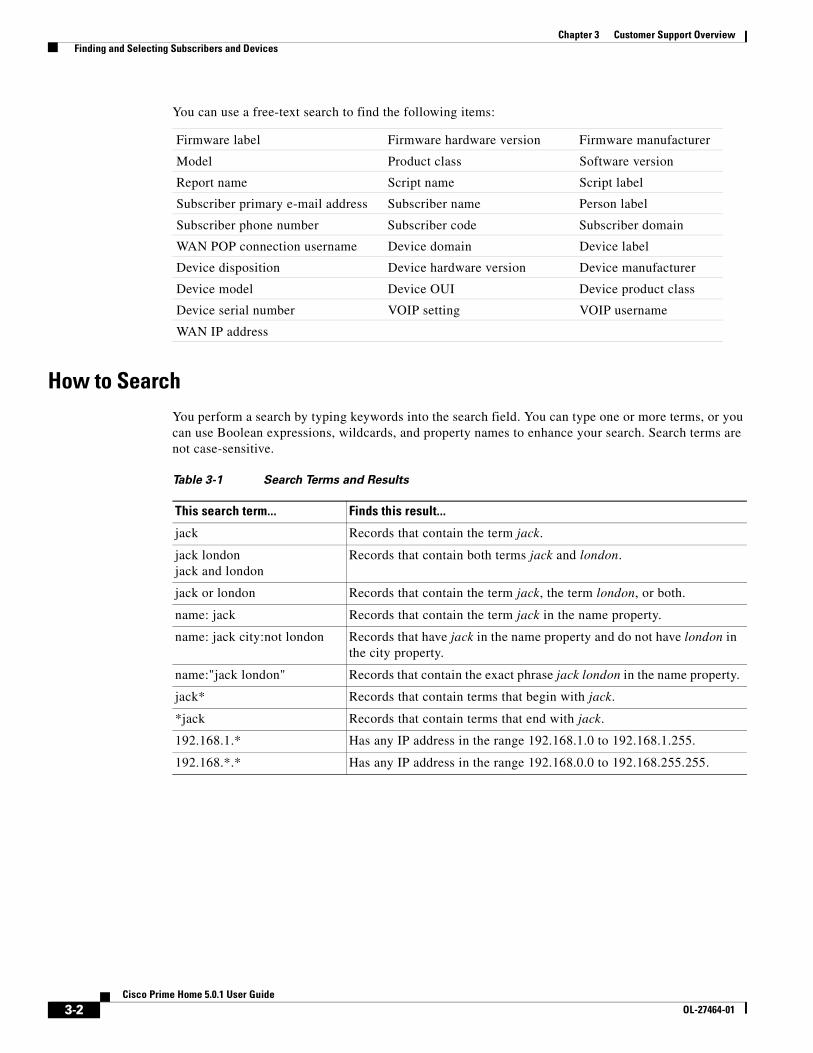
You can use a free-text search to find the following items:
How to SearchYou perform a search by typing keywords into the search field. You can type one or more terms, or you can use Boolean expressions, wildcards, and property names to enhance your search. Search terms are not case-sensitive.
Firmware label Firmware hardware version Firmware manufacturer
Model Product class Software version
Report name Script name Script label
Subscriber primary e-mail address Subscriber name Person label
Subscriber phone number Subscriber code Subscriber domain
WAN POP connection username Device domain Device label
Device disposition Device hardware version Device manufacturer
Device model Device OUI Device product class
Device serial number VOIP setting VOIP username
WAN IP address
Table 3-1 Search Terms and Results
This search term... Finds this result...
jack Records that contain the term jack.
jack londonjack and london
Records that contain both terms jack and london.
jack or london Records that contain the term jack, the term london, or both.
name: jack Records that contain the term jack in the name property.
name: jack city:not london Records that have jack in the name property and do not have london in the city property.
name:"jack london" Records that contain the exact phrase jack london in the name property.
jack* Records that contain terms that begin with jack.
*jack Records that contain terms that end with jack.
192.168.1.* Has any IP address in the range 192.168.1.0 to 192.168.1.255.
192.168.*.* Has any IP address in the range 192.168.0.0 to 192.168.255.255.
3-2Cisco Prime Home 5.0.1 User Guide
OL-27464-01
Chapter 3 Customer Support Overview Applying or Removing Labels for Multiple Records
Examples:
• city: Portland—Finds subscribers whose address includes Portland as the city.
• city: *land—Finds subscribers whose address includes a city name that ends with land.
• model: AG10*—Finds all devices with a model designation that starts with AG-10, such as AG10-NA1 and AG10W-NA2.
• personLabel: Promo10—Finds all subscribers who have the label Promo10.
• wanip:192.168.*.* deviceLabel:Version3 softwareVersion:3.7—Finds all devices with WAN IP addresses 192.168.0.0 through 192.168.255.255 that have a device label of Version3 and are running software version 3.7.
To perform a search:
Step 1 On the Customer Support tab, type the search term in the Find Subscriber or Device field.
Step 2 Press Enter.
Matching subscriber or device records appear on the Customer Support tab.
Selecting Subscribers or DevicesAfter you locate one or more subscribers or devices, you can select them for further processing, such as applying labels. You can also display a single subscriber or device.
To select one or more subscribers or devices, check the check box to the left of the desired subscribers or devices.
Note Depending on how your Prime Home installation is configured, selecting multiple accounts might be restricted to Admin users.
To display a single subscriber or device, click the blue text in the search results for that record, such as the subscriber name or device model number.
Applying or Removing Labels for Multiple RecordsWhen you have multiple records selected, you can apply subscriber or device labels to all of them. You can also remove labels. For information about defining labels, see Managing Labels, page 8-1.
To apply a label to multiple records:
Step 1 Search for the subscribers or devices you want to label.
Step 2 Select the records you want to label.
Step 3 Choose a label from the Add section of the Subscriber Labels or Device Labels menu.
3-3Cisco Prime Home 5.0.1 User Guide
OL-27464-01

Chapter 3 Customer Support Overview About New Accounts
To remove a label from multiple records:
Step 1 Search for the subscribers or devices for which you want to remove a label.
Step 2 Select the records for which you want to remove a label.
Step 3 Choose a label from the Remove section of the Subscriber Labels or Device Labels menu.
About New AccountsAn account usually consists of a subscriber and an associated device. Some accounts have only a subscriber or only a device.
Note Depending on how your Prime Home installation is configured, the ability to create accounts might be restricted to Admin users.
Creating new devices and subscribers is handled through the provisioning process. You use the Provisioning page to complete the following tasks:
• Create a new subscriber.
• Create a new device.
• Associate the subscriber with an existing device.
• Associate the device with an existing subscriber.
Creating a new subscriber establishes an account record for the subscriber and might associate the subscriber with a device. Provide the following information:
• Subscriber code—(Required) Unique code for the subscriber. You can use the subscriber’s phone number or any other unique identifier.
Note Your system administrator might set this field to require a specific number of digits. If you have problems creating a record, contact your system administrator.
• Name—(Optional) The subscriber’s full name.
• Email—(Optional) The subscriber’s e-mail address, which must be unique.
• Control panel login and password—Credentials the subscriber uses to log into the control panel. You can specify a password, or click Generate Password to generate a secure one.
3-4Cisco Prime Home 5.0.1 User Guide
OL-27464-01
Chapter 3 Customer Support Overview About New Accounts
Creating a new device sets up device information for a specific device and might associate it with a subscriber. You can use the following types of information to identify the device. The identifier you use must be unique within your system so it is recognized when the device checks in.
• Serial number and OUI—The device’s serial number and the first six hexadecimal digits of the device’s MAC address.
• Provisioning code—A unique code that you specify.
• Control panel provisioning ID—A unique identifier used to associate the device with the subscriber when it is installed. An installer uses this code to bring up the control panel after installing the device at the customer location. The control panel associates the device with the subscriber and applies previously specified settings. You can use this method to configure settings prior to knowing the specific device the customer will use.
Note You must specify a subscriber code when using the control panel provisioning ID. You cannot create a new device using this identifier unless you also create a subscriber or assign the device to an existing subscriber.
You must specify PPP credentials or allow the device to connect to your network with default credentials.
Creating a Subscriber or Device AccountTo create a new subscriber or device account:
Step 1 On the Customer Support tab, click Create New Subscriber/Device.
Step 2 In the Subscriber section of the Provisioning page, make sure the Create New Subscriber tab is selected.
Step 3 Enter subscriber identification information: subscriber code, full name, and e-mail address.
Note Your system might require a phone number or subscriber ID with a specific number of digits.
Step 4 Do one of the following:
• Check the Disable Control Panel check box.
• Provide a username and password for the subscriber’s control panel. You can click Generate Password to create a password.
Step 5 In the Assign Gateway section, make sure the New Device tab is selected.
Step 6 In the New Device section, enter a unique device identifier for the device, using serial number or OUI, provisioning code, or control panel provisioning ID.
Step 7 In the PPP Credentials section, do one of the following:
• Check the Use Default check box.
• Enter a username and password for PPP access.
3-5Cisco Prime Home 5.0.1 User Guide
OL-27464-01
Chapter 3 Customer Support Overview About New Accounts
Step 8 (Optional) Select a domain.
Step 9 Click Provision Device.
Prime Home displays the Customer Support page for the account. You can then enter additional information about the subscriber or device, enable services, or perform advanced tasks.
If you encounter errors, the errored fields are highlighted and more information about the error is displayed at the top of the page. Correct the errors and click Provision Device.
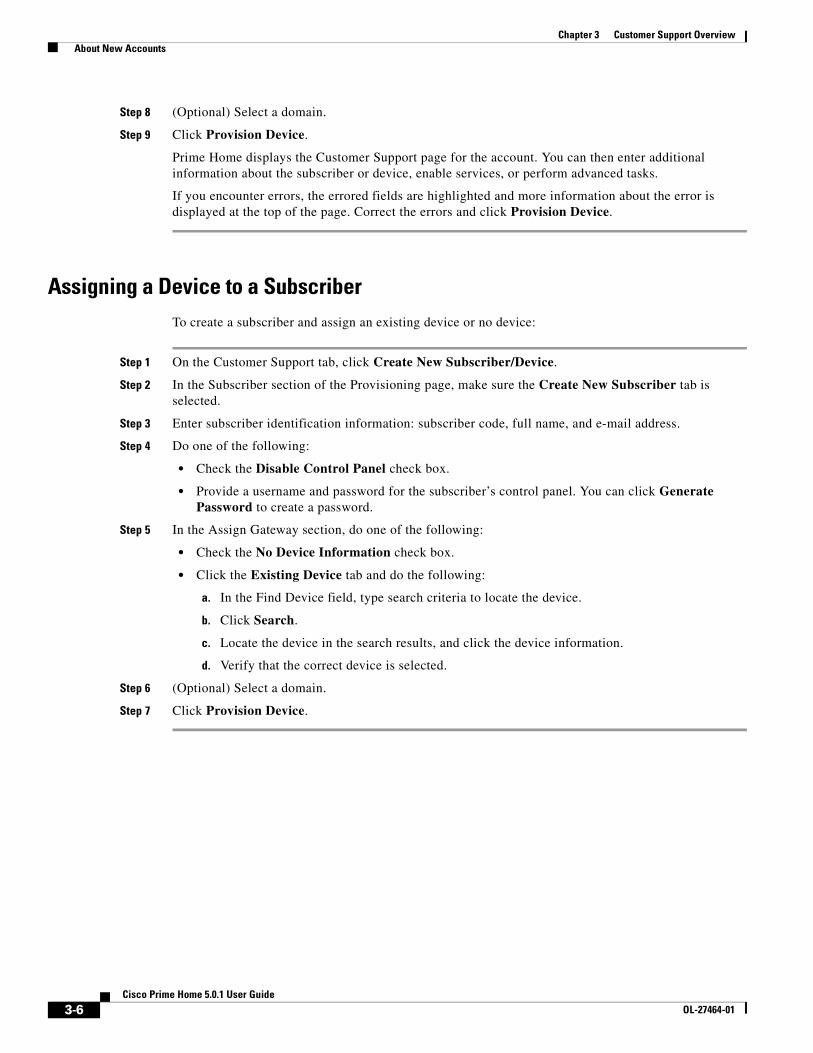
Assigning a Device to a SubscriberTo create a subscriber and assign an existing device or no device:
Step 1 On the Customer Support tab, click Create New Subscriber/Device.
Step 2 In the Subscriber section of the Provisioning page, make sure the Create New Subscriber tab is selected.
Step 3 Enter subscriber identification information: subscriber code, full name, and e-mail address.
Step 4 Do one of the following:
• Check the Disable Control Panel check box.
• Provide a username and password for the subscriber’s control panel. You can click Generate Password to create a password.
Step 5 In the Assign Gateway section, do one of the following:
• Check the No Device Information check box.
• Click the Existing Device tab and do the following:
a. In the Find Device field, type search criteria to locate the device.
b. Click Search.
c. Locate the device in the search results, and click the device information.
d. Verify that the correct device is selected.
Step 6 (Optional) Select a domain.
Step 7 Click Provision Device.
3-6Cisco Prime Home 5.0.1 User Guide
OL-27464-01
Chapter 3 Customer Support Overview About Saving Changes
Assigning a Subscriber to a DeviceTo create a device and assign an existing subscriber:
Step 1 On the Customer Support tab, click Create New Subscriber/Device.
Step 2 In the Subscriber section of the Provisioning page, do one of the following:
• Check the No Subscriber Information check box.
• Click the Assign Existing Subscriber tab and do the following:
a. In the Find Subscriber field, type search criteria to locate the subscriber.
b. Click Search.
c. Locate the subscriber in the search results, and click the subscriber information.
d. Verify that the correct subscriber is selected.
Step 3 In the New Device section, enter a unique device identifier for the device, using serial number or OUI, provisioning code, or control panel provisioning ID.
Step 4 In the PPP Credentials section, do one of the following:
• Check the Use Default check box.
• Enter a username and password for PPP access.
Step 5 (Optional) Select a domain.
Step 6 Click Provision Device.
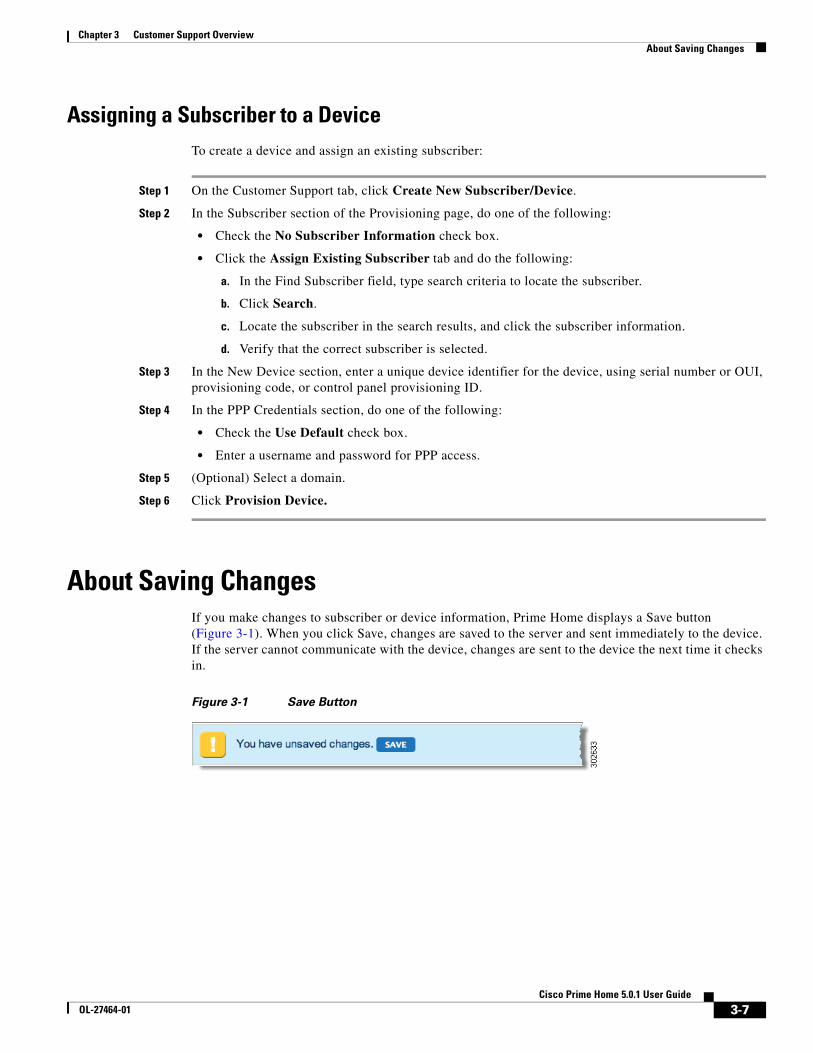
About Saving ChangesIf you make changes to subscriber or device information, Prime Home displays a Save button (Figure 3-1). When you click Save, changes are saved to the server and sent immediately to the device. If the server cannot communicate with the device, changes are sent to the device the next time it checks in.
Figure 3-1 Save Button
3-7Cisco Prime Home 5.0.1 User Guide
OL-27464-01

Chapter 3 Customer Support Overview About Saving Changes
3-8Cisco Prime Home 5.0.1 User Guide
OL-27464-01
OL-27464-01
C H A P T E R 4
Working with AccountsOnce you have created a Prime Home account, you can manage it. The tasks you can perform depend on the account and your user level. Some of the actions described in this section are available only to Admin users.
You can perform the following account management tasks:
• Manage subscriber information
• Manage devices
• Manage the local network
• View account status
Displaying an AccountTo display an account:
Step 1 Click the Customer Support tab.
Step 2 Enter search criteria and click Search.
Step 3 In the list of search results, click the blue text within the desired account.
An account window (Figure 4-1) displays summary information about the account in the banner at the top. If no subscriber or device is associated with the account, the banner displays clickable links that let you quickly make an assignment.
The left side of the window contains a list of account management tasks. To select an item, click it. For example, to perform an account management task, click view next to the task.
4-1Cisco Prime Home 5.0.1 User Guide

Chapter 4 Working with Accounts Working with Subscribers
Figure 4-1 Account Window
What Happens When You Display an AccountWhen you display an account, the following happen:
1. Initial text and data are loaded from the server (unless you disabled automatic refresh in your user profile).
2. The system attempts to contact the devices associated with the account to obtain updated data, unless the device is configured as not contactable.
– If the device is successfully contacted, a message is displayed and the data is updated as needed. At the bottom of the Status section in the banner, the Refresh Device Data button appears.
– If the device cannot be contacted, a message is displayed and the Status banner displays an alert.
Working with SubscribersUse the Subscriber window to manage individual subscriber data. The Subscriber window contains several sections of subscriber data.
To display the Subscriber window, click view.
Managing Subscriber InformationYou can view subscriber identification, address, and phone information. Whether you can edit these items depends on how your Prime Home installation is configured.
4-2Cisco Prime Home 5.0.1 User Guide
OL-27464-01
Chapter 4 Working with Accounts Working with Subscribers
Identification Information
Basic subscriber information includes the following:
• Subscriber code—The unique code assigned to the subscriber when the account was created. Phone numbers are frequently used as subscriber codes.
• Name—The subscriber’s full name.
• Email—The subscriber’s e-mail address.
To edit subscriber information:
Step 1 Click the desired field and add or change information.
Step 2 Click Save.
Address and Phone Information
The Subscriber window displays addresses and phone numbers for the subscriber. Subscribers can have several addresses and phone numbers associated with their account.
To add an address or phone number:
Step 1 Click Add Address or Add Phone.
Step 2 Enter the desired information.
Step 3 Click Save.
Step 4 To delete an address or phone number, click the Remove button associated with the address or phone number.
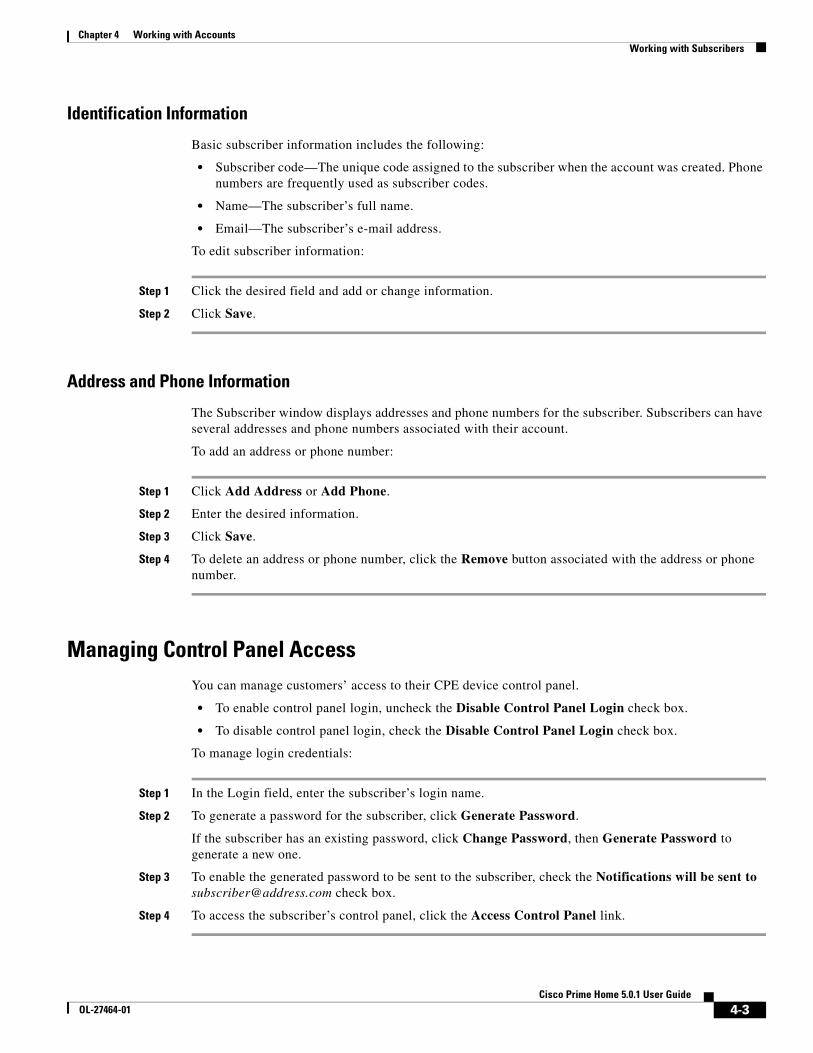
Managing Control Panel AccessYou can manage customers’ access to their CPE device control panel.
• To enable control panel login, uncheck the Disable Control Panel Login check box.
• To disable control panel login, check the Disable Control Panel Login check box.
To manage login credentials:
Step 1 In the Login field, enter the subscriber’s login name.
Step 2 To generate a password for the subscriber, click Generate Password.
If the subscriber has an existing password, click Change Password, then Generate Password to generate a new one.
Step 3 To enable the generated password to be sent to the subscriber, check the Notifications will be sent to [email protected] check box.
Step 4 To access the subscriber’s control panel, click the Access Control Panel link.
4-3Cisco Prime Home 5.0.1 User Guide
OL-27464-01
Chapter 4 Working with Accounts Working with Subscribers
Managing Subscriber LabelsLabels can be used to tag subscribers. For example, you might tag subscribers who signed up for a specific promotional program. Labels can alert you to information about a subscriber, and you can search for subscribers with a specific label. Your system administrator sets up the available labels. For more information about setting up labels, see Managing Labels, page 8-1.
To assign a label:
Step 1 From the Add section of the Labels menu, choose a label.
The label appears in the Label section of the Subscriber window.
Step 2 Click Save.
To remove a label:
Step 1 From the Remove section of the Labels menu, choose a label.
The label is removed from the Label section of the Subscriber window.
Step 2 Click Save.
Deleting a SubscriberDeleting a subscriber permanently removes all information about the subscriber from your system. Deleting the subscriber does not delete the associated device; the device and its settings remain in the system after a subscriber is deleted.
Caution Make sure you really want to delete a subscriber. Information about the subscriber cannot be retrieved after being deleted.
To delete a subscriber:
Step 1 In the Delete section of the Subscriber window, click Delete Subscriber.
Step 2 In the confirmation dialog box, click OK.
4-4Cisco Prime Home 5.0.1 User Guide
OL-27464-01
Chapter 4 Working with Accounts Managing Devices
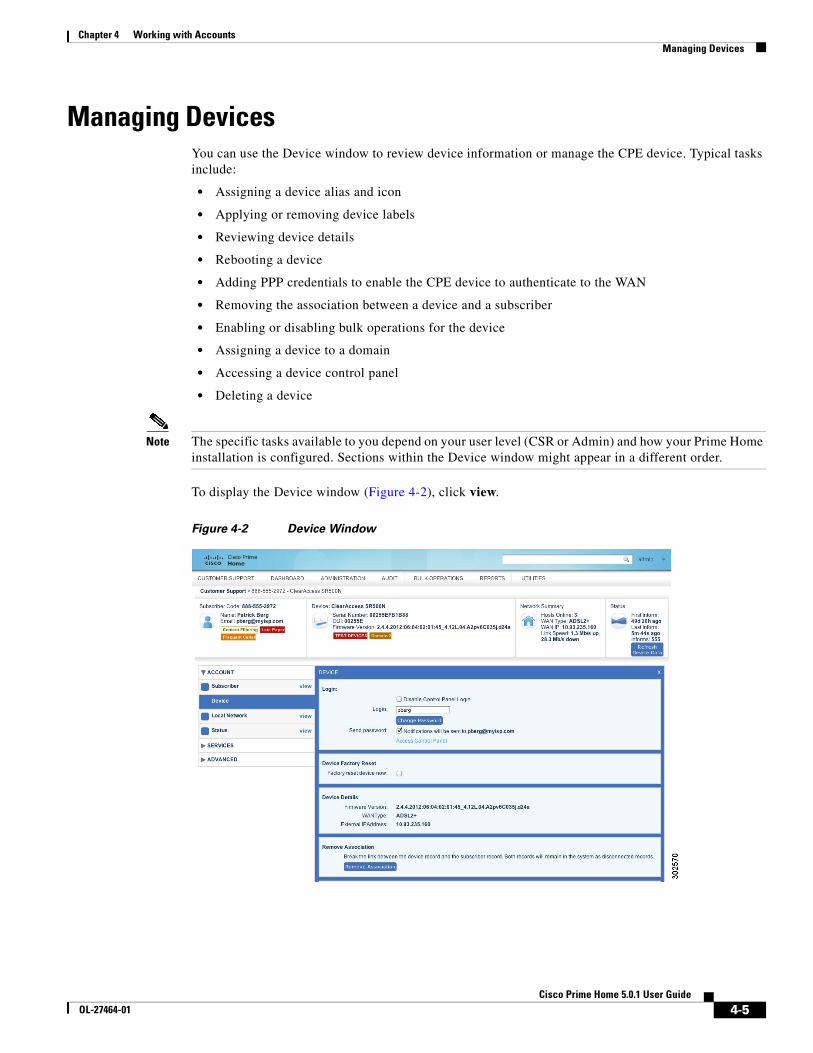
Managing DevicesYou can use the Device window to review device information or manage the CPE device. Typical tasks include:
• Assigning a device alias and icon
• Applying or removing device labels
• Reviewing device details
• Rebooting a device
• Adding PPP credentials to enable the CPE device to authenticate to the WAN
• Removing the association between a device and a subscriber
• Enabling or disabling bulk operations for the device
• Assigning a device to a domain
• Accessing a device control panel
• Deleting a device
Note The specific tasks available to you depend on your user level (CSR or Admin) and how your Prime Home installation is configured. Sections within the Device window might appear in a different order.
To display the Device window (Figure 4-2), click view.
Figure 4-2 Device Window
4-5Cisco Prime Home 5.0.1 User Guide
OL-27464-01
Chapter 4 Working with Accounts Managing Devices
Assigning a Device Alias and IconYou can specify an alias for the device and apply an icon to facilitate identification. If none of the supplied icons are appropriate, you can specify a URL where an icon is located. The alias and icon appear in the Device section of the account banner.
To set up an alias and icon for a device:
Step 1 In the Device Identification section, click Rename Device.
Step 2 In the Device Alias field, enter the desired alias.
Step 3 Click the Change icon.
Step 4 Do one of the following:
• Select a device icon
• Specify the URL to an icon
Step 5 Click OK.
To remove a device alias and icon:
Step 1 In the Device Identification section, click Rename Device.
Step 2 Click Remove Device Alias & Icon.
Step 3 In the confirmation dialog box, click Delete Alias & Icon.
Working with Device LabelsDevice labels are defined by your system administrator. You can apply new labels or remove existing ones. There is no limit to the number of labels you can apply.
To apply a device label, click the Labels menu and select a label from the Add section of the menu.
To remove a device label, click the Labels menu and select a label from the Remove section of the menu.
Viewing Device InformationThe Device window displays the manufacturer, model, serial number, firmware version, WAN type, IP address, and so on.
4-6Cisco Prime Home 5.0.1 User Guide
OL-27464-01

Chapter 4 Working with Accounts Managing Devices
Rebooting a DeviceTo immediately reboot a device:
Step 1 In the Device Reboot section, check the Reboot device now check box.
Step 2 Click Save.
Adding and Removing PPP CredentialsSome ISPs require the CPE device to authenticate using PPP. You must resynchronize the information so that the PPP credentials are sent to the CPE device.
To add PPP credentials:
Step 1 In the PPP Credentials section, click Add PPP Credentials.
Step 2 Enter a username and password.
Step 3 Check the Resync PPP information check box.
Step 4 Click Save.
To remove PPP credentials:
Step 1 In the PPP Credentials section, click Remove.
Step 2 Check the Resync PPP information check box.
Step 3 Click Save.
Enabling or Disabling Bulk OperationsIf you enable bulk operations for a device, it can participate in actions that affect many devices simultaneously. For example, you can update firmware, enable a service, or set a default configuration for a group of devices. For more information about bulk operations, see Chapter 10, “Managing Bulk Operations.”
• To enable bulk operations, check the Participates in Bulk Operations check box.
• To disable bulk operations, uncheck the Participates in Bulk Operations check box.
Assigning a Device to a DomainYou can assign a device to a specific domain. Domains can be used to restrict access to a group of CSRs or to group the devices.
To assign a device to a domain, choose a domain from the Domain menu.
4-7Cisco Prime Home 5.0.1 User Guide
OL-27464-01
Chapter 4 Working with Accounts Managing the Local Network
Removing the Association Between a Device and a SubscriberRemoving an association breaks the link between a device and subscriber, but leaves the device and subscriber records available in the system.
To remove a subscriber/device association, click Remove Association.
Deleting a DeviceDeleting a device removes its association with a subscriber (if one exists), and deletes all information about the device from the system.
To delete a device, click Delete Device.
Managing the Local NetworkThe Local Network window displays information about any LAN devices attached to the subscriber’s CPE device. The LAN devices might be physically attached, or if wireless networking is enabled, might be communicating wirelessly with the device.
You can view link throughput and the number of known LAN devices and actual devices online. You can also assign icons to devices and name them, and delete disconnected devices from the LAN.
Some local network devices (such as webcams) might have a local interface web service that lets you manage the device configuration. Prime Home can be used to set up a link to this interface that appears in the user’s control panel. It also sets up a port forward that allows the interface to be accessed from the internet.
If a device supports a local interface, its manual provides information on the port or path required to access the local interface. The device must be online to configure this link.
Viewing Local Network StatusThe information displayed in the Local Network window can be useful for troubleshooting. For example, if a subscriber is running an unsecured wireless network, there might be unauthorized users who are impacting service. You can see device IP and MAC addresses, device status, connection type, and any applied services.
If the device is wireless, the Connections column shows the type of Wi-Fi (b, g, or n) and a graph indicating the signal strength.
If the device supports it, you can enable a local interface. You can also delete offline devices. For more information about working with services for specific devices, see Chapter 5, “Working with Services.”
To display the Local Network window (Figure 4-3), click view.
4-8Cisco Prime Home 5.0.1 User Guide
OL-27464-01

Chapter 4 Working with Accounts Managing the Local Network
Figure 4-3 Local Network Window
Naming a LAN DeviceTo name or rename a device:
Step 1 In the Local Network window, click the icon in the Device column.
Step 2 Type a name for the device.
Step 3 If desired, select an icon for the device.
Step 4 Click OK.
Some devices support a browser-based local interface for configuration. Review the documentation for the device to determine the port number or path needed to access the device.
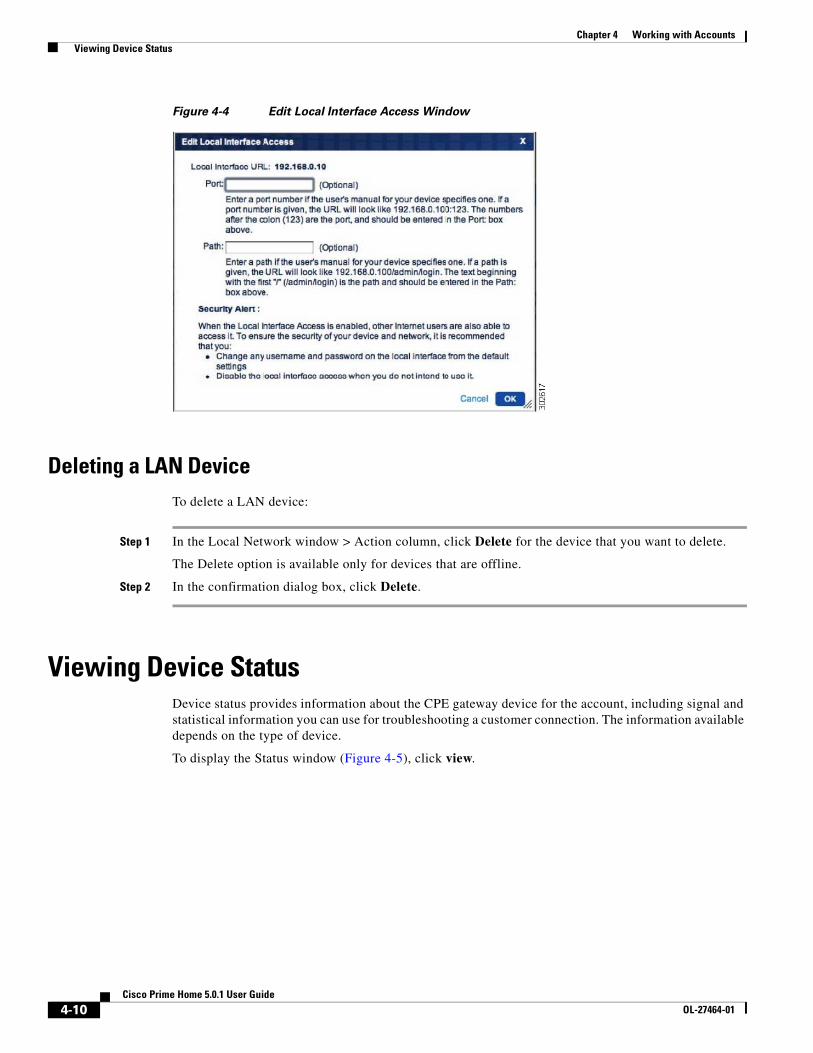
Enabling Local Interface AccessTo enable local interface access:
Step 1 In the Local Network window, click Enable in the Local Interface column.
Step 2 If applicable, enter the port number or path (see Figure 4-4); then, click OK.
Step 3 Save the changes to see the new link.
Step 4 To disable local interface access, click Disable in the Local Interface column.
4-9Cisco Prime Home 5.0.1 User Guide
OL-27464-01
Chapter 4 Working with Accounts Viewing Device Status
Figure 4-4 Edit Local Interface Access Window
Deleting a LAN DeviceTo delete a LAN device:
Step 1 In the Local Network window > Action column, click Delete for the device that you want to delete.
The Delete option is available only for devices that are offline.
Step 2 In the confirmation dialog box, click Delete.
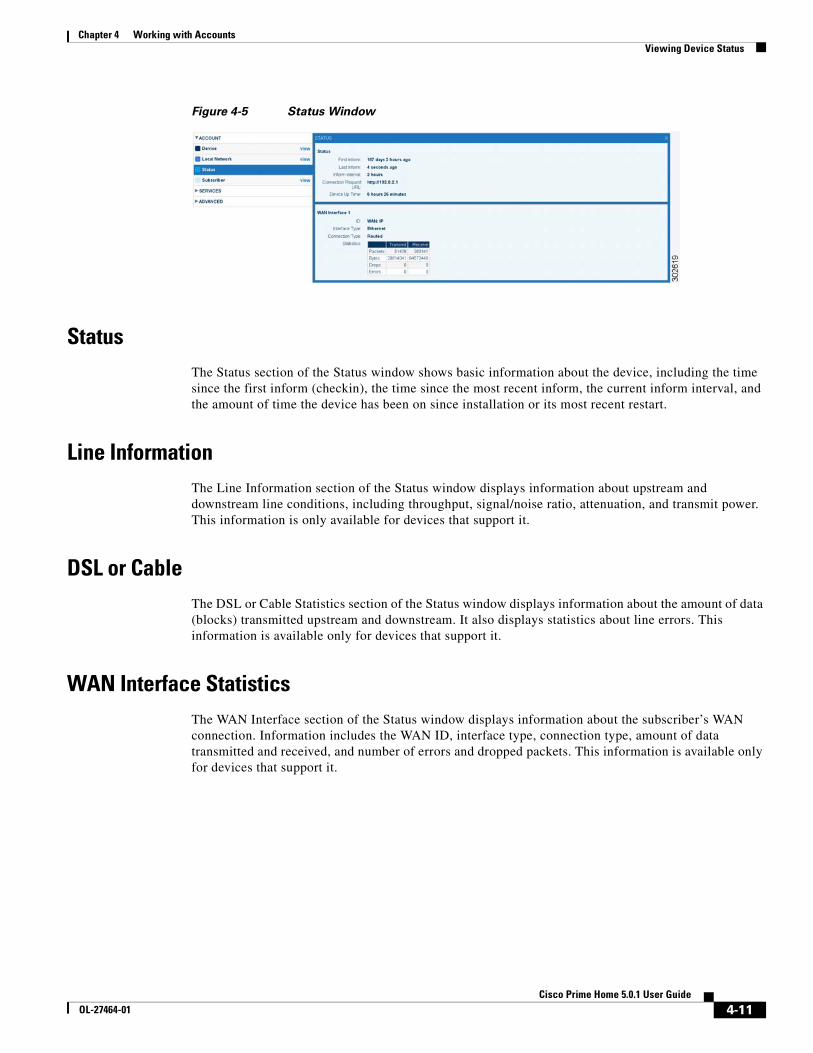
Viewing Device StatusDevice status provides information about the CPE gateway device for the account, including signal and statistical information you can use for troubleshooting a customer connection. The information available depends on the type of device.
To display the Status window (Figure 4-5), click view.
4-10Cisco Prime Home 5.0.1 User Guide
OL-27464-01
Chapter 4 Working with Accounts Viewing Device Status
Figure 4-5 Status Window
StatusThe Status section of the Status window shows basic information about the device, including the time since the first inform (checkin), the time since the most recent inform, the current inform interval, and the amount of time the device has been on since installation or its most recent restart.
Line InformationThe Line Information section of the Status window displays information about upstream and downstream line conditions, including throughput, signal/noise ratio, attenuation, and transmit power. This information is only available for devices that support it.
DSL or CableThe DSL or Cable Statistics section of the Status window displays information about the amount of data (blocks) transmitted upstream and downstream. It also displays statistics about line errors. This information is available only for devices that support it.
WAN Interface StatisticsThe WAN Interface section of the Status window displays information about the subscriber’s WAN connection. Information includes the WAN ID, interface type, connection type, amount of data transmitted and received, and number of errors and dropped packets. This information is available only for devices that support it.
4-11Cisco Prime Home 5.0.1 User Guide
OL-27464-01

Chapter 4 Working with Accounts Viewing Device Status
4-12Cisco Prime Home 5.0.1 User Guide
OL-27464-01
OL-27464-01
C H A P T E R 5
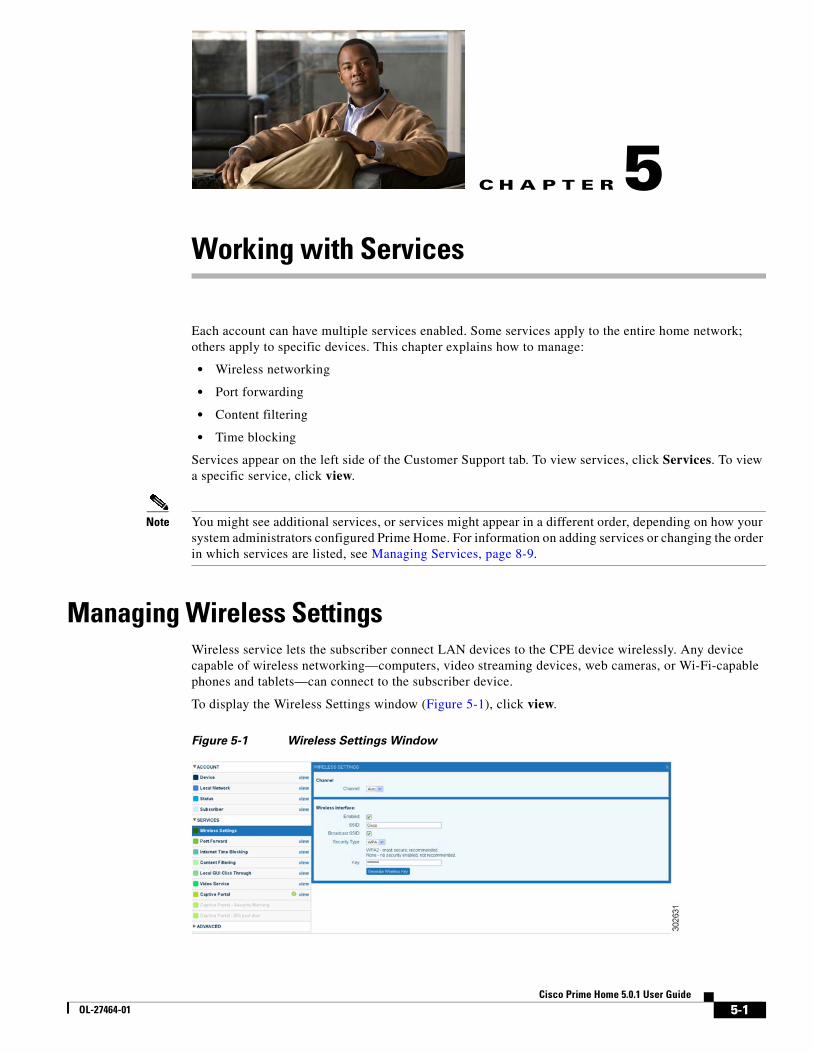
Working with ServicesEach account can have multiple services enabled. Some services apply to the entire home network; others apply to specific devices. This chapter explains how to manage:
• Wireless networking
• Port forwarding
• Content filtering
• Time blocking
Services appear on the left side of the Customer Support tab. To view services, click Services. To view a specific service, click view.
Note You might see additional services, or services might appear in a different order, depending on how your system administrators configured Prime Home. For information on adding services or changing the order in which services are listed, see Managing Services, page 8-9.
Managing Wireless SettingsWireless service lets the subscriber connect LAN devices to the CPE device wirelessly. Any device capable of wireless networking—computers, video streaming devices, web cameras, or Wi-Fi-capable phones and tablets—can connect to the subscriber device.
To display the Wireless Settings window (Figure 5-1), click view.
Figure 5-1 Wireless Settings Window
5-1Cisco Prime Home 5.0.1 User Guide
Chapter 5 Working with Services Managing Wireless Settings
About Wireless SettingsTo enable wireless service, specify the following parameters in the Wireless Settings window:
• Channel—Is typically set to Auto to enable the device to select a channel. However, if there are many devices using the same channel in close proximity, performance is enhanced by selecting a specific channel. Channels are numbered 1 through 11.
Note If the subscriber has multiple wireless services, they must all be set to the same channel.
• Enabled—Turns the CPE device’s wireless capabilities on or off.
• SSID—Displays the CPE device ID; typically a word, code, or short phrase. Compatible devices can choose from available SSIDs to connect. Administrators can set the SSID, or subscribers can set it for their devices from their control panel.
If the device supports multiple SSIDs, each one has its own interface section where it can be enabled and disabled independently and the SSID and security type can be set.
• Broadcast SSID—Specifies whether the SSID is broadcast to available devices, or whether users must know the SSID to connect.
• Restore Factory SSID—Restores the SSID to the original value from the first time the device checked in with the system. This button appears only for devices that support this capability.
• Security type—Is one of the following:
• Key—Is a password or phrase used to establish secure communications. You can specify a key, or Prime Home can generate one for you. Subscribers must know the key to connect LAN devices to the wireless access point. All security types except None require a key.
None No password is needed to connect a LAN device to the network. Anyone can connect. None is the least secure setting for a local network.
WAP Wi-Fi Access Protected (WAP) provides more security than Wireless Equivalent Privacy (WEP). WAP is backward-compatible with WEP.
WAP2 Wi-Fi Access Protected 2 (WAP2) uses AES encryption and provides the highest level of security available for local networks.
Mixed Mixed allows devices using WEP, WAP, and WAP2 to connect.
WEP WEP uses stream cipher RC4 encryption for confidentiality protection and CRC-32 for integrity assurance. WEP is the least secure encryption method.
5-2Cisco Prime Home 5.0.1 User Guide
OL-27464-01
Chapter 5 Working with Services Managing Port Forwarding
Enabling Wireless ServiceTo enable wireless service:
Step 1 In the Wireless Settings window, click Enable to enable the wireless function on the device.
Step 2 Check the Enabled check box to enable the wireless service from the provider.
Step 3 Specify the SSID and any SSID options. The SSID is from 1 to 32 characters and cannot contain the following:
’ " & < > \
Step 4 From the Security Type menu, choose a security type.
Step 5 In the Key field, do one of the following:
• Specify a security key. Depending on the security type selected, passwords must meet the following requirements:
– WEP—5 to 13 characters.
– WPA/WPA2—8 to 30 characters. Cannot contain ’ " & < > \.
• Click Generate Wireless Key to generate a key.
Step 6 Click Save.
Disabling Wireless ServiceTo disable wireless service:
Step 1 In the Wireless Settings window, click Disable.
Step 2 Click Save.
Managing Port ForwardingPort forwarding lets you specify ports that are open for communication. By default, the subscriber device blocks access to most ports. If an application requires other ports, you must specifically open them.
If a customer cannot use an application, you must determine which ports need to be open.
Port forwarding is specific to a device. To avoid conflicts, each port forward should be applied to only one device. Some CPE devices do not allow conflicting port forwards to be set; others do. Prime Home allows you to assign conflicting port forwards, but it flags them.
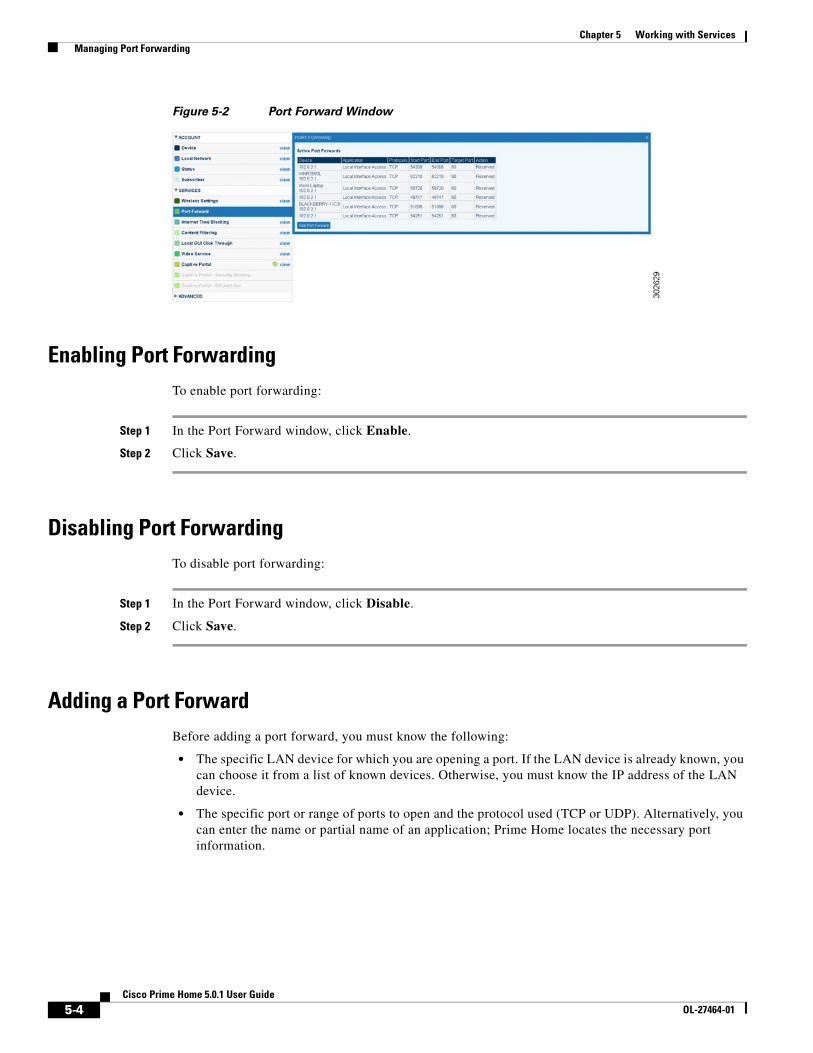
To display the Port Forward window (Figure 5-2), click view.
5-3Cisco Prime Home 5.0.1 User Guide
OL-27464-01
Chapter 5 Working with Services Managing Port Forwarding
Figure 5-2 Port Forward Window
Enabling Port ForwardingTo enable port forwarding:
Step 1 In the Port Forward window, click Enable.
Step 2 Click Save.
Disabling Port ForwardingTo disable port forwarding:
Step 1 In the Port Forward window, click Disable.
Step 2 Click Save.
Adding a Port ForwardBefore adding a port forward, you must know the following:
• The specific LAN device for which you are opening a port. If the LAN device is already known, you can choose it from a list of known devices. Otherwise, you must know the IP address of the LAN device.
• The specific port or range of ports to open and the protocol used (TCP or UDP). Alternatively, you can enter the name or partial name of an application; Prime Home locates the necessary port information.
5-4Cisco Prime Home 5.0.1 User Guide
OL-27464-01
Chapter 5 Working with Services Managing Content Filtering
To add a port forward:
Step 1 In the Port Forward window, click Add Port Forward.
Step 2 In the Add Port Forwards window, choose the LAN device for the port forward. Do one of the following:
• Choose Select Device, and from the Select Device menu, choose a known LAN device. You can only add port forwards to devices that are currently online.
• Choose Enter IP Address and enter the IP address of the LAN device.
Step 3 Specify the port by doing one of the following:
• Choose Enter Custom. Enter the application name and protocol (TCP or UDP). Specify a range of port numbers by entering a starting port number and an ending port number. Specify the target port number.
• Choose From List. Enter the name or partial name of the application. Once you type three or more characters, a list of potential matches appears. If the application you want is in the list, select its name. The port numbers are displayed.
Step 4 Click OK; then, click Save.
Deleting a Port ForwardTo delete a port forward:
Step 1 In the Port Forward window, locate the port forward you want to delete.
Step 2 Click Delete.
Step 3 Click Save to save your changes.
Managing Content FilteringContent filtering lets subscribers block inappropriate web content. You can set content filters at four levels, or specify no content filtering. Subscribers can create lists of specific sites to allow or block. You can apply filter settings to the entire network or to specific devices. Subscribers can change these settings in their control panel.
Note Filter level names and categories are configured in a special configuration file. Configuration options can be set to disallow access if the content rating service is unavailable, if a site is unrated, or if the site is secure (https). For assistance with the content filtering configuration file, contact Cisco Advanced Services.
5-5Cisco Prime Home 5.0.1 User Guide
OL-27464-01
Chapter 5 Working with Services Managing Content Filtering
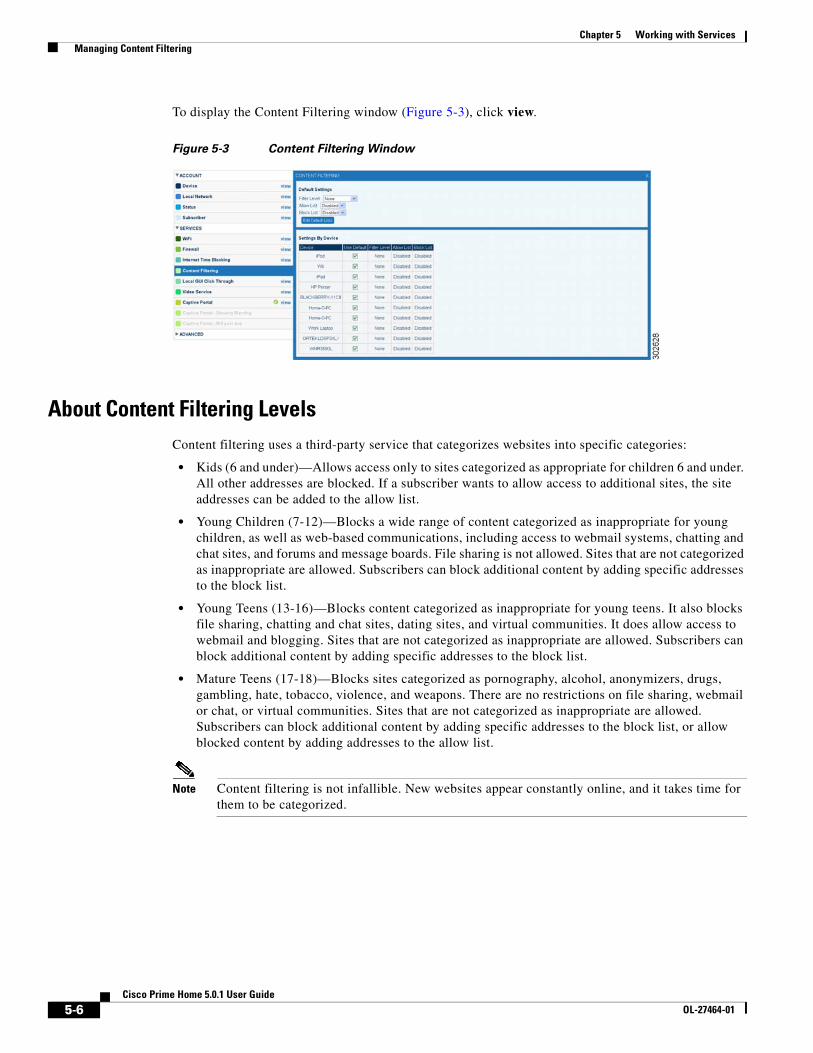
To display the Content Filtering window (Figure 5-3), click view.
Figure 5-3 Content Filtering Window
About Content Filtering LevelsContent filtering uses a third-party service that categorizes websites into specific categories:
• Kids (6 and under)—Allows access only to sites categorized as appropriate for children 6 and under. All other addresses are blocked. If a subscriber wants to allow access to additional sites, the site addresses can be added to the allow list.
• Young Children (7-12)—Blocks a wide range of content categorized as inappropriate for young children, as well as web-based communications, including access to webmail systems, chatting and chat sites, and forums and message boards. File sharing is not allowed. Sites that are not categorized as inappropriate are allowed. Subscribers can block additional content by adding specific addresses to the block list.
• Young Teens (13-16)—Blocks content categorized as inappropriate for young teens. It also blocks file sharing, chatting and chat sites, dating sites, and virtual communities. It does allow access to webmail and blogging. Sites that are not categorized as inappropriate are allowed. Subscribers can block additional content by adding specific addresses to the block list.
• Mature Teens (17-18)—Blocks sites categorized as pornography, alcohol, anonymizers, drugs, gambling, hate, tobacco, violence, and weapons. There are no restrictions on file sharing, webmail or chat, or virtual communities. Sites that are not categorized as inappropriate are allowed. Subscribers can block additional content by adding specific addresses to the block list, or allow blocked content by adding addresses to the allow list.
Note Content filtering is not infallible. New websites appear constantly online, and it takes time for them to be categorized.
5-6Cisco Prime Home 5.0.1 User Guide
OL-27464-01
Chapter 5 Working with Services Managing Content Filtering
How Content Filtering WorksWhen content filtering features are enabled, the system goes through a series of checks to determine whether to allow a request from a particular device on the subscriber’s network. The results vary depending on what type of filtering features are enabled, such as allow lists, block lists, content filtering, or time blocking. It is important to understand the interactions among these features to be able to troubleshoot specific site access issues.
Note If an allow list is active, but a category filter has not been applied, access is blocked to all addresses not on the allow list. The assumption is that if an allow list has been provided with no category filter specified, the desire is to limit access to only the addresses specified on the allow list.
If a category filter has been applied, access is allowed to items on the allow list that would normally be blocked by the category filter. In all cases, if a block list is active, access to items on the block list is blocked, regardless of any category filter applied.
When the in-home device receives a request for a web page, it does the following in this order:
1. Checks to see if a block list is active for the device. If a block list is active, it checks the address against the block list. If the address is on the block list, access is blocked.
2. Checks to see if Time Blocking is enabled. If access during the current time is not allowed, access is blocked. (For information about restricting access by time, see Managing Time Blocking, page 5-10.)
3. Checks to see if an allow list is active for the device. If the address is on the allow list, access is allowed.
4. Checks to see if a filter level (Kids, Young Children, and so on) has been applied.
• If no filter level has been applied, but an allow list is active, access is not allowed unless the address is on the allow list.
• If a category filter has been applied, the device sends the site address (URL) to the content rating service. The content rating service returns information about the category.
— If the site is in a category banned by the filter, access is blocked.
— If the site is not in a category banned by the filter or is unrated, access is allowed.
— If the Kids filter category is applied, access is allowed only if the site is rated appropriate for children 6 and under.
Note Prime Home can be configured to block access if the content rating service is unavailable, if the site has not been rated or categorized, or if the site is secure (https).
The following examples show how content filtering works.
Example 1: Allow list applied. Category filter set to Kids.
The user requests access to a site.
The device checks the allow list, which contains that site. Access is allowed. Because the site is on the allow list, it does not need to check with the content rating service.
5-7Cisco Prime Home 5.0.1 User Guide
OL-27464-01

Chapter 5 Working with Services Managing Content Filtering
Example 2: Allow list applied. Category filter is not applied.
The user requests access to a site.
The device checks the allow list, which does not contain that site. Because no category filter is applied, it does not send the URL to the content rating service. Because an allow list is active without a category filter, it does not allow access to other sites. Access is blocked.
Example 3: Block list applied. Category filter set to Young Teens.
The user requests access to a chat site.
The device checks the block list, which does not include that site. It then checks time blocking to see if access is allowed at this time. It sends the site address to the content rating service. The service returns a category of Chat, which is not allowed under the Young Teens category. Access is blocked.
Example 4: Allow list applied. Category filter set to Young Teens.
The user requests access to a site.
The device checks the block list, which does not include that site. It then checks time blocking to see if access is allowed at this time. The device checks the allow list, which contains that site. Access is allowed.
Example 5: Allow list applied. Category filter set to Young Teens. Time blocking applied.
The user requests access to a site.
The device checks the block list, which does not include that site. It then checks time blocking, which shows that the device is not available for use at the current time. Access is blocked.
Enabling the Content Filtering ServiceTo quickly enable content filtering for a subscriber:
Step 1 In the Content Filtering window, click Enable.
Step 2 Click Save.
Disabling the Content Filtering ServiceTo quickly disable content filtering for a subscriber:
Step 1 In the Content Filtering window, click Disable.
Step 2 Click Save.
5-8Cisco Prime Home 5.0.1 User Guide
OL-27464-01
Chapter 5 Working with Services Managing Content Filtering
Managing Default Content Filtering SettingsThe default settings apply to LAN devices that join the network after the default is applied. They do not affect existing devices already connected unless they are set to use the default setting. You can set a filter level and enable or disable allow and block lists.
You also use the default settings to edit allow and block lists. These lists can then be applied to individual devices. An allow or block list is simply a list of website domains that the subscriber’s device allows or blocks access to. Allow and block lists override the filter-level setting. For example, if the filter allows access to a particular site, but you place it on a block list, that site is blocked.
To set default content filtering settings:
Step 1 In the Default Settings section of the Content Filtering window, choose a default filtering level from the Filter Level menu.
Step 2 From the Allow List menu, choose Enabled to enable the list or Disabled to disable the list.
Step 3 From the Block List menu, choose Enabled to enable the list or Disabled to disable the list.
Step 4 Click Save.
Step 5 Edit the default allow and block lists by doing the following:
a. Click Edit Default Lists.
b. In the allow/block list editor, enter the domain names for allowed and blocked websites. Enter only one domain name per row.
c. Click OK; then, click Save.
Managing Content Filtering for Specific LAN DevicesYou can set content filtering for specific LAN devices. For example, a subscriber might want to filter content for computers used by children in the household, but not for computers used by adults. Each device can have its own filter level, and you can enable or disable the allow or block lists for each device. Individual devices use the allow and block lists set up in Default Settings. You cannot create separate lists for each device.
To set content filtering for specific devices:
Step 1 In the Settings by Device section of the Content Filtering window, choose a filter level for each device.
Step 2 Enable or disable the allow list for each device.
Step 3 Enable or disable the block list for each device.
Step 4 Click Save.
Step 5 To reset content filtering for a specific device so it uses the network default, check the Use Default check box for that device.
5-9Cisco Prime Home 5.0.1 User Guide
OL-27464-01

Chapter 5 Working with Services Managing Time Blocking
Managing Time BlockingTime blocking lets subscribers restrict local network access to certain hours. They can also add a bonus time, which is a period of additional time available during periods when access is restricted.
Time blocking settings can be applied to the entire home network or to specific devices on the network. Subscribers can view and change these settings in their control panel.
To display the Internet Time Blocking window (Figure 5-4), click view.
Figure 5-4 Internet Time Blocking Window
Enabling Time BlockingTo quickly enable time blocking:
Step 1 In the Internet Time Blocking window, click Enable.
Step 2 Click Save.
Disabling Time BlockingTo quickly disable time blocking:
Step 1 In the Internet Time Blocking window, click Disable.
Step 2 Click Save.
5-10Cisco Prime Home 5.0.1 User Guide
OL-27464-01

Chapter 5 Working with Services Managing Time Blocking
Managing Default Time Blocking SettingsDefault settings specify the local time zone and apply to the entire home network.
Note Time blocking settings for specific devices override the default settings. Any devices that join the network after the default is set up use the default time blocking settings.
To set default time blocking settings:
Step 1 In the Default Settings section of the Internet Time Blocking window, choose a time zone from the Time Zone menu.
Step 2 Under Night Blocking, choose to block or unblock network access during specific hours for weekdays and weekends. If you choose Block, specify the hours during which access is blocked.
Step 3 Click Save.
Managing Time Blocking for Specific DevicesYou can apply time limits, night blocking, and bonus time to specific LAN devices. Once a LAN device has been recognized by the system, its blocking information continues in effect even if it leaves the network for a period. For example, if a laptop that is night blocked is removed from the network for a week, night blocking resumes when the laptop returns to the network.
Note Time blocking limits apply only when a device is connected to the local network. If the device connects to a different network, the limits do not apply.
To set time blocking for specific devices:
Step 1 In the Settings by Device section of the Internet Time Blocking window, click a device name.
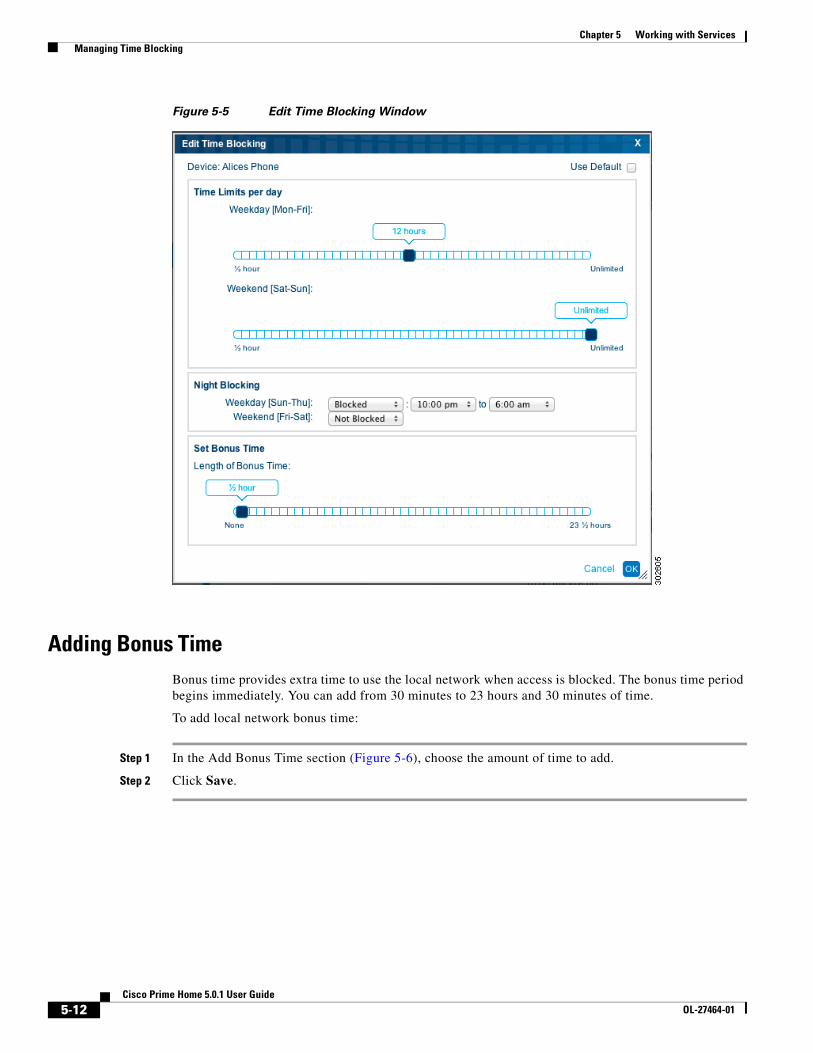
Step 2 In the Edit Time Blocking window (Figure 5-5), uncheck the User Default check box.
Step 3 Use the sliders to choose the number of hours per day the device can access the local network per weekday and per weekend day.
Step 4 For night blocking, choose whether the device is blocked during the night for weekdays or weekends. Specify the time periods for weekday and weekend night blocking.
Step 5 (Optional) Add bonus time.
Step 6 Click OK; then, click Save.
5-11Cisco Prime Home 5.0.1 User Guide
OL-27464-01
Chapter 5 Working with Services Managing Time Blocking
Figure 5-5 Edit Time Blocking Window
Adding Bonus TimeBonus time provides extra time to use the local network when access is blocked. The bonus time period begins immediately. You can add from 30 minutes to 23 hours and 30 minutes of time.
To add local network bonus time:
Step 1 In the Add Bonus Time section (Figure 5-6), choose the amount of time to add.
Step 2 Click Save.
5-12Cisco Prime Home 5.0.1 User Guide
OL-27464-01

Chapter 5 Working with Services Managing Time Blocking
Figure 5-6 Add Bonus Time Section
5-13Cisco Prime Home 5.0.1 User Guide
OL-27464-01

Chapter 5 Working with Services Managing Time Blocking
5-14Cisco Prime Home 5.0.1 User Guide
OL-27464-01

OL-27464-01
C H A P T E R 6
Performing Advanced TasksWhen working with accounts, you might need to investigate the customer network, send information to the customer’s device, or update device firmware. This chapter describes how to:
• View and manage event logs
• Browse parameters
• Synchronize devices
• Run scripts
• Update firmware
• Replace devices
• Set up local GUI access
Advanced tasks appear on the left side of the Customer Support tab. To view advanced tasks, click Advanced. To view a specific task, click view.
Note The available tasks and the order in which they appear depend on how your Prime Home installation is configured, and on your user level (CSR or Admin).
Working with Event LogsEvent logs record information about TR-069 communications between the device and the ACS, such as when data is sent to or received from a device, error messages, and the results of scripts or scheduled events. You can view event logs at different levels of detail, print event logs, and configure the amount and type of information collected. Logs are kept for a maximum of 10 days.
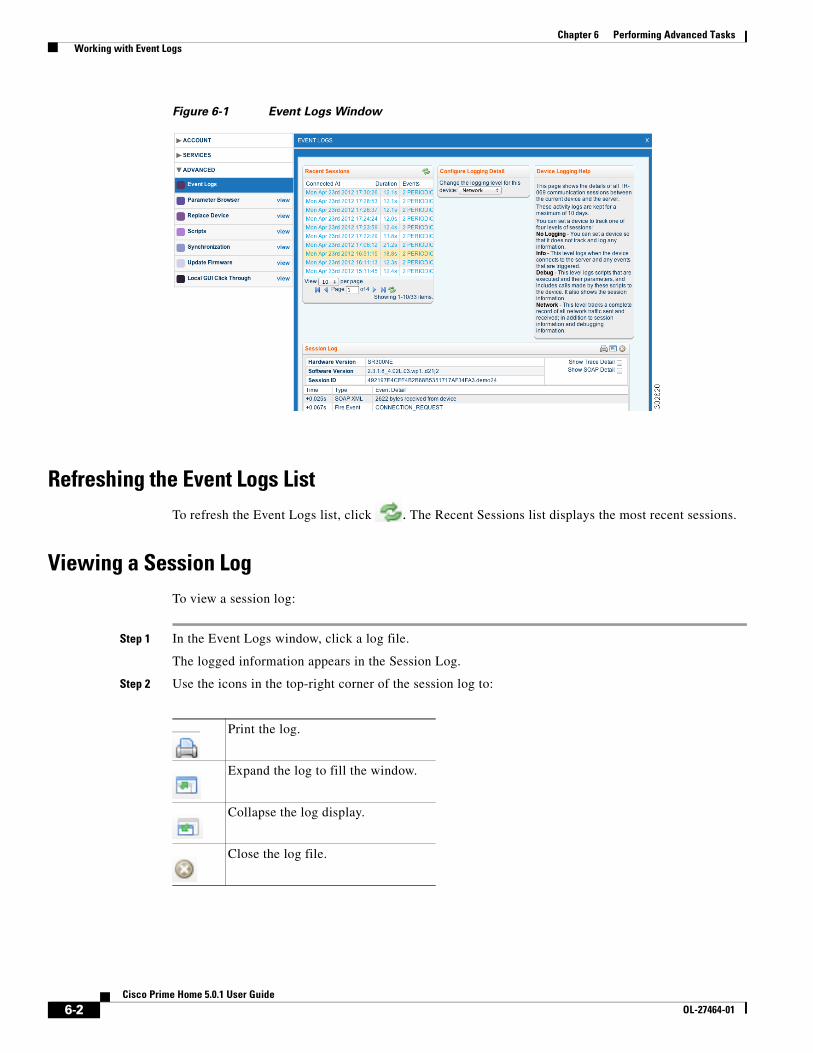
The Event Logs window (Figure 6-1) displays a list of recent sessions by date and time and a menu for configuring the logging level.
To view the Event Logs window, click view.
6-1Cisco Prime Home 5.0.1 User Guide
Chapter 6 Performing Advanced Tasks Working with Event Logs
Figure 6-1 Event Logs Window
Refreshing the Event Logs ListTo refresh the Event Logs list, click . The Recent Sessions list displays the most recent sessions.
Viewing a Session LogTo view a session log:
Step 1 In the Event Logs window, click a log file.
The logged information appears in the Session Log.
Step 2 Use the icons in the top-right corner of the session log to:
Print the log.
Expand the log to fill the window.
Collapse the log display.
Close the log file.
6-2Cisco Prime Home 5.0.1 User Guide
OL-27464-01
Chapter 6 Performing Advanced Tasks Using the Parameter Browser
Step 3 Depending on the event logging level, check the following check boxes to view trace and SOAP details in the log:
• Show Trace Detail—Provides detailed information about events captured by the log. You can view the parameter and properties used, as well as detailed information about script execution.
• Show SOAP Detail—Displays the XML communications with the device for each event in the log.
Setting the Event Logging LevelPrime Home lets you set a level for capturing events to the log. The level applies to the device. If a device is functioning well, you might want to turn off logging to reduce traffic or to avoid using up disk space. Conversely, if a customer reports a problem, you might want to turn on a higher level of logging to troubleshoot the problem. The following logging levels are available:
• No logging—No log information is recorded.
• Info—Records when the device connects to the server and information about any events that occurred, such as inform or upgrade events.
• Debug—Records session and script information, including parameters used in scripts and the calls made by the scripts to the device.
• Network—Saves a complete record of all network traffic sent and received, in addition to session and debug information.
To set the event logging level:
Step 1 Open the Event Logs window for an account.
Step 2 In the Configure Logging Detail section, choose a logging level for the device.
The system displays a message that the logging level was changed.
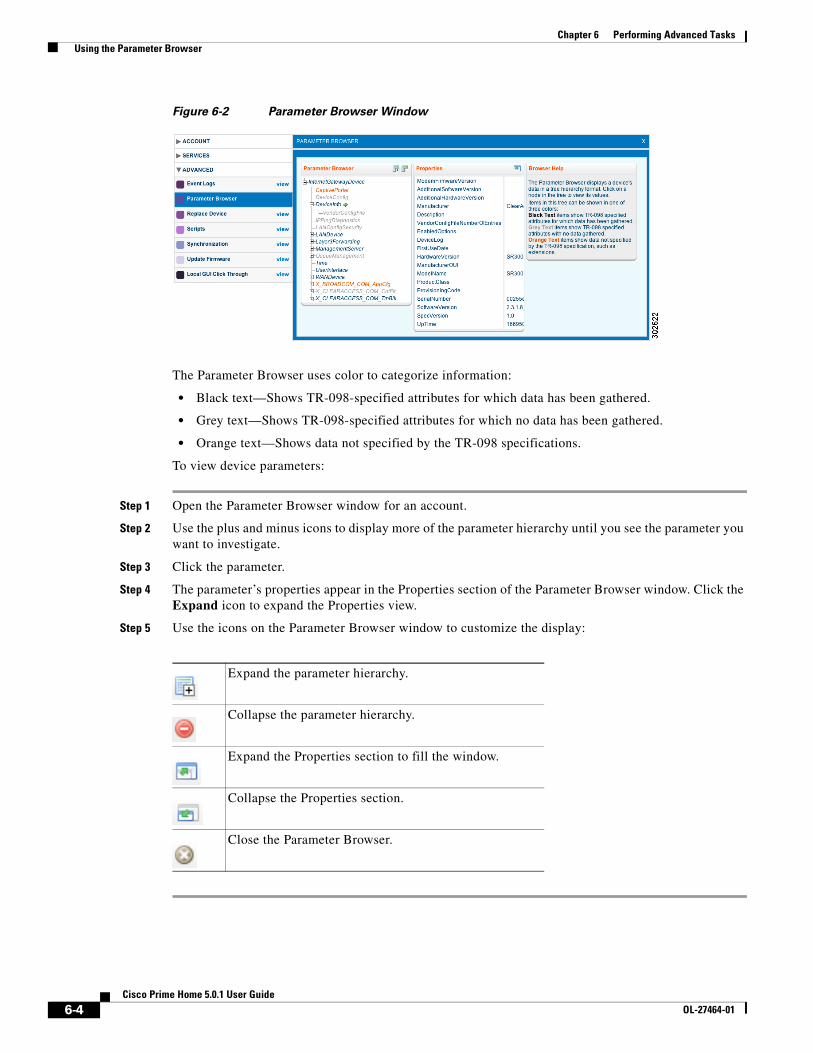
Using the Parameter BrowserThe Parameter Browser window displays device data in a tree hierarchy. The data model is based on the TR-098 specification but includes Prime Home extensions. You can browse the hierarchy and select a parameter to view its properties and parameter values.
To view the Parameter Browser window (Figure 6-2), click view.
6-3Cisco Prime Home 5.0.1 User Guide
OL-27464-01
Chapter 6 Performing Advanced Tasks Using the Parameter Browser
Figure 6-2 Parameter Browser Window
The Parameter Browser uses color to categorize information:
• Black text—Shows TR-098-specified attributes for which data has been gathered.
• Grey text—Shows TR-098-specified attributes for which no data has been gathered.
• Orange text—Shows data not specified by the TR-098 specifications.
To view device parameters:
Step 1 Open the Parameter Browser window for an account.
Step 2 Use the plus and minus icons to display more of the parameter hierarchy until you see the parameter you want to investigate.
Step 3 Click the parameter.
Step 4 The parameter’s properties appear in the Properties section of the Parameter Browser window. Click the Expand icon to expand the Properties view.
Step 5 Use the icons on the Parameter Browser window to customize the display:
Expand the parameter hierarchy.
Collapse the parameter hierarchy.
Expand the Properties section to fill the window.
Collapse the Properties section.
Close the Parameter Browser.
6-4Cisco Prime Home 5.0.1 User Guide
OL-27464-01

Chapter 6 Performing Advanced Tasks Managing Device Synchronization
Managing Device SynchronizationThe Synchronization window (Figure 6-3) lets you view parameters that can be synchronized between the device and server. You can see which applications need to be initialized or synchronized, and you can select items to synchronize. Use the Synchronization window to assess any synchronization failures that occur when you use the primary tools under the Account and Services menus (on the left sidebar).
Caution Do not use the Synchronization window for routine synchronizing of applications. Instead, use the primary tools under the Account and Services drop-down menus; doing so invokes multiple applications that synchronize the entire device, not just parts of the device.
Figure 6-3 Synchronization Window
Resolving Synchronization FailuresIf you receive a “failed to sync” error while using the primary tools under the Account and Services menu, do the following:
Step 1 Expand the Advanced drop-menu on the left sidebar.
Step 2 To the right of the Synchronization option, click view.
The Synchronization window opens.
Step 3 In the State column, locate the “Failed” notification and check the corresponding Pending Sync check box.
Step 4 Click Save to force the selected application to resynchronize.
Step 5 Verify that the “failed to sync” error clears.
6-5Cisco Prime Home 5.0.1 User Guide
OL-27464-01
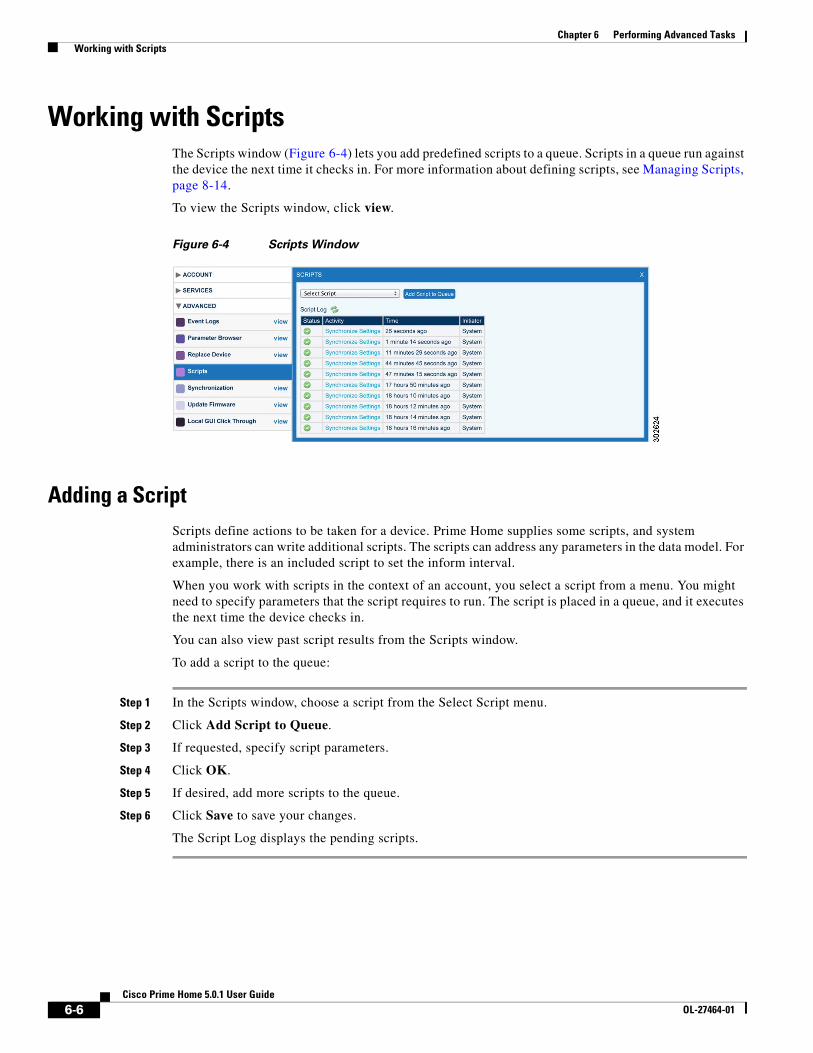
Chapter 6 Performing Advanced Tasks Working with Scripts
Working with ScriptsThe Scripts window (Figure 6-4) lets you add predefined scripts to a queue. Scripts in a queue run against the device the next time it checks in. For more information about defining scripts, see Managing Scripts, page 8-14.
To view the Scripts window, click view.
Figure 6-4 Scripts Window
Adding a ScriptScripts define actions to be taken for a device. Prime Home supplies some scripts, and system administrators can write additional scripts. The scripts can address any parameters in the data model. For example, there is an included script to set the inform interval.
When you work with scripts in the context of an account, you select a script from a menu. You might need to specify parameters that the script requires to run. The script is placed in a queue, and it executes the next time the device checks in.
You can also view past script results from the Scripts window.
To add a script to the queue:
Step 1 In the Scripts window, choose a script from the Select Script menu.
Step 2 Click Add Script to Queue.
Step 3 If requested, specify script parameters.
Step 4 Click OK.
Step 5 If desired, add more scripts to the queue.
Step 6 Click Save to save your changes.
The Script Log displays the pending scripts.
6-6Cisco Prime Home 5.0.1 User Guide
OL-27464-01
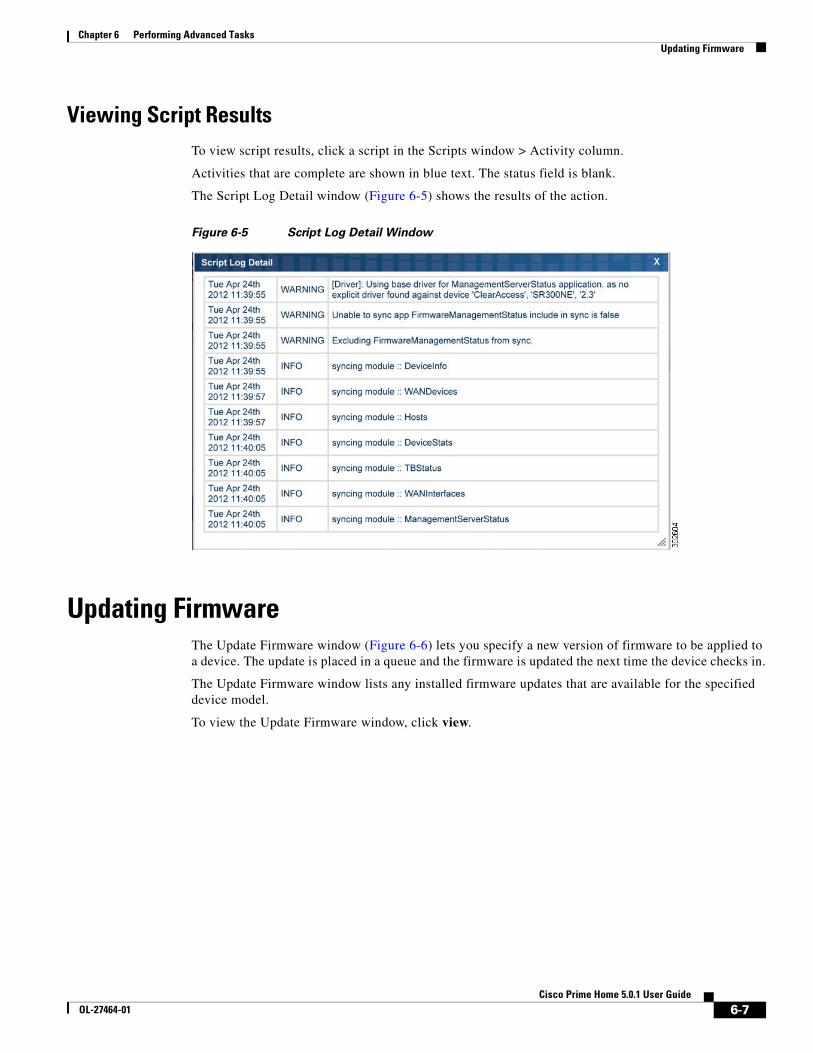
Chapter 6 Performing Advanced Tasks Updating Firmware
Viewing Script ResultsTo view script results, click a script in the Scripts window > Activity column.
Activities that are complete are shown in blue text. The status field is blank.
The Script Log Detail window (Figure 6-5) shows the results of the action.
Figure 6-5 Script Log Detail Window
Updating FirmwareThe Update Firmware window (Figure 6-6) lets you specify a new version of firmware to be applied to a device. The update is placed in a queue and the firmware is updated the next time the device checks in.
The Update Firmware window lists any installed firmware updates that are available for the specified device model.
To view the Update Firmware window, click view.
6-7Cisco Prime Home 5.0.1 User Guide
OL-27464-01
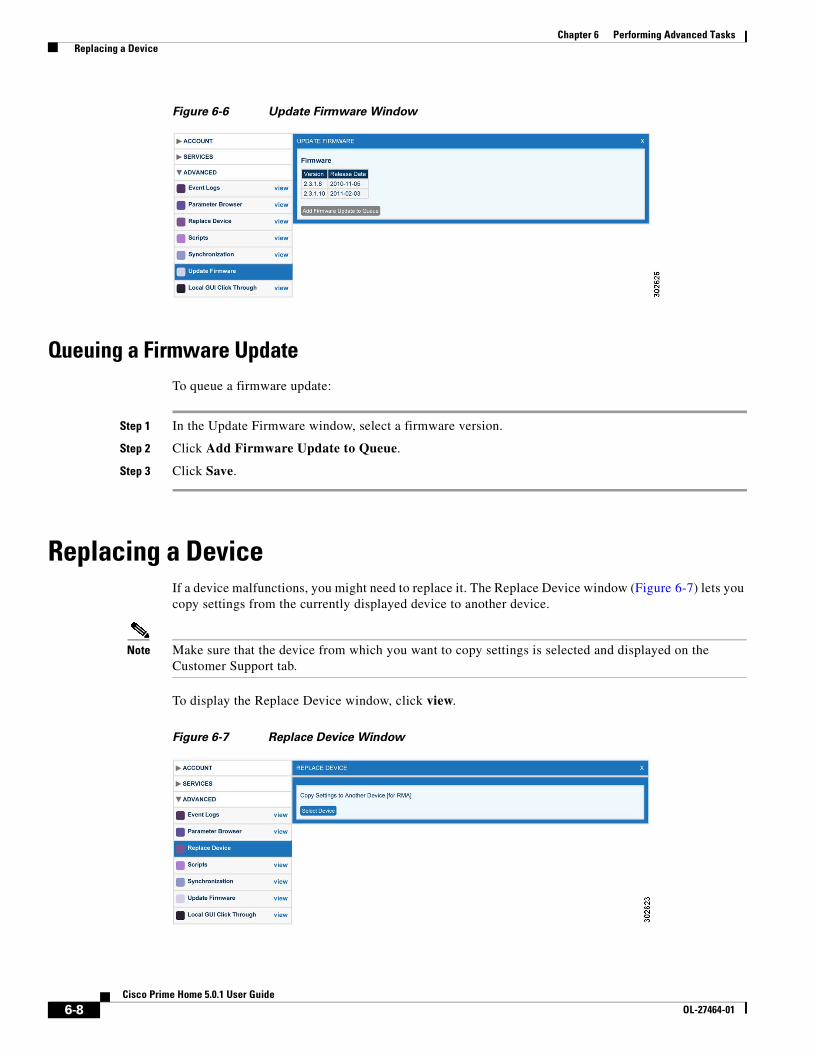
Chapter 6 Performing Advanced Tasks Replacing a Device
Figure 6-6 Update Firmware Window
Queuing a Firmware UpdateTo queue a firmware update:
Step 1 In the Update Firmware window, select a firmware version.
Step 2 Click Add Firmware Update to Queue.
Step 3 Click Save.
Replacing a DeviceIf a device malfunctions, you might need to replace it. The Replace Device window (Figure 6-7) lets you copy settings from the currently displayed device to another device.
Note Make sure that the device from which you want to copy settings is selected and displayed on the Customer Support tab.
To display the Replace Device window, click view.
Figure 6-7 Replace Device Window
6-8Cisco Prime Home 5.0.1 User Guide
OL-27464-01

Chapter 6 Performing Advanced Tasks Setting Up Local GUI Access
Copying Device Settings to Another DeviceTo copy device settings to another device:
Step 1 In the Replace Device window, click Select Device.
Step 2 Do one of the following to locate a device:
• Use the New Device tab to enter information about a new device that will check into your system in the future.
• Use the Existing Device tab to locate an existing CPE device not currently assigned to a subscriber. Click the device serial number to select it.
• Use the Activation Server Device tab to locate a CPE device.
Note Depending on how your Prime Home installation is configured, you might not see the Activation Server Device tab.
Step 3 Click the device to which you want to copy settings.
Step 4 Verify that the selected device is the correct one.
Step 5 Click Copy Settings.
After you copy the settings, the page reloads the information about the device that received the settings. You can then make changes to the new device.
Setting Up Local GUI AccessThe Local GUI Click Through window (Figure 6-8) lets you create a link to the user interface for a device. This link enables a CSR to access local statistics maintained by the CPE device, or configure device-specific settings that are not available through the Prime Home interface.
To view the Local GUI Click Through window, click view.
To set up local GUI access:
Step 1 In the Local GUI Click Through window, check the Enable Local GUI Access check box.
Step 2 Click Save.
Step 3 After the device has updated, return to the Local GUI Click Through window to use a link to the device user interface.
The link remains active for about 15 minutes. After that, access must be re-enabled before you use it again.
6-9Cisco Prime Home 5.0.1 User Guide
OL-27464-01
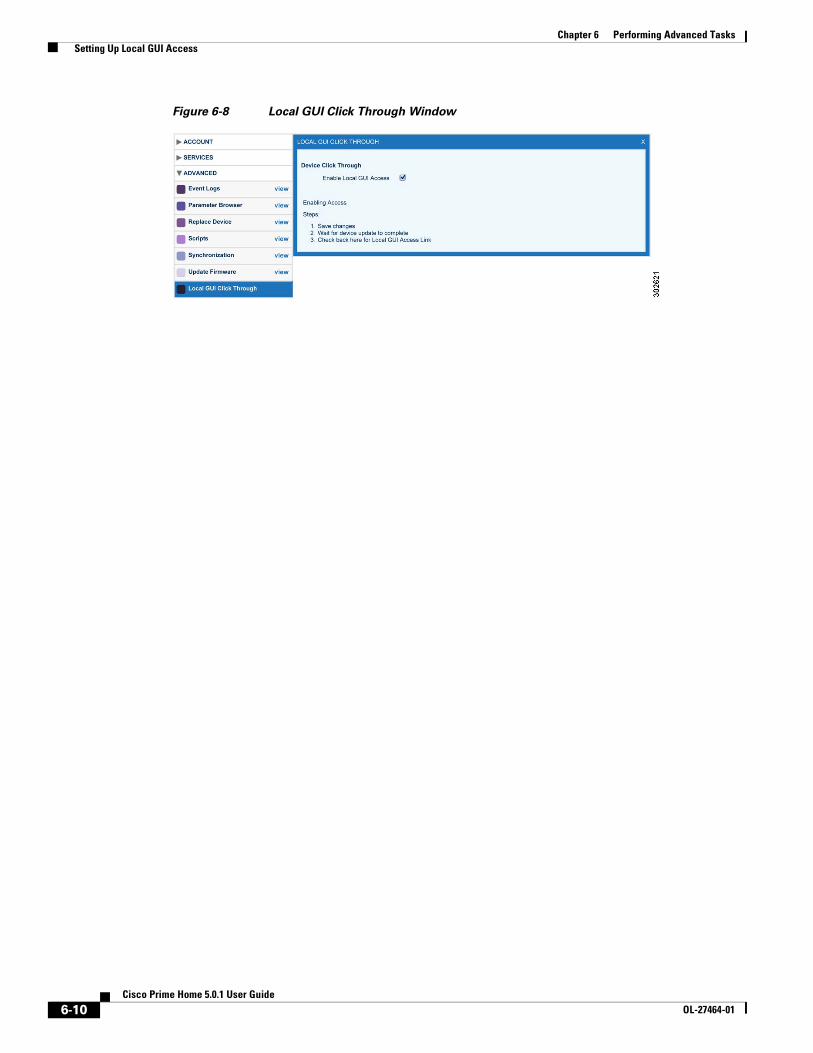
Chapter 6 Performing Advanced Tasks Setting Up Local GUI Access
Figure 6-8 Local GUI Click Through Window
6-10Cisco Prime Home 5.0.1 User Guide
OL-27464-01

OL-27464-01
C H A P T E R 7
ReportsPrime Home includes a customizable reporting tool with standard reports, exportability, and analysis. Reports can provide information about devices and subscribers across your entire installed base in a unified fashion. This information enables you to take preventive measures when support issues occur.
You can collect snapshot data and see just that moment in time, or you can continually export and aggregate data to study trends over time. Report results can be saved in comma-separated value (CSV) format and from there can be translated into graphs or spreadsheets, or opened with other tools such as Microsoft Excel or Crystal Reports.
Reporting is an optional, subscription-based product that is enabled with a license key.
Built-In ReportsPrime Home comes with five built-in reports:
• Device Count by Firmware Version
• Device Count by Manufacturer and Model
• Device Count by Label
• Subscriber Count by Label
• Device Count by WAN Interface
These reports, called aggregate reports, cannot be edited or deleted, but the results can be exported in CSV format to Excel or any other spreadsheet application. Aggregate reports give you insight into the total subscriber/device base (see Figure 7-1).
7-1Cisco Prime Home 5.0.1 User Guide
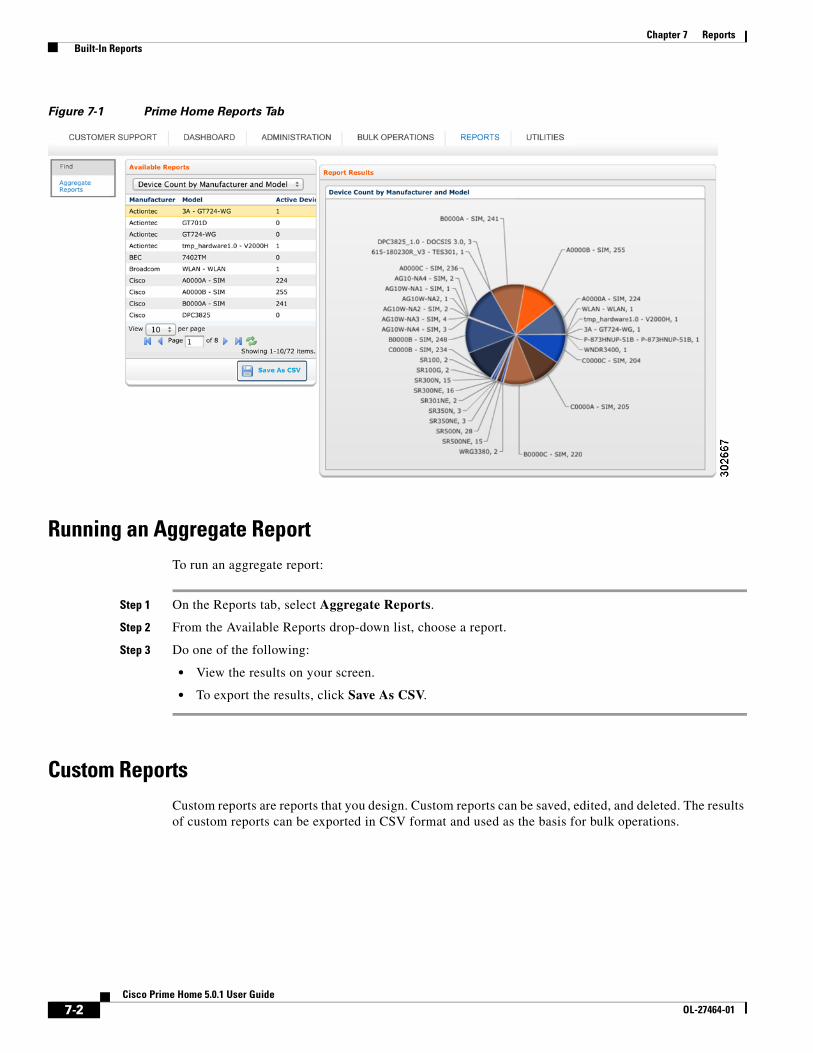
Chapter 7 Reports Built-In Reports
Figure 7-1 Prime Home Reports Tab
Running an Aggregate ReportTo run an aggregate report:
Step 1 On the Reports tab, select Aggregate Reports.
Step 2 From the Available Reports drop-down list, choose a report.
Step 3 Do one of the following:
• View the results on your screen.
• To export the results, click Save As CSV.
Custom ReportsCustom reports are reports that you design. Custom reports can be saved, edited, and deleted. The results of custom reports can be exported in CSV format and used as the basis for bulk operations.
7-2Cisco Prime Home 5.0.1 User Guide
OL-27464-01
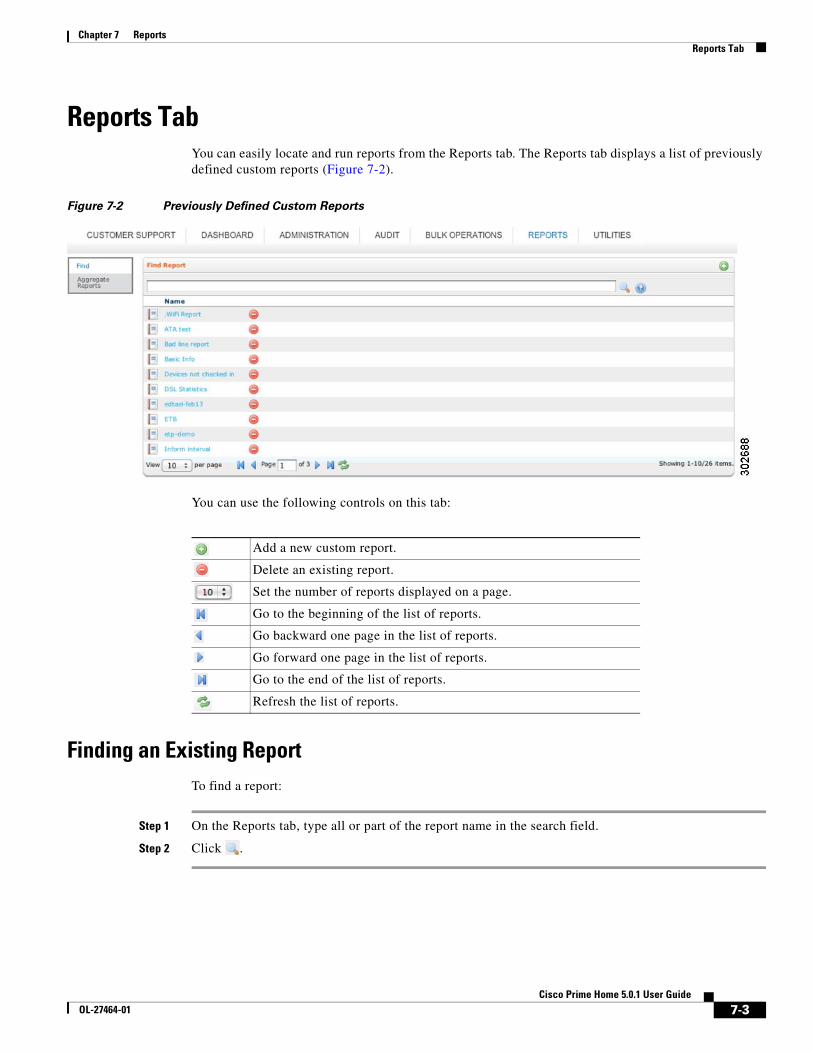
Chapter 7 Reports Reports Tab
Reports TabYou can easily locate and run reports from the Reports tab. The Reports tab displays a list of previously defined custom reports (Figure 7-2).
Figure 7-2 Previously Defined Custom Reports
You can use the following controls on this tab:
Finding an Existing ReportTo find a report:
Step 1 On the Reports tab, type all or part of the report name in the search field.
Step 2 Click .
Add a new custom report.
Delete an existing report.
Set the number of reports displayed on a page.
Go to the beginning of the list of reports.
Go backward one page in the list of reports.
Go forward one page in the list of reports.
Go to the end of the list of reports.
Refresh the list of reports.
7-3Cisco Prime Home 5.0.1 User Guide
OL-27464-01
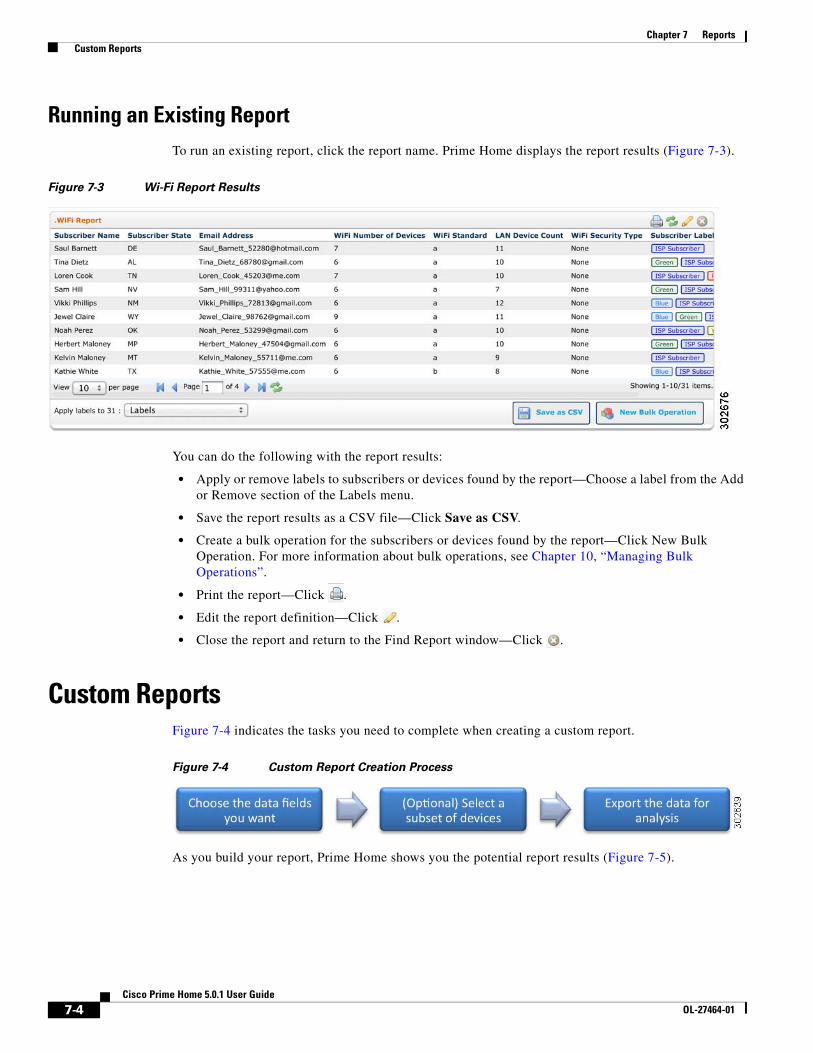
Chapter 7 Reports Custom Reports
Running an Existing ReportTo run an existing report, click the report name. Prime Home displays the report results (Figure 7-3).
Figure 7-3 Wi-Fi Report Results
You can do the following with the report results:
• Apply or remove labels to subscribers or devices found by the report—Choose a label from the Add or Remove section of the Labels menu.
• Save the report results as a CSV file—Click Save as CSV.
• Create a bulk operation for the subscribers or devices found by the report—Click New Bulk Operation. For more information about bulk operations, see Chapter 10, “Managing Bulk Operations”.
• Print the report—Click .
• Edit the report definition—Click .
• Close the report and return to the Find Report window—Click .
Custom ReportsFigure 7-4 indicates the tasks you need to complete when creating a custom report.
Figure 7-4 Custom Report Creation Process
As you build your report, Prime Home shows you the potential report results (Figure 7-5).
7-4Cisco Prime Home 5.0.1 User Guide
OL-27464-01

Chapter 7 Reports Custom Reports
Figure 7-5 Edit Report Window
Creating a Custom ReportTo create a custom report:
Step 1 On the Reports tab, click .
Step 2 In the Report Name field, enter a name for your report.
Step 3 Choose your data fields. These fields are the headings for the columns in your report.
a. From the Available Columns area, drag the field you want to see in the report and drop it into the Include these Columns area.
b. Drag additional fields into the Available Columns area.
Note To search the available columns, enter a keyword and click . To expand the editing area, click .
7-5Cisco Prime Home 5.0.1 User Guide
OL-27464-01

Chapter 7 Reports Custom Reports
Step 4 (Optional) Define the sort order:
a. From the Available Columns area, drag the field you want to sort on and drop it in the Sorting area.
b. To sort on additional fields, drag each field to the Sorting area. Arrange the fields in the order in which you want to sort.
Step 5 (Optional) Set up filtering:
a. From the Available Columns area, drag the field you want to use for filtering the report and drop it in the Filter Criteria area.
b. Select a parameter to apply to the filter. The available parameters depend on the field included.
c. To filter on additional fields, drag over the fields and arrange them in the order in which you want to filter.
Step 6 Do one of the following:
• Click Save to save the report and stay in the Edit Report window.
• Click Save and Return to View to save the report and view the results on the Devices and Subscribers window.
After you save the report, it appears on the Find window.
Working with Sort OrderYou can sort on one or more fields, you can order the fields to control the sort order, and you can choose an order for each field (ascending or descending.)
When you add a field to the Sorting area, the following options appear (Figure 7-6):
• remove—Click to remove the field from the sorting area.
• A-Z—Click to change the sort order from ascending to descending or vice versa.
Figure 7-6 Sorting Options
To change the sort order, drag the fields to represent the order in which you want the data sorted. The data is sorted on the top field first, then the next, and so on.
Working with FiltersFiltering enables you to limit the devices or subscribers found by a report. You filter the report results by adding criteria. Each available column has a set of parameters you can apply. You can create complex filters by grouping filter fields and using AND and OR.
7-6Cisco Prime Home 5.0.1 User Guide
OL-27464-01

Chapter 7 Reports Custom Reports
Applying Parameters
You must apply a parameter to each filter criterion (Figure 7-7). The parameters can be a simple true or false, or you can specify a relationship (more than, less than, equal to) or set up a list of values.
Figure 7-7 Applying Parameters to a Filter Criterion
For example, if you want to filter on devices that have Content Filtering and Port Forwards enabled, you can create a list of those two items.
After you select a parameter and supply additional information, do one of the following:
• Click Apply to apply the filter parameter.
• Click Cancel to cancel the parameter.
Editing Parameters
To change a parameter after applying it, click edit (Figure 7-8). Move the pointer over the filter criterion to display the edit link.
Figure 7-8 Editing Filter Parameters
7-7Cisco Prime Home 5.0.1 User Guide
OL-27464-01
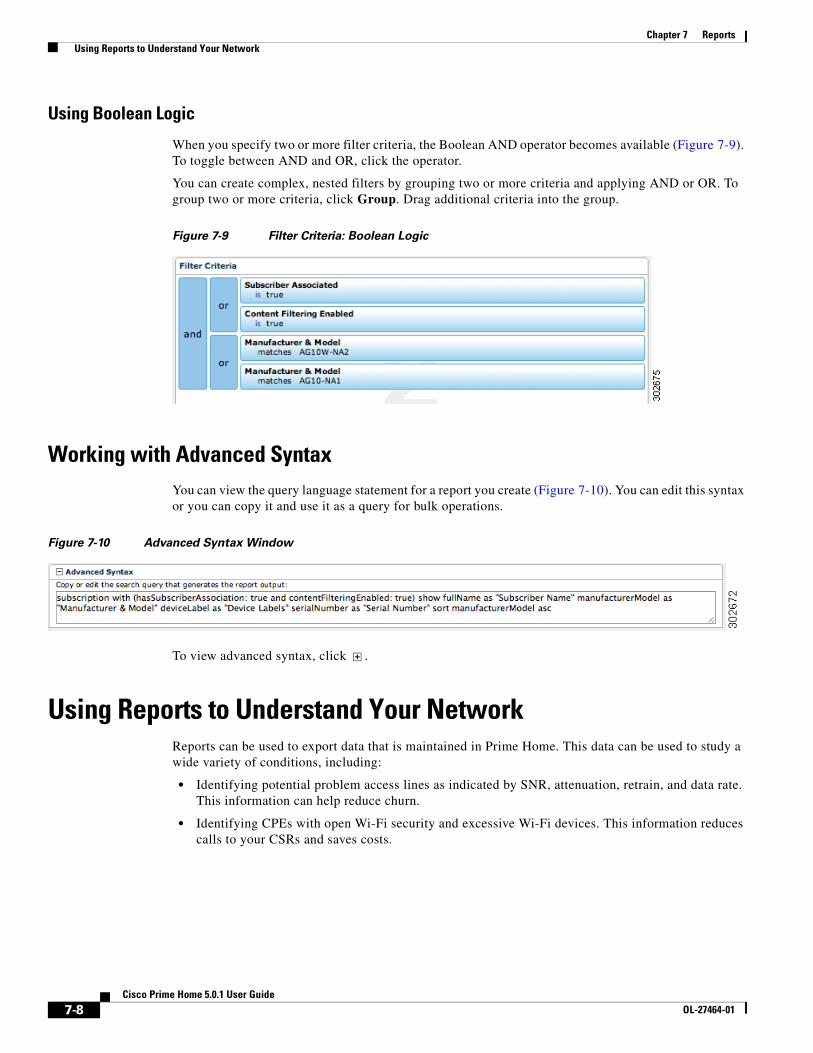
Chapter 7 Reports Using Reports to Understand Your Network
Using Boolean Logic
When you specify two or more filter criteria, the Boolean AND operator becomes available (Figure 7-9). To toggle between AND and OR, click the operator.
You can create complex, nested filters by grouping two or more criteria and applying AND or OR. To group two or more criteria, click Group. Drag additional criteria into the group.
Figure 7-9 Filter Criteria: Boolean Logic
Working with Advanced SyntaxYou can view the query language statement for a report you create (Figure 7-10). You can edit this syntax or you can copy it and use it as a query for bulk operations.
Figure 7-10 Advanced Syntax Window
To view advanced syntax, click .
Using Reports to Understand Your NetworkReports can be used to export data that is maintained in Prime Home. This data can be used to study a wide variety of conditions, including:
• Identifying potential problem access lines as indicated by SNR, attenuation, retrain, and data rate. This information can help reduce churn.
• Identifying CPEs with open Wi-Fi security and excessive Wi-Fi devices. This information reduces calls to your CSRs and saves costs.
7-8Cisco Prime Home 5.0.1 User Guide
OL-27464-01
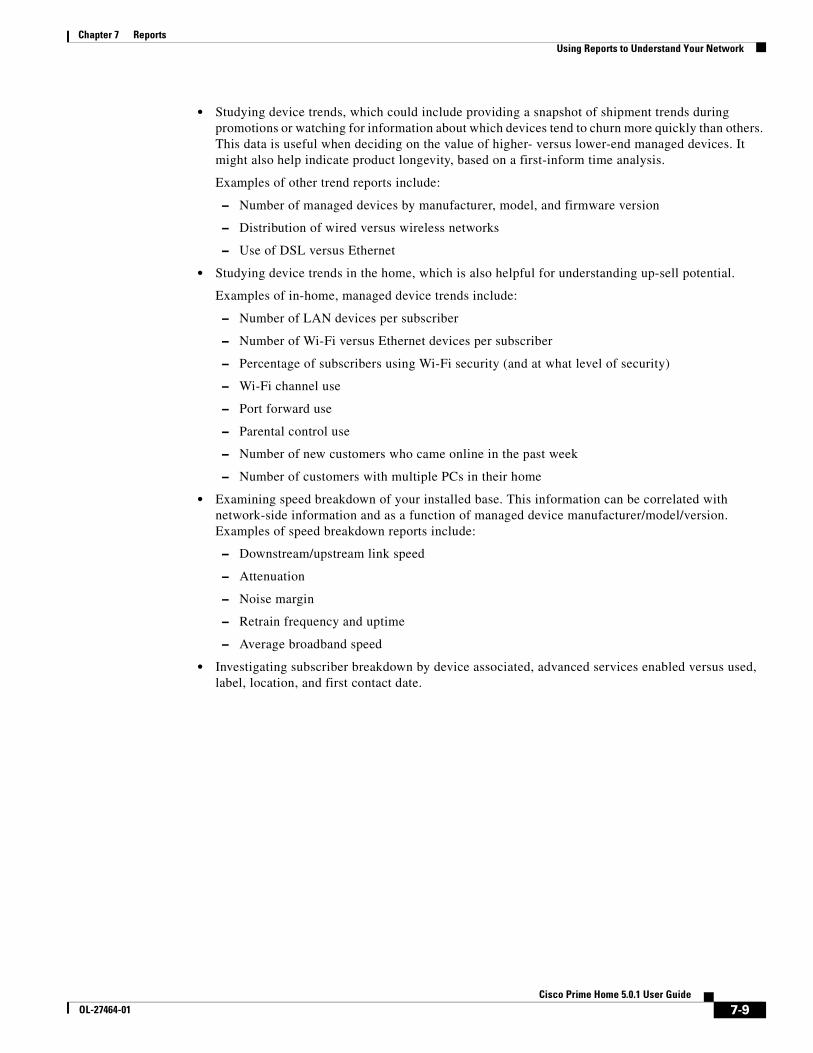
Chapter 7 Reports Using Reports to Understand Your Network
• Studying device trends, which could include providing a snapshot of shipment trends during promotions or watching for information about which devices tend to churn more quickly than others. This data is useful when deciding on the value of higher- versus lower-end managed devices. It might also help indicate product longevity, based on a first-inform time analysis.
Examples of other trend reports include:
– Number of managed devices by manufacturer, model, and firmware version
– Distribution of wired versus wireless networks
– Use of DSL versus Ethernet
• Studying device trends in the home, which is also helpful for understanding up-sell potential.
Examples of in-home, managed device trends include:
– Number of LAN devices per subscriber
– Number of Wi-Fi versus Ethernet devices per subscriber
– Percentage of subscribers using Wi-Fi security (and at what level of security)
– Wi-Fi channel use
– Port forward use
– Parental control use
– Number of new customers who came online in the past week
– Number of customers with multiple PCs in their home
• Examining speed breakdown of your installed base. This information can be correlated with network-side information and as a function of managed device manufacturer/model/version. Examples of speed breakdown reports include:
– Downstream/upstream link speed
– Attenuation
– Noise margin
– Retrain frequency and uptime
– Average broadband speed
• Investigating subscriber breakdown by device associated, advanced services enabled versus used, label, location, and first contact date.
7-9Cisco Prime Home 5.0.1 User Guide
OL-27464-01

Chapter 7 Reports Using Reports to Understand Your Network
7-10Cisco Prime Home 5.0.1 User Guide
OL-27464-01
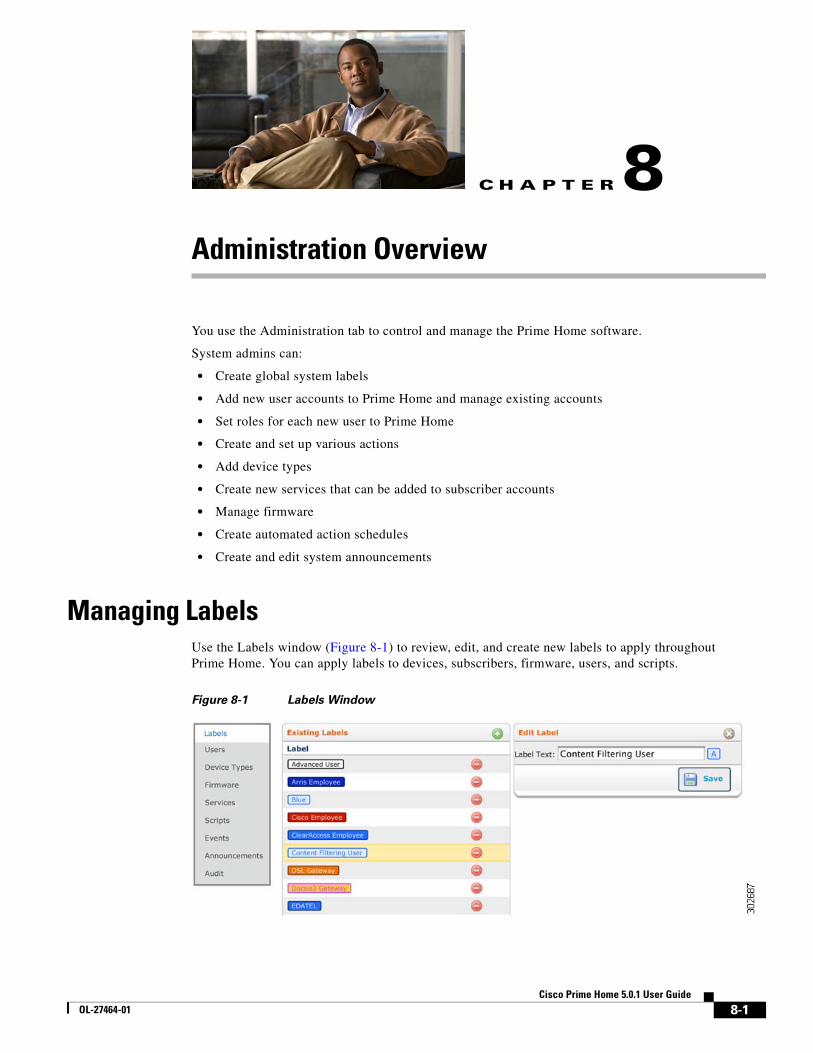
OL-27464-01
C H A P T E R 8
Administration OverviewYou use the Administration tab to control and manage the Prime Home software.
System admins can:
• Create global system labels
• Add new user accounts to Prime Home and manage existing accounts
• Set roles for each new user to Prime Home
• Create and set up various actions
• Add device types
• Create new services that can be added to subscriber accounts
• Manage firmware
• Create automated action schedules
• Create and edit system announcements
Managing LabelsUse the Labels window (Figure 8-1) to review, edit, and create new labels to apply throughout Prime Home. You can apply labels to devices, subscribers, firmware, users, and scripts.
Figure 8-1 Labels Window
8-1Cisco Prime Home 5.0.1 User Guide
Chapter 8 Administration Overview Managing Labels
Labels WindowThe Labels window comprises:
• Existing Labels—Shows all the current labels in the system. Click to add a new label to the system with the Label Editor.
• Label Editor—Use the Label Editor to create new labels or edit existing labels. From here:
– Click to close the editor and discard your changes.
– Click to delete a label from the system.
– Click to save your changes.
Adding a New Label
To add a new label:
Step 1 On the Administration tab, click Labels.
Step 2 Click .
The system displays the Label Editor.
Step 3 Enter the label name in the Label Text field.
Step 4 Click . A color palette window displays the colors you can use to distinguish your label.
Step 5 Select a color to apply from the color palette.
Step 6 Click .
Note Labels can include alphanumeric characters, underlines, and spaces only. Labels cannot exceed 32 characters in length.
Editing a Label
To edit a label:
Step 1 On the Administration tab, click Labels.
Step 2 Click a label to edit from the Existing Labels List.
Step 3 Make your changes to the fields. You can change a label's name or color scheme.
Step 4 Click .
8-2Cisco Prime Home 5.0.1 User Guide
OL-27464-01
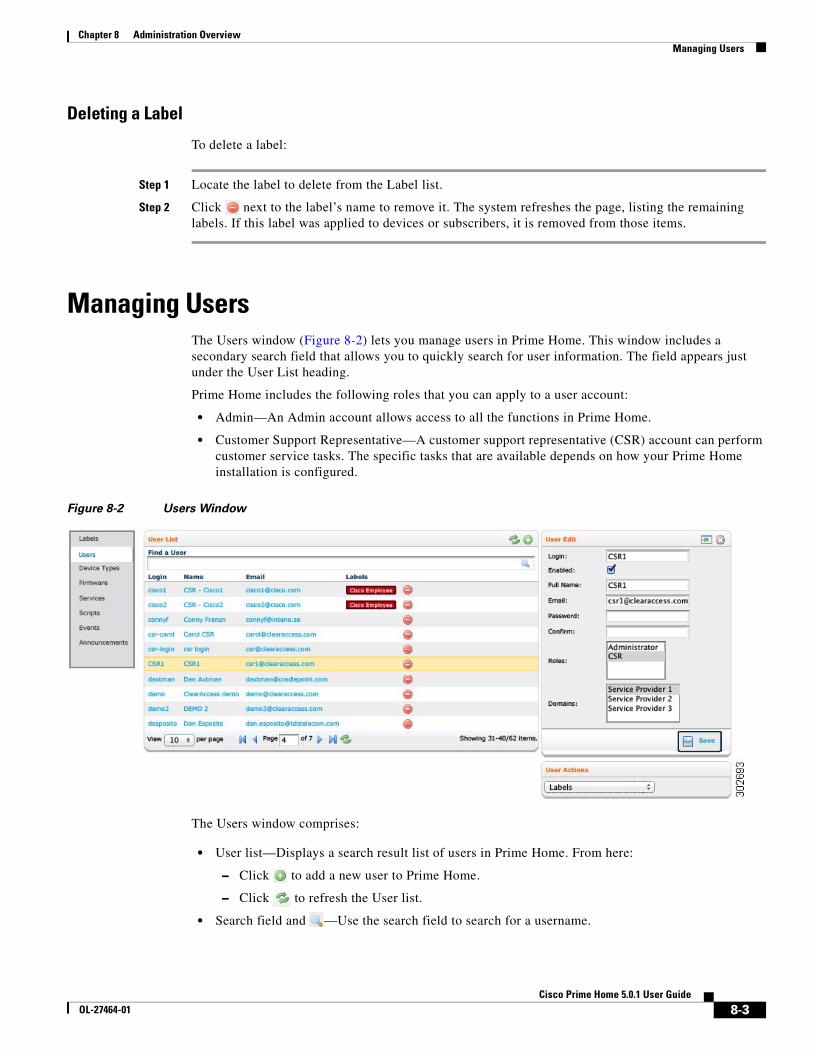
Chapter 8 Administration Overview Managing Users
Deleting a Label
To delete a label:
Step 1 Locate the label to delete from the Label list.
Step 2 Click next to the label’s name to remove it. The system refreshes the page, listing the remaining labels. If this label was applied to devices or subscribers, it is removed from those items.
Managing UsersThe Users window (Figure 8-2) lets you manage users in Prime Home. This window includes a secondary search field that allows you to quickly search for user information. The field appears just under the User List heading.
Prime Home includes the following roles that you can apply to a user account:
• Admin—An Admin account allows access to all the functions in Prime Home.
• Customer Support Representative—A customer support representative (CSR) account can perform customer service tasks. The specific tasks that are available depends on how your Prime Home installation is configured.
Figure 8-2 Users Window
The Users window comprises:
• User list—Displays a search result list of users in Prime Home. From here:
– Click to add a new user to Prime Home.
– Click to refresh the User list.
• Search field and —Use the search field to search for a username.
8-3Cisco Prime Home 5.0.1 User Guide
OL-27464-01
Chapter 8 Administration Overview Managing Users
• Search Results List—This list displays all your search results. If your results are more than the page can handle, then use the page forward and page backward buttons to see more results. Use the Items per page drop-down menu to set the limit of results to 10, 25, or 50 per page.
• Click to delete a user from the system.
• User Editor—The User Editor allows you to enter or edit user information. Enable the account by checking the Enabled check box. Disable the account by unchecking the Enabled check box.
• User Actions—Assign or remove labels from the user. From here:
– Click to expand the User Editor to full size. When in full-size mode, click to restore the window to its original size.
– Click to close the editor and discard your changes.
– Click to save your changes.
Adding a New User
To add a new user:
Step 1 On the Administration tab, click Users.
Step 2 Click .
Step 3 Enter the user’s login name in the Login field.
Step 4 Check the Enabled check box to activate the account and allow the user to log in. (To disable the account later, uncheck the Enabled check box.)
Step 5 Enter the user’s full name in the Full Name field.
Step 6 Enter the user’s e-mail address in the Email field.
Step 7 Enter the user’s password in the Password field.
Step 8 Enter the user’s password again in the Confirm field.
Step 9 Select a role for your user from the Roles list.
Step 10 (Optional) Select one or more domains that this user can view and work with. To select more than one domain, hold the Control (PC) or Command (Mac) key while selecting and deselecting.
Step 11 Click .
Editing User Information
To edit user information:
Step 1 Search for the user.
Step 2 Click a username in the Users List to display the User Editor.
Step 3 Edit any of the fields for that user.
Step 4 Click .
8-4Cisco Prime Home 5.0.1 User Guide
OL-27464-01
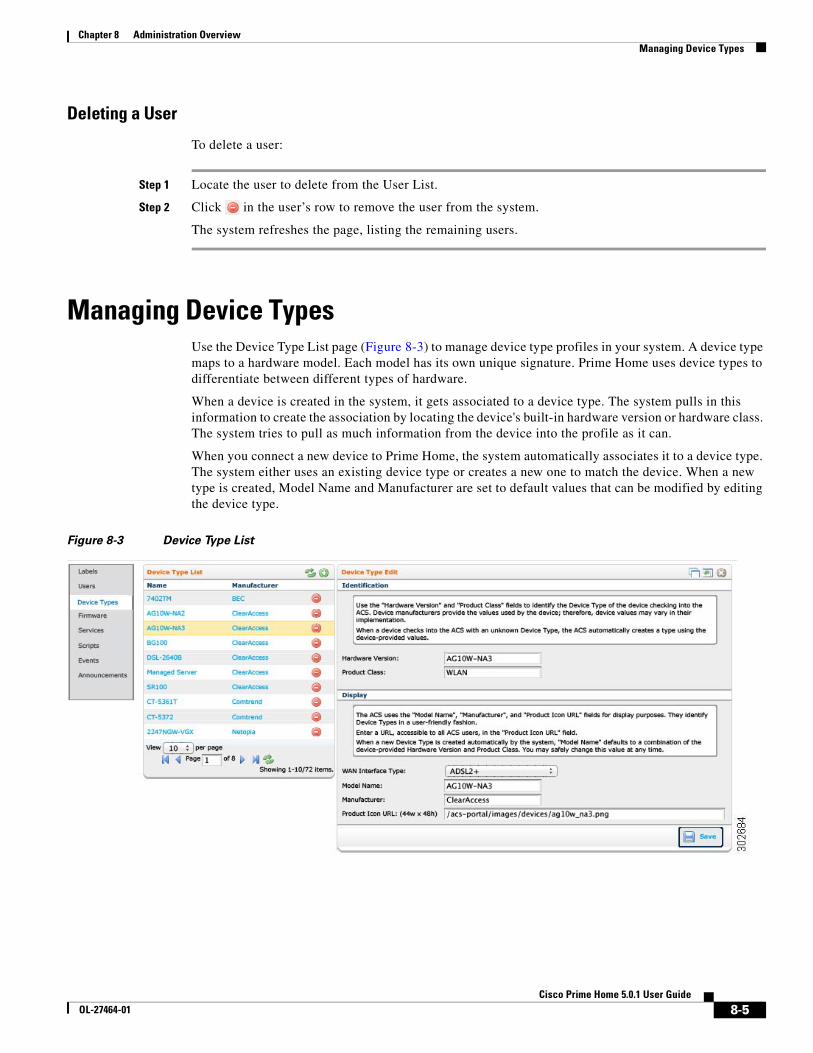
Chapter 8 Administration Overview Managing Device Types
Deleting a User
To delete a user:
Step 1 Locate the user to delete from the User List.
Step 2 Click in the user’s row to remove the user from the system.
The system refreshes the page, listing the remaining users.
Managing Device TypesUse the Device Type List page (Figure 8-3) to manage device type profiles in your system. A device type maps to a hardware model. Each model has its own unique signature. Prime Home uses device types to differentiate between different types of hardware.
When a device is created in the system, it gets associated to a device type. The system pulls in this information to create the association by locating the device's built-in hardware version or hardware class. The system tries to pull as much information from the device into the profile as it can.
When you connect a new device to Prime Home, the system automatically associates it to a device type. The system either uses an existing device type or creates a new one to match the device. When a new type is created, Model Name and Manufacturer are set to default values that can be modified by editing the device type.
Figure 8-3 Device Type List
8-5Cisco Prime Home 5.0.1 User Guide
OL-27464-01
Chapter 8 Administration Overview Managing Device Types
Device Type PageThe Device Type page consists of the following:
• Device Type List—This list displays all the available device types in the system. From here:
– Click to refresh the list.
– Click to add a new device type to the system.
– Click to delete a device type from the system.
• Device Type Editor—Click a device name from the Device Type list to open the Device Type Editor. Use the Device Type Editor to create or edit device types. From here:
– Click to clone and create a new device type based on the current settings. This option appears only when you are editing a pre-existing device type.
– Click to expand the Device Types Editor window to full size. To restore the window to its original size when in full-size mode, click again.
– Click to close the editor and discard your changes.
– Click to save changes to the device type.
Adding a Device Type
To add a device type:
Step 1 On the Administration tab, click Device Types.
Step 2 Click .
Step 3 Enter the device name in the Hardware Version field.
Step 4 Enter the device product class in the Product Class field.
Step 5 From the WAN Interface Type menu, select the WAN interface type.
Step 6 Enter the model name in the Model Name field.
Step 7 Enter the manufacturer name in the Manufacturer field.
Step 8 Enter a URL to a product icon (if desired) in the Product Icon URL field. The icon can be no bigger than 64 x 64 pixels high and wide.
Step 9 Click .
8-6Cisco Prime Home 5.0.1 User Guide
OL-27464-01
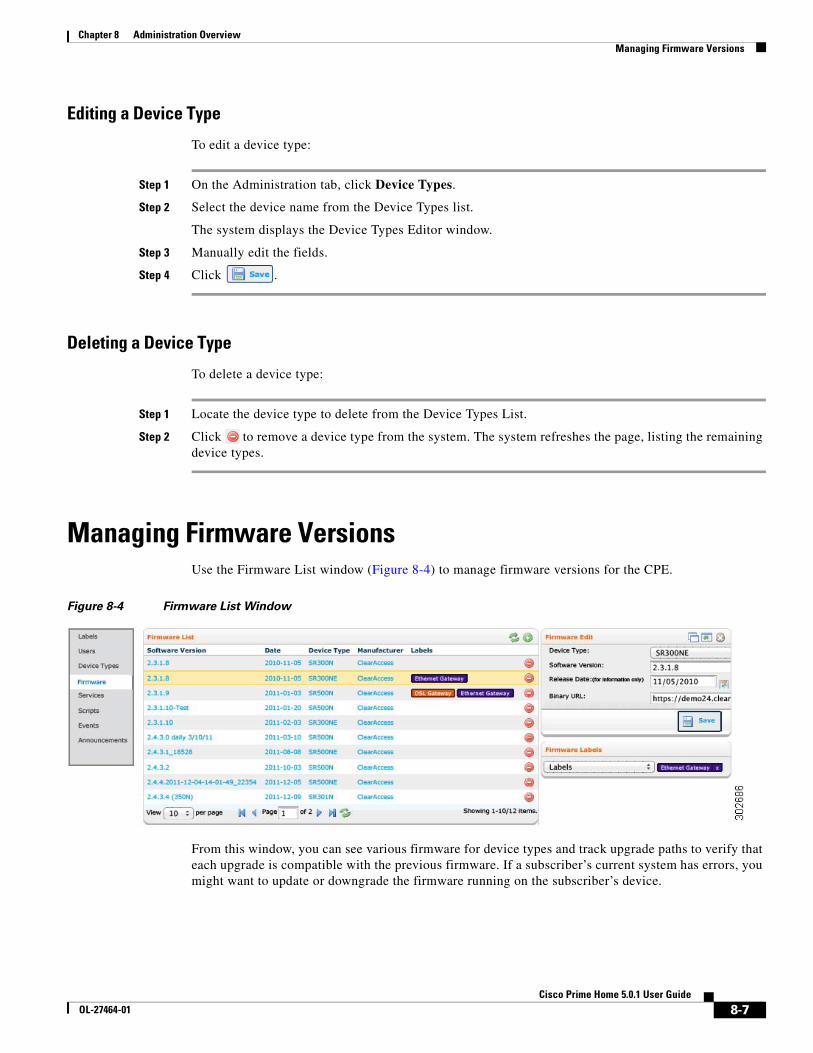
Chapter 8 Administration Overview Managing Firmware Versions
Editing a Device Type
To edit a device type:
Step 1 On the Administration tab, click Device Types.
Step 2 Select the device name from the Device Types list.
The system displays the Device Types Editor window.
Step 3 Manually edit the fields.
Step 4 Click .
Deleting a Device Type
To delete a device type:
Step 1 Locate the device type to delete from the Device Types List.
Step 2 Click to remove a device type from the system. The system refreshes the page, listing the remaining device types.
Managing Firmware VersionsUse the Firmware List window (Figure 8-4) to manage firmware versions for the CPE.
Figure 8-4 Firmware List Window
From this window, you can see various firmware for device types and track upgrade paths to verify that each upgrade is compatible with the previous firmware. If a subscriber’s current system has errors, you might want to update or downgrade the firmware running on the subscriber’s device.
8-7Cisco Prime Home 5.0.1 User Guide
OL-27464-01
Chapter 8 Administration Overview Managing Firmware Versions
Firmware List WindowThe Firmware List window consists of the following:
• Firmware List—Displays a list of all available firmware versions for all CPE models available on the system.
– Click to add a new firmware release to the list.
– Click to refresh the list.
– Click to delete a firmware release from the system.
• Firmware Editor—Use the Firmware Editor to create new firmware releases or edit existing firmware releases.
– Click to create a new firmware release based on the current settings.
– Click to expand the Firmware Editor window to full size. To restore the window to its original size when in full-size mode, click again.
– Click to close the editor and discard your changes.
– Click to save the changes to the firmware.
Adding a Firmware Version
To add a firmware version:
Step 1 On the Administration tab, click Firmware.
Step 2 Click .
The system displays the Firmware Editor window.
Step 3 From the Device Type drop-down list, choose the model of a device to associate the firmware version to.
Step 4 Enter the software version number in the Software Version field.
Step 5 Enter a release date in the Release Date field. You can click to open up a calendar to select a release date as well.
Step 6 Specify a web location for the firmware in the Binary URL field.
Note You do not upload firmware directly to Prime Home. The URL must be accessible to the device.
Step 7 Click .
8-8Cisco Prime Home 5.0.1 User Guide
OL-27464-01
Chapter 8 Administration Overview Managing Services
Editing a Firmware Version
To edit a firmware version:
Step 1 On the Administration tab, click Firmware.
Step 2 Select the firmware version from the Firmware List.
The system displays the Firmware Editor window with the firmware version info.
Step 3 Manually edit the fields.
Step 4 Click .
You can clone a firmware version to quickly create new update releases that contain information similar to that of the previous firmware.
Cloning a Firmware Version
To clone a firmware version:
Step 1 Click to create a new firmware version based on current settings.
Step 2 Edit and adjust the information in the Firmware Editor.
Step 3 Click .
Managing ServicesUse the Services window (Figure 8-5) to manage services offered by your company. You can create new services and edit them directly in this window.
When you are done setting up your services on this window, you can activate or deactivate the service on your customers’ devices from the Customer Support tab.
8-9Cisco Prime Home 5.0.1 User Guide
OL-27464-01
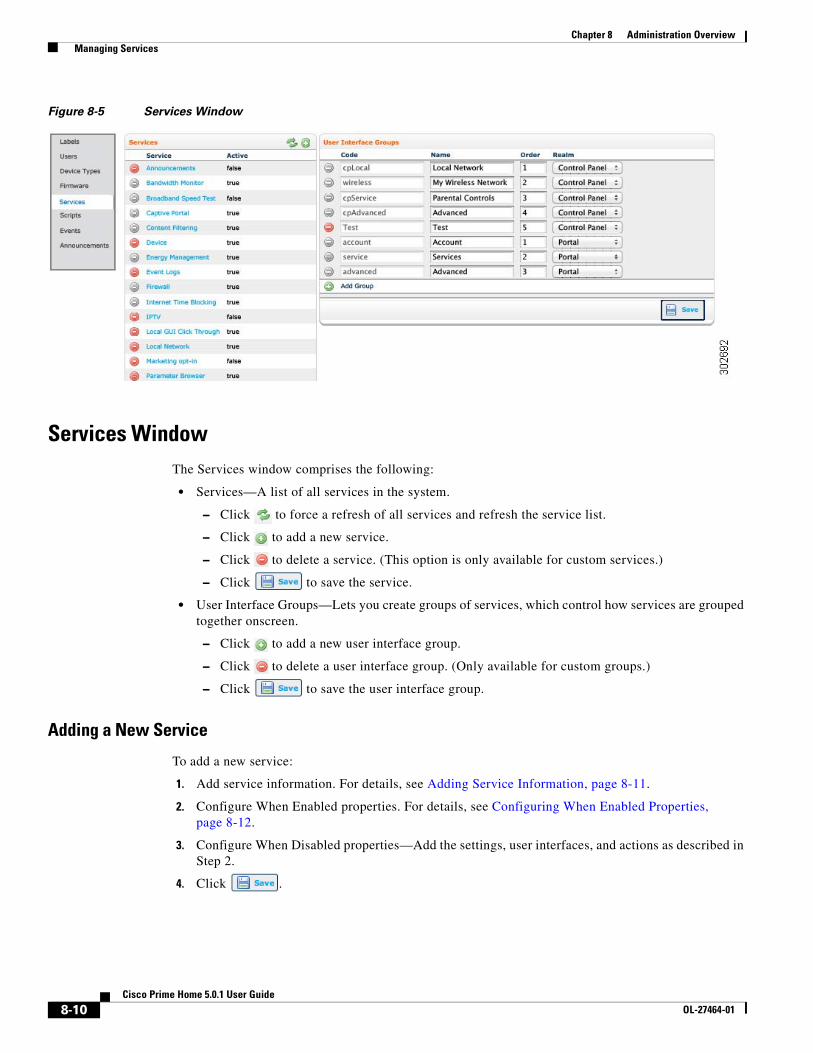
Chapter 8 Administration Overview Managing Services
Figure 8-5 Services Window
Services WindowThe Services window comprises the following:
• Services—A list of all services in the system.
– Click to force a refresh of all services and refresh the service list.
– Click to add a new service.
– Click to delete a service. (This option is only available for custom services.)
– Click to save the service.
• User Interface Groups—Lets you create groups of services, which control how services are grouped together onscreen.
– Click to add a new user interface group.
– Click to delete a user interface group. (Only available for custom groups.)
– Click to save the user interface group.
Adding a New Service
To add a new service:
1. Add service information. For details, see Adding Service Information, page 8-11.
2. Configure When Enabled properties. For details, see Configuring When Enabled Properties, page 8-12.
3. Configure When Disabled properties—Add the settings, user interfaces, and actions as described in Step 2.
4. Click .
8-10Cisco Prime Home 5.0.1 User Guide
OL-27464-01
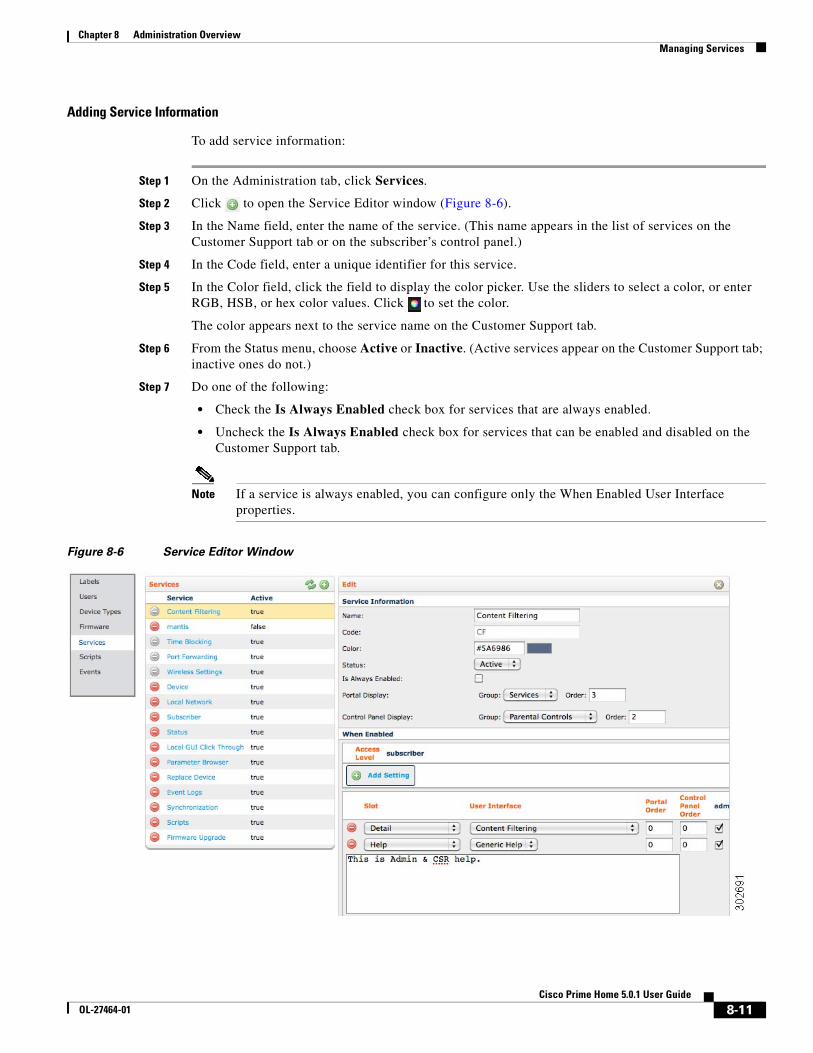
Chapter 8 Administration Overview Managing Services
Adding Service Information
To add service information:
Step 1 On the Administration tab, click Services.
Step 2 Click to open the Service Editor window (Figure 8-6).
Step 3 In the Name field, enter the name of the service. (This name appears in the list of services on the Customer Support tab or on the subscriber’s control panel.)
Step 4 In the Code field, enter a unique identifier for this service.
Step 5 In the Color field, click the field to display the color picker. Use the sliders to select a color, or enter RGB, HSB, or hex color values. Click to set the color.
The color appears next to the service name on the Customer Support tab.
Step 6 From the Status menu, choose Active or Inactive. (Active services appear on the Customer Support tab; inactive ones do not.)
Step 7 Do one of the following:
• Check the Is Always Enabled check box for services that are always enabled.
• Uncheck the Is Always Enabled check box for services that can be enabled and disabled on the Customer Support tab.
Note If a service is always enabled, you can configure only the When Enabled User Interface properties.
Figure 8-6 Service Editor Window
8-11Cisco Prime Home 5.0.1 User Guide
OL-27464-01
Chapter 8 Administration Overview Managing Services
Step 8 Choose where and how to display this service:
• Portal Display—Determines where this service appears in the Services list on the Customer Support tab.
• Control Panel Display—Determines where this service appears in the subscriber’s control panel.
– From the Group menu, select the user interface group under which this service will appear.
– In the Order field, type a number indicating the order for this service within the group. Smaller numbers appear closer to the top.
Configuring When Enabled Properties
To configure the properties for a service that has been enabled:
Step 1 Configure the access level (to specify whether subscribers can modify settings for this service):
a. In the Access Level section, click Add Setting.
b. Enter the element of the data model that describes the setting (for example, settings.enabled.timeblocking).
c. From the menu, choose None to deny access or Modify to allow access.
d. Repeat steps a through c for each access level you want to add.
Step 2 Configure the user interface. This lets you control information and settings that are displayed for different user interface areas related to this service, both on the Customer Support tab and on the subscriber’s control panel.
a. In the User Interface section, click Add User Interface.
b. From the Slot menu, choose how much information to display:
– Detail—Shows detailed information and settings for the selected user interface area. It appears in the window for the service on the Customer Support tab and the subscriber control panel.
– Summary—Information is a brief read-only version of the settings for this user interface. It appears in the left navigation of the subscriber’s control panel.
– Help—Lets you display helpful information in the subscriber’s control panel.
– Status—Reserved for future use.
– LAN Device Detail—Appears within the control panel when the user is viewing a particular local device. It shows device-specific information and settings for the service.
– LAN Device Summary—Appears on the subscriber’s control panel when they pause the mouse over a device.
c. From the menu, choose one of the available user interfaces.
d. Enter values for Portal Order and Control Panel Order to determine the order in which user interface information is displayed. Smaller numbers appear closer to the top.
e. Select the roles the user interface is visible to:
– Admin—Appears to Admin users only.
– CSR—Appears to CSR users only.
– Subscriber—Appears on the subscriber’s control panel.
f. Repeat steps a through e to add additional user interfaces.
8-12Cisco Prime Home 5.0.1 User Guide
OL-27464-01
Chapter 8 Administration Overview Managing Services
Step 3 Configure Actions.
a. In the Actions section, click Add Action.
b. From the Actions menu, choose an action:
– sync app—Synchronizes an application. Choose the application from the Application menu.
– run script—Runs a script. Choose a script from the menu.
– set attribute value—Sets a value for a data model element. Enter the setting and value. Check the Force check box to change the value regardless of prior setting; uncheck the Force check box to leave an existing value unchanged.
– remove attribute—Removes a setting from the data model. Enter the data model element.
Editing a Service
To edit a service:
Step 1 On the Administration tab, click Services.
Step 2 Locate the service from the Services List.
Step 3 Edit any field.
Step 4 Click .
Managing User Interface GroupsUser interface groups let you control how services are grouped together on the Prime Home Customer Support tab and on the subscriber’s control panel. Once you have created the groups that make sense for your users, you then assign new and existing services to those groups.
Adding a User Interface Group
To add a user interface group:
Step 1 On the Administration tab, click Services.
The system displays the User Interface Groups window.
Step 2 In the User Interface Groups window, click .
Step 3 In the Code field, enter a unique identifier for this group.
Step 4 In the Name field, enter the name of the group.
Step 5 In the Order field, type a number indicating where you want this group to appear in the list. Smaller numbers appear closer to the top.
8-13Cisco Prime Home 5.0.1 User Guide
OL-27464-01

Chapter 8 Administration Overview Managing Scripts
Step 6 From the Realm menu, choose where this group appears:
• Portal—Appears on the Prime Home Administrator tab in the Services list.
• Control Panel—Appears on the screen used by subscribers to manage their services.
Step 7 Click .
Editing a User Interface Group
To edit a user interface group:
Step 1 On the Administration tab, click Services.
Step 2 Locate the service in the User Interface Group window.
Step 3 Edit any field.
Step 4 Click .
Deleting a User Interface Group
Note Only custom user interface groups can be deleted from the system.
To delete a user interface group:
Step 1 In the User Interface Groups window, locate the group you want to delete.
Step 2 Click to delete your custom group from the system. The system refreshes the page, listing the remaining groups.
Managing Scripts
Note Your system might restrict script editing based on your license with Cisco. If your license restricts editing scripts, you cannot add new scripts or edit the source of existing scripts. You can change a script’s name field and the Usable With option field.
Scripts are implemented using a customized JavaScript-based environment that runs on the ACS. This environment supports complete manipulation of the CPE via TR-069, as well as access to data models stored locally on the ACS, such as the subscriber’s.
Use the Scripts window (Figure 8-7) on the Customer Support tab to manage scripts on your system. You can add new scripts, edit existing scripts, or delete custom scripts. When a device checks into the system, scripts are executed on the device in the order in which they were put into the queue.
8-14Cisco Prime Home 5.0.1 User Guide
OL-27464-01

Chapter 8 Administration Overview Managing Scripts
Figure 8-7 Scripts Window
Prime Home contains two types of scripts:
• Bundled scripts—Scripts that are bundled with Prime Home.
• Custom scripts—Scripts that you set up and apply to your own network.
All script names must be unique. When writing custom scripts, write them with the idea that the script will run against one device at a time. Scripts that run on a device that is associated with a subscriber have access to the subscriber’s information.
For more information on building scripts, contact Cisco Advanced Services.
8-15Cisco Prime Home 5.0.1 User Guide
OL-27464-01

Chapter 8 Administration Overview Managing Scripts
Scripts WindowThe Scripts window comprises the following:
• Script List—This list displays all existing scripts. The Name column displays the action name. The Labels column displays any labels applied to the script. From here, you can:
– Click to refresh the Script List.
– Click to add a new script.
– Select a script from the list to edit it in the Script Editor.
– Click to delete a script. (Only available for custom scripts.)
• Script Editor—The Script Editor allows you to write new scripts or edit existing ones. From here:
– Click to expand the Script Editor to full size. When in full-size mode, click to restore the window to its original size.
– Click to close the editor and discard your changes.
• Script Labels—Apply labels to the script currently selected. From here, click to save your changes.
Adding a New Script
To add a new script:
Step 1 On the Administration tab, click Scripts.
Step 2 Click .
The system displays the Script Editor window.
Step 3 In the Name field, enter the name of the script.
Step 4 In the Code field, enter a unique identifier for this script.
Step 5 Select where you want the script to execute. You can select more than one of the following locations:
• Users—Script executes on user accounts.
• Events—Script executes upon specific events.
• Bulk Operations—Script executes during bulk operations.
• Services—Script executes on services.
Step 6 Click Add New Parameter and specify a type, name, and description. Click Add Another Parameter to add additional parameters.
Step 7 In the JavaScript Source text box, enter the code for the script.
Step 8 Select a script label, if appropriate to the action.
Step 9 Click .
8-16Cisco Prime Home 5.0.1 User Guide
OL-27464-01

Chapter 8 Administration Overview Managing Events
Editing a Script
Note You can edit any script in the system.
To edit a script:
Step 1 On the Administration tab, click Scripts.
Step 2 In the Script List, select the name of the script to edit.
The system displays the Script Editor window.
Step 3 Make changes to any of the fields.
Step 4 Click .
Deleting a Script
Note Only custom scripts can be deleted from the system.
To delete a script:
Step 1 In the Script List, locate the script you want to delete.
Step 2 Click to delete your custom script from the system. The system refreshes the page, listing the remaining scripts.
Managing EventsAn event is a predefined occurrence on a CPE that triggers scripts at specified moments. Events represent various points within the device's lifecycle. You cannot add new events to the list, but you can add new scripts to be run at each event point. An event can have multiple scripts. However, each script needs to be added one at a time.
Prime Home defines the following types of events:
• Initial Contact—Occurs when the server sees the CPE appear on its network for the first time.
• Subscriber Associated—Occurs when a device is associated to a subscriber. This event also occurs when a future device informs for the first time.
• Reboot—Occurs when the CPE reboots due to a power outage or specific request. This event also typically occurs with Initial Contact.
• Service Enable—Occurs after a service is enabled on a device.
• Service Disable—Occurs after a service is disabled on a device.
8-17Cisco Prime Home 5.0.1 User Guide
OL-27464-01
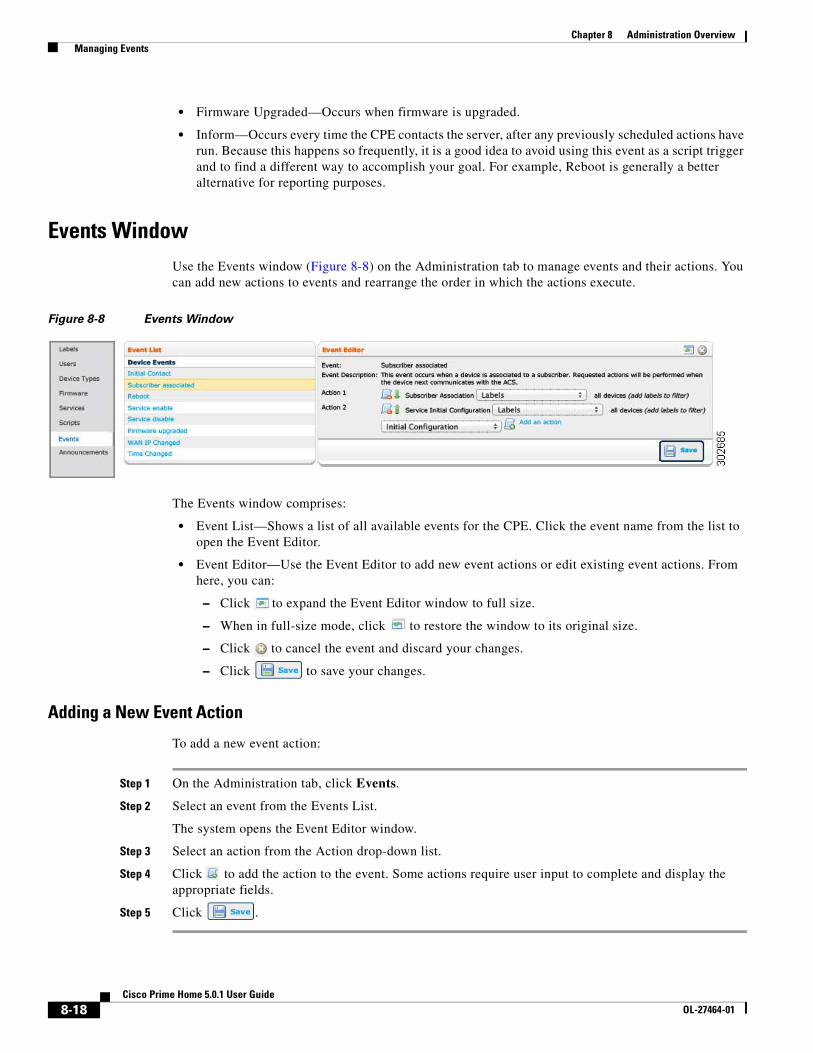
Chapter 8 Administration Overview Managing Events
• Firmware Upgraded—Occurs when firmware is upgraded.
• Inform—Occurs every time the CPE contacts the server, after any previously scheduled actions have run. Because this happens so frequently, it is a good idea to avoid using this event as a script trigger and to find a different way to accomplish your goal. For example, Reboot is generally a better alternative for reporting purposes.
Events WindowUse the Events window (Figure 8-8) on the Administration tab to manage events and their actions. You can add new actions to events and rearrange the order in which the actions execute.
Figure 8-8 Events Window
The Events window comprises:
• Event List—Shows a list of all available events for the CPE. Click the event name from the list to open the Event Editor.
• Event Editor—Use the Event Editor to add new event actions or edit existing event actions. From here, you can:
– Click to expand the Event Editor window to full size.
– When in full-size mode, click to restore the window to its original size.
– Click to cancel the event and discard your changes.
– Click to save your changes.
Adding a New Event Action
To add a new event action:
Step 1 On the Administration tab, click Events.
Step 2 Select an event from the Events List.
The system opens the Event Editor window.
Step 3 Select an action from the Action drop-down list.
Step 4 Click to add the action to the event. Some actions require user input to complete and display the appropriate fields.
Step 5 Click .
8-18Cisco Prime Home 5.0.1 User Guide
OL-27464-01
Chapter 8 Administration Overview Managing Announcements
Editing an Event Action
To edit an event action:
Step 1 On the Administration tab, click Events.
Step 2 In the Event List, select the name of the event.
Step 3 In the Event Editor, click the name of the action.
Step 4 Edit the properties for the action, if any.
Step 5 Use the and icons to rearrange the order in which the actions execute.
Step 6 Click .
Deleting an Event Action
To delete an event action:
Step 1 On the Administration tab, click Events.
Step 2 In the Event List, select the name of an event.
Step 3 Click next to the action you want to delete from the event.
Step 4 Click .
Managing AnnouncementsYou can create custom announcements to communicate with your CSRs. For example, you can use announcements to alert CSRs to problems or to issue reminders about new services.
Note The location of the announcements depends on how your Prime Home installation is configured. Announcements can be configured as a standalone service, or an announcements panel can be added to another service.
Prime Home supports the following types of announcements:
Information
Warning
Alert
8-19Cisco Prime Home 5.0.1 User Guide
OL-27464-01
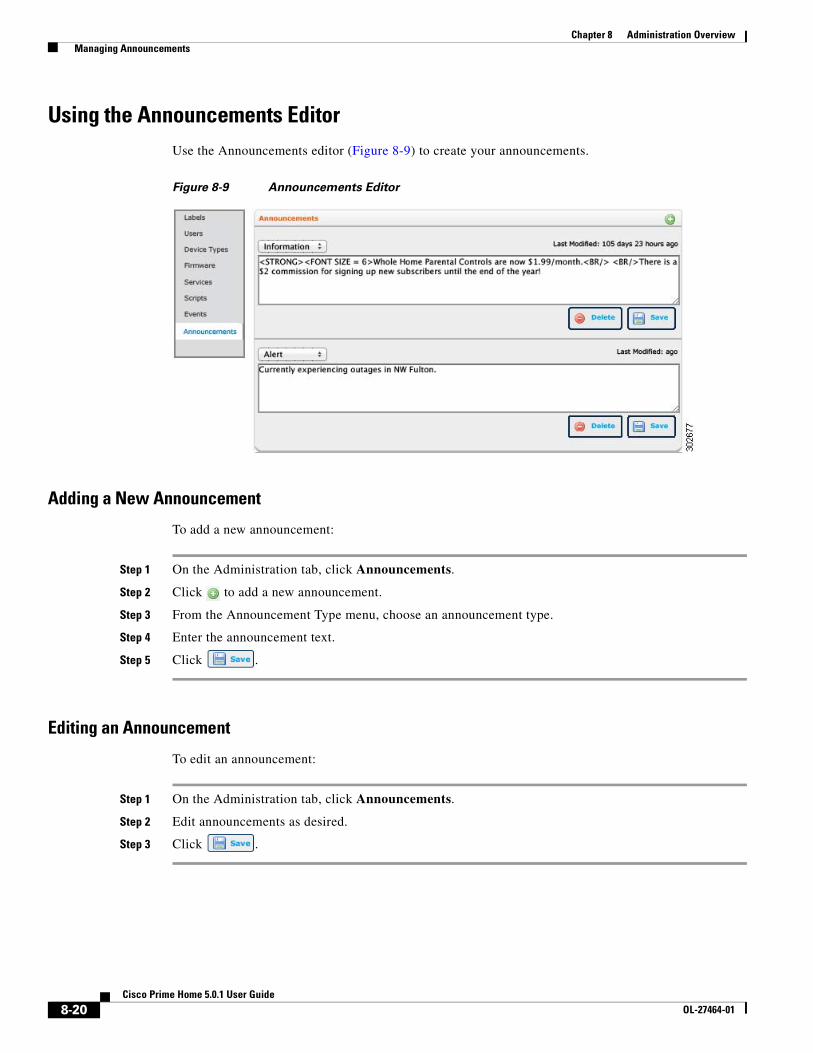
Chapter 8 Administration Overview Managing Announcements
Using the Announcements EditorUse the Announcements editor (Figure 8-9) to create your announcements.
Figure 8-9 Announcements Editor
Adding a New Announcement
To add a new announcement:
Step 1 On the Administration tab, click Announcements.
Step 2 Click to add a new announcement.
Step 3 From the Announcement Type menu, choose an announcement type.
Step 4 Enter the announcement text.
Step 5 Click .
Editing an Announcement
To edit an announcement:
Step 1 On the Administration tab, click Announcements.
Step 2 Edit announcements as desired.
Step 3 Click .
8-20Cisco Prime Home 5.0.1 User Guide
OL-27464-01

Chapter 8 Administration Overview Managing Announcements
Deleting an Announcement
To delete an announcement:
Step 1 On the Administration tab, click Announcements.
Step 2 Locate the announcement to delete and click Delete.
8-21Cisco Prime Home 5.0.1 User Guide
OL-27464-01

Chapter 8 Administration Overview Managing Announcements
8-22Cisco Prime Home 5.0.1 User Guide
OL-27464-01

OL-27464-01
C H A P T E R 9
Reviewing Audit LogsAudit logs give you a view into exactly what is happening on your system. An audit log records every transaction and event.
You can view the audit log based on a date range.
Filters help you find information by showing only:
• Changes made by a particular portal user, a subscriber, or the system (root) user.
• Changes applied during bulk operations or to a particular device, portal user, or subscriber.
Here are definitions of a few key terms:
• Portal users—Admins or CSRs who can make changes to device or subscriber records and to other portal users’ accounts.
• Subscribers—Customers who can make changes to their devices through the control panel. The audit log shows changes to local network and wireless settings, parental controls, and port forwarding.
• System—Refers to the system, or root, user who can make changes to any device or user.
• Device—Refers to a CPE device or a customer device attached to the CPE device’s LAN.
Launching the Audit LogTo launch the audit log:
Step 1 Click the Audit tab.
Step 2 In the Audit window, specify a range of dates to display information for. The default is the past five days.
Step 3 (Optional) From the Changed By menu, choose one of the following:
• Portal User—Enter the username of a portal user.
• Subscriber—Enter a subscriber code.
• System—Leave this value blank.
9-1Cisco Prime Home 5.0.1 User Guide
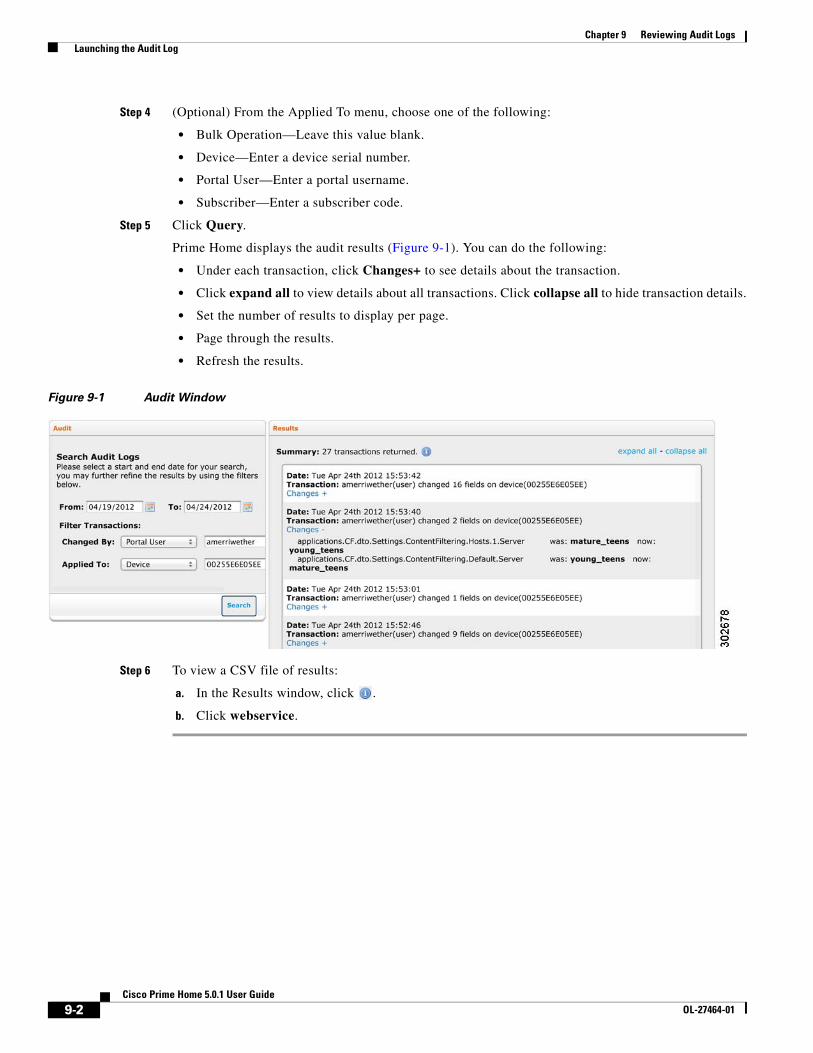
Chapter 9 Reviewing Audit Logs Launching the Audit Log
Step 4 (Optional) From the Applied To menu, choose one of the following:
• Bulk Operation—Leave this value blank.
• Device—Enter a device serial number.
• Portal User—Enter a portal username.
• Subscriber—Enter a subscriber code.
Step 5 Click Query.
Prime Home displays the audit results (Figure 9-1). You can do the following:
• Under each transaction, click Changes+ to see details about the transaction.
• Click expand all to view details about all transactions. Click collapse all to hide transaction details.
• Set the number of results to display per page.
• Page through the results.
• Refresh the results.
Figure 9-1 Audit Window
Step 6 To view a CSV file of results:
a. In the Results window, click .
b. Click webservice.
9-2Cisco Prime Home 5.0.1 User Guide
OL-27464-01

OL-27464-01
C H A P T E R 10
Managing Bulk OperationsBulk operations are a flexible, convenient tool designed to help you automate and keep tight control over every part of many common activities. They allow you to use built-in or custom actions to automate a wide range of common activities, whether you use Cisco CPEs or third party CPEs.
Note Certain bulk operations are limited when using third-party CPEs. Contact Cisco Customer Support if you have questions.
Bulk operations allow you to run actions against some or all of your CPEs, either passively or actively. If the action runs passively, each CPE is affected by the bulk operation as the CPE calls into the ACS during its regular inform. If the action runs actively, then, based on processing availability, the server solicits CPEs to call in for the update.
With bulk operations, you can:
• Stage complicated WAN changes
• Silently accomplish firmware updates
• Enable and disable services
• Cause browser redirection for CPEs with Wi-Fi security issues, taking subscribers to a page with security configuration tech tips
The Bulk Operations interface uses simple drag-and-drop functionality, allowing you to quickly create customized search criteria. Search criteria can be based on CPE information, subscriber information, or a combination of both. When you run a bulk operation action, the search criteria allow the action to run on only the CPEs and subscribers that match your specific requirements.
10-1Cisco Prime Home 5.0.1 User Guide
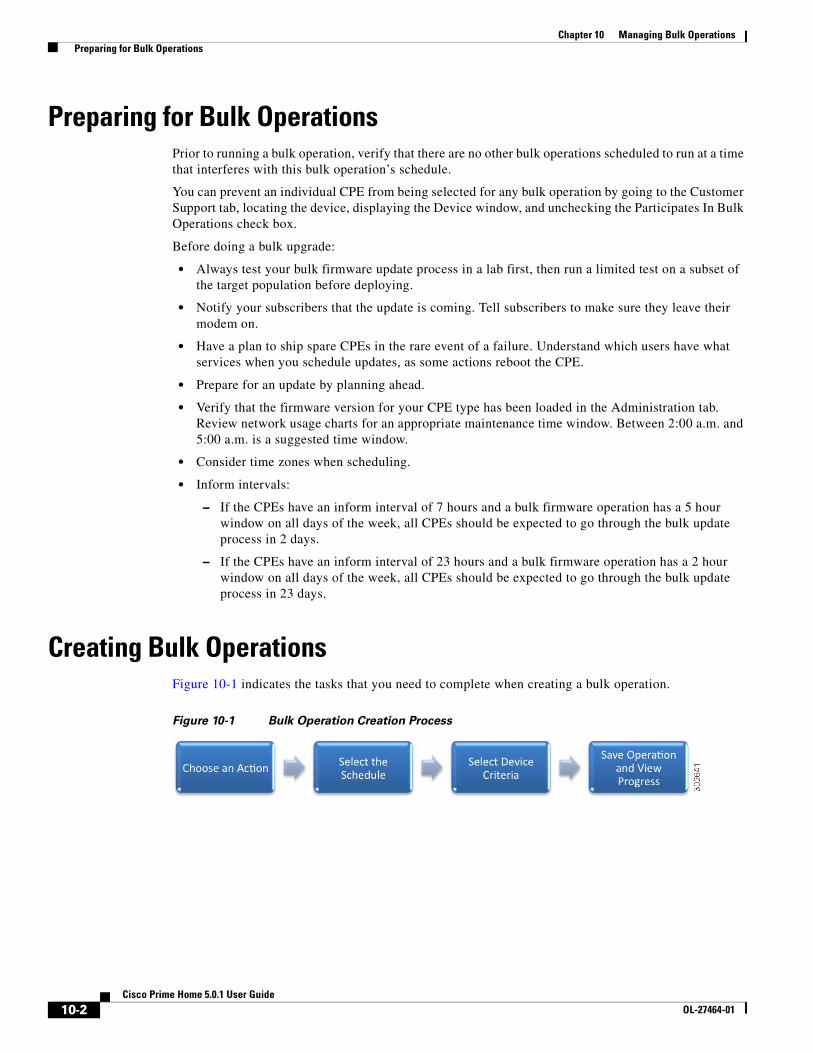
Chapter 10 Managing Bulk Operations Preparing for Bulk Operations
Preparing for Bulk OperationsPrior to running a bulk operation, verify that there are no other bulk operations scheduled to run at a time that interferes with this bulk operation’s schedule.
You can prevent an individual CPE from being selected for any bulk operation by going to the Customer Support tab, locating the device, displaying the Device window, and unchecking the Participates In Bulk Operations check box.
Before doing a bulk upgrade:
• Always test your bulk firmware update process in a lab first, then run a limited test on a subset of the target population before deploying.
• Notify your subscribers that the update is coming. Tell subscribers to make sure they leave their modem on.
• Have a plan to ship spare CPEs in the rare event of a failure. Understand which users have what services when you schedule updates, as some actions reboot the CPE.
• Prepare for an update by planning ahead.
• Verify that the firmware version for your CPE type has been loaded in the Administration tab. Review network usage charts for an appropriate maintenance time window. Between 2:00 a.m. and 5:00 a.m. is a suggested time window.
• Consider time zones when scheduling.
• Inform intervals:
– If the CPEs have an inform interval of 7 hours and a bulk firmware operation has a 5 hour window on all days of the week, all CPEs should be expected to go through the bulk update process in 2 days.
– If the CPEs have an inform interval of 23 hours and a bulk firmware operation has a 2 hour window on all days of the week, all CPEs should be expected to go through the bulk update process in 23 days.
Creating Bulk OperationsFigure 10-1 indicates the tasks that you need to complete when creating a bulk operation.
Figure 10-1 Bulk Operation Creation Process
10-2Cisco Prime Home 5.0.1 User Guide
OL-27464-01
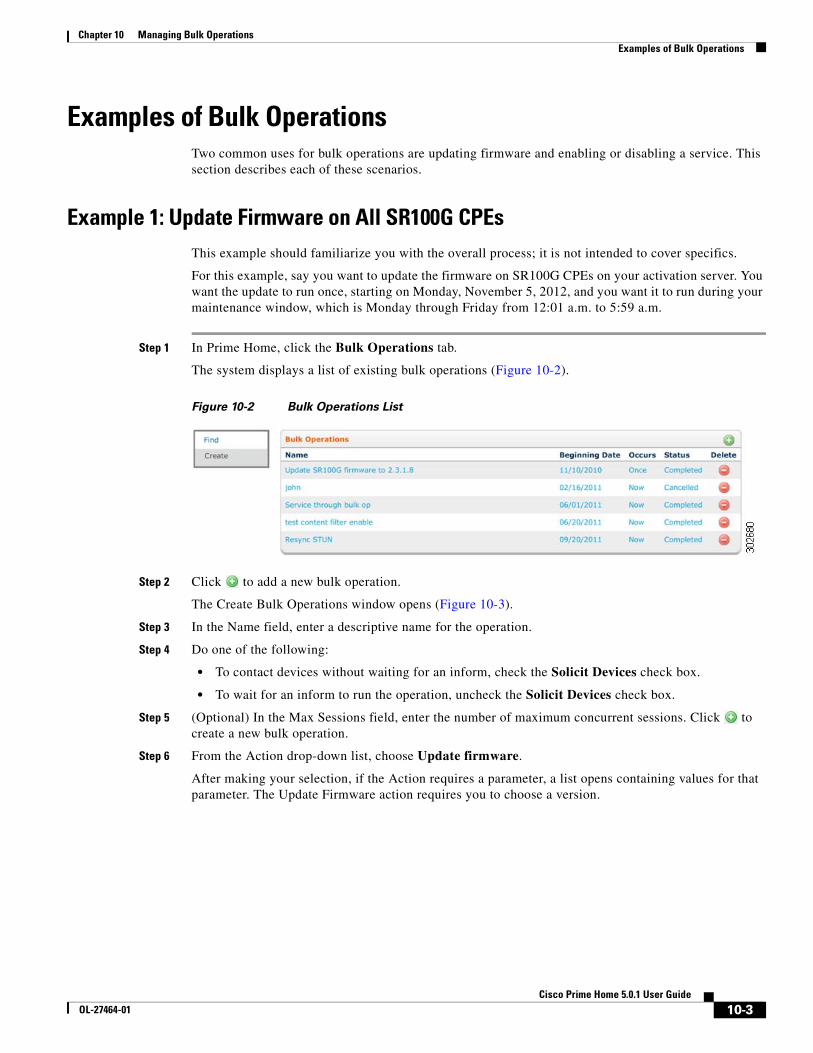
Chapter 10 Managing Bulk Operations Examples of Bulk Operations
Examples of Bulk OperationsTwo common uses for bulk operations are updating firmware and enabling or disabling a service. This section describes each of these scenarios.
Example 1: Update Firmware on All SR100G CPEsThis example should familiarize you with the overall process; it is not intended to cover specifics.
For this example, say you want to update the firmware on SR100G CPEs on your activation server. You want the update to run once, starting on Monday, November 5, 2012, and you want it to run during your maintenance window, which is Monday through Friday from 12:01 a.m. to 5:59 a.m.
Step 1 In Prime Home, click the Bulk Operations tab.
The system displays a list of existing bulk operations (Figure 10-2).
Figure 10-2 Bulk Operations List
Step 2 Click to add a new bulk operation.
The Create Bulk Operations window opens (Figure 10-3).
Step 3 In the Name field, enter a descriptive name for the operation.
Step 4 Do one of the following:
• To contact devices without waiting for an inform, check the Solicit Devices check box.
• To wait for an inform to run the operation, uncheck the Solicit Devices check box.
Step 5 (Optional) In the Max Sessions field, enter the number of maximum concurrent sessions. Click to create a new bulk operation.
Step 6 From the Action drop-down list, choose Update firmware.
After making your selection, if the Action requires a parameter, a list opens containing values for that parameter. The Update Firmware action requires you to choose a version.
10-3Cisco Prime Home 5.0.1 User Guide
OL-27464-01
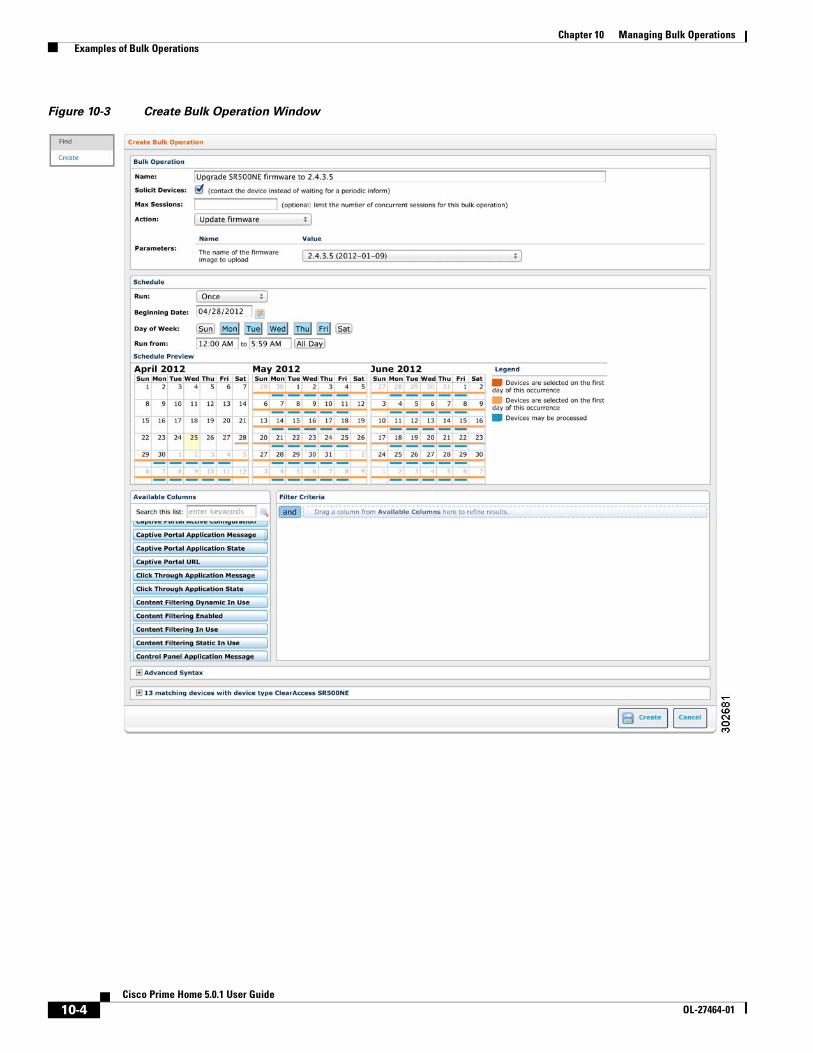
Chapter 10 Managing Bulk Operations Examples of Bulk Operations
Figure 10-3 Create Bulk Operation Window
10-4Cisco Prime Home 5.0.1 User Guide
OL-27464-01
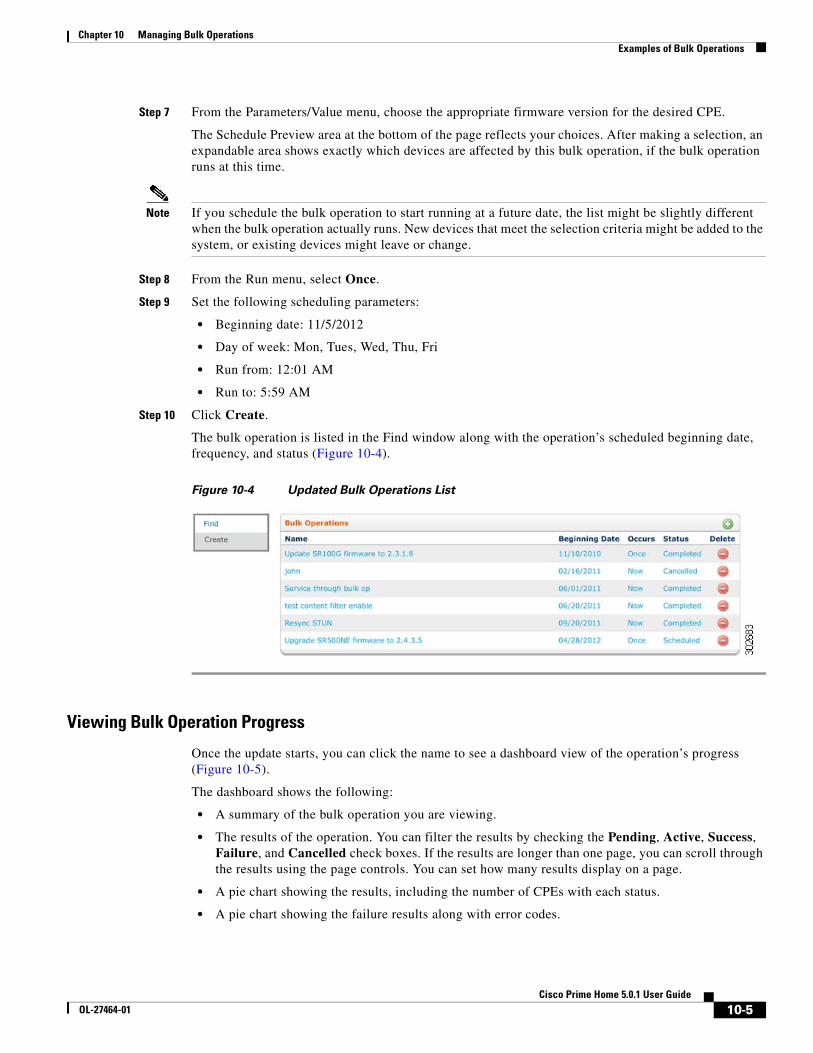
Chapter 10 Managing Bulk Operations Examples of Bulk Operations
Step 7 From the Parameters/Value menu, choose the appropriate firmware version for the desired CPE.
The Schedule Preview area at the bottom of the page reflects your choices. After making a selection, an expandable area shows exactly which devices are affected by this bulk operation, if the bulk operation runs at this time.
Note If you schedule the bulk operation to start running at a future date, the list might be slightly different when the bulk operation actually runs. New devices that meet the selection criteria might be added to the system, or existing devices might leave or change.
Step 8 From the Run menu, select Once.
Step 9 Set the following scheduling parameters:
• Beginning date: 11/5/2012
• Day of week: Mon, Tues, Wed, Thu, Fri
• Run from: 12:01 AM
• Run to: 5:59 AM
Step 10 Click Create.
The bulk operation is listed in the Find window along with the operation’s scheduled beginning date, frequency, and status (Figure 10-4).
Figure 10-4 Updated Bulk Operations List
Viewing Bulk Operation Progress
Once the update starts, you can click the name to see a dashboard view of the operation’s progress (Figure 10-5).
The dashboard shows the following:
• A summary of the bulk operation you are viewing.
• The results of the operation. You can filter the results by checking the Pending, Active, Success, Failure, and Cancelled check boxes. If the results are longer than one page, you can scroll through the results using the page controls. You can set how many results display on a page.
• A pie chart showing the results, including the number of CPEs with each status.
• A pie chart showing the failure results along with error codes.
10-5Cisco Prime Home 5.0.1 User Guide
OL-27464-01
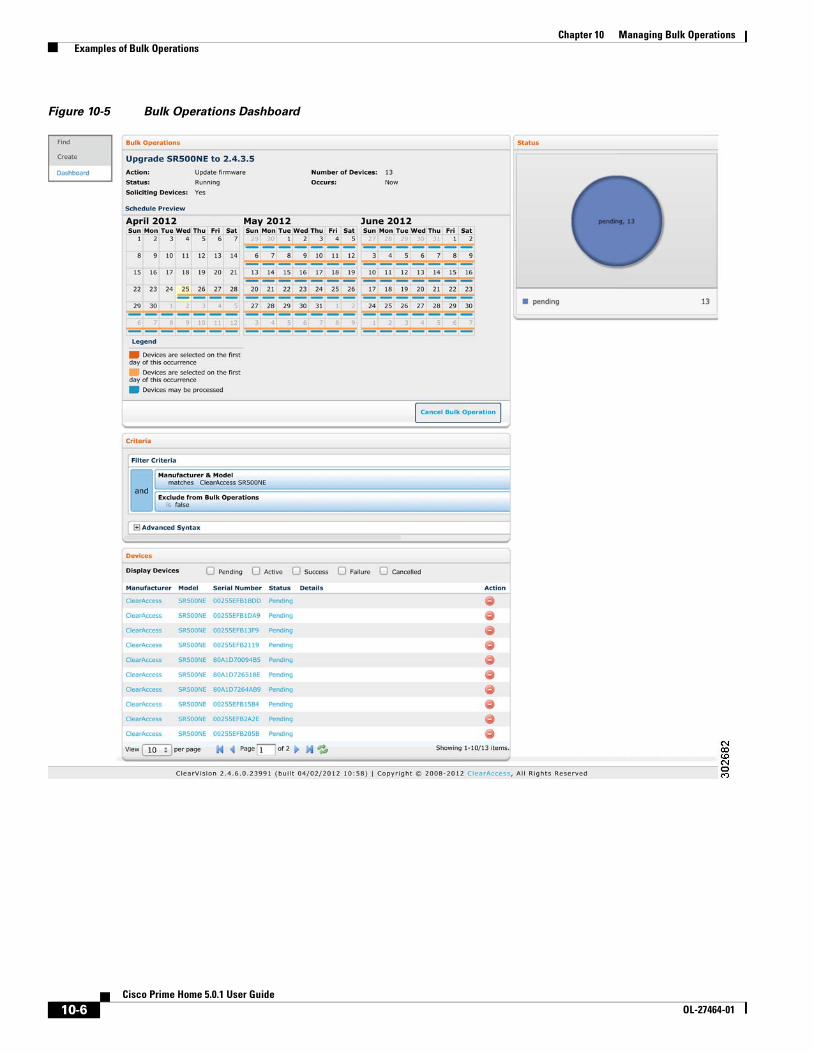
Chapter 10 Managing Bulk Operations Examples of Bulk Operations
Figure 10-5 Bulk Operations Dashboard
10-6Cisco Prime Home 5.0.1 User Guide
OL-27464-01
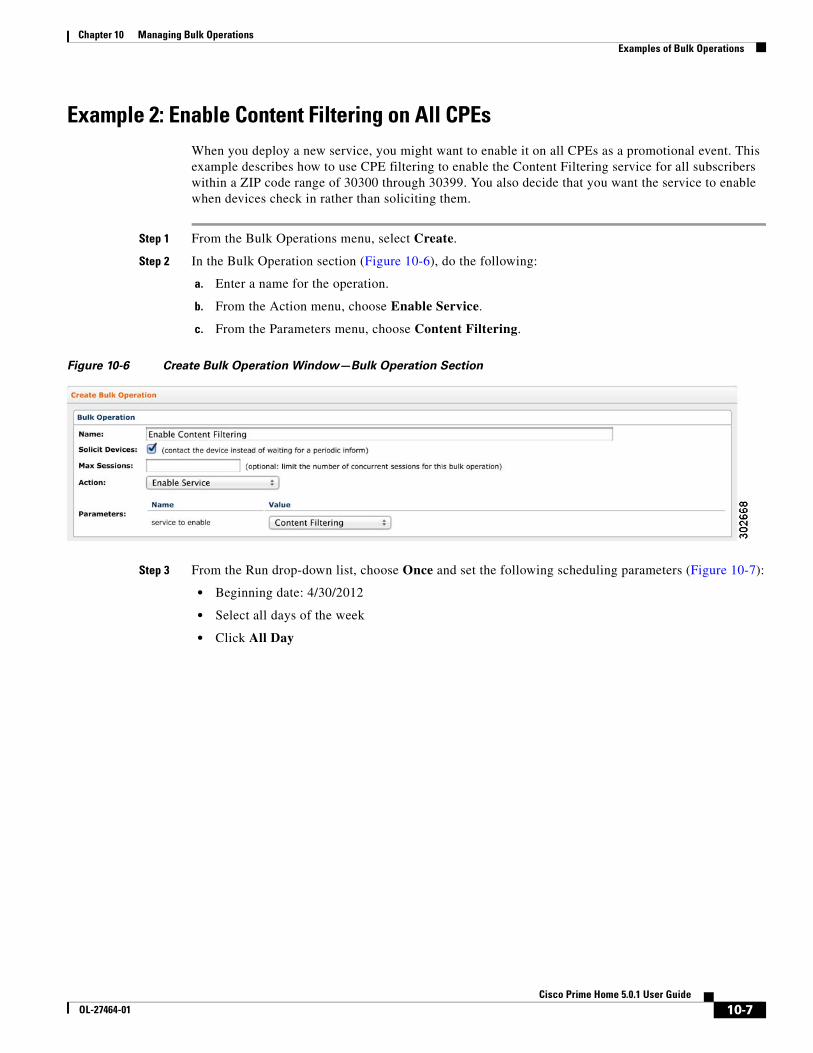
Chapter 10 Managing Bulk Operations Examples of Bulk Operations
Example 2: Enable Content Filtering on All CPEsWhen you deploy a new service, you might want to enable it on all CPEs as a promotional event. This example describes how to use CPE filtering to enable the Content Filtering service for all subscribers within a ZIP code range of 30300 through 30399. You also decide that you want the service to enable when devices check in rather than soliciting them.
Step 1 From the Bulk Operations menu, select Create.
Step 2 In the Bulk Operation section (Figure 10-6), do the following:
a. Enter a name for the operation.
b. From the Action menu, choose Enable Service.
c. From the Parameters menu, choose Content Filtering.
Figure 10-6 Create Bulk Operation Window—Bulk Operation Section
Step 3 From the Run drop-down list, choose Once and set the following scheduling parameters (Figure 10-7):
• Beginning date: 4/30/2012
• Select all days of the week
• Click All Day
10-7Cisco Prime Home 5.0.1 User Guide
OL-27464-01
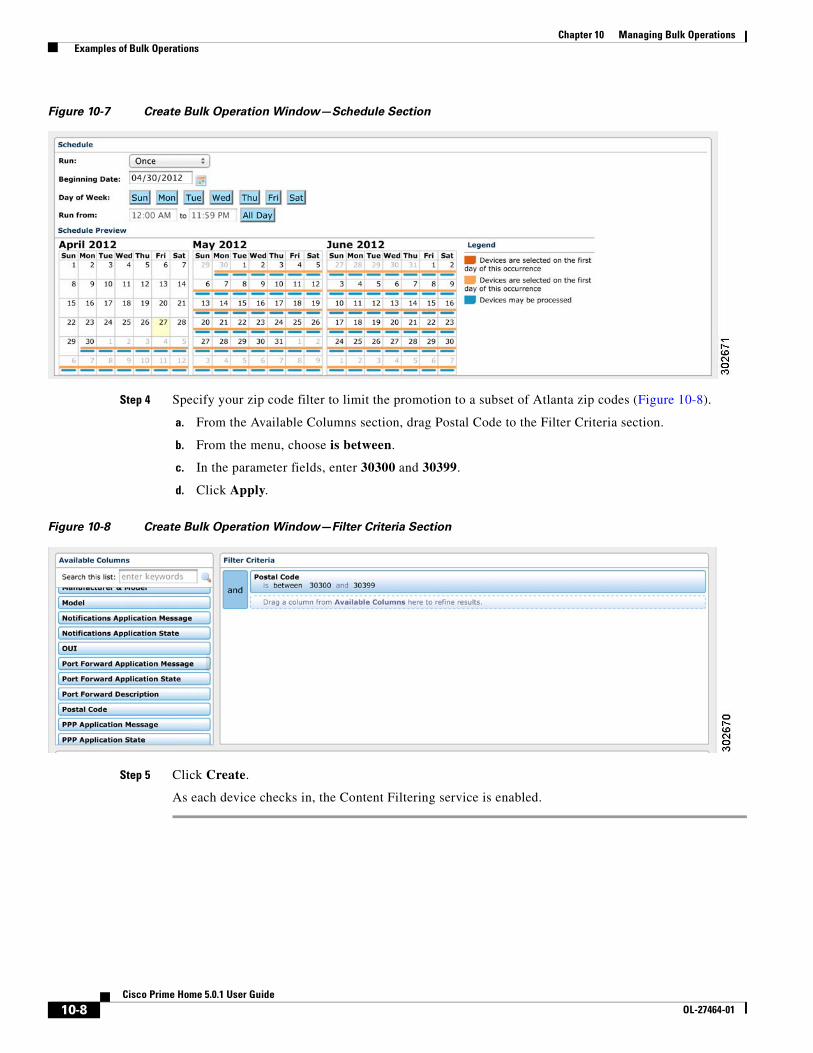
Chapter 10 Managing Bulk Operations Examples of Bulk Operations
Figure 10-7 Create Bulk Operation Window—Schedule Section
Step 4 Specify your zip code filter to limit the promotion to a subset of Atlanta zip codes (Figure 10-8).
a. From the Available Columns section, drag Postal Code to the Filter Criteria section.
b. From the menu, choose is between.
c. In the parameter fields, enter 30300 and 30399.
d. Click Apply.
Figure 10-8 Create Bulk Operation Window—Filter Criteria Section
Step 5 Click Create.
As each device checks in, the Content Filtering service is enabled.
10-8Cisco Prime Home 5.0.1 User Guide
OL-27464-01
Chapter 10 Managing Bulk Operations Best Practices for Working with Bulk Operations
Best Practices for Working with Bulk Operations
Caution Bulk Operations is a powerful tool that you should understand before you use. It is possible to adversely affect your subscribers’ services if you do not understand the actions you schedule.
Troubleshooting Failed Bulk OperationsBulk Operations rarely fail on all CPEs, if you have set up the operation correctly. However, there can be “failed actions” on a particular CPE. In this case, Prime Home does not attempt to rerun the action against that CPE.
If the operation is scheduled to run multiple times, the CPE might “enter the pool” of selected CPEs a second time. Otherwise, determine the reason the action failed and then run another bulk operation that includes that CPE.
Controlling Maximum Throughput/ThrottlingThere are three base parameters that control the maximum throughput of Bulk Operations:
• bulkOp.maximumConcurrentRunningBulkOperations
• bulkOp.timeBetweenSolicitingSchedulerSecs
• bulkOp.minimumTimeBetweenSolicitsMS
The first, bulkOp.maximumConcurrentRunningBulkOperations, is the maximum number of bulk operations that can run at a given time.
The second and third parameters control the behavior of the bulk operations engine when there are free bulk operation slots. The process is described below.
When a bulk operations starts, there are N number of free slots for bulk operations. The engine retrieves N CPEs from the result set (the list of CPEs that are part of the bulk operation) to solicit. It then solicits the CPEs, and the spacing between those solicits is bulkOp.minimumTimeBetweenSolicitsMS.
For every interval defined in bulkOp.timeBetweenSolicitingSchedulerSecs, the engine checks for free bulk operation slots. If there are free slots, it grabs that number of CPEs from the result set and solicits them.
For passive bulk operations, solicits don’t occur. Instead, when a CPE informs, if it’s in the result set and there are free bulk operation slots, the bulk operation runs.
The maximum number of bulk operations is modified internally by the system, depending on the number of CPE sessions that are active. For example, if tr069.maxConcurrentSessions is set to 100, bulkOp.maximumConcurrentRunning-BulkOperations is set to 50, and there are 50 CPEs checked in, the maximum number of bulk operations is reduced by 50%. Current sessions equal 50% of the maximum sessions, and the number of bulk operations is reduced by that percentage.
10-9Cisco Prime Home 5.0.1 User Guide
OL-27464-01

Chapter 10 Managing Bulk Operations Understanding Bulk Operation Options
Preparing to Run Firmware Update OperationsPreparation is the key to a successful bulk firmware update process. There are several things to consider before updating to a newer firmware version:
• Make and model—You can only choose one CPE type per process, but you can schedule multiple bulk operations.
• Firmware version—Verify that the firmware version being updated from will go directly to the new version. If the CPEs to be updated are on a firmware release that is very far behind the current release, you might need to perform interim updates prior to updating them to the current version. Contact Cisco Customer Support if you have questions.
• Firmware definition—View the firmware definition on the Firmware window of the Administration tab. If any changes need to be made, edit the firmware definition.
• Field preparation—Verify that all CPEs in the selected group are informing.
• Always run a test update on a small group of CPEs before running an update on a large group of CPEs.
• Labels—If you have applied a time zone-related label to your devices, searching by labels is useful when updating CPEs in multiple time zones.
Understanding Bulk Operation OptionsYou have many choices to make when creating your bulk operations. For information on creating a custom solution, one tailored to your specific needs, contact Cisco Advanced Services.
The section below describes some of the built-in options you have for:
• Actions—The types of operations you can run.
• Scheduling—Allows you to set when you want the action to start running and how often you want Prime Home to select the pool of CPEs to be acted on.
• CPE Selection—The CPEs you want this operation to run on.
Action OptionsActions are designed to carry out a specific set of instructions. Each built-in action is named so it describes what the action does.
Prime Home has built-in actions, but you can also contact Cisco Advanced Services to create custom actions. If you are an advanced user, you can create actions by going to the Scripts window on the Administration tab to add a new script.
10-10Cisco Prime Home 5.0.1 User Guide
OL-27464-01
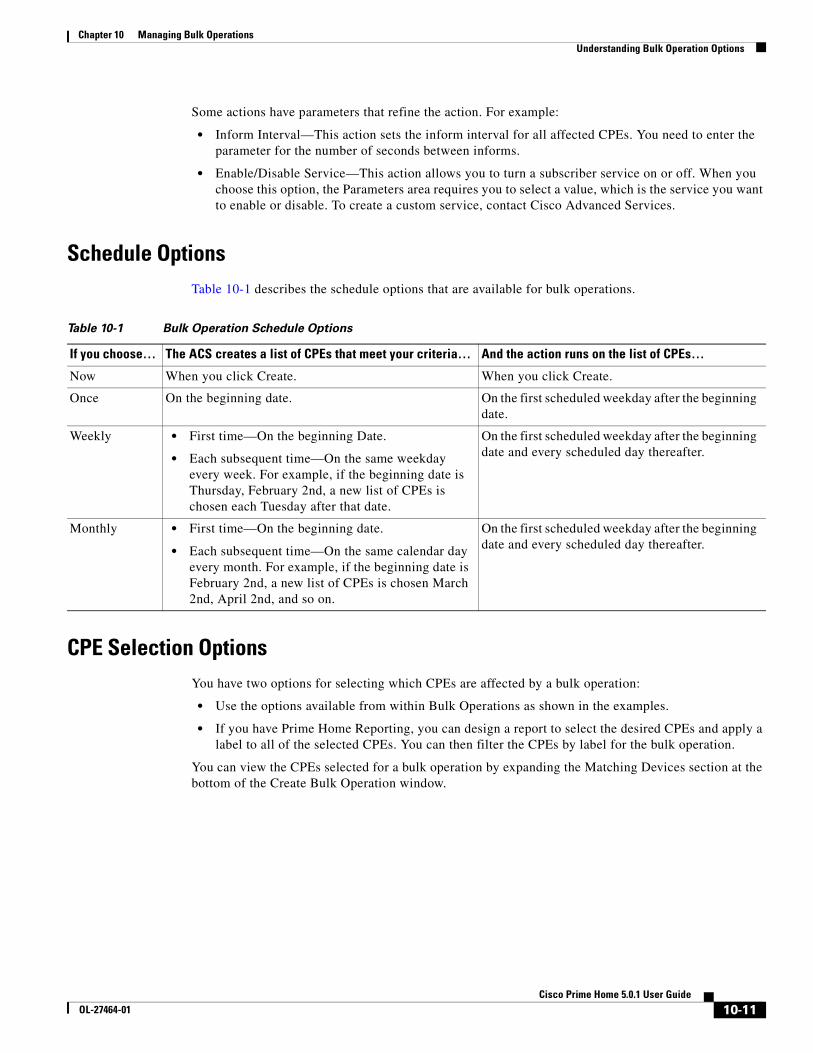
Chapter 10 Managing Bulk Operations Understanding Bulk Operation Options
Some actions have parameters that refine the action. For example:
• Inform Interval—This action sets the inform interval for all affected CPEs. You need to enter the parameter for the number of seconds between informs.
• Enable/Disable Service—This action allows you to turn a subscriber service on or off. When you choose this option, the Parameters area requires you to select a value, which is the service you want to enable or disable. To create a custom service, contact Cisco Advanced Services.
Schedule OptionsTable 10-1 describes the schedule options that are available for bulk operations.
CPE Selection OptionsYou have two options for selecting which CPEs are affected by a bulk operation:
• Use the options available from within Bulk Operations as shown in the examples.
• If you have Prime Home Reporting, you can design a report to select the desired CPEs and apply a label to all of the selected CPEs. You can then filter the CPEs by label for the bulk operation.
You can view the CPEs selected for a bulk operation by expanding the Matching Devices section at the bottom of the Create Bulk Operation window.
Table 10-1 Bulk Operation Schedule Options
If you choose… The ACS creates a list of CPEs that meet your criteria… And the action runs on the list of CPEs…
Now When you click Create. When you click Create.
Once On the beginning date. On the first scheduled weekday after the beginning date.
Weekly • First time—On the beginning Date.
• Each subsequent time—On the same weekday every week. For example, if the beginning date is Thursday, February 2nd, a new list of CPEs is chosen each Tuesday after that date.
On the first scheduled weekday after the beginning date and every scheduled day thereafter.
Monthly • First time—On the beginning date.
• Each subsequent time—On the same calendar day every month. For example, if the beginning date is February 2nd, a new list of CPEs is chosen March 2nd, April 2nd, and so on.
On the first scheduled weekday after the beginning date and every scheduled day thereafter.
10-11Cisco Prime Home 5.0.1 User Guide
OL-27464-01

Chapter 10 Managing Bulk Operations Understanding Bulk Operation Options
10-12Cisco Prime Home 5.0.1 User Guide
OL-27464-01
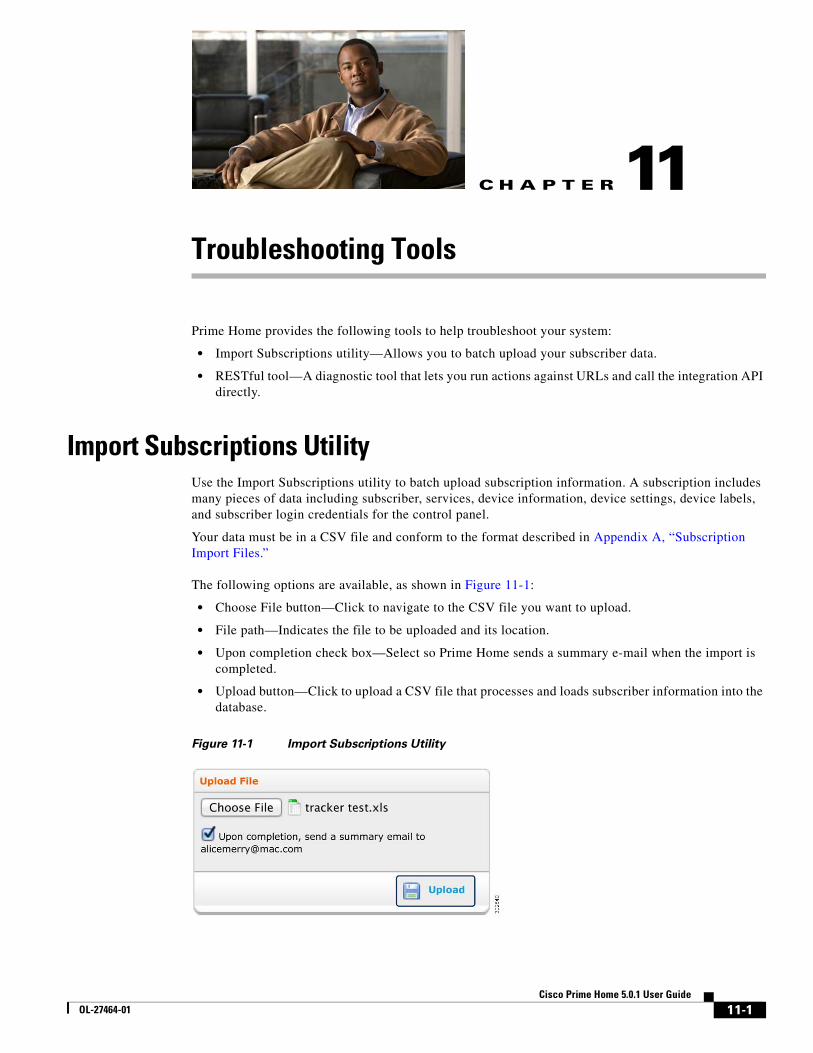
OL-27464-01
C H A P T E R 11
Troubleshooting ToolsPrime Home provides the following tools to help troubleshoot your system:
• Import Subscriptions utility—Allows you to batch upload your subscriber data.
• RESTful tool—A diagnostic tool that lets you run actions against URLs and call the integration API directly.
Import Subscriptions UtilityUse the Import Subscriptions utility to batch upload subscription information. A subscription includes many pieces of data including subscriber, services, device information, device settings, device labels, and subscriber login credentials for the control panel.
Your data must be in a CSV file and conform to the format described in Appendix A, “Subscription Import Files.”
The following options are available, as shown in Figure 11-1:
• Choose File button—Click to navigate to the CSV file you want to upload.
• File path—Indicates the file to be uploaded and its location.
• Upon completion check box—Select so Prime Home sends a summary e-mail when the import is completed.
• Upload button—Click to upload a CSV file that processes and loads subscriber information into the database.
Figure 11-1 Import Subscriptions Utility
11-1Cisco Prime Home 5.0.1 User Guide

Chapter 11 Troubleshooting Tools RESTful Service Tool
Importing Multiple SubscriptionsTo import multiple subscriptions:
Step 1 On the Utilities tab, click Import Subscriptions.
Step 2 Click Choose File.
Step 3 In the system dialog box, choose a CSV file to upload.
Step 4 Click Upload.
Prime Home imports your data, displays a progress bar, and informs you of success.
RESTful Service ToolThe RESTful service tool lets you run actions against URLs and call the integration API directly. The following options are available, as shown in Figure 11-2:
• Operation—Choose an HTTP verb from the drop-down list, and then enter a URL in the text box.
• Execute—Click to run the operation on the desired URL.
Figure 11-2 RESTful Service Tool
11-2Cisco Prime Home 5.0.1 User Guide
OL-27464-01
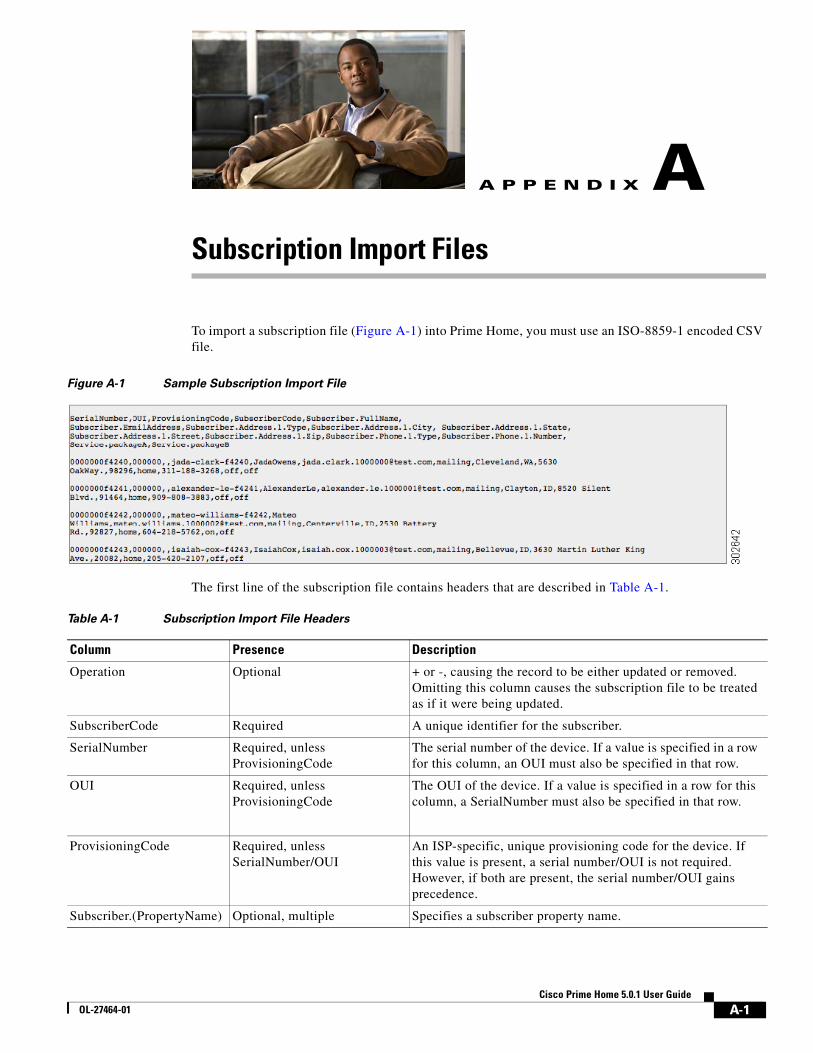
OL-27464-01
A
P P E N D I X A Subscription Import FilesTo import a subscription file (Figure A-1) into Prime Home, you must use an ISO-8859-1 encoded CSV file.
Figure A-1 Sample Subscription Import File
The first line of the subscription file contains headers that are described in Table A-1.
Table A-1 Subscription Import File Headers
Column Presence Description
Operation Optional + or -, causing the record to be either updated or removed. Omitting this column causes the subscription file to be treated as if it were being updated.
SubscriberCode Required A unique identifier for the subscriber.
SerialNumber Required, unless ProvisioningCode
The serial number of the device. If a value is specified in a row for this column, an OUI must also be specified in that row.
OUI Required, unless ProvisioningCode
The OUI of the device. If a value is specified in a row for this column, a SerialNumber must also be specified in that row.
ProvisioningCode Required, unless SerialNumber/OUI
An ISP-specific, unique provisioning code for the device. If this value is present, a serial number/OUI is not required. However, if both are present, the serial number/OUI gains precedence.
Subscriber.(PropertyName) Optional, multiple Specifies a subscriber property name.
A-1Cisco Prime Home 5.0.1 User Guide
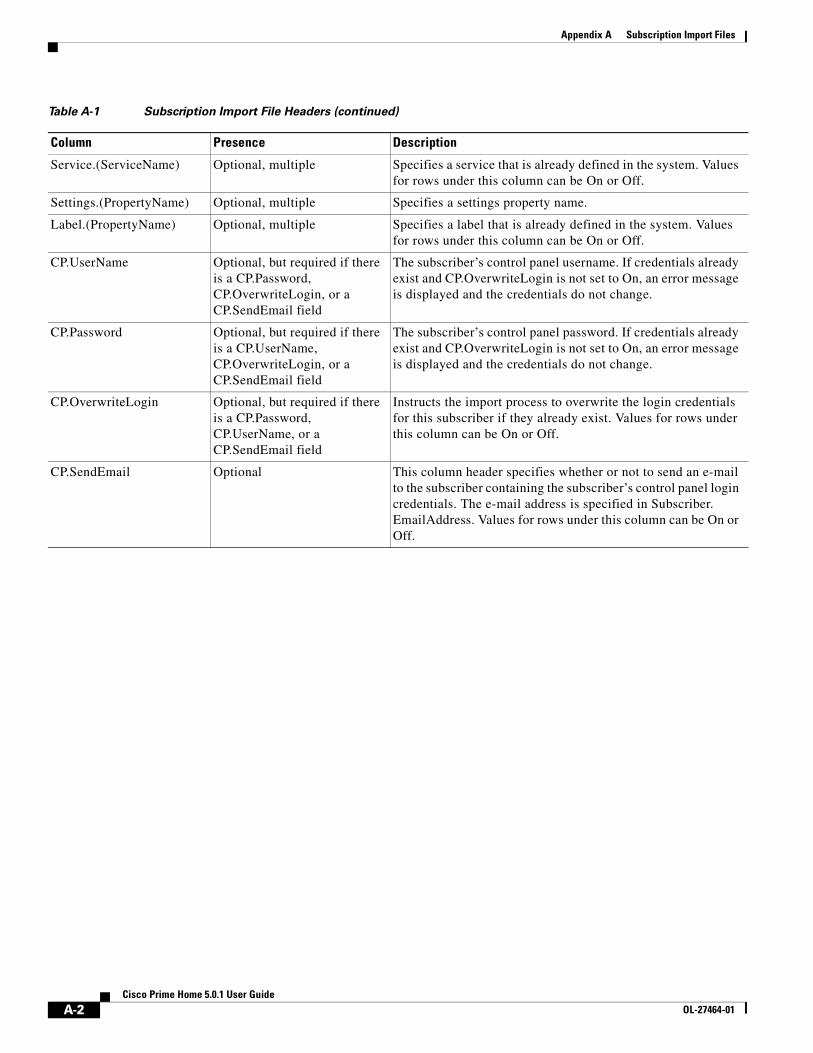
Appendix A Subscription Import Files
Service.(ServiceName) Optional, multiple Specifies a service that is already defined in the system. Values for rows under this column can be On or Off.
Settings.(PropertyName) Optional, multiple Specifies a settings property name.
Label.(PropertyName) Optional, multiple Specifies a label that is already defined in the system. Values for rows under this column can be On or Off.
CP.UserName Optional, but required if there is a CP.Password, CP.OverwriteLogin, or a CP.SendEmail field
The subscriber’s control panel username. If credentials already exist and CP.OverwriteLogin is not set to On, an error message is displayed and the credentials do not change.
CP.Password Optional, but required if there is a CP.UserName, CP.OverwriteLogin, or a CP.SendEmail field
The subscriber’s control panel password. If credentials already exist and CP.OverwriteLogin is not set to On, an error message is displayed and the credentials do not change.
CP.OverwriteLogin Optional, but required if there is a CP.Password, CP.UserName, or a CP.SendEmail field
Instructs the import process to overwrite the login credentials for this subscriber if they already exist. Values for rows under this column can be On or Off.
CP.SendEmail Optional This column header specifies whether or not to send an e-mail to the subscriber containing the subscriber’s control panel login credentials. The e-mail address is specified in Subscriber. EmailAddress. Values for rows under this column can be On or Off.
Table A-1 Subscription Import File Headers (continued)
Column Presence Description
A-2Cisco Prime Home 5.0.1 User Guide
OL-27464-01
OL-27464-01
A
P P E N D I X B Common Error Messages and Fault CodesThis section covers the error messages and fault codes that you are most likely to see in Cisco Prime Home. Refer to the following topics for more information:
• Error Messages, page B-1
• TR-069 Fault Codes, page B-3
Error MessagesThis topic describes the four most common error messages displayed by Cisco Prime Home and how to best deal with them.
Error Message Synchronization failed.
Explanation When either a device is informing or you are attempting to save changes to a device, a timeout occurs, resulting in one or more applications failing to complete their synchronization with the device.
Recommended Action Use the Synchronization tool to resolve this state:
1. From the left sidebar, expand the Advanced drop-down list and look for "Synchronization."
2. Skim the State column for the "Failed" notification.
3. Check the adjacent check box under the Pending Sync column.
4. Click Save to force that specific application to attempt to synchronize again.
These steps may clear the error and put things back on track before you need to resort to a reboot or other potentially service affecting measures.
B-1Cisco Prime Home 5.0.1 User Guide
Appendix B Common Error Messages and Fault Codes Error Messages
Error Message Device could not be contacted.
Explanation This error implies that the physical connection to the device has been severed in some fashion. This could be either a connection issue or another problem within the confines of the customer premise. This message could also indicate network congestion or a variety of possible problems with the outside plant/Telco infrastructure.
Recommended Action Do the following:
1. Confirm that the CPE device is plugged in and powered up, and that the LED indicators for WAN connectivity are lit.
2. Unplug and reseat the Ethernet cable from both the wall jack and the CPE WAN port end of the cable.
3. Consider rebooting the CPE device (note that Cisco Prime Home has the means to trigger a reboot remotely).
4. Consider replacing the Ethernet cable if it appears faulty.
Error Message Unknown error during refresh. Retry later.
Explanation One or more web calls that populate the page contents failed. This symptom may manifest with no message at all and the page simply does not populate completely.
Recommended Action Do the following:
1. Reload the page.
2. If the problem persists, try clearing the browser cache, history, cookies, and so on. Then, reload the page again.
Error Message Device Not Supported
Explanation Prime Home 5.0.1 has changed how device support is controlled. In previous versions of the product, the system would attempt to work with any device that informed. This caused several problems:
– Synchronizing applications that are not supported on the device; for example, trying to push PPP settings to an STB device.
– Incorrectly pushing other values to a device; for example, pushing "Mixed" as the wireless security type when the device does not support it.
– Displaying UI elements for a device that are not applicable for that device; for example, displaying Time Blocking when the device does not support it.
– Calls to Cisco's operational support team when rogue devices cause problems with system resources.
The Prime Home management platform now employs a white-list for devices. This means that Cisco must explicitly enable support for each device type before devices of that type can be used by the system. If you select a device from the "find device" page and you are taken to a message indicating that your device is not supported, this is expected behavior for devices that have not been configured for your particular instance of Cisco Prime Home.
B-2Cisco Prime Home 5.0.1 User Guide
OL-27464-01
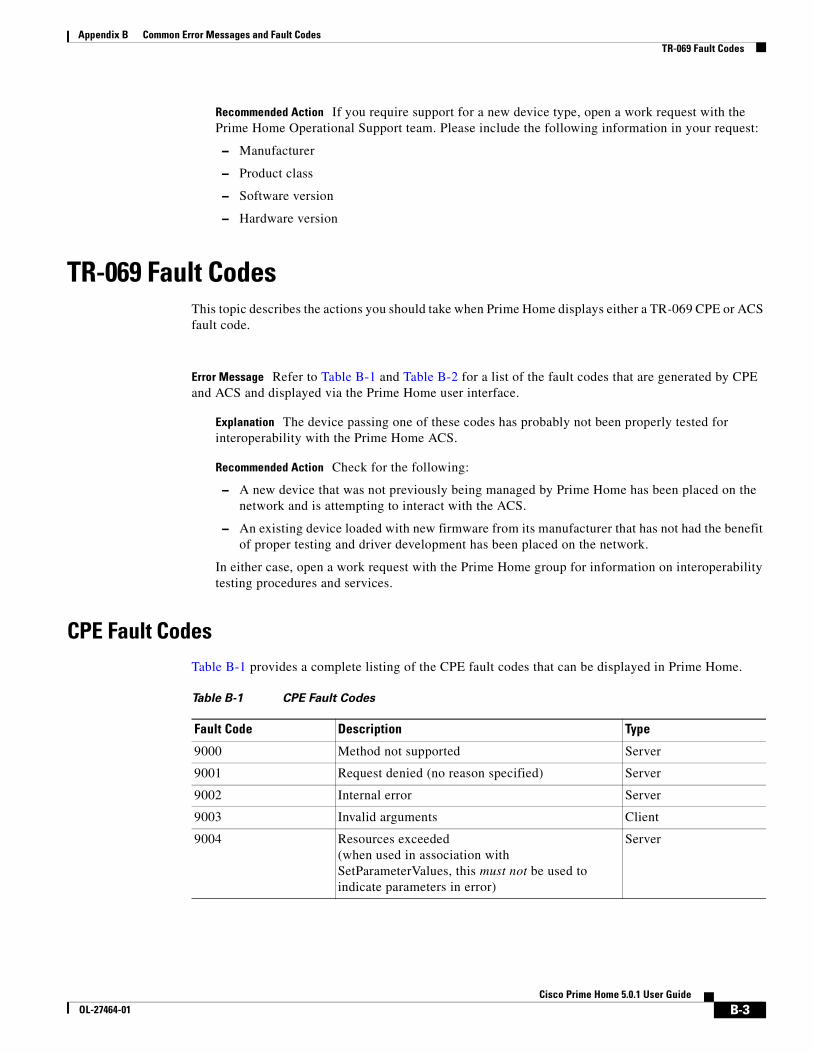
Appendix B Common Error Messages and Fault Codes TR-069 Fault Codes
Recommended Action If you require support for a new device type, open a work request with the Prime Home Operational Support team. Please include the following information in your request:
– Manufacturer
– Product class
– Software version
– Hardware version
TR-069 Fault CodesThis topic describes the actions you should take when Prime Home displays either a TR-069 CPE or ACS fault code.
Error Message Refer to Table B-1 and Table B-2 for a list of the fault codes that are generated by CPE and ACS and displayed via the Prime Home user interface.
Explanation The device passing one of these codes has probably not been properly tested for interoperability with the Prime Home ACS.
Recommended Action Check for the following:
– A new device that was not previously being managed by Prime Home has been placed on the network and is attempting to interact with the ACS.
– An existing device loaded with new firmware from its manufacturer that has not had the benefit of proper testing and driver development has been placed on the network.
In either case, open a work request with the Prime Home group for information on interoperability testing procedures and services.
CPE Fault CodesTable B-1 provides a complete listing of the CPE fault codes that can be displayed in Prime Home.
Table B-1 CPE Fault Codes
Fault Code Description Type
9000 Method not supported Server
9001 Request denied (no reason specified) Server
9002 Internal error Server
9003 Invalid arguments Client
9004 Resources exceeded (when used in association with SetParameterValues, this must not be used to indicate parameters in error)
Server
B-3Cisco Prime Home 5.0.1 User Guide
OL-27464-01
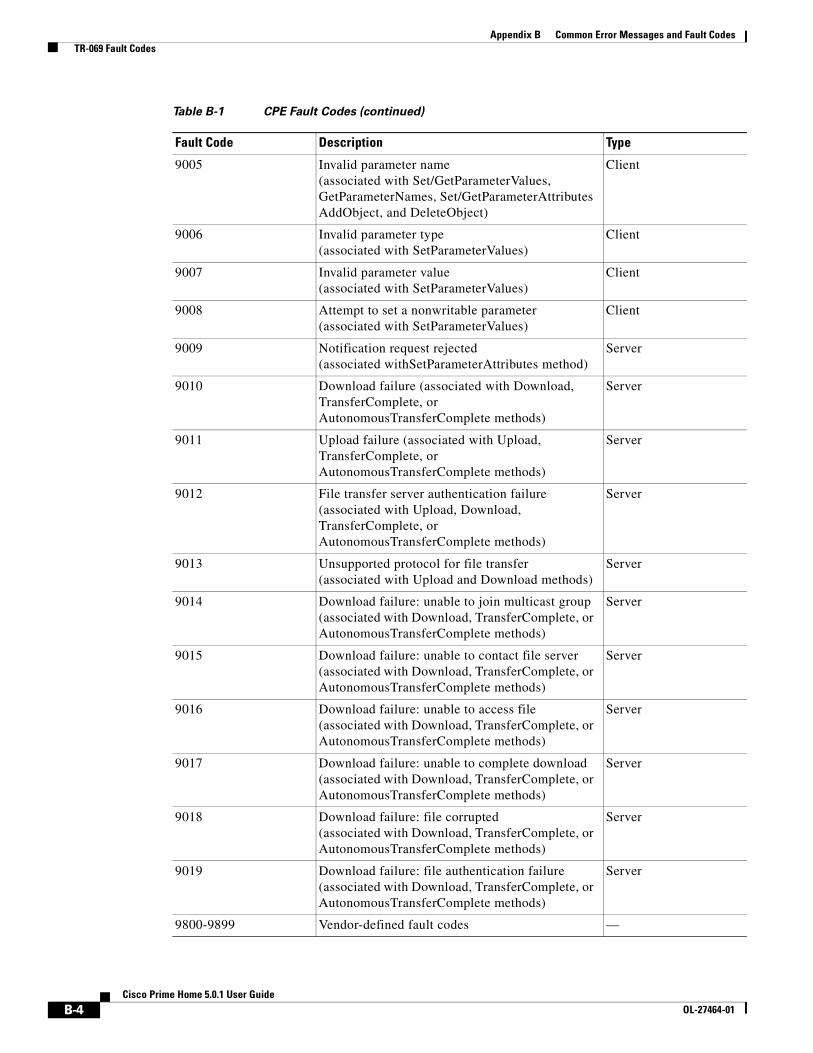
Appendix B Common Error Messages and Fault Codes TR-069 Fault Codes
9005 Invalid parameter name (associated with Set/GetParameterValues, GetParameterNames, Set/GetParameterAttributes AddObject, and DeleteObject)
Client
9006 Invalid parameter type (associated with SetParameterValues)
Client
9007 Invalid parameter value (associated with SetParameterValues)
Client
9008 Attempt to set a nonwritable parameter (associated with SetParameterValues)
Client
9009 Notification request rejected (associated withSetParameterAttributes method)
Server
9010 Download failure (associated with Download, TransferComplete, or AutonomousTransferComplete methods)
Server
9011 Upload failure (associated with Upload, TransferComplete, or AutonomousTransferComplete methods)
Server
9012 File transfer server authentication failure (associated with Upload, Download, TransferComplete, or AutonomousTransferComplete methods)
Server
9013 Unsupported protocol for file transfer (associated with Upload and Download methods)
Server
9014 Download failure: unable to join multicast group (associated with Download, TransferComplete, or AutonomousTransferComplete methods)
Server
9015 Download failure: unable to contact file server (associated with Download, TransferComplete, or AutonomousTransferComplete methods)
Server
9016 Download failure: unable to access file (associated with Download, TransferComplete, or AutonomousTransferComplete methods)
Server
9017 Download failure: unable to complete download (associated with Download, TransferComplete, or AutonomousTransferComplete methods)
Server
9018 Download failure: file corrupted (associated with Download, TransferComplete, or AutonomousTransferComplete methods)
Server
9019 Download failure: file authentication failure (associated with Download, TransferComplete, or AutonomousTransferComplete methods)
Server
9800-9899 Vendor-defined fault codes —
Table B-1 CPE Fault Codes (continued)
Fault Code Description Type
B-4Cisco Prime Home 5.0.1 User Guide
OL-27464-01
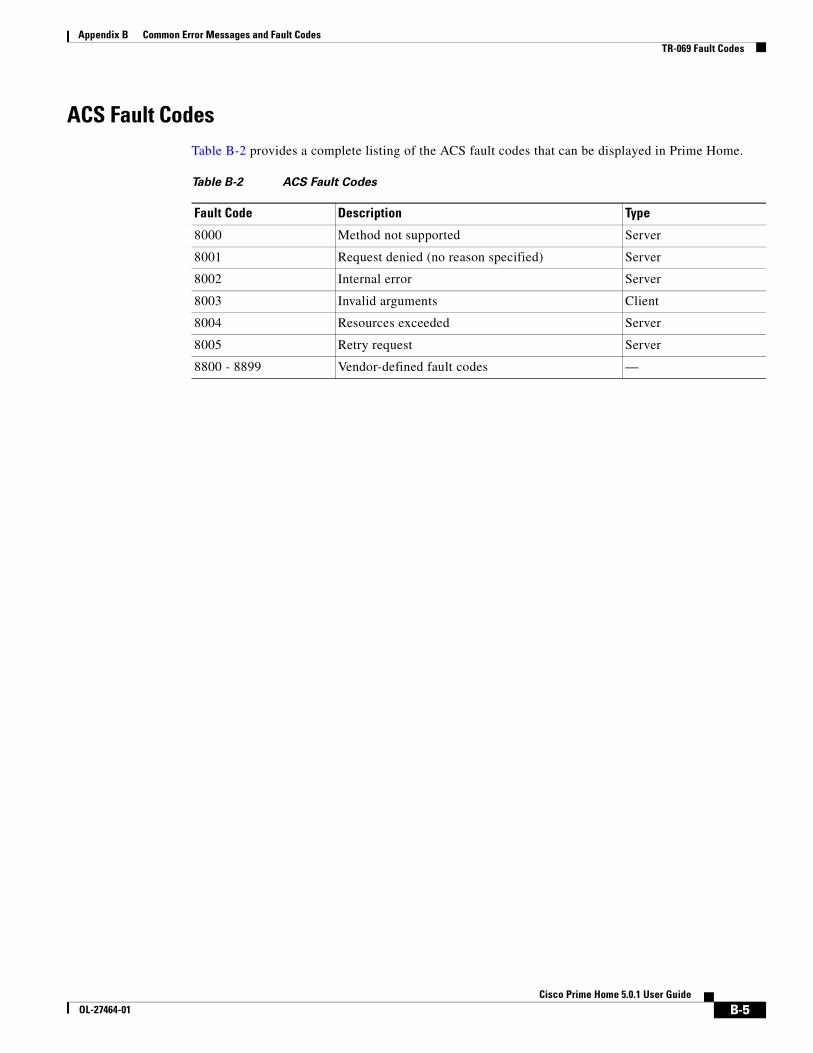
Appendix B Common Error Messages and Fault Codes TR-069 Fault Codes
ACS Fault CodesTable B-2 provides a complete listing of the ACS fault codes that can be displayed in Prime Home.
Table B-2 ACS Fault Codes
Fault Code Description Type
8000 Method not supported Server
8001 Request denied (no reason specified) Server
8002 Internal error Server
8003 Invalid arguments Client
8004 Resources exceeded Server
8005 Retry request Server
8800 - 8899 Vendor-defined fault codes —
B-5Cisco Prime Home 5.0.1 User Guide
OL-27464-01

Appendix B Common Error Messages and Fault Codes TR-069 Fault Codes
B-6Cisco Prime Home 5.0.1 User Guide
OL-27464-01
OL-27464-01
G L O S S A R Y
A
ACS Automated configuration service. Includes software such as Prime Home.
Administrator role A user role that gives users full access to all features and functions in the system. Referred to in the guide as Admin.
attribute A unit of data associated to a device or subscriber.
C
CPE Customer premise equipment. Also known as a gateway.
Customer Support
role
A user role that allows access to the Customer Support tab.
D
device Any piece of equipment that the system can track.
E
event A predefined occurrence on a CPE that triggers actions to occur at specified moments. Events represent a notable point within the device’s lifecycle.
I
inform The act of a managed device connecting to the system and receiving updates.
L
label Arbitrary tags that can be added to certain items in the system to enable grouping for easy searching.
GL-1Cisco Prime Home 5.0.1 User Guide

Glossary
M
managed device A device that possesses the traits necessary to be managed by the system.
O
OUI Refers to the manufacturer ID. The first six characters of the MAC address.
P
property A single-named piece of configuration data.
R
Reporting
Administrator role
A user role that allows access to the Reports tab.
S
script JavaScript code that can be executed by the system.
service A capability that can be enabled for a device or subscriber account.
subscriber An end user who has devices managed by the system.
subscription A set of packages to which a device is subscribed.
GL-2Cisco Prime Home 5.0.1 User Guide
OL-27464-01