Embed Size (px)
Citation preview

PRIMA FACIE® XL User Guide
Document Version 4.6

2
Important Notices
Title: Prima Facie XL User GuideDocument Version 4.6
PN: SV-PRIMAFACE32B1.6.8
Software Version: Local Agent 1.4.0
Safety Vision attempts to provide information contained in this manual based on the latest product information available at the time of publication. However, because of Safety Vision’s policy of continual product improvement, Safety Vision reserves the right to amend the information in this document at any time without prior notice.
This material is confidential and the property of Safety Vision. It is shared with your company for the sole purpose of helping you with the operation of the described equipment.
Safety Vision makes no warranty of any kind with regard to this material, including, but not limited to, the implied warranties of merchantability and fitness for a particular purpose. Safety Vision shall not be liable for errors contained herein or for incidental or consequential damages in connection with the furnishing, performance, or use of this material.
Safety Vision expressly disclaims all responsibility and liability for the installation, use, performance, maintenance, and support of third-party products. Customers are advised to make their independent evaluation of such products.
No part of this document may be photocopied, reproduced, or translated to another language without the prior written consent of Safety Vision.
Safety Vision® is a registered trademark of Safety Vision, LLC. All other products or name brands mentioned in this document are trademarks of their respective owners. For more information about Safety Vision and its products, go to www.safetyvision.com or call 800-880-8855.

3
Table of Contents
Features....................................................................................... 4Parts Included ....................................................................................4Prima Facie Components ..................................................................5LCD Screen Display ............................................................................7Recharging the Battery ....................................................................8Turning the Prima Facie On and Off .................................................9Stealth Mode ......................................................................................9Digital Zoom .......................................................................................9Sleep Mode .........................................................................................9Car Mode .............................................................................................9Recording a Video ............................................................................10Recording Audio ..............................................................................11Taking a Snapshot ...........................................................................11Reviewing Recorded Files ..............................................................12Installing Prima Facie Local Agent ...............................................13Using Prima Facie Local Agent .......................................................14Resolutions and Pre-Event Times..................................................16Specifications.....................................................................20FCC Compliance Statement ............................................................21

4
Features
• 32 GB of internal storage• Rechargeable battery with included base station• Rotating clothing clip and shoulder clip included• Secure download software ensures no unauthorized access
Parts Included
• Prima Facie unit• USB cable• Power cable• AC adapter• Base station• Shoulder clip• USB Car Charger (optional)• Two-Way Radio Cable (optional)
NOTICE - Safety Vision recommends maintaining a charged battery in all Prima Facie units. Leaving the battery in a drained state while in long-term storage may have a detrimental effect on battery life.

5
Prima Facie Components
1. Two-Way Radio Microphone2. Infrared (IR) illuminators3. Camera Lens4. Status LED5. Infrared (IR) illuminators6. Voice Recording Microphone7. Audio Speaker8. Video Record Button9. Reset Button10. Lanyard Attachment11. LCD Screen12. Docking Station/Radio Interface Connector
6
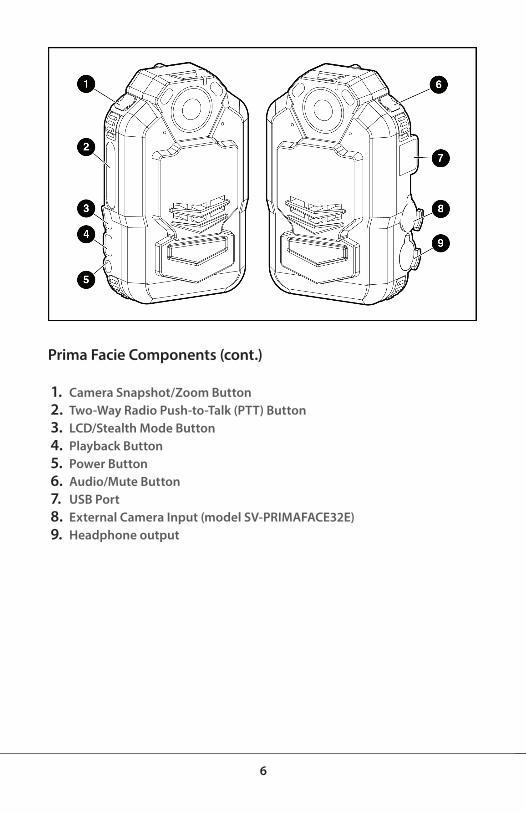
Prima Facie Components (cont.)
1. Camera Snapshot/Zoom Button2. Two-Way Radio Push-to-Talk (PTT) Button3. LCD/Stealth Mode Button4. Playback Button5. Power Button6. Audio/Mute Button7. USB Port8. External Camera Input (model SV-PRIMAFACE32E)9. Headphone output

7
LCD Screen Display
1. Recording IndicatorBlinks when video is being recorded (replaces Available Space display).
2. Available SpaceDisplays the remaining available storage space for all file types in mega-bytes (MB).
3. File QuantityDisplays the total number of files of all types saved.
4. Recording TimeDisplays the remaining available time for video recording.
5. Battery LifeDisplays the battery life remaining in thirds.
6. Resolution/Frames Per Second (FPS)Displays the resolution (1080, 720, or 480) and frames per second the unit is configured to record
7. Zoom IndicatorDisplays the length of digital zoom.
8. Time StampDisplays the current date (in YYYY/MM/DD format) and time that will be applied to recorded files. (The Prima Facie Local Agent software automati-cally updates the time stamp to the PC’s date and time when the unit is at-tached and the Local Agent software is opened)
9. Audio Disabled IndicatorIndicates that audio is disabled/muted when recording video.

8
Recharging the Battery
Using the USB Cable (or optional Car Charger)
Connect the Prima Facie unit to a PC with the supplied USB cable (or Car Charger). When connected to a computer, the Prima Facie unit turns on automatically.
Using the Base Station
Plug the 5V DC power adapter to an appropriate power source and connect it to the Base Station. Insert the Prima Facie unit into the Base Station firmly as shown. The Status LED displays red while recharging, and displays green when the recharge is complete.
Turn the Prima Facie unit off to decrease recharging time. (Recharging the Prima Facie unit while powered on increases recharging time.)
Recording video or audio while recharging does not change the Status LED.

9
Turning the Prima Facie On and Off
To turn the Prima Facie on, ensure it is adequately charged, then press and hold the Power button for one second until the unit beeps once and the Status LED displays green. The Prima Facie is now in Standby Mode (ready to record). To turn the Prima Facie off, press and hold the Power button until the unit beeps twice.
Stealth Mode
Press the LCD/Stealth Mode button quickly to turn the LCD screen on and off. Press and hold the LCD/Stealth Mode button for two (2) seconds to turn off the front Status LED and the IR illuminators. To exit Stealth Mode, press and hold the LCD/Stealth Mode button again for two (2) seconds or cycle the Prima Facie’s power.
Note - The ability to turn the status LED and IR illuminators on and off can be over-ridden in Local Agent. See page 16.
Digital Zoom
Press and hold the Camera Snapshot/Zoom button for four (4) seconds to acti-vate the digital zoom feature. The Zoom Indicator appears on the LCD screen. Continue holding the Camera Snapshot/Zoom button to digitally zoom in the camera image up to 10×. Release the Camera Snapshot/Zoom button when the desired zoom is achieved. Once zoomed all the way in, release and then press and hold the Camera Snapshot/Zoom button again to zoom out. The zoom is retained while recording video or taking pictures. The camera reverts to the normal focal length (1×) when the power is cycled.
Sleep Mode
After three (3) minutes of inactivity, the Prima Facie turns off the LCD, cam-era, and other non-critical components to conserve power. Simply press the Camera Snapshot/Zoom, Audio, Video Record, or LCD/Stealth Mode buttons to exit sleep mode and immediately perform the button’s respective function.
Car Mode
When the Prima Facie is connected to a USB power source (such as the optional Car Charger), the IR illuminators are disabled to reduce IR reflection through a vehicle windshield.

10
Recording a Video
The Prima Facie captures video with synchronous sound in MP4 (.mp4) format.
Depending on the configured resolution and frame rate, the Prima Facie records a set amount of time before the Video Record button is pressed (pre-event time):
FHD - 5 secondsHD/60 fps - 5 secondsHD/30 fps - 10 secondsD1 - 30 seconds
Pre-event recording can also be turned off. See page 15 for configuration details.
Note - If video recording is initiated while the unit is in Sleep Mode, pre-event time is not recorded.
To record a video:1. Ensure the unit is on.
Press the Power button. When powered on, the Status LED displays solid green.
2. Press the Video Record button on the front of the unit.The unit beeps once.The Status LED blinks red (unless in Stealth Mode).
3. Point the unit in the direction of the object or event you want to record.4. To stop recording, press the Video Record button on the front of the
unit again. If the Enable Long Press option has been selected in Local Agent, press and hold the Video Record button for two (2) seconds.The unit beeps twice.The Status LED returns to displaying solid green.
Audio Disable/Enable -While recording, press and hold the Audio/Mute button for four (4) seconds. A tone sounds and the Audio Disabled Indicator appears in the upper left of the LCD screen. To enable audio, press and hold the Audio/Mute but-ton again for four (4) seconds.
11
Recording Audio
The Prima Facie records audio files in WAV (.wav) format.
To record an audio file:1. Ensure the unit is on.
Press the Power button. When powered on, the Status LED displays solid green.
2. Press the Audio/Mute button on top of the unit.The unit beeps once.The Status LED displays blinking yellow.
3. Orient the microphone towards the source of audio you want to record.4. To stop recording, press the Audio/Mute button on top of the unit
again.The unit beeps once.The Status LED returns to displaying solid green.
Taking a Snapshot
The Prima Facie captures still images (snapshots) in JPEG (.jpg) format.
Note - A Snapshot can be captured while a video is being recorded.
To take a snapshot:1. Ensure the unit is on.
Press the Power button. When powered on, the Status LED displays solid green.
2. Press the Camera Snapshot/Zoom button on top of the unit.The unit makes a camera “shutter” sound.The LCD Display momentarily displays the still image captured before revert-ing to the live view.

12
Reviewing Recorded Files
Videos, audio files, and snapshots can be reviewed instantly on the Prima Facie’s LCD Display.
To review recorded files:1. Press the Playback button on the side of the unit.
The LCD Display displays a menu showing a camera icon (snapshots), video icon (videos), and microphone icon (audio files).
2. Use the Audio/Mute and Camera Snapshot/Zoom buttons on top of the unit to highlight the type of file you want to review (video, audio, or snapshot) and press the Playback button again.Thumbnails of the available files are displayed.
3. Use the Audio/Mute and Camera Snapshot/Zoom buttons to select the file you want to review and press the Playback button once more.File playback (for video and audio files) begins, or the still image (for snap-shots) is displayed.
4. When viewing video or audio files, press the Playback button to pause and again to resume. Press the Audio/Mute button to rewind and the Camera Snapshot/Zoom button to fast forward.
5. When finished reviewing files, press the Video Record button to exit Playback Mode.

13
Installing Prima Facie Local Agent
The Prima Facie requires a USB driver to be installed to properly communicate with a PC and the Prima Facie Local Agent software. The appropriate software downloads can be found at www.safetyvisionftp.com/LE. Contact your Safety Vision Account Executive for access instructions.
Note: Both drivers and the Local Agent software must be installed with Administrator privileges.
1. Install the Prima Facie USB Device Driver.Select “Install Anyway” if a prompt appears warning of unsigned drivers.
2. Install the Prima Facie Local Agent software.3. Connect the Prima Facie unit to the PC and allow Windows to find and
install the appropriate drivers.
Note - Drivers only need to be installed the first time the Prima Facie unit is connected.

14
Using Prima Facie Local Agent
The Prima Facie Local Agent software is required to mount the Prima Facie as a removeable drive on your PC to securely browse or download recorded data.
1. Connect the Prima Facie to the PC.- Insert the Prima Facie unit into a base station connected to the PC via USB- OR -- Connect the Prima Facie unit directly to the PC via the USB cable.Close or disregard any prompts or messages Windows displays.
2. Open the Local Agent software.The Transfer Agent window appears and displays the name of the Prima Facie unit that is connected.
3. Enter the Prima Facie unit’s password in the Password field.The default password is 123456.
Note:The Import option does not require a password to be entered.
4. Select one of three options: Settings, Browse Files, or Import Files.See the following pages for details.
Note - After the Browse Files or Import Files options are selected, Settings becomes unavailable. Disconnect and then reconnect the unit to change set-tings after importing files.

15
Settings
Click Settings to access configurable settings for both the Prima Facie unit and the Local Agent software. When finished changing settings, click Save Changes.
Device Settings:
Change Device ID: Enter a unique alphanumeric ID for the attached Prima Facie. The Device ID MUST be alphanumeric and cannot include spaces or special characters. The Device ID is added to file names during the import process.
Change Device Password: Enter a unique and secure password for the attached Prima Facie unit.
Device Record Resolution and Pre-recording Time: see next page
OSD Name: Enter a unique ID for the attached Prima Facie unit that will appear on the unit’s on-screen display and embedded into video and picture files (can be different from the Device ID).

16
Device Record Resolution: Select either FHD (1920 x 1080 @ 30 fps), HD (1280 x 720 @ 60 fps), HD (1280 x 720 @ 30 fps) or D1 (720 x 480 @ 30 fps).
Enable Pre-recording: Select this option to record video from before before the Record button is pressed. The amount of pre-event record time is dependant on the selected resolution:
Resolution Pre-Record TimeFHD (30 fps) 5 secondsHD (60 fps) 5 secondsHD (30 fps) 10 secondsD1 (30 fps) 30 seconds
Note - Higher resolution settings create larger files, which may increase file download times. If you encounter long download times when transferring data, try decreasing the Device Record Resolution setting.

17
Enable Options
Enable status LED: Deselect this option to turn the status LED on the front of the Prima Facie unit off (deselecting this option overrides the ability to turn the status LED on or off using the LCD/Stealth Mode button).
Enable audio: Deselect this option to turn off audio during video recordings (audio-only files still record).
Enable Auto IR: Deselect this option to turn off the automatic IR functionality when encountering low-light conditions (deselecting this option overrides the ability to turn the IRs on or off using the LCD/Stealth Mode button).

18
Prima Facie Local Agent Settings
When “Import Files” button is clicked: Select either:
• Transfer to file locationClick the Browse button to select a local directory to which files are imported, or manually enter a file path (including networked paths).
Note for ICOP iVAULT MMS users only - To import files to iVAULT MMS, select the ‘Blob Folder’, typically located at [Storage Drive]\iVAULT\BLOB\.
• Transfer to FTP ServerEnter the FTP Server Address, Port, Username, and Password of the FTP server to which files are imported.
Once file transfer is complete, append extension: Select this option and enter an appropriate file extension in the field to append that to file names after they are imported. These file extensions are used by iVAULT MMS to identify Prima Facie files.
Note: If you do not have have iVAULT MMS, unselect this option to save files with standard .mp4 (video), .jpg (images), or .wav (audio) file extensions.
Transfer files separate by device ID and date: When this option is selected, Local Agent automatically creates a folder for each device ID with files organized by date upon import.

19
Import Files
Click the Import Files button to automatically import all files resident on the body camera to the location specified in the Prima Facie Local Agent Settings as described previously.
A status bar appears displaying the progress of the transfer. Once the transfer is complete, files are automatically deleted from the Prima Facie.Browse Files
Click the Browse button to automatically open a Windows Explorer window to the DCIM folder on the Prima Facie unit. Recorded media is stored in the 100MEDIA folder. From there, the files resident on the Prima Facie unit can be browsed and transfered to different locations or storage devices manually.

20
Specifications
SPECIFICATIONSImage Sensor 5 MP CMOS sensor
LCD Screen Size 2 in; color
Field of View 120° wide angle
Storage Built-in internal NAND flash memory 32 GB
Video Resolution1920 × 1080 (FHD), 1280 × 720 (HD), 720 × 480 (D1)
Frame Rate 30 fps (all channels, all resolutions), HD up to 60 fps
Image Resolution 5210 × 3840 (20 MP)
File Compression MP4/H.264 (video); JPEG (image); WAV (audio)
Continuous Record Time Approx. 8 hours (D1)
Pre-event Time Approx. 30 seconds (D1)
Inputs Earphone (3.5 mm), mini-USB 2.0
Lux Rating 0 with IRs
IP Rating IP55
Power Supply 2 × 1600 mAh rechargable battery
Standby Time Approx. 12 hours
Recharging Time Approx. 8 hours
Operating Temperature -22°F to approx. 131°F
Dimensions (w × h × d) 2.24 in × 3.67 in × 1.36 in
Weight 0.34 lb (with battery)
21
FCC Compliance Statement
This device has been tested and found to comply with the limits for a Class A digital device, pursuant to part 15 of the FCC Rules. These limits are designed to provide reasonable protection against harmful interference when the equip-ment is operated in a commercial environment. This equipment generates, uses, and can radiate radio frequency energy and, if not installed and used in accordance with the instruction manual, may cause harmful interference in which case the user will be required to correct the interference at his own expense.
Any changes or modifications in construction of this device which are not ex-pressly approved by the party responsible for the compliance could void the user’s authority to operate the equipment.
NOTE
CAUTION

22
Memo

23
Memo

Copyright © 2017 Safety Vision, LLC. All Rights Reserved.
CORPORATE HEADQUARTERS6100 W. Sam Houston Pkwy. N.Houston, TX 77041-5113Toll Free: 800.880.8855Main: 713.896.6600Fax: 713.896.6640
www.safetyvision.com