Embed Size (px)
Citation preview

12 daysqsewing
Holidays can sneak up fast, use your sewing skills to create unique and
fun gifts for everyone on your list. With the 12 Days of Sewing eBook you’ll
find 12 easy to sew gifts that are perfect for last minute gift exchanges,
holiday parties or to teach sewing with a friend or child. 12 Days of
Sewing projects include handmade gift cards, a friendship quilt, Christmas
Countdown Calendar, snowflake ornaments, fabric wreath, throw pillows,
notebook cover, potpourri bags, tote bag, napkin rings, puppets and
holiday inspired place mats. All 12 projects allow you to express your
sewing creativity while making memories for friends and family.
{ by Erin Seaward-Hiatt }
presents

Send out your well wishes with fabric, needlework and trim added to card stock.
Supplies• Kraftpaperorcoloredcardstock
• Fabricandribbonscraps
• Gluestick
• Size90/14universalneedle
ConstructFor a classic look, cut a 51⁄2”x81⁄2” rectangle from the paper. Fold the paper in half width-wise to form a 51⁄2”x41⁄4” bifold card, perfect for A2 envelopes. Add fabric, felt, ribbon, and more to the card stock using a size 90/14 universal needle.
Place the desired embellishments on the card front right side; secure using a glue stick, if desired. Stitch the embellishments onto the card front. Don’t backstitch, instead pull the thread ends toward the card wrong side and tie off.
HolidayCards
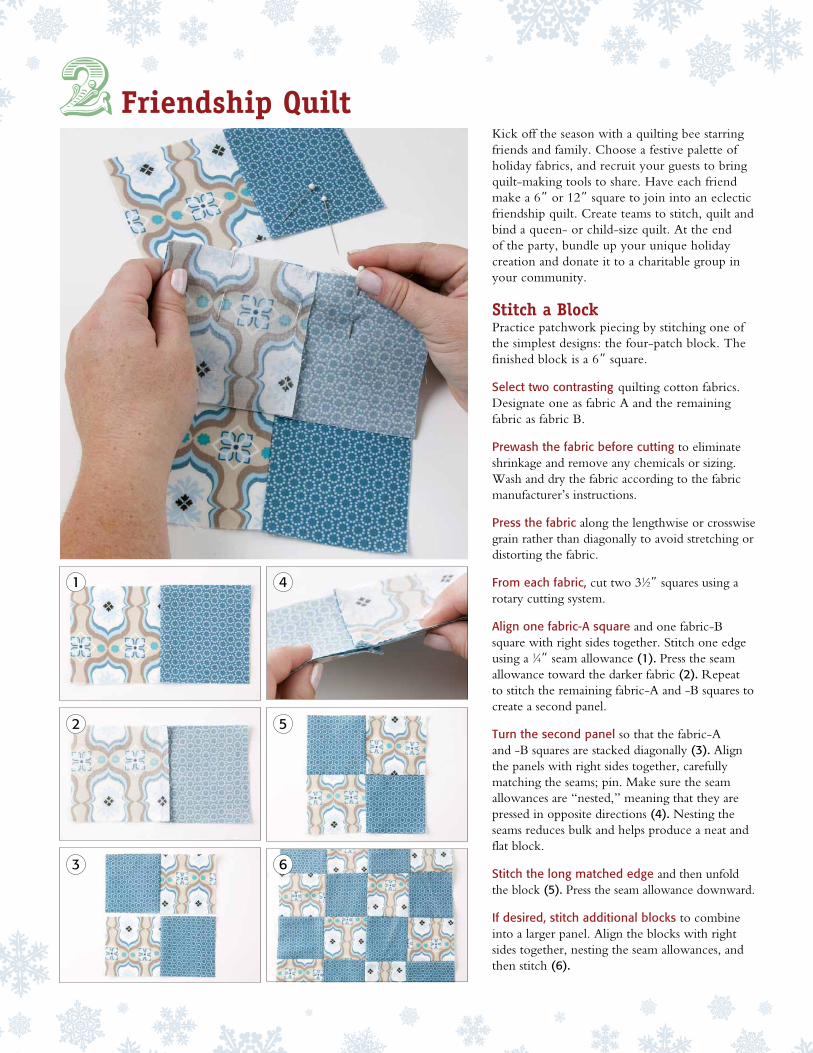
Kick off the season with a quilting bee starring friends and family. Choose a festive palette of holiday fabrics, and recruit your guests to bring quilt-making tools to share. Have each friend make a 6” or 12” square to join into an eclectic friendship quilt. Create teams to stitch, quilt and bind a queen- or child-size quilt. At the end of the party, bundle up your unique holiday creation and donate it to a charitable group in your community.
StitchaBlockPractice patchwork piecing by stitching one of the simplest designs: the four-patch block. The finished block is a 6” square.
Select two contrasting quilting cotton fabrics. Designate one as fabric A and the remaining fabric as fabric B.
Prewash the fabric before cutting to eliminate shrinkage and remove any chemicals or sizing. Wash and dry the fabric according to the fabric manufacturer’s instructions.
Press the fabric along the lengthwise or crosswise grain rather than diagonally to avoid stretching or distorting the fabric.
From each fabric, cut two 31⁄2” squares using a rotary cutting system.
Align one fabric-A square and one fabric-B square with right sides together. Stitch one edge using a 1⁄4” seam allowance (1). Press the seam allowance toward the darker fabric (2). Repeat to stitch the remaining fabric-A and -B squares to create a second panel.
Turn the second panel so that the fabric-A and -B squares are stacked diagonally (3). Align the panels with right sides together, carefully matching the seams; pin. Make sure the seam allowances are “nested,” meaning that they are pressed in opposite directions (4). Nesting the seams reduces bulk and helps produce a neat and flat block.
Stitch the long matched edge and then unfold the block (5). Press the seam allowance downward.
If desired, stitch additional blocks to combine into a larger panel. Align the blocks with right sides together, nesting the seam allowances, and then stitch (6).
FriendshipQuilt
1 4
2 5
3 6
SnowDayOrnaments
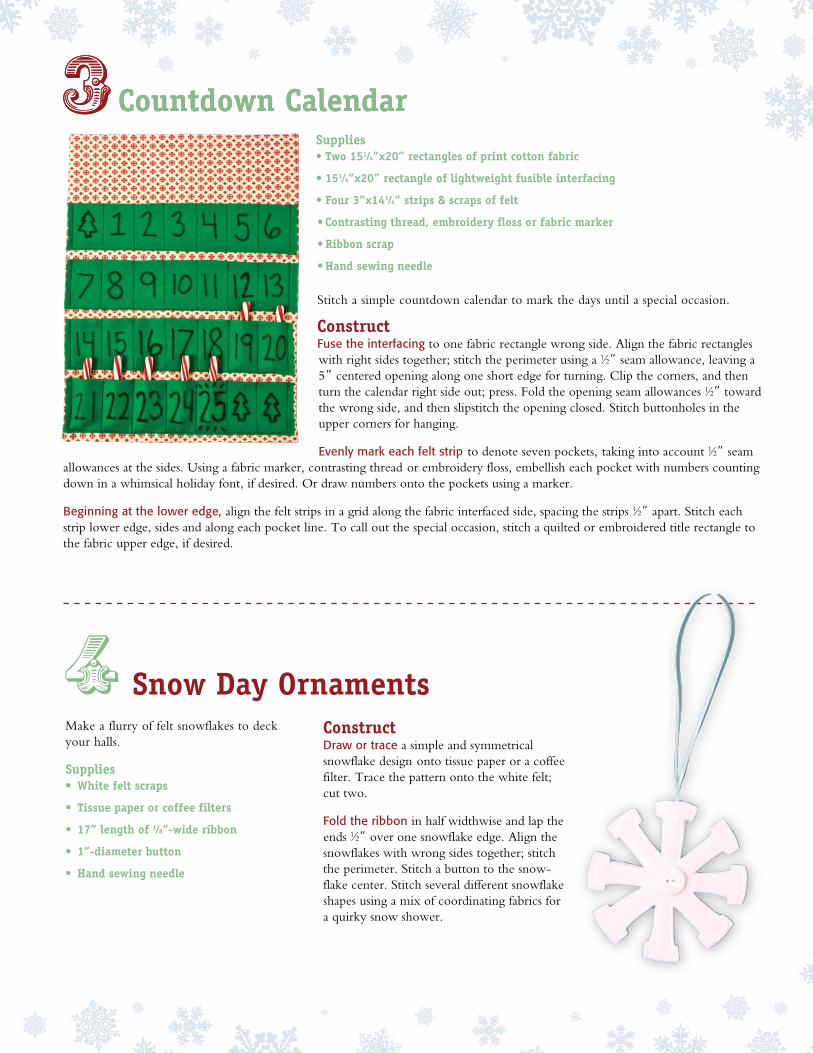
CountdownCalendarCountdownCalendarSupplies•Two151⁄4”x20”rectanglesofprintcottonfabric
•151⁄4”x20”rectangleoflightweightfusibleinterfacing
•Four3”x141⁄4”strips&scrapsoffelt
•Contrastingthread,embroideryflossorfabricmarker
•Ribbonscrap
•Handsewingneedle
Stitch a simple countdown calendar to mark the days until a special occasion.
ConstructFuse the interfacing to one fabric rectangle wrong side. Align the fabric rectangles with right sides together; stitch the perimeter using a 1⁄2” seam allowance, leaving a 5” centered opening along one short edge for turning. Clip the corners, and then turn the calendar right side out; press. Fold the opening seam allowances 1⁄2” toward the wrong side, and then slipstitch the opening closed. Stitch buttonholes in the upper corners for hanging.
Evenly mark each felt strip to denote seven pockets, taking into account 1⁄2” seam allowances at the sides. Using a fabric marker, contrasting thread or embroidery floss, embellish each pocket with numbers counting down in a whimsical holiday font, if desired. Or draw numbers onto the pockets using a marker.
Beginning at the lower edge, align the felt strips in a grid along the fabric interfaced side, spacing the strips 1⁄2” apart. Stitch each strip lower edge, sides and along each pocket line. To call out the special occasion, stitch a quilted or embroidered title rectangle to the fabric upper edge, if desired.
Make a flurry of felt snowflakes to deck your halls.
Supplies• Whitefeltscraps
• Tissuepaperorcoffeefilters
• 17”lengthof1⁄8”-wideribbon
• 1”-diameterbutton
• Handsewingneedle
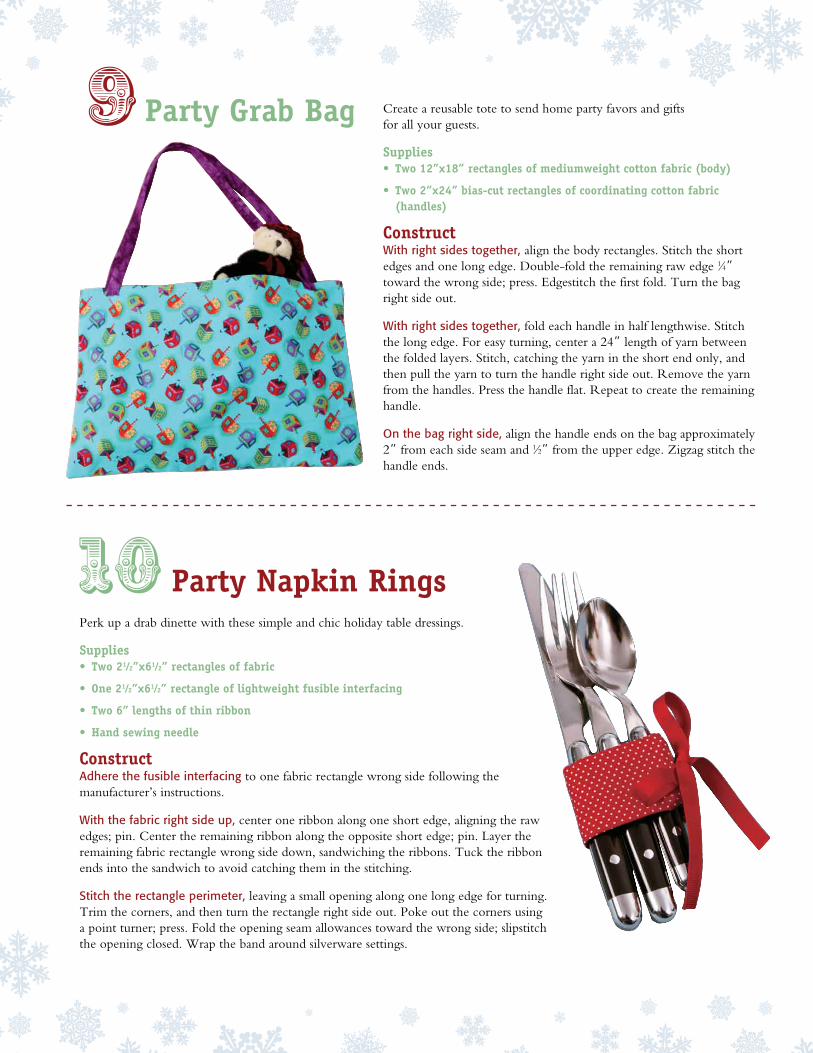
ConstructDraw or trace a simple and symmetrical snowflake design onto tissue paper or a coffee filter. Trace the pattern onto the white felt; cut two.
Fold the ribbon in half widthwise and lap the ends 1⁄2” over one snowflake edge. Align the snowflakes with wrong sides together; stitch the perimeter. Stitch a button to the snow-flake center. Stitch several different snowflake shapes using a mix of coordinating fabrics for a quirky snow shower.

Transform fabric scraps into a winter-fresh holiday wreath.Supplies• 10”-diameterfoamwreathbase
• Five3”x11”rectanglesof4coordinatingprintcottonfabrics
• Hotgluegun&gluesticks
• Two18”lengthsof11⁄2”-widesatinribbon
• Handsewingneedle
• Scrapsofcoordinatingfabrics
• Snowflakeorglitterbuttons(optional)
ConstructUsing a long basting stitch, stitch one long edge of each rectangle 1⁄4” from the edge. Gather each rectangle to measure 51⁄4”.
Using glue, adhere one rectangle to the foam base along the gathered edge. Add each remaining rectangle to the base, lapping 1” over the previous rect-angle and keeping the short edges toward the wreath wrong side.
Glue or hand stitch the satin ribbon ends 5” apart to the wreath wrong side, and then tie in a bow for hanging. Dovetail the ribbon ends, if desired.
From the fabric scraps, cut three 1”x20” strips, piecing scraps if necessary and using coordinating fabrics if desired. Twist the scraps, and then curl them into a rosette shape, using hot glue to secure. Hand stitch the rosettes in a cluster to the wreath ruffles. Hand stitch a button to one rosette center or along the wreath as desired.
WinterWreath
SweaterThrowPillowsTransform a kitschy holiday sweater into a comfy and cozy conversation piece.
Supplies• Threecoordinatingsweaters
• Coordinatingcottonfabricscraps
• 1⁄2”-diametercording(measurementaccordingtopillowperimeter)
• Zipperfoot
• Polyesterfiberfill
• Handsewingneedle
ConstructRaid your closet or local thrift stores for a sweater with a fun pattern and a few solid sweaters to create accent pillows. From each sweater, cut two 18” squares.
Cut 1”-wide bias strips equal to the pillow perimeter, plus seam allowances. Join the
bias strips with right sides together along the short edges, if necessary. Fold the strip in half lengthwise with wrong sides together around the cording.
Install a zipper foot onto the machine. Stitch close to the cord. Align the piping with one pil-low panel right side, aligning the raw edges. Stitch using a 1⁄2” seam allowance, beginning and ending 2” from the cord ends. Pull the cord ends from the piping and trim them to abut. Fold one piping end 1⁄2” to-ward the wrong side and wrap around the remaining piping end; continue stitching.
Align the pillow panels with right sides together. Stitch the perimeter as close as possible to the piping, leaving an
opening along one edge for turning. Clip the corners, and then turn the pillow right side out.
Stuff the pillow with fiberfill to the desired fullness. Fold the opening seam al-lowances toward the wrong side; slipstitch the opening closed.

NotebookCozy
OrganzaPotpourriBags
Adorn an ordinary journal with a fabric cover.
Supplies• Notebookorrecipebook
• Threeprintcottonfabricscraps(A,B&C)
• Two6”lengthsof1⁄4”-wideribbon
• Handsewingneedle
ConstructUse 1⁄4” seam allowances.
Measure the book height; record. Open the book. Measure the book from one short end to the other. Divide this measurement by three. Add 3⁄8” to all edges for a 1⁄4” seam allowance and 1⁄8” ease.
From fabric C, cut one rectangle according to the full cover mea-surement, plus 3⁄8”.
From fabric A, cut two pieces according to the recorded measure-ments. From fabric B, cut one piece according to the recorded measurements.
With right sides together, stitch one fabric-A piece to the fabric-B piece along one long edge; press open. Stitch the remaining fabric-A piece to the remaining fabric-B piece long edge; press open.
Divide the full cover width in half; record. From fabric C, cut two pieces according to the book height plus 3⁄8” and the recorded width.
Fold one long edge of each piece 1⁄2” toward the wrong side; topstitch 3⁄8” from the fold.
With right sides facing up, position the small fabric-C rectangles over the large fabric-C rectangle along the short edges; baste.
With right sides together, align the pieced rectangle with the fabric-C rectangles. Sandwich one ribbon along each short edge between the fabric-A and fabric-C rectangles, aligning the raw edges. Stitch the cover perimeter, leaving a centered opening along one long edge for turning. Clip the corners, and then turn the cover right side out; press. Fold the opening seam allowances 1⁄4” toward the wrong side; hand stitch. Slip the notebook front and back cover into the pockets.
Stitch a simple drawstring bag and fill it with potpourri to freshen your holiday home.Supplies• 4”x12”rectangleoforganza
• 20”lengthofbraidedcord
• Bodkin(optional)
ConstructFold the organza in half widthwise with wrong sides together. Stitch the bag sides from the fold to the upper edge using an 1⁄8” seam allowance. Turn the bag inside out; press. Stitch the sides again using an 1⁄8” seam allowance to create French seams; press.
Double-fold the bag raw edge 1⁄2” toward the wrong side. Edgestitch the first fold, leaving a 1” opening for threading the drawstring. Thread the cord through the drawstring channel. Turn bag right side out; press. Fill the bag with dried fruit or seasonal spices, and cinch the drawstring to close the bag.
Create a reusable tote to send home party favors and gifts for all your guests.
Supplies• Two12”x18”rectanglesofmediumweightcottonfabric(body)
• Two2”x24”bias-cutrectanglesofcoordinatingcottonfabric(handles)
ConstructWith right sides together, align the body rectangles. Stitch the short edges and one long edge. Double-fold the remaining raw edge 1⁄4” toward the wrong side; press. Edgestitch the first fold. Turn the bag right side out.
With right sides together, fold each handle in half lengthwise. Stitch the long edge. For easy turning, center a 24” length of yarn between the folded layers. Stitch, catching the yarn in the short end only, and then pull the yarn to turn the handle right side out. Remove the yarn from the handles. Press the handle flat. Repeat to create the remaining handle.
On the bag right side, align the handle ends on the bag approximately 2” from each side seam and 1⁄2” from the upper edge. Zigzag stitch the handle ends.
Perk up a drab dinette with these simple and chic holiday table dressings.
Supplies• Two21⁄2”x61⁄2”rectanglesoffabric
• One21⁄2”x61⁄2”rectangleoflightweightfusibleinterfacing
• Two6”lengthsofthinribbon
• Handsewingneedle
ConstructAdhere the fusible interfacing to one fabric rectangle wrong side following the manufacturer’s instructions.
With the fabric right side up, center one ribbon along one short edge, aligning the raw edges; pin. Center the remaining ribbon along the opposite short edge; pin. Layer the remaining fabric rectangle wrong side down, sandwiching the ribbons. Tuck the ribbon ends into the sandwich to avoid catching them in the stitching.
Stitch the rectangle perimeter, leaving a small opening along one long edge for turning. Trim the corners, and then turn the rectangle right side out. Poke out the corners using a point turner; press. Fold the opening seam allowances toward the wrong side; slipstitch the opening closed. Wrap the band around silverware settings.
PartyGrabBag
PartyNapkinRings

Kids’SockPuppets
FestivePlaceMats
Gather the kids and craft sock puppets to keep the family occupied when the weather is frightful. Use socks whose mates have been lost, and fold the toes inside the sock to form the mouth.
Hand tack the toe center loosely to the roof of the puppet’s mouth, fitting between the puppeteer’s middle and ring fingers.
Adorn the puppet with buttons, hand stitching, yarn hair, felt, and tulle tutus to make a tiny twin for each member of your family.
Finish off your holiday table with easy seasonal place mats.
Supplies• 141⁄2”x181⁄2”&101⁄2”x141⁄2”rectanglesofprint
cottonfabric
• Scrapsofcoordinatingprintcottonfabric
• Lightweightfusibleinterfacing
• Handsewingneedle
ConstructAdhere the interfacing to the large print cotton fabric wrong side, following the manufacturer’s instructions. Designate as the place mat back.
From the coordinating fabric, cut two 41⁄2”x141⁄2” rectangles.
With right sides together, align one small rectangle long edge with one large rectangle long edge; stitch using a 1⁄4” seam allowance, and then press open. Repeat to stitch the remaining small rectangle to the remaining large rectangle long edge.
With right sides together, align the pieced place mat front and place mat back. Stitch the perimeter using a 1⁄2” seam allowance, leaving a centered opening along one edge for turning. Trim the corners, and then turn the place mat right side out. Poke out the corners to form a crisp point; press. Fold the opening seam allowances toward the wrong side, and then slipstitch the opening closed.


![MySewingMall.com [Sewing Machine Parts & Sewing Jargons]](https://img.pdfslide.us/doc/110x75/587a415b1a28ab00148b4837/mysewingmallcom-sewing-machine-parts-sewing-jargons.jpg)