Embed Size (px)
Citation preview

1
Presented by The Polycarbonate Store A division of Charley’s Greenhouse & Garden
06-16
also available: 25 mm (1")
Multi-Wall Polycarbonate Insulated for lower heating cost Nearly unbreakable Diffused, even light More stable interior climate Easy to handle Lightweight 15-20 year life
RECOMMENDATIONS
Types of Polycarbonate CLEAR highest light transmission
BRONZE shading and privacy
COLORS: BLUE Accent GREEN Accent OPAL Privacy
We make building easy! ©
Building With Polycarbonate 101
Glazing Choices
● 3 mm (1/8") Clear tempered safety glass Heavy, but has longest life and best clarity. Requires summer shading to protect plants. ● B1274 6 mm (1/4") TwinWall Polycarbonate Our standard glazing panel. Very strong and flexible. (R 1.6) Use to replace single glass panes.
● B1278 10 mm (3/8") TwinWall Polycarbonate Best price for 10 mm. More strength than 6 mm. (R 2.0) ● B1290 10 mm (3/8") 3-Wall Polycarbonate Better insulation and clarity than 4 mm or 6 mm. (R 2.1)
● B1283 16 mm (5/8") TripleWall Polycarbonate Best clarity and appearance because of the wider flute spacing. Better insulation value (R 2.5).
● B1376 16 mm (5/8") Super 5-Wall Storm Polycarbonate Highest strength and insulation value (R 2.78). Best for cold and windy climates.
6 mm
16 mm
16 mm
3 mm
10 mm TwinWall
10 mm 3-Wall

2
Polycarbonate 101
Framing Materials A. WOOD
B. PVC PIPE C. ALUMINUM & STEEL D. FASTENERS – Decking screws, lag bolts, washer head screws
E. SILICONE – Sikasil-N Plus Silicone Sealant
Disclaimer: These sketches are only intended to show possible framing tech-niques. They are not structurally engineered or specifically approved by any building code. Structures over 120 sq. ft (sometimes less) often require a building permit.
Greenhouse Design
Gothic Arch Hoop Gable Solar Custom Solar Lean-To Lean-To Shed-Attached Lean-To
cross-blocking
sealant
washer-head screw
gasket washer

3
Framing Ideas

4
► 4 mm, 6 mm, 8 mm and 10 mm Polycarbonate You can cut small amounts with a box knife. Larger jobs should be cut with a circular saw, table saw or saber saw. In all cases, a fine-tooth blade is required. (Plywood/finish blade for circular saw / table saw, and a metal cutting blade for a saber saw.) Circular Saw / Saber Saw: Clamp a straight-edge to the panel to guide the saw. Proper cutting speed is important ... Too slow and the plastic will melt, too fast and you may have large chips. Table Saw: Push through the saw as you would a piece of plywood paneling. Box Knife – Not recommended, but can be used for small, short cuts. Always draw the knife away from the hand holding the polycarbonate sheet. A box knife tends to drag and skip, making it dangerous to use. Draw the knife lightly to start the cut then repeat with more pressure. When the cut is almost complete, you can flex and snap the pieces to finish the separation.
► 16 mm and 25 mm Polycarbonate
Cutting 16 mm and 25 mm Polycarbonate: A table saw and circular saw are the best cutting tools. A saber saw may be useful for cutting holes or rounding corners.
Cutting Multi-Wall Polycarbonate
NOTE: When the panels are cut to size, small particles may have entered the flute channels. Compressed air is used to clear the flutes. Peel off the protective film from the inside of the panel and inspect the panel closely. Remove any remaining particles with a vacuum or compressed air. Do not flush the flutes with water because it may take a long time to dry out.

5 2-23-17
Fig 5
Silicone
Poly End Cap
poly
Installing Multi-Wall Polycarbonate
• The framing for Multi-Wall should be 24" to 24½" on center. Cross blocking should be 4 ft. to 6 ft. apart going up rafters between Ridge and Eave, and also in walls over 6 ft. tall.
• Inspect the panels and read any information printed on the protective film. • Multi-Wall has film on both sides. One side is clear and the other will have printing on it or will be blue.
The side with printing, or blue (if there is no printing), is the UV-protected side, which must face outward. • Verify that any silicone or caulk that will come into contact with the polycarbonate is compatible with the
polycarbonate. (Never apply silicone sealant so that it will enter the poly channels of the Multi-Wall.)
CAUTION! The Multi-Wall Panels must be stored in a cool, dry location. - Do not store in the sun, or the temporary protective film will be difficult or impossible to remove. - Leave film on until after installation is complete (UV side must face out) unless you have marked one side (Fig 4.)
Step 1. Taping the ends of the panels or installing End Caps. The ends of the polycarbonate panels should be enclosed to keep out dust and insects. This can be done with a special breathable tape (B7524), aluminum channel, or by fitting the panel into a Polycarbonate End Cap. Apply tape to the end of any panel that does not fit into wood channel, aluminum or Poly End Cap. Do not use silicone or caulking to seal the ends. This will damage the polycarbonate.
A. To seal the top ends with the polycarbonate tape:
a. Lay out the Multi-Wall panel on a flat surface. b. Peel back plastic film on each side of the panel
about 4" to 6" from edge (fig 1). c. Measure panel width and cut polycarbonate
tape to length. d. Peel off protective backing on tape. e. With one end of tape in each hand, start one
end with 1/4" to 3/8" overlap onto panel. Pulling tight with opposite hand, press other end in place (fig 2).
f. Using fingers, press tape evenly, and then fold onto back side and smooth out (fig 3).
NOTE: Only remove the protective film from the inside of the panels before installation. Peel back the outside protective film about 4" from the edge, but leave the outside film on the panel until after installation is complete. It is difficult or impossible to tell the inside from the outside once both films have been removed. Place a small mark on the outside edge of the panel with a permanent marker (fig 4).
B. To enclose the ends with the End Cap (fig 5)
a. Lay out the Multi-Wall panel on flat surface. b. Peel back plastic film on each side of panel about 4"-6" from edge. c. With the wider side down, fit the End Cap halfway onto the panel. d. Apply silicone sealant. Then finish pushing the End Cap into
place, leaving a small air gap (1/16"-1/8") at the bottom.
Fig 1
Fig 3
Fig 2
Fig 4
Mark “outside” of panel
Poly End Cap

6 2-23-17
Side Cap “F”
Washer Head Screw
End Wall Framing
Polycarbonate
Fig 11
Step 2. Polycarbonate Installation:
Option 1. Using wood cap Make from 5/4 x 4 decking (net 1" x 3½).
A. Refer to Step 1A to seal ends with polycarbonate tape. B. For installation where two panels will be joined side by side (fig 6):
a. Lay down two strips of glazing tape (B7521), one on each edge of the framing, or on each edge of poly panel.
b. Lay the two pieces of polycarbonate down – leave about a 1/4" to 1/2" gap between the panels for expansion and for the screws. Remove backing film from tape, and press panels onto the tape. (TIP: Apply mist to tape from a spray bottle to reduce tack. This allows repositioning, if necessary.)
c. Seal with a layer of Foilastic Tape (B7532) for roof applications (optional). d. Lay down another two strips of glazing tape on the back of the wood cap.
Remove backing film. e. Set the wood cap onto panel and attach with coated decking screws
every 9" to 12". f. Seal screw heads with silicone.
C. On framing where the rafter is in the middle of the panel (fig 6.5): • OPTION A: For up to 8 ft. panels, use 1 or 2 screws placed in the center of
the panel (fig 10). For 12 ft. panels, use 2 screws, one 4 ft. in from each end. • OPTION B: Follow procedure with wood cap shown in fig. 6.5
D. For the top and sides where the panels will end (fig 8):
a. Lay down one strip of glazing tape, and remove backing film. b. Set panel in place. c. Place a wood spacer at the end and seal the seam with the Foilastic Tape. d. Lay down another strip of glazing tape. e. Install wood cap with coated decking screws every 9" to 12". f. Seal screw heads with silicone.
E. Ridge – rip 5/4x6 to make cap (fig 12.5).
Option 2. Using Polycarbonate Capping A. On framing where 2 panels will be joined (fig 9):
a. With the wider side of the Joiner Cap on the bottom, slip polycarbonate panels into each side of the Joiner Cap. Start at one end and slide panels until edge is completely covered by Joiner Cap.
b. Set Joiner Cap on framing and attach using Washer Head Screws (B7406) every 12" and at each end.
B. On framing where one panel crosses the framing and does not join another panel (fig 10): a. Lay down two strips of glazing tape. b. Lay down the panel. c. Add a 1" gasket washer to your Washer Head
Screw. This will spread the pressure over a larger area to prevent crushing the polycarbonate.
d. For up to 8 ft. panels, use 1 or 2 screws placed in the center of the panel. For 12 ft. panels, use two screws, one 4 ft. in from each end.
C. For the sides where the panels will end (fig 11): a. With the wider side down, fit the Side Cap (“F”
extrusion) over one side of the Multi-Wall panel. b. Attach using Washer Head Screws every 12". c. OPTION: Also End Cap as shown in fig 11.5
Glazing Tape
Screw Foilastic Tape
Rafter
Wood Cap
Fig 6
Glazing Tape
Screw
Rafter
Wood Cap
Fig 6.5
Glazing Tape Screw
Framing
Wood Cap
Wood Spacer
Foilastic Tape
Fig 8
Screw
1" Gasket Washer (B7436)
Glazing Tape
Fig 10
Rafter or Cross-Block
Polycarbonate
Joiner Cap Washer Head Screw
Rafter or Cross-Block Fig 9

7 2-23-17
Option 2. Using Polycarbonate Capping (continued) D. Poly Ridge Cap (fig 12) a. Fasten the Ridge Cap to the ridge beam with truss-head or decking screws. b. Insert the polycarbonate into the Ridge Cap. c. Leave 1/8" gap at the top to allow the panel to breathe and to expand in warm weather. Option 3. Using Aluminum Bar Cap
A. Refer to Step 1. A. to seal ends with polycarbonate tape.
B. For framing with two panels (fig 13): a. Lay down two strips of glazing tape, one for each panel on the
edges of the framing. Remove plastic backing tape. (TIP: Apply mist to tape from a spray bottle to reduce tack. This allows repositioning, if necessary.)
b. Lay the two pieces of polycarbonate down – leave about a 1/4" to 1/2" gap between the panels for expansion and for the screws.
c. Slide the rubber gasket into each side of the Aluminum Base. d. Set the Aluminum Base onto the polycarbonate and attach with
truss-head screws every 9". e. Slide Aluminum Cap into the base. Crimp end to keep cap in place.
C. On framing where rafter is in the middle of the panel (fig 13.5): a. Lay down two strips of glazing tape. b. Lay down the panel. c. Slide the rubber gasket into each side of the Aluminum Base. d. Set the Aluminum Base onto the polycarbonate and attach with a truss-head screw at each end and every 24". e. Slide Aluminum Cap into the base.
D For the sides where the panels will end (fig 14): a. Lay down one strip of glazing tape. b. Set panel in place. c. Install a wood spacer at the end. d. Slide the rubber gasket into each side of the Aluminum Base. e. Set the Aluminum Base onto the polycarbonate and attach with
truss-head screws every 12". f. Slide Aluminum Cap into the base. Crimp ends to hold the
Aluminum Cap in place.
Glazing Tape
Screw
Aluminum Cap
Rafter
Rubber Gasket
Aluminum Base
Fig 13
Glazing Tape
Rafter
Aluminum Base
Fig 13.5
Rubber Gasket
Aluminum Cap
Screw
Framing
Aluminum Base
Fig 14 Aluminum Cap
Screw
Glazing Tape
Rubber Gasket
Wood Spacer
FLASHING
Polycarbonate
Ridge Beam
Rafter
Fig 12.5
Poly Ridge Cap
Fig 12
Corner Stud or End Rafter
Roof Polycarbonate
End Cap
Washer Head Screw
Fig 11.5
8 2-23-17
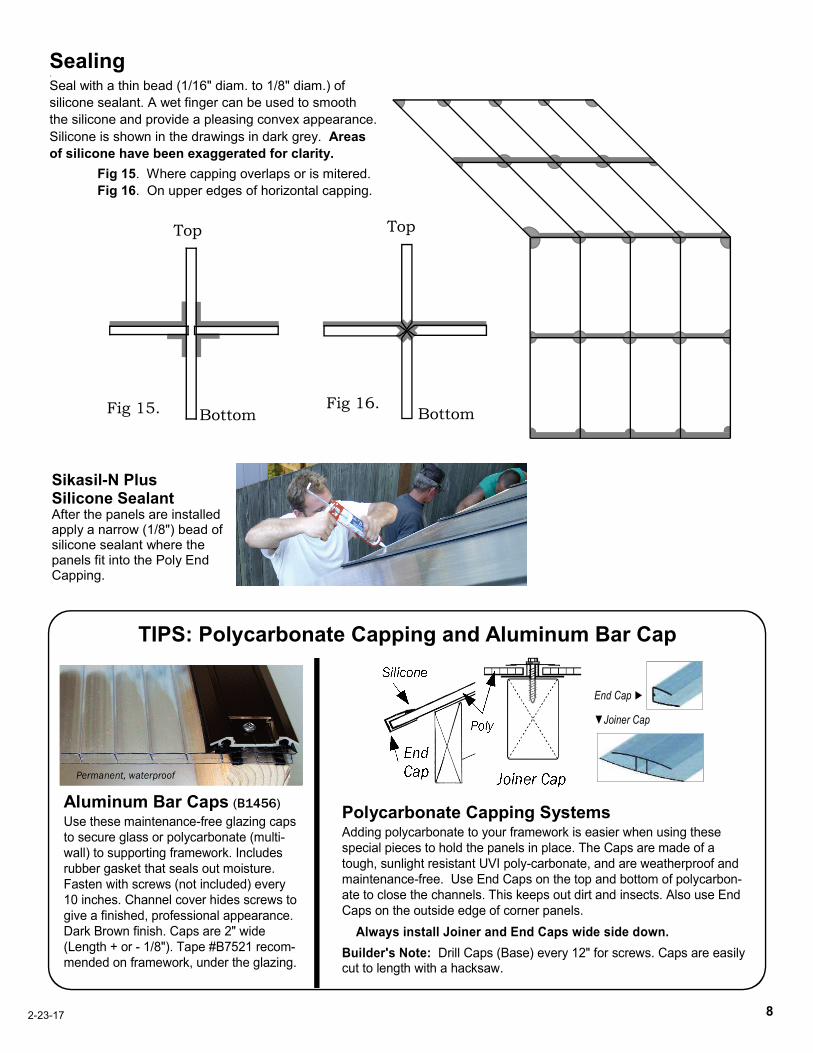
End Cap ►
▼Joiner Cap
Sealing 1.
Seal with a thin bead (1/16" diam. to 1/8" diam.) of silicone sealant. A wet finger can be used to smooth the silicone and provide a pleasing convex appearance. Silicone is shown in the drawings in dark grey. Areas of silicone have been exaggerated for clarity.
Fig 15. Where capping overlaps or is mitered. Fig 16. On upper edges of horizontal capping.
Fig 16. Fig 15.
Top Top
Bottom Bottom
Sikasil-N Plus Silicone Sealant After the panels are installed apply a narrow (1/8") bead of silicone sealant where the panels fit into the Poly End Capping.
TIPS: Polycarbonate Capping and Aluminum Bar Cap
Aluminum Bar Caps (B1456) Use these maintenance-free glazing caps to secure glass or polycarbonate (multi-wall) to supporting framework. Includes rubber gasket that seals out moisture. Fasten with screws (not included) every 10 inches. Channel cover hides screws to give a finished, professional appearance. Dark Brown finish. Caps are 2" wide (Length + or - 1/8"). Tape #B7521 recom-mended on framework, under the glazing.
Permanent, waterproof
Polycarbonate Capping Systems
Adding polycarbonate to your framework is easier when using these special pieces to hold the panels in place. The Caps are made of a tough, sunlight resistant UVI poly-carbonate, and are weatherproof and maintenance-free. Use End Caps on the top and bottom of polycarbon-ate to close the channels. This keeps out dirt and insects. Also use End Caps on the outside edge of corner panels. Always install Joiner and End Caps wide side down. Builder's Note: Drill Caps (Base) every 12" for screws. Caps are easily cut to length with a hacksaw.
9 We make building easy! ©
Manufacturer-Approved Cleaning Procedures for Multi-Wall Polycarbonate, Acrylic & APET
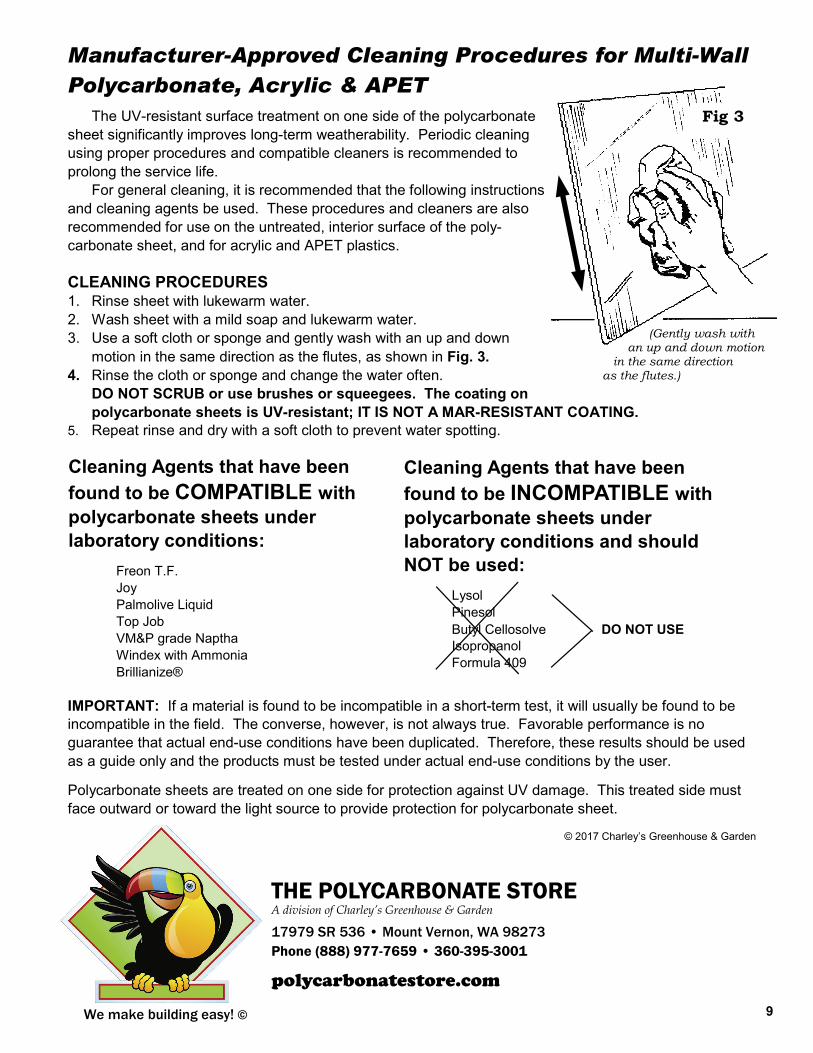
The UV-resistant surface treatment on one side of the polycarbonate sheet significantly improves long-term weatherability. Periodic cleaning using proper procedures and compatible cleaners is recommended to prolong the service life. For general cleaning, it is recommended that the following instructions and cleaning agents be used. These procedures and cleaners are also recommended for use on the untreated, interior surface of the poly- carbonate sheet, and for acrylic and APET plastics. CLEANING PROCEDURES 1. Rinse sheet with lukewarm water. 2. Wash sheet with a mild soap and lukewarm water. 3. Use a soft cloth or sponge and gently wash with an up and down
motion in the same direction as the flutes, as shown in Fig. 3. 4. Rinse the cloth or sponge and change the water often.
DO NOT SCRUB or use brushes or squeegees. The coating on polycarbonate sheets is UV-resistant; IT IS NOT A MAR-RESISTANT COATING.
5. Repeat rinse and dry with a soft cloth to prevent water spotting.
IMPORTANT: If a material is found to be incompatible in a short-term test, it will usually be found to be incompatible in the field. The converse, however, is not always true. Favorable performance is no guarantee that actual end-use conditions have been duplicated. Therefore, these results should be used as a guide only and the products must be tested under actual end-use conditions by the user.
Polycarbonate sheets are treated on one side for protection against UV damage. This treated side must face outward or toward the light source to provide protection for polycarbonate sheet.
Cleaning Agents that have been found to be COMPATIBLE with polycarbonate sheets under laboratory conditions: Freon T.F. Joy Palmolive Liquid Top Job VM&P grade Naptha Windex with Ammonia Brillianize®
Cleaning Agents that have been found to be INCOMPATIBLE with polycarbonate sheets under laboratory conditions and should NOT be used: Lysol Pinesol Butyl Cellosolve DO NOT USE Isopropanol Formula 409
THE POLYCARBONATE STORE A division of Charley’s Greenhouse & Garden
17979 SR 536 • Mount Vernon, WA 98273 Phone (888) 977-7659 • 360-395-3001
polycarbonatestore.com
© 2017 Charley’s Greenhouse & Garden
Fig 3
(Gently wash with an up and down motion in the same direction as the flutes.)