Embed Size (px)
Citation preview
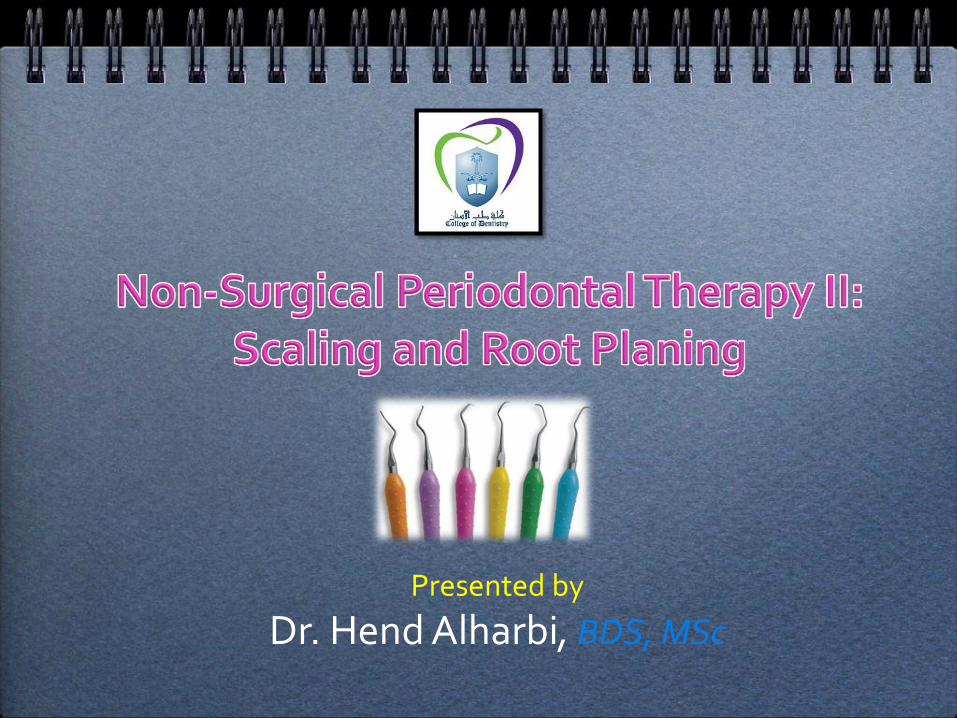
Presented by
Dr. Hend Alharbi, BDS, MSc
Reference
CARRANZA’s Clinical Periodontology 11th Edition
Part 6, Section III, Chapter (45 & 46 )
outlineCLASSIFICATION OF PERIODONTAL
INSTRUMENTS
- Periodontal Probes , explorer
- - Scaling and Curettage Instruments
- Cleansing and Polishing Instruments
GENERAL PRINCIPLES OF INSTRUMENTATION
- Accessibility: Positioning of Patient and Operator
- Visibility, Illumination, and Retraction
- Condition and Sharpness of Instrument
- Maintaining a Clean FieldInstrument StabilizationInstrument ActivationInstruments for Scaling and Root
Planing
PRINCIPLES OF SCALING AND ROOT PLANING- Definitions and Rationale- Detection Skills- Supragingival Scaling Technique- Subgingival Scaling and Root-PlaningTechnique- Ultrasonic and Sonic Scaling- Ultrasonic Instruments- Evaluation
INSTRUMENT SHARPENING- Evaluation of Sharpness- Objective of Sharpening- Sharpening Stones- Principles of Sharpening- Sharpening Individual Instruments
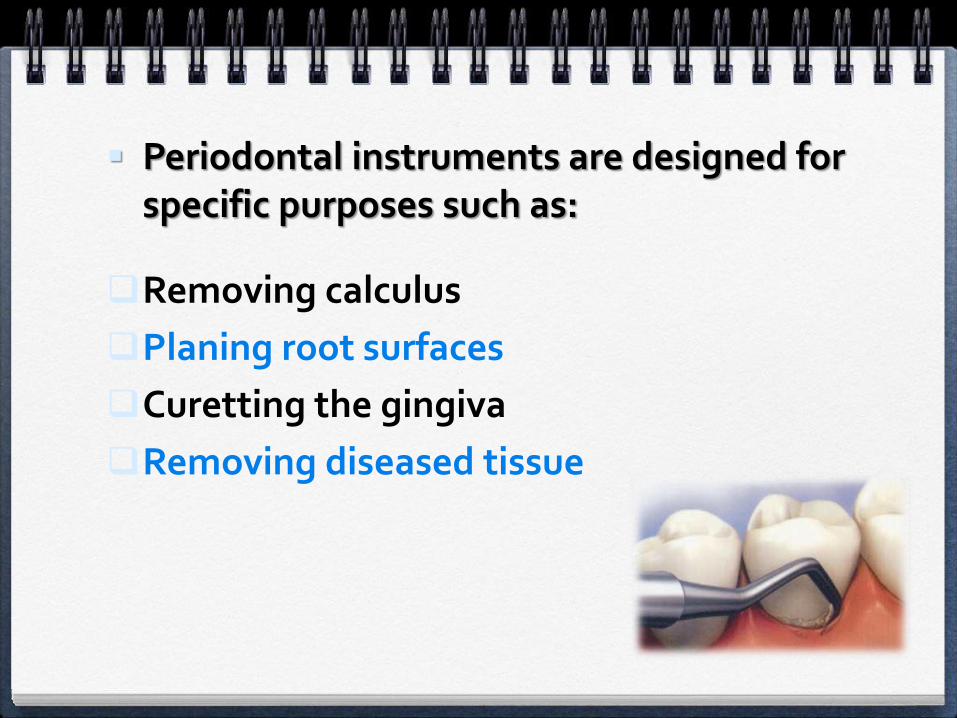
Periodontal instruments are designed for specific purposes such as:
Removing calculus
Planing root surfaces
Curetting the gingiva
Removing diseased tissue
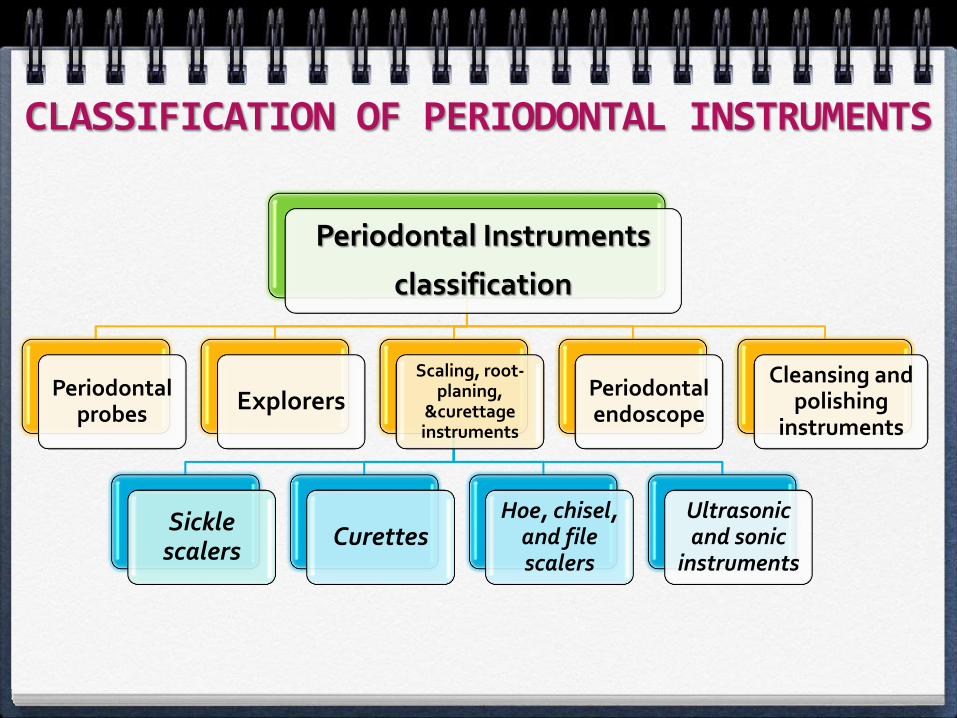
CLASSIFICATION OF PERIODONTAL INSTRUMENTS
Periodontal Instruments
classification
Periodontal probes
ExplorersScaling, root-
planing, &curettage instruments
Sickle scalers
CurettesHoe, chisel,
and file scalers
Ultrasonic and sonic
instruments
Periodontal endoscope
Cleansing and polishing
instruments
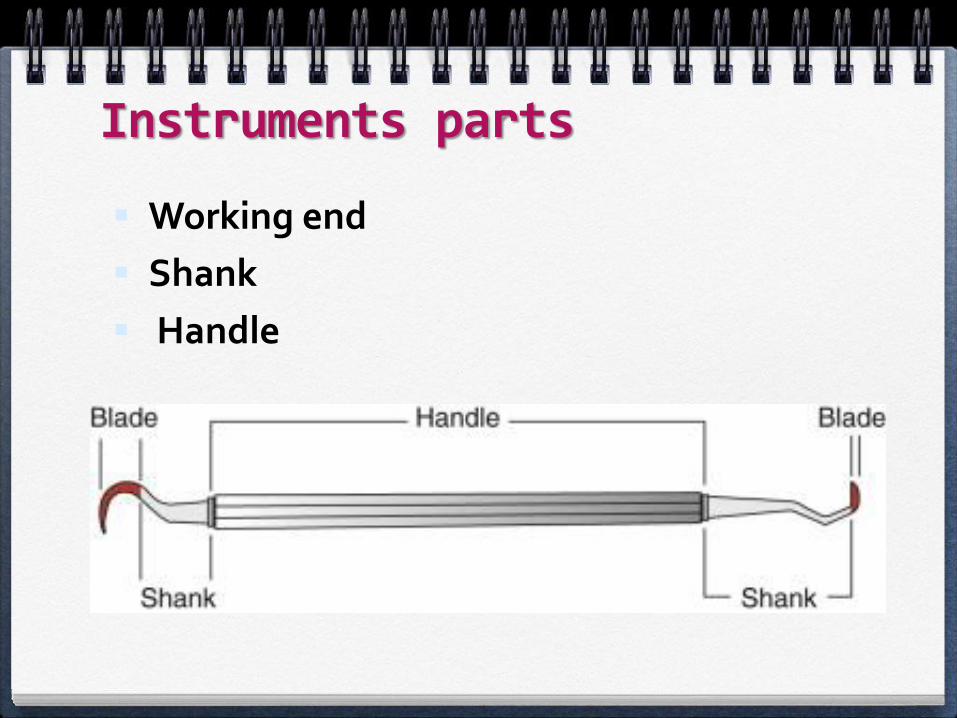
Instruments parts
Working end
Shank
Handle
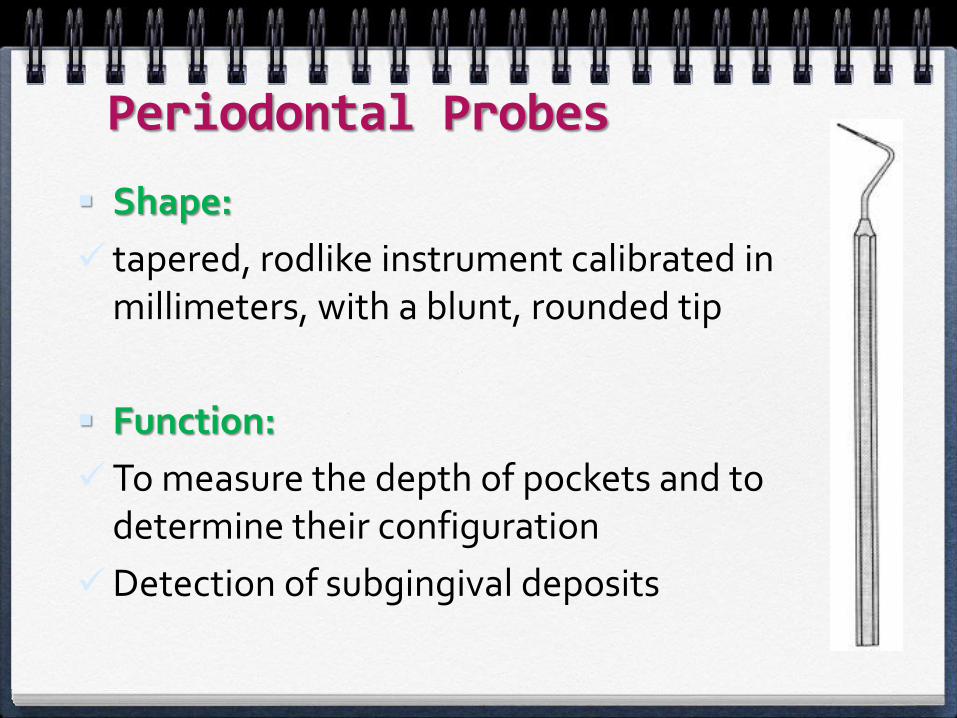
Periodontal Probes
Shape:
tapered, rodlike instrument calibrated in millimeters, with a blunt, rounded tip
Function:
To measure the depth of pockets and to determine their configuration
Detection of subgingival deposits
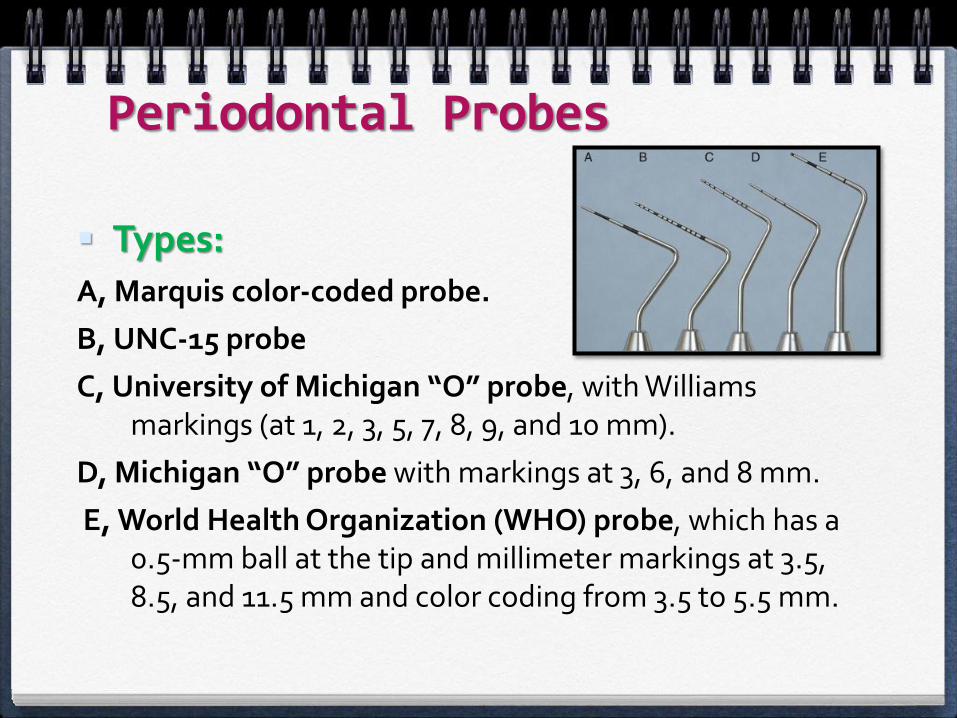
Types:A, Marquis color-coded probe.
B, UNC-15 probe
C, University of Michigan “O” probe, with Williams markings (at 1, 2, 3, 5, 7, 8, 9, and 10 mm).
D, Michigan “O” probe with markings at 3, 6, and 8 mm.
E, World Health Organization (WHO) probe, which has a 0.5-mm ball at the tip and millimeter markings at 3.5, 8.5, and 11.5 mm and color coding from 3.5 to 5.5 mm.
Periodontal Probes
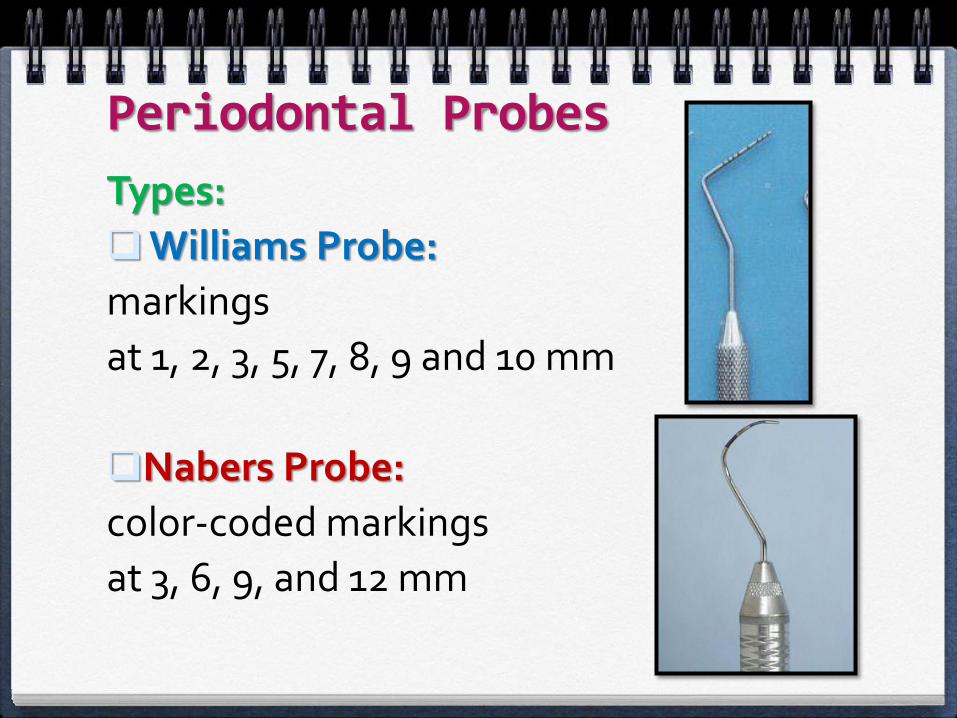
Types:
Williams Probe:
markings
at 1, 2, 3, 5, 7, 8, 9 and 10 mm
Nabers Probe:
color-coded markings
at 3, 6, 9, and 12 mm
Periodontal Probes

When measuring a pocket:
1. Probe is inserted with a firm, gentle pressure to the bottom of the pocket.
2. The shank should be aligned with the long axis of the tooth surface to be probed
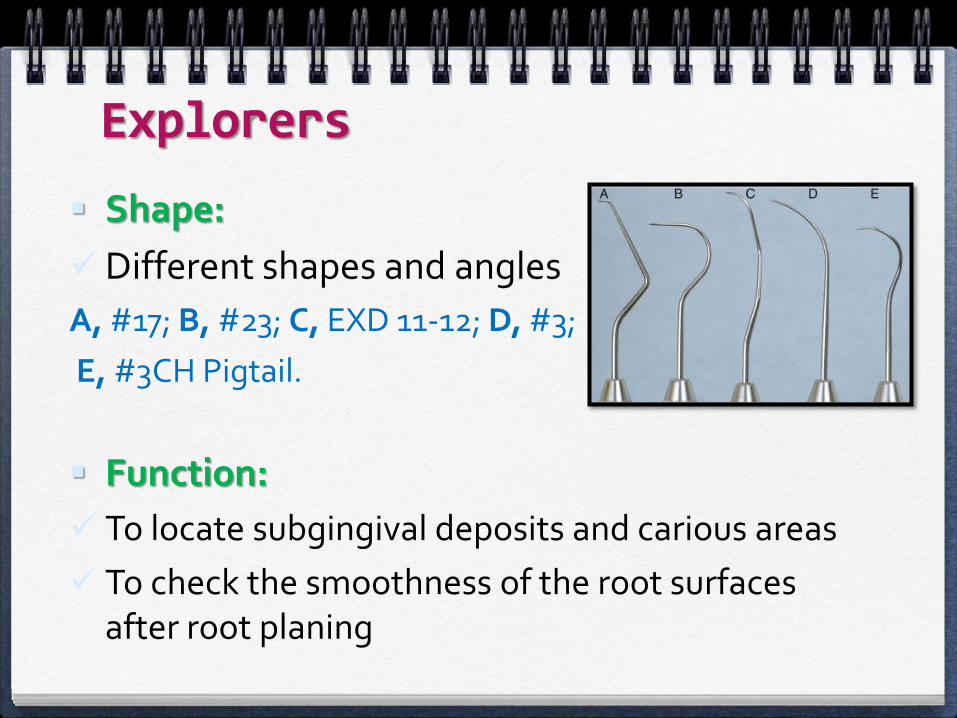
Explorers
Shape:
Different shapes and angles
A, #17; B, #23; C, EXD 11-12; D, #3;
E, #3CH Pigtail.
Function:
To locate subgingival deposits and carious areas
To check the smoothness of the root surfaces after root planing
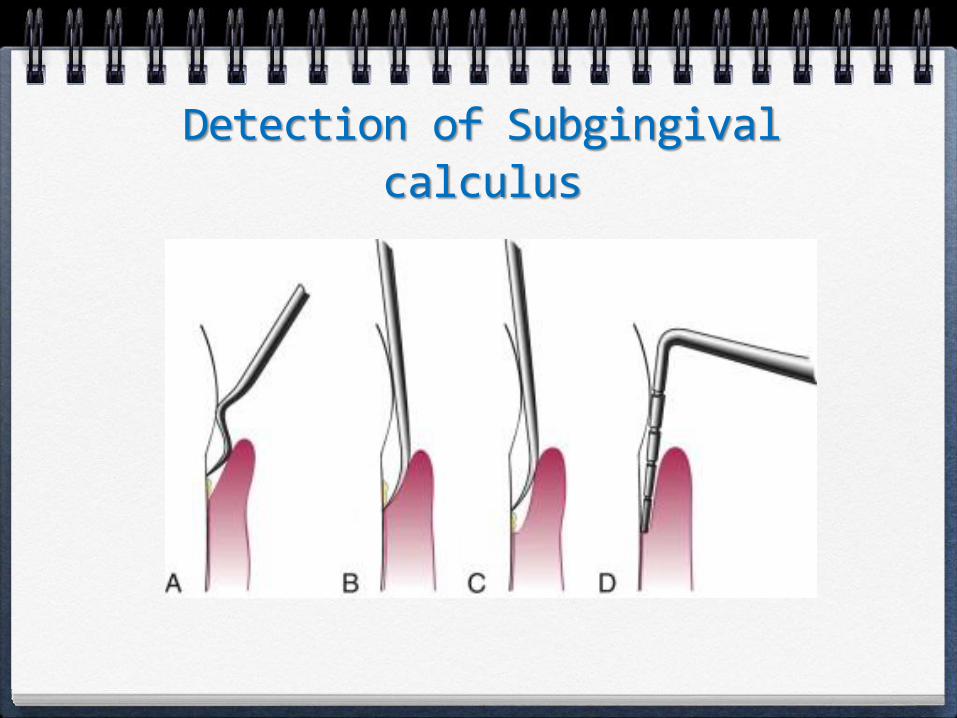
Detection of Subgingivalcalculus
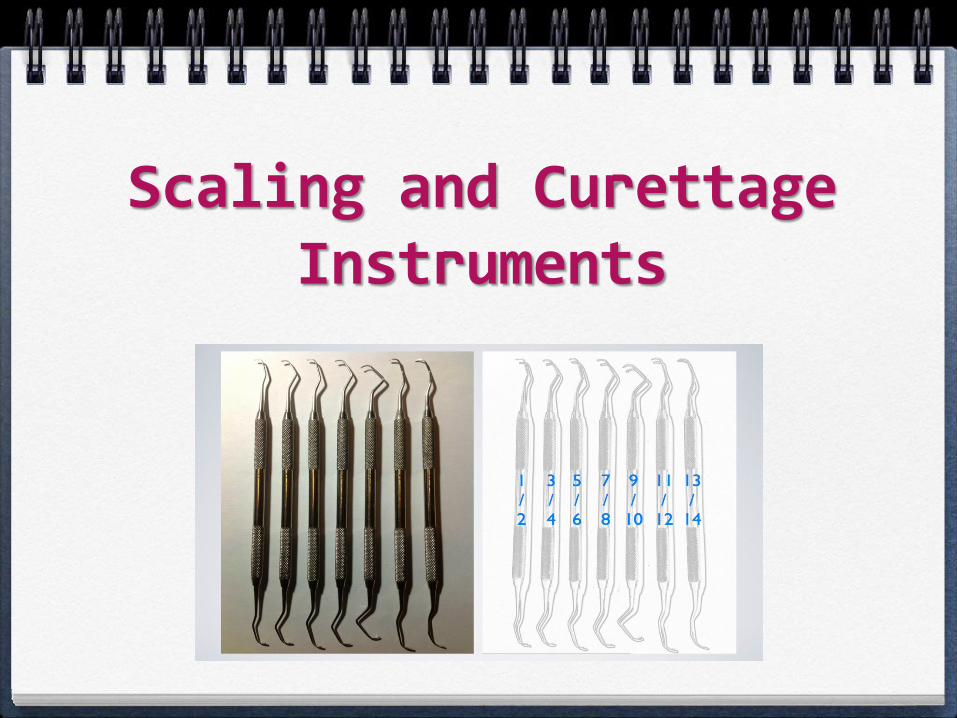
Scaling and Curettage Instruments
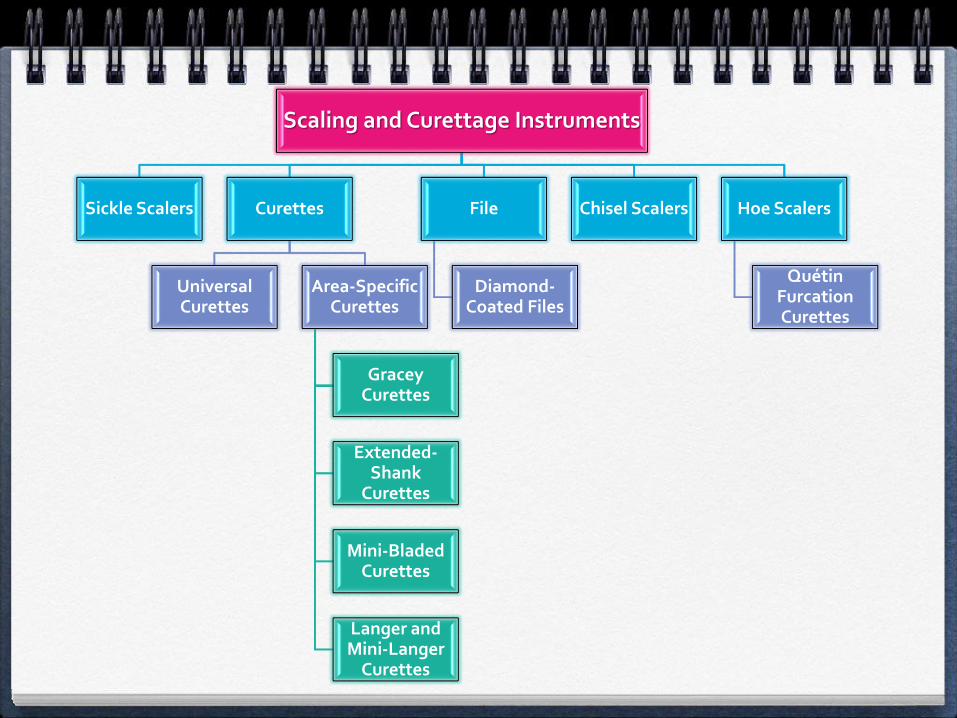
Scaling and Curettage Instruments
Sickle Scalers Curettes
Universal Curettes
Area-Specific Curettes
GraceyCurettes
Extended-Shank
Curettes
Mini-Bladed Curettes
Langer and Mini-Langer
Curettes
File
Diamond-Coated Files
Chisel Scalers Hoe Scalers
QuétinFurcationCurettes
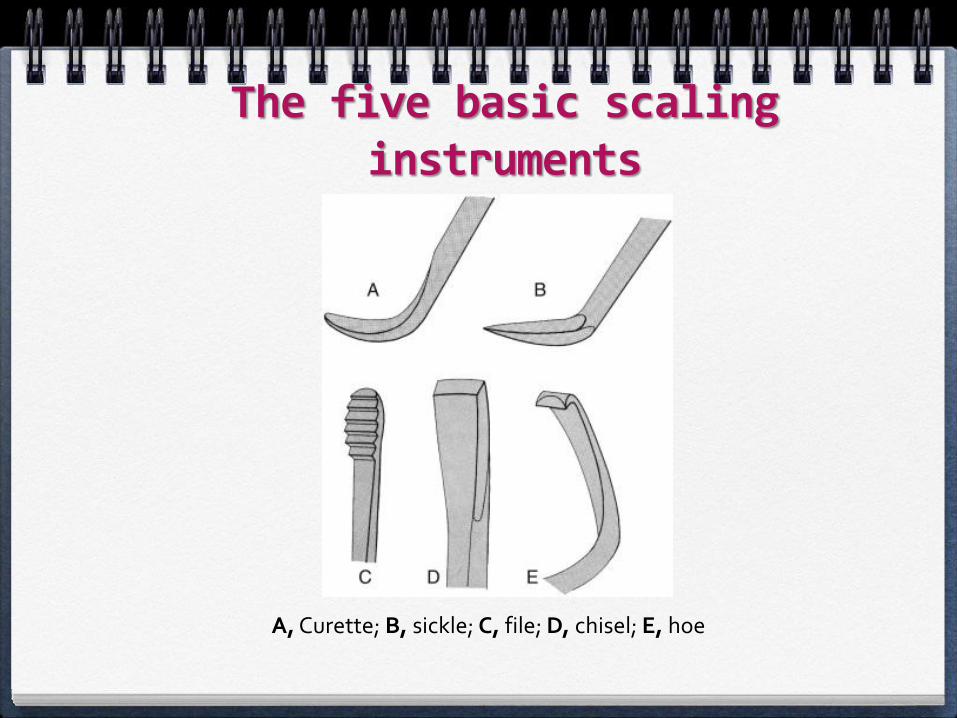
The five basic scaling instruments
A, Curette; B, sickle; C, file; D, chisel; E, hoe
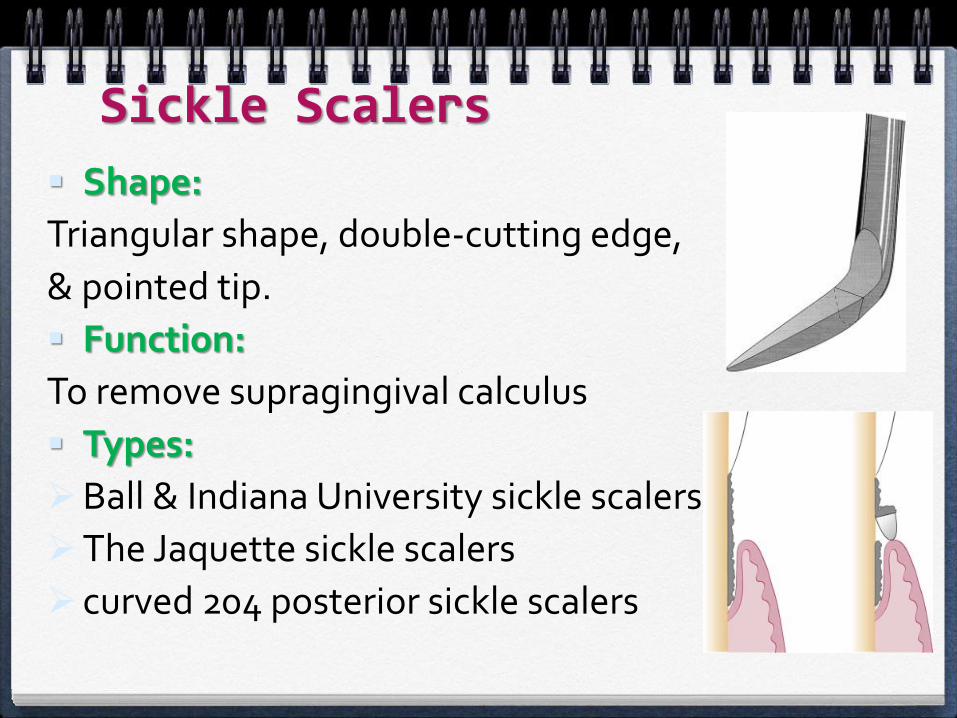
Sickle Scalers
Shape:
Triangular shape, double-cutting edge,
& pointed tip.
Function:
To remove supragingival calculus
Types:
Ball & Indiana University sickle scalers are large.
The Jaquette sickle scalers
curved 204 posterior sickle scalers
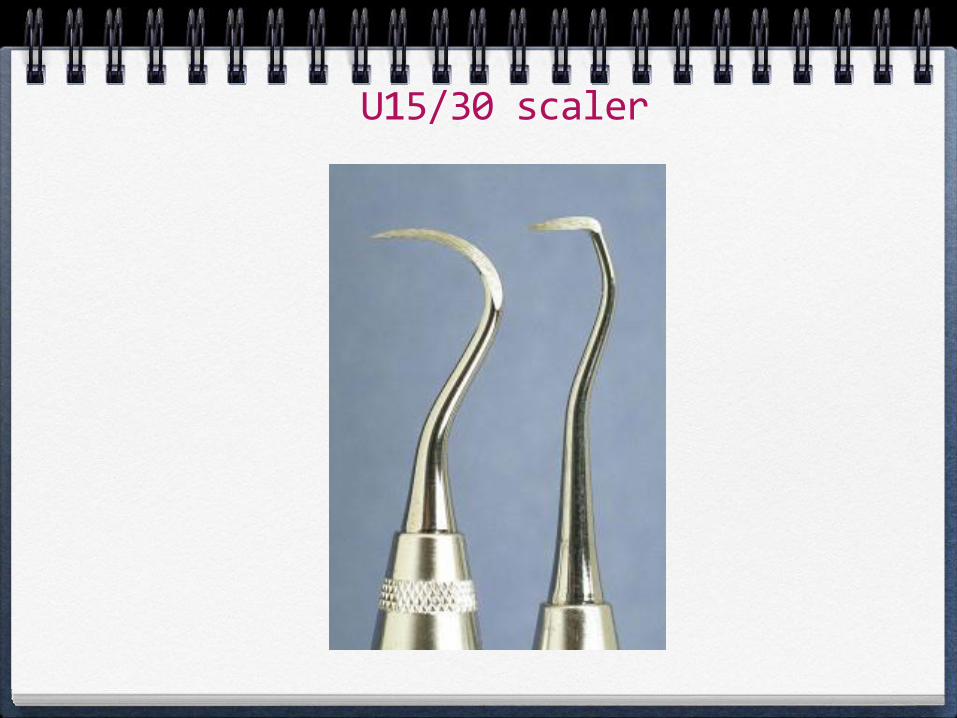
U15/30 scaler
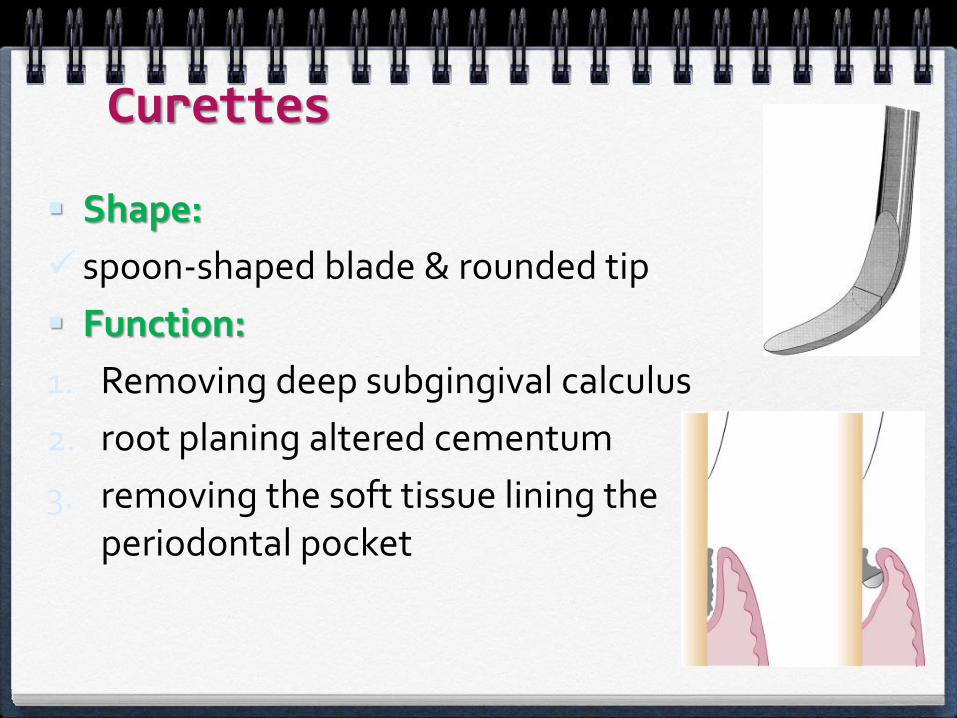
Curettes
Shape:
spoon-shaped blade & rounded tip.
Function:
1. Removing deep subgingival calculus
2. root planing altered cementum
3. removing the soft tissue lining the periodontal pocket
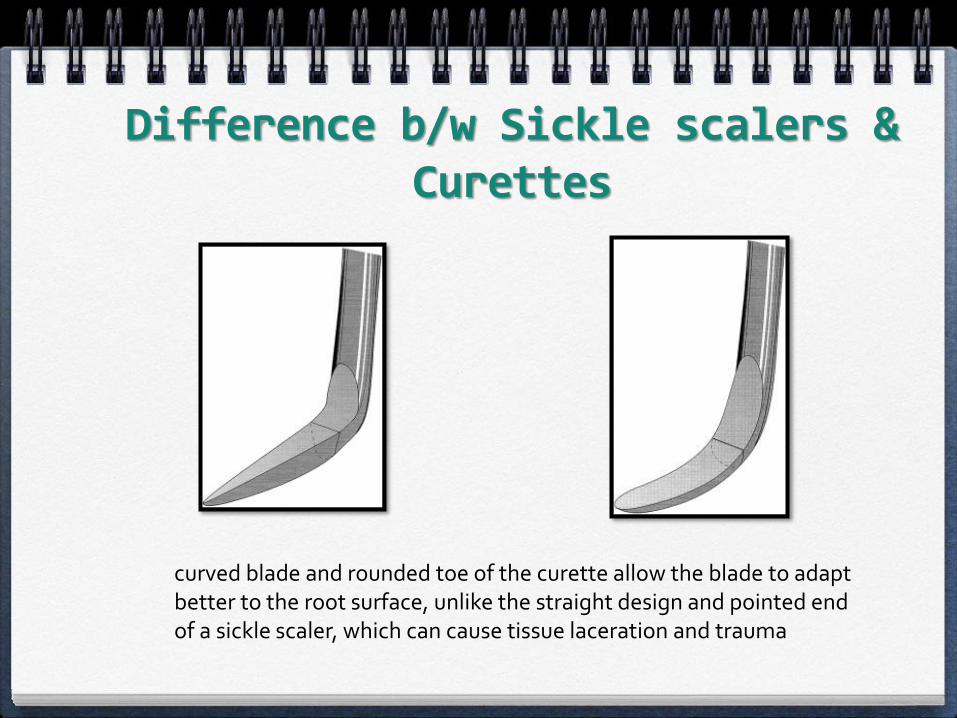
Difference b/w Sickle scalers & Curettes
curved blade and rounded toe of the curette allow the blade to adapt better to the root surface, unlike the straight design and pointed end of a sickle scaler, which can cause tissue laceration and trauma
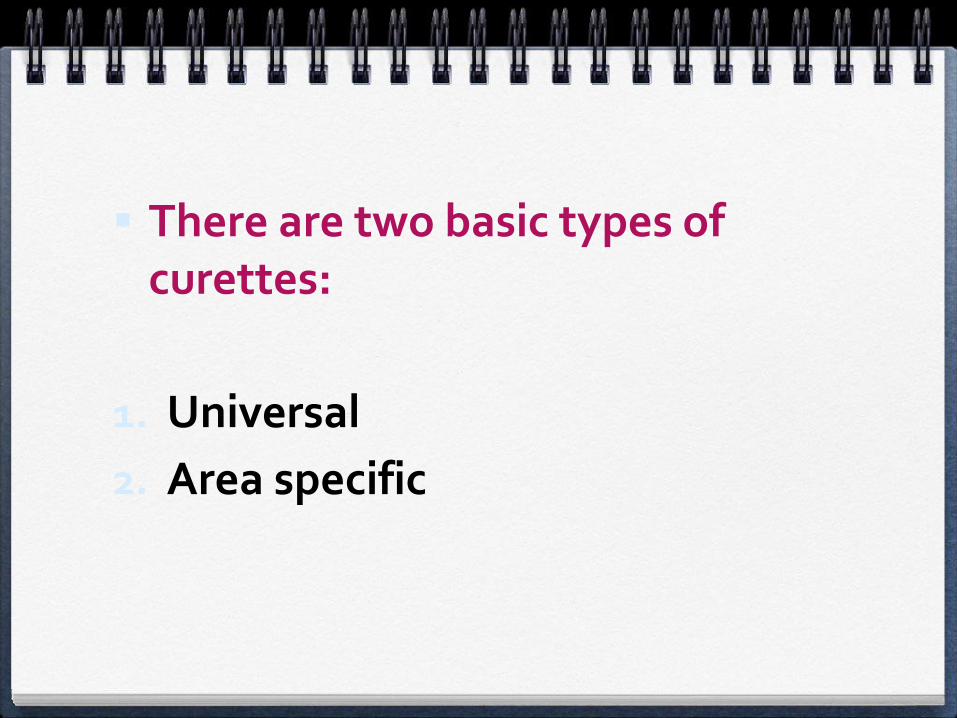
There are two basic types of curettes:
1. Universal
2. Area specific
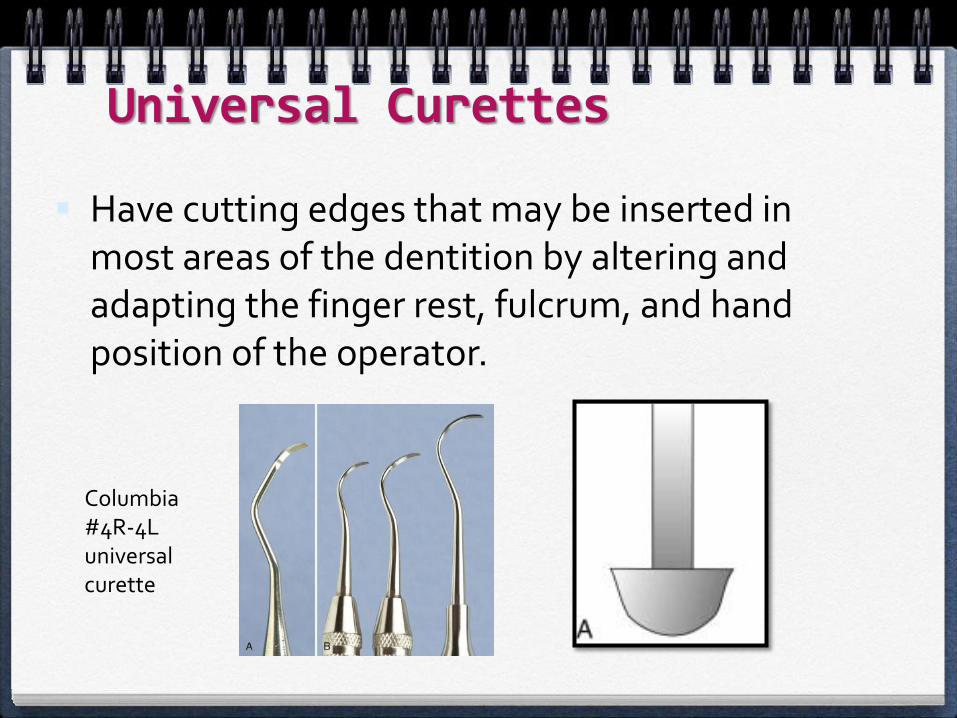
Universal Curettes
Have cutting edges that may be inserted in most areas of the dentition by altering and adapting the finger rest, fulcrum, and hand position of the operator.
Columbia #4R-4L universal curette
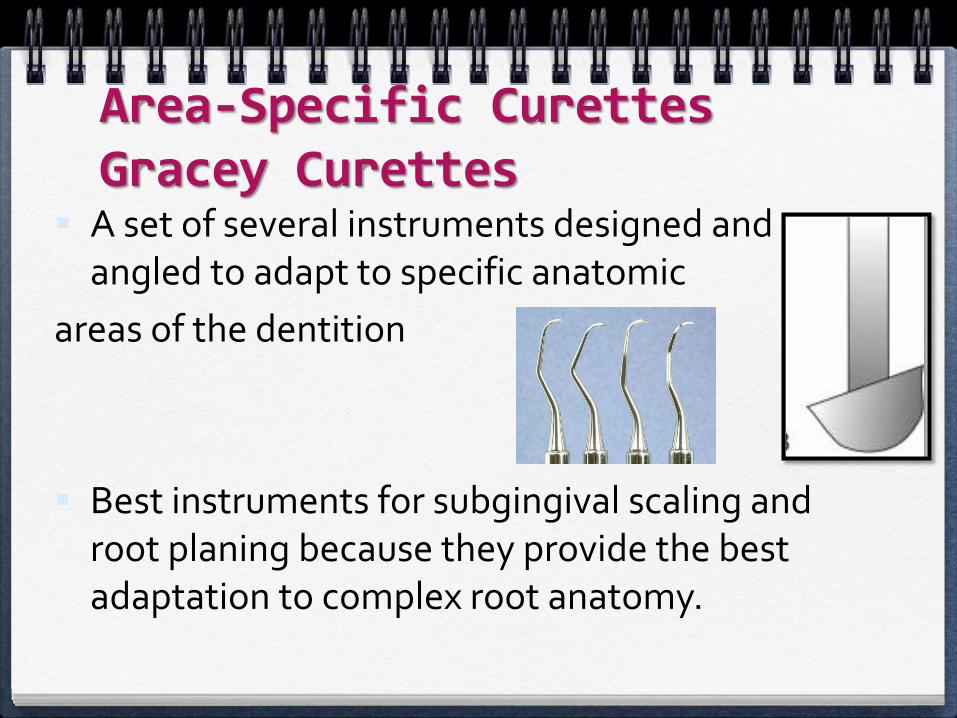
Area-Specific Curettes Gracey Curettes
A set of several instruments designed and angled to adapt to specific anatomic
areas of the dentition
Best instruments for subgingival scaling and root planing because they provide the best adaptation to complex root anatomy.

Gracey Curettes
Double-ended Gracey curettes are paired in the following manner:
Anterior teeth
Anterior & PM teeth
Posterior teeth (F&L)
Posterior teeth (Mesial)
Posterior teeth (Distal)
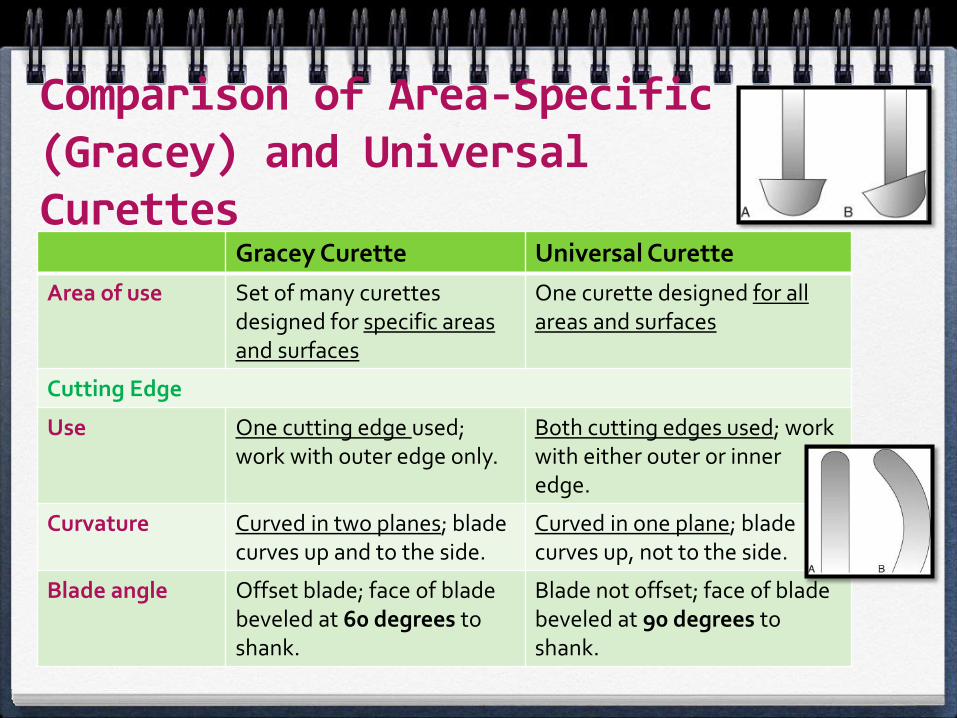
Comparison of Area-Specific (Gracey) and Universal Curettes
Gracey Curette Universal Curette
Area of use Set of many curettes designed for specific areas and surfaces
One curette designed for all areas and surfaces
Cutting Edge
Use One cutting edge used; work with outer edge only.
Both cutting edges used; work with either outer or inner edge.
Curvature Curved in two planes; blade curves up and to the side.
Curved in one plane; blade curves up, not to the side.
Blade angle Offset blade; face of blade beveled at 60 degrees to shank.
Blade not offset; face of blade beveled at 90 degrees to shank.
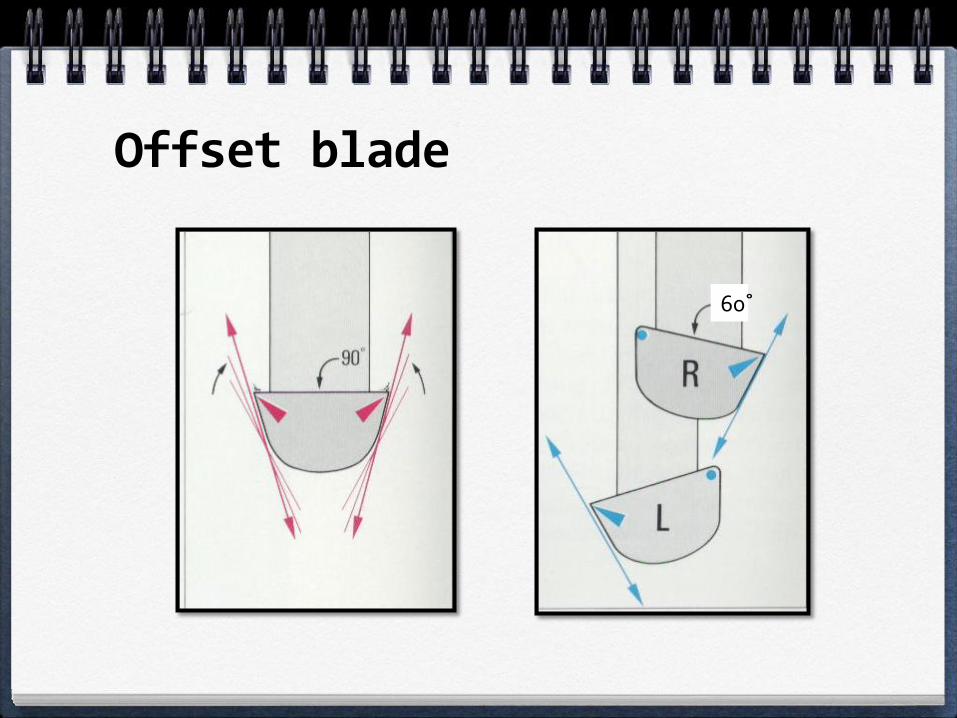
Offset blade
60˚
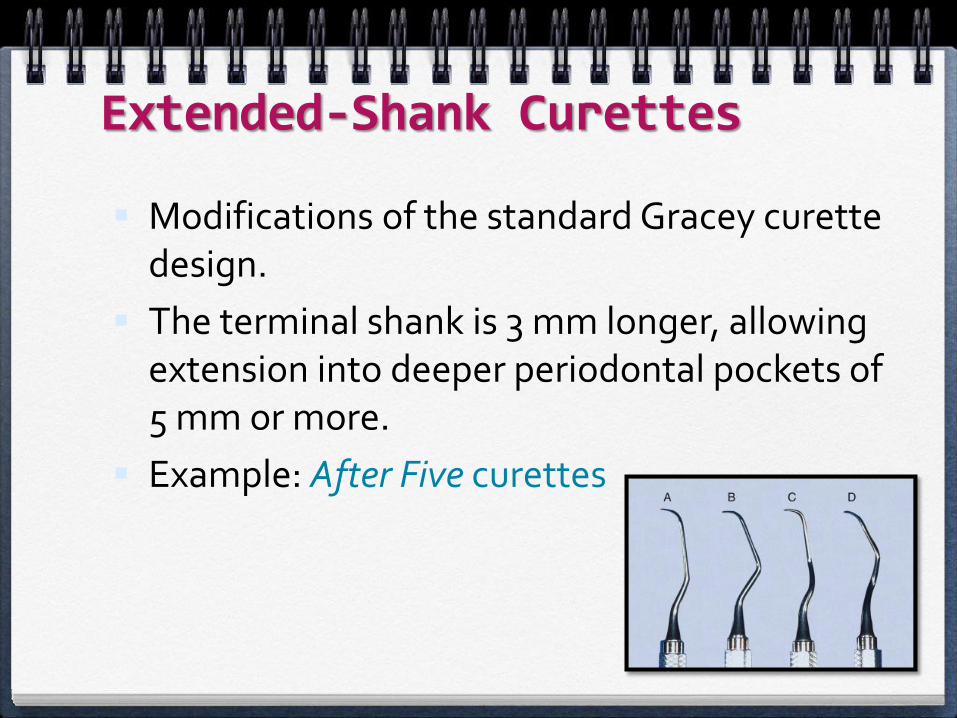
Extended-Shank Curettes
Modifications of the standard Gracey curette design.
The terminal shank is 3 mm longer, allowing extension into deeper periodontal pockets of 5 mm or more.
Example: After Five curettes
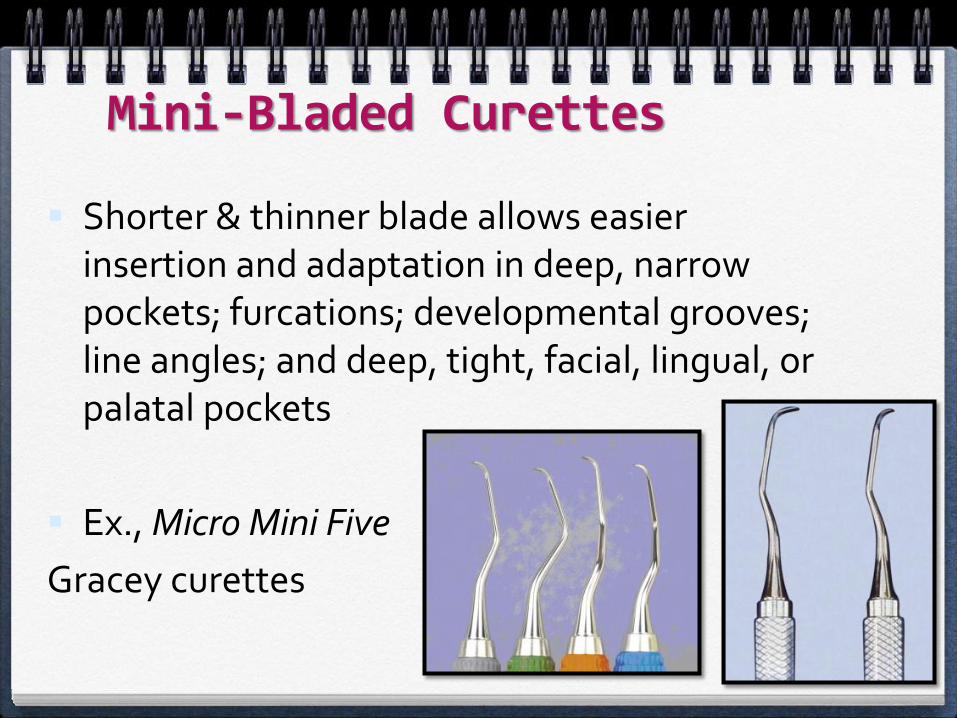
Mini-Bladed Curettes
Shorter & thinner blade allows easier insertion and adaptation in deep, narrow pockets; furcations; developmental grooves; line angles; and deep, tight, facial, lingual, or palatal pockets
Ex., Micro Mini Five
Gracey curettes
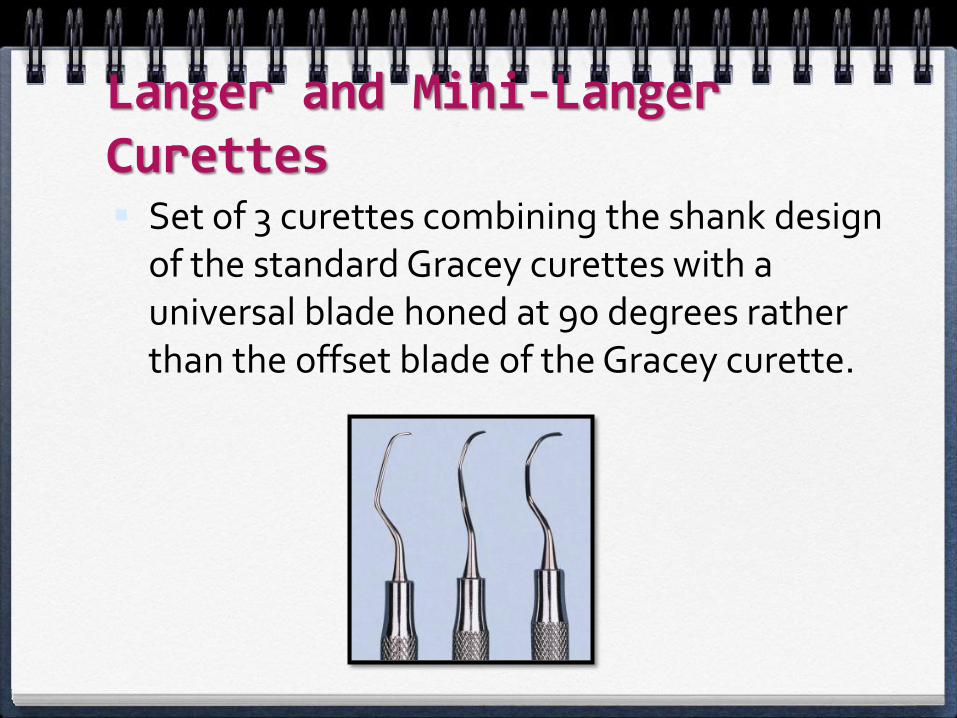
Langer and Mini-Langer Curettes Set of 3 curettes combining the shank design
of the standard Gracey curettes with a universal blade honed at 90 degrees rather than the offset blade of the Gracey curette.
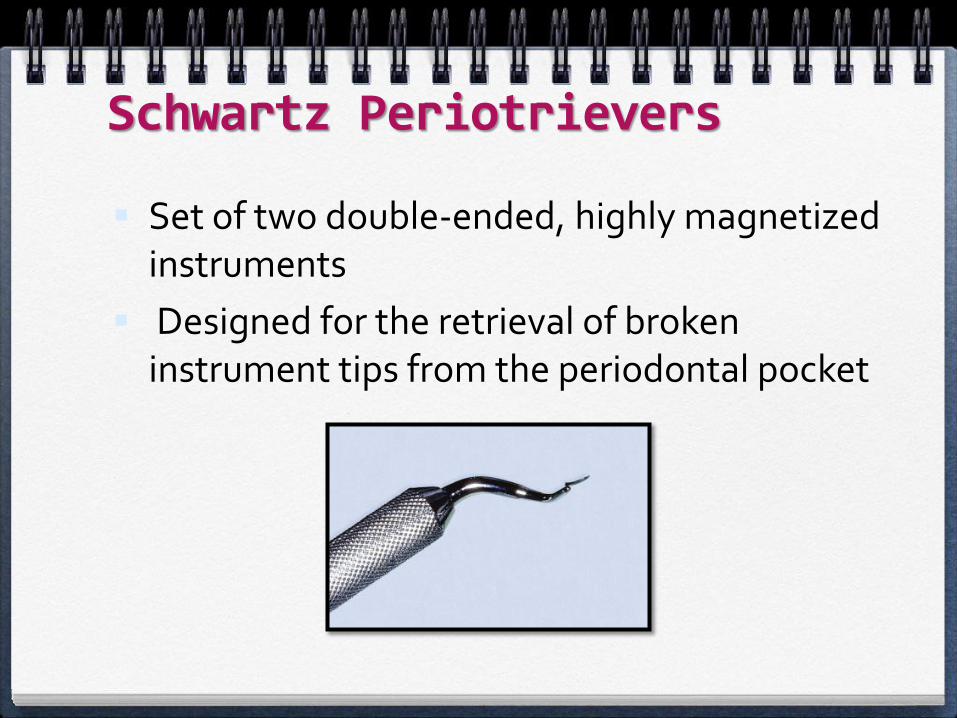
Schwartz Periotrievers
Set of two double-ended, highly magnetized instruments
Designed for the retrieval of broken instrument tips from the periodontal pocket
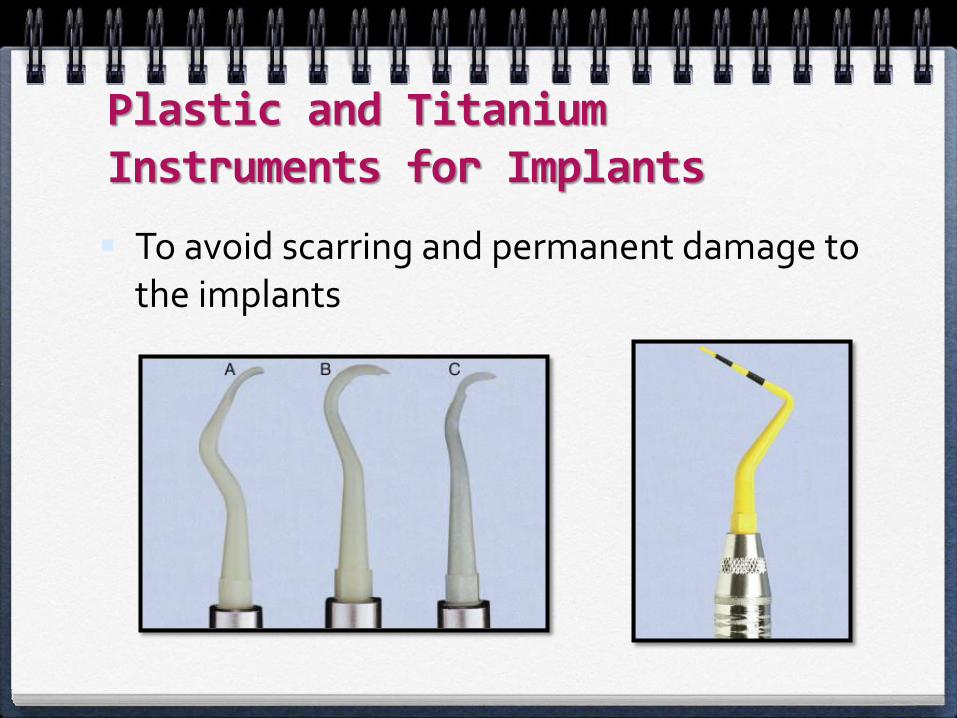
Plastic and Titanium Instruments for Implants
To avoid scarring and permanent damage to the implants
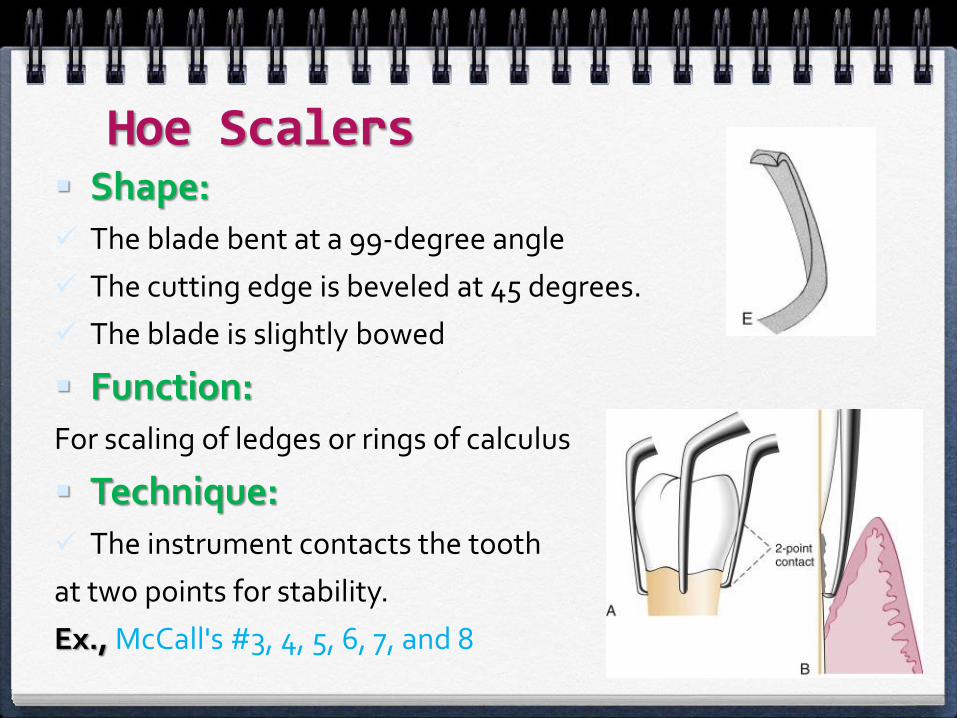
Hoe Scalers Shape: The blade bent at a 99-degree angle
The cutting edge is beveled at 45 degrees.
The blade is slightly bowed
Function:For scaling of ledges or rings of calculus
Technique: The instrument contacts the tooth
at two points for stability.
Ex., McCall's #3, 4, 5, 6, 7, and 8
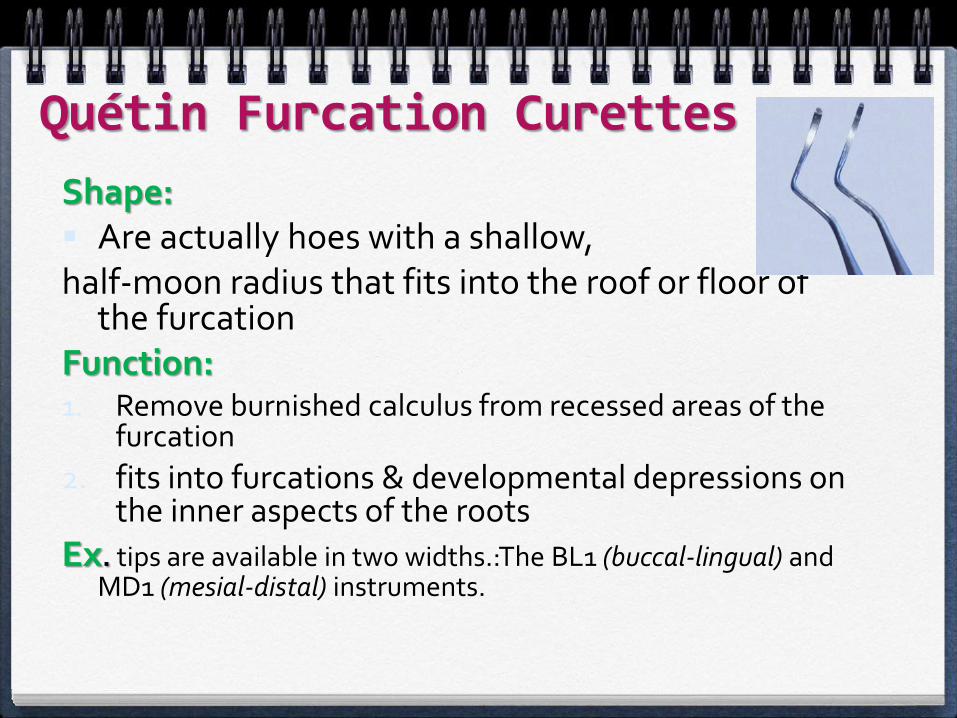
Quétin Furcation Curettes
Shape: Are actually hoes with a shallow, half-moon radius that fits into the roof or floor of
the furcationFunction:1. Remove burnished calculus from recessed areas of the
furcation
2. fits into furcations & developmental depressions on the inner aspects of the roots
Ex. tips are available in two widths.:The BL1 (buccal-lingual) and MD1 (mesial-distal) instruments.

Files
Function:
To fracture or crush large deposits of tenacious calculus or burnished sheets of calculus
Sometimes used for removing overhanging margins of dental restorations.
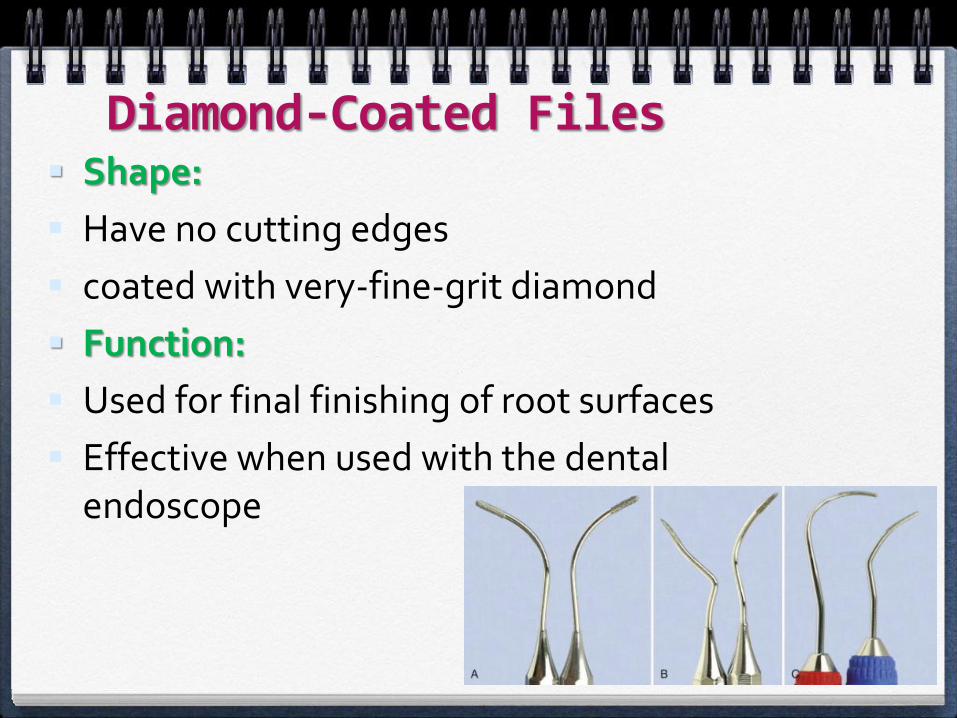
Diamond-Coated Files Shape:
Have no cutting edges
coated with very-fine-grit diamond
Function:
Used for final finishing of root surfaces
Effective when used with the dental endoscope
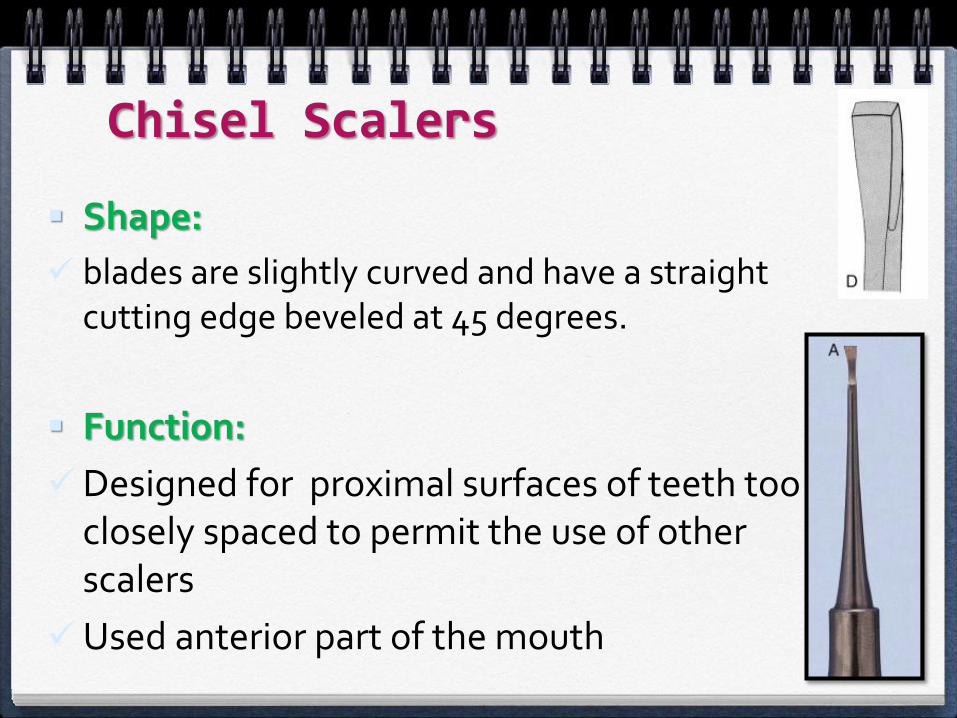
Chisel Scalers
Shape:
blades are slightly curved and have a straight cutting edge beveled at 45 degrees.
Function:
Designed for proximal surfaces of teeth too closely spaced to permit the use of other scalers
Used anterior part of the mouth
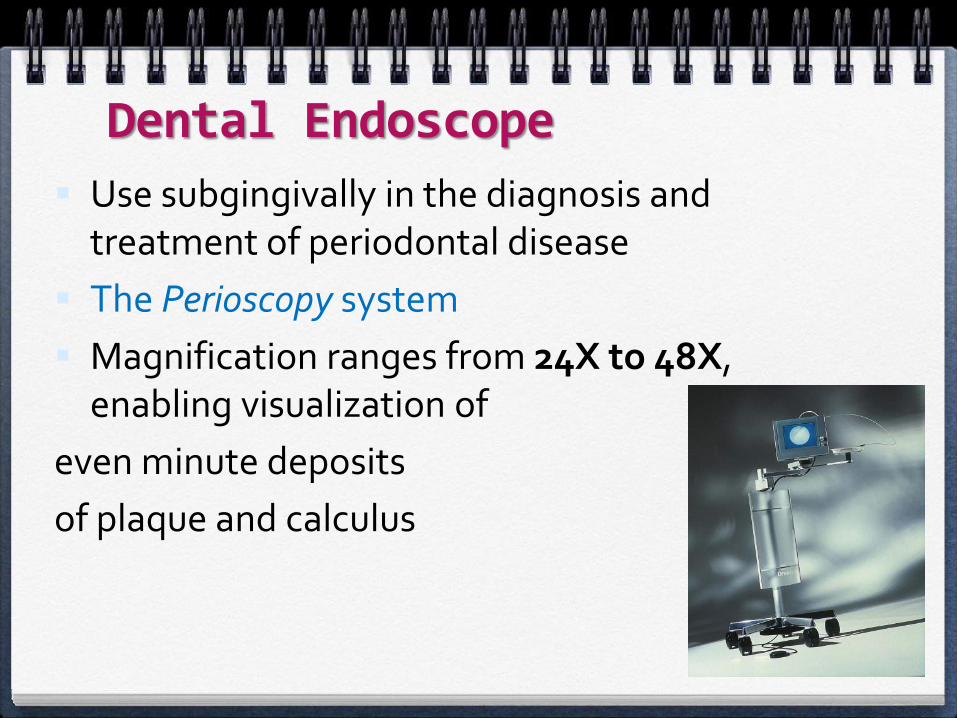
Dental Endoscope
Use subgingivally in the diagnosis and treatment of periodontal disease
The Perioscopy system
Magnification ranges from 24X to 48X, enabling visualization of
even minute deposits
of plaque and calculus
CLEANSING AND POLISHING INSTRUMENTS
Cleansing and Polishing Instruments
1. Rubber Cups
2. Bristle Brushes
3. Dental Tape
4. Air-Powder Polishing (Prophy-Jet)
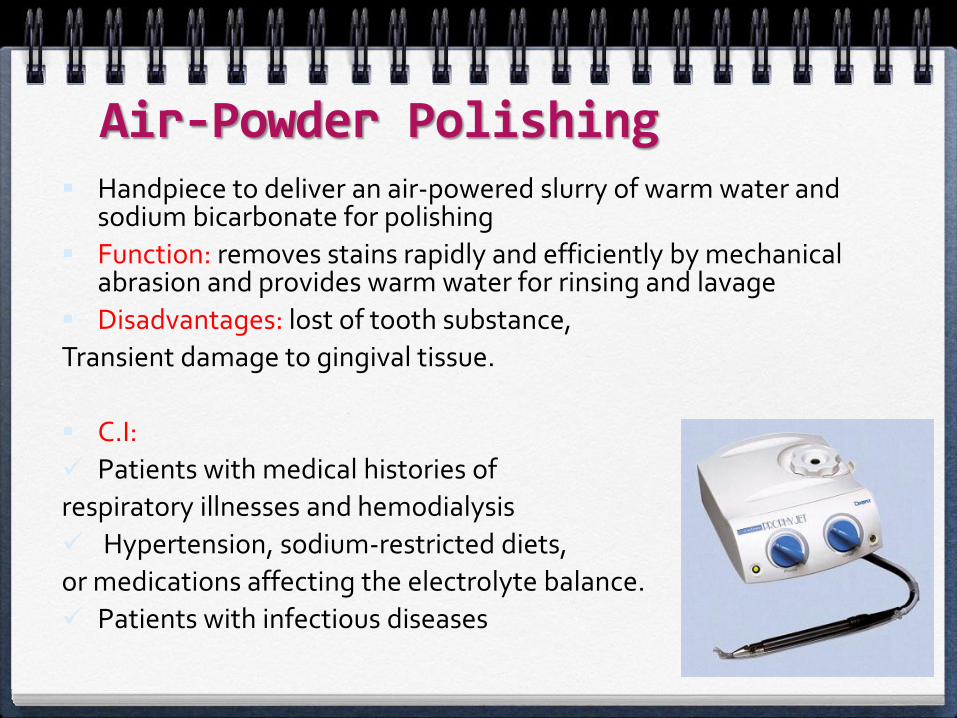
Air-Powder Polishing Handpiece to deliver an air-powered slurry of warm water and
sodium bicarbonate for polishing
Function: removes stains rapidly and efficiently by mechanical abrasion and provides warm water for rinsing and lavage
Disadvantages: lost of tooth substance,
Transient damage to gingival tissue.
C.I:
Patients with medical histories of
respiratory illnesses and hemodialysis
Hypertension, sodium-restricted diets,
or medications affecting the electrolyte balance.
Patients with infectious diseases


GENERAL PRINCIPLES OF INSTRUMENTATION

GENERAL PRINCIPLES OF INSTRUMENTATION
1. Accessibility: Positioning of Patient and Operator
2. Visibility, Illumination, and Retraction
3. Condition and Sharpness of Instrument
4. Maintaining a Clean Field
5. Instrument stabilization
6. Instrument activation
7. Instruments for Scaling and Root Planing
Accessibility: Positioning of Patient and Operator Accessibility facilitates thoroughness of instrumentation.
The clinician should be seated on a comfortable operating stool
The patient should be in a supine position and placed so that the mouth is close to the resting elbow of the clinician
For instrumentation of the maxillary arch, the patient should be asked to raise the chin slightly
For instrumentation of the mandibular arch, the patient should be asked to lower the chin
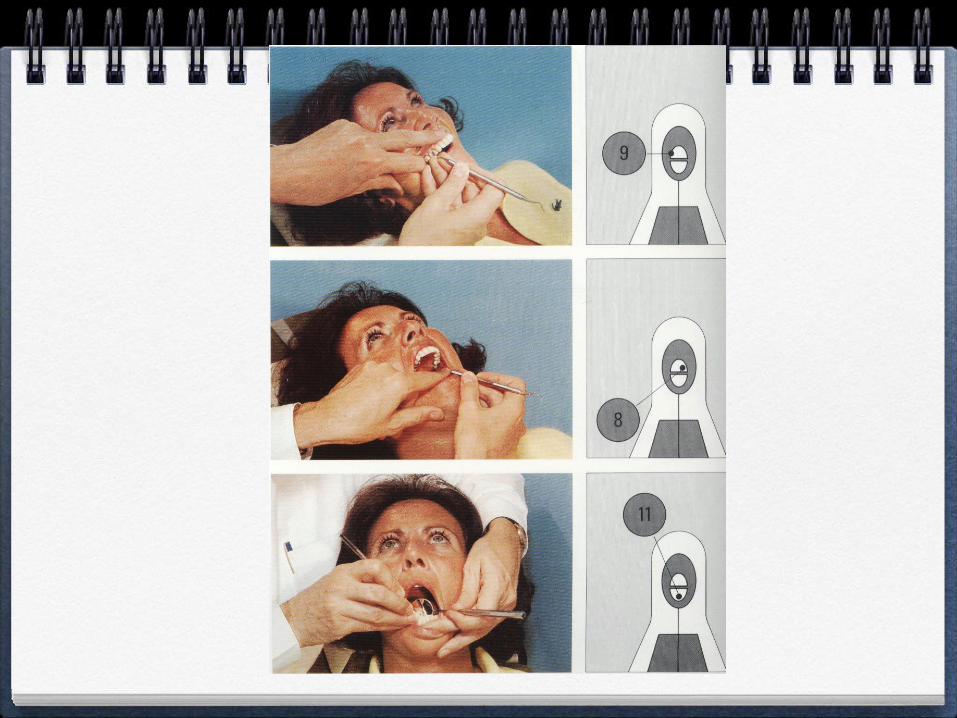

Visibility, Illumination, and Retraction Whenever possible, direct vision with direct
illumination from the dental light is most desirable
If this is not possible, indirect vision may be obtained by using the mouth mirror and indirect illumination
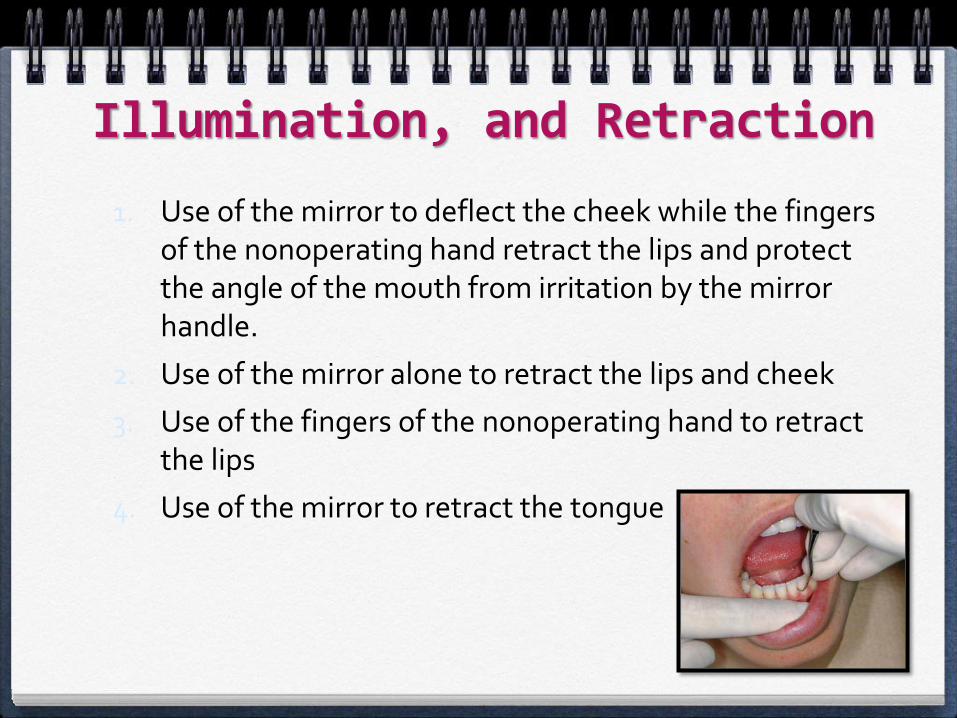
Illumination, and Retraction
1. Use of the mirror to deflect the cheek while the fingers of the nonoperating hand retract the lips and protect the angle of the mouth from irritation by the mirror handle.
2. Use of the mirror alone to retract the lips and cheek
3. Use of the fingers of the nonoperating hand to retract the lips
4. Use of the mirror to retract the tongue
Condition and Sharpness of Instruments Before any instrumentation, all instruments
should be inspected to make sure that they are clean, sterile, and in good condition.
The working ends of pointed or bladed instruments must be sharp to be effective
Dull instruments may lead to incomplete calculus removal and unnecessary trauma
Maintaining a Clean Field
Pooling of saliva
Gingival bleeding (bleeding is not necessarily an indication of trauma from incorrect technique but rather may indicate ulceration of the pocket epithelium)
Adequate suction
Wiping with gauze squares.
Flush occasionally with water.
A jet of air directed into the pocket deflects a retractable gingival margin
Instrument Stabilization
The two factors of major importance in providing stability are:
1. The instrument grasp
1. The finger rest.
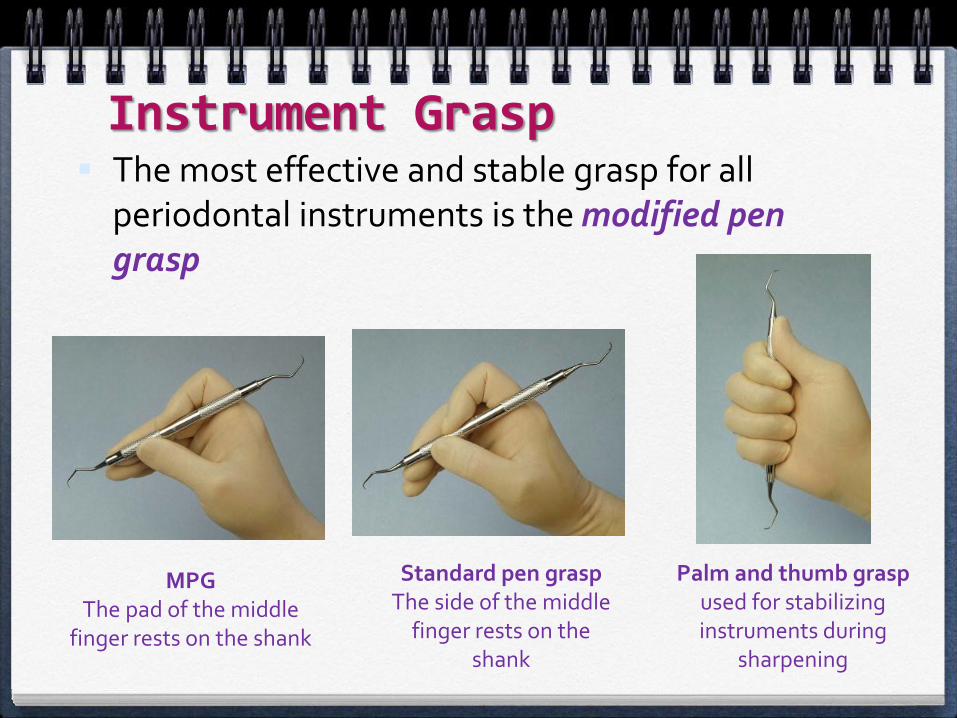
Instrument Grasp The most effective and stable grasp for all
periodontal instruments is the modified pen grasp
MPGThe pad of the middle
finger rests on the shank
Standard pen graspThe side of the middle
finger rests on the shank
Palm and thumb grasp used for stabilizing instruments during
sharpening
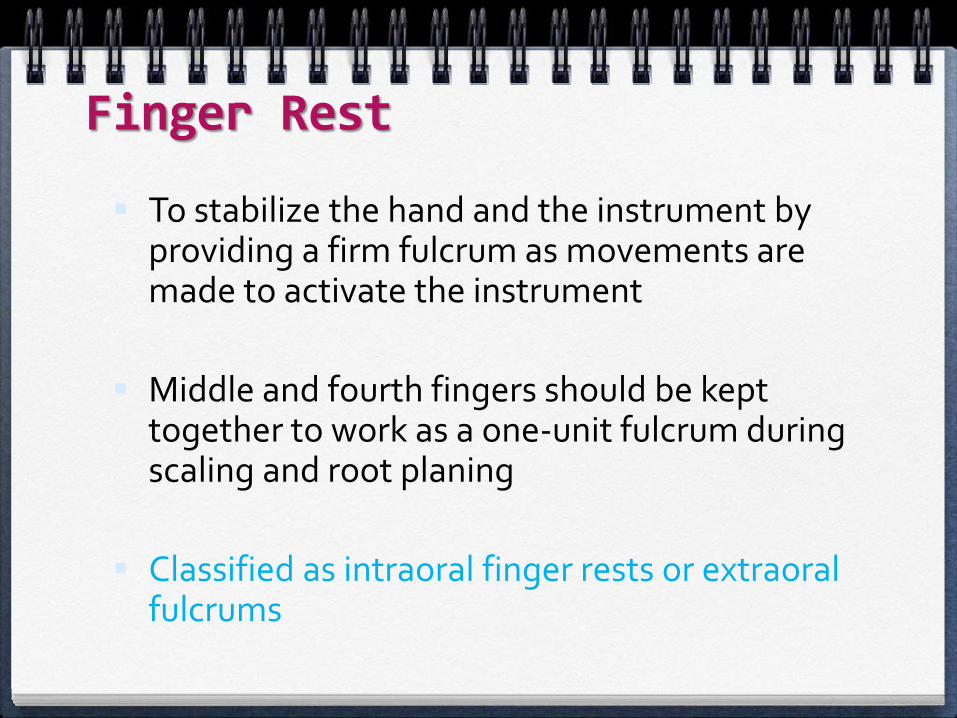
Finger Rest
To stabilize the hand and the instrument by providing a firm fulcrum as movements are made to activate the instrument
Middle and fourth fingers should be kept together to work as a one-unit fulcrum during scaling and root planing
Classified as intraoral finger rests or extraoralfulcrums
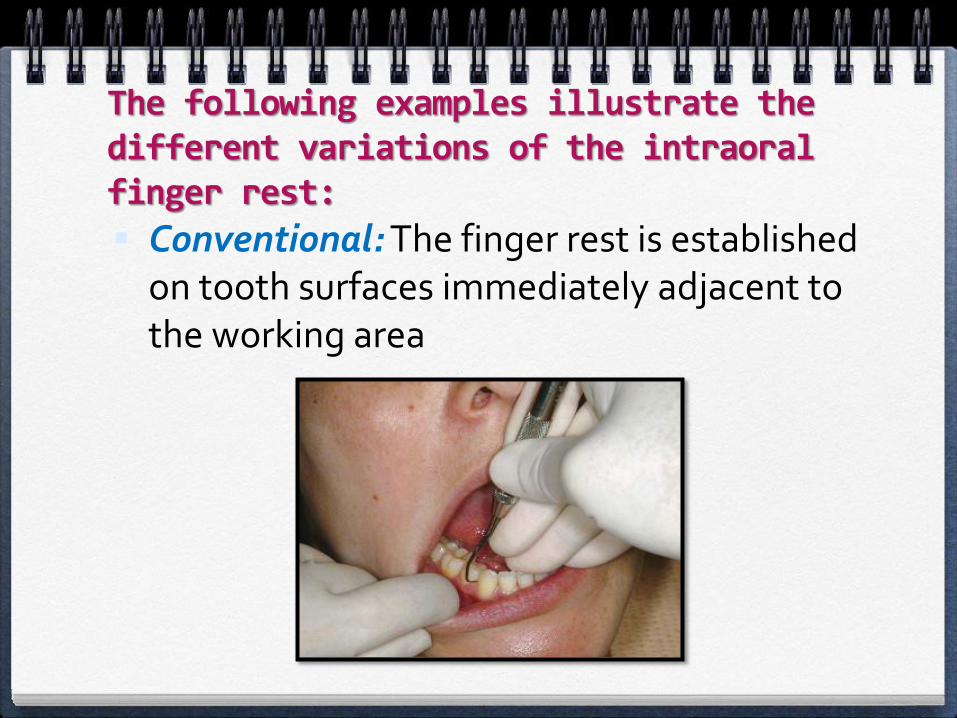
The following examples illustrate the different variations of the intraoral finger rest:
Conventional: The finger rest is established on tooth surfaces immediately adjacent to the working area
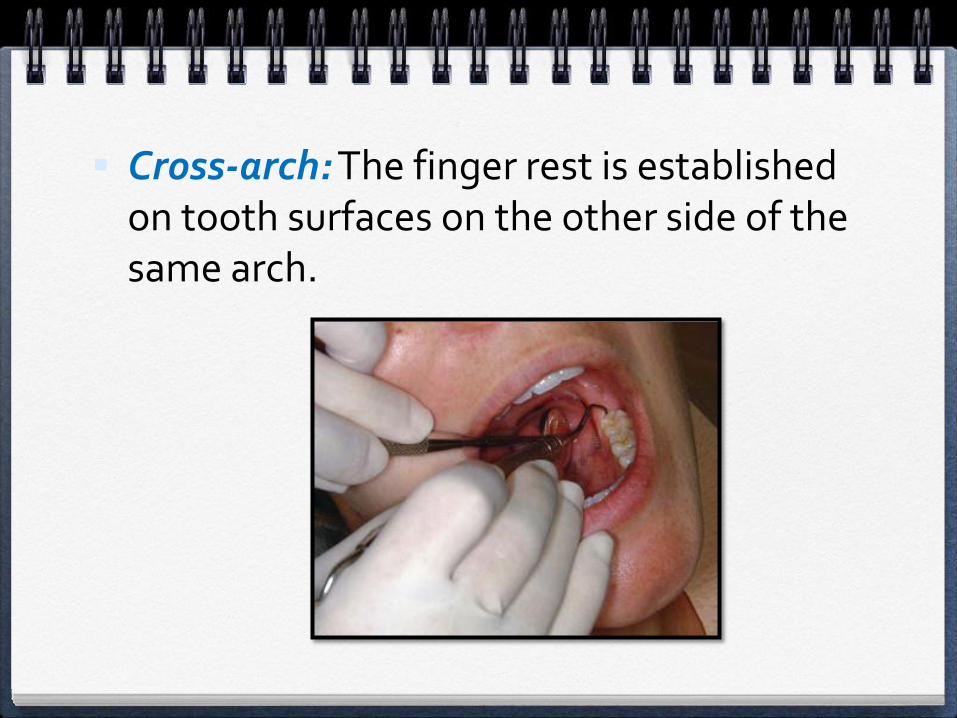
Cross-arch: The finger rest is established on tooth surfaces on the other side of the same arch.
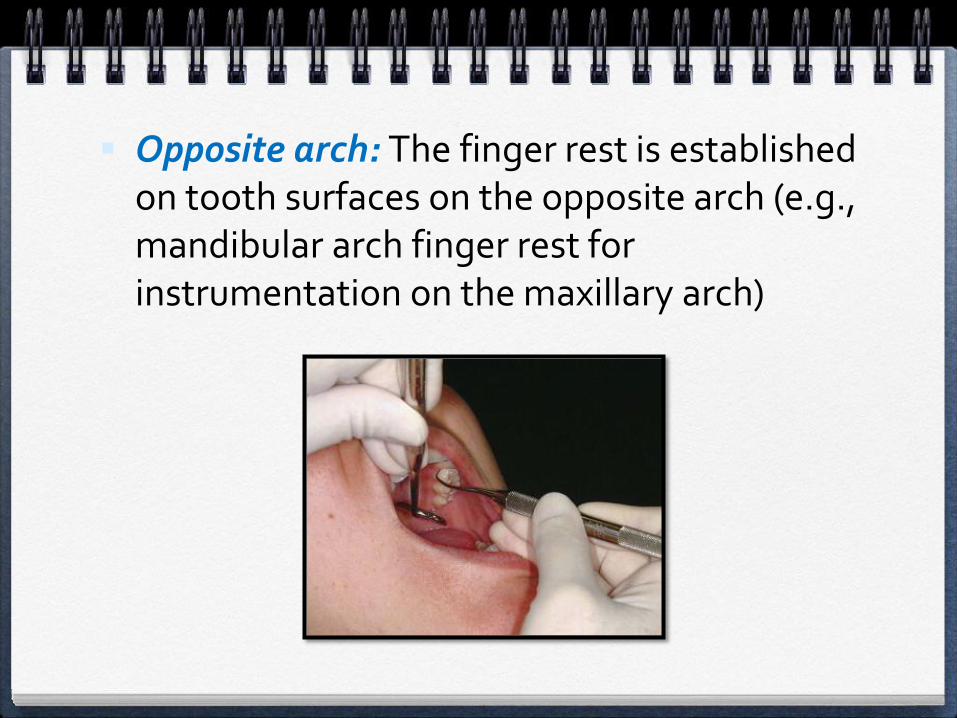
Opposite arch: The finger rest is established on tooth surfaces on the opposite arch (e.g., mandibular arch finger rest for instrumentation on the maxillary arch)
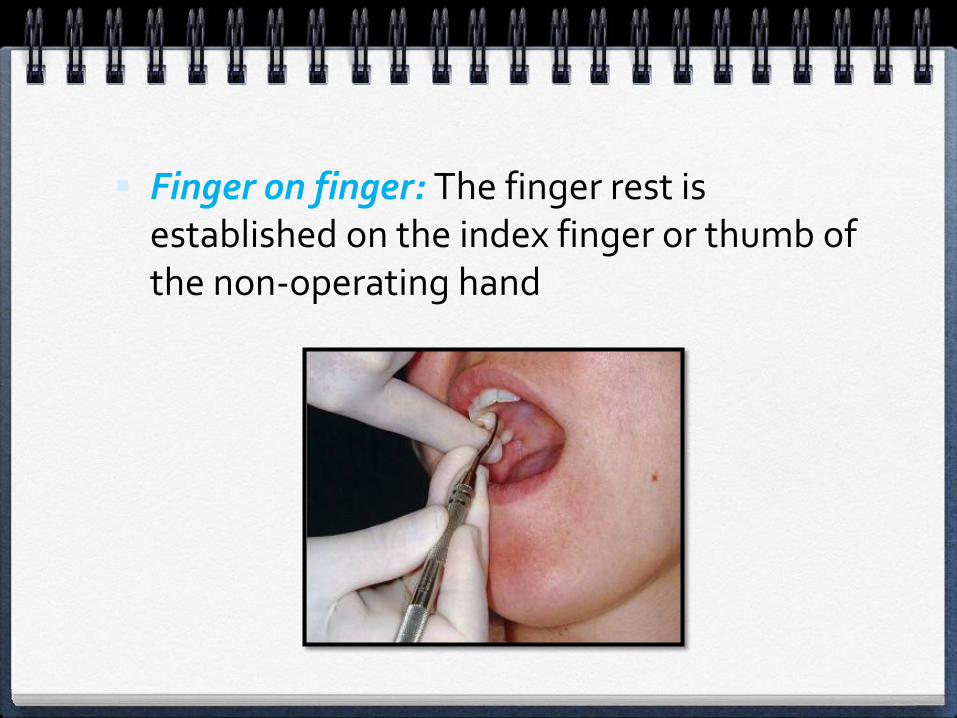
Finger on finger: The finger rest is established on the index finger or thumb of the non-operating hand
Extraoral fulcrums
They allow optimal access and angulation
Providing adequate stabilization
The two most common extraoral fulcrums are used as follows:
1. Palm up
2. Palm down
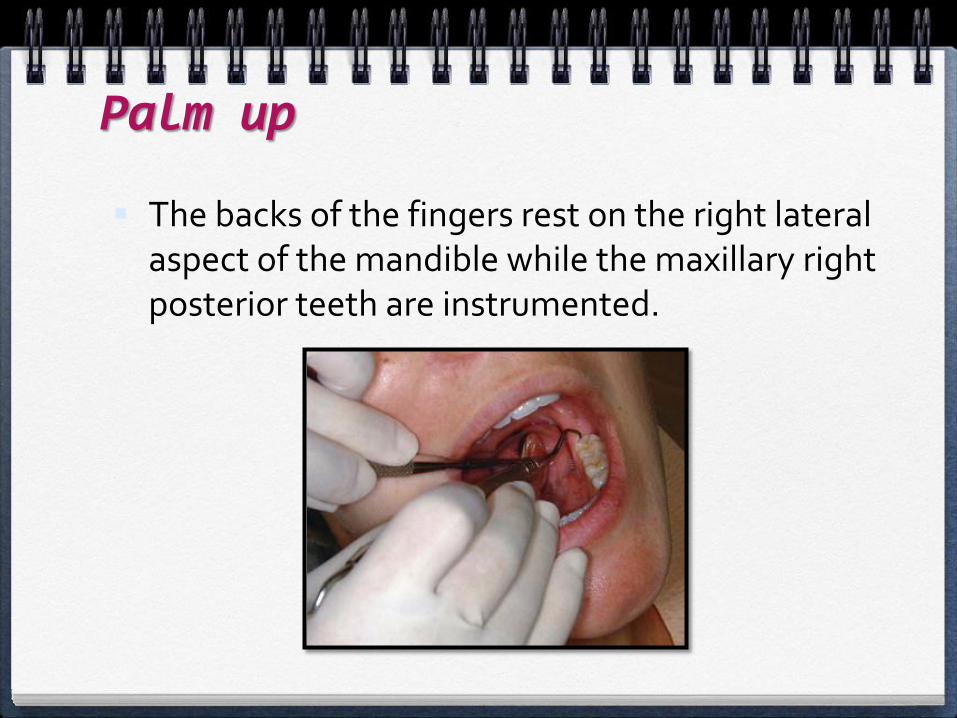
Palm up
The backs of the fingers rest on the right lateral aspect of the mandible while the maxillary right posterior teeth are instrumented.
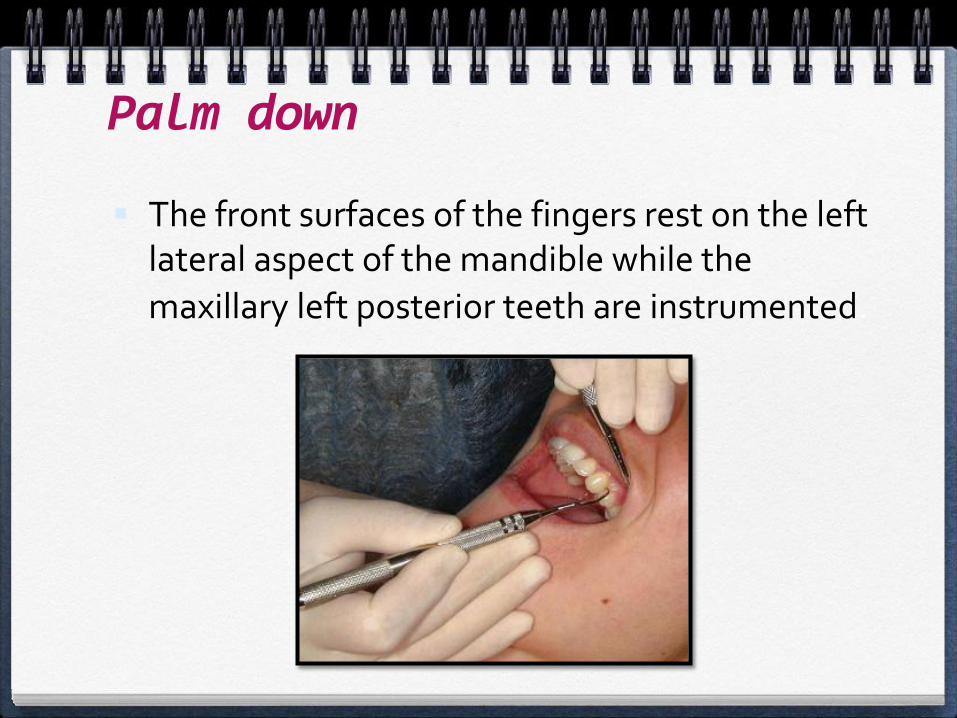
Palm down
The front surfaces of the fingers rest on the left lateral aspect of the mandible while the
maxillary left posterior teeth are instrumented.


THANK YOU
ANY QUESTIONS?