Embed Size (px)
Citation preview

©Tench Computing Ltd Version 1
Presentation software Level 2 Notes
for City & Guilds
7574 ITQ Unit 225
Written for PowerPoint 2007® for Windows™ XP

©Tench Computing Ltd Version 1
Tench Computing Ltd Pines Glendale Road Burgess Hill West Sussex RH15 0EJ Web address: www.tenchcomputing.co.uk Email address: [email protected]
About the author: Jackie Tench MSc, ACIB, Cert Ed Jackie started her working career in branch banking with the Midland Bank (now HSBC) and was transferred to their Computing Department after achieving 100% in their ability test for programmers. She then worked for more than a decade in this department and was one of the first women to achieve a junior management grade at the age of 21. She attended a significant number of IBM programming training courses during her time there.
Jackie was the first woman to pass the ACIB (Associate Chartered Institute of Bankers) examinations in the Midland Bank (HSBC) and the youngest person at 21 years of age.
Jackie then left to raise a family but still found time to teach part-time at a college in Sheffield and to obtain a MSc in Computing and a Cert Ed in teaching.
When her children were old enough Jackie returned to work full-time and was a Senior Lecturer in Software Engineering and Computer Studies at a college in Brighton for nearly 10 years teaching all levels up to and including HND.
Therefore, Jackie has considerable business knowledge and qualifications plus wide experience in practical computing and training – covering areas such as structured design, analysis, coding, testing and implementing software applications plus training students to fulfil an important role in the computer industry.
Jackie has worked as a consultant for several blue chip companies and examination boards using her software engineering and educational training skills and is now one of the foremost experts in computing with an extensive knowledge of programming languages and applications.
Copyright ©1999 Tench Computing Ltd Microsoft, Windows, Windows NT or other Microsoft products referenced herein are either the trademarks or registered trademarks of the Microsoft Corporation. Other trademarks for products referenced herein are also acknowledged.
All rights are reserved and no part of this training manual may be reproduced, stored in a retrieval system, or transmitted, in any form or by any means, electronic, mechanical, photocopying, recording or otherwise, without the purchase of a licence.
This training manual is sold subject to licence and on condition that it shall not, by way of trade or otherwise, be lent, re-sold, hired out or otherwise circulated without the prior consent of Tench Computing Ltd in any form of binding or cover other than that in which it is issued and without a similar condition being imposed on the subsequent purchaser. Any program listings within this training manual may be entered, stored and executed in a computer but they may not be reproduced for publication.

7574 ITQ Unit 225 Presentation software
©Tench Computing Ltd Version L2 1
Contents Page Office Button .......................................................................................... 1 Quick Access toolbar ............................................................................. 3 Help ....................................................................................................... 4 Command tabs....................................................................................... 4 Home command tab Clipboard command set ........................................................ 5 Slides command set.............................................................. 6 Font command set ................................................................ 6 Paragraph command set....................................................... 7 Drawing command set .......................................................... 8 Editing command set............................................................. 9 Insert command tab Tables command set............................................................. 9 Illustrations command set ..................................................... 9 Links command set ............................................................. 10 Text command set............................................................... 11 Media Clips command set................................................... 12 Design command tab Page Setup command set................................................... 12 Themes command set......................................................... 13 Background command set .................................................. 13 Animation command tab Preview command set......................................................... 14 Animations command set.................................................... 14 Transitions to This Slide command set ............................... 14 Slide Show command tab Start Slide Show command set ........................................... 15 Set Up command set........................................................... 15 Monitors command set........................................................ 16 View command tab Presentation Views command set ....................................... 16 Show/Hide command set .................................................... 17 Zoom command set ............................................................ 17 Color/Grayscale command set............................................ 18 Window command set......................................................... 18 View icons............................................................................................ 19 Help ..................................................................................................... 20 Shortcut keys ....................................................................................... 21 Preentation of slides ............................................................................ 22 Version numbers.................................................................................. 22 Find a file ............................................................................................. 23 Access PowerPoint Start PowerPoint.......................................................................... 25 Exit PowerPoint ........................................................................... 25 Create a new presentation file ..................................................... 26 Open an existing presentation file ............................................... 27 Open a recently used file............................................................. 28 Close the presentation................................................................. 28

7574 ITQ Unit 225 Presentation software
©Tench Computing Ltd Version L2 1
Exit PowerPoint ........................................................................... 28 Save a presentation..................................................................... 29 Switch between presentation files ............................................... 29 Views Slide Show View.......................................................................... 30 Slide Sorter View......................................................................... 31 Notes Page.................................................................................. 32 Normal View ................................................................................ 33 Select text ............................................................................................ 34 Slide layouts......................................................................................... 34 Create a new presentation Access PowerPoint...................................................................... 35 Add a Title slide........................................................................... 36 Add a border and colour to a placeholder.................................... 38 Insert a new slide......................................................................... 40 Change the font ........................................................................... 42 Change the font style................................................................... 44 Change the font size.................................................................... 44 Change the font colour ................................................................ 45 Move a placeholder ..................................................................... 46 Question 1 ........................................................................................... 47 Open an existing presentation Access PowerPoint...................................................................... 51 Justification.................................................................................. 53 Draw a Text Box.......................................................................... 54 Change the size of a Text Box .................................................... 56 Move a Text Box.......................................................................... 56 Delete a Text Box........................................................................ 56 Rulers .......................................................................................... 57 Use tabs to create a table............................................................ 57 Line spacing ................................................................................ 60 Move a tab stop on the ruler........................................................ 61 Remove a tab stop from the ruler ................................................ 61 Indentation................................................................................... 61 Remove bullets............................................................................ 65 Apply background........................................................................ 66 Question 2 ........................................................................................... 67 Copy and paste text Copyright ..................................................................................... 71 Copy text from a document file.................................................... 72 Rotate text in a Text Box ............................................................. 75 Copy text from a Web page......................................................... 77 Copy an image from a Web page................................................ 78 Create graphical text ................................................................... 79 Group objects .............................................................................. 83 Format command tab .................................................................. 85 Questions 3.......................................................................................... 87 Graphics Insert a clip art image .................................................................. 91 Resize the image......................................................................... 93

7574 ITQ Unit 225 Presentation software
©Tench Computing Ltd Version L2 1
Move the image........................................................................... 93 Sources for clip art....................................................................... 94 Floppy disk or CD-ROM...................................................... 94 Internet................................................................................ 96 Insert picture from file .................................................................. 96 Insert a photograph ..................................................................... 97 Crop an object ............................................................................. 99 Predefined shapes..................................................................... 101 Duplicate an object .................................................................... 103 Mirror an object.......................................................................... 104 Position an object exactly .......................................................... 106 Rotate an object ........................................................................ 107 Invert an object .......................................................................... 108 Delete an object......................................................................... 109 Undo an action .......................................................................... 109 Group objects ............................................................................ 110 Copy an object to another slide ................................................. 110 Ungroup objects ........................................................................ 110 Layer objects ............................................................................. 111 Make an object transparent ....................................................... 113 Group text with an object........................................................... 115 Draw an organisational diagram................................................ 116 Image file formats .............................................................................. 117 Questions 4........................................................................................ 118 Manipulate slides Change the view........................................................................ 121 Move a slide .............................................................................. 121 Duplicate a slide ........................................................................ 122 Copy and Paste a slide.............................................................. 122 Delete a slide............................................................................. 122 Run the slide show .................................................................... 123 Controls ..................................................................................... 123 Hardware requirements for presenting a slide show.................. 124 Printing Print a single slide ..................................................................... 125 Print a range of slides................................................................ 126 Print all the slides ...................................................................... 127 Print handouts ........................................................................... 128 Print slides in colour .................................................................. 129 Create notes.............................................................................. 131 Print notes ................................................................................. 132 Question 5 ......................................................................................... 133 Spell checker Set spell check options.............................................................. 135 Use spell check ......................................................................... 136 Add a word to dictionary ............................................................ 139 Find ........................................................................................... 140 Find and replace........................................................................ 140 Question 6 ......................................................................................... 141
7574 ITQ Unit 225 Presentation software
©Tench Computing Ltd Version L2 1
Tables Insert a table.............................................................................. 143 Hyperlink............................................................................................ 146 Mailto: hyperlink ................................................................................. 146 Charts Bar chart.................................................................................... 148 Pie chart .................................................................................... 148 Line graph ................................................................................. 148 Create a bar (column) chart....................................................... 149 Change the chart type ............................................................... 154 Change chart format.................................................................. 155 Change data series options....................................................... 156 Resize a chart ........................................................................... 158 Questions 7........................................................................................ 159 Slide Master Create a Slide Master................................................................ 161 Add text to each slide ................................................................ 163 Save as a template.................................................................... 165 Change background colour ....................................................... 166 Change bullet styles .................................................................. 168 Change footer............................................................................ 172 Questions 8........................................................................................ 175 Design template ................................................................................. 177 Transitions Apply a transition effect ............................................................. 179 Change a transition ................................................................... 180 Preview transition effects........................................................... 181 Animate text and objects Apply animation......................................................................... 182 Edit animation effects ................................................................ 185 Movies and sounds Insert an animated GIF on a slide.............................................. 186 Insert music or sound on a slide ................................................ 189 Control volume .......................................................................... 189 Change play settings for sound ................................................. 190 Play sound for multiple slides .................................................... 191 Summary slide Create a summary slide............................................................. 192 Looped presentations ........................................................................ 193 Set the timing for slides...................................................................... 194 Rehearse timings....................................................................... 195 Package a presentation Pack a presentation................................................................... 196 Run a presentation with the viewer............................................ 199 Questions 9........................................................................................ 200 Preparation for sample assignment ................................................... 203 Sample assignment ........................................................................... 204 Appendix A RGB (Red, Green, Blue) colours

7574 ITQ Unit 225 Presentation software
©Tench Computing Ltd charts L2 2007 143
Tables Insert a table A table can be inserted on a slide.
• Open a new presentation.
• Change the first slide to a Title and Content layout.
The following slide layout appears.
• Save the file with the filename Chart1.
• Enter Internet usage as the title.
• Click on the Insert Table icon in the bottom placeholder.
The Insert Table dialog appears.

7574 ITQ Unit 225 Presentation software
©Tench Computing Ltd charts L2 2007 144
• Enter 5 in the Number of columns box.
• Enter 4 in the Number of rows box.
• Click OK.
A table containing 5 columns and 4 rows is inserted on the slide.
• Using the cursor arrow keys or the Tab key to move between cells enter the
following data into the table.
1995 1996 1997 1998 Parents 15 21 23 24 Elderly 20 24 25 24 Children 30 37 36 39
• Select all the numeric data.
• Under the Home command tab click on the Align Text Right icon on the Paragraph command set.
You can change the size of the table by clicking on one of its size handles and dragging inwards to make the table smaller or dragging outwards to make it larger.
• Select the table.
The 8 size handles become visible.
• Click and drag the bottom right size handle and make the table smaller as shown below.
Size handle
Size handle

7574 ITQ Unit 225 Presentation software
©Tench Computing Ltd charts L2 2007 145
You can move the table by hovering over its outside edge until a Move icon appears then clicking and dragging the table to the position required.
• Move the table so that it is positioned in the bottom area of the slide as shown below.
You can change the style of the table by clicking on the table and selecting one of the table styles displayed on the Table Styles command set under the Table Tools|Design command tab.
Click the More icon at the right of the displayed Table Styles to display more styles.
• Save the file. .

7574 ITQ Unit 225 Presentation software
©Tench Computing Ltd charts L2 2007 146
Hyperlink A hyperlink links to a web page on the Internet using a web address e.g. www.buypresents.co.uk and is underlined and displayed in a blue font.
You can enter a web address in a document and make it a hyperlink.
If you do not want the web address to be linked to an Internet source; right click on the web address in the document and select Remove Hyperlink on the pop up menu.
• Under the table draw a text box.
• Select the Insert command tab and click the Hyperlink icon on the Links command set.
The Insert Hyperlink dialog appears.
• Select the Existing File or Web Page option in the left window and enter the
web page address www.buypresents.co.uk in the Address box (http:// is automatically added).
• Click OK.
The web page address will now appear as a hyperlink in the text box on the slide as follows http://www.buypresents.co.uk
Mailto: hyperlink You can also set up a hyperlink for an e-mail address. This will mean that when a user clicks on the hyperlink the system default e-mail program will be started up with a blank new message and the e-mail address already set up.
• Under the hyperlink draw a text box.
• Select the Insert command tab and click the Hyperlink icon on the Links command set.
The Insert Hyperlink dialog appears.

7574 ITQ Unit 225 Presentation software
©Tench Computing Ltd charts L2 2007 147
• Select the E-mail Address option in the left window and enter the e-mail
address [email protected] in the E-mail address box (mailto: is automatically added).
• Click OK.
The e-mail address will now appear as a hyperlink in the text box on the slide as follows mailto:[email protected]
The slide should appear as shown below.
• Save the file.

7574 ITQ Unit 225 Presentation software
©Tench Computing Ltd charts L2 2007 148
Charts A chart can be included on a slide.
Charts and graphs are used to provide visual impact for data. There are three main chart types - bar charts, pie charts and line graphs. The purpose of all charts is the same; to help us appreciate the differences between numbers, something most people find difficult to do from printed figures. The type of chart that works best depends on the type of comparison we want to draw.
Bar chart Bar charts are used to provide 'what's biggest' comparisons: between a group of items (total sales of products), a single item over a period (a product's sales in each quarter), or both (product sales by quarter).
In PowerPoint a bar chart is called a column chart.
Pie chart Pie charts show proportions (percentages) of a whole - how much each product contributed to total sales.
Line graph Line graphs show trends over a period of time, either for a single item or a group of items e.g. how sales have grown this year. Each value is shown as a point above the horizontal axis (X) with a line passing through each point.

7574 ITQ Unit 225 Presentation software
©Tench Computing Ltd charts L2 2007 149
Create a bar (column) chart • Insert a new slide with a Title and Content layout.
The following slide layout appears:
• Click on the Insert Chart icon in the bottom placeholder.
The Insert Chart dialog appears:
On this dialog you select the type of chart required.
• Select Column in the left window.
Note that a Bar chart is called a Column chart in PowerPoint.
7574 ITQ Unit 225 Presentation software
©Tench Computing Ltd charts L2 2007 150
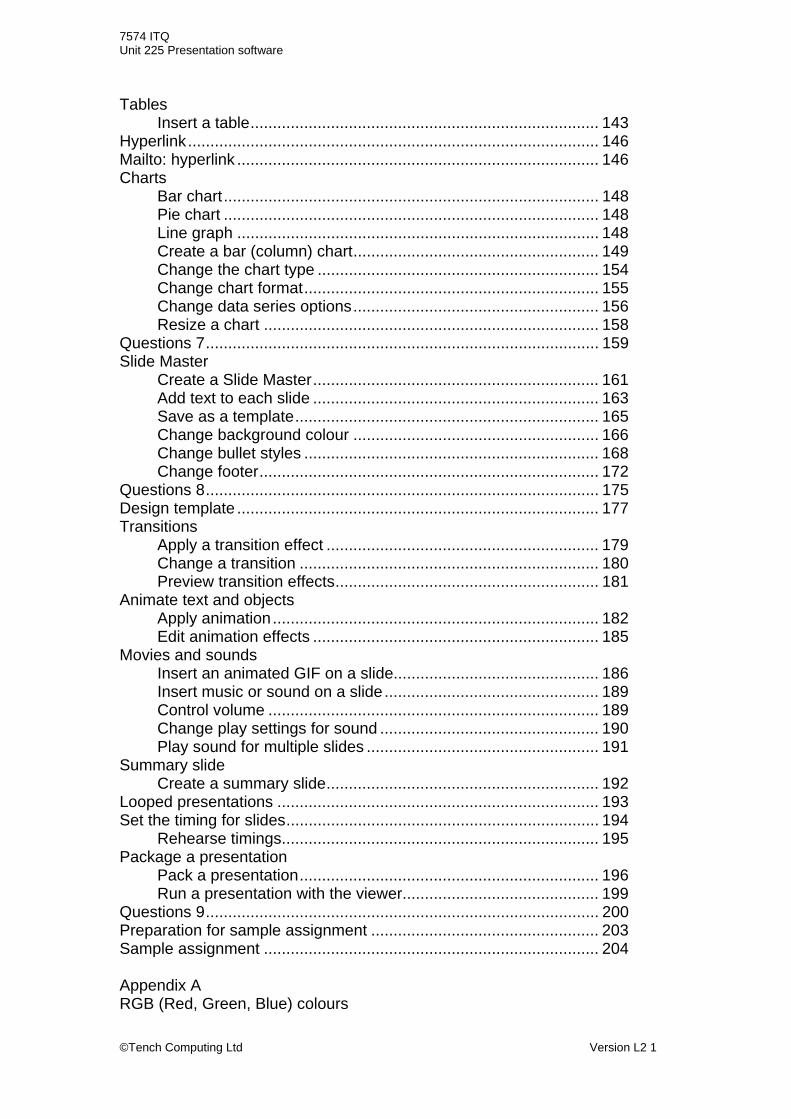
• Click on the Clustered Column chart under the Column section.
• Click OK.
A bar chart appears on the slide with an Excel worksheet displayed at the right of the screen.
• Resize the data area for the worksheet by clicking on the bottom right corner
and making it one column wider and one row smaller.
• Enter the following data into the datasheet table overwriting the existing data.
1995 1996 1997 1998
Parents 15 21 23 24
Elderly 20 24 25 24
Children 30 37 36 39
• Delete any extra data by selecting it and pressing the Delete key.
The worksheet should appear as shown below.
Click and drag to resize table

7574 ITQ Unit 225 Presentation software
©Tench Computing Ltd charts L2 2007 151
• Close the datasheet table by clicking on the X at the upper right-hand corner.
• Add the slide title Comparison of Internet usage.
The slide should appear as shown.
To add a title to the chart:
• Click on the chart to select it.

7574 ITQ Unit 225 Presentation software
©Tench Computing Ltd charts L2 2007 152
New command tabs have been added for Chart Tools: Design, Layout and Format. The commands contained on these command tabs can be used to customise the chart.
• Select the Design command tab and click the More icon at the right of the Chart Layouts command set.
A selection of chart layouts is displayed.
• Select Layout 9 on the dropdown list.
The layout of the chart on the slide is changed to include a chart title and axis titles.
• Click on the Chart Title and change it to Hours spent weekly on the
Internet.
• Click on the Axis Title for the y-axis and change it to Hours.
• Click on the Axis Title for the x-axis and change it to Users.
x-axis title
7574 ITQ Unit 225 Presentation software
©Tench Computing Ltd charts L2 2007 153
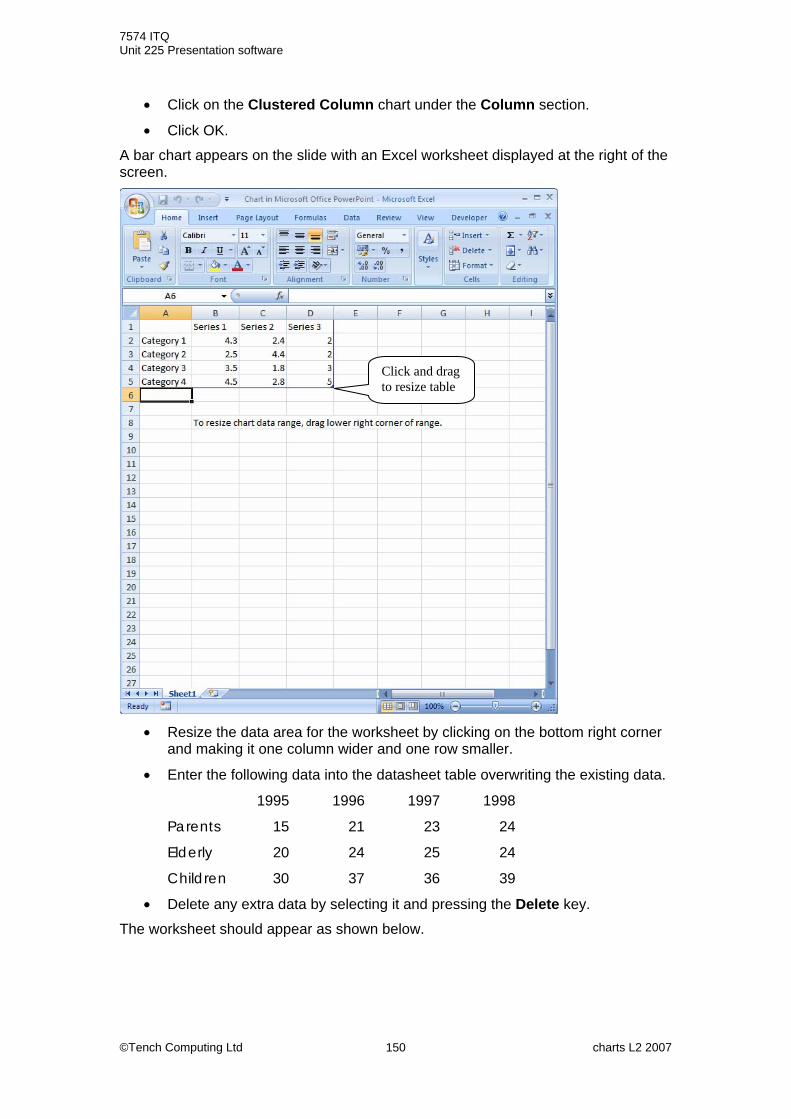
A legend is included on the chart by default. The legend can be removed by clicking on it and pressing the Delete key.
The legend defaults to being displayed at the right. The placement of the legend can
be changed by selecting a different chart layout OR by using the Legend icon on the Layout command set.
• Click on the slide outside the chart area to remove the chart editing command tabs.
The chart should appear as shown below:
To edit the data in the worksheet table:
Click on the chart and select the Design command tab and click the Edit Data icon on the Data command set.
The worksheet will appear and you can change the data.
• Save the file.

7574 ITQ Unit 225 Presentation software
©Tench Computing Ltd charts L2 2007 154
Change the chart type The chart type can be changed.
• Right click on an empty area of the chart and select Change Chart Type on the pop up menu.
The Change Chart Type dialog appears.
• Select Line in the left window.
• Select the chart type Line with Markers under the Line section.
• Click OK.
The chart on the slide has now been changed to a line graph.
• Save the file with the filename Chart2.

7574 ITQ Unit 225 Presentation software
©Tench Computing Ltd charts L2 2007 155
Change chart format • Click in an empty part of the chart area.
You can change the format of any of the text on a chart e.g. font, font size, bold, italic, colour by clicking on it and using the formatting icons on the Font command set of the Home command tab.
• Select the Format command tab and click the down arrow at the right of the Shape Fill icon on the Shape Styles command set.
• Select a light blue on the colour palette that appears. The chart is filled with the light blue colour.
• Select the Format command tab and click the Shape Outline
icon on the Shape Styles command set.
• Select a dark blue colour on the colour palette that appears.
The chart is outlined with a dark blue colour.
• Select the Format command tab and click the Shape Outline
icon on the Shape Styles command set.
• Select Weight then 6 pt on the dropdown list.
The outline around the chart is changed to a width of 6 point.
The slide now appears as shown below.
• Change the chart title to Hours spent on the Internet per week.

7574 ITQ Unit 225 Presentation software
©Tench Computing Ltd charts L2 2007 156
The slide now appears as shown below.
Change data series options • Right click on one of the marked points on the bottom data series line when
the chart is selected.
• Select Format Data Series on the pop up menu.
The Format Data Series dialog appears.
Marked point on data series line
7574 ITQ Unit 225 Presentation software
©Tench Computing Ltd charts L2 2007 157
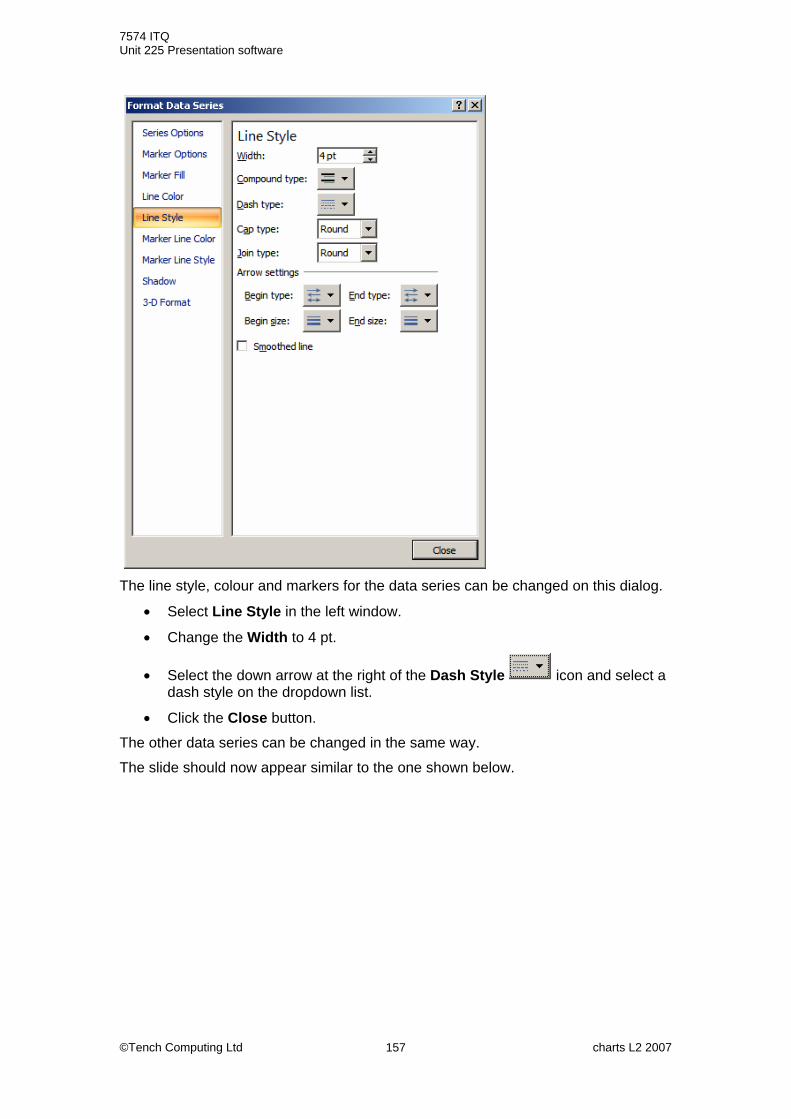
The line style, colour and markers for the data series can be changed on this dialog.
• Select Line Style in the left window.
• Change the Width to 4 pt.
• Select the down arrow at the right of the Dash Style icon and select a dash style on the dropdown list.
• Click the Close button.
The other data series can be changed in the same way.
The slide should now appear similar to the one shown below.

7574 ITQ Unit 225 Presentation software
©Tench Computing Ltd charts L2 2007 158
Resize a chart To resize a chart click on it and 8 size handles (three dots) appear on its outer edges. Click on one of the handles and drag the handle until the chart is the size required. Make sure that all the chart data is still fully displayed if the chart is made smaller.
The middle top and bottom handles can be dragged inwards to make the chart shorter or outwards to make the chart taller.
The middle right and left handles can be dragged inwards to make the chart narrower or outwards to make the chart wider.
The corner handles can be dragged inwards to make the chart shorter and narrower or outwards to make the chart taller and wider.
Using the corner handles will keep the chart in proportion.
• Save and close the file.
Size handle

7574 ITQ Unit 225 Presentation software
©Tench Computing Ltd charts L2 2007 159
Questions 7 1.
• Create a new presentation and save it with the filename chocshop.
• Create a slide to include a table with the following data:
2005 2006 2007 2008
Nut bar 20 30 30 35
Raisin bar 30 35 40 42
Mint bar 45 40 40 36
Slide Title: Sales
• Change the table style.
• Centre align all the numeric data.
• Resize and position the table in the centre of the bottom of the slide.
• Add a hyperlink under the table for the web address www.buymore.co.uk
• Add a mailto hyperlink for the e-mail address mpatel.etel.co.uk
2.
• Create a new slide as the second slide to include a bar (column) chart using the figures shown below.
• Display a legend at the bottom of the chart.
• Add a border to the chart.
Slide Title: Sales of chocolate bars
No chart title
X Axis: Chocolate types
Y Axis: Sales (000s)
3.
• Create a new slide as the third slide in the chocshop presentation.
• Add a pie chart with each slice separated, using the figures shown below.

7574 ITQ Unit 225 Presentation software
©Tench Computing Ltd charts L2 2007 160
Slide Title: Market share for 2000
No chart title
Use a chart layout to show data labels for the Category name and percentage for the pie chart.
Remove the legend.
The slices for the pie chart can be separated, by clicking on the pie chart, holding down the left mouse button and dragging outwards from the centre OR by selecting the Chart Type as Exploded Pie.
The legend can be deleted by clicking on it and pressing the Delete key.


![Gainesville Daily Sun. (Gainesville, Florida) 1909-10-10 [p 6].ufdcimages.uflib.ufl.edu/UF/00/02/82/98/01261/00085.pdf · 2009-05-12 · Jones Stores ndor Tnblo Tench Tench being](https://img.pdfslide.us/doc/110x75/5ea3f0f257afe007cb2eddf6/gainesville-daily-sun-gainesville-florida-1909-10-10-p-6-2009-05-12-jones.jpg)