Embed Size (px)
Citation preview

Presentation Pointer User Manual
Version 1.6.0
February 2016
www.presentation-assistant.com

Contents
Contents Contents ........................................................................................................................................................ ii 1. Overview ............................................................................................................................................... 1 2. Features List ......................................................................................................................................... 3 3. Getting Started ...................................................................................................................................... 4 4. Highlight Mouse Pointer ........................................................................................................................ 6 5. Mouse Trail ............................................................................................................................................ 9 6. Mouse Clicks Visible Effect ..................................................................................................................11 7. Display Keystrokes .............................................................................................................................. 13 8. Live Draw on Screen ........................................................................................................................... 15 9. Live Zoom in Screen ........................................................................................................................... 17 Technology Support .................................................................................................................................... 19
Presentation Pointer User Manual
www.presentation-assistant.com 1
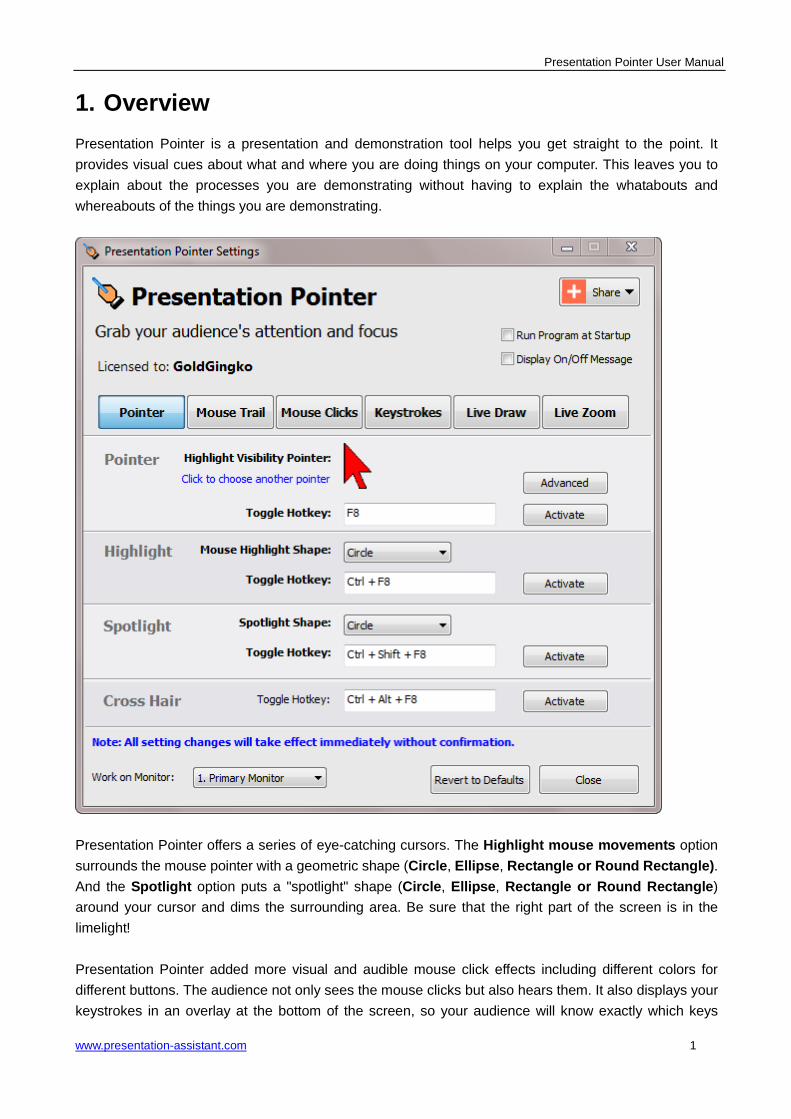
1. Overview Presentation Pointer is a presentation and demonstration tool helps you get straight to the point. It provides visual cues about what and where you are doing things on your computer. This leaves you to explain about the processes you are demonstrating without having to explain the whatabouts and whereabouts of the things you are demonstrating.
Presentation Pointer offers a series of eye-catching cursors. The Highlight mouse movements option surrounds the mouse pointer with a geometric shape (Circle, Ellipse, Rectangle or Round Rectangle). And the Spotlight option puts a "spotlight" shape (Circle, Ellipse, Rectangle or Round Rectangle) around your cursor and dims the surrounding area. Be sure that the right part of the screen is in the limelight! Presentation Pointer added more visual and audible mouse click effects including different colors for different buttons. The audience not only sees the mouse clicks but also hears them. It also displays your keystrokes in an overlay at the bottom of the screen, so your audience will know exactly which keys

Presentation Pointer User Manual
www.presentation-assistant.com 2
you've pressed. In addition to all this, Presentation Pointer also allows you to draw freely on the screen but not lock the screen. Presentation Pointer is an essential tool for everyone doing demos at tradeshows, presentations and trainings.

Presentation Pointer User Manual
www.presentation-assistant.com 3
2. Features List Pointer Effect Highlight Visibility Pointer
Highlight Mouse Movements
Spotlight Effect
Cross Hair
Mouse Trail Leaves a light trail as you move your pointer
Mouse Click Effect
Display a circle when you click your mouse
Different colors for different buttons
Animation Effect
Play Click Sounds
Keystrokes Displaying
Displays your keystrokes in an overlay at the bottom of the screen.
Keystroke Filter: Allows you to define a list of custom keystrokes that will not be displayed.
Live Drawing
Allows you to draw freely on the screen but not lock the screen.
Draw horizontal, vertical lines
Draw arrow lines
Press hotkey to clear all
Live Zoom
Zoom in and zoom out the windows but allows you to work on the screen.
Support the drawing
Flexible, Easy to Use
Activate or deactivate all effects with the toggle Hotkey.
All effects can be operated in two different modes: Standalone or Together.
Everything about Presentation Pointer is customizable: you can change all the hotkeys and adjust
options to control appearance and behaviors of Presentation Pointer’s effects.
Presentation Pointer User Manual
www.presentation-assistant.com 4
3. Getting Started
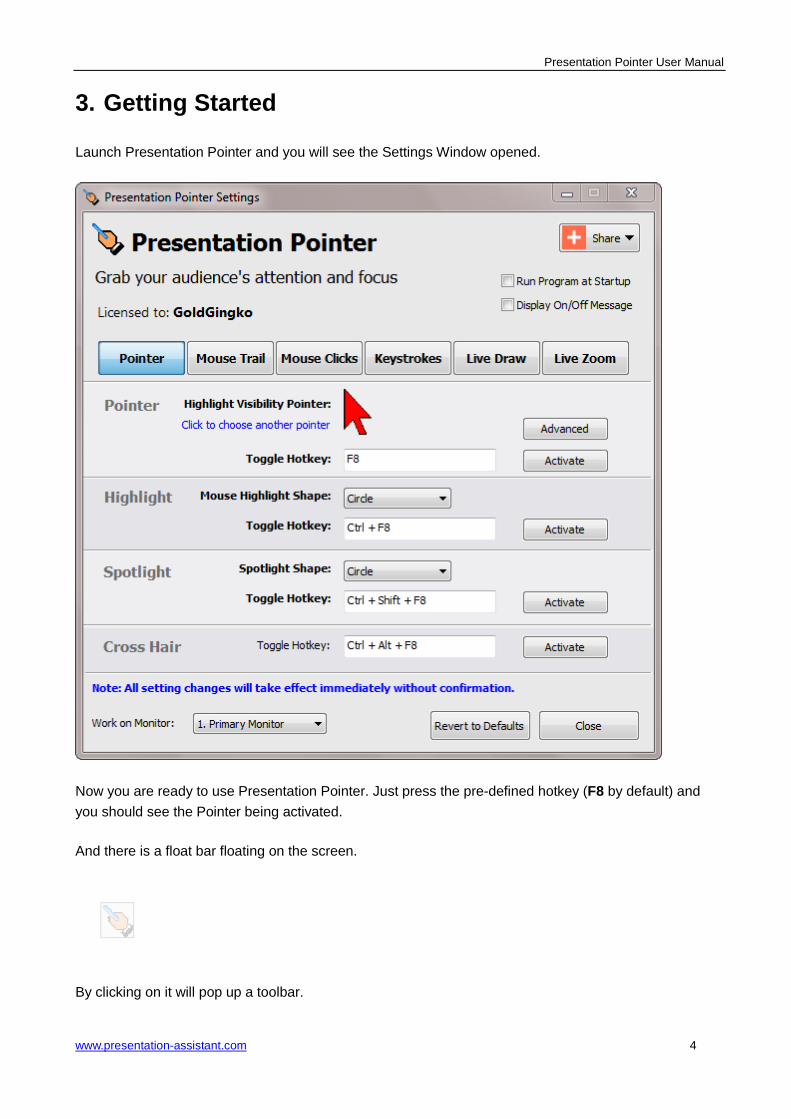
Launch Presentation Pointer and you will see the Settings Window opened.
Now you are ready to use Presentation Pointer. Just press the pre-defined hotkey (F8 by default) and you should see the Pointer being activated.
And there is a float bar floating on the screen.
By clicking on it will pop up a toolbar.

Presentation Pointer User Manual
www.presentation-assistant.com 5
Alternatively you can also activate the effect or access the settings through the Presentation Pointer
menu by right click the icon in system tray.
The Mouse Trail, Mouse Clicks, Keystrokes and Live Draw function can be operated in two different modes: Standalone or together with the Pointer effect. The first mode means, you can make that effects independently controllably. The latter mode means the effect will automatically be toggled whenever the Pointer effect is toggled.
Switch on the effect when giving a demo in front of an audience or even in a 1:1 situation, and your audience will be able to follow you much easier.
Everything about Presentation Pointer is customizable: you can change all the hotkeys and adjust options to control appearance and behaviors of Presentation Pointer’s effects.
Presentation Pointer User Manual
www.presentation-assistant.com 6
4. Highlight Mouse Pointer
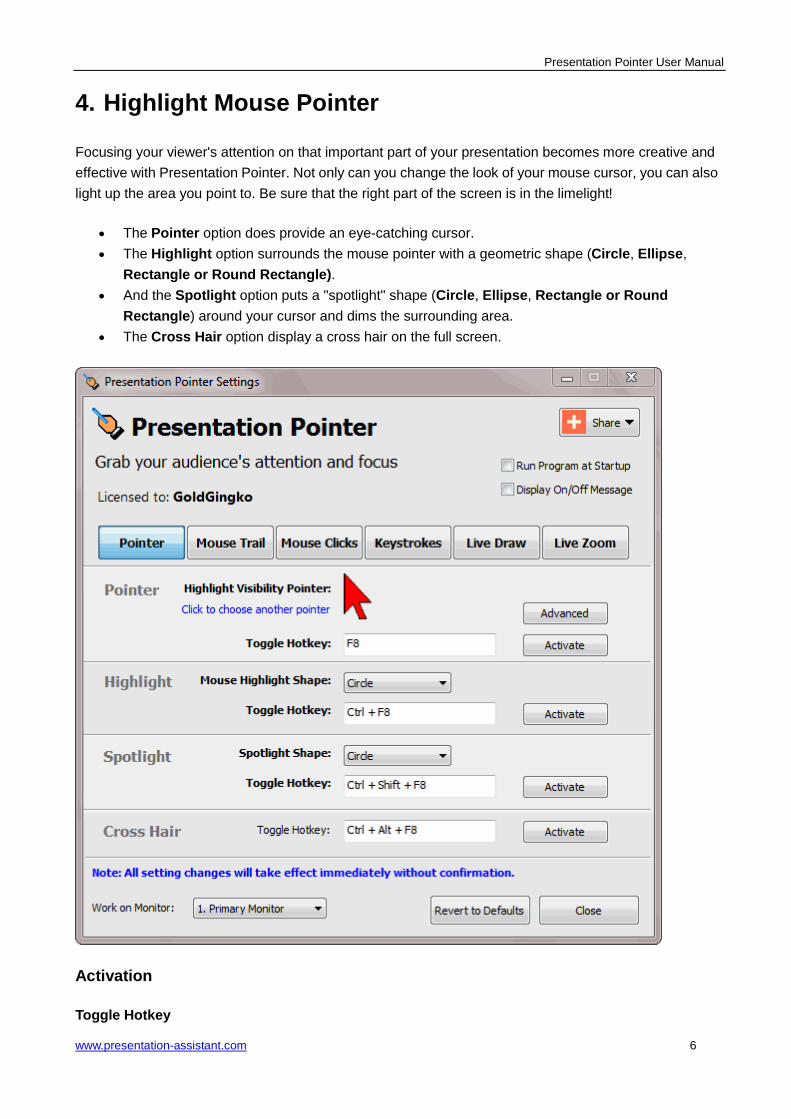
Focusing your viewer's attention on that important part of your presentation becomes more creative and effective with Presentation Pointer. Not only can you change the look of your mouse cursor, you can also light up the area you point to. Be sure that the right part of the screen is in the limelight!
• The Pointer option does provide an eye-catching cursor. • The Highlight option surrounds the mouse pointer with a geometric shape (Circle, Ellipse,
Rectangle or Round Rectangle). • And the Spotlight option puts a "spotlight" shape (Circle, Ellipse, Rectangle or Round
Rectangle) around your cursor and dims the surrounding area. • The Cross Hair option display a cross hair on the full screen.
Activation
Toggle Hotkey
Presentation Pointer User Manual
www.presentation-assistant.com 7
By default, you should see the key assigned as hot key for every option (Pointer, Highlight, Spotlight), which means that pressing the hot key once activates the effect. Pressing the same key again deactivates it. This is what's referred to by Toggle: The same key switches something on and off, much like a light switch at home. And please note you can press ESC key two times to turn off the Highlight, Spotlight or Cross Hair.
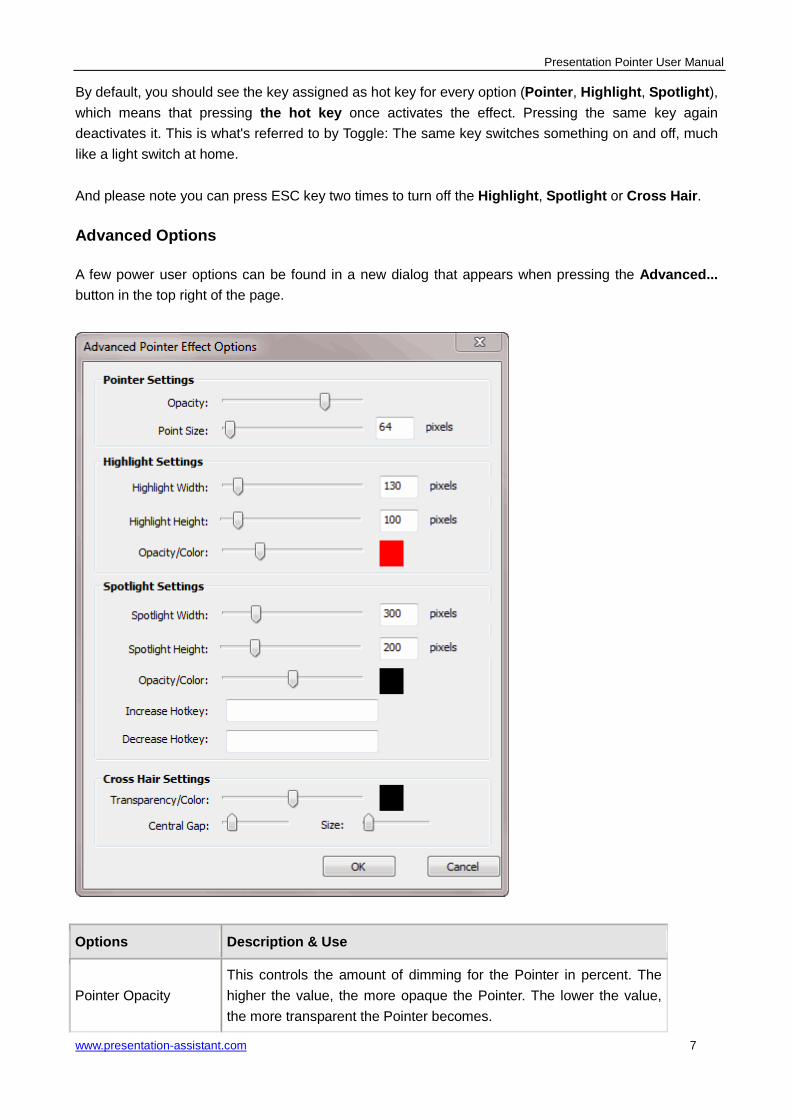
Advanced Options
A few power user options can be found in a new dialog that appears when pressing the Advanced... button in the top right of the page.
Options Description & Use
Pointer Opacity This controls the amount of dimming for the Pointer in percent. The higher the value, the more opaque the Pointer. The lower the value, the more transparent the Pointer becomes.

Presentation Pointer User Manual
www.presentation-assistant.com 8
Highlight Width Define the width of the highlight.
Highlight Height Define the height of the highlight.
Highlight Opacity
This controls the amount of dimming for the highlight area background color in percent. The higher the value, the more opaque the background color. The lower the value, the more transparent the background of the highlight becomes.
Highlight Color The highlight area background color.
Spotlight Width Define the width of the spotlight.
Spotlight Height Define the height of the spotlight.
Spotlight Opacity
This controls the amount of dimming for the Spotlight background color in percent. The higher the value, the more opaque the background color. The lower the value, the more transparent the background of the Spotlight becomes.
Spotlight Color The Spotlight background color.
Increase/Decrease Hotkey
In order to change the size of the highlight or spotlight, you can also assign hotkeys.
Cross Hair Transparency & Color
Define the Transparency and color of the cross hair.
Cross Hair Central Gap
Define the central gap size of the cross hair.
Cross Hair Size Define the line size of the cross hair
Presentation Pointer User Manual
www.presentation-assistant.com 9
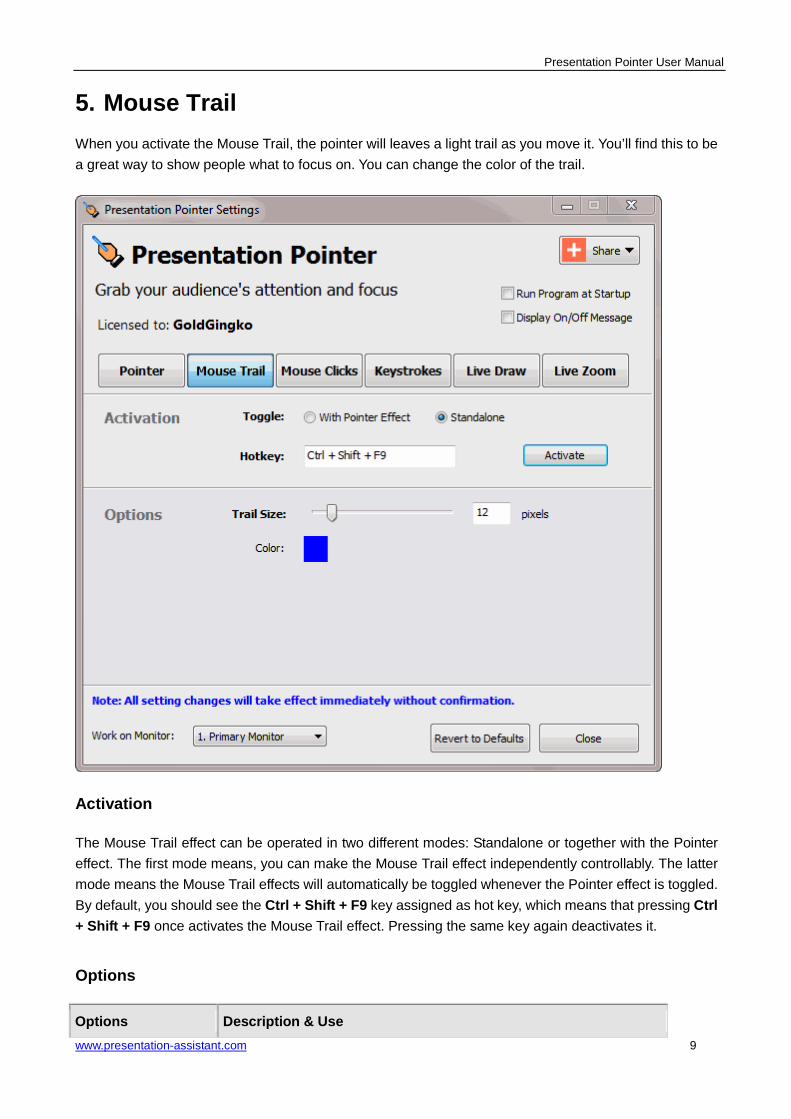
5. Mouse Trail When you activate the Mouse Trail, the pointer will leaves a light trail as you move it. You’ll find this to be a great way to show people what to focus on. You can change the color of the trail.
Activation
The Mouse Trail effect can be operated in two different modes: Standalone or together with the Pointer effect. The first mode means, you can make the Mouse Trail effect independently controllably. The latter mode means the Mouse Trail effects will automatically be toggled whenever the Pointer effect is toggled. By default, you should see the Ctrl + Shift + F9 key assigned as hot key, which means that pressing Ctrl + Shift + F9 once activates the Mouse Trail effect. Pressing the same key again deactivates it.
Options
Options Description & Use

Presentation Pointer User Manual
www.presentation-assistant.com 10
Trail Size Define the size of the trail
Color The color for trail
Presentation Pointer User Manual
www.presentation-assistant.com 11
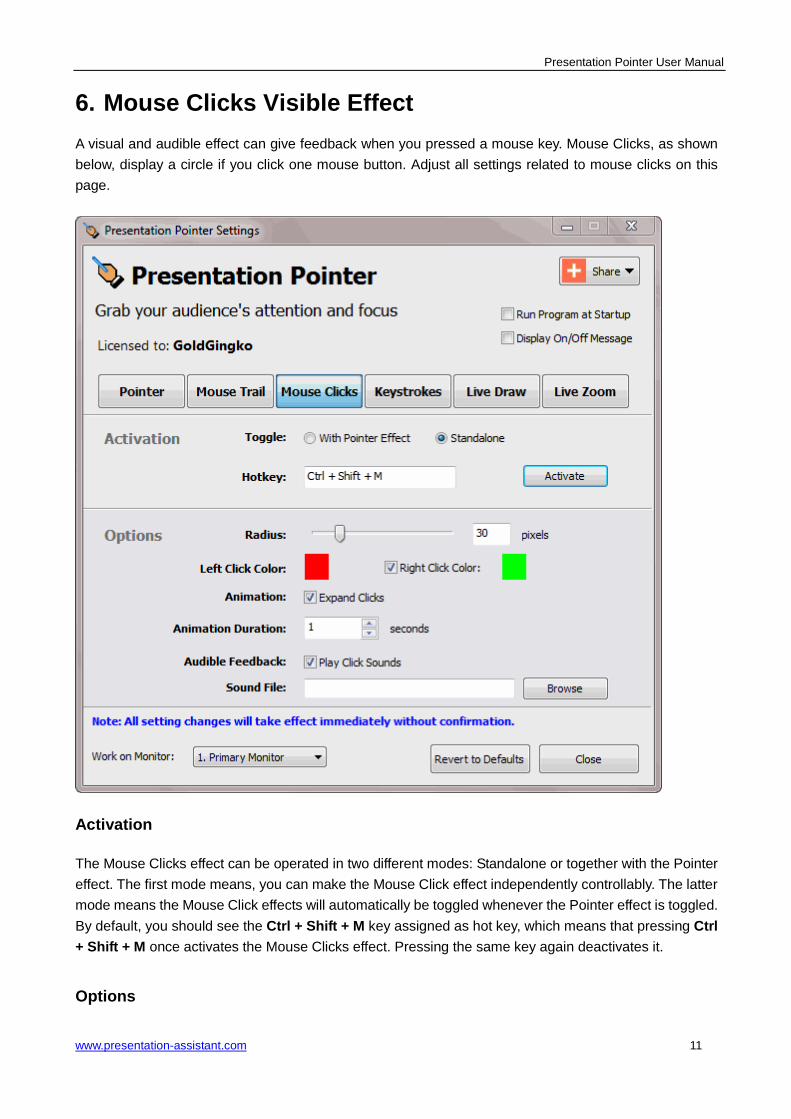
6. Mouse Clicks Visible Effect A visual and audible effect can give feedback when you pressed a mouse key. Mouse Clicks, as shown below, display a circle if you click one mouse button. Adjust all settings related to mouse clicks on this page.
Activation
The Mouse Clicks effect can be operated in two different modes: Standalone or together with the Pointer effect. The first mode means, you can make the Mouse Click effect independently controllably. The latter mode means the Mouse Click effects will automatically be toggled whenever the Pointer effect is toggled. By default, you should see the Ctrl + Shift + M key assigned as hot key, which means that pressing Ctrl + Shift + M once activates the Mouse Clicks effect. Pressing the same key again deactivates it.
Options

Presentation Pointer User Manual
www.presentation-assistant.com 12
Options Description & Use
Radius Define the radius of the circles
Left Click Color The color for left-clicking
Right Click Color The color for right-clicking
Animation The animation refers to expanding circles from the click origin.
Animation Duration
The duration of the click animation.
Audible Feedback
When this option is enabled sounds of mouse click will be produced when pressing and releasing the mouse button.

Presentation Pointer User Manual
www.presentation-assistant.com 13
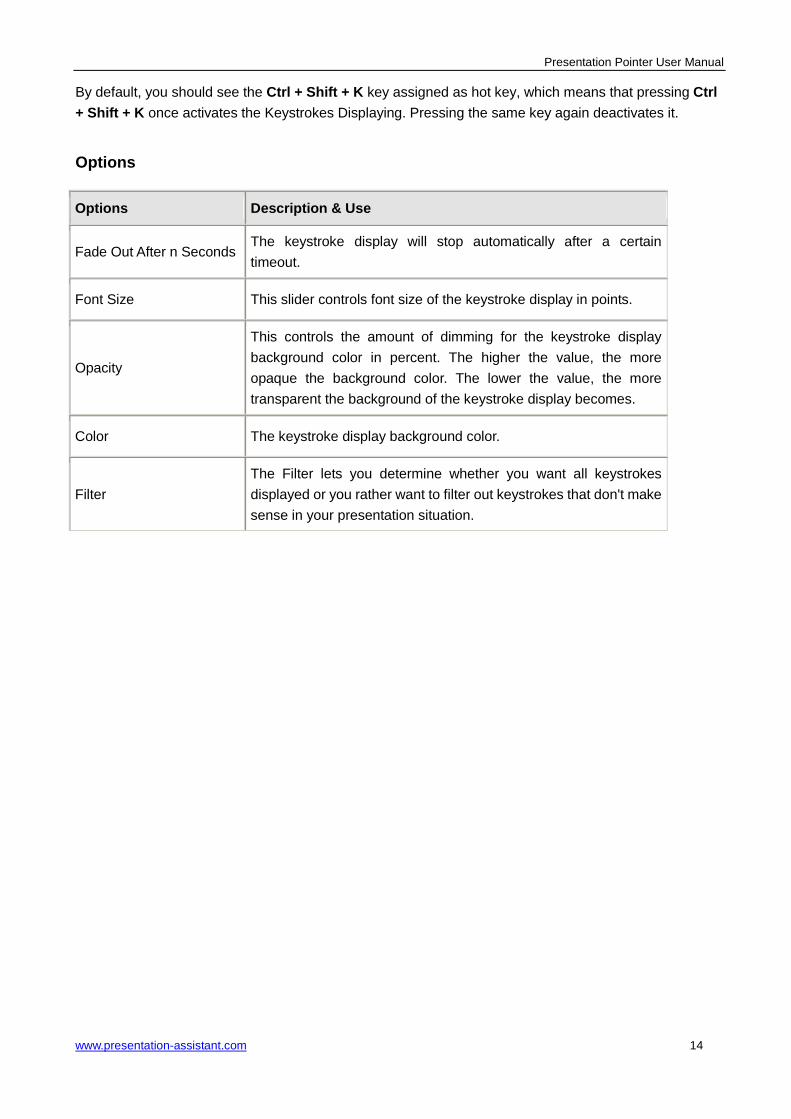
7. Display Keystrokes
With the Keystrokes function you can display large characters on the screen for whichever keys you press (including modifier keys such as Shift, Alt, Control, and Windows). Using Keystrokes as you manually type out the various controlling key operations when demonstrating software, your audience will know exactly which keys you've pressed.
The options in the Keystrokes page control if and how keyboard usage is being visualized on screen.
Activation
The Keystrokes Displaying can be operated in two different modes: Standalone or together with the Pointer effect. The first mode means, you can display keystrokes on your computer screen without the Point Effect being on. The latter mode means the keystrokes get displayed as soon as you have activated the Point Effect.
Presentation Pointer User Manual
www.presentation-assistant.com 14
By default, you should see the Ctrl + Shift + K key assigned as hot key, which means that pressing Ctrl + Shift + K once activates the Keystrokes Displaying. Pressing the same key again deactivates it.
Options
Options Description & Use
Fade Out After n Seconds The keystroke display will stop automatically after a certain timeout.
Font Size This slider controls font size of the keystroke display in points.
Opacity
This controls the amount of dimming for the keystroke display background color in percent. The higher the value, the more opaque the background color. The lower the value, the more transparent the background of the keystroke display becomes.
Color The keystroke display background color.
Filter The Filter lets you determine whether you want all keystrokes displayed or you rather want to filter out keystrokes that don't make sense in your presentation situation.
Presentation Pointer User Manual
www.presentation-assistant.com 15
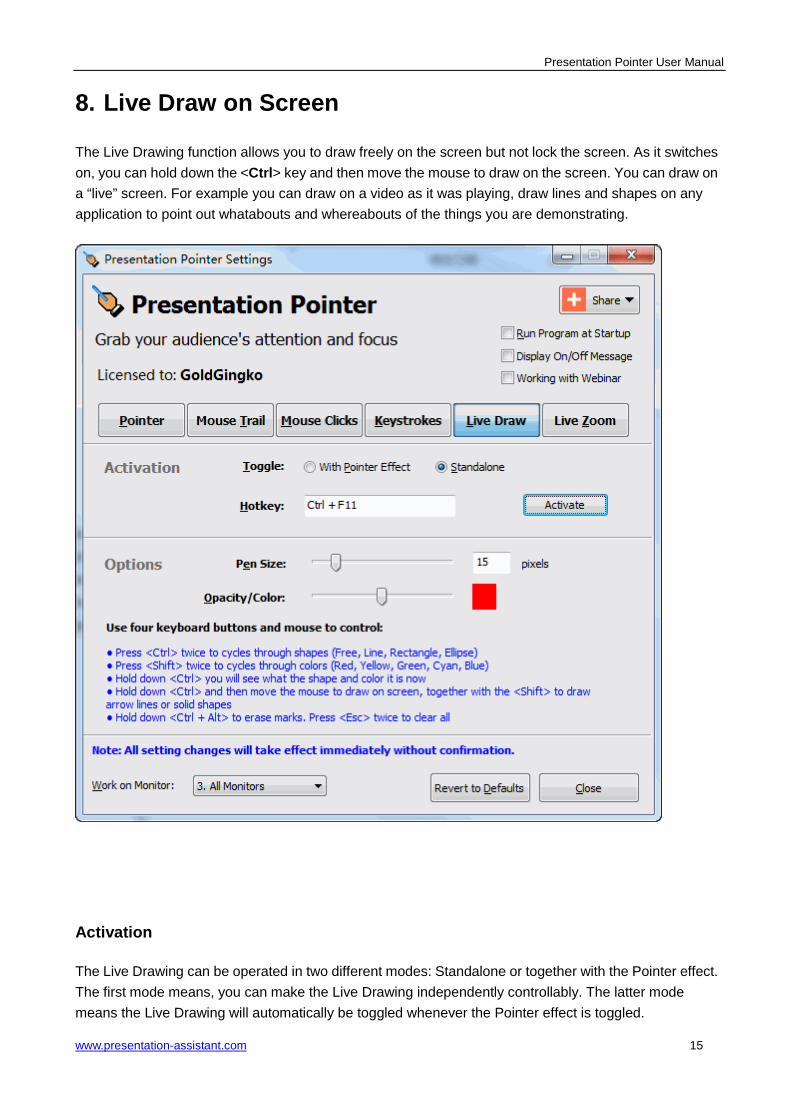
8. Live Draw on Screen
The Live Drawing function allows you to draw freely on the screen but not lock the screen. As it switches on, you can hold down the <Ctrl> key and then move the mouse to draw on the screen. You can draw on a “live” screen. For example you can draw on a video as it was playing, draw lines and shapes on any application to point out whatabouts and whereabouts of the things you are demonstrating.
Activation
The Live Drawing can be operated in two different modes: Standalone or together with the Pointer effect. The first mode means, you can make the Live Drawing independently controllably. The latter mode means the Live Drawing will automatically be toggled whenever the Pointer effect is toggled.

Presentation Pointer User Manual
www.presentation-assistant.com 16
By default, you should see the Ctrl + F11 key assigned as hot key, which means that pressing Ctrl + F11 once activates the Live Drawing. Pressing the same key again or press ESC key two times deactivates it.
How to Live Draw on Screen?
Use four keyboard buttons and mouse to control:
Press <Ctrl> twice to cycles through shapes (Free, Line, Rectangle, Ellipse) Press <Shift> twice to cycles through colors (Red, Yellow, Green, Cyan, Blue) Hold down <Ctrl> you will see what the shape and color it is now Hold down <Ctrl> and then move the mouse to draw on screen, together with the <Shift> to draw
arrow lines or solid shapes Hold down <Ctrl + Alt> to erase marks. Press <Esc> twice to clear all You can also select what shape to draw like the figure below.
Options
Options Description & Use
Pen Size The pen size in pixels.
Opacity This controls the amount of dimming for drawings in percent. The higher the value, the more opaque the background. The lower the value, the more transparent the drawings become.
Color The pen color
Clear Hotkey Press this hotkey to clear all drawings.
Presentation Pointer User Manual
www.presentation-assistant.com 17
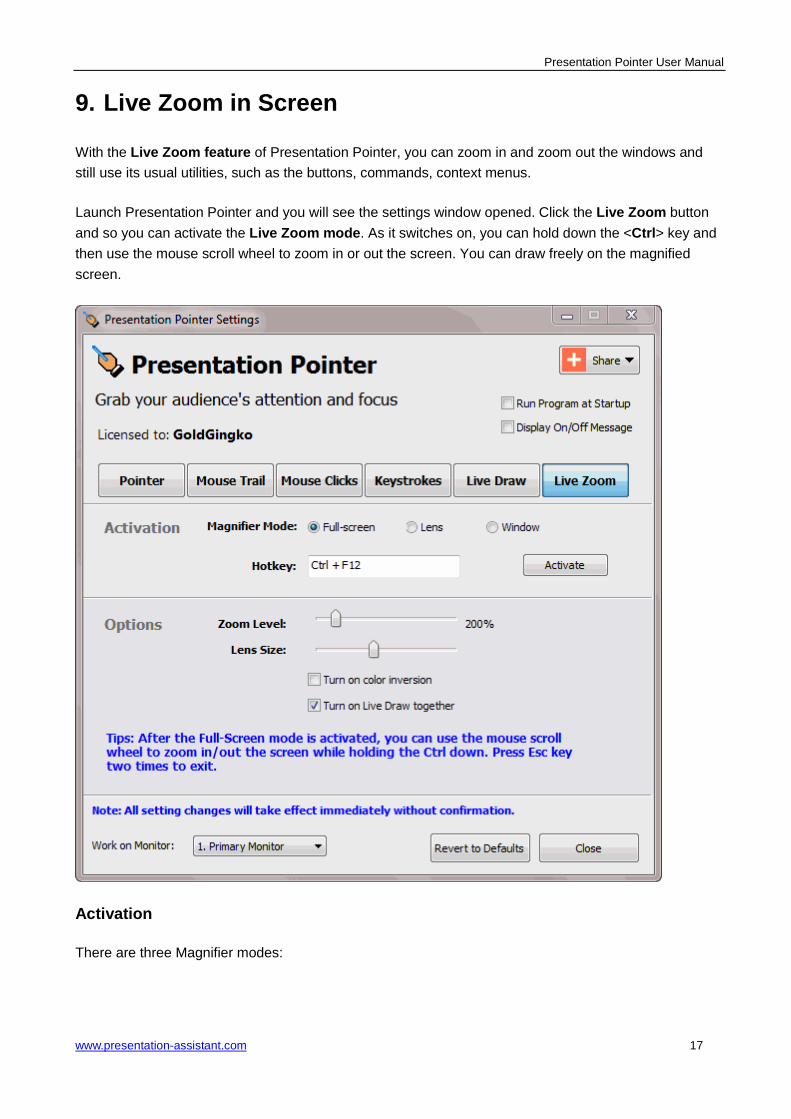
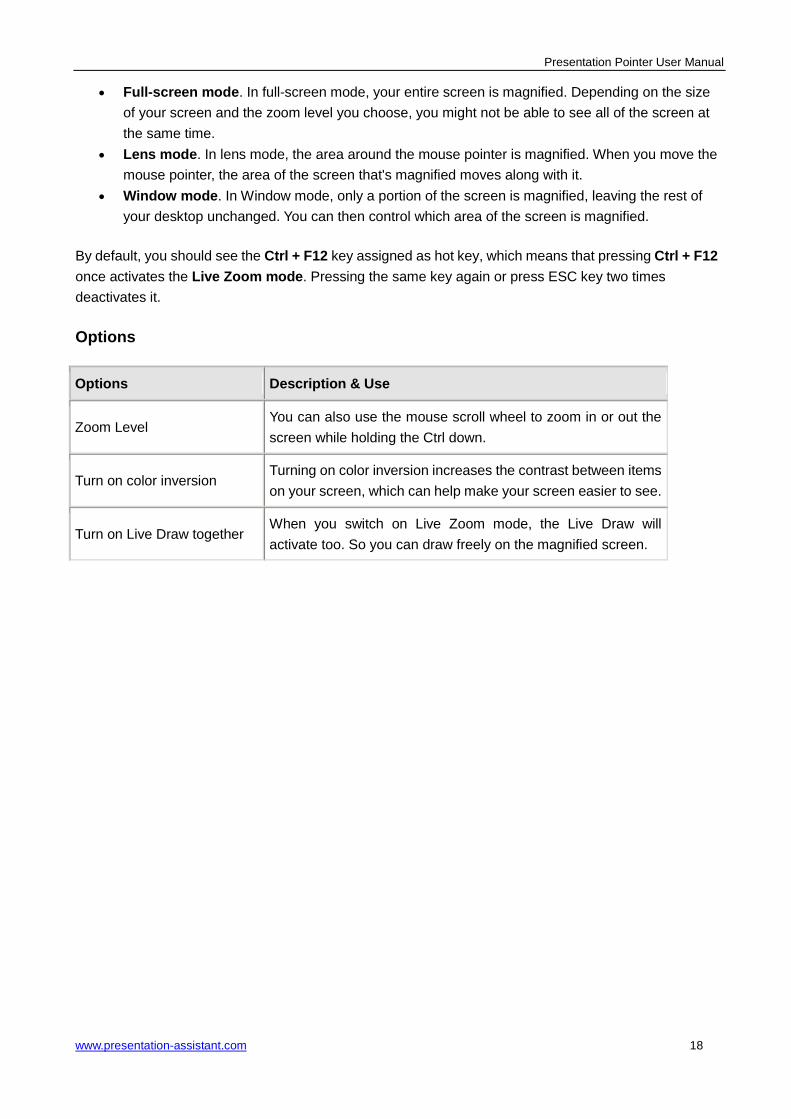
9. Live Zoom in Screen
With the Live Zoom feature of Presentation Pointer, you can zoom in and zoom out the windows and still use its usual utilities, such as the buttons, commands, context menus.
Launch Presentation Pointer and you will see the settings window opened. Click the Live Zoom button and so you can activate the Live Zoom mode. As it switches on, you can hold down the <Ctrl> key and then use the mouse scroll wheel to zoom in or out the screen. You can draw freely on the magnified screen.
Activation
There are three Magnifier modes:
Presentation Pointer User Manual
www.presentation-assistant.com 18
• Full-screen mode. In full-screen mode, your entire screen is magnified. Depending on the size of your screen and the zoom level you choose, you might not be able to see all of the screen at the same time.
• Lens mode. In lens mode, the area around the mouse pointer is magnified. When you move the mouse pointer, the area of the screen that's magnified moves along with it.
• Window mode. In Window mode, only a portion of the screen is magnified, leaving the rest of your desktop unchanged. You can then control which area of the screen is magnified.
By default, you should see the Ctrl + F12 key assigned as hot key, which means that pressing Ctrl + F12 once activates the Live Zoom mode. Pressing the same key again or press ESC key two times deactivates it.
Options
Options Description & Use
Zoom Level You can also use the mouse scroll wheel to zoom in or out the screen while holding the Ctrl down.
Turn on color inversion Turning on color inversion increases the contrast between items on your screen, which can help make your screen easier to see.
Turn on Live Draw together When you switch on Live Zoom mode, the Live Draw will activate too. So you can draw freely on the magnified screen.

Presentation Pointer User Manual
www.presentation-assistant.com 19
Technology Support Customers' satisfaction is the best gift for us. We would like to try our best to provide you with the best products and service. So we welcome any question or suggestion. We promise to our customers that we will deal with emails within 24 hours after receiving them. Free trial customers are also welcome to enjoy our effective One Business Day Email Service! Please do not hesitate to contact us.
http://www.presentation-assistant.com/
E-mail: [email protected]


![EXPRESSSCOPE Engine User's Guide · If the host system runs Windows Server 2003, go to [Mouse properties]–[Pointer Options]–[Motion] and clear the check box for “Enhance pointer](https://img.pdfslide.us/doc/110x75/5e89e75c0e3f63111b0c97c7/expressscope-engine-users-guide-if-the-host-system-runs-windows-server-2003-go.jpg)