Embed Size (px)
Citation preview

Preparing Hyper-V Templates for Windows Server 2008 in HC

Table Of Contents Proprietary Notice .......................................................................................... 5 Target Audience............................................................................................. 6 Document Conventions ................................................................................... 6 About Virtualization and Hyper-V...................................................................... 7 HC Help........................................................................................................ 8 Creating Master Virtual Machine ....................................................................... 9 Installing Guest Operating System...................................................................16 Installing Hyper-V Integration Services ............................................................22 Installing HC Hyper-V Component ...................................................................24 Generalizing Virtual Hard disk .........................................................................28 Contact Us ...................................................................................................42
iii

Proprietary Notice © 2011 Hosting Controller. All Rights Reserved. This document is the property of, and contains proprietary information of Hosting Controller. No part of this document may be reproduced or transmitted in any form or by any means, electronic or mechanical, including photocopying or recording, for any purpose other than consideration of the technical contents without the written acquiescence of a duly authorized representative of Hosting Controller.
5

6
Target Audience The sole purpose of this document is to provide complete information of preparing Hyper-V templates with Windows Server 2008 in Hosting Controller (HC) panel. Target audience includes every one who want to prepare virtual hard disks with Windows Server 2008 in HC. This guide supplies detailed information of HC panel in a comprehensive manner. It is specifically written with a view point to provide easy and quick understanding of all the technicalities of the virtual hard disk preparation process. Please, read this document to have absolute information and to avoid any type of ambiguity related to preparing Hyper-V templates with Windows Server 2008 in HC.
Document Conventions Terms/Symbols Meanings
BOLD The Bold text is used to highlight command operations in the document.
This symbol is used for TIP. It provides additional information regarding the term being explained. For differentiation, tips are Italic and Green.
This symbol is used for Note. It highlights some steps that cannot be skipped or should be followed as stated to avoid errors and confusion. For differentiation, notes are Italic and Navy Blue.

7
About Virtualization and Hyper-V By Virtualization we means having separate operating systems from the actual operating system of the Web server. It is therefore be said that any damage caused to the virtual operating system will not effect the actual operating system. It is just like a separate OS or computer within the real computer. Microsoft Hyper-V Server is a stand-alone product that provides reliable and optimized virtualization solutions. Thus, enabling organizations to improve server utilization and reduce costs. HC Virtualization module provides automated provisioning and management of MS Hyper-V server. It offers virtualization through a centralized administration interface for creating new virtual machines and managing all user activation related tasks in an organized manner. Virtual Private Servers are rapidly gaining popularity in the world of web hosting. They are deployed to the end customers with less provisioning time and administrative efforts. All that needs to be done in this regard is to prepare templates of VPS (Virtual Private Servers). These templates are also referred as OS templates. HC provides an easy and simple way to prepare virtual hard disks, as per your business needs.
This document only provides information about preparing virtual hard disks with Windows Server 2008 in HC.
The key steps involved in preparing the OS templates with Windows Server 2008 in HC are as under:
1. Creating Master Virtual Machine 2. Installing Guest Operating System 3. Installing Hyper-V Integration Services 4. Installing HC Hyper-V Component 5. Generalizing Virtual Hard Disk

8
HC Help You can have quick information regarding HC panel with this manual but if you are unsure how to do something or you have any problem, try the following approaches:
Online Help / Manuals - Refer to the online user manuals for more assistance.
Support Forums - You can ask questions on Hosting Controller Forums
http://forum.hostingcontroller.com
Knowledgebase - For any additional information, please visit http://hostingcontroller.com/English/support/kb/search.html
FAQs - You can check the list of Frequently Asked Questions in case of any ambiguity http://hostingcontroller.com/english/support/FAQ/index.html
Quick Help - For your ease, every page of panel contains a built-in help section that provides brief description about the page (currently opened).

9
Creating Master Virtual Machine
A Master Virtual Machine is created to be used with the VHD template.
To create master virtual machine:
1. Launch Hyper-V Manager. The Hyper-V Manager is launched.
To launch Hyper-V Manager, on the Start menu, click Administrative Tools, and then Hyper-V Manager.
2. On the Action menu, point to New, and then click Virtual Machine.
The Virtual Machine creation wizard is started. 3. Type Name of the virtual machine.
For your convenience, specify some meaning full name for Virtual Machine.
4. Select Store the Virtual Machine in a Different Location check box to
enter path for the virtual machine to be stored. 5. Enter Location of the virtual machine to be stored.
It is better to create virtual machines on a separate hard disk volume.
Again for your convenience define a good structure for virtual machines to avoid ambiguities later on.
6. Click Next.
The Assign Memory screen is displayed. 7. Type Memory. 8. Click Next.
The Configure Networking screen is displayed. 9. Click the Connection arrow and select the network adapter for the virtual
machine. 10. Click Next.
The Connect Virtual Hard Disk screen is displayed. 11. Click Create a virtual hard disk. 12. Specify Name of the virtual machine storage. 13. Enter Location of the virtual machine storage. 14. Type Size of the virtual machine storage.
Specify hard disk size that is enough to install the Windows Server 2008.
15. Click Next.
The Installation Options screen is displayed. 16. Click Install an operating system from a boot CD/DVD-ROM.

10
17. Click the Image file (.ISO). 18. Enter path for the image file. 19. Click Next.
The Summary screen is displayed. 20. Click Finish.
The Virtual Machine is created. Creating Master Virtual Machine

11

12
13

14

15

16
Installing Guest Operating System
Before installing guest operating system, you must have created the Master Virtual Machine.
To install guest operating system:
1. Boots the created Master Virtual Machine from Windows Server 2008 installation DVD. The OS installation is started.
2. Click Language to install arrow and select required Language from the drop-down list box.
3. Click Time and currency format arrow and select required format for time and currency from the drop-down list box.
4. Click Keyboard or input method arrow and select required method for input from the drop-down list box.
5. Click Next. The Install Now screen is displayed.
6. Click Install Now. The installation is started and takes few minutes to complete.
After installation ends, a Windows Welcome screen is displayed.
On Windows Welcome screen, specify user credentials to log on.

17
Installing Guest Operating System

18

19

20

21

22
Installing Hyper-V Integration Services
Hyper-V Integration Services include the followings:
Drivers Mouse Windows Services
o System Shutdown o Time Synchronization o Data Exchange o Heartbeat o Backup
To install hyper-v integration services:
1. Remove Windows Server 2008 installation DVD from virtual machine's DVD drive.
To remove DVD, on the Media menu, point to DVD Drive, and then click Eject (file name.iso).
2. On the Action menu, click Insert Integration Services Setup Disk.
The installation is started and takes few minutes to complete.
You must restart your system once the installation of Hyper-V Integration Services is completed.
If the installation is completed successfully then you can:
Use mouse to work with Virtual Machine Connect Virtual Machine to the network View the special Hyper-V Windows services running on Guest OS

23
Installing Hyper-V Integration Services

24
Installing HC Hyper-V Component To install HC hyper-v component:
1. Double click the HCHyperVComponent setup file. The installation is started and a Welcome screen is displayed.
2. Click Next. The Select Installation Folder screen is displayed.
3. Enter path to install the HC Hyper V Component. 4. Click the required option to specify user of HC Hyper V Component. 5. Click Next.
The Confirm Installation screen is displayed. 6. Click Next.
The installation may take few minutes. 7. Click Close.
The HC Hyper-V Component is installed.
The setup installs the Hosting Controller Hyper-V Management service.
Installing HC Hyper-V Component

25

26

27
HC Hyper-V Management Service
28
Generalizing Virtual Hard disk
The System Preparation (Sysprep) tool is a technology that you can use with other deployment tools to install Windows operating systems onto new hardware. Sysprep prepares a computer for disk imaging or delivery to a customer by configuring the computer to create a new computer security identifier (SID) when the computer is restarted. In addition, Sysprep cleans up user- and computer-specific settings and data that must not be copied to a destination computer. For more information refer to http://technet.microsoft.com/en-us/library/cc766049.aspx
To Sysprep Windows 2008/Vista/Windows 7 you need to install WAIK (Windows Automated Installation Kit).
To generalize virtual hard disk:
1. Launch Windows System Image Manager. The Windows System Image Manager is launched.
To launch Windows System Image Manager, on All Programs menu, point to Microsoft Windows AIK, and then click Windows System Image Manager.
There are several panes in the Windows System Image Manager.
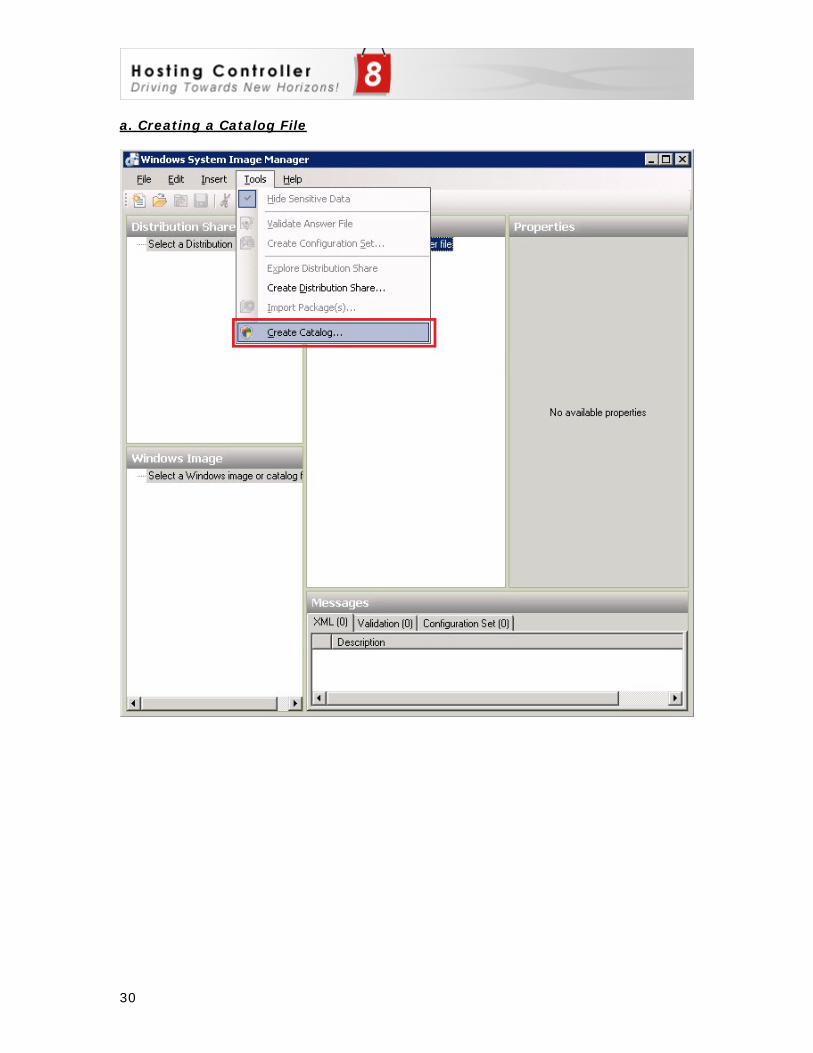
2. Create a Catalog File.
a. To create a catalog file: i. On Tools menu, click Create Catalog.
To create a catalog file you need to provide a WIM (Window Image) file install.wim. It is provided in the source folder of the Windows installation media (CD or DVD).
ii. Copy the install.wim file to any directory. iii. In Open a Windows Image dialog box, select install.wim,
and then click Open. A Select an Image dialog box is displayed.
iv. Select image file and click OK. The catalog file is created.
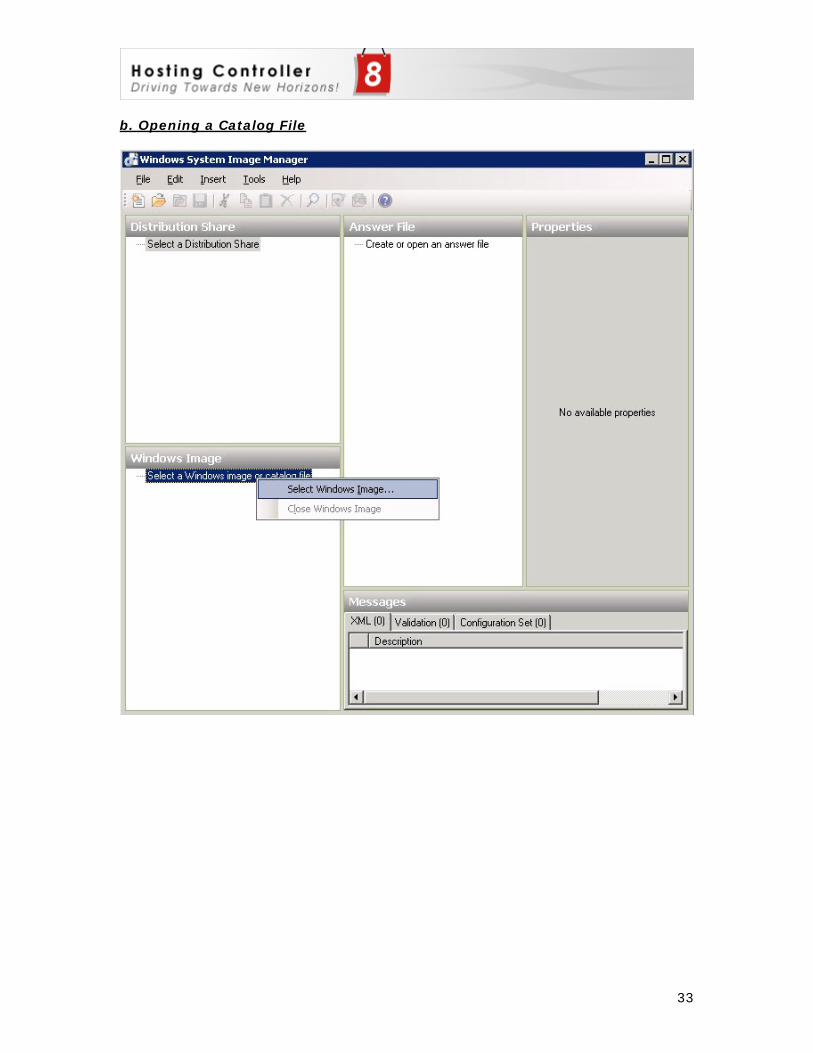
3. Open a Catalog File. a. To open a catalog file:
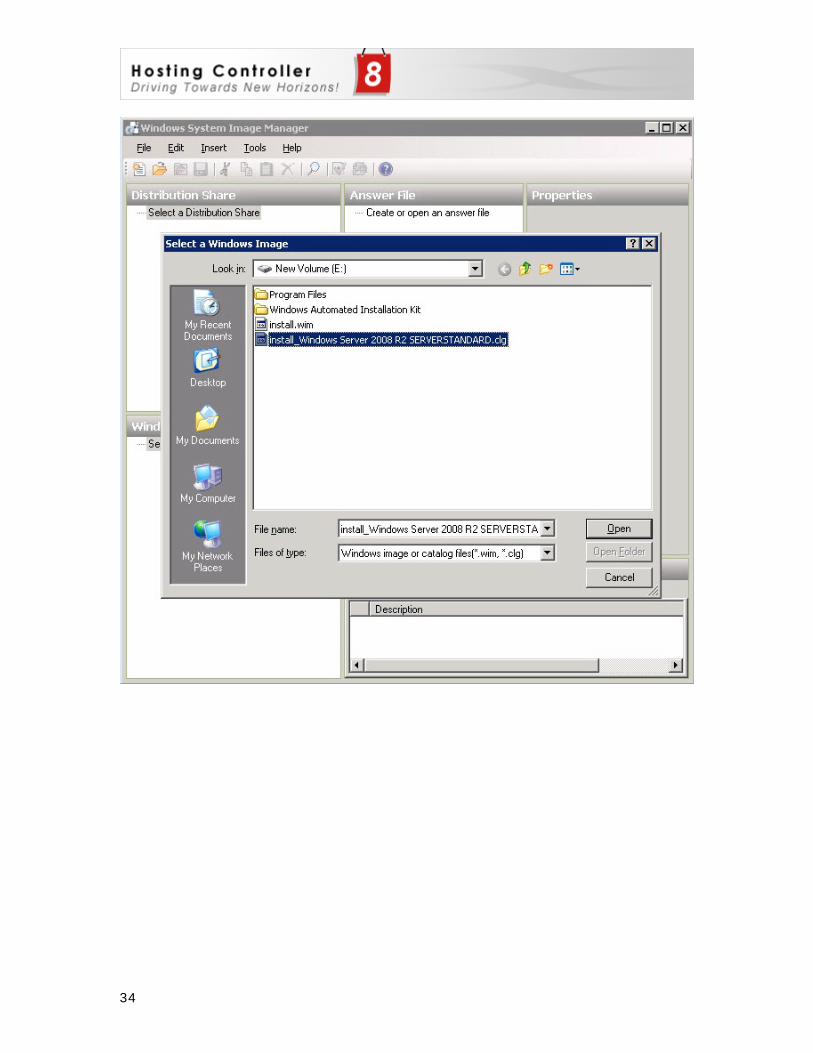
i. Under Windows Image pane, right click Select a Windows image or catalog file and click Select Windows Image. The Select a Windows Image dialog box is displayed.
ii. Select the catalog file (file name.clg) and click Open. The catalog file is opened.
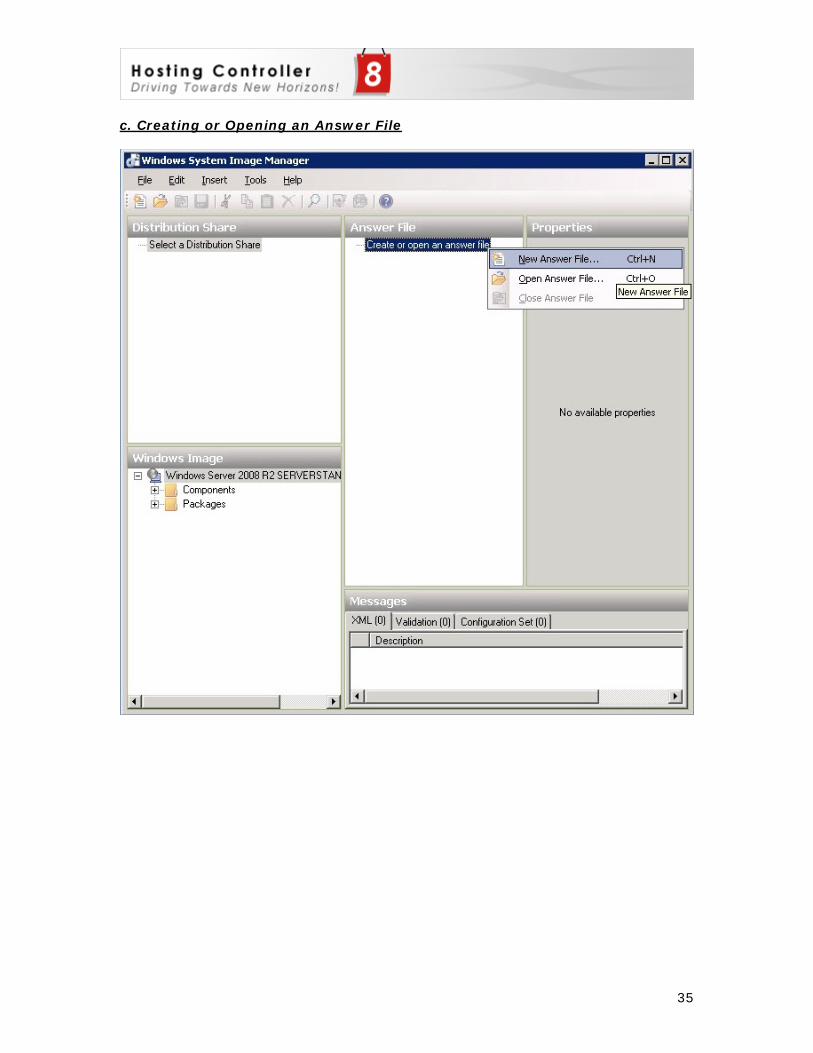
4. Create or Open an Answer File. a. To create or open as answer file:

29
i. Under Answer File pane, right click Create or open an answer file and click New Answer File. The Answer File is created.
You can use an answer file with Sysprep to configure unattended Setup settings.
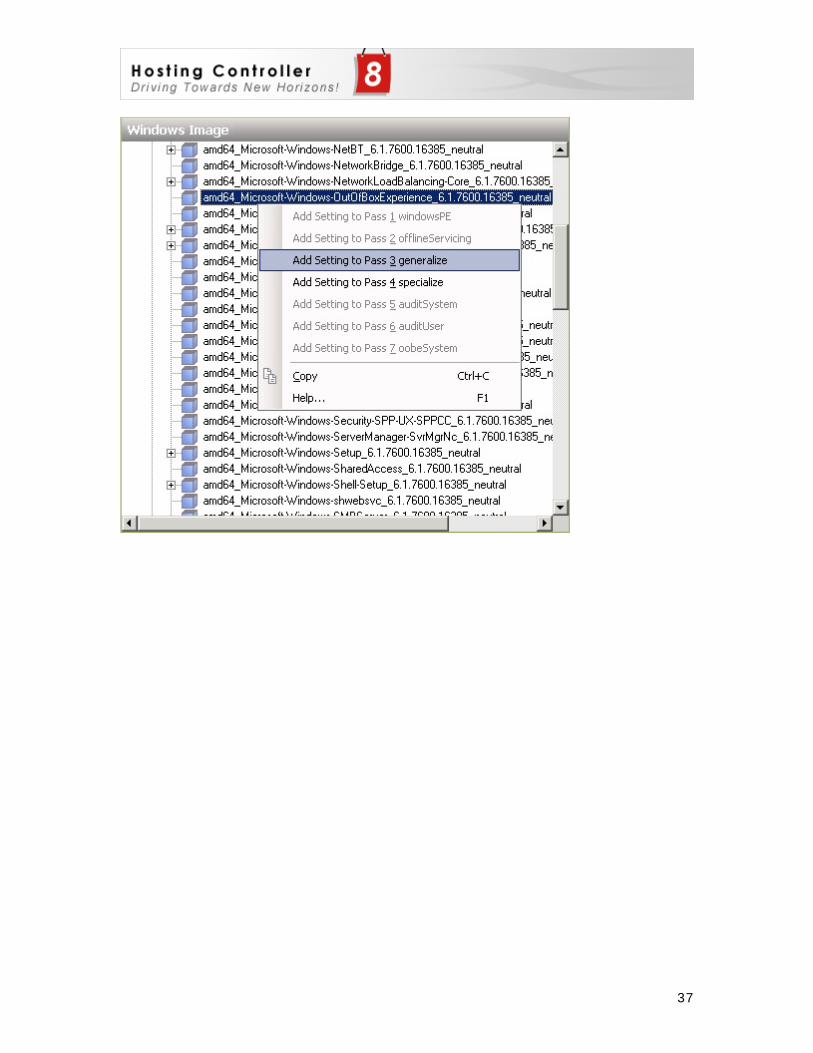
Not all configuration passes run during Windows Setup. Some configuration passes are only available when you run Sysprep. The generalize, auditSystem and auditUser passes are available only by running Sysprep. If you add settings to your answer file in these configuration passes, you must run Sysprep to apply these settings. To apply the settings in the generalize pass, you must generalize the Windows image by using the sysprep/generalize command. For more information, refer to http://technet.microsoft.com/en-us/library/cc766514(WS.10).aspx
The tree structure in the Windows Image pane contains all possible settings that can be included in an Answer File.
5. Save the answer file and place it at
%ROOTDRIVE%:\Windows\System32\sysprep folder. 6. Execute the following command:
sysprep /generalize /oobe /shutdown /unattend:%GENERATED ANSWER FILE%.xml
Generalizing Virtual Hard Disk
30
a. Creating a Catalog File

31

32
33
b. Opening a Catalog File
34
35
c. Creating or Opening an Answer File

36
d. Possible Settings that can be Included in an Answer File
37

38
e. Certain Settings in WSIM are:
Disabling the Initial Configuration Dialog
Disabling Server Manager from Loading at First Run

39
Setting the IE Home Page to about:blank, Turning Off the IE8 Accelerators, and Disabling the First Run Wizard
There are two versions of Internet Explorer on a 64-bit machine – the 64-bit IE and the 32-bit IE. Both are configured independently. Duplicate the above IE configuration in the wow64_Microsoft-Windows-IE-InternetExplorer_neutral component.

40
Setting Product Key, Time Zone Settings, and Computer Name
Settings for Localization
To set language other than US English, refer to the Input Locales in the index of the Unattended Windows Setup Reference CHM file referenced earlier.

41
Setting the Screen Resolution and Color Depth
Setting Setup Not to Show the EULA Again

42
Setting Setup to Install a Default Local Administrator Account Password
Contact Us In case of any ambiguity/query regarding preparing Hyper-V Templates for Windows Server 2008 in HC, please feel free to contact us at [email protected]