Embed Size (px)
Citation preview
300
PREPARING FILES FOR THE WEB
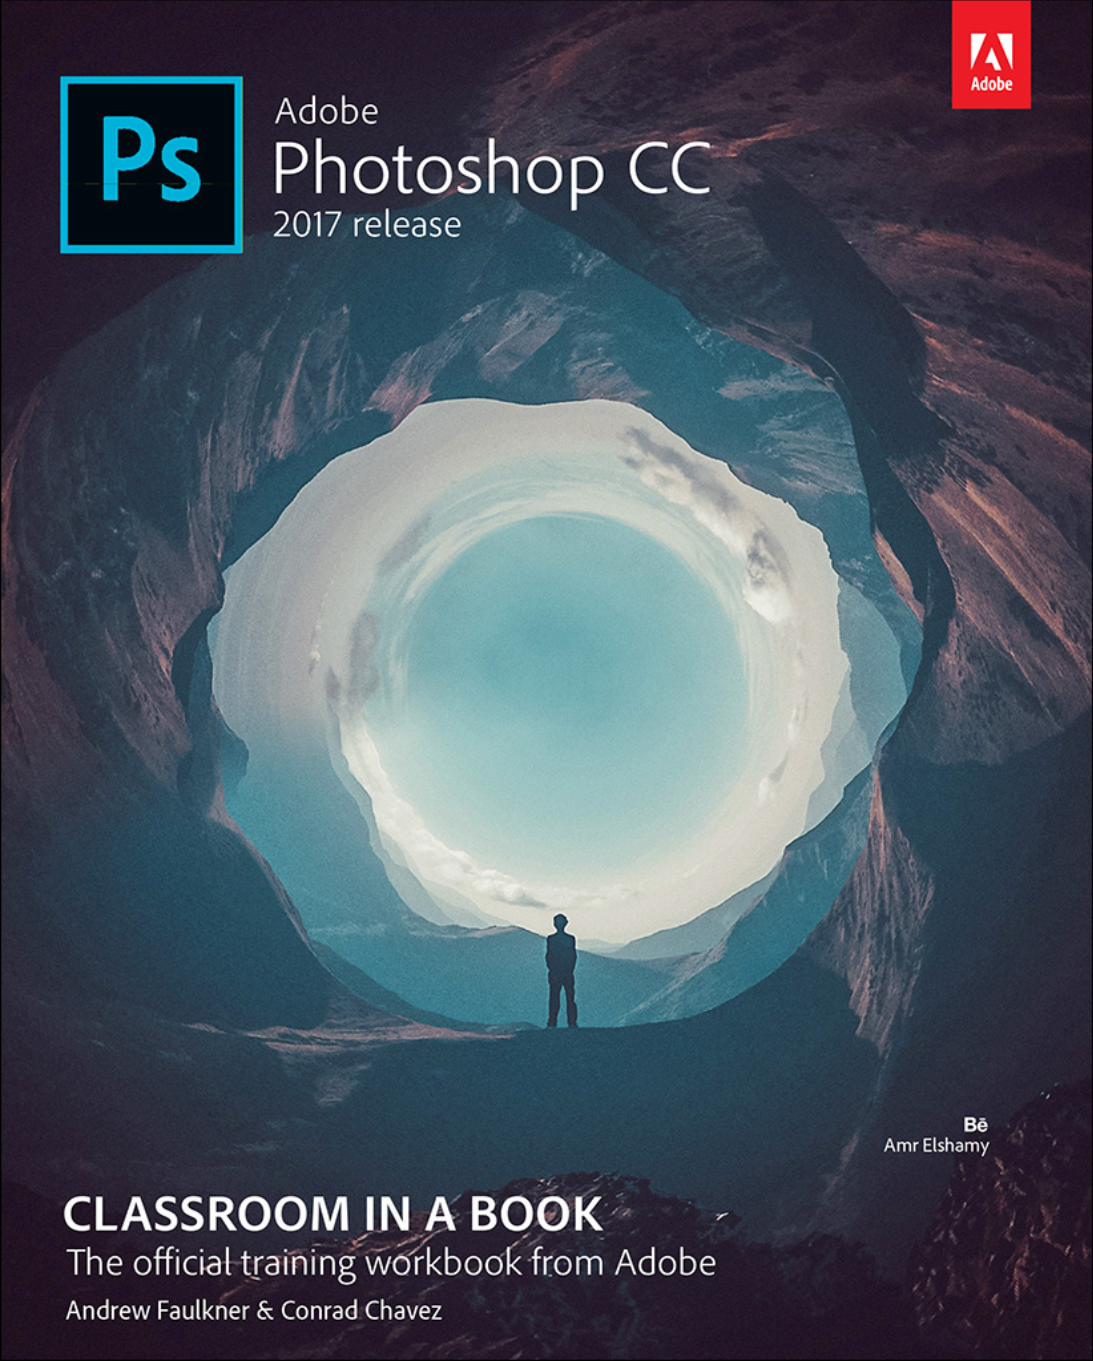
Lesson overviewIn this lesson, you’ll learn how to do the following:
• Create and stylize a button for a website.
• Use layer groups and artboards.
• Optimize design assets for the web.
• Record an action to automate a series of steps.
• Play an action to affect multiple images.
• Save entire layouts and individual assets using Export As.
• Design for multiple screen sizes with multiple artboards and testthem with the Adobe Preview CC mobile application.
Th s lesson will take about an hour to complete. Download the Lesson13 project fil s from the Lesson & Update Files tab on your Account page at www.peachpit.com, if you haven’t already done so. As you work on this lesson, you’ll preserve the start fil s. If you need to restore the start fil s, download them from your Account page.
13
9780134663456_13_000-000.indd 300 10/17/16 12:00 AM
© 2017 Pearson Education, Inc., and Adobe Systems Incorporated and its licensors. All rights reserved.

301
It’s often necessary to create separate images for buttons or other objects in a website. The Export As workfl w makes it easy to save layers, layer groups, and artboards as separate image file .
PROJECT: MUSEUM WEBSITE
9780134663456_13_000-000.indd 301 10/17/16 12:00 AM
© 2017 Pearson Education, Inc., and Adobe Systems Incorporated and its licensors. All rights reserved.
302 LESSON 13 Preparing Files for the Web
Getting startedIn this lesson, you will build buttons for the home page of a Spanish art museum’s website, and then generate appropriate graphics fil s for each button. You’ll use layer groups to assemble the buttons, and then create actions to prepare a set of images for use as a second group of buttons. First, you’ll view the final web design.
1 Start Photoshop, and then immediately hold down Ctrl+Alt+Shift (Windows) or Command+Option+Shift (Mac) to restore the default preferences. (See “Restoring Default Preferences” on page 5.)
2 When prompted, click Yes to delete the Adobe Photoshop Settings file
3 Choose File > Browse In Bridge.
4 In Bridge, click Lessons in the Favorites panel. Double-click the Lesson13 folder in the Content panel.
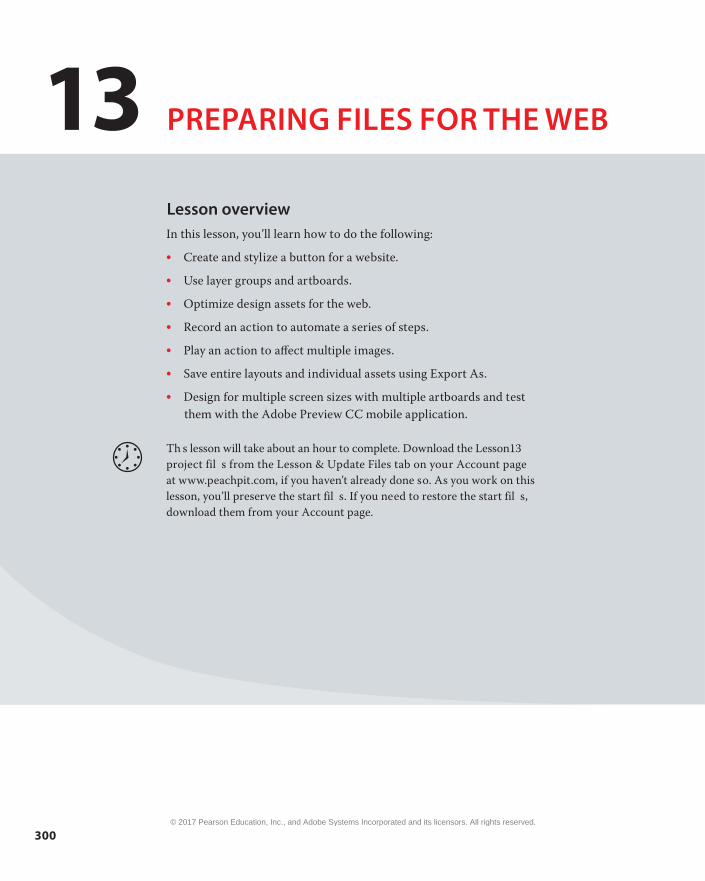
5 View the 13End.psd file n Bridge.
The e are eight buttons at the bottom of the page, arranged in two rows. You’ll transform images into buttons for the top row, and use an action to prepare the buttons for the second row.
6 Double-click the 13Start.psd thumbnail to open the file in Photoshop. Click OK if you see the Missing Profile ialog box, and click Cancel if the Create New Library from Document dialog box appears.
13Start.psd 13End.psd
7 Choose File > Save As, rename the file 13Working.psd, and click Save. Click OK in the Photoshop Format Options dialog box.
Note: If Bridge isn’t installed, you’ll be prompted to install it when you choose Browse In Bridge. For more information, see page 3.
9780134663456_13_000-000.indd 302 10/17/16 12:00 AM
© 2017 Pearson Education, Inc., and Adobe Systems Incorporated and its licensors. All rights reserved.
ADOBE PHOTOSHOP CC CLASSROOM IN A BOOK (2017 RELEASE) 303
Using layer groups to create button graphicsLayer groups make it easier to organize and work with layers in complex images, especially when there are sets of layers that work together. You’ll use layer groups to assemble the layers that make up each button, and they’ll come in handy when you export assets later.
Four images have been arranged in the start file o serve as the basis for buttons. You’ll add a label to each, identifying the gallery it represents, and then add a drop shadow and a stroke.
Creating the first but onYou’ll design the first button, and then duplicate layers and edit them to quickly apply the same treatment to the other three. First, you’ll change the units of mea-surement to pixels.
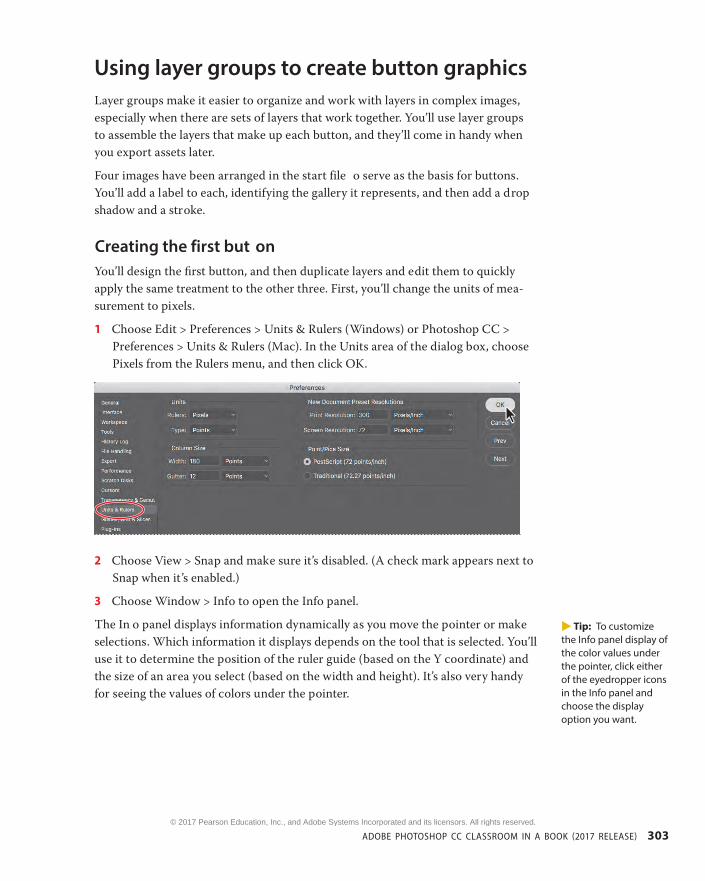
1 Choose Edit > Preferences > Units & Rulers (Windows) or Photoshop CC > Preferences > Units & Rulers (Mac). In the Units area of the dialog box, choose Pixels from the Rulers menu, and then click OK.
2 Choose View > Snap and make sure it’s disabled. (A check mark appears next to Snap when it’s enabled.)
3 Choose Window > Info to open the Info panel.
The In o panel displays information dynamically as you move the pointer or make selections. Which information it displays depends on the tool that is selected. You’ll use it to determine the position of the ruler guide (based on the Y coordinate) and the size of an area you select (based on the width and height). It’s also very handy for seeing the values of colors under the pointer.
E Tip: To customize the Info panel display of the color values under the pointer, click either of the eyedropper icons in the Info panel and choose the display option you want.
9780134663456_13_000-000.indd 303 10/17/16 12:00 AM
© 2017 Pearson Education, Inc., and Adobe Systems Incorporated and its licensors. All rights reserved.
304 LESSON 13 Preparing Files for the Web
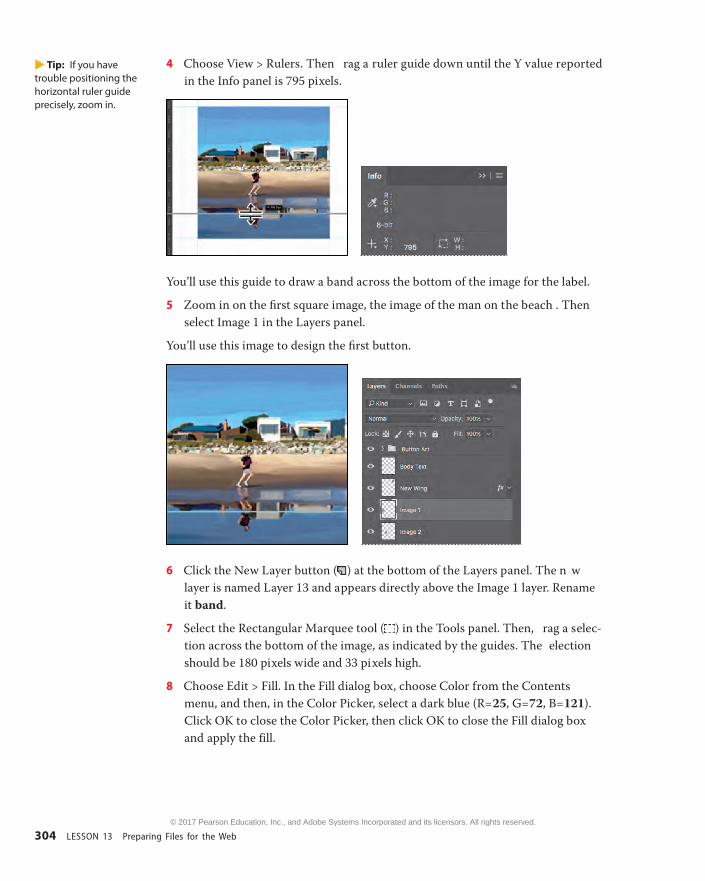
4 Choose View > Rulers. Then rag a ruler guide down until the Y value reported in the Info panel is 795 pixels.
You’ll use this guide to draw a band across the bottom of the image for the label.
5 Zoom in on the first square image, the image of the man on the beach . Thenselect Image 1 in the Layers panel.
You’ll use this image to design the first button.
6 Click the New Layer button ( ) at the bottom of the Layers panel. The n w layer is named Layer 13 and appears directly above the Image 1 layer. Rename it band.
7 Select the Rectangular Marquee tool ( ) in the Tools panel. Then, rag a selec-tion across the bottom of the image, as indicated by the guides. The election should be 180 pixels wide and 33 pixels high.
8 Choose Edit > Fill. In the Fill dialog box, choose Color from the Contents menu, and then, in the Color Picker, select a dark blue (R=25, G=72, B=121). Click OK to close the Color Picker, then click OK to close the Fill dialog box and apply the fill.
E Tip: If you have trouble positioning the horizontal ruler guide precisely, zoom in.
9780134663456_13_000-000.indd 304 10/17/16 12:00 AM
© 2017 Pearson Education, Inc., and Adobe Systems Incorporated and its licensors. All rights reserved.
ADOBE PHOTOSHOP CC CLASSROOM IN A BOOK (2017 RELEASE) 305
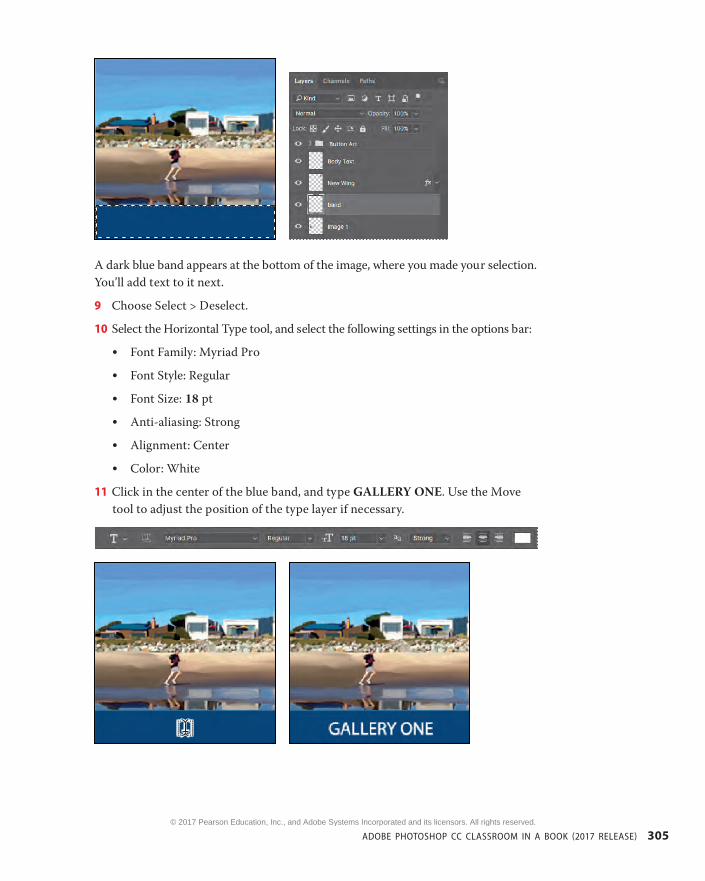
A dark blue band appears at the bottom of the image, where you made your selection. You’ll add text to it next.
9 Choose Select > Deselect.
10 Select the Horizontal Type tool, and select the following settings in the options bar:
• Font Family: Myriad Pro
• Font Style: Regular
• Font Size: 18 pt
• Anti-aliasing: Strong
• Alignment: Center
• Color: White
11 Click in the center of the blue band, and type GALLERY ONE. Use the Move tool to adjust the position of the type layer if necessary.
9780134663456_13_000-000.indd 305 10/17/16 12:00 AM
© 2017 Pearson Education, Inc., and Adobe Systems Incorporated and its licensors. All rights reserved.
306 LESSON 13 Preparing Files for the Web
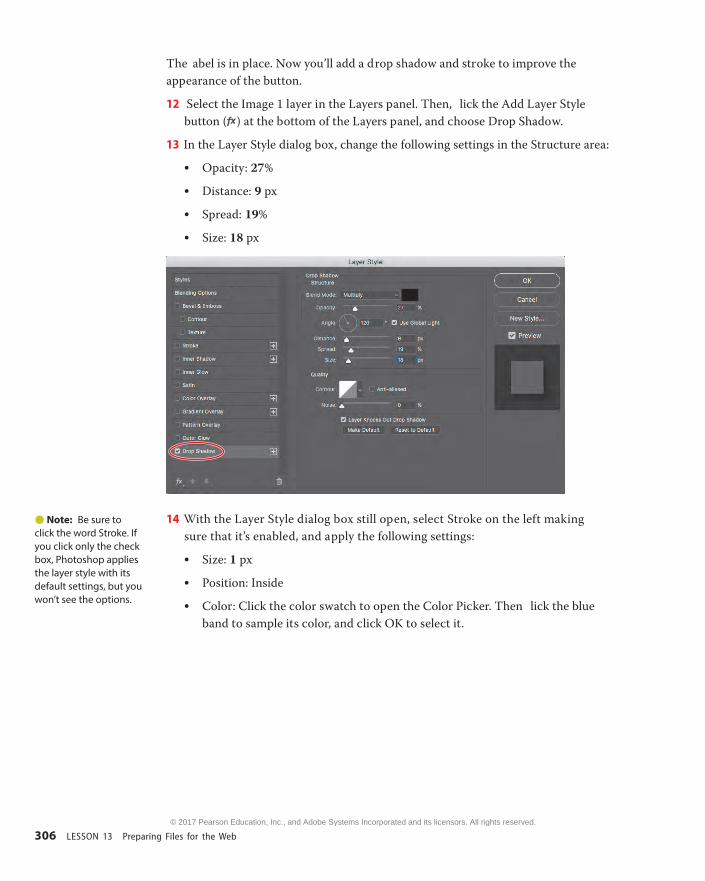
The abel is in place. Now you’ll add a drop shadow and stroke to improve the appearance of the button.
12 Select the Image 1 layer in the Layers panel. Then, lick the Add Layer Style button ( ) at the bottom of the Layers panel, and choose Drop Shadow.
13 In the Layer Style dialog box, change the following settings in the Structure area:
• Opacity: 27%
• Distance: 9 px
• Spread: 19%
• Size: 18 px
14 With the Layer Style dialog box still open, select Stroke on the left making sure that it’s enabled, and apply the following settings:
• Size: 1 px
• Position: Inside
• Color: Click the color swatch to open the Color Picker. Then lick the blue band to sample its color, and click OK to select it.
Note: Be sure to click the word Stroke. If you click only the check box, Photoshop applies the layer style with its default settings, but you won’t see the options.
9780134663456_13_000-000.indd 306 10/17/16 12:00 AM
© 2017 Pearson Education, Inc., and Adobe Systems Incorporated and its licensors. All rights reserved.
ADOBE PHOTOSHOP CC CLASSROOM IN A BOOK (2017 RELEASE) 307
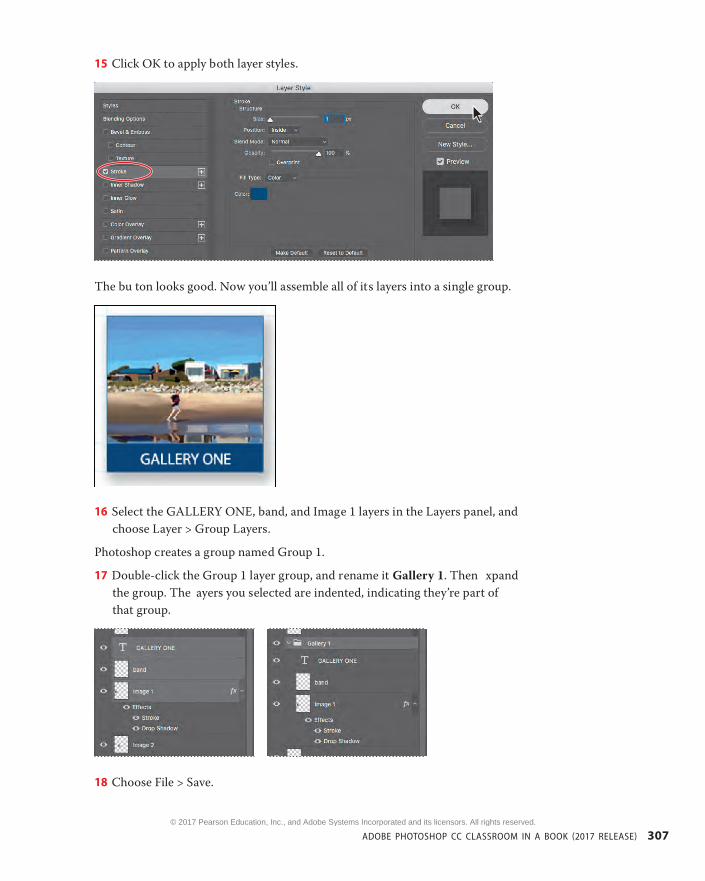
15 Click OK to apply both layer styles.
The bu ton looks good. Now you’ll assemble all of its layers into a single group.
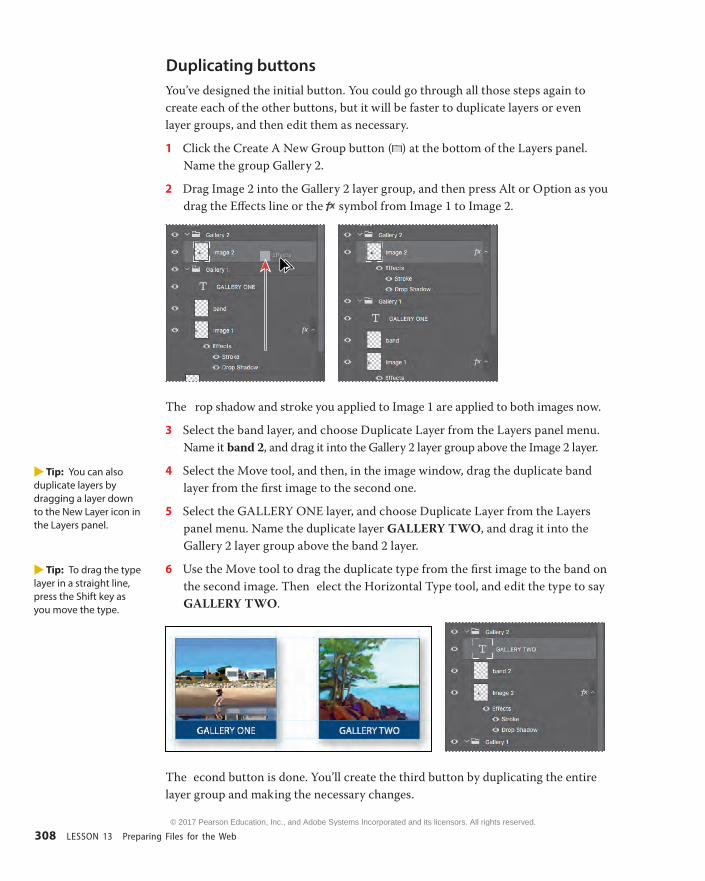
16 Select the GALLERY ONE, band, and Image 1 layers in the Layers panel, and choose Layer > Group Layers.
Photoshop creates a group named Group 1.
17 Double-click the Group 1 layer group, and rename it Gallery 1. Then xpand the group. The ayers you selected are indented, indicating they’re part of that group.
18 Choose File > Save.
9780134663456_13_000-000.indd 307 10/17/16 12:00 AM
© 2017 Pearson Education, Inc., and Adobe Systems Incorporated and its licensors. All rights reserved.
308 LESSON 13 Preparing Files for the Web
Duplicating buttonsYou’ve designed the initial button. You could go through all those steps again to create each of the other buttons, but it will be faster to duplicate layers or even layer groups, and then edit them as necessary.
1 Click the Create A New Group button ( ) at the bottom of the Layers panel. Name the group Gallery 2.
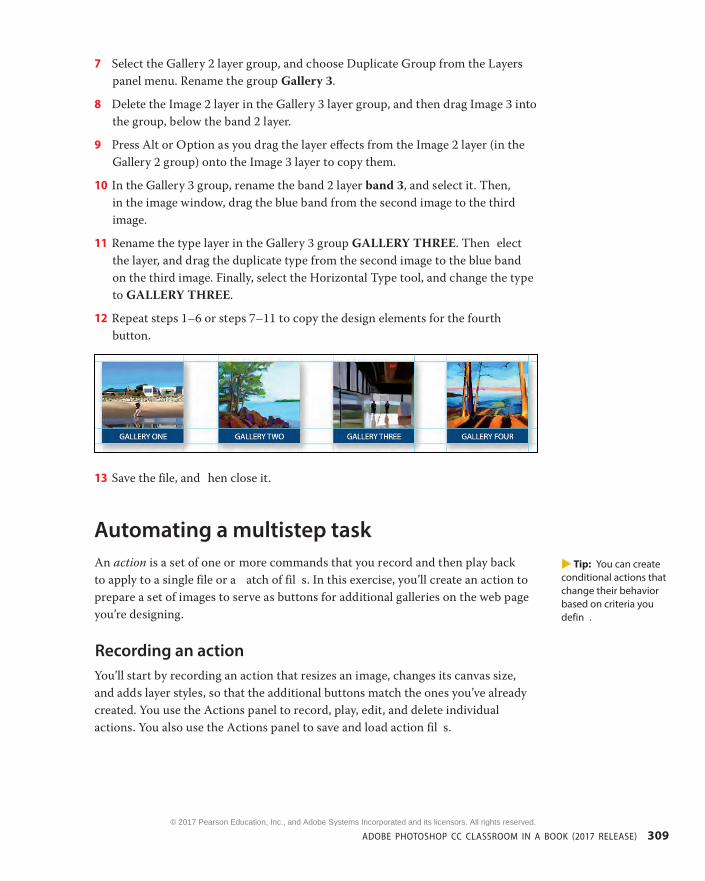
2 Drag Image 2 into the Gallery 2 layer group, and then press Alt or Option as you drag the Effects line or the symbol from Image 1 to Image 2.
The rop shadow and stroke you applied to Image 1 are applied to both images now.
3 Select the band layer, and choose Duplicate Layer from the Layers panel menu. Name it band 2, and drag it into the Gallery 2 layer group above the Image 2 layer.
4 Select the Move tool, and then, in the image window, drag the duplicate band layer from the first image to the second one.
5 Select the GALLERY ONE layer, and choose Duplicate Layer from the Layers panel menu. Name the duplicate layer GALLERY TWO, and drag it into the Gallery 2 layer group above the band 2 layer.
6 Use the Move tool to drag the duplicate type from the first image to the band on the second image. Then elect the Horizontal Type tool, and edit the type to say GALLERY TWO.
The econd button is done. You’ll create the third button by duplicating the entire layer group and making the necessary changes.
E Tip: You can also duplicate layers by dragging a layer down to the New Layer icon in the Layers panel.
E Tip: To drag the type layer in a straight line, press the Shift key as you move the type.
9780134663456_13_000-000.indd 308 10/17/16 12:00 AM
© 2017 Pearson Education, Inc., and Adobe Systems Incorporated and its licensors. All rights reserved.
ADOBE PHOTOSHOP CC CLASSROOM IN A BOOK (2017 RELEASE) 309
7 Select the Gallery 2 layer group, and choose Duplicate Group from the Layers panel menu. Rename the group Gallery 3.
8 Delete the Image 2 layer in the Gallery 3 layer group, and then drag Image 3 into the group, below the band 2 layer.
9 Press Alt or Option as you drag the layer effects from the Image 2 layer (in the Gallery 2 group) onto the Image 3 layer to copy them.
10 In the Gallery 3 group, rename the band 2 layer band 3, and select it. Then,in the image window, drag the blue band from the second image to the third image.
11 Rename the type layer in the Gallery 3 group GALLERY THREE. Then elect the layer, and drag the duplicate type from the second image to the blue band on the third image. Finally, select the Horizontal Type tool, and change the type to GALLERY THREE.
12 Repeat steps 1–6 or steps 7–11 to copy the design elements for the fourth button.
13 Save the file, and hen close it.
Automating a multistep taskAn action is a set of one or more commands that you record and then play back to apply to a single file or a atch of fil s. In this exercise, you’ll create an action to prepare a set of images to serve as buttons for additional galleries on the web page you’re designing.
Recording an actionYou’ll start by recording an action that resizes an image, changes its canvas size, and adds layer styles, so that the additional buttons match the ones you’ve already created. You use the Actions panel to record, play, edit, and delete individual actions. You also use the Actions panel to save and load action fil s.
E Tip: You can create conditional actions that change their behavior based on criteria you defin .
9780134663456_13_000-000.indd 309 10/17/16 12:00 AM
© 2017 Pearson Education, Inc., and Adobe Systems Incorporated and its licensors. All rights reserved.
310 LESSON 13 Preparing Files for the Web
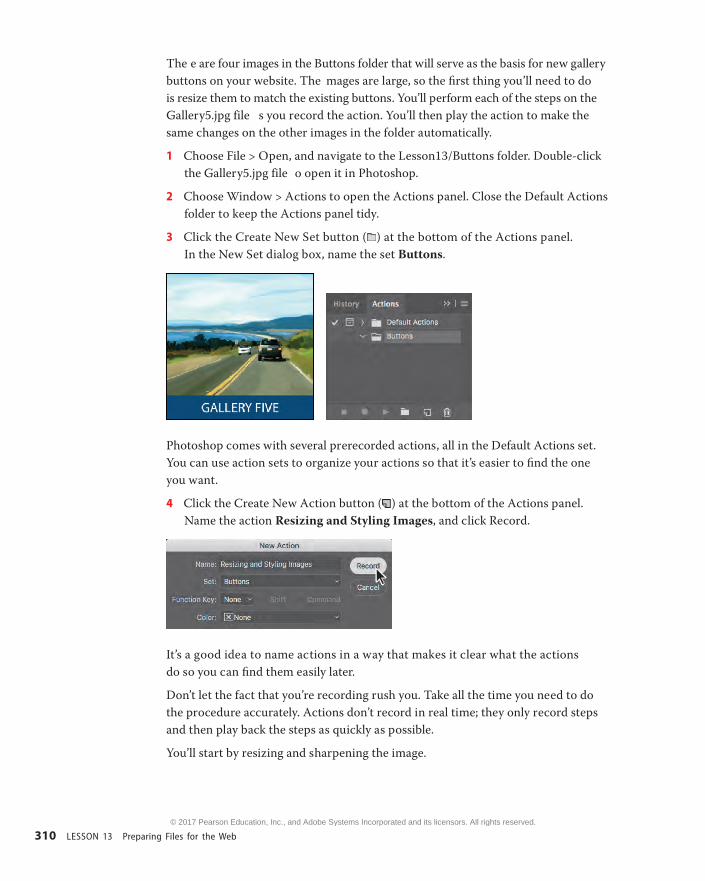
The e are four images in the Buttons folder that will serve as the basis for new gallery buttons on your website. The mages are large, so the first thing you’ll need to do is resize them to match the existing buttons. You’ll perform each of the steps on the Gallery5.jpg file s you record the action. You’ll then play the action to make the same changes on the other images in the folder automatically.
1 Choose File > Open, and navigate to the Lesson13/Buttons folder. Double-click the Gallery5.jpg file o open it in Photoshop.
2 Choose Window > Actions to open the Actions panel. Close the Default Actions folder to keep the Actions panel tidy.
3 Click the Create New Set button ( ) at the bottom of the Actions panel. In the New Set dialog box, name the set Buttons.
Photoshop comes with several prerecorded actions, all in the Default Actions set. You can use action sets to organize your actions so that it’s easier to find the one you want.
4 Click the Create New Action button ( ) at the bottom of the Actions panel. Name the action Resizing and Styling Images, and click Record.
It’s a good idea to name actions in a way that makes it clear what the actions do so you can find them easily later.
Don’t let the fact that you’re recording rush you. Take all the time you need to do the procedure accurately. Actions don’t record in real time; they only record steps and then play back the steps as quickly as possible.
You’ll start by resizing and sharpening the image.
9780134663456_13_000-000.indd 310 10/17/16 12:00 AM
© 2017 Pearson Education, Inc., and Adobe Systems Incorporated and its licensors. All rights reserved.
ADOBE PHOTOSHOP CC CLASSROOM IN A BOOK (2017 RELEASE) 311
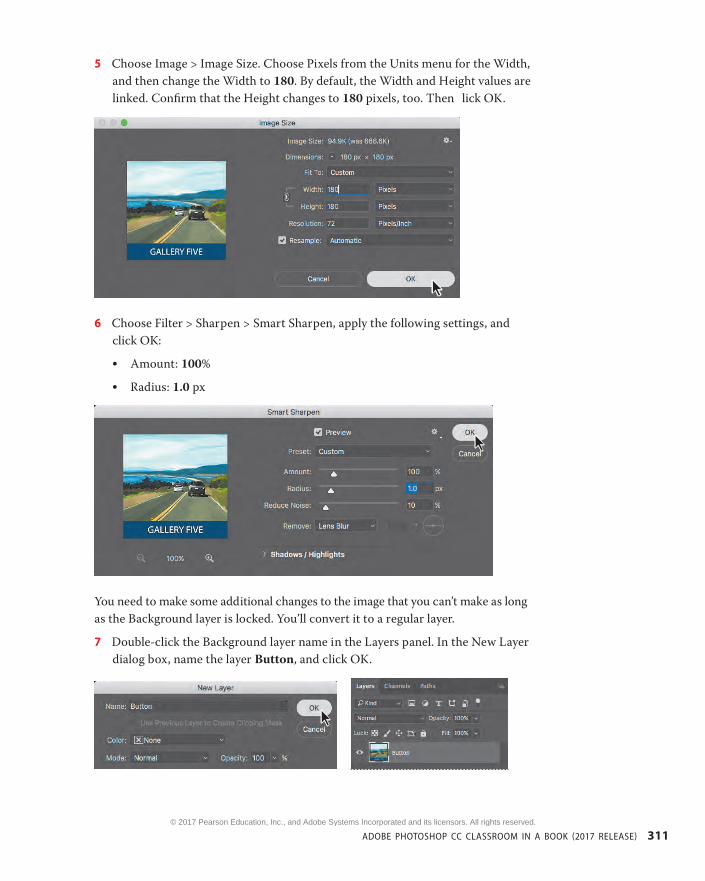
5 Choose Image > Image Size. Choose Pixels from the Units menu for the Width, and then change the Width to 180. By default, the Width and Height values are linked. Confirm that the Height changes to 180 pixels, too. Then lick OK.
6 Choose Filter > Sharpen > Smart Sharpen, apply the following settings, and click OK:
• Amount: 100%
• Radius: 1.0 px
You need to make some additional changes to the image that you can’t make as long as the Background layer is locked. You’ll convert it to a regular layer.
7 Double-click the Background layer name in the Layers panel. In the New Layer dialog box, name the layer Button, and click OK.
9780134663456_13_000-000.indd 311 10/17/16 12:00 AM
© 2017 Pearson Education, Inc., and Adobe Systems Incorporated and its licensors. All rights reserved.
312 LESSON 13 Preparing Files for the Web
When you rename a Background layer, you’re converting it to a regular layer, so Photoshop displays the New Layer dialog box. But the new layer replaces the Background layer; Photoshop doesn’t add a layer to the image.
Now that you’ve converted the Background layer, you can change the canvas size and add layer styles.
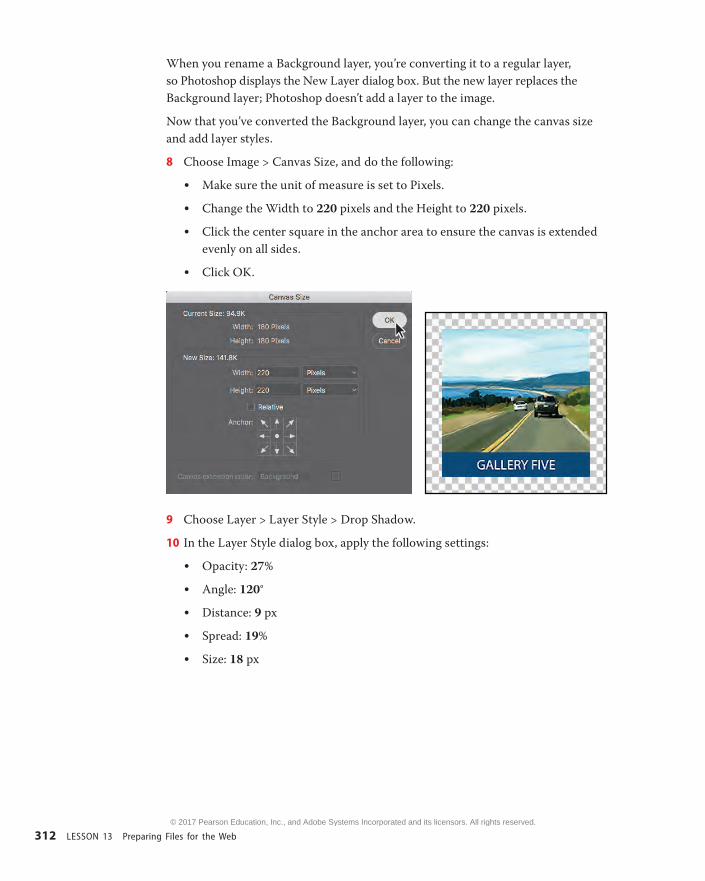
8 Choose Image > Canvas Size, and do the following:
• Make sure the unit of measure is set to Pixels.
• Change the Width to 220 pixels and the Height to 220 pixels.
• Click the center square in the anchor area to ensure the canvas is extended evenly on all sides.
• Click OK.
9 Choose Layer > Layer Style > Drop Shadow.
10 In the Layer Style dialog box, apply the following settings:
• Opacity: 27%
• Angle: 120°
• Distance: 9 px
• Spread: 19%
• Size: 18 px
9780134663456_13_000-000.indd 312 10/17/16 12:00 AM
© 2017 Pearson Education, Inc., and Adobe Systems Incorporated and its licensors. All rights reserved.
ADOBE PHOTOSHOP CC CLASSROOM IN A BOOK (2017 RELEASE) 313
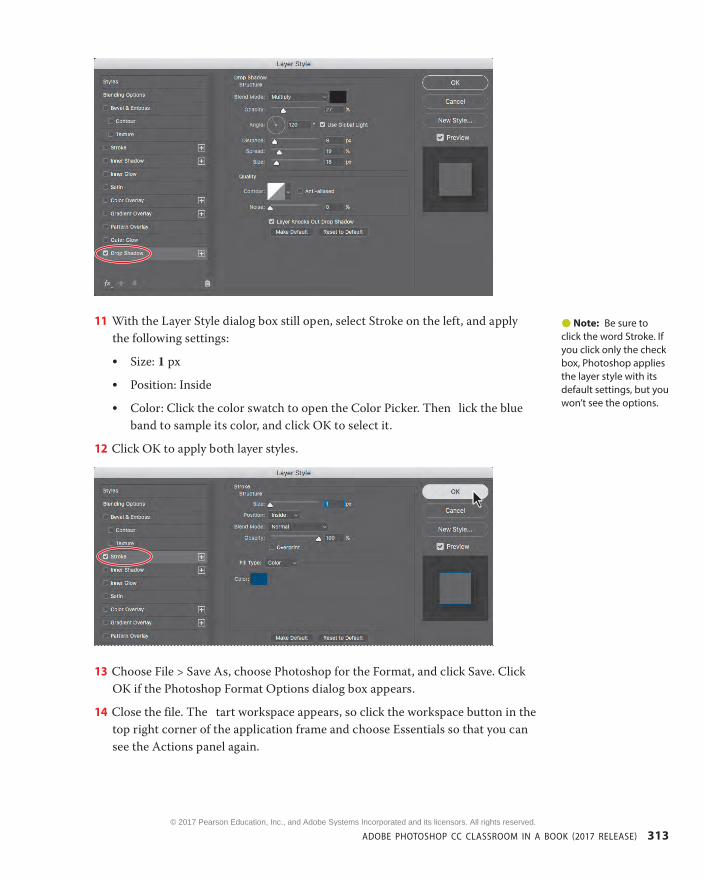
11 With the Layer Style dialog box still open, select Stroke on the left, and apply the following settings:
• Size: 1 px
• Position: Inside
• Color: Click the color swatch to open the Color Picker. Then lick the blue band to sample its color, and click OK to select it.
12 Click OK to apply both layer styles.
13 Choose File > Save As, choose Photoshop for the Format, and click Save. Click OK if the Photoshop Format Options dialog box appears.
14 Close the file. The tart workspace appears, so click the workspace button in the top right corner of the application frame and choose Essentials so that you can see the Actions panel again.
Note: Be sure to click the word Stroke. If you click only the check box, Photoshop applies the layer style with its default settings, but you won’t see the options.
9780134663456_13_000-000.indd 313 10/17/16 12:00 AM
© 2017 Pearson Education, Inc., and Adobe Systems Incorporated and its licensors. All rights reserved.
314 LESSON 13 Preparing Files for the Web
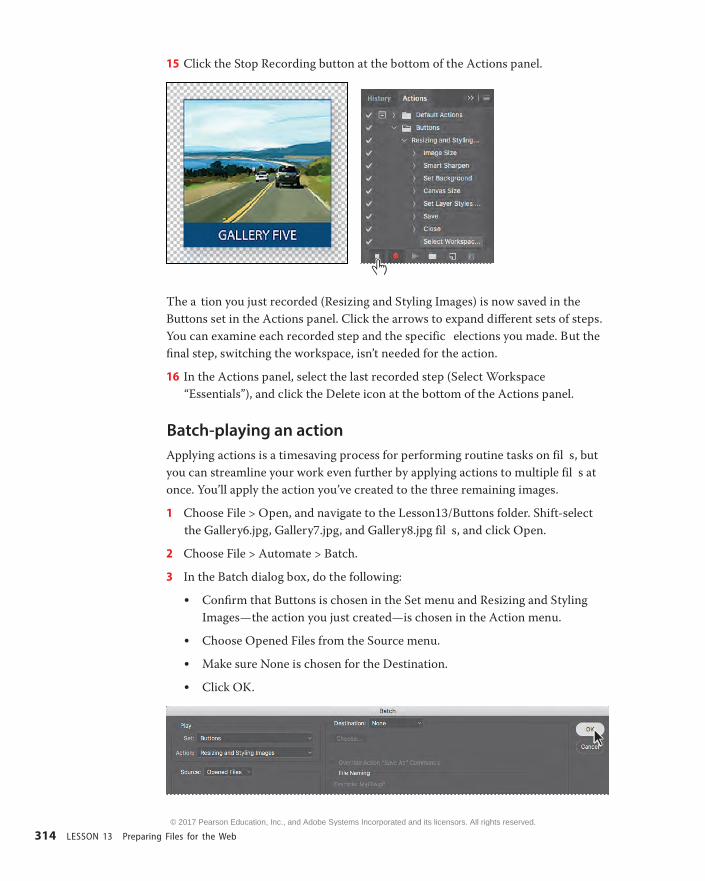
15 Click the Stop Recording button at the bottom of the Actions panel.
The a tion you just recorded (Resizing and Styling Images) is now saved in the Buttons set in the Actions panel. Click the arrows to expand different sets of steps. You can examine each recorded step and the specific elections you made. But the final step, switching the workspace, isn’t needed for the action.
16 In the Actions panel, select the last recorded step (Select Workspace “Essentials”), and click the Delete icon at the bottom of the Actions panel.
Batch-playing an actionApplying actions is a timesaving process for performing routine tasks on fil s, but you can streamline your work even further by applying actions to multiple fil s at once. You’ll apply the action you’ve created to the three remaining images.
1 Choose File > Open, and navigate to the Lesson13/Buttons folder. Shift-select the Gallery6.jpg, Gallery7.jpg, and Gallery8.jpg fil s, and click Open.
2 Choose File > Automate > Batch.
3 In the Batch dialog box, do the following:
• Confirm that Buttons is chosen in the Set menu and Resizing and Styling Images—the action you just created—is chosen in the Action menu.
• Choose Opened Files from the Source menu.
• Make sure None is chosen for the Destination.
• Click OK.
9780134663456_13_000-000.indd 314 10/17/16 12:00 AM
© 2017 Pearson Education, Inc., and Adobe Systems Incorporated and its licensors. All rights reserved.
ADOBE PHOTOSHOP CC CLASSROOM IN A BOOK (2017 RELEASE) 315
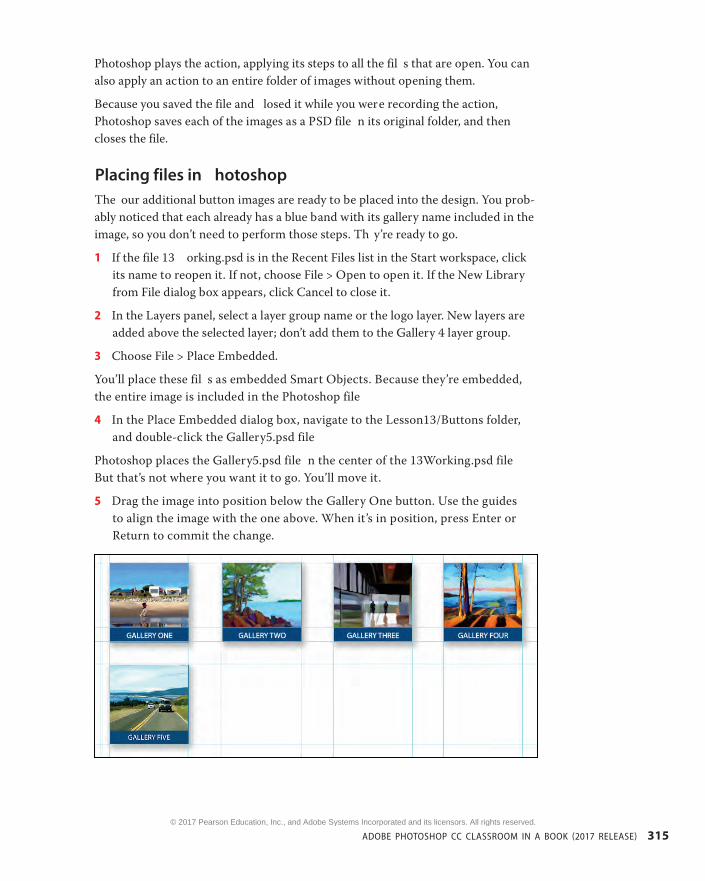
Photoshop plays the action, applying its steps to all the fil s that are open. You can also apply an action to an entire folder of images without opening them.
Because you saved the file and losed it while you were recording the action, Photoshop saves each of the images as a PSD file n its original folder, and then closes the file.
Placing files in hotoshopThe our additional button images are ready to be placed into the design. You prob-ably noticed that each already has a blue band with its gallery name included in the image, so you don’t need to perform those steps. Th y’re ready to go.
1 If the file 13 orking.psd is in the Recent Files list in the Start workspace, click its name to reopen it. If not, choose File > Open to open it. If the New Library from File dialog box appears, click Cancel to close it.
2 In the Layers panel, select a layer group name or the logo layer. New layers are added above the selected layer; don’t add them to the Gallery 4 layer group.
3 Choose File > Place Embedded.
You’ll place these fil s as embedded Smart Objects. Because they’re embedded, the entire image is included in the Photoshop file
4 In the Place Embedded dialog box, navigate to the Lesson13/Buttons folder, and double-click the Gallery5.psd file
Photoshop places the Gallery5.psd file n the center of the 13Working.psd file But that’s not where you want it to go. You’ll move it.
5 Drag the image into position below the Gallery One button. Use the guides to align the image with the one above. When it’s in position, press Enter or Return to commit the change.
9780134663456_13_000-000.indd 315 10/17/16 12:00 AM
© 2017 Pearson Education, Inc., and Adobe Systems Incorporated and its licensors. All rights reserved.
316 LESSON 13 Preparing Files for the Web
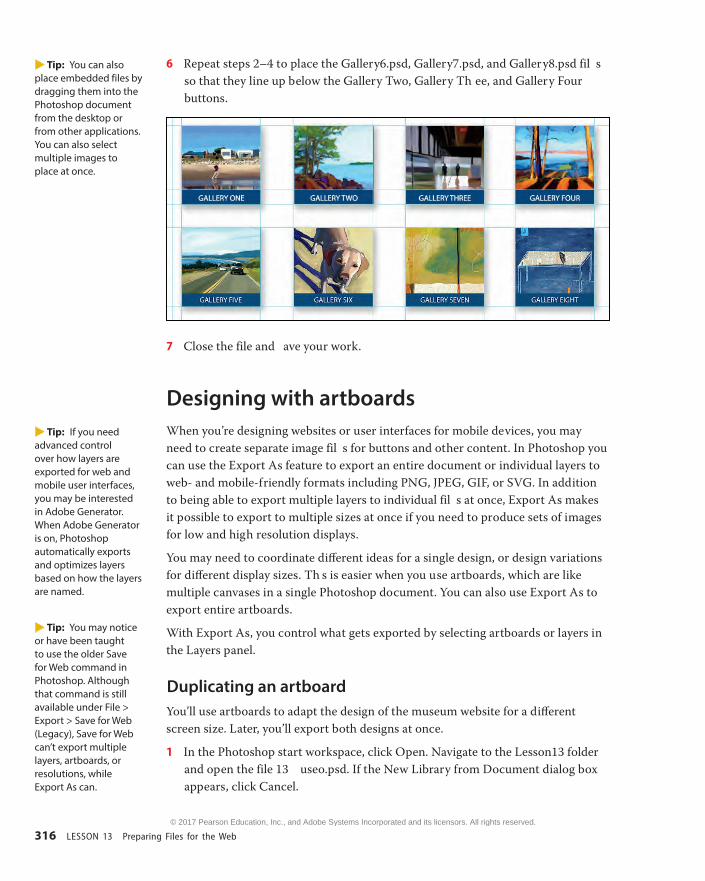
6 Repeat steps 2–4 to place the Gallery6.psd, Gallery7.psd, and Gallery8.psd fil s so that they line up below the Gallery Two, Gallery Th ee, and Gallery Four buttons.
7 Close the file and ave your work.
Designing with artboardsWhen you’re designing websites or user interfaces for mobile devices, you may need to create separate image fil s for buttons and other content. In Photoshop you can use the Export As feature to export an entire document or individual layers to web- and mobile-friendly formats including PNG, JPEG, GIF, or SVG. In addition to being able to export multiple layers to individual fil s at once, Export As makes it possible to export to multiple sizes at once if you need to produce sets of images for low and high resolution displays.
You may need to coordinate different ideas for a single design, or design variations for different display sizes. Th s is easier when you use artboards, which are like multiple canvases in a single Photoshop document. You can also use Export As to export entire artboards.
With Export As, you control what gets exported by selecting artboards or layers in the Layers panel.
Duplicating an artboardYou’ll use artboards to adapt the design of the museum website for a different screen size. Later, you’ll export both designs at once.
1 In the Photoshop start workspace, click Open. Navigate to the Lesson13 folder and open the file 13 useo.psd. If the New Library from Document dialog box appears, click Cancel.
E Tip: You can also place embedded files by dragging them into the Photoshop document from the desktop or from other applications. You can also select multiple images to place at once.
E Tip: If you need advanced control over how layers are exported for web and mobile user interfaces, you may be interested in Adobe Generator. When Adobe Generator is on, Photoshop automatically exports and optimizes layers based on how the layers are named.
E Tip: You may notice or have been taught to use the older Save for Web command in Photoshop. Although that command is still available under File > Export > Save for Web (Legacy), Save for Web can’t export multiple layers, artboards, or resolutions, while Export As can.
9780134663456_13_000-000.indd 316 10/17/16 12:00 AM
© 2017 Pearson Education, Inc., and Adobe Systems Incorporated and its licensors. All rights reserved.
ADOBE PHOTOSHOP CC CLASSROOM IN A BOOK (2017 RELEASE) 317
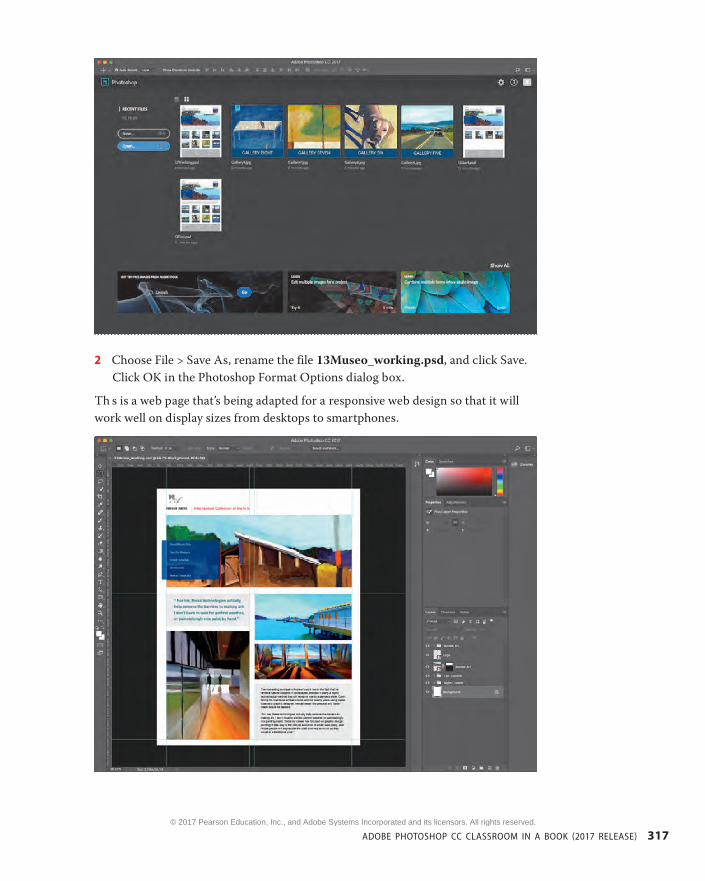
2 Choose File > Save As, rename the file 13Museo_working.psd, and click Save. Click OK in the Photoshop Format Options dialog box.
Th s is a web page that’s being adapted for a responsive web design so that it will work well on display sizes from desktops to smartphones.
9780134663456_13_000-000.indd 317 10/17/16 12:00 AM
© 2017 Pearson Education, Inc., and Adobe Systems Incorporated and its licensors. All rights reserved.
318 LESSON 13 Preparing Files for the Web
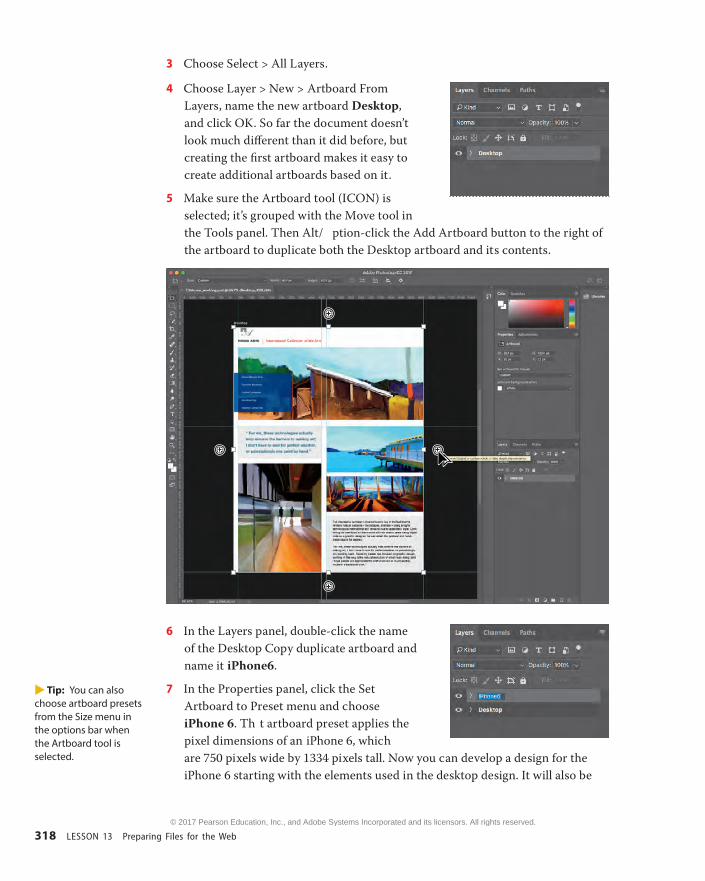
3 Choose Select > All Layers.
4 Choose Layer > New > Artboard From Layers, name the new artboard Desktop, and click OK. So far the document doesn’t look much different than it did before, but creating the first artboard makes it easy to create additional artboards based on it.
5 Make sure the Artboard tool (ICON) is selected; it’s grouped with the Move tool in the Tools panel. Then Alt/ ption-click the Add Artboard button to the right of the artboard to duplicate both the Desktop artboard and its contents.
6 In the Layers panel, double-click the name of the Desktop Copy duplicate artboard and name it iPhone6.
7 In the Properties panel, click the Set Artboard to Preset menu and choose iPhone 6. Th t artboard preset applies the pixel dimensions of an iPhone 6, which are 750 pixels wide by 1334 pixels tall. Now you can develop a design for the iPhone 6 starting with the elements used in the desktop design. It will also be
E Tip: You can also choose artboard presets from the Size menu in the options bar when the Artboard tool is selected.
9780134663456_13_000-000.indd 318 10/17/16 12:00 AM
© 2017 Pearson Education, Inc., and Adobe Systems Incorporated and its licensors. All rights reserved.
ADOBE PHOTOSHOP CC CLASSROOM IN A BOOK (2017 RELEASE) 319
easier to maintain design consistency since both the desktop and mobile designs are in the same document.
8 Save your work.
Creating a design variation with artboardsYou now have different artboards for desktop and smartphone display sizes, but the next thing to do is fit he desktop-sized objects within the width of the smartphone display’s pixel dimensions.
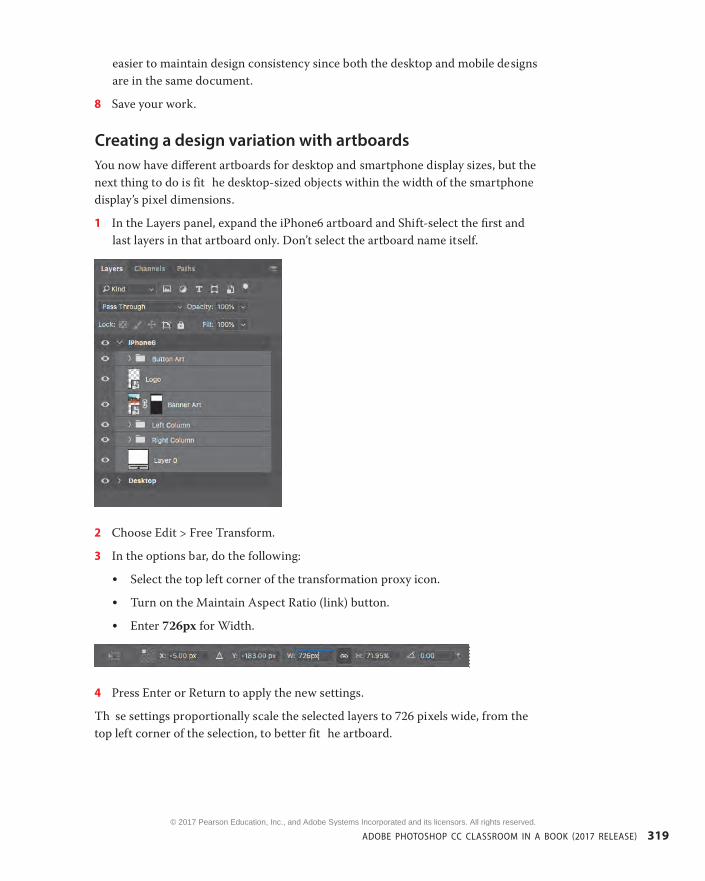
1 In the Layers panel, expand the iPhone6 artboard and Shift-select the first and last layers in that artboard only. Don’t select the artboard name itself.
2 Choose Edit > Free Transform.
3 In the options bar, do the following:
• Select the top left corner of the transformation proxy icon.
• Turn on the Maintain Aspect Ratio (link) button.
• Enter 726px for Width.
4 Press Enter or Return to apply the new settings.
Th se settings proportionally scale the selected layers to 726 pixels wide, from the top left corner of the selection, to better fit he artboard.
9780134663456_13_000-000.indd 319 10/17/16 12:00 AM
© 2017 Pearson Education, Inc., and Adobe Systems Incorporated and its licensors. All rights reserved.
320 LESSON 13 Preparing Files for the Web
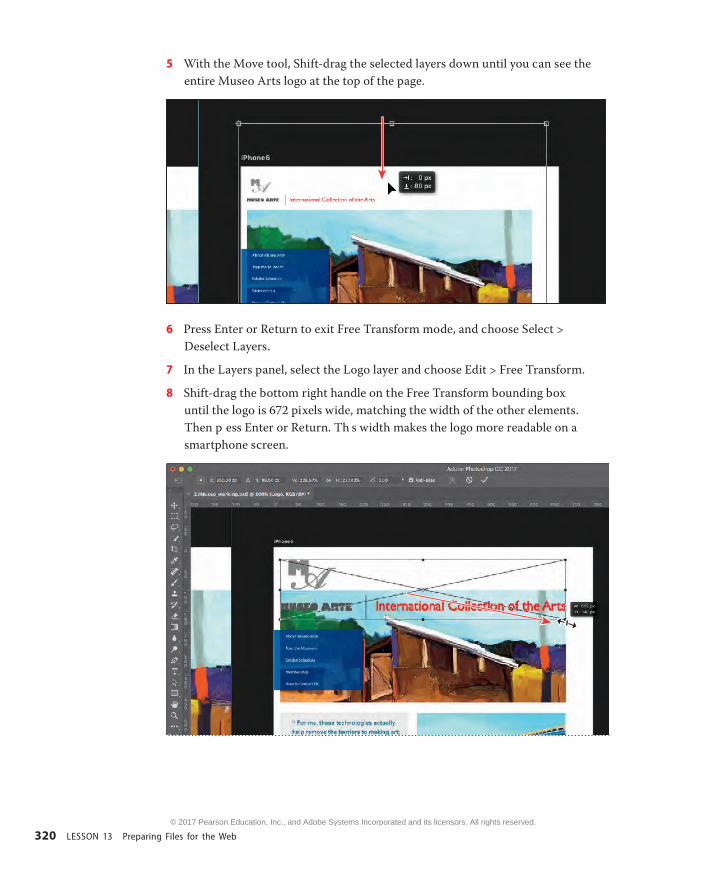
5 With the Move tool, Shift-drag the selected layers down until you can see the entire Museo Arts logo at the top of the page.
6 Press Enter or Return to exit Free Transform mode, and choose Select > Deselect Layers.
7 In the Layers panel, select the Logo layer and choose Edit > Free Transform.
8 Shift-drag the bottom right handle on the Free Transform bounding box until the logo is 672 pixels wide, matching the width of the other elements. Then p ess Enter or Return. Th s width makes the logo more readable on a smartphone screen.
9780134663456_13_000-000.indd 320 10/17/16 12:00 AM
© 2017 Pearson Education, Inc., and Adobe Systems Incorporated and its licensors. All rights reserved.
ADOBE PHOTOSHOP CC CLASSROOM IN A BOOK (2017 RELEASE) 321
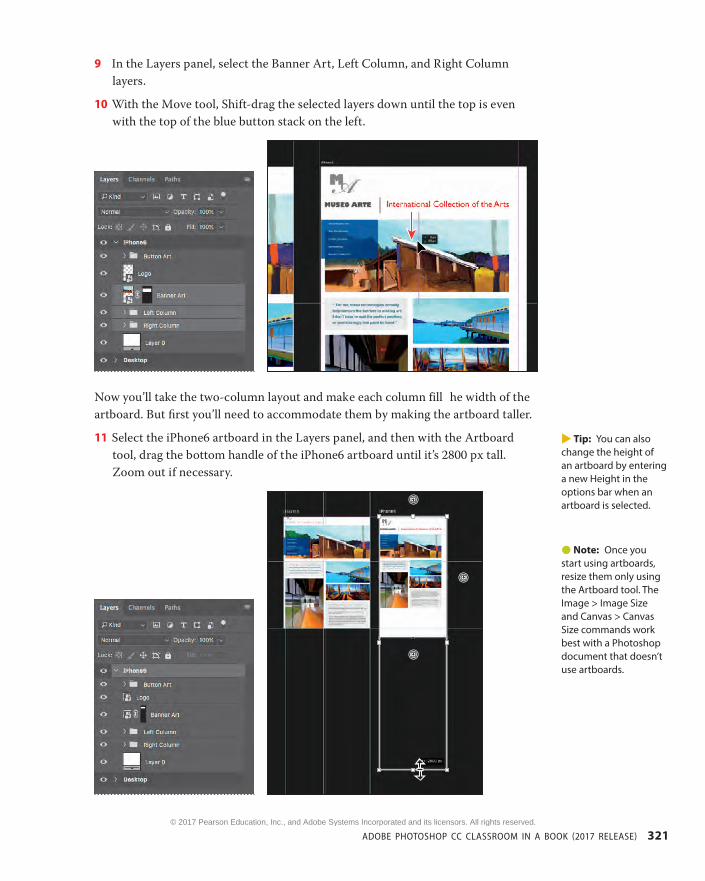
9 In the Layers panel, select the Banner Art, Left Column, and Right Column layers.
10 With the Move tool, Shift-drag the selected layers down until the top is even with the top of the blue button stack on the left.
Now you’ll take the two-column layout and make each column fill he width of the artboard. But first you’ll need to accommodate them by making the artboard taller.
11 Select the iPhone6 artboard in the Layers panel, and then with the Artboard tool, drag the bottom handle of the iPhone6 artboard until it’s 2800 px tall. Zoom out if necessary.
E Tip: You can also change the height of an artboard by entering a new Height in the options bar when an artboard is selected.
Note: Once you start using artboards, resize them only using the Artboard tool. The Image > Image Size and Canvas > Canvas Size commands work best with a Photoshop document that doesn’t use artboards.
9780134663456_13_000-000.indd 321 10/17/16 12:00 AM
© 2017 Pearson Education, Inc., and Adobe Systems Incorporated and its licensors. All rights reserved.
322 LESSON 13 Preparing Files for the Web
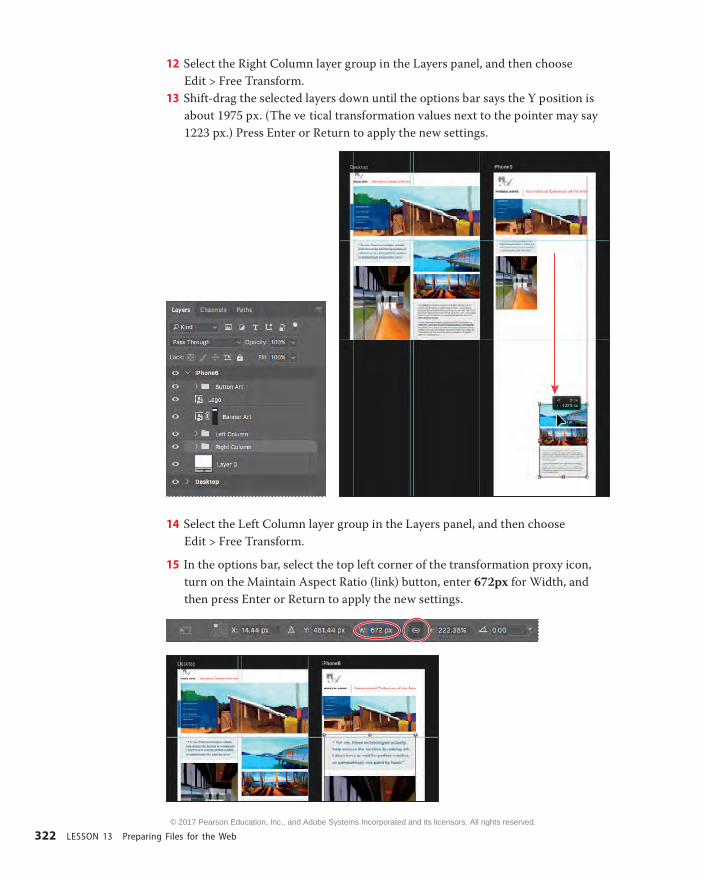
12 Select the Right Column layer group in the Layers panel, and then choose Edit > Free Transform.
13 Shift-drag the selected layers down until the options bar says the Y position is about 1975 px. (The ve tical transformation values next to the pointer may say 1223 px.) Press Enter or Return to apply the new settings.
14 Select the Left Column layer group in the Layers panel, and then choose Edit > Free Transform.
15 In the options bar, select the top left corner of the transformation proxy icon, turn on the Maintain Aspect Ratio (link) button, enter 672px for Width, and then press Enter or Return to apply the new settings.
9780134663456_13_000-000.indd 322 10/17/16 12:00 AM
© 2017 Pearson Education, Inc., and Adobe Systems Incorporated and its licensors. All rights reserved.
ADOBE PHOTOSHOP CC CLASSROOM IN A BOOK (2017 RELEASE) 323
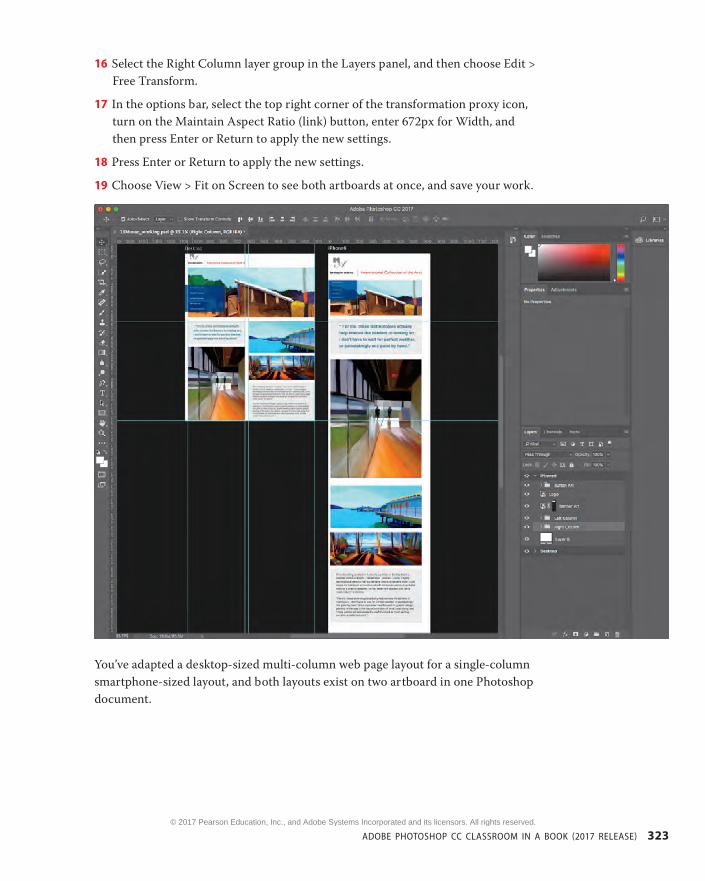
16 Select the Right Column layer group in the Layers panel, and then choose Edit > Free Transform.
17 In the options bar, select the top right corner of the transformation proxy icon, turn on the Maintain Aspect Ratio (link) button, enter 672px for Width, and then press Enter or Return to apply the new settings.
18 Press Enter or Return to apply the new settings.
19 Choose View > Fit on Screen to see both artboards at once, and save your work.
You’ve adapted a desktop-sized multi-column web page layout for a single-column smartphone-sized layout, and both layouts exist on two artboard in one Photoshop document.
9780134663456_13_000-000.indd 323 10/17/16 12:00 AM
© 2017 Pearson Education, Inc., and Adobe Systems Incorporated and its licensors. All rights reserved.
324 LESSON 13 Preparing Files for the Web
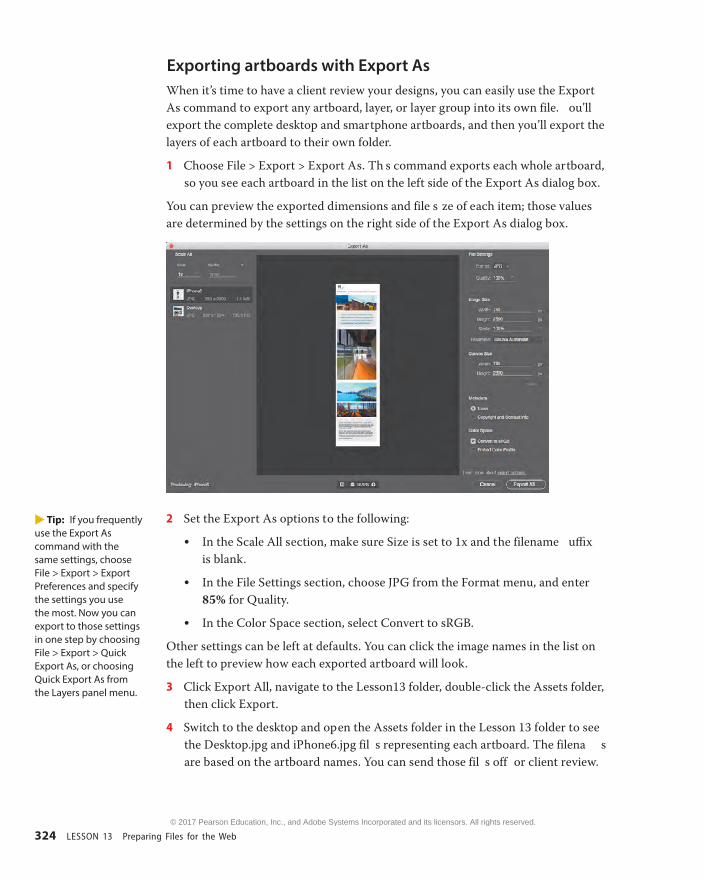
Exporting artboards with Export AsWhen it’s time to have a client review your designs, you can easily use the Export As command to export any artboard, layer, or layer group into its own file. ou’ll export the complete desktop and smartphone artboards, and then you’ll export the layers of each artboard to their own folder.
1 Choose File > Export > Export As. Th s command exports each whole artboard, so you see each artboard in the list on the left side of the Export As dialog box.
You can preview the exported dimensions and file s ze of each item; those values are determined by the settings on the right side of the Export As dialog box.
2 Set the Export As options to the following:
• In the Scale All section, make sure Size is set to 1x and the filename uffix is blank.
• In the File Settings section, choose JPG from the Format menu, and enter 85% for Quality.
• In the Color Space section, select Convert to sRGB.
Other settings can be left at defaults. You can click the image names in the list on the left to preview how each exported artboard will look.
3 Click Export All, navigate to the Lesson13 folder, double-click the Assets folder, then click Export.
4 Switch to the desktop and open the Assets folder in the Lesson 13 folder to see the Desktop.jpg and iPhone6.jpg fil s representing each artboard. The filena s are based on the artboard names. You can send those fil s off or client review.
E Tip: If you frequently use the Export As command with the same settings, choose File > Export > Export Preferences and specify the settings you use the most. Now you can export to those settings in one step by choosing File > Export > Quick Export As, or choosing Quick Export As from the Layers panel menu.
9780134663456_13_000-000.indd 324 10/17/16 12:00 AM
© 2017 Pearson Education, Inc., and Adobe Systems Incorporated and its licensors. All rights reserved.
ADOBE PHOTOSHOP CC CLASSROOM IN A BOOK (2017 RELEASE) 325
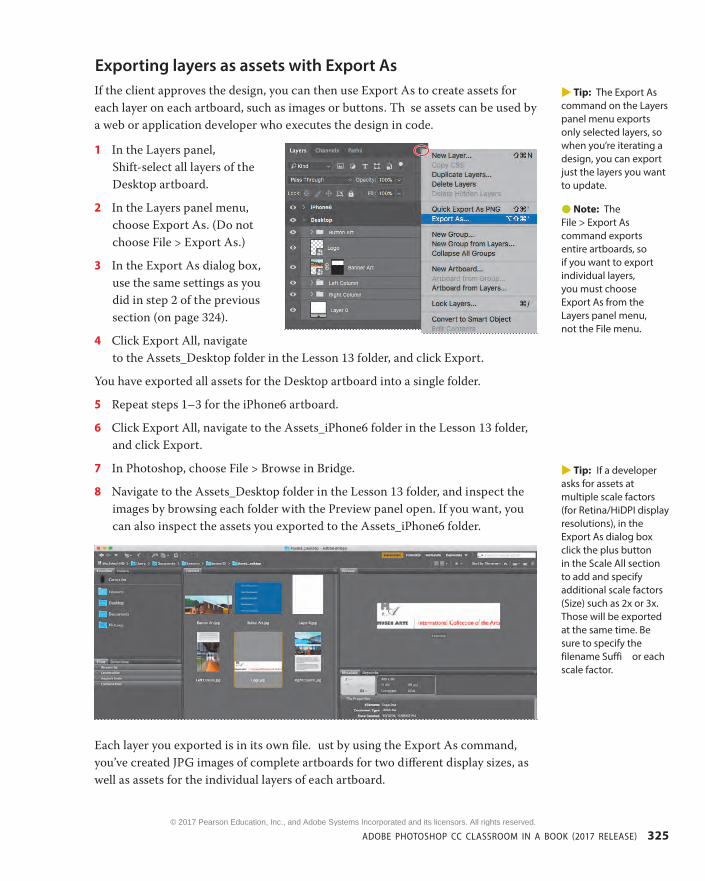
Exporting layers as assets with Export AsIf the client approves the design, you can then use Export As to create assets for each layer on each artboard, such as images or buttons. Th se assets can be used by a web or application developer who executes the design in code.
1 In the Layers panel, Shift-select all layers of the Desktop artboard.
2 In the Layers panel menu, choose Export As. (Do not choose File > Export As.)
3 In the Export As dialog box, use the same settings as you did in step 2 of the previous section (on page 324).
4 Click Export All, navigate to the Assets_Desktop folder in the Lesson 13 folder, and click Export.
You have exported all assets for the Desktop artboard into a single folder.
5 Repeat steps 1–3 for the iPhone6 artboard.
6 Click Export All, navigate to the Assets_iPhone6 folder in the Lesson 13 folder, and click Export.
7 In Photoshop, choose File > Browse in Bridge.
8 Navigate to the Assets_Desktop folder in the Lesson 13 folder, and inspect the images by browsing each folder with the Preview panel open. If you want, you can also inspect the assets you exported to the Assets_iPhone6 folder.
Each layer you exported is in its own file. ust by using the Export As command, you’ve created JPG images of complete artboards for two different display sizes, as well as assets for the individual layers of each artboard.
E Tip: The Export As command on the Layers panel menu exports only selected layers, so when you’re iterating a design, you can export just the layers you want to update.
Note: The File > Export As command exports entire artboards, so if you want to export individual layers, you must choose Export As from the Layers panel menu, not the File menu.
E Tip: If a developer asks for assets at multiple scale factors (for Retina/HiDPI display resolutions), in the Export As dialog box click the plus button in the Scale All section to add and specify additional scale factors (Size) such as 2x or 3x. Those will be exported at the same time. Be sure to specify the filename Suffi or each scale factor.
9780134663456_13_000-000.indd 325 10/17/16 12:00 AM
© 2017 Pearson Education, Inc., and Adobe Systems Incorporated and its licensors. All rights reserved.
326 LESSON 13 Preparing Files for the Web
Extra credit
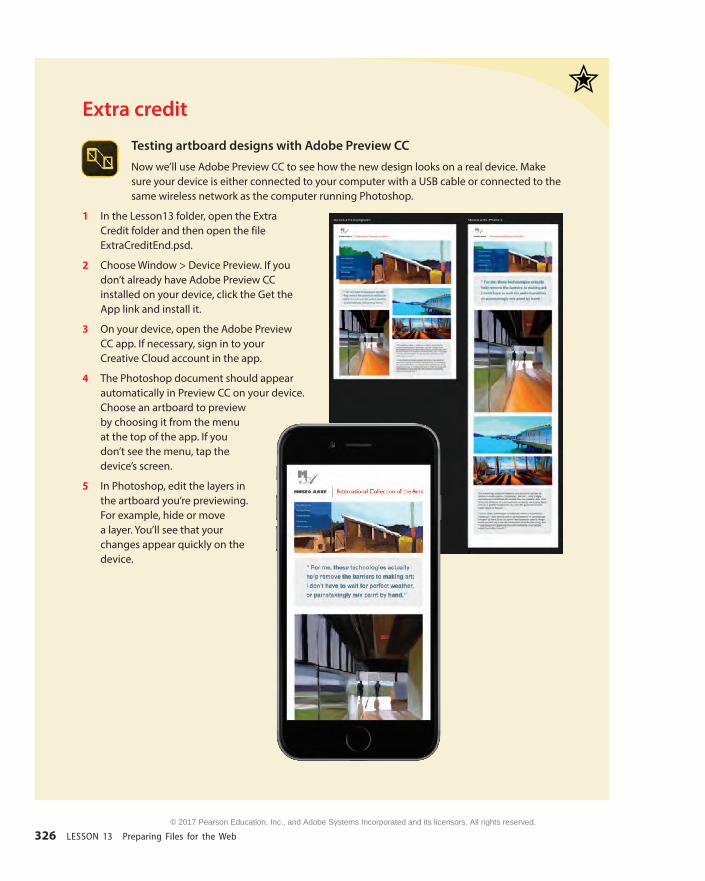
Testing artboard designs with Adobe Preview CC
Now we’ll use Adobe Preview CC to see how the new design looks on a real device. Make sure your device is either connected to your computer with a USB cable or connected to the same wireless network as the computer running Photoshop.
1 In the Lesson13 folder, open the Extra Credit folder and then open the fileExtraCreditEnd.psd.
2 Choose Window > Device Preview. If you don’t already have Adobe Preview CC installed on your device, click the Get the App link and install it.
3 On your device, open the Adobe Preview CC app. If necessary, sign in to your Creative Cloud account in the app.
4 The Photoshop document should appear automatically in Preview CC on your device. Choose an artboard to preview by choosing it from the menu at the top of the app. If you don’t see the menu, tap the device’s screen.
5 In Photoshop, edit the layers in the artboard you’re previewing. For example, hide or move a layer. You’ll see that your changes appear quickly on the device.
9780134663456_13_000-000.indd 326 10/17/16 12:00 AM
© 2017 Pearson Education, Inc., and Adobe Systems Incorporated and its licensors. All rights reserved.

ADOBE PHOTOSHOP CC CLASSROOM IN A BOOK (2017 RELEASE) 327
Review questions1 What is a layer group?
2 What is an action? How do you create one?
3 How can you create assets from layers and layer groups in Photoshop?
Review answers1 A layer group is a group of layers. Layer groups make it easier to organize and work
with layers in complex images, especially when there are sets of layers that work together.
2 An action is a set of one or more commands that you record and then play back to apply to a single file or a atch of fil s. To create one, click the Create New Action button in the Actions panel, name the action, and click Record. Then erform the tasks you want to include in your action. When you’ve finished, click the Stop Recording button at the bottom of the Actions panel.
3 Use the Export As command to create assets from layers and layer groups in Photoshop. Create images of each whole artboard by choosing File > Export As, or to create assets from selected layers and layer groups choose Export As from the Layers panel menu.
9780134663456_13_000-000.indd 327 10/17/16 12:00 AM
© 2017 Pearson Education, Inc., and Adobe Systems Incorporated and its licensors. All rights reserved.