Embed Size (px)
Citation preview

Mark
et K
now
ledge
& D
evel
opm
ent
Pro
ject
No.
PN
03.2
303
Preparing and ApplyingDecorative Wood Veneers and Inlays to Substrates

© 2004 Forest & Wood Products Research & Development Corporation All rights reserved. Publication: Preparing and Applying Decorative Wood Veneers and
Inlays to Substrates The Forest and Wood Products Research and Development Corporation (“FWPRDC”) makes no warranties or assurances with respect to this publication including merchantability, fitness for purpose or otherwise. FWPRDC and all persons associated with it exclude all liability (including liability for negligence) in relation to any opinion, advice or information contained in this publication or for any consequences arising from the use of such opinion, advice or information. This work is copyright and protected under the Copyright Act 1968 (Cth). All material except the FWPRDC logo may be reproduced in whole or in part, provided that it is not sold or used for commercial benefit and its source (Forest and Wood Products Research and Development Corporation) is acknowledged. Reproduction or copying for other purposes, which is strictly reserved only for the owner or licensee of copyright under the Copyright Act, is prohibited without the prior written consent of the Forest and Wood Products Research and Development Corporation. Project no: PN03.2303 Researchers: J. MacGregor Decorative Wood Veneers Association PO Box 115, Everton Park QLD 4053 Final report received by the FWPRDC in December 2004 Forest and Wood Products Research and Development Corporation PO Box 69, World Trade Centre, Victoria 8005 Phone: 03 9614 7544 Fax: 03 9614 6822 Email: [email protected] Web: www.fwprdc.org.au ACKNOWLEDGEMENTS This resource is based on Australia National Training Authority ABC 607 – “Veneer Processes”, input from the “Manual for Decorative Wood Veneering Technology” by Dr Barbara Ozarska, and members of the Decorative Wood Veneers Association and their resources.

The FWPRDC is jointly funded by the Australian forest and wood products industry and the Australian Government.
Preparing and Applying Decorative Wood Veneers and Inlays to Substrates
Prepared for the
Forest & Wood Products Research & Development Corporation
by
J. MacGregor

TABLE OF CONTENTS
TABLE OF CONTENTS ............................................................................................1
INTRODUCTION........................................................................................................5
OVERVIEW OF VENEER PRODUCTION ............................................................6
SOURCES OF VENEER TYPES FROM A TREE .................................................7
VENEER CUTTING METHODS..............................................................................7
VENEER CUTTING METHODS..............................................................................8 SAW CUTTING.............................................................................................................8 CROWN CUT OR FLAT CUT VENEER............................................................................8 QUARTER CUT VENEERS...........................................................................................10 ROTARY CUTTING.....................................................................................................10 OFF-CENTRE CUTTING OR HALF ROUND CUTTING ...................................................11 HALF-ROUND CUTTING (BACK SAWN).....................................................................13 RIFT-CUT SLICING ....................................................................................................13
RECONSTITUTED OR RECONSTRUCTED VENEER.....................................14
VENEER GRAIN PATTERNS OR FIGURE.........................................................15
BURR OR BURL VENEER ...........................................................................................15 CURLY FIGURE & FIDDLEBACK VENEER ..................................................................15 CROTCH, FLAME OR CURL VENEER ..........................................................................16 BUTT VENEER...........................................................................................................16 QUILTED FIGURE .......................................................................................................16 POMMELE..................................................................................................................17 BIRD’S EYE ...............................................................................................................17 PECKY AND MASUR BIRCH .......................................................................................17 COLOURED VENEER..................................................................................................17
OTHER IMPORTANT VENEER PROPERTIES.................................................18
SLICER OR PEELER CHECKS ......................................................................................18 SEASONING CHECKS .................................................................................................18 DIMENSIONAL TOLERANCES OF VENEER ..................................................................19 VENEER MOISTURE CONTENT...................................................................................19
FLATTENING OF VENEERS.................................................................................20 GENERAL REQUIREMENTS.........................................................................................20 FLATTENING BURLS VENEERS ...................................................................................20
PURCHASING VENEER.........................................................................................21
TOOLS FOR VENEERING .....................................................................................22 RULES AND STRAIGHTEDGES ....................................................................................22 CUTTING MAT ..........................................................................................................22 VENEER SAW ............................................................................................................22 KNIVES .....................................................................................................................22 VENEER HAMMERS ...................................................................................................23 VENEER PINS ............................................................................................................23
1

VENEER TAPE ...........................................................................................................23 SHOOTING BOARD ....................................................................................................24
CUTTING VENEER .................................................................................................25 SELECTING FLITCHES................................................................................................25 CUTTING VENEER .....................................................................................................25
VENEER JOINING...................................................................................................26 JOINTING VENEER BY HAND .....................................................................................27 TAPING THE JOINT.....................................................................................................27
VENEER MATCHING METHODS........................................................................28 BOOK MATCHING .....................................................................................................28 SLIP MATCHING........................................................................................................29 REVERSE SLIP MATCHING.........................................................................................30 DIAMOND MATCH.....................................................................................................30 REVERSE DIAMOND MATCH .....................................................................................32 QUARTERED OR FOUR WAY MATCHING ...................................................................32 MISMATCHED OR RANDOM MATCHING ....................................................................33 “V” MATCH OR HERRINGBONE MATCH....................................................................34 END MATCHING/BUTT JOINING ................................................................................34 SEGMENTAL MATCH.................................................................................................35 OTHER MATCHES......................................................................................................35
SUBSTRATES FOR VENEERING.........................................................................36 SOLID TIMBER ..........................................................................................................36 PARTICLEBOARD.......................................................................................................37 MEDIUM DENSITY FIBREBOARD (MDF) ...................................................................37 PLYWOOD .................................................................................................................37 BLOCKBOARD ...........................................................................................................38 VENEER WRAPPED PROFILES....................................................................................38
IMPORTANT REQUIREMENTS FOR SUBSTRATES ......................................39
SHAPED SUBSTRATES FOR CURVED PANELS..............................................40
SOLID TIMBER ..........................................................................................................40 BUILT UP CONSTRUCTION ........................................................................................40 COOPERED CONSTRUCTION ......................................................................................40 STEAM BENDING.......................................................................................................41 KERFING ...................................................................................................................41 LAMINATED CONSTRUCTION ....................................................................................41
ADHESIVES ..............................................................................................................43 ANIMAL PROTEIN ADHESIVE ....................................................................................43 THERMOSETTING ......................................................................................................43 THERMOPLASTICS .....................................................................................................44 ELASTOMERS ............................................................................................................44 HOT-MELTS..............................................................................................................44 EPOXY RESINS ..........................................................................................................45
LAMINATING VENEERS TO SUBSTRATES.....................................................46 PREPARATION OF THE ADHESIVE ..............................................................................46
2

ANIMAL GLUES.........................................................................................................46 APPLICATION OF THE ADHESIVE ...............................................................................46
CAUL VENEERING.................................................................................................48 MAKING A CAUL ASSEMBLY ....................................................................................48 FLAT CAULS .............................................................................................................48 CURVED CAULS ........................................................................................................48 FLEXIBLE CAUL ........................................................................................................49
HAND VENEERING USING A HOUSEHOLD ELECTRIC IRON & PVA .....50 PREPARING THE VENEER LAYON ..............................................................................50 APPLYING THE ADHESIVE .........................................................................................51 IRONING THE VENEER ...............................................................................................52
HAND VENEERING WITH ANIMAL GLUE ......................................................53 PREPARING THE SUBSTRATE/GROUNDWORK ............................................................53 TOOTHING.................................................................................................................53 SIZING.......................................................................................................................54 SANDING...................................................................................................................54 MARKING THE LOCATION OF THE LEAVES ................................................................54 PREPARING EQUIPMENT FOR LAYING .......................................................................55 PREPARING THE ANIMAL GLUE.................................................................................55 THE GLUING AREA ...................................................................................................56 THE LAYING EQUIPMENT FOR ANIMAL GLUE ...........................................................56 GLUE BRUSHES.........................................................................................................56 CLEAN RAGS.............................................................................................................56 HOT, CLEAN WATER ................................................................................................56 STEEL IRON...............................................................................................................56 SCRAPER ...................................................................................................................57 LAYING THE VENEER ................................................................................................57 WETTING THE VENEER FACE ....................................................................................57 APPLYING THE GLUE ................................................................................................57 HAMMERING THE VENEER ........................................................................................58 CHECKING FOR BLISTERS .........................................................................................58
USING GLUE FILM .................................................................................................59
APPLYING THE FILM .................................................................................................59 LAYING THE VENEER ................................................................................................59
USING CONTACT ADHESIVE..............................................................................60
APPLYING THE GLUE ................................................................................................60 LAYING THE VENEER ................................................................................................60
MARQUETRY AND INLAYS .................................................................................61 BANDINGS AND INLAY MOTIFS.................................................................................61 STRINGING AND BANDINGS.......................................................................................61 STRINGING ................................................................................................................61 BANDINGS.................................................................................................................61 VENEERING A BORDERED PANEL..............................................................................62 CUTTING CROSS BANDINGS ......................................................................................62 HAND LAYING CROSS BANDINGS .............................................................................62 CAUL LAYING BANDINGS .........................................................................................63
3

INLAYING BANDINGS ................................................................................................64 INLAY MOTIFS ..........................................................................................................64 INSETTING AN INLAY MOTIF .....................................................................................65 SOLID TIMBER INLAY................................................................................................65 SURFACE LAYING .....................................................................................................65
VENEER PRESSES ..................................................................................................67 SINGLE AND MULTI-PLATEN HYDRAULIC HOT PRESS ..............................................67 HYDRAULIC COLD PRESS..........................................................................................67 HAND OPERATED PRESS ...........................................................................................68 TWIN VACUUM SHAPERS AND VENEER PRESS ..........................................................68 VACUUM PRESS ........................................................................................................69
CONDITIONING OF VENEERED PRODUCTS..................................................71
FINISHING VENEERED PRODUCTS..................................................................72
GENERAL CARE OF VENEERED SURFACES .................................................74 SPECIFIC CLEANING AND CARE INSTRUCTIONS FOR COATED VENEERED SURFACES 74
DEFINITIONS OF TERMS USED IN TRADE .....................................................76
4

INTRODUCTION
The art of wood veneering dates back to ancient Egypt in the time of the Pharaohs. During the 17th and 18th century a revival of veneering was seen in European traditional furniture. Today, veneers are used in cabinet work and fine furniture. The object of this resource is to provide a comprehensive compilation of the bulk of the relevant technical and practical information on the manufacture of, and how real timber veneers can be applied to substrates for furniture and cabinetmaking. As can be seen from the Table of Contents all aspects of timber veneering from the tree to its final application are covered. Timber veneer is the finest use of fine timbers, because it is real timber, cut fine. One cubic metre of log produces around 1000 square metres of veneer! No other form of woodworking results in such a yield. The benefits of using real timber veneer are:
• A design collaboration with nature The natural variation of timber means each project is individual. No two veneers are exactly alike. The "fingerprints" of nature lift your designs above that achievable with man-made alternatives. Choose from a vast array of species, colours and textures. Virtually identical to solid timber.
• All the warmth and depth of genuine timber Timber finishes add natural warmth and ambience to your project. Timber is pleasant and friendly to the touch.
• Prestige and versatility Timber is a sought-after, premium decorative finish that adds prestige and style to furniture and joinery. Timber veneer can be moulded to fit any shape, and adhered to a stable commodity substrate to give all the versatility of solid timber. Our oldest, yet most modern material.
• Maximises nature’s resources With each metre of timber typically providing 1000 slices, veneer is a highly efficient use of timber.
• Ecologically sensible solution A natural product - not made from petro-chemicals. The industry is committed to sustainable forest resources.
For additional technical information and/or hot links to members of the industry see the industry Website www.woodveneer.asn.au.
5

OVERVIEW OF VENEER PRODUCTION
In Australia most decorative veneers are crown cut (flat sliced) or quarter cut by slicing in either a vertical or horizontal slicer, or in a stay log (semi-rotary) veneer lathe. Some decorative veneers are rotary peeled, resulting in veneer grain patterns that are variegated. As the manufacture of decorative wood veneers is a costly and time consuming process, only the highest quality logs with minimal internal defects are selected. It is difficult to select the highest quality logs because many internal defects such as gum vein, rot and insect damage are difficult to detect from the outside of the log. Each log is cut to the required length, and then sawn lengthwise into sections called flitches. The fitches can be “shaped” to reduce the amount trimming of the veneers when sliced. To soften and plasticise the wood, the flitches are steamed or soaked in vats of heated water, usually between 50 and 90 degrees C for between 24 to 36 hours depending upon the size of the flitches and the manufacturers’ heating schedule. Some species may be “cooked” for many days, for example, European Beech, a white wood, takes on a pink colour after sufficient cooking. Overcooked logs can become fuzzy and “hot cut.” This “conditioning” of the flitches in hot water results in higher quality slicing and longer knife life. After conditioning, the flitches are moved to a slicer where they are sliced into thin pieces called veneer leaves. These are generally range from 100 mm wider and are normally 0.6 mm in thickness. This is considered an optimum thickness for decorative wood veneers. Thinner veneer can result in substrate being visible through the veneer after sanding, while thicker veneer is effectively wasting good resources. In a vertical slicer the half or quartered log or flitch is mounted on a sliding frame which can move up and down. The pressure bar and knife are set horizontally in front of the wood, and a slice of veneer is removed with every downstroke (or upstroke on some machines) of the frame. The pressure bar applies force to the outside face of the veneer as it is sliced and so holds the veneer against the knife, thus improving the veneer quality (reducing veneer surface “checks” and knife chatter) and veneer thickness consistency. After each cut the knife or flitch is advanced by the required thickness of the veneer. In a horizontal slicer the actions are much the same except the flitch movement is from side to side. The veneer leaves, having been packed sequentially as they are sliced are force dried in high velocity hot air boxes to a usual moisture content of between 8-12%. This drying process takes about 1.5 minutes. Defects caused by knots, splits and gum veins are docked from the dried veneer leaves, which are then sorted and colour graded before going to store in bundles of consecutive leaves for matching veneer work.
6

crown cut
Quarter cut veneers are sliced radiallygiving a striped effect.
Flat Sliced veneers are sliced tangentiallyfrom the full length of half the log.
Burl (burr) veneers are expensive andare end grain type growths with acircling, wavy, knotty pattern – burlsare lumps formed by new thick,twisted, fibrous cellular growth on atree to heal an injury.
Butt veneers arecompressed and resultin a wavy pattern.
Crotch (Flame or curl) veneeris cut from the junction of thetrunk and branches.
Sources of Veneer Types from a Tree
7

VENEER CUTTING METHODS
Saw Cutting Until the early eighteenth century, when veneer slicing machines were developed, all veneers were cut using first handsaws and then power saws. These veneers were relatively thick, some being about 3 mm thick. Sawing is now reserved only for very hard timbers, small diameters and curl, because of its wasteful nature.
Specialist veneer tradespeople can produce their own sawn veneer from specially selected timber blocks using a well-tuned band saw. Sharp blades are essential. Start with a new blade, and change it when it starts to dull. The most obvious sign of dulling is increased resistance to feeding, plus a drop off in cut quality. A dull blade leaves a more ragged surface and may give a bowed rather than a perfectly vertical cut. ½” skip tooth blades with 3 or 4 TPI are recommended. Larger blades often have too much set and produce more sawdust and fewer veneers The rip fence that comes with most bandsaws is inadequate for sawing veneer. Make a fence tall enough to support the full width of the wood and stopped just past the blade to let the sawn wood move will give much better results. As it's held in place by clamps, you can angle it to follow the lead of the bandsaw blade. Bandsaw blades rarely want to cut at exactly 90° to the front of the table. To find the lead of the blade, draw a line parallel to one edge of a piece of scrap, and bandsaw freehand partway along the line. Then turn off the saw, and set a bevel gauge so that its handle is along the front edge of the bandsaw table and its blade is along the edge of the scrap. Use the bevel to set the veneer fence. It is important to maintain constant pressure against the fence when cutting veneer. Use a smooth, steady feed rate from start to finish without stopping. When the veneer is sawn, it should be stacked in the order it was cut and weighted down to keep it flat until use. Finally, one or two light passes through a planer should ensure uniform thickness. Crown Cut or Flat Cut Veneer Sliced veneer cut tangentially to the grain (i.e. parallel to the growth rings) is known as “crown cut” or “flat cut” (crown cut is generally from a quartered log, while flat cut from a halved log). It displays an attractive figure of bold sweeping (“cathedral”) curves and ovals along the centre of the leaf, with striped grain nearer the edges. The most common production method is by
8

vertical slicing where the half logs or flitch is mounted on a metal frame with the heart side flat against the guide plate. The frame moves up and down against a knife in a straight plane parallel to a line through the centre of the flitch. As each slice of veneer is removed from the flitch, the knife moves forward the same distance as the thickness of the veneer that is removed. This is repeated until the entire flitch is converted into veneer. As the veneer is removed from the flitch, it is kept in the same sequence, and the flitch is literally re-built in veneer form. This is important for its future use. The grain pattern gradually changes from one piece to the next and follows the grain of the log as it changes.
Crown cut veneer is produced in lengths to suit the resource generally from of 1.8 metre upwards (with majority in 2.5 to 2.8 metres) and in various widths, ranging from 100mm averaging about 150 to 250 mm, depending on species. It is used for furniture making and wall panelling because of the consistency in its grain and the ability to match sequences of leaves in “book and end matches”. Crown cut veneer is also produced locally using a stay log (semi-rotary) veneer lathe (see below in the section titled “Off-Centre Cutting or Half Round Cutting”). In Australia, an equivalent term “back-sawn” is used for solid timber cut in such a way that the wide surface of the board is a tangential plane to the growth rings.
9

Quarter Cut Veneers The quarter log or flitch is mounted on a metal frame so that the growth rings of the flitch strike the knife at approximately right angles, producing a series of stripes, straight in some timbers or varied in others. Further variations in figure can be produced by setting the knife out of alignment with the wood grain. In the interests of production efficiency quarter cutting is usually only employed with large diameter logs.
Rotary Cutting In the manufacture of plywood softwood (and some hardwoods) are cut by the rotary peeling method. The whole log is set in a huge lathe which peels off a continuous sheet of veneer, a bit like “unrolling” toilet paper roll. The log is rotated against a pressure bar and knife which run the full length of the machine. The knife is set just below the bar and forward of it by the thickness of the veneer. The setting of the bar and knife in relation to the log is critical, to reduce surface cracking known as “checks”. For each revolution of the log, the knife is automatically advanced by the thickness of the veneer.
10

Veneer produced in this way can be recognised by a distinctive watery patterned or variegated figure where the continuous tangential cut has sliced though the growth rings. Rotary cutting is a particularly efficient way to produce veneer as it is continuous and can be done at high speed. Rotary cut veneer is becoming more accepted as an economical decorative veneer. The process is used to produce specialist decorative veneers such as bird’s eye maple. Off-Centre Cutting or Half Round Cutting This method is a variation of rotary cutting and is also called “stay log” cutting. Segments or flitches of the log are mounted off centre in the lathe and then rotated against a knife and a pressure bar. This results in the veneer being cut in a curved manner slightly across the annual growth rings. The veneer visually shows modified characteristics of both rotary and flat sliced methods, producing wide decorative veneers with sapwood on each edge in order to give a figure something like that of typical flat sliced crown cut veneer As this method produces a wider sheet of veneer from a given size of log compared to a flat slicing, smaller logs can be used for veneer production. This technique is ideally suited for the production of veneer from plantation logs of a relatively young age and smaller diameters.
11

In the early 1990’s the sawing of young trees for veneer production was the subject of considerable research by the CSIRO in Tasmania. Regrowth is the resource of the future and requires specialist flitch sawing techniques. The research led to adoption of the centre sawing system to produce flitches suitable for stay log lathe production. Regrowth hardwood logs tend to "stress split" into a "Y" pattern. The centre sawing system allows the efficient cutting of logs into three sections, as the cuts are made at the split locations. Thus, when using a stay log lathe with one third sections the quality of crown sliced veneers is enhanced as splitting of the veneer is minimised.
12

Half-Round Cutting (Back Sawn) Half-round logs can be mounted on a stay log with the heartwood facing outwards. This is known as ‘back cutting’ and is used for cutting decoratively figured butts and curls.
Rift-Cut Slicing Rift cut veneer is produced in a number of species but particularly oak. Oak has medullary ray cells, which radiate from the centre of the log like curved spokes of a wheel. The rift or comb grain effect is obtained in a stay log lathe by cutting at an angle of about 15 degrees off the quartered position to avoid the flake figure of the medullary rays.
13

RECONSTITUTED OR RECONSTRUCTED VENEER
Reconstituted veneers are man made veneers that are manufactured from readily available timbers, normally plantation grown. The manufacturing process involves rotary peeling of logs into veneers, which are dyed and dried. The layers of variously coloured veneers are then re-glued in moulds in a controlled pattern into flitches to form “grain” patterns, which are then re-sliced into veneers. The way the layers of the veneers are arranged and the way the flitches are sliced depend on the desired pattern. The process is fully automated and often involves the use of computer software developed for different veneer figures and pattern. The veneers have excellent consistency in colour and repeated grain pattern. The result is a wide range of colours and patterns. In many ways, reconstituted veneers are easier to manufacture than ordinary veneers. Spots, knots and other defects are eliminated. Wastage is reduced because the veneer sheet sizes are predetermined. In addition, less skill is required in handling and matching veneers At present, no veneer manufacturers in Australia produce reconstituted veneers. However, several companies import and market them throughout Australia.
14
VENEER GRAIN PATTERNS OR FIGURE
Experts say there are upwards of 60,000 different species of timber known to man, of which well over 100 are in common usage in veneer form. No two are ever the same, even of the same species they differ in grain, texture, colour, markings and smell. Texture refers to size and distribution of the wood cells and is described as fine, medium or course. Two logs of the same species, but with their veneers cut differently, will have entirely different visual characteristics. However, the part of the tree from which the veneer is cut also affects the grain pattern. The pattern seen on the surface of a veneer is known as the “figure”. It results from two main factors:
• Interaction of several natural features eg. the frequency of growth rings, the colour tone variations between earlywood and latewood, type of grain (wavy or curly grain, interlocked grain), medullary rays, markings and pigments in the wood structure, burls or curls.
• The way the flitch is cut to achieve the desired figure. There are several traditional types of figures, some of which are explained below: Burr or Burl Veneer Burrs or Burls are large abnormal growths on the trunk of a tree. Burr veneers display an attractive pattern of tightly packed bud formations that appear as rings and dots and results in an attractive and unusual figure whichever way it is cut. They are the most expensive type of veneer used in producing furniture and small woodworks. Burr veneers are supplied in irregular shapes and various sizes, from 150 mm x 100 mm to about 1 metre long by 450 mm wide.
Curly Figure & Fiddleback Veneer Logs with wavy grains, when quarterly sliced, produce beautiful veneer with wavy patterns i.e. bands of light and dark running across the width of the leaf. Light is reflected at varying angles from quarter-cut surfaces because the individual elements are cut across at varying angles. A variation of curly veneer is when the wave is fine and regular, the markings on quarter-cut surfaces are also regular and appear as lustrous bars across the veneer leaf. Such grain is termed “fiddleback” (the wood gets its name from its historical use for violin backs) and is commonly found in such species as Red gum, Blackwood, Mountain ash, Alpine ash, Jarrah, Sycamore and others.
15

Crotch, Flame or Curl Veneer Crotch (flame or curl) veneer comes from the portion of a tree just below the point where it forks into two limbs. When the crotch is sliced perpendicularly an attractive figure is revealed. The distorted diverging grain is crushed and twisted, and produces a lustrous upward sweeping plume pattern known as “feather figure”. The outside of the block produces a swirl figure that changes to full crotch figure as the cutting approaches the centre of the block. . The veneer is available in sizes from 300 mm to 1 metre long and 200 mm to 450 mm wide. This unusual veneer generally is from a large Mahogany, and is rare.
Butt Veneer At the base of a buttressed tree, the folding or wrinkling of the wood elements is quite marked. These parts of trees of certain species are in demand for veneer.
Quilted figure Although greatly resembling a larger and exaggerated version of pommele or blister figure, quilted figure has bulges that are elongated and closely crowded. Quilted grain looks veritably three-dimensional when seen at its billowy best. It is most commonly found in Mahogany, Maple, Sapele and Myrtle, and occurs only rarely in other species.
16

Pommele This figure resembles a puddle surface during a light rain: a dense pattern of small rings enveloping one another. Some say this has a “suede” or “furry” look. It is usually found in extremely large trees of African species, such as Sapele, Bubinga and Makore. Some domestic species with a sparser, larger figure are referred to as “blistered”. Bird’s eye This figure can be seen on back-cut surfaces of certain species as numerous rounded areas resembling small eyes. It is caused by small conical depressions of the fibres and is common in maple, it is also found in the Australian species Musk, which, as a result, is highly prized. Radiata pine sometimes exhibits a similar effect, but such material is not segregated commercially Pecky and Masur Birch This figure, as the name implies, appears to have been pecked by a bird, leaving darkened marks over the surface. It is much like the bird’s-eye figure and is caused by the infection of the annular growth ring. When one species, the Scandinavian birch exhibits this figure, it is called Karelian or Masur birch. It is a pinkish white veneer with dark brown peck marks over the entire surface. Another North American veneer that often displays this figure is Pecan Coloured Veneer Artificially coloured veneers are available from suppliers. Light coloured woods such as Sycamore, are used. Dyes are used to produce other colours, the veneer being pressure-treated for maximum penetration.
17

OTHER IMPORTANT VENEER PROPERTIES
Slicer or Peeler Checks Veneer slicing machines are like giant planes, with the veneer representing the shaving. In this case it is important that the shaving is produced to a fine tolerance and with a clean cut. The quality of the cut is controlled by the pressure bar and knife setting. The closely spaced knife checks can occur on the back face of a veneer (the face closest to the knife), particularly when rotary peeled. . The back face of the veneer is called the “open” or “loose” face and the other, the “closed” or “tight” face. You can identify the face by flexing the veneer, which will bend to a greater degree when the loose face is convex.
Always try to lay veneer with the tight side outwards (if it is possible to detect), since the loose side of veneer does not finish quite as well. For some species, the difference between the tight side and the loose side is significant and easy to detect. However, there are species in which such identification is very difficult. However, veneer-slicing technology has improved significantly and knife checking has been greatly reduced. When two sheets of veneer are book-matched, the tight and loose faces alternate in adjacent leaves.
Seasoning Checks Seasoning checks appear as small slits running parallel to the grain of wood, caused chiefly by strains produced in the drying or seasoning. The forces that
18

lead to these checks are caused by the outside trying to shrink over the still swollen (from moisture) inside of the wood. Dimensional Tolerances of Veneer Decorative veneers are produced in Australia at nominal thickness of 0.6 mm (+/-0.1 mm) or as specified between purchaser and supplier. Each piece of veneer must be sliced to a uniform thickness. In North America, the thickness of veneers varies between 0.7 and 0.9 mm and in Europe between 0.5 and 0.7 mm. In Japan, fine furniture is produced using veneers of between 0.2 and 0.3 mm thickness. Veneer Moisture Content As a very thin material, veneer responds quickly to humidity changes. Therefore, it is critical that the value of the veneer moisture content (MC) is as close as possible to the average value of the equilibrium moisture content for the intended service conditions (moisture content is the weight of the moisture in veneer, expressed as a percentage of its oven dry weight). According to Australian Standard AS/NZS 1859.3 “Reconstituted wood-based panels Part 3 Decorative overlaid wood panels” the MC of veneer must be in the range of 6% to 12% prior to making up into layon and also prior to pressing onto the substrate. It should be pointed out that according to the Standard requirements the MC of the substrate must be in the range of 8% and 12%. However, the applying a veneer of 12% MC onto a substrate of say MDF of 8% MC can cause severe veneer checking as the two materials’ MC’s equalised in service. Therefore, it is recommended that the MC of veneer and substrate should be between 8% and 10%. However, some brittle veneers are difficult to handle when their MC is below 11%. In such cases, the MC can be increased to at least 11% or 12%. Severe problems can occur if the MC of veneer is too high or too low. If veneer with too high a MC is used for production of furniture panels and the furniture is then used in a dry environment (such as an air-conditioned or centrally heated building) it will dry out and shrink significantly, resulting in splitting and cracking. The MC of the veneer should be measured with a moisture meter. It is important to use correction factors for various veneer species. These can be obtained from any supplier of moisture meters. If the MC of veneers is too high they should be re-dried. There are various methods that can be used for re-drying veneers and which keep them flat. One method is to put a stack of veneers in a warm press (slightly above room temperature) and leave them overnight. Another method is to put a few sheets of veneer in a hot press (about 60 degrees C) for 2-3 hours, between two pieces of dry, absorbent board, which will remove excess moisture The correct MC of veneers and substrate is a critical factor in the manufacture of high quality and high performance veneered products.
19

FLATTENING OF VENEERS
General requirements One of the main prerequisites for good veneering work is that the veneer must be flat. However, veneers often buckle or warp in various ways. The primary causes of general buckling of veneer are tension wood in hardwoods, compression wood in softwoods, irregular grain and non-uniform drying. In all cases, buckle is caused by unequal stresses across or parallel to the grain of a sheet of veneer. Buckled veneer can be flattened by various methods, which are based on the application of moisture, heat and pressure. However, to save further damage it is good practice to tape the veneer ends and splits before any flattening. The most commonly used method involves applying a mixture of water and glycerine to the veneer to dampen the wood. Various proportions of the two liquids are recommended and a solution of 10% glycerine to 90% water is usually used. A sheet of dry absorbent material (eg. particleboard, brown kraft paper) is inserted between every 6-10 sheets of veneers (depending on the species and its density) to absorb excess moisture. The veneer is then kept flat in a warm press. The time in the press can be varied, but two hours at 60°C is thought to be adequate, provided sufficient absorbent material is included within the stack in the press. Flattening burls veneers Laying burl (or burr) curl veneers can cause difficulties because their surface usually is not flat, but presents a mass of brittle knots and short fibres. As burls are end grain they are extremely brittle – wood is around 30 times stronger along its grain. These veneers are often dried with a slightly higher moisture content than ordinary veneers, which makes them less liable to crack or break in handling. However, it is almost impossible to prepare and handle burl veneer with low moisture content. To overcome this problem, the veneers need to be dampened to make them more flexible prior to flattening and, unless they are dried carefully, this treatment can increase the risk of cracking in later stages. There are methods of flattening burls whilst minimizing the risk of cracking. The most effective procedure is as follows:
• Dampen every third or fourth veneer in a stack of 10 to 12 with a sponge or rag dipped in water.
• Wrap stack in a plastic film for 24 hours to enable all veneers to reach equilibrium
• After removing veneers from plastic film, place a panel of a dry particleboard in the centre of the stack.
• Lightly press the stack in a heated press at 80°C for two hours. • After removing the stack from the press, remove dampened
particleboard from the centre and replace with a similar dry panel. • Place stack under a light pressure between two panels of dry
particleboard or plywood in a dry atmosphere for one or two days. The above method can be used for flattening not only burl veneers, but also other buckled and wavy veneers.
20

PURCHASING VENEER
When buying veneers you can buy leaves or full bundles of veneer from veneer merchants, panel layers and some timber merchants. As it is important to keep the veneers in consecutive order for matching purposes, you will be supplied with veneer from the top of the stack. The merchant will not usually pull out selected leaves, as that would reduce the value of the veneer flitch. Before buying veneer, calculate the area you need and make an allowance for wastage. Err on the generous side since each veneer is unique and if you have to order more you are unlikely to obtain a match. Full leaves are customarily priced by the square metre, and some merchants will supply pre-cut lengths at a set price per piece. Small orders of full veneers supplied through the mail are usually rolled for dispatch. But pieces, such as burrs or curls, are generally packed flat. Since veneers are fragile, open a rolled package carefully, so that it doesn’t spring open and cause damage. End splits are not uncommon in veneer. Repair them promptly with veneer paper tape to prevent dirt entering. If veneer remains curled after unpacking, dampen it with steam from a kettle or pass it through a tray of water, then press it flat in a press or between sheets of particleboard. Do not leave it between boards in a damp condition, or mildew may develop. Store veneers flat and protect them from dust and strong light as wood is light sensitive and can lighten or darken according to the species.
21

TOOLS FOR VENEERING
Veneer laying may require the relatively straight forward application of a single veneer or complicated cutting and fitting of different veneers to make intricate patterns. The woodworker’s basic tool kit will contain a number of tools used in veneer work including measuring and marking tools, a fret saw, block and shoulder planes, chisels, scrapers and sanding equipment. If you wish to concentrate on veneering, additional tools will be required. Most of the tools you are likely to use are available from good tool stores or from veneer suppliers. You will also need to make some equipment, such as a shooting board, and simple cutting jigs for patterned work. Rules and Straightedges In addition to a steel tape measure, you will find that a graduated metal safety ruler 300 mm long is handy since it can double as a straightedge for cutting small work. A safety rule is designed to grip the work, to prevent slipping when used as a cutting guide, and is wide enough to keep your fingers clear of the knife. For cutting longer veneers, use a steel straightedge. Cutting Mat Use plywood or other fine surface man-made board for cutting on. Or better still, particularly for fine work use a special cutting mat. This is made of a self sealing rubber like compound which allows the point of the knife to penetrate its surface without causing permanent scoring or dulling of the blade. Veneer Saw A veneer saw can be used, with the aid of a straightedge, to cut veneers of any thickness. It produces a square edge cut for accurate butt jointing of matched veneers and has a reversible double edge blade with fine teeth that have no set.
Knives Use a surgical scalpel or craft knife fitted with a pointed blade for cutting intricate shapes, and a stiffer curved edge blade for cutting straight lines (particularly if extra pressure is required). These blades are ground on both sides, producing a V cut. If it is vital that the edge of the veneer is cut square, hold the knife at an angle away from the straightedge. A hint to reduce premature breakage is to stone the sharp tip of the blade so it has a slightly rounded tip.
22

Veneer Hammers A veneer hammer is used for hand laying veneers. The wooden type has a rounded brass strip blade mounted in the edge of a hardwood head fitted with a handle. The metal type is more like a conventional hammer, but the head is designed for pressing blisters. Work the blade across the panel in a zigzag motion, using firm pressure to press the veneer down and exclude surplus glue and trapped air.
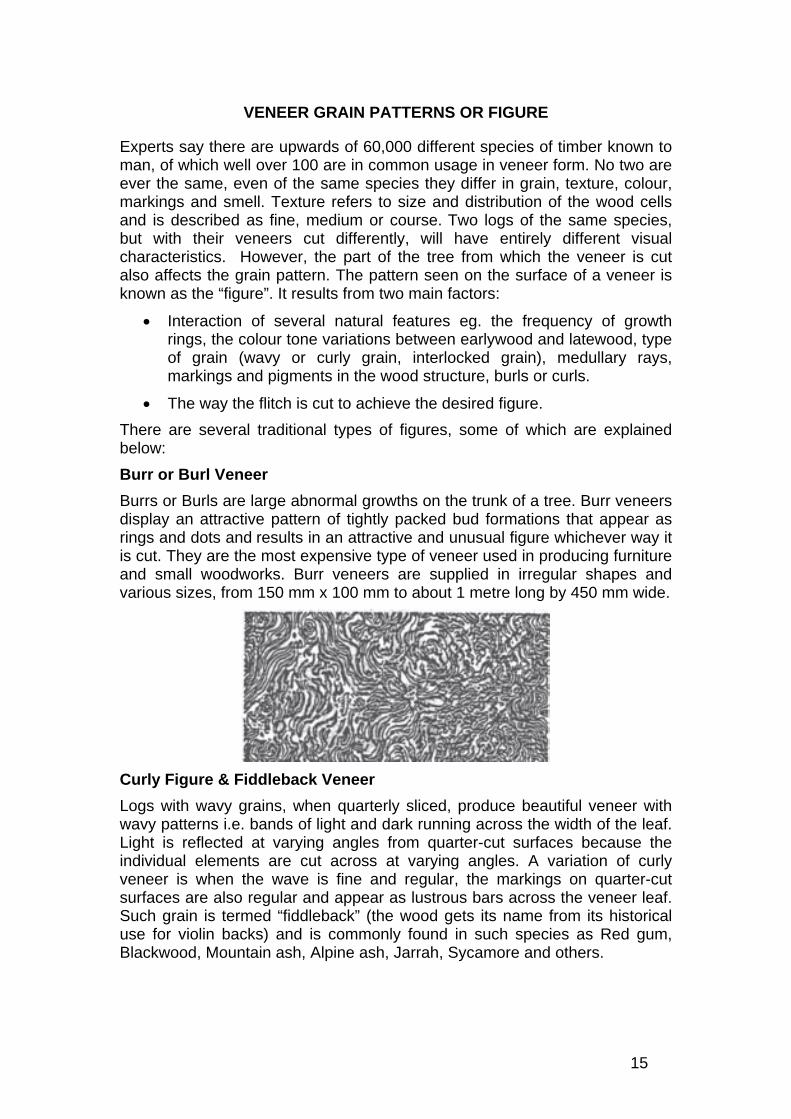
Veneer Pins Fine, short pins with large plastic heads are used to hold veneers temporarily while the joints are taped. Veneer Tape Gummed paper tape 18 mm or 25 mm wide is used to hold pieces of veneer together and prevents the joints of newly laid veneer opening up as a result of shrinkage. The tape is removed, after the glue has set by wetting and scraping.
23
Shooting Board A thin strip of wood is fixed along the top to prevent the plane tilting; its height above the base depends on the width size of the plane being used. It may be held in the vice endways or sideways. The veneer is placed on the shooting board with the edge overhanging slightly, and a batten pressed tightly down over it.
24

CUTTING VENEER
Veneering is the process of covering a core/substrate with wood veneer. The finished core looks like solid timber. Typically in Australia, the veneer is normally 0.6 mm thick. Mostly, you will use hardwood species for veneering although softwoods are readily available. Veneering typically involves covering the entire surface. Groups of flitches may be fitted together to form matches. You can also create geometric shapes or designs. Producing a veneered surface requires artistic ability, patience, and skill. Your artistic talents show when selecting flitches and laying out patterns. Patience and skill are necessary when cutting trimming, and assembling the veneer. Selecting Flitches Select flitches of veneer on the basis of grain patterns, defects, and overall appearance to suit the application and/or client. Generally, for most work you will want matched grain forms. Veneer merchants and suppliers provide veneers in the order they were sliced from the log. The grain pattern will almost be identical. Sometimes you may choose veneers of contrasting colours. They may be heart and sapwood of the same wood species or fitches from different species. Cutting Veneer Always use sharp tools and some kind of guide to cut veneer. Freehand cutting is discouraged. With a saw, use a wooden straightedge as you do when back sawing. With a knife, use a metal straightedge, square, or metal template (for curves). Tape or pin the veneer while cutting. Always cut veneer oversize to allow trimming. Cutting should not be done in one pass. This tends to split or splinter the veneer. Single pass veneer cutting also crushes the wood cells. Light pressure on a knife or forward and backward saw motion is best. Several passes with the knife are necessary. When cutting veneers which will be laid side by side, it is best to cut both at the same time. Overlap them slightly and cut on the overlap. This assures that adjacent pieces will match. Cutting them separately means you will have to trim and fit each of them.
25

VENEER JOINING
Veneer leaves can be joined together to form a “layon” in order to create the width necessary to cover the surface of substrate material which is to be veneered. Jointing veneer gives the opportunity to create decorative effects by placing the leaves side by side to bring out the wood’s natural features of figure and colour. Before jointing veneer leaves into layons in a factory production situation veneer bundles must be trimmed. Specialized guillotines are used for trimming. It is essential that the joint lines are straight, parallel and square with minimal tear-out. Joints that are not straight create gap problems When joining veneers it is recommended that the moisture content of adjacent leaves should be close, say within 2%, otherwise the movement of veneers due to changes in environmental conditions may result in veneer splitting and checking. In addition, the thickness of the veneer leaves should be checked as variations between leaves of more than 0.1mm may give rise to problems during pressing. Factory produced layons are normally joined by one of the following methods:
• Veneer (Zigzag) Stitchers – These have formed the basis of the industry in Australia for many years. The stitching machines like “Kuper” crossfeed stitcher apply a hot melt glue thread to the underside of the veneer to hold two leaves of veneer together by “stitching” across the joint in a zigzag fashion right down the length of the leaf. Immediately after the thread is applied, it is compressed flat by compression rollers. The glue thread is buried in the glue line, against the core, so that removing the glue-thread with a sander becomes unnecessary. Additional leaves of veneer are stitched one side piece at a time side, to build up the full width of the layon. The automatic machines work on a continuous feed basis and dock off the layon at a predetermined width automatically stacking the layons on a pallet table.
• Butt joining (splicing) – Veneer leaves are edge glued together using
PVA or urea formaldehyde glues. The veneer sheets are automatically aligned to allow a precise application of the glue.
26

• Paper tape − this method is used for specialist segmented or intricate veneer work.
Jointing Veneer by Hand For specialist segmented or intricate veneer work, paper tape is used. The meeting edges of the veneer must be cut straight. When you are matching two veneers, lay them together with the figure accurately aligned. Temporarily tape them to the cutting board and, holding them down with a straightedge set just inside the edge to be cut, cut through both veneers with a knife or saw. To check the fit, hold the two veneers together against the light. If any gaps show, “shoot” the edges by running a finely set plane along the edges of the veneer held between two straight battens or use a shooting board. Taping the Joint Place the two edges together and apply 100 mm lengths of veneer tape across the joint at 150 mm intervals, then run a length of tape along the joint, the tape will pull the joint together as it shrinks.
27

VENEER MATCHING METHODS
Veneer “matching” produces interesting decorative designs and is the term used to describe the method by which the individual leaves are jointed edge to edge into a layon. The method of match determines the final appearance of the panel. Careful choice of veneer colour and grain pattern may produce highly decorative effects. You may also choose to match veneers together when inlaying or overlaying. Matching is done by splicing veneers together with the grain pattern in specific directions. The veneers you use should be consecutive slice from a log. The colour and grain pattern of successive slices are the same. There are established patterns that are used to create veneer designs, which are described below: Book Matching A book match uses successive leaves of veneer. Every other one is turned over like the pages in a book, and edge-joined in this manner. Since the reverse side of one leaf is the mirror image of the succeeding leaf, the result is a series of pairs.
Book matching works best for jointing two consecutive decorative veneers when the figure is biased to one side of the leaf.
28

(1) The direction in which the
leaves are turned depends on the position of the dominant figure. If it is on the left hand side, turn the top leaf as if you were opening a book.
(2) If the figure is on the right hand side, then turn the top leaf to the right.
The figure must be perfectly aligned to avoid a disjointed match or poor appearance. Book matching may be used with plain, quarter or rift sliced veneers. A book-match is commonly seen on furniture where veneer with a strong figure, such as swirl mahogany or walnut is used. This creates a dramatic visual effect on a cupboard door or tabletop. When two sheets of veneer are book-matched, the “tight” and “loose” faces alternate in adjacent leaves. They reflect light and accept stain differently, and this may result in a noticeable colour variation in some species, which is often called a “picket fence” effect in Australia or a “barber pole effect” in America. Slip Matching Slip matching is used to create a wide veneer from narrow ones. Consecutive veneers are slipped sideways and edge-jointed together without altering their grain direction. This provides pattern repetition.
This method is best used for striped veneers if the joint is not to be obvious. Should the stripes not be parallel to the jointing edge, the joint may have a
29

poor match and will require trimming to true up the figure. If the grain “runs off” the edge of the leaf the resulting layon could visually make the panel “lean”. However, this method gives the veneer layon the uniformity of colour because all faces have the same light refraction (in contrast to book matching). Reverse Slip Matching This method is generally used with crown cut veneers. Veneer leaves are slip matched, and then every second leaf is turned end to end. The method is used to balance crowns in the leaves so that not all the crowns appear at one end.
Diamond Match
Diamond matching is a variation of quarter/four way matching which can be used to advantage when the veneer is striped and straight grained with not too much figure. The sheets are cut on an angle and quarter-matched to produce a diamond figure.
30

The process for diamond matching is detailed as follows:
• Lay four consecutive veneers together and true the two long edges. Cut both ends to 45 degrees, making the cuts parallel to each
• Open the top two veneers book match fashion, but turn them along the
top diagonal edge to form an inverted V then tape the joint.
• Next. Make a straight horizontal cut from corner to corner.
• Fit the triangular piece into the V at the bottom to form a rectangle.
31

• Now repeat the process with the second pair of veneers but first reverse them so they are face matching.
• Finally join the two rectangles along the centre.
Reverse Diamond Match Reverse diamond matching uses the same principle with the same kind of veneers as a diamond match, but the grains are matched to produce an “X” pattern rather than a closed diamond, i.e. The grain pattern points towards the outer four corners.
Quartered or Four Way Matching This is the most common method of joining burls, and takes the book matching technique a stage further. The four way centre and butt match uses four consecutive pieces of veneer. They are matched with a common centre, joined side by side and end to end. The process for this method is detailed as follows:
• Take four consecutive veneers and select a portion which places the focal point of the figure at the bottom.
• Take the first pair of leaves and book match the vertical edges. To get an accurate match, true the jointing edge of one leaf first. Lay the trued
32

edge on the edge of the adjacent leaf and match the pattern, and then cut the second leaf to match and tape the joint.
• Next, cut the horizontal jointing edge straight and square. Book match
the vertical edges of the second pair as for the first, but reverse them along the horizontal edge so they are face down.
• Now match the horizontal edges by laying the first pair on the second
and cutting the veneer at the point where the figure matches. Tape the horizontal joint in readiness for laying.
These panels can be continued in a sequence matched manner. Mismatched or Random Matching In this method individual leaves are random matched with the intention of dispersing characteristics such as knots or gum veins more evenly across the sheet. Assorted leaves not matched for grain and not necessarily of the same width. The advantage of random matching is that veneers from several logs may be used in the manufacture of a set of panels.
33

“V” Match or Herringbone Match Striped figure diagonally cut veneer strips are used and matched to both sides of a horizontal centre line, at an angle to it. The resulting appearance is reminiscent of the bones in a fish as they are attached to the backbone
End Matching/Butt Joining Where the length of the veneer does not permit its fabrication into the desired height of panel, it may be matched with vertical butts, as well as horizontal book match joins.
34

Segmental Match Segmental matching consists of building up a pattern from more than four pieces of veneer usually triangular in shape meeting at a central point.
Other Matches Other matches include box, reverse box, and sunburst pattern.
As an alternative, or in addition to matching veneers, veneers can be applied to substrates as inlays or in the form of marquetry. These methods are discussed in a later section titled “Marquetry & Inlays”.
35

SUBSTRATES FOR VENEERING
Veneering is the term given to the method of laying thin slices of timber (veneer) on a substrate as in traditional and fine cabinetmaking, or in manufactured panels. Substrates are sometimes called the ground or the groundwork. Various types of substrates can be used for the production of veneered panels and furniture, such as solid timber, particleboard, medium density fibreboard, plywood, blockboard and hardboard. The advantages of using manufactured panels over solid timber can be summarised as follows:
• Panels are generally less expensive
• Panels are available in large sheets which mean more economy in cutting and less waste.
• Panels are sanded smooth to uniform standard thickness, thus no preparation is necessary and much initial labour is saved.
• Timber is weak across the grain and moves substantially across the grain with MC changes.
Solid Timber Solid timber can be jointed with ease, shaped, moulded, and bent to any radius, and edges do not have to be protected or disguised in any way. When veneering over solid wood, orient the veneer in the same direction as the substrate so that they move together as the moisture content changes. If only one side of a tangentially cut board is to be veneered, always veneer the heart side. These boards tend to cup, but if laid heart side up, the veneer will help pull them flat as the glue dries. Where possible, use quarter cut boards as these are more stable, with only slight shrinkage across the thickness. To maintain an even balance, it is best to veneer both sides of the board
Where possible, select defect free timber. Cut out unavoidable defects such as fine knots to receive diamond or round shaped plugs, which are cut with their grain following that of the timber. Make the plugs slightly thicker than the board, and level them with a plane after gluing.
36

Particleboard Particleboard is a panel manufactured from lignocellulose materials (usually wood) primarily in the form of particles, flakes or strands bonded together with synthetic resin, or other binder, under heat and pressure until cured. The advantages of using particleboard in veneered panels are smoothness, surface integrity, uniform thickness, uniform properties, machinability, good dimensional stability and ability to stay flat. However, as the edges are not suitable for coating, the panels have to be finished with veneer or solid wood edgings. Both standard and moisture resistant particleboard panels are available.
Medium Density Fibreboard (MDF) MDF is a wood-based panel manufactured from wood fibres bonded with synthetic resin or other binder under heat and pressure until cured. MDF is widely used as a substrate material due its smooth surface and edge-finishing qualities. Other advantages include good dimensional stability, flatness, close tolerances, impact resistance, good machining characteristics, low glue usage and lack of grain-telegraphing, high bond strength and screw holding characteristics. Both standard and moisture resistant MDF panels are available
Plywood Plywood is an assembled panel comprising three or more layers of wood (generally rotary cut veneer) bonded together, usually with the layers laid so the direction of the grain of alternative layers is at right angles. As a result of this cross lamination plywoods advantages are it resists impact and edge
37

damage, is a quite strong and stiff panel and is very dimensionally stable product in applications of variable humidity. Plywood is used sometimes as a core material but not as widely as particleboard and MDF. For greater stability decorative veneers are generally laid with its grain at right angles to that of the plywood surface in order to maintain the alternating grain direction in the structure of the substrate.
Blockboard Blockboard is a composite panel comprising a core of timber strips bonded together as a slab, faced on each side with two layers of veneer, laid so their grain is at right angles to that of the core strips. In Australia, blockboard is mainly used in the manufacture of solid core doors, and is rarely used in the production of decorative veneered products. In Europe, it is often used in joinery and architectural products.
Veneer Wrapped Profiles Veneer wrapped profiles, which are essentially profiled or moulded MDF with wood veneer adhered to its face, are available locally manufactured by specialists.
38

IMPORTANT REQUIREMENTS FOR SUBSTRATES
Probably the three most important requirements for substrates for veneering are a clean surface, consistent thickness, and moisture content. Obviously, a dusty or dirty surface can interfere with the adhesive successfully bonding the veneer to the substrate. If the product is being bonded in a press, variations in thickness can lead to areas of low pressure and therefore possible poor bonding. The veneer itself will not mask surface defects or uneven surface on the substrate, and it will show or telegraph through the veneer surface and will become plainly obvious when the surface is polished. According to AS/NZ 1859.2 the moisture content of the substrate material should be between 8% and 12%. However, to minimise the differential movement of the substrate and veneer it is recommended that the moisture content of the substrate should be between 8% and 10%. Another consideration for the type of substrate is, if using particleboard or MDF is whether the application is subject to high humidity or possible occasional moisture thus requiring the use of a moisture resistant board in lieu of standard board.
39

SHAPED SUBSTRATES FOR CURVED PANELS
Since veneer is thin and flexible, it can be laid on curved surfaces and bent with or across its grain to produce curved panels. The shaped substrate can be made by various methods:
• Solid timber • Built up construction • Coopered Construction • Steam Bending • Kerfing • Laminated Construction
Solid Timber Small shallow curved substrates can be cut from solid timber on the band saw, before being planed and sanded smooth.
Built Up Construction Curved shapes have traditionally been made by building up the section by gluing short timber “bricks” in a curved layers or courses staggered as in conventional brickwork.
Coopered Construction This method uses bevelled strips of wood glued edge to edge. It is sometimes used for bowed doors. The edges of the strips are planed to the required angle, then glued and clamped together in specially made jigs with shape saddles to hold the curve. When set the surfaces are smoothed, ready for cross banding, and face veneer laid with cauls.
40
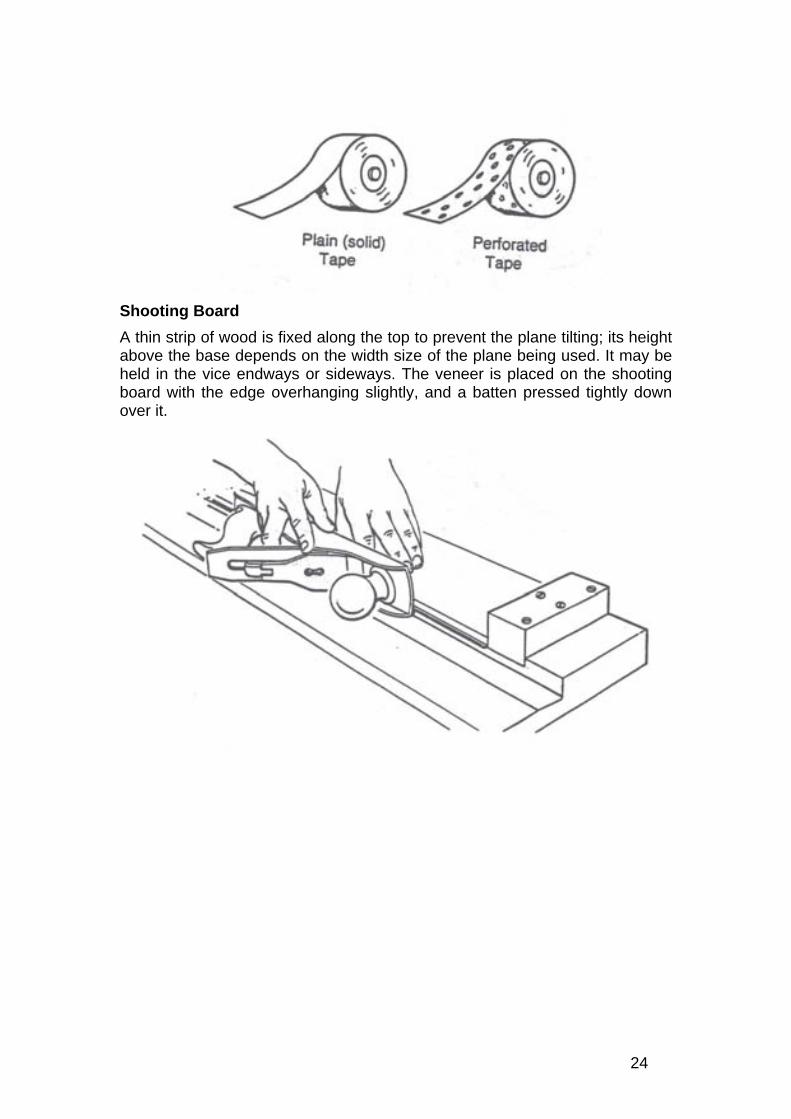
Steam Bending Thinly cut timber will take a bend without pre-treatment. The radius to which it can be bent will depend on the thickness and natural stiffness of the timber. Thin unrestrained ‘free bent’ timber will form a ring when both ends are pulled together. For tighter bends, the timber must be steamed and held around a former / caul to set the timber to the required shape. When thicker timber is to be bent, it is necessary to restrain the outer fibres of the timber to prevent them from splitting out. Kerfing A stiff section of timber can be dry bent by kerfing the inside face. Kerfs are the grooves formed by a saw; and if a series of equally spaced saw cuts are made part way through the timber (leaving approximately 2 - 3 mm) it can be bent where its thickness is reduced. Kerfing technique is mainly used for curved work which shows only one face, such as bases that have rounded corners.
Laminated Construction As veneer and timber, when cut into thin sections, are flexible and can be bent dry. Curved substrates can be formed by glue laminating a number of layers of veneer, thin cut timber strips or thin three ply plywood panels around a shaped former or caul. Unlike laminated plywood sheets, which has the grain direction alternating with each veneer, in shaped laminating work the grain of each (or most if using thin three ply plywood), laminate follows the same direction. A laminated component can therefore be bent into a tighter curve than a steamed timber component of comparable dimensions and is more stable and reliable.
41

42

ADHESIVES
Adhesive is a substance used to bond two surfaces. The correct use of adhesives plays an important part in many timber using industries. There are many types of adhesives, the most commonly used in hand veneering and in production of veneered panels being Urea Formaldehyde (UF) or one of the Polyvinyl Acetates (PVA). However, animal glue still finds use in hand veneering. Melamine urea formaldehyde glue can be used for moisture resistant bonding applications. PVA glue is the most popular as it is easier and faster to apply. Urea formaldehyde is probably a more effective and reliable bonding agent, but it has the disadvantage that its curing time is temperature dependent. Therefore, a hardener needs to be selected that is consistent with the ambient temperature and relative humidity in the workplace. Adhesives may be segregated into three general groups:
• Natural (Animal Protein) • Thermosetting - cured by heat, not able to be replasticised by heat
once cured, and usually providing a rigid glueline, or • Thermoplastic - cured by loss of solvent, which may be water or
organic, able to be replasticised by heat, and the cured glueline is non-rigid i.e. can creep if loaded long-term.
Animal Protein Adhesive The oldest known glue, dating back thousands of years, is animal or “hide” glue. Animal glue is made by boiling down and extracting protein or collagen from animal skins and parts, and is still used for hand laying of veneers (particularly curved work) and for restoration of antiques. Animal glue once mastered is quite versatile; it is not “waterproof” but has the advantage of being able to soften the glue later (even centuries) for repairs. Casein glue is extracted from the curds of skim milk and still finds limited use. These natural adhesives have time proven performance and limited creep, but have been replaced in general use by synthetic adhesives. Thermosetting Thermosetting adhesives, once cured, give a rigid glueline that does not replasticise even when heated. They do not to creep under conditions of long term load (or stress) and are therefore ideally suited for products such as MDF, plywood, and laminated timbers. The major thermosetting adhesives are the following formaldehyde based resins:
• phenol-formaldehyde, resorcinol-formaldehyde (phenolics) • melamine-formaldehyde, melamine urea-formaldehyde, urea-
formaldehyde (aminoplastics) These adhesives come as a two part mix (resin and hardener) and usually have fillers and extenders (such as wheat flour or ground nut shell) added. These adhesives have poor gap filling properties and require reasonably high pressure during bonding. The phenolic adhesives are dark in colour and if used with thin veneers any bleed through can cause unsightly staining. The
43

aminoplastics result in white or clear gluelines. Urea-formaldehyde is used in the manufacture of standard particleboard and is the most common aminoplastic adhesive used in veneering and furniture manufacture. Generally, urea resins have a reasonable open assembly time of about 30 minutes. The most promising adhesives for wood starting to come into more common use worldwide are the highly durable but costly isocyanates. Polymer-isocyanate adhesives give a chemical bond with wood, in contrast to the mechanical bond of the formaldehyde types. Thermoplastics Thermoplastic adhesives can replasticise when heated, and tend to deform or creep under long term stress or elevated temperature. The most common thermoplastic adhesives are polyvinyl acetates (PVA’s), contact or elastomeric adhesives and hot melts. PVA’s are composed of polyvinyl acetates emulsified in water and are inexpensive, easy to use, easy to clean have good gap filling properties and are transparent when dry and non staining. Water resistance is usually low but cross linking formulations have much improved water resistance. Most PVA’s are cured at room temperature and set quite rapidly, some of the water dissipating into the wood and veneer (this may lead to veneers swelling, and then splitting surrounding joins in veneer as the moisture dries out). Some PVA’s are susceptible to dampness and bleed through porous wood showing up as a lighter colour through the finish. General PVA’s (sometimes called ‘white’ PVA in US publications) soften at reasonably low temperatures (80 °C – below the ‘delicate’ setting on a household electric iron) and have short assembly times (10 to 20 minutes) so are not suited to bonding large areas by hand. However, this thermoplastic property enables running repairs to veneers during assembly by judicial use of a hot household iron. Though gap filling properties are good, firm and rapidly applied pressure is important in securing a good quality join. ‘Yellow’ (aliphatic resin) PVA (which is thicker than white) soften at around 120 °C (between ‘delicate’ and ’wool’ on an iron) are slower to soften during sanding, and therefore less likely to clog sandpaper. ‘Yellow’ PVA’s have longer open assembly times thus suit larger and/or detailed inlay veneer applications. Highly crosslinked PVA’s (sometimes called ‘waterproof yellow’ PVA) soften at 175 °C or more (in the ‘cotton’ to ‘linen’ range on an iron) and are stronger bonding. Note – excessive heat can break down the PVA. Elastomers Elastomers are rubber-based adhesives which have gap-filling properties. Contact cements are the most common and are widely used in furniture manufacture for securing overlays (upholstery) and also gluing laminates, and laminated plastics where instant and permanent bonding is needed. Hot-Melts Hot-melt glues are formulated from vinyl polymers, rubbers and other natural or synthetic resins. As they cure quickly, are useful for temporary bonds and certain permanent bonds, such as veneer edgings and profile wrappings. Cyano-acrylates (superglues) surprisingly fall into this category. These are
44

very expensive but dry rapidly without clamping and are popular with tradesmen for small repairs and musical instrument makers for gluing inlays. Epoxy Resins Epoxy resin glues are generally prepared by the mixing of a resin and a curing agent and have very good chemical and heat resistance and gap filling properties. Epoxy resins will harden at room temperature with little need for pressure to the joint. Their main use in timber appears to be to builders of wood aircraft and boats.
45

LAMINATING VENEERS TO SUBSTRATES
The methods employed of applying the chosen adhesive and bonding the veneer layons or individual veneers to substrates depend on the equipment available and the quantities of veneering involved. Probably the most important criteria is the pressing method. The possible alternatives are:
• Single or multi daylight hydraulic hot press • Hydraulic or mechanical cold press • Vacuum bags or press • A clamp and caul type of press • Applying pressure using a hot household electric iron • “Hammer” veneering i.e. using animal glue
In a natural timber veneered panel processing factory using a single or multi daylight hydraulic hot press with self-loading and unloading equipment the adhesive might be a crosslinked PVA with a press time of 30 seconds to 60 seconds at a press temperature of 100ºC to 120ºC. Urea formaldehyde can be utilised however in general it is a little slower than the fast setting PVA’s. Generally, PVA can be used with the cold pressing methods (cold press, vacuum or the clamp and caul method) which has the advantage of much longer set up times. The hot iron approach works best with small hand veneering and involves the use of thermoplastic adhesives. “Hammer” veneering is a century’s old method of laying veneers by hand with hot animal glue – the “hammering” being a method of rubbing a “veneer hammer” in a zig-zag fashion across the laid veneer surface to force the excess glue to the edges of the veneer. Preparation of the Adhesive The best advice is to follow the manufacturer’s recommendations for the adhesive. PVA’s are available in single pack, which can be used from the container, or two pack which involves mixing sufficient for the application. With PVA’s there is no need to keep checking viscosity and the clean up time is greatly reduced. Urea formaldehyde has been used as a veneering adhesive for many years and is still commonly used. Depending on the manufacturer and application, a typical mix of urea is urea resin, shell flour, wheat flour, plus hardener. Powdered mixes which only require water are available. Animal Glues Animal glues are generally supplied as powdered gelatine, or are available in a pre-prepared slab or liquid form. Application of the Adhesive The amount of glue spread on the contact surfaces is a very important parameter of the veneer laminating process when using a hot press. The glue spread must be controlled within the limits set by the glue manufacturer. Excessive glue spread will increase the moisture content of veneer and/or will cause steam blows as the water will turn into steam during the pressing
46

operation. Too small an amount of glue will result in lack of bonding and can lead to delamination of veneer. For large volume manufacturing of veneered panels the adhesive can be applied by a traditional roller glue spreader to both sides of the substrate, or by a curtain coater to the top of the substrate and to the top side of the underside veneer. This equipment can be adjusted so that correct volume of adhesive is applied to each joint. For smaller veneering applications the adhesive can be applied using paint brushes or rollers. Depending on the application the adhesive for each joint may be applied to both the underside of the veneer and to the corresponding substrate surface.
47

CAUL VENEERING
In hand caul veneering rarely is a press used to lay the veneer, however in the trade presses are normally used. The pressure can be applied by “G” clamps, bolts through beams on either side of the job, weights or a press. Cauls are stiff boards, either flat or curved, between which the groundwork and veneer are pressed. Unlike hand laying techniques, caul veneering requires extra work and materials, both for making cauls and manual presses. Less materials are needed if use in mechanical presses. However, it is the best method for laying veneer made from taped together pieces or weak veneers such as burrs or curls. It also offers the possibility of veneering both sides of the groundwork simultaneously. With caul veneering, larger curved surfaces are easier to handle as cold setting glues allow time for laying up. Making a Caul Assembly The complexity of the caul assembly will depend on the size and shape of the work and the extent to which it will be used. Flat Cauls For small or narrow work, make the cauls from solid lengths of timber and apply pressure to them with cramps placed along the centre line.
For veneering wide panels, make a simple press with cauls cut from man made board a least 18 mm thick and larger than the panel to be veneered. To provide pressure across the cauls, cut at least three pairs of solid cross bearers from 75 mm x 50 mm softwood. Plane a shallow convex curve across one narrow edge of each, in order to apply initial pressure at the centre of the cauls and force surplus glue and trapped air out to the edges. This compensates for the cramping forces, which can only be applied at the ends. Use cramps to apply pressure, or bolt the cross bearers together with threaded rods fitted with nuts and washers.
Curved Cauls Curved panels can be caul veneered using male and female formers, as in laminated bending. Or you can make a press similar to the ones used for flat
48
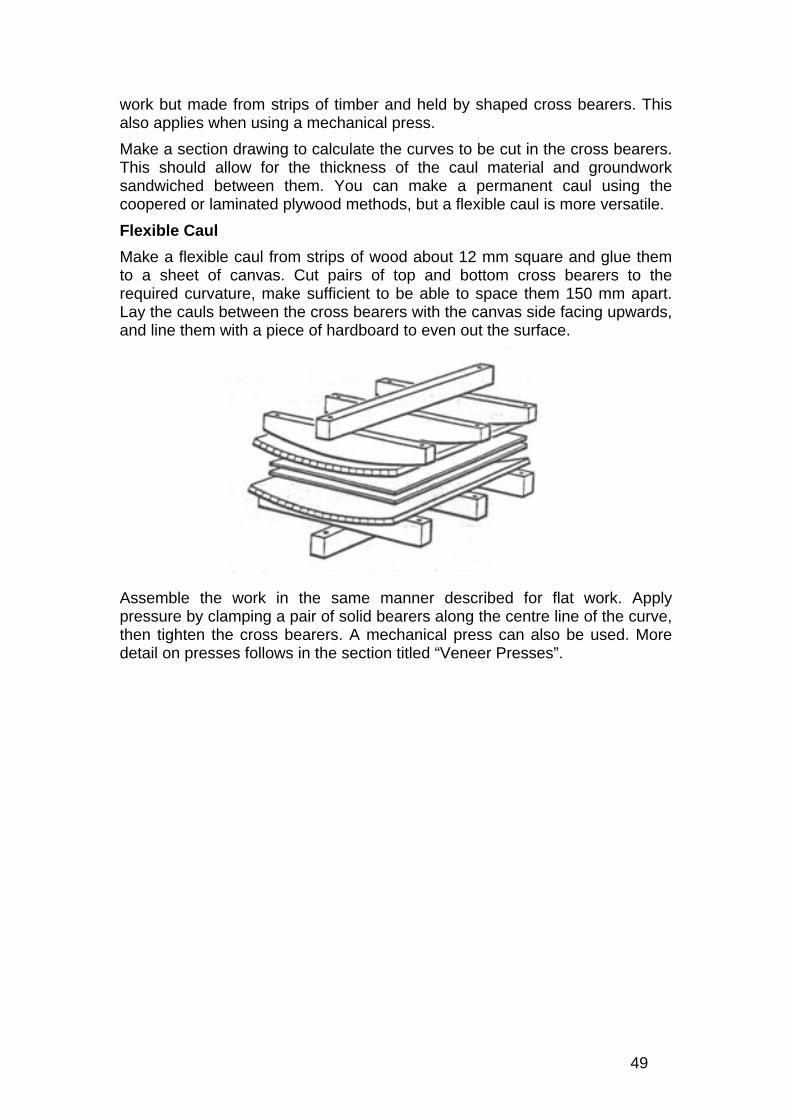
work but made from strips of timber and held by shaped cross bearers. This also applies when using a mechanical press. Make a section drawing to calculate the curves to be cut in the cross bearers. This should allow for the thickness of the caul material and groundwork sandwiched between them. You can make a permanent caul using the coopered or laminated plywood methods, but a flexible caul is more versatile. Flexible Caul Make a flexible caul from strips of wood about 12 mm square and glue them to a sheet of canvas. Cut pairs of top and bottom cross bearers to the required curvature, make sufficient to be able to space them 150 mm apart. Lay the cauls between the cross bearers with the canvas side facing upwards, and line them with a piece of hardboard to even out the surface.
Assemble the work in the same manner described for flat work. Apply pressure by clamping a pair of solid bearers along the centre line of the curve, then tighten the cross bearers. A mechanical press can also be used. More detail on presses follows in the section titled “Veneer Presses”.
49

HAND VENEERING USING A HOUSEHOLD ELECTRIC IRON & PVA
Being able to veneer in a small workshop can dramatically extend the scope of projects available to a woodworker. You can take veneer, a beautiful but unstable material, and apply it to a solid, flat substrate. You can also repeat or book match patterns for a spectacular effect. But what's the best way to glue down the veneer and keep it down? A modern alternative to traditional techniques of hot hide glue and a veneer hammer is applying veneer using “waterproof” yellow PVA glue and a household electric iron. The adhesive is applied to both the veneer and the substrate, and then allowed to dry before hot ironing the veneer onto the substrate. The advantages of this method for small projects are the adhesive is commonly available, you don't have to worry about water-to-glue ratios, soaking time, temperature, hammering pressure or the mess associated with hide glue; and by using an ordinary iron, there's no need for a vacuum bag, an expensive press or any complicated clamping cauls. The only drawback is over heating the PVA can break it down and reduce its effectiveness and life. Therefore, only apply enough heat to complete the task. Another advantage of using “waterproof” PVA adhesive are in situations where the wood will be exposed to moisture, the veneer isn't likely to come loose. Also, once this type of glue is cured, it isn't sensitive to common finishing solvents, so finishing shouldn't affect the veneer bond. Another advantage of this method is that you can glue down burl or crotch veneer without getting adhesive stains, which can cause finish delamination and uneven staining. When you glue down these veneers using a press, the adhesive bleeds through. This is because of the capillary action caused by the high percentage of end grain in these types of veneer. This method of allowing the adhesive to dry before ironing is it sets up a barrier that minimises bleed-through. This barrier can be enhanced is to apply shellac to the underside of porous veneer prior to applying the adhesive. The shellac undercoat works well because shellac is thermoplastic, just like the PVA adhesive. If you get a dab of shellac on the veneer face, no problem, as shellac is a great sealer and it's compatible with virtually any finish. Another option to the this method described in this section of utilising pre dried waterproof adhesive is to apply general white PVA adhesive to the substrate only, and then immediately iron on the veneer. However, with this method, the veneer can slide on the wet glue, causing misalignment and gaps at the seams. By contrast, when you heat the dry glue through the veneer, it adheres in place right away. And water is less likely to evaporate out of the glue and through the veneer, causing bubbles. Preparing the Veneer Layon Depending on the project the veneer may be large enough to cover the substrate in one piece, or by joining veneer pieces to span a larger surface. There are two options in meeting the requirements of larger substrates. The first is to "shoot" the edges (by running a finely set plane along the edges of the veneer held between two straight battens or use a shooting board) and tape the seams prior to gluing, and then treat the assembly as one piece. Alternatively, the veneer can be laid one piece at a time, cutting the seams in place. This can be achieved by overlapping the second piece onto the first
50

and cutting through both of them. After passing the saw or knife over the seam several times, lift the top waste piece away from the seam. Then gently lift the edge of the top sheet, and remove the waste strip from the bottom piece of veneer. If the veneer will not lift, use a bit of steam from the iron to loosen the bond. When both waste strips are removed, the seam should be pressed firmly. After ironing, apply veneer tape lengthwise down the seam, and place tape straps across the seam (which prevents the seam from creeping open). Leave the tape in place for 24 to 48 hours. Another alternative is, after bonding the first veneer place the second veneer so it overlaps the first veneer by 0.25 mm and then bond the second veneer to within 40 mm of the seam, then butt the two pieces together by buckling the loose veneer edge up from the substrate and finally iron down the seam. This technique of ironing each veneer separately works with wrinkled veneers, even burls and crotches, and it may avoid the need to flatten such rare and beautiful woods before application. Before gluing, it is good practice to tape all the cracks, which is especially important if you're using curly veneer. To see if there are any splits, hold the veneer up to a light. If there are any cracks of light, even slightly suspect areas, tape them. Use veneer tape and tape them on the face side. Veneer tape is just a strip of paper with adhesive on one side that is wet and stuck down. After bonding the tape can be scrapped off the face. Masking tape should not be used as heat from the iron will turn it into a gummy mess, plus masking tape also stretches. The veneer tape will hold the veneer together and prevent the glue from reaching the face. Like any other technique ironing down veneer has its quirks. The heat produced by an iron can shrink the veneer, opening up seams and causing some checking. When used with a little forethought and care, these problems are minimal. Another safeguard with a high shrinkage veneer is to pre-shrink the veneer before ironing it down. Some species can shrink dramatically under the heat that will be required to bond them with dry glue. To check, measure a piece of veneer across the grain, and then heat the wood with the iron set at the ‘silk’ setting After the veneer has cooled for a few minutes, measure again. If the shrinkage is significant, it's a good idea to pre-shrink all of the veneer by thoroughly heating it with the iron. Even though the glue will swell the veneer when it's applied, pre-shrinking the material now reduces the chance of checks and open seams later. Applying the Adhesive The “waterproof” adhesive is then applied as a heavy coat, preferably using a brush (or perhaps a paint roller with a short nap), to completely cover both the substrate the back of the veneer. A roller can leave air bubbles and an undesirable texture and is totally ineffective on wrinkled veneer. Before allowing the veneer to dry, mist a little water from a spray bottle on to the face side of the veneer to minimise any curling up of the veneer. When working with veneer it is good practice to balance whatever is done on one side by what is done to the other – in this case the effect of the moisture in the applied adhesive is balanced by the sprayed water on the opposite side The veneer should be placed to dry for about 30 minutes on supports so that air circulates around both sides. Veneer, properly coated with dried adhesive will have a leather-like feel. Spreading glue on the substrate is very straightforward - just
51

brush on a good, even coat. Once you have enough glue on both surfaces and it has dried, pass a sanding block with 80 grit paper lightly over the substrate and, if possible, the veneer. This will knock the top off any dust, coagulated glue or whatever may have settled on the glue as it was drying. Anything that the sandpaper won't smooth out should be cut off with a sharp knife or a chisel. Another option to the one heavy coat and for easier spreading is to thin the adhesive with about 10% water (thinning it until it's the consistency of heavy cream) before applying the adhesive in two coats. Ironing the Veneer After, place the veneer over the substrate with some overhang all around. Then, using a steam iron on the cotton setting, use the tip to tack the veneer in place and with slow, circular motions working from the centre out start pressing the veneer firmly onto the substrate. Keep both the pressure steady and slowly moving the iron. How hard should the iron be pressed - don't break the handle! Remember that the heated glue is plastic, not fluid, so the more pressure the better. Clicking sounds heard during ironing generally are small spots pulling loose so ironing should continue until the clicking stops but don't linger too long in any spot. Note that overheating the glue will destroy its bonding characteristics. Watch for any gaps and open seams and allow the iron to linger over any trouble spots. If there is too much overhang on the veneer, the edges could curl away from the substrate, preventing a clean, tight job. To remedy this, limit overhang to 3 mm, and apply steam from the iron. The steam causes the veneer to expand on the face side, which allows it to lie flat again. The iron may leave some light skid and scorch marks, but these can easily be scraped off later after the glue has cured. On larger areas, work from the centre out toward the edges to avoid creating bubbles or creases. Remember that every veneer behaves differently even within the same species. In certain applications it may be better to iron the edges first. Experiment on scrap to see. The heat from the iron should drive out excess moisture from the glue, which might otherwise bubble up under the veneer. Steam also works to temporarily release the veneer to reposition it or when to iron out blisters and bubbles.
52

HAND VENEERING WITH ANIMAL GLUE
Hot hide glue can be messy and needs experience to work. If fresh glue is used and old mixes not reheated (unless refrigerated) then the common complaint of animal glue being smelly is not a problem. The smell comes from using old glue – the gelatine used for this adhesive needs to have the impurities to work! The glue can be made softened with heat, even after the veneer has been in place for many years, so mistakes can be rectified simply and damaged or blistered veneers easily repaired. However, raw glue must be melted to reduce it to the required consistency, and the laying technique requires practice. Modem glues are cleaner and simpler to use although not quite so versatile. Preparing the Substrate/Groundwork The surface of the groundwork may be acceptable for the laying of veneer using most adhesives, immediately it is flat or shaped as required. However, when using animal glues as the adhesive certain practices are necessary to further prepare the surface to affect a good durable bond. The required practices include toothing, sizing and sanding. Toothing Toothing is the scratching of the surface of the substrate. The scratches should be regular, not too deep and in at least two directions which cut across the grain. The toothing is carried out in order to tear and lift the fibres. This allows deeper penetration of the glue to "key" the bond.
Toothing may be carried out by dragging a saw across the surface. Blow away loose dust before sizing.
53

Sizing Sizing is the coating of the surface which has been "toothed" with a diluted (thin) coating of animal glue (approximately 20% glue to 80% water). The thin glue soaks quickly into the substrate to further enhance the "keying" effect. Sizing is carried out for the following reasons:
• To limit the amount of moisture lost through absorption during the laying operation. This prolongs the time in which the glue is workable.
• To create a deep and strong bond. • To improve the workability of the veneer; the veneer may need to
be worked (slipped) slightly to achieve a neat joint or match a grain pattern.
Veneer laid using animal glue without sizing is difficult to position and the bond is suspect. Sanding The coat of size seals and stiffens the torn fibres created during toothing. These fibres should be removed by a light sanding with coarse abrasive paper. The toothed, sized and sanded surface is now prepared for the laying operation
Marking the Location of the Leaves The location of each veneer leaf should be determined and marked accurately onto the substrate. The leaves must be numbered to indicate their exact location on the groundwork so that mix-ups will not occur during the laying. The above practices avoid miss-matching and miss-alignment of the joints. Below are common examples of marked layouts.
Diamond Matched Panels
54

Bank of Drawers
Alternative Method of Marking
Preparing Equipment for Laying The hot glue and other necessary equipment should be prepared in advance so that the laying operation can be carried quickly and without fuss. Preparing the Animal Glue A fresh pot of glue will produce the best result. The glue should be placed in a clean pot and covered with clean water. The pot should then be heated in a situation where it is not in direct contact with the heat source (this is to avoid burning the glue). When the mix is hot it should be tested for consistency. The glue is acceptable when it flows freely from a dipped brush without breaking into droplets.
Clean, hot water may be added during the use of the glue to maintain the required consistency.
55

The Gluing Area The bench where the gluing is to take place should be clean and clear of anything not needed for the laying operation. A vice is useful to hold the work. The work area should be free of draughts and some form of maintaining a temperature around 20° C would be an asset. If possible the glue pot should be left on the glue kettle near the bench to maintain the working temperature around 48° C. However, the pot may be carried to the bench. The Laying Equipment for Animal Glue Apart from a Veneer Hammer the following equipment is required when using animal glue: Glue Brushes A clean, round brush (mop) is generally used to transfer the glue from the pot onto the work. The size of the brush is determined by the volume of glue required for the operation.
Clean Rags Rags should be available to clean hands, equipment and the veneer surface of excess glue. One clean rag should be kept aside for the moistening of the veneer face. Hot, Clean Water A bucket of hot, clean water should be on hand to aid the moistening and cleaning of equipment etc. The water may also be necessary to dilute the glue during laying. Steel Iron An iron may be required to reactivate the glue if it begins to gel (set) before the excess is squeezed out. The iron should be of the solid steel type which is heated by leaving it in the bucket of hot water.
Note
An electric iron should not be used in wet areas
56

Scraper Some form of scraper (eg old chisel) should be on hand to aid the removal of squeezed out glue after it has gelled. Laying the Veneer The first leaf on any matched panel must be laid accurately in its location as marked on the groundwork. It sets the positioning of all other leaves involved in the panel.
The following operations are in the order in which they are generally carried out: Wetting the Veneer Face The face of the leaf should be dampened with a moist, clean cloth which has been dipped in hot water. The dampening will cause the face to expand and cup the veneer. When hot glue is applied to the undersurface of the veneer it will return to a flat leaf.
With particularly delicate veneers it may be necessary to completely dampen them well before laying to overcome their brittleness. Applying the Glue The leaf should be positioned face down next to the groundwork on which it is to be laid. The glue can then be applied to both the groundwork and the underside of the veneer in one quick motion.
57

It is better to coat a little wider than the actual groundwork location as marked. This is because the veneer has expanded slightly due to the moisture applied to it. The veneer should be turned over and rubbed into position as soon as it has been coated with glue. Hammering the Veneer Once the veneer has been rubbed into its position it should be hammered, (squeezing the excess glue out of the joint). Using a veneer hammer in a zig-zag or walking motion (without lifting) while maintaining a reasonable downwards pressure the excess glue should be forced toward the edges of the panel. Care should be taken when hammering across the grain as the moist veneer will easily split. Care should also be taken to avoid damaging the edges of the veneers which have been prepared as joints.
Note
Do not re-hammer the veneer too many times. The intention is to gain a flat bond with a thin layer of glue, do not remove all the glue.
Checking For Blisters Tap the surface with the end of a pencil or your fingernails to detect air bubbles. Treat any hollow sounding areas by pressing the veneer again with the hot iron and veneer hammer. If necessary, slit it along the grain with a sharp knife to allow trapped air to escape.
58

USING GLUE FILM
A paper backed film of glue which becomes liquid only when heated with an electric iron is the modern equivalent of traditional animal glue. It can be reworked in a similar way to animal glue, with a further application of heat, comes ready for use and takes less skill to apply. However, experience is required before using glue film to lay difficult veneers such as curls and burrs.
Applying the Film Using scissors, cut the glue film slightly larger that the groundwork. Place the film face down on the groundwork and lightly smooth it flat with an iron heated to a medium setting. When the glue has cooled, peel off the backing.
Laying the Veneer Lay the veneer on the glued groundwork and place the paper backing on top to protect the veneer. Press with the heated iron, working slowly across the surface from the centre outwards. Follow behind with a veneer hammer or a block of wood to keep the veneer pressed flat as the glue cools.
59

USING CONTACT ADHESIVE
Specially developed contact adhesives enable you to veneer flat or curved surfaces without pressing or special tools or heat. A solid lipping or some other form of edge protection is recommended, as veneer is more vulnerable to chipping with this type of adhesive. Do not use contact adhesive for curls or burr veneers. Applying the Glue Using a brush or toothed spreader, apply a thin even coat of glue to the veneer. Work diagonally from corner to corner; first in one direction then the other, making sure that you cover the surface thoroughly. Apply glue to the groundwork in the same way, then leave until it is touch dry.
Laying the Veneer Lay a sheet of news paper or brown paper over the groundwork, leaving a 50 mm strip of glue exposed at one edge.
Lay the veneer on top, and when it is aligned with the groundwork, press the veneer against the strip not covered by paper. Gradually slide the paper out from between the veneer and groundwork, pressing the two glued surfaces together with a block of wood. Finally, rub over with the block to flatten the veneer, then trim off the surplus, using a knife or veneer trimming tool.
60

MARQUETRY AND INLAYS
As an alternative, or in addition to matching veneers, veneers can be applied to substrates as inlays or in the form of marquetry. The difference between these two methods can be a little blurred but they can be described as follows:
• Cabinetmakers often frame a highly decorative wood grain with a plainer grain to accent it. To delineate it, a narrow strip or dark or patterned veneer is cut in along the joint line. This technique is called inlay. It has also come to mean cutting patterns into the basic veneer as well.
• Veneer faces of various kinds are made up with small segments of veneer cut into patterns and fitted together to form marquetry. Often many different species and grain patterns, including many of the most exotic grains, are used in the marquetry work. Beautiful effects can be obtained using the marquetry technique it is generally applied in furniture manufacture and can be quite ornate. Utilising the wide range of species and colours available in veneers craftspeople are able to produce pictures and art forms.
Bandings and Inlay Motifs Bandings and inlays can transform a plain panel into an attractive piece of decorative woodwork in the traditional manner. Bandings are plain or patterned strips of veneer used to create decorative borders. You can make your own, but commercially produced bandings (normally in one metre lengths) offer a wide choice and come ready to use. Inlays are marquetry motifs set into a background - either solid or veneer and used as decorative features. They are available in traditional, pictorial or floral patterns. Commercially made inlays are relatively simple to apply and can be hand laid if they are individual motifs, but use cauls for veneer assemblies. Stringing and Bandings Commercially produced decorative inlay bandings are made in batches from selected timbers. Always buy sufficient when you first order, as you may not be able to obtain an exact match at a later date. Not only may the timber be different but the size may vary, too. Stringing Stringings are fine strips of timber used to divide areas of veneer by providing light or dark lines between different types of veneer or where the grain direction changes. Ebony and boxwood were the traditional materials for stringing. Bandings Decorative bandings are made from side grain sections of coloured timbers glued together and sliced to produce strips approximately 1 mm thick. They come ready edged, with a choice of boxwood or black stringings, and are used to make ornamental borders. Strips of veneer cut across the grain are known as cross bandings and are used to make bordered panels. Cross
61

bandings can also be produced by cutting them from the veneer used for the panel.
Veneering a Bordered Panel Cut and lay the centre panel veneer so that it stops short of the edges all round. Trim the veneer true to the edges with a cutting gauge set to planned width of the cross banding. Peel the waste and remove surplus glue. Soften glue with an iron if necessary.
Cutting Cross Bandings Cut cross bandings from the ends of consecutive veneers, using a cutting gauge or sharp knife, First, shoot the end of the veneer with a finely set plane, then cut the cross bandings for the border slightly longer and wider than required. Use a straight edged board to guide the gauge.
Hand Laying Cross Bandings The ends of the bandings can either be mitred before laying or cut after they have been laid. The latter should guarantee a good fit. Apply animal glue or PVA to the substrate and both sides of the bandings. Press each in place, using either a veneer hammer, cross pein hammer or press.
62

To cut the mitres once laid, align a straightedge with the inner and outer corners of the overlapped bandings and cut through both layers carefully.
Remove the top waste, and then lift the end of the border to extract the bottom piece. Press the mitred ends with the hammer. Cut the waste from the long edges and wipe away the surplus glue. Apply veneer tape to the joints and edges. Caul Laying Bandings You can use cauls to lay bandings after the centre panel veneers, or lay them together. By laying the centre panel first and trimming it with a cutting gauge you can be sure it is centred and the border will be even all around. You will need to take the veneered panel from the press and trim it before the resin adhesive has cured.
Cut and mitre the bandings to fit. Apply adhesive to the groundwork border, then tape the veneers in position and return the panel to the press.
63

Alternatively, cut the centre panel veneer and the banding to size, allowing extra at the border, and tape them together. Pencil centre lines across the length and width of the groundwork and assembled veneer. Apply adhesive to the groundwork, carefully position the veneer and press it down by hand or with a roller before placing it in the press. Inlaying Bandings Bandings can be inlaid into the surface of solid timber, using a router or cutting gauge and hand router to cut the grooves. Set the gauge to cut the width lines of the groove, working from the edge. Clean out the groove with a router or a hand router, but use a chisel at the corners. Make the depth of the recess slightly less then the thickness of the banding. Mitre the ends of the banding, then apply the adhesive and press it into place with a cross peen hammer.
Inlay Motifs Inlay motifs are supplied with protective paper backing. They are laid with the paper surface uppermost. Some are made to a finished size, other have spare veneer surrounding the design for cutting to shape.
64

Insetting an Inlay Motif You can inset the inlay into your veneer assembly before caul veneering. Ideally, the inlay should be the same thickness as the veneer so as to maintain even pressure across the panel. For a centre motif, mark centre lines on the veneer background and on the motif. Using a strip of double sided tape, position the motif and carefully trace around it with a knife to cut the shape in the background veneer.
If the motif has spare material surrounding it, mark the required shape on it and cut both layers together. Tape the motif in position and then lay the complete assembly with cauls. When set, dampen the paper backing and scrape it off ready for sanding. Solid Timber Inlay Position the inlay on the surface and cut round it with a knife. Using chisels and gouges cut the waste from the edges of the recess.
Remove the remaining waste with a finely set hand router. Alternatively, use a power router first then trim the edges by hand. Make the depth of the recess slightly less then the thickness of the motif. Glue the inlay into place and clamp it with a block of wood or place it in a press, with a layer of paper placed between surfaces. Waxed paper is the best to use if you have access to some, provided a hot platen press is not used. Surface Laying Motifs can be glued directly onto a solid timber surface without inlaying them. To improve the appearance, gouge a groove around the edge to give a break line.
65

66

VENEER PRESSES
In the trade presses are used to the almost entire exclusion of hand methods, though the types of presses used vary with the requirements of the particular trade. The principle is the same throughout, i.e. to maintain sufficient positive pressure to bend or flatten the veneer onto its former or substrate; excessive pressure over and above the minimum requirements should be avoided or glue-starved joints will result. A thin skin only of glue should be used and the object, therefore, is not to squeeze out the surplus glue as in hand veneering but merely to establish the requisite contact. Single and Multi-Platen Hydraulic Hot Press These presses have platens that are electrically heated or heated with hot water, and pressing time (varying with the type of glue and temperature) may be a few minutes.
Hydraulic Cold Press The hydraulic press has a single opening.
67

Hand Operated Press Quick-action hand operated screw veneer press with open ends.
Twin Vacuum Shapers and Veneer Press In this the tailored veneer is placed over the groundwork, the frame with rubber sheet lowered over it and the air beneath pumped out. The electrically heated dome is drawn forward over it and left until curing time has been completed.
68

Vacuum Press A vacuum press is nothing more than a large vinyl bag, with a pump attached to evacuate air from the bag. The platen is placed inside the bag to support work piece and to facilitate airflow.
69

70

CONDITIONING OF VENEERED PRODUCTS
After completion of veneering, veneered products should be stored in relatively dry conditions to allow the moisture from the adhesive to dissipate. Products should be allowed to condition to an equilibrium moisture content (E.M.C) of approximately 10% - 12%. Probably the most critical aspect of preparation for finishing is the moisture content of veneered product. High moisture content is difficult to detect visually (unless it has progressed to “puffiness”) so prevention is the key. All veneered products should then be maintained at this moisture content until sanded and finished or polished. All timber products pick up moisture from the air so store in a cool dry place and do not leave exposed to wet or humid conditions.
71

FINISHING VENEERED PRODUCTS
An important stage in the manufacture of veneered products is the finishing, or polishing, process. Veneers like most timbers used in furniture, joinery and fit-out require a protective coating or lacquer to protect them from the rigours of day to day usage. It is important that the selection of finish is suitable for the end use application of the finished piece of furniture, etc. For example; a highly decorative jewellery box doesn’t need the same durable coating as a kitchen cabinet, or even a laboratory fitment does. Finishing is usually undertaken by furniture or joinery companies or by a specialised finishing factory. Veneered products should be sanded smooth. Care should be taken to round sharp edges since finishes (especially viscous liquids) tend to draw away from sharp edges and minimise the seal. A well lit workplace is essential to ensure that the piece to be finished is free from marks, indentations, etc., that will detract from the finish. After sanding, ensure that the product is clean. Dust and grit will adversely affect finish and care should be taken to remove loose particles before installation. Oil, wax and other contaminants also need to be removed before a lacquer is applied. If necessary use a grease remover. An appropriate face mask should be used when spray-painting to prevent solids e.g. spray mist from entering the lungs. For small projects there are several traditional finishing systems available:
• Wax • Oils • Varnish • Shellac
Generally lacquers are used for finishing. The DWVA “Veneer Product Information Manual” and Website www.woodveneer.asn.au both recommend the following four types of generic clear finish for veneered products in interior applications:
• Nitrocellulose Lacquers – simple, easy to use, fast drying, economical • Pre-catalysed Lacquers - improved mar and scuff resistance, fast
drying, medium water and solvent resistance • Acid catalysed Lacquers - high build, superior mar and scuff resistance • Polyurethane Coatings - excellent - chemical solvent and water
resistance, high build, excellent mar and scuff resistance A high quality lacquer will help achieve a high quality result. Cheaper finishes usually have lower solids contents and take more coats to achieve the same finish. You also need to consider the grain of the veneer – open grained veneers may require filling (especially if a gloss finish is desired) or a more flexible lacquer. The use of ‘thin wet’ coats of the addition of solvent can be helpful. Some species of timbers (and veneers) have phenols, tannins and other chemicals present in their cell structure, these species are best sealed with a specially formulated ‘isolator’ coating that provides a barrier to stop the chemicals in the wood reacting with the chemicals in the top-coat. Lacquer manufacturers can provide advice as to the most suitable coating system for particular species. It may be necessary or possible to use two or more coating
72

systems on a piece of furniture. For example, a dresser or sideboard needs a very durable serving surface, whilst the vertical surfaces can have a less durable, but just as attractive coating. It can be seen that the range of finishes is large and should be selected to suit. Some are low yellowing, some are hard wearing and/or have chemical resistance, some high build – it is a balance of cost versus quality. Finally, it is generally bad practice to mix systems e.g. the sealer and the top coats must be of the same type from the one manufacturer.
73

GENERAL CARE OF VENEERED SURFACES
The on-going, in service, care of finished veneered surfaces depends largely on the type and quality of the coating utilized. Thus, the manufacturer of the finish should be involved in preparing the recommended care instructions for the furniture, joinery or fit-out. This can occur at the specification stage or by the chosen joiner/cabinetmaker as they are the people in control of the final product and finish.
In general, timber veneered surfaces should not be left wet/damp or with wet staining materials on them (such as dark fruit juice/wine). They should not be cleaned with harsh cleaners or chemicals that affect the surface finish. Abrasive cleaning of clear finishes can scratch the surface and reduce the visual clarity. Sharp edges are potential problem zones for breaks or cracks in the coating as during finishing process the coating tends to flow away from sharp edges resulting in a thinner coating in that region. Therefore, it is recommended such edges be eliminated by design, or by sanding during manufacture.
Veneered products are not suitable for high wear and wet horizontal surfaces such as kitchen counter tops, unless the veneer is completely encased within a suitable resin system. Veneer surfaces (like all coloured materials) will always change colour, to a greater or lesser degree, particularly upon exposure to natural and artificial light. The degree of colour change will depend on such factors as the species chosen, the coating type used and the intensity and period of time of exposure to light. Some stains, notably dye stains, can fade if subjected to long term ultra violet light. In addition, conventional coatings have a tendency to yellow with age which can have quite a dramatic effect on the original colour of the stain/timber veneer selected. To minimise this, low-yellowing finishes can be specified.
It is not possible to comprehensively speak on behalf of all coatings, board and glue suppliers, nor on how these products is used or applied. These factors and their interactive effects should be referred to experienced people. It is believed the best source of in service care information is the coating manufacturers; however, following are some specific care and cleaning instructions.
Specific Cleaning and Care Instructions for Coated Veneered Surfaces Dusting: Use only a soft dry cloth or feather duster.
Polishing: Use a high quality furniture polish and a soft dry cloth. It is recommended the polish used not contain any silicone as this may cause recoating or refurbishment problems at a later date. Abrasive polishes should be avoided.
Extreme Temperature Changes: The expansion or contraction of the timber due to extreme temperature changes may cause damage to the surface coating. Care should be taken in air conditioned or heated environments to keep temperature changes within reasonable limits. Use heat resistant place mats under hot food and beverages to avoid heat damage.
Spillages: All spillages should be cleaned with a damp cloth as soon as possible. Moisture may cause damage to the coating. High humidity, steam and excessive water being in contact with the coating may cause the coating to crack, or if it gets under the coating cause white marking of the veneer surface. If spilled, all chemical substances and alcohol should be removed immediately from all veneered surfaces.
Dirty or Greasy Marks: After first wiping with a dry cloth, wipe with a cloth lightly dampened with a mixture of water and a high quality furniture polish. Persistent dirty or greasy marks may be removed by mild, non-abrasive proprietary cleaners appropriate to the type of surface finish. The appropriateness of the cleaner should be sought from the surface coating or cleaner manufacturer. The effect of the cleaner on the surface should be tested on a hidden or a less conspicuous section on the
74

finished veneer surface.
Direct Sunlight: Direct sunlight should be avoided on all internal veneered surfaces as fading, bleaching or colour changes of the surface coating and of the veneer may occur. Excessive hot sunshine may dry the veneer surface more quickly than the veneer substrate thereby causing small surface checks parallel to the grain to appear and possibly damage the surface coating.
75

DEFINITIONS OF TERMS USED IN TRADE
BALANCED CONSTRUCTION – A construction such that forces induced by uniformly distributed changes in moisture will not cause warping or twisting of the product (usually a panel). In veneered panels, a construction in which back and face veneers are essentially equal in thickness, grain direction and properties is normally balanced construction. BALANCE MATCH – One or more pieces of uniform size used in a single face. BANDING – A plain or patterned strip of veneer used to make decorative borders. BIRD’S EYE – A figure created by local sharp depressions in the annual rings accompanied by considerable fibre distortions. BLISTER – Spot or area where veneer does not adhere. Blisters are considered a bond line failure. BOOK MATCH – Adjacent sheets from a flitch, opened like a book, with the figure on the back of the first sheet matched to the figure on the face of the next sheet. The fibres of the wood, slanting in opposite directions in the two sheets, create a characteristic light and dark effect when the surface is seen from an angle. BURL (BURR) – A hard, woody, abnormal growth or excrescence on trunk or branch formed by the local development of numerous dormant buds and often caused by injury to the tree. CAUL – Shapes of wood or metal used to press veneer on to substrate/groundwork. CENTRE MATCH – An even number of pieces of equal size matched with a joint formed in the centre of the panel. COMPRESSION WOOD – Abnormal “reaction” wood that forms on the lower side of a leaning softwood tree which in effect is trying to straighten the tree growth to the vertical. It is harder, denser and more brittle and prone to greater longitudinal shrinkage than normal wood. CONTINUOUS MATCH – Each panel face is arranged from as many veneer sheets as necessary for the specified panel width. If a portion of a veneer is left over, it becomes the start of the next panel face. CORE – The inner part of a veneered panel or plywood between face and back. Particleboard, MDF, sawn timber, hardboard, veneers or other material can be used as cores. CREEP – Movement at the glue line where the different materials bonded slip due to the glue’s plasticity. CROTCHWOOD – Crotchwood comes from the portion of a tree just below the point where it forks into two limbs. The grain is crushed and twisted, creating a variety of plume and flame figures, often resembling a well-formed feather. The outside of the block produces a swirl figure that changes to full crotch figure as the cutting approaches the centre of the block.
76

CROWN CUT – Sliced from a billet with successive veneers parallel to the axis of the billet and kept in sequence as cutting progresses across the diameter. This method is also known as Flat Cut. In Australia, an equivalent term “back-sawn” is used for solid timber cut in such a way that the wide surface of the board is a tangential plane to the growth rings. CROSS-BANDED – A veneered panel in which the grain direction of the veneers is parallel to the shorter panel dimension. CURLY – Figure which occurs when the fibres are distorted producing a wavy or curly effect in the veneer. Primarily found in North American Maple and Birch. DEFECT, OPEN – Open checks, splits, joints, knotholes, cracks, loose knots, gaps, voids or other openings interrupting the smooth continuity of the wood surface. DISCOLOURATION – Stains in wood substances. Common veneer stains are sap stains, blue stains, stains produced by chemical action caused by iron in the cutting knife coming into contact with the tannic acid of the wood, chemical reaction between extractives in wood and glue or finish. END MATCH or BUTT – Veneers as described for book matched, but the ends of the sheets are also matched. EXTRACTIVES – Many species have a high tannin content, which reacts with iron to form black and insoluble iron tannates if the wood is in wet or humid conditions. Any contact with iron can cause problems; therefore it is essential that special care be taken during storage and manufacture of these types of veneers, veneered panels and products. All external fixings and metal joints should be of heavily galvanised steel or of non-ferrous metals. FIDDLE-BACK FIGURE – A fine, strong, even, ripple figure in veneers. The figure is often found in Red gum, Myrtle, Mahogany and Maple, but also occurs in other species. FIGURE – The pattern produced in a wood surface by annual growth rings, rays, knots, deviations from natural grain, such as interlocked and wavy grain, and irregular colouration. FLITCH – A sawn block of log made ready for slicing into veneers, or the bundle of sliced veneers. FORMER – The mould shape to which wood is bent around, known also as a caul. KEY – To roughen a surface, usually with an abrasive paper or toothing plane, to allow deeper penetration of the adhesive. GRAIN – The direction, size, arrangement and appearance of the fibres in timber and veneer. GRAIN SLOPE – Expression of the angle of the grain to the long edges or the length of the veneer. GUM POCKETS – Well defined openings between rings of annual growth containing gum or evidence of prior gum accumulations.
77

GUM VEINS – A ribbon of resin between growth rings - a common feature of eucalypts. Gum forms as a protective response to injury to the tree, such as from insect attack, fire or mechanical damage. HALF-ROUND VENEER – Veneer produced in the same manner as rotary cutting, except that the piece being cut is secured to a “stay log”, a device that permits the cutting of the log on a wider sweep than when mounted with its centre secured in the lathe. A type of half-round cutting can be used to achieve “flat cut” veneer. HARDWOOD – Lumber or veneer produced from broad-leafed or deciduous trees in contrast to softwood, which is produced from evergreen or coniferous trees. HEARTWOOD – The non-active centre of a tree, generally distinguishable from the outer portion (sapwood) by its darker colour. INTERLOCKED GRAIN – The angle of the fibres periodically changes or reverses in successive layers. JOINT – The line between the edges or ends of two adjacent sheets of veneer in the same plane. JOINT, EDGE – Joint running parallel to the grain of the veneer or lumber. JOINT, OPEN – Joint in which two adjacent pieces of veneer do not fit tightly together. KNIFE (PEELER or SLICER) CHECKS – Surface splits on one side of a veneer caused by stressing during veneer cutting. KNIFE MARKS – A raised or hollowed cross grain cut caused generally by a nick in the peeling or slicing knife. KNOT – A portion of a branch, which is enclosed by the natural growth of the tree, with grains usually running at right angles to that of the piece of wood in which it occurs. KNOT, OPEN – Opening produced when a portion of the wood substance of a knot has dropped out, or where cross checks have occurred to produce an opening. LIPPING – A protective strip of solid timber applied to the edge of a man-made board. LOOSE SIDE OF VENEER – In knife-cut veneer, the side of the sheet that was in contact with the knife as the sheet was being cut, and containing cutting checks (slicer or lathe checks) caused by the bending of the veneer at the knife edge. MOISTURE CONTENT – The weight of the moisture in wood, expressed as a percentage of its oven dry weight. OVERLAP – A condition in which one piece of veneer overlaps an adjacent piece of the same ply. QUARTER-CUT – A method of slicing veneers whereby the average inclination of the growth rings to the wide surface is greater than 45 degrees.
78

QUILTED FIGURE − Although greatly resembling a larger and exaggerated version of pommele or blister figure, quilted figure has bulges that are elongated and closely crowded. Quilted grain looks three-dimensional when seen at its best and is most commonly found in Mahogany, Maple, Sapele and Myrtle. It occurs only rarely in other species. OVERLAP – A condition in which one piece of veneer overlaps an adjacent piece of the same ply. POMMELE − Pommele figure resembles a puddle surface during a light rain − a dense pattern of small rings enveloping one another. Some say it has a "suede" or "furry" look. It is usually found in extremely large trees of African species, such as Sapele, Bubinga and Makore. Some domestic species with a sparser, larger figure are referred to as "blistered". RIBBON GRAIN – The ribbon effect produced by quarter slicing woods with interlocking grain. RIFT CUT VENEER – A variation on the quarter cut appearance specifically used to eliminate medullary rays in white oak, which results in a broader stripe. Veneer is produced by centring the entire log in a lathe and turning it against a broad cutting knife set into the log at a slight angle. ROTARY VENEER − A veneer produced when a log mounted in a lathe is rotated against a cutting blade. This method of peeling is used to produce veneers for plywood manufacture. ROUGH CUT – Irregular shaped areas of generally uneven corrugation on the surface of veneer, differing from surrounding smooth veneer and occurring as the veneer is cut by the lathe or slicer. RUBBER MARKS – A raised or hollowed cross grain cut caused by a sliver between the knife and pressure bar. SAPWOOD – The living wood occurring in the outer portion of a tree immediately under the bark, sometimes referred to as “sap”. Generally, it is lighter in colour than the heartwood, the part of the tree used for veneer. SLICED VENEER – Veneer produced by thrusting a log or sawn flitch into a slicing machine, which shears off the veneer in sheets. SLIP MATCH – The top sheet of veneer is slid into position with the sheet beneath it. The faces of both sheets are exposed, instead of the back of one sheet and the face of another, as in book matching. SMOOTH, TIGHT CUT – Veneer carefully cut to minimize peeler or slicer checks. SOFTWOOD – General term used to describe lumber or veneer produced from needle and/or cone bearing trees. SPECIES – A distinct kind of wood. SPIRAL GRAIN – The fibres form a spiral around the circumference of the tree. SPLITS – Separation of wood fibre running parallel to the grain. SIZING – Diluted glue used for sealing a porous surface. Approximately 80% water to 20% glue.
79
TELEGRAPHING – Visible irregularities in the surface of the face of the veneered panel or plywood caused by corresponding irregularities in the underlying core such as voids, zigzag stitches etc. TENSION WOOD – Reaction wood formed typically on the upper sides of branches and leaning or crooked trunks of hardwood trees. It has an abnormally high longitudinal shrinkage. TIGHT SIDE – In knife-cut veneer, the side of the sheet farthest from the knife as the sheet is being cut and containing no cutting checks (lathe checks). WAVY GRAIN – The fibres form short undulating waves in a regular sequence.
80