Embed Size (px)
Citation preview

Prepared by: Applications Support Help Desk
Version: 2.0
Date: December 13, 2017

ii
Disclosure Information
The information in this document may not be changed without the express written
agreement of the Department of Environmental Protection.
Change History
Version Date Revision Description
1.0 August 8, 2017 Version for user review
2.0 December 13, 2017 Updating language and screenshots
specifically for paying a permit renewal
3.0 December 27, 2017 Added GreenPort login instructions
Purpose
Welcome to the guide to user administration for the ePermitting website via the
DEPGreenPort website.
This guide provides information on how to successfully administer users on the
DEPGreenPort website and use the functions available through the ePermitting Application.
Applications Support Help Desk Team
Help Desk Support Line:
Number: (717) 787-HELP
Hours: Monday to Friday 8:00 am to 4:30 pm
Email: [email protected]
Applications Support Help Desk Team:
The Applications Support Help Desk Team includes helpdesk specialists, trainers, web
masters, on-line help developers, and testing engineers working together to provide
complete end-user support for eFACTS and other applications.
Applications Support Help Desk Team's Services:
➢ Applications Training
➢ Formalized Classroom Training
➢ Small Group Training
➢ One-on-One Training
➢ Participate in meetings to provide application guidance
➢ Telephone Support Help Desk
➢ Application Web Page Development and Maintenance
➢ Publish articles identifying solutions to common problems
➢ Application Testing
➢ Documentation Development
➢ Application On-Line Help Development and Maintenance
iii
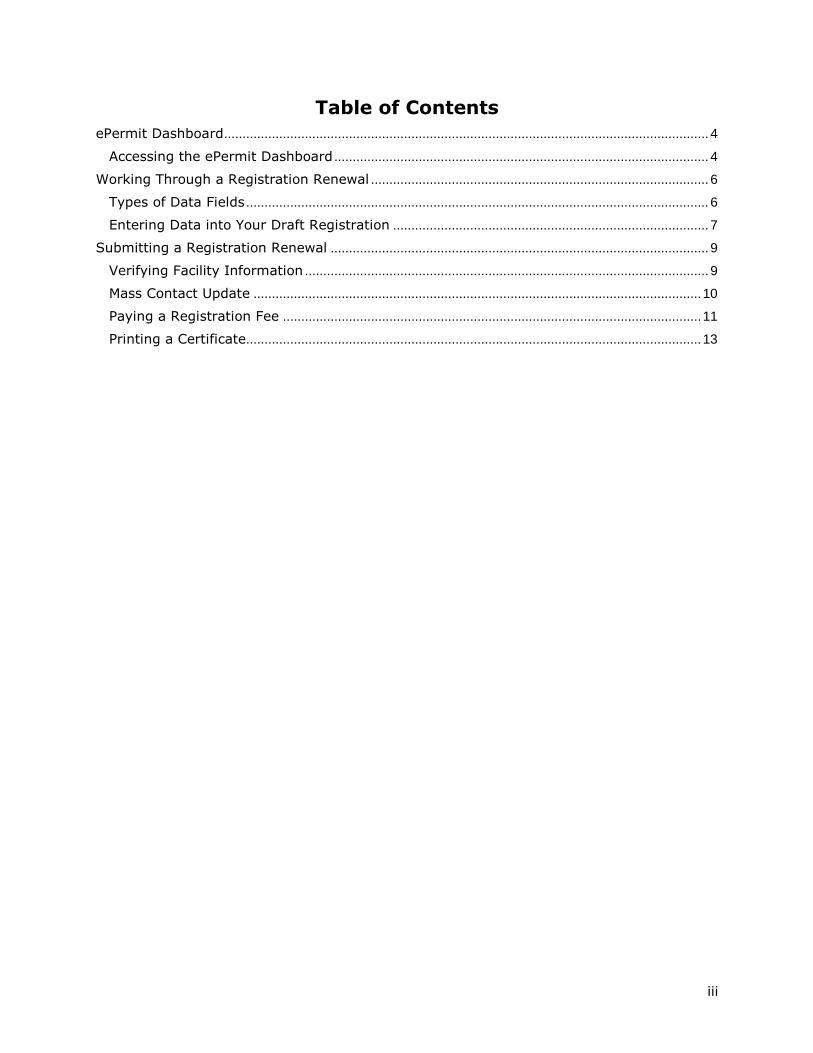
Table of Contents
ePermit Dashboard .................................................................................................................................... 4
Accessing the ePermit Dashboard ...................................................................................................... 4
Working Through a Registration Renewal ............................................................................................ 6
Types of Data Fields .............................................................................................................................. 6
Entering Data into Your Draft Registration ...................................................................................... 7
Submitting a Registration Renewal ....................................................................................................... 9
Verifying Facility Information .............................................................................................................. 9
Mass Contact Update .......................................................................................................................... 10
Paying a Registration Fee .................................................................................................................. 11
Printing a Certificate............................................................................................................................ 13

4
ePermit Dashboard
ePermitting users access the ePermit Dashboard to create, view, modify and/or delete draft
authorization applications or previously submitted authorizations based on security roles
given by the Electronic Filing Administrator (EFA). Users can view applications that are
Draft, Submitted, Correction Required, Approved and Withdrawn/Denied.
Accessing the ePermit Dashboard
1. Open Internet Explorer.
2. In the URL Address Bar type in https://www.depgreenport.state.pa.us
3. The DEPGreenPort website will display:
4. Enter your username in the Username field.
5. Enter your password into the Password field.
6. Click the button.
7. The List Applications Screen will display:

5
8. Click the button.
9. From within the ePermitting application, the ePermit Dashboard is the “home” page.
It can be accessed at any time by clicking the button.
10. Authorized users will see various links based on the programs they have been given
access to.

6
Note: If users only have access to one program, this page is skipped and the
user is taken directly to their dashboard for that program.
Working Through a Registration Renewal
Authorized ePermitting users have the ability to update information in their Registration
Renewal by completing modules and saving them at any time within the ePermitting
Application.
Types of Data Fields
Users will encounter several different types of data field types when working through
their applications. Some samples of these types of data fields are below.
1. Checkbox - a checkbox is clicked to select the value next to it. You may click it a
second time to deselect it.
Example:

7
2. Text Box - a textbox is a box where users can enter text manually or paste text
that was copied from another application.
Example:
3. Radio Button – a radio button is used to select one item from a series of items.
Only one button in the grouping can be selected.
Example:
4. Dropdown menu – a dropdown menu is a menu you click on to display a list of
items. You will click the item you wish to select from the list for it to display as the
selected item from the list.
Example:
5. Button – a button is used to operate the command shown on the button. In the
example below, the Save button saves the data that had been entered onto the
screen.
Example:
Entering Data into Your Draft Registration
The ePermitting Application is a dynamic application which means it can change
based on the information entered into it. Users may notice that, depending on the
answers given in some areas, the application will add additional questions or perhaps
even require additional modules.
1. While working in a draft application in the ePermitting application, click the link
for an unfinished module.
2. Complete all data fields in the module, including all required fields.
Required fields - a required field is indicated by an asterisk * to the right of the
field title. The module will not be considered complete until all required fields have
been completed.
3. Click to save your changes at any time while working on the module.
You can return to the module to complete it at another time.
4. You may encounter an error message when saving a module if something was
entered incorrectly.
5. You will see a message indicating if the module was saved successfully or not.
Or

8
6. Click to verify all required information has been completed for the
module.
*Note: If a module is not complete, you will see a list of items that need to be finished before the module can be considered complete.
7. Click .
8. The completed module will be indicated with a to the right of the facility
name under the Status heading.

9
Submitting a Registration Renewal
Authorized ePermitting users can verify facility information and pay a facility registration
from the ePermit Dashboard page within the ePermitting application.
Verifying Facility Information
1. From within the ePermitting Application, access the Storage Tanks ePermit
Dashboard page.
2. Select clients or facilities to verify facility information is correct. A user can select
multiple clients and facilities by selecting the checkboxes to the left of the records
listed in the Pending tab:
3. To verify multiple facilities, click on the “Verify Selected Facilities” button at the
bottom of the page.
4. To verify an individual facility, click on the “Edit” button beside the facility record.
5. The ePermit Module Detail-Verify Facility Information will display. Verify the Tank
Owner Information and Facility Information is correct by selecting the check box to
indicate their accuracy. If they are not accurate, follow the instructions on the page.
6. Responsible Official Contact Information and Billing Contact Information is
updateable.

10
7. When finished working on the module, click the button and the
button to verify the module is complete.
8. Select the button to return to the Dashboard.
9. A green status should appear beside the client/facility record.
Mass Contact Update
Clients with multiple facilities have the ability to update contact information for more than
one facility at a time.
1. At the bottom of the Verify Facility Information module, select the
button.
2. Select the Contact to Copy from the drop down options.

11
3. Select the Facility(ies) to copy the contact information to, and select the
button.
4. When finished, select the to return to the module.
5. Complete the module, save, and return to the dashboard.
Paying a Registration Fee
Payment can only be made once client/facility information is verified and a green icon
appears in the status column on the dashboard.
1. After the information has been verified for accuracy, select the Client/Facility and
click the button at the bottom of the page.
2. User is taken to the Payeezy Payment page. Enter in payment information for Credit
Card or Telecheck, and select the payment button at the bottom of the page.

12
3. Message will appear if payment has been processed

13
Printing a Certificate
1. To view paid registrations, select the Completed tab from the ePermitting dashboard.
2.The user may view and print a Temporary Registration Certificate by
selecting the View Temporary Certificate link
.