Embed Size (px)
Citation preview
Institut für Mineralogie und Petrographie
Preparation of glass beads and powder pills
for XRF analysis of silicic and calcareous rocks
(standard version)
- Edition 2004 -
Volker Dietrich, Florian Schwandner and Flurin Vils Institute of Mineralogy and Petrography, ETH Zurich
Use of the analytical facilities (including preparation labs and machines) of ETH-IMP For a PhD or Diploma thesis a successful participation of the ETH course “Physikalische Methoden der Mineral- und Gesteinsanalyse” is required.

START
END
preparation ofrock powders
(ETH NO CO 25)
analysis(EMPA)
- fill out forms (download from IMP homepage)- fill pills into transport tray- label tray & hand over to assistant
quantitation(ETH-IMP)
Loss On Ignition
glass beads(major & minor
elements)
powder pills(trace elements)
sign-up for XRF(ETH NO 18.5)
field sampling:- representative (max. grainsize?)- homogenous- no alteration rims, weathering, veins- dry transport & storage- labeling (no ink!): max. 7 characters e.g. ID 12345 (2 letters & 5 numbers)
petrography (macroscopic):- rock type- ore content- water & CO2 content- mineralogy (hardest mineral?)
petrography (microscopic):- rock type- ore content- water & CO2 content- hydrous phases, content (e.g. amph)- mineralogy (hardest mineral?)
sample list- rock type- ore content (vol %)- water & CO2 content (wt % estimate)- amphibole content (wt % estimate)- mineralogy (hardest mineral?)
select representative samples- check with project supervisor: which samples to analyse first (priority list!)- before proceeding to ICP-MS, have a representative sample set analysed by XRF, from there choose samples for trace element analysis
thin section preparation:use saw in lab D 14 to prepare
rock slabs for thin sections and XRF.
For XRF: 300 g if phenocrysts > 0.5 cm100 g if phenocrysts < 0.5 cm
crush
homogenize
fair split
(select coarse fraction 0.2-3 mm)
grind to powder
store in flask
XRF analysis?
No
Yes
ROCK SAMPLE ANALYSIS
Table of contents flow chart 2 table of contents 3 regulations 4 1 rock specimen preparation 5 1.1 jaw breaker (Backenbrecher) Hydraulic Press 5 1.2 Homogenize sample 5 1.3 disk mills (Scheibenschwingmühlen) 6 1.4 Contamination effects through grinding 7 1.4.1 Oxidation effect 7 1.4.2 Contamination through mortar material 7 1.4.3 Cross-contamination effects 8 1.4.4 Literature 8 2 Preparation of powder pills for trace element determination 9 3 Preparation of Glass Beads for Major Element Determination 10 3.1 Determination of the Loss on Ignition (L.O.I.) 10 3.2 casting galss beads 12 3.2.1 The Machine 12 3.2.2 Preparation of casting powders 12 3.2.3 Casting with Claisse Flux M4 13 3.2.3.1 Start-up and operation 13 3.2.3.2 The Menu and available programs 13 3.2.3.3 Activation of a casting program 14 3.2.3.4 Sequence of events during casting 14 3.3 Cleaning and proper treatment of the platinum material 15 3.4 Troubleshooting and Error messages 16 3.4.1 Casting problems 16 3.4.2 Maintenance checks 16 3.5 Casting glass beads by hand 17 4 Lab Rules 18 For publication/thesis: Methods of preparation and calibration in: Nisbet et al. (1979) Dietrich et al. (1984). Nisbet, E.G., Dietrich, V.J., and Esenwein, A. (1979). Routine trace element determination in silicate minerals and rocks by X-Ray Fluorescence. Fortschr. Mineral., 57 (2): 264-279. Dietrich, V.J., Carman, M.F., Wyttenbach, A. And McKee, E.H. (1984). Geochemistry of basalts from Holes 519A, 520, 522B, and 524, Deep Sea Drilling Project Leg 73 (South Atlantic). Init. Reports DSDP, 7: 579-601. Reusser, E. (2000). XRF 2000. ETHZ-IMP Internal Report. [data treatment software]
3

Regulations • Every user has to register beforehand without exception (on calendar in E 18, key for NO CO 25 and platinum crucibles from the assistant). By signing up, full responsibility is taken and the rules, operating instructions and safety rules of ETH are accepted. • Each user has to fully report in the lab journal (with assistant) after the work period is completed. A sample is given on the first page of the lab journal. The points to note are:
• readable name/institute/tel.-no. or e-mail/date work (XRF: powder pellets or glass beads, which program and how many samples) (crushing: jaw breaker, hydraulic press, or (which) mills and how many samples)
• rock types (exotica ? ) • incidents/notes
Always do:
• cleaned up, consumables refilled, cleaned • platinum crucibles and keys back • signature
Sample identification: maximum of 7 figures: 2 letters & 5 digits (e.g. FS 12345). Other formats are not allowed and can not be considered for analyses. The data acquisition and treatment software accept only this format. No samples will be sent to EMPA for analysis, if the following conditions are not fulfilled:
- sign-out is incomplete or missing, - the lab is not left in good condition, - the lists (forms) are not readable (print or fill out on computer).
• The devices and their settings must not be modified. Working on weekends and at night requires prior approval of the assistant. • Preconditions for use of the lab are the successful visit of the course “Physikalische Methoden der Mineral- und Gesteinsanalyse” and a personal instruction by the assistant.
V. Dietrich/Assistances For any questions please contact the lab assistant Adélie Delacour, NO E 22 (E-mail: [email protected] , Tel.: 27823)
4
5
1 rock specimen preparation The following instructions apply to silicate and carbonate rocks. Production of pills from non-silicate (or carbonate) rocks without prior approval and instruction of the laboratory leader results not only in significantly more work (preparation, measurement, interpretation) but also results into errors of the instruments and of the final results. No observance can result into exclusion from laboratory work and possible compensation payments. This is especially the case for rocks with an ore content >5% (esp. sulphidic), sulphates, slag and flint. sample selection The sample/specimen should be fist-sized, about 200-500 g, and shouldn’t have any veins, paint (sample numbers etc.), grease from the saw, or weathered sections. We advise to group samples of similar composition and to treat them group wise. This reduces the probability of contamination! Setting up a sample list with priority assignment is strongly recommended:
- own name, exact sampling location, date, unit, etc; representative for what? use/scientific question? - field description (rock type), macroscopic classification - microscopic description (texture, mineral content, rock type) - amphibole content, ore content (sulphide, oxide), approx. content of hydrous minerals - sample ID (alphanumeric, no symbols, max. 7 digits) and relative priority
1.1 Jaw Crusher & Hydraulik Press (NO CO 25) Jaw crusher: use for large samples only. Crush the clean sample and use a hand magnet to remove metal splinters or fragments (contamination!). Hydraulic press: use for normal to small sized samples. Place isometric cuted pieces or grains of maximum diameter of 20 mm on the anvil. Crush them to 1-2 mm-sized grains. Caution! Both devices should be cleaned using the air hose and acetone. Do not use water! Rust leads to elevated Fe, Ni & Cr values! 1.2 Homogenize sample Powder sized sample grains of equal size but different density will vertically separate if you only tap the jar on the table too hard. Inhomogeneities and unknowingly wrong or not at all interpretable results follow. fair split Fair-split and reunite the crushed sample several times: on white printing or wax paper, separate a symmetric pile of the powder into four sections, using a spatula. Re-unite facing quarters in diagonal direction. piece out method Piece out a fraction of the sample from a sample cone using a tube end (1.5 – 3 cm diameter, bring your own; alternative to fair split) shaking Shake the sample well, in a plastic bag or pot, together with two agate balls, by rotation & eccentric shaking over a horizontal axis (homogenizing!).
6
1.3 disk mills (“Sacheibenschwingmühlen”, for grinding gravel to powder)
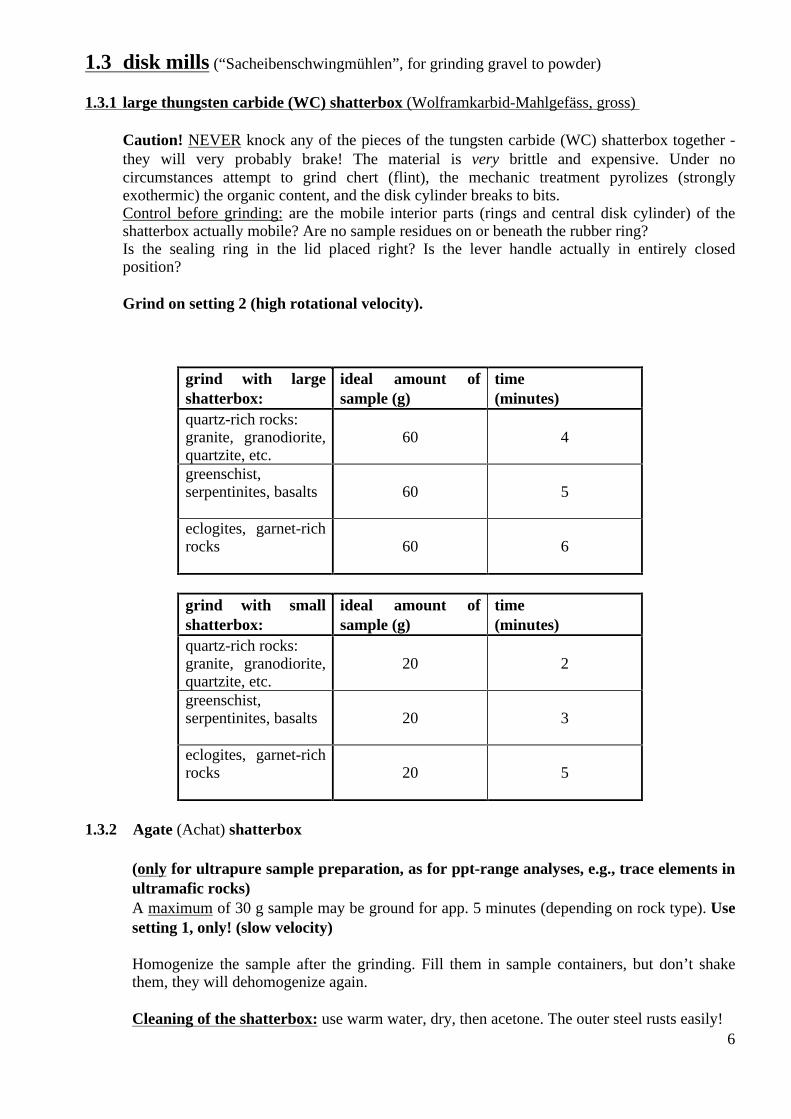
1.3.1 large thungsten carbide (WC) shatterbox (Wolframkarbid-Mahlgefäss, gross) Caution! NEVER knock any of the pieces of the tungsten carbide (WC) shatterbox together - they will very probably brake! The material is very brittle and expensive. Under no circumstances attempt to grind chert (flint), the mechanic treatment pyrolizes (strongly exothermic) the organic content, and the disk cylinder breaks to bits. Control before grinding: are the mobile interior parts (rings and central disk cylinder) of the shatterbox actually mobile? Are no sample residues on or beneath the rubber ring? Is the sealing ring in the lid placed right? Is the lever handle actually in entirely closed position? Grind on setting 2 (high rotational velocity).
grind with large shatterbox:
ideal amount of sample (g)
time (minutes)
quartz-rich rocks: granite, granodiorite, quartzite, etc.
60
4
greenschist, serpentinites, basalts
60
5
eclogites, garnet-rich rocks
60
6
grind with small shatterbox:
ideal amount of sample (g)
time (minutes)
quartz-rich rocks: granite, granodiorite, quartzite, etc.
20
2
greenschist, serpentinites, basalts
20
3
eclogites, garnet-rich rocks
20
5
1.3.2 Agate (Achat) shatterbox
(only for ultrapure sample preparation, as for ppt-range analyses, e.g., trace elements in ultramafic rocks) A maximum of 30 g sample may be ground for app. 5 minutes (depending on rock type). Use setting 1, only! (slow velocity) Homogenize the sample after the grinding. Fill them in sample containers, but don’t shake them, they will dehomogenize again. Cleaning of the shatterbox: use warm water, dry, then acetone. The outer steel rusts easily!
7
1.4 Contamination effects through grinding
The following Information should be taken serious when attempting to grind rocks in the XRF sample preparation lab CO 25. For any questions, contact the lab assistant.
Note: The greatest systematic errors through contamination occur during rock crushing and grinding, not in later wet chemical digestion or analytical procedures! For powder pills, grain size must not be greater than 64 micrometers (a sieve with 250 mesh without residues). If the powders feels and looks like flower when rubbing between your fingertips (no grains felt), then the powder is right.
1.4.1 oxidation effect.
When grinding rock pieces, Fe (II) -bearing minerals heat up and react with atmospheric O2. To critically evaluate the effect on your sample, you might consider two ideas:
- treat all your samples the same way too keep the systematic error to the same level. This makes your results more reproducible, precise and comparable. For example, always use the same mortar of the disk mill for your samples, use the same amount of sample, and the same grinding time (if equality of composition allows it, see lab manual for composition-time relation).
- Seperately determine FeO by spectrophotometry (contact V. Dietrich) on coarser powder. J. POTTS (1987) reports up to 20% increase of Fe2O3 relative to FeO in the same sample allready, when grinding for less than 10 minutes!
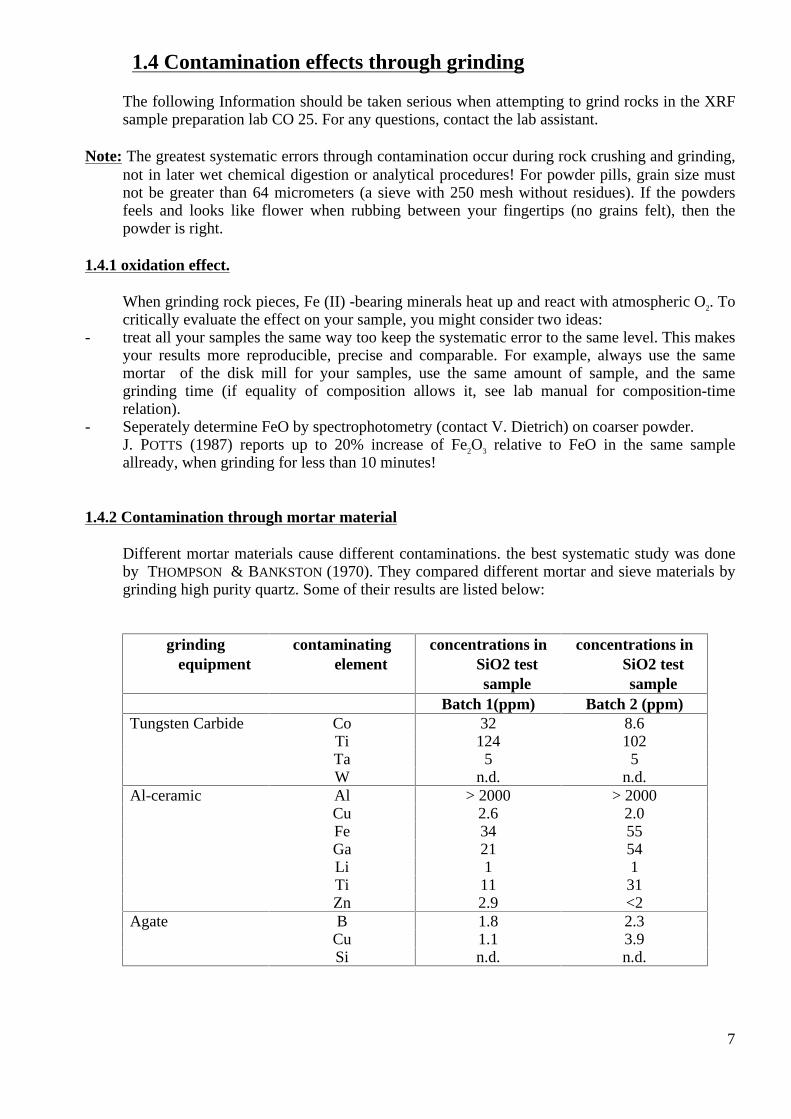
1.4.2 Contamination through mortar material
Different mortar materials cause different contaminations. the best systematic study was done by THOMPSON & BANKSTON (1970). They compared different mortar and sieve materials by grinding high purity quartz. Some of their results are listed below:
grinding equipment
contaminating element
concentrations in SiO2 test sample
concentrations in SiO2 test sample
Batch 1(ppm) Batch 2 (ppm) Tungsten Carbide Co 32 8.6 Ti 124 102 Ta 5 5 W n.d. n.d. Al-ceramic Al > 2000 > 2000 Cu 2.6 2.0 Fe 34 55 Ga 21 54 Li 1 1 Ti 11 31 Zn 2.9 <2 Agate B 1.8 2.3 Cu 1.1 3.9 Si n.d. n.d.

Other useful references with similar data can be found in JOHNSON & MAXWELL (1981), p. 75, BENNET & REED (1971), p. 10ff, and in ZIEF & MITCHELL (1976), p.153. In addition, especially Nd and Ta among other HFSE (high field strength elements) may show contamination by using tungsten carbide. 1.4.3 Cross-contamination effects Cross contamination means: Contamination of sample B by traces of sample A, when sample B is ground after sample A, using the same container. This is probably the greatest contamination effect. To avoid or minimize this effect, consider two ideas: - Carefully read and follow the lab manual instructions for cleaning the equipment. Rather run the mill with quartz twice than only once between samples. Note: cleaning the mortar with water, and acetone after (see manual) carefully and running it once with quartz can give better results than loosely cleaning it but running with quartz twice. - Think of the right order of grinding your samples. Similar compositions give less contamination. There is actually a reason why certain mortars are assigned to certain rock chemistries! 1.4.4 Literature POTTS, J. (1987). A handbook of silicate rock analysis. Blackie London, 622pp. JOHNSON, W. M., & MAXWELL, J. A. (1981). Rock and Mineral analysis. Chemical analysis series Vol. 47. J.Wiley, New York, 489 pp. (2nd ed.) ZIEF, M., & MITCHELL, J. W. (1976). Contamination control in trace element analysis. Chemical analysis series Vol. 47. J.Wiley, New York, 262 pp. BENNET, H., & REED, R. A. (1971). Chemical methods of silicate analysis. British Ceramic Research Association. Academic Press, London, 272 pp. THOMPSON, G., & BANKSTON, D.C. (1970): Sampling contamination for grinding and sieving determined by emission spectroscopy. Appl. Spectrosc. 24:210-219.
8

2. Preparation of powder pills for trace element determination Powder pills are produced by pressing the rock powder under a maximum pressure of 450 bar. Before pressing, an acrylic polymer resin is added in order to have the individual grains stick together. It is dissolved in acetone (polymerizes quickly in water), which vaporizes and leaves a grain-coated coagulate of grains behind. Under pressure, it flows into one mass and binds the grains together. Once the pressure is released, it solidifies and the result is a solid pill that can easily be measured in the XRF spectrometer. An earlier version used polyvinyl alcohol instead (much more toxic). Make sure to have read the material safety data sheets (MSDS) before using it. Procedure: 1. Dry the powder overnight in an oven at 110°C 2. Weigh ca. 10 g dry powder in a 150 ml beaker 3. Add a 2/3 pipette of 10% Elvacite (dissolved in acetone) 4. With a thick glass rod, stir until the powder appears to dust out of the beaker 5. Repeat twice, then add 1/3 pipette and repeat twice. Total: 2.3 pipettes (2 mL) 6. Fill the dry powder into the pressing equipment, don’t stir, but distribute equally while
pouring. Make sure the piston is right side up (polished side down) 7. Insert equipment into hydraulic press and apply pressure (350 to 450 bar). 8. Leave for one minute, NOT longer! 9. Release pressure slowly by opening the release handle. 10. Securely grab the device at bottom and top, turn upside down slowly, secure piston. 11. Take bottom plate off. Careful: don’t drop piston. Cover cylinder piece bottom with plastic
cap. Turn right side up again and re-insert into hydraulic press. 12. Slowly, by hand, press the piston down into the cylinder to press the pill out into the plastic
cup (press by turning the top wheel of the press). Hold the piston with two fingers while doing so (you feel it releasing), and stop applying pressure as soon as the pill is released, otherwise it will break.
13. Remove assembly and carefully drop the pill onto a clean paper towel. CRASH-TEST: The pill gets dropped onto a stainless steel surface inside the x-ray spectrometer and may brake if it was not made well. To simulate and test its behaviour, drop it from 8 cm high on a double paper towel. It should neither break nor have cracks. If so, grind it in the agate mortar/pestle and add another 1/3 mL Elvacite, try again. The assistants perform crash tests with some of the pills to ensure that they were tested. If a pill breaks in the XRF spectrometer, it has to be taken apart and cleaned which takes ½ day. DO NOT TOUCH PILL SURFACES WITH YOUR FINGERS!!
9

3 Preparations of Glass Beads for Major Element Determination 3.1 Determination of the Loss on Ignition (L.O.I.) Material: weighing: ceramic crucible (glass cupboard) powder spatula (drawer) dried sample powders in jars acetone, Kimwipes form „L.O.I.“ ignition: - heated oven (Muffelofen) - long tongs - large leather gloves - small Nomex® gloves (densely woven cotton) - protection glasses with light filter - fibber ceramic plate - desiccator with blue drying agent (if it appears pink, it has to be placed into the hot air cabinet in the large ceramic bowl for dehydration) 3.1.1 drying in the hot-air cabinet and using the oven Let the sample drying in its open sample glass bottle in the hot-air cabinet for at least 6 hours (best overnight) at 105-110°C in order to remove remaining moisture (in earlier times called H2O-
). The oven (Muffelofen) has to be pre-heated. On maximum heating rate, it takes about 2 h. If it is switched off, any temperature programming might be lost. Note that the display is in minutes. It is preferable to program it the night before, so that you can start using it right away once you arrive in the morning. 3.1.2 sample amount 1.7 g sample powder for normal silicate rocks (L.O.I. of 1-10 wt.-%), 1.8 g sample powder for chlorite-rich or serpentinitic rocks (L.O.I. of 10-20 wt.-%), 2.3 g sample powder for carbonaceous rocks (L.O.I. of 30-50 wt.-%). Weigh the empty ceramic crucible exactly and note the mass (n1) on the L.O.I. form. Slowly add the powder with the spatula and note the total mass (n2 = ceramic crucible + sample powder). No exactly mass of sample is necessary but to determine it with an accuracy of 0.1 mg (0.0001g). 3.1.3 burning-off Place the crucibles (numbered at bottom) into the oven and burn them red-hot at least 1 hour at 1050°C (1070°C if amphiboles >5%vol). Take the crucibles out and place them onto the fibre ceramic plate (at the Bunsen burner). After 5 minutes it is cold enough to handle it with a Nomex®-glove and place it into the desiccator. This protects your fingers and ensures that no skin fat or tissue is stuck to the crucible which would contribute to errors of the weighing result.
10
3.1.4 Calculate L.O.I. Weigh the crucible cold, always 10 minutes after removing it from the oven. Room temperature is reached in the crucible after ca. 5 minutes. If the crucible is still too hot, the air in the closed weighing chamber would be heated up, expanding and press on the scale. In experiments performed in this lab, it became obvious that the error due to adsorption of air moisture becomes negligible after 10 minutes. After 15 to 20 minutes though, recarbonatisation plays an increasingly significant role. Note its total mass (n3) and calculate the L.O.I. using this formula: Formula for L.O.I. : L.O.I. (weight %) = 100 x ( (n2-n3) / (n2-n1) ) The L.O.I. is made of contributions from: Volatile compounds: H2O+, CO2, F, Cl, S; in parts also K, Na (if heated for too long); Additional compounds: O2 (oxidation, e.g. FeO to Fe2O3), later CO2 (CaO to CaCO3). NOTE: For later interpretation of the results of measurement: Due to the escape of volatiles, there will be an increase of mass among all other oxides. By oxidizing FeO to Fe2O3, the value of Fe2O3 total increases but all other oxides will be mass-reduced. These changes in concentration are considered in the calculation of the analysis data. 3.1.4 Rehomogenization The burned off sample has to be rehomogenized in an agate mortar until the compound has a uniform colour. Depending on rock chemistry, at 1050° C and following cooling, a sintering, partial glass formation, or partial crystallization might occur. The grinding of the sinter optimizes the homogeneity and reduces the analytical errors.
11

3.2 Casting glass beads Instruction manual Claisse Flux M4 - Automated glass bead casting machine - 3.2.1 The Machine The M4 casts glass beads in standardized dimension (4 cm) in a single automated procedure. The casting powder (mixture of sample and flux) is rapidly heated with a Bunsen burner. Automated agitation homogenizes the material and removes gas bubbles from the melt. The actual casting is isothermal, casting dish and crucible are heated up to the same temperature. This prevents early crystallization of the sample. The vitreous solidification of the melt is done with cool air from ventilators underneath the casting dish. The whole process needs between 10-15 minutes for 3 samples cast synchronically. In general the machine can be used again immediately after a run. The product can be analysed directly; no subsequent polishing is necessary. 3.2.2 Preparation of casting powders The casting powder is a homogenised mixture of the dehydrated sample powder and a flux (Li2B4O7 – Di-lithium tetraborate). The flux lowers the melting point of the mixture far enough, that the powder easily melts at ca. 1150°C and can be casted. On weighing paper or in a small glass beaker 1.5 g of the dehydrated sample powder has to be weighed. Then 7.5 g Di-lithium tetraborate are added. Both masses have to be accurate by four digits after dot (1.0000 g). This ensures an exact mixture of 5 : 1 (flux : powder), which is necessary for the used software while measuring with the Philips spectrometer, because the Alpha-factors are calculated for this ratio. Otherwise the whole interpretation is wrong. The powder is transferred quantitatively into an agate mortar and homogenized with the pestle. Coarser grains of the ignition-dehydrated powder will also be grounded in this process. Homogenisation is necessary because the agitation in the M4 wouldn’t homogenise enough. As long as the powder is not absolutely homogenous, any splitting of powder over the mortar rim will alter the analytical result. The scale: Never switch the scale off, even overnight or on weekends. The weighing will be much more stable. If the indicated masses seem unstable, recalibrate the scale. Operational steps: 1. Close the sliding doors; check the bubble in the level ring and adjust level on the scale feet, if
necessary. 2. Hold black key down until the display shows 'CAL ----', then release. The scale begins auto
calibration. After a while the figure 100.000 is displayed (blinking). 3. Slowly push the black lever on the right hand lower rim of the back away from you. This sets
the calibration standard mass onto the weighing lever. After a while, the figure 100.000 is displayed constantly (not blinking), and then the figure 0.0000 blinks.
4. Slowly pull black lever back to front. The scale will return to its original display. After homogenisation the powder mixture has to be transferred quantitatively into the titanium crucible. Please ensure that no powder is left on the flat rim of the crucible. Remove it with rubber spatula or a towel, because the remaining powder can interfere with the casting.
12

3.2.3 Casting with Claisse Flux M4 3.2.3.1 Start-up and operation Important: - The machine must never be loaded with more than 11 g total mass (powder + flux).
(Otherwise the melt will overflow upon casting and the Bunsen burners will be damaged.) - Work with M4 only with safety goggles (the pill can burst at all the time) - Crucible and casing dish should NEVER be touched on the inner side!!! (even small scratches
are leading to contamination of the following samples) The operation of the machine is done through a panel of the operation microprocessor. a. open the gas valve (do not change anything on the in-between red valve!!) b. Make sure that the ultrasonic bath is filled with water (level up to 3 cm below rim, see mark)
and plug it in. c. press the ‘on’ button d. Switch the used burners on. e. Employ the casting dish f. employ the crucible with the weighted powder g. put down the pivot arm (position 20°above horizontal) h. Choose the suitable program P 8 for silica and alumina P3 for rocks i. close the security shutter j. start the machine through pressing the ‘start’- button k. after the program is finished, pick up the pill using the suction cup. In emergency case: press the ‘STOP’-button (reset the machine by pressing the ‘reset’-button) The M4 conducts a self-test of the electronics and the supply lines (gas) after the start-up. If the settings do not meet the requirements, the start of the machine will be interrupted automatically. The panel shows an error message (how to solve problems see below). In such a case, please try first to fix it yourself with the helping manual further on. If it is an extraordinary fault, contact immediately the responsible lab assistant. 3.2.3.2 The Menu and available programs After start-up, a total of 10 main menus can be used. The most frequently used are mentioned above. For choosing a program, press ‘P’-Button followed by the wanted number. Afterwards confirm it with pressing the ‘Enter’ Button. If you want to cast different rock compositions, you must seek advice of the lab assistant first. The following materials are not allowed for processing: - NO slag und cinders (e.g., flying ashes) - NO ores (especially sulphides) - NO sulphates The use of these materials leads to partial destruction of the platinum dish and crucible. A separate preparation protocol for rocks with oxide ore content >3%vol (dilution with standardized quartz powder) exists and has to be individually assigned by the lab assistant. No guarantee can be given for its success. Changes on the working programs are only done by the assistant, because they are code protected
13

3.2.3.3 Activation of a casting program Place the crucible containing the powder softly into its holder. Insert the crucible from the top. With one hand, open the holder und put the crucible softly in between the triangle carrier. Check that the crucible is sitting correctly, wrong placed crucible could be scratched or fall out while rotating. Be very careful during insertion!!! If you have cast pills before, take care when placing the crucible, because the holder is extremely hot. Always use the special crucible tongs but never let the tongs touch the inside or upper rim of the crucible! Only touch the outside. Melt drops will be almost impossible to remove from scratches and will contaminate further samples. With the same tongs, touch only the casting dish on the rim, but never on the casting surface. Any scratches will be on the glass bead measurement surface, and will cause the incident X-Ray beam to be out of focus. Open the holder with one hand (can be hot) and place the dish from above softly into position. Make sure the holder encloses the dish safely and check the correct placement. Wrong placed casting dishes can be scratched or lost while rotating. Topple over the pivot arm (position 20°above horizontal) into the right position. The machine will rotate the dish into casting position after start of a program. Choose the desired program (‘P+number’) and then press the green 'Start' Button on the panel. From here on, everything is automated. During operation, the remaining time can be read from the display: You can read the following details: 12.3.0 means the remaining time is 12min 30s. F 4.32 means the used function remains for 4min 32s. GO means the program has been started. 3.2.3.4 Sequence of events during casting The currently available programs comprise the following steps: a. First Fusion: melting of the powder while turning slowly b. Second Fusion: Homogenisation of the powder using higher axial triangle and higher
velocity. c. Slow down: the crucible dish is pivot into the flame and heated up. As soon as the crucible
and the dish have the same temperature the rotating is stopped. d. Casting: The casting dish is pivot down and the crucible is pivot the melt into the dish. e Cooling: Short time afterwards, the fans underneath start and the melt is cool down. f. Handling after the program: As soon as the fans stopped, you can pick up the pills using the suction cup. Never touch the slightly convex side of the glass bead with your fingers. You will experience elevated sodium values in your analysis. If it occurs, gently wipe the surface with a soft Kimwipe dipped in alcohol.
14

3.3 Cleaning and proper treatment of the platinum material For use of the machine, 3 casting dishes and 3 crucibles are handed out to the user. During the in between program time, the last used crucible is placed in warm (not boiling, ca. 80°C) hydrochloric acid (HCl 5%). 5 minutes are enough to clean the crucible if the antecedent program has been finished properly (this means, that the crucible has been shocked) and shortly placed in the ultrasonic bath. A hot plate (max. set dial to 6), glass beaker and acid are in the lab. Under normal conditions of use, the casting dish doesn’t have to be cleaned by this procedure. It is only placed into the acid after the last sample for a few minutes. This is mainly to keep the lower side of the dish clean and reflective. Never place the dish into the acid bath together with the crucibles! Their rims would scratch the inner casting surface of the dish. If the room is left for any short time, switch the hot plate off and leave the platinum in the acid bath. As well switch the main gas supply off if you leave the room (in door frame, red button = OFF and green = ON) Waste acid has to be poured into the white 10 L waste acid container next to the sink. Place container into the sink, unscrew top, pour waste acid in (GLOVES, SAFETY GOGGLES, LAB COAT!!!). If the container filling reaches the marked top level (ca. 10 cm below top), inform lab assistant for proper disposal. Do not pour waste acid into the sink. NEVER pour water into the waste acid container, explosion hazard! Under no circumstances are the inner parts of the crucible or the casting dish ever to be touched by the tongs!! Even slightest contacts scratch the platinum surface. On these scratches, small melt drops remain, leading to lesser quality melts and contaminated glass beads. The platinum crucibles and/or dish would have to be replaced which takes a long time (>1 month) and is extremely expensive (depending on platinum price ca. 5000, - CHF per item!). After extensive use, the casting dish will deform to leave a convex surface on the analytical side of the glass bead. Scratches and uneven surface can be flattened and polished by about 4 hours work. Uneven surface leads to a defocused incident beam during analysis.
15

3.4 Troubleshooting and Error messages 3.4.1 Casting problems Because the M4 is new, we do not know all the established problems. Please tell us what kind of problems you had, so we can improve the programs or manuals. a. The bead does not cover the entire floor of the casting dish: a1: The bead was caste a few degrees too cold. Check if the valve on the gas bottle is open, make
new powder mixture and cast again. a2. The whole mass is too small (6g instead of 9g flux and sample). Cast the pill again with the
exact amount of flux and sample (1.5g sample/7.5g flux) a3. The melt is too viscous. Add a few drops of a non-wetting agent to a new weighted solution
and cast again. (Still in experimental mode) b. Small melt remnants stay behind in the crucible: The melt is too viscous. Add to the beginning powder a non-wetting agent (2 drops of LiBr) and cast the pill again. (Still in experimental mode) c. The bead has a small gas bubble trapped in its rim: The bubble won’t change the quality of the analysis, because the outer millimetres of the bead are not incorporated into the measurement grid. Treat the casting dish for 5-10 minutes in warm acid. d. the pill splits d1. The casting dish is too cold. Open the gas valve until the maximum is reached (do not touch
the in-between valve!!) and cast the pill again. d2. There are external particles in the casting dish or the melt. Clean the casting dish before the
next cast by putting it for 5 min in the warm hydrochloric acid bath. d3. The measurement of the powder was too improper (not 1:5 rate sample-flux). Cast the pill
again with exacter measurements. 3.4.2 Maintenance checks The machine is given out 2 error messages (‘Fail’ or ‘Err?). If it displays these messages, all application stop immediately. After the error is eliminated, you can ‘reset’ the machine with pressing the ‘reset’-button and the machine is ready for the normal use. Possible error messages and how to fix it: ERR: a. the pivot arm is left in the position high. Put down the pivot arm (position 20° above horizontal) into initial position. b. Switch the machine off/on and if ’ERR’ still occur, ask your lab assistant. FAIL: is displayed on the panel, if one or all of the used Bunsen burners couldn’t ignite. Open the gas valve (do not change anything on the in-between valve!!), push the ‘reset’-button and start the casting run again. ARM7: The pivot arm is in position high. Put down the pivot arm (position 20° above horizontal) into initial position.
16
3.5. Casting Glass beads by hand If the machine is down or in repair, glass beads have to be casted by hand. The Cons are the sweaty character of the work, the Pros the quick procedure, the fast cleaning of the thinner Pt crucibles, and the almost unlimited number of pills possible every day. 3.5.1 Preparations The sample powders are to be prepared exactly the same way as in the procedure for the automated casting. The thinner crucibles are numbered. Make sure that the ultrasonic bath is filled with water (level up to 3 cm below rim, see mark) and plug it in. 3.5.2 Melting Place the powders in Pt/Au (95/5) crucibles into the oven and melt them during about 30 minutes at 1150°C. Li2B4O7 lowers the melting point to ca. 650-700°C, the melt is of low viscosity and can easily be homogenized by pioving. Sometimes, solid to viscous powder remnants stick to the inner walls. They have to be reunified with the melt. Tilt the crucible until the remnants are covered by melt and place it into the oven. Repeat this procedure until the inner walls are entirely free of remnants. If the melt still shows bubbles after 10 minutes, keep shaking the crucibles and leave them in the oven a little longer. 3.5.3 Preparation of the casting dish The casting dish gets heated to red above the special Bunsen burner. Open gas and air only slightly, so that the flame stays small and pointy. 3.5.4 Casting Remove the melt quickly from the oven and empty the crucible onto the casting dish. Immediately put the crucible down, and adjust the casting dish to horizontal (note symmetric cooling patterns). Immediately switch off the gas (not the air) to let the melt quench. 3.5.5 The bead Once the glass is quenched and detaches from the dish (clicking noise), empty the dish onto a towel. The measurement side is the side that faced the dish and must not be touching the towel while still hot. If the pill is not cracking, put the casting dish back on a small flame for a short time and turn over the casting dish on a towel. The pill should now unhinge without problems (dish spreads quicker than the pill). If in the crucible is left too much of any melt remnant, put the crucible back into the oven for 10 minutes, heat it and rapidly quench it in the Ultrasonic bath. Never scratch the crucible inside!! After the ultrasonic bath, put it into the acid bath for a few minutes to clean it. 3.5.6 Storage and transport of glass beads There are one-way round plastic containers and foam inserts in the lab. They can be used for bead storage. For longer storage times, keep them in a desiccators. The Li2B4O7 is strongly hygroscopic. For transport to EMPA, get a transport tray from the lab assistant.
17
18
4. Lab Rules 1. The lab has to be kept tidy and must be completely cleaned after use. Empty trash and close vent valves in the crushing room. 2. Report any machine errors, missing or almost empty supplies and broken parts to the lab assistant. 3. The lab key CO 25 The key and platinum tools are handed out to individuals who have signed up, are introduced to the protocols by the lab assistant and accept the lab rules and the “Regalement” (see lab book). It is never to be taken outside the building (e.g. lunch, overnight). The signed-up users accept full responsibility for the lab (both rooms). Users are held individually legally responsible for anything broken, stolen, left dirty or damaged. These responsibilities partially expire after signing off the lab book (in E 18), and handing in the platinum and lab key. The same rules applied for use of the crushing room, too. 4. Report missing supplies to the lab assistant. The following violations and non-observance of the lab rules may lead to payment of compensation to the IMP and to exclusion from any further lab work: 1. Scratching of crucibles and/or casting dish
2. Handing the lab key over to a third person without permission/note in the lab journal
3. Not reporting damages
4. Not reporting damages on the machine (M4):
- Placing hot crucibles on polymer surfaces
5. Casting of glass beads from non-silicate materials: - no metallic (esp. sulphide) ores - no sulphates - no slag or cinders
If you plan to cast such materials, you must seek advice of the lab assistant first.
6. Casting of glass beads from more than 11 g total mass (powder + flux)
7. Not removing beads from the casting dish.
![Basics of Handheld XRF - Berg Engineering | Ultrasonic ... · Basics of Handheld XRF. ... XRF Spectrum L to R = Cr, Co, Ni, and Mo 200 250 300 350 ... 2009 Simple XRF Basics [Read-Only]](https://img.pdfslide.us/doc/110x75/5af4ea757f8b9a9e598d5e09/basics-of-handheld-xrf-berg-engineering-ultrasonic-of-handheld-xrf-.jpg)