Embed Size (px)
Citation preview
Preface
The guide walks you through an installation of ALES 3.0 and demonstrates how ALES can be used to secure an application. It is organized as follows:
“Overview” on page 1-1 gives an overview of the tutorials, describes the use-case scenario, and lists preliminary requirements.
“Tutorial 1: Installing ALES” on page 2-1 describes how to install the Administration Server and launch the Entitlements Management Tool.
“Tutorial 2: Defining Application Resources” on page 3-1 demonstrates how to define application resources in ALES.
“Tutorial 3: Creating Identities” on page 4-1 shows how to model application users in ALES using Identities (Groups and Users) and Roles.
“Tutorial 4: Creating a Role with a Membership Rule” on page 5-1 shows how to create a Role and a Membership Rule.
“Tutorial 5: Creating Authorization Policies” on page 6-1 leads you through the creation of two Authorization policies.
“Tutorial 6: Generating Policy Reports” on page 7-1 shows how to generate policy reports to audit and verify the policies in place.
Introduction v

Pre face
vi Introduction

C H A P T E R 1
Overview
This section contains the following topics:
“Scenario” on page 1-1
“Requirements” on page 1-2
ScenarioThis document provides five tutorials that collectively demonstrate some of the basic steps involved in securing applications using ALES 3.0.
The tutorials address a simple, yet realistic use-case scenario. The Admissions Department at Parker Hospital maintains a web-based Patient Roster that provides information about currently admitted patients. Using ALES, the Patient Roster can be secured by policies that control who may access it, under what conditions, and what rights they have when they do so.
In successive steps the tutorials demonstrate how to install the Administration server, launch the Entitlements Management Tool, and use it to:
– Define the Patient Roster in ALES.
– Define Users and Groups that model who uses the Patient Roster.
– Define a Membership rule that assigns a Role used to secure the Patient Roster.
– Define Authorization policies that secure access to and privileges on the Patient Roster.
– Audit and monitor the policies in place.
Getting Started with ALES 3.0 1-1

Overv iew
RequirementsIn order to follow the tutorials, you must first install a supported servlet container and database.
Servlet Containers:– WebLogic Server 10.0 MP1, 9.2 MP2, or 8.1 SP5/SP6
– Apache Tomcat 5.5.23
Databases:– Oracle 9.2.0.5, 10.1.2, 10.2.0.2
– Sybase 12.5.3, 15
– MS-SQL 2000 & 2005 (with MS-SQL 2005 driver)
Note: MS-SQL 2000 driver is not supported.
– PointBase 5.1
– IBM DB2 Universal DB Enterprise Server 9.1
For detailed information about supported products, see the Administration Server Installation Guide.
1-2 Getting Started with ALES 3.0

C H A P T E R 2
Tutorial 1: Installing ALES
This section contains the following topics:
“Overview” on page 2-1
“Obtain the Database Configuration Tool” on page 2-2
“Run the Database Configuration Tool” on page 2-2
“Install the Administration Server” on page 2-4
“Start the Server and Launch the Entitlements Management Tool” on page 2-7
“Summary” on page 2-8
OverviewThis tutorial walks you through installation of the ALES 3.0 Administration Server. At the completion of this task, you’ll be able to start the server and launch the Entitlements Management Tool.
Note: In order to follow the steps in this tutorial, you must have already installed the servlet container and the database.
After installing the database used as the policy store, you must add a user account that is needed to run the Administration Server installation program. This is performed with tool that is downloadable from a BEA web site.
Getting Started with ALES 3.0 2-1

Tuto r ia l 1 : I ns ta l l ing ALES
Obtain the Database Configuration ToolTo obtain the program:
1. Open a browser and go to ALES 3.0 download site.
2. Click the AquaLogic Enterprise Security 3.0 link.
3. On the next page, click the AquaLogic Enterprise Security Database Configuration Tool link.
4. On the ensuing pages, complete as required and download one of the following files:
Windows—ales300_DBConfigTool_Win32.zip
UNIX/Linux—ales300_DBConfigTool_unix.tar.gz
Run the Database Configuration ToolAfter obtaining the file, unzip and run it as follows:
1. Open DBConfig.bat|sh in an editor and set the following properties:
– JAVA-HOME — specify the fully-qualified path to a JDK.
– INSTALL_HOME — specify the fully-qualified path to the directory where you unzipped ales300_DBConfigTool_Win32.zip or ales300_DBConfigTool_unix.tar.gz.
– DB_JDBC_DRIVER_LOC — For Pointbase and MSSQL, specify the fully-qualified path to the JDBC driver. (This is not required for Oracle or Sybase databases.) Examples:
(Pointbase) C:\bea\weblogic92\common\eval\pointbase\lib\pbclient.jar
(MS-SQL) C:\Program Files\Microsoft SQL Server 2005 JDBC Driver\sqljdbc_1.2\enu\sqljdbc.jar
2. Enter dbconfig.bat or dbconfig.sh on a command line. The program issues a number of prompts to answer.
3. Respond to the prompts as described in the table below:
2-2 Getting Started with ALES 3.0

Run the Database Conf igurat ion Too l
4. The script runs and displays messages like the following:-- Configuring table space [ales_oracle]** Tablespace [ales_oracle] exists in DB server. Continuing with the same.-- Creating new user [ales_db_admin] .......Done-- Configuring ALES role [asi_role]
Prompt Description
Please input DB type<oracle|sybase|mssql|pointbase>
Enter one of the database names listed.
Please input JDBC URL Enter the JDBC URL for the database server.
Oracle—jdbc:oracle:thin:@<server>:<port>:<sid>
Sybase— jdbc:sybase:Tds:<server>:<port>
Sql Server— jdbc:sqlserver://<server>:<port>
Pointbase—jdbc:pointbase:server://<server>/ales
<server>—name or IP address of database machine<port>—port where the database listener is running<sid>—database SID of Oracle database
Please input JDBC Driver Enter the JDBC driver used to connect to the database.
Oracle—oracle.jdbc.driver.OracleDriver
Sybase—com.sybase.jdbc3.jdbc.SybDriver
Sql—com.microsoft.jdbc.sqlserver.SQLServerDriver
Pointbase—com.pointbase.jdbc.jdbcUniversalDriver
Please input new database user name Enter a username for the account being created.
Please input new database user password
Enter a password for the new user.
Please input database admin username (not required for Pointbase)
Enter the database administrator user name.
Please input database admin password (not required for Pointbase)
Enter the database administrator password.
Getting Started with ALES 3.0 2-3
Tuto r ia l 1 : I ns ta l l ing ALES
-- Assigning privs to ALES role .......Done-- Assigning privs to new user [ales_db_admin].......Done-- Closing down connection-- Successfully created ALES Database Account --
At the completion of these steps, you may install the Administration Server. See the next section for instructions.
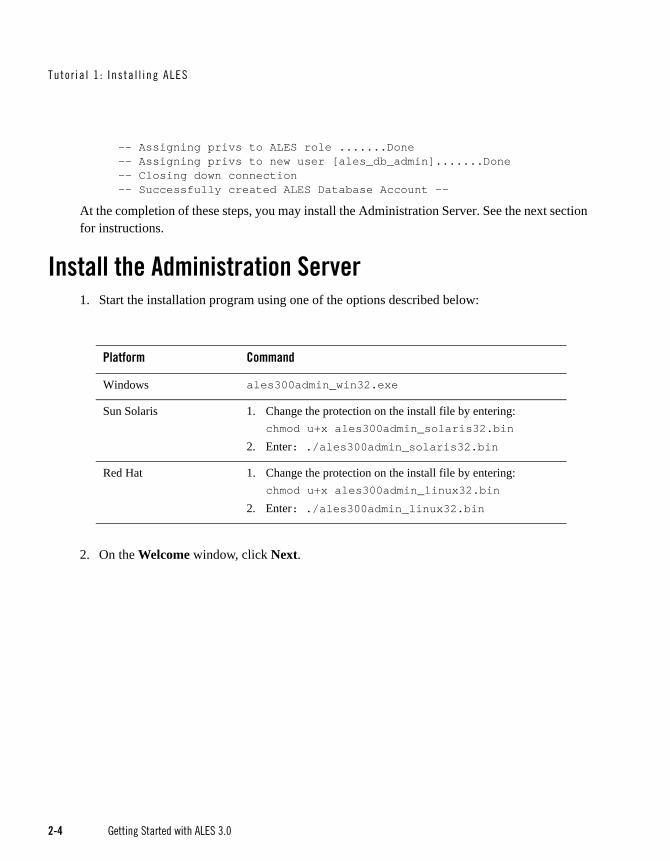
Install the Administration Server1. Start the installation program using one of the options described below:
2. On the Welcome window, click Next.
Platform Command
Windows ales300admin_win32.exe
Sun Solaris 1. Change the protection on the install file by entering: chmod u+x ales300admin_solaris32.bin
2. Enter: ./ales300admin_solaris32.bin
Red Hat 1. Change the protection on the install file by entering:chmod u+x ales300admin_linux32.bin
2. Enter: ./ales300admin_linux32.bin
2-4 Getting Started with ALES 3.0

Ins ta l l the Admin is t ra t ion Server
3. On the BEA License Agreement window, select Yes and click Next.
4. On the Choose BEA Home Directory, accept the default directory and click Next.
5. On the Choose Product Installation Directories, accept the default and click Next.
6. On the Choose Service Control Manager Directory, accept the default and click Next.
7. On the Choose Application Server, select the servlet container you are using (WebLogic or Tomcat) and then specify the web server directory and click Next.
WARNING: When using Tomcat, the directory name cannot contain spaces.
Getting Started with ALES 3.0 2-5

Tuto r ia l 1 : I ns ta l l ing ALES
8. On the Choose Network Interfaces window, accept the default and click Next.
9. On the Configure Administration Application window, accept the default and click Next.
10. On the Choose JDK window, accept the default and click Next.
11. On the Configure Database Connection, select your database type from the Database client dropdown list. Then complete the following fields and click Next.
JDBC URL—Replace the bracketed values. These vary by database type:
<SERVER>—name/IP address of the database machine
<PORT>—port number where the database listener is running
<INSTANCE>—instance name to connect to on <server>
<SID>—database SID of Oracle database
JDBC driver—Accept the default
Driver location—If required, browse to and select the driver location.
Login ID—user created using the database setup script described in “Run the Database Configuration Tool” on page 2-2.
12. On the Key Protection Password Selection window, select Generate Random Password and click Next.
2-6 Getting Started with ALES 3.0

Star t the Se rve r and Launch the Ent i t l ements Management Too l
The program takes several minutes to install the files and displays a status bar showing progress.
13. On the Installation Complete window, click Done. This page indicates the Administration Server completed successfully.
Start the Server and Launch the Entitlements Management Tool
To start the Administration Server on Windows:
1. From the Windows Start Menu, select Programs > BEA Aqualogic Enterprise Security > Administration Server > Start Server.
This opens a DOS box that gives information about the start process, which can take several minutes. When the server starts, a message like the following appears:The ALES WLS.<server_name> service was started successfully.
2. Open Internet Explorer and go to https://localhost:7010/entitlementsadministration.
When you see a message about the security certificate being used, click Yes to display the the log on window.
3. In the Username field, enter system. Then enter weblogic in the Password field and click Log In. You’ll then see Entitlement Management Tool’s main window.
Getting Started with ALES 3.0 2-7

Tuto r ia l 1 : I ns ta l l ing ALES
SummaryThis tutorial walked you through a basic installation of the Administration Server and showed how to start the server and launch the Entitlements Management Tool.
The next tutorial will demonstrate how to define application resources in ALES.
2-8 Getting Started with ALES 3.0

C H A P T E R 3
Tutorial 2: Defining Application Resources
This section contains the following sections:
“Overview” on page 3-1
“Scenario” on page 3-1
“Create the Resources” on page 3-3
“Save the Resources” on page 3-5
“Summary” on page 3-6
OverviewIn order to secure an application using ALES, the application’s resources must be defined in the ALES database. In many cases, application resources are defined using a hierarchical tree of Resources.
The Resource tree used to define application resources may be simple or quite detailed. This depends solely on the application being secured and policy model used to secure it.
ScenarioThis tutorial leads you through the steps of creating a simple Resource tree to represent the Admission System’s patient roster as described in “Scenario” on page 1-1.
Getting Started with ALES 3.0 3-1

Tuto r ia l 2 : De f in ing Appl i cat i on Resources
Resource Description
ParkerHospital Represents the entire hospital in ALES.
AdmissionsSystem Represents the Admissions System in ALES.
roster_index.jsp Represents the JSP page that provides the Patient Roster data.
3-2 Getting Started with ALES 3.0

Create the Resources
Create the Resources1. If you have not already done so, start the Administration Server and launch the Entitlements
Management Tool.
2. In the left navigation pane, select the Resources node and click New at the bottom of the pane.
3. On the New Child Node window, enter ParkerHospital in the Name field and select the Allow Virtual Resource checkbox. Then click OK.
Select Resources
Click New
Getting Started with ALES 3.0 3-3
Tuto r ia l 2 : De f in ing Appl i cat i on Resources
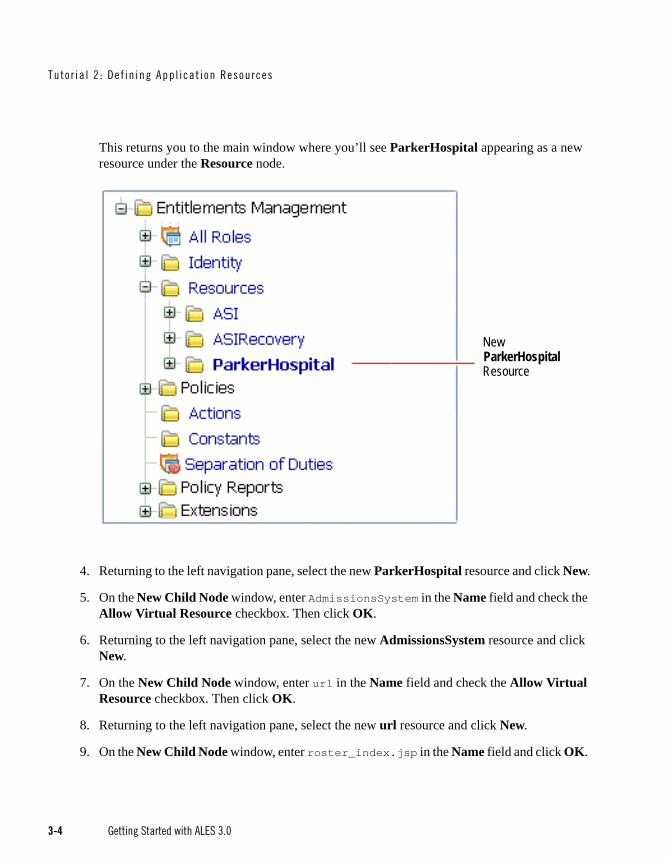
This returns you to the main window where you’ll see ParkerHospital appearing as a new resource under the Resource node.
4. Returning to the left navigation pane, select the new ParkerHospital resource and click New.
5. On the New Child Node window, enter AdmissionsSystem in the Name field and check the Allow Virtual Resource checkbox. Then click OK.
6. Returning to the left navigation pane, select the new AdmissionsSystem resource and click New.
7. On the New Child Node window, enter url in the Name field and check the Allow Virtual Resource checkbox. Then click OK.
8. Returning to the left navigation pane, select the new url resource and click New.
9. On the New Child Node window, enter roster_index.jsp in the Name field and click OK.
New ParkerHospital Resource
3-4 Getting Started with ALES 3.0

Save the Resources
Note that roster_index.jsp would be the actual name of the web page where users access the patient roster.
Save the ResourcesAfter creating the Resources as described, return to the main window and click Save Changes.
Click Save Changes
Getting Started with ALES 3.0 3-5

Tuto r ia l 2 : De f in ing Appl i cat i on Resources
SummaryThis tutorial showed how to create the Resource tree needed to define the Admissions System’s patient roster. When complete, the Resource tree should look like this:
The next tutorial demonstrates how to create Identities (Groups and Users) to represent the Patient Roster users.
Created Resources
3-6 Getting Started with ALES 3.0

C H A P T E R 4
Tutorial 3: Creating Identities
This section contains the following topics:
“Overview” on page 4-1
“Scenario” on page 4-2
“Create the Users” on page 4-2
“Create the Groups” on page 4-6
“Save the Identities” on page 4-8
“Summary” on page 4-8
OverviewIn addition to defining the application resources in ALES, the users of the application must also be defined. Depending on the security model being used to secure the application, this may be as simple as defining an Anonymous user to represent anyone or it may involve defining of multiple roles or groups containing many users.
Getting Started with ALES 3.0 4-1

Tuto r ia l 3 : C reat ing Ident i t i es
ScenarioThis section walks you through the steps of creating the Identities (Groups and Users) needed to represent users of the Admissions System’s Patient Roster.
Create the Users1. If you have not already done so, start the Administration Server and launch the Entitlements
Management Tool.
Type Name Description
Users John Kildaire A doctor who is a member of the Doctor’s group. He requires View access to the Admissions System.
Harold Hopkins An Admissions System operator who is a member of the AdmissionsOperator group. To add and remove names from the Admissions System’s patient roster, he requires View and Edit access.
Groups Doctors All doctors at Parker Hospital.
AdmissionsOperators All Admissions System operators.
4-2 Getting Started with ALES 3.0

Create the Users
2. In the left navigation pane, select the Identity node and click New at the bottom of the pane.
3. On the New Identity Directory window, enter Admissions and click OK.
Note: In most cases, you should create a separate Identity directory for an organizational domain. In this example, the Admissions directory could be used for all Parker Hospital employees.
Select Identity node
Click New
Getting Started with ALES 3.0 4-3
Tuto r ia l 3 : C reat ing Ident i t i es
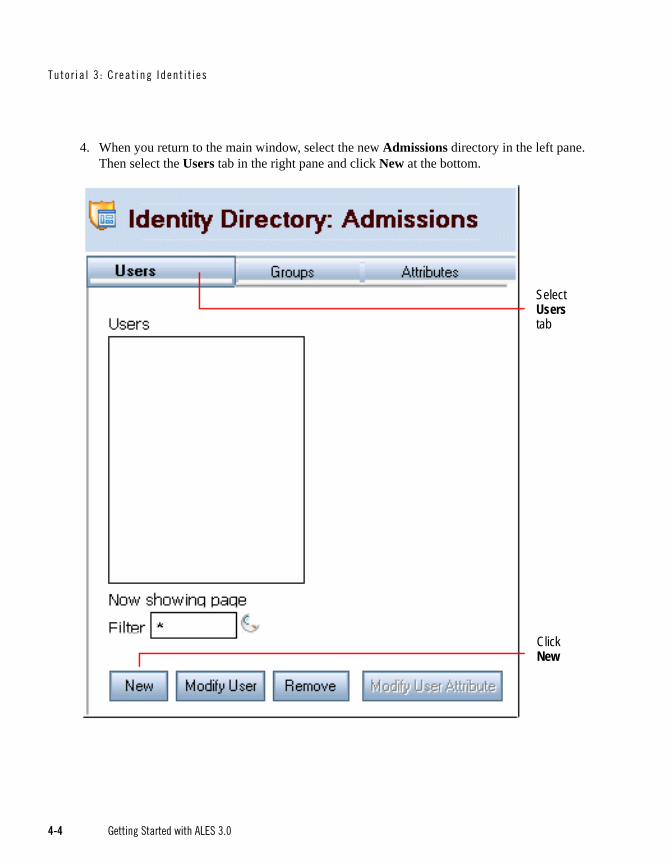
4. When you return to the main window, select the new Admissions directory in the left pane. Then select the Users tab in the right pane and click New at the bottom.
Select Users tab
Click New
4-4 Getting Started with ALES 3.0

Create the Users
5. On the New User window, enter John Kildaire in the User Name field and complete the two password fields using any six-character string. Then click OK.
This returns you the Admissions Identity page and shows John Kildaire as a new user.
6. To create the Harry Hopkins user, click New in the right pane. Then enter Harry Hopkins and the passwords and click OK.
7. To save your work, click Save Changes at the top of the main window.
Click Save Changes
Getting Started with ALES 3.0 4-5

Tuto r ia l 3 : C reat ing Ident i t i es
Create the Groups1. Returning to the left navigation pane, select the new Admissions directory in the left pane.
Then select the Groups tab in the right pane and click New at the bottom.
2. On the New Group window, enter Doctors in the Group Name field and click OK.
3. To add John Kildaire to this Group, select Doctors in the Group list and then click Modify Group Membership.
Select Doctors group
Click Modify Group Membership
4-6 Getting Started with ALES 3.0

Create the Groups
4. On the Modify Group Members window, select John Kildaire and click Add.
5. Then use the same steps to add Harold Hopkins to the AdmissionsOperators group.
Select John Kildaire Click Add
Getting Started with ALES 3.0 4-7

Tuto r ia l 3 : C reat ing Ident i t i es
Save the IdentitiesAfter creating the Users and Groups described, return to the main window and click Save Changes.
SummaryThis tutorial showed how to create the Groups and Users needed to represent users who access the Admissions System Patient Roster.
In the next tutorial, you will learn how create a Role with a Membership Rule.
4-8 Getting Started with ALES 3.0

C H A P T E R 5
Tutorial 4: Creating a Role with a Membership Rule
This section contains the following sections:
“Overview” on page 5-1
“Create the Role Using a Membership Policy” on page 5-2
“Save the Role” on page 5-4
“Summary” on page 5-5
OverviewThis section walks you through the steps of creating a Role using a Membership Rule. A Role is essentially a collection of permissions that are granted the Users who are assigned to it. It also defines how, when, and under what constraints the Role is assigned.
In ALES 3.0, the inheritance pattern of Roles can be configured so that a User assigned to a parent Role also inherits any child Roles (so long as this is not prohibited by other policies).
The Role created in this tutorial is named HealthProviders. The Membership Rule assigns all members of the Doctors group to this Role.
Getting Started with ALES 3.0 5-1

Tuto r ia l 4 : C reat ing a Ro le w i th a Membersh ip Ru le
Create the Role Using a Membership PolicyYou can create a Role and Membership Rule using either the All Roles or the Membership Rules node. In this example we use All Roles.
1. In the left navigation pane, select the All Roles node and click New at the bottom of the pane. This opens the New Role window.
5-2 Getting Started with ALES 3.0

Create the Ro l e Us ing a Membersh ip Po l i cy
2. On the New Role window, enter HealthProviders in the Name field and click OK.
3. To create the Membership Rule that assigns the Doctors group to this Role, select HealthProviders in the left pane so that it displays at the top of the right pane. Then click New under Membership Rules in the right pane. This opens the New Membership Rule window.
Select HealthProviders Click New
Getting Started with ALES 3.0 5-3

Tuto r ia l 4 : C reat ing a Ro le w i th a Membersh ip Ru le
4. On the New Membership Role window, select the Grant radio button. Make sure that Group displays in the Select Policy Subjects From field and that the Admissions group displays in the Choose Identity Directory field. Then select the Doctors group in the Available Subjects list and click Add.
For this tutorial, we won’t add any more information to the Membership Rule. But if you want to, you can specify that this rule applies only to the Patient Roster. If you would like to do this, click Show More at the top of the Modify Rule Membership window. This adds the Resources tab to the window where you can drill down and select roster_index.jsp, the Resource representing the Patient Roster.
5. Click OK to save the Membership Rule.
Save the RoleAfter creating the Role as described, click Save Changes at the top of the main window.
5-4 Getting Started with ALES 3.0
Summary
SummaryThis tutorial showed how to create a Role and define its membership using a Membership Rule. The next tutorial shows how to define Authorization policies. One of these policies will make use of the HealthProviders Role to grant access to the Patient Roster.
Getting Started with ALES 3.0 5-5

Tuto r ia l 4 : C reat ing a Ro le w i th a Membersh ip Ru le
5-6 Getting Started with ALES 3.0

C H A P T E R 6
Tutorial 5: Creating Authorization Policies
This section contains the following sections:
“Overview” on page 6-1
“Scenario” on page 6-1
“Create Authorization Policy 1” on page 6-3
“Create Authorization Policy 2” on page 6-5
“Save the Policies” on page 6-5
“Summary” on page 6-6
OverviewOnce you define the necessary Resources, Roles, and Identities (Groups and Users), you can make use of them in the Authorization Policies. An Authorization Policy specifies who can access a resource and what rights they have when they do so.
ScenarioTwo Authorization policies will be used to define access to the patient roster:
Getting Started with ALES 3.0 6-1

Tuto r ia l 5 : Crea t ing Author i za t i on Po l i c ies
Policy Description
Authorization Policy 1 This policy allows any user in the AdmissionsOperators group to view and edit the Patient Roster. Since the roster is a JSP page, required access rights are POST and GET.
Effect: Grant
Actions: GET, POST
Subjects: AdmissionsOperators
Resources: policy/ParkerHospital/Admissions/url/roster_index.jsp
Authorization Policy 2 This policy allows any user in the HealthProviders Role to view the roster.
Effect: Grant
Actions: GET
Subjects: HealthProviders role
Resources: policy/ParkerHospital/Admissions/url/roster_index.jsp
6-2 Getting Started with ALES 3.0

Create Autho r i za t i on Po l i c y 1
Create Authorization Policy 11. In the left navigation pane, expand the Policies node and select Authorization Policies. Then
click New in the lower part of the right pane. This displays the New Authorization Policy window.
2. Select the Grant radio button.
3. On the Actions tab, select url in the Select Action Group field. Then select POST and GET in the Available Actions list and click Add>>.
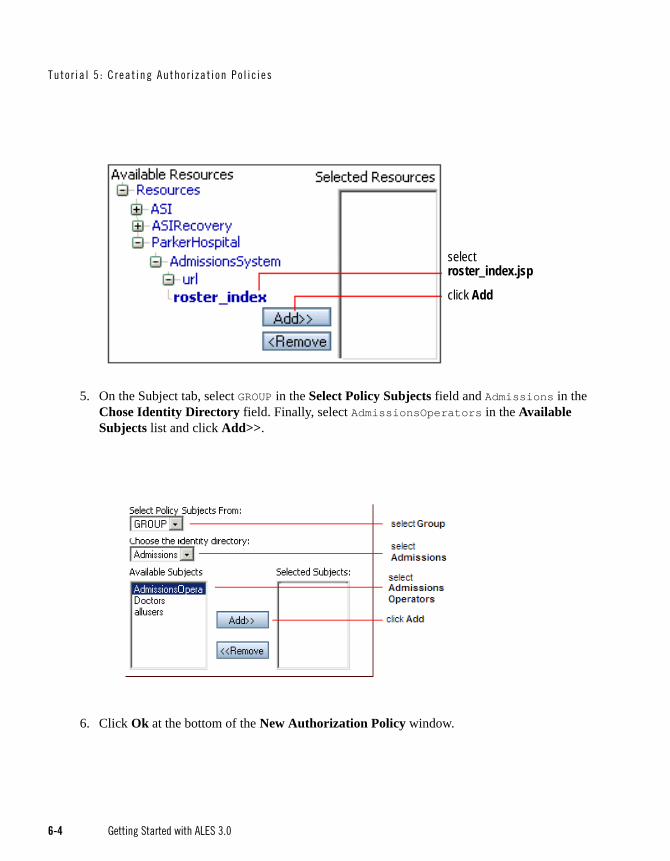
4. Click on the Resource tab and expand the Resources tree under Available Resources until you see the roster_index.jsp Resource. Then select roster_index.jsp and click Add>>.
select Grant
select url
click Add
select POST and GET
Getting Started with ALES 3.0 6-3
Tuto r ia l 5 : Crea t ing Author i za t i on Po l i c ies
5. On the Subject tab, select GROUP in the Select Policy Subjects field and Admissions in the Chose Identity Directory field. Finally, select AdmissionsOperators in the Available Subjects list and click Add>>.
6. Click Ok at the bottom of the New Authorization Policy window.
roster_index.jsp
click Add
select
6-4 Getting Started with ALES 3.0
Create Autho r i za t i on Po l i c y 2
Create Authorization Policy 21. In the left navigation pane, expand the Policies node and select Authorization Policies. Then
click New in the lower part of the right pane. This displays the New Authorization Policy window.
2. In the Effect field, select the Grant radio button.
3. On the Actions tab, select url in the Select Action Group field. Then select GET in the Available Actions list and click Add.
4. On the Resource tab, expand the Resources tree under Available Resources until you see the roster_index.jsp. Then select it and click Add.
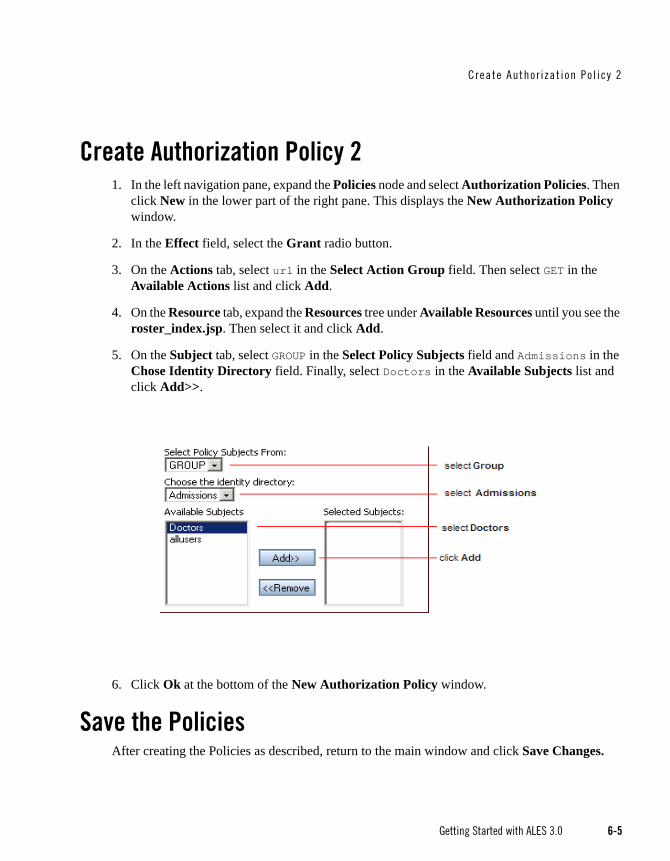
5. On the Subject tab, select GROUP in the Select Policy Subjects field and Admissions in the Chose Identity Directory field. Finally, select Doctors in the Available Subjects list and click Add>>.
6. Click Ok at the bottom of the New Authorization Policy window.
Save the PoliciesAfter creating the Policies as described, return to the main window and click Save Changes.
Getting Started with ALES 3.0 6-5
Tuto r ia l 5 : Crea t ing Author i za t i on Po l i c ies
SummaryIn this tutorial you defined two Authorization policies that restrict access to the Patient Roster.
– Authorization Policy 1 allows users in the AdmissionsOperators group to view and edit the roster. Since Harry Hopkins is a member of this Group, he may view and edit the roster.
– Authorization Policy 2 allows the HealthcareProviders Role to view the roster. Since the Doctors group is assigned to HealthProviders and John Kildaire is a member of the Doctors group, he may view the roster.
Had an actual SSM been in place, the policies could have been distributed to the SSM and enforced immediately.
Note that these policies as defined allow only John Kildaire and Harry Hopkins to access the roster. Once a resource is secured by an ALES policy, users must be explicitly granted access to it. To grant other users access, they could be added to the AdmissionsOperators or Doctors group -- or additional policies could be created that grant access in some other way.
6-6 Getting Started with ALES 3.0
C H A P T E R 7
Tutorial 6: Generating Policy Reports
This section contains the following topics:
“Overview” on page 7-1
“Generate Authorization Policy Report” on page 7-2
“Generate Role Mapping Report” on page 7-6
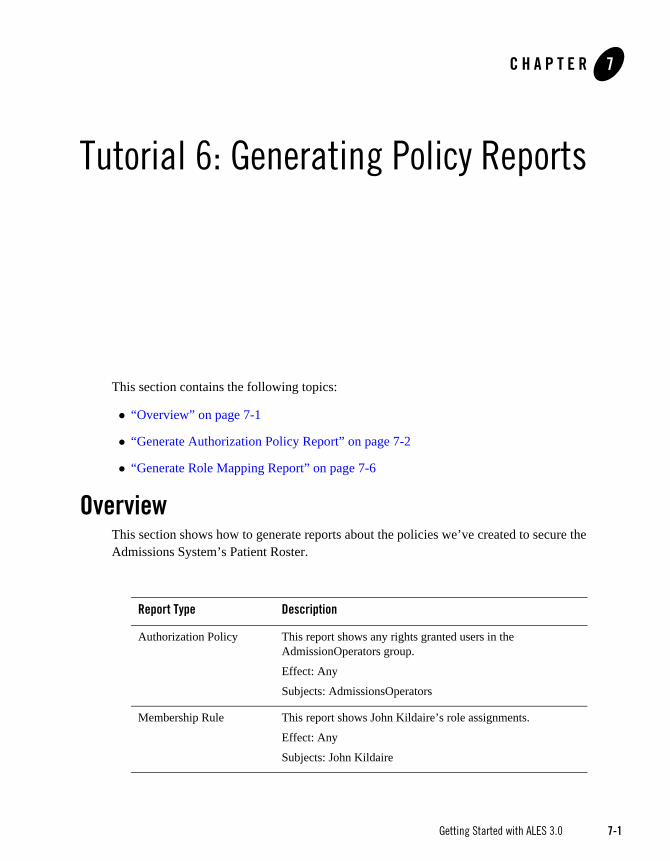
OverviewThis section shows how to generate reports about the policies we’ve created to secure the Admissions System’s Patient Roster.
Report Type Description
Authorization Policy This report shows any rights granted users in the AdmissionOperators group.
Effect: Any
Subjects: AdmissionsOperators
Membership Rule This report shows John Kildaire’s role assignments.
Effect: Any
Subjects: John Kildaire
Getting Started with ALES 3.0 7-1
Tuto r ia l 6 : Generat ing Po l i c y Repor ts
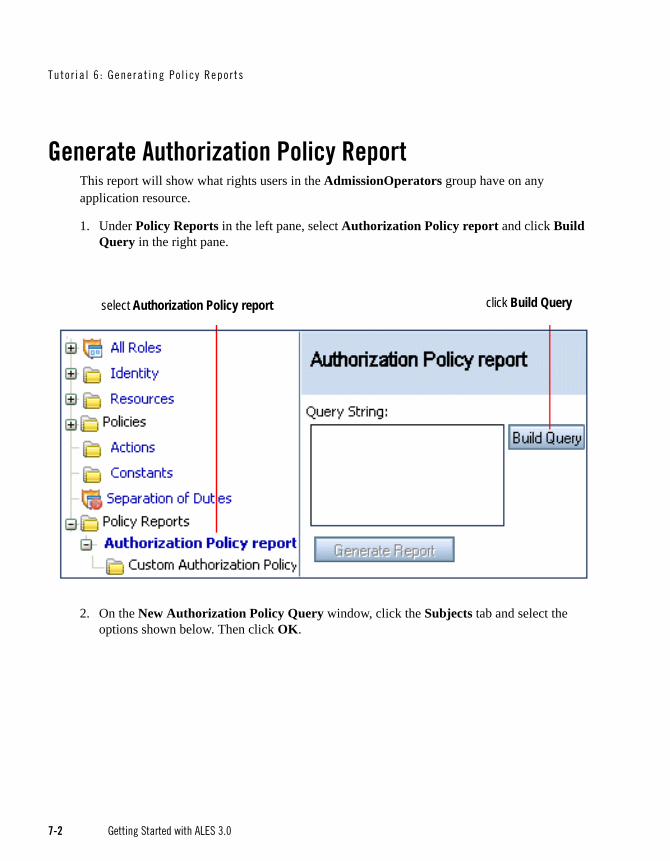
Generate Authorization Policy ReportThis report will show what rights users in the AdmissionOperators group have on any application resource.
1. Under Policy Reports in the left pane, select Authorization Policy report and click Build Query in the right pane.
2. On the New Authorization Policy Query window, click the Subjects tab and select the options shown below. Then click OK.
select Authorization Policy report click Build Query
7-2 Getting Started with ALES 3.0

Generate Autho r i zat ion Po l i c y Repor t
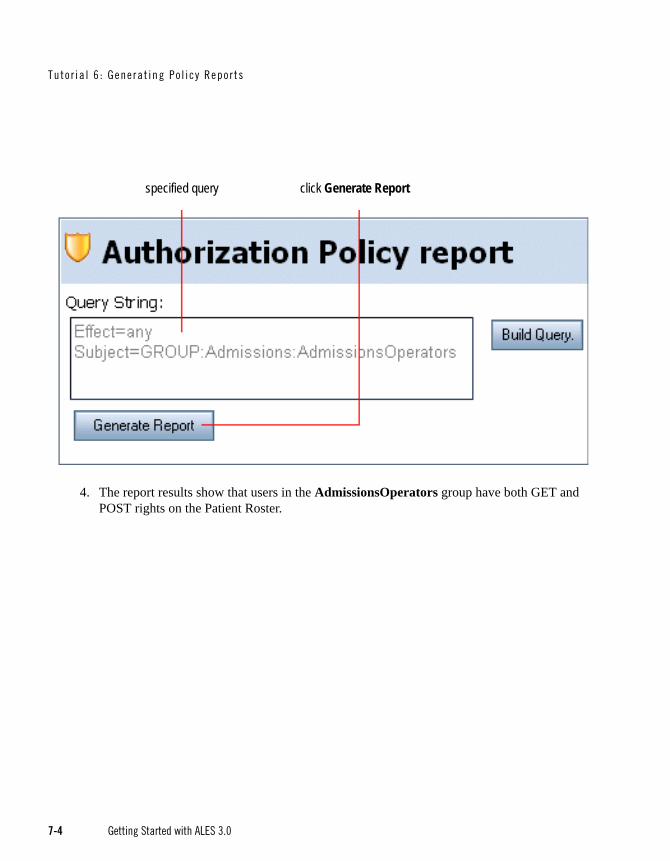
3. On the main window, notice the query you specified and click Generate Report.
select Any
select Group
click Add
selectAdmissionsOperators
selectAdmissions
Getting Started with ALES 3.0 7-3
Tuto r ia l 6 : Generat ing Po l i c y Repor ts
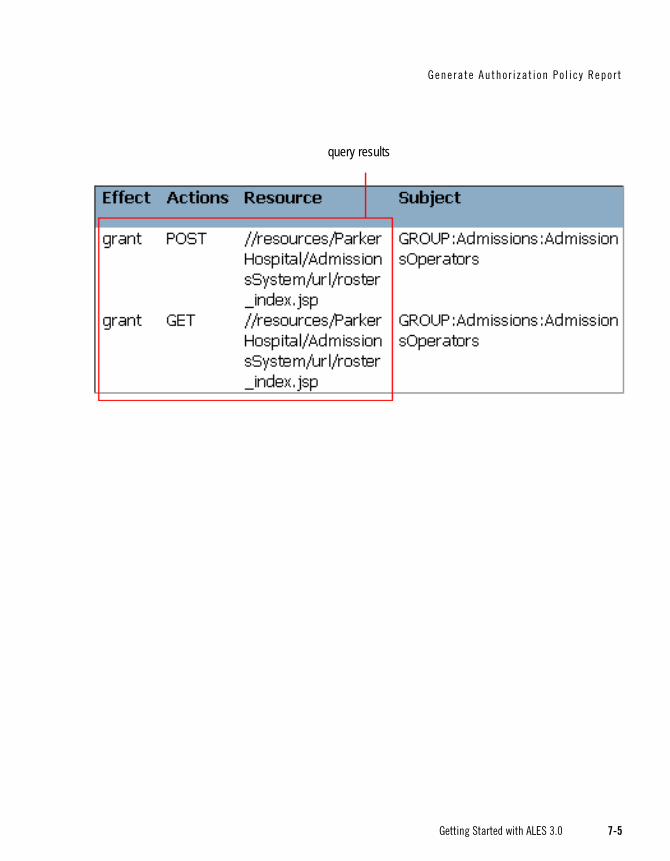
4. The report results show that users in the AdmissionsOperators group have both GET and POST rights on the Patient Roster.
specified query click Generate Report
7-4 Getting Started with ALES 3.0
Generate Autho r i zat ion Po l i c y Repor t
query results
Getting Started with ALES 3.0 7-5

Tuto r ia l 6 : Generat ing Po l i c y Repor ts
Generate Role Mapping ReportThis report will show John Kildaire’s assigned roles.
1. Under Policy Reports in the left pane, select Membership Rule report and click Build Query in the right pane.
2. On the Subjects tab, select the options shown below and click OK.
select John Kildaire
select Any
select ParkerHospital
select User
click Add
7-6 Getting Started with ALES 3.0

Generate Ro le Mapping Repor t
3. On the main window, notice the query you specified and click Generate Report.
4. The report results show that HealthProviders is John Kildaire’s only role assignment.
specified query click Generate Report
Getting Started with ALES 3.0 7-7

Tuto r ia l 6 : Generat ing Po l i c y Repor ts
7-8 Getting Started with ALES 3.0