Embed Size (px)
Citation preview
8/4/2019 Predictable Cement at Ion of All Ceramic Restoration
http://slidepdf.com/reader/full/predictable-cement-at-ion-of-all-ceramic-restoration 1/5138 Australasian Dental Practice November/December 2008
clinical | EXCELLENCE
Creation of an ideally prepared tooth and its
detail being “captured” in a master impres-
sion are critical steps in the indirect dental
restorative process. All can be for naught if a metic-
ulous delivery technique is not followed. Most
indirect definitive restorations are crafted with pre-
cision on carefully trimmed dies machined with pin
placement to align the preparations on the cast in the
exact position relative to one another as they appear
in the patient’s oral cavity. The final test of accu-
racy, however, is in the patient’s mouth. Many times
ceramic reconstructions may appear to have perfect
fit and contact on the master dies relative to one
another, yet require adjustment when tried-in the
patient. This is to be expected from time to time
when dealing with an indirect fabrication method. It
is also true that multiple adjacent restorations may
appear to have perfect fit and proximal contact upon
try-in only to have a slightly altered fit after cemen-
tation. This can mean a remake if the restoration is
placed in an improper position and it cannot be
recovered before the set of the cement. Some clini-
cians espouse a “multiple cementation technique”
placing eight to ten restorations at one time. This
can often lead to a disastrous result, if even one
restoration is placed in a slightly altered positionaffecting the correct seating of the remaining units.
Dental cements -an historical perspectiveDental cements, by definition, are “luting agents”
meant to fill the microscopic gap between restora-
tive materials and tooth structure. Zinc Phosphate
Cements, while universally used for many years,
are soluble in oral fluids and can “wash out” when
restorative materials are not engineered to fit pre-
cisely. Polycarboxylate cements have a slight
advantage in that they “chealate” to dentin, but the
film thickness is greater than that of zinc phosphate
cements and can sometimes be a problem with a
restoration seating fully. Glass ionomer cements,
which are still widely used as luting cements, offer
some distinct advantages over both zinc phosphates
and polycarboxylates. The film thickness is
extremely thin and the material has a fluoride
release which has been shown to remineralize
dentin. The downside is that glass ionomers are
still quite soluble in oral fluids. The next generation
was to move into modified resin ionomers.
These cements have the advantages of glass
ionomers and are much less soluble in the
oral environment. In fact, some manufactures
report “zero” solubility with these materials. The
one common thread with all of these types of cements is again that they do not bond to the
Predictable cementation
of all ceramic dental restorations:
The “Noah” technique
By Robert A. Lowe, DDS, FAGD, FICD, FADI, FACD
“Noah Technique
comes from the
biblical reference
of Noah’s Ark...
Since we have
two hands, it
only makes sense
that we have
maximum control
of only two
restorations at a
time during the
cementation
process...”
8/4/2019 Predictable Cement at Ion of All Ceramic Restoration
http://slidepdf.com/reader/full/predictable-cement-at-ion-of-all-ceramic-restoration 2/5November/December 2008 Australasian Dental Practice 139
clinical | EXCELLENCE
restorative materials. The resin cement
family evolved out of the total etch and
dentin adhesive technologies. For proper
use, they require pretreatment of the tooth
surface with 37% Phosphoric acid and
application of a dentin bonding agent
prior to application of the resin cement.
These cements truly form a micromechan-
ical bond to both tooth structure on one
side and restorative material on the other
side. Also, they are insoluble in oralfluids. The latest advance in resin cements
are the self-etching resin cements that
require no pretreatment of the tooth
surface and appear to have many advan-
tages of resin cement systems, with the
ease of use of more traditional types of
cements. It is important to emphasize that
in some cases, bond strengths of self-
etching resin cements are not as high as
those for resin cements using the “total
etch technique”. More recent generations
of self-etching resin cements, such asMaxcem™ Elite (Kerr Corporation) for
one, are showing significant increases in
bond strength. The manufacturer reports
up to 24 megapascals of bond strength
without pretreating the tooth surface.
However, it is important to remember that
the purpose of any cement is to fill the
microgap between tooth structure and
restorative material and to aid in retention
of the restoration. Proper resistance and
retention form of the preparation is still
more important for successful retention of any restorative material.
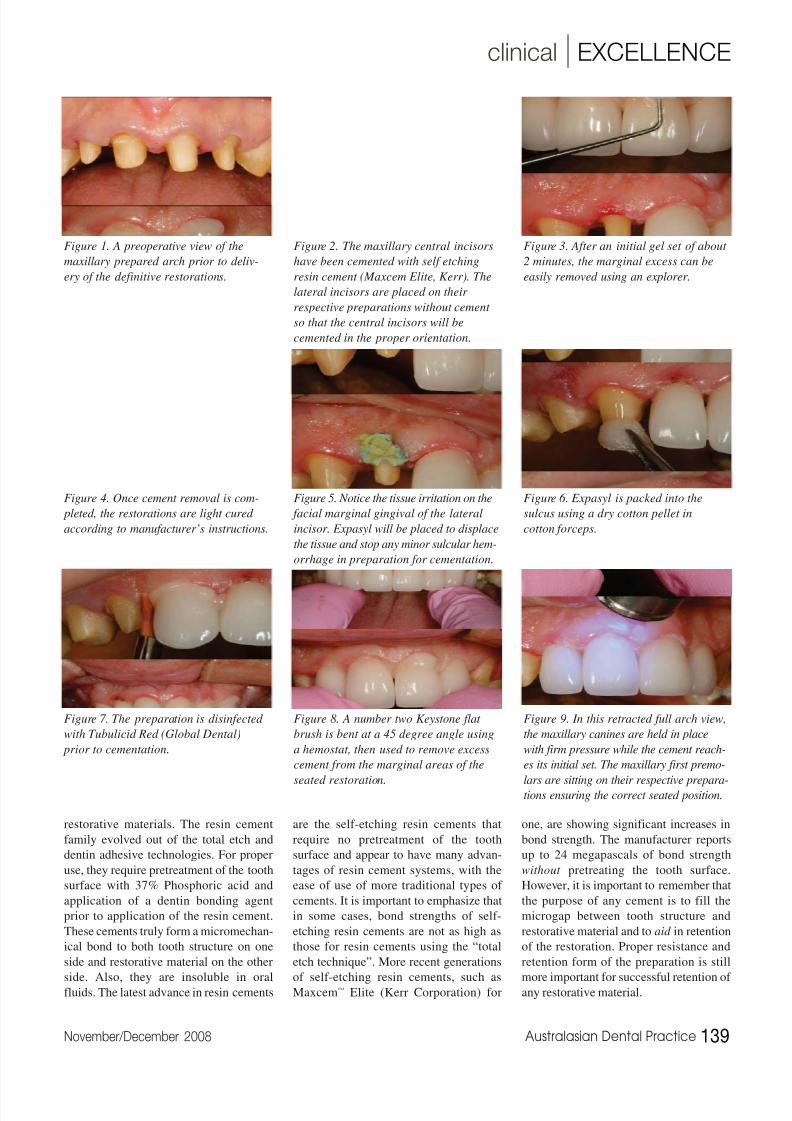
Figure 1. A preoperative view of the
maxillary prepared arch prior to deliv-
ery of the definitive restorations.
Figure 2. The maxillary central incisors
have been cemented with self etching
resin cement (Maxcem Elite, Kerr). The
lateral incisors are placed on their
respective preparations without cement
so that the central incisors will be
cemented in the proper orientation.
Figure 3. After an initial gel set of about
2 minutes, the marginal excess can be
easily removed using an explorer.
Figure 4. Once cement removal is com-
pleted, the restorations are light cured
according to manufacturer’s instructions.
Figure 5. Notice the tissue irritation on the
facial marginal gingival of the lateral
incisor. Expasyl will be placed to displace
the tissue and stop any minor sulcular hem-
orrhage in preparation for cementation.
Figure 6. Expasyl is packed into the
sulcus using a dry cotton pellet in
cotton forceps.
Figure 7. The preparation is disinfected
with Tubulicid Red (Global Dental)
prior to cementation.
Figure 8. A number two Keystone flat
brush is bent at a 45 degree angle using
a hemostat, then used to remove excess
cement from the marginal areas of the
seated restoration.
Figure 9. In this retracted full arch view,
the maxillary canines are held in place
with firm pressure while the cement reach-
es its initial set. The maxillary first premo-
lars are sitting on their respective prepara-
tions ensuring the correct seated position.
8/4/2019 Predictable Cement at Ion of All Ceramic Restoration
http://slidepdf.com/reader/full/predictable-cement-at-ion-of-all-ceramic-restoration 3/5140 Australasian Dental Practice November/December 2008
clinical | EXCELLENCE
The “Noah Delivery Technique”
utilizing self etching resin cementThe term “Noah Technique” comes from
the biblical reference of Noah’s Ark. The
animals entered the ark two by two. Since
we have two hands, it only makes sense
that we have maximum control of only
two restorations at a time during the
cementation process.
For any multiple unit case involving the
maxillary anterior region, the maxillary
central incisors are the most important aes-thetically. These are the “main actors” on
the stage; the first teeth the patient sees.
The maxillary central incisors should be
cemented first. The following sequence
will describe a delivery for a complete
maxillary and mandibular restoration.
First, all maxillary restorations are tried-in
individually and evaluated for marginal
integrity and fit. Next, proximal contacts
are evaluated with dental floss as the dental
assistant stabilizes adjacent restorations.
At this point, proximal contacts should be
adjusted with porcelain polishing wheelsas needed. Next, evaluate the “collective
fit”. Place all restorations on their respec-
tive preparations and evaluate whether or
not the restorations fit passively. Any
minor displacement of individual restora-
tions or resistance to complete seating is
indicative of a tight contact that will need
to be adjusted. To make this process easier,
replace the restoration on the master die in
the appropriate position on the master
model. Place a piece of articulation paper
between the restorations to mark the con-
tact area. Then, “erase” the spot with the
porcelain adjuster and evaluate the fit
again. This process may need to be
repeated a few times before the fit is pas-
sive, yet the contact is maintained being
“lightly resistant” to dental floss. It is
important to note that this alone does not
mean that the restorations will fit passively
in the mouth. Remember, dies can move a
bit on the master model even though they
are pinned; teeth don’t move!
Facebow transfer and centric occlusion
records taken between 1) the maxillary
and mandibular preparations and 2) the
maxillary provisional restorations and
mandibular preparations allow the labora-
tory technician to “cross mount” the
provisional casts and master casts during
the fabrication process. This will allow a
very accurate approximation in centric
occlusion of the maxillary definitive
restorations to the mandibular provisional
restorations. Because of this, after the
maxillary restorations are adjusted for
proximal contact and a passive, collective
fit is achieved, the entire maxillary casecan then be cemented.
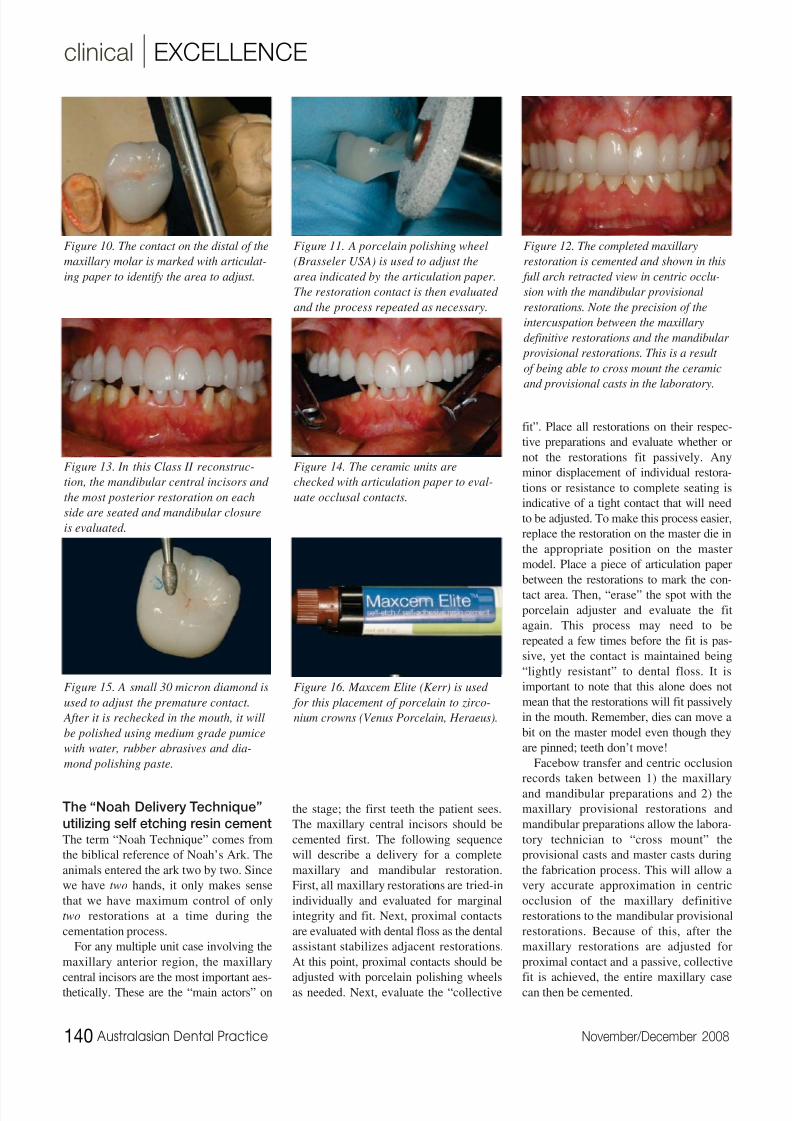
Figure 10. The contact on the distal of the
maxillary molar is marked with articulat-
ing paper to identify the area to adjust.
Figure 11. A porcelain polishing wheel
(Brasseler USA) is used to adjust the
area indicated by the articulation paper.
The restoration contact is then evaluated
and the process repeated as necessary.
Figure 12. The completed maxillary
restoration is cemented and shown in this
full arch retracted view in centric occlu-
sion with the mandibular provisional
restorations. Note the precision of the
intercuspation between the maxillary
definitive restorations and the mandibular
provisional restorations. This is a result
of being able to cross mount the ceramic
and provisional casts in the laboratory.
Figure 13. In this Class II reconstruc-
tion, the mandibular central incisors and
the most posterior restoration on each
side are seated and mandibular closure
is evaluated.
Figure 14. The ceramic units are
checked with articulation paper to eval-
uate occlusal contacts.
Figure 15. A small 30 micron diamond is
used to adjust the premature contact.
After it is rechecked in the mouth, it will
be polished using medium grade pumice
with water, rubber abrasives and dia-
mond polishing paste.
Figure 16. Maxcem Elite (Kerr) is used
for this placement of porcelain to zirco-
nium crowns (Venus Porcelain, Heraeus).

8/4/2019 Predictable Cement at Ion of All Ceramic Restoration
http://slidepdf.com/reader/full/predictable-cement-at-ion-of-all-ceramic-restoration 4/5
Delivery of the maxillary
definitive restorationsThe first step is to place the maxillary cen-
tral incisors in position and verify seating
again visually and then radiographically.
Digital x-ray, such as Dexis, allows imme-
diate verification of complete seating on theoperatory monitor. First, the preparations
are cleaned and disinfected with Tubulicid
Red (Global Dental) on a cotton pellet.
Next, self-etching resin cement (Maxcem
Elite, Kerr Corporation) is placed via
automix syringe delivery into the restora-
tion. Once both centrals are completely
seated with positive pressure expressing
excess around the periphery of the margins,
a #2 Keystone brush (Patterson Dental) is
used to wipe away all excess material. The
adjacent restorations, the lateral incisors,
are placed on their respective preparationsto “hold the space” while ensuring that the
central incisors are properly positioned spa-
tially during the gel set of the cement. One
must be sure that no cement is on the lateral
incisor preparations, or the restorations may
not be able to be removed after the central
incisors are completely set. This process is
then repeated for the lateral incisors. If the
tissue at any time is unintentionally irritated
and starts to bleed, Expasyl is syringed into
the area, tapped to place with a dry cotton
pellet and left undisturbed for about a
minute. After that period of time, air and
water spray remove the Expasyl and as a
result, the tissue is now displaced away
from the restorative margin and the
bleeding is stopped. The preparations are
cleaned with Tubulicid and the lateral
incisors are then filled with self-etching
resin cement and placed on the prepara-
tions. The number 2 Keystone brush is used
to remove marginal cement excess as before
and the canine restorations are placed on
their respective preparations to hold the
space as the cement cures. This process is
completed respectively for the maxillary
cuspids, first premolars, and second premo-
lars leaving only the first molars to cement
next to the natural remaining second
molars. Invariably at this point, even though
there was a previously passive fit, these
restorations will now probably be tight and
not go to full seat. Proximal contacts should
be marked with articulation paper on the
master model, as previously described, then
adjusted and checked with dental floss in
the patients’ mouth. When the restoration
has a passive, full seat, it is cemented withself-etching resin cement.
Delivery of the mandibular
definitive restorationsOnce the maxillary restorations are deliv-
ered, the individual mandibular restorations
are tried-in on an individual basis and eval-
uated for marginal fit. A collective try-in is
also done to help identify possible prox-imal contacts that may need adjustment.
Digital radiographs (Dexis) are taken to
verify positive seating during the collective
try-in. Once this is accomplished and
everything looks acceptable, the following
regimen is followed in the delivery of the
mandibular restorations. First, the
mandibular central incisors are placed onthe preparations as well as the most posterior
142 Australasian Dental Practice November/December 2008
clinical | EXCELLENCE
Figure 17. The self etching resin cement
(Maxcem Elite, Kerr) is dispensed from
the auto mix syringe via its specially
manufactured curved tip.
Figure 18. This is a unique view of the
cemented mandibular molar in centric
occlusion demonstrating the “occlusal
lock” in centric occlusion with the
opposing maxillary first molar.
Figure 19. This full arch retracted view
shows the mandibular incisors in place
as the molar and premolar units are
placed from the most posterior unit on
each side moving forward toward the
anterior region.
Figure 20. All mandibular units are now
cemented except the right and left
mandibular canines. As each unit has
been placed, occlusion is rechecked to
identify possible prematurities.
Figure 21. It is apparent from this view
that the canine needs proximal adjust-
ment prior to seating even though it fit
passively when all units were tried in
collectively without cement. The canine
ceramic unit can be adjusted on the die
as previously described. It may also be
desirable to “lightly dust” the contacts
on the adjacent cemented teeth using an
8 fluted carbide bur, and then polished
with high gloss abrasives.
Figure 22. A retracted full arch view
of the completed cementation in
centric occlusion.
8/4/2019 Predictable Cement at Ion of All Ceramic Restoration
http://slidepdf.com/reader/full/predictable-cement-at-ion-of-all-ceramic-restoration 5/5144 Australasian Dental Practice November/December 2008
clinical | EXCELLENCE
restoration on each side. The patient is
instructed to close into light occlusal con-
tact on Accufilm II (Parkell) articulating
paper. One of three possibilities will
occur: 1) the patient will contact and mark
only on the occlusal surface(s) of one or
both of the posterior teeth; 2) The patient
will contact only on the incisal edges of
the mandibular incisors; or 3) There will
be simultaneous contact on both posterior
units and the mandibular incisor restora-
tions. If one or both of the posterior units
contact first, the centric prematurity, or
prematurities, are identified and adjusted
using 30 micron (red stripe) composite
finishing diamonds (Axis Dental, Bras-
seler USA) and rechecked with Accufilm
until simultaneous contact on both ante-
rior units and posterior units is achieved.
If the anterior units contact first, either the
incisal edges need shortening, or the max-
illary lingual concavities of the maxillary
central incisors need deepening. Again the
goal is to achieve simultaneous and even
closure with these units in place. It is
important to think of occlusal stability like
a “three legged stool”. One can sit on a
“three legged stool” very easily, but cut
one leg off, it gets harder to balance. Mus-
cles are activated to maintain a stable
seating position that may have been at rest
before. Cut off two legs - the task of main-
taining stability is even harder! The
minimal contact for a stabile situation is a
contact with the maxillary and mandibular
central incisors and a posterior contact (asfar posterior as possible) on each side.
This does not mean that the occlusion is
considered stable with only three points of
contact, but this is a start. The ultimate
goal is to have even and simultaneous con-
tact of all maxillary and mandibular teeth
in centric occlusion (maximum intercus-
pation). Posterior teeth should touch only
in centric occlusion. Any eccentric move-
ment from that position (working,
balancing, protrusive) should result in
immediate disclusion of all posterior teeth
because of canine guidance and anterior
coupling (Anterior Guidance). Once the
mandibular incisors and the most poste-
rior units on each side are cemented, the
next posterior tooth moving forward
toward the anterior teeth is placed on each
side and the occlusion is checked with
Accufilm once more. If the proper reg-
imen was followed and each of the
cemented units that were placed prior has
correct occlusion. Any prematurity after
placement of the next two units can be
easily identified and corrected. It is much
easier to identify prematurities in this
fashion than when trying all units in at the
same time! As with the maxillary cemen-
tation, all of the mandibular posterior
units are placed leaving only the
mandibular cuspids. And again, with both
approximating restorations now
cemented, the mandibular cuspids will
probably need minimal proximal adjust-
ment to go to full seat in a passive fashion.
Once all the units are cemented, centric
occlusion is rechecked, all adjusted areasare polished with porcelain rubber abra-
sives. Working, balancing and protrusive
movements are also rechecked verifying
canine guidance and posterior disclusion
upon engagement of the anterior teeth in
any movement from centric occlusion.
ConclusionA technique has been described for
methodical and predictable cementation
of multi-unit dental reconstructions. It can
be applied to any cementation scenario,
regardless of the number of units involved.
It should also be mentioned that it is very
important to verify final cementation with
vertical bitewing radiographs (Dexis) to
ensure accuracy.
About the author Dr Robert A. Lowe graduated magna cum
laude from Loyola University School of
Dentistry in 1982 and was an Assistant
Professor in Operative Dentistry until its
closure in 1993. Since January of 2000,
Dr Lowe has been in private practice in
Charlotte, North Carolina. Dr Lowe lec-
tures internationally and publishes in
well-known dental journals on aesthetic
and restorative dentistry. He is a clinical
evaluator of materials and products with
many prominent dental manufacturers. Dr
Lowe received fellowships in the AGD,
ICD, ADI, ACD, and received the 2004
Gordon Christensen Outstanding Lec-
turers Award at the Chicago Midwinter
Meeting. In 2005, he was awarded
Diplomat status on the American Board of Aesthetic Dentistry.
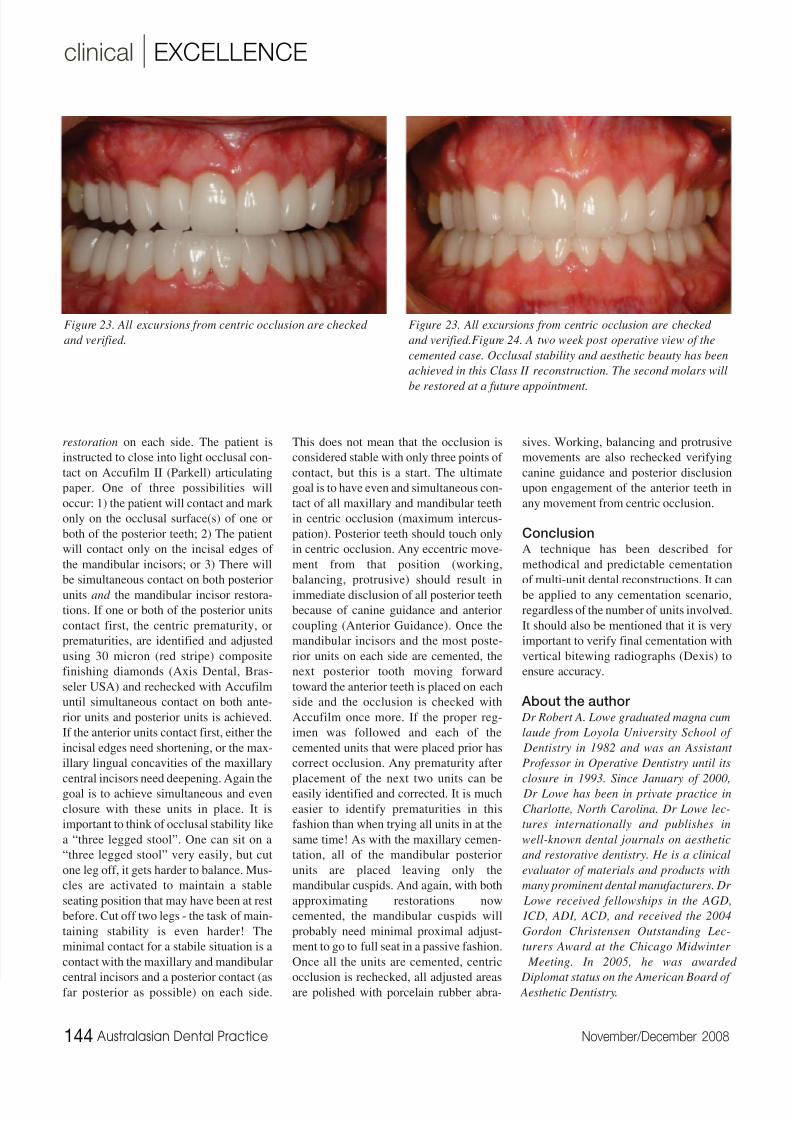
Figure 23. All excursions from centric occlusion are checked
and verified.
Figure 23. All excursions from centric occlusion are checked
and verified.Figure 24. A two week post operative view of the
cemented case. Occlusal stability and aesthetic beauty has been
achieved in this Class II reconstruction. The second molars will
be restored at a future appointment.