Embed Size (px)
Citation preview
Practice safe design: Use a concept.
PETRULA VRONTIKIS CREATIVE DIRECTOR VRONTIKIS DESIGN OFFICE
All Rights Reserved. Copyright © 2021 by Pearson Education, Inc.

CHAPTER GOALSThis online chapter expands upon the Motion techniques introduced in Chapter 15, “Motion Graphics: Make Things Move.” While the previous chapter looked at how to build a single video, this chapter explores other techniques you can use to attract the eye.
You wouldn’t use all of these in a single video—well, you could, but it would look pretty outrageous. Instead, I want you to see what these are and how to create them. Then, you can experiment on your own to learn which techniques work best with your stories.
Specifically, this chapter covers:
■ How to time multiple scenes in a motion graphic video
■ How to use particles and blend modes
■ How to animate elements
■ How to draw paths and apply shape styles
■ How to add reflections
ADVANCED MOTION: PARTICLES, PATHS, AND PERSPECTIVE
CHAPTER 16
16-3All Rights Reserved. Copyright © 2021 by Pearson Education, Inc.

THIS CHAPTER doesn’t have a plot, but it does have a lot of characters.
Creating ScenesIn Chapter 15, I explained that one of the challenges of creating motion graphics is timing, especially between scenes. A “scene” in a motion graphic is just like a scene in a movie: related images grouped around a central theme.
Motion graphics are similar. For example, the first scene is an attention- grabbing hook for the eye of the audience. It generally implies a question: Why should you watch this? The second scene explains why this problem needs a solution. The third scene provides the solution with a Call to Action.
The trick with motion graphics is that you have very limited time, about 10–15 seconds, for your message. This means that the planning and timing of each scene becomes important.
Here’s a technique you can use when all your scenes are discrete, that is, no graphical element is shared between scenes. Not all motion graphics fall into this format, but I want to illustrate this because many students have prob-
lems getting scenes to start and end at precisely the same time—what editors call “clean edits.”
As you create the initial groups for your project—and remember that a motion graphic will have many elements and groups—create a group for each scene. I call these “master scene groups,” as illus-trated in FIGURE 16.1.
Macaleigh, one of my teaching assistants, wants me to stress the importance of organization: “During our class, students would often have trouble with Motion projects because they didn’t put their elements into groups. Once they started using groups and organizing everything, they had a lot less trouble. Still, they all seemed to want to do it the hard way. The moral of my story: ‘ Hammer on the fact that groups are essential, because students don’t seem to get it on the first try.1’”
Next, add and modify the elements for each scene within that master scene group (FIGURE 16.2). There’s no limit to the number of elements in a group, so you can create subgroups inside the master scene group whenever needed.
Finally, when all elements are added and animated, select each master scene group and trim it so that the first scene ends and the next one starts at exactly the same frame. To trim, select each master scene group, put the
SCENE In film, this is generally defined as the action in a single location during a continuous time.
FIGURE 16.1 Create a group for each scene then put all the elements and groups for that scene in each group. Remember: groups can hold other groups.
1 Personal email
Motion graphics are all about capturing the eye of the viewer long enough to deliver a message.
16-4 SECTION 3: PERSUASIVE MOVING IMAGESAll Rights Reserved. Copyright © 2021 by Pearson Education, Inc.

playhead where you want a scene to start, and press I. Next, move the play-head to where you want the scene to end and press O. FIGURE 16.3 shows an example of this trimming. Remember, Ins and Outs are always set at the position of the playhead.
Before I change the subject, if you need a graphical element to extend through the entire project—a common background is a typical example—put it into its own group at the bottom of the Layers panel. The contents of any group that isn’t trimmed for time will last for the duration of the project.
Particles and Blend ModesNow that we know how to create scenes and time elements, let’s move on to some specific techniques. One of the real benefits to using Motion is that its Library contains thousands of royalty-free elements for our projects. For example, as shown in FIGURE 16.4, the Library contains more than 200 par-ticle effects—fully animated systems that range from abstract patterns to
FIGURE 16.2 Store all the elements and groups for each scene in a master scene group. The contents of a group are shown as indented layers.
FIGURE 16.3 After all elements are added, trim the duration of each master scene group to match the timings of your scene.
It would be great if you could trim the duration of a group before put-ting elements into it, but Motion doesn’t allow that. All elements need to be added and ani-mated before trimming the group. What this technique does is make sure that elements from one scene don’t “flash” into the previous or fol-lowing scenes.
ChAPTER 16: ADVANCED MOTION: PARTICLES, PAThS, AND PERSPECTIVE 16-5All Rights Reserved. Copyright © 2021 by Pearson Education, Inc.

falling leaves to fire and explosions. To see them, choose Library > Particle Emitters > All. Figure 16.4 displays 16 particle systems in the SciFi category.
As with any element in the Library, select one you like. Once selected, it appears in the small, animated preview window at the top of the Library panel. To add it to a project, click the Apply button. This places it in the cen-ter of the frame starting at the beginning of the project.
Let’s combine a particle system with text to create a different look. Create a new project, choose Library > Particle Emitters > SciFi > Hypnotic so it appears in the Preview window, then click Apply. (I illustrated where this effect is located in Figure 16.4.)
Using Inspector > Properties, scale the particle emitter to fill the frame. You’ll need to scale this particle system a lot to get it to fill the frame, as shown in FIGURE 16.5.
To zoom into the Viewer, press Cmd+[plus].
To zoom out of the Viewer, press Cmd+[minus].
To fit the image into the Viewer, press Shift+Z.
To show the image at 100 percent size, press Option+Z.
These shortcuts only affect the Viewer dis-play, not the elements themselves.
FIGURE 16.4 The Motion Library holds more than 200 particle systems. All are animated.
FIGURE 16.5 The Hypnotic effect, scaled much larger to fill the frame in the Viewer. The double blue lines are the Safe zones that I use to define the frame. The white box shows how much larger the particle system was scaled.
Roll Your Own ParticlesMotion allows us to create our own custom particle systems. This is both enormously flexible—for example, any image can be a particle—and great fun. However, it would take more pages to explain than I have room for in this book. If particles tickle your fancy, check out Motion’s Help files. Particles are worth learning.
16-6 SECTION 3: PERSUASIVE MOVING IMAGESAll Rights Reserved. Copyright © 2021 by Pearson Education, Inc.

Select the Text tool (Shortcut: T), select the group that contains the particle system, then enter some text.
In FIGURE 16.6, we have a colorful, animated background with white text in front of it. Nice, but boring. Next, select the text in the Layers panel and, using Inspector > Properties, change the blend mode to Stencil Alpha.
Pretty darn cool! The animated lower image now fills the letters, as shown in FIGURE 16.7. You can add a different background below this, rather than black, provided it is stored in a different, and lower, group than the one hold-ing the text and the background.
Unlike traditional bit-maps, particle systems can be scaled to any size without becoming blurry or pixelated.
FIGURE 16.6 Text is added in the same group, but above the animated particle system.
FIGURE 16.7 Apply the Stencil Alpha blend mode to fill the text with the lower image.
ChAPTER 16: ADVANCED MOTION: PARTICLES, PAThS, AND PERSPECTIVE 16-7All Rights Reserved. Copyright © 2021 by Pearson Education, Inc.

The Six Priorities still apply. Even though the text is no longer white, it is still moving, bigger, brighter, and different than anything else on the screen. It’s visually interesting and eye-catching.
Animate Elements with Basic Motion BehaviorsWhile I really like text behaviors to animate 2D text, there are other behav-iors that can also animate text or any other element. The most frequently used are stored in a Behavior category labeled: “Basic Motion.” While I use many of these in virtually all my projects, for this example, I’ll illustrate two: Throw and Spin.
In Chapter 15, “Motion Graphics: Make Things Move,” we created a project using 3D text. Let’s start with that same example, but use different behaviors to animate both the background and the text.
Select the Background layer; then click the Behaviors icon at the top of the interface and choose Basic Motion > Throw. Then, click the HUD icon at the top right of the Motion interface (or choose Window > Show HUD).
A Note on TransparencyThe black background Motion displays isn’t real. You see it in Motion, but it doesn’t export. This is important because virtually all particle systems, like Hypnotic, are translucent. It may look like Hypnotic displays its colors against black. Instead, it is actually dis-playing its colors over a transpar-ent background, as shown here. To avoid having particles wash out when placed over a different back-ground, consider putting a solid black rectangle behind the particle system, but in the same group.
You can see the transparency in a layer or project by clicking the small color chip indicated by the red arrow in the top-right corner of the Viewer. Color shows final output. Transparent displays a grid for all images that are not fully opaque.
Behaviors animate elements.
16-8 SECTION 3: PERSUASIVE MOVING IMAGESAll Rights Reserved. Copyright © 2021 by Pearson Education, Inc.
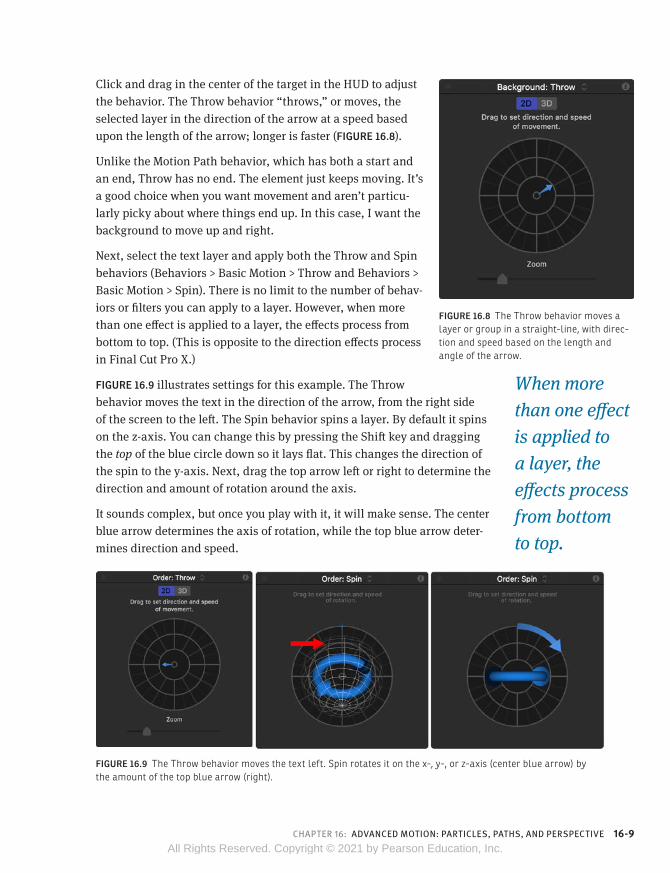
Click and drag in the center of the target in the HUD to adjust the behavior. The Throw behavior “throws,” or moves, the selected layer in the direction of the arrow at a speed based upon the length of the arrow; longer is faster (FIGURE 16.8).
Unlike the Motion Path behavior, which has both a start and an end, Throw has no end. The element just keeps moving. It’s a good choice when you want movement and aren’t particu-larly picky about where things end up. In this case, I want the background to move up and right.
Next, select the text layer and apply both the Throw and Spin behaviors (Behaviors > Basic Motion > Throw and Behaviors > Basic Motion > Spin). There is no limit to the number of behav-iors or filters you can apply to a layer. However, when more than one effect is applied to a layer, the effects process from bottom to top. (This is opposite to the direction effects process in Final Cut Pro X.)
FIGURE 16.9 illustrates settings for this example. The Throw behavior moves the text in the direction of the arrow, from the right side of the screen to the left. The Spin behavior spins a layer. By default it spins on the z-axis. You can change this by pressing the Shift key and dragging the top of the blue circle down so it lays flat. This changes the direction of the spin to the y-axis. Next, drag the top arrow left or right to determine the direction and amount of rotation around the axis.
It sounds complex, but once you play with it, it will make sense. The center blue arrow determines the axis of rotation, while the top blue arrow deter-mines direction and speed.
FIGURE 16.9 The Throw behavior moves the text left. Spin rotates it on the x-, y-, or z-axis (center blue arrow) by the amount of the top blue arrow (right).
When more than one effect is applied to a layer, the effects process from bottom to top.
FIGURE 16.8 The Throw behavior moves a layer or group in a straight-line, with direc-tion and speed based on the length and angle of the arrow.
ChAPTER 16: ADVANCED MOTION: PARTICLES, PAThS, AND PERSPECTIVE 16-9All Rights Reserved. Copyright © 2021 by Pearson Education, Inc.

As you play this back, the background moves up right, while the text moves left and rotates through the center of the frame, as shown in FIGURE 16.10. During the move, lights glint off the shiny materials we applied to the 3D text surfaces. Cool.
Paths and Shape StylesLet’s create a new project and explore new ways to decorate an image. Some-times, a bit of decoration makes the frame more interesting. For instance, in FIGURE 16.11, the top half is complete, but the entire lower half is empty. In Chapter 15 we discovered gadgets, gauges, and drawings (Library > Content). This time, I want to explore paths and shape styles.
3D text, by default, reflects light based on the material you applied to the surface and the lighting style you selected. Experi-ment with the different lighting styles and see the differences. Motion also supports placing and animating your own lights.
FIGURE 16.11 This image is cute, but the lower half needs decoration. It’s time to explore paths and styles. (Image courtesy of Jim Walker and Lobsters Gone Wild Productions.)
FIGURE 16.10 The left image is the starting position. The right image is where the animation ends. The background moves, while the text moves and rotates.
16-10 SECTION 3: PERSUASIVE MOVING IMAGESAll Rights Reserved. Copyright © 2021 by Pearson Education, Inc.

Paths can be drawn by either the Pen or Paint Brush tool. The Pen creates a path, while the Paint Brush creates a path and immediately applies a shape style to it. Both paths can be modified as illustrated here.
A “path” is exactly that, a line, which can be curved or straight, filled or open, which is drawn with either the Pen tool or the Paint Brush tool. While similar, we’ll use the Pen tool for this example. Specifically, select the Bezier mode for the Pen tool, as shown in FIGURE 16.12.
FIGURE 16.12 At the bottom center of the Viewer, next to the Rectangular drawing tool, is the Pen tool. We’ll use it to draw Bezier paths.
Click where you want the line to start. Move the mouse then click and drag to add a curve; keep dragging until the curve is the shape you want. (Click without dragging to insert a corner.) Finally, close the shape by moving the mouse back to the starting point and click. Immediately, the shape fills with a color, as FIGURE 16.13 shows. You can create as many corners and curves within a shape as you like.
You create open shapes by double-clicking the end point of the path you are drawing; you create closed shapes by re-clicking the starting point.
A “path” is a line, which can be curved or straight, filled or open, which is drawn using the Pen or Paint Brush tools.
FIGURE 16.13 A shape (top) drawn by the Pen tool. As soon as you close the shape by clicking the start-ing point again, the shape fills in (bottom).
ChAPTER 16: ADVANCED MOTION: PARTICLES, PAThS, AND PERSPECTIVE 16-11All Rights Reserved. Copyright © 2021 by Pearson Education, Inc.

Using the HUD, change the color of Fill, or enable Outline and change its color, as shown in FIGURE 16.14. (Width is enabled when Outline is selected.) Roundness makes corners, um, “roundier.”
FIGURE 16.14 When a shape is selected, the HUD displays the Shape controls.
While it is nice to create custom shapes, it is hardly exciting. But…there’s a hidden option. Delete that layer and let’s start again.
Select the Pen tool and draw a similar shape, but, this time, after you add the last point, don’t end the path by clicking the starting point. Instead, double-click where you want the line to end. This is called creating an “open shape,” because the two ends don’t connect.
OK, the shape in FIGURE 16.15 is better, but can’t we do something more…eye-catching?
Paths can be edited after they are drawn using the Edit Points tool.
How to Edit a PathBezier curves, which are what these paths are actually called, can be edited after they are drawn. Go to the Tools palette and select the Edit Points tool. Right-click any red corner/curve dot in the Bezier curve to display a popup menu: Linear cre-ates corners, and Smooth creates curves. Drag the white dots (which are called “control points”) to change the shape of the curve. Press Shift, Option, and/or Cmd to constrain the movement of the con-trol point in various ways. To add a control point to an existing line, double-click the line using the Edit Points tool. Then, drag the newly created dot to create a new section of the curve.
16-12 SECTION 3: PERSUASIVE MOVING IMAGESAll Rights Reserved. Copyright © 2021 by Pearson Education, Inc.

FIGURE 16.15 Double-click the end point to create an open curve. Disable Fill, enable Outline, and adjust the width and color to suit your style.
Yes! The Shape Styles options (FIGURE 16.16) can be applied to any line drawn by the Pen or Paint Brush tool, as well as the geometric shapes. They inherit whatever color you apply to the outline. In this example, the rattan pattern (top right) is tinted green using the Outline color chip.
FIGURE 16.16 Click the small icon next to Shape Style (red arrow) and discover hundreds of textures you can use to decorate the outline of any shape. Three favorites are Abstract > Ideal Form, Liquid > Ink Bleed 03 Drops, and anything in the Light category.
ChAPTER 16: ADVANCED MOTION: PARTICLES, PAThS, AND PERSPECTIVE 16-13All Rights Reserved. Copyright © 2021 by Pearson Education, Inc.

To animate this line and make it look like it is being drawn on the screen, select the Bezier layer and choose Behaviors > Shape > Write On, as shown in FIGURE 16.17. As with all behaviors, changing the duration and position of the effect in the Mini-Timeline changes the speed and timing of the effect.
Perspective and Reflections3D is woven throughout the entire application, though 3D is initially hid-den to prevent new users from getting hopelessly confused. In this example, shown in FIGURE 16.18, both the text and the video are angled to give them a slight perspective. The video casts a reflection, but the text does not. Here’s how to position elements in 3D and create a reflection.
FIGURE 16.17 The rattan texture is being drawn on using the Write On behavior.
FIGURE 16.18 Here’s where we are going: text and video with perspective and the video creates a reflec-tion. (Snowboard footage courtesy of Standard Films, www.standardfilms.com.)
The Shape Styles options provide a wealth of textures and shapes to use as borders.
16-14 SECTION 3: PERSUASIVE MOVING IMAGESAll Rights Reserved. Copyright © 2021 by Pearson Education, Inc.

Create a new project. Everything we need will fit in one group. Create new text and color it green. In my example, I used:
■ Font: Flatbush Bold ■ Size: 400 points ■ Alignment: Right ■ Line spacing: –150 (enter the number; the slider doesn’t go this far) ■ Tracking: 10%
Every element in Motion can be moved or rotated in 3D. While you can posi-tion or rotate any element using Inspector > Properties, it is often easier to do this on-screen. When you enable (click) the 3D Transform tool (FIGURE 16.19) then select a layer, a new control appears in the center of the element in the Viewer. This control has three arrows and three small white circles, as shown in FIGURE 16.20.
FIGURE 16.19 The 3D Transform tool moves any selected object in three dimensions. These dimensions are color-coded red (X), green (Y), and blue (Z).
FIGURE 16.20 The 3D Transform controls in the Viewer can be hard to see. The RGB arrows in the center move the selected object along one of the three axes. The circles control rotation.
Look closely at Figure 16.20 to see the small white circles—they are hard to see against a busy background. Drag these to rotate an element along one of the three axes. Remember, each axis is color-coded: XYZ = RGB.
Using the 3D Transform tool, move, rotate, and position the “Pure Rush” text to your taste.
Then, import a video clip (File > Import) and scale it by dragging the blue dots while pressing Shift to constrain the aspect ratio. Next, use the 3D Transform tool to rotate it. FIGURE 16.21 shows the current status of our work.
3D is woven throughout Motion, though 3D is initially hidden to prevent new users from getting confused.
When working in 3D each axis is color-coded: XYZ = RGB.
ChAPTER 16: ADVANCED MOTION: PARTICLES, PAThS, AND PERSPECTIVE 16-15All Rights Reserved. Copyright © 2021 by Pearson Education, Inc.

Reflections require a surface to reflect from. This means drawing a rectangle then positioning it to catch the reflection of the video. The easiest way to do this is to work with a light-colored rectangle to make it easier to see as we position it, even though we will ultimately color it black to make it match the background and disappear.
Using the Rectangular drawing tool, draw a rectangle that fills the frame. Then, use the 3D Transform tool to lean it back under the image and position it so it is below the image.
FIGURE 16.21 Add, position, and rotate text and video using 3D Transform.
When you add a camera, Motion provides a new view setting that allows you to view a project from the top, bottom, and sides. This allows easier positioning of elements in space.
A Quick Way to ResetTo reset any setting, click the small down arrow to the right of the parameter you want to reset then choose Reset Param-eter. Resetting the Transform > Position parameters to 0,0,0 is also a handy trick when you drag a clip into the Viewer then want to position it dead-center.
16-16 SECTION 3: PERSUASIVE MOVING IMAGESAll Rights Reserved. Copyright © 2021 by Pearson Education, Inc.

Motion Uses Real DepthWhen you rotate an image, it is not skewed or distorted; it moves in depth. When you add a camera, which I don’t cover in this book, the camera can move through space, hiding or revealing shapes or text. Shapes can easily move through other shapes. Foreground to background is actual distance. We can even apply depth-of-field blurs using a camera to any element.
Once the rectangle is in place, as shown in FIGURE 16.22, we need to switch from a 2D to a 3D environment. (3D is off by default.) This allows the different elements in a group to interact with each other in space. Only groups can be toggled, not specific elements.
Click the 2D/3D toggle on the right side of the group, illustrated in FIGURE 16.23, to enable 3D space, which is required for reflections, or any movement, actually, where you want an element or group to move in space relative to other elements.
FIGURE 16.23 To switch a group from 2D (top red arrow) to 3D (bottom red arrow), click the shapes icon on the right. This is a toggle; you can easily switch back and forth.
FIGURE 16.22 A light gray (for visibility) rectangle is drawn and positioned under the video. I use this lighter color to see where the rectangle is located.
Only groups can be toggled between 2D and 3D, not specific elements in a group.
ChAPTER 16: ADVANCED MOTION: PARTICLES, PAThS, AND PERSPECTIVE 16-17All Rights Reserved. Copyright © 2021 by Pearson Education, Inc.

When the shape icon shows three side-by-side shapes, the group is 2D. When the three shapes are stacked, the group is 3D. Switching between 2D and 3D is set using groups, not layers or projects.
To finish this reflection, we need to:
1. Select the rectangle in the Layers panel.
2. Choose Inspector > Properties, enable Reflection, and show its parameters.
3. Use the 3D Transform tool to position the rectangle to get the reflec-tion you need. Finding the right position can be finicky; be patient. Keep the rectangle light gray so you can see what you are doing. Make tweaks slowly and watch the results until you get the reflection you want.
4. Use Inspector > Shape > Style to change the rectangle color to black to match the background.
5. Select the Text layer, choose Inspector > Properties, and change Casts Reflection to No. This makes sure that the text won’t also reflect in the rectangle.
FIGURE 16.24 illustrates the reflection settings I used for the rectangle in Figure 16.18. Falloff makes the reflection fade into infinity.
In the finished example, I also added the blue racing stripes in a new group at the bottom of the Layers panel—Library > Content > Lines > Curl 29—and included it in the reflection because it looked cool.
Motion graphics combine elements, animation, and movement to create eye-catching, compelling visual messages. A simple rule is: If it looks good to you, it most likely is good.
When 2D space is active, the stacking order of layers in the Layer panel determines foreground to background. When 3D space is active, the position in Z space (depth) of the element determines foreground to background.
To have a background fill a 3D space, leave the background in its own group and set the group to 2D.
FIGURE 16.24 Here are the reflection settings I used for the rectangle.
16-18 SECTION 3: PERSUASIVE MOVING IMAGESAll Rights Reserved. Copyright © 2021 by Pearson Education, Inc.
KEY POINTSThis chapter explored a variety of ways to capture the eye of the viewer by creating visual elements that are out of the ordinary. That’s what a good motion graphic video is: something out of the ordinary to capture the eye.
Here are the key points I want you to remember as we wrap up this section:
■ Plan the content and timing of your scene before starting actual creation to simplify organizing and creating your project.
■ Clips, effects, and groups are timed by trimming and/or moving them in the Mini-Timeline.
■ Motion has a complete, create-your-own particle system; however, to save time, there are dozens of prebuilt particle emitters we can use in the Library.
■ Blend modes work in Motion the same way they do in Photoshop or Final Cut.
■ Motion supports moving elements in 3D, though only 3D text and par-ticles exist as 3D shapes. Everything else is displayed as 2D elements moving in 3D space.
■ The HUD displays common settings that speed up configuring effects. ■ The Pen and Paint Brush tools draw Bezier paths that can be straight
or curved, filled, outlined, or styled, as well as modified after they are drawn.
■ Shape styles provide a wealth of textures and shapes to use as borders for shapes.
■ Within 3D space, we can add reflections to objects. (We can, just for your information, also add lights, cameras, and sets, all of which exist and move in 3D.)
PRACTICE PERSUASIONGiven what you’ve learned about persuasion throughout this book, how would you change your approach to planning and creating the visual mes-sage that we first discussed in Chapter 1, “The Power of Persuasion,” if you were creating a business presentation, poster, video or motion graphic? In other words, how does your choice of delivery medium alter your message?
Then, given what we covered in this chapter, how would you modify the motion graphic video you created in Chapter 15?
ChAPTER 16: ADVANCED MOTION: PARTICLES, PAThS, AND PERSPECTIVE 16-19All Rights Reserved. Copyright © 2021 by Pearson Education, Inc.

PERSUASION P-O-VBUDDY’S DOGHOUSE
Carleton W. Cole Former KHOU-TV executive sports producer
Back in 1993, I was tasked at KHOU-TV to produce “The Buddy Ryan Show” for the Houston Oilers and our station. Now you have to understand, Buddy was not the head coach; Jack Pardee was. But the fiery defensive coordinator, who already had a reputation for making the life of the head coach difficult, was well established in the NFL. (He played second fiddle to Mike Ditka when the Bears won the Super Bowl in 1986.) We were producing “The Jack Pardee Show” the same season as “Quarterback Corner with Warren Moon,” so the difficulty was to give a unique twist to each program so that the viewers would be getting something different.
With Jack and Buddy, that wasn’t too hard. They not only had different person-alities; we would air Jack’s program live on Sunday nights after the late news, so for the most part, Jack’s program was a “postgame show.” But both Warren and Buddy were pregame shows, so we had to give them separate looks. To accomplish that, we needed to think of things that were different visually. To complicate matters, NFL Films was the rights holder to all game footage, even video we may have shot, so we were only allowed to use two minutes of “game film” in a 30-minute broadcast.
Both shows were recorded in front of live audiences. With Warren’s program it was in a studio, but for Buddy we produced it at a country-and-western bar. Where Warren’s program was much more “family oriented,” Buddy’s audience was a lot more, shall we say, “cowboy.” We did our best to make sure all the participants were sober, including Buddy, so the crowd wasn’t raucous, but it certainly wasn’t reserved.
Perhaps the most untraditional visual device was the creation of a segment called “Buddy’s Doghouse,” as in who’s on Buddy’s list, as he was known to be, well, abrasive. I remember coming up with the idea in training camp with the show’s host, former NFL Quarterback Giff Nielsen, who thought it would be a riot. So we created a visual doghouse that animated on the screen, with the signature “Buddy’s Doghouse” over the door where we could add a picture of the offending person. Oftentimes it would be a player who might have made a bad play, but the coup de grace was when Buddy had to add himself. That’s because he tried to throw a punch at offensive coordinator Kevin Gilbride during a game on national television. Yes, there is nothing like having two coaches on the same team trying to fight during a game. The program ran for only one season as Buddy was hired by the Arizona Cardinals when the sea-son ended, but to this day, I have had former players come up to me and ask, “Who’s in Buddy’s Doghouse this week?”
16-20 SECTION 3: PERSUASIVE MOVING IMAGESAll Rights Reserved. Copyright © 2021 by Pearson Education, Inc.

APPENDIX: KEYBOARD SHORTCUTS
Top 15 Shortcuts for Adobe PhotoshopSHORTCUT WHAT IT DOES
V Selects the Move tool
Cmd+O Opens an existing image
Cmd+S Saves the active image
M Selects the last-used Marquee tool
C Selects the Crop tool
Option+Cmd+I Displays the Image Size dialog
Cmd+A Selects everything on one layer
Cmd+D Deselects whatever is selected
Cmd+L Displays the Levels dialog
Cmd+[plus] Zooms image display, but doesn’t change the image
Cmd+[minus] Zooms out of image display
Cmd+1 Displays image at 100 percent size
Cmd+0 Fills screen with image
D Sets default colors to black and white
X Switches foreground and background colors
APPENDIX: KEYBOARD ShORTCUTS A-21All Rights Reserved. Copyright © 2021 by Pearson Education, Inc.

Top 15 Keyboard Shortcuts for Adobe Audition* SHORTCUT WHAT IT DOES
V Selects the Move tool
Cmd+O Opens an existing edit
Shift+Cmd+E Exports multitrack mixdown
R Selects the Razor tool
Option+Shift+Cmd+K Cuts all tracks at the position of playhead
T Selects Time Selection tool
Shift+Cmd+Delete Deletes selected region and removes the gap
I/O Sets an In or Out
G Clears the In and Out
+ Zooms into Timeline
- Zooms out of Timeline
\ Fits Timeline in window
M Adds marker
Option+Cmd+left/right arrow Jumps to next/previous marker
Option+,/Option+. Nudges clip one video frame left or right
*Based on the default shortcuts
A-22 APPENDIX: KEYBOARD ShORTCUTSAll Rights Reserved. Copyright © 2021 by Pearson Education, Inc.
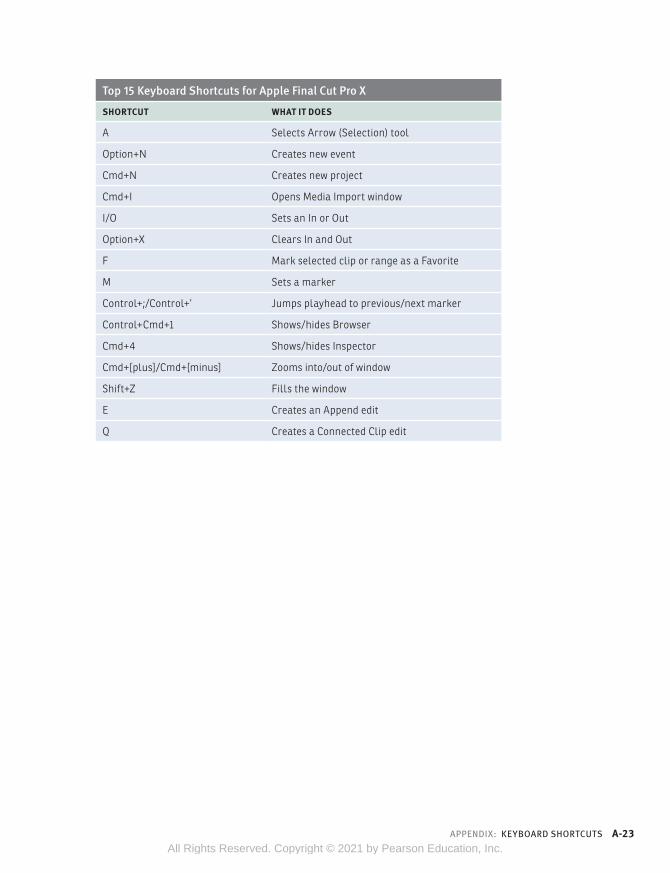
Top 15 Keyboard Shortcuts for Apple Final Cut Pro XSHORTCUT WHAT IT DOES
A Selects Arrow (Selection) tool
Option+N Creates new event
Cmd+N Creates new project
Cmd+I Opens Media Import window
I/O Sets an In or Out
Option+X Clears In and Out
F Mark selected clip or range as a Favorite
M Sets a marker
Control+;/Control+‘ Jumps playhead to previous/next marker
Control+Cmd+1 Shows/hides Browser
Cmd+4 Shows/hides Inspector
Cmd+[plus]/Cmd+[minus] Zooms into/out of window
Shift+Z Fills the window
E Creates an Append edit
Q Creates a Connected Clip edit
APPENDIX: KEYBOARD ShORTCUTS A-23All Rights Reserved. Copyright © 2021 by Pearson Education, Inc.

Top 15 Keyboard Shortcuts for Apple Motion*SHORTCUT WHAT IT DOES
Shift+S Selects the Arrow (Selection) tool
Cmd+3 Shows/hides the Inspector
Cmd+4 Shows/hides the Layers panel
F6 Shows/hides the Timeline
F7 Shows/hides the HUD
F8 Maximizes Viewer
Q Selects 3D Transform tool
A Enables keyframe recording
‘ (apostrophe) Toggles safe zones on/off
Cmd+N Creates a new project
Cmd+I Imports media clip
Cmd+S Saves Motion project
Cmd+E Exports Movie
I/O Sets an In/Out
Cmd+[plus]/Cmd+[minus] Zooms into/out of Viewer
*Based on the Motion Command Set
A-24 APPENDIX: KEYBOARD ShORTCUTSAll Rights Reserved. Copyright © 2021 by Pearson Education, Inc.