Embed Size (px)
Citation preview

Dan ShaferDean A. Ritz
Practical SmalltalkUsing Smalltalk/V
With 48 Illustrations
This book has been scanned by AdrianLeinhart and OCR by Stéphane Ducasseand Tudor Gîrba.We thanks Dan Shaferfor giving this book to the community.
Springer-VerlagNew York Berlin Heidelberg LondonParis Tokyo Hong Kong Barcelona
Dan ShaferRedwood City, CA 94062USA
Dean A. RitzPalo Alto, CA 94301USA
Library of Congress Cataloging-in-Publication DataShafer, Dan
Practical Smalltalk : using Smalltalk/V / Dan Shafer. Dean A. Ritz.p. cm. Includes
index. ISBN 0-387-97394-X1. Smalltalk/V (Computer program language) I. Ritz. Dean A. H.
Title.QA76.73.S59S53 1991005.13'3-dc20 91-327
Printed on acid-free paper.
© 1991 by Dan Shafer.All rights reserved. This work may not be translated or copied in whole or in part without the writtenpermission of the publisher (Springer-Verlag New York, Inc. 175 Fifth Avenue, New York, NY 10010,USA), except for brief excerpts in connection with reviews or scholarly analysis. Use in connection withany form of information and retrieval, electronic adaptation, computer software, or by similar ordissimilar methodology now known or hereafter developed is forbidden.The use of general descriptive names, trade names, trademarks, etc., in this publication, even if theformer are not especially identified, is not to be taken as a sign that such names, as understood by theTrade Marks and Merchandise Marks Act, may accordingly be used freely by anyone.
Typeset by Production Services, Redwood City, California.Printed and bound by R.R. Donnelley & Sons, Harrisonburg, Virginia.Printed in the United States of America.
9 8 7 6 5 4 3 2 1
ISBN 0-387-97394-X Springer-Verlag New York Berlin HeidelbergISBN 3-540-97394-X Springer-Verlag Berlin Heidelberg New York

This book is dedicated
by Dan Shafer
to
Bill Gladstone Super-
Agent and Super-Friend
and
by Dean Ritz
to his Brothers, Keith and Mike

Preface
This is a book about what we believe may well be the Computer ProgrammingLanguage of the 90s: Smalltalk. No, you're not about to be subjected to yetanother sales pitch for Object-Oriented Programming (OOP) and the lan-guages that support that approach to software design and construction. Ifyou've purchased this book, you're already sold on OOP and probably atleast to some degree on Smalltalk as well.
As we looked at the available book titles about Smalltalk programmingwhen we started this project, we noticed that those books as well asdocumentation for Smalltalk products, provided very good introductoryinformation. But the level of detail was such that these materials did notreally help the reader to see easily how real-world applications could beconstructed in Smalltalk. Yet we realized, too, that once you have aSmalltalk environment in your hands, the natural thing to want to do is tobuild something useful and interesting. Helping you understand how tobuild applications is the sole focus of this book.
This book is specifically aimed at people who are interested in learning tobuild real-world applications using Smalltalk/V (and, more specifically,Smalltalk/V 286). To some extent at least, it picks up where the Smalltalk/Vtutorial leaves off, although it also includes a bit of refresher material thatextends some of the information in that tutorial as well. We assume that youare already sold on OOP and on Smalltalk/V and that you are familiar withthe basic programming concepts contained in the Smalltalk/V tutorial. Wedo not assume that you are a professional programmer.
You will benefit most from this book if you work through the projects itcontains. But Smalltalk code tends to be quite readable; if you don't haveready access to a system running Smalltalk/V, you can still gain someinsights into the design, coding techniques, and strategies that will make youa better Smalltalk programmer.
vii
viii Practical SmallTalk
What Should You Expect To Learn?
Obviously, we expect you to make a reasonably serious time commitmentto learning OOP and Smalltalk/V. Why should you do this? What's in it foryou?
In brief, we expect that by the time you finish this book, you will learn howto handle the following programming-related tasks in Smalltalk/V 286 (and,by extension, in other flavors of Smalltalk/V as well):
• how to organize your classes into hierarchies that make them easier toreuse and extend
• where and how to find reusable classes in the Smalltalk/V class library
• how to design and implement projects related to all of the key conceptsin Smalltalk/V, including simulations
You will do all of this by following through the book from start to finish aswe take you through the process of learning the Smalltalk/V environment,tools, libraries, and techniques, on a practical level.
What Does this Book Cover?
This book is divided into 11 chapters, some of which may be longer than youare used to seeing in computer books. With the exception of Chapter 1, itfollows a careful organization of background and theory followed by aspecific project for you to build that reinforces and extends the concepts inthe preceding chapter.
Chapter 1 is a brief look at the Smalltalk/V environment. It encom-passes an overview of the Smalltalk/V tools, some emphasis on theClass Hierarchy Browser (CHB) and the Disk Browser, an introduc-tion to the use of the Debugger, and a discussion of how to customizethe Smalltalk/V environment to make it more compatible with yourstyle of programming and design. Some of the material in this chapterreviews information found in the Digitalk tutorial, and some of it isnew material.
Chapter 2 focuses on the Smalltalk language itself. The language is, ofcourse, just one of the tools in the Smalltalk/V environment. Thischapter looks at basic Smalltalk/V syntax, outlines some of theimportant classes in the Smalltalk/V class library that we'll be dealing
______________________ Preface ix
with in this book, and points out some key programming concepts thatare either glossed over or not covered in detail in the Digitalk manuals.
Chapter 3 puts the material in the first two chapters to work in the firstof five projects around which the book is centered. In this chapter,you'll build a small project that extends the Smalltalk/V environmentby adding a simple but useful application to the system and demomenus. This application is called the Prioritize^ it helps you to rankand sort through a list of choices you enter. You'll see how to designthis application and become comfortable with the idea of modifyingthe Smalltalk/V environment. Many programmers coming to Smalltalkfrom other languages and approaches find a difficult psychologicalbarrier in the fact that all of the programming you do in Smalltalkentails changing the environment itself. This chapter will help youover that hurdle and build a useful application in the process.
Chapter 4 turns our attention to the development processes involved indesigning and creating Smalltalk/V applications. As you'll see, pro-gramming in Smalltalk is a little like peeling an onion. There areseveral approaches to programming, none of which is the best and allof which may actually be used in creating a single application.
Chapter 5 will then demonstrate the simplest approach to programmingin Smalltalk/V as you build a small counter project. While simplisticin execution, this project requires that you understand the basic use ofthe Model-Pane-Dispatcher (MPD) triad that is at the core of allSmalltalk/V interactive applications.
Chapter 6 then exclusively focuses on this triad and examines the keyrole played by the MPD interactions. The most useful aspect of thischapter lies in the triage it performs on the relatively complex andextensive set of classes and methods that comprise the MPD architec-ture. By defining what is important for you to learn and understand,and differentiating it from what you can simply take for granted, thischapter will greatly accelerate your ability to grasp the MPD conceptsthat are crucial to successful Smalltalk/V programming. We'll takeapart the ListPane class to see how the MPD architecture is imple-mented in Smalltalk/V's class libraries.
Chapter 7 then puts the MPD triad to work by helping you build a newtype of pane, specifically a new sub-class of the ListPane class thatallows the user to select more than one item from the scrolling list itcontains. You'll see how this list requires the use of the MPD triad.We'll also describe the interaction between this list pane and astandard one that shows the user's selections as they change.
x Practical SmallTalk
Chapter 8 turns our attention to the graphic world of Smalltalk/V. Thislanguage lives in an inherently graphic environment. Even on systemswhich do not feature a built-in graphic user interface, Smalltalk/Vprovides it. In this chapter, we'll look at the basic graphic concepts:forms, drawing primitives, and animation. Along the way we'll takea brief look at some of the mathematics involved in all graphic work.
Chapter 9 puts some of these basic graphic techniques to work as youbuild your fourth Smalltalk/V project, a graphing tool. This projectwas designed and constructed specially for this book by MortonGoldberg. You'll see the incremental development approach andunderstand how the graphic aspects of the program are used both tocreate the interface for the user and to generate the display of data. Thischapter concludes with an enlightening discussion of how to extendthis little example project into a more fully featured application.
Chapter 10 does for the text world of Smalltalk/V what Chapter 8 didfor the graphic world. It explores Smalltalk/V text editing concepts,including the TextPane, TextEditor, and TextSelection classes andhow they are used.
Chapter 11 provides you a chance to try out your knowledge of thetextual aspects of the language and environment by building a flexibleextension to Smalltalk/V's built-in methods of prompting users fortextual responses. You'll learn how to design, build, and extend adynamically modifiable blank form generator.
This book does not attempt to do any of the following:
• persuade you that OOP is important, efficient, effective, or indispensable. We believe it is all of these things, but other writers have beentouting this technology for a long time and many of them are better atsuch writing than we are.
• teach you basic OOP concepts. You should understand classes,methods, inheritance, encapsulation, polymorphism, and other keyOOP ideas, at least minimally, before you attempt to read this book.If you don't, then the Digitalk documentation provides some excellentbackground in the subject. There are numerous other books dedicatedto teaching OOP.
• compare OOP or Smalltalk to other programming methodologies. Ifyou are an experienced programmer, you can draw your own analogies as you progress through the book. Those conclusions will be more
Preface xi
valid than any we might suggest because they are yours and are basedon your experience. If you are not an experienced programmer, thenyou p. ibably neither care how Smalltalk and OOP compare to theseother approaches nor have the background to understand the differ-ences if we took the time and space to list them.
Some Notational Conventions
As with any programming book, this one adopts certain notational andsyntactic conventions to make readability easier. Here are the most impor-tant of those conventions.
• All class names are printed in bold type except in section headings,which are already bold and where they are usually evidently classnames from their context.
• All method names are printed in italic type, including in sectionheadings.
• We use a special font to reproduce program listings. It looks like this:
sample code
• We try to differentiate between elements of the Smalltalk languageand environment that are peculiar to Smalltalk/V and those that aremore generic and could be considered applicable regardless of thedialect of the language you choose. We use the term "Smalltalk/V" tomean that the subject being discussed is either unique to Smalltalk/Vor implemented differently than in other versions of the language.Where we use the term "Smalltalk," we refer to the broader context ofthe language of which Smalltalk/V is but one (albeit the most widelyused) implementation.
Contacting the Authors
We always enjoy hearing from people who have bought and read our books.Whether you want to tell us how much you enjoyed it and how much youlearned, point out weaknesses, complain in general, or just exchange ideasabout Smalltalk and OOP, you can reach us in any of several ways.Electronic mail is your best bet; we read and respond to electronic messagespractically daily. You can reach Dan Shafer on CompuServe (71246,402),

xii Practical SmallTalk
MCI Mail (DSHAFER), or CONNECT (DSHAFER). If you want to drop usa line, Dan's address is 277 Hillview Ave., Redwood City, CA 94062.That's not too reliable, though; we may even move by the time this book isprinted!
Dean Ritz is on the move as this is being printed, so if you have somethingspecifically to say to him, your best bet is to send it through Dan Shafer usingone of the above approaches.
Acknowledgments
The authors gratefully acknowledge the assistance of many people whoseinput, insights, and occasional interrogations helped shape this book.Among the more important people in this regard are:
Adele Goldberg, Stephen Pope, and several other people whom Danmet at ParcPlace Systems and who were responsible for his earlySmalltalk education.
Dave Wilson, an OOP fanatic who contributed greatly to Dan's under-standing of objects and their proper role in the universe (which Davebelieves, of course, is everywhere!).
Timothy Randle, who spent many hours with Dean discussing OOP andSmalltalk and reviewing designs for some of the programs in thisbook.
Morton Goldberg, who spent a great deal of time reviewing the earlychapters of this book and who designed and built the graphingapplication in Chapter 9.
Richard Szabo, Dean's good friend who first introduced Dean tocomputer science and demonstrated how something potentially soannoying could be so interesting.
Charles A. Rovira and Martin Shapiro, who reviewed portions of themanuscript, helped Dan over some Smalltalk rough spots and encour-aged the project all without having to deal with Dan face to face,thanks to the miracle of CompuServe!
John Sellers, who painstakingly read and commented on a late draft ofthe manuscript and made several extremely helpful and insightfulsuggestions.
Dan Goldman, Barbara Noparstak, Mike Anderson, Mike Teng, andthe rest of the gang at Digitalk, who put up with delays, repetitivequestions, panic and other modes of human behavior that no self-respecting publisher should have to put up with. In addition, both JimAnderson and George Bosworth were positive, encouraging, andenthusiastic in their support for this project from the first discussionabout its possibilities.
xiii

xiv Practical SmallTalk
The Editorial Staff at Springer-Verlag treated the project with careand enthusiasm.
Don and Rae Huntington of Production Services, who typeset thebook, tolerated more than a few quirks in the authors and themanuscript, painstakingly proofread the copy, and in generalmade the book look and read as well as it does.
We've omitted dozens of other people whose support and encourage-ment, inspiration and help, have made this an enjoyable and, we trustyou'll agree, successful project. Thanks to one and all!
Preface...................................................................................................... viiAcknowledgments .................................................................................. xiii
1 The Environment...................• ........................................................ 1Introduction................................................................................ 1An Overview of the Environment .............................................. 1Using the Class Hierarchy Browser ........................................... 2
Templates in the CHB ......................................................... 4Removing Classes via the CHB........................................... 5
The Smalltalk/V Image .............................................................. 6Using the Disk Browser.............................................................. 7Using the Other Browsers .......................................................... 9Using Inspectors ......................................................................... 9Using Workspaces...................................................................... 11Using the Debugger.................................................................... 12
2 The Smalltalk/V Language ............................................................. 17Introduction................................................................................ 17Review of Basic Smalltalk Syntax ............................................... 17
Message-Passing Syntax...................................................... 18Method-Definition Syntax................................................... 19Summary of Syntax.............................................................. 20
The Essential Classes .................................................................. 21Object.................................................................................... 23BitBlt..................................................................................... 23CharacterScanner ................................................................. 23Pen........................................................................................ 23The Collection Classes......................................................... 23Dispatcher ............................................................................ 25Form ..................................................................................... 25DisplayScreen ...................................................................... 25Magnitude Classes .............................................................. 26Menu .................................................................................... 26The Pane Classes ................................................................. 26Point ..................................................................................... 27Prompter .............................................................................. 27Rectangle.............................................................................. 28
XV

xvi Practical Smalltalk
Stream................................................................................... 28StringModel ......................................................................... 28TextSelection........................................................................ 28
3 The First Project: A Prioritizer....................................................... 29Introduction ................................................................................ 29Project Overview.................................................................. ,..... 29Designing the Project.................................................................. 30Building the Project .............., .................................................... 30
Class Prompter .................................................................... 31Creating a Prompter............................................................ 32Sorting the User's List.........,. ............................................... 34Displaying the Result........................................................... 36The Finished Prioritizer Method ......................................... 37Adding Prioritizer to the Menus.......................................... 38Demo Menu Modification.................................................... 38System Menu Modification ................................................. 40
Sprucing Up the Application ..................................................... 42Changing the Prompter....................................................... 43Consolidating the Code ....................................................... 44
Using the Debugger, Part 2......................................................... 46
4 Programming Techniques ............................................................... 49Introduction ................................................................................ 49Why Smalltalk/V Feels Different ............................................... 49Peeling the Onion........................................................................ 50Where to Begin?.......................................................................... 51What Should the Application Do?.............................................. 52Objects and Their Responsibilities............................................. 53
What Do Objects Need to Know?........................................ 53How Do Objects Collaborate? ............................................. 54Starting With Class Diagrams ............................................. 54
Creating Objects.......................................................................... 55Subclassing the Class Object ............................................... 55Subclassing Other Classes................................................... 57The Subclassing Process...................................................... 57Modifying Behavior of Chosen Class ................................. 58
Creating and Using Abstract Classes ......................................... 59The Purpose of Do-Nothing Methods................................. 60
Identifying the Right Class ......................................................... 60Adding Methods ........................................................................ 61
The Process of Adding a Method........................................ 62Avoid Adding Methods to System Classes ........................ 62

5 The Second Project: A Simple Counter ........................................ 65Introduction................................................................................ 65Project Overview ......................................... .............................. 65A Quick Overview of Model-Pane-Dispatcher ......................... 66
The Model............................................................................ 67The Pane ............................................................... .., ........... 67The Dispatcher .................................................................... 68What's Really Going on Here? ........................................... 68
Designing the Project ................................................................. 69Dividing the Responsibilities.............................................. 69Defining the Class ............................................................... 70Defining the Main Window ................................................ 70Defining the Subpanes.......................................................,. 71
Displaying the Window ............................................................. 73Creating a Single Method for Window Definition ............ 73
Writing the Methods for SubPane Interaction........................... 74Methods to Create a Counter ............................................. 76Testing the Counter............................................................. 77
Making the Window Smaller...................................................... 78Inspecting a Running Counter........................................... 80
Removing the Counter Class ..................................................... 81The Complete Counter Project Listing...................................... 81
6 The World of MPD........................................................................... 83Introduction ................................................................................ 83There's So Much Going on Here!................................................ 83TopPane Methods Youll Need.................................................... 84
The new Method....................... ,.......................................... 84The label: Method ................................................................. 85The addSubpane: Method ..................................................... 85The minimumSize: Method................................................... 86The initWindowSize Method................................................. 87The rightlcons: and leftlcons: Methods................................. 88
SubPane Methods Youll Need................................................... 89The model: Method ............................................................... 89The name: Method................................................................ 90The change: Method ............................................................. 90The framingBlock: andframingRatio: Methods ..................... 91Creating Rectangles ............................................................. 92Rectangles and Subpanes .................................................... 93
Pane Menus ................................................................................. 94Obtaining a TextPane's Contents ........................................ 96
The Only Model Method Youll Need......................................... 96
xviii Practical Smalltalk
Dispatcher Methods You'll Need ............................................... 97The scheduleWindow Method............................................... 97The open Method ................................................................. 97Standard Use of Dispatcher Methods ................................. 97
7 The Third Project: Creating a New Pane Type............................ 99Introduction................................................................................ 99Designing the Project ................................................................. 99
Problems Addressed by ListPane........................................ 100Responsibilities of ListPane................................................. 101Problems to be Addressed by MListPane ......... , ................ 101Responsibilities of MListPane ............................................. 102A Note About Responsibilities ........................................... 103
Building the Test Application.................................................... 103Defining and Initializing Instance Variables...................... 103Opening the Application Window..................................... 106Connecting the Two Panes ................................................. 108Creating and Constructing MListPane ............................... 110
Building MListPane.....................................................................Relevant MListPane Responsibilities..................................Clearing selection and selections as Needed... ...................... 112Formatting and Unformatting Selections ........................... 114Adding and Removing Elements of selections.................... 115Preserving the Original List................................................ 115Interpreting User Input for Selecting and De-Selecting
Elements .......................................................................118Providing the Model With User's Selections ......................121
The Complete Listing................................................................. 122An Alternative Approach .......................................................... 126
8 The Graphic World ..........................................................................129Introduction ................................................................................129Basic Graphic Concepts ..............................................................129
The Class Point .....................................................................130The Class Rectangle ..............................................................131The Class Form .....................................................................132
Drawing in Smalltalk/V .............................................................134The Class BitBlt ....................................................................135The Class Pen........................................................................137The direction: Method...........................................................139The turn: Method .................................................................140The place: Method.................................................................140The home Method .................................................................140The go: Method.....................................................................141The goto: Method .................................................................141Class GraphPane ...................................................................141
Contents xix
9 The Fourth Project: A Graphing Application.............................. 143Introduction .................................... ,.......................................... 143Designing the Application.......................................................... 143
The Subpanes....................................................................... 144The Class PlotWindow.......................................................... 145
Building the Application: Stage One......................................... 145The open Method.................................................................. 145The initWindowSize Method ................................................ 146Methods for the Text Pane.................................................. 147Methods for the Graphing Pane ......................................... 148Demonstrating the First Version........ . ............................... 148
Building the Application: Stage Two........................................ 149Plotting the Plots' Arguments ............................................ 150The initialize Method ........................................................... 151Drawing the Bars................................................................. 152Defining Graph Selection Methods.................................... 155The clearPlot Method.......................................................... 155The stringfrom: Method ...................................................... 156
Demonstrating the Second Version............................................ 156The Complete Listing of Second Version ........................... 158
Building the Application: Stage Three ...................................... 161User Selection of Graph Arguments .................................. 161Changing the plotMenu ....................................................... 162The optionPicker Method...................................................... 162The barFill Method .............................................................. 163The barSpacing, barWidth, and factor Methods .................... 164The promptFor:default:validateWith: Method........................ 165
File-Based Data Retrieval and Storage ...................................... 166The Modified dataMenu Method ........................................ 167Thefileln Method ................................................................ 167ThefileOut Method ............................................................. 168Redrawing the Plot on User Demand .................................169
The Complete Listing................................................................. 169
10 The Text World.................................................................................177Introduction .................................................................................177Behind the Text in Smalltalk.......................................................177The Class TextPane ..................................................................... 179
Methods for Appending Text..............................................179Methods for Scrolling the Text ............................................179Methods Related to Selection of Text ..................................180
The Class Text Editor ....................................................................180Tracking the Status of Text..................................................181Putting Special Characters in Text.......................................181Zooming the Pane ................................................................181
The Class StringModel..................................................................182
xx Practical Smalltalk
Information-Gathering Methods ........................................182Searching Methods ..............................................................183Editing Methods...................................................................183
The Class CharacterScanner ........................................................ 183Methods to Control Appearance ........................................184Methods to Display Text .....................................................184Methods to Blank Portions of the Pane ...............................185
11 The Fifth Project: A Form Designer..............................................187Introduction ................................................................................187Project Overview.........................................................................187Designing the Project ..................................................................188
Statement of Purpose ...........................................................188Defining the Objects ............................................................189Object Responsibilities ........................................................189General Approach................................................................190Knowledge Needed .............................................................191
Building the Project ....................................................................191Creating the New Classes ....................................................192Skeletal Interaction Methods...............................................193Building the Test Application .............................................198
Writing Methods to Place Sub-Panes..........................................200Installing the Text Panes for Each Editable Field.......................203
Modifying Undesirable Behavior in the Superclasses ........206Adding Menu Capabilities...................................................210Formatting the Name Fields ................................................211Creating a More Complex Test Application.......................213Disabling Scrolling in the GraphPane.................................214
An Alternative Approach...........................................................215Complete Source Code ................................................................216
Index.........................................................................................................223
1
In this chapter, we will look at the various tools that make up the Smalltalk/Vprogramming environment. We will examine the Class Hierarchy Browser,Disk Browser, Inspector, Workspace, and the Debugger. We include sometips that help you make more effective use of the Smalltalk/V programmingtools as you develop applications.
The documentation that comes with Smalltalk/V 286 (and the otherflavors of Smalltalk/V as well) contains detailed instructions on the use ofthese tools. We won't attempt to duplicate that information in detail here.Rather, our focus will be on two aspects of each tool: an overview of its use(condensing information contained in the documentation in greater detail)and tips and hints about its use that don't appear in the documentation andthat only arise from experience using the environment.
Any productive object-oriented development tool consists of three interre-lated elements:
• tools that facilitate use of the language (editor, browser, debugger, etc.)
• the language itself (compiler)
• the class libraries that give the programmer access to the operatingsystem, user interface, and other elements of program design
This chapter focuses on the first issue: tools. Chapter 2 reviews and providessome insights into the Smalltalk language as embodied in Smalltalk/V. Therest of the book uses these tools and the language in conjunction with themost important and useful classes in the class library to construct someinteresting applications.
2 Practical Smalltalk
Most of the tools you'll find useful in the Smalltalk/V 286 environment arewindows. All windows have certain things in common, including:
• a title bar containing the title of the window and providing a handle forthe direct manipulation of the window
• one or more panes of various types
• pop-up menus associated with each pane
• optional icons that allow you to do things like close, collapse, zoom,or resize the window
Some windows also include buttons on which you can click with the mouseto change the state of things in the window. For example, the ClassHierarchy Browser (at which we'll look closely in a moment) has twobuttons labeled "instance" and "class" that let you decide which type ofmethods you want to examine for the selected class.
Another behavior that all Smalltalk/V windows exhibit may take yousome time to get accustomed to. You can only type in a window when thatwindow is the topmost and active window. That's not too surprising ifyou've had any experience with Microsoft Windows or the Apple Macin-tosh. Some other windowing environments differ slightly in this behavior(e.g., UNIX X Windows). What may come as a surprise, though, is that thecursor must be physically located inside the window for you to edit itscontents. If you are accustomed to shoving the mouse pointer out of yourway as you type, you'll have to unlearn that behavior; Smalltalk/V 286 willsimply beep at you if you attempt to type into a window that does not containthe cursor.
Your Smalltalk/V environment automatically includes one window, theTranscript, when you launch the system. This window cannot be closed orcollapsed but it can be zoomed and resized as well as moved. You will quiteoften instruct your Smalltalk methods — particularly while you are devel-oping and debugging them — to place information into the Transcriptbecause you can be sure it will always be around and because displayinginformation there is relatively easy.
Most experienced Smalltalk/V programmers always have at least one copyof the Class Hierarchy Browser open (or collapsed but accessible) in theirenvironment. This window is used so frequently in Smalltalk programmingthat we'll shorten references to it and call it the CHB so you won't get tiredof reading (and we won't get tired of typing) Class Hierarchy Browser.
Chapter 1 The Environment 3
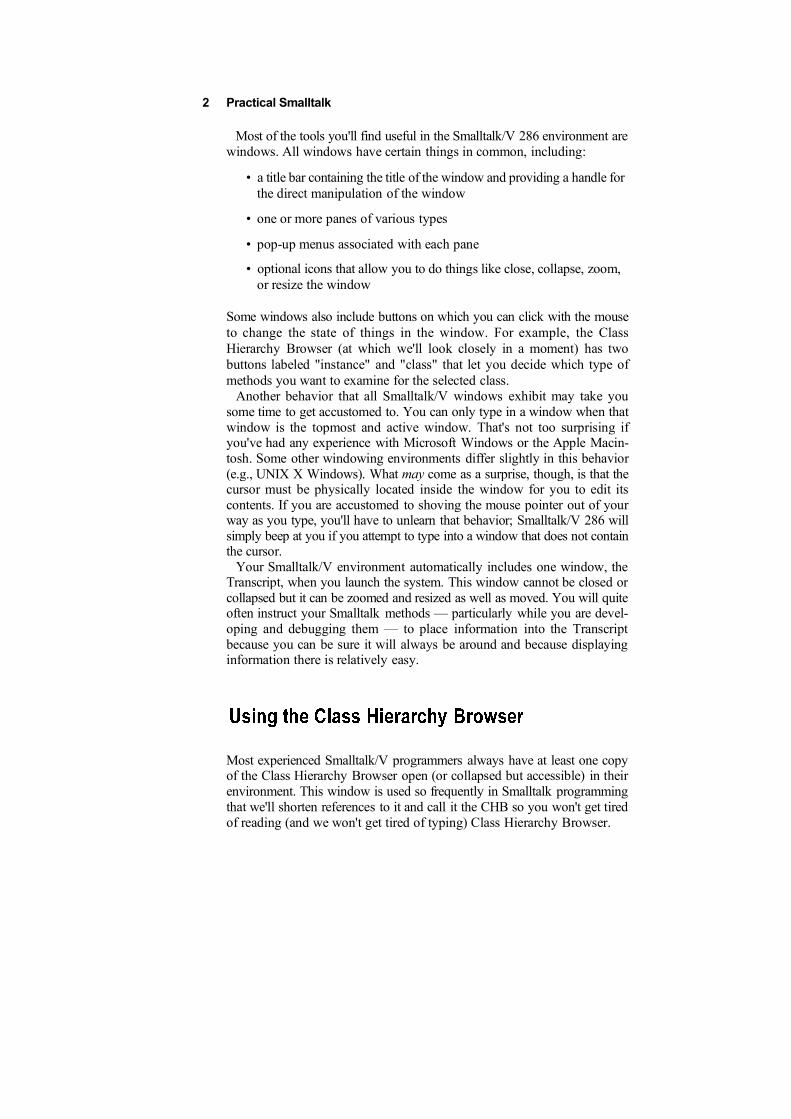
Figure 1-1 shows the Class Hierarchy Browser as it appears when you firstopen it in Smalltalk/V. This window has five panes. The class list pane inthe upper left lists all the classes in your current Smalltalk/V image. Thenames of classes which have subclasses are followed by ellipses. Themethod list pane in the upper right lists the methods associated with theselected class.
Notice that when you first open the CHB, no class is selected, so themethod list pane is empty. Immediately below the method list pane are twosub-panes that look and act like buttons. One is labeled instance and the otheris labeled class. Selecting one of these panes results in the instance or classmethods of the selected class being shown in the method list pane. Finally,there is a larger pane at the bottom of the window that is a text editing panewhere the source code of the selected method or class definition will appear.You can edit the text here; in fact, this is the place you will do most of yourSmalltalk/V programming.
If you are working with code from two or more classes at once, you willfind the most efficient way of setting up your environment will probably beto open a separate CHB for each class with which you are working. Eachtime you change the class you' ve selected in the upper-left list pane, you willlose the focus on the method you were editing before you made the change.This is quite often inefficient/Since Smalltalk/V lets you have a theoreti-cally unlimited number of CHBs open at one time, multiple browsers willbecome a frequent part of your Smalltalk/V programming experience.
Remember from your Smalltalk/V tutorial work that you can also open aCHB with a specific focus, that is, a CHB that not only opens on a specific
Figure 1-1. Typical Class Hierarchy Browser
4 Practical Smalltalk
class but one that contains a limited subset of the total Smalltalk/V classhierarchy. You do this by evaluating the following expression (probably inyour Transcript or your Workspace):
ClassHierarchyBrowser new openOn: (Array with: <className> with:<className>...)
You will, of course, substitute the name(s) of the class(es) you wish to becontained in the CHB for the <className> place markers in the above lineof code.
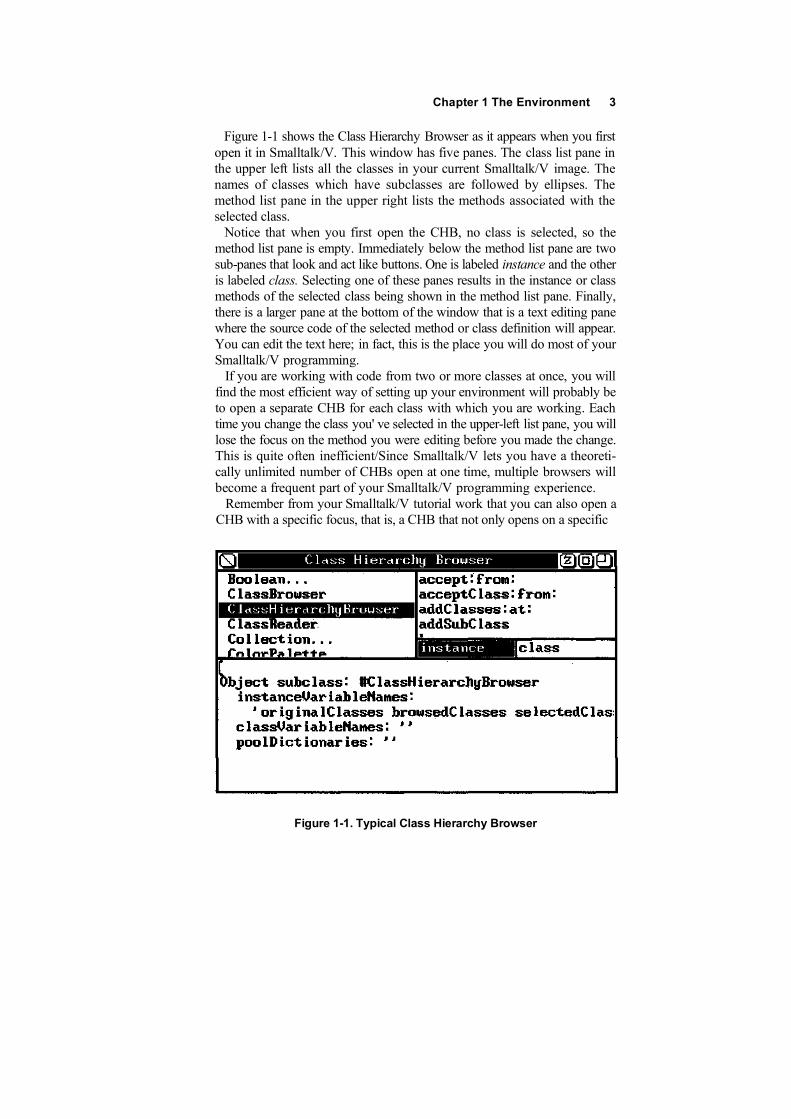
Templates in the CHB
Any time you create a new element of the Smalltalk/V environment in theCHB, you will be presented with a template for that definition in the lower,text-editing pane of the CHB' s window. Figure 1 -2 shows you the templatefor the creation of a new method, which is one of the most commonoperations you'll perform. Similarly, a relevant template appears if you tellSmalltalk/V through the CHB that you want to create a new class.
These templates are often useful in helping to remind you of the things that arerequired and expected in defining new Smalltalk/V objects.
Figure 1-2. New Method Template in CHB
Chapter 1 The Environment 5
Removing Classes via the CHB
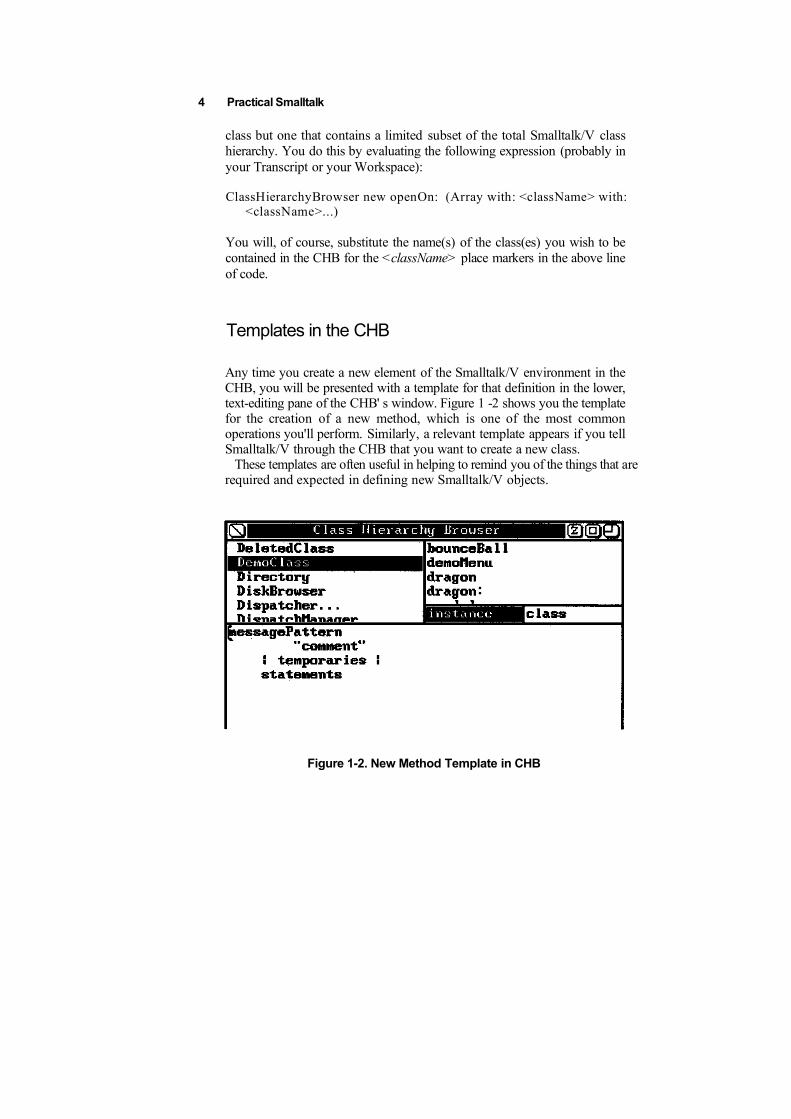
As you work with a Smalltalk/V image (see below), you will occasionallywant to "clean it up" by removing classes you created for some experimentalpurpose but no longer need. Doing so is easy by means of the CHB .providedthere are no instances of the class lying around the image. We find this isoften a source of confusion even to Smalltalk/V programmers with someexperience.
If you create an instance of a class — for example, by sending the class themessage new and assigning the result to a global variable — and then try todelete the class, Smalltalk/V won't let you. Instead, it will present you witha walkback with the message "has instances" (see Figure 1-3),
Smalltalk/V, through its automatic process known as garbage collection,removes from the image any object that is not referred to by some otherobject in the system. So the has instances error indicates that you havecreated an instance of the class in question and cannot delete the classbecause these instances depend on it.
You can find out what instances Smalltalk/V finds for the class you'retrying to delete by sending the alllnstances message to the class. For ex-ample, if you try to delete a class you created and named Counter, you canfind out what instances of it exist by typing the following line in theTranscript or Workspace, selecting the text, and selecting show it from thepane menu:
Figure 1-3. Walkback with "Has instances" Error

6 Practical Smalltalk
Then you need to type a line in the Transcript or Workspace removing theclass affiliation for each of these references. If, for example, the above linerevealed that you had created a new counter at some point called MyCounterl,you could do something like the following:
After doing this for all of the objects that reference the class you wish toremove, you can then return to the CHB and remove the class.
A more effective way to accomplish this task in one step (if you are sureyou want to remove all instances of a particular class so that you can changeits definition or remove it) is to evaluate the following expression:
This expression transfers all the references (pointers) to each instance ofCounter to an empty string.
The Smalltalk/V Image
We have mentioned the concept of an "image" in Smalltalk withoutexplaining it. On one level, an image is a simple and basic concept. It canbe thought of as the current environment that contains all the compiledmethods and all of the instances of active objects.
Whenever you run Smalltalk, you work with an image. You can only workwith one image at a time. As you develop applications, you may well haveoccasion to store more than one image on your disk, particularly as you wishto back up previous work or operate on different versions of the sameapplication or even create other applications. Each separate application,unless they are to be delivered together for some reason, is a separate image.
One of the most helpful and interesting aspects of an image is the ChangesLog. This log keeps track of all the changes you make in an image. It shouldbe saved each time you save the image itself. You must keep the change logwith its associated image, since they are bound logically but not physically.It is a common mistake to use a change log with the wrong image.Eventually, of course, this portion of the image can become quite large. Youcan reduce the size of your image by evaluating the following expression:

When you evaluate this expression, Smalltalk/V clears out all of the contents ofthe change log except for the latest copy of each new or changed method. It alsoremoves class definitions and writes a new image file automatically.
You can save even more disk space by compressing the entire source file,which is logically also part of the image. Do this by evaluating the followingexpression:
Evaluating this expression creates an entirely new source file for all methodsin the system, using the most recent copy of the source code for each method.It then empties the change log and automatically writes a new image to thedisk. The result, then, is a new base system with which to work.
You can open a Disk Browser any time you wish simply by selecting thebrowse disk option from the system pop-up menu. You can have multipleinstances of Disk Browsers open in your environment at a time (typically,you may have one for each disk that is currently in use).
The Disk Browser (see Figure 1-4) has two list panes in its upper portion.The leftmost one contains the directory of the disk and the subdirectorycurrently being viewed. The rightmost one contains a list of all the files inthat directory or subdirectory.
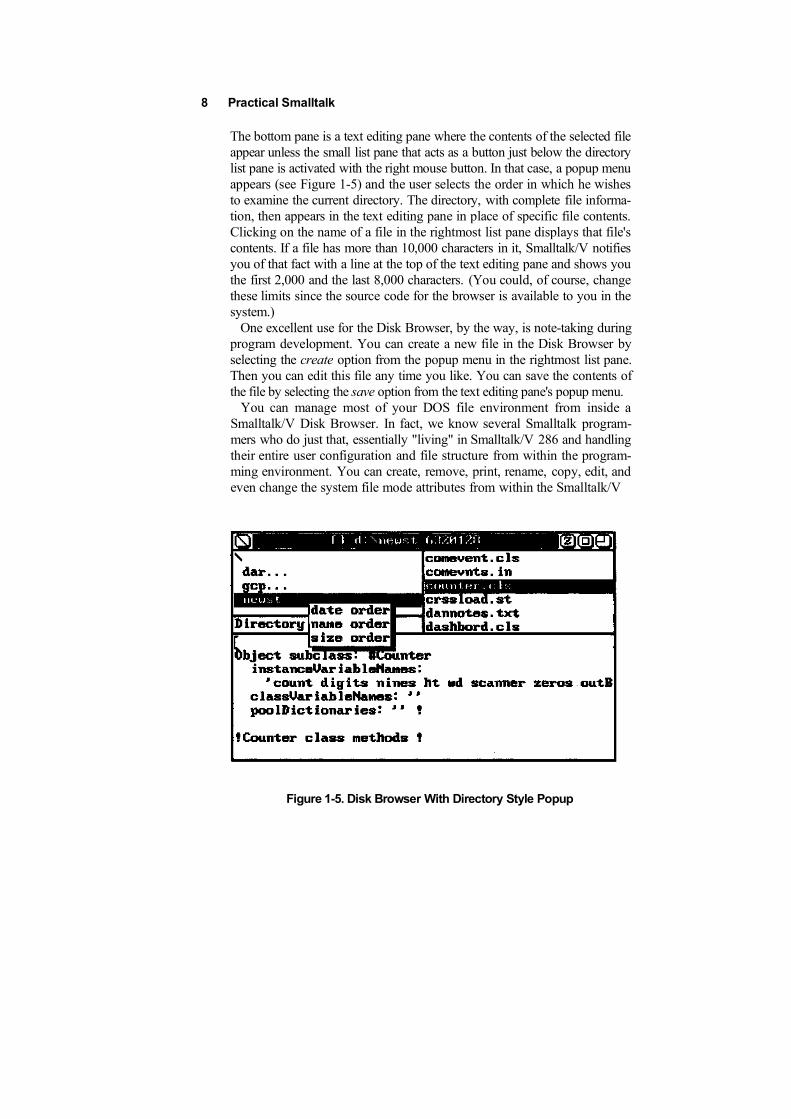
8 Practical Smalltalk
The bottom pane is a text editing pane where the contents of the selected fileappear unless the small list pane that acts as a button just below the directorylist pane is activated with the right mouse button. In that case, a popup menuappears (see Figure 1-5) and the user selects the order in which he wishesto examine the current directory. The directory, with complete file informa-tion, then appears in the text editing pane in place of specific file contents.Clicking on the name of a file in the rightmost list pane displays that file'scontents. If a file has more than 10,000 characters in it, Smalltalk/V notifiesyou of that fact with a line at the top of the text editing pane and shows youthe first 2,000 and the last 8,000 characters. (You could, of course, changethese limits since the source code for the browser is available to you in thesystem.)
One excellent use for the Disk Browser, by the way, is note-taking duringprogram development. You can create a new file in the Disk Browser byselecting the create option from the popup menu in the rightmost list pane.Then you can edit this file any time you like. You can save the contents ofthe file by selecting the save option from the text editing pane's popup menu.
You can manage most of your DOS file environment from inside aSmalltalk/V Disk Browser. In fact, we know several Smalltalk program-mers who do just that, essentially "living" in Smalltalk/V 286 and handlingtheir entire user configuration and file structure from within the program-ming environment. You can create, remove, print, rename, copy, edit, andeven change the system file mode attributes from within the Smalltalk/V
Figure 1-5. Disk Browser With Directory Style Popup
Chapter 1 The Environment 9
Disk Browser. (Of course, you can't run other DOS applications from insideSmalltalk/V 286, so you can only handle operating system and Smalltalk-related activities this way.)
There are two other types of browsers in Smalltalk/V for which you may findoccasional use. They are most useful when you are "playing detective" andtrying to find a particular class or method in the Smalltalk/V hierarchy.
The first browser is a Class Browser that lets you browse a particular class.You can create such a browser by sending the message edit to any class orby choosing the browse option from the class list pane of a CHB after havingselected a class.
You can also open a Method Browser that lets you examine and edit aparticular method that may be implemented in more than one class in thesystem. You create such a browser by choosing a method name in a browserand selecting either senders or implementors from the menu of the upper-right pane. In either case, you will be presented with a browser that lists allof the methods that send (or implement) the particular message in which youcan view the source code of the methods.
Quite often, you will find that creating a series of these browsers, lookingfirst at classes, then at methods, then at implementors and senders ofmessages, can give you a very complete picture of how a particular classoperates or how a specific method propagates throughout the hierarchy.
Next to the CHB, the most useful window in the Smalltalk/V 286 environ-ment is the Inspector. You'll use inspectors primarily during the process ofdebugging your Smalltalk/V applications.
While a CHB (or other browser) lets you look at a class or method as itrepresents a part of the Smalltalk/V image and hierarchy, an inspector letsyou examine the contents of the instance variables of a particular object orinstance of a class.
Actually, you can do much more than merely examine contents with anInspector. You can also change these contents. In addition, you can evencompile and execute expressions in the text pane of an Inspector with thesave menu option in that pane.
10 Practical Smalltalk
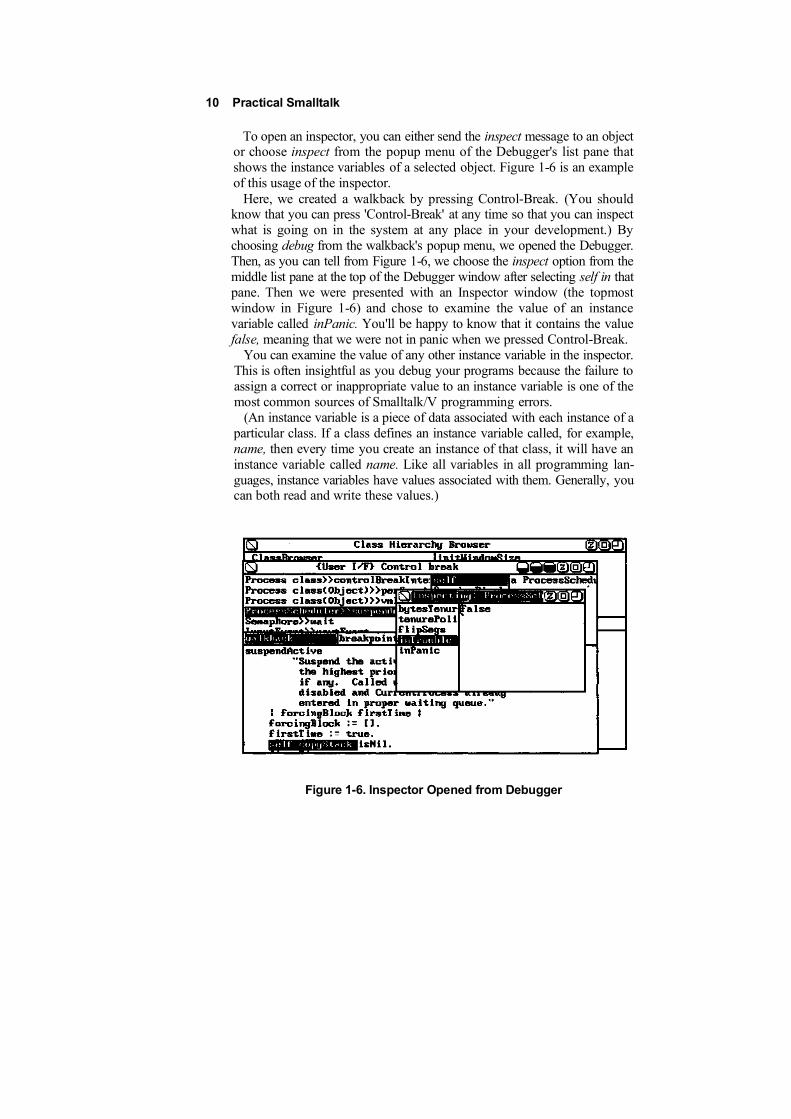
To open an inspector, you can either send the inspect message to an objector choose inspect from the popup menu of the Debugger's list pane thatshows the instance variables of a selected object. Figure 1-6 is an exampleof this usage of the inspector.
Here, we created a walkback by pressing Control-Break. (You shouldknow that you can press 'Control-Break' at any time so that you can inspectwhat is going on in the system at any place in your development.) Bychoosing debug from the walkback's popup menu, we opened the Debugger.Then, as you can tell from Figure 1-6, we choose the inspect option from themiddle list pane at the top of the Debugger window after selecting self in thatpane. Then we were presented with an Inspector window (the topmostwindow in Figure 1-6) and chose to examine the value of an instancevariable called inPanic. You'll be happy to know that it contains the valuefalse, meaning that we were not in panic when we pressed Control-Break.
You can examine the value of any other instance variable in the inspector.This is often insightful as you debug your programs because the failure toassign a correct or inappropriate value to an instance variable is one of themost common sources of Smalltalk/V programming errors.
(An instance variable is a piece of data associated with each instance of aparticular class. If a class defines an instance variable called, for example,name, then every time you create an instance of that class, it will have aninstance variable called name. Like all variables in all programming lan-guages, instance variables have values associated with them. Generally, youcan both read and write these values.)
Figure 1-6. Inspector Opened from Debugger
Chapter 1 The Environment 11
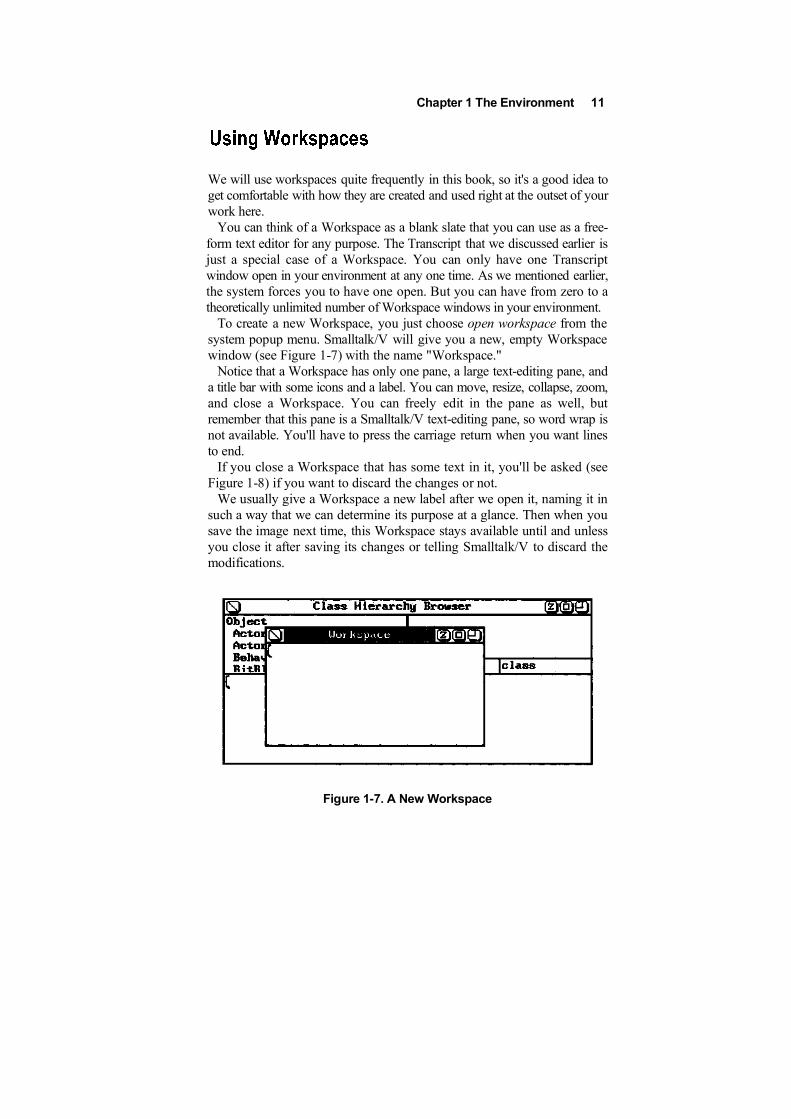
We will use workspaces quite frequently in this book, so it's a good idea toget comfortable with how they are created and used right at the outset of yourwork here.
You can think of a Workspace as a blank slate that you can use as a free-form text editor for any purpose. The Transcript that we discussed earlier isjust a special case of a Workspace. You can only have one Transcriptwindow open in your environment at any one time. As we mentioned earlier,the system forces you to have one open. But you can have from zero to atheoretically unlimited number of Workspace windows in your environment.
To create a new Workspace, you just choose open workspace from thesystem popup menu. Smalltalk/V will give you a new, empty Workspacewindow (see Figure 1-7) with the name "Workspace."
Notice that a Workspace has only one pane, a large text-editing pane, anda title bar with some icons and a label. You can move, resize, collapse, zoom,and close a Workspace. You can freely edit in the pane as well, butremember that this pane is a Smalltalk/V text-editing pane, so word wrap isnot available. You'll have to press the carriage return when you want linesto end.
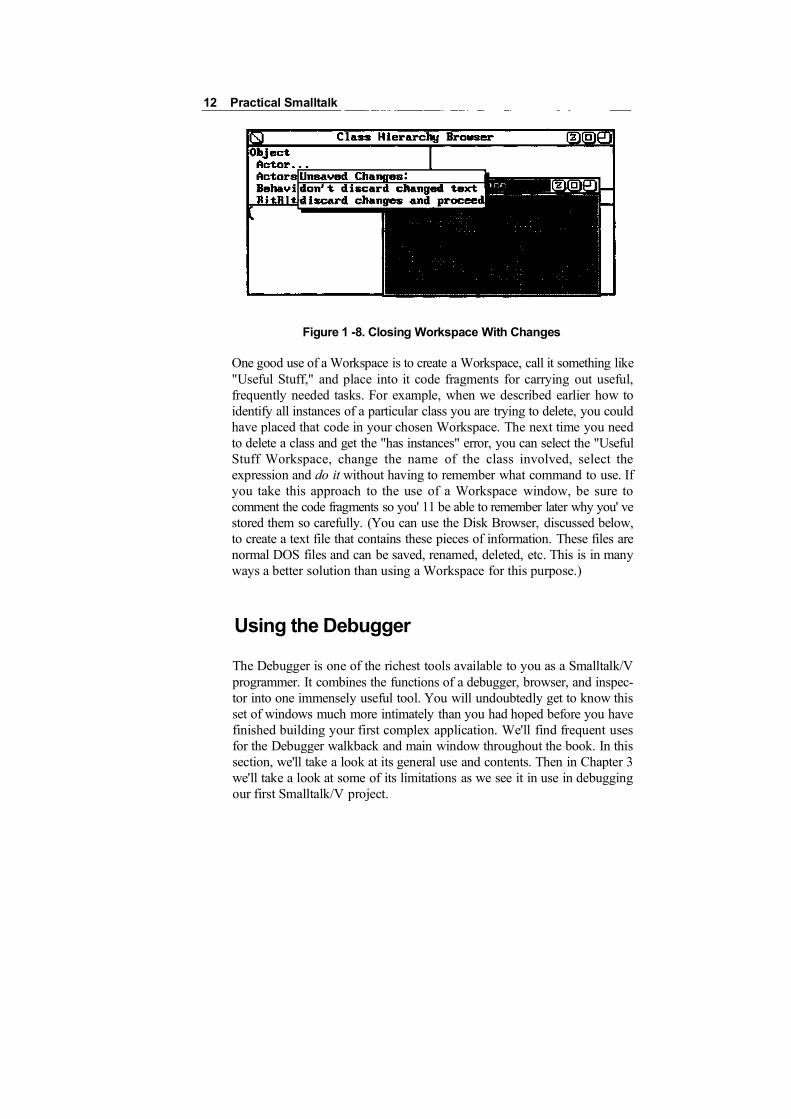
If you close a Workspace that has some text in it, you'll be asked (seeFigure 1-8) if you want to discard the changes or not.
We usually give a Workspace a new label after we open it, naming it insuch a way that we can determine its purpose at a glance. Then when yousave the image next time, this Workspace stays available until and unlessyou close it after saving its changes or telling Smalltalk/V to discard themodifications.
Figure 1-7. A New Workspace
12 Practical Smalltalk
Figure 1 -8. Closing Workspace With Changes
One good use of a Workspace is to create a Workspace, call it something like"Useful Stuff," and place into it code fragments for carrying out useful,frequently needed tasks. For example, when we described earlier how toidentify all instances of a particular class you are trying to delete, you couldhave placed that code in your chosen Workspace. The next time you needto delete a class and get the "has instances" error, you can select the "UsefulStuff Workspace, change the name of the class involved, select theexpression and do it without having to remember what command to use. Ifyou take this approach to the use of a Workspace window, be sure tocomment the code fragments so you' 11 be able to remember later why you' vestored them so carefully. (You can use the Disk Browser, discussed below,to create a text file that contains these pieces of information. These files arenormal DOS files and can be saved, renamed, deleted, etc. This is in manyways a better solution than using a Workspace for this purpose.)
Using the Debugger
The Debugger is one of the richest tools available to you as a Smalltalk/Vprogrammer. It combines the functions of a debugger, browser, and inspec-tor into one immensely useful tool. You will undoubtedly get to know thisset of windows much more intimately than you had hoped before you havefinished building your first complex application. We'll find frequent usesfor the Debugger walkback and main window throughout the book. In thissection, we'll take a look at its general use and contents. Then in Chapter 3we'll take a look at some of its limitations as we see it in use in debuggingour first Smalltalk/V project.

Chapter 1 The Environment 13
There are four ways for the Smalltalk/V Debugger to be invoked:
• by the system encountering an error condition
• by the user pressing Control-Break
• by sending the message halt to any object
• by Smalltalk encountering a method for which the programmer has set
a breakpoint
We'll look in this chapter at the use of the Debugger in all but the last twosituations.
Whenever an error occurs in a Smalltalk/V application, the system createsa Debugger Walkback window. This walkback has two aspects that interestus: its label and its pane contents. The label provides the message thattriggered the error condition (in most situations, at least) and the pane showsus the list of messages that have been processed in the current processingchain. The last method executed always appears on the top; as you go downthrough the list, the messages sent or methods called are less and less recent.(To be precise, this pane contains a nested list of all calls that are currentlybeing executed.) The list represents the most recent portion of the message-passing chain for the currently executing method. It obviously includesmany messages that your code does not originate or deal with and leaves offsome with which your code did deal.
Let's deliberately create an error that will produce a Debugger Walkback.In the Transcript (or in a Workspace), type the following nonsense code:
Now select and do it. You'll get a Debugger Walkback like the one shownin Figure 1-9.
When the Debugger Walkback window appears, you can do two thingswith it: you can close it or you can open the Debug window by selecting"debug" from the pane pop-up menu. You can close it either by clicking itsclose icon in the upper left corner of the title bar or by choosing resume fromthe pane pop-up. In most cases, you'll probably open a Debug window.Occasionally, the Debugger Walkback's label and the message list aresufficient for you to see quickly what has gone wrong. In that case, of course,you can simply dismiss the Debugger Walkback, fix the offending code, andresume your work.
Generally, the first entry or two on the message list are not very useful.They usually present the messages that deal with the error-handling processitself. As such, they don't provide a lot of insight into what is happening withthe code that has gone awry.
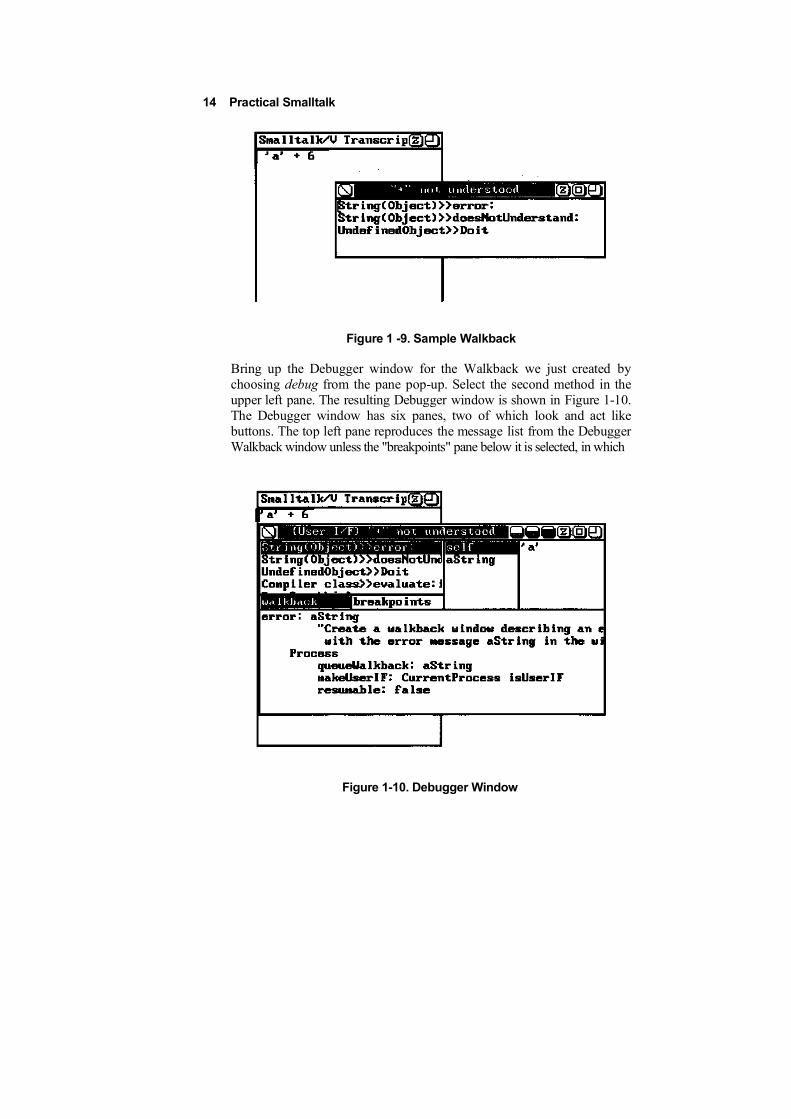
Figure 1 -9. Sample Walkback
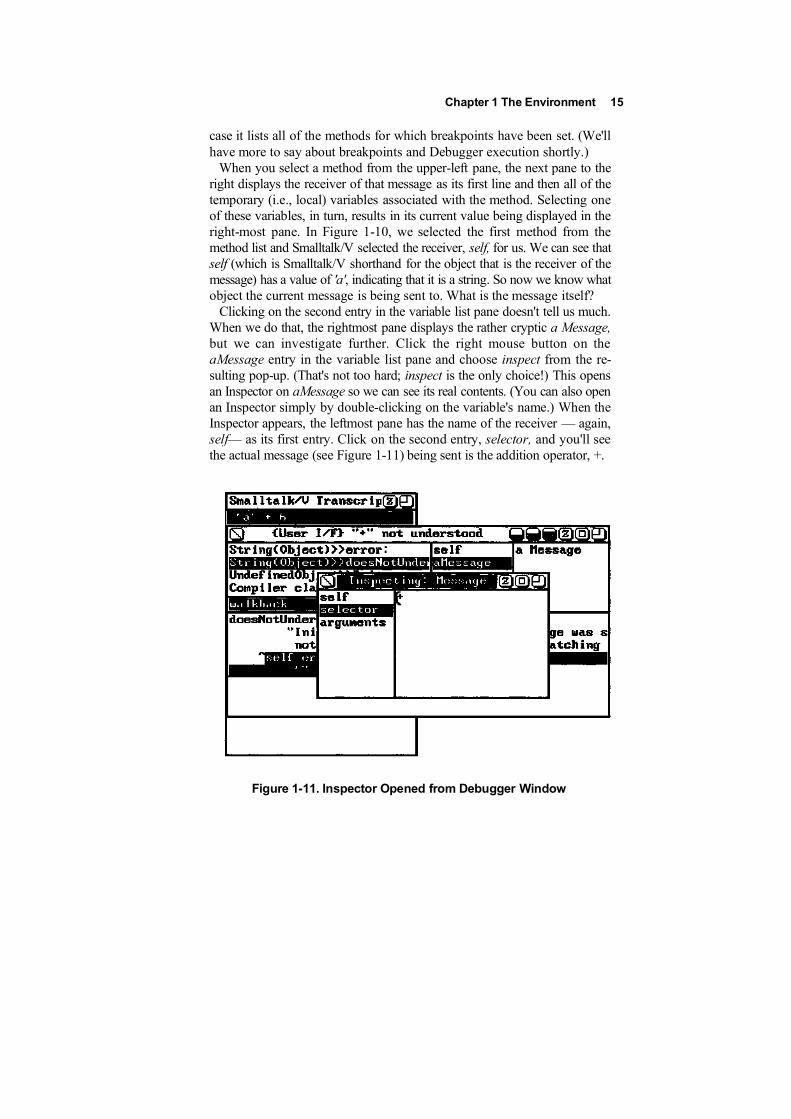
Bring up the Debugger window for the Walkback we just created bychoosing debug from the pane pop-up. Select the second method in theupper left pane. The resulting Debugger window is shown in Figure 1-10.The Debugger window has six panes, two of which look and act likebuttons. The top left pane reproduces the message list from the DebuggerWalkback window unless the "breakpoints" pane below it is selected, in which
14 Practical Smalltalk
Figure 1-10. Debugger Window
Chapter 1 The Environment 15
case it lists all of the methods for which breakpoints have been set. (We'llhave more to say about breakpoints and Debugger execution shortly.)
When you select a method from the upper-left pane, the next pane to theright displays the receiver of that message as its first line and then all of thetemporary (i.e., local) variables associated with the method. Selecting oneof these variables, in turn, results in its current value being displayed in theright-most pane. In Figure 1-10, we selected the first method from themethod list and Smalltalk/V selected the receiver, self, for us. We can see thatself (which is Smalltalk/V shorthand for the object that is the receiver of themessage) has a value of 'a', indicating that it is a string. So now we know whatobject the current message is being sent to. What is the message itself?
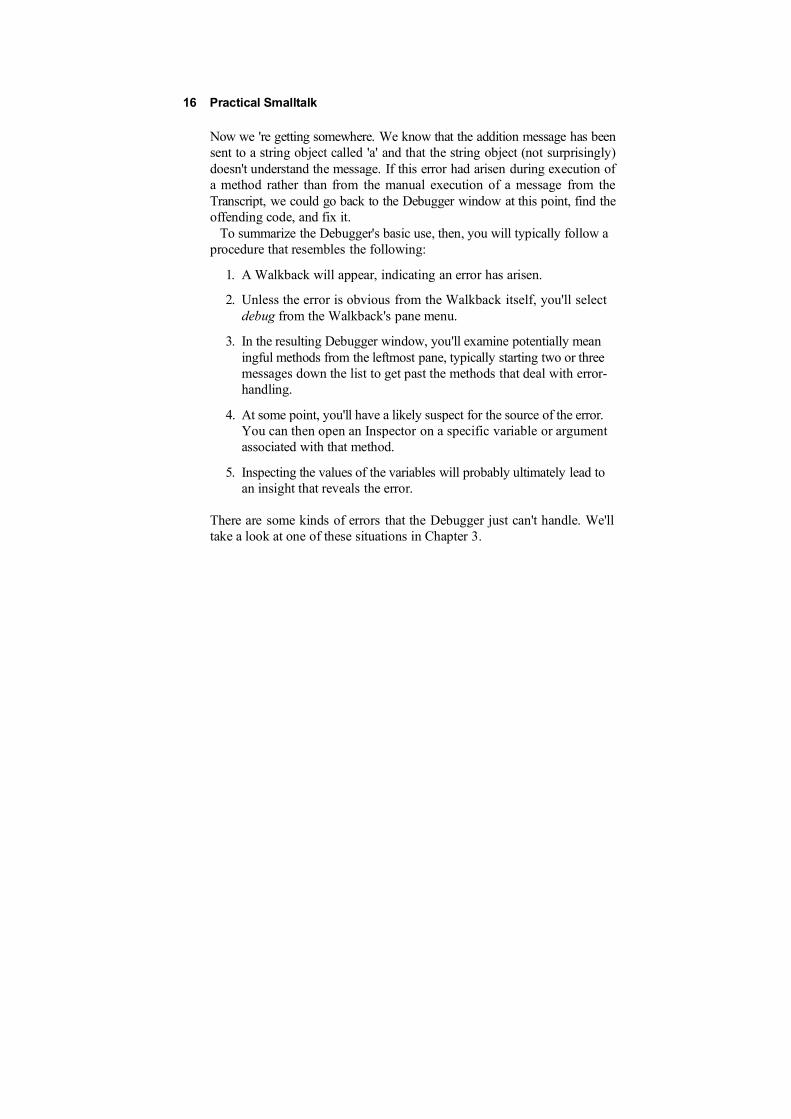
Clicking on the second entry in the variable list pane doesn't tell us much.When we do that, the rightmost pane displays the rather cryptic a Message,but we can investigate further. Click the right mouse button on theaMessage entry in the variable list pane and choose inspect from the re-sulting pop-up. (That's not too hard; inspect is the only choice!) This opensan Inspector on aMessage so we can see its real contents. (You can also openan Inspector simply by double-clicking on the variable's name.) When theInspector appears, the leftmost pane has the name of the receiver — again,self— as its first entry. Click on the second entry, selector, and you'll seethe actual message (see Figure 1-11) being sent is the addition operator, +.
Figure 1-11. Inspector Opened from Debugger Window
16 Practical Smalltalk
Now we 're getting somewhere. We know that the addition message has beensent to a string object called 'a' and that the string object (not surprisingly)doesn't understand the message. If this error had arisen during execution ofa method rather than from the manual execution of a message from theTranscript, we could go back to the Debugger window at this point, find theoffending code, and fix it.
To summarize the Debugger's basic use, then, you will typically follow aprocedure that resembles the following:
1. A Walkback will appear, indicating an error has arisen.
2. Unless the error is obvious from the Walkback itself, you'll selectdebug from the Walkback's pane menu.
3. In the resulting Debugger window, you'll examine potentially meaningful methods from the leftmost pane, typically starting two or threemessages down the list to get past the methods that deal with error-handling.
4. At some point, you'll have a likely suspect for the source of the error.You can then open an Inspector on a specific variable or argumentassociated with that method.
5. Inspecting the values of the variables will probably ultimately lead toan insight that reveals the error.
There are some kinds of errors that the Debugger just can't handle. We'lltake a look at one of these situations in Chapter 3.

2The Smalltalk/V Language
Having examined the programming tools of Smalltalk/V 286 in Chapter 1,this chapter focuses on the other two major components of the environment:the language and the class library. The first part of this chapter will reviewthe basic syntax of the Smalltalk/V programming language. While much ofthis material duplicates information contained in the Smalltalk/V 286documentation, it capsulizes the syntax of the language in a way that wehope you' 11 find useful. The second part of this chapter will discuss the majorclasses in the Smalltalk/V 286 class library. By "major," we mean theclasses with which you must be most concerned in a huge percentage of yourprogramming work.
At the end of this chapter, then, you should be more comfortable with thesyntax and structure of Smalltalk/V, and be better equipped to program in it.
Everything that happens in a Smalltalk/V application happens as a result ofa message being sent to an object which supports a method of the same nameas the message. Seen from the broadest perspective, Smalltalk/V program-ming consists of defining objects with methods where some of the methodssend messages to other objects.
Syntactically, we can look at Smalltalk/V at two levels: that of themessage-passing process and that of the method-execution process.
17
18 Practical Smalltalk
Message-Passing Syntax
All messages in Smalltalk/V have the same basic syntax. The receiver of themessage — i.e., the object to which the message is being sent — appearsfirst, followed by the message. To open an Inspector window on the classDemoClass, for example, you send this message:
DemoClass inspect.
The receiver, DemoClass, is passed the message inspect. In effect, the classis told, "Inspect yourself." This order of expression is opposite that used intraditional programming languages and is one of the most frequent sourcesof confusion to Smalltalk/V programmers who have experience in otherlanguages. The temptation is to write the above line as "inspect DemoClass"because you are accustomed to having the commands first and the datastructures on which they operate second. This is the natural sequence ofverb-object in English declarative sentences as well.
The message you pass to an object can consist of a single word (as ininspect) or of a series of words (keyword). Whether there is one or a numberof these elements, it is called the selector. By convention, a keyword thatends with a colon expects to have an argument associated with it, while onewithout a colon does not expect an argument. You might have multiplearguments associated with a selector. This results in quite long messagenames like this one:
labelArray:lines:selectors
You should recognize this as a single message selector consisting of threekeywords, each of which requires an argument. The message name willappear as shown above when you examine it in the CHB or in anotherbrowser. Each colon is a signal to you as a programmer that you need tosupply an argument, and to the language compiler that it should expect tofind one there.
There is one other type of message that requires an argument but has nocolon notation. This type of message is called a binary selector. The clearestexamples of such a selector are the math operators like the addition sign (+).The following line of Smalltalk/V code sends the message "+" to the object6 and passes the argument of 4 in the process:
6 + 4.
You can evaluate expressions from any place where you can edit text, suchas a Workspace or the Transcript or from within a method definition. Tosend a message from a Workspace or Transcript window, you type themessage, select it, and then choose either do it or show it from the pane menu.
Chapter 2 The Smalltalk/V Language 19
The choice of whether to select do it or show it can seem unimportant but itisn't. For example, if you type the above addition message into the Tran-script, select it, and then choose do it from the menu, nothing appears tohappen. In fact, Smalltalk/V carries out your instruction by adding 6 and 4.But you didn't tell it to do anything with the answer, so it didn't. Select thesame message and choose show it from the pane menu and the answerappears in the pane.
You will often find it necessary to send a series of successive messages tothe same object. In this case, you can avoid repeating the name of thereceiver object by using message cascading. Each message sent to the sameobject is followed by a semicolon until the final message is sent. The entirecascaded message group is terminated with a period like any other Smalltalkmessage.
Method-Definition Syntax
When you define a new method, whether you do so in the CHB or anotherbrowser or in a Workspace or Transcript window, you will follow the syntaxshown in the code sample below:
The messagePattern includes the method selector and the variable namesused to refer to arguments in the method. It therefore defines how to phrasea message you wish to send to this object to cause this method to execute.
The comments are optional, but the template for defining a new method inthe CHB includes them and they are strongly recommended by experiencedSmalltalk/V programmers and designers. Something brief that describes thepurpose of the method will suffice. (In fact, it could be argued that if yourmethod requires copious comments to explain it, it is probably too mono-lithic and large. You should probably consider breaking it into smaller com-ponents that are easier to describe because they are single-purpose and focused.)
You will seldom have need to identify a primitive number in your meth-ods. Primitives in Smalltalk/V are low-level routines that carry out funda-mental computer operations (such as addition, file saving, and logicalcomparison). You can directly invoke one of these primitives by putting aline like this in your method definition:
20 Practical Smalltalk
The primitives pre-defined by Smalltalk/V are described in an appendix tothe Smalltalk/V documentation.
(Incidentally, you can also create new primitives in Smalltalk/V. In thatcase, your primitives are not referred to by numbers like the systemprimitives. Rather they will have a name you have assigned to them and willbe invoked using that name.)
If your method uses any temporary, or local, variables, they must bedefined at the beginning of the method. Such variables are placed betweentwo vertical bars (created with the shifted backslash on the standard IBM PCkeyboard) and separated from one another by spaces if more than one is needed.
The expressionSeries portion of the method definition is the part of thecode that actually performs some operation when the method is invoked.
Let's take a look at a typical Smalltalk/V method to see how the variouspieces (with the exception of the primitive) look and behave. Open a CHBif one is not already opened and choose the class Magnitude. If the nameis followed by three dots (indicating it has hidden subclasses), double-clickon it to open the list of subclasses. Now choose the subclass called Integer.Scroll down its method list and pick the gcd: method. Examine the code inthe text-editing pane.
You can see from the code listing that the gcd: method takes an integer asan argument. Since it is a member of the class Integer, its receiver must alsobe an integer value (or a subclass of Integer). The comment tells you thatthis method returns the greatest common denominator of the receiver andthe argument (i.e., the largest number that can be divided into both of themwithout a remainder).
Notice that this method defines three temporaries called a, v, and r. If youexamine the expression series that makes up the executable portion of themethod definition, you'll see that all of these variables are used.
Chances are you've never seen this method definition before, but just byreading the source code, you can tell what it does and how to use it. How doyou think you could use this method in the Transcript to find the greatestcommon denominator between the numbers 12 and 18 ? It' s easy, right? Justtype the following line, select it, and choose show it from the pane menu:
12 gcd: 18
Smalltalk/V returns the value 6, which is the largest integer number that candivide into both 12 and 18 evenly.
Summary of Syntax
The complete syntax of the Smalltalk/V language is, of course, morecomplex than what we have just described. But this explanation gives you
Chapter 2 The Smalltalk/V Language 21
enough information to use the language with facility. Nitty-gritty details arediscussed in the Smalltalk/V documentation.
Smalltalk/V 286 comes equipped with more than 100 classes and nearly2,000 methods. (Other flavors of Smalltalk/V have different numbers ofclasses and methods, and all versions come with classes associated withsuch activities as tutorials that are not technically part of the system.) As youbuild applications, acquire code from other sources, and work with theenvironment, the number of classes and methods can grow quite substan-tially. If you had to be familiar with all of these classes and methods, youmight arguably never be confident as a Smalltalk/V programmer.
Fortunately, you can safely ignore many of the classes that exist in theSmalltalk/V class hierarchy because they are either used primarily by thesystem or have such esoteric functions that the likelihood you'll ever needthem is reduced. In this section, we'll identify the classes with which youwill want to become most familiar and comfortable as you begin yourexploration of Smalltalk/V.
We won't supply a great deal of information about each class in this list.The Smalltalk/V documentation from Digitalk contains detailed descrip-tions of all classes and methods and we will demonstrate many of theseclasses in even greater detail when we use them to build our six projects laterin the book.
Figure 2-1 shows you the entire Smalltalk/V class hierarchy. Thoseclasses we consider essential to your effective use of Smalltalk/V are shownin boldfaced type in the figure.
It is a tribute to the compactness with which Smalltalk/V's class library isdefined that even with the process of elimination we've undertaken, thereremain 54 classes with which you will have to have at least a noddingacquaintance to undertake most of the programming work you'll do in thisbook and in the real world of Smalltalk program development. (In reality,you will probably deal with a subset of these 54 classes for any particularapplication. But because our intent in this book is to give you broad exposureto Smalltalk programming, we have chosen a broad subset of the total classhierarchy to discuss in varying levels of detail.)
We will look briefly at each of these classes, presenting them in the orderin which they appear in Figure 2-1. In each case, we'll describe briefly thepurpose of the class and, where appropriate, the types of applications inwhich it might be used. We will also refer you to the chapter in this bookwhere the class is discussed in greatest detail. (Recognize, however, thatsometimes this level of detail is not great because we can focus our attentionon a small number of methods in a given class for our purposes.)

22 Practical Smalltalk
Figure 2-1. Smalltalk/V Class Hierarchy Showing Essential Classes
Chapter 2 The Smallfalk/V Language 23
Object
You will only sub-class this class. You never create an instance of the classObject, which is an abstract class that defines behavior common to allobjects in the Smalltalk/V class hierarchy. We will not explicitly discuss thisclass and its contents in the book; rather, you will learn about this class asyou sub-class it to create your own special classes for applications and projects.
BitBIt
This class is used in graphics programs and operations. Its purpose is toprovide a mechanism by which bits representing an image can be movedfrom one place to another. We will make use of this class in Chapter 8.
CharacterScanner
The CharacterScanner class plays a key role in text-based applications. Itsrole is to translate characters from their standard ASCII code representa-tions to bitmapped images representing the appearances of the characters onthe screen. We will discuss this class in Chapters 10 and 11.
Pen
This class is a subclass of the class BitBIt. It enables you to create a drawingimplement that can be instructed to move, draw lines and shapes, and eraseits trail as it moves. If you are familiar with the programming languageLogo, this class lets you emulate the turtle graphics that made that languageso popular and well-known. We will study this class in greater detail inChapter 8.
The Collection Classes
One of the largest groups of classes with which we will work in this bookand which form an important core of classes for your Smalltalk programmingexperience are the many subclasses of the abstract class Collection. Looselydescribed, a Collection is a basic data structure used to store objects in
24 Practical Smalltalk
groups. They may be stored in any of several forms, sorted or unsorted,paired with other key objects or in unary fashion.
(We should point out here that Collection is one of several classes inSmalltalk that are described as abstract classes. An abstract class is simplya class that is defined as a place to organize and collect common behavioramong other classes. You almost never create an instance of an abstractclass. Its purpose is not to provide a class definition that is useful toinstantiate but rather to provide a convenient place for behavior common toother, more useful classes. You'll see more precisely what we mean as youstudy several abstract classes later in this chapter.)
The three main subclasses of the class Collection are:
• Bag, in which duplicate elements are allowed to gather and theelements of which are stored in no particular order.
• IndexedCollection, in which duplicate elements are allowed to gatherbut the elements of which are either stored in some pre-determinedorder (i.e., sorted) or are at least accessible by an integer index (fromwhich this subclass derives its name).
• Set, in which no duplicate elements are allowed and the elements ofwhich are stored in no particular order.
The class IndexedCollection, in turn, has two main abstract subclasses:FixedSizeCollection and OrderedCollection. The first subclass consistsof a group of different classes distinguished by the fact that when you createa new instance of one of them, you must give it a size and that size thenremains fixed for the life of the object. Instances of class OrderedCollection,on the other hand, can shrink or grow dynamically as needed. Among theseveral subclasses of the class FixedSizeCollection are:
• Array, which is a collection which can contain a mixture of anyvariety of object types.
• String, which is a group of characters in an indexable sequence. Wedon't usually think of strings as collections of individual charactersfrom a programming standpoint but Smalltalk/V maintains consistency even at this detailed level.
• Symbol, which is a subclass of the class String consisting of guaranteed unique sequences of characters of which the system makesspecial use.
The most important subclass of the class Set is Dictionary. You can thinkof a Dictionary as a Set of Associations. An Association is a pair of objects:a unique key (usually a symbol, but can be any object) and a value (anyobject). A Dictionary has an Association for each key. Each key in turn hasa value which may or may not be unique. This description corresponds to a
Chapter 2 The Smalltalk/V Language 25
real-world dictionary in which you look up words (keys) to determine theirdefinitions (values). The keys are the words themselves, arranged alphabeti-cally in the dictionary.
We will use various members of the class Collection and its subclassesthroughout the book.
Dispatcher
The various members of the class Dispatcher are responsible for dealingwith user input via the mouse and keyboard. Dispatchers are part of the impor-tant model-pane-dispatcher (MPD) triad that is the focus of Chapters 6 and 7.Smalltalk/V defines several subclasses of the abstract class Dispatcher,the most important of which for our purposes are the following:
• GraphDispatcher, which deals with events in graphic panes.
• ScreenDispatcher, which handles events that take place outside anywindow or pane (i.e., on the background of the Smalltalk/V environment or desktop).
• TextEditor, which specializes in text-editing input (character input,editing commands, etc.).
• TopDispatcher, which is always associated with an instance of theclass TopPane and is therefore responsible for handling events directed not to a particular subpane but to the window as a whole.
Form
All drawing in Smalltalk/V graphic applications involves bitmapped dis-plays. The class Form holds these bitmaps and contains behavior to initializeand manipulate them. We'll take a close look at this class in Chapters 8 and 9.
DisplayScreen
This sub-class of the class Form is a special bitmapped object whose size,shape, and other characteristics are hardware-dependent. You'll often usethis class as the target for messages when you wish to show bitmappedimages on the Smalltalk/V screen. We learn some of these techniques inChapters 8 and 9.
26 Practical Smalltalk
Magnitude Classes
Like the class Collection which we discussed above, the class Magnitudehas many subclasses and many important uses in Smalltalk/V. We'll useinstances of this class and its subclasses throughout the rest of the book.The class Magnitude itself is an abstract class where objects that can becompared, counted, and measured are grouped together. The majorsubclasses of the class Magnitude are as follows:
• Association, which can be used to define objects made up of key/value pairs. (See the discussion of the class Dictionary in the sectionon Collection classes above.)
• Character, which defines the behavior of all characters in the system(i.e., those objects represented by ASCII codes from 0 to 255).
• Date, which represents a particular day and which can be used tomanipulate months, days, days of the week, years, weekdays, weekends, and other calendar-related activities.
• Number, an abstract class where all types of numeric values aremanaged. This class includes the basic behavior for all numbers ofseveral types, chief among which are Float (numbers expressed asIEEE double-precision floating-point values), Fraction (numbersexpressed as one number divided by another), and Integer (wholenumbers with no decimal or fraction parts).
• Time, whose instances are a particular time and which is used tomanipulate time-related objects, in this case objects containing information about hours, minutes, seconds, and fractions of seconds.
Menu
The class Menu contains all methods required to create, display, andrespond to the user's interaction with popup menus in your Smalltalk/Vapplications. All menus other than the System Menu are associated with apane; as a result, the class Menu is discussed when we talk about the MPDtriad in Chapters 6 and 7.
Chapter 2 The Smalltalk/V Language 27
The Pane Classes
The class Pane is an abstract class which provides a place for windows(referred to in Smalltalk/V as instances of the class TopPane or simply as"top panes") and the panes these windows contain (more accurately referred toas sub-panes, all of which are members of the class SubPane) to be defined.There are three types of sub-panes, each of which is a sub-class of SubPane:
• GraphPane, which can be used to display graphic and drawingelements.
• ListPane, which displays scrolling lists of one-line entries fromwhich the user can select one element.
• TextPane, which is a text-editing pane in which text can be displayedand manipulated.
All Smalltalk/V windows — including those generated by the system aswell as those you build in your programs — consist of one and only oneinstance of the class TopPane and one or more instances of the SubPane classes.
Point
The class Point describes the operations that can be performed on objectsthat are composed of a pair of x-y coordinate values defining a point on thedisplay. Points are important for our purposes primarily in defining thelocations of SubPane objects in windows (Chapters 6 and 7) and in graphics(Chapters 8 and 9).
Prompter
You will find frequent use for instances of the class Prompter in yourSmalltalk/V programming. A prompter is a small window that asks the usera question and waits for a response to be typed. In fact, a prompter is a
28 Practical Smalltalk
window with one instance of the class TextPane. The user must supply aresponse to the question that appears as the label of the prompter before theprompter can be dismissed. Thus a prompter is equivalent to what is referredto in windowing environments as a modal dialog. Unlike most modal dia-logs in other environments, however, a prompter accepts only one type ofinput (text).
We will create instances of the class Prompter at several places in ourprogramming throughout this book.
Rectangle
An instance of the class Rectangle describes a rectangular area either bydefining its upper left and lower right corners (i.e., absolute location of bothcoordinates) or by describing its upper left corner and an extent (length andwidth) for the rectangle.
Rectangles are used most often in graphics (Chapters 8 and 9) but also havesome significance in defining the sizes and relative positions of subpanes ina window (Chapter 6).
Stream
In the world of Smalltalk/V, streams are pathways for information, used tohandle input and output. The class Stream contains methods that definesuch things as the current position of the read/write operation in the stream,adding information to itself, or returning some portion of its contents to arequesting object, and relocating the position of the read/write operation.
You can define streams to be read-only (using instances of the classReadStream), write-only (with WriteStream) or read-write (with Read-WriteStream). This last class, in turn, has subclasses for files (FileStream)and the display (Terminalstream).
Although we make occasional use of various kinds of I/O streams in otherplaces, the main discussion of streams in Smalltalk/V takes place in Chapter 10.
StringModel
The class StringModel plays a key role in text editing as it acts as the holderfor the text being edited as well as providing some of the most commonediting behavior to be applied to that text. We look at this class and itsbehaviors in Chapters 10 and 11.
Introduction
In this chapter, we will build our first Smalltalk/V project. Applying thelessons learned in Chapters 1 and 2, we will design and construct a smallapplication, make it accessible from the System Menu and from the DemoMenu, and test it. Then we will see how to make more effective use of theSmalltalk/V environment by consolidating some code. As part of thisproject, we will also learn to understand more of the capabilities of theSmalltalk/V debugger. We will work with the following classes in thischapter:
• SortedCollection
• Prompter
• DemoClass
• ScreenDispatcher
In addition, we'll create our own class called Prioritizer.
Project Overview
The project we will build in this chapter is called Prioritizer. It is a handylittle program that lets you type in a list of items in any order, then helps youthrough the process of ranking these items from the most important to theleast important (or from most expensive to least expensive, or by any otherranking criterion you want to use). In other words, rather than using theconventional "greater than" or "less than" comparisons of mathematics thatare built into some of Smalltalk/V's classes, the Prioritizer uses the user asthe comparison operator,
29
30 Practical Smalltalk
We encounter decisions in virtually every aspect of our lives. You'veprobably heard the expression, "Everything is a trade-off." The Prioritizerapplication will help you focus trade-off decisions between or among twoor more alternatives by forcing you to look at each possible alternative'srelative value when compared to other choices.
Designing the Project
Viewed at its simplest level, the Prioritizer application converts an instanceof the class Collection to an instance of the class SortedCollection. We haveplaced some additional design constraints on it so that we end up with adesign that requires that the finished application have several components.Specifically, we need to build components to:
• prompt the user for individual items to be prioritized
• ask the user to rank pairs of elements in the list, answering for each pairthe question "is this one greater than (more important than) this otherone?"
• display the resulting sorted list
• make the Prioritizer application accessible from the System Menu
• make the Prioritizer application accessible from the Demo Menu
Clearly these last two are not mandatory. But we do need some way to keepthe Prioritizer application in the environment and accessible to us when wewant it. We are going to discuss how to add it to both menus so that you cansee what the process of doing so looks like. Then at the end of the chapter,we're going to put the Prioritizer application into a more logical, permanenthome, and in the process remove some unnecessarily duplicated code.
Building the Project
We will begin the construction of the Prioritizer project by building someof its key elements in the Workspace and testing them iteratively. When wehave these pieces working, we can then copy and paste them into a single textpane as we define the Prioritizer as a method in its own right.
Let's work with the tasks in the order in which we listed them above. Thismeans that we will first build a Smalltalk/V routine to get the user to giveus a list of items to prioritize. We'll need a way to ask the user a question,
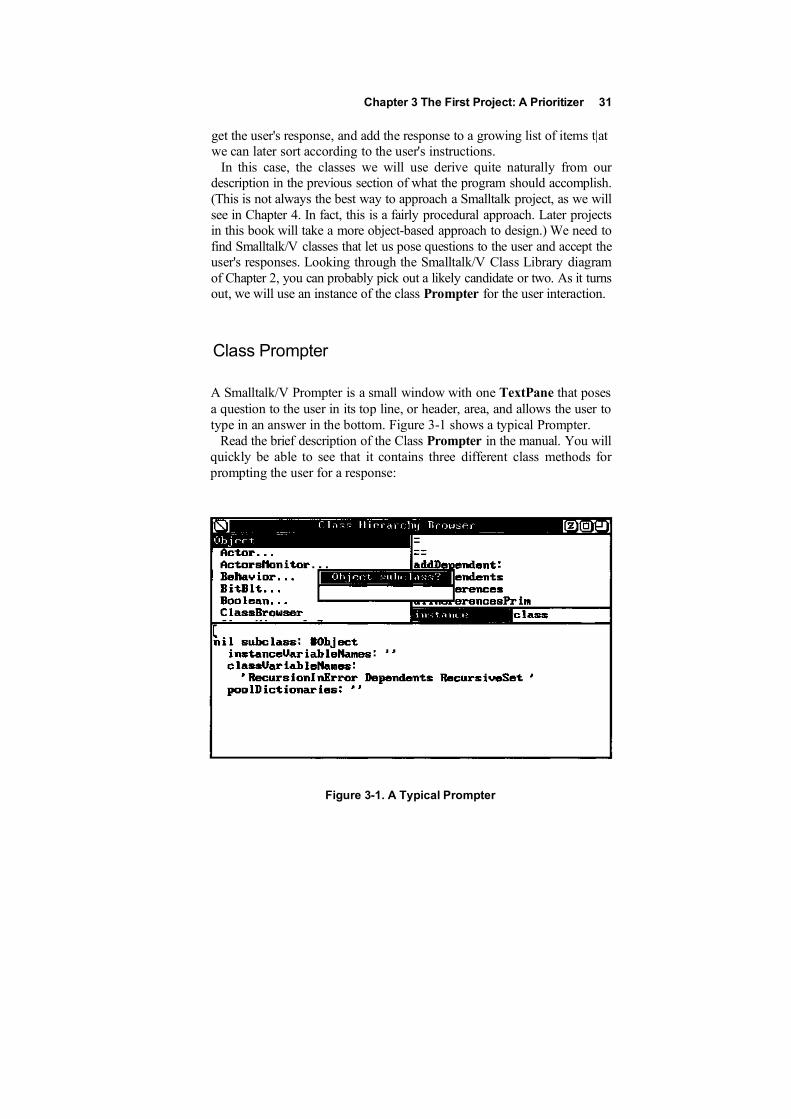
Chapter 3 The First Project: A Prioritizer 31
get the user's response, and add the response to a growing list of items t|atwe can later sort according to the user's instructions.
In this case, the classes we will use derive quite naturally from ourdescription in the previous section of what the program should accomplish.(This is not always the best way to approach a Smalltalk project, as we willsee in Chapter 4. In fact, this is a fairly procedural approach. Later projectsin this book will take a more object-based approach to design.) We need tofind Smalltalk/V classes that let us pose questions to the user and accept theuser's responses. Looking through the Smalltalk/V Class Library diagramof Chapter 2, you can probably pick out a likely candidate or two. As it turnsout, we will use an instance of the class Prompter for the user interaction.
Class Prompter
A Smalltalk/V Prompter is a small window with one TextPane that posesa question to the user in its top line, or header, area, and allows the user totype in an answer in the bottom. Figure 3-1 shows a typical Prompter.
Read the brief description of the Class Prompter in the manual. You willquickly be able to see that it contains three different class methods forprompting the user for a response:
Figure 3-1. A Typical Prompter
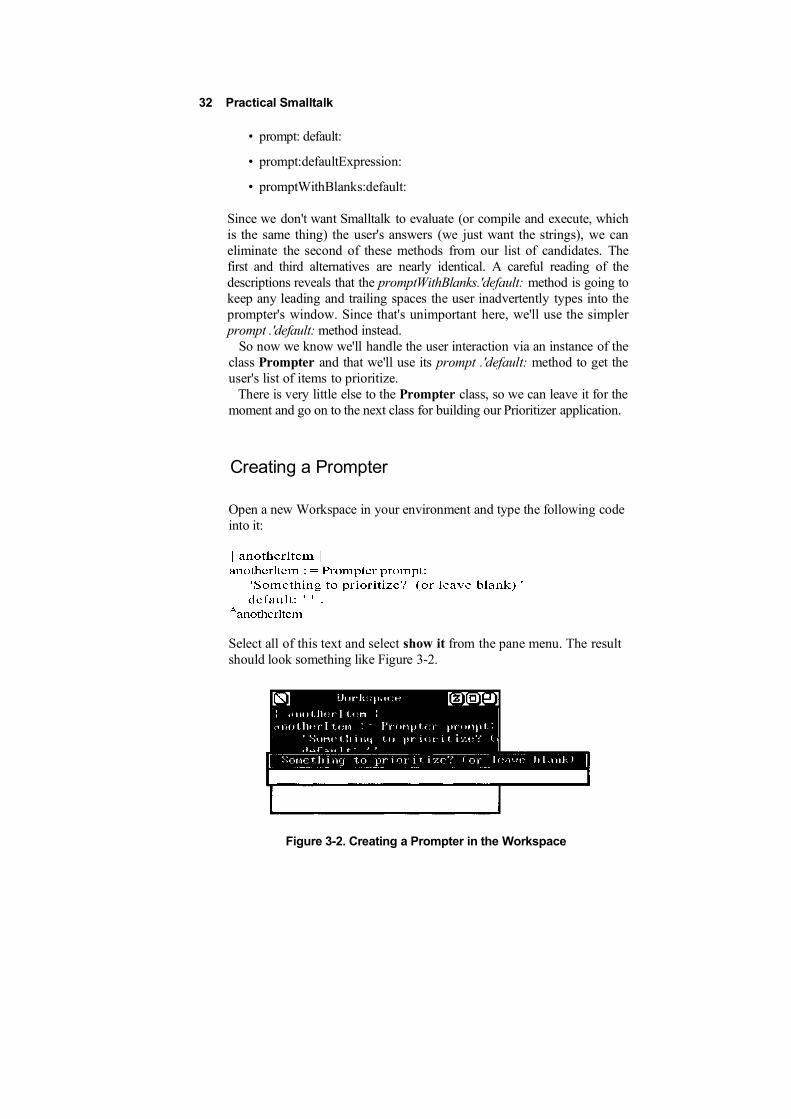
32 Practical Smalltalk
• prompt: default:
• prompt:defaultExpression:
• promptWithBlanks:default:
Since we don't want Smalltalk to evaluate (or compile and execute, whichis the same thing) the user's answers (we just want the strings), we caneliminate the second of these methods from our list of candidates. Thefirst and third alternatives are nearly identical. A careful reading of thedescriptions reveals that the promptWithBlanks.'default: method is going tokeep any leading and trailing spaces the user inadvertently types into theprompter's window. Since that's unimportant here, we'll use the simplerprompt .'default: method instead.
So now we know we'll handle the user interaction via an instance of theclass Prompter and that we'll use its prompt .'default: method to get theuser's list of items to prioritize.
There is very little else to the Prompter class, so we can leave it for themoment and go on to the next class for building our Prioritizer application.
Creating a Prompter
Open a new Workspace in your environment and type the following codeinto it:
Select all of this text and select show it from the pane menu. The resultshould look something like Figure 3-2.
Figure 3-2. Creating a Prompter in the Workspace
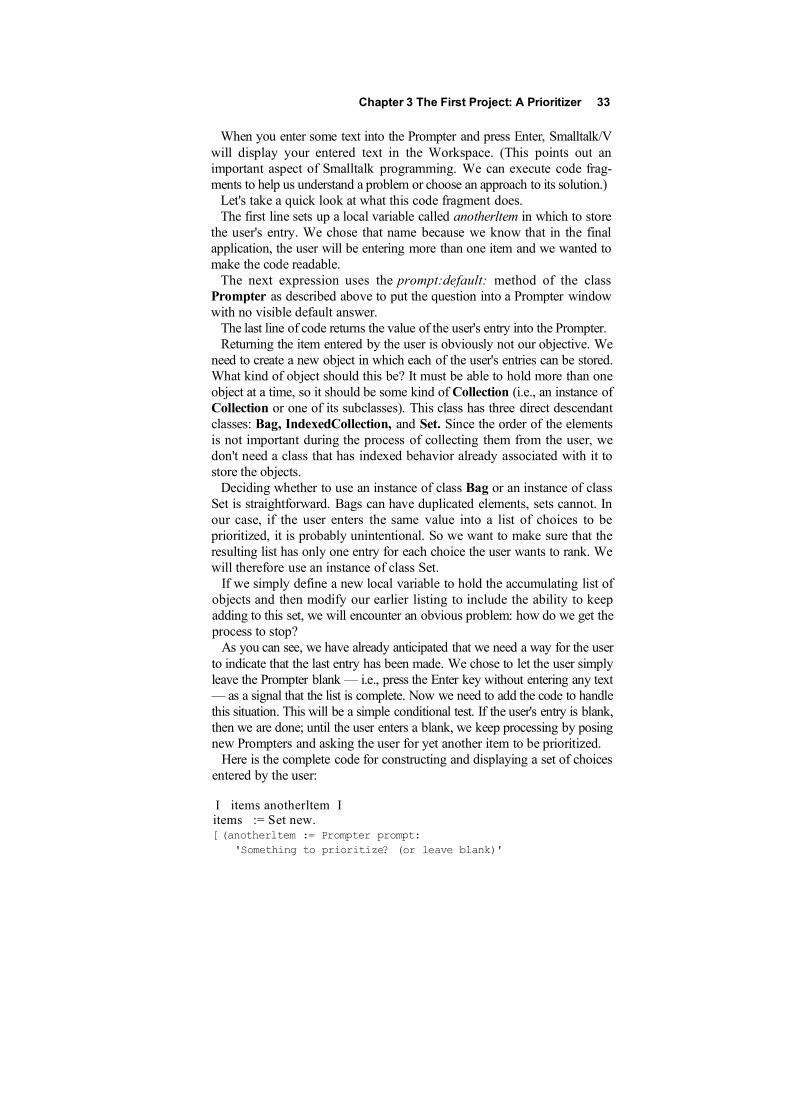
Chapter 3 The First Project: A Prioritizer 33
When you enter some text into the Prompter and press Enter, Smalltalk/Vwill display your entered text in the Workspace. (This points out animportant aspect of Smalltalk programming. We can execute code frag-ments to help us understand a problem or choose an approach to its solution.)
Let's take a quick look at what this code fragment does.The first line sets up a local variable called anotherltem in which to store
the user's entry. We chose that name because we know that in the finalapplication, the user will be entering more than one item and we wanted tomake the code readable.
The next expression uses the prompt:default: method of the classPrompter as described above to put the question into a Prompter windowwith no visible default answer.
The last line of code returns the value of the user's entry into the Prompter.Returning the item entered by the user is obviously not our objective. We
need to create a new object in which each of the user's entries can be stored.What kind of object should this be? It must be able to hold more than oneobject at a time, so it should be some kind of Collection (i.e., an instance ofCollection or one of its subclasses). This class has three direct descendantclasses: Bag, IndexedCollection, and Set. Since the order of the elementsis not important during the process of collecting them from the user, wedon't need a class that has indexed behavior already associated with it tostore the objects.
Deciding whether to use an instance of class Bag or an instance of classSet is straightforward. Bags can have duplicated elements, sets cannot. Inour case, if the user enters the same value into a list of choices to beprioritized, it is probably unintentional. So we want to make sure that theresulting list has only one entry for each choice the user wants to rank. Wewill therefore use an instance of class Set.
If we simply define a new local variable to hold the accumulating list ofobjects and then modify our earlier listing to include the ability to keepadding to this set, we will encounter an obvious problem: how do we get theprocess to stop?
As you can see, we have already anticipated that we need a way for the userto indicate that the last entry has been made. We chose to let the user simplyleave the Prompter blank — i.e., press the Enter key without entering any text— as a signal that the list is complete. Now we need to add the code to handlethis situation. This will be a simple conditional test. If the user's entry is blank,then we are done; until the user enters a blank, we keep processing by posingnew Prompters and asking the user for yet another item to be prioritized.
Here is the complete code for constructing and displaying a set of choicesentered by the user:
I items anotherltem Iitems := Set new.[(anotherltem := Prompter prompt:
'Something to prioritize? (or leave blank)'
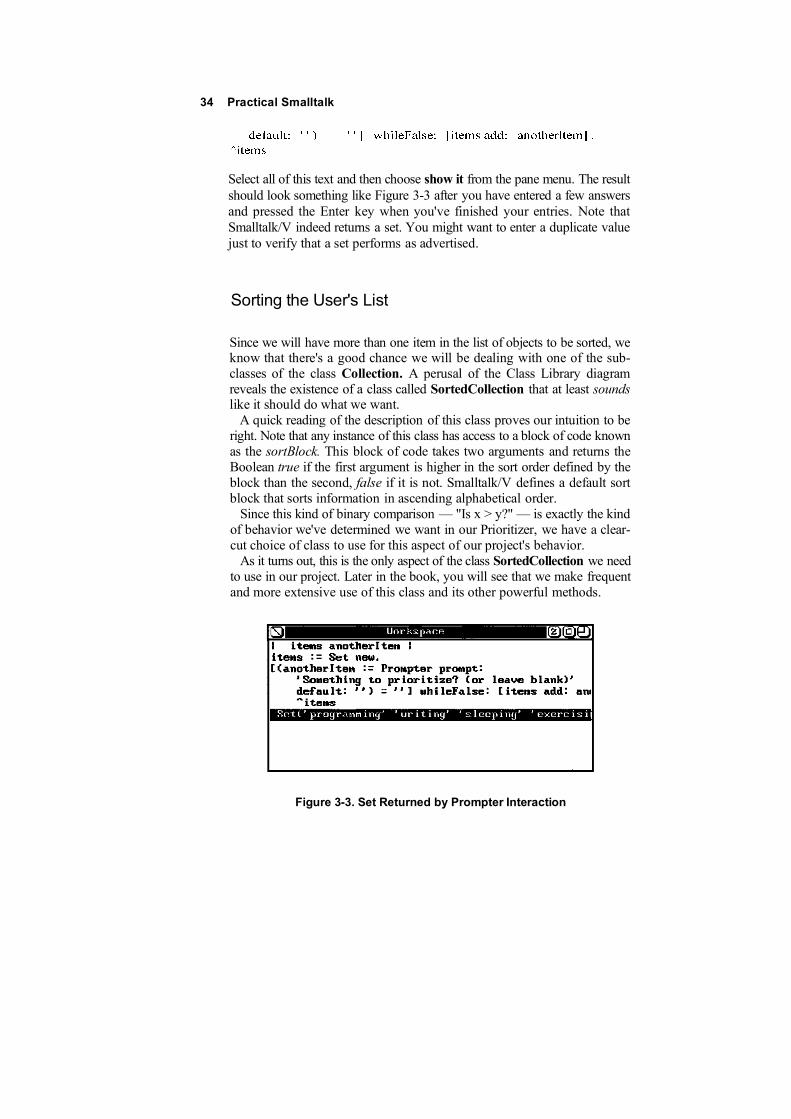
34 Practical Smalltalk
Select all of this text and then choose show it from the pane menu. The resultshould look something like Figure 3-3 after you have entered a few answersand pressed the Enter key when you've finished your entries. Note thatSmalltalk/V indeed returns a set. You might want to enter a duplicate valuejust to verify that a set performs as advertised.
Sorting the User's List
Since we will have more than one item in the list of objects to be sorted, weknow that there's a good chance we will be dealing with one of the sub-classes of the class Collection. A perusal of the Class Library diagramreveals the existence of a class called SortedCollection that at least soundslike it should do what we want.
A quick reading of the description of this class proves our intuition to beright. Note that any instance of this class has access to a block of code knownas the sortBlock. This block of code takes two arguments and returns theBoolean true if the first argument is higher in the sort order defined by theblock than the second, false if it is not. Smalltalk/V defines a default sortblock that sorts information in ascending alphabetical order.
Since this kind of binary comparison — "Is x > y?" — is exactly the kindof behavior we've determined we want in our Prioritizer, we have a clear-cut choice of class to use for this aspect of our project's behavior.
As it turns out, this is the only aspect of the class SortedCollection we needto use in our project. Later in the book, you will see that we make frequentand more extensive use of this class and its other powerful methods.
Figure 3-3. Set Returned by Prompter Interaction
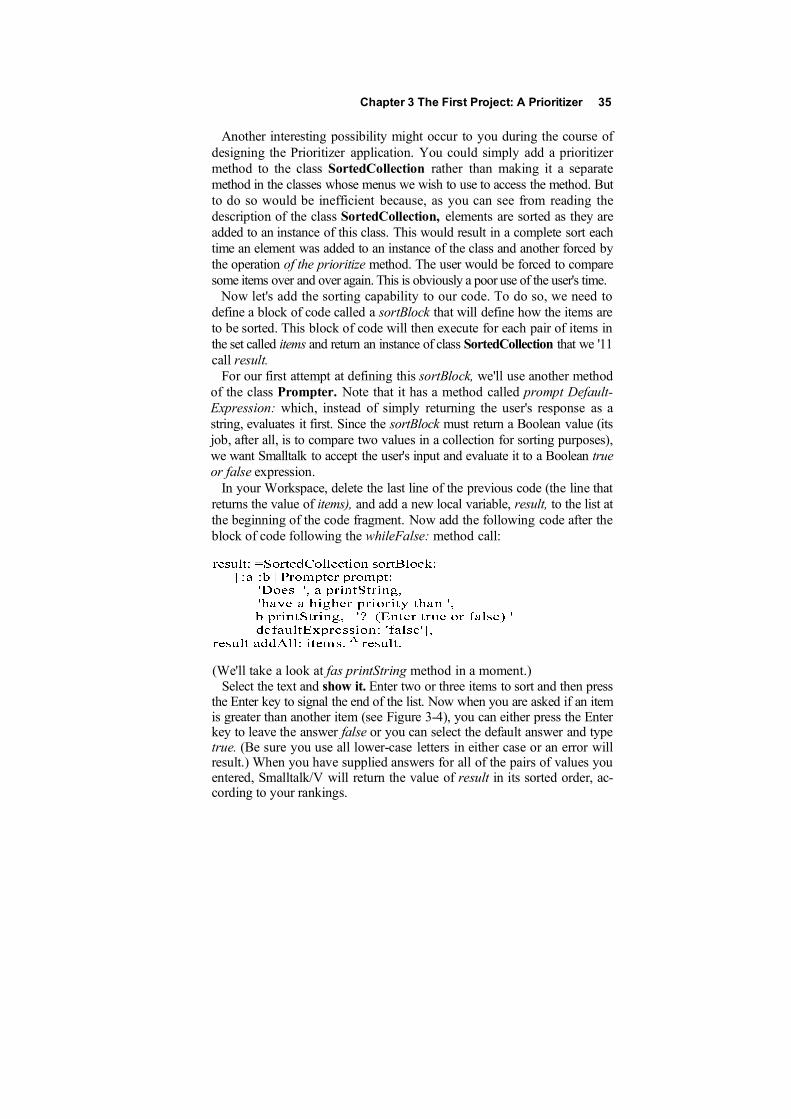
Chapter 3 The First Project: A Prioritizer 35
Another interesting possibility might occur to you during the course ofdesigning the Prioritizer application. You could simply add a prioritizermethod to the class SortedCollection rather than making it a separatemethod in the classes whose menus we wish to use to access the method. Butto do so would be inefficient because, as you can see from reading thedescription of the class SortedCollection, elements are sorted as they areadded to an instance of this class. This would result in a complete sort eachtime an element was added to an instance of the class and another forced bythe operation of the prioritize method. The user would be forced to comparesome items over and over again. This is obviously a poor use of the user's time.
Now let's add the sorting capability to our code. To do so, we need todefine a block of code called a sortBlock that will define how the items areto be sorted. This block of code will then execute for each pair of items inthe set called items and return an instance of class SortedCollection that we '11call result.
For our first attempt at defining this sortBlock, we'll use another methodof the class Prompter. Note that it has a method called prompt Default-Expression: which, instead of simply returning the user's response as astring, evaluates it first. Since the sortBlock must return a Boolean value (itsjob, after all, is to compare two values in a collection for sorting purposes),we want Smalltalk to accept the user's input and evaluate it to a Boolean trueor false expression.
In your Workspace, delete the last line of the previous code (the line thatreturns the value of items), and add a new local variable, result, to the list atthe beginning of the code fragment. Now add the following code after theblock of code following the whileFalse: method call:
(We'll take a look at fas printString method in a moment.)Select the text and show it. Enter two or three items to sort and then press
the Enter key to signal the end of the list. Now when you are asked if an itemis greater than another item (see Figure 3-4), you can either press the Enterkey to leave the answer false or you can select the default answer and typetrue. (Be sure you use all lower-case letters in either case or an error willresult.) When you have supplied answers for all of the pairs of values youentered, Smalltalk/V will return the value of result in its sorted order, ac-cording to your rankings.
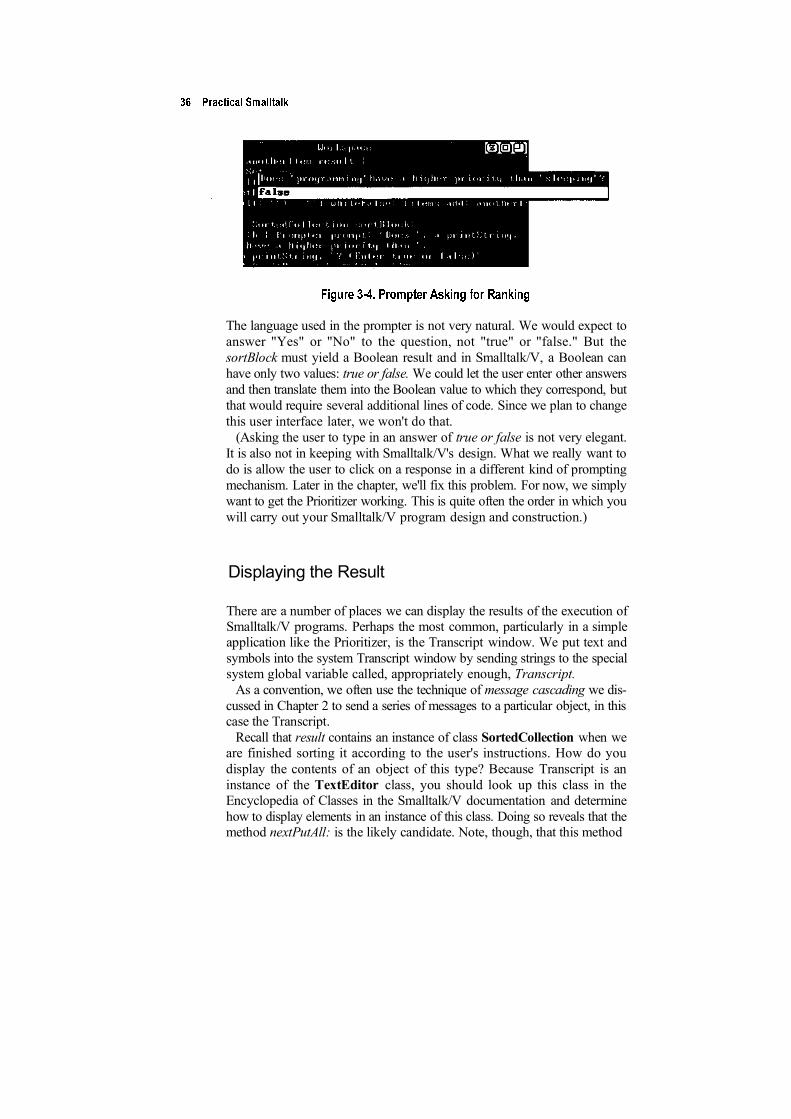
The language used in the prompter is not very natural. We would expect toanswer "Yes" or "No" to the question, not "true" or "false." But thesortBlock must yield a Boolean result and in Smalltalk/V, a Boolean canhave only two values: true or false. We could let the user enter other answersand then translate them into the Boolean value to which they correspond, butthat would require several additional lines of code. Since we plan to changethis user interface later, we won't do that.
(Asking the user to type in an answer of true or false is not very elegant.It is also not in keeping with Smalltalk/V's design. What we really want todo is allow the user to click on a response in a different kind of promptingmechanism. Later in the chapter, we'll fix this problem. For now, we simplywant to get the Prioritizer working. This is quite often the order in which youwill carry out your Smalltalk/V program design and construction.)
Displaying the Result
There are a number of places we can display the results of the execution ofSmalltalk/V programs. Perhaps the most common, particularly in a simpleapplication like the Prioritizer, is the Transcript window. We put text andsymbols into the system Transcript window by sending strings to the specialsystem global variable called, appropriately enough, Transcript.
As a convention, we often use the technique of message cascading we dis-cussed in Chapter 2 to send a series of messages to a particular object, in thiscase the Transcript.
Recall that result contains an instance of class SortedCollection when weare finished sorting it according to the user's instructions. How do youdisplay the contents of an object of this type? Because Transcript is aninstance of the TextEditor class, you should look up this class in theEncyclopedia of Classes in the Smalltalk/V documentation and determinehow to display elements in an instance of this class. Doing so reveals that themethod nextPutAll: is the likely candidate. Note, though, that this method
Chapter 3 The First Project: A Prioritizer 37
requires that it be passed a string as an argument. We have defined result tobe an instance of the class SortedCollection. How are we going to convertit to a string?
The answer turns out to be simple but not so easy to find by exploring theSmalltalk/V class library. Every member of the class Object — which is tosay, every object in the environment, since all objects are ultimatelydescended from the class Object — knows how to respond to the systemmethod printString. This method is defined in the description of the classObject as answering a string that is the ASCII representation of the receiver.Applying this method to result, then, returns a string that is the ASCIIrepresentation of that collection.
Add the following code to the end of your Workspace:
This code fragment displays the value of result in a way that is not veryacceptable. We can take advantage of the fact that the class Collection, ofwhich SortedCollection is a sub-class, understands the iterative operatordo:. So we can have Smalltalk show each element of the sorted list on aseparate line by changing the last line of the above code fragment so that theentire Transcript-displaying portion of the code looks like this:
The Finished Prioritizer Method
Now that we've built and debugged this new method, we need to give it aname and find it a home. We'll call the method prioritize. For the sake ofcompleteness, and to allow you to double-check your code before we proceed,here is the complete listing of the Prioritizer method as it has been defined:
prioritize"This method collects a bunch of items into an instanceof Set, then lets the user sort them, placing the resultinto an instance of SortedCollection."I anotherltem items result |items := Set new.[ (anotherltem := Prompter prompt:
'Something to prioritize? (or leave blank) 'default: ")=''] whileFalse: [items add: anotherltem].
result := SortedCollection sortBlock:[:a :b | Prompter prompt: 'Does ', a printString,

38 Practical Smalltalk
Now we just need to have a place or places to store the code. Specifically,we need one or more classes to which to add this method. Since we havedetermined as part of our design that we want to be able to invoke theprioritizer from the System menu and from the Demo menu, we will add thismethod to the appropriate classes to make this happen. The next section ofthis chapter describes how to do this.
Adding Prioritizer to the Menus
Adding the ability to call this application from the System and Demo menusdoes not require not sub-classing an existing Smalltalk/V class, but rathermodifying existing Smalltalk/V code. (Note that, as a rule, directly modify-ing the library sources in Smalltalk/V is not a good programming approach.This is because any changes you make here will have system-wide effects.However, because of the way Smalltalk/V implements the menus withwhich we want to work, this is the only reasonable means we have ofmodifying their behavior.)
Be sure to keep your Workspace intact while you complete this chapter.It might be a good idea to save your image at this point. We'd recommendthat you then re-label the Workspace (call it "Prioritizer" or something elseyou'll associate with this program), then collapse it out of your way. Duringinitial program development, many Smalltalk programmers find they keepseveral Workspace windows around their desktops.
Demo Menu Modification
Let's first add our prioritizer application to the Smalltalk/V 286 Demomenu. This gives us a convenient place from which to show off our work toour friends and it turns out to be a convenient way to learn how to work withexisting menus. Then when we move to adding the Prioritizer to the Systemmenu, we'll have very little new skills to master.
To create any menu, we simply create an instance of the class Menu andgive it at least two arguments: a list of labels, or values, to display; and acorresponding list of selectors, or methods, to execute. These lists have a
Chapter 3 The First Project: A Prioritizer 39
one-for-one correspondence. Optionally, we can divide the list of labels intogroups with lines by supplying a lines: argument.
Open the Class Hierarchy Browser and select the class DemoClass. No-tice that it has an instance method called demoMenu. We're going to modifythis menu so that it shows our Prioritizer and runs it when the user picks thenew menu option.
Adding the Prioritizer to the menu is simple. Here is what the demoMenumethod looks like before we begin working on it:
demoMenu"Answer the menu for the receiver. " AMenu
labels: (' exit\dragon\mandala\multi mandala\ ',1 multi pentagon\multi spiral\bouncing ball') withers.lines: #(1 4)
It is important to note that there is a direct correspondence between the orderof the labels in the menu and the order of the selectors to which theycorrespond. The first label, exit, invokes the first item in the list of selectors,which happens to have the same name (but it could have had another name).To add our new method to this class, we '11 just modify the contents of theargument of the labels: keyword, adding our label at the end. Then we'll addthe name of our method to the array of selectors associated with the menu.We'll also add a dividing line between the bouncing ball entry and ourprioritize entry by adding the number 9 to the lines: array. Edit the code inthe CHB to look like this:
demoMenu"Answer the menu for the receiver." AMenu
labels: (' exit\dragon\mandala\multi mandala\ f,'multi pentagon\multi spiral\bouncingballYprioritize') withers.lines: #(1 4 9)
Save this code and then run the demo by selecting run Demo from the systemmenu. Notice that the Prioritizer now appears as its own menu item at the endof the Demo menu, separated from the bouncing ball option by a line (seeFigure 3-5).
To make the Prioritizer available to the class DemoClass, you'll need tostore its code in the class. To add it to the class, follow these steps:
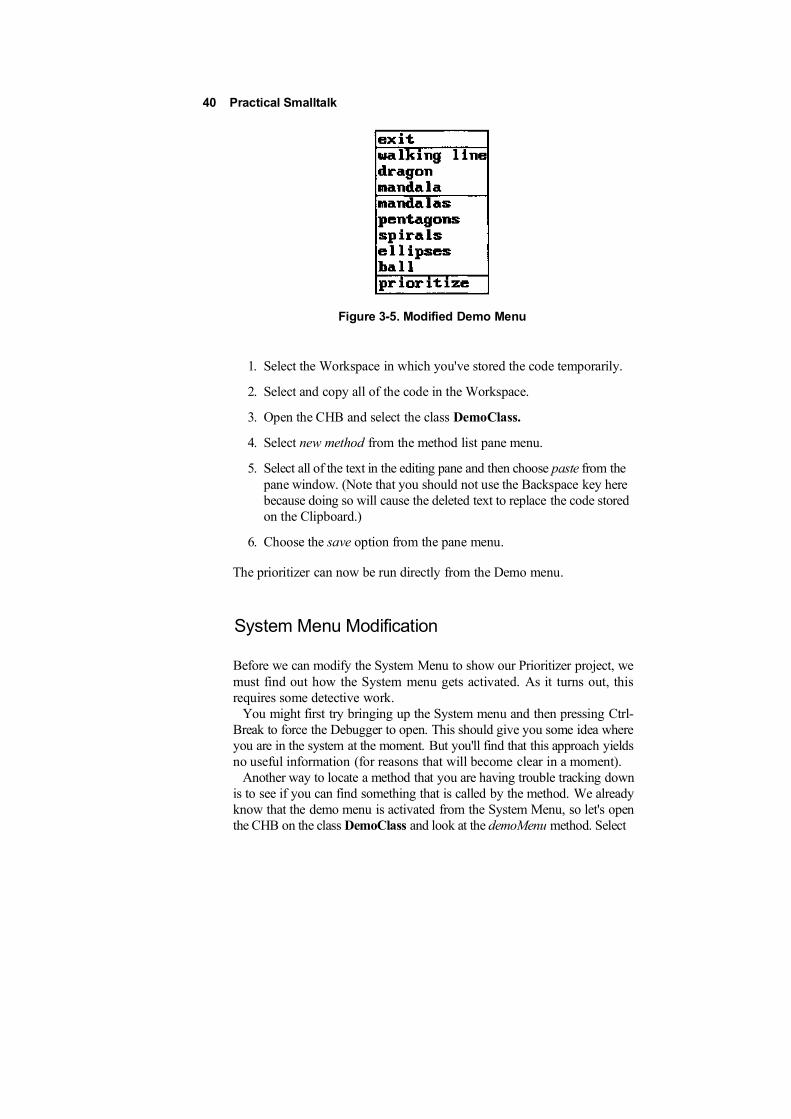
40 Practical Smalltalk
Figure 3-5. Modified Demo Menu
1. Select the Workspace in which you've stored the code temporarily.
2. Select and copy all of the code in the Workspace.
3. Open the CHB and select the class DemoClass.
4. Select new method from the method list pane menu.
5. Select all of the text in the editing pane and then choose paste from thepane window. (Note that you should not use the Backspace key herebecause doing so will cause the deleted text to replace the code storedon the Clipboard.)
6. Choose the save option from the pane menu.
The prioritizer can now be run directly from the Demo menu.
System Menu Modification
Before we can modify the System Menu to show our Prioritizer project, wemust find out how the System menu gets activated. As it turns out, thisrequires some detective work.
You might first try bringing up the System menu and then pressing Ctrl-Break to force the Debugger to open. This should give you some idea whereyou are in the system at the moment. But you'll find that this approach yieldsno useful information (for reasons that will become clear in a moment).
Another way to locate a method that you are having trouble tracking downis to see if you can find something that is called by the method. We alreadyknow that the demo menu is activated from the System Menu, so let's openthe CHB on the class DemoClass and look at the demoMenu method. Select
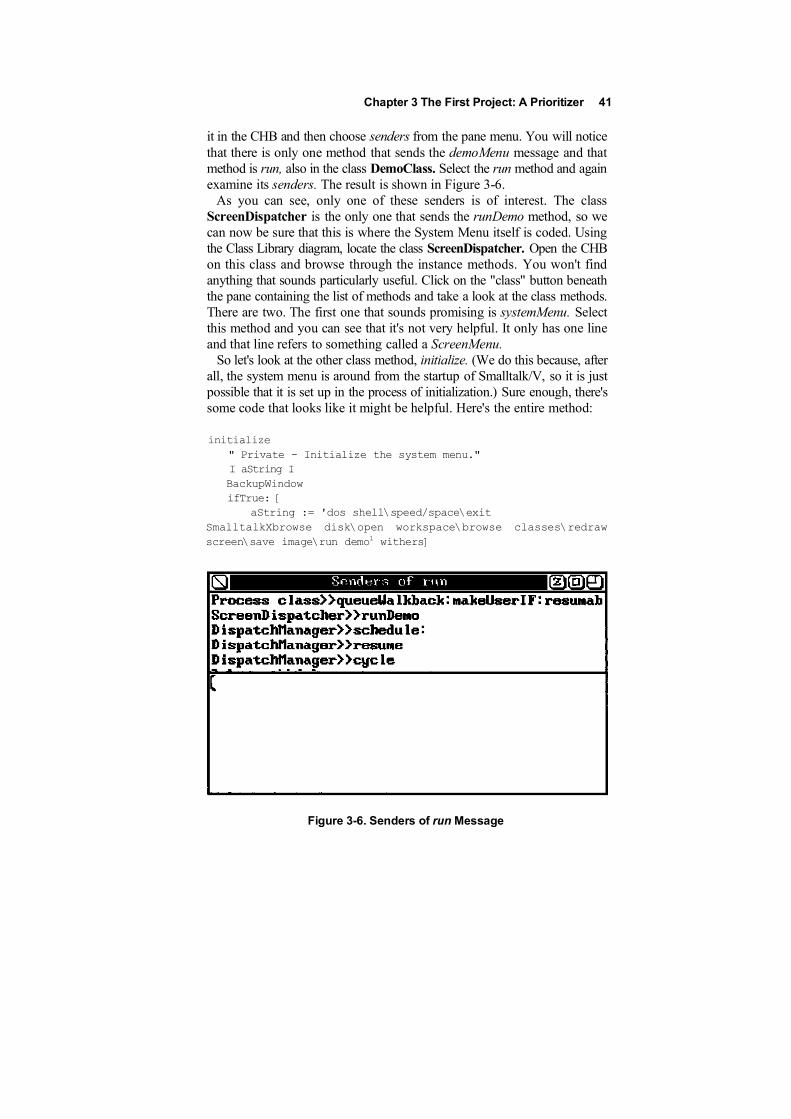
Chapter 3 The First Project: A Prioritizer 41
it in the CHB and then choose senders from the pane menu. You will noticethat there is only one method that sends the demoMenu message and thatmethod is run, also in the class DemoClass. Select the run method and againexamine its senders. The result is shown in Figure 3-6.
As you can see, only one of these senders is of interest. The classScreenDispatcher is the only one that sends the runDemo method, so wecan now be sure that this is where the System Menu itself is coded. Usingthe Class Library diagram, locate the class ScreenDispatcher. Open the CHBon this class and browse through the instance methods. You won't findanything that sounds particularly useful. Click on the "class" button beneaththe pane containing the list of methods and take a look at the class methods.There are two. The first one that sounds promising is systemMenu. Selectthis method and you can see that it's not very helpful. It only has one lineand that line refers to something called a ScreenMenu.
So let's look at the other class method, initialize. (We do this because, afterall, the system menu is around from the startup of Smalltalk/V, so it is justpossible that it is set up in the process of initialization.) Sure enough, there'ssome code that looks like it might be helpful. Here's the entire method:
initialize" Private - Initialize the system menu."I aString IBackupWindowifTrue: [
aString := 'dos shell\speed/space\exitSmalltalkXbrowse disk\open workspace\browse classes\redrawscreen\save image\run demo1 withers]
Figure 3-6. Senders of run Message
42 Practical Smalltalk
Now the systemMenu method makes more sense. It simply returns theScreenMenu created by this initialize method.
From our experience with the Demo menu, we can already see what wehave to do. Just add the label prioritize at the end of the aString assignmentstatements, and after the runDemo entry in the selectors: array. Save the code.
Now we need to copy the prioritize method from the Workspace into theclass ScreenDispatcher as a new method. Follow the same steps as abovewhen we copied it into the class DemoClass, changing the class with whichyou work. Finally, save the method.
Before you can run this new method of the class ScreenDispatcher, though,execute the following line of code from the Transcript or a Workspace:
This causes the ScreenDispatcher to re-initialize itself, which is neces-sary because we need to add the new menu, which is somethingScreenDispatcher does only when it is initialized since this menu normallydoesn't change during processing.
You can now demonstrate the prioritizer from either the System menu orfrom the Demo menu. The basic functionality of the prioritizer is now setand we could go on to the next chapter at this point. But we promised somefinal clean-up, so let's take care of that before we move on.
Sprucing Up the Application
We will do two things to clean up the Prioritizer application before we considerourselves done with it for the moment. First, we'll change the somewhatugly true-false prompter with which we ask the user to rank each pair ofchoices in the list. Second, we'll remove the necessity of having two copiesof the code around in our image by creating a new class for the Prioritizerapplication and removing the old code which will no longer be needed.
Chapter 3 The First Project: A Prioritizer 43
Changing the Prompter
We used an instance of the class Prompter to create both of the user interac-tion components of our prioritizer. The problem is that a prompter can onlydo one thing: pose a question and let the user type in an answer (or accepta supplied default response). We'd like to allow the user to click on thewords "Yes" and "No" as the means of providing information about a givenchoice that we've placed into the Prioritizer.
Although prompters only allow the user to type a response, there is a userinterface component on which the user is accustomed to clicking to providea response to the system. This object is, of course, the pop-up menu. Suchobjects are instances of the class Menu, which we will work with to createour new Yes-No confirmation interface for the user.
Everything else about the way we deal with asking the user to sort the listof choices remains the same.
We will create a new method for the class Menu that pops up a menu withtwo choices: Yes and No. We will call the method confirm:. It will take asan argument the question we wish the user to answer. Note that by not hard-coding this question, we make this a general-purpose method. That, ofcourse, is a key objective of good object-oriented design.
Open a CHB on the class Menu, select the Class button, then new methodfrom the pane menu in the method list pane, and type in the following code:
confirm: queryString"Returns Boolean true for Yes, false for No." |
label Imp tempMenu response | labelTmp := queryString,..'\Yes\No*. tempMenu : = Menu
labels: labelTmp witherslines: #(1)
In line four of this method, we concatenate the question passed to the methodwhen it is called with the labels "Yes" and "No" to form the contents of thepop-up menu. Note that the question itself, contained in queryString, ap-pears as part of the menu and, in Smalltalk/V, may be selected by the user.Because of that, we have to supply a selector for the top line of the menu eventhough it is unlikely that an experienced user of a mouse-and-menu-basedsystem would actually choose the question as a response. The backslashesin the labels: argument are item separators that are converted to carriagereturns when the string containing them is sent the withCrs message.
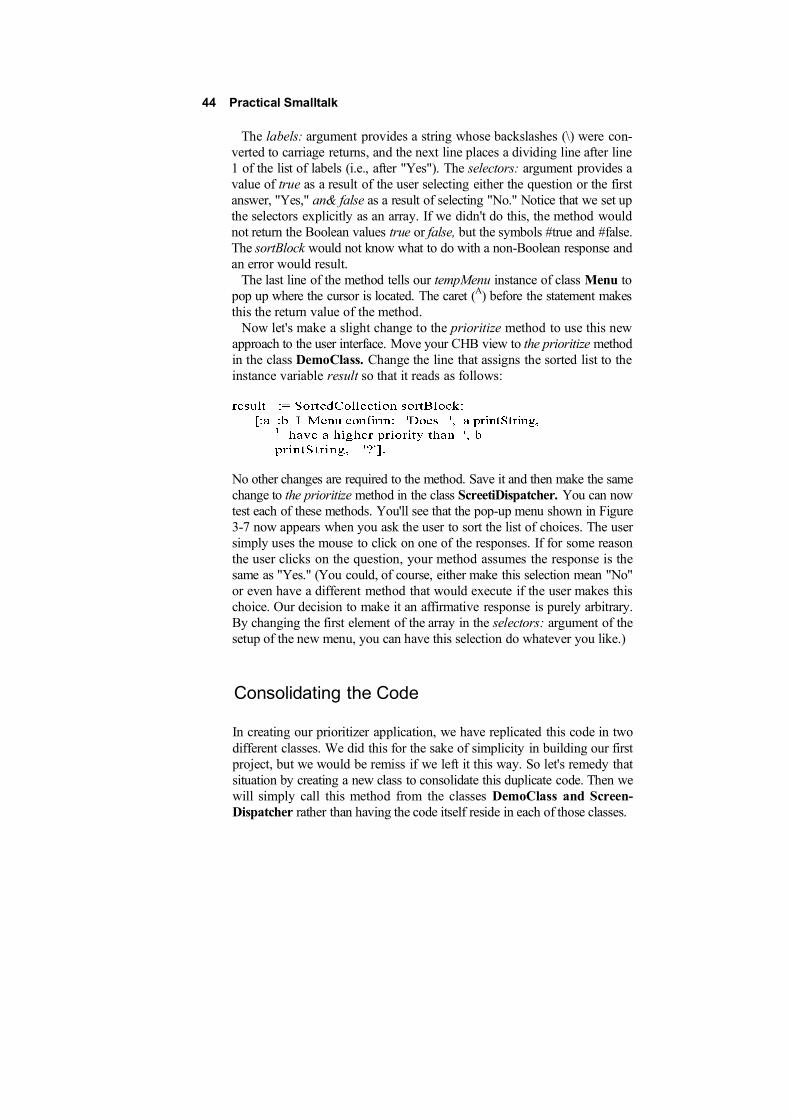
44 Practical Smalltalk
The labels: argument provides a string whose backslashes (\) were con-verted to carriage returns, and the next line places a dividing line after line1 of the list of labels (i.e., after "Yes"). The selectors: argument provides avalue of true as a result of the user selecting either the question or the firstanswer, "Yes," an& false as a result of selecting "No." Notice that we set upthe selectors explicitly as an array. If we didn't do this, the method wouldnot return the Boolean values true or false, but the symbols #true and #false.The sortBlock would not know what to do with a non-Boolean response andan error would result.
The last line of the method tells our tempMenu instance of class Menu topop up where the cursor is located. The caret (A) before the statement makesthis the return value of the method.
Now let's make a slight change to the prioritize method to use this newapproach to the user interface. Move your CHB view to the prioritize methodin the class DemoClass. Change the line that assigns the sorted list to theinstance variable result so that it reads as follows:
No other changes are required to the method. Save it and then make the samechange to the prioritize method in the class ScreetiDispatcher. You can nowtest each of these methods. You'll see that the pop-up menu shown in Figure3-7 now appears when you ask the user to sort the list of choices. The usersimply uses the mouse to click on one of the responses. If for some reasonthe user clicks on the question, your method assumes the response is thesame as "Yes." (You could, of course, either make this selection mean "No"or even have a different method that would execute if the user makes thischoice. Our decision to make it an affirmative response is purely arbitrary.By changing the first element of the array in the selectors: argument of thesetup of the new menu, you can have this selection do whatever you like.)
Consolidating the Code
In creating our prioritizer application, we have replicated this code in twodifferent classes. We did this for the sake of simplicity in building our firstproject, but we would be remiss if we left it this way. So let's remedy thatsituation by creating a new class to consolidate this duplicate code. Then wewill simply call this method from the classes DemoClass and Screen-Dispatcher rather than having the code itself reside in each of those classes.
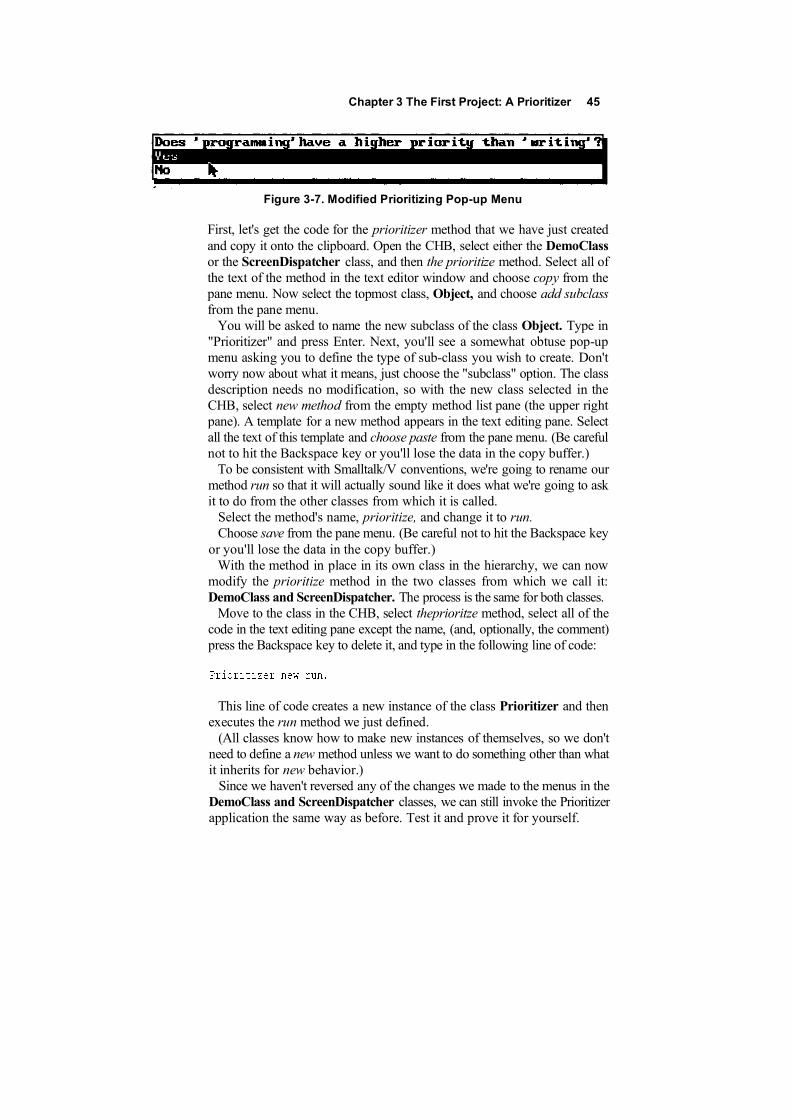
Figure 3-7. Modified Prioritizing Pop-up Menu
First, let's get the code for the prioritizer method that we have just createdand copy it onto the clipboard. Open the CHB, select either the DemoClassor the ScreenDispatcher class, and then the prioritize method. Select all ofthe text of the method in the text editor window and choose copy from thepane menu. Now select the topmost class, Object, and choose add subclassfrom the pane menu.
You will be asked to name the new subclass of the class Object. Type in"Prioritizer" and press Enter. Next, you'll see a somewhat obtuse pop-upmenu asking you to define the type of sub-class you wish to create. Don'tworry now about what it means, just choose the "subclass" option. The classdescription needs no modification, so with the new class selected in theCHB, select new method from the empty method list pane (the upper rightpane). A template for a new method appears in the text editing pane. Selectall the text of this template and choose paste from the pane menu. (Be carefulnot to hit the Backspace key or you'll lose the data in the copy buffer.)
To be consistent with Smalltalk/V conventions, we're going to rename ourmethod run so that it will actually sound like it does what we're going to askit to do from the other classes from which it is called.
Select the method's name, prioritize, and change it to run.Choose save from the pane menu. (Be careful not to hit the Backspace key
or you'll lose the data in the copy buffer.)With the method in place in its own class in the hierarchy, we can now
modify the prioritize method in the two classes from which we call it:DemoClass and ScreenDispatcher. The process is the same for both classes.
Move to the class in the CHB, select theprioritze method, select all of thecode in the text editing pane except the name, (and, optionally, the comment)press the Backspace key to delete it, and type in the following line of code:
This line of code creates a new instance of the class Prioritizer and thenexecutes the run method we just defined.
(All classes know how to make new instances of themselves, so we don'tneed to define a new method unless we want to do something other than whatit inherits for new behavior.)
Since we haven't reversed any of the changes we made to the menus in theDemoClass and ScreenDispatcher classes, we can still invoke the Prioritizerapplication the same way as before. Test it and prove it for yourself.
Chapter 3 The First Project: A Prioritizer 45
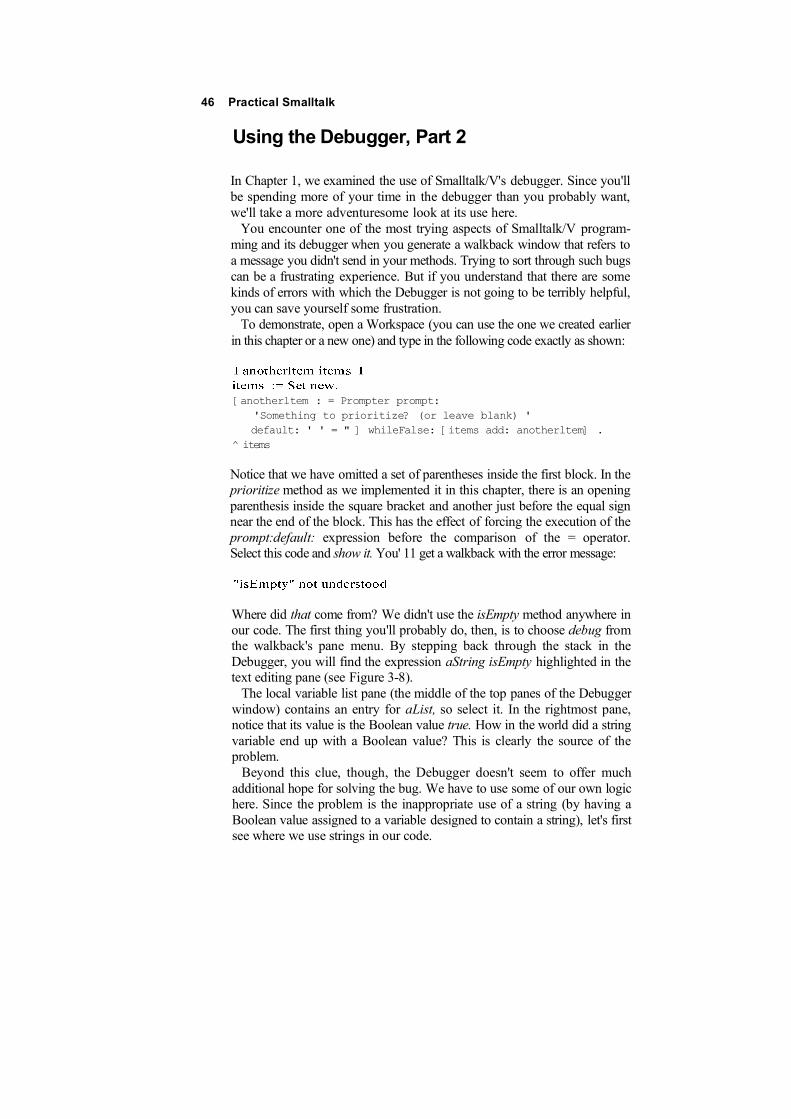
46 Practical Smalltalk
Using the Debugger, Part 2
In Chapter 1, we examined the use of Smalltalk/V's debugger. Since you'llbe spending more of your time in the debugger than you probably want,we'll take a more adventuresome look at its use here.
You encounter one of the most trying aspects of Smalltalk/V program-ming and its debugger when you generate a walkback window that refers toa message you didn't send in your methods. Trying to sort through such bugscan be a frustrating experience. But if you understand that there are somekinds of errors with which the Debugger is not going to be terribly helpful,you can save yourself some frustration.
To demonstrate, open a Workspace (you can use the one we created earlierin this chapter or a new one) and type in the following code exactly as shown:
[anotherltem : = Prompter prompt:'Something to prioritize? (or leave blank) 'default: ' ' = " ] whileFalse: [items add: anotherltem] .
items
Notice that we have omitted a set of parentheses inside the first block. In theprioritize method as we implemented it in this chapter, there is an openingparenthesis inside the square bracket and another just before the equal signnear the end of the block. This has the effect of forcing the execution of theprompt:default: expression before the comparison of the = operator.Select this code and show it. You' 11 get a walkback with the error message:
Where did that come from? We didn't use the isEmpty method anywhere inour code. The first thing you'll probably do, then, is to choose debug fromthe walkback's pane menu. By stepping back through the stack in theDebugger, you will find the expression aString isEmpty highlighted in thetext editing pane (see Figure 3-8).
The local variable list pane (the middle of the top panes of the Debuggerwindow) contains an entry for aList, so select it. In the rightmost pane,notice that its value is the Boolean value true. How in the world did a stringvariable end up with a Boolean value? This is clearly the source of theproblem.
Beyond this clue, though, the Debugger doesn't seem to offer muchadditional hope for solving the bug. We have to use some of our own logichere. Since the problem is the inappropriate use of a string (by having aBoolean value assigned to a variable designed to contain a string), let's firstsee where we use strings in our code.
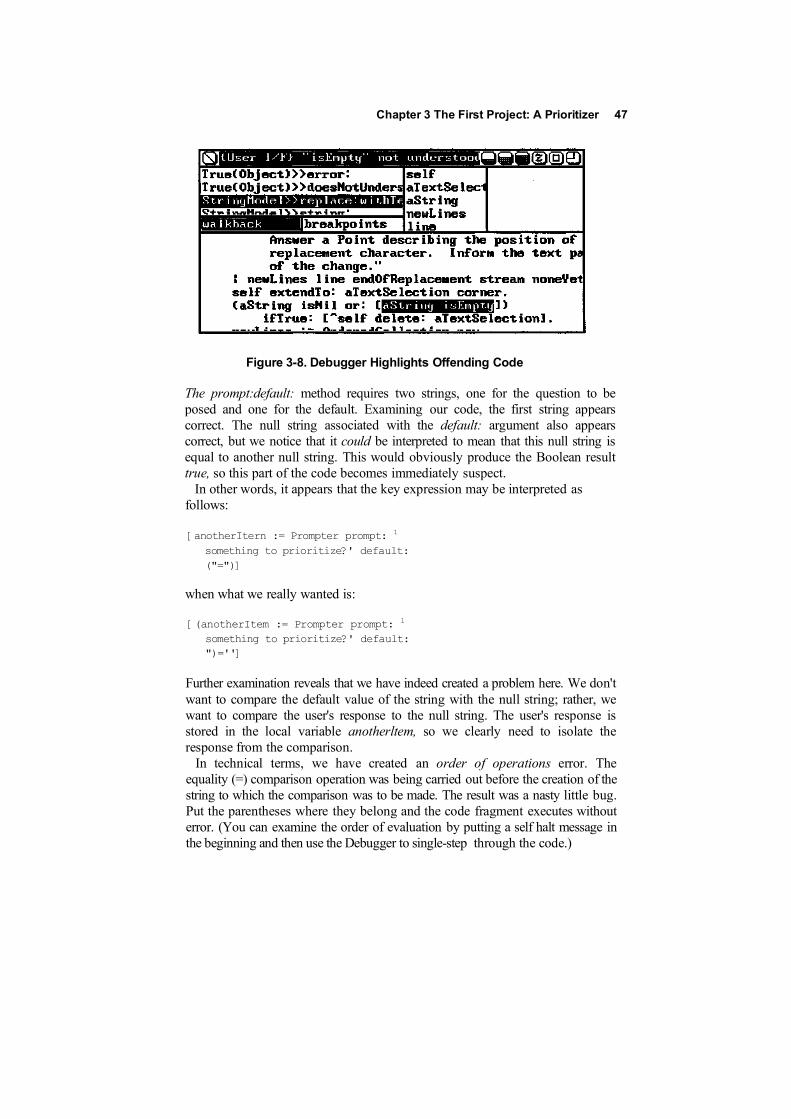
Figure 3-8. Debugger Highlights Offending Code
The prompt:default: method requires two strings, one for the question to beposed and one for the default. Examining our code, the first string appearscorrect. The null string associated with the default: argument also appearscorrect, but we notice that it could be interpreted to mean that this null string isequal to another null string. This would obviously produce the Boolean resulttrue, so this part of the code becomes immediately suspect.
In other words, it appears that the key expression may be interpreted asfollows:
[anotherItern := Prompter prompt: 1
something to prioritize?' default:("=")]
when what we really wanted is:
[(anotherItem := Prompter prompt: 1
something to prioritize?' default:")='']
Further examination reveals that we have indeed created a problem here. We don'twant to compare the default value of the string with the null string; rather, wewant to compare the user's response to the null string. The user's response isstored in the local variable anotherltem, so we clearly need to isolate theresponse from the comparison.
In technical terms, we have created an order of operations error. Theequality (=) comparison operation was being carried out before the creation of thestring to which the comparison was to be made. The result was a nasty little bug.Put the parentheses where they belong and the code fragment executes withouterror. (You can examine the order of evaluation by putting a self halt message inthe beginning and then use the Debugger to single-step through the code.)
Chapter 3 The First Project: A Prioritizer 47

In this chapter, we will take a look at high-level programming and designissues that will make your work in Smalltalk easier and more effective.We'll start with a discussion of why object programming in general andSmalltalk/V programming specifically "feel" different from conventionalprocedural programming. Then we'll discuss the "onion peeling" processthat characterizes all computer programming to one degree or another andsee how Smalltalk makes that process more robust and easier to manage.Next, we'll examine the two main means by which you will accomplishapplication development in Smalltalk/V: creating objects and addingmethods.
People who approach Smalltalk programming with a background in otherprogramming languages often express a sense of disorientation and evenfrustration on their first encounters with this new environment. "It's likeanother planet," some will say. "I just can't seem to get started" is anotheroften heard complaint.
Our experience indicates that for the most part these comments andfeelings reflect the fact that Smalltalk programming — and, in fact, object-oriented programming in general — really is qualitatively different fromconventional programming. A short example will serve to focus our think-ing on the fundamental reasons for this.
If you have a background in a conventional programming language like Cor Pascal, for example, you might approach the process of learning a newimplementation of your favorite language by trying to write a straightfor-ward piece of code using the new tool. Let's say that you have a favoritesorting algorithm that helps you both learn the new tool and discover some
49
50 Practical Smalltalk
of its potential inherent weaknesses. So you write the code and test it.Conceptually, what you really do is you start with an algorithm (the sortingcode) and you pour some data into it (the test data which will be sorted).
Now if you try to approach Smalltalk/V with that same approach, you'regoing to feel like you have indeed traveled to another planet. But if you thinknot about pouring data into an algorithm but instead focus on creating anobject that is inherently sortable and then giving it the ability to sort itself,you'll be able to make the transition.
In other words, the emphasis is not on the separation of data and methodbut on the very opposite: their tight integration with one another.
Peeling the Onion
Solving any puzzle has at least a faint resemblance to the process of onion-peeling. You strip away outer layers of information, much of which servesonly to distract you from your real objective. Then you reach progressivelylower and deeper layers of the onion until finally you reach its core. Alongthe way, you find useful and some not-so-useful parts of the onion.
Programming is puzzle-solving. Regardless of the programming languagebeing used, the hardware on which the program will eventually be run, or theprogram's ultimate purpose, programming bears a resemblance to onion-peeling. You begin with a broad understanding of what you want theprogram to accomplish and with a fundamental grasp of the tools availableto attain that goal. Then through a series of successive approximations, yougradually hone your tools and your skills with them as you focus moreintently on the problem. You identify small pieces that can be dealt with andyou master them. (The order in which these processes occur may vary, ofcourse, depending on the programming methodology you adopt. Thatdoesn't make the work any less like onion-peeling, it just results in more orfewer tears in the process.)
Object-oriented programming is even more like onion-peeling than otherkinds of programming. This is particularly true when you are working in theSmalltalk/V system. As we saw in Chapter 2, there are families of classesand sub-classes, sometimes extending as much as five layers deep. Associ-ated with each class is a collection of instance and class methods and thecode that makes the class and its instances behave as they do. Finally there'sthe source code, where you can read comments and the source listing itselfto determine what the method does and how it does it. Sometimes, you haveto take all of these steps to get to the point where you are ready to begin aSmalltalk/V programming assignment.
Chapter 4 Programming Techniques 51
Beyond this organizational hierarchy, there is a behavioral or message-passing hierarchy that becomes visible any time you are trying to analyzewhat is going on in a system rather than just in one class at a time. We'veseen how the Debugger in Smalltalk/V provides us with a list of currentlyexecuting methods. Because applications reuse existing components,messages are passed back and forth between objects you've created andobjects that exist in the Smalltalk/V class library. Tracking through thatmaze can sometimes be quite a challenge. That's why Digitalk supplies somany helpful tools with Smalltalk/V, including the Debugger which is quiterevealing when you know how to use it.
Boiled down to its essence, the onion-peeling in Smalltalk programmingcan be looked at as learning how to decide when to do what.
What we hope to do in this brief chapter is to help you peel the Smalltalk/Vonion a little more efficiently.
Where to Begin?
If all programming in Smalltalk consists only of creating objects andassociating methods with them, how do you know where to start? How canyou determine what objects you need to create? How do you know how todivide up the methods among all the objects available to you? In short, howdo you know what to implement?
There are, as you might expect, no easy and universal answers to thesequestions. But we can offer some general guidance that you will find usefulagain and again as you create Smalltalk applications.
The process of deciding where to begin with a Smalltalk programmingtask can be described as posing and answering four basic questions:
• What do I expect my application to do? (Or, expressed in more object-oriented terms, "What behavior do I expect my application to exhibit?")
• What objects are needed to represent my application's components?
• What is each object's responsibility?
• What must each object "know" about itself?
• How do the objects in my application collaborate with other objects?
Let's take a brief look at each of these questions to glean some ideas for howto answer them.

52 Practical Smalltalk
Obviously, this question is one you have to ask yourself regardless of whichlanguage or programming methodology you're using. It is essential to goodsoftware design.
But in an OOP system like Smalltalk, the way you phrase the answer to thisquestion can be useful. Think about describing your application's behaviorin an English-language sentence (unless, of course, your native language isnot English, in which case you should use a human language you under-stand!). It may take more than one sentence to describe your application ifit is complex. That's fine.
When you have refined your sentence description of your application, youhave already gone a long way towards constructing the class diagrams thatwe'll talk about shortly. The nouns in your sentence are candidates forobjects to be created. The verbs are candidates for methods. For example,if you wanted to construct a Smalltalk application that would enable the userto click on some buttons to increment or decrement a counter, you mightwrite a sentence like this:
This application consists of a counter that starts out with a value of zeroand then lets the user change its value by clicking on buttons to incrementor decrement it by one each time.
In fact, we'll build just such an application in Chapter 5. This sentence hasthe following nouns:
• application• counter• value• user• buttons• time
Not all of these will be converted to objects as it turns out. But all of theobjects we create in our application are on this list. Similarly, the verbs inthe sentence are:
• consists• starts• lets• change• clicking• increment• decrement
Chapter 4 Programming Techniques 53
Again, not all of these verbs will translate into methods in the finishedapplication, but all of the methods that appear in that application are eitheron this list or grow out of it and an understanding of how user interaction isimplemented in Smalltalk/V.
Obviously, you can go a long way toward a workable starting point for adesign of a Smalltalk application with this simple approach.
Objects and Their Responsibilities
Once you've come up with a list of the candidate objects of which yourapplication may be composed, you need to look at each object and askyourself what responsibility it will have in the application.
Staying with our counter example, we know we're going to have a counterapplication object which retains a numeric value and displays that value tothe user, updating the display each time the value changes. So we can definean object whose responsibility is to re-display the value each time it changes.The object also obviously needs to know how to add and subtract valuesfrom the value.
Other objects might include buttons whose behaviors consist of being ableto detect when they have been the subject of the user's mouse-click andsending some information about that fact to another object. You canprobably surmise, too, that we'll need a window of some sort to hold all ofthese various objects.
In this simple application, there is a clear line of demarcation amongobjects. That is not always the case. When it is not, you will spend some timeduring the design of your application looking for common or similarbehaviors among various objects and combining them into other classes.
What Do Objects Need to Know?
Each object will probably have to have some information about itself so thatit can carry out its behavior. The counter object, for example, can'tincrement or decrement its value unless it knows the value at all times. Thesethings that an object must know about itself provide a starting point for a listof instance variables to be defined for the object.
Sometimes these lists are quite long, but most often an object only needsa few pieces of information about itself to behave as expected.
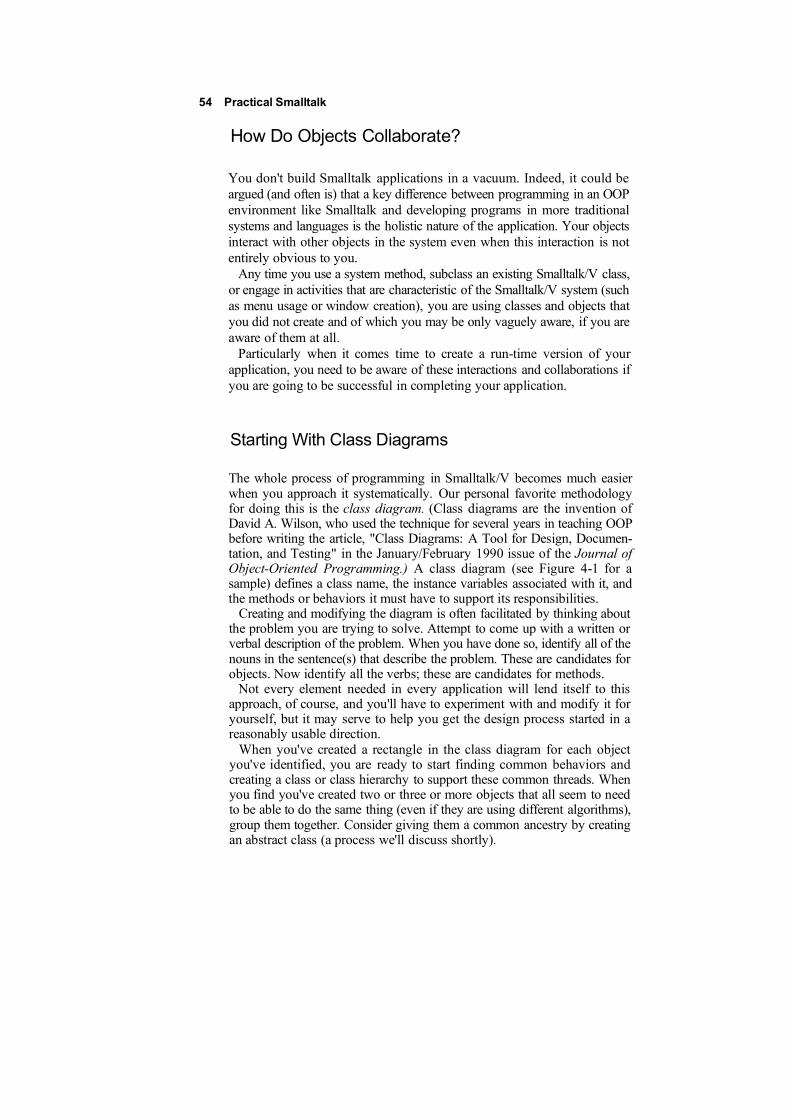
54 Practical Smalltalk
How Do Objects Collaborate?
You don't build Smalltalk applications in a vacuum. Indeed, it could beargued (and often is) that a key difference between programming in an OOPenvironment like Smalltalk and developing programs in more traditionalsystems and languages is the holistic nature of the application. Your objectsinteract with other objects in the system even when this interaction is notentirely obvious to you.
Any time you use a system method, subclass an existing Smalltalk/V class,or engage in activities that are characteristic of the Smalltalk/V system (suchas menu usage or window creation), you are using classes and objects thatyou did not create and of which you may be only vaguely aware, if you areaware of them at all.
Particularly when it comes time to create a run-time version of yourapplication, you need to be aware of these interactions and collaborations ifyou are going to be successful in completing your application.
Starting With Class Diagrams
The whole process of programming in Smalltalk/V becomes much easierwhen you approach it systematically. Our personal favorite methodologyfor doing this is the class diagram. (Class diagrams are the invention ofDavid A. Wilson, who used the technique for several years in teaching OOPbefore writing the article, "Class Diagrams: A Tool for Design, Documen-tation, and Testing" in the January/February 1990 issue of the Journal ofObject-Oriented Programming.) A class diagram (see Figure 4-1 for asample) defines a class name, the instance variables associated with it, andthe methods or behaviors it must have to support its responsibilities.
Creating and modifying the diagram is often facilitated by thinking aboutthe problem you are trying to solve. Attempt to come up with a written orverbal description of the problem. When you have done so, identify all of thenouns in the sentence(s) that describe the problem. These are candidates forobjects. Now identify all the verbs; these are candidates for methods.
Not every element needed in every application will lend itself to thisapproach, of course, and you'll have to experiment with and modify it foryourself, but it may serve to help you get the design process started in areasonably usable direction.
When you've created a rectangle in the class diagram for each objectyou've identified, you are ready to start finding common behaviors andcreating a class or class hierarchy to support these common threads. Whenyou find you've created two or three or more objects that all seem to needto be able to do the same thing (even if they are using different algorithms),group them together. Consider giving them a common ancestry by creatingan abstract class (a process we'll discuss shortly).
Figure 4-1. Sample Class Diagram
Creating Objects
As we have said, all Smalltalk programming consists of extending anexisting Smalltalk class library by creating new classes, and adding methodsto these classes.
When you are refining the behavior of a class or extending its capabilities,or adding to its "knowledge" of itself (i.e., instance variables), it might betime to create a new class. When you create a new class, the first thing you haveto do is decide which class to subclass, since all new classes you create are goingto be subclasses of some Smalltalk class, even if it is the class called Object.
Subclassing the Class Object
Your first impulse will probably be to define your new class as a subclass of thetop Smalltalk/V class, Object. Every class that comes in the Smalltalk/V classlibrary is a descendent of Object and since every class has to have a parent, or"superclass", this is the easiest way to approach the need for subclassing.
Chapter 4 Programming Techniques 55
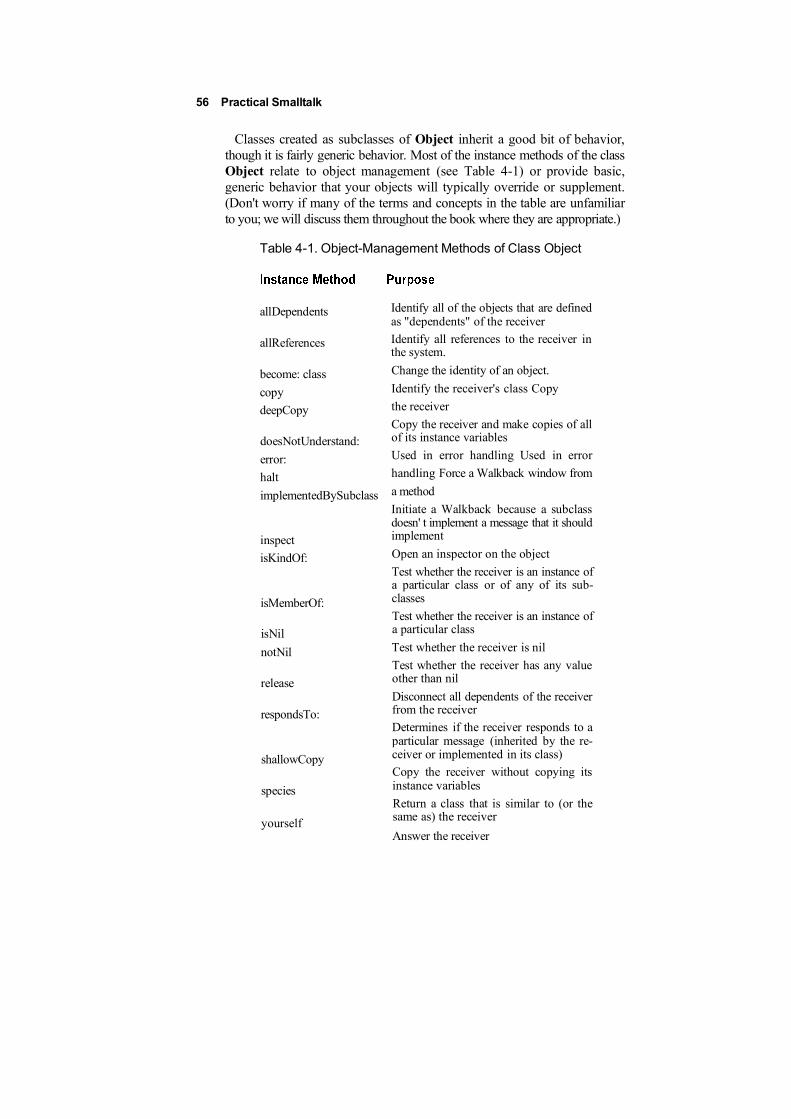
56 Practical Smalltalk
allDependents
allReferences
become: class
copy
deepCopy
doesNotUnderstand:
error:
halt
implementedBySubclass
inspect
isKindOf:
isMemberOf:
isNil
notNil
release
respondsTo:
shallowCopy
species
yourself
Identify all of the objects that are definedas "dependents" of the receiverIdentify all references to the receiver inthe system.
Change the identity of an object.
Identify the receiver's class Copy
the receiver
Copy the receiver and make copies of allof its instance variables
Used in error handling Used in error
handling Force a Walkback window from
a method
Initiate a Walkback because a subclassdoesn' t implement a message that it shouldimplement
Open an inspector on the object
Test whether the receiver is an instance ofa particular class or of any of its sub-classes
Test whether the receiver is an instance ofa particular class
Test whether the receiver is nil
Test whether the receiver has any valueother than nil
Disconnect all dependents of the receiverfrom the receiverDetermines if the receiver responds to aparticular message (inherited by the re-ceiver or implemented in its class)Copy the receiver without copying itsinstance variables
Return a class that is similar to (or thesame as) the receiver
Answer the receiver
Classes created as subclasses of Object inherit a good bit of behavior,though it is fairly generic behavior. Most of the instance methods of the classObject relate to object management (see Table 4-1) or provide basic,generic behavior that your objects will typically override or supplement.(Don't worry if many of the terms and concepts in the table are unfamiliarto you; we will discuss them throughout the book where they are appropriate.)
Table 4-1. Object-Management Methods of Class Object
Chapter 4 Programming Techniques 57
Other behavior associated with the class Object involves such activities asprinting or displaying the object's value, support for the dependencymechanism (see Chapter 5), and forcing the sending of messages to the object.
Subclassing Other Classes
If you can find a class in the Smalltalk/V class library that exhibits some ofthe behavior you desire or that at least provides some kernel of your desiredfunctionality, you can create a subclass of that class rather than Object. Obvi-ously, this means that the newly created subclass inherits all of the behavior ofthe class you've chosen and all of its superclasses including Object.
For example, if you want to create a new class that contains behavior fordealing with a new type of aggregate of elements (such as a new dictionarywith special capability), you would probably look first to the class Collectionor one of its subclasses to see which one seems to offer the most support forthe behavior you wish the object to exhibit. Having identified such a class,you can create your own subclass of it using the method outlined below.
The Subclassing Process
The step-by-step process for creating a subclass of an existing Smalltalk/Vclass, whether the class came with the Smalltalk/V library or is one youadded, is quite simple:
1. In the CHB, find the class you wish to subclass and select it.
2. From the class list pane popup menu, choose add subclass.
3. Give the new class a name in the prompter that appears.
4. For most classes, you will need to tell the system (see Figure 4-2)whether the subclass is a normal subclass, a variableSubclass or avariableByteSubclass. The first type contains pointers to namedinstance variables. The second contains pointers to both named andindexed instance variables. The third contains bytes and is seldom used.
5. Make any modifications needed to the class definition template in thetext editing pane.
6. Select save from the text editing pane popup menu.
The new class is now selected and ready for you to add your first method,following the steps outlined in the preceding discussion. From this point on,the new subclass is treated exactly like any other class in the library.
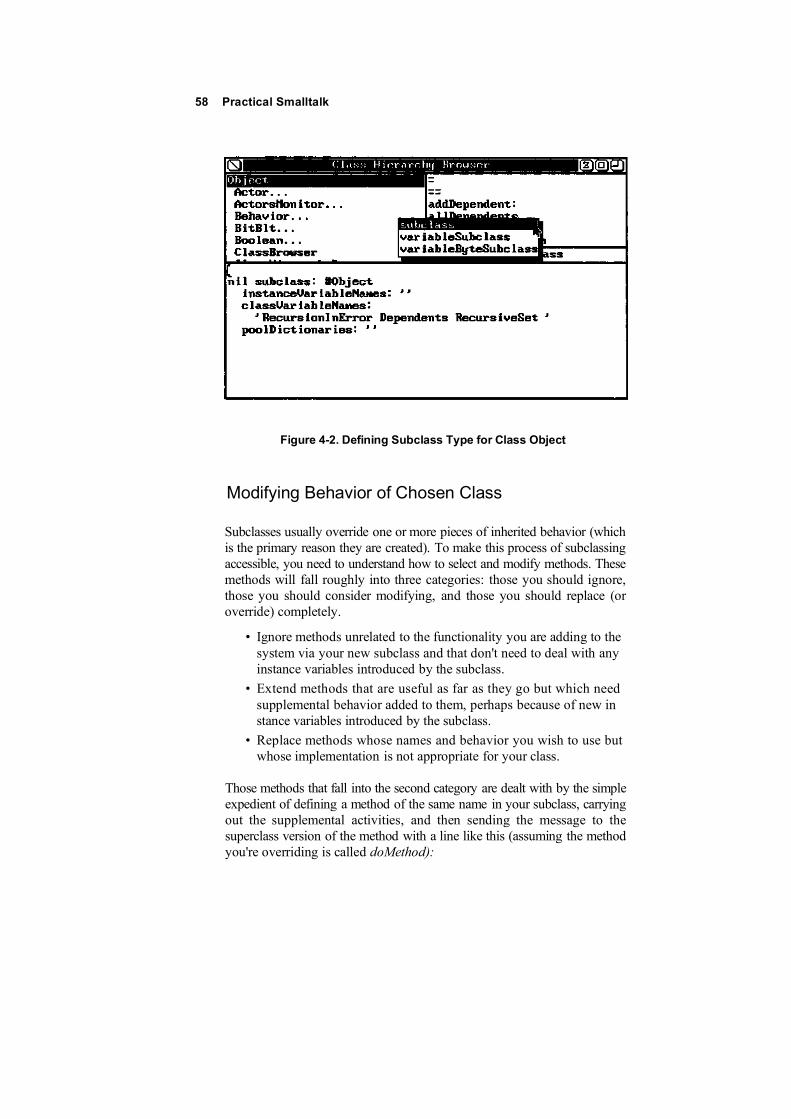
Figure 4-2. Defining Subclass Type for Class Object
Modifying Behavior of Chosen Class
Subclasses usually override one or more pieces of inherited behavior (whichis the primary reason they are created). To make this process of subclassingaccessible, you need to understand how to select and modify methods. Thesemethods will fall roughly into three categories: those you should ignore,those you should consider modifying, and those you should replace (oroverride) completely.
• Ignore methods unrelated to the functionality you are adding to thesystem via your new subclass and that don't need to deal with anyinstance variables introduced by the subclass.
• Extend methods that are useful as far as they go but which needsupplemental behavior added to them, perhaps because of new instance variables introduced by the subclass.
• Replace methods whose names and behavior you wish to use butwhose implementation is not appropriate for your class.
Those methods that fall into the second category are dealt with by the simpleexpedient of defining a method of the same name in your subclass, carryingout the supplemental activities, and then sending the message to thesuperclass version of the method with a line like this (assuming the methodyou're overriding is called doMethod):
58 Practical Smalltalk
Chapter 4 Programming Techniques 59
The effect of this line is simply to tell Smalltalk/V, "Use the doMethodmethod found in the superclass of the receiver." In other words, Smalltalk/Vwill carry out your special processing and then use the inherited version. Itis also possible, of course, to execute the superclass method first and thencarry out the specialized processing in your method of the same name. Butyou must understand the implications of this. Including this code ensures aconsistent return value, but it may in some circumstances have the effect ofentirely undoing the work your method is designed to accomplish. As a basicrule, you should be sure to return a consistent value in keeping with theinherited version of the method you are overriding.
If the behavior embodied in the method in the superclass is just notappropriate to the new class you're defining, simply define a new methodto override the behavior exhibited by the ancestor class(es). This includesdisabling behavior completely; if there is a message in the superclass thatyou simply do not want your objects to respond to, you can't just ignore itsexistence in the superclass. Instead, you must define a method that doesnothing (or something harmless and invisible) and give it the same name asthe method you wish your class to ignore. Note that if you find yourself witha great many methods that fit this description, you may wish to re-think yourdesign. You may have not chosen the best class to subclass for your project.
Creating and Using Abstract Classes
An "abstract" class in Smalltalk is a class that is not intended to haveinstances. It exists for the sole purpose of grouping together related behav-iors that will be exhibited by objects created from its "concrete" subclasses.But that whole definition is a bit too abstract, so let's take a look at a specificexample.
The class Collection is an abstract class. You would never create a newobject and call it an instance of Collection.
An abstract class is a repository for behavior that is shared by all instancesof all its subclasses. In the case of the class Collection, for example, behaviorthat all collections need to know how to do is defined. These activitiesinclude such things as:
• adding, deleting, and retrieving elements of the collection
• iterating over all of the members of a collection, executing a block ofcode for each element
• displaying or printing itself in some useful way
Many of these methods as they are defined in the abstract class Collectioneither do nothing or return an error indicating that the method should beimplemented by a subclass. For example, the method add: in the abstractclass Collection might do nothing but send the message implementedBy-Subclass to the receiver (self) and return the result. In other words, the add:method is so specific to the type of collection that we cannot genericallyimplement behavior that will apply to all types of collections. (Of course,many methods in abstract classes do implement real behavior.)
The Purpose of Do-Nothing Methods
You might be tempted to ask, "If these methods don't do anything or, worseyet, generate errors if I don't implement them in my subclasses, then whyare the methods defined at all?" The answer relates to the general purposefor which abstract classes exist. We've said that abstract classes exist onlyto gather together behavior that is common to all their subclasses. Another,perhaps more illustrative way of saying this is that abstract classes define"policies" (i.e., what all subclasses and their instances must know how to doif they are going to be members in good standing of the abstract class) whileconcrete classes (i.e., all those that are not abstract) define the "mechanism"for carrying out the policy.
Seen in this light, the add: method in the class Collection tells you as aSmalltalk/V designer that if you create a new subclass of this class, you mustbe sure that it knows how to respond to the add: message. It sets a policy:all members of this class know how to deal with the message add:. It is upto your class to implement this method any way it wants (including, ofcourse, ignoring it by defining an add: method that does nothing). Youcannot ignore it without generating a Walkback.
A difficult part of programming in Smalltalk by these last two approacheswe've examined is identifying the class to subclass — whether that class isabstract or concrete. How do you go about this?
There are no hard and fast answers. This is part of Smalltalk programmingthat lends itself to a great many stylistic differences among programmers.We know Smalltalk developers who apply the following techniques:
• examine abstract classes for desired behavior, then critically analyzea candidate abstract class' subclasses
60 Practical Smalltalk
Chapter 4 Programming Techniques 61
• use the Method Index in the Smalltalk/V documentation to find amethod that sounds like it does something they'd expect the class forwhich they are looking to know how to do and then examining thatclass' definition in the Encyclopedia of Classes in the same manual
• make it a subclass of object and, after implementing some of theapplication, move it as appropriate
• ask other programmers in their group or circle of colleagues
Ultimately, there is no substitute for a solid working knowledge of what'sin the Smalltalk/V class library. One of the main purposes of this book is tofamiliarize you with the most often used and important elements of thatlibrary so that you have a base from which to begin your own explorations.
You can rarely expect to find a class that is coded with all of the behavioryou want. (If this does happen, think how easy your job has become!) Lookfor a class that has a reasonable amount of behavior dealing with things youexpect your class to understand. When you find such a class, dig in and startprogramming. If your search doesn't yield perfect results, you can build yourown class and later make it a subclass of a class you later identify as useful.
In Chapter 5, we'll take a close look at a practical example of how toapproach this problem.
Adding Methods
The simplest approach to programming in Smalltalk is to find a class thatmakes a good "home" for the behavior you're trying to add to the system andsimply define a new method for that class. You saw this method used inChapter 3 when we created the prioritize method and added it to the classesDemoClass and ScreenDispatcher. This process is the easiest because:
• You don't have to know very much at all about the class involved andits overall behavior. In fact, you could even just grab an arbitrary classand stick the new method into it if it was a stand-alone method (i.e.,one that didn't depend on that object's other behaviors). We shouldnote that this would not be good programming practice, but it illustrates the point that you need not always have an in-depth understanding of a class before adding a new method to it.
• Adding a new method is a relatively simple process. We'll provide astep-by-step instruction list shortly, just for reference.
• It is easy to "undo." Thus you can use it to experiment with a newmethod approach without committing yourself to careful tracking ofpotential changes to the image.
62 practical Smalltalk
The Process of Adding a Method
Here is the process of programming in Smalltalk/V by adding a method toan existing class:
1. Identify the class to which the new method should be added. Ideally,you'll find a class which contains at least some related functionalityand which may be in a "good" position in the hierarchy (i.e., itssubclasses would make good use of the method as well).
2. Find the class in the CHB and move to the method pane.
3. In the method list pane, choose new method from the popup menu.
4. In the text editing pane, enter the source code for the new method. Youwill generally do this, of course, simply by editing the templateSmalltalk/V provides for you. But on occasion you will have previously typed the method code into the Transcript or a Workspacewindow. In that case, you can simply copy it from that window andthen select the entire method template in the text editing window of theCHB and paste the copied method over the template.
5. Select save from the text editing pane's popup menu.
That's all there is to the process. Your new method can now be invoked bya message being sent to the class or an instance of the class.
Avoid Adding Methods to System Classes
Adding a method to an existing class is so simple and straightforward, youmight wonder why you just don't handle all of your Smalltalk/V program-ming this way.
If you are adding a new method similar to one which already exists, selectthe existing method, edit its name to the new method name, and then edit andsave the code. When we made our first pass at implementing the prioritizemethod in Chapter 3, for example, we simply added it to two classes. It didnot affect other objects in those classes in any significant way, only alteringtheir menus (which is a relatively unintrusive change). Similarly, it did notdepend heavily on those classes and their other methods.
It is also wise to consider creating a new method by adding a method to anexisting class only if the new method is going to be added only one place.In Chapter 3, when we had implemented the prioritize method in two dif-ferent places, we concluded that we should consolidate the code. To do so,we abandoned the strategy of simply adding the method as a functional piece
Chapter 4 Programming Techniques 63
of code to two different classes, opting instead to create a new class to holdthe method and then sending the prioritize message to that class from theother places in the system where we wanted the functionality available.However, this was feasible because we did not need to inherit anything fromthese two classes. Inheritance sometimes forces the duplication of code. Inaddition, if a new method needs to be added in several places, it may be anindication that it is being inserted at the wrong position in the classhierarchy.
Finally, you should probably not decide to undertake programming byadding methods to existing classes if you are going to have to add severalnew methods to one or more existing classes to make your design work.That's probably an indication that you'll be able to build a more specializedobject, so you should create a new class to hold all of the related pieces ofbehavior. This is not, however, to say you should never build an applicationby adding many methods throughout the system. That approach is some-times appropriate; it just isn't often the right technique from the standpointof reusability.
In other words, before you decide to create a new bit of functionality foryour Smalltalk environment by adding a new method to an existing class,make sure it is singular and isolatable. If that's the case, you're probably safehandling the task by addition of a method. Otherwise, this is not the mosteffective or robust means of Smalltalk programming.

The Second Project:A Simple Counter
In our first project, the Prioritizer of Chapter 3, we added methods to existingclasses as our primary programming method. At the conclusion of thatprocess, we saw how to create a new class with a single method and then usethat class as we would any other supplied in the class library. It would, ofcourse, be somewhat unusual for us to have a Smalltalk/V application thatconsisted of one class with one method.
This chapter extends our work with Smalltalk/V as we build anotherapplication, this time beginning by creating a new class. The application ispurposely kept small so that we can concentrate on the details of design andprogramming methods that you can use on all of your Smalltalk program-ming projects rather than on the details of how the application itself works.Though small, the project is functional and it forms the kernel of somethingthat could be far more useful.
In this chapter, you'll also learn how to use an Inspector to observe whatis happening in a running application.
This project involves creating a counter. Recall from Chapter 4 that wedescribed this project in one sentence that served there as the starting pointfor our design. We said the project would consist of a counter that starts outwith a value of zero and then lets the user change its value by clicking onbuttons to increment or decrement it by one each time. Figure 5-1 is a sketchshowing how the finished application should look. If the user clicks on theportion of the pane that looks like a button labeled "increment," the counterwill increase the value by 1. If the user clicks on the "decrement" button, thecounter will decrease the value by 1.
That's all there is to the project. Let's dive into seeing how we mightdesign it.
65
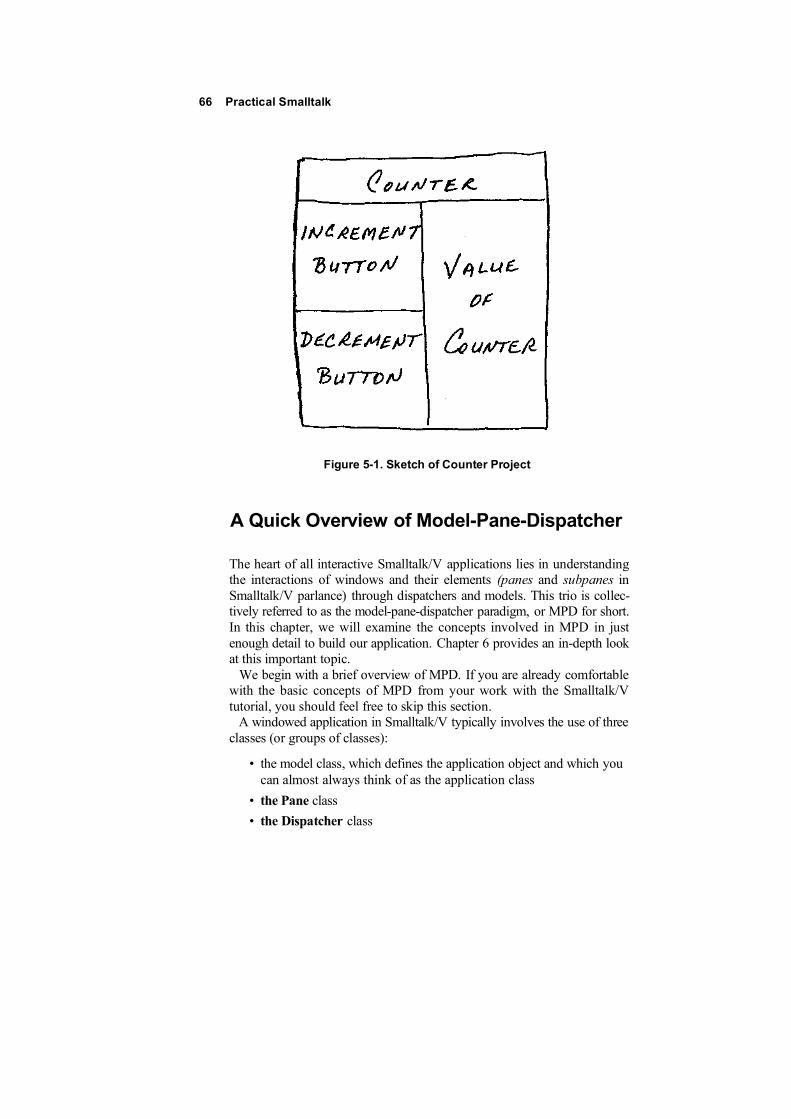
Figure 5-1. Sketch of Counter Project
A Quick Overview of Model-Pane-Dispatcher
The heart of all interactive Smalltalk/V applications lies in understandingthe interactions of windows and their elements (panes and subpanes inSmalltalk/V parlance) through dispatchers and models. This trio is collec-tively referred to as the model-pane-dispatcher paradigm, or MPD for short.In this chapter, we will examine the concepts involved in MPD in justenough detail to build our application. Chapter 6 provides an in-depth lookat this important topic.
We begin with a brief overview of MPD. If you are already comfortablewith the basic concepts of MPD from your work with the Smalltalk/Vtutorial, you should feel free to skip this section.
A windowed application in Smalltalk/V typically involves the use of threeclasses (or groups of classes):
• the model class, which defines the application object and which youcan almost always think of as the application class
• the Pane class
• the Dispatcher class
66 Practical Smalltalk
____________ Chapter 5 The Second Project: A Simple Counter 67
Generally speaking, you can focus your concerns on creating the modelclass and with supporting the Pane class protocol, which is the secret to yourapplication's interactivity.
The Model
The purpose of the model is to represent the underlying informationdepended upon by the other objects in the application. Normally, thisconsists primarily of the graphic user interface associated with the applica-tion.
The model class is also responsible for the activities listed below. You cansee why we said earlier that the application and the model are almost alwaysthe same object. These are tasks you normally associate with an application:
• saving the current state of the window and the application, generallyby tracking instance variables
• creating new panes
• initializing the contents of panes
• carrying out communications between panes and synchronizing theactivities of all the panes in a window
• defining optional menus for the panes
One significant issue that appears when we talk about the model class is theconcept of dependencies. Various elements of your Smalltalk/V applicationare dependent on other elements. For example, in our counter application,what is displayed as the value of the counter is dependent on what the userhas instructed the application to do to that value. Because of this dependencyrelationship, we establish a connection between the buttons that the userclicks on to change the value and the pane in which the value is displayed.
The Pane
You will make extensive use of the behavior of the Pane class in yourSmalltalk/V applications, so you must understand how panes and subpaneswork and interact. Smalltalk/V provides a complete set of pane-buildingblocks and you generally use them just as they are supplied. The class Panehas two immediate subclasses: TopPane and SubPane. An applicationwindow always has one and only one instance of TopPane. Its purpose is
68 Practical Smalltalk
to control the actions of all of its subpanes in relation to the window. (If anapplication has more than one window, as we will see in Chapter 6, eachwindow has an instance of TopPane.) There are three types of subpanesavailable in Smalltalk/V:
• text subpanes that support the display of and allow the user interactionwith text
• list subpanes that display (optionally) scrolling lists of one or moreitems
• graphics subpanes (GraphPanes) which best support graphical information
Unless you are defining a new type of pane (which we will demonstrate inChapter 6), you will generally not need to do anything with these classesother than to create instances of them with specific characteristics peculiarto your program.
In our counter application, we will see that we have the requisite TopPaneand two subpanes, one to handle the button-like behavior with which theuser interacts and one to display the current value of the counter.
The Dispatcher
Every pane and subpane has a unique instance of a dispatcher associatedwith it. You don't need to do anything to create this instance and for allpractical purposes you can ignore it. Its only purpose is to gather inputevents (i.e., keyboard and mouse actions) from the user and pass them on tothe pane that should process them.
Generally speaking, the only interaction you have is with the Dispatcherassociated with the TopPane in your window and even then all you do issend it a message to tell it to start working. Since this is "canned" code, youdon't even need to understand what is happening at this point unless you aresimply insatiably curious about it.
What's Really Going on Here?
This whole MPD interaction discussion may seem a bit mysterious to you.In fact, you may be tempted to accuse us of arm-waving, of saying, inessence, "This is top hard, so just ignore it and trust us."
This behind-the-scenes activity is desirable and supportive, but until youget used to the idea and learn to trust Smalltalk to do exactly what it says itwill do, you can get a bit paranoid about using it. As we hope you'll see
___________ Chapter 5 The Second Project: A Simple Counter 69
before this chapter is over, writing interactive Smalltalk/V programs is easyonce you gain a little trust in the system.
This is a single-window application. That window consists of three components:
• a button-like object for incrementing the counter's value
• a button-like object for decrementing the counter's value
• a place to display the current value of the counter
Before we can begin writing the code for this project, we need to answer thefollowing questions:
• How can we divide up the responsibilities of this application amongthe model, pane, and dispatcher portions of the design?
• What type of user interface objects support our desired button-likebehavior?
Dividing the Responsibilities
From the sketch we made of the application window (see Figure 5-1), weknow that the subpanes and their automatically associated dispatchers aregoing to be responsible for detecting the user's click on a button-like object,and for displaying the value of the counter after any change. The model,then, is responsible only for two basic tasks:
• It must keep track of the value. For this purpose, it is relativelyapparent we should use an instance variable. All classes are capableof storing values in instance variables.
• It must coordinate the activity between the button-like objects and thepane where the value is displayed. Since MPD behavior is defined inthe class Object, all classes know how to handle these tasks.
Essentially, then, we've seen that we don't require any particularly special-ized behavior of the class we are going to create for our counter application.Because of this, we do not need to look for a class to subclass. Instead, wecan create our new class as a sublcass of Object.
70 Practical Smalltalk
Defining the Glass
We begin, as we generally will, by defining a new class with which toassociate the behavior and the application. To do this, activate or open theCHB, select the top-level class, Object, and then select add subclass fromthe pane's popup menu. When you are asked for the name of the class,answer Counter.
Now edit the class definition appearing in the text pane in the CHB. Merelyadd the instance variable value to the definition. Save the class definition.
You are now ready to begin adding methods to your new class, startingwith the method that will define the main window for the application.
Defining the Main Window
Our Counter application will have a single window with two subpanes. Themain window, as we have already seen, will be defined as an instance ofTopPane and will be given certain characteristics in the process. Here is thebasic code involved:
In almost every case that you'll experience as a Smalltalk/V programmer,the model associated with a pane—whether a TopPane as here or a SubPaneas we' 11 see in the next section—is the application object that also initializesthe application. Using Smalltalk/V notation, we refer to this object using theSmalltalk special variable self. This simply means in this case that theCounter application is the model with which the pane will interact.
It is optional to put a label on a TopPane. On the other hand, subpanes donot have labels.
You can request that Smalltalk/V 286 put icons to the left or right of thewindow label with the methods called leftlcons: and rightlcons:. By default,Smalltalk/V 286 puts a close icon in the upper-left corner of the window andthree icons — one for zooming, one for collapsing, and one for resizing —in the upper-right corner of the window. In our case, we've decided not todeal with the issues of redrawing the window if the user resizes or zooms it,so we've supplied an empty array as an argument to the rightlcons: message.Because we haven't specifically supplied any leftlcons: message, the win-dow will, by default, have a close box icon.
As we'll see in Chapter 6, there are other things we might frequently wantto do as part of the process of defining the TopPane for our application modelwindow. But in this case* what we have described will suffice.

Chapter 5 The Second Project: A Simple Counter 71
Defining the Subpanes
We need two subpanes, as we've already seen. One subpane has theresponsibility for displaying the current value of the counter. The othersubpane allows the user to interactively change the value of the counter byadding or subtracting 1 from the counter's current value. This latter subpanecould consist of a single pane containing both increment and decrementcommands, or buttons, or it could consist of two separate panes, each ofwhich would handle one of the commands.
Let's work on the first subpane. It has a simple assignment, so it shouldn'tbe too hard to implement. Of the three types of subpanes we have available,it should be clear that we don't need a ListPane since there is only one valuefor the counter at any given point in time. That leaves us with a decisionbetween a TextPane and a GraphPane. We could actually choose eitherone as it turns out. There are advantages and disadvantages to each.
A TextPane will be simpler to work with primarily because placinginformation into such a subpane is much more straightforward than usinggraphic-related commands associated with the GraphPane. On the otherhand, using a TextPane means we can't stop the user from editing thecontents of the window, though we could still protect the value of the counterif the user did make a direct change to this subpane's contents. This wouldnot be good user interface design in a real-world application but sincecreating such an application is not our intent here, that is not a significantfactor in the decision.
On the other hand, using a GraphPane makes the value displayeduneditable. But displaying information in such a pane requires more carefulunderstanding of graphic procedures, which are inherently more complexthan methods for displaying text.
In the interest of simplicity, then, we'll create the part of the window thatdisplays the counter's value as a TextPane.
Here is the code we'll use to create the TextPane that will hold the valueof the counter. An explanation of each line follows the listing.
We have previously created the instance of TopPane called aTopPane.Here, we send this instance the message addSubPane: along with an argu-ment that describes the subpane to be added. This description consists offour lines. The first creates a new instance of TextPane and the remainingthree lines are cascaded messages sent to this instance. The second linedefines the pane's model to be the Counter application by using the keyword
72 Practical Smalltalk
self as described earlier. The third line gives this new pane a name, values.(The pound sign before the name causes Smalltalk to treat the word "values"as a symbol rather than as a variable. Its omission would result in an error.)This name gives us a label by which to refer to this pane later when we wantto update it. It also acts as the message selector the pane will send to themodel to get the data to display in this subpane. The final line tellsaTopPane what portion of its total area to allocate to this new TextPane.We are allocating 1/4 of the total area by starting this window's horizontalposition 3/4 of the way across the width of the aTopPane. (Don't worry atthis point about how this calculation is carried out and what it means. We'llspend a good bit of time in Chapter 6 discussing this issue.)
In the other subpane we want to create we will put the commands fromwhich the user will select what to do with the value of the counter. As we saidearlier, we could implement these button-like objects as two separatesubpanes or as one subpane containing both commands. In the interest ofkeeping the design of the window as simple as possible, we'll use a singlepane to hold the button-like objects labeled increment and decrement. Sincethis subpane will hold multiple objects and since we want the user to be ableto select either (but not both) of them, this subpane should be a ListPane.
Another reason for selecting ListPane as the type of subpane to carry outthis responsibility is that this type of pane exhibits the behavior we need.Look at the ListPane class in the Dictionary of Classes in the Smalltalk/Vdocumentation; it is described as having button-like behavior. The classbehaves in such a way that, "when one of the strings in the collection is selected,either the selected string or its index in the list is passed to the application modelfor further processing." Sounds like what we need, doesn't it?
Here is the code that we'll use to create this new subpane. An explanationfollows the listing.
aTopPane addSubpane: (ListPane new model: self ;name: #cmds; change: #cmds:; framingRatio: (0@ 0 extent: 3/4 @ 1) ) .
The only part of this subpane definition that is different from the TextPanesubpane we saw earlier is the addition of the fifth line, which defines achange: method for this subpane. We obviously need such a method, sincewe want the user's interaction with this subpane to modify the contents ofthe TextPane. This links the subpane and the model more closely togetherand requires that we define a method that we can use to notify the text paneof changes in this subpane. The argument to the change: message is theselector for the message that the ListPane will send to the model when theListPane is clicked.
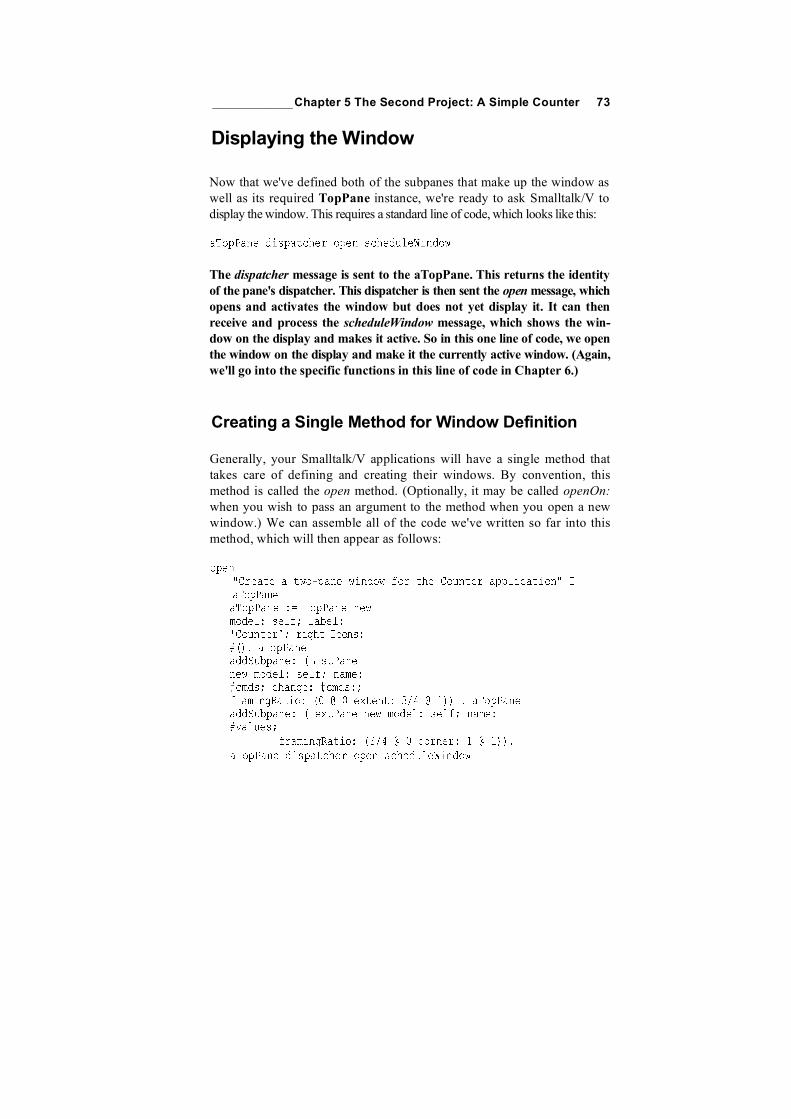
____________ Chapter 5 The Second Project: A Simple Counter 73
Displaying the Window
Now that we've defined both of the subpanes that make up the window aswell as its required TopPane instance, we're ready to ask Smalltalk/V todisplay the window. This requires a standard line of code, which looks like this:
The dispatcher message is sent to the aTopPane. This returns the identityof the pane's dispatcher. This dispatcher is then sent the open message, whichopens and activates the window but does not yet display it. It can thenreceive and process the scheduleWindow message, which shows the win-dow on the display and makes it active. So in this one line of code, we openthe window on the display and make it the currently active window. (Again,we'll go into the specific functions in this line of code in Chapter 6.)
Creating a Single Method for Window Definition
Generally, your Smalltalk/V applications will have a single method thattakes care of defining and creating their windows. By convention, thismethod is called the open method. (Optionally, it may be called openOn:when you wish to pass an argument to the method when you open a newwindow.) We can assemble all of the code we've written so far into thismethod, which will then appear as follows:
74 Practical Smalltalk
(You may have noticed that we reversed the order of the ListPane andTextPane portions of this method. In this particular case, the order in whichthey appear is insignificant, but the code is somewhat more readable if thepanes are defined in the order they appear in the window, left to right andtop to bottom.)
As a result of the code we have written to create the Counter's applicationwindow, we can see that we need to write several other methods:
• cmds, where the list of commands that will make up the contents of theListPane will be defined
• cmds:, which will contain the code for the method that notifies theTextPane when the contents of the ListPane have changed (i.e., whenthe user has made a selection in the ListPane)
• values, where the TextPane can get text to display
Just by their descriptions, the code that makes up these methods is fairly easyto envision.
The cmds method must simply define what the command options will be.Here is the code for this method:
This method simply returns an array that contains two symbols that are thelabels to appear in the ListPane. If you ever wanted to change the labels inthe counter, then, all you'd have to do is change this method.
Similarly, the cmds: method will translate the user's selection (whichwe'll pass to the method as an argument) into the appropriate method to beinvoked. Here's the code for this method:

____________ Chapter 5 The Second Project: A Simple Counter 75
If the user selects the word increment in the ListPane, then the message cmds: in-crement will be sent to the Counter application. It will then invoke thismethod and discover that it should send the increment message.
Finally, the values method simply handles the display of the current valueof the counter. Since we are using a TextPane for this purpose, we need totell the counter's value to print itself in a way that the TextPane can un-derstand. A reading of the description of the class TextPane in the Ency-clopedia of Classes reveals that it deals with an indexed collection of strings.The value contains an integer value, so we have to find some way to displayit as a string.
Fortunately, Smalltalk/V's Object class contains a method calledprintString which all objects understand. This method returns a stringrepresentation of the receiver. So the method to display the current value ofthe counter is simple:
We still don't have any real interaction between the two subpanes. Thecmds: method sends either the increment or the decrement message, wherethe actual updating of the value of the counter takes place. These methodsshould, in turn, notify the Counter application (or model) that the counter'svalue has changed. Let's look at these two methods at one time:
"Add 1 to the value of the counter"value : = value + 1. self changed:lvalues
decrement
The final line in each of these methods takes care of "broadcasting" the factthat the value of the counter has changed. It sends to the model (representedby the keyword self) the message changed: with the argument lvalues. Thismessage, inherited from the class Object, tells the model to notify all de-pendents (e.g., the ListPane) that something has changed. Subpanes inheritbehavior that tells them to refresh themselves from the model if theargument is their name. As we have seen, we associated this name with theTextPane, so that pane responds to that change. The dependents are notifiedby sending them an update: message with the argument lvalues.
76 Practical Smalltalk
Methods to Create a Counter
We have now written methods to create a two-pane window in which the-value of a counter is displayed, and in which the user can click on button-like objects (actually, entries in a ListPane) to add or subtract 1 from thatvalue. We've also coded the interaction between the two panes.
The only thing left to do now is to provide a way for the user to create andinitialize a new Counter object. This will require two methods: one whichwe'll call new that will allow the user to create a new Counter object and onecalled initialize that will give that Counter object its initial value of zero.
In the Method Index in the Smalltalk/V 286 documentation, you can tellat a glance that the method called new is supported by every class in theSmalltalk/V system. Examine the places where it is implemented and you'llfind in every case it is a class method rather than an instance method. Thinkabout that for a moment and the logic will be apparent. You can't send thenew message to an object and ask it to create itself because the object doesn' texist until you create it. You see the problem. The reason for this is that aclass is really a factory for creating instances. The new method requests thata class create an instance of itself. So we'll define new as a class method (alsoreferred to in some Smalltalk literature as a meta-method) in the class Counter.
To do so, just click on the class button in the CHB and then select newmethod from the method pane popup menu. Then enter the following codein the text pane:
We call the new method of the class Object by sending the message new tothe object super, which always holds the name of the receiver class'superclass. We do this because we are redefining the new method but weneed the basic behavior of the new method to do so. Then we send theinitialize method to this newly created object. We haven't yet coded theinitialize instance method, of course, so let's do so now. Here's the code:
initialize"Initialize the value of the counter to 0"value := 0
The first time the TextPane is displayed on the screen, it queries the modelfor text to display. Because the model (our application) is initialized to 0,that is what the TextPane displays. (Note that if we didn't initialize value,we would not be able to add 1 to it later — a fairly common mistake.)
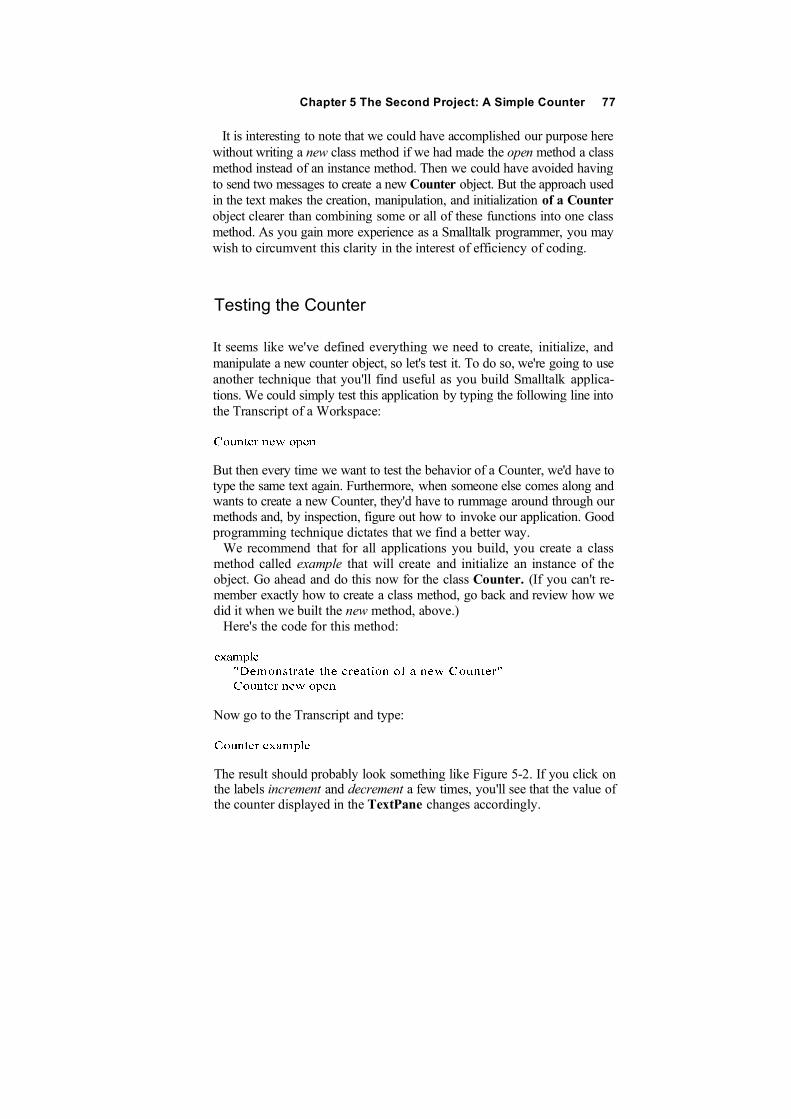
Chapter 5 The Second Project: A Simple Counter 77
It is interesting to note that we could have accomplished our purpose herewithout writing a new class method if we had made the open method a classmethod instead of an instance method. Then we could have avoided havingto send two messages to create a new Counter object. But the approach usedin the text makes the creation, manipulation, and initialization of a Counterobject clearer than combining some or all of these functions into one classmethod. As you gain more experience as a Smalltalk programmer, you maywish to circumvent this clarity in the interest of efficiency of coding.
Testing the Counter
It seems like we've defined everything we need to create, initialize, andmanipulate a new counter object, so let's test it. To do so, we're going to useanother technique that you'll find useful as you build Smalltalk applica-tions. We could simply test this application by typing the following line intothe Transcript of a Workspace:
But then every time we want to test the behavior of a Counter, we'd have totype the same text again. Furthermore, when someone else comes along andwants to create a new Counter, they'd have to rummage around through ourmethods and, by inspection, figure out how to invoke our application. Goodprogramming technique dictates that we find a better way.
We recommend that for all applications you build, you create a classmethod called example that will create and initialize an instance of theobject. Go ahead and do this now for the class Counter. (If you can't re-member exactly how to create a class method, go back and review how wedid it when we built the new method, above.)
Here's the code for this method:
Now go to the Transcript and type:
The result should probably look something like Figure 5-2. If you click onthe labels increment and decrement a few times, you'll see that the value ofthe counter displayed in the TextPane changes accordingly.
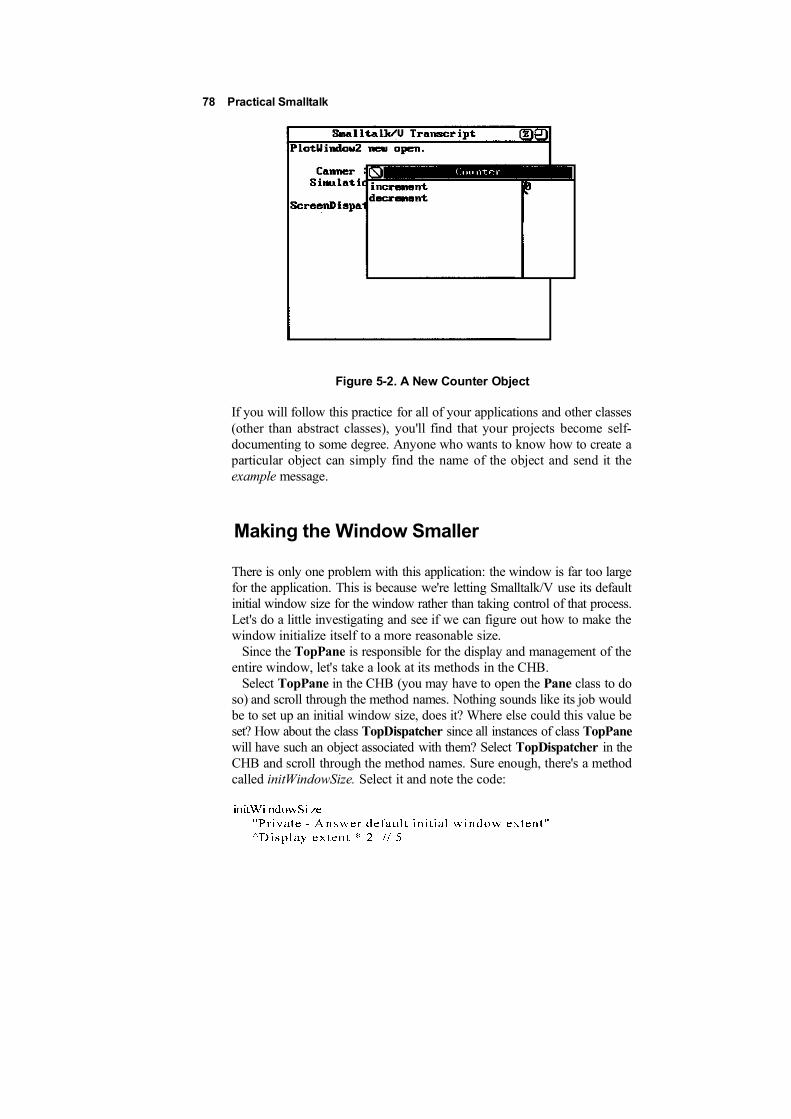
Figure 5-2. A New Counter Object
If you will follow this practice for all of your applications and other classes(other than abstract classes), you'll find that your projects become self-documenting to some degree. Anyone who wants to know how to create aparticular object can simply find the name of the object and send it theexample message.
Making the Window Smaller
There is only one problem with this application: the window is far too largefor the application. This is because we're letting Smalltalk/V use its defaultinitial window size for the window rather than taking control of that process.Let's do a little investigating and see if we can figure out how to make thewindow initialize itself to a more reasonable size.
Since the TopPane is responsible for the display and management of theentire window, let's take a look at its methods in the CHB.
Select TopPane in the CHB (you may have to open the Pane class to doso) and scroll through the method names. Nothing sounds like its job wouldbe to set up an initial window size, does it? Where else could this value beset? How about the class TopDispatcher since all instances of class TopPanewill have such an object associated with them? Select TopDispatcher in theCHB and scroll through the method names. Sure enough, there's a methodcalled initWindowSize. Select it and note the code:
78 Practical Smalltalk
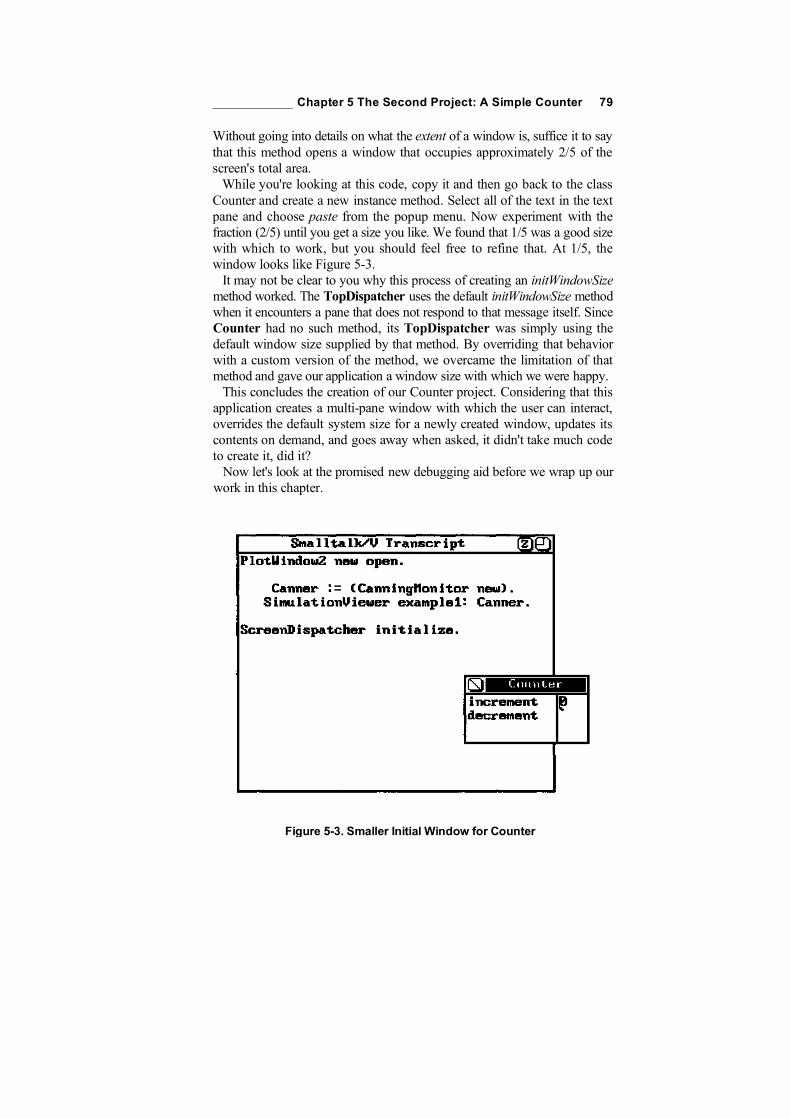
____________ Chapter 5 The Second Project: A Simple Counter 79
Without going into details on what the extent of a window is, suffice it to saythat this method opens a window that occupies approximately 2/5 of thescreen's total area.
While you're looking at this code, copy it and then go back to the classCounter and create a new instance method. Select all of the text in the textpane and choose paste from the popup menu. Now experiment with thefraction (2/5) until you get a size you like. We found that 1/5 was a good sizewith which to work, but you should feel free to refine that. At 1/5, thewindow looks like Figure 5-3.
It may not be clear to you why this process of creating an initWindowSizemethod worked. The TopDispatcher uses the default initWindowSize methodwhen it encounters a pane that does not respond to that message itself. SinceCounter had no such method, its TopDispatcher was simply using thedefault window size supplied by that method. By overriding that behaviorwith a custom version of the method, we overcame the limitation of thatmethod and gave our application a window size with which we were happy.
This concludes the creation of our Counter project. Considering that thisapplication creates a multi-pane window with which the user can interact,overrides the default system size for a newly created window, updates itscontents on demand, and goes away when asked, it didn't take much codeto create it, did it?
Now let's look at the promised new debugging aid before we wrap up ourwork in this chapter.
Figure 5-3. Smaller Initial Window for Counter
80 Practical Smalltalk
Inspecting a Running Counter
There will be many times in your experience as a Smalltalk/V programmerwhen you' 11 want to run an application while you watch what happens to itsinstance variables. Sometimes, this will enable you to spot an insidious bugfaster than you can without such a capability. Other times, it will simply giveyou insight into code perhaps written by another person.
To do this, you need to open an Inspector on the application. The problemis, you can't usually open an Inspector except from the Debugger or bytyping a command into the Transcript or a Workspace. While a program isrunning, these options are not readily available. So we trick Smalltalk/V intocreating a Walkback by inserting a halt method at an appropriate point. Tosee this in action, follow these steps:
1. In the CHB, select the class Counter and then select its initialize method.
2. Change the initialize method to read as follows (note the period afterthe first line):
3. Now save this modified form of the initialize method and go back tothe Transcript.
4. Type Counter example in the Transcript or a Workspace. When thecounter begins to appear, you'll see a Walkback labeled "halt encountered."
5. Select debug from the popup menu in the Walkback. You'll be shownthe usual Debugger window.
6. Select the label self in the receiver pane (the middle pane across the topof the window) and then select inspect from that pane's popup menu.
7. An Inspector opens on the Counter object that is presently executing.Position and size it conveniently.
8. Go back to the Debugger window and select resume from the framepopup menu.
9. The Counter window appears, with the value of 0 in the TextPane asexpected.
You can now use the increment and decrement selections in the ListPaneto manipulate the value of the counter. Any time you wish to inspect the stateof the program, just select the Inspector window and choose any of theinstance variables in the left ListPane. Its value will then appear in the right pane.
Chapter 5 The Second Project: A Simple Counter 81
With the Counter object, this is not terribly revealing or exciting, but thetechnique is one you'll undoubtedly want to remember.
Be sure when you are finished with your inspection experiment that youremove the halt from the initialize method. Removing the period at the endof the remaining line is optional but good form.
Hopefully, you've found the process of creating, testing, modifying, anddebugging the Counter class helpful and enlightening. However, unlessyou intend to build something more interesting using it as a base, youprobably want to remove the class from your image before you save theimage again. Instructions for removing a class are in Chapter 1.
If you wish to save your work somewhere for later review but don't wantit cluttering up your Smalltalk/V image, you should file it out. Simply selectthe class name Counter in the CHB's class hierarchy list pane, then choosethe file out option from the pane menu. Smalltalk/V creates a text file calledCOUNTER.CLS that you can later read, print, or even edit and file back inif you wish.
In every chapter where we present a full program for you to create andexecute, we'll reproduce the entire listing of that application at the end of thechapter. This gives you a central place to look at the code, compare it to yourwork, and retype it if you come back later after having removed the class.

82 Practical Smalltalk
cmds: userSelection"Perform the command selected by the user"self perform: userSelection
decrement
"Subtract 1 from the value of the counter"value : = value - 1. self changed: #values
increment"Add 1 to the value of the counter"value : = value + 1. self changed:
lvalues
initialize"Initialize the value of the counter to 0"value := 0
ini tWindowS i z e"Private - Answer default initial window extent"^Display extent * 1 // 5 "Your value may vary here. "
open"Create a two-pane window for the Counterapplication" I aTopPane IaTopPane := TopPane newmodel: self ; label: 'Counter'; rightlcons: # (). aTopPane addSubpane:(List Pane new model:self; name: #cmds;change: #cmds:;framingRatio: (0 @ 0 extent: 3/4 @ 1) ) .aTopPane addSubpane: (TextPane new model: self;name: #values;
framingRatio: (3/4 @ 0 corner: 1 @ 1) ) .aTopPane dispatcher open scheduleWindow
values"Answer the value of the counter in the TextPane"^value printString
As we saw in Chapter 5, the model-pane-dispatcher (MPD) triad is centralto Smalltalk/V programming. In fact, it is safe to say that you will probablynever write a Smalltalk/V application that doesn't include the use of MPD.This chapter takes a closer look at MPD in an attempt to answer thefollowing questions:
• Of all of the classes and methods involved in the classes that make upMPD interaction, which ones are essential to understand and use, andwhich can you safely ignore?
• How can you identify and use the protocols of MPD to promotepluggability?
Our goal, then, is to perform a sort of triage on the MPD world so that youcan concentrate your focus on the important points and set aside whatotherwise looks like a hopelessly complex portion of Smalltalk/V program-ming. Our experience has been that many Smalltalk/V programmers stumbleover MPD as they attempt to implement their first serious application.
This chapter will take a look at the various methods you'll need tounderstand before you can apply MPD design and interaction to yourSmalltalk/V applications. It provides the groundwork for understandingMPD in general and the work we'll do in Chapter 7 in particular.
Smalltalk/V window interaction involves instances of three families ofclasses:
• your own application class (the model)
• Pane
• Dispatcher
83
84 Practical Smalltalk
A quick perusal of the Encyclopedia of Classes in the Smalltalk/V 286documentation reveals that just these last two classes involve 15 classes witha combined total of nearly 175 instance methods, to say nothing of dozensof instance variables and class methods.
Let's see if we can cut this forest down to a manageable size. We'll focus,by the way, on non-graphics applications (i.e., those that don't drawanything on the screen other than windows and their subpanes). In Chapter8, we'll take a look at how to construct a graphic application in Smalltalk/Vand then we' 11 add a bit more complexity to the amount of MPD with whichyou should become familiar. But since many applications are fundamentallynon-graphic once the windows and menus are accounted for, you may findyourself never needing the graphic-related MPD classes and methods.
TopPane Methods You'll Need
Of the more than 20 methods included in the class TopPane, you need to beaware of only seven. In fact, you will often use only three of them. The threemost often used are:
• new
• label:
• addSubpane:
The other four important TopPane methods are:
• minimumSize:
• initWindowSize
• rightlcons:
• leftlcons:
Let's take a look at each of these methods in turn.
The new Method
The new method in the class TopPane is actually inherited from the classPane. While most of the methods we'll examine in this chapter are instancemethods, new is a class method. In essence, it says to the class, "make a newinstance of yourself."
Chapter 6 The World of MPD 85
Only very rarely will you do anything to this method. It will be adequatefor your needs; all you have to do is to send the new message from yourapplication to the TopPane class. This is how you create a new window foryour application.
You will almost always assign the return value of new to a temporary variabledeclared in the method where the new message was sent to TopPane. Thisgives you a way to send to the instance the messages that add subpanes andhandle other window processing. In most cases, you'll probably name themethod that contains the TopPane new expression either open or openOn:depending on whether it has any arguments associated with it.
The label: Method
Every window in Smalltalk/V may have a label associated with it. If youdefine a label for the TopPane of the window, the label will appear centeredin the title bar of the window. If the title is too long for the title bar, it will betruncated on the right and as much of it as possible will be shown in the title bar.The argument passed to the label: method should be a string (i.e., a seriesof characters enclosed in single quotation marks). Here is an example of its use:
Given that the label is optional, you may wonder why we placed it amongthe most common methods for you to learn. It is quite unusual to create aSmalltalk window without a label. There are occasions when you wish to doso, but you should generally provide a label for the window in the absenceof a very strong design reason for not doing so. The user may want to knowthe purpose of the window long after it's been opened. An unlabeledwindow is clearly less identifiable than one that is clearly labeled as to itspurpose.
The addSubpane: Method
A TopPane without any subpanes can do only what an instance of TopPaneis capable of doing. In other words, it does nothing of particular interest.Even a single-pane window must have at least one subpane. You addsubpanes to a TopPane with the addSubPane: method. Since you generallycreate these subpanes as you insert them into the TopPane, you should notbe surprised to find out that the general way this process works is exempli-fied by this code fragment:
86 Practical Smalltalk
Of course, you'll use whatever temporary variable you've used to hold thename of the TopPane instance in place of our aTopPane and you'll sub-stitute the kind of pane you want to create where we've used the name of theListPane class. But the format is the same regardless of those two differences.A quick perusal of the various windows defined in the Smalltalk/Venvironment reveals that every use of the addSubPane: method appears morecomplex than we've just described. This is because the newly addedSubPane is generally sent a series of cascaded messages to give it thedesired characteristics. We'll get to some of the most important of thosemessages in the next section when we discuss the important implementationaspects of subpanes.
The minimumSize: Method
Any window that can be resized by the user should define a minimum sizeto which the user will be allowed to shrink it without collapsing it com-pletely. If you don't define this method in your TopPane description,Smalltalk/V will use the default, which defines a window's minimum size as24 by 32 pixels.
You will often want to define a window's minimum size in terms of thefont(s) being used in its pane(s) while keeping in mind the minimal amountof information that the user will find useful as he interacts with the window.For an example of this, select the class ClassHierarchyBrowser in the CHBitself and examine its openOn: method. Use the text pane popup menu tochoose next menu and then search and find the reference to the minimumSize:method. You should see something like this:
minimumSize: 20 * SysFontWidth @ (10 * SysFontHeight)
Here Smalltalk/V defines the minimum size of the CHB's window to be nonarrower than 20 times as wide as the width of a character in the font beingused to display its contents, and no shorter than 10 times that font's height.If you try to reduce the CHB to as small a size as possible, you'll end up witha size something like that shown in Figure 6-1. If you count the characters andallow for the borders of the subpanes, you'll find out that the CHB is indeed20 characters wide, and 10 lines high, at its smallest possible size.
You can also define a window's minimum size in terms of other objects thatdescribe rectangles in Smalltalk/V. We will have more to say about thissubject later in this chapter when we discuss how to describe the sizes of thesubpanes within a TopPane instance.
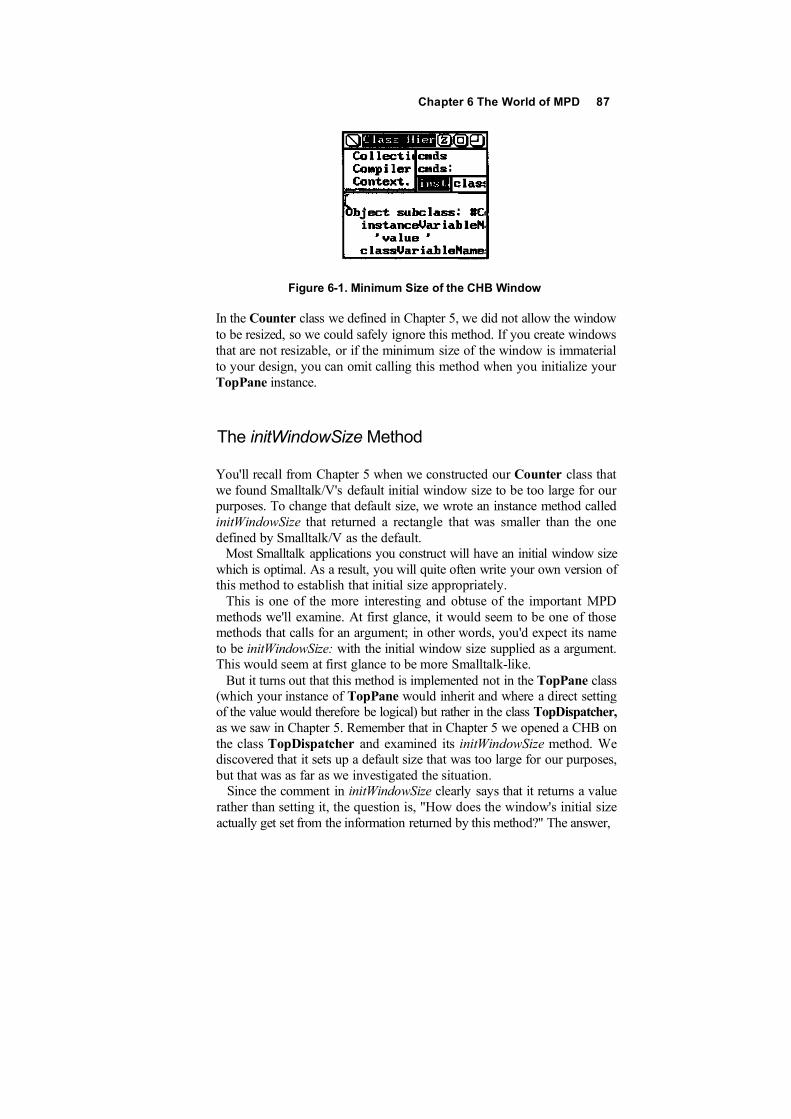
Figure 6-1. Minimum Size of the CHB Window
In the Counter class we defined in Chapter 5, we did not allow the windowto be resized, so we could safely ignore this method. If you create windowsthat are not resizable, or if the minimum size of the window is immaterialto your design, you can omit calling this method when you initialize yourTopPane instance.
The initWindowSize Method
You'll recall from Chapter 5 when we constructed our Counter class thatwe found Smalltalk/V's default initial window size to be too large for ourpurposes. To change that default size, we wrote an instance method calledinitWindowSize that returned a rectangle that was smaller than the onedefined by Smalltalk/V as the default.
Most Smalltalk applications you construct will have an initial window sizewhich is optimal. As a result, you will quite often write your own version ofthis method to establish that initial size appropriately.
This is one of the more interesting and obtuse of the important MPDmethods we'll examine. At first glance, it would seem to be one of thosemethods that calls for an argument; in other words, you'd expect its nameto be initWindowSize: with the initial window size supplied as a argument.This would seem at first glance to be more Smalltalk-like.
But it turns out that this method is implemented not in the TopPane class(which your instance of TopPane would inherit and where a direct settingof the value would therefore be logical) but rather in the class TopDispatcher,as we saw in Chapter 5. Remember that in Chapter 5 we opened a CHB onthe class TopDispatcher and examined its initWindowSize method. Wediscovered that it sets up a default size that was too large for our purposes,but that was as far as we investigated the situation.
Since the comment in initWindowSize clearly says that it returns a valuerather than setting it, the question is, "How does the window's initial sizeactually get set from the information returned by this method?" The answer,
Chapter 6 The World of MPD 87
88 Practical Smalltalk
obscurely enough, lies in the class Dispatcher's open method. Use the CHBto examine this method and notice the following lines:
size := (pane topPane model respondsTo: MnitWindowSize) ifTrue: [pane topPane model initWindowSize] ifFalse: [selftopDispatcher initWindowSize]
This code makes use of the respondsTo: method defined in the class Objectand therefore understood by all objects in the environment, to determinewhether you have implemented an initWindowSize method in your appli-cation. If you have, then Smalltalk/V uses that method to define a value. Ifyou haven't, it uses the value returned by the initWindowSize method of yourapplication's TopDispatcher. That's how the default is used whenever youfail to override it with your own definition of this method.
The rightlcons: and leftlcons: Methods
One of the strong suits of the MPD capability in Smalltalk/V is the relativeease with which you can give your windows behavior that would takesignificant amounts of code to program if they didn't exist in the library.Icons represent a substantial part of that capability. Smalltalk/V definesicons with the names and functions shown in Table 6-1.
Note that you can use these icons in ways other than those defined bySmalltalk/V if you want to do so, by identifying and overriding the methodsthat respond to the user's click on the icons.
Table 6-1. Predefined Icons In Smalltalk/V
Chapter 6 The World of MPD 89
If you don't supply either a rightlcons: or a leftlcons: method in yourTopPane definition, then Smalltalk/V will populate the title bar with a closeicon on the left side of the title and icons for zoom, resize, and collapse onthe right side of the title. You can eliminate all of the icons on the right sideof the title bar as we did in the Counter class in Chapter 5 by sending ourTopPane instance the message:
The argument is an array of symbols which specify the names of icons to beincluded.
SubPane Methods You'll Need
Among the main subpanes — specifically the classes SubPane, ListPane,and Text-Pane — there are some 60 methods. We'll focus attention onseven of these, six of which are applicable to all types of subpanes and oneof which applies only to TextPane objects. The seven methods you'll needto know are:
• model:
• name:
• change:
• framingBlock:
• framingRatio:
• menu:
• contents
The last, contents, is the one that is applicable only to instances of the classTextPane. All the others are relevant to all types of subpanes, includinginstances of GraphPane, whose details we delay until Chapter 8. Let'slook at each of these methods in turn.
The model: Method
The model: method is required for using any SubPane. It is commonly usedin this form:
90 Practical Smalltalk
where self refers to the application object.This is because it is rare to find a case where the model for a given subpane
is different from the application model itself. Since self refers to the appli-cation throughout its execution, and since each pane is generally dependenton the application for its contents and behavior, self is almost always theright argument to the model: message.
The name: Method
The name: method is required and always takes as an argument a symbol thatis the name of a method which the pane uses to obtain its contents from themodel. This symbol is also used as the name of the SubPane instance. Wesaw this in Chapter 5 in the Counter class where the ListPane instancereceived the following message:
name: #cmds
and our model included a method called cmds which contained the follow-ing code:
cmds
For our Counter application, the contents of the ListPane are determinedby sending the model the cmds message. In this case, a simple two-elementarray is returned. In other examples we'll see throughout the book, morecomplex methods may be invoked by this same process to give panes highlycomplex and dynamic behavior.
The change: Method
Whenever a change in a subpane's contents are global in scope—i.e., affectat least one other pane in the window — you must define a change: method.This method takes a single argument, a symbol that must be the name of amessage that the pane will send to the model to indicate that its contents arechanged. (As we'll see shortly, the model must then use its changed: methodto deal with the change.)
Again, in the ListPane of our Counter class from Chapter 5, we find thefollowing pair of Smalltalk/V program elements:
Chapter 6 The World of MPD 91
change: #cmds:
cmds: userSelection"Perform the command selected by the user"userSelection == #increment ifTrue: [selfincrement. Aself]. userSelection == ttdecrementifTrue: [self decrement]
The increment and decrement methods, in turn, adjusted the value of thecounter and then used the changed: message to cause the model to broadcastthat change to the TextPane by using that pane's name, values.
There are several variations on the changed: message in Smalltalk/V. Eachof these variations makes it possible to add arguments to the message to bemore detailed or explicit about the changed: process. For example, you canuse changed:with: to add a second argument. In that case, you will use acorresponding update:with: method. Similarly, there artchanged:with:with:and changed:with:with:with: messages with corresponding update:with:with: and update:with:with:with: messages
Figure 6-2 depicts the entire interactive process that transpires when a user (or, forthat matter, the programitself) changes the contentsofapaneinawaythathasaglobaleffect.
The framingBlock'. and fromingRatio: Methods
Perhaps the trickiest part of defining a subpane in a Smalltalk/V applicationis calculating its relative size and position with respect to the total window.The framingBlock: and framingRatio: methods have this responsibility.Both of these methods take an argument which evaluates to a rectangle. Thedifference between them may be summarized as follows:
• framingBlock: returns an absolute rectangle, leaving your applicationin control of its size and location.
• framingRatio: returns a rectangle proportional to the enclosingTopPane and whose proportions will be maintained when the windowis resized. Its size is therefore relative to the size of the enclosingTopPane and is not within the direct control of your application,which has essentially delegated responsibility for the window size toanother element of the application.
Every subpane you define must use one of these methods (but not both) todescribe its size and location within the window.
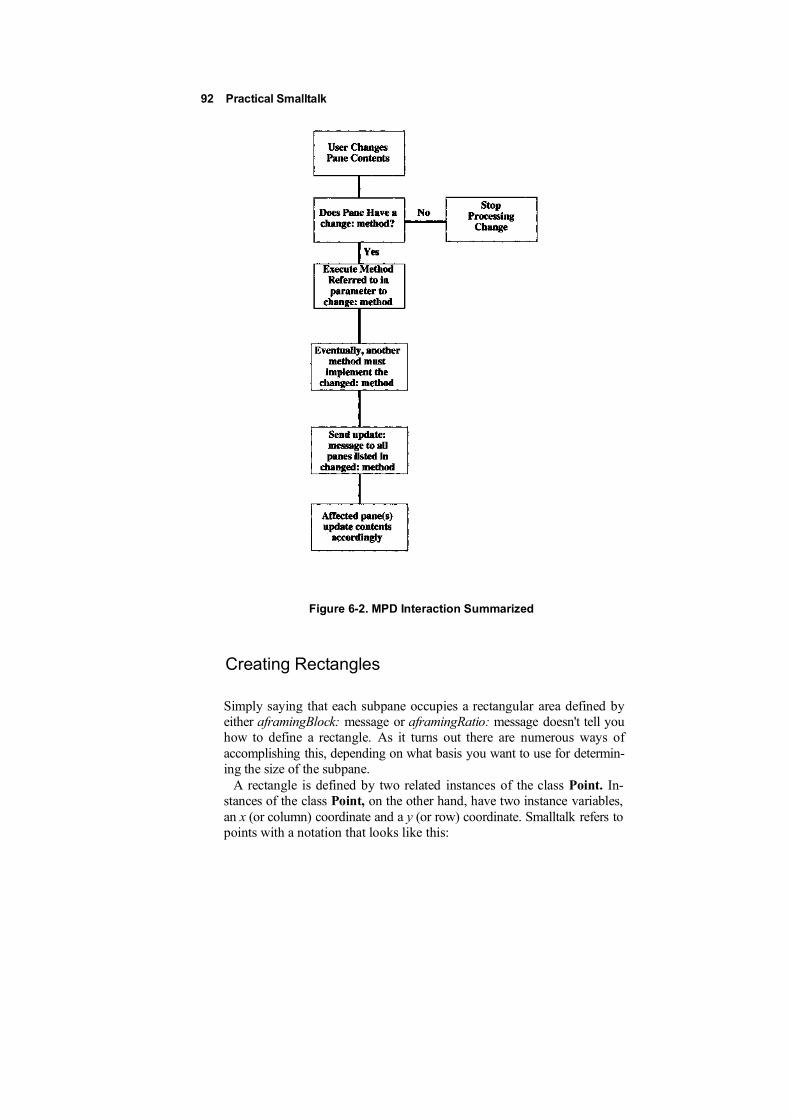
Figure 6-2. MPD Interaction Summarized
Creating Rectangles
Simply saying that each subpane occupies a rectangular area defined byeither aframingBlock: message or aframingRatio: message doesn't tell youhow to define a rectangle. As it turns out there are numerous ways ofaccomplishing this, depending on what basis you want to use for determin-ing the size of the subpane.
A rectangle is defined by two related instances of the class Point. In-stances of the class Point, on the other hand, have two instance variables,an x (or column) coordinate and a y (or row) coordinate. Smalltalk refers topoints with a notation that looks like this:
92 Practical Smalltalk
Chapter 6 The World of MPD 91
1 5 @ 23
Conceptually and to maintain consistency of the language, Smalltalkdefines this construct as sending the @ message to the first integer (in thiscase, 15) with the second integer argument (here, 23) as an argument.
To create a rectangle, we generally send either the extent: or the corner:message to a point, passing along another point as an argument. Smalltalk/Vthen creates the appropriate rectangle. Thus a statement like this:
15 @ 23 extent: 30 @ 45
creates a new rectangle with an upper-left corner 15 pixels to the right and23 pixels down from the upper-left corner of the screen, with a width of 30pixels and a height of 45 pixels. This same rectangle could be created by thisstatement:
15 @ 23 corner: 45 @ 68
Rectangles and Subpanes
It would be unwise to use these absolute-address techniques for creatingsubpanes in a resizable window because they wouldn't be able to adjust tothe window's change in size by the user. Their positions would be fixed onthe screen in absolute row-column coordinate terms and they would notunderstand intuitively how to move. In other words, they would not act likesubpanes of the window's TopPane object.
That's where framingBlock: md framingRatio: come in. They allow youto define rectangles relative not to the entire display but to the window inwhich their subpanes exist. Thus when the user moves the window, thesubpanes' understanding of where they are located on the screen's bitmapadjusts automatically. By this simple expedient, Smalltalk solves for you theotherwise very complex issue of keeping track of a window and all of itselements as it is dragged about on the display by the user.
Recall from Chapter 5 that when we defined the two subpanes in ourCounter class window, we used a framingRatio: approach that looked likethis for the ListPane where the commands increment and decrement weredisplayed:
framingRatio: (0 @ 0 extent: 3/4 @ 1) )
and like this for the TextPane where the counter displays its value:
framingRatio: (3/4 @ 0 corner: 1 @ 1) ) .

94 Practical Smalltalk
The first of these lines created a rectangle that started in the upper-left corner of theTopPane (at a point that is the "Oth" position across and the "Oth" in height) andextended 3/4 of the way across the width of the TopPane as well as the entire height(as indicated by the whole number 1 rather than a fraction for the second part of theargument to the extent: message). The second line then specifies a rectangle that starts3/4 of the way across the TopPane's width and at the top of the pane (thus the 0 forthe second part of its starting point) and extended the rest of the way across and downtheareaoftheTopPane(wWchisthemeaningoftheargument7 @lmaframingRatio:message).
The size and location of a SubPane within a TopPane are always relative,that is, they are recalculated each time the window is resized. TheframingRatio: message provides a rectangle by which the system calculatesthe coordinates. You just sit back and let the system do all the work. If youuse framingBlock: instead, you supply the code for the calculation. Thiscode takes the form of a block (thus the name of the method) that takes asingle argument. This argument is the rectangle of the window (excludingthe title bar). Your code can do whatever it likes to calculate a rectangle forany SubPane that usesframingBlock: so long as your other SubPanes takethis method of resizing into account. Your block of code must return arectangle.
Pane Menus
If you want a pane to have a special popup menu, you define this menu withthe menu: method as part of the subpane's definition. Note that a TextPanehas a default popup menu that allows for menu-driven editing of the textcontents of the subpane. You can add to this menu, completely replace it, orsimply default to it.
The argument to the menu: message is a symbol that is the name of amethod of the model that returns or contains the menu definition. Thefollowing code fragment from the CHB will clarify what we mean. Here isa portion of the code that defines the selector ListPane in the CHB (the right-most subpane across the top of the window):
You would therefore expect to find a method named selectorMenu amongthe CHB's instance methods. It is indeed there and it looks like this:
Chapter 6 The World of MPD 95
In creating almost any Smalltalk/V menu, you'll use the same technique,namely sending the class Menu the message labels: lines .'selectors: as shownabove. These three elements of the selector have the following roles:
• labels: takes as an argument a string that lists the names of the menuitems as they will appear when the user pops up the menu. Note thecombined use of backslashes to separate items from one another in thestring and the withCrs message, which replaces each occurrence of abackslash with a line-feed character.
• The argument to lines: is an array of the line numbers of those menuitems that should be separated from the next item by a horizontal line.In the case of the selector pane menu above, all four items appear aspart of one, uninterrupted menu, so an empty array is supplied as theargument. (This is required since you cannot simply omit lines: fromthe message.) To see how this works, edit the selectorMenu method inthe class ClassHierarchyBrowser so that the lines: argument linelooks like this:
lines: # ( 1 2 3 )
Now select a method in the selector pane and pop up the menu. Noticethe horizontal lines after each entry. Be sure to return the CHB to itsoriginal condition before you save your image.
• The final element in the selector takes an array as an argument as well.This array is a list of message selectors (or message names), eachcorresponding to an entry in the menu itself. If the user selects the firstentry in the menu, the first selector in this array will be executed (i.e.,that message will be sent to the model). You can now see how youcould easily modify the behavior of a popup menu. Just change theselector associated with that menu's entry in the Menu definition andSmalltalk/V would send your new message to the model instead of theoriginal whenever the user selected that menu option.

96 Practical Smalltalk
Obtaining a TextPane's Contents
The last of the subpane methods we'll look at is contents. As we said earlier,it applies only to instances of TextPane. Its use is quite straightforward. Italways returns the entire contents of the TextPane. You can then do what-ever you like with the contents. (For example, you might write them to a file,change some characteristic, etc.)
The Only Model Method You'll Need
Your application is the model, of course, and that means that it uses a greatmany methods. But in terms of its interaction with the MPD world, yourmodel really only needs to deal with one method: changed:.
There are actually several variations on this method's theme. They are asfollows:
• changed
• changed:
• changed:with:
• changed:with:with:
The only difference among these four versions of this method is the numberof arguments they take. You'll choose which of them to use based on howmuch information you need to pass to the various panes when a changeoccurs that you are interested in broadcasting to the model's dependents.
If you use the changed:with: method, it takes as an argument the name ofthe method to be executed. If you use the changed:with:with: method, it takesas its first argument the name of the method to be executed and as its secondargument an argument that this called method requires. In other words, thechanged:with: method is used when the method being called requires noarguments and the changed:with:with: method is used when the methodbeing called requires an argument.
In the Counter class example of Chapter 5, recall that the increment anddecrement methods both sent the model the changed: message when the userselected one of the entries in the ListPane. In each case, the changed:message was adequate because the only argument needed was the name ofthe subpane (in the example, the subpane called values) that had to be no-tified of the change.
Chapter 6 The World of MPD 97
Dispatcher Methods You'll Need
We could argue that you really don't need to understand any of the messagesimplemented by the class Dispatcher and its subclasses because as a ruleyou'll simply use these messages without needing to know much about what theydo. However, both for the sake of completeness and because they areinteresting, we'll look at the two Dispatcher methods you will use in virtuallyevery Smalltalk/V application you build. We'll also look at the structure ofthe statement in which these messages are usually sent to describe briefly howyou might want to change it for some specific purpose. The two methods we'llexamine are scheduleWindow and open.
The scheduleWindow Method
This method is sent to a dispatcher to make it a recognized part of the system asan active window. The system scheduler is notified of the window's existenceand treats it accordingly. As you know, only one window can be active at atime in Smalltalk/V, and whichever window is active is the one into which theuser's input will be entered for processing (provided the cursor is in thewindow's boundaries). When you create a new window, it is usually becauseyou are ready for the user to do something to interact with your program, so youwill want your new window to be the active one.
Warning
If you attempt to open an unscheduled window, a fatal error may result.
The open Method
The open message is sent to a window to cause it to initialize and prepare toappear on the display and to become the active window using its default size.
Standard Use of Dispatcher Methods
As you may recall from our discussion in Chapter 5, we generally end ouropen (or openOn:) methods with a single line that looks like this:
98 Practical Smalltalk
topPane dispatcher open scheduleWindow
This has the desired effect of causing our new window to appear on thedesktop and become the active window. There are times when you need todivide this line into two operations so that after you've opened theTopPaneDispatcher, you can effect some other change in the windowbefore making it the active window, at which point you lose control oversome aspects of the window until the user interacts with it somehow. Forexample, if you wanted to position the selection (i.e., the text cursor) at agiven point in the TextPane of a window before you made it active, youwould do so in three steps:
1. Open the dispatcher with the line:
topPane dispatcher open
2. Carry out your special subpane processing. For example, you mighthave a line like this:
inputPane selectAfter: startPoint
where you've previously named the TextPane as inputPane anddefined the variable startPoint to contain a point within theappropriate pane.
3. Activate the window with the line:
topPane dispatcher scheduleWindow
7The Third Project:Creating a New Pane Type
^ IntroductionIn this chapter, we extend our understanding of the MPD architecturedescribed in detail in Chapter 6 by using our knowledge of the classListPane as the basis for creating a new subclass called MListPane, whichallows the selection and de-selection of multiple items from a list.
We begin by explaining a new approach to the design of Smalltalkapplications. We will use this approach for the rest of the book, so itis important that you understand what this methodology means andhow to apply it to your own designs. Once we have explained the newdesign approach, we' 11 work through the construction of a smallapplication whose sole purpose is to help us solidify ourunderstanding of the ListPane.
Finally, we'll create the subclass MListPane and demonstrate itsuse in a small application.
At the conclusion of the chapter, we present a postscript thatdescribes an alternate approach to this problem that is much moredirect and concise but which lacks one of the capabilities of theproject we build in this chapter.
^ Designing the ProjectThe ListPane class supplied with the Smalltalk/V class library allows onlya single element in a list to be selected at a time. Selecting a new elementautomatically de-selects any currently selected element. For someapplications, we may want to allow the user to make multiple selectionsfrom the list and to invoke a single action that applies to all of them. Forexample, in a Disk Browser, we might want to allow the user to selectseveral files to be printed or copied. There may also be times when wewould like to know which of a list of several selected items the userselected most recently. None of this behavior is supported by the classListPane, so we will add it to our application by creating a new subclass.
In Chapter 3, when we created our first example application, the Prioritizer,you'll recall that we took a strongly procedural approach to the design,consisting of the following steps:
99

100 Practical Smalltalk
1. Get the data from the user.
2. Sort the data elements by querying the user about each pair ofalternatives.
3. Format and print the results of this processing in the Transcript.
Essentially, then, we designed the Prioritizer by building a mental model ofthe way the program would process the information. We focused on theprocess or flow of the operations. This was a perfectly acceptable way toapproach the design of such a simple application but in the real world ofOOP, we want to take a far more object-based approach to the design.
In the design of this application, then, we will adopt the followingmethodology:
1. Identify the problems to be addressed by the application. What kindsof behavior do we want it to exhibit? What kinds of objects does theapplication need to represent and/or manipulate?
2. Assign responsibilities to objects. What responsibilities should eachobject in the application have? What kinds of actions should theyrepresent or embody? What kind of knowledge about themselves andtheir teammate objects must these objects have to carry out theirresponsibilities?
We will first identify the problems addressed by the current ListPane classand determine how it behaves. Then we will do the same for our MListPaneclass. As is often the case in building a Smalltalk application, the veryactivity of refining the responsibilities of the objects that make up theapplication will clarify the process by which the various elements interact.
Problems Addressed by ListPane
We need to understand a number of things about the way the ListPane classworks (i.e., the problems it solves) before we can design and construct areasonable subclass to modify this behavior. These problems include:
• how to highlight a selection
• how to interpret user input to the pane as a signal to select an element
• how to handle scrolling
• how to interact with the model so that use can be made of the selection
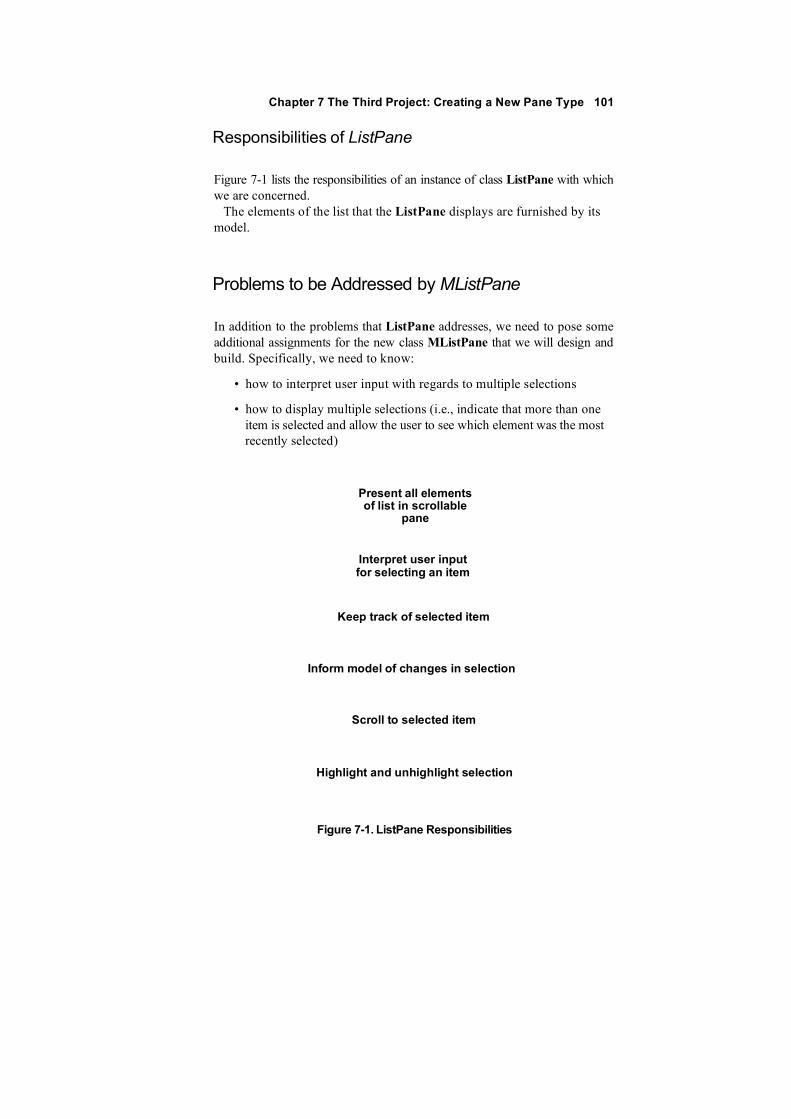
Chapter 7 The Third Project: Creating a New Pane Type 101
Responsibilities of ListPane
Figure 7-1 lists the responsibilities of an instance of class ListPane with whichwe are concerned.
The elements of the list that the ListPane displays are furnished by itsmodel.
Problems to be Addressed by MListPane
In addition to the problems that ListPane addresses, we need to pose someadditional assignments for the new class MListPane that we will design andbuild. Specifically, we need to know:
• how to interpret user input with regards to multiple selections
• how to display multiple selections (i.e., indicate that more than oneitem is selected and allow the user to see which element was the mostrecently selected)
Present all elementsof list in scrollable
pane
Interpret user inputfor selecting an item
Keep track of selected item
Inform model of changes in selection
Scroll to selected item
Highlight and unhighlight selection
Figure 7-1. ListPane Responsibilities
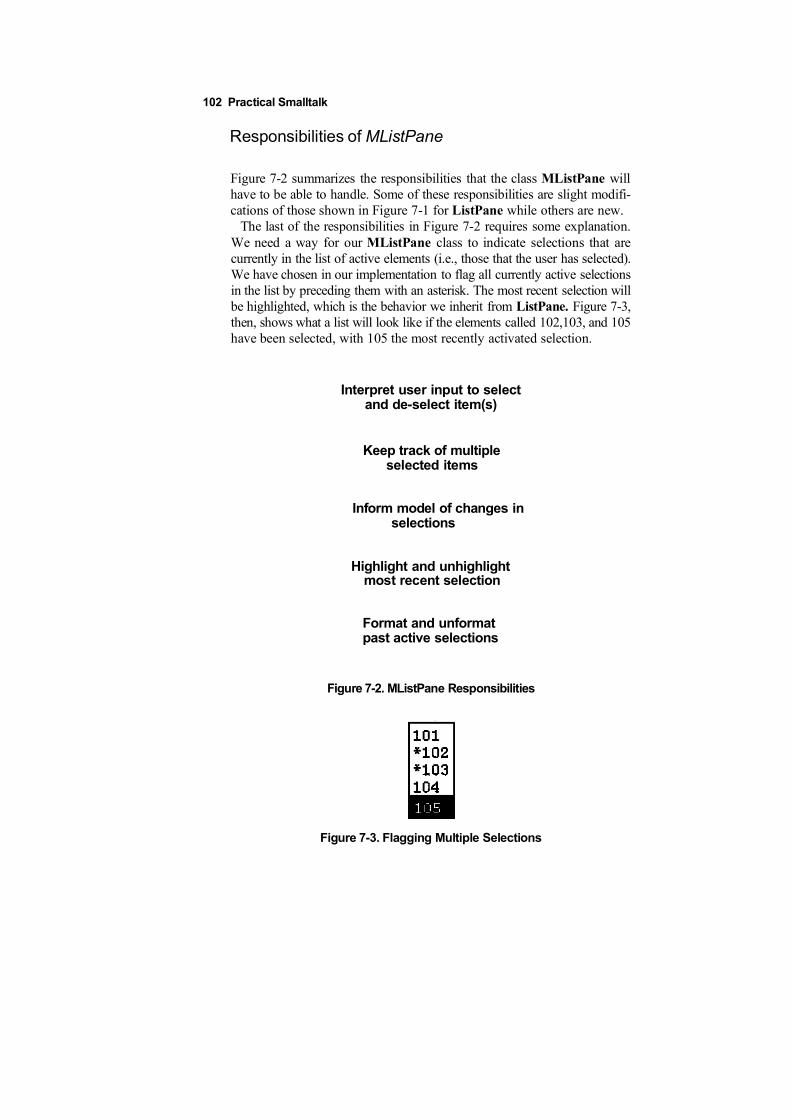
102 Practical Smalltalk
Responsibilities of MListPane
Figure 7-2 summarizes the responsibilities that the class MListPane willhave to be able to handle. Some of these responsibilities are slight modifi-cations of those shown in Figure 7-1 for ListPane while others are new.
The last of the responsibilities in Figure 7-2 requires some explanation.We need a way for our MListPane class to indicate selections that arecurrently in the list of active elements (i.e., those that the user has selected).We have chosen in our implementation to flag all currently active selectionsin the list by preceding them with an asterisk. The most recent selection willbe highlighted, which is the behavior we inherit from ListPane. Figure 7-3,then, shows what a list will look like if the elements called 102,103, and 105have been selected, with 105 the most recently activated selection.
Interpret user input to selectand de-select item(s)
Keep track of multipleselected items
Inform model of changes inselections
Highlight and unhighlightmost recent selection
Format and unformatpast active selections
Figure 7-2. MListPane Responsibilities
Figure 7-3. Flagging Multiple Selections
Chapter 7 The Third Project: Creating a New Pane Type 103
A Note About Responsibilities
The link between the pane and the model is limited to a minimum numberof channels. The only things a ListPane can do with its model are query itfor a list of items to be displayed and inform the model when the selectionchanges. (The ListPane determines when it will ask the model for a list todisplay, though this action is often triggered by the model broadcasting achanged message.) This clear delineation of responsibility is a key aspect ofobject-oriented design and can result in objects that are easily reusable.
Building the Test Application
As we said at the beginning of this chapter, we delay the implementation ofour MListPane class to build a small application which confirms ourunderstanding of ListPane and provides us with a test case to use as we buildand test our MListPane class.
This test application will create a window with two subpanes, one aListPane and the other an MListPane. (Actually, we'll start with twoListPanes since we haven't yet built the MListPane class. But to keep thediscussion focused and simple, we'll still refer to the second pane as anMListPane. Later, when we convert it so that it actually is an instance of ournewly created class, we won't have to change all our terminology.) TheMListPane will hold a list of items and, before we're finished, will enablethe selection of multiple items in the pane. The ListPane will be responsiblefor displaying a list of the items selected in the MListPane. If the user se-lects an item that is displayed in the ListPane, we'll simply display it in theTranscript.
We're ready to begin building the test application itself. Since it is anapplication that doesn't depend on any particular inherited behavior, we'llmake it a subclass of the class Object. Open the CHB, select Object, andchoose new class from the pane pop-up menu. Name the new class ListApp.
Defining and Initializing Instance Variables
Since we've already described the behavior we expect of this application,we can determine that this class needs two instance variables: one to holdthe items to be displayed in the MListPane and one to keep track of the itemsdisplayed in the ListPane. We support this self-knowledge by defining twoinstance variables, allltems and selectedltems. The former keeps track of allof the items from which the user can choose in the MListPane; the latter
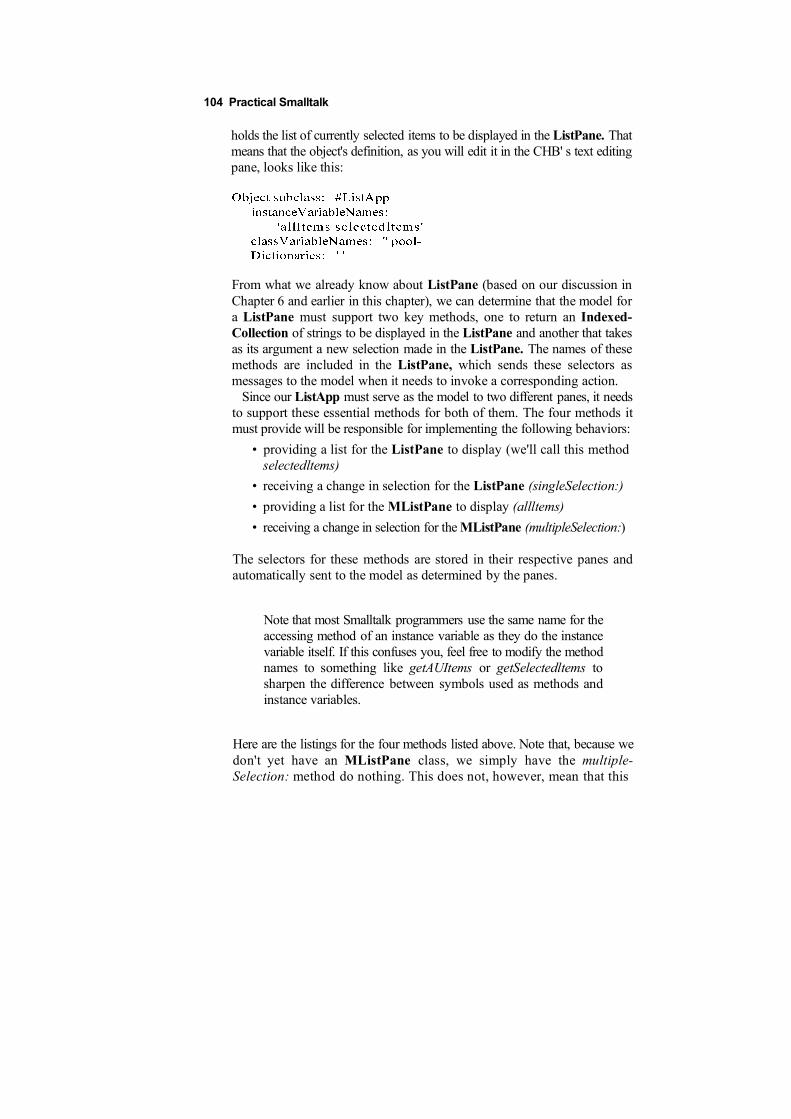
104 Practical Smalltalk
holds the list of currently selected items to be displayed in the ListPane. Thatmeans that the object's definition, as you will edit it in the CHB' s text editingpane, looks like this:
From what we already know about ListPane (based on our discussion inChapter 6 and earlier in this chapter), we can determine that the model fora ListPane must support two key methods, one to return an Indexed-Collection of strings to be displayed in the ListPane and another that takesas its argument a new selection made in the ListPane. The names of thesemethods are included in the ListPane, which sends these selectors asmessages to the model when it needs to invoke a corresponding action.
Since our ListApp must serve as the model to two different panes, it needsto support these essential methods for both of them. The four methods itmust provide will be responsible for implementing the following behaviors:
• providing a list for the ListPane to display (we'll call this methodselectedltems)
• receiving a change in selection for the ListPane (singleSelection:)
• providing a list for the MListPane to display (allltems)
• receiving a change in selection for the MListPane (multipleSelection:)
The selectors for these methods are stored in their respective panes andautomatically sent to the model as determined by the panes.
Note that most Smalltalk programmers use the same name for theaccessing method of an instance variable as they do the instancevariable itself. If this confuses you, feel free to modify the methodnames to something like getAUItems or getSelectedltems tosharpen the difference between symbols used as methods andinstance variables.
Here are the listings for the four methods listed above. Note that, because wedon't yet have an MListPane class, we simply have the multiple-Selection: method do nothing. This does not, however, mean that this
Chapter 7 The Third Project: Creating a New Pane Type 105
method has no value or can be omitted. It provides documentation for thebehavior we are planning to implement in our class.
Since we need something for the allltems method to return, we should pro-vide code to initialize this instance variable to some useful value. We'lldefine an initialize method that will handle this process. As you can see fromthe Smalltalk/V 286 documentation, ListPane deals with data in the formof an indexed collection of strings. Since IndexedCollection is an abstractclass, we'll use the concrete class OrderedCollection to hold the strings forListPane. While we're at it, we should also provide an initially emptyOrderedCollection for the instance variable selectedltems. Initialize pro-vides a place for both of these tasks:
The initial value for allltems will be a list of numbers from 1 00 to 1 20, whichis adequate for testing purposes and has the further virtue of allowing us tosee at a glance which line of the list has been selected. This may come inhandy during debugging.
106 Practical Smalltalk
Opening the Application Window
Now that we've got a method to initialize the instance variables for theListApp, it's time to focus on the open method that will create a window(TopPane), add two subpanes (both of which are, for the moment at least,ListPanes), and schedule the window. We'll discuss this code in severalsegments, and provide a listing of the method in its entirety at the end of thediscussion.
The first chunk of code, below, creates an instance of TopPane, providesa window label, and defines the window as having a minimum size of 20characters in width and eight lines in height. Note that SysFontWidth andSysFontHeight are global variables in the Smalltalk/V 286 system.
aTopPane := TopPane new.aTopPane label: ' My TestApp';
minimumSize: SysFontWidth * 20 @ (SysFontHeight * 8) .
Now we need to create an instance of ListPane (which will eventually becomea new instance of MListPane). Here is the code that handles thisassignment:
In addition to creating a new instance of ListPane called theMListPane,this code also sets up some important arguments for the pane.
The model: argument defines our instance of ListApp to be the pane'smodel.
The name: argument is the name of a message selector that will be sent tothe model to invoke a method that returns the OrderedCollection of stringsthe pane is to display. This method also gives the pane a name by which itcan identify itself, which is important because it enables the pane to respondto a changed: message, as we'll see later.
The change: argument provides a selector that will be sent to the modelalong with an argument to inform the model when the selection changes.
We have seen framingRatio: in detail before. It simply determines the sizeof the pane in coordinates relative to the TopPane.
The returnlndex: argument informs the pane to send the selection as a stringrather than the index of the selection when we inform the model of a changein the selection. The default value for this argument is false, but we take thisstep solely to make the code more readable.
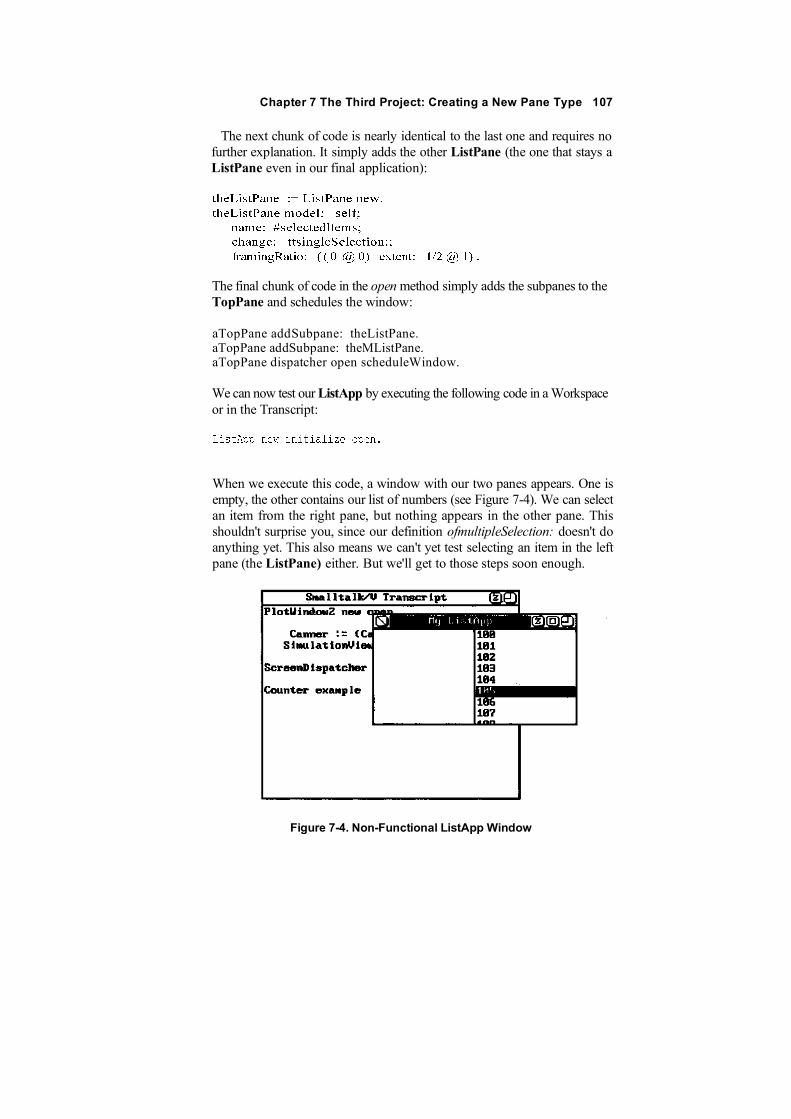
Chapter 7 The Third Project: Creating a New Pane Type 107
The next chunk of code is nearly identical to the last one and requires nofurther explanation. It simply adds the other ListPane (the one that stays aListPane even in our final application):
The final chunk of code in the open method simply adds the subpanes to theTopPane and schedules the window:
aTopPane addSubpane: theListPane.aTopPane addSubpane: theMListPane.aTopPane dispatcher open scheduleWindow.
We can now test our ListApp by executing the following code in a Workspaceor in the Transcript:
When we execute this code, a window with our two panes appears. One isempty, the other contains our list of numbers (see Figure 7-4). We can selectan item from the right pane, but nothing appears in the other pane. Thisshouldn't surprise you, since our definition ofmultipleSelection: doesn't doanything yet. This also means we can't yet test selecting an item in the leftpane (the ListPane) either. But we'll get to those steps soon enough.
Figure 7-4. Non-Functional ListApp Window
108 Practical Smalltalk
As we did in Chapter 5, we'll create a class method called example that willfacilitate our future testing of this application. Select the class button be-neath the method list pane in the CHB, choose new method from the panepop-up menu, and enter the following code into the text editing pane:
We can now examine the listing of the entire open method so that you cansee it all in one place:
open"Opens our test application."I aTopPane theListPane theMListPane IaTopPane : = TopPane new.aTopPane label: 'My ListApp1 ;
minimumSize: SysFontWidth * 20 @ (SysFontHeight* 8) .theMListPane := ListPane new. theMListPane model: self;
name: #alIIterns;change: tmultipleSelection:;framingRatio: ((1/2 @ 0) extent: 1/2 @ 1) ;returnlndex: false.
theListPane := ListPane new.theListPane model: self;
name: #selectedltems;change: ttsingleSelection:;framingRatio: ( (0 @ 0) extent: 1/2 @ 1) .
aTopPane addSubpane: theListPane. aTopPaneaddSubpane: theMListPane. aTopPanedispatcher open scheduleWindow.
Connecting the Two Panes
Now that we have the application developed to the point where it opens atwo-pane window and displays the initial list in the right pane, let's connectthe two panes so that a selection in the right pane will appear in the left. (Themethod singleSelection: which we have already defined will take care of theuser selecting an element of the left pane's list.) We've already establishedthe necessary model relationships between the panes, so all we really needto do is flesh out our multipleSelection: method so that it handles the currentcapability of the ListPane. In other words, it needs to receive a single string
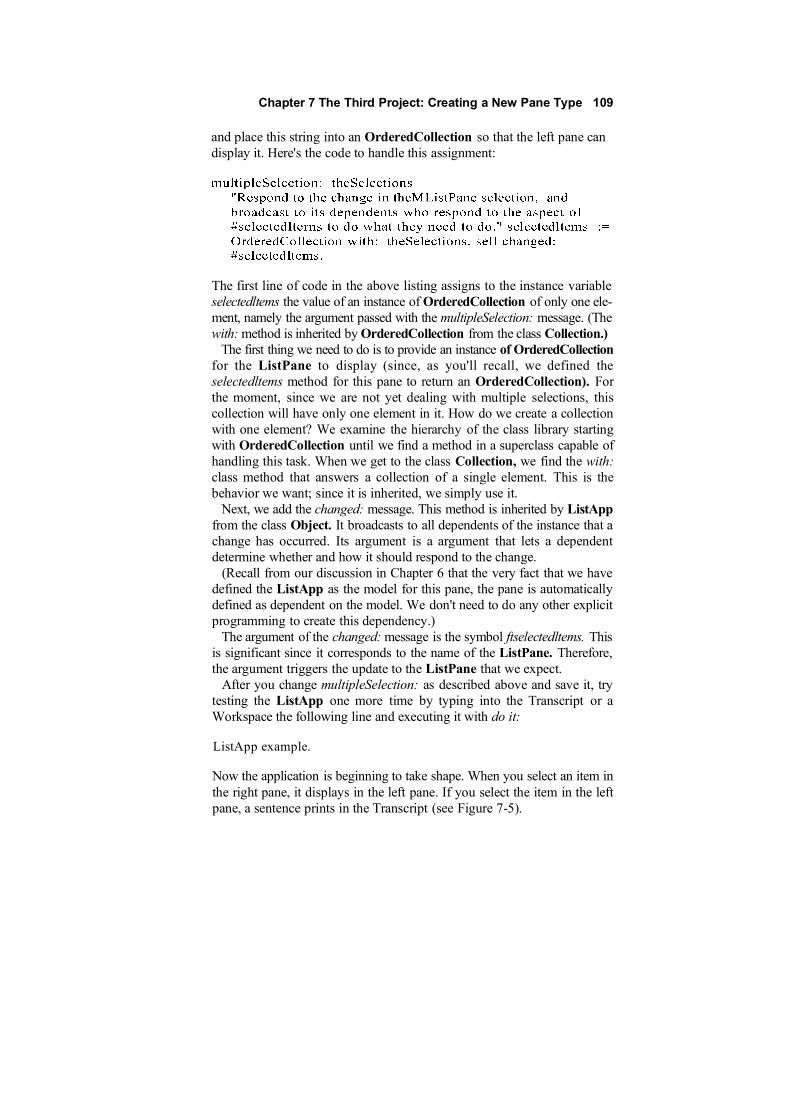
Chapter 7 The Third Project: Creating a New Pane Type 109
and place this string into an OrderedCollection so that the left pane candisplay it. Here's the code to handle this assignment:
The first line of code in the above listing assigns to the instance variableselectedltems the value of an instance of OrderedCollection of only one ele-ment, namely the argument passed with the multipleSelection: message. (Thewith: method is inherited by OrderedCollection from the class Collection.)
The first thing we need to do is to provide an instance of OrderedCollectionfor the ListPane to display (since, as you'll recall, we defined theselectedltems method for this pane to return an OrderedCollection). Forthe moment, since we are not yet dealing with multiple selections, thiscollection will have only one element in it. How do we create a collectionwith one element? We examine the hierarchy of the class library startingwith OrderedCollection until we find a method in a superclass capable ofhandling this task. When we get to the class Collection, we find the with:class method that answers a collection of a single element. This is thebehavior we want; since it is inherited, we simply use it.
Next, we add the changed: message. This method is inherited by ListAppfrom the class Object. It broadcasts to all dependents of the instance that achange has occurred. Its argument is a argument that lets a dependentdetermine whether and how it should respond to the change.
(Recall from our discussion in Chapter 6 that the very fact that we havedefined the ListApp as the model for this pane, the pane is automaticallydefined as dependent on the model. We don't need to do any other explicitprogramming to create this dependency.)
The argument of the changed: message is the symbol ftselectedltems. Thisis significant since it corresponds to the name of the ListPane. Therefore,the argument triggers the update to the ListPane that we expect.
After you change multipleSelection: as described above and save it, trytesting the ListApp one more time by typing into the Transcript or aWorkspace the following line and executing it with do it:
ListApp example.
Now the application is beginning to take shape. When you select an item inthe right pane, it displays in the left pane. If you select the item in the leftpane, a sentence prints in the Transcript (see Figure 7-5).
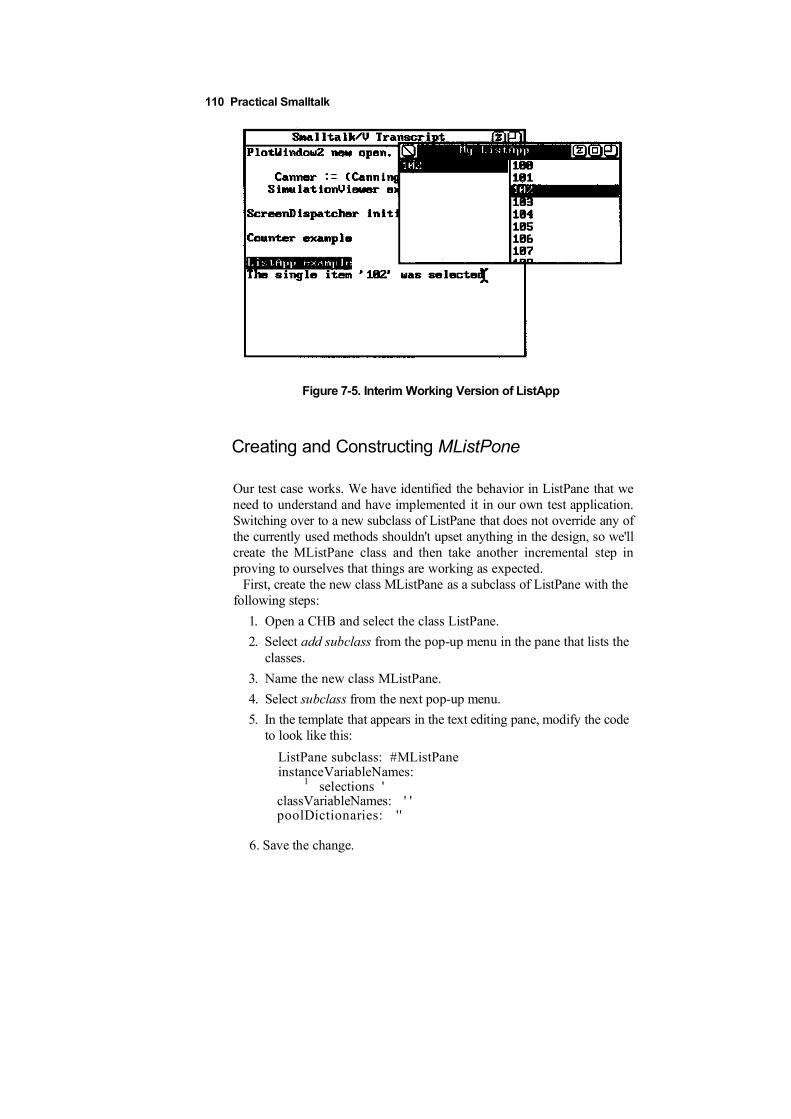
Figure 7-5. Interim Working Version of ListApp
Creating and Constructing MListPone
Our test case works. We have identified the behavior in ListPane that weneed to understand and have implemented it in our own test application.Switching over to a new subclass of ListPane that does not override any ofthe currently used methods shouldn't upset anything in the design, so we'llcreate the MListPane class and then take another incremental step inproving to ourselves that things are working as expected.
First, create the new class MListPane as a subclass of ListPane with thefollowing steps:
1. Open a CHB and select the class ListPane.
2. Select add subclass from the pop-up menu in the pane that lists theclasses.
3. Name the new class MListPane.
4. Select subclass from the next pop-up menu.
5. In the template that appears in the text editing pane, modify the codeto look like this:
ListPane subclass: #MListPaneinstanceVariableNames:
1 selections 'classVariableNames: ' 'poolDictionaries: ''
6. Save the change.
110 Practical Smalltalk
Chapter 7 The Third Project: Creating a New Pane Type 111
We have defined one new instance variable called selections. It will hold thepotentially several selections that the user has made in the MListPane of ourapplication. We also need an instance variable to keep track of the last itemselected, but we can see by looking at the class definition for ListPane thatit already has such an instance variable, called selection. We will simply usethat inherited variable rather than upsetting the apple cart by defining ourown new instance variable to handle the same task. (Another reason for doingthis is that ListPane will take care of finding, highlighting, and other house-keeping functions as a result of this decision and its inherent behavior.)
Now let's test our application to be sure it still works with this minimalchange. Find the line in the open method in the class ListApp that looks like this:
theMListPane := ListPane new.
and change it to read as follows:
theMListPane := MListPane new.
Try out the application by typing into the Transcript or Workspace the lineof code that invokes the example method. Everything should work as before.We have proven that we can create a new instance of MListPane and useit in our application transparently.
Now we start the more challenging task of building the MListPane class byadding to it the behavior that we need in order for it to carry out its previouslydefined responsibilities. We will identify the unique or new responsibilitiesit has, find the methods in its parent class ListPane which deal with thosetasks, and override them in MListPane.
Relevant MListPane Responsibilities
We can identify the following responsibilities that our MListPane class musthandle that are different from those handled by ListPane:
• setting the instance variable selections to empty any time selection isset to empty
• formatting and unformatting string representations in the MListPaneas the user makes and un-makes selections
• adding elements to and removing elements from selections
112 Practical Smalltalk
preserving the original list of items as provided by the model (ex-plained in detail later)
interpreting user input for selecting and de-selecting items
providing the model with the selections the user has made as acollection of indexes or strings
Let's look at each of these responsibilities in turn and see how we implementthem in MListPane.
Clearing selection and selections as Needed
When the instance variable selection is set to empty, we must set our newinstance variable selections to be an empty instance of OrderedCollection.Examining the methods in ListPane to find out where selection is set to nil,we find numerous places where this takes place. Rather than overriding allof these methods and having to deal with the two instance variablesseparately, we've decided to write a new method called clearSelectionswhich will set both of these instance variables to appropriate empty values.Another thing we notice as we go through ListPane looking at the placeswhere selection is set to empty is that in every case the code also sets theinstance variable currentLine to nil. So we add this to our method as well.This leads to the following new method in our class MListPane:
Now we can override the ListPane methods where this processing takesplace and replace the line in the ListPane methods that reads:
with:
This affects the close, restore, and update methods, which will now looklike this in their implementations in MListPane:
______ Chapter 7 The Third Project: Creating a New Pane Type 113
Note that if you examine the initialize method in the ListPane class, you'llfind that it does not set up selection to be nil. This was probably consideredunnecessary in that class since an untouched variable is bound to nil by default.In our case, though, we must initialize selections, so to keep things consis-tent and to make the code somewhat more readable, we'll override initializewith a version that handles our selections:
Note that the placement of the super expression in relation to ourclearSelections message is significant. Normally, we place ourmessage send after the call to the super method because we wantthe new method to return the same information as was returned bythe version of the method provided in our superclass. In this case,though, we want to empty the selection and selections instancevariables before the pane is refreshed, so we place our messagesends first. We do this because it is important to return the expectedor same value as that returned by the inherited method. This alsoexplains why we go to the effort of saving the value in result.
It is also worth noting, as a design lesson for your own work in Smalltalk,that if the original implementors of Smalltalk had handled this process ofselection identification by putting the line:
in a separate method of its own, we would not have had to override it in threeother places. You should see this not so much as a criticism of the originatorsof Smalltalk as you should take heart from the fact that even the people whoinvented this language didn't do everything right the first time!
Save these new methods and run the ListApp example again. Everythingshould work precisely as before. (This may sound like paranoia; after all, we
114 Practical Smalltalk
didn't make any significant behavioral change to the application in thisdiscussion. But sometimes even the tiniest changes have a surprising effecton existing programs. We prefer frequent testing to protracted debuggingsessions later!)
Formatting and Unformatting Selections
When the user selects an entry in the MListPane, we need to add an asteriskto the beginning of the string entry if it wasn't previously selected andremove the asterisk if the selection was previously made. (We have previ-ously decided that the user can de-select a list entry by clicking on an entrythe user had already made.)
MListPane inherits from ListPane an instance variable called list thatcontains the IndexedCollection of the list. An instance of IndexedCollectioncan reference its individual components by means of an index (which is, ofcourse, where the class derives its name). Using simple concatenation, wecan get the string that is located at the index where the selection has beenmade and then add an asterisk to the beginning of that string. Here is themethod that handles this responsibility:
(Note the relatively long name of this method that describes with someprecision what it does. We recommend that meaning take precedence overlength to make your code more readable.)
The removal of the asterisk requires some logic testing. If there is noasterisk in the first position of the string, we don't have to do anythingbecause ourformatlndexedStringAsSelected: method will add the asterisk.Here is the method that removes the asterisk if necessary:

Chapter 7 The Third Project: Creating a New Pane Type 115
Adding and Removing Elements of selections
When the user selects an element of the list in the MListPane, we must eitheradd it to the OrderedCollection selections if it is one that was not previ-ously on the list or we must remove it from that collection if it was previouslythere.
To add an element to an OrderedCollection, we have a number of meth-ods from which to choose. A quick review of their operations, however,reveals that the simplest of these — the method called, simply, add: — issufficient for our purposes. We also want to handle the formatting of thedisplay list using the methods outlined in the previous section. Here is thecode we'll use to add a newly selected element to the Collection beingdisplayed in the ListPane in our application:
The code for removing an element from the list is similar. Examining themethods available in the class OrderedCollection, we find that all of themamount to over-kill. We need a simple removal of an indexed element, whileall of those defined in the class either work only with specific elements (asdo removeFirst and removeLast, for example) or are more complicated than weneed. In the superclass Collection, though, we find a simple remove: methodthat appears to do what we want, so we'll use it. Here's where:
Preserving the Original List
With all of the methods in the previous section, we alter the contents of thelist involved in the application. This destructive change to the list may notbe what we want, since this list is shared by the pane and the model. The
116 Practical Smalltalk
model probably considers this rude, and other methods outside MListPanemay depend on the model's state. Furthermore, it is bad manners to alterdirectly the contents of an instance variable belonging to another class.
We examine the methods of the class ListPane to find out where the in-stance variable called list is used and determine if the methods make a copyof the list before using it or if they return the original list. We discover thatlist is bound in several ListPane methods and that in no case does the systemmake a copy of the instance variable. (Note that if the ListPane class hadbeen defined with a specialized method to handle this process, our applica-tion would be simpler to write. We would then merely have to override thatmethod in MListPane. As it is, our new class will be much easier to subclassin this respect than the original ListPane class from which we are working.)
To provide this behavior to our ListApp application, we override a num-ber of methods of ListPane in MListPane.
There are two main copying methods defined in the Smalltalk/V system:deepCopy and shallowCopy. The former copies a variable and all of itselements while the latter copies only the receiver and not its elements. In thiscase, we need to copy the strings as well as the list, so we use deepCopy.
In keeping with good design and the goal of reusable code, we define amethod setListFromModel which we can then use in various other methodsto take care of the copying process wherever it's needed:
The perform: method is Smalltalk/V's way of sending a message to an objectand returning the result of the message sent. It is a behavior exhibited by allobjects in the Smalltalk/V system since it is inherited from the class Object.The above example sends the message name to the model and then sends adeepCopy message to the result, assigning the output to the variable list.
The restore method in the class ListPane also modifies the list, so we needto override it in MListPane. But we have already created an overridingversion of the method earlier. As we examine the method in ListPane, though,we notice that it performs other processing that is dependent on the value oflist, so we have to create a more complex version of the overriding method:
"Refresh the list from the modeland maintain the position in the listwithout selecting it."
Chapter 7 The Third Project: Creating a New Pane Type 117
Notice that this new method is a hybrid of our earlier version in MListPaneand code taken directly from ListPane.
There are two methods closely related to restore that we must similarlyoverride in MListPane. The new code for these methods is shown here; itis self-explanatory in light of the discussion above.
The open method for the ListPane also sets the list and must therefore beoverridden in MListPane as follows:
Similarly, the update method in ListPane must be overridden because of itsuse of list to refresh the list from the model:
update"Refresh the list from themodel and display it." selfsetListFromModel. selfclearSelections. topCorner :=1@1. self refreshAll
118 Practical Smalltalk
We must override one remaining method. The searchForLineToShow: methodalso makes use of the list instance variable. Be careful in working with thismethod. Select the method name in the CHB and then select senders fromthe pane pop-up menu, you' 11 see that this message is sent by restoreSelected:.A careful examination of the code for the restoreSelected: method showsthat it relies on the returned value of this method for its correct operation.Thus if we simply override the searchFor-LineToShow: method we could"break" the restoreSelected: method.
Further examination of the restoreSelected: code reveals that althoughthis method sets the value of the list, it accesses only the length of the list,not its contents. So we can safely use super to handle this processing withinour overridden version of the searchForLineToShow: method, rather thanrewriting the method as we were forced to do in the methods above. Here isthe new code:
Interpreting User Input for Selecting and De-SelectingElements
In ListPane, all of the interpretation of the user's input and the display ofthe results of the user's interaction with the application are handled inselectAtCursor. This method is complex as it stands; to override it withanother monolithic version capable of dealing with multiple selectionswould require making extensive additions to a copy of the method. Theresult would be code that would be difficult to read and maintain. So we takeadvantage of the fact that we have to override this method anyway to makethe code simpler to deal with. We override selectAtCursor with a methodthat unhighlights the current selection, then calls a new method to interpretthe user's input, and finally redisplays the pane's contents. Here is thenew version of selectAtCursor for MListPane:
Chapter 7 The Third Project: Creating a New Pane Type 119
If you compare this method with the method of the same name in theListPane superclass, you'll see that this version is much more straightfor-ward and policy-oriented. That doesn't mean the original selectAtCursormethod was badly designed, only that as we found it necessary to addcomplexity, it turned out to be easier to simplify the method and have it callother methods than to attempt to squeeze all of the new functionality into asingle new version.
Notice that the overridden version of the selectAtCursor method calls threenew methods that are not part of the ListPane class: interpretSelection, all-S electionsAslndexes, and allSelectionsAsStrings. Here are the listings forthose three methods:
interpretSelection"Performs the interpretation of the user selection.By having this as a separate method we can simplify thenesting of ifFalse: and ifTrue because we can simply testfor a case, and return from the method when finished.""The first selection made in the MListPane"selection == nil
ifTrue: [^selection := currentLine]."If the only item selected is selected again, it becomesunselected." ( (currentLine == selection) and: [selectionsisEmpty] )
ifTrue: [Aself clearSelections] ."If we have made it here, selections must not be empty so. . ."(currentLine == selection)
ifTrue: [selection := selections last.self removeFromS elect ions: (selections last) ] . "The
new selection has nothing to do with the old selection, socheck on what it has to do with previous selections."(selections includes: currentLine)
120 Practical Smalltalk
"Remove the selection from selections."
ifTrue: [self removeFromSe lections: currentLine] "A completely newselection. Select iti"
ifFalse: [self addToSelections: selection. . ^selection :=currentLine].
alISelect ionsAsIndexes"Return an OrderedCollection of indexesrepresenting selections in the pane."I result Iresult := selections shallowCopy.result add: selection.result
allSelectionsAsStrings"Return an OrderedCollection of strings
representing the unformatted selections in the pane."I result cleanList IcleanList := self getListFromModel.result :== OrderedCol lection new.selections notEmpty
ifTrue: [selections do: [ :anlndex |result add: (cleanList at: anindex) ] ] . selection notNil
ifTrue: [result add: (list at: selection) ] . ^result — •
The allSelectionsAsStrings method, in turn, calls an as-yet-undefinedmethod called getListFromModel, which sounds like it ought to returna copy of the list from the model. In fact, that's just what we'll definethat method to do:
getListFromModel
"Gets the list from the model and stores a copy of it in the list instancevariable." A (model perform: name) deepCopy.
Now that we've written a method that returns a copy of the list, wecan rewrite setListFromModel to use this new method, thus furtherreducing the number of links between our pane and the model. This isalways a desirable design goal.
setListFromModel
"Gets the list from the model and stores a copy of it in the list instancevariable." list := self getListFromModel.
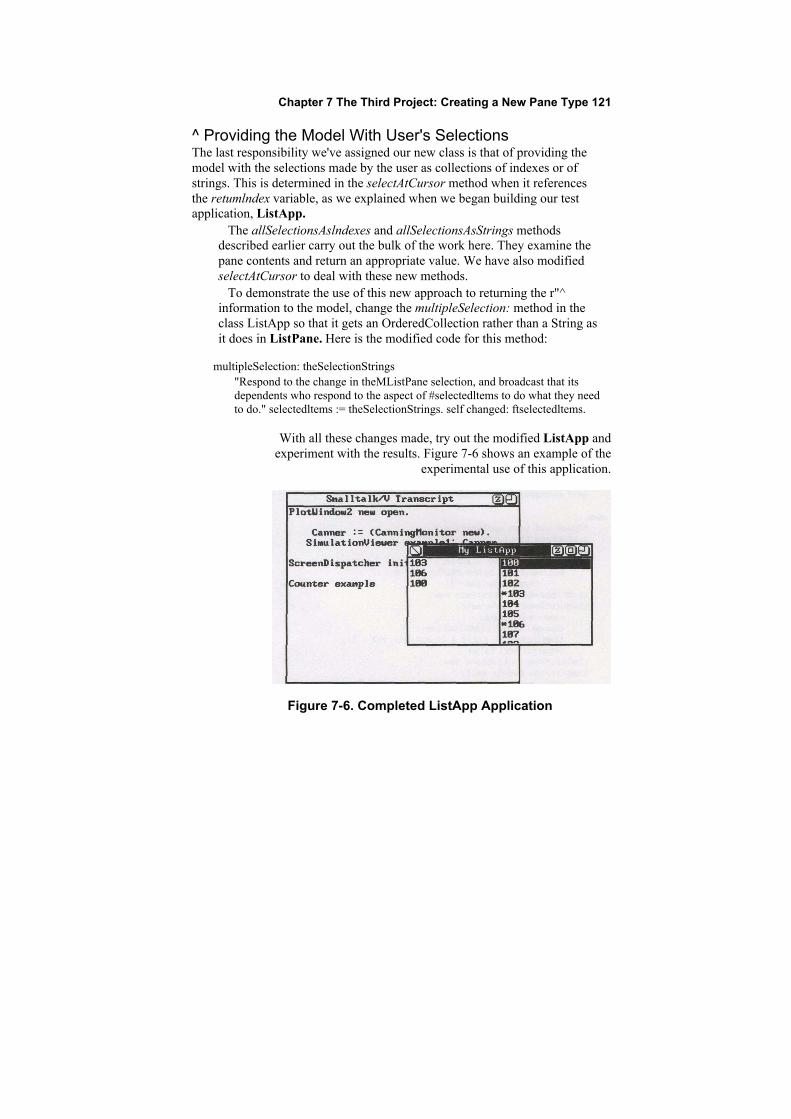
Chapter 7 The Third Project: Creating a New Pane Type 121
^ Providing the Model With User's SelectionsThe last responsibility we've assigned our new class is that of providing themodel with the selections made by the user as collections of indexes or ofstrings. This is determined in the selectAtCursor method when it referencesthe retumlndex variable, as we explained when we began building our testapplication, ListApp.
The allSelectionsAslndexes and allSelectionsAsStrings methodsdescribed earlier carry out the bulk of the work here. They examine thepane contents and return an appropriate value. We have also modifiedselectAtCursor to deal with these new methods.
To demonstrate the use of this new approach to returning the r"^information to the model, change the multipleSelection: method in theclass ListApp so that it gets an OrderedCollection rather than a String asit does in ListPane. Here is the modified code for this method:
multipleSelection: theSelectionStrings"Respond to the change in theMListPane selection, and broadcast that itsdependents who respond to the aspect of #selectedltems to do what they needto do." selectedltems := theSelectionStrings. self changed: ftselectedltems.
With all these changes made, try out the modified ListApp andexperiment with the results. Figure 7-6 shows an example of the
experimental use of this application.
Figure 7-6. Completed ListApp Application
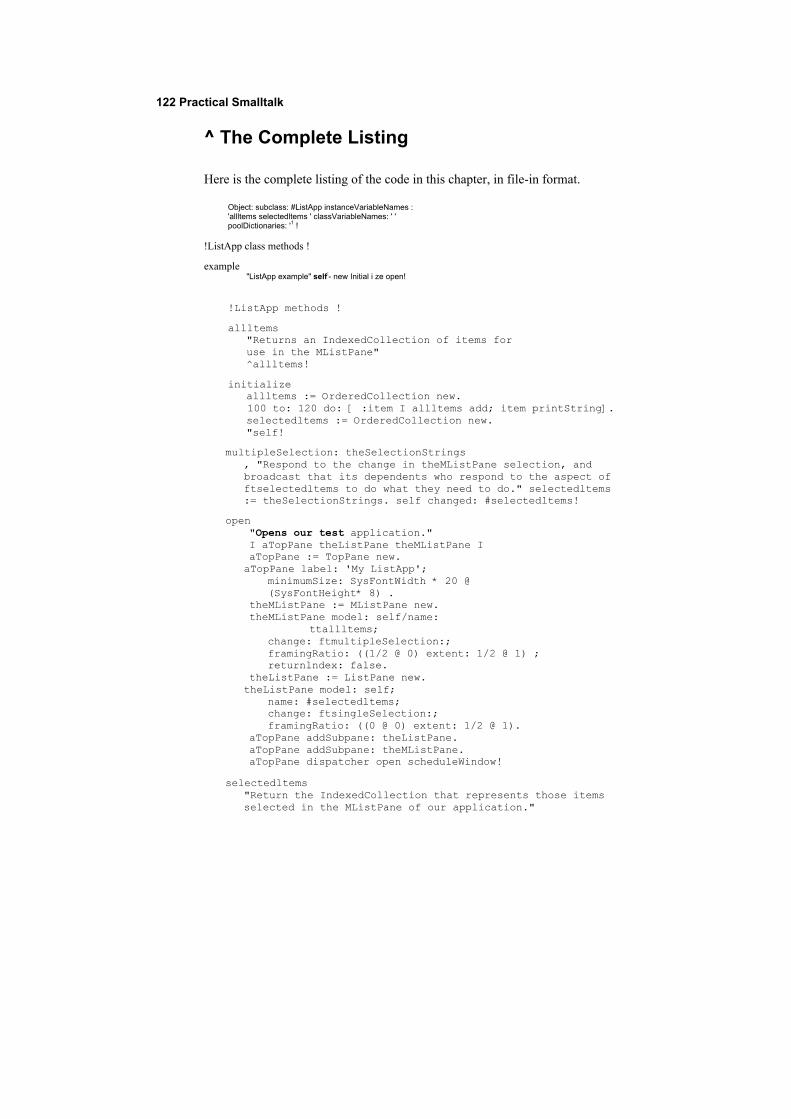
122 Practical Smalltalk
^ The Complete Listing
Here is the complete listing of the code in this chapter, in file-in format.
Object: subclass: #ListApp instanceVariableNames :'allltems selectedltems ' classVariableNames: ' 'poolDictionaries: '1 !
!ListApp class methods !
example"ListApp example" self;- new Initial i ze open!
!ListApp methods !
allltems"Returns an IndexedCollection of items foruse in the MListPane"^allltems!
initializeallltems := OrderedCollection new.100 to: 120 do: [ :item I allltems add; item printString].selectedltems := OrderedCollection new."self!
multipleSelection: theSelectionStrings, "Respond to the change in theMListPane selection, andbroadcast that its dependents who respond to the aspect offtselectedltems to do what they need to do." selectedltems:= theSelectionStrings. self changed: #selectedltems!
open"Opens our test application."I aTopPane theListPane theMListPane IaTopPane := TopPane new.aTopPane label: 'My ListApp';
minimumSize: SysFontWidth * 20 @(SysFontHeight* 8) .
theMListPane := MListPane new.theMListPane model: self/name:
ttallltems;change: ftmultipleSelection:;framingRatio: ((1/2 @ 0) extent: 1/2 @ 1) ;returnlndex: false.
theListPane := ListPane new.theListPane model: self;
name: #selectedltems;change: ftsingleSelection:;framingRatio: ((0 @ 0) extent: 1/2 @ 1).
aTopPane addSubpane: theListPane.aTopPane addSubpane: theMListPane.aTopPane dispatcher open scheduleWindow!
selectedltems"Return the IndexedCollection that represents those itemsselected in the MListPane of our application."
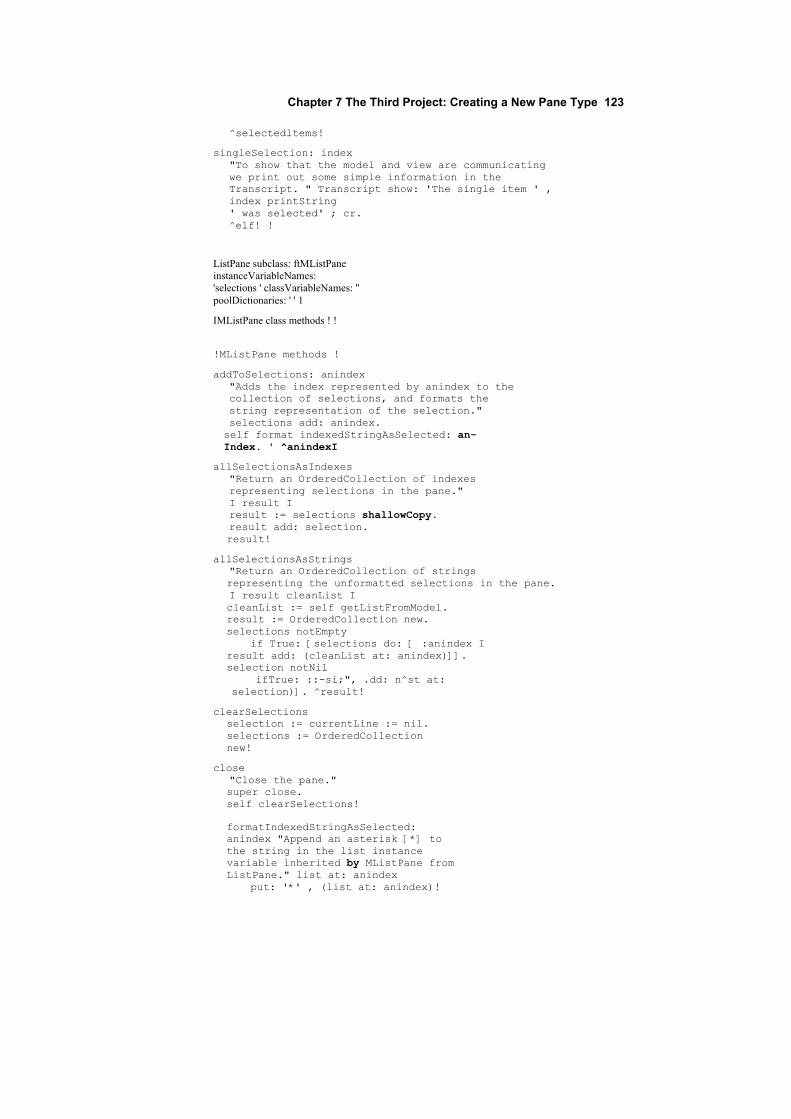
Chapter 7 The Third Project: Creating a New Pane Type 123
^selectedltems!
singleSelection: index"To show that the model and view are communicatingwe print out some simple information in theTranscript. " Transcript show: 'The single item ' ,index printString' was selected' ; cr.^elf! !
ListPane subclass: ftMListPaneinstanceVariableNames:'selections ' classVariableNames: ''poolDictionaries: ' ' 1
IMListPane class methods ! !
!MListPane methods !
addToSelections: anindex"Adds the index represented by anindex to thecollection of selections, and formats thestring representation of the selection."selections add: anindex.self format indexedStringAsSelected: an-Index. ' ^anindexI
allSelectionsAsIndexes"Return an OrderedCollection of indexesrepresenting selections in the pane."I result Iresult := selections shallowCopy.result add: selection.result!
allSelectionsAsStrings"Return an OrderedCollection of stringsrepresenting the unformatted selections in the pane.I result cleanList IcleanList := self getListFromModel.result := OrderedCollection new.selections notEmpty
if True: [selections do: [ :anindex Iresult add: (cleanList at: anindex)]].selection notNil
ifTrue: ::-si;", .dd: n^st at:selection)]. ^result!
clearSelectionsselection := currentLine := nil.selections := OrderedCollectionnew!
close"Close the pane."super close.self clearSelections!
formatIndexedStringAsSelected:anindex "Append an asterisk [*] tothe string in the list instancevariable inherited by MListPane fromListPane." list at: anindex
put: '*' , (list at: anindex)!
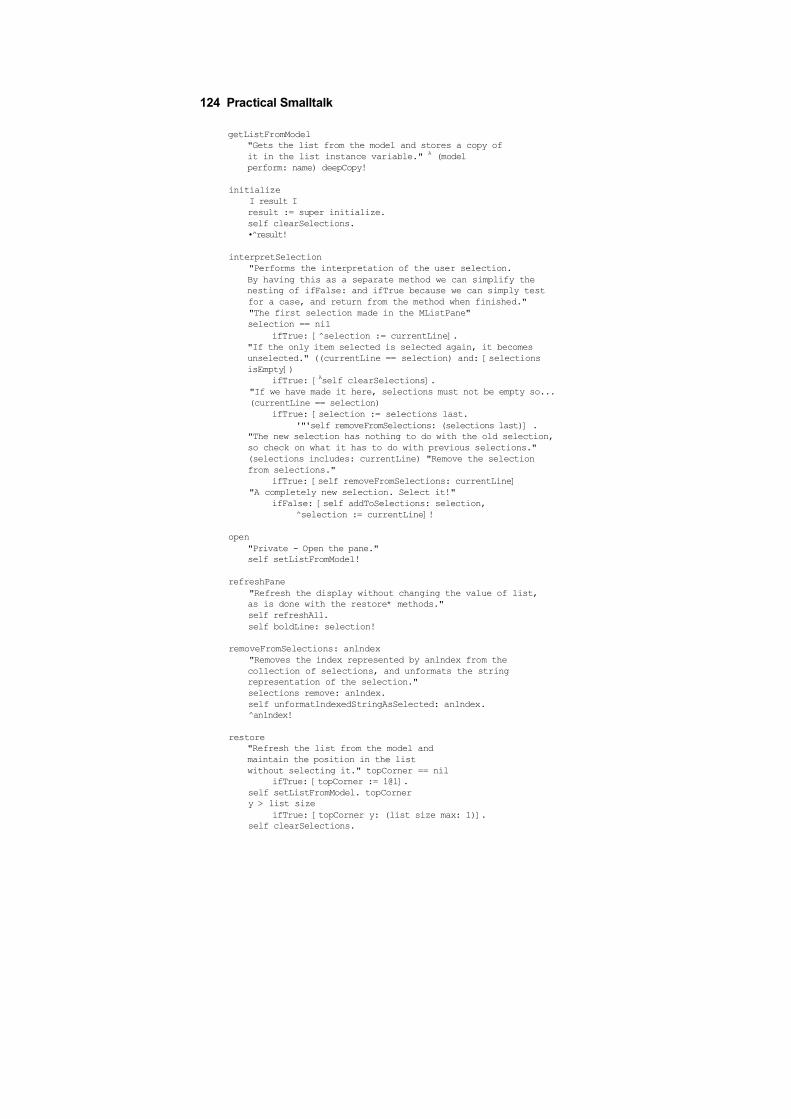
124 Practical Smalltalk
getListFromModel"Gets the list from the model and stores a copy ofit in the list instance variable." A (modelperform: name) deepCopy!
initializeI result Iresult := super initialize.self clearSelections.• result!
interpretSelection"Performs the interpretation of the user selection.By having this as a separate method we can simplify thenesting of ifFalse: and ifTrue because we can simply testfor a case, and return from the method when finished.""The first selection made in the MListPane"selection == nil
ifTrue: [^selection := currentLine]."If the only item selected is selected again, it becomesunselected." ((currentLine == selection) and: [selectionsisEmpty])
ifTrue: [Aself clearSelections]."If we have made it here, selections must not be empty so...(currentLine == selection)
ifTrue: [selection := selections last.'"'self removeFromSelections: (selections last)] .
"The new selection has nothing to do with the old selection,so check on what it has to do with previous selections."(selections includes: currentLine) "Remove the selectionfrom selections."
ifTrue: [self removeFromSelections: currentLine]"A completely new selection. Select it!"
ifFalse: [self addToSelections: selection,^selection := currentLine]!
open"Private - Open the pane."self setListFromModel!
refreshPane"Refresh the display without changing the value of list,as is done with the restore* methods."self refreshAll.self boldLine: selection!
removeFromSelections: anlndex"Removes the index represented by anlndex from thecollection of selections, and unformats the stringrepresentation of the selection."selections remove: anlndex.self unformatlndexedStringAsSelected: anlndex.^anlndex!
restore"Refresh the list from the model andmaintain the position in the listwithout selecting it." topCorner == nil
ifTrue: [topCorner := 1@1].self setListFromModel. topCornery > list size
ifTrue: [topCorner y: (list size max: 1)].self clearSelections.
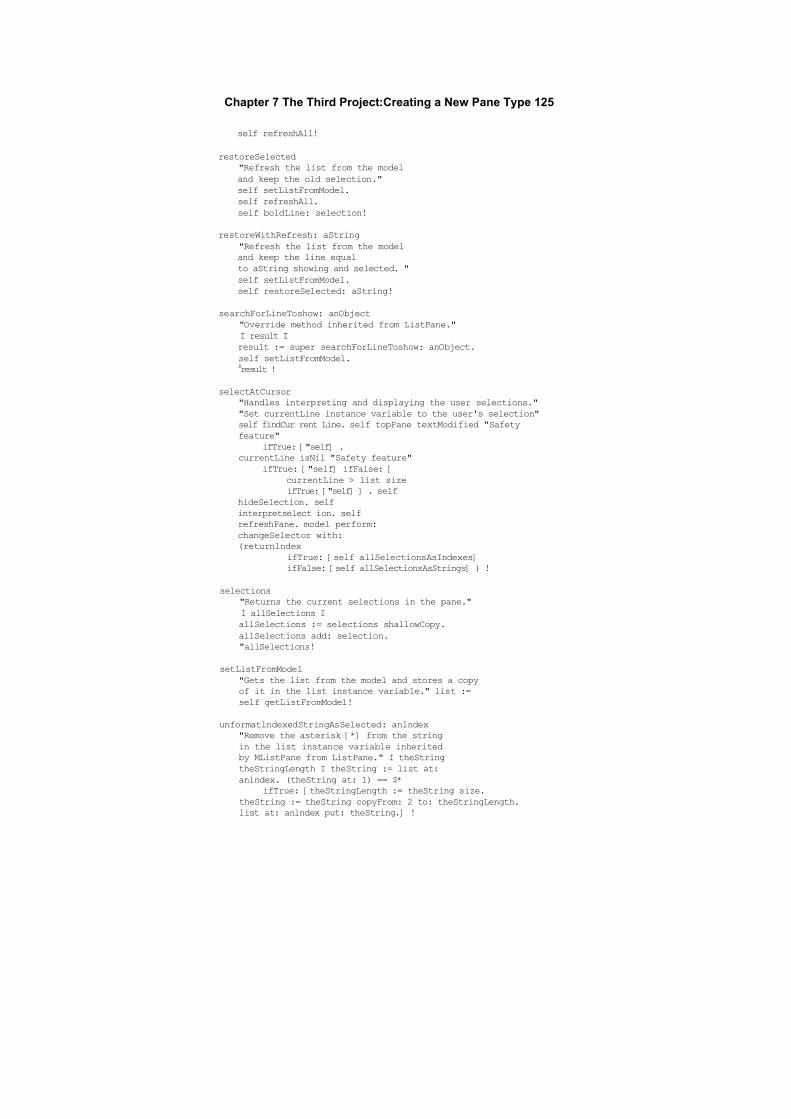
Chapter 7 The Third Project:Creating a New Pane Type 125
self refreshAll!
restoreSelected"Refresh the list from the modeland keep the old selection."self setListFromModel.self refreshAll.self boldLine: selection!
restoreWithRefresh: aString"Refresh the list from the modeland keep the line equalto aString showing and selected. "self setListFromModel.self restoreSelected: aString!
searchForLineToshow: anObject"Override method inherited from ListPane."I result Iresult := super searchForLineToshow: anObject.self setListFromModel.Aresult !
selectAtCursor"Handles interpreting and displaying the user selections.""Set currentLine instance variable to the user's selection"self findCur rent Line. self topPane textModified "Safetyfeature"
ifTrue: ["self] .currentLine isNil "Safety feature"
ifTrue: ["self] ifFalse: [currentLine > list sizeifTrue: ["self] ] . self
hideSelection. selfinterpretselect ion. selfrefreshPane. model perform:changeSelector with:(returnlndex
ifTrue: [self allSelectionsAsIndexes]ifFalse: [self allSelectionsAsStrings] ) !
selections"Returns the current selections in the pane."I allSelections IallSelections := selections shallowCopy.allSelections add: selection."allSelections!
setListFromModel"Gets the list from the model and stores a copyof it in the list instance variable." list :=self getListFromModel!
unformatlndexedStringAsSelected: anlndex"Remove the asterisk [*] from the stringin the list instance variable inheritedby MListPane from ListPane." I theStringtheStringLength I theString := list at:anlndex. (theString at: 1) == $*
ifTrue: [theStringLength := theString size.theString := theString copyFrom: 2 to: theStringLength.list at: anlndex put: theString.] !
126 Practical Smalltalk
update"Refresh the list from themodel and display it." selfsetListFromModel. selfclearSelections. topCorner:= 1@1. self refreshAll! !
An Alternative Approach
When we had finished the work on this chapter, Mike Anderson of Digitalk,who handled most of the technical review on the manuscript, suggested thatwe consider an alternate approach which, while eliminating one bit offunctionality from MListPane, was a much simpler approach to the singleproblem of multiple selections. His solution, which does not allow us todeselect items or to know by examination which item was selected last, isnonetheless highly instructive.
He modified the ListPane method boldLine: so that it took a collection asan argument rather than an integer that indexes the location of a single entryin the pane. Along with other modifications shown in the listing that follows,this approach results in fewer modifications than our approach. You willbenefit from studying it and its behavior in comparison with the MListPaneproject we built together in this chapter.
Here's the listing for Anderson's MultipleSelectListPane project.
Project : MLPDate : Nov 1, 1990Time : 00:16:07
Classes :MLPTest MultiSelectListPane
Methods :
Object subclass: ttMLPTestinstanceVariableNames:
'multiSelectListPane 'classVariableNames: ''poolDictionaries: ''!
ListPane subclass: #MultiSelectListPaneinstanceVariableNames: ' 'classVariableNames: ''poolDictionaries: ''!
!MLPTest class methods ! !
Chapter 7 The Third Project: Creating a New Pane Type 127
IMLPTest methods !
ClassCorranentA'this class is creates a simple windowto test MultiSelectListPanes ' !
list^#(one two three) !
labels: 'show selected1
lines: #()selectors: # (showSelected) !
open(TopPane new
addSubpane: (multiSelectListPane := MultiSelectListPane newmodel: self; name: #list; change : # select : ; menu: ttmenu) )dispatcher open scheduleWindow!
select: aString!
showSelected Istream Istream := String new asStream.multiSelectListPane selection do: [ -.line IstreamnextPutAll: line printString; nextPutAll:' , ' ] . Menu message: stream contents!!
!MultiSelectListPane class methods ! !
!MultiSelectListPane methods !
boldLine: aCollection"Private - Reverse the set of lines indexed byaCollectoin in the receiver pane." aCollection do: [:line I paneScanner reverse:
(self lineToRect: line)]!
graySelection"Private - Change the visual cue of the selection toreflect a deactivated window." selection do: [ :lineI paneScanner gray:
(self lineToRect: line)]!
hideSelection"Private - Turn off the reverse of the
selected items."selection do: [ :line IpaneScanner recover:
(self lineToRect: line)]!
initialize

128 Practical Smalltalk
super initialize.selection := OrderedCollection new!
selectAtCursor"Private - Set currentLine to the line at thecursor position." self findCurrentLine. selftopPane textModifiedifTrue: [Aself].currentLine isNilifTrue: [^self]ifFalse: [
currentLine > list sizeifTrue: ["self]].
super boldLine: currentLine.(selection includes: currentLine)ifTrue: [selection remove: currentLine]ifFalse: [selection add: currentLine]. model
perform: changeSelectorwith:
(returnlndexifTrue: [currentLine]ifFalse: [list at: currentLine])!
"construct application"((Smalltalk at: #Application ifAbsent: [])
isKindOf: Class) ifTrue: [((Smalltalk at: #Application) forr'MLP1)
addClass: MLPTest;addClass: MultiSelectListPane;comments: nil;initCode: nil;finalizeCode: nil;
startUpCode: nil]!
8The Graphic World
Introduction
Smalltalk is a completely graphic environment. Its graphic nature has set itapart from other PC languages. It should come as no surprise, then, that youcan control its graphic nature and create interesting and useful graphicpatterns. In fact, if you've ever run the demos that come with Smalltalk/V286, you've seen some intriguing graphic effects available on a desktopcomputer in a program which is not primarily designed to create graphics.
In this chapter, we're going to examine Smalltalk/V's graphic world insome depth. We'll take a look at the basic concepts of graphic programmingas Smalltalk/V implements them. Then we'll examine the use of forms anddrawing primitives in the language, pausing in the process to look at thebasic mathematics involved in calculating and drawing graphic objects.We'll also take a brief look at some of the ways Smalltalk/V 286 implementsand supports animation.
We'll accomplish our usual triage on the graphic classes, helping youfocus on the classes and methods that are important for you to understandas you add graphics to your own Smalltalk applications.
All of this will prepare us for Chapter 9, where we will undertake thedesign and construction of a highly graphic application.
Basic Graphic Concepts
Everything displayed on the Smalltalk screen — windows, lines, cursors,even text characters — is composed of a series of dots (more technicallyreferred to as pixels, an acronym for picture elements) arranged in a pattern.A line appears as a continuous vector of such dots whose color is black (ona monochrome display) or any color contrasting with the background (on acolor display).
129
130 Practical Smalltalk
On a monochrome display, a bitmap defines a rectangular area of bitswhere each bit has a value of 1 if the pixel represented by that bit is blackand 0 if it is white. Because of this method of representing graphic patterns,Smalltalk is said to use bitmapped graphics.
An individual pixel within a bitmap is addressed as a point with an xcoordinate and a y coordinate. The x coordinate defines the point's column(horizontal position) and the y coordinate defines its row (vertical position).The coordinates may be stated relative to the entire area of the display orrelative to a specific pane, depending on the circumstances and the need.
A bitmap in Smalltalk/V is always contained in an instance of the classForm or in one of its subclasses — BiColorForm or Color Form.
Rectangular collections of bits in a bitmap can be described as instancesof the class Rectangle, where the origin (upper-left corner) and either thebottom-right corner or the size (height and width) of the rectangle areknown, with the latter two being expressed relative to the upper-left corner.
It is important to understand that instances of the class Point or Rectangleare not displayable objects but simply represent positions and areas. The objectthat actually holds the graphical image of points and rectangles is the Form.
The basic classes of graphic data representation and display, then, arePoint, Rectangle, and Form. Let's take a brief look at each of these classes.(This subject is covered in some detail in the Smalltalk^286 Manual, so wedo not attempt a complete treatment here. If you want more information onany of these subjects, refer to the manual.)
The Class Point
An instance of the class Point has two instance variables of interest: x andy. As we have said, these represent, respectively, the horizontal and verticalposition of the point.
To create a new point, you send the @ message to an integer. (We sawsome of this in Chapter 6 when we studied how to define the size and relativelocation of a subpane in a window.) You can create a point and theninterrogate it for its coordinates in a process depicted in Figure 8-1. Noticethat the point we create is never displayed; we have not given the point aninstance of class Form within which it can display itself.
You can perform a number of manipulations on instances of the classPoint. For example, you can add, subtract, or multiply two points or a pointand an integer value. If you use a point as the argument to any of thesemessages, then the x coordinate of the point used as a argument is appliedto the x coordinate of the receiver. The y coordinates are treated similarly.For example, evaluate the following expressions separately in a Workspaceor Transcript window with show it:
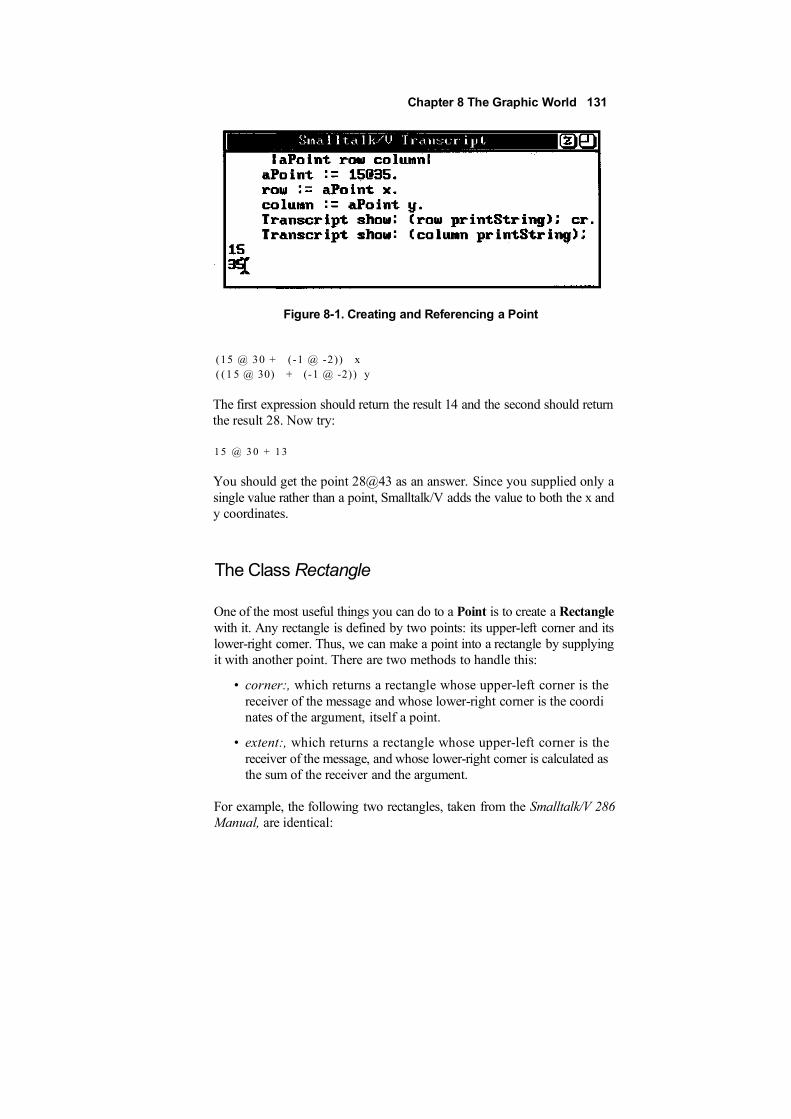
Figure 8-1. Creating and Referencing a Point
(15 @ 30 + (-1 @ -2)) x( (1 5 @ 30) + (-1 @ -2)) y
The first expression should return the result 14 and the second should returnthe result 28. Now try:
1 5 @ 3 0 + 1 3
You should get the point 28@43 as an answer. Since you supplied only asingle value rather than a point, Smalltalk/V adds the value to both the x andy coordinates.
The Class Rectangle
One of the most useful things you can do to a Point is to create a Rectanglewith it. Any rectangle is defined by two points: its upper-left corner and itslower-right corner. Thus, we can make a point into a rectangle by supplyingit with another point. There are two methods to handle this:
• corner:, which returns a rectangle whose upper-left corner is thereceiver of the message and whose lower-right corner is the coordinates of the argument, itself a point.
• extent:, which returns a rectangle whose upper-left corner is thereceiver of the message, and whose lower-right corner is calculated asthe sum of the receiver and the argument.
For example, the following two rectangles, taken from the Smalltalk/V 286Manual, are identical:
Chapter 8 The Graphic World 131
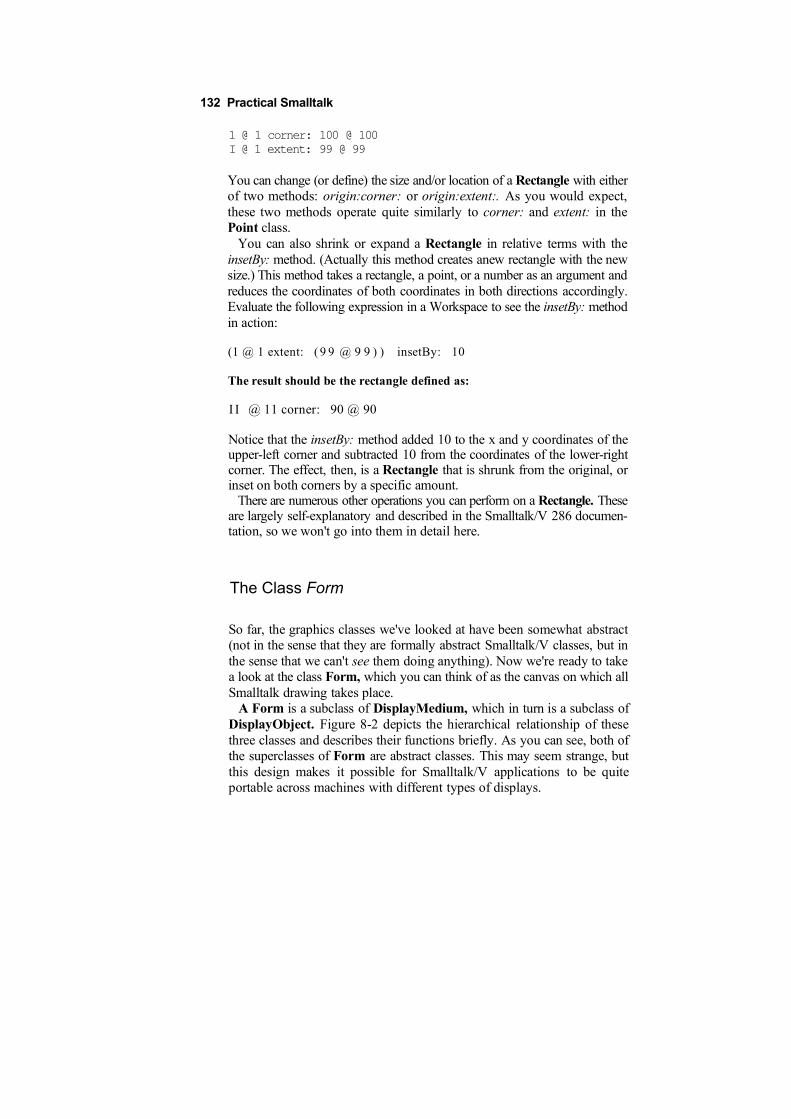
132 Practical Smalltalk
1 @ 1 corner: 100 @ 100I @ 1 extent: 99 @ 99
You can change (or define) the size and/or location of a Rectangle with eitherof two methods: origin:corner: or origin:extent:. As you would expect,these two methods operate quite similarly to corner: and extent: in thePoint class.
You can also shrink or expand a Rectangle in relative terms with theinsetBy: method. (Actually this method creates anew rectangle with the newsize.) This method takes a rectangle, a point, or a number as an argument andreduces the coordinates of both coordinates in both directions accordingly.Evaluate the following expression in a Workspace to see the insetBy: methodin action:
(1 @ 1 extent: ( 9 9 @ 9 9 ) ) insetBy: 10
The result should be the rectangle defined as:
I I @ 11 corner: 90 @ 90
Notice that the insetBy: method added 10 to the x and y coordinates of theupper-left corner and subtracted 10 from the coordinates of the lower-rightcorner. The effect, then, is a Rectangle that is shrunk from the original, orinset on both corners by a specific amount.
There are numerous other operations you can perform on a Rectangle. Theseare largely self-explanatory and described in the Smalltalk/V 286 documen-tation, so we won't go into them in detail here.
The Class Form
So far, the graphics classes we've looked at have been somewhat abstract(not in the sense that they are formally abstract Smalltalk/V classes, but inthe sense that we can't see them doing anything). Now we're ready to takea look at the class Form, which you can think of as the canvas on which allSmalltalk drawing takes place.
A Form is a subclass of DisplayMedium, which in turn is a subclass ofDisplayObject. Figure 8-2 depicts the hierarchical relationship of thesethree classes and describes their functions briefly. As you can see, both ofthe superclasses of Form are abstract classes. This may seem strange, butthis design makes it possible for Smalltalk/V applications to be quiteportable across machines with different types of displays.
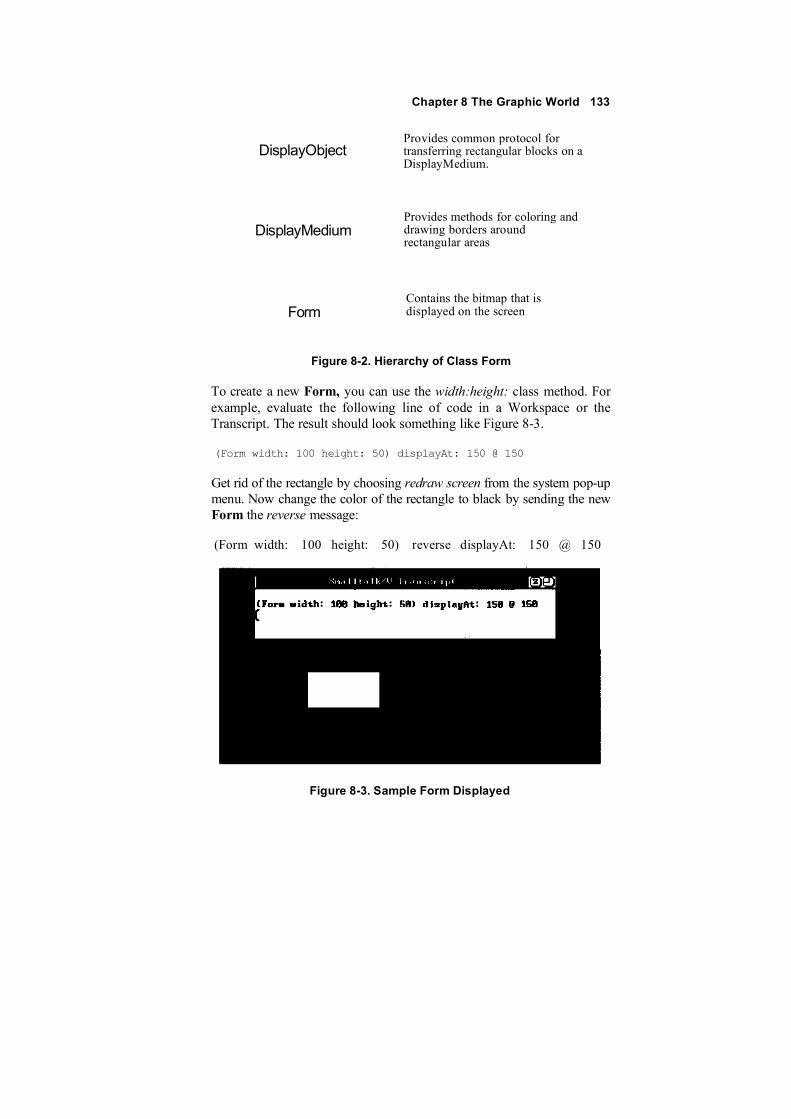
Chapter 8 The Graphic World 133
DisplayObjectProvides common protocol fortransferring rectangular blocks on aDisplayMedium.
DisplayMediumProvides methods for coloring anddrawing borders aroundrectangular areas
FormContains the bitmap that isdisplayed on the screen
Figure 8-2. Hierarchy of Class Form
To create a new Form, you can use the width:height: class method. Forexample, evaluate the following line of code in a Workspace or theTranscript. The result should look something like Figure 8-3.
(Form width: 100 height: 50) displayAt: 150 @ 150
Get rid of the rectangle by choosing redraw screen from the system pop-upmenu. Now change the color of the rectangle to black by sending the newForm the reverse message:
(Form width: 100 height: 50) reverse displayAt: 150 @ 150
Figure 8-3. Sample Form Displayed
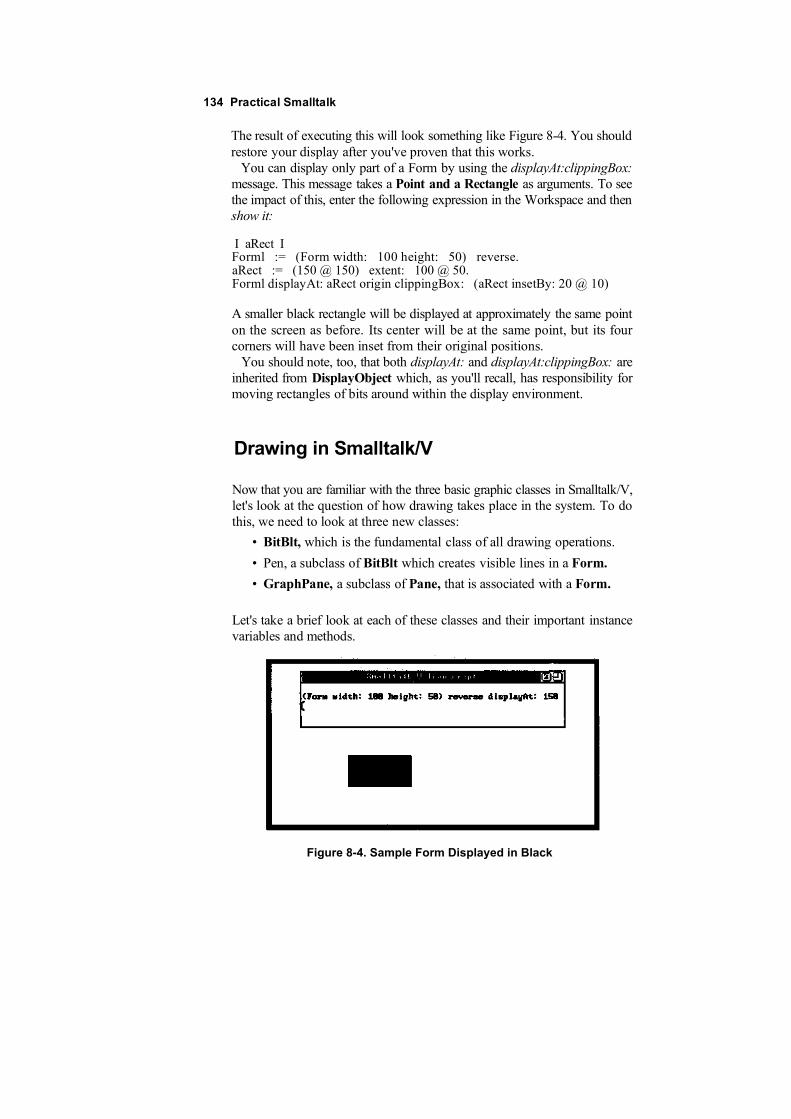
134 Practical Smalltalk
The result of executing this will look something like Figure 8-4. You shouldrestore your display after you've proven that this works.
You can display only part of a Form by using the displayAt:clippingBox:message. This message takes a Point and a Rectangle as arguments. To seethe impact of this, enter the following expression in the Workspace and thenshow it:
I aRect IForml := (Form width: 100 height: 50) reverse.aRect := (150 @ 150) extent: 100 @ 50.Forml displayAt: aRect origin clippingBox: (aRect insetBy: 20 @ 10)
A smaller black rectangle will be displayed at approximately the same pointon the screen as before. Its center will be at the same point, but its fourcorners will have been inset from their original positions.
You should note, too, that both displayAt: and displayAt:clippingBox: areinherited from DisplayObject which, as you'll recall, has responsibility formoving rectangles of bits around within the display environment.
Drawing in Smalltalk/V
Now that you are familiar with the three basic graphic classes in Smalltalk/V,let's look at the question of how drawing takes place in the system. To dothis, we need to look at three new classes:
• BitBlt, which is the fundamental class of all drawing operations.
• Pen, a subclass of BitBlt which creates visible lines in a Form.
• GraphPane, a subclass of Pane, that is associated with a Form.
Let's take a brief look at each of these classes and their important instancevariables and methods.
Figure 8-4. Sample Form Displayed in Black
Chapter 8 The Graphic World 135
The Class BitBIt
This class takes its strange-sounding name from the concept of a bit blocktransfer and is usually pronounced "bit-blit" by experienced Smalltalkprogrammers. As its full name implies, this class has as its primaryresponsibility the transferring of blocks of bits from one area to another.This simple-sounding process turns out to be quite complex because theprocess of moving these blocks of bits around involves three importantideas: rules, masks and clipping rectangles. As we will see, the messagecalled copy Bits actually carries out the transfer of the bits.
The Mask Form
The movement of a block of bits from one place to another involves thecareful combination of the characteristics of three different forms:
• the source form, where the bits to be moved are located before theprocess begins
• the destination form, where the bits are to be moved
• the mask form, which contains information BitBIt uses to determinethe appearance of the bit block as it is transferred to (i.e. drawn in) itsdestination form
The message that initializes all of the necessary instance variables in aninstance of the class BitBIt is destForm: ordestForm:sourceForm:. (Thereis one other initialization message that sets up six other instance variablesbut we won't be using it here and you will probably find little practical usefor it unless you are creating quite complex graphic applications.) Once aBitBIt has been initialized, you define its mask form with the mask:message.
Some of the interesting power and complexity of BitBIt manipulation liein the mask form. This form defines a "halftone," or pattern that producesa gray or multi-color effect as the bits are transferred. On a monochromedisplay, the mask has one of five pre-defined values:
• black
• darkGray
• gray
• lightGray
• white
As a BitBIt transfer takes place, the bits in the source form are first logicallyANDed with the bits in the mask form. A mask form is restricted to have aheight and width of 16 pixels. When the source form with which the mask
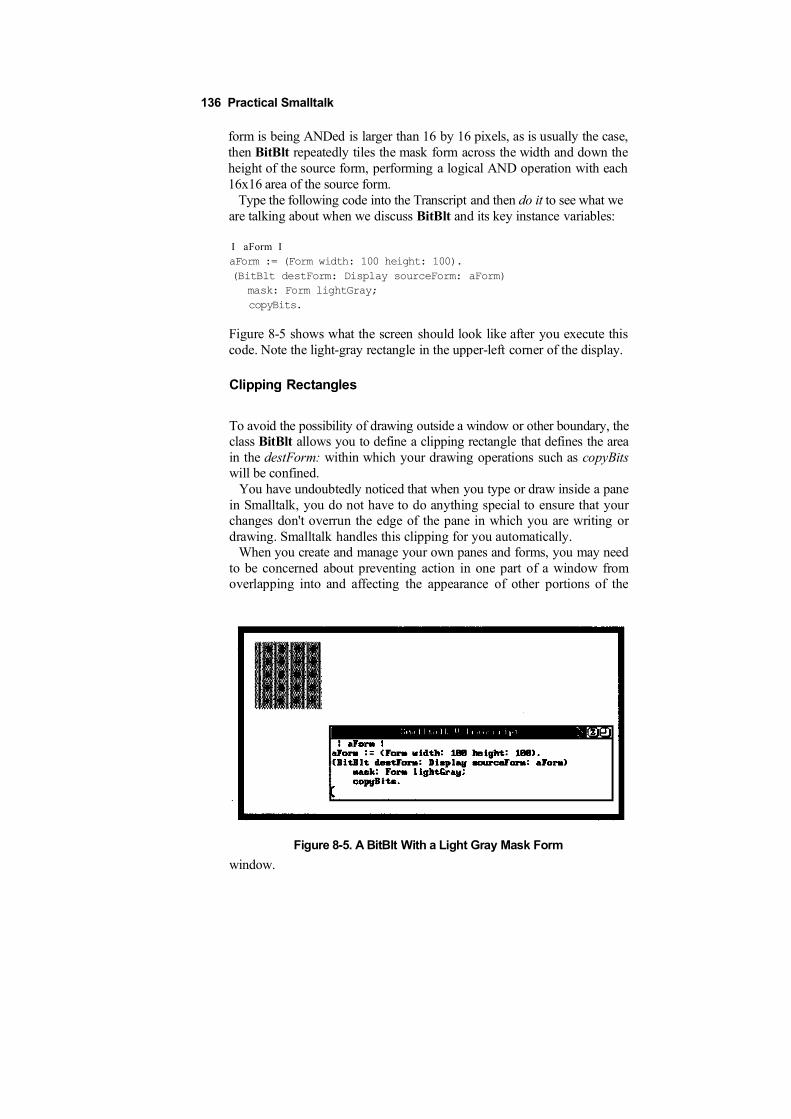
136 Practical Smalltalk
form is being ANDed is larger than 16 by 16 pixels, as is usually the case,then BitBlt repeatedly tiles the mask form across the width and down theheight of the source form, performing a logical AND operation with each16x16 area of the source form.
Type the following code into the Transcript and then do it to see what weare talking about when we discuss BitBlt and its key instance variables:
I aForm IaForm := (Form width: 100 height: 100).(BitBlt destForm: Display sourceForm: aForm)
mask: Form lightGray;copyBits.
Figure 8-5 shows what the screen should look like after you execute thiscode. Note the light-gray rectangle in the upper-left corner of the display.
Clipping Rectangles
To avoid the possibility of drawing outside a window or other boundary, theclass BitBlt allows you to define a clipping rectangle that defines the areain the destForm: within which your drawing operations such as copyBitswill be confined.
You have undoubtedly noticed that when you type or draw inside a panein Smalltalk, you do not have to do anything special to ensure that yourchanges don't overrun the edge of the pane in which you are writing ordrawing. Smalltalk handles this clipping for you automatically.
When you create and manage your own panes and forms, you may needto be concerned about preventing action in one part of a window fromoverlapping into and affecting the appearance of other portions of the
window.
Figure 8-5. A BitBlt With a Light Gray Mask Form
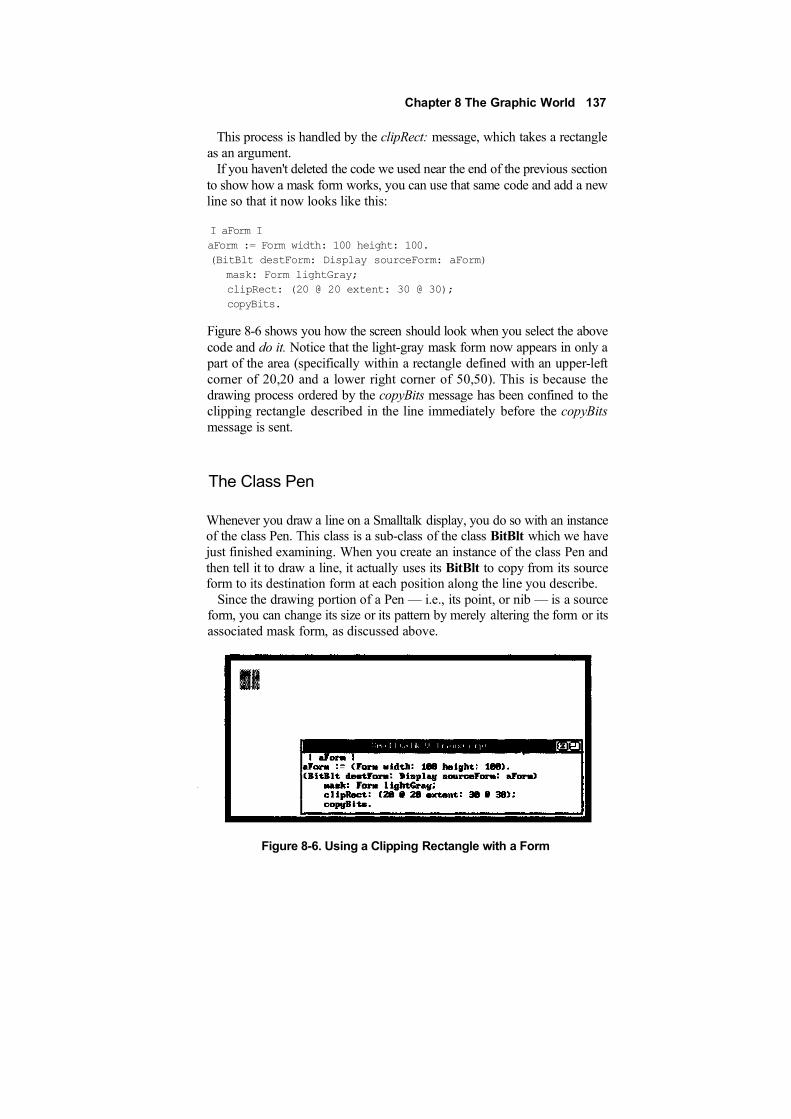
Chapter 8 The Graphic World 137
This process is handled by the clipRect: message, which takes a rectangleas an argument.
If you haven't deleted the code we used near the end of the previous sectionto show how a mask form works, you can use that same code and add a newline so that it now looks like this:
I aForm IaForm := Form width: 100 height: 100.(BitBlt destForm: Display sourceForm: aForm)
mask: Form lightGray;clipRect: (20 @ 20 extent: 30 @ 30);copyBits.
Figure 8-6 shows you how the screen should look when you select the abovecode and do it. Notice that the light-gray mask form now appears in only apart of the area (specifically within a rectangle defined with an upper-leftcorner of 20,20 and a lower right corner of 50,50). This is because thedrawing process ordered by the copyBits message has been confined to theclipping rectangle described in the line immediately before the copyBitsmessage is sent.
The Class Pen
Whenever you draw a line on a Smalltalk display, you do so with an instanceof the class Pen. This class is a sub-class of the class BitBlt which we havejust finished examining. When you create an instance of the class Pen andthen tell it to draw a line, it actually uses its BitBlt to copy from its sourceform to its destination form at each position along the line you describe.
Since the drawing portion of a Pen — i.e., its point, or nib — is a sourceform, you can change its size or its pattern by merely altering the form or itsassociated mask form, as discussed above.
Figure 8-6. Using a Clipping Rectangle with a Form
138 Practical Smalltalk
Any instance of Class Pen keeps track, among other things, of its currentlocation, direction, and downState (i.e., whether it is drawing or movingwithout leaving a trace behind).
We'll take a look at nine of the most useful methods in the class Pen insome detail. We can divide these methods as follows:
• two methods that deal with the status of the Pen (i.e., whether it isdrawing or not)
• two methods that deal with the Pen's point, or nib
• five methods that deal with movement and location of the Pen
Methods Relating to Pen Status
There are two methods that relate to the status of an instance of the class Pen:up and down.
Sending an instance of Pen the up message effectively stops drawing asit moves around in response to other messages that relocate its position inthe form. Conversely, sending it the down message resumes drawing.
A new instance of the class Pen starts with its point down.
Methods Relating to a Pen's Nib
When you create a new instance of class Pen, you generally give the drawinginstrument a point, or nib, to use as a default. As you use the Pen, you maywish to change its nib from time to time. As we indicated earlier, a Pen nibis actually a source form used as the Pen draws lines during movement.
The defaultNib: method sets the size and shape of the nib of a Pen. It takesan integer or a point as an argument. With no defaultNib:, Smalltalk/Vdefaults to a nib of one pixel by one pixel in size. This is equivalent tosupplying 1 or the point 1 @ 1 as an argument to the defaultNib: message. Ifyou use an integer argument, Smalltalk/V creates a nib that is that integernumber of pixels wide and high. In other words, the command:
is identical in effect to the command:
Whenever the Pen draws, it uses its current defaultNib: setting. To changethe size of the nib, you must send another defaultNib: message with a newinteger or point value.
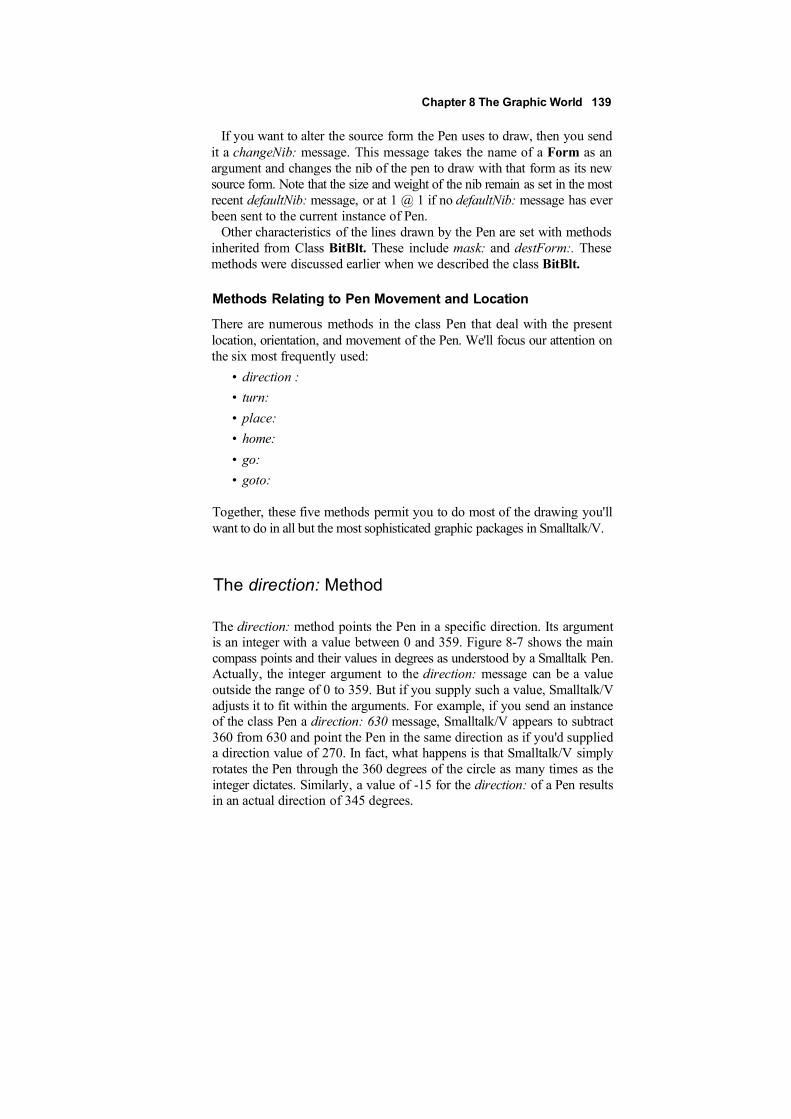
Chapter 8 The Graphic World 139
If you want to alter the source form the Pen uses to draw, then you sendit a changeNib: message. This message takes the name of a Form as anargument and changes the nib of the pen to draw with that form as its newsource form. Note that the size and weight of the nib remain as set in the mostrecent defaultNib: message, or at 1 @ 1 if no defaultNib: message has everbeen sent to the current instance of Pen.
Other characteristics of the lines drawn by the Pen are set with methodsinherited from Class BitBlt. These include mask: and destForm:. Thesemethods were discussed earlier when we described the class BitBlt.
Methods Relating to Pen Movement and Location
There are numerous methods in the class Pen that deal with the presentlocation, orientation, and movement of the Pen. We'll focus our attention onthe six most frequently used:
• direction :
• turn:
• place:
• home:
• go:
• goto:
Together, these five methods permit you to do most of the drawing you'llwant to do in all but the most sophisticated graphic packages in Smalltalk/V.
The direction: Method
The direction: method points the Pen in a specific direction. Its argumentis an integer with a value between 0 and 359. Figure 8-7 shows the maincompass points and their values in degrees as understood by a Smalltalk Pen.Actually, the integer argument to the direction: message can be a valueoutside the range of 0 to 359. But if you supply such a value, Smalltalk/Vadjusts it to fit within the arguments. For example, if you send an instanceof the class Pen a direction: 630 message, Smalltalk/V appears to subtract360 from 630 and point the Pen in the same direction as if you'd supplieda direction value of 270. In fact, what happens is that Smalltalk/V simplyrotates the Pen through the 360 degrees of the circle as many times as theinteger dictates. Similarly, a value of -15 for the direction: of a Pen resultsin an actual direction of 345 degrees.
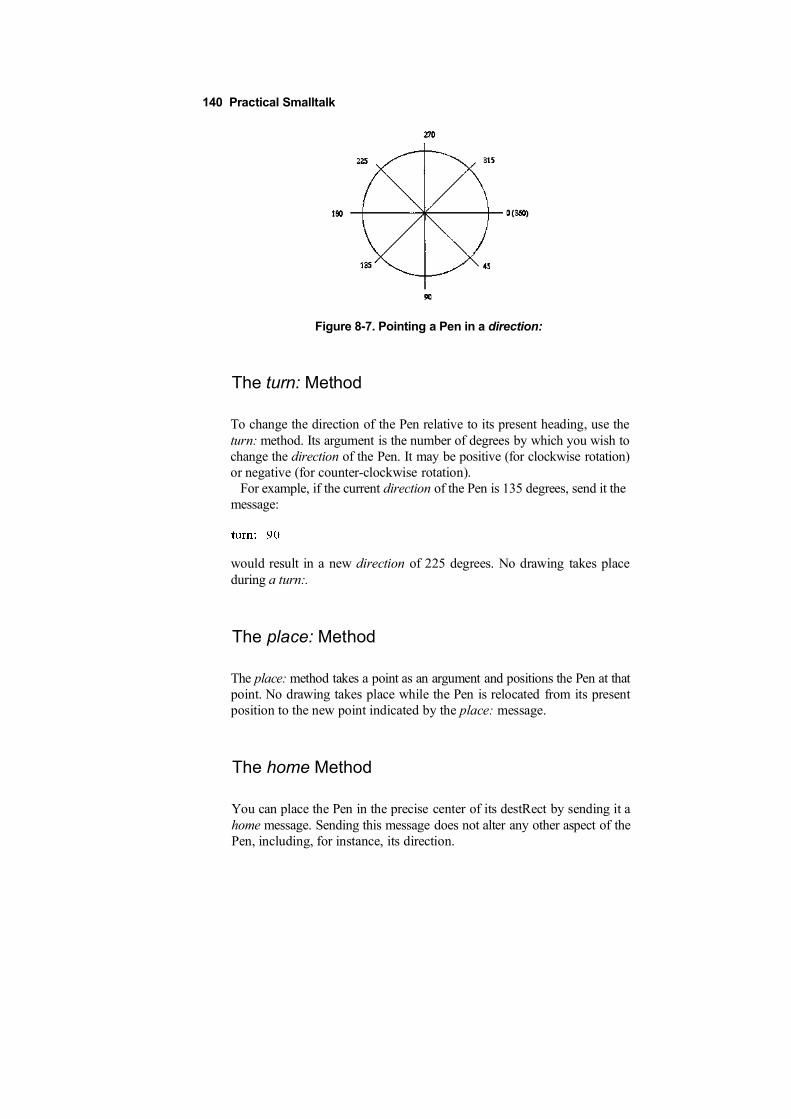
Figure 8-7. Pointing a Pen in a direction:
The turn: Method
To change the direction of the Pen relative to its present heading, use theturn: method. Its argument is the number of degrees by which you wish tochange the direction of the Pen. It may be positive (for clockwise rotation)or negative (for counter-clockwise rotation).
For example, if the current direction of the Pen is 135 degrees, send it themessage:
would result in a new direction of 225 degrees. No drawing takes placeduring a turn:.
The place: Method
The place: method takes a point as an argument and positions the Pen at thatpoint. No drawing takes place while the Pen is relocated from its presentposition to the new point indicated by the place: message.
The home Method
You can place the Pen in the precise center of its destRect by sending it ahome message. Sending this message does not alter any other aspect of thePen, including, for instance, its direction.
140 Practical Smalltalk
Chapter 8 The Graphic World 141
The go: Method
To move the Pen relative to its present position, send it a go: message withan integer as an argument. The integer tells the Pen how many pixels tomove in its current direction. For example, if the Pen is located at point 50@ 50 in the Form in which it is drawing, and is pointed in direction 270 (i.e.,straight toward the top of the screen) and you send it a message like this:
Pen go: 200.
then it will move 200 pixels straight up the screen. (Actually, its verticalmovement is adjusted depending oil the aspect ratio of the display, but thatis a nicety you can ignore for the moment.)
The goto: Method
You can achieve absolute movement of the Pen to a defined point on thescreen while drawing a line (if the Pen is down, of course) with the goto:message. This message takes a point as an argument and moves the Pen fromits current position directly to that point in the current Form.
It is important to note that this kind of movement by nature overrides thePen's current direction setting if it is necessary to do so. The direction of thePen remains unchanged after movement with the goto: method, however.
Class GraphPane
Smalltalk/V defines a specific type of pane called a GraphPane. Its pur-pose, as its name implies, is to accommodate drawing activities in much thesame way an instance of the class TextPane is designed to accommodate thedisplay and edit text.
You know that drawing in Smalltalk requires an instance of class Form.An instance of class GraphPane is associated with a Form which containsa backup of the bitmapped image shown in the pane. This allows the paneto refresh its contents if, for example, they should be obscured by anoverlapping window.
This basic behavior of a GraphPane is the major reason for using a panerather than an arbitrarily defined Form for drawing.
The basic behavior and methods of panes we discussed in Chapter 6 andworked with in Chapter 7 are valid for instances of class GraphPane as well.Creating a graphic subpane requires the same basic syntax as that forcreating a text pane.

9The Fourth Project:A Graphing Application
Introduction
This chapter presents a graphic application which demonstrates the use ofmany of the classes and methods we examined in Chapter 8. In the process,you will get a chance to see a highly incremental approach to Smalltalkprogramming in which we build the application in three distinct stages.
As with our previous projects, we will begin this chapter by describing theapplication's purpose and operation. Then we will discuss its design interms of the Smalltalk/V class library and other considerations. Finally,we'll construct the application in small segments, explaining each as weproceed.
The program in this chapter was designed and developed by the authors inconjunction with Morton Goldberg, who wrote the code and extended theoriginal concept into a more intriguing example than it would have becomewithout his efforts.
Designing the Application
This application will be a scaled-down version of a business graphingpackage. It will lack some of the functionality and polish that a commer-cially published program for converting business data into graphs wouldhave, but within its limited scope and purpose, it will give the user a gooddeal of flexibility and control over the appearance of the graphs it produces.The window of this application—which we will call Plot Window to keepthings simple — consists of two panes. One pane displays the data beinggraphed. The other pane displays the graph itself in the form of a collectionof horizontal or vertical bars. The user can choose the orientation of the bars(horizontal or vertical), their spacing, proportionality, and pattern (whichcould be extended on a color display to specify the color of the bars).Obviously, a more robust application would allow the user more types of graphs.
143
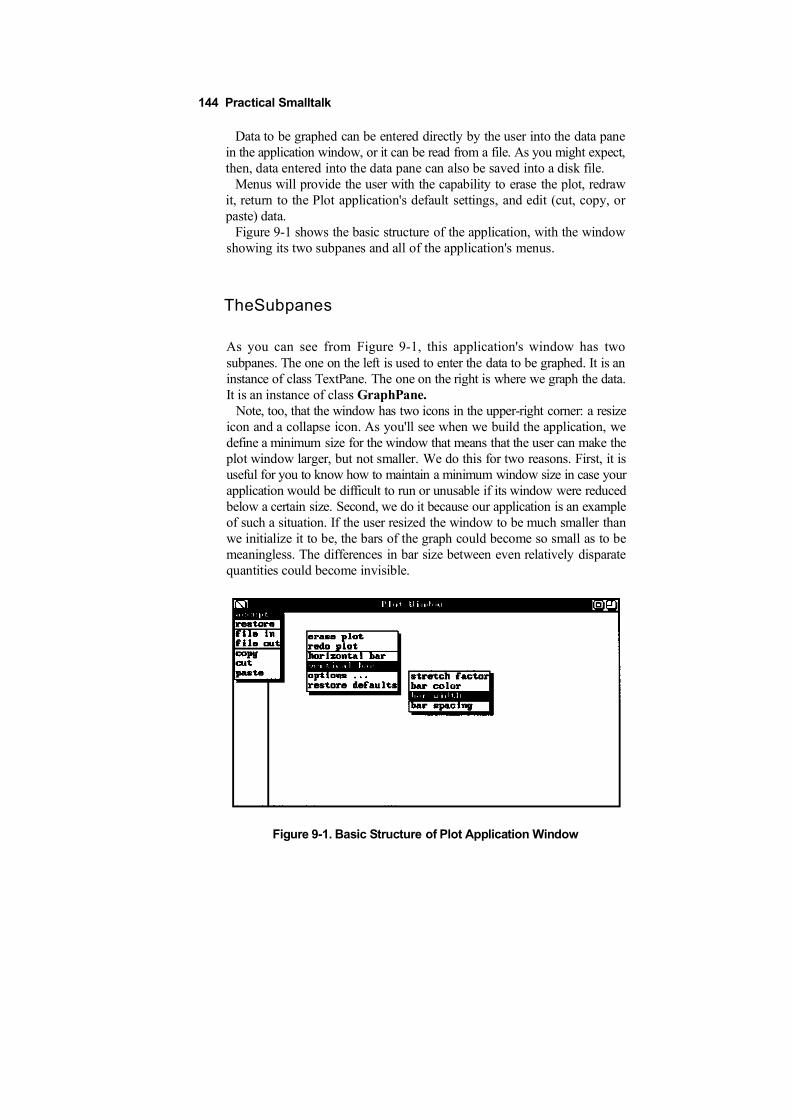
144 Practical Smalltalk
Data to be graphed can be entered directly by the user into the data panein the application window, or it can be read from a file. As you might expect,then, data entered into the data pane can also be saved into a disk file.
Menus will provide the user with the capability to erase the plot, redrawit, return to the Plot application's default settings, and edit (cut, copy, orpaste) data.
Figure 9-1 shows the basic structure of the application, with the windowshowing its two subpanes and all of the application's menus.
TheSubpanes
As you can see from Figure 9-1, this application's window has twosubpanes. The one on the left is used to enter the data to be graphed. It is aninstance of class TextPane. The one on the right is where we graph the data.It is an instance of class GraphPane.
Note, too, that the window has two icons in the upper-right corner: a resizeicon and a collapse icon. As you'll see when we build the application, wedefine a minimum size for the window that means that the user can make theplot window larger, but not smaller. We do this for two reasons. First, it isuseful for you to know how to maintain a minimum window size in case yourapplication would be difficult to run or unusable if its window were reducedbelow a certain size. Second, we do it because our application is an exampleof such a situation. If the user resized the window to be much smaller thanwe initialize it to be, the bars of the graph could become so small as to bemeaningless. The differences in bar size between even relatively disparatequantities could become invisible.
Figure 9-1. Basic Structure of Plot Application Window
Chapter 9 The Fourth Project: A Graphing Application 145
The Class PlotWindow
We create an entirely new class for this application, as you will usually do.We call this class PlotWindow. Because this is a largely self-containedapplication, we make it a descendant of the root class Object rather thansubclassing. Start by creating this class, editing the class definition templateto add the following instance variables: plotPane, plotSelector, factor,barWidth, barFill, barSpacing, and barPen.
Building the Application: Stage One
As we indicated at the beginning of this chapter, we're going to develop thePlot application using an incremental style. You may often find thisapproach useful, particularly in situations where you wish to demonstrate tosomeone (a customer or user, for example) how an application is going tolook before you've spent a lot of time and energy developing its morecomplex behavioral methods.
When you take this approach, you need to decide how many stages to useand how much functionality you'll incorporate at each stage. These deci-sions tend to be somewhat arbitrary and application-specific, so we can'tgive you a lot of guidance. The issues involved are basic computer scienceconcerns that are addressed in many other books. We can, however, say thatthe first stage of an incremental development in Smalltalk should almostalways be one that produces a basic shell of what the application willultimately look like. It should have little or no functionality. Its purpose isto demonstrate to a prospective user what the application looks like, what itsbasic menu choices are, and how it will behave in the broadest sense of theterm.
We have chosen to develop this application in three stages:
1. Non-functional shell
2. Basic graphing capability, with most user options not yet incorporated
3. Inclusion of all user options
The open Method
As will often be the case in incremental Smalltalk program development,we'll begin by creating the method that sets up the application window andits subpanes. By convention, we'll refer to this as the open method. The code
146 Practical Smalltalk
for this method appears below. Other than the inclusion of an instance ofclass GraphPane, there is nothing in this method you haven't seen in earlierchapters, so we won't spend time describing it here.
open"Open the Receiver. Define the pane sizes and behavior,and schedule the window. "
I topPane ItopPane := TopPane new.topPanemodel: self;
minimumSize: self initWindowSize extent;label: 'Plot Window'; rightlcons: #(resizecollapse). topPane addSubpane: (TextPanenew model: self; menu: ftdataMenu; name:#dataPane; change: #string:from:;framingBlock:[ :box I box origin extent: 50 @ box height ] ) . topPaneaddSubpane: (plotPane := GraphPane new model: self;menu: #plotMenu; name: #plotPane:; framingBlock:
[ :box I (box origin + (50 @ 0) ) corner: box corner ] )topPane dispatcher open scheduleWindow
The initWindowSize Method
As we saw in Chapters 6 and 7, most of the time we want to include aninitWindowSize method in any pane definitions we create. We are tying theminimum size of the application window to its initial size, so we must createa method to define that initial size. The code follows:
initWindowSize"Answer the initial size for a receiver Window."
'M Display boundingBox insetBy: 30 @ 25)
Chapter 9 The Fourth Project: A Graphing Application 147
Since we plan on creating a window that occupies most of the screen'sdisplay area, we inset it initially only a little from the top left corner of thescreen.
Methods for the Text Pane
The text pane where the data will be entered requires three basic methods,as you can see from its definition in the open method above: dataMenu,dataPane, and string:from:. We have seen the functional equivalents ofthese methods before. The code for the three methods appears below:
dataMenu"Answer the menu for the data pane. " ^Menu labels:'accept\restore\copy\cut\paste' withers
lines: #(2)selectors: #(accept cancel copySelection cutSelection
pasteSelection)
dataPane
The menu for this pane will, in this preliminary version at least, allow theuser to choose from the options: accept, restore, copy, cut, and paste. Wewill see that later we will decide (based, in a real-world situation, on thecustomer's feedback in all likelihood) that we need to add other functionsto this menu. But for the moment, we'll leave the prototype in this state.
Notice that the change: method—named, in this case, string:from:—doesnothing in this prototype version of the application. Later, we'll fill it in withcode that will result in it changing the plot when the data in the TextPanechanges.
For now, we just need to have the method present to avoid an error thatwould otherwise arise if the user selected "Save" from the menu.
148 Practical Smalltalk
Methods for the Graphing Pane
From the open method, you can see we need to define two methods for theGraphPane to avoid compilation errors and complete work on our semi-functional prototype version of the Plot application: plotMenu (which de-fines the menu for the pane) and plotPane: (which plays the usual role of aname: method in a subpane definition). Here is the code for these two methods:
selectors: #(clearPlot setHorizontal setVertical)
plotPane: aRect"Make a blank form the size of the screen. Display the form in
aRect on the screen. Answer the form." I blankForm I (blankForm:= Form width: Display width height: Display height)
displayAt: aRect origin clippingBox: aRect.^blankForm
Notice that the menu allows the user to erase the current graph or to chooseeither a horizontal bar or a vertical bar.
The plotPane: method creates a new blank Form the size of the screen(which is why you see the Display being used as a sizing reference). Inpractice, we'll send the plotPane: message with a argument that is a rect-angle. You'll see how this works when we flesh out the application later.
Demonstrating the First Version
In keeping with the principle we presented earlier, we'll define an exampleclass method for our new PlotWindow class. Like most such methods, it isquite simple:
example"Open a PlotWindow for demonstration purposes"PlotWindow new open
Now we can demonstrate how this window will look and describe itsbehavior by executing the following line of code:

Chapter 9 The Fourth Project: A Graphing Application 149
You can now display the two pane menus, show how the minimum size ofthe window is constrained, collapse the window, and describe what willhappen when the menu choices are selected in the finished application. (Ofcourse, we haven't defined the methods that will be called when the menuchoices are actually made, so if you or the user inadvertently selects a menuchoice at this point, an error walkback will appear. Some prototype design-ers would take our design a step farther and define dummy methods for allof these menu choices. You can make this determination for yourself. It willprobably vary with the application and the nature of the user for whom thedemonstration is being presented.)
Incidentally, the menu options in the TextPane will work as expected,since the methods they call are standard TextEditor methods. We'll learnmore about text editing classes and methods in Chapters 10 and 11. Anotherthing you can demonstrate to the user is that an attempt to close the windowafter the contents of the TextPane have been changed will result in a con-firmation window being presented by Smalltalk.
For a prototype, this little application is reasonably demonstrable. You canshow the user the window and its subpanes, demonstrate its movement,resizing and collapsing, examine the menu choices you've decided toinclude, and show how data entry and editing will work in the TextPane. Youcan also show the user a built-in safeguard against accidentally deletingdata. And yet you've had to write relatively little code to get this far.
We won't reproduce the entire listing of this prototype version of theapplication here as we have done in earlier chapters. Instead, we will list thenext version's code in its entirety since that is the first one that will actuallydo something when you run it.
Building the Application: Stage Two
In the second stage of our application construction, we will add the abilityto draw the bar graphs. We will also define and initialize some factors thatthe user will later be able to adjust affecting the style, appearance, spacing,and other characteristics of the graphing bars themselves. Finally, to makethe application complete, we will fill in the string:from: method that we needto cause the graphing pane to update its contents in response to the user'smodifying the data in the TextPane.
150 Practical Smalltalk
Plotting the Plots' Arguments
Before we can write the methods that will draw the bars, we need to decidewhat factors make up the size, appearance, and relative positioning of thebars in a graph. Then we can determine which factors we want to controlwithin the application and which ones we wish to allow the user to modify.That will give us the information we need to create an initialization routineto set up default values for all of these variables and to write the bar-generating methods horizontalBar: and verticalBar: to make use of thesevariables.
Three of these values are relatively self-evident from an examination ofany bar graph. These are the width of each bar (which you can also think ofas the thickness of the lines), the spacing between bars, and the pattern orcolor to use to fill in the bars. This last value, as you can probably guess fromour discussion in Chapter 8 about drawing in Smalltalk/V, will determinethe mask to be used for the Pen we create to draw the bars.
A study of data graphing techniques reveals one other characteristic of abar in a graph which we may wish to accommodate. We need some way tocontrol the scaling of the data in the GraphPane so that we can convey themaximum amount of information to the user in the space available. Depend-ing on the ranges of values the user enters, the scaling needs to be adjusted.For example, if the user enters a series of values all within the range of 10-50, and then later wants to plot a series of values ranging from 100 to 500,we don't want the second plot to be 10 times as wide as the first (or,conversely, for the first plot to be one-tenth as wide as the second). Thiscould result in either miniscule bars that are very hard to differentiate fromone another at low ranges so we can accommodate larger ranges or bars thatare so wide that getting to the ends so we can assess their relative sizes wouldbe cumbersome at best and impossible at worst.
To accommodate this need, we have chosen to use a stretch factor, whichis an integer by which we will multiply each of the data values to be plotted.
A quick examination of these four constraints on a bar graph reveals thatwe probably want the user to be able to control them in all situations. In thefinal version of the application, then, we'll devise a method to allow the userto modify any or all of these characteristics from a popup menu withouthaving to modify the code of the application. For this version, however,we're going to establish reasonable default values for all of these variablesand define a method to initialize them. This is, of course, preferable to "hard-coding" the values directly in the bar-graphing methods, since it will makeit easier later to modify them either in the code (as we develop andexperiment with it) or from a menu (when we make that capability available
Chapter 9 The Fourth Project: A Graphing Application 151
to the user). We will, however, add the methods necessary to permit the userto determine which type of graph to use.
The initialize Method
Now that we know what variables we need to accommodate, we can easilywrite the initialize method that will set up the arguments for a bar graphunless the user modifies any or all of them later.
We need to initialize one additional factor, namely the type of bar to bedrawn. We had already determined in the prototype to let the user choose ahorizontal or vertical bar. We're going to decide, quite arbitrarily of course,to start out assuming the user wants to use horizontal bars.
Here, then, is the code for the initialize method:
initialize"Initialize instance variables with default values."plotSelector := #horizontalBar : .factor := 4. "stretch the data values by this much"barWidth := 2 * SysFont height. barSpacing :=SysFont height. barFill := Form gray. barPen := Pennew mask: barFill
Notice that we use the system font' s height as the yardsticks by which to setup default values for width and spacing of the bars. This is preferable tohard-coding some value since it allows the display to be flexible dependingon the system and the font it uses. Also notice the last line of this methodwhere we create an instance of class Pen with which to draw the bars andgive it the mask value stored in the instance variable barFill.
The mere inclusion of this method and the definition of these instancevariables necessitate two other changes to our earlier code.
First, we have to declare these instance variables in the class defi-nition. We've done this before, so we won't take the time to reproduce thecode here. As we go along in this development, you'll notice that we addsome other instance variables to the list as well. We'll point these out as theyarise; be sure to add them to the class definition.
Second, we must call this initialize method from somewhere in the openmethod so that the initialization actually takes place. This simply requiresus to add a line anywhere in the open method that says:
152 Practical Smalltalk
Drawing the Bars
With the constraint variables defined, we are ready to write the methods thatactually draw the bars in the GraphPane. They are quite similar to oneanother, so we'll take a close look at the horizontalBar: method and thenreproduce the verticalBar: method with little commentary. The drawingprocess can be thought of as taking place in five steps:
1. Create a form in which the drawing will take place.
2. Define a pen with which to draw.
3. Loop through each data element, calculating and drawing each bar.
4. Set up a backup Form where the GraphPane's contents can be storedin the event the pane needs refreshing at some point.
5. Use copy Bits to cause the actual display of the graph as described inChapter 8.
Here is the code for the horizontalBar: method. We'll analyze its variouscomponents with the above five-step process in mind.
Creating the Form
The first executable line of code in the horizontalBar: method defines a newForm the size of the display screen. We saw this approach in Chapter 8.
Chapter 9 The Fourth Project: A Graphing Application 153
Defining the Pen
Having created an instance of class Pen called barPen in the initializemethod, we now send this new drawing instrument a series of messages.
The first message sets the pen's defaultNib: to be one pixel high. The widthof the nib is calculated by multiplying the width of the bars defined in theinitialize method by the aspect ratio of the display, a value that is stored ina special Smalltalk/V global variable called Aspect. (Note that this variable'sname begins with a capital letter to indicate that it is either a global or a classvariable.)
Next, we set the pen's direction to be 0, which, as we saw in Chapter 8,means that it will begin drawing from left to right (or, directionally, to theeast) when it is moved.
Finally, we tell the Pen to use the form created earlier as its destinationForm.
Calculating and Drawing the Bars
We use a do: block to loop through the data in the instance variable theDatathat is passed as an argument with the horizontalBar: message. (We will seeshortly how this variable is determined from the values entered by the userin the TextPane. This processing is handled by the string:from: method thatis defined as this pane's change: method.)
For each entry in this variable, which is an instance of classOrderedCollection, we place the pen at its next starting point, then use thego: method to cause the pen to draw the bar. Finally, we relocate the verticalposition of the pen by incrementing the value of its y instance variable. Thenwe repeat the process.
Notice that we use the stretch factor, which we stored in the instance variablefactor, to scale each element in the data collection as we draw it. Note, too,that we determine where to place the pen for the next horizontal bar byadding the spacing and width of the bars — factors that are set up in theinitialize routine — and then multiplying them by the aspect ratio of the display.
Setting Up a Backup Form
The next to last line in the horizontalBar: method uses the GraphPaneinstance method form: to define the form declared at the first step in thisdrawing process as the backup form for the GraphPane's contents.
Displaying the Bars with copyBits
The last line in the horizontalBar: method uses the copyBits message which,as you know, is the method that causes the drawing to appear in the
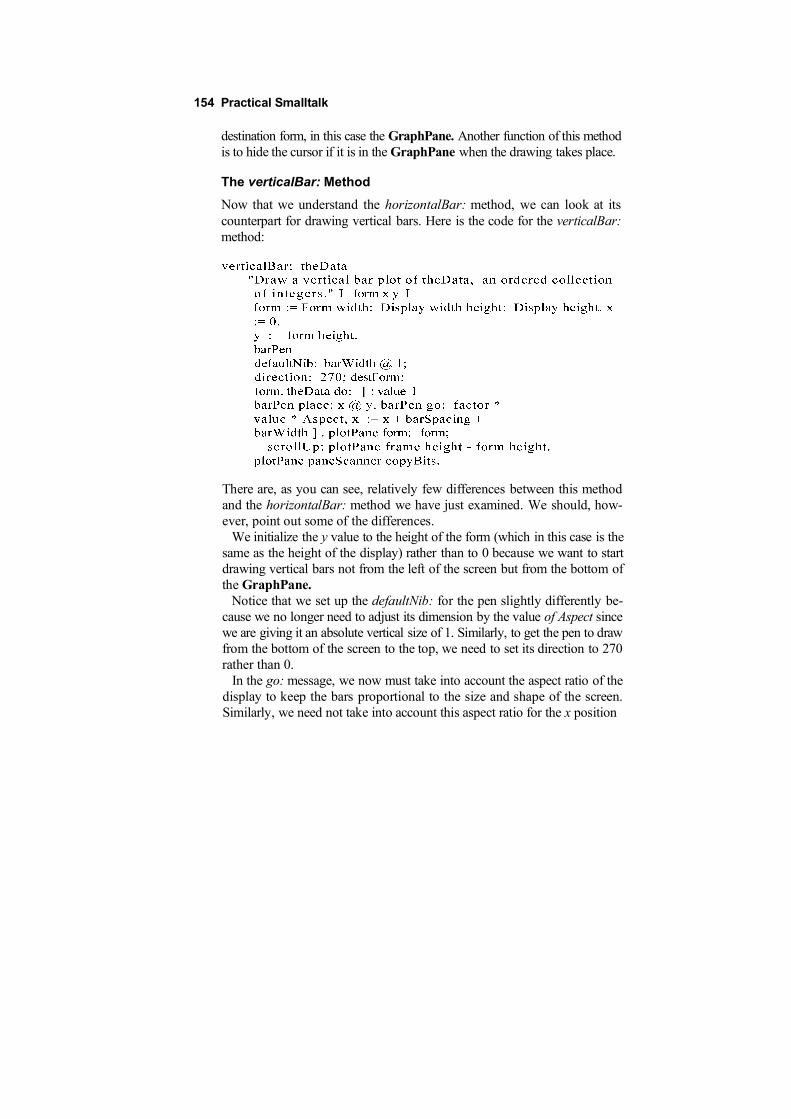
154 Practical Smalltalk
destination form, in this case the GraphPane. Another function of this methodis to hide the cursor if it is in the GraphPane when the drawing takes place.
The verticalBar: Method
Now that we understand the horizontalBar: method, we can look at itscounterpart for drawing vertical bars. Here is the code for the verticalBar:method:
There are, as you can see, relatively few differences between this methodand the horizontalBar: method we have just examined. We should, how-ever, point out some of the differences.
We initialize the y value to the height of the form (which in this case is thesame as the height of the display) rather than to 0 because we want to startdrawing vertical bars not from the left of the screen but from the bottom ofthe GraphPane.
Notice that we set up the defaultNib: for the pen slightly differently be-cause we no longer need to adjust its dimension by the value of Aspect sincewe are giving it an absolute vertical size of 1. Similarly, to get the pen to drawfrom the bottom of the screen to the top, we need to set its direction to 270rather than 0.
In the go: message, we now must take into account the aspect ratio of thedisplay to keep the bars proportional to the size and shape of the screen.Similarly, we need not take into account this aspect ratio for the x position
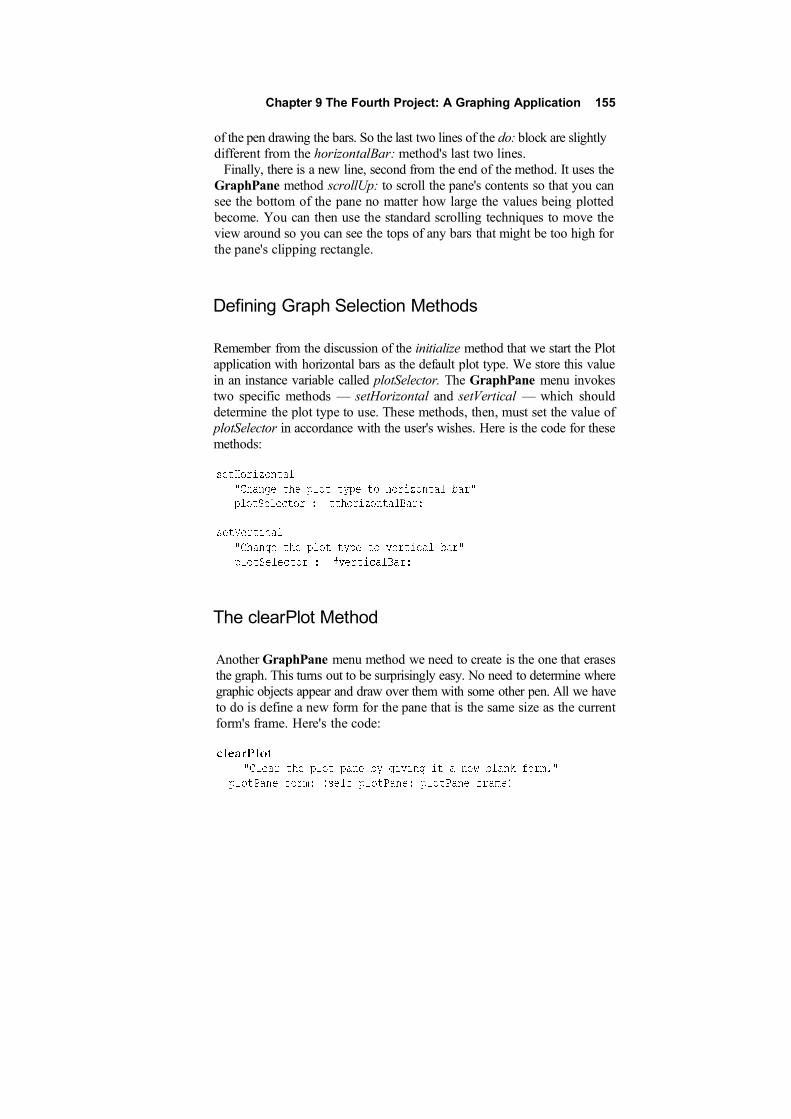
Chapter 9 The Fourth Project: A Graphing Application 155
of the pen drawing the bars. So the last two lines of the do: block are slightlydifferent from the horizontalBar: method's last two lines.
Finally, there is a new line, second from the end of the method. It uses theGraphPane method scrollUp: to scroll the pane's contents so that you cansee the bottom of the pane no matter how large the values being plottedbecome. You can then use the standard scrolling techniques to move theview around so you can see the tops of any bars that might be too high forthe pane's clipping rectangle.
Defining Graph Selection Methods
Remember from the discussion of the initialize method that we start the Plotapplication with horizontal bars as the default plot type. We store this valuein an instance variable called plotSelector. The GraphPane menu invokestwo specific methods — setHorizontal and setVertical — which shoulddetermine the plot type to use. These methods, then, must set the value ofplotSelector in accordance with the user's wishes. Here is the code for thesemethods:
The clearPlot Method
Another GraphPane menu method we need to create is the one that erasesthe graph. This turns out to be surprisingly easy. No need to determine wheregraphic objects appear and draw over them with some other pen. All we haveto do is define a new form for the pane that is the same size as the currentform's frame. Here's the code:
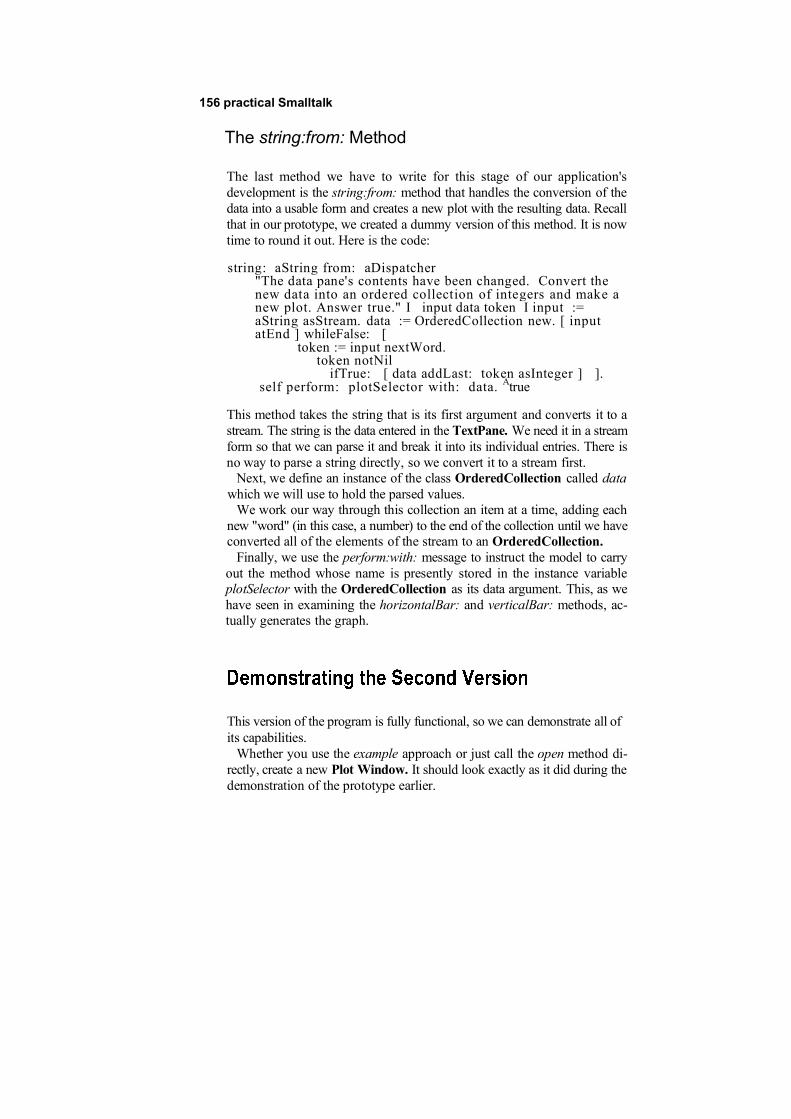
156 practical Smalltalk
The string:from: Method
The last method we have to write for this stage of our application'sdevelopment is the string:from: method that handles the conversion of thedata into a usable form and creates a new plot with the resulting data. Recallthat in our prototype, we created a dummy version of this method. It is nowtime to round it out. Here is the code:
string: aString from: aDispatcher"The data pane's contents have been changed. Convert thenew data into an ordered collection of integers and make anew plot. Answer true." I input data token I input :=aString asStream. data := OrderedCollection new. [ inputatEnd ] whileFalse: [
token := input nextWord.token notNil
ifTrue: [ data addLast: token asInteger ] ].self perform: plotSelector with: data. Atrue
This method takes the string that is its first argument and converts it to astream. The string is the data entered in the TextPane. We need it in a streamform so that we can parse it and break it into its individual entries. There isno way to parse a string directly, so we convert it to a stream first.
Next, we define an instance of the class OrderedCollection called datawhich we will use to hold the parsed values.
We work our way through this collection an item at a time, adding eachnew "word" (in this case, a number) to the end of the collection until we haveconverted all of the elements of the stream to an OrderedCollection.
Finally, we use the perform:with: message to instruct the model to carryout the method whose name is presently stored in the instance variableplotSelector with the OrderedCollection as its data argument. This, as wehave seen in examining the horizontalBar: and verticalBar: methods, ac-tually generates the graph.
This version of the program is fully functional, so we can demonstrate all ofits capabilities.
Whether you use the example approach or just call the open method di-rectly, create a new Plot Window. It should look exactly as it did during thedemonstration of the prototype earlier.
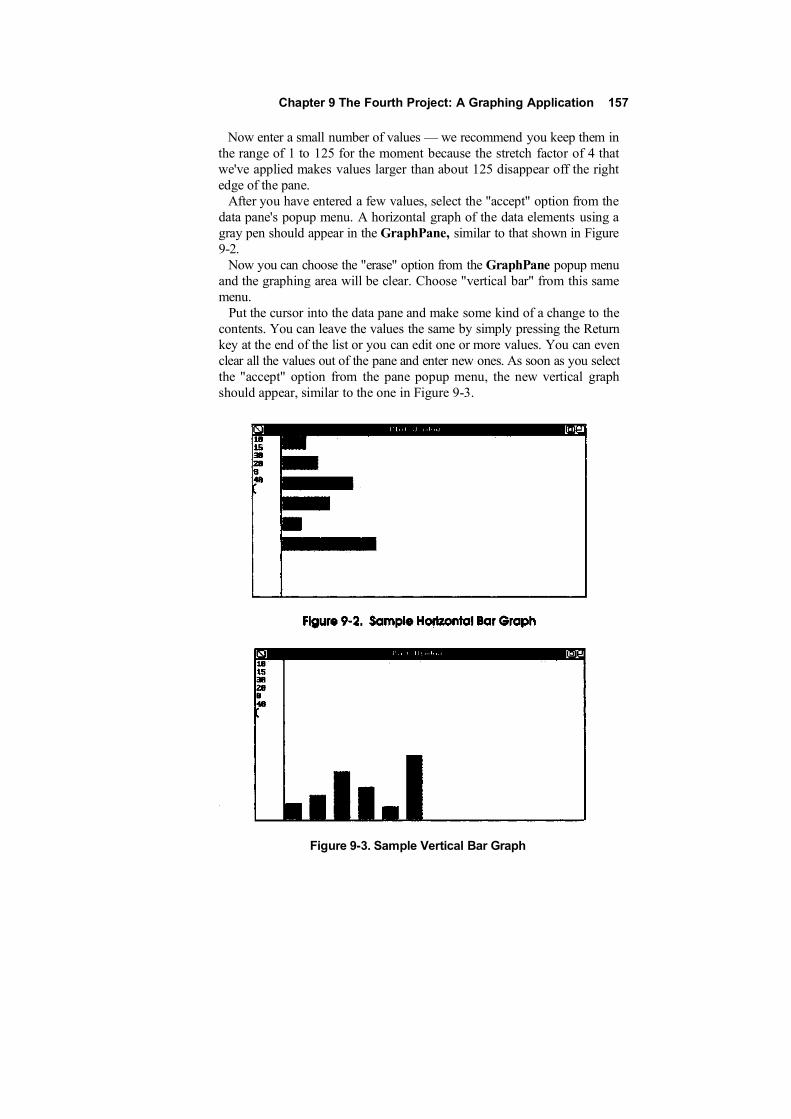
Chapter 9 The Fourth Project: A Graphing Application 157
Now enter a small number of values — we recommend you keep them inthe range of 1 to 125 for the moment because the stretch factor of 4 thatwe've applied makes values larger than about 125 disappear off the rightedge of the pane.
After you have entered a few values, select the "accept" option from thedata pane's popup menu. A horizontal graph of the data elements using agray pen should appear in the GraphPane, similar to that shown in Figure9-2.
Now you can choose the "erase" option from the GraphPane popup menuand the graphing area will be clear. Choose "vertical bar" from this samemenu.
Put the cursor into the data pane and make some kind of a change to thecontents. You can leave the values the same by simply pressing the Returnkey at the end of the list or you can edit one or more values. You can evenclear all the values out of the pane and enter new ones. As soon as you selectthe "accept" option from the pane popup menu, the new vertical graphshould appear, similar to the one in Figure 9-3.
Figure 9-3. Sample Vertical Bar Graph
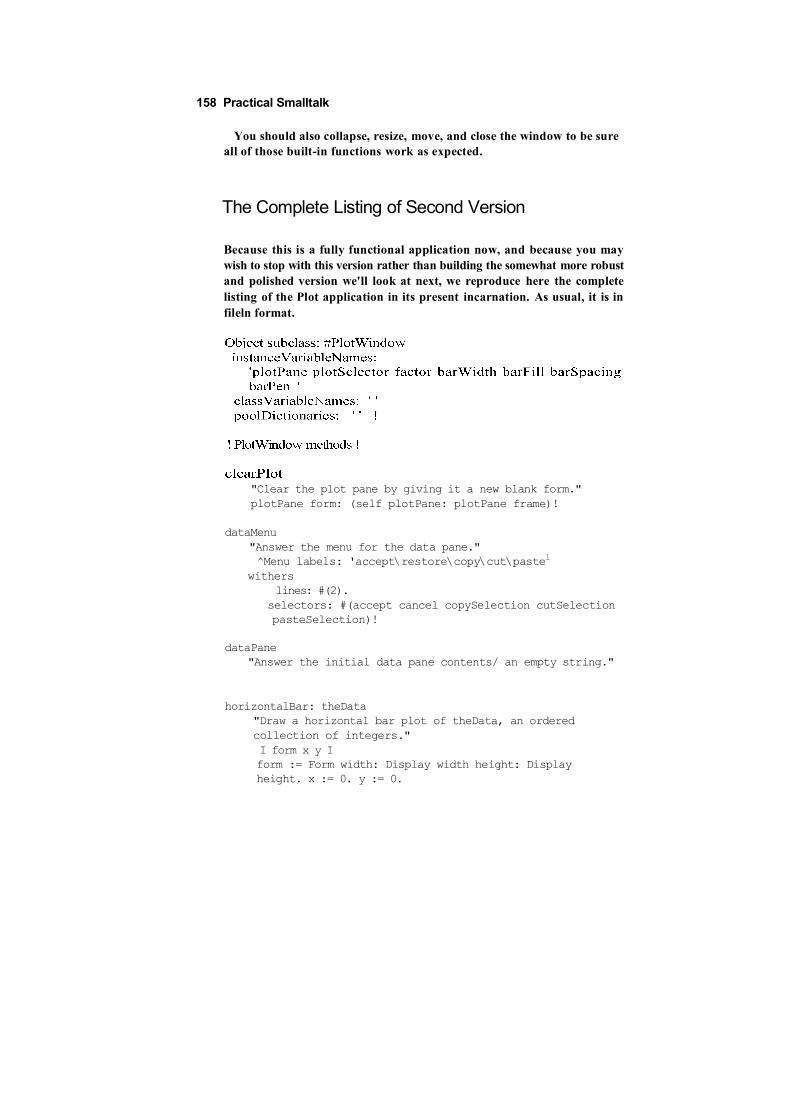
158 Practical Smalltalk
You should also collapse, resize, move, and close the window to be sureall of those built-in functions work as expected.
The Complete Listing of Second Version
Because this is a fully functional application now, and because you maywish to stop with this version rather than building the somewhat more robustand polished version we'll look at next, we reproduce here the completelisting of the Plot application in its present incarnation. As usual, it is infileln format.
"Clear the plot pane by giving it a new blank form."plotPane form: (self plotPane: plotPane frame)!
dataMenu"Answer the menu for the data pane."^Menu labels: 'accept\restore\copy\cut\paste1
witherslines: #(2).
selectors: #(accept cancel copySelection cutSelectionpasteSelection)!
dataPane"Answer the initial data pane contents/ an empty string."
horizontalBar: theData"Draw a horizontal bar plot of theData, an orderedcollection of integers."I form x y Iform := Form width: Display width height: Displayheight. x := 0. y := 0.
________ Chapter 9 The Fourth Project: A Graphing Application 159
barPendefaultNib: 1 @ (barWidth * Aspect) rounded;direction: 0; destForm: form. theData do: [ :datum I
barPen place: x @ y.barPen go: factor * datum.
y := y + ((barSpacing + barWidth) * Aspect) rounded ]plotPane form: form. plotPane paneScanner copyBits!
initialize"Initialize instance variables with default values."plotSelector := #horizontalBar:.factor := 4. "stretch the data values by this much"barWidth := 2 •* SysFont height. barSpacing :=SysFont height. barFill : = Form gray. barPen := Pennew mask: barFill!
ini tWindowS i z e"Answer the initial size for a receiver Window."^(Display boundingBox insetBy: 30 @ 25) !
open"Open the Receiver. Define the pane sizes and behavior,and schedule the window." I topPane I self initialize.topPane := TopPane new. topPane
model: self;minimumSize: self initWindowSize extent;label: 'Plot Window1; rightlcons: #(resizecollapse). topPane addSubpane: (TextPane newmodel: self; menu: #dataMenu; name:ttdataPane; change: #string:from: ;framingBlock: [ :box I box origin extent: 50@ box height ]). topPane addSubpane:(plotPane :=
160 Practical Smalltalk
GraphPane new model:self; menu:#plotMenu; name:#plotPane:;framingBlock: [:box I(box origin + (50 @ 0)) corner: box corner ]) .
topPane dispatcher open scheduleWindow!
plotMenu"Answer the menu for the plot pane." ^Menu labels:'erase\horizontal bar\vertical bar1 withers
lines: #(1) selectors: #(clearPlot setHorizontalsetVertical)!
plotPane: aRect"Make a blank form the size of the screen. Display the formin aRecton the screen. Answer the form."I blankForm I(blankForm := Form width: Display width height: Displayheight)displayAt: aRect origin clippingBox: aRect.
"blankForm!
setHorizontal"Change the plot type to horizontal bar."plotSelector :=#horizontalBar: !
setVertical"Change the plot type to vertical bar. "plotSelector := #verticalBar: !
string: aString from: aDispatcher"The data pane's contents have been changed. Convert thenew data into an ordered collection of integers and makea new plot. Answer true." I input data token I input :=aString asStream. data := Orderedcollection new. [ inputatEnd ] whileFalse: [
token := input nextWord.token notNilifTrue: [ data addLast: token aslnteger ] ] .
self perform: plotSelector with: data. Atrue!
verticalBar: theData"Draw a vertical bar plot of theData, an ordered collectionof integers."
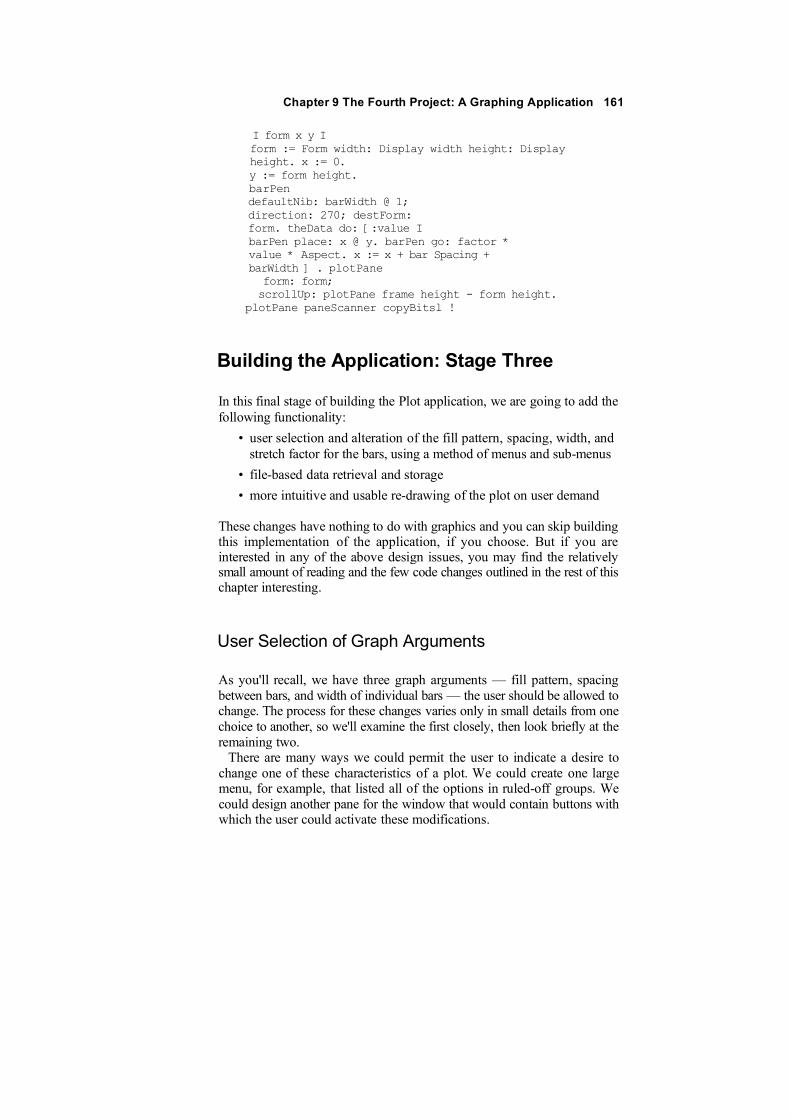
Chapter 9 The Fourth Project: A Graphing Application 161
I form x y Iform := Form width: Display width height: Displayheight. x := 0.y := form height.barPendefaultNib: barWidth @ 1;direction: 270; destForm:form. theData do: [:value IbarPen place: x @ y. barPen go: factor *value * Aspect. x := x + bar Spacing +barWidth ] . plotPane
form: form;scrollUp: plotPane frame height - form height.
plotPane paneScanner copyBitsl !
Building the Application: Stage Three
In this final stage of building the Plot application, we are going to add thefollowing functionality:
• user selection and alteration of the fill pattern, spacing, width, andstretch factor for the bars, using a method of menus and sub-menus
• file-based data retrieval and storage
• more intuitive and usable re-drawing of the plot on user demand
These changes have nothing to do with graphics and you can skip buildingthis implementation of the application, if you choose. But if you areinterested in any of the above design issues, you may find the relativelysmall amount of reading and the few code changes outlined in the rest of thischapter interesting.
User Selection of Graph Arguments
As you'll recall, we have three graph arguments — fill pattern, spacingbetween bars, and width of individual bars — the user should be allowed tochange. The process for these changes varies only in small details from onechoice to another, so we'll examine the first closely, then look briefly at theremaining two.
There are many ways we could permit the user to indicate a desire tochange one of these characteristics of a plot. We could create one largemenu, for example, that listed all of the options in ruled-off groups. Wecould design another pane for the window that would contain buttons withwhich the user could activate these modifications.
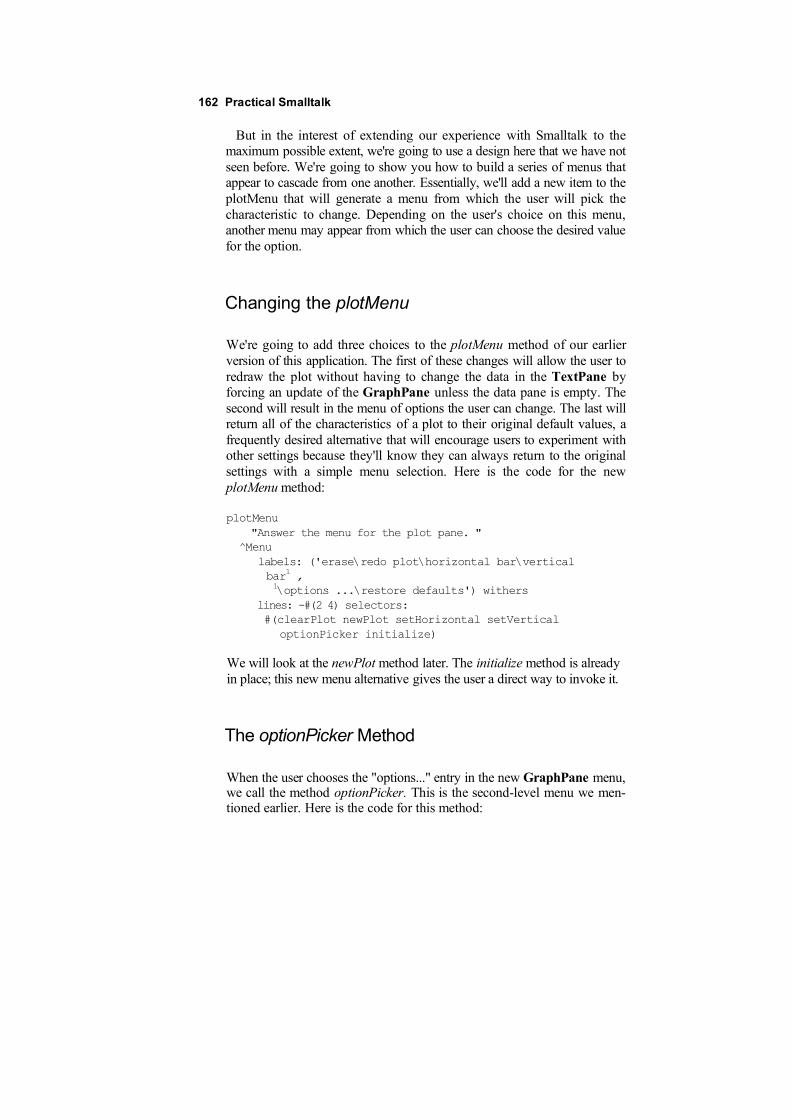
162 Practical Smalltalk
But in the interest of extending our experience with Smalltalk to themaximum possible extent, we're going to use a design here that we have notseen before. We're going to show you how to build a series of menus thatappear to cascade from one another. Essentially, we'll add a new item to theplotMenu that will generate a menu from which the user will pick thecharacteristic to change. Depending on the user's choice on this menu,another menu may appear from which the user can choose the desired valuefor the option.
Changing the plotMenu
We're going to add three choices to the plotMenu method of our earlierversion of this application. The first of these changes will allow the user toredraw the plot without having to change the data in the TextPane byforcing an update of the GraphPane unless the data pane is empty. Thesecond will result in the menu of options the user can change. The last willreturn all of the characteristics of a plot to their original default values, afrequently desired alternative that will encourage users to experiment withother settings because they'll know they can always return to the originalsettings with a simple menu selection. Here is the code for the newplotMenu method:
plotMenu"Answer the menu for the plot pane. "
^Menulabels: ('erase\redo plot\horizontal bar\verticalbar1 ,1\options ...\restore defaults') withers
lines: -#(2 4) selectors:#(clearPlot newPlot setHorizontal setVertical
optionPicker initialize)
We will look at the newPlot method later. The initialize method is alreadyin place; this new menu alternative gives the user a direct way to invoke it.
The optionPicker Method
When the user chooses the "options..." entry in the new GraphPane menu,we call the method optionPicker. This is the second-level menu we men-tioned earlier. Here is the code for this method:
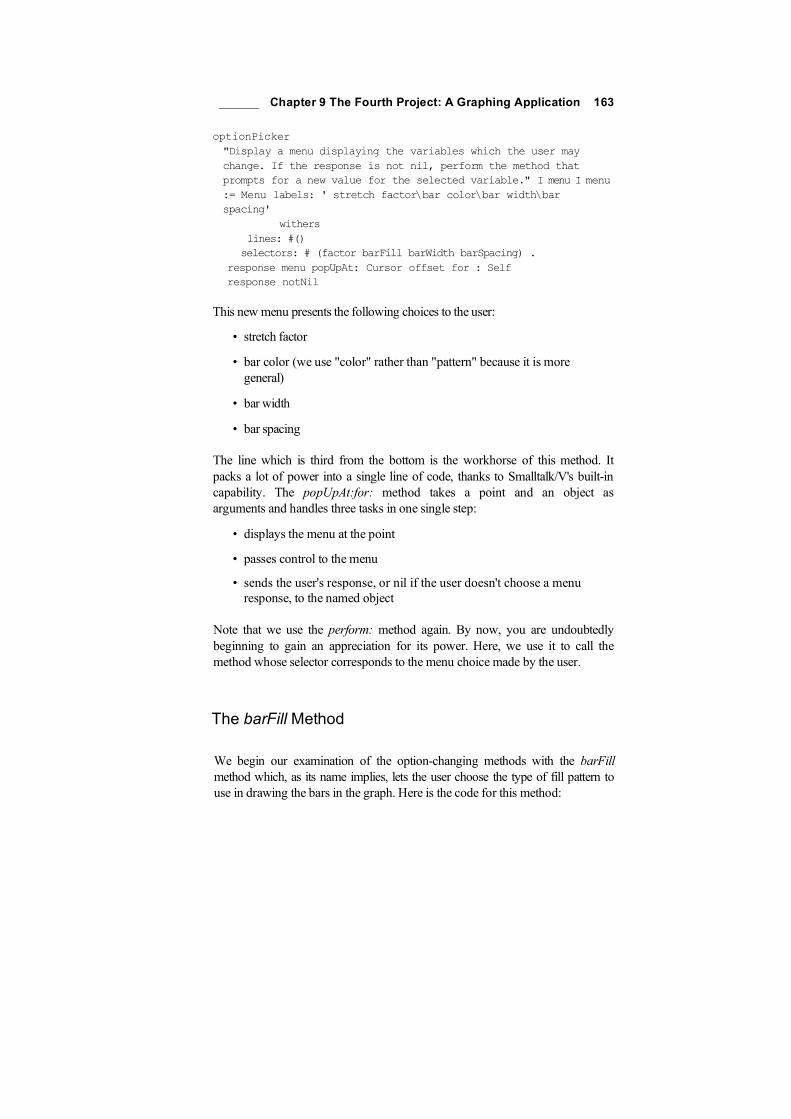
______ Chapter 9 The Fourth Project: A Graphing Application 163
optionPicker"Display a menu displaying the variables which the user maychange. If the response is not nil, perform the method thatprompts for a new value for the selected variable." I menu I menu:= Menu labels: ' stretch factor\bar color\bar width\barspacing'
witherslines: #()selectors: # (factor barFill barWidth barSpacing) .
response menu popUpAt: Cursor offset for : Selfresponse notNil
This new menu presents the following choices to the user:
• stretch factor
• bar color (we use "color" rather than "pattern" because it is moregeneral)
• bar width
• bar spacing
The line which is third from the bottom is the workhorse of this method. Itpacks a lot of power into a single line of code, thanks to Smalltalk/V's built-incapability. The popUpAt:for: method takes a point and an object asarguments and handles three tasks in one single step:
• displays the menu at the point
• passes control to the menu
• sends the user's response, or nil if the user doesn't choose a menuresponse, to the named object
Note that we use the perform: method again. By now, you are undoubtedlybeginning to gain an appreciation for its power. Here, we use it to call themethod whose selector corresponds to the menu choice made by the user.
The barFill Method
We begin our examination of the option-changing methods with the barFillmethod which, as its name implies, lets the user choose the type of fill pattern touse in drawing the bars in the graph. Here is the code for this method:
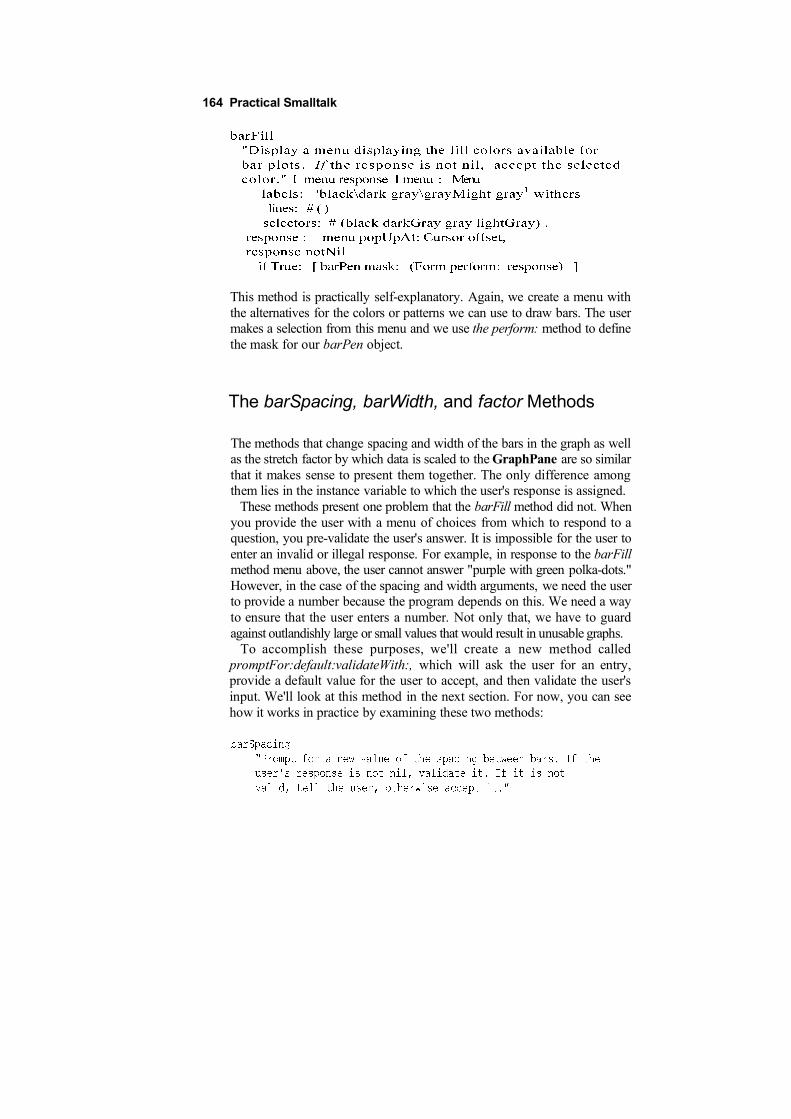
164 Practical Smalltalk
This method is practically self-explanatory. Again, we create a menu withthe alternatives for the colors or patterns we can use to draw bars. The usermakes a selection from this menu and we use the perform: method to definethe mask for our barPen object.
The barSpacing, barWidth, and factor Methods
The methods that change spacing and width of the bars in the graph as wellas the stretch factor by which data is scaled to the GraphPane are so similarthat it makes sense to present them together. The only difference amongthem lies in the instance variable to which the user's response is assigned.
These methods present one problem that the barFill method did not. Whenyou provide the user with a menu of choices from which to respond to aquestion, you pre-validate the user's answer. It is impossible for the user toenter an invalid or illegal response. For example, in response to the barFillmethod menu above, the user cannot answer "purple with green polka-dots."However, in the case of the spacing and width arguments, we need the userto provide a number because the program depends on this. We need a wayto ensure that the user enters a number. Not only that, we have to guardagainst outlandishly large or small values that would result in unusable graphs.
To accomplish these purposes, we'll create a new method calledpromptFor:default:validateWith:, which will ask the user for an entry,provide a default value for the user to accept, and then validate the user'sinput. We'll look at this method in the next section. For now, you can seehow it works in practice by examining these two methods:
Chapter 9 The Fourth Project: A Graphing Application 165
Notice that in each of these methods, we use the new prompting method,with appropriate arguments, to ask the user for a new value for thecorresponding instance variable. The validation uses the isKindOf: methodto ensure that the entry is not only numeric but a whole number. It thenchecks the range of the entry to be sure it is within reasonable limits.
The promptFondefault:validateWith; Method
Here is the code for the method we used with barSpacing and barWidthabove to prompt the user for an entry and validate the user's response:

166 Practical Smalltalk
You may use this compact general-purpose method in your own programs.It uses the Prompter class' prompt .'default: method. We used other methodsof this class earlier in the book, so it is no stranger to us.
Our new method is designed so that it takes three arguments. The first isa string that is used to complete the user prompt "Enter a new value for" withthe appropriate characteristic or property you are prompting the user tochange. The second argument is a string that represents the default value thatwill be used if the user doesn't alter it. The final argument is a block that thismethod executes. The block must return a logical value (true or false) so thatour new method can respond accordingly.
You can now see how the. barSpacing method works. It presents aprompter with the label, "Enter a new value for bar spacing" and places thecurrent value of the instance variable barSpacing into the prompter as adefault response. If the user does anything but delete this default response,then the method checks to ensure that the user's entry is a valid integer witha value between 2 and 15. The barWidth and factor methods are functionallyidentical.
File-Based Data Retrieval and Storage
The second major change we want to make to our Plot application is to allowthe user to store data elements in a disk file from which they can be retrieved.To do this, we need to modify the menu in the data pane to offer the optionsof loading and saving data from and to a DOS file, and we need to write themethods that will handle the file input/output processing.
Chapter 9 The Fourth Project: A Graphing Application 167
The Modified dotaMenu Method
We only need to add two items to the menu that appears in the TextPanemenu. Here is the code for the method as it will now appear:
dataMenu"Answer the menu for the data pane."
^Menulabels:('accept\restore' , '\fileinXfile out1 ,'\copy\cut\paste') witherslines: #(2 4) selectors:#(accept cancelfileln fileOut copySelection cutSelection
pasteSelection)
The fileln Method
Here is the code for the method that will be called when the user indicatesa desire to file in some data previously stored in a file. (Note that you mustadd dataPath to the list of instance variables for the class.)
fileln"Prompt for a specification of a file containing dataoffering the last file accessed as a default. Providingthe user responds with a non-nil, non-empty string, tryto open a stream on the path. If this fails, prompt again;otherwise ask the data pane to file the data in. Finally,mark the data pane as modified so the 'accept1 choice onthe pane menu will respond." I path stream dataPathdataPane I path := Prompterprompt: "Enter a DOS path to a data file1
default: dataPath. (path isNil or: [ pathisEmpty ] )ifTrue: [ Aself ] .
dataPath := path.stream := File pathName: dataPath.(stream size > 0)
168 Practical Smalltalk
This code is fairly self-explanatory, particularly in view of its extensivecomment. We use the Prompter class' prompt:default: method to ask theuser for the name of the file to read. If the user has previously opened a file,we have stored its name in the instance variable dataPath and offer it as thedefault response. If the user answers with a possible file name, then we tryto open a stream on it. We check the size of the stream; if it is 0, then we knowthat we have not been successful in opening the file for some reason and wecall the fileln method again to give the user a chance to recover from enteringa wrong file name.
Once we have a valid stream, we use the TextPane methodfilelnFrom: torefresh the contents of the data pane with the contents of the file. Then weclose the stream.
The last line of the method is interesting. Recall from our earlier use of thisapplication in its second-stage incarnation that we had to make some kindof editing change to the contents of the data pane before the "accept" menuoption would work. This is how the TextEditor "accept" method works. Itdoes nothing if the text hasn't changed since it was last used. If we load datafrom a file, the TextPane will not see its contents as having been editedbecause they have instead been replaced by other data without the user'sediting intervention. To get around that problem here, our method sends themodified: message with a argument of true to the TextPane's dispatcher.The "accept" menu choice will now work as expected.
The fileOut Method
The method that writes information from the TextPane to a DOS file isalmost identical to the fileln method. Here is its code:
"Prompt for a specification of a file to receive dataoffering the last file accessed as a default. Providingthe user responds with a non-nil, non-empty string, open astream on the path and ask the data pane to file the dataout." I path stream I path := Prompterprompt: 'Enter a DOS path to a data file1
default: dataPath. (path isNil or: [ pathisEmpty ] )
Chapter 9 The Fourth Project: A Graphing Application 169
This method is simpler than the fileln method because we don't have toworry about not finding the file (we'll create it if it doesn't exist) and weneed not worry about whether the "accept" menu choice works since,presumably, the user is filing information with which he is finished working,at least for the moment. In every other respect, this method is identical to thefileln method.
Redrawing the Plot on User Demand
Earlier, we saw that we added a "redo plot" option to the GraphPane popupmenu. We promised to write the corresponding newPlot method later. It isnow time to take care of this. Here is the code for the method:
newPlot"If there is data to plot, plot it using the currentlyselected set of plot arguments." plotData notNilifTrue: [ self perform: plotSelector with: plotData ]
This is a simple and straight-forward method. If the instance variableplotData — which, you may recall, is created by the string:from: methodbased on the contents of the TextPane—is not empty, then this method callsthe method whose name is presently stored in the instance variableplotSelector, sending along the data as an argument. This causes the plot tobe redrawn. (Note that you must modify the String:from: method to useplotData instead of data.)
This method makes it fast and easy for the user to change any of thecharacteristics of the plot and see the results of the changes. This is asignificant improvement over the previous version in which the user had tomake a change to the bar type, then change the data and choose the "accept"menu option from the TextPane menu just to redraw the graph.
The Complete Listing
Here is the complete listing of the final version of the Plot application, infileln format.

170 Practical Smalltalk
Object subclass: #PlotWindowinstanceVariableNames:'plotPane dataPane datapath plotData plotSelector factor ''barWidth bar Spacing bar Pen ' classVariableNames: ''poolDictionaries: ' ' !
! PlotWindow methods 1
barFill"Display a menu displaying the fill colors available for barplots. If the response is not nil, accept the selectedcolor." I menu response I menu := Menu
labels: 'black\dark gray\grayMight gray1 witherslines: #()
selectors: #(black darkGray gray lightGray).response := menu popUpAt: Cursor offset, responsenotNil if True: [ bar Pen mask: (Form perform:response) ] !
barSpacing"Prompt for a new value of the spacing between bars. If theuser's response is not nil, validate it. If it is notvalid, tell the user, otherwise accept it." barSpacing : =self
promptFor: 'bar spacing'default: barSpacingvalidateWith:
[ :ii I ( (ii isKindOf: Integer) and: [ ii > 1 ]) and:[ ii < 16 ] ]!
barWidth"Prompt for a new value of the spacing between bars. If theuser's response is not nil, validate it. If it is notvalid, tell the user, otherwise accept it." barWidth :=self
promptFor: 'bar width'default: barWidthvalidateWith:
[ :ii I ((ii isKindOf: Integer) and: [ ii > 2 ] ) and:[ ii < 50 ] ]!
clearPlot"Erase the plot pane by giving it a new blank form. "
plotPane form: (self plotPane: plotPane frame)!
dataMenu"Answer the menu for the data pane."
AMenulabels:('accept\restore' ,
________ Chapter 9 The Fourth Project: A Graphing Application 171
'\file inXfile out1 ,1\copy\cut\paste1) witherslines: #(24) selectors:#(accept cancelfileln fileOut copySelection cutSelection
pasteSelection) !
dataPane"Answer the contents for the data pane, initially an emptystring."
factor"Prompt for a new value of the data stretch factor. If theuser's response is not nil, validate it. If it is not valid,tell the user, otherwise accept it." factor := self
promptFor: 'data stretch factor1
default: factor validateWith:[ :ii I (ii isKindOf: Integer) and: [ ii > 0 ] ] !
fileln"Prompt for a specification of a file containing dataoffering the last file accessed as a default. Providing theuser responds with a non-nil, non-empty string, try to open astream on the path. If this fails, prompt again; otherwiseask the data pane to file the data in. Finally, mark the datapane as modified so the 'accept' choice on the pane menu willrespond." I path stream I path := Prompterprompt: 'Enter a DOS path to a data file'default: dataPath. (path isNil or: [ pathisEmpty ])ifTrue: [ ^self ]. datapath :=
path, stream := File pathName:dataPath. (stream size > 0)
ifFalse: [ self fileln. ^self ].dataPane filelnFrom: stream, streamclose. dataPane dispatcher modified:true!
fileOut"Prompt for a specification of a file to receive dataoffering the last file accessed as a default. Providing theuser responds with a non-nil, non-empty string, open astream on the path and ask the data pane to file the dataout." I path stream I path := Prompter
172 Practical Smalltalk
prompt: 'Enter a DOS path to a data file1
default: dataPath. (path isNilor: [ path isEmpty ] )ifTrue: [ Aself ] .
dataPath := path.stream := File pathName: dataPath.dataPane fileOutOn: stream, streamclose!
horizontalBar: theData"Draw a horizontal bar plot of theData, an orderedcollection of integers." I form x y Iform :•= Form width: Display width height: Display height. x:= 0. y := 0. barPendefaultNib: 1 @ (barWidth * Aspect) rounded;direction: 0; destForm: form. theData do: [:value I
barPen place: x @ y.barPen go: factor * value.y :- y + ( (barSpacing + barWidth) * Aspect) rounded ] ,
plotPane form: form. plotPane paneScanner copyBits!
initialize"Initialize instance variables with default values. "
plotSelector := thorizontalBar:.factor := 4. "stretch the data values by this much"barWidth := 2 * SysFont height. barSpacing : =SysFont height. barPen : = Pen new mask: Form gray!
initWindowSize"Answer the initial size for a PlotWindow. "
A (Display boundingBox insetBy: 30 @ 25) !
newPlot"If there is data to plot, plot it using the currentlyselected set of plot arguments." plotData notNilifTrue: [ self perform: plotSelector with: plotData ] !
open"Open a PlotWindow. Define the pane sizes and behavior, andschedule the window." I topPane I self initialize. topPane:= TopPane new. topPanemodel: self;
Chapter 9 The Fourth Project: A Graphing Application 173
rightlcons: #(resize collapse) .topPane addSubpane: (dataPane :=TextPane new model: self; menu:#dataMenu; name: #dataPane; change:ttstring:from: ; framingBlock:[ :box I box origin extent: 50 @ box height ] ) . topPane
addSubpane: (plotPane : = GraphPane new model: self; menu:#plotMenu; name: ftplotPane:; framingBlock:
[ :box I (box origin + (50 @ 0) ) corner: box corner ]).topPane dispatcher open schedulewindow!
optionPicker"Display a menu of the variables which the user may change. Ifresponse is not nil, perform the method that prompts for a newvalue for the selected variable. " i menu response I menu := Menulabels: ' stretch factorXbar colorXbar widthXbar spacing' withers
lines: #()selectors: #(factor barFill barWidth barSpacing).
response := menu popUpAt: Cursor offset, responsenotNilifTrue: [ self perform: response ] !
plotMenu"Answer the menu for the plot pane."
^Menulabels: ('eraseXredo plotXhorizontal barXverticalbar1 ,1Xoptions . . . \restore defaults') withers
lines: #(2 4) selectors:#(clearPlot newPlot setHorizontal setVertical
optionPicker initialize)!
plotPane: aRect"Make a blank form the size of the screen. Display the form in aRecton the screen. Answer the form." I blankForm I (blankForm :=
Form width: Display width height: Display height)displayAt: aRect origin clippingBox: aRect.
^blankForm!
promptFor: aString default: anObject validateWith: aBlock"Prompt the user to supply a new value for what isdescribed by aString. Present anObject as the default.
174 Practical Smalltalk
If the user's response is nil, answer anObject. If it is notnil, validate it. If not valid, tell the user, and answeranObject, otherwise answer the user's response." I response Iresponse := Prompterprompt: 'Enter a new value for ' , aStringdefaultExpression: anObject printString.(response isNil)ifTrue: [ AanObject ] .(aBlock value: response)ifTrue: [ ^response ]ifFalse: [ Menu message:
response printString , ' is not a valid ' , aString.^anObject ] !
setHori zontal"Change the plot type to horizontal bar."plotSelector := #horizontalBar: .
setVertical"Change the plot type to vertical bar."plotSelector := ftverticalBar: .
string: aString from: aDispatcher"The data pane's contents have been changed. Convert the newdata into an ordered collection of integers and make a newplot. Answer true." I input token I input := aString asStream.plotData := OrderedCollection new. t input atEnd ] whileFalse:[
token := input nextWord,token notNilifTrue: [ plotData addLast: token aslnteger ] ].
self newPlot. ^true!
verticalBar: theData"Draw a vertical bar plot of theData, an ordered collectionof integers."
I form x y Iform := Form width: Display width height: Display height.x := 0.y := form height.barPendefaultNib: barWidth @ 1;direction: 270; destForm:form. theData do: [ :valueI
barPen place: x @ y.barPen go: factor * value.x := x + barSpacing + barWidth ] .

Chapter 9 The Fourth Project: A Graphing Application 175
plotPaneform: form;
scrollUp: plotPane frame height - form height.
plotPane paneScanner copyBits! !

10The Text World
In this chapter, we will look at the key classes involved in manipulating texton the screen of a Smalltalk application. In one sense, text is graphic becauseeach character, symbol, and space is really made up of a collection of bits.But in this chapter, we will focus on the text as a collection of characters thathas meaning in some context. This does not mean, however, that we willignore the bit-mapped image that makes up its appearance on the screen.We will begin this chapter with an overview discussion of how text isdisplayed, represented, and manipulated in Smalltalk/V. Then we'll take alook at four of the six classes that play some role in the text world ofSmalltalk. As we discuss each class, we will point out important instancevariables and methods in addition to describing the overall role of the classin the process of text management.
All editable text in Smalltalk/V is displayed in an instance of the classTextPane. (Text which is not intended to be edited can be drawn onto anygraphical context including a GraphPane or the Display.) Identified withthis pane, text is represented as an OrderedCollection of Strings. Eachcharacter in each string can be identified by a Point, whose x value is itsindex within the string and whose y value is the index of the string in theOrderedCollection. Thus the fourth character in the third string of the arrayhas a Point location of (4,3).
As we know from previous experience, it is easiest to display text in aninstance of TextPane. Associated with each such instance is an instance ofthe class TextEditor. This latter class processes user interaction with thepane, such as cursor movement, scrolling commands, menu requests, textselection, and editing (copy, cut, paste, and related operations) commands.
177
178 Practical Smalltalk
It is assisted in this process by an instance of the class StringModel, whichactually carries out the editing operations. This whole process comes aboutas a result of the fact that whenever you create a new instance of the classTextPane it automatically gives you a TextEditor as its dispatcher, aCharacterScanner (discussed below) as its pane scanner, a StringModelas its textHolder and a TextSelection (also discussed below) as its selection.These classes are automatically associated with any instance of the classTextPane; you don't have to do anything to get them, all you have to do isuse them as needed.
Text is represented in Smalltalk in two separate but related ways. First,every character has an ASCII value associated with it. This value is standardacross all computer systems that use it, which includes almost all desktopand minicomputers. On all of these systems, for example, the ASCII value64 always means a capital letter "A." ASCII values range from 0 to 255.Second, every character in Smalltalk has associated with it a bitmappedimage that represents its appearance in the TextPane on the computer screen.This bitmap depends on two major factors: the character's ASCII value andthe font in use (including its size and style, if appropriate).
Conversion between ASCII character codes and their bitmap equivalentsis handled by an instance of the class CharacterScanner, a subclass of thegraphic class BitBlt which we used in Chapters 8 and 9. The current font inuse on the system is stored in an instance variable of this class. The font isused as the source form and the TextPane is the destination form. With thatinformation, you can see how the drawing of characters takes place in aSmalltalk/V system.
Whenever users want to edit existing text in a TextPane, they follow theSmalltalk paradigm of select-then-operate. In other words, they first selectthe text on which they wish to perform some editing operation, then invokethe operation, usually by selecting it from a menu but also possibly by othermeans (e.g., typing to replace selected text rather than first cutting it bymeans of a menu selection). An instance of the class TextSelection keepstrack of the beginning and ending points of the user's text selection, andhandles the non-editing manipulation of the text (e.g., its graying when theuser interface calls for selected text to be grayed, as when the window is nolonger active).
With this overview in mind, let's take a look at each of the classes that canbe involved in the display and editing of text in a Smalltalk/V TextPane. Tosummarize, these classes are:
• TextPane
• TextEditor
•• StringModel
• CharacterScanner
• TextSelection
• String
Chapter 10 The Text World 179
We will examine the first four of these classes in some detail. You willseldom need to worry about the other two — TextSelection and String, sowe won't discuss their instance variables or methods.
We spent some time examining the class TextPane in Chapter 6 in thecontext of the MPD paradigm and methods that are common to all types ofpanes in Smalltalk/V. If you are unclear about the creation and managementof such panes, it might be a good idea to review Chapter 6 before proceedingwith this discussion.
In this chapter, we will focus on several methods that we did not explorein Chapter 6 but which you may find useful when you create text-basedapplications. Several of these methods will appear in Chapter 11 when webuild a data entry form class as an example of how to handle text-basedapplications. Specifically, in this chapter, we'll look at methods that handlethe addition of text to the end of a TextPane's current contents, scroll thepane's contents to show a designated portion of the text, and handle theselection and de-selection of text in the pane.
Methods for Appending Text
The class TextPane defines two methods for adding text to the end of thecontents of one of its instances: appendChar: and appendText:. The firsttakes a single character as an argument and places that character at the endof the text in the pane. The second takes a string as an argument and placesits contents at the end of the text in the pane.
Recall that, since all text editing other than text entry is handled by otherclasses in the Smalltalk/V text world, this class need only concern itself withappending text to the current contents of the pane.
Methods for Scrolling the Text
There are two ways that a text-based application might want to alter thescrolling status of a TextPane's contents aside from the user's directmodification of the scrolling via the pane's built-in scrollbars.
First, we might want to scroll the text in the pane so that the end of the textis visible. We may want to do this, for example, when we first open a pane
180 Practical Smalltalk
which already has some content and where the user's expected first desireis to resume or begin entering text. To handle this, the class TextPaneprovides \hQforceEndOntoDisplay method, which does what its name suggests.Second, we may want to scroll so that currently selected text is visible inthe pane. This task is handled via the forceSelectionOntoDisplay method.
Methods Related to Selection of Text
There are two types of selection in a TextPane. The one we think of mostoften involves the selection and highlighting of one or more characters in thepane's contents. The second, less obvious selection, is called the gapselection and arises when no characters have been selected. In that case, theselection refers to the position of the I-beam cursor in the TextPaneindicating where the next character typed will be placed. To select text ina TextPane, you can use one of three methods:
• selectAll, which, as its name implies, selects all of the text in the pane
• selectFrom:to:, which takes two points as arguments and selects all ofthe text between those two points (where the points are the x-ycoordinates of a character as described earlier in the chapter)
• selectTo:, which extends an existing selection to the point provided asan argument
To position the gap selection (which is the same thing as positioning theI-beam cursor), you can use one of these three methods:
• select After:, which places the gap selection after the point supplied asan argument
• selectBefore:, which places the gap selection before the point suppliedas an argument
• selectAtEnd, which places the gap selection at the end of the TextPane'scontents
Since the purpose of the class TextEditor is to process user input, it isseldom necessary for you to do anything to its methods other than use them.Many of its methods, such as those that actually place text in the pane, are
Chapter 10 The Text World 181
used by other methods in the Smalltalk/V text world and you will be unlikelyever to use these methods.
Still, there are five methods in this class that are worth exploring andknowing something about. Two deal with keeping track of the status of thecontents of the pane, two deal with special characters you might have a needto place in the text, and one deals with zooming the pane to full-screen size.
Tracking the Status of Text
It is often useful to know whether the contents of a TextPane have beenmodified since they were last saved or since some other operation (such asa database update) was performed. Smalltalk handles the automatic trackingof this status for you but if your program needs either to know the status ofthe text or to change it for some reason that is not being monitored bySmalltalk, you can use the modified and modified: methods in class Text-Editor to do so.
As you can tell by their names, modified returns a. Boolean value indicatingwhether the contents of the pane have been modified since the last time thetext was saved, while modified: sets this value to be true or false dependingon the argument.
Putting Special Characters in Text
You can put a carriage return, a space or a tab at the end of the currentcontents of a TextPane using the methods called cr, space, and tab. This isa useful thing to be able to do when, for example, you are re-opening someformerly saved text and need to place one of these characters at the end toprepare the contents for further additions by the user or additional text to beloaded from a file.
Zooming the Pane
You have undoubtedly noticed that a TextPane, unique among the sub-panetypes, can be zoomed so that its contents occupy the entire screen. You may,for example, have been surprised early in your Smalltalk experience to clickon the Zoom icon in the Class Hierarchy Browser and see only the text paneand not the entire window zoom to full-screen size.
182 Practical Smalltalk
In a case where you may wish to give the user the full screen in which toedit text without requiring that the user zoom the pane manually, you cansend the pane the zoom message.
For the most part, you will find yourself calling on the methods in the classStringModel as you build text-based applications in Smalltalk/V. Seldomwill you have to override these methods because their behavior is relativelygeneric and in general encompasses the actions users expect when they edittext in a TextPane.
A few of the methods of this class are interesting enough to spend a fewmoments discussing. These methods can be grouped into the followingbroad categories:
• information-gathering methods
• searching methods
• editing methods
Information-Gathering Methods
Some information about the contents of a TextPane may be useful to youin designing and building text-intensive applications. The class StringModelincludes three methods that reveal data about the contents of the pane.
The lineAt: method takes an integer as an argument and answers the stringcontained in the line indexed by that integer. Recall that a StringModelholds its text in an array of lines.
You can find out how many lines of text are in the StringModel with thetotalLength method.
One particularly intriguing and potentially useful method is themaxLineBetween:and: method. The two arguments to this method are bothintegers that represent line numbers in the array of strings. The methodanswers the length of the longest line between the two lines provided asarguments. This would be useful, for example, in dynamically adjusting thewidth of the TextPane to show all, or as much as possible, of the contentsof the pane's text lines.
Chapter 10 The Text World 183
Searching Methods
Two methods in the StringModel class are designed to search for a specifiedstring. The searchFrom:for: method takes a selection as its first argumentand a string, character, or text pattern for its second argument. It beginssearching from the end of the text selection until it finds the first instance ofthe pattern in the second argument and then returns that matched selectionif it finds one. It returns nil if it fails to find a match.
To search in reverse in the pane, use the searchBackFrom:for: method,which is identical to the searchFrom:for: method except in the direction inwhich it conducts its search, and that it starts its search at the beginning ofthe selection. Both methods search each line from left to right, however.
Editing Methods
There are three editing methods that are of possible interest to you if you arebuilding a text-based application. Most of the common editing operationsinvolve some combination of these methods. Earlier in the chapter we saidthat most editing operations operate on a selection of text. That selection ispassed as an argument to these methods.
The delete: method deletes the text contained in the selection and leavesthe cursor positioned just before the selection's location.
The other two editing methods replace text, replace:withChar: replacesthe text selection supplied as the first argument with a single charactersupplied as the second. The other method, replace:withText:, replaces theselection with a string supplied as the second argument.
Both methods inform the TextPane of the change in contents and bothanswer a point which describes the position of the last replacement character.
The Class CharacterScanner
Like the classes TextEditor and StringModel, you will rarely interact di-rectly with a CharacterScanner. You will usually create a specific instanceof this class in a text-based application, but for the most part its methodshandle their processing in the standard, accepted way and therefore areseldom candidates for your own specialized methods.
184 Practical Smalltalk
Five of this class' methods can be used to set up or modify its visiblecharacteristics, such as its foreground and background colors or the font ituses. Four of its methods involve the display of text in the clipping rectangleof the TextPane with which the CharacterScanner is associated. Anothertwo are available to enable you to erase some portion of that pane.
Methods to Control Appearance
When you want to initialize an instance of class CharacterScanner, youcan use one of two methods. The one we'll look at because it is the morecommon of the two is initalize:font:. This method takes two arguments. Thefirst is the rectangle which you wish to become the clipping rectangle of thescanner. The second is the font you want to use to display text within thescanner's TextPane. (We discussed clipping rectangles in conjunction withgraphics in Chapter 8.)
Once a CharacterScanner has been created and initialized, you canchange the font it uses with the setFont: method or its color scheme with thesetForeColor:backColor: method. This method requires two colors as argu-ments. When you initialize an instance of CharacterScanner, Smalltalk/Vdefaults these values to black as the foreground and white as the background.
To invert some or all of the contents of the frame of the TextPane, you canuse the method reverse:. This method takes a rectangle as an argument andreverses the color of the text within that rectangle. For example, if thesecolors have not been changed since the CharacterScanner was initialized,this method causes the text to appear to be white characters on a blackbackground. You can undo the effect of the reverse: method with the re-cover: method. This method also takes a rectangle as its argument.
If you wish to change the font associated with a CharacterScanner, yousend it the setFont: message along with the name or other identifier of thefont you wish it to use. Since the system does not support multiple fonts ina single TextPane, this message changes the font of all text already displayedin the pane in addition to becoming the font in which all newly typedinformation will be displayed.
Methods to Display Text
Of the four methods available to a CharacterScanner object to cause it todisplay text, three are quite similar to one another and the fourth operatesslightly differently. The three similar methods are:
Chapter 10 The Text World 185
• display:at:
• display:from: at:
• display:from: to: at:
Since the last of these is the most robust, we'll begin by explaining it. Youcan then see quickly how the other two differ. The display:from:to:at:method requires four arguments. The first is the identifier of the string to becompletely or partially displayed. The next two arguments tell theCharacterScanner the index positions in the string array at which to beginand end the text to be displayed. The final argument is a point that definesthe location in the frame of the receiver at which the display of the string isto start.
To display the entire string, then, you would use the first method since itdoesn't require a starting or ending position in the string. To display fromsome point other than the beginning of the string to the end of the string, youwould use the second method.
The most common use of these methods is to replace a portion of adisplayed line with some other text. Since the present line or portion of theline may not be the same length as the replacement text, the display:from:at:method adds one bit of behavior the other two methods do not involve: itblanks the rest of the line from where the display of the replacement textends.
This leads to the need for the fourth text-displaying method we'll examine,show:from:at:. This method behaves the same as display:from:at: exceptthat it does not alter the other text in the string.
Methods to Blank Portions of the Pane
You sometimes wish to remove text from a TextPane display, perhaps withoutaffecting the contents of the stored text itself. To do this, you can use eitherthe blank:width: method or the blankRestFrom: method.
The first of these methods blanks all or part of a line by painting to thebackground color a rectangle whose origin is supplied as the first argumentand whose width is calculated from the second argument, an integer. Therectangle has the height of the current font.
If you want to blank the bottom portion of a frame starting at some specificknown row of text, you can use the blankRestFrom: method, which takes asingle integer argument. This integer is the row starting from which youwish to blank the frame.

11
In this chapter we will put into practice some of the theory of Smalltalk/Vtext classes and methods we learned about in Chapter 10. This applicationwill also prove useful for inclusion in or use with other applications you maybuild.
As we saw early in our exploration of Smalltalk/V, the primary built-inmeans by which you can pose questions to the user and deal with userresponses is the class Prompter. This class, combined with the judicioususe of menus, provides means by which you can ask users to provideinformation to the program. These answers can either be selections from apre-determined list (similar to a menu) or an editing rectangle in which theuser types a response, perhaps selecting an optional default answer suppliedby the program. /
This method of user interaction is severely limiting, because the user canonly see and respond to one question at a time. In some cases, users may wishto change an earlier answer or plan later responses if they knew what otherquestions they were going to be called upon to answer during a session withthe program.
The project in this chapter simulates a blank-form style of data entry thatallows your programs to pose a number of questions that require textanswers. The user can move around among the fields in the form and selectan "OK" or "Cancel" button to indicate that all answers have been providedand may be processed by the program. Figure 11-1 shows a typical form thatmight be created by an application using this project's classes. Since the
187

Figure 11-1. Typical Form Created by Project
purpose of this project is to provide a framework for the creation of suchforms, no two forms will necessarily be identical.
We will begin by stating the purpose of the program, then using thatstatement to identify the objects the application will have to contain. Finally,we'll determine the responsibilities of each of these objects in the applica-tion.
Statement of Purpose
This application is given two arrays of strings as input. One array holdsquestions, or name fields, which the user may not edit and which identify forthe user the type of input needed. The second array holds answers or entryfields into which the user will type responses to the questions or labels.Given this input, the application object will create a nonmodal (i.e., non-preemptive) window in which the user can edit answers to all entries andthen use buttons to accept or cancel the answers provided.
We should note that this project is not an application per se. Rather, it isa complex type of window (TopPane) which supports form-like propertiesand behavior. The only real application we will build is a test application sothat we can demonstrate and test the project.
Since we are going to be focusing on the pane and its behavior and sinceour objective is to create a form-like data entry interface project, we'll referto the new class we're creating as FormPane.
188 Practical Smalltalk
Chapter 11 The Fifth Project: A Form Designer 189
Defining the Objects
From the above description of this project, we can conclude that theapplication requires the following objects:
• application
• window
« name (or question) fields which may not be edited by the user
• entry (or answer) fields which may be edited by the user
• buttons
Object Responsibilities
Let us now examine each of these objects in turn and define the responsibili-ties we will assign to each.
Application Object Responsibilities
As is most often the case in Smalltalk applications, the application objectwill act as the model to the window, which contains all of the fields. It willalso initialize our special type of window, which will automatically formatthe fields and buttons correctly.
What may not be obvious from this brief description is that the applicationobject will not play its usual role of acting as a model to the sub-panes in theFormPane window. We are creating a new type of TopPane with complexbehavior that emulates an electronic data entry form. We want the applica-tion that uses this FormPane to be able to do so without any understandingof the sub-panes and their behaviors.
This results in an intriguing design problem. The sub-panes need a modeland if we're not going to call upon the application object for this task, wemust decide on some other object to handle it. Your first inclination (whichmatches ours) would probably be to permit the FormPane to be the modelto its sub-panes. However, you would find (as we did) that this approachdoes not work. The Smalltalk/V MPD architecture we discussed in Chapter6 makes the assumption that the model to any Pane will not be another Pane.This requires us to create an object that will have the assignments of acting
190 Practical Smalltalk
as the model to the sub-panes and playing "go-between" or intermediarybetween the sub-panes and the FormPane. As it turns out, this approach hasa major benefit: it allows us to divide the many methods of this project intomore refined categories (methods for the FormPane itself, and methods formanaging and interacting with its sub-panes).
We will therefore create a new object called Formlntermediary. The rolepf this object is to act as a model to the sub-panes and to mediate betweenthem and their FormPane so this class will end up assuming most of theknowledge that we might otherwise place into the FormPane class directly.
Window Object Responsibilities
The window object will be an instance of class TopPane. It will have twobasic responsibilities.
First, it will automatically calculate the correct placement for all of thefield and button sub-panes within its borders based on a number of factors.
Second, it will be responsible for informing the model of changes that takeplace as a result of user responses.
Name Field Object Responsibilities
The name or question field objects have no responsibilities in this applica-tion. Their only role is to serve as a guidepost to assist the user in data entry.They are therefore entirely passive.
Since these fields are not going to be subject to editing, we can use aGraphPane for them. As it happens, this class includes some behavior —for example, scrolling — that is undesirable for our purposes. If, forexample, we allowed labels in the GraphPane to scroll, the alignment be-tween the questions or labels and the fields into which their associated datawill be entered may be lost. We will have to override some of these methods.
Entry Field Object Responsibilities
The entry or answer field objects must support the editing of text by the user,restoring to a default value if one is supplied, and zooming (to allow longanswers to questions without destroying the integrity and appearance of theform).
General Approach
Based on the above analysis, we can see that we will create this applicationby sub-classing TopPane for our FormPane class, giving the new class thespecial behavior our project requires. The editable text fields (answer or
Chapter 11 The Fifth Project: A Form Designer 191
entry fields) can be created from the existing TextPane class we discussedin Chapter 10. The "OK" and "Cancel" buttons can be created as one-itemListPane objects just as the Counter project of Chapter 5 and the CHB itselfhandle this task. The Formlntermediary class will be a sub-class of classObject.
Knowledge Needed
The protocol for interaction between our FormPane and its model (ourapplication) will involve the application setting arguments for the FormPane.This means that we must identify the knowledge our FormPane will re-quire. These in turn become candidates for instance variables.
The FormPane needs to know one thing that is peculiar to our project. Wemust add an instance variable to contain information about the instance ofthe new Formlntermediary class in handling its interaction with the sub-panes. So we need a new instance variable called intermediary to containthis information.
The rest of the specialized knowledge needed in our project can be placedin the Formlntermediary class and consists of the following information(or instance variables):
• formPane, which holds the name of the instance of FormPane to whichthe Formlntermediary instance is attached or the FormPane itself.
• questionStrings, which we will create as an IndexedCollection ofstrings that will hold the name or question fields.
• defaultAnswerStrings, another IndexedCollection of strings to holddefault answers for the entry fields where they exist.
• textFieldPanes, yet another IndexedCollection, this one containingTextPanes representing the entry fields so that we can query them foruser-entered values when processing is complete and we must informthe Formlntermediary's dependents of the results of the data entry.
Building the Project
To build this project, we will have to take a number of steps. Their order is,for the most part, insignificant, but dividing our work into these steps makesit possible to get a prototype up and working quickly and then to modify itsvarious key behavioral characteristics individually.
192 Practical Smalltalk
The steps we will take are as follows (in the order in which we will discussthem):
1. Create the new classes.
2. Write skeletal interaction methods for the new classes.
3. Build a simple test application.
4. Write the methods to place the sub-panes in the FormPane.
5. Install TextPanes for each editable entry field.
6. Modify undesirable behavior in our superclasses.
7. Add some capabilities at the FormPane menu level.
8. Format the name (question) fields.
9. Write a more complex test application.
10. Disable scrolling in the GraphPane.
Creating the New Classes
We begin our construction of this project by building the two new classeswe've identified — Formlntermediary and FormPane. To createFormlntermediary, we'll sub-class Object. Find Object in theCHB and sub-class it to create the new class by editing the new classtemplate furnished by Smalltalk/V so it appears as follows:
Object subclass: #FormIntermediaryinstanceVariableNames:1 f ormPane questionStrings def aultAnswerStrings textFieldPanes 'classVariableNames: ' ' poolDictionaries: ' '
To create FormPane, find TopPane in the CHB and sub-class it to createthe new class by editing the new class template furnished by Smalltalk/V soit appears as follows:
TopPane subclass: #FormPaneinstanceVariableNames: 1
intermediary 'classVariableNames: ' 'poolDictionaries: ' '
Chapter 11 The Fifth Project: A Form Designer 193
Skeletal Interaction Methods
With our two key classes constructed, our next step is to provide them withminimal interactive functionality. By building only the basic methods thatsupport providing the FormPane with the collections of question and an-swer strings needed to handle communication, we can get a first version ofthe program working relatively quickly. This is almost always a sounddesign idea, particularly when you are constructing an application of anyreasonable size.
As we saw briefly in Chapter 6, interaction among the components in aSmalltalk/V program with its MPD model is made highly flexible by thedesign of the system. This design does not use hard-coded message selectorsso that the means of interaction between elements of the application are pre-determined. The selectors to be used for such tasks as informing a pane'smodel of a change in the pane could have any names and accomplish anyadditional purpose other than simple model notification. Naming andproviding these selectors can be thought of as setting arguments. Our projectneeds to set a number of characteristics. These Include:
• label:
• addSubpane:
• rightlcons:
• leftlcons:
• open
• close
• model:
In addition, because of the somewhat unusual relationship among compo-nents in our project, we will create two other methods normally associatedwith sub-panes: name: and change:. These methods will perform for aFormPane tasks similar to those they normally handle for a SubPane.
From this brief discussion, we can already see that our definition for theclass FormPane is not adequate because it does not include two instancevariables needed for this design, namely name and changeSelector to ac-commodate the last need we discussed. A quick examination of the Ency-clopedia of Classes or of the class TopPane in the CHB reveals that thesetwo methods are not inherited from the FormPane superclass. So you shouldnow open the class definition for FormPane and edit the definition to addtwo more instance variables. The finished class definition should look like this:
194 Practical Smalltalk
TopPane subclass: ttFormPaneinstanceVariableNames:
1 intermediary name changeSelector 'classVariableNames: ''poolDictionaries: ' '
Now we are ready to write the first methods for the class FormPane. We'llstart, somewhat but not entirely arbitrarily, with an initialize method. (You'llnote that we frequently begin with an inherited method for our work eventhough we know we'll ultimately be overriding its behavior. This points upanother advantage of OOP with a strong class library like Smalltalk/V's:you get a good deal of default behavior that, while it may not be what youultimately desire, it gives you a place to begin with a working application.)Here is the code for this first method:
initializeintermediary := Formlntermediary new.intermediary formPane: self, superinitialize
Notice that we place the super initialize line last in this initialize method.This is a case where doing so is not only acceptable but preferable to thesomewhat more frequent approach of placing it first in an initialize method.It is acceptable because our initialize method does nothing with the existinginstance variables of the superclass TopPane, so we need not guard againsttheir being initialized to some value other than the one we need in ourapplication. It is preferable in this situation because by putting this messagelast in our initialize method, we ensure that our method returns the sameresult as that which was returned before we created our own new class.
Notice in the second line of the initialize method, we send the newly createdFormPane object aformPane: message. We do this so that we can give thisobject a name by which we can refer to it elsewhere in the system. Recall thatwe defined an instance variable formPane in the class definition forFormlntermediary. We need to refer to the FormPane (which is a sub-class of TopPane) several times throughout the application as we dynamicallywork with its sub-panes and their contents. In the class Formlntermediary,then, add the following method:
formPane: a FormPaneformPane := a FormPane
This will initialize the instance variable formPane appropriately when theFormPane is created for an application.
The name: method will allow us to provide a selector to be used as thename of the FormPane and also as a message to the model so it has a wayof retrieving information needed by the FormPane when it is opened. Themethod named by this selector should be able to return an instance of the
_______________ Chapter 11 The Fifth Project: A Form Designer 195
class Association whose key is the collection of questions and whose valueis the corresponding collection of default answers or values. Here is the codefor the name: method:
name: aSelector"Selector used as the name of the FormPane, and to get theinitial information displayed in the pane." name :=aSelector
The change: method allows us to provide the name of a selector that willserve as a message to the model to inform it of changes that take place in thepane. The method named by this selector should be able to take an argumentthat will be an IndexedCollection containing the values entered by the userin the FormPane. Here is the code for this method:
change: aSelector"Used as a message to the model to inform it of a change in theFormPane. Must take an argument of the FormPane values. "changeSelector := aSelector
Following the normal MPD paradigm, we now need to use our name selectormethod to handle the initialization of the strings of questions and defaultanswers (questionStrings and defaultAnswerStrings). We cannot handle theseinitializations from an initialize method because class TopPane initializesall of its instances immediately after they are created. This would cause aninteresting problem here since FormPane is not in a position to be initial-ized immediately after its creation; it lacks a name selector, a changeselector, and even a model. Therefore, we must find a place later in theprocessing — after these selectors have been provided to the FormPane butbefore the sub-panes are installed in the FormPane, to initialize these in-stance variables.
We will create a special method to handle this task and separate it from theopen method that will normally set up a new FormPane because this makesit easier to sub-class FormPane and to initialize these variables from otherplaces in the application if that were to become necessary. The effect is tohide implementation detail, which, as we know, is an objective of OOP.
Here, then, is the code for the initializeFields method that will set up thetwo arrays of strings for questions and default answers:
initializeFields"Queries the model and informs the Formlntermediary."I anAssociation IanAssociation := model perform: name.intermediary questionStrings: anAssociation key.intermediary defaultAnswerStrings: anAssociation value
We also need to set the instance variables of a Formlntermediary instance,so we add the following two methods:
196 Practical Smalltalk
questionStrings: indexedStringsquestionStrings := indexedStrings
defaultAnswerStrings: indexedStringsdefaultAnswerStrings := indexedStrings
As we have seen in our previous projects, a programming custom inSmalltalk is to have an application that creates a TopPane — as most do —explicitly install that pane's sub-panes. We can adapt that idea here andinclude in the FormPane class a method with which it can configure itself.Eventually, this method will have to become fairly complex as it calculatesthe positioning of each of its potentially numerous sub-panes. For this firstpass at this important method, though, we'll design a minimal configurationprocess that simply enables us to test its basic behaviors. Here's the method:
configureSubpanes"Format the layout of the window's components."self initializeFields.self addSubpane: (ListPane new model: intermediary;
name: #okBu11 on;change: #okButton:;framingRatio: (0 @ 0 extent: (1/2) @ 1)). self
addSubpane: (ListPane new model: intermediary;name: #cancelButton;change: ttcancelButton:;framingRatio: ((1/2) @ 0 extent: (1/2) @ 1))
This method first calls the initializeFields method we just created. Then itadds the two buttons — "OK" and "Cancel" — as single-element ListPaneinstances. We use framingRatio: to make the sizes of the buttons relative tothose of the window. Later, we'll see that we need to change this approachbut for our first draft of the project, this technique is easier and certainly adequate.
These buttons need methods that will be invoked when the user clicks onthem. If the user selects the "OK" button, the button method will notify themodel of the user's responses. If the user clicks the "Cancel" button, noupdate is needed. These methods will be part of Formlntermediary, sincewe designed this class for this specific purpose. Also, this new class is themodel to these button sub-panes. Each of these methods requires anargument, since all ListPane objects require arguments for their changemethods. Since our ListPane objects each have only one element, theargument we pass is a mere formality and we will ignore its value.
The behavior of the "OK" button involves extracting the contents of eachentry field. The fields return their contents as strings, which are placed intoa collection before passing them to FormPane. Eventually, the FormPaneobject will pass this information to its model, the application.
Here is the code for the method for the "OK" button:
_________ Chapter 11 The Fifth Project: A Form Designer 197
okButton: dontCare"Inform formPane of the values in the question/field subpanes.As a model to a ListPane, it must take an argument of thelist index. We ignore it because the list only has a single item.I result Iresult := OrderedCollection new.textFieldPanes notNil
ifTrue: [textFieldPanes do:[:aSubpane Iresult add: aSubpane contents]].
formPane takeResult: result
As you can see, this method is quite straightforward. The core of its behavioris the do: construct that loops through all of the elements of the textFieldPanesand adds their contents to the OrderedCollection called result.
If the user cancels a FormPane, then we need to send the result nil alongto the model. Here is the code that will accomplish that:
Now we need a method for the class FormPane called takeResult: that dealswith the information passed to it by the Formlntermediary button methodswe just built. Here is its code:
takeResult: result"Inform the model of the change and result."model perform: changeSelector with: result,self dispatcher close
The powerful perform: method takes care of handling the processing of theresult for us. The last line is a variation on a theme we see each time we createa new TopPane. Rather than opening a dispatcher, this line closes it. (Thisis the same method used to close a TopPane when the user clicks thewindow's close icon.) This ensures that the process of closing the windowin our code will be identical to the processing Smalltalk/V undertakes.
Finally, before we have a working rudimentary project, we need to set upmethods in Formlntermediary that will inform the button ListPaneinstances of their initial contents (i.e., give them their name labels if we thinkof them as buttons). These methods are pretty simple:
okButton"Label for the OK button."
198 Practical Smalltalk
cancelButton"Label for the Cancel button.^#(Cancel)
This completes our basic functioning project. Although it does not yet doany of the TextPane processing that is eventually at the heart of our design,it does enable us to build a test application which will provide a test case forour implementation. That is our next task.
Building the Test Application
As will most often be the case with applications, we'll start by sub-classingObject to create the application's class. Find Object in the CHB and sub-class it to create the FormApp class. Edit the new class template providedso that it appears as follows:
Object subclass: #FormAppinstanceVariableNames:
1 questionStrings defaultAnswerStrings answerStrings 'classVariableNames: '' poolDictionaries: ''
Now let's add some methods to make our FormApp do something inter-esting and useful. As we envisioned it earlier, a form application would:
• open a FormPane with some questions and some default answers
• be aware of the collection of actual answers and do something with it
Notice that this implies two separate collections for answers, one for thedefaults and one for the user's actual replies. It might seem logical to keepjust one collection, substituting the user's actual responses for defaultanswers as they are supplied. But that would be too inflexible. What if youwant to compare the user's actual answers with the default replies to seewhat fields in a database need to be updated, for example?
We'll begin by adding our by-now-traditional example metamethod.Remember that this must be a class method, while all of the others we'llcreate here will be instance methods.
example"FormApp example."I aFormApp IaFormApp := self new.aFormApp openOn: #('Name: ' 'Address: ' 'Phone #: ')
defaultAnswers: #('Fred' '123 Main Street' '900-976-4257')label: 'Fill this form1.
aFormApp open
_______________ Chapter 11 The Fifth Project: A Form Designer 199
The key message in this method is openOn: default Answers :label:, whichtakes three arguments:
• an array of labels or questions that act as prompts to guide user input
• an array of strings that are the default responses to those questions
• a label that provides an overall prompt or title for the form
Next, let's build the openOn: method. (Its name follows the Smalltalkconvention for naming such methods when it takes an argument to specifywhat is to be opened. If no argument were necessary, we would use the morefamiliar open name.) Here is the code; it should be quite familiar to you bynow:
openOn: questions defaultAnswers: answers label: aLabel"Open a FormPane with the specified questions, answers, and label."I aFormPane IquestionStrings := questions.defaultAnswerStrings := answers.aFormPane : = FormPane new
model: self;label: aLabel;name: #formlnfo;change: #userResponse:;yourself.
aFormPane configureSubpanes. aFormPanedispatcher open scheduleWindow
The only new element here is the use of yourself in the last line of the cascadeof messages that creates aFormPane.We include that message to insure thataFormPane gets bound to the instance created by the new message, ratherthan simply assuming that change: will return the right object for our needs.We notice in the above method that we called the name method for theopenOn: method formlnfo. Here is the code for that method:
formlnfo"Returns an association of questions and answers for the FormPane."^Association key: questionStrings value: defaultAnswerStrings
We make use of the class Association here to set up a pair of parallelstructures (actually contained in one object) matching name fields and entryfields. This device is clearly made to order for our need to keep the two lists"in sync" with one another.
Like all programmers, we have a curiosity about the success of ourprogramming even before we're really ready to do anything with the output.So in our FormApp application, we'll use the Smalltalk/V Transcript win-dow to print the results of our data entry. Obviously, if we were writing anapplication for some purpose other than testing, we would be doing some-thing more useful with the user's entries in the FormPane, but the important
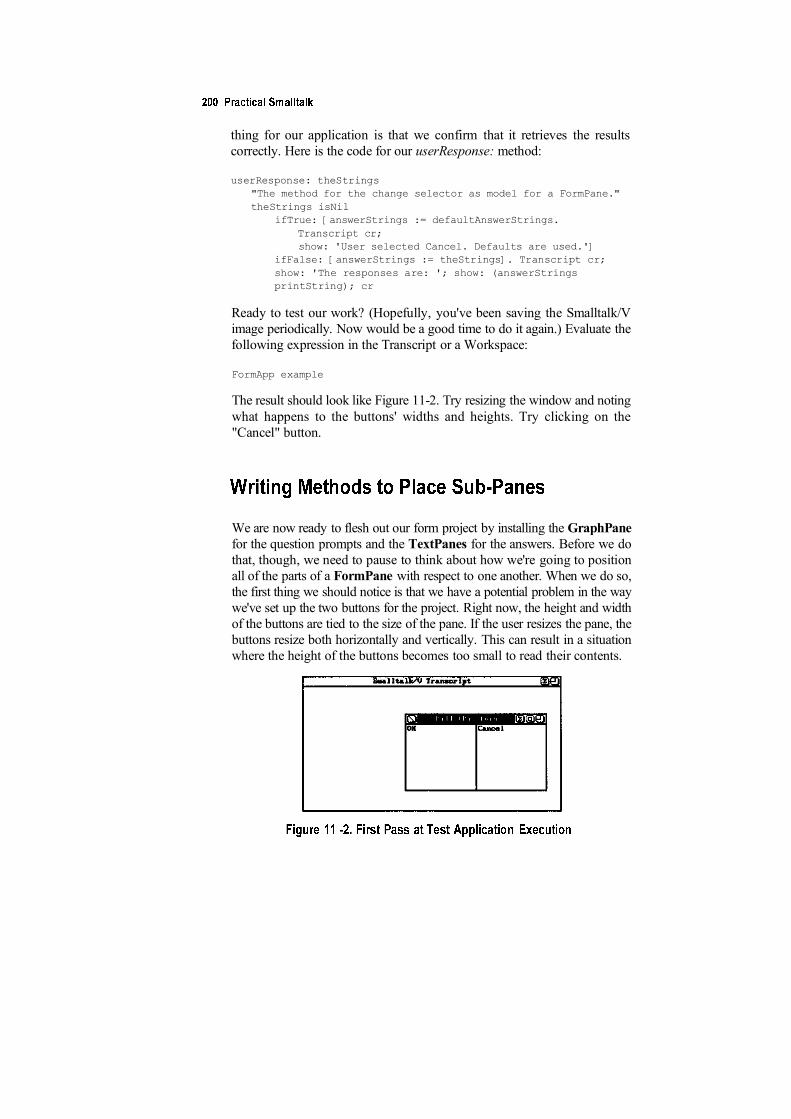
thing for our application is that we confirm that it retrieves the resultscorrectly. Here is the code for our userResponse: method:
userResponse: theStrings"The method for the change selector as model for a FormPane."theStrings isNil
ifTrue: [answerStrings := defaultAnswerStrings.Transcript cr;show: 'User selected Cancel. Defaults are used.']
ifFalse: [answerStrings := theStrings]. Transcript cr;show: 'The responses are: '; show: (answerStringsprintString); cr
Ready to test our work? (Hopefully, you've been saving the Smalltalk/Vimage periodically. Now would be a good time to do it again.) Evaluate thefollowing expression in the Transcript or a Workspace:
FormApp example
The result should look like Figure 11-2. Try resizing the window and notingwhat happens to the buttons' widths and heights. Try clicking on the"Cancel" button.
We are now ready to flesh out our form project by installing the GraphPanefor the question prompts and the TextPanes for the answers. Before we dothat, though, we need to pause to think about how we're going to positionall of the parts of a FormPane with respect to one another. When we do so,the first thing we should notice is that we have a potential problem in the waywe've set up the two buttons for the project. Right now, the height and widthof the buttons are tied to the size of the pane. If the user resizes the pane, thebuttons resize both horizontally and vertically. This can result in a situationwhere the height of the buttons becomes too small to read their contents.
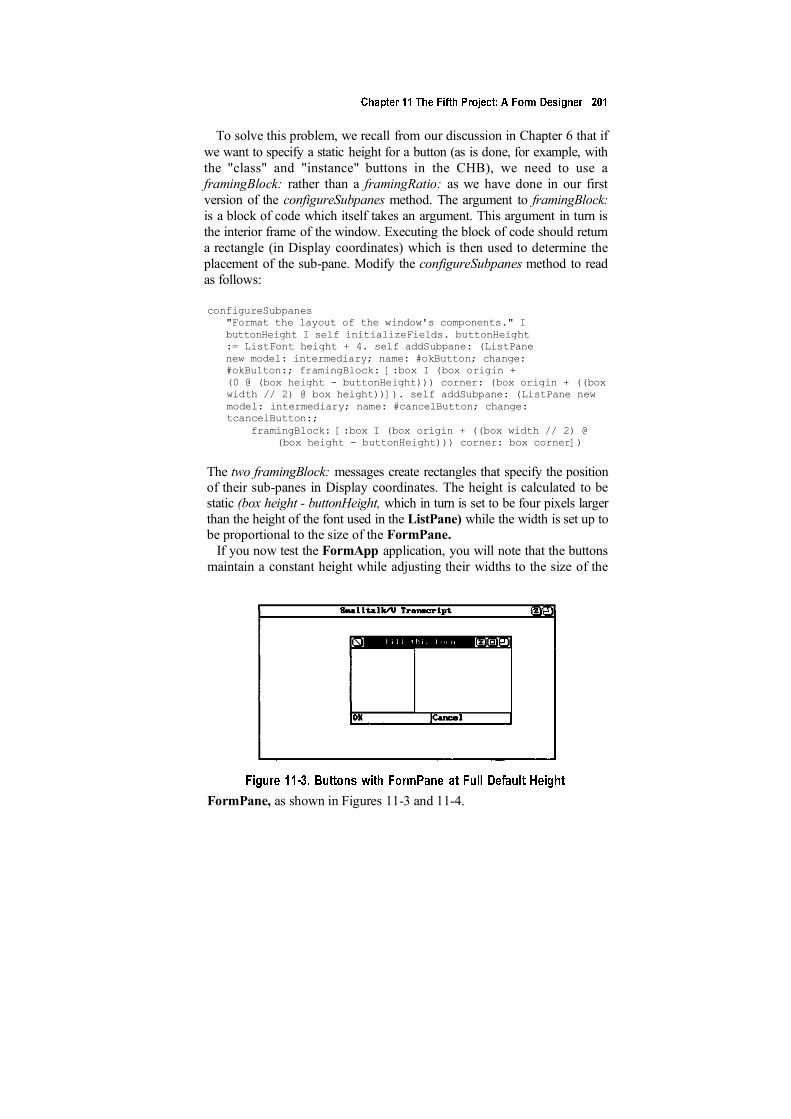
To solve this problem, we recall from our discussion in Chapter 6 that ifwe want to specify a static height for a button (as is done, for example, withthe "class" and "instance" buttons in the CHB), we need to use aframingBlock: rather than a framingRatio: as we have done in our firstversion of the configureSubpanes method. The argument to framingBlock:is a block of code which itself takes an argument. This argument in turn isthe interior frame of the window. Executing the block of code should returna rectangle (in Display coordinates) which is then used to determine theplacement of the sub-pane. Modify the configureSubpanes method to readas follows:
configureSubpanes"Format the layout of the window's components." IbuttonHeight I self initializeFields. buttonHeight:= ListFont height + 4. self addSubpane: (ListPanenew model: intermediary; name: #okButton; change:#okBu1ton:; framingBlock: [:box I (box origin +(0 @ (box height - buttonHeight))) corner: (box origin + ((boxwidth // 2) @ box height))]). self addSubpane: (ListPane newmodel: intermediary; name: #cancelButton; change:tcancelButton:;
framingBlock: [:box I (box origin + ((box width // 2) @(box height - buttonHeight))) corner: box corner])
The two framingBlock: messages create rectangles that specify the positionof their sub-panes in Display coordinates. The height is calculated to bestatic (box height - buttonHeight, which in turn is set to be four pixels largerthan the height of the font used in the ListPane) while the width is set up tobe proportional to the size of the FormPane.
If you now test the FormApp application, you will note that the buttonsmaintain a constant height while adjusting their widths to the size of the
FormPane, as shown in Figures 11-3 and 11-4.
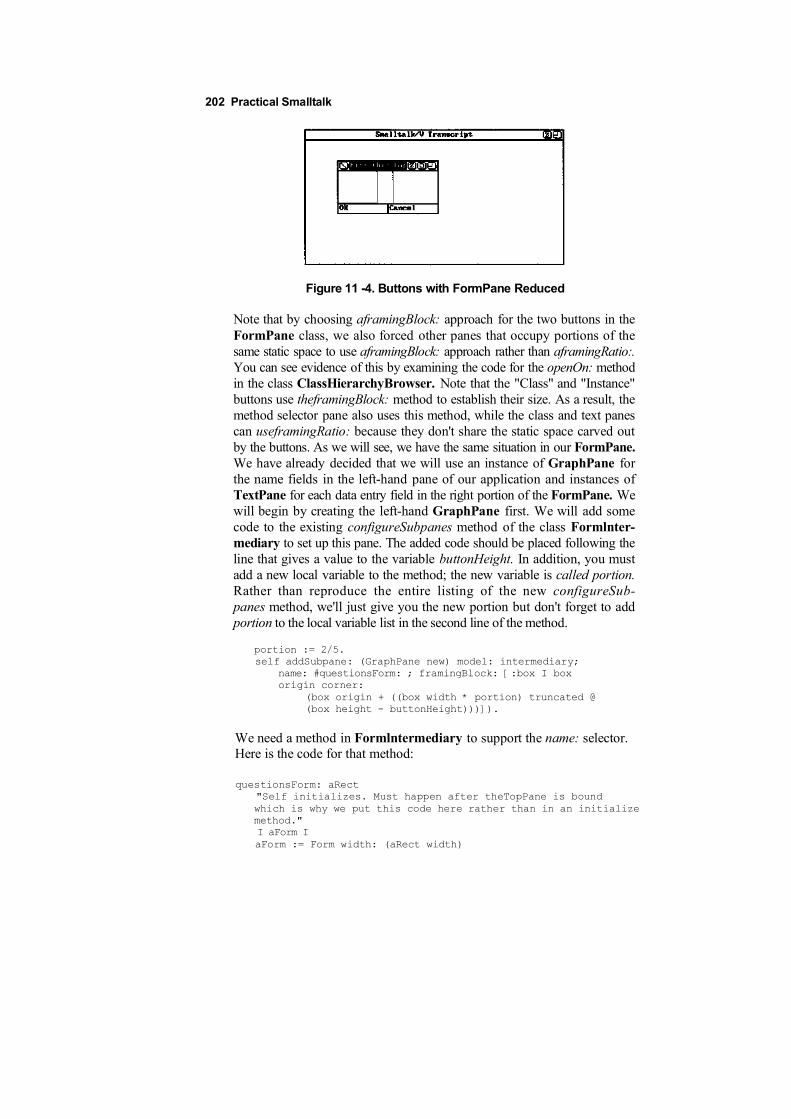
Figure 11 -4. Buttons with FormPane Reduced
Note that by choosing aframingBlock: approach for the two buttons in theFormPane class, we also forced other panes that occupy portions of thesame static space to use aframingBlock: approach rather than aframingRatio:.You can see evidence of this by examining the code for the openOn: methodin the class ClassHierarchyBrowser. Note that the "Class" and "Instance"buttons use theframingBlock: method to establish their size. As a result, themethod selector pane also uses this method, while the class and text panescan useframingRatio: because they don't share the static space carved outby the buttons. As we will see, we have the same situation in our FormPane.We have already decided that we will use an instance of GraphPane forthe name fields in the left-hand pane of our application and instances ofTextPane for each data entry field in the right portion of the FormPane. Wewill begin by creating the left-hand GraphPane first. We will add somecode to the existing configureSubpanes method of the class Formlnter-mediary to set up this pane. The added code should be placed following theline that gives a value to the variable buttonHeight. In addition, you mustadd a new local variable to the method; the new variable is called portion.Rather than reproduce the entire listing of the new configureSub-panes method, we'll just give you the new portion but don't forget to addportion to the local variable list in the second line of the method.
portion := 2/5.self addSubpane: (GraphPane new) model: intermediary;
name: #questionsForm: ; framingBlock: [:box I boxorigin corner:
(box origin + ((box width * portion) truncated @(box height - buttonHeight)))]).
We need a method in Formlntermediary to support the name: selector.Here is the code for that method:
questionsForm: aRect"Self initializes. Must happen after theTopPane is boundwhich is why we put this code here rather than in an initializemethod."I aForm IaForm := Form width: (aRect width)
202 Practical Smalltalk
_______________ Chapter 11 The Fifth Project: A Form Designer 203
height: (aRect height) .aForm display At: aRect origin.•"aForm
Save the image and try the test application again by executing
FormApp example
in a Workspace or the Transcript. You should be impressed with your workso far! Even though the application isn't complete yet, it is beginning to takeshape and you can see how it is going to behave.
We're ready now to tackle a fairly difficult part of our assignment. We mustcode a framing Block: method that uses variables intelligently because thenumber of data entry fields that a FormPane must accommodate is notknown in advance. We want our methods to be as reusable as possible. Asyou' 11 see, handling this assignment requires us to do some clever programming.The work we want to do will be handled within the configureSubpanesmethod of FormPane. But that method is already getting fairly long and wecan tell that the new code we're about to write will be (in the words ofsoftware professionals) "non-trivial." So we'll add a single line to theconfigureSubpanes method to invoke another method that will actuallyhandle the initialization of the multiple TextPanes needed to serve as entryfields. That line looks like this:
self conf igureTextPanes: portion buttonHeight: buttonHeight.
Place the above line after the conclusion of the definition of the GraphPaneand before the code that sets up the "OK" button.
Now we need to write the conf igureTextPanes .'buttonHeight: method. Thiswill be the trickiest method in our project.
If we stop and think for a moment, there are only two basic ways to writea method that will create and place an arbitrary number of TextPanes in aFormPane for us. One way would be to create hard-coded entries for anarbitrarily large number of such frames and then use only as many of theseentries as we have data entry fields in the application. This is inefficient andinflexible and hardly reusable. The alternative is to find a way to write asingle method that would use an indexing approach (i.e., setting an indexvariable to 1 for the first pane, 2 for the second, etc.) and multiply anincremental amount by this index value to calculate dynamically thelocations of all of the TextPanes.
Examine thcframingBlock: for the GraphPane in the configureSubpanesmethod. Notice that it uses a local variable of the method — portion — as
204 Practical Smalltalk
part of its calculations. It might therefore seem logical for us to define a localvariable to be used by aframingBlock: method for the configure-TextPanes:buttonHeight: method and increment it for each TextPane we create. Butwe run into a technical problem if we attempt to approach the project thisway. It is impossible to reference the value of such a variable at the time theTextPane is created. That is because we are only able to obtain the ultimate(resultant) value of such a variable in Smalltalk/V. As a result, despite thevalue of the index at the time each TextPane is created, all of the TextPaneframingBlock: executions would be bound to the value of that local variableat the time its containing method (i.e., configureTextPanes:buttonHeight:)completed its execution, not the value at the time each block is created.
We can get around this problem by using a separate method to create theblock rather than creating all of them in the middle of the execution of asingle method. This way, the local variable references from the block willrefer to the variable bindings at the time the method that created the sub-panewas executed. By executing this new method once for each pane, we canensure that we have unique values for that variable and thus non-overlappedplacement of all TextPanes.
With that background, here is the method that will handle the configura-tion of the TextPanes. Notice that it uses a custom approach to framingblock construction called textFramingBlock: buttonHeight .'portion: quantity:.
configureTextPanes: portion buttonHeight: buttonHeight"Configure the layout of the TextPanes, and provide thecollection of them to intermediary. Portion is the amount ofhorizontal space used by the Graph pane, leaving (1 - portion)for the TextPanes." I theTextPanes quantity I quantity :=intermediary numberOf Entries . theTextPanes := OrderedCol lectionnew: quantity. 1 to: quantity do: [:index I
theTextPanes add:(TextPane new framingBlock: (self textFramingBlock: indexbuttonHeight: buttonHeightportion: portionquantity: quantity) ;yourself) ] .
theTextPanes do: [:aTextPane I self addSubpane: aTextPane] .intermediary textFieldPanes: theTextPanes
Now we can write the textFramingBlock:buttonHeight:portion:quantity:method, whose code is reproduced below. Notice the use of comments todescribe the mathematical implications of each line of the method's code.
textFramingBlock: indexbuttonHeight: buttonHeightportion: portion
The somewhat unusual formatting of this method should also make its logiceasier to follow. If you read this alongside a conventional framingBlock:method, you can see what this method does. It uses known quantities likebuttonHeight and portion and quantity to calculate the right placement forthe current TextPane. The index is used as a multiplier to define the top andbottom locations of each TextPane's rectangle.
As you can see from the above methods, we must now supply two moresupporting methods to Formlntermediary. The first is textFieldPanes:,which takes an OrderedCollection as an argument. The second isnumberOfEntries which simply returns the number of questions the appli-cation is designed to ask. Here are those two methods:
textFieldPanes: anlndexedCollectiontextFieldPanes := anlndexedCollection
numberOfEntries^questionStrings size
Now when we try our test application again, we sense a bit more success.Resizing it demonstrates the self-configuration characteristics of the sub-panes. But we still have some problems to work out. For example, there isan extra space between the bottom TextPane and the button due to ourtruncation operation where we lose a partial pixel for each entry and theaccumulated effect is noticeable.
Your first impulse might be simply to switch from truncation to rounding,but this won't fix the problem in all cases. If that process consistently roundsdown, the problem will persist. The best solution is probably to have the lastTextPane use the top of the buttons as its bottom coordinate rather thancalculating it from the top of the window with the truncation errors. Here isa revised textFramingBlock:buttonHeight:portion:quantity: method thathandles this situation:
206 Practical Smalltalk
"dY" ( ( (box height - buttonHeight) // quantity) * (index - 1) )) corner:(box origin + "dX" ( (box width)@"6V" ( ( (box height - buttonHeight) // quantity) * index) )
if True: [A[:box i (box origin +("dX" (((box width) * portion) truncated)
@"dY" ( ( (box height - buttonHeight) // quantity) * (index - 1) )) corner:(box origin + "dX" ( (box width) @"dY" (box height - buttonHeight) ) ) ) ] ]
Testing our application now demonstrates that the problem is handled.
Modifying Undesirable Behavior in the Superclasses
If you experiment with the test application for a few minutes, you'll noticethat we still have some problems to resolve before we can consider ourselvesto have created a reusable project. Specifically, you'll find that:
• selecting the "OK" or "Cancel" button results in the system asking ifwe want to save pane contents
• zooming of the FormPane always results in zooming only the firstTextPane
• default values don't appear in the data entry fields as expected
To address these problems, we're going to make the following changes tothe project:
• disable the querying about saving changes
• disable zooming
• disable collapsing
• remove the FormPane's close box (to ensure the user exits the formvia one of our buttons)
• initialize the TextPanes to their default values
Chapter 11 The Fifth Project: A Form Designer 207
Disabling Query on Ending Interaction with FormPane
We need to determine where in the system the question about savingchanges originates. Since we know that the close method of the TopDis-patcher class is the source of the action that closes the window, we beginour search there. Use the CHB to examine the source code for this method.Notice that it sends self a closelt message. Let's track down closelt. We canfind it in the class Dispatcher. Here is its source code:
closelt"Close the receiver window and resume theScheduler main processing loop. " selftopDispatcher pane textModified ifTrue:[^self]. self closeWindow. Scheduler resume
As you can see, this method checks to see if textModified produces a trueresult and, if it does, the method does not close the window. Clearly, then,we need to find out how the textModified method works. Consulting theMethod Index in the Smalltalk/V 286 documentation, you can see thattextModified is implemented only in the class TopPane.
Examining its source code in the CHB, we determine that its purpose is toquery the user and return true if the user wishes to continue editing,/a/,se ifthey wish to discard changes. Because we will force the user to use the "OK"or "Cancel" button to terminate editing in our application, we can safelyassume that the answer will always be false because we will already haveprocessed the panes' contents.
Since FormPane is a subclass of TopPane, we can simply override thetextModified method with our own:
textModified"The saving of modifications is handled by an alternatemechanism, so ignore this one. "^false
Disabling Zooming, Collapsing, and Closing
The most direct way to eliminate the possibility that the user will zoom,collapse, or close the FormPane inappropriately is to remove the icons thatenable this behavior. We saw in Chapter 6 that the methods leftlcons: andrightlcons: determine which icons will be available in a window.
We could simply handle the removal of these icons in our FormAppinstance when we create the FormPane and set some of its arguments. Butsince we are going to want to do this for every application that usesFormPane, it is better handled in the class FormPane directly.
Before we can remove the icons, we have to find out where they are nowbeing set. In the CHB, locate TopPane, select its leftlcons: method, and
208 Practical Smalltalk
choose "senders" from the pane pop-up menu to find out which TopPanemethod sets the default value. We discover that the initialize method of Top-Pane handles this assignment. This is fortuitous because we've alreadyoverridden that method in our FormPane class. Recall that when we didthat, we sent the super initialize message first so that the return value fromthe initialization would be consistent. Now we need to send that message lastso that our override of the icons isn't in turn overridden by the TopPane'sinitialize method. But we still want to be sure that we return the same resultas if we had called the superclass' initialize method first. We accomplishthat by storing the result of that method call in a local variable. Here's thecode for the modified initialize method for FormPane:
initialize Iresult Iresult := super initialize,intermediary := Formlntermediary new.intermediary formPane: self, selfleftlcons: #() . self rightlcons: #(resize) . '""result
A quick test of the FormApp reveals that our changes have worked.
The final change in our list is to initialize the TextPanes so that they displaythe default answers when we open the pane.
We might start by simply locating a method that will add text to aTextPane. As we saw in Chapter 10, the appendText: method handles thisassignment. Since we're starting with empty panes, appending the defaultanswers to the existing text would work just fine for our purposes.
This turns out, however, not to be an optimal solution. Why? Because wereally want to make use of the existing initialization mechanism forTextPanes, which set up pane contents by the standard process of queryingthe model. This is also the method by which a pane restores its originalcontents; in our case, that means the default responses. So it makes eminentsense for us to use this approach to our own pane content initialization.
To gain a better understanding of how and when a TextPane is initialized,examine the open method of the class TopPane in the CHB. Notice that itsends the open message to each of its sub-panes. Since we are interested inTextPanes, we examine the open method of that class. Note that it performsa self cancel.
The logic behind this approach is that the "cancel" menu item for aTextPane reverts the pane to its original contents prior to any user editing.Whether it is reverting to this value or setting it initially, the mechanism isidentical. The process involves simply setting the pane's contents to thevalue provided by the model.
Now let's examine the cancel method of the class TextPane. Notice theline that says in part:
string: (model perform: name)
If the model provides a selector to use for getting the pane';s initial value, thecancel method uses it. The problem with this approach for our project is thatwe wish to use the same method to initialize all of the TextPanes. But theexpression above does not let us know which TextPane we are addressing.Thus this mechanism makes it impossible to know which defaultAnswerStringto provide.
As we can see, then, there are two ways for us to provide the initial valuefor a TextPane. We can use the cancel method or we can set up a namemethod in the TextPane's model. We'll do the latter.
Let's begin by subclassing TextPane to create a new class EntryTextPanethat supports informing its model of its identity. Open the CHB, chooseTextPane and then "new subclass" from the pane pop-up menu. Edit thenew class template so that it looks like this:
TextPane subclass: #EntryTextPaneinstanceVariableNames: ''classVariableNames: ''poolDictionaries: "'
This class will have only one method, cancel. We set it up so that our modelcan support either a name selector method or a cancel: method which takesthe TextPane as an argument. Here is the code:
cancel"Private - Restore the last savedversion of the text."name == #yourselfifTrue: [textHolder string: model]ifFalse: [
(model respondsTo: #cancel:) ifTrue: ['"model cancel: self]ifFalse:[
textHolderstring: (model perform: name with: self)]].
selftopCorner: 1@1;refreshAll
Next, we update the configureTextPanes:buttonHeight: method to set upthe name for the Entry TextPanes, so that it looks like this:
configureTextPanes: port ion buttonHeight: buttonHeight"Configure the layout of the TextPanes, and provide the collection ofthem to intennediary. Portion is the amount of horizontal space usedty the Graph pane, leaving (1 - portion) for the TextPanes."I theTextPanes quantity Iquantity := intermediary numberOfEntries
210 Practical Smalltalk
theTextPanes := OrderedCollection new: quantity. 1to: quantity do: [:index I
theTextPanes add:(EntryTextPane new framingBlock: (self textFramingBlock: indexbuttonHeight: buttonHeightportion: portionquantity: quantity) ;model: intermediary; "This line added"name: #defaultAnswer: /"This line added"yourself)].
theText Panes do: [:aTextPane I self addSubpane: aTextPane] .intermediary textFieldPanes: theTextPanes
Now Formlntermediary obviously needs a default Answer: method so thatit can deal with the updating process established in the above method. Hereis the code for this new method:
defaultAnswer: entryTextPane"Find the index of the entry, and extract the string of the sameindex from the defaults."^defaultAnswerStrings at: (textFieldPanes indexOf: entryTextPane)
This method uses the index that is tracking which entry field is being workedwith to retrieve the default answer from the defaultAnswerStrings, which wasinitialized to be an Association so that we could retrieve its contents byindex value.
> Adding Menu Capabilities
Another modification we'd like to support to our new FormPane project isto provide a custom popup menu providing some of the key functionalitythat exists in TextPanes and TextEditors. We're going to make it possiblefor the user to restore the pane's contents, to perform the standard editingoperations (cut, copy, and paste), and to zoom any individual TextPane inconformance with the project design described earlier.
As we have seen in earlier projects, we can associate a popup menu witha pane by setting its paneMenuSelector to a selector of a method supportedby the model. We'll add that capability to our configureTextPanes:button-Height: method, just before the yourself line that signals the end of thecreation of the EntryTextPane instances. Insert this line in that place:
menu: #entryFieldMenu;
Before we create our menu, let's take a look at what is already available tous in the way of default menus and behaviors. We look through the classTextPane in the CHB to find the method that invokes a menu. The
__________ Chapter 11 The Fifth Project: A Form Designer 211
performMenu method has possibilities, so we examine its code. Reading thecomment, we can see that we need to deal with the dispatcher class. As wesaw in Chapter 10, the dispatcher class for a TextPane is a TextEditor. Webrowse through this class and look at its menu metamethod. It returns thecontents of StandardEditMenu. You may have noticed already that thisselector begins with a capital letter, meaning that it is most likely a globalvariable. Select it and then choose "showlt" from the pane popup menu. Wefind out it is not globally bound.
So we check the class definition and find that it is a class variable. Nowthat we know what it is, we need to find out where it is initialized so we cansee what's in it by default. There are only a few metamethods to look at andinitialize turns out to be the right choice. By examining its code, we can seethat it defines a single menu, the last choice of which is "next menu" andwhose selector is misc. From our experience working with the system, weknow that this menu selection brings up a second menu and we want toexamine what's in it as well, so we look at the misc method.
Now we know what the selector names are that correspond to the variousmenu choices that we want to include in our EntryTextPanes. Here is thecode for our method to be placed in the Formlntermediary class:
entryFieldMenuAMenu
labels: ' restore\copy\cut\paste\zoom1 witherslines: # ( 1 - 4 )selectors : # (cancel copySelection cutSelectionpasteSelection zoom)
Run the test application and bring up the entry field menu to confirm that wehave indeed accomplished our objective. Selecting "zoom" now enables usto zoom any selected EntryTextPane rather than just the topmost pane ashappened before when we chose the zoom icon in the window.
Formatting the Name Fields
At this point, our application is not yet displaying the prompt labels (namefields) in the GraphPane. Since this is primarily cosmetic (i.e., it haslimited interactive functionality), we have saved this task to near the end ofconstructing our project. The time has now come to handle this responsibil-ity, however.
Look at the name selector in the GraphPane definition of our configure-Subpanes method in the class Formlntermediary. Notice that it is questions-Form:. This method now does nothing but set up the blank pane area. Let'srewrite it so it looks like this:
212 Practical Smalltalk
quest ionsForm: aRect"As the model of a GraphPane, this method supports the nameselector. By returning nil, it informs the GraphPane to use thismethod when the window is -.refrained. " I aForm characterscannerspacing theString I aForm := Form width: (aRect width)
height: (aRect height) .characterscanner : = Characterscanner new
initialize: (Display boundingBox) f ont : SysFont .aForm displayAt : aRect origin.spacing := (aRect height // self numberOf Entries) .1 to: (self numberOf Entries) do: [: index I
theString := (questionStrings at: index) .characterscanner display : theString
at: (aRect origin +(4 @ ( (spacing \\ 2) +(spacing * (index - 1) ))))].
Let's examine this code in some detail. It accomplishes two basic tasks:
1. renders a white background
2. draws text in the GraphPane
First, we create a new Form the same size as the pane:
aForm := Form width: (aRect width)height: (aRect height) .
Next we create a Character Scanner whose job (as you'll recall fromChapter 10) is converting ASCII codes to bitmaps in the system font.Because we will specifically position each string to be drawn, we can let theCharacterScanner be set up to use the whole display:
characterscanner : = CharacterScanner newinitialize: (Display boundingBox) font: SysFont.
Now we display our blank background (blank because all Forms are blankwhen they are created):
aForm displayAt : aRect origin.
Now for the real work. We iterate through the entries, asking thecharacterScanner to display each string with consistent horizontal spacing(4 pixels from the left) and with a calculated vertical spacing:
1 to: (self numberOf Entries) do: [: index ItheString := (questionStrings at: index) .characterScanner display: theString at:(aRect origin +
(4 @ ( (spacing \\ 2) +(spacing * (index - 1) ))))].
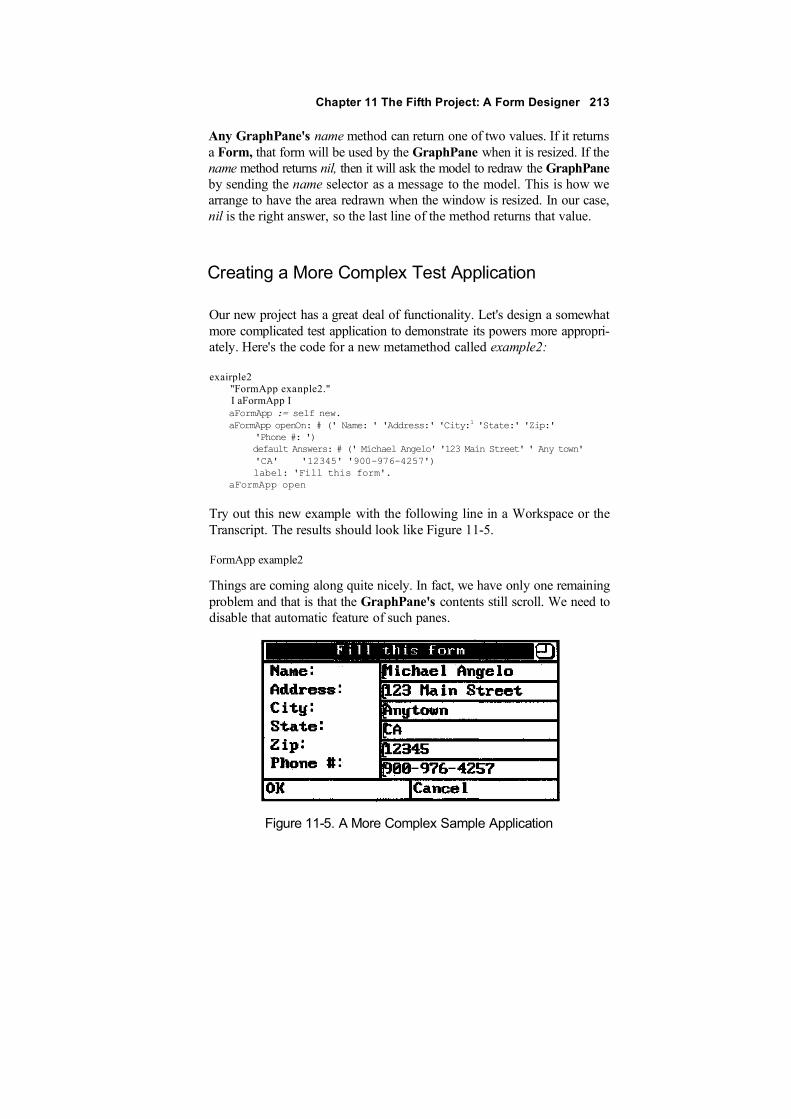
Chapter 11 The Fifth Project: A Form Designer 213
Any GraphPane's name method can return one of two values. If it returnsa Form, that form will be used by the GraphPane when it is resized. If thename method returns nil, then it will ask the model to redraw the GraphPaneby sending the name selector as a message to the model. This is how wearrange to have the area redrawn when the window is resized. In our case,nil is the right answer, so the last line of the method returns that value.
Creating a More Complex Test Application
Our new project has a great deal of functionality. Let's design a somewhatmore complicated test application to demonstrate its powers more appropri-ately. Here's the code for a new metamethod called example2:
exairple2"FormApp exanple2."I aFormApp IaFormApp := self new.aFormApp openOn: # (' Name: ' 'Address:' 'City:1 'State:' 'Zip:'
'Phone #: ')default Answers: # (' Michael Angelo' '123 Main Street' ' Any town''CA' '12345' '900-976-4257')label: 'Fill this form'.
aFormApp open
Try out this new example with the following line in a Workspace or theTranscript. The results should look like Figure 11-5.
FormApp example2
Things are coming along quite nicely. In fact, we have only one remainingproblem and that is that the GraphPane's contents still scroll. We need todisable that automatic feature of such panes.
Figure 11-5. A More Complex Sample Application
214 Practical Smalltalk
Disabling Scrolling in the GraphPane
Before we can disable this scrolling behavior, we have to know how it getsinvoked in the first place. Clearly, a pane doesn' t scroll without an interpre-tation of a user action of some sort. User actions are the province ofDispatchers, so the first thing we need to know is what kind of Dispatcheris associated with a GraphPane. Examine the defaultDispatcherClassmethod of a GraphPane in the CHB. It indicates that a GraphDispatcherplays this role.
Now we examine the GraphDispatcher class to see how it invokesscrolling. We're in luck; it has only one method, processFunctionKey:.Unfortunately, as we look at this method, nothing seems to invoke anyscrolling. So we examine the inherited version of processFunctionKey: inthe class ScrollDispatcher.
As we examine this code, we quickly conclude that all subclasses ofScrollDispatcher inherit scrolling. We might therefore think that a goodway to eliminate scrolling would be to create a new subclass ofGraphDispatcher called, for example, NoScrollDispatcher. A carefulexamination of this alternative reveals that it has some problems. To seethem, select the processFunctionKey: method for any of the Dispatcherclasses and select "implementors" from the pane popup menu. This opensa browser on all implementors of this method and enables us to see how thismethod in GraphDispatcher uses the one from ScrollDispatcher, which inturn uses the method from Dispatcher.
We want most of this inherited behavior. All we really want to ridourselves of is the scrolling behavior. The best way to do this is to create aNoScrollDispatcher class that is a subclass of Dispatcher rather than ofScrollDispatcher. That way, the new class would not inherit the scrollingcapabilities to begin with and we wouldn't waste our time figuring out howto override them.
In the CHB, select the class Dispatcher and create a new subclass, editingthe default template to appear as follows:
Dispatcher subclass: #NoScrollGraphDispatcherinstanceVariableNam.es: ' ' classVariableNames: ' 'poolDictionaries: ' FunctionKeys CharacterConstants '
Copy the processFunctionKey: method of GraphDispatcher into this newclass. The code should look like this:
_______________ Chapter 11 The Fifth Project: A Form Designer 215
"Private - Perform the requested functionfrom the keyboard or mouse. "(SelectFunction == aCharacter or:
[EndSelectFunction == aCharacter])if True: [^pane selectAtCursor] . SetLoc== aCharacter ifTrue: [
Terminal mouseSelectOnif True: [ pane selectAtCursor] ] .
super processFunctionKey: aCharacter
Now we just need to subclass GraphPane so it will use ourNoScrollDispatcher as its dispatcher. We'll make this class aNoScrollGraphPane. Open the CHB, select GraphPane and create a newsubclass, editing the resulting template so it looks like this:
GraphPane subclass: #NoScrollGraphPaneinstanceVariableNam.es: ''classVariableNames: ''poolDictionaries: '
This new class will have only one method since its only purpose is to ensurethe proper Dispatcher is used:
Finally, edit the configureSubpanes method in the class FormPane so thatthe one reference in it to GraphPane is changed to refer to aNoScrollGraphPane.
Save the image and test to your heart's content. Everything works asoriginally envisioned.
An Alternative Approach
We could have dealt with the scrolling problem of the previous section in acompletely different way. We could have defined a new class betweenGraphPane and SubPane that handled all but the scrolling methods, whichwe would place in GraphPane instead. That would have required a bit moredetail and knowledge and, for the purposes of this book, wouldn't haveadded much to the discussion. Still, it is an alternative that you may want toexamine for your own interest.
There are almost always several ways to accomplish a particular objectivein Smalltalk.
216 Practical Smalltalk
Complete Source Code
Following is the complete source code listing of the project in this chapter.
TextPane subclass: #EntryTextPaneinstanceVariableNames: ' 'classVariableNames: ''poolDictionaries: ' ' !
!EntryTextPane class methods ! !
!EntryTextPane methods !
cancel"Private - Restore the last savedversion of the text." name == #yourself
ifTrue: [textHolder string: model]ifFalse: [
(model respondsTo: #cancel:)ifTrue: ["model cancel: self]ifFalse:[
textHolderstring: (model perform: name with: self)]].
selftopCorner: 1@1;refreshAll! !
Object subclass: #FormIntermediaryinstanceVariableNames:
1 formPane questionStrings defaultAnswerstrings textFieldPanes questionsFormquestionsScanner 'classVariableNames: ' 'poolDictionaries: '' !
IFormlntermediary class methods ! !
IFormlntermediary methods !
cancelButton
"Label for the Cancel button."A#(Cancel)!
cancelButton: whoCares"Because the user has canceled, we provide nil as the result. Themodel to formPane should know that nil indicates that no values werechanged, so use what it has as the default if desired." formPanetakeResult: nil!
defaultAnswer"comment" I I AdefaultAnswerStrings at: (textFieldPanes
indexOf: self)!
defaultAnswer: entryTextPane"Find the index of the entry, and extract the string of the sameindex from the defaults." AdefaultAnswerStrings at: (textFieldPanes
indexOf: entryTextPane)!
defaultAnswerstrings: indexedStrings
Chapter 11 The Fifth Project: A Form Designer 217

218 Practical Smalltalk
!NoscrollGraphDispatcher methods !
processFunctionKey: aCharacter"Private - Perform the requested function
from the keyboard or mouse."(SelectFunction == aCharacter or:[EndSelectFunction == aCharacter])ifTrue: [Apane selectAtCursor].SetLoc == aCharacter ifTrue: [
Terminal mouseSelectOnifTrue: [Apane selectAtCursor]].
super processFunctionKey: aCharacter! !
GraphPane subclass: #NoScrollGraphPaneinstancevariableNames: ' 'classVariableNames: ''poolDictionaries: ' ' !
!NoScrollGraphPane class methods ! !
!NoScrollGraphPane methods !
defaultDispatcherClass"Answer the default dispatcherof a NoScrollGraphPane."
^NoScrollGraphDispatcher! !
TopPane subclass: #FormPaneinstancevariableNames:
'intermediary name changeSelectorclassVariableNames: ' 'poolDictionaries: ' ' !
!FormPane class methods ! !
!FormPane methods !
change: aSelector"Used as a message to the model to inform it of a change in theFormPane. Must take an argument of the FormPane values."changeSelector := aSelector!
configureSubpanes"Format the layout of the window's components."I buttonHeight portion I self initializeFields.buttonHeight := ListFont height + 4. portion :=2/5.self addSubpane: (NoScrollGraphPane new model: intermediary;
name: #questionsForm:; framingBlock: [:box I box origincorner:
(box origin + ((box width * portion) truncated(box height - buttonHeight)))] ) .
self configureTextPanes: portion buttonHeight: buttonHeight.self addSubpane: (ListPane new model: intermediary; name:ttokButton; change: ftokButton:;
Chapter 11 The Fifth Project: A Form Designer 219
f ramingBlock: [:box I (box origin +(0 @ (box height - buttonHeight) ) ) corner: (box origin + ( (boxwidth // 2) @ box height) ) ] ) .
self addSubpane : (List Pane new model: intermediary;name: ttcancelButton; change: ttcancelButton:;framingBlock: [:box I (box origin + ( (box width // 2) @
(box height - buttonHeight))) corner:box corner]
conf igureTextPanes : portion buttonHeight : buttonHeight"Configure the layout of the TextPanes, and provide the collectionof them to intermediary. Portion is the amount of horizontal spaceused by the Graph pane, leaving (1 - portion) for the TextPanes." ItheText Panes quantity 1quantity := intermediary numberOf Entries .theTextPanes := OrderedCollection new: quantity. 1to: quantity do: [: index I theText Pane s add :
(Entry Text Pane new framingBlock: (self textFramingBlock: indexbuttonHeight: buttonHeight portion: portionquantity: quantity) ; model: intermediary; name:#defaultAnswer : ; menu: ttentryFieldMenu;yourself) ] .
theTextPanes do: [:aTextPane I self addSubpane: aTextPane] .intermediary textFieldPanes : theTextPanes!
initializeI result Iresult := super initialize.intermediary := Formlntermediary new.intermediary formPane: self. selfleftlcons: #() . self rightlcons: #(resize). '"result !
initializeFields"Queries the model and informs the Formlntermediary."I anAssociation IanAssociation := model perform: name. intermediaryquestionStrings: anAssociation key. intermediary defaultAnswerStrings : anAssociation value!
name: aSelector"Selector used as the name of the FormPane, and to get theinitial information displayed in the pane." name :=aSelector!
takeResult: result"Inform the model of the change and result."model perform: changeSelector with: result.self dispatcher close!
textFramingBlock: index buttonHeight : buttonHeight portion: portion quantity:quantity
"Generate the framingBlock for the TextPanes. If the Text Pane is thebottom one, indicated by the == test, then be sure it butts up against thebuttons (use the alternate block) ."
220 Practical Smalltalk
index == quantityifFalse: [^[:box I (box origin +
("dX" (((box width) * portion) truncated)@
"dY" (((box height - buttonHeight) // quantity) * (index - 1))) corner: (box origin + "dX" ((box width)
@ "dy" (((box height - buttonHeight) // quantity) *index))
)) ]] ifTrue: [A[:box i (boxorigin +
("dX" (((box width) * portion) truncated)@
"dY" (((box height - buttonHeight) // quantity) * (index - 1))) corner: (box origin + "dX" ((box width) @
"dY" (box height - buttonHeight))))]]!
textModified"The saving of modifications are handled by an alternatemechanism, so ignore this one." ^false! 1
Object subclass: #FormAppinstanceVariableNames:
'questionStrings defaultAnswerstrings answerStrings 'classVariableNames: '' poolDictionaries: '' !
!FormApp class methods 1
example"FormApp example." I aFormApp I aFormApp := self new.aFormApp openOn: #('Name: ' 'Address: ' 'Phone #: ')defaultAnswers: #('Fred' '123 Main Street' '900-976-4257') label:'Fill this form'. aFormApp open!
example2"FormApp example2." I aFormApp I aFormApp := self new. aFormApp openOn:#('Name:' 'Address:' 'City:' 'State:' 'Zip:' 'Phone #: ')
defaultAnswers: #('Michael Angelo' '123 Main Street' 'Anytown' 'CA''12345' '900-976-4257')
label: 'Fill this form'.aFormApp open! !
!FormApp methods !
formlnfo

Chapter 11 The Fifth Project: A Form Designer 221
aFormPane := FormPane newmodel: self;
aFormPane configureSubpanes. aFormPanedispatcher open scheduleWindow!
userResponse: theStrings"The method for the change selector as model for a FormPane."theStrings isNil
ifTrue: [answerStrings := defaultAnswerStrings.Transcript cr;
show: 'User selected Cancel. Defaults are used.1]ifFalse: [answerStrings := theStrings]. Transcript cr; show: 'Theresponses are: '; show: (answerStrings printString); crl !


Index
#EntryTextPane, 209#FormIntermediary class, 192#FormPane class, 192#NoScrollGraphDispatcher, 214#NoScrollGraphPane, 215@ message, 130abstract class, 24, 54, 59, 60, 78add subclass, 57adding a method, 62addSubpane:, 71, 84-85, 193addToSelections:, 115allDependents method, 56alllnstances message, 5allltems, 105allReferences method, 56allSelectionsAsIndexes method, 120-121allSelectionsAsStrings method, 120-121appendChar: method, 179appendText method, 179Array class, 22, 24ASCII, 23, 34, 37, 178, 212Aspect variable, 153Association class, 22, 24, 26back up, 6Bag class, 22, 24, 33barFill method, 163-164barSpacing method, 165barWidth method, 165become: method, 56behavior, 53behavioral hierarchy, 51binary selector, 18BitBlt class, 22-23, 134-135, 178bitmap, 130black, 135blank: width method, 185blankRestFrom: method, 185
223

224 Practical Smalltalk
Boolean, 35-36breakpoints pane, 14broadcasting, 103broadcasts, 110browse
browse class, 3browse disk, 7browse option, 9Class Browser, 9Disk Browser, 7Method Browser, 9
browse class, 3 browsedisk, 7 browse option, 9button
buttonHeight: method, 204, 209cancelButton, 197-198okButton method, 197
buttonHeight: method, 204, 209 Clanguage, 49 cancelButton, 197-198 cancel: method, 209 carriagereturn, 11 cascading, 19change: method, 89-90, 193-195,changed message, 75, 103 changedmethod, 96 changed: method, 75, 90,96 changed:with: method, 96changed:with:with: method, 96changeNib: message, 139 Changes Log,6-7 Character class, 22-23, 26CharacterScanner class, 22-23, 178, 183CHB, 3Class Browser, 9 ClassHierarchy Browser, 2-3 classdiagrams, 54 class hierarchy,21 class libraries, 1, 17, 65class list pane, 3 classmethod, 56 clearPlot method,155 clearSelections method,112

clipRect: message, 137close method, 112, 193close, 89, 193closelt, 207closelt Icon, 88cmds, 74collapse Icon, 88-89Collection class, 22-23, 26, 30, 33-34, 37, 59compressChanges, 6compressing source file, 7concrete classes, 59-60configureSubpanes method, 196, 201configureTextPanes method, 204, 209confirm: method, 43contents method, 89, 96Control-Break, 10, 13copy method, 56copyBits, 135, 152-153corner: method, 93, 131create option, 8cursors, 129darkGray, 135dataMenu method, 147, 167dataPane method, 147Date class, 22, 26debug menu option, 13, 16Debugger, 12-16,46-47debugging, 9decrement, 75deepCopy method, 56, 116defaultAnswers: method, 199, 210defaultAnswerStrings instance variable, 191, 195-19defaultDispatcherClass, 214-215defaultNib: method, 138-139, 153-154delete: method, 183Demo Menu, 29, 38DemoClass class, 29, 44dependents, 56, 96, 110destForm:, 135destForm:sourceForm:, 135destination form, 135Dictionary class, 22, 24, 26direction: method, 139Disk Browser, 7
Index 225

226 Practical Smalltalk
Dispatcher class, 22, 25, 66-68, 83, 214dispatcher method, 73, 97Display class, 148display:from:at: method, 185display:from:to:at: method, 185display At: method, 134, 185display AtxlippingBox: method, 134DisplayMedium class, 132-133DisplayObject, 133DisplayScreen class, 22, 25do it pane menu option, 18-19do: operator, 37, 153doesNotUnderstand: method, 56DOS file, 8, 12, 166down method, 138editing messages, 9editing text files, 8entryFieldMenu method, 211error: method, 56examining the value of instance variables, 10example, 77, 108, 148, 198example2, 213extent: method, 93, 131factor method, 164-165file I/O, 28, 166file out option, 81fileln method, 167fileOut method, 168FileStream class, 22, 28FixedSizeCollection class, 22, 24Float class, 22, 26forceEndOntoDisplay method, 180forceSelectionOntoDisplay method, 180Form class, 22, 25, 130, 132, 134, 148form: method, 153FormAp class, 198formatlndexedStringAsSelected:, 114formlnfo, 199formlntermediary, 190FormPane instance variable, 191FormPane method, 188Fraction class, 22, 26framingBlock: method, 89, 91, 93, 201framingRatio: method, 89, 91, 93, 196, 201

from: method, 147garbage collection, 5gcd: method, 20getListFromModel method, 120go: method, 139, 141goto: method, 139, 141Graph Dispatcher class, 22, 25GraphPane class, 22, 27, 71, 134, 141, 153, 190gray, 135halftone, 135halt message, 13halt method, 56, 80home: method, 139-140hop Icon, 88horizontalBar: method, 152-153image file, 7image, 6implementedBySubclass method, 56, 60implementors, 9increment, 75IndexedCollection class, 22, 24, 33initialize method, 151, 208initialize, 76, 105, 194initialize:font: method, 184initializeFields method, 195initWindowSize method, 78-79, 87-88, 146inPanic, 10insetBy: method, 132inspect message, 10, 15inspect method, 56Inspector, 9, 16instance variable, 10, 103Integer class, 20, 22, 26interprets election method, 119isEmpty method, 46isKindOf: method, 56, 165isMemberOf: method, 56isNil method, 56jump Icon, 88keyword, 18label:, 84-85, 193, 199labels: argument, 44labels:lines:selectors: message, 95leftlcons: method, 70, 84, 88, 193, 207
Index 227

228 Practical Smalltalk
lightGray, 135lineAt: method, 182lines, 129ListApp, 104, 110ListPane class, 22, 27, 71-72, 99, 100Logo, 23Magnitude class, 20, 22, 26mask form, 135maxLineBetween:and: method, 182Menu class, 22, 26, 43menu: method, 89message, 17
@ message, 130alllnstances, 5changed, 75,103changeNib:, 139clipRect:, 137edit, 9halt, 13inspect, 10,15labels:lines;selectors:, 95message cascading, 19, 36message-passing hierarchy, 51message-passing process, 17message-passing syntax, 18new, 5reverse, 133scheduleWindow, 73update, 75withCrs, 43,95zoom, 181 Message class,
22 message cascading, 19, 36message-passing hierarchy, 51message-passing process, 17message-passing syntax, 18Method Browser, 9 method listpane, 3 method, 17method-definition syntax, 19method-execution process, 17minimumSize method, 84, 86mListPane, 102-103, 110, 114modal dialog, 27

model class, 66, 67, 83model: method, 89, 96model, 193model-pane-dispatcher, 66modified method, 181modified: method, 181MPD, 25-26, 83-98, 193multipleSelection, 105, 109, 121name: method, 89-90, 193, 195new message, 5new method, 3, 76, 84newPlot method, 169nextPutAll:, 36notNil method, 56nouns, 52Number class, 22, 26numberOffintries method, 205Object class, 22-23, 55-56, 69-70object, 17okButton method, 197open method, 73, 97, 108, 117, 145-146open workspace, 11open, 85, 193openOn, 85, 97, 199openOn: default Answers: label:, 199option
browse option, 9create option, 8debug menu option, 13,16do it pane menu option, 18-19file out option, 81optionPicker, 163show it pane menu option, 19
optionPicker method, 163 order ofoperations error, 47 OrderedCollection,22, 24, 109, 115, 156 organizationalhierarchy, 51 origin:corner: method, 132origin:extent: method, 132 Pane class,22, 26, 66-67, 83, 84 Pascal, 49Pen class, 22-23, 134, 137-139perform: method, 163 perform:with method, 156
Index 229

230 Practical Smalltalk
pixels, 129place: method, 139-140plotMenu method, 148, 162plotPane: method, 148PlotWindow class, 145Point class, 22, 27, 92, 130popup At: method, 163primitive, 19printString method, 37, 75Prioritizer class, 29, 37processFunctionKey: method, 214program design, 51prompt:default: class method, 32-33, 47prompt:defaultExpression: class method, 32PromptEditor class, 22Prompter class, 22, 27, 29, 31, 168, 187promptFor: default: validate With: method, 165promptWithBlanks:default: class method, 32putting special characters in text, 181questionsForm:, 203, 212questionStrings instance variable, 191, 195-196ReadStream class, 22, 28ReadWrite stream, 22, 28Rectangle class, 22, 28, 92, 130-132redraw screen menu item, 133reducing image size, 6release method, 56removeFromSelections:, 115removing classes, 5replace:withChar: method, 183replace :withText:, 183resize Icon, 88-89respondsTo: method, 56, 88responsibilities, 53restore method, 113, 116restoreSelected, 117restoreWithRefresh: method, 117resume, 13reverse message, 133rightlcons: method, 70, 84, 88, 193save, 11schedule Window message, 73schedule Window method, 97ScreenDispatcher class, 22, 25, 29, 44
ScreenMenu, 41ScrollDispatcher method, 214Scrolling, 179scrollUp: method, 155searchBackFrom:for: method, 183searchForLineToShow: method, 118searchFrom:for: method, 183selectAfter: method, 180selectAll method, 180selectAtCursor, 118, 121select AtEnd method, 180selectBefore: method, 180selectedltems, 105, 109selectFromito: method, 180selection variable, 112selections variable, 112selector, 18selectorMenu, 94selectTo: method, 180senders, 9Set class, 22, 24, 33setFont: method, 184setForeColonbackColor: method, 184setHorizontal method, 155setListFromModel method, 116, 120set Vertical method, 155shallowCopy method, 56, 116show it pane menu option, 18-19show:from:at: method, 185singleSelection, 105skip Icon, 88Smalltalk dictionary, 6Smalltalk syntax, 17-18sortBlock code block, 34-36, 44SortedCollection class, 22, 29-30, 34-35, 37source file, compressing, 7source form, 135species method, 56Stream class, 22, 28String class, 24, 178string: method, 147string:from: method, 147, 153, 156StringModel class, 22, 28, 178, 182subclassing process, 57
Index 231

232 Practical Smalltalk
subclassing, 55, 57SubPane class, 22, 27-28, 67, 71, 89, 193subpanes, 28super, 59super expression, 113superclass, 55Symbol class, 22, 24syntax, 17-19sysFontHeight, 106sysFontWidth, 106System Classes, 62System Menu Class, 26, 29, 38, 40-41system pop-up menu, 7, 11, 133takeResult: method, 197template, 4temporary variables, 20TerminalStream class, 22, 28text editing pane, 3,11Text, 179TextEditor class, 22, 25, 36, 149, 168, 177, 178, 180textFieldPanes instance variable, 191textFieldPanes: method, 205textFramingBlock:buttonHeight:portion:quantity: method, 204-205textModified, 207TextPane class, 22, 27-28, 71-72, 89, 168, 177-179, 209TextSelection class, 22, 28, 178Time class, 22, 26title bar, 2, 85TopDispatcher class, 22, 25, 78TopPane class, 22, 25, 26-27, 67-68, 84, 87, 89, 106, 188, 193totalLength method, 182Transcript, 2, 5-6, 11, 36, 111turn: method, 139-140turtle graphics, 23unformatlndexedStringAsSelected:, 114up method, 138update method, 75, 113, 117userResponse: method, 200values method, 75variableByteSubclass, 57variables
Aspect variable, 153defaultAnswerStrings instance variable, 191,195-196examining the value of instance variables, 10

FormPane instance variable, 191instance variable, 10local, 20questionStrings instance variable, 191,195-196selection variable, 112selections variable, 112temporary variables, 20textFieldPanes instance variable, 191variableByteSubclass, 57variableSubclass, 57
variableSubclass, 57verbs, 52verticalBar: method, 154 walkback, 10,12-13, 16, 46, 56, 149 white, 135width:Height: class, 133Wilson, David A., 54windows, 2, 26, 129 with:method, 109 withCrs message,43, 95 Workspace, 5-6, 11-12,111 WriteStream class, 22, 28X Windows, 2 x coordinate,130 y coordinate, 130 yourselfmethod, 56, 199 zoom Icon,88-89 zoom message, 181
Index 233