Embed Size (px)
Citation preview
PR1- Appliance User Manual v1.0
Page: 1/48
USER MANUAL
PR1- Appliance User Manual v1.0
Page: 2/48
Version History Version Description of change 0.4 Origin 0.5 Section 2.3.1. For interface cables added 0.6 Section 3.23.1 Firmware upgrade is elaborated 0.7 Section 3.23.1 Firmware upgrade is elaborated 0.8 Section 3.23.1 Firmware upgrade is elaborated 0.9 Links are updated to point SwitchVoice Ltd. web site 1.0 Section 1.1 is updated
PR1- Appliance User Manual v1.0
Page: 3/48
Table of Contents
Table of Contents ................................................................................................................. 3 1. General overview.............................................................................................................. 4
1.1. Echo cancellation module ........................................................................................... 6 2. Technical information...................................................................................................... 7
2.1. System: uClinux, SwitchFin ...................................................................................... 7 2.2. Hardware: .................................................................................................................... 8 2.3. Interfaces ..................................................................................................................... 8 2.3.1. Interface cables......................................................................................................... 8 2.4. Applications ................................................................................................................ 9 2.5. Additional information................................................................................................ 9
3. Software and Configuration tips................................................................................... 10 Working with the GUI ....................................................................................................... 10
3.1. System Status Menu .................................................................................................. 10 3.2. Configure Hardware Menu........................................................................................ 12 3.3. Trunks........................................................................................................................ 15 3.4. Outgoing Calling Rules ............................................................................................. 16 3.5. Dial plans................................................................................................................... 18 3.6. Users.......................................................................................................................... 19 3.7. Ring Groups .............................................................................................................. 21 3.8. Music on Hold........................................................................................................... 23 3.9. Call Queues ............................................................................................................... 24 3.10. Voice Menus ........................................................................................................... 26 3.11. Time Intervals ......................................................................................................... 28 3.12. Incoming Calling Rules........................................................................................... 29 3.13. Voice mail ............................................................................................................... 30 3.14. Conferencing ........................................................................................................... 32 3.15. Follow me................................................................................................................ 34 3.16. Directory.................................................................................................................. 35 3.17. Call Features............................................................................................................ 36 3.18. VoiceMail Groups ................................................................................................... 38 3.19. Voice Menu Prompts............................................................................................... 39 3.20. System Info ............................................................................................................. 40 3.21. Back up.................................................................................................................... 40 3.22. Options .................................................................................................................... 42 3.23. Advanced Options ................................................................................................... 43 3.23.1 Updating your PR1 firmware ................................................................................ 46
PR1- Appliance User Manual v1.0
Page: 4/48
1. General overview
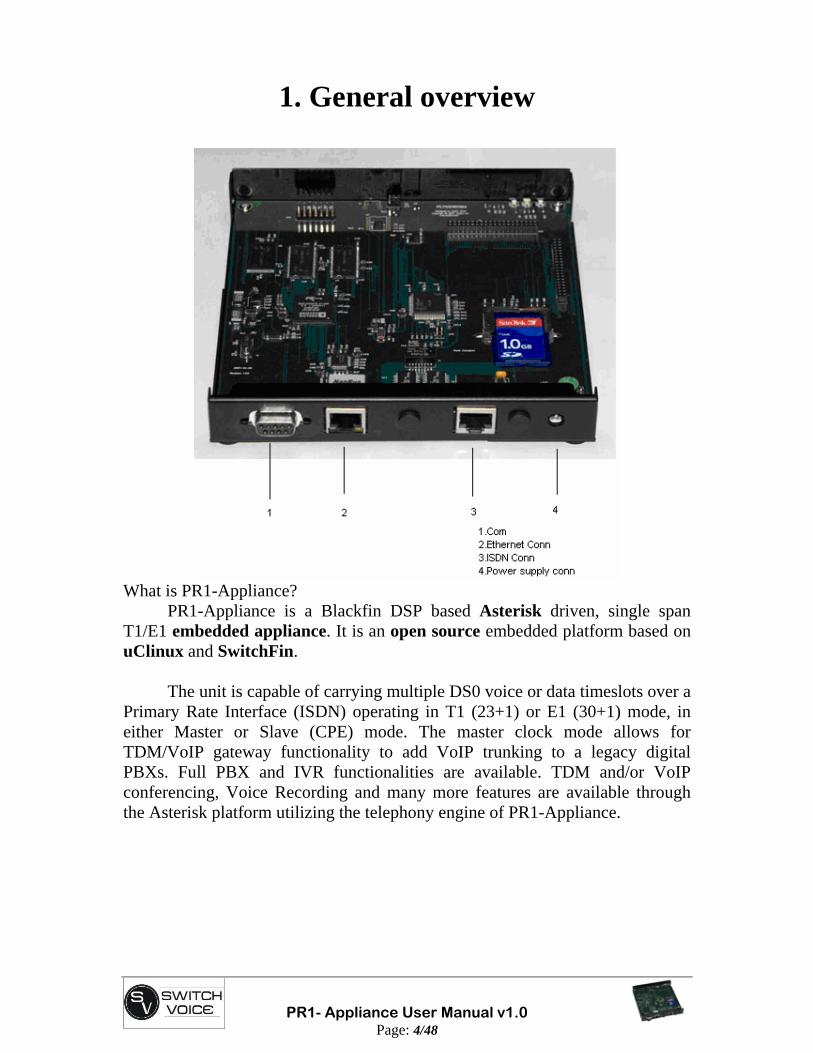
What is PR1-Appliance?
PR1-Appliance is a Blackfin DSP based Asterisk driven, single span T1/E1 embedded appliance. It is an open source embedded platform based on uClinux and SwitchFin.
The unit is capable of carrying multiple DS0 voice or data timeslots over a
Primary Rate Interface (ISDN) operating in T1 (23+1) or E1 (30+1) mode, in either Master or Slave (CPE) mode. The master clock mode allows for TDM/VoIP gateway functionality to add VoIP trunking to a legacy digital PBXs. Full PBX and IVR functionalities are available. TDM and/or VoIP conferencing, Voice Recording and many more features are available through the Asterisk platform utilizing the telephony engine of PR1-Appliance.
PR1- Appliance User Manual v1.0
Page: 5/48
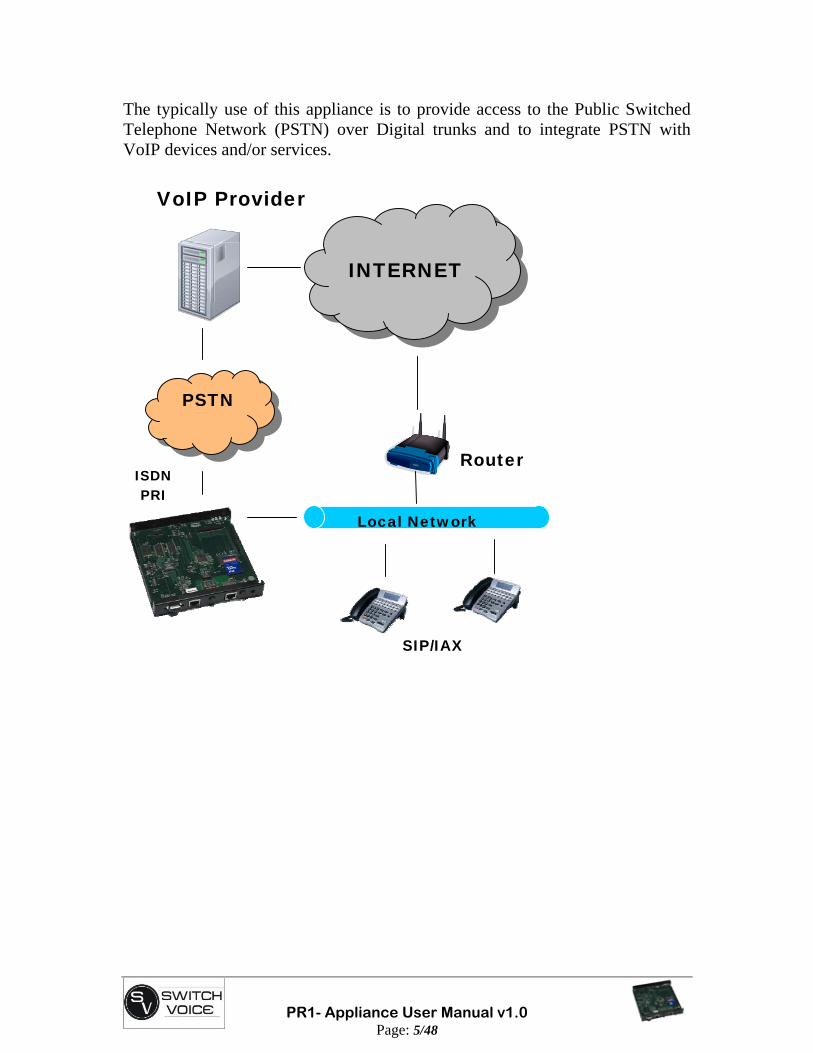
The typically use of this appliance is to provide access to the Public Switched Telephone Network (PSTN) over Digital trunks and to integrate PSTN with VoIP devices and/or services.
PSTN
INTERNET
Local Network
VoIP Provider
SIP/IAX
Router ISDN PRI
PR1- Appliance User Manual v1.0
Page: 6/48
1.1. Echo cancellation module
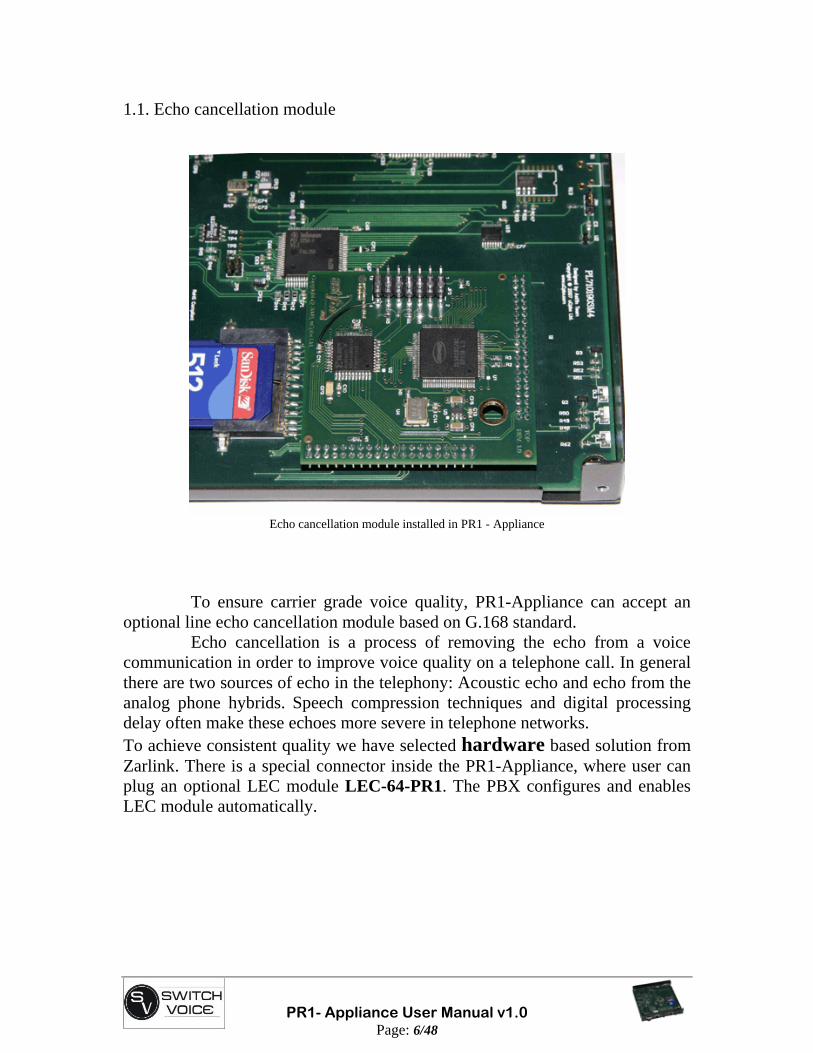
Echo cancellation module installed in PR1 - Appliance
To ensure carrier grade voice quality, PR1-Appliance can accept an optional line echo cancellation module based on G.168 standard. Echo cancellation is a process of removing the echo from a voice communication in order to improve voice quality on a telephone call. In general there are two sources of echo in the telephony: Acoustic echo and echo from the analog phone hybrids. Speech compression techniques and digital processing delay often make these echoes more severe in telephone networks. To achieve consistent quality we have selected hardware based solution from Zarlink. There is a special connector inside the PR1-Appliance, where user can plug an optional LEC module LEC-64-PR1. The PBX configures and enables LEC module automatically.

PR1- Appliance User Manual v1.0
Page: 7/48
2. Technical information
*picture without LEC module
2.1. System: uClinux, SwitchFin Our PBXs are driven by our own telephony oriented, Open Source uClinux distribution called SwitchFin ( http://switchfin.org). Current version of SwitchFin provides Asterisk 1.4.x, Zaptel 1.4.x and Libpri 1.4.x together with custom kernel modules to support our hardware. Additional applications such as PPPoE, SMTP forwarder, NTPd and many more are also provided to extend usability of the PR1-Appliance under different scenarios.
PR1- Appliance User Manual v1.0
Page: 8/48
2.2. Hardware: • ADSP - BF537 600MHz CPU. DSP core for the media processing. • 128MB of SDRAM • 256KB serial flash for the boot-loader • 1GB NAND flash for voicemail and prompts. • SD card interface on a dedicated bus. • RS232 for console connectivity (115k, 8-N-1) • Watchdog timer • Optional, hardware based echo cancellation.
2.3. Interfaces
• Single span T1/E1 interface based on Infinieon silicon • PRI: Network or CPE • EuroISDN, AT&T 4ESS, DMS 100, Lucent 5E, National • 10/100Mbps Ethernet port with high performance PHY
2.3.1. Interface cables
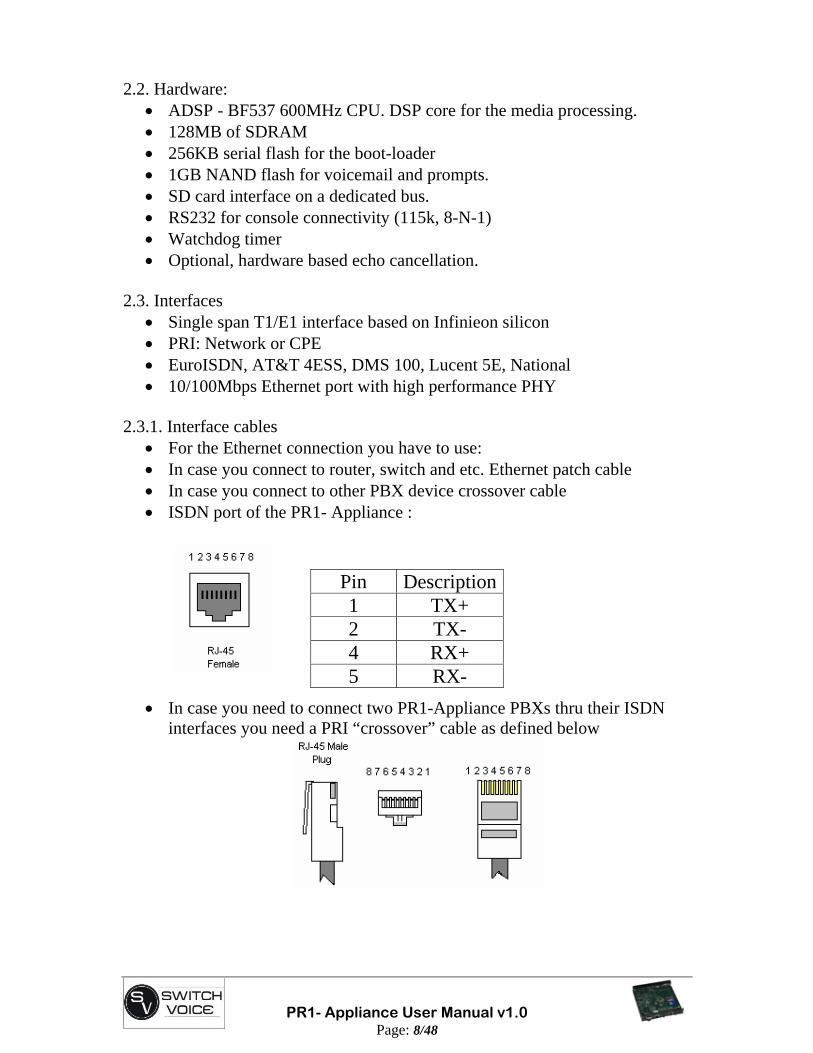
• For the Ethernet connection you have to use: • In case you connect to router, switch and etc. Ethernet patch cable • In case you connect to other PBX device crossover cable • ISDN port of the PR1- Appliance :
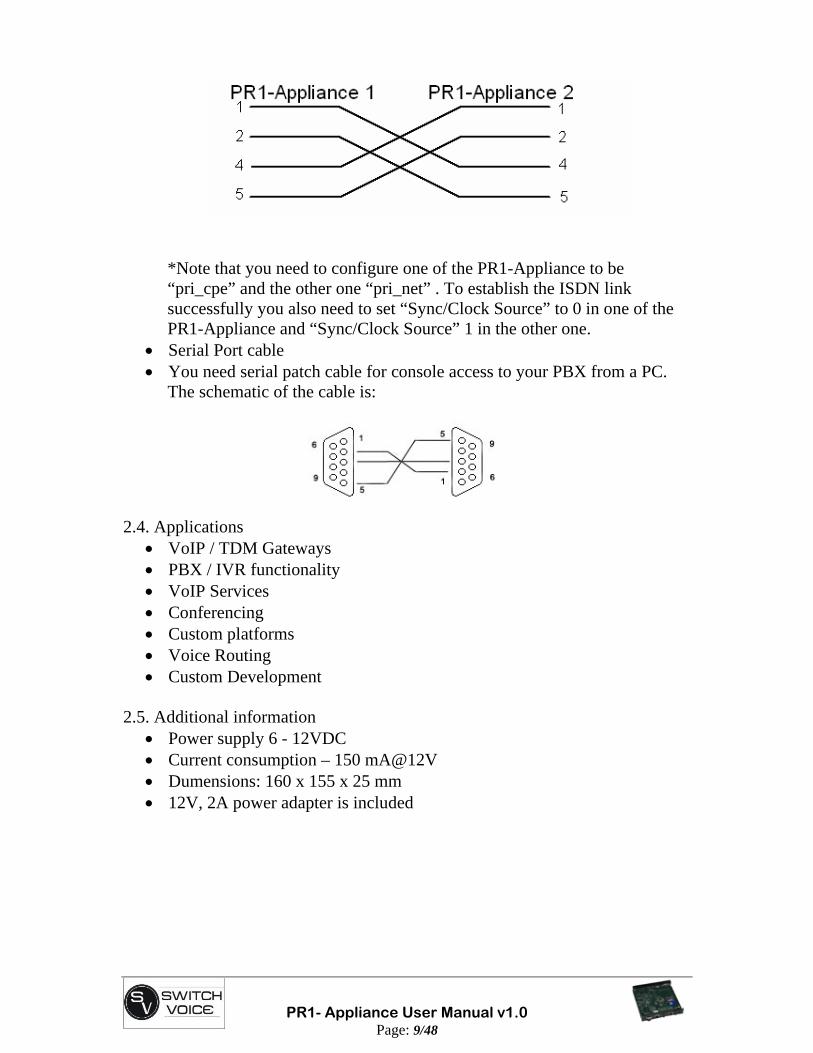
• In case you need to connect two PR1-Appliance PBXs thru their ISDN interfaces you need a PRI “crossover” cable as defined below
Pin Description1 TX+ 2 TX- 4 RX+ 5 RX-
PR1- Appliance User Manual v1.0
Page: 9/48
*Note that you need to configure one of the PR1-Appliance to be “pri_cpe” and the other one “pri_net” . To establish the ISDN link successfully you also need to set “Sync/Clock Source” to 0 in one of the PR1-Appliance and “Sync/Clock Source” 1 in the other one.
• Serial Port cable • You need serial patch cable for console access to your PBX from a PC.
The schematic of the cable is:
2.4. Applications
• VoIP / TDM Gateways • PBX / IVR functionality • VoIP Services • Conferencing • Custom platforms • Voice Routing • Custom Development
2.5. Additional information
• Power supply 6 - 12VDC • Current consumption – 150 mA@12V • Dumensions: 160 x 155 x 25 mm • 12V, 2A power adapter is included
PR1- Appliance User Manual v1.0
Page: 10/48
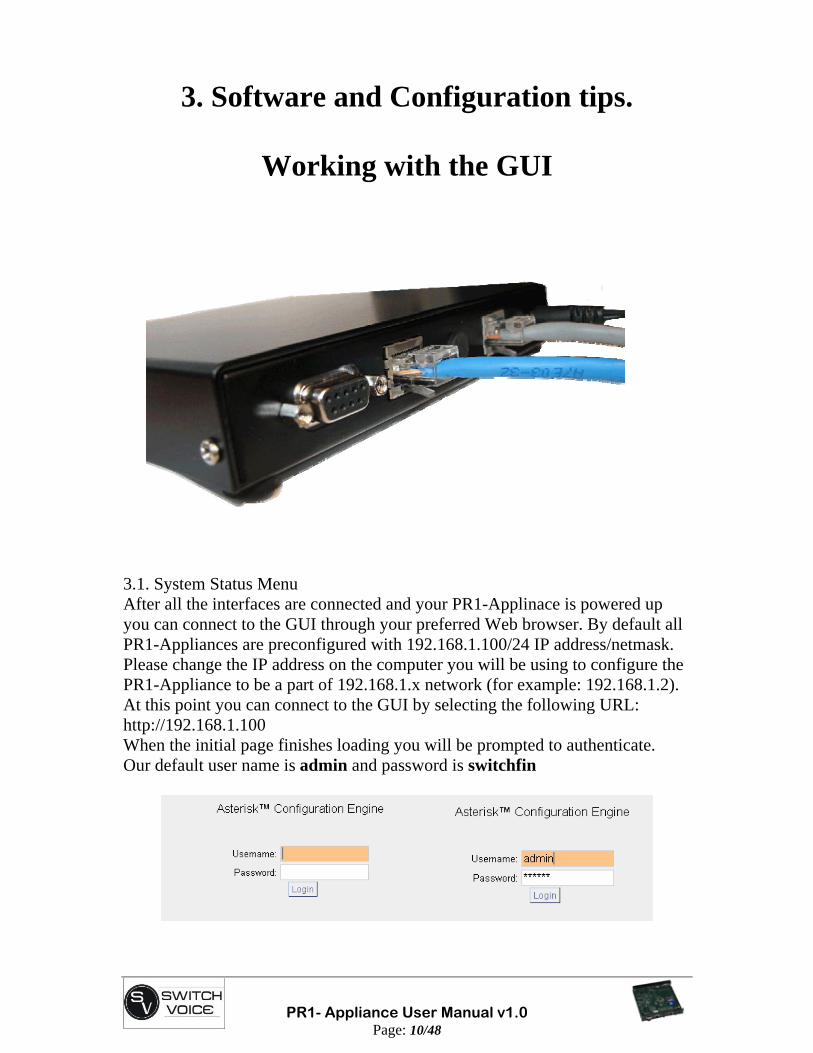
3. Software and Configuration tips.
Working with the GUI
3.1. System Status Menu After all the interfaces are connected and your PR1-Applinace is powered up you can connect to the GUI through your preferred Web browser. By default all PR1-Appliances are preconfigured with 192.168.1.100/24 IP address/netmask. Please change the IP address on the computer you will be using to configure the PR1-Appliance to be a part of 192.168.1.x network (for example: 192.168.1.2). At this point you can connect to the GUI by selecting the following URL: http://192.168.1.100 When the initial page finishes loading you will be prompted to authenticate. Our default user name is admin and password is switchfin
PR1- Appliance User Manual v1.0
Page: 11/48
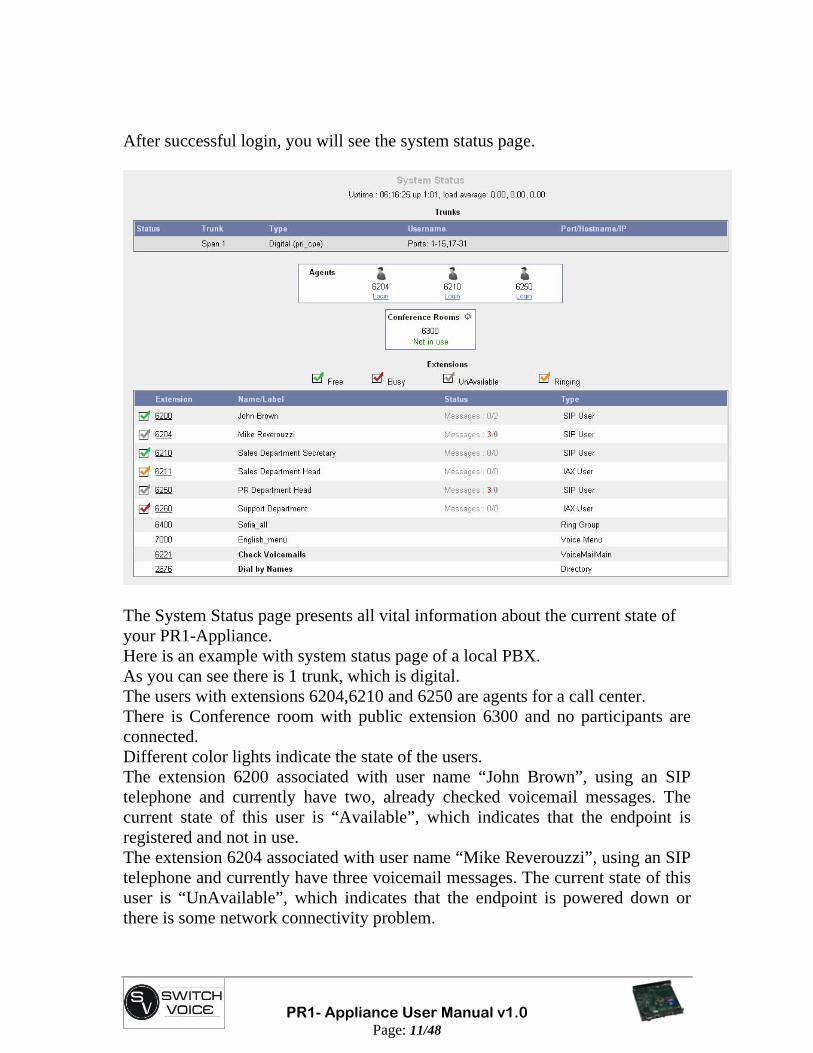
After successful login, you will see the system status page.
The System Status page presents all vital information about the current state of your PR1-Appliance. Here is an example with system status page of a local PBX. As you can see there is 1 trunk, which is digital. The users with extensions 6204,6210 and 6250 are agents for a call center. There is Conference room with public extension 6300 and no participants are connected. Different color lights indicate the state of the users. The extension 6200 associated with user name “John Brown”, using an SIP telephone and currently have two, already checked voicemail messages. The current state of this user is “Available”, which indicates that the endpoint is registered and not in use. The extension 6204 associated with user name “Mike Reverouzzi”, using an SIP telephone and currently have three voicemail messages. The current state of this user is “UnAvailable”, which indicates that the endpoint is powered down or there is some network connectivity problem.
PR1- Appliance User Manual v1.0
Page: 12/48
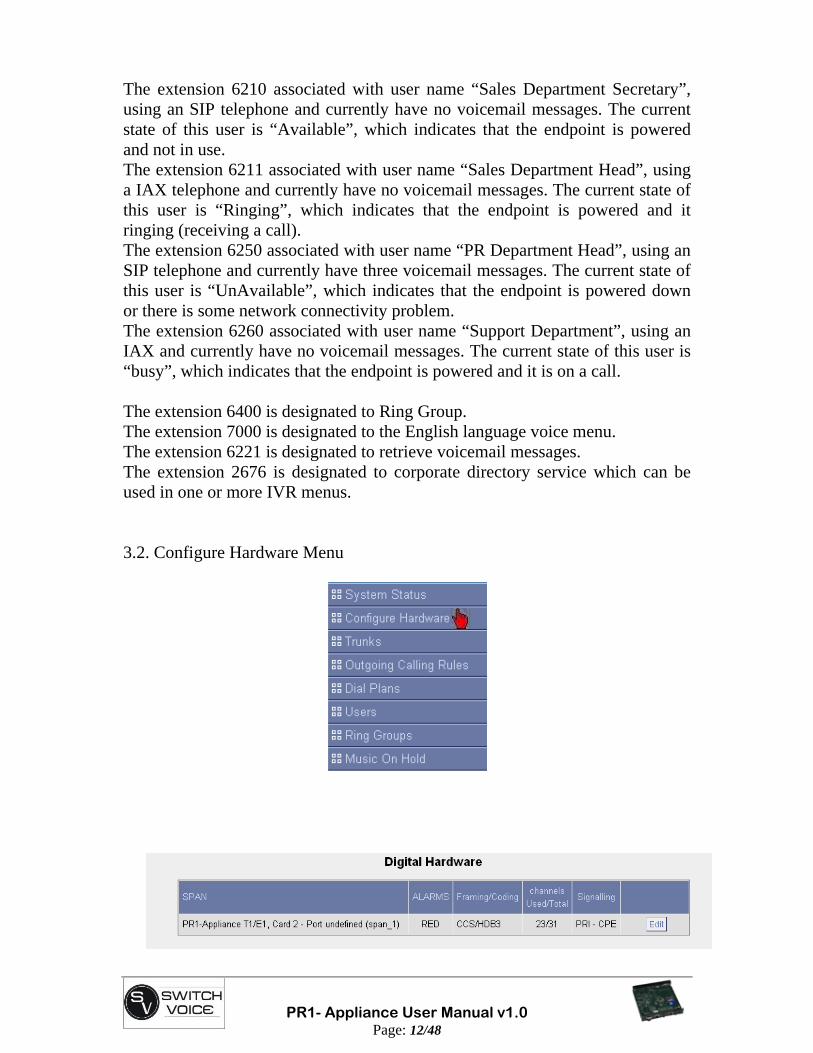
The extension 6210 associated with user name “Sales Department Secretary”, using an SIP telephone and currently have no voicemail messages. The current state of this user is “Available”, which indicates that the endpoint is powered and not in use. The extension 6211 associated with user name “Sales Department Head”, using a IAX telephone and currently have no voicemail messages. The current state of this user is “Ringing”, which indicates that the endpoint is powered and it ringing (receiving a call). The extension 6250 associated with user name “PR Department Head”, using an SIP telephone and currently have three voicemail messages. The current state of this user is “UnAvailable”, which indicates that the endpoint is powered down or there is some network connectivity problem. The extension 6260 associated with user name “Support Department”, using an IAX and currently have no voicemail messages. The current state of this user is “busy”, which indicates that the endpoint is powered and it is on a call. The extension 6400 is designated to Ring Group. The extension 7000 is designated to the English language voice menu. The extension 6221 is designated to retrieve voicemail messages. The extension 2676 is designated to corporate directory service which can be used in one or more IVR menus. 3.2. Configure Hardware Menu

PR1- Appliance User Manual v1.0
Page: 13/48
By clicking on the “Edit” button a pop-up menu will appear.
*Reminder – You can always use the “i” (info) tooltips for additional information
The option here that you can use are :
• Span Type – here you can select the configuration of the system depending on the type of network in you country. E1 is used in Europe, and T1 in North America. Please note that after changing the Interface type (t1/e1) the box will reboot and the following fields will be set to their respective default values.
• Framing/Coding • Signaling • Switch type • Sync/Clock Source • Line Build Out • Channels
PR1- Appliance User Manual v1.0
Page: 14/48
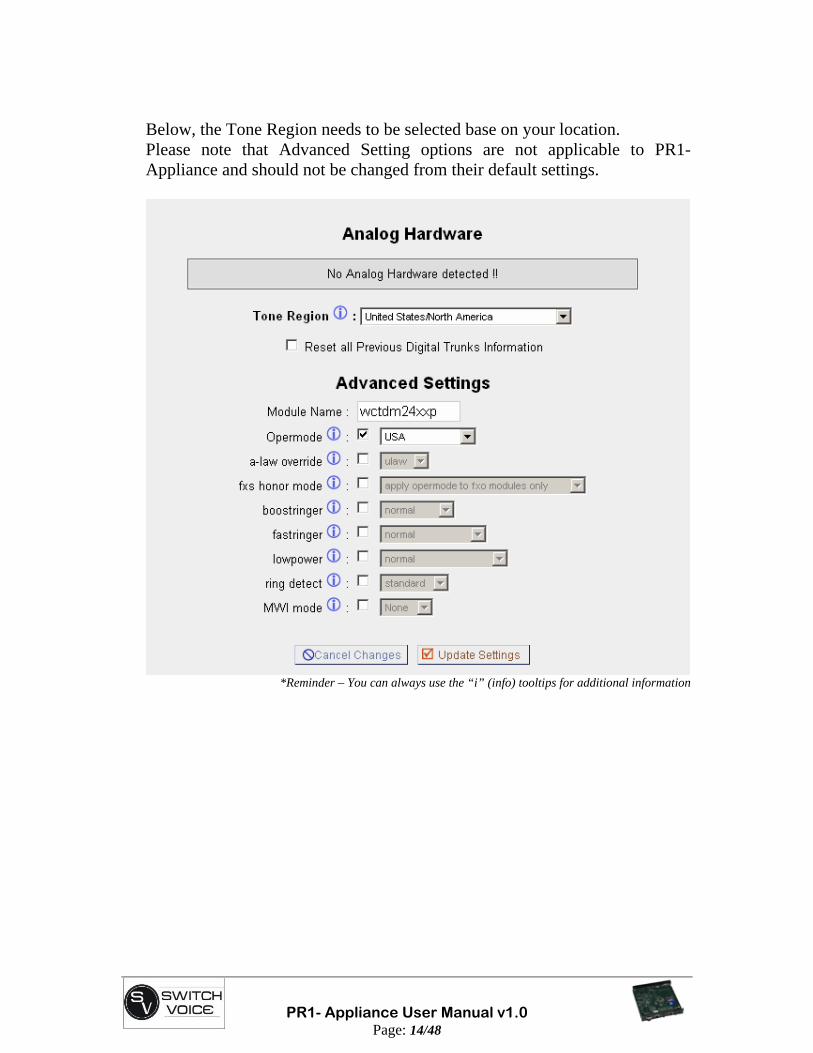
Below, the Tone Region needs to be selected base on your location. Please note that Advanced Setting options are not applicable to PR1-Appliance and should not be changed from their default settings.
*Reminder – You can always use the “i” (info) tooltips for additional information
PR1- Appliance User Manual v1.0
Page: 15/48
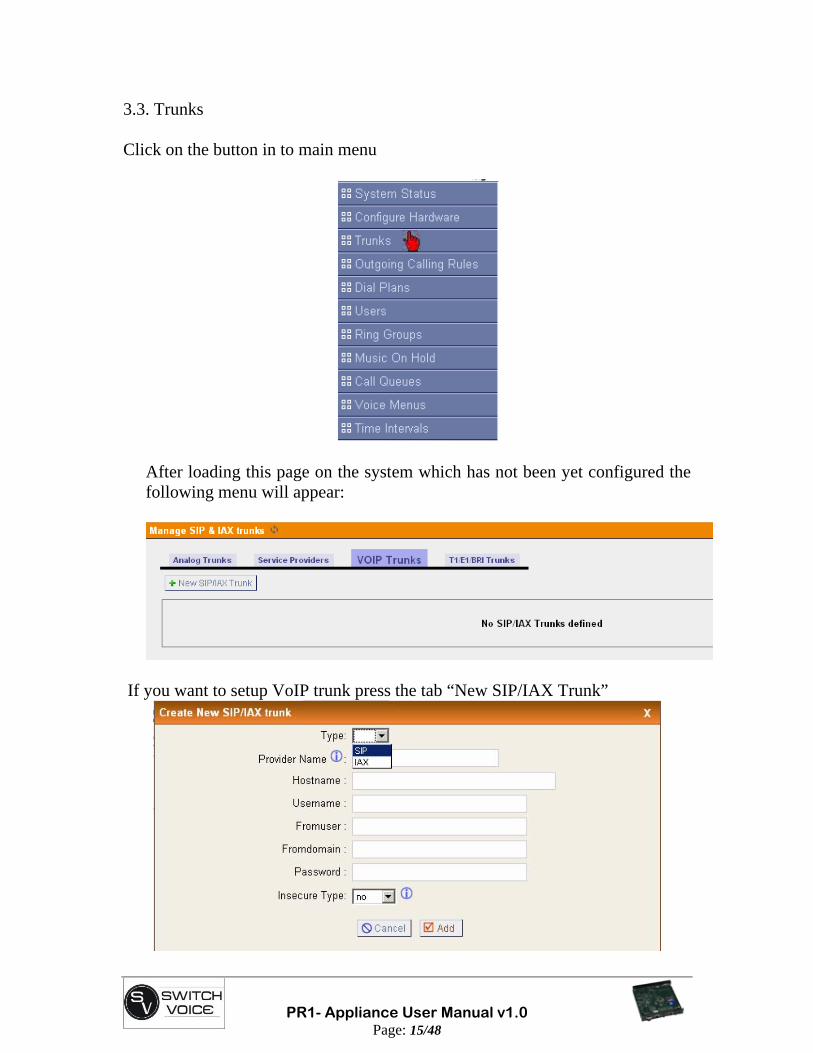
3.3. Trunks Click on the button in to main menu
After loading this page on the system which has not been yet configured the following menu will appear:
If you want to setup VoIP trunk press the tab “New SIP/IAX Trunk”
PR1- Appliance User Manual v1.0
Page: 16/48
*Reminder – You can always use the “i” (info) tooltips for additional information
• First you have to select the type of your provider as shown SIP or IAX • Provider name – specify your provider name for reference • Hostname – here you type the default address of your provider for
example support.provider.com • Username – this is you username also given by the provider • Fromuser – fill this field as per providers instructions • Fromdomain – fill this field as per providers instructions • Password – this is you password given by the provider • Insecure Type – Specifies how to handle connections with peers
After creating new trunk you have to click the Reload button in the GUI. * Warning – In order for complete adding of new Trunk , after creating the trunk you must reboot your PBX from Reboot button in to the Option Menu. This should be done before doing any other changes in to the GUI. As a general advice, always reboot your PBX when a popup window appears in the GUI
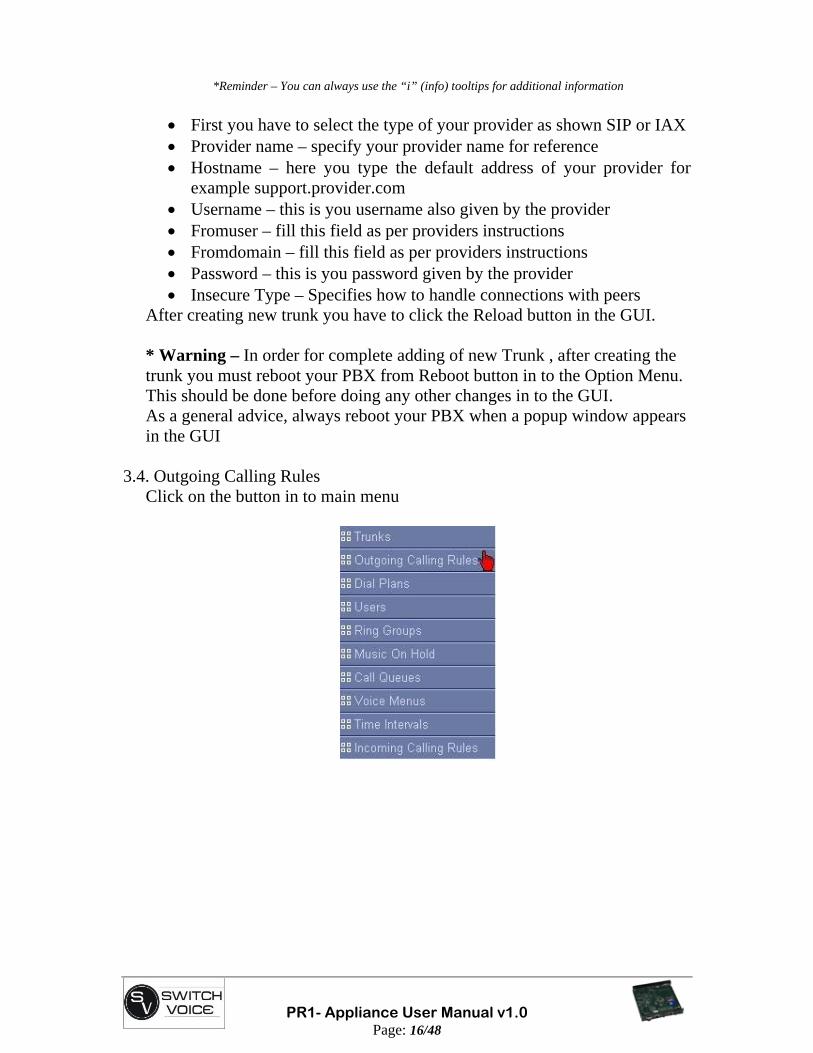
3.4. Outgoing Calling Rules Click on the button in to main menu
PR1- Appliance User Manual v1.0
Page: 17/48
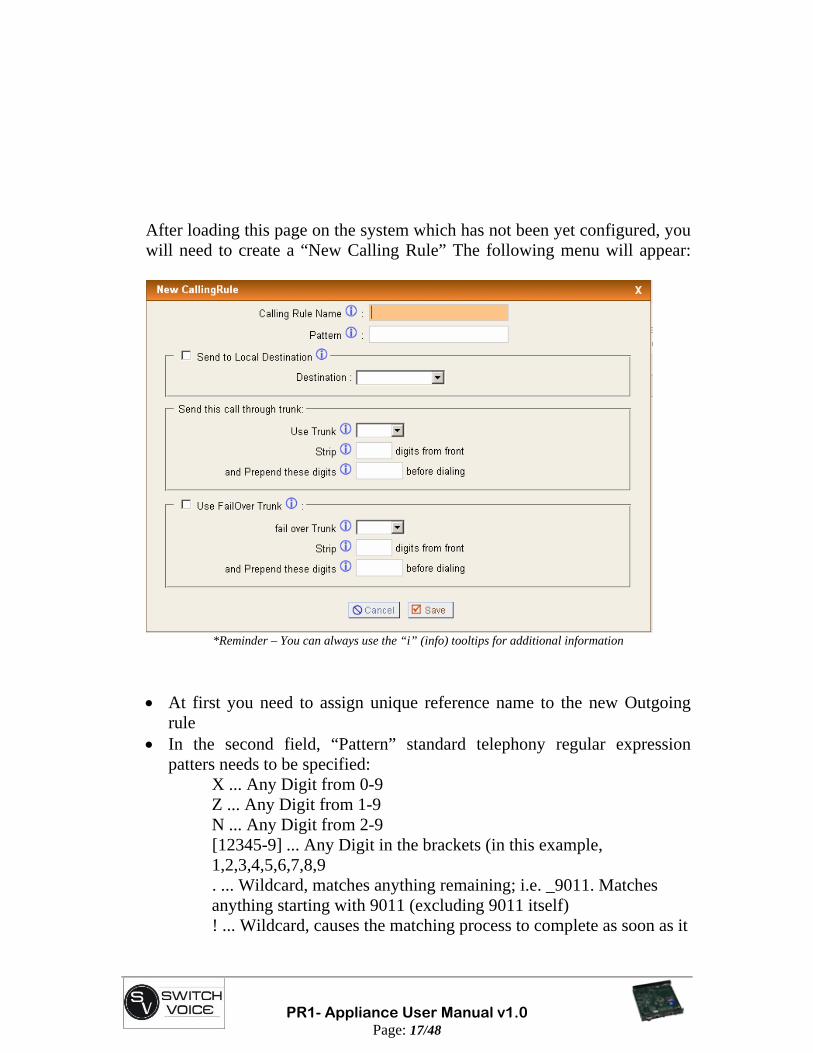
After loading this page on the system which has not been yet configured, you will need to create a “New Calling Rule” The following menu will appear:
*Reminder – You can always use the “i” (info) tooltips for additional information
• At first you need to assign unique reference name to the new Outgoing rule
• In the second field, “Pattern” standard telephony regular expression patters needs to be specified:
X ... Any Digit from 0-9 Z ... Any Digit from 1-9
N ... Any Digit from 2-9 [12345-9] ... Any Digit in the brackets (in this example, 1,2,3,4,5,6,7,8,9 . ... Wildcard, matches anything remaining; i.e. _9011. Matches anything starting with 9011 (excluding 9011 itself) ! ... Wildcard, causes the matching process to complete as soon as it

PR1- Appliance User Manual v1.0
Page: 18/48
can unambiguously determine that no other matches are possible For example, the extension _NXXXXXX would match normal 7 digit numbers, while _1NXXNXXXXX would represent a three digit area code plus phone number, proceeded by a one.
• “Destination” field should be used only if you want to invoke some local application or if the call should be processed in some special way.
• “Use trunk” indicates which trunk should be used to handle this call. • “Strip” indicates how many proceeding digits should be removed from a
dialstring. • “Failover trunk” indicates if there is an alternative trunk to be used in case
if the primary trunk is not available (in use for example).
3.5. Dial plans
The “DialPlan” page allows you to define different Classes of Service (Dial Plans) and associate them with one or more Outgoing Calling Rules defined in the previous step. Also, predefined local services/application can be associated with each Class of Service.
• Please select a unique identifier for your Dial Plan entry. • Select all services and rules to be available to users using this Dial
Plan entry (Class of Service).
PR1- Appliance User Manual v1.0
Page: 19/48
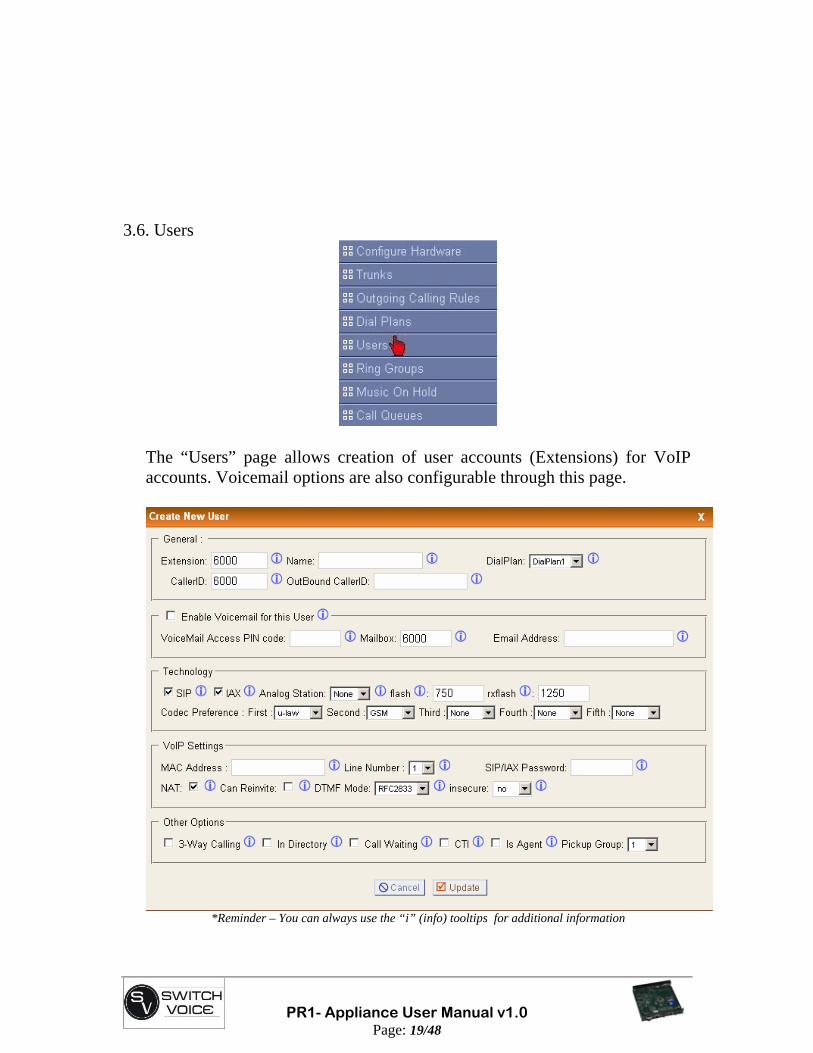
3.6. Users
The “Users” page allows creation of user accounts (Extensions) for VoIP accounts. Voicemail options are also configurable through this page.
*Reminder – You can always use the “i” (info) tooltips for additional information
PR1- Appliance User Manual v1.0
Page: 20/48
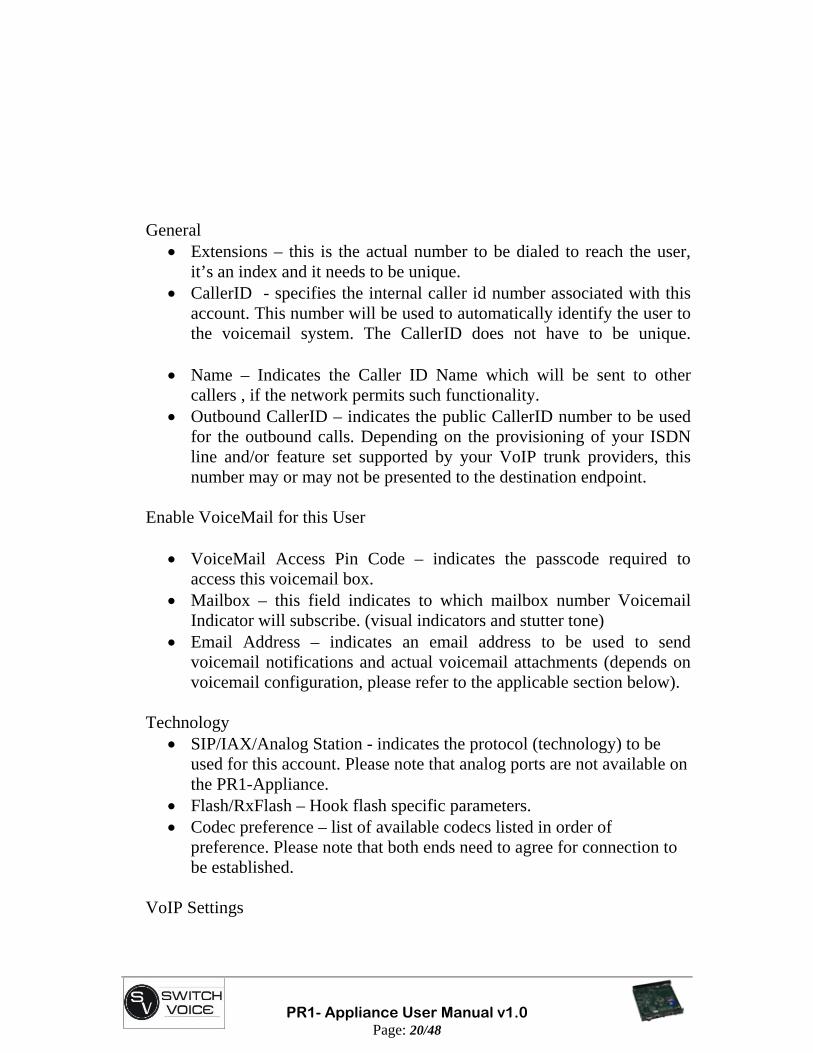
General
• Extensions – this is the actual number to be dialed to reach the user, it’s an index and it needs to be unique.
• CallerID - specifies the internal caller id number associated with this account. This number will be used to automatically identify the user to the voicemail system. The CallerID does not have to be unique.
• Name – Indicates the Caller ID Name which will be sent to other callers , if the network permits such functionality.
• Outbound CallerID – indicates the public CallerID number to be used for the outbound calls. Depending on the provisioning of your ISDN line and/or feature set supported by your VoIP trunk providers, this number may or may not be presented to the destination endpoint.
Enable VoiceMail for this User
• VoiceMail Access Pin Code – indicates the passcode required to access this voicemail box.
• Mailbox – this field indicates to which mailbox number Voicemail Indicator will subscribe. (visual indicators and stutter tone)
• Email Address – indicates an email address to be used to send voicemail notifications and actual voicemail attachments (depends on voicemail configuration, please refer to the applicable section below).
Technology
• SIP/IAX/Analog Station - indicates the protocol (technology) to be used for this account. Please note that analog ports are not available on the PR1-Appliance.
• Flash/RxFlash – Hook flash specific parameters. • Codec preference – list of available codecs listed in order of
preference. Please note that both ends need to agree for connection to be established.
VoIP Settings
PR1- Appliance User Manual v1.0
Page: 21/48
• MAC Address – this field is required for Polycom phone provisioning, do not use it at this point.
• Line number – as above • SIP/IAX password – user password associated with this account • NAT – indicated if the device will be located behind NAT router in
respect to our PR1-Appliance. • Can Re-invite – indicates if SIP session can use re-invite to send RTP
directly between to endpoints. • DTMF Mode – DMTF method to be used for VoIP communication.
TFC2833 would be the most common choice here. • Insecure – method of authentication, both ends need to agree.
Other Options
• 3 Way Calling – enable/disable 3 way calling functionality, please make sure that your device is capable of handling it before selecting this option.
• In directory - indicates if this user account will be listed in a “directory listing” accessible from one or more IVRs.
• Call Waiting – enable/disable call waiting functionality on the account. • CTI – Computer Telephony Integration, allows access to 3rd party
applications over Asterisk Manager Interface. • Is Agent – indicates if the user will be available in call queuing
application. • Pickup group – specified the call pickup group, if available
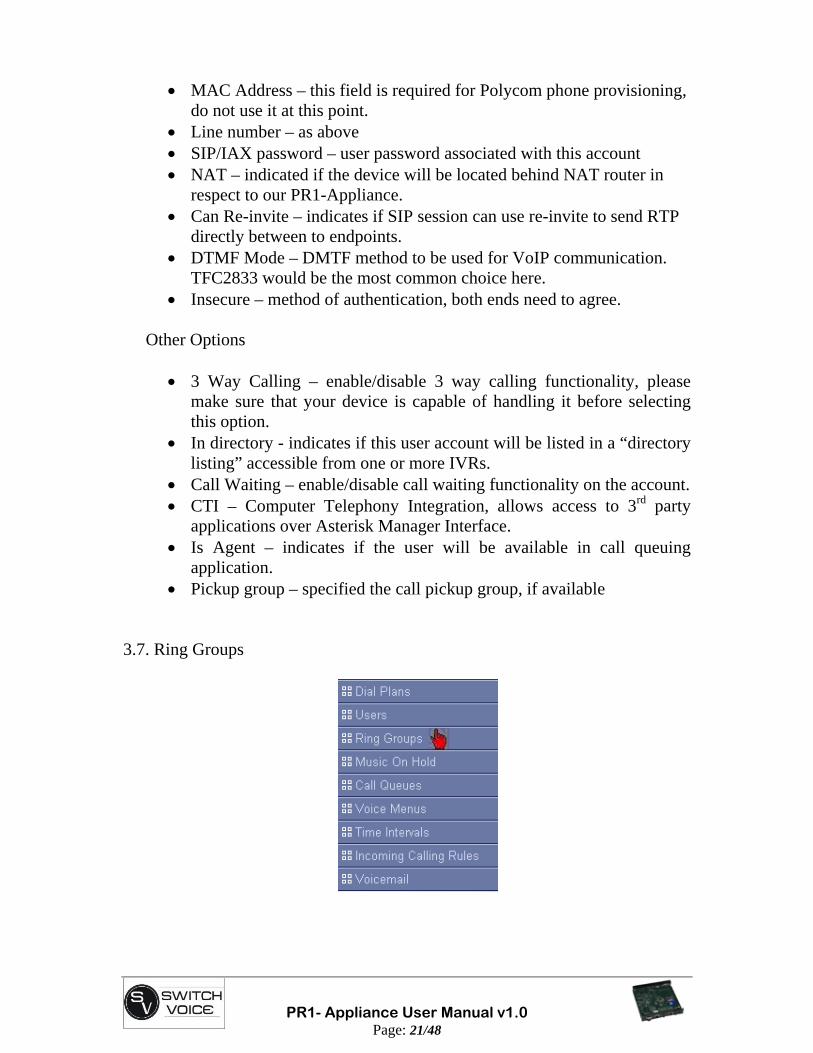
3.7. Ring Groups

PR1- Appliance User Manual v1.0
Page: 22/48
This page allows to group several users (extensions) into one Ring Group. Unique extensions number will be associated with each Ring Group to allow easy access from your dial plan.
• At first you have to choose the name of the group (you can create several independent groups)
• Type the preferred extension for that group, in the example this is “6500”
• In the left window you can see the users that are members of the specific group, you can add/remove them with button in the middle. The available users are in the right window.
You have several options about the group calls.
• Strategy, when you dial the extension for the group the phones can ring in order (left window) or in sequence for a predefined period of time. The other option is to ring all the devices in the group together at the same time.
• Handling for non answered calls: Call can be redirected to specific Voicemail, another extension, or another ring group.
PR1- Appliance User Manual v1.0
Page: 23/48
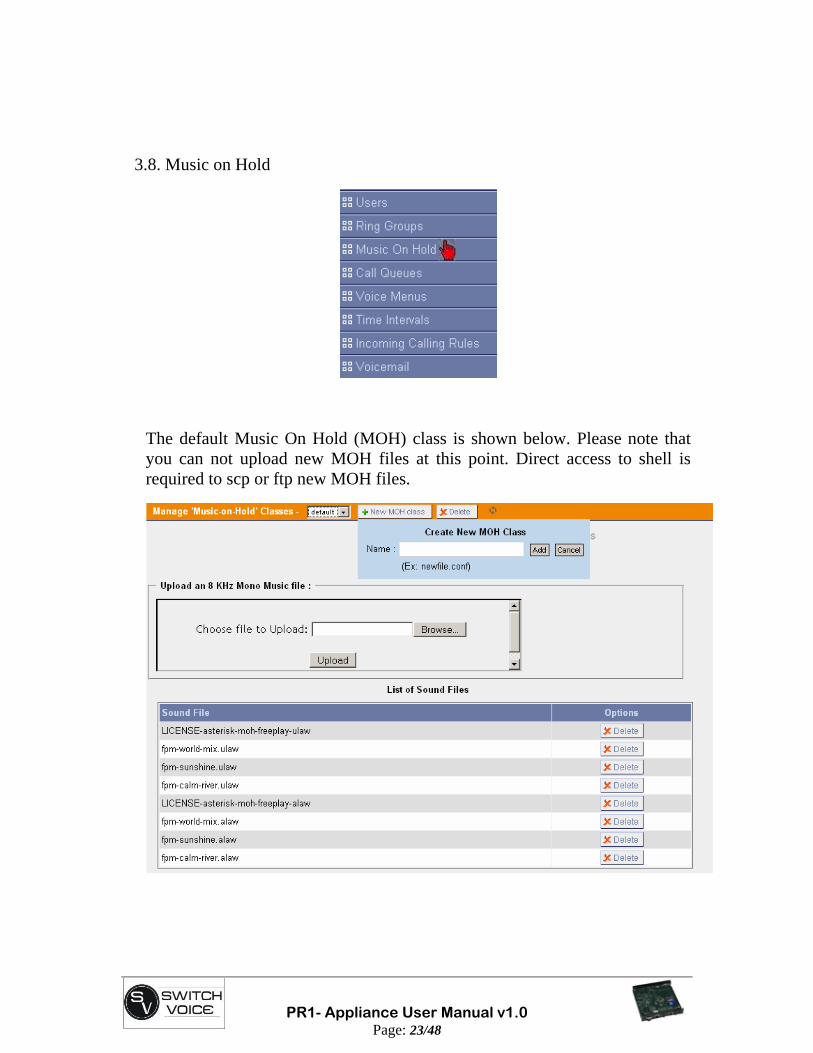
3.8. Music on Hold
The default Music On Hold (MOH) class is shown below. Please note that you can not upload new MOH files at this point. Direct access to shell is required to scp or ftp new MOH files.
PR1- Appliance User Manual v1.0
Page: 24/48
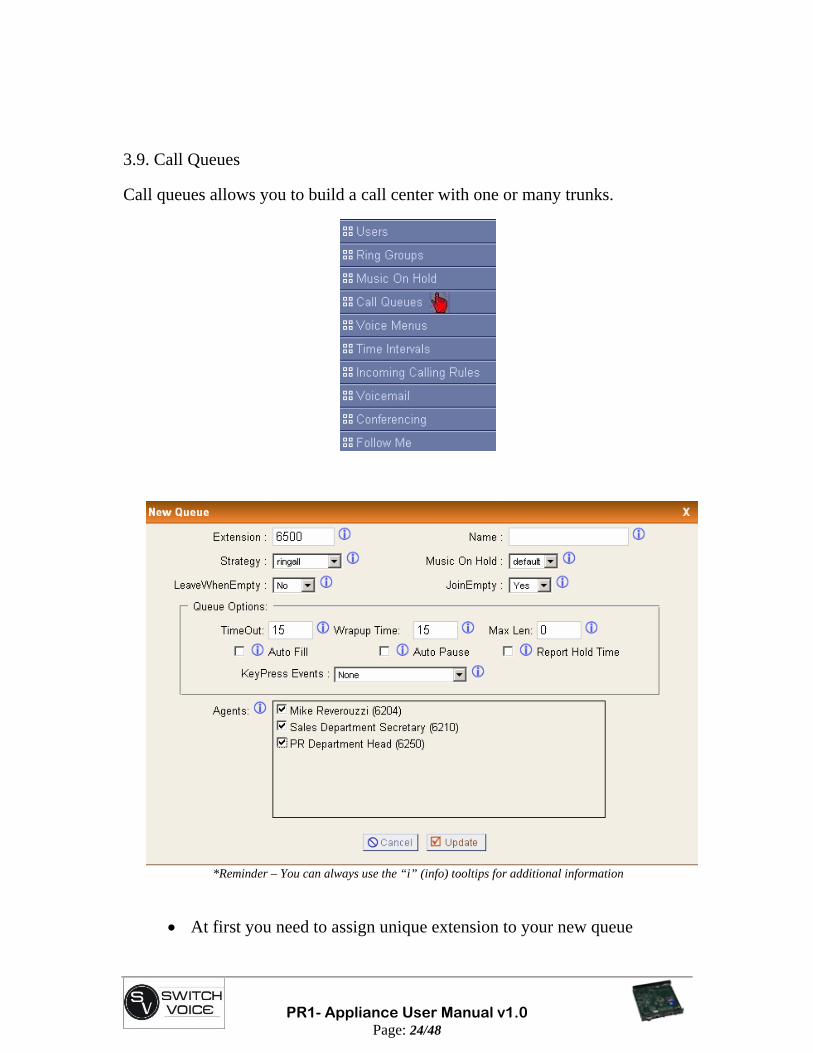
3.9. Call Queues
Call queues allows you to build a call center with one or many trunks.
*Reminder – You can always use the “i” (info) tooltips for additional information
• At first you need to assign unique extension to your new queue
PR1- Appliance User Manual v1.0
Page: 25/48
• Then you need to name it, ie: “sales” • Select the appropriate strategy for your application:
o Ringall – ring all available agents at the same time. o RoundRobin – Each all agents in sequence. o Leastrecent – ring agent which was recently called. o Random – ring random agent. o RRmemory – RoundRobin with memory, where we left off last
ring sequence. • The appropriate Music on Hold class can be selected from the “Music
on hold” menu. • Leave when empty – this option controls state of users that are in the
queue. If yes is selected, the callers are pushed out of the queue when no agents are logged in. If no is selected, callers will remain in the queue with no agents. If Strict is selected, callers are forced out of the queue if no agents are logged in, or if all logged in agents are unavailable.
• Join Empty - If yes is selected, callers can join a call queue with no agents or unavailable agents. If no is selected, the callers cannot join queue with no agents. If strict is selected, the callers cannot join queue with no agents or unavailable agents.
• Queue options – o Timeout – how many seconds will ring an agent’s phone before the
queue tries to ring the next agent. o Wrap-up time is how many seconds delay has an agent after
completing a call, before another call is connect. o Max Len is how many calls can be queued at once. This includes
only calls that have not been yet connected. o Auto Fill – when multiple calls are in the queue at the same time,
to push them to agents simultaneously. o Auto Pause – this option pauses an agent if they fail to answer a
call. o Report Hold Time – this option reports to the agent the hold time
of the caller, before he is connected to an agent. o Key Press Events – this setting selects which voice menu to be
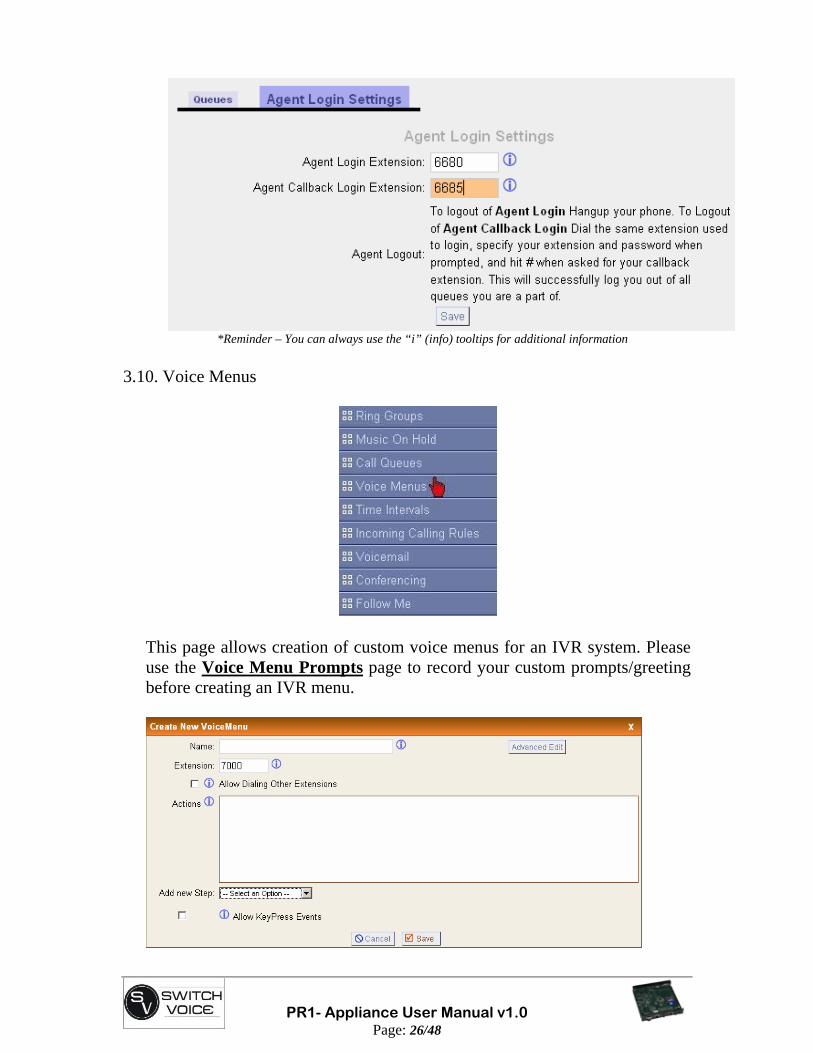
connected if a user waiting in the queue presses a button. • List of available agents is available at the bottom. • Agent Login Settings – you have to type the extensions for the agent
login and agent callback login
PR1- Appliance User Manual v1.0
Page: 26/48
*Reminder – You can always use the “i” (info) tooltips for additional information
3.10. Voice Menus
This page allows creation of custom voice menus for an IVR system. Please use the Voice Menu Prompts page to record your custom prompts/greeting before creating an IVR menu.
PR1- Appliance User Manual v1.0
Page: 27/48
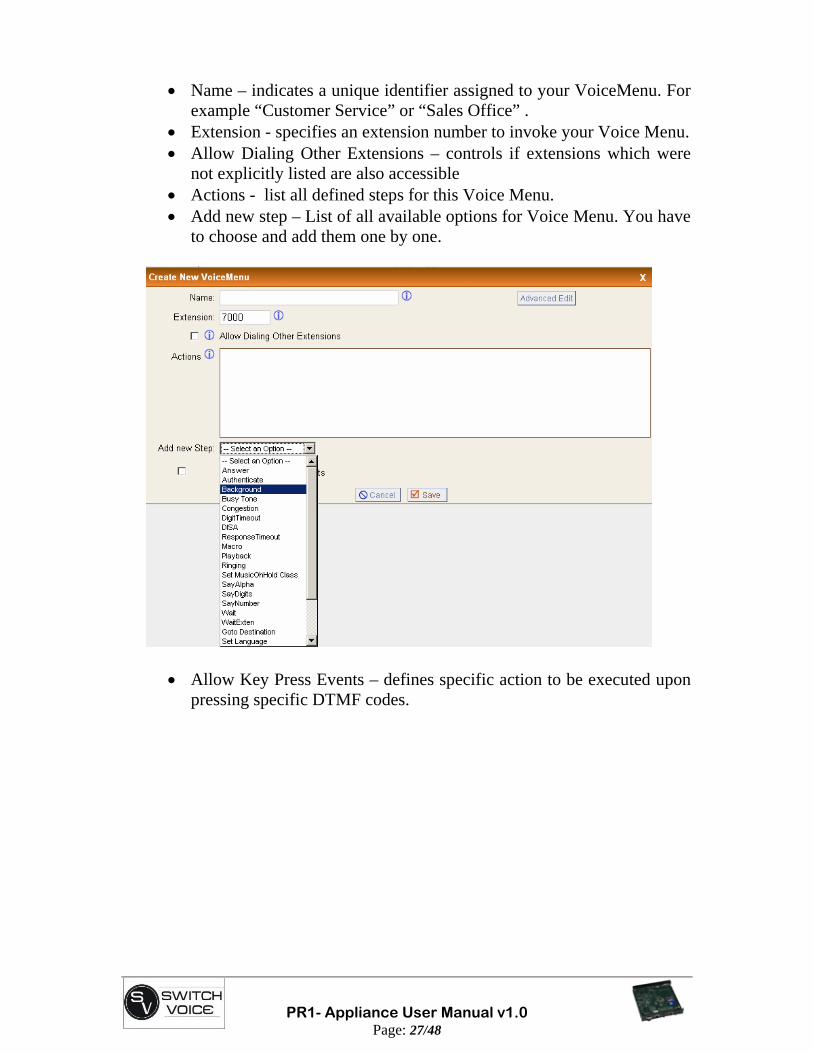
• Name – indicates a unique identifier assigned to your VoiceMenu. For example “Customer Service” or “Sales Office” .
• Extension - specifies an extension number to invoke your Voice Menu. • Allow Dialing Other Extensions – controls if extensions which were
not explicitly listed are also accessible • Actions - list all defined steps for this Voice Menu. • Add new step – List of all available options for Voice Menu. You have
to choose and add them one by one.
• Allow Key Press Events – defines specific action to be executed upon pressing specific DTMF codes.
PR1- Appliance User Manual v1.0
Page: 28/48
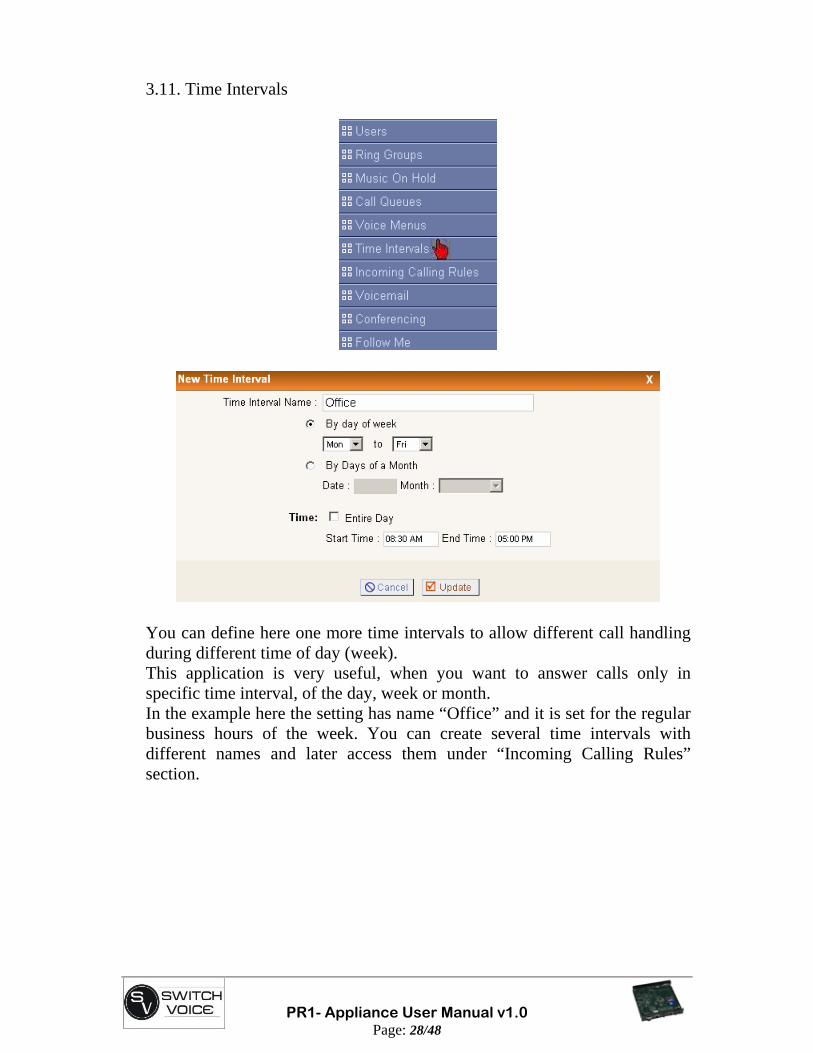
3.11. Time Intervals
You can define here one more time intervals to allow different call handling during different time of day (week). This application is very useful, when you want to answer calls only in specific time interval, of the day, week or month. In the example here the setting has name “Office” and it is set for the regular business hours of the week. You can create several time intervals with different names and later access them under “Incoming Calling Rules” section.
PR1- Appliance User Manual v1.0
Page: 29/48
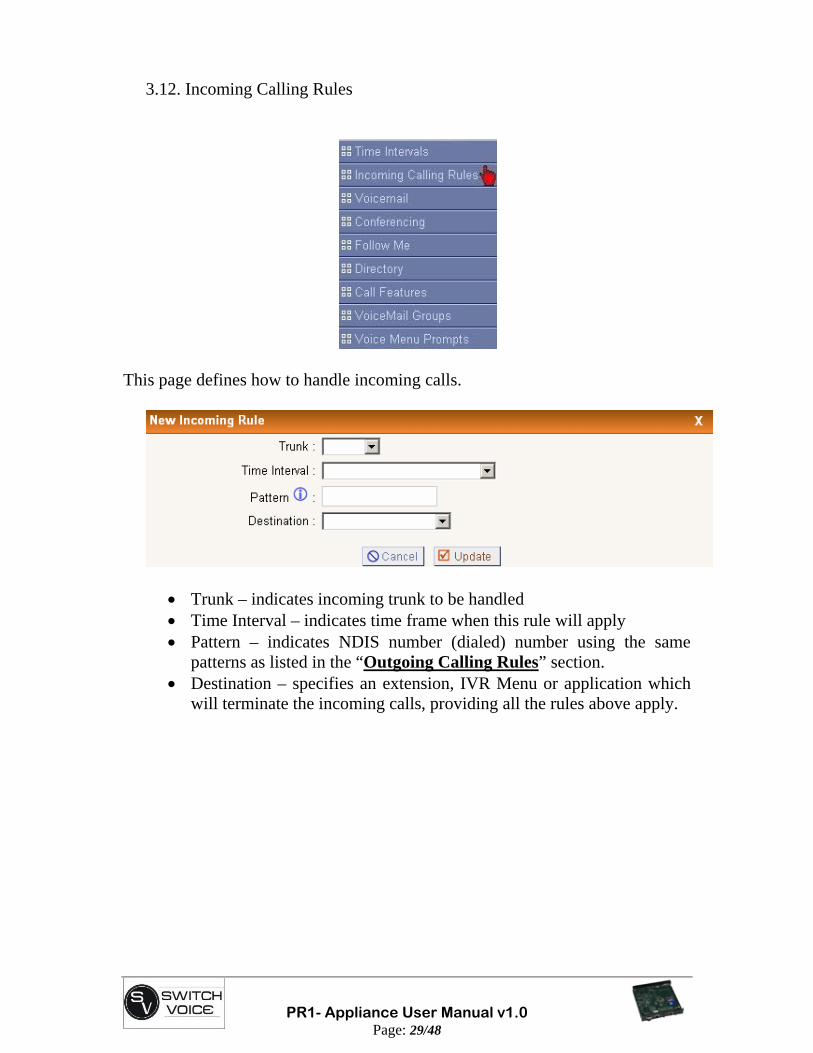
3.12. Incoming Calling Rules
This page defines how to handle incoming calls.
• Trunk – indicates incoming trunk to be handled • Time Interval – indicates time frame when this rule will apply • Pattern – indicates NDIS number (dialed) number using the same
patterns as listed in the “Outgoing Calling Rules” section. • Destination – specifies an extension, IVR Menu or application which
will terminate the incoming calls, providing all the rules above apply.
PR1- Appliance User Manual v1.0
Page: 30/48
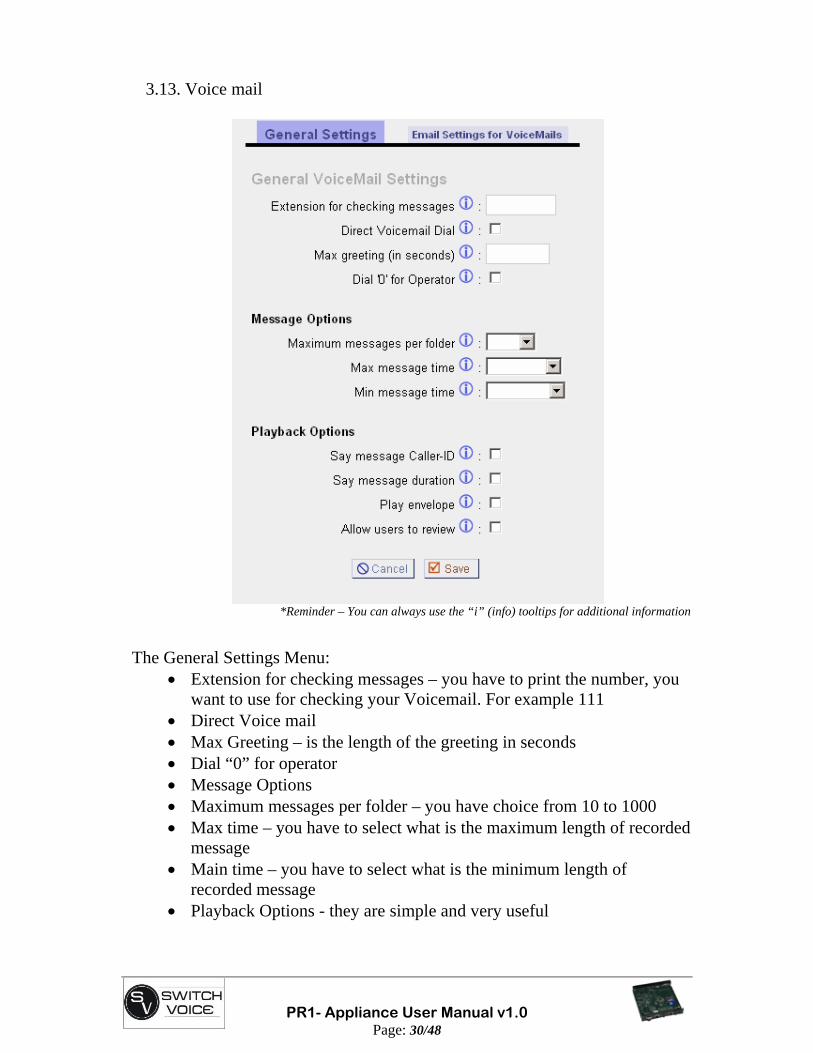
3.13. Voice mail
*Reminder – You can always use the “i” (info) tooltips for additional information
The General Settings Menu: • Extension for checking messages – you have to print the number, you
want to use for checking your Voicemail. For example 111 • Direct Voice mail • Max Greeting – is the length of the greeting in seconds • Dial “0” for operator • Message Options • Maximum messages per folder – you have choice from 10 to 1000 • Max time – you have to select what is the maximum length of recorded
message • Main time – you have to select what is the minimum length of
recorded message • Playback Options - they are simple and very useful
PR1- Appliance User Manual v1.0
Page: 31/48
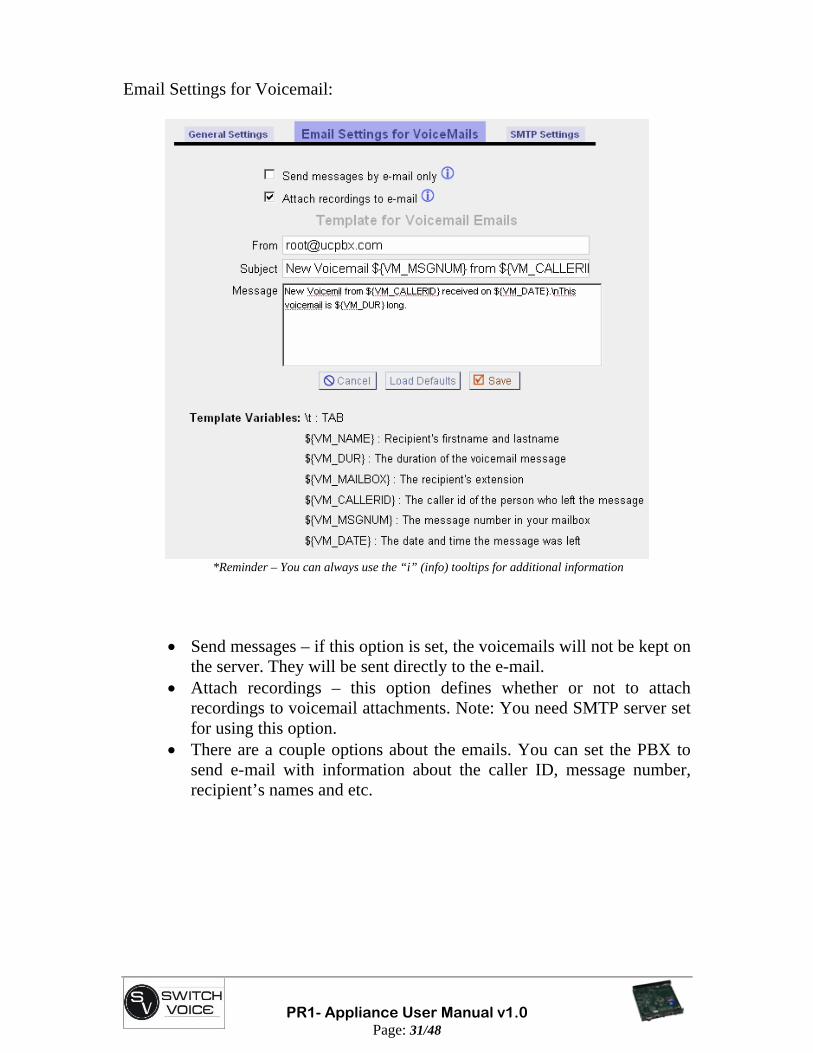
Email Settings for Voicemail:
*Reminder – You can always use the “i” (info) tooltips for additional information
• Send messages – if this option is set, the voicemails will not be kept on the server. They will be sent directly to the e-mail.
• Attach recordings – this option defines whether or not to attach recordings to voicemail attachments. Note: You need SMTP server set for using this option.
• There are a couple options about the emails. You can set the PBX to send e-mail with information about the caller ID, message number, recipient’s names and etc.
PR1- Appliance User Manual v1.0
Page: 32/48
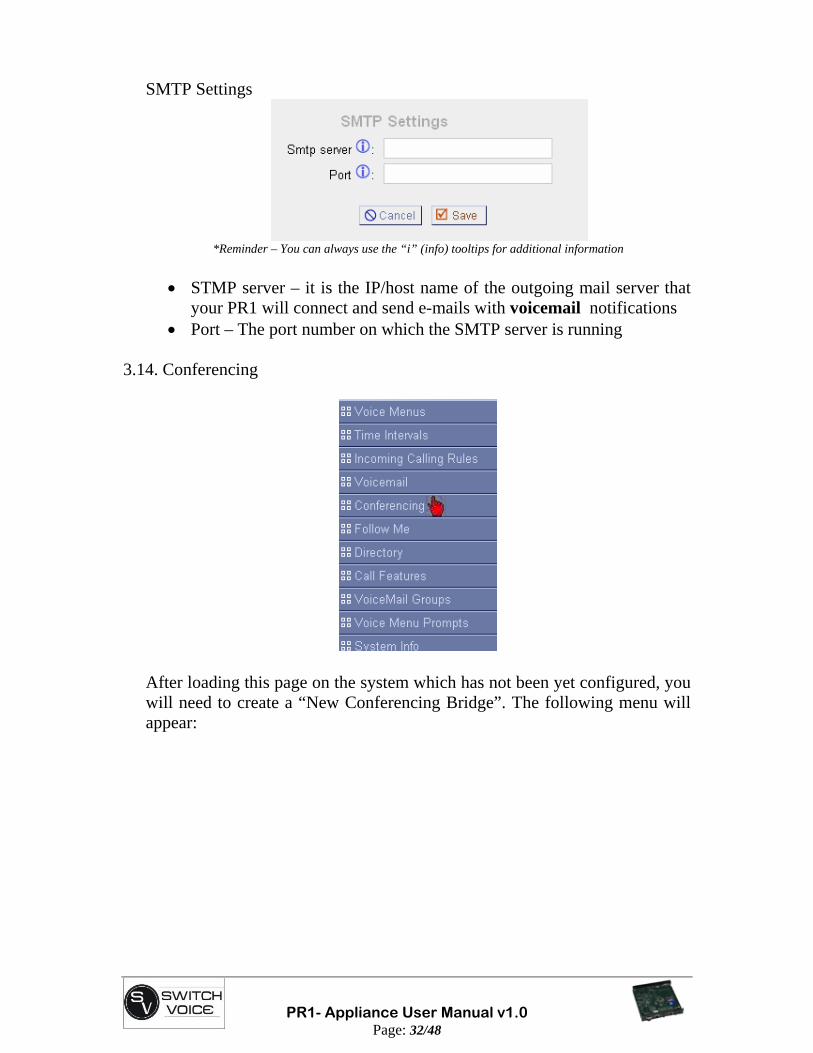
SMTP Settings
*Reminder – You can always use the “i” (info) tooltips for additional information
• STMP server – it is the IP/host name of the outgoing mail server that
your PR1 will connect and send e-mails with voicemail notifications • Port – The port number on which the SMTP server is running
3.14. Conferencing
After loading this page on the system which has not been yet configured, you will need to create a “New Conferencing Bridge”. The following menu will appear:
PR1- Appliance User Manual v1.0
Page: 33/48
*Reminder – You can always use the “i” (info) tooltips for additional information
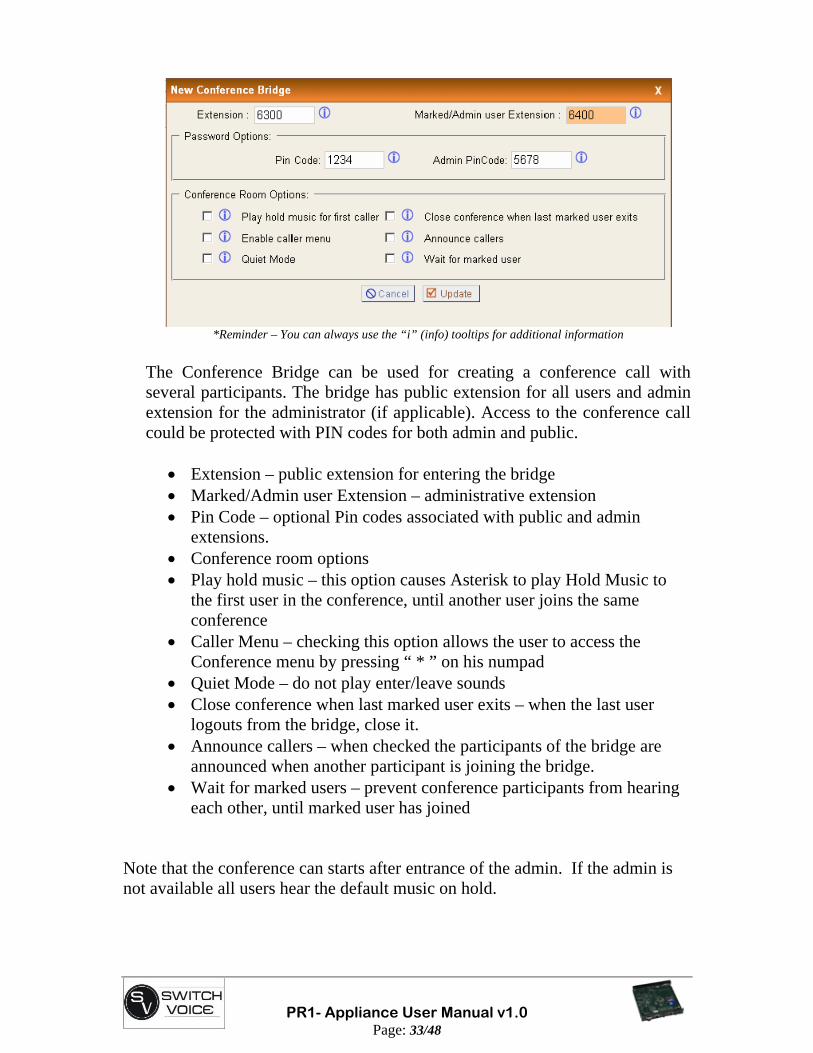
The Conference Bridge can be used for creating a conference call with several participants. The bridge has public extension for all users and admin extension for the administrator (if applicable). Access to the conference call could be protected with PIN codes for both admin and public.
• Extension – public extension for entering the bridge • Marked/Admin user Extension – administrative extension • Pin Code – optional Pin codes associated with public and admin
extensions. • Conference room options • Play hold music – this option causes Asterisk to play Hold Music to
the first user in the conference, until another user joins the same conference
• Caller Menu – checking this option allows the user to access the Conference menu by pressing “ * ” on his numpad
• Quiet Mode – do not play enter/leave sounds • Close conference when last marked user exits – when the last user
logouts from the bridge, close it. • Announce callers – when checked the participants of the bridge are
announced when another participant is joining the bridge. • Wait for marked users – prevent conference participants from hearing
each other, until marked user has joined
Note that the conference can starts after entrance of the admin. If the admin is not available all users hear the default music on hold.
PR1- Appliance User Manual v1.0
Page: 34/48
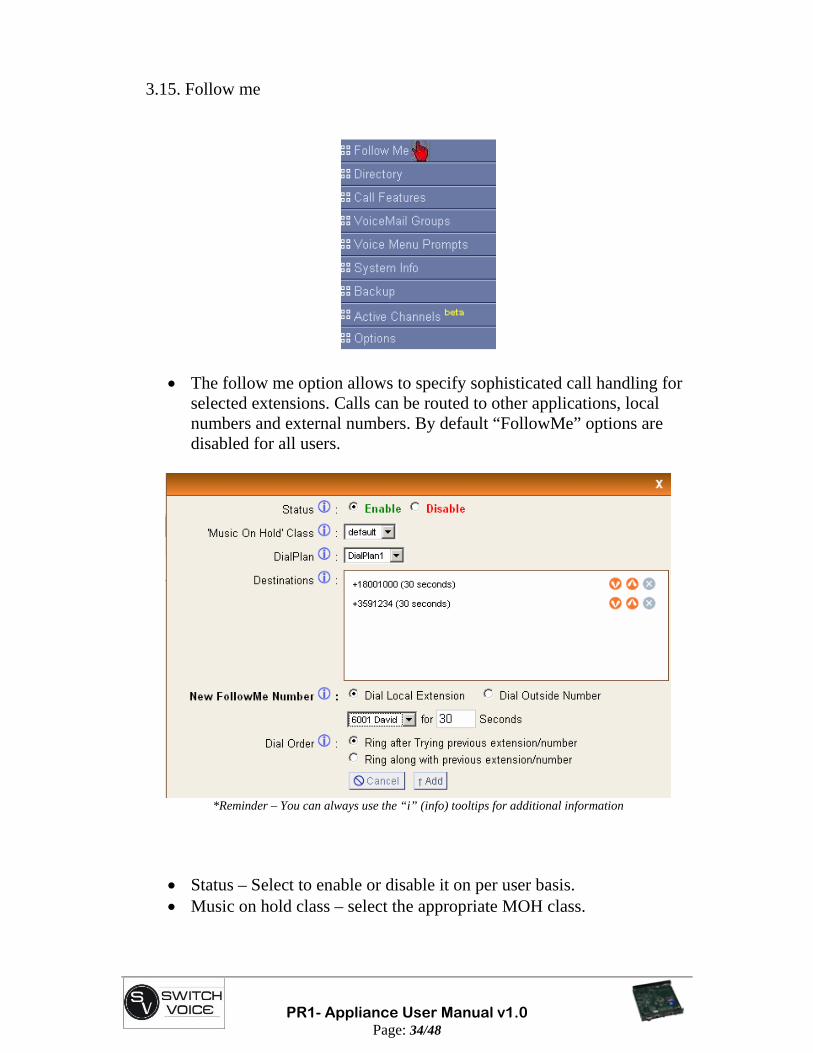
3.15. Follow me
• The follow me option allows to specify sophisticated call handling for selected extensions. Calls can be routed to other applications, local numbers and external numbers. By default “FollowMe” options are disabled for all users.
*Reminder – You can always use the “i” (info) tooltips for additional information
• Status – Select to enable or disable it on per user basis. • Music on hold class – select the appropriate MOH class.
PR1- Appliance User Manual v1.0
Page: 35/48
• DialPlan – Select Class of Service to control access to outbound trunks.
• Destination – list of numbers in priority sequence • Add Number – you can add local numbers or outside numbers. • Dial Order – method of handling the call
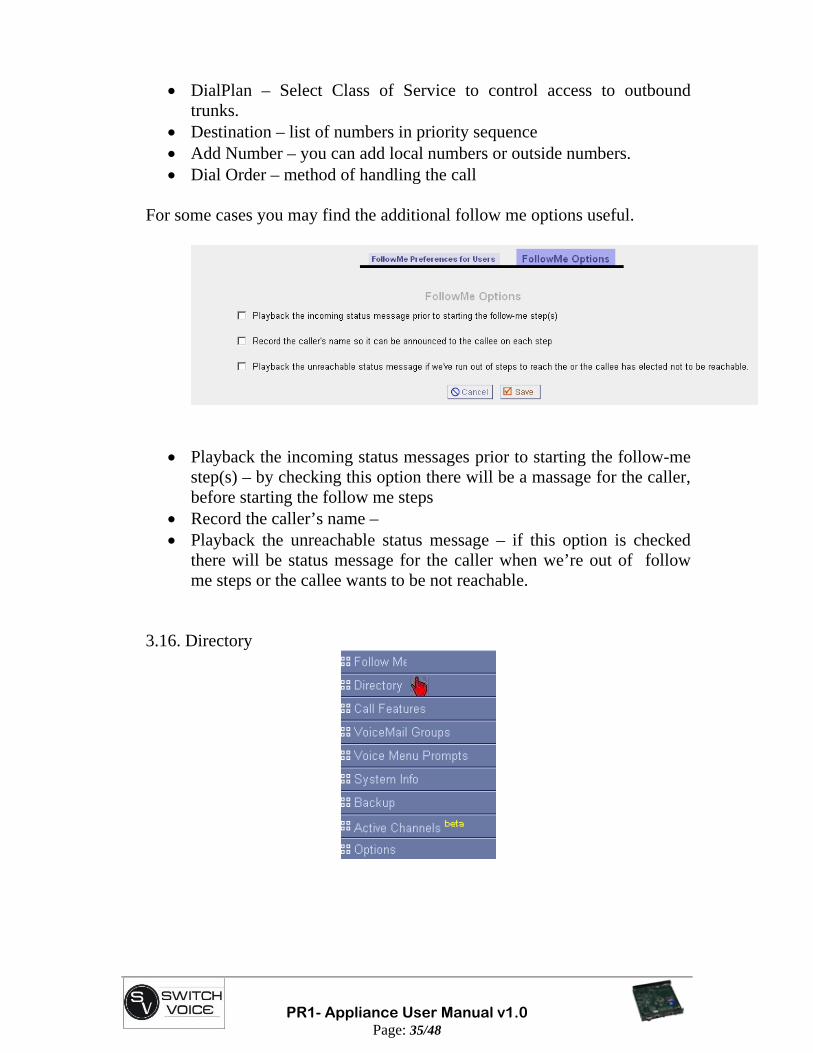
For some cases you may find the additional follow me options useful.
• Playback the incoming status messages prior to starting the follow-me step(s) – by checking this option there will be a massage for the caller, before starting the follow me steps
• Record the caller’s name – • Playback the unreachable status message – if this option is checked
there will be status message for the caller when we’re out of follow me steps or the callee wants to be not reachable.
3.16. Directory
PR1- Appliance User Manual v1.0
Page: 36/48
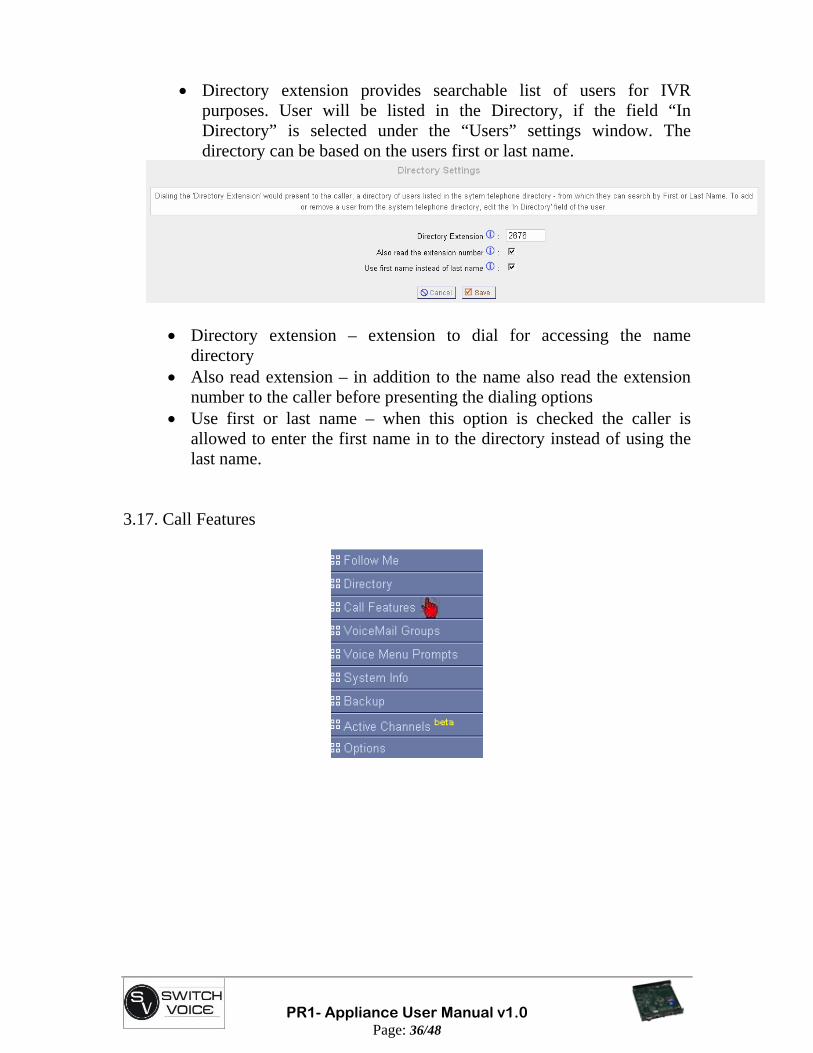
• Directory extension provides searchable list of users for IVR purposes. User will be listed in the Directory, if the field “In Directory” is selected under the “Users” settings window. The directory can be based on the users first or last name.
• Directory extension – extension to dial for accessing the name directory
• Also read extension – in addition to the name also read the extension number to the caller before presenting the dialing options
• Use first or last name – when this option is checked the caller is allowed to enter the first name in to the directory instead of using the last name.
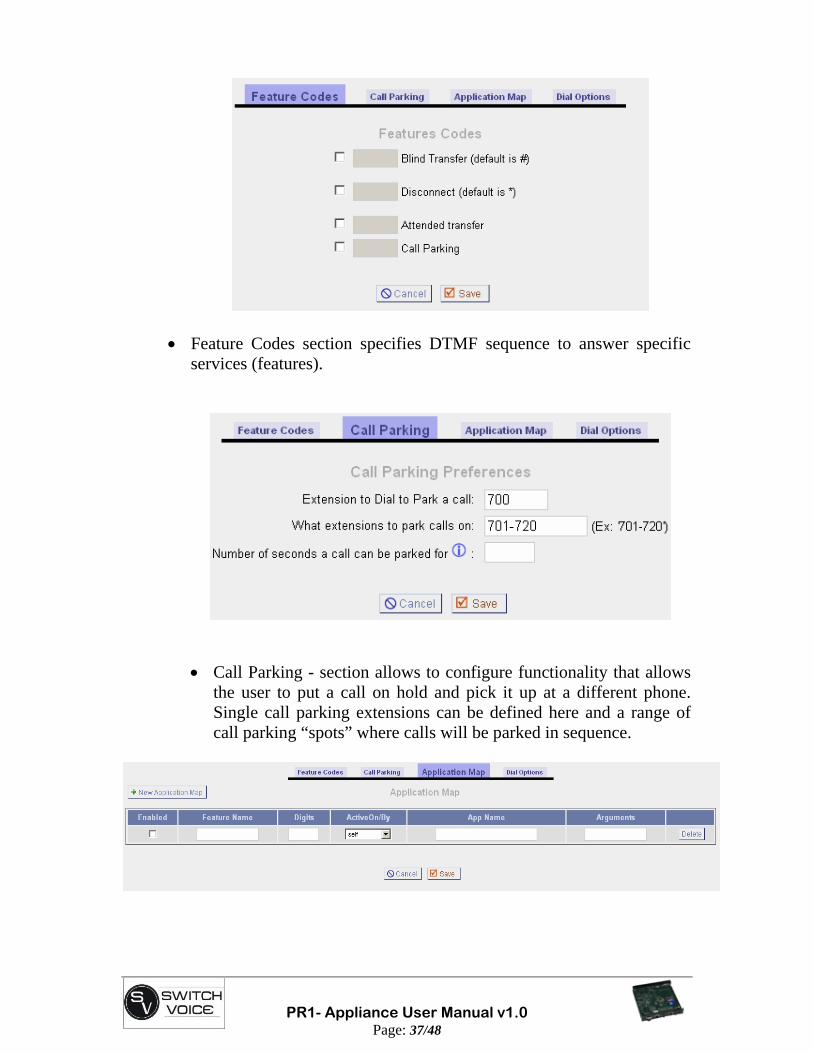
3.17. Call Features
PR1- Appliance User Manual v1.0
Page: 37/48
• Feature Codes section specifies DTMF sequence to answer specific services (features).
• Call Parking - section allows to configure functionality that allows
the user to put a call on hold and pick it up at a different phone. Single call parking extensions can be defined here and a range of call parking “spots” where calls will be parked in sequence.
PR1- Appliance User Manual v1.0
Page: 38/48
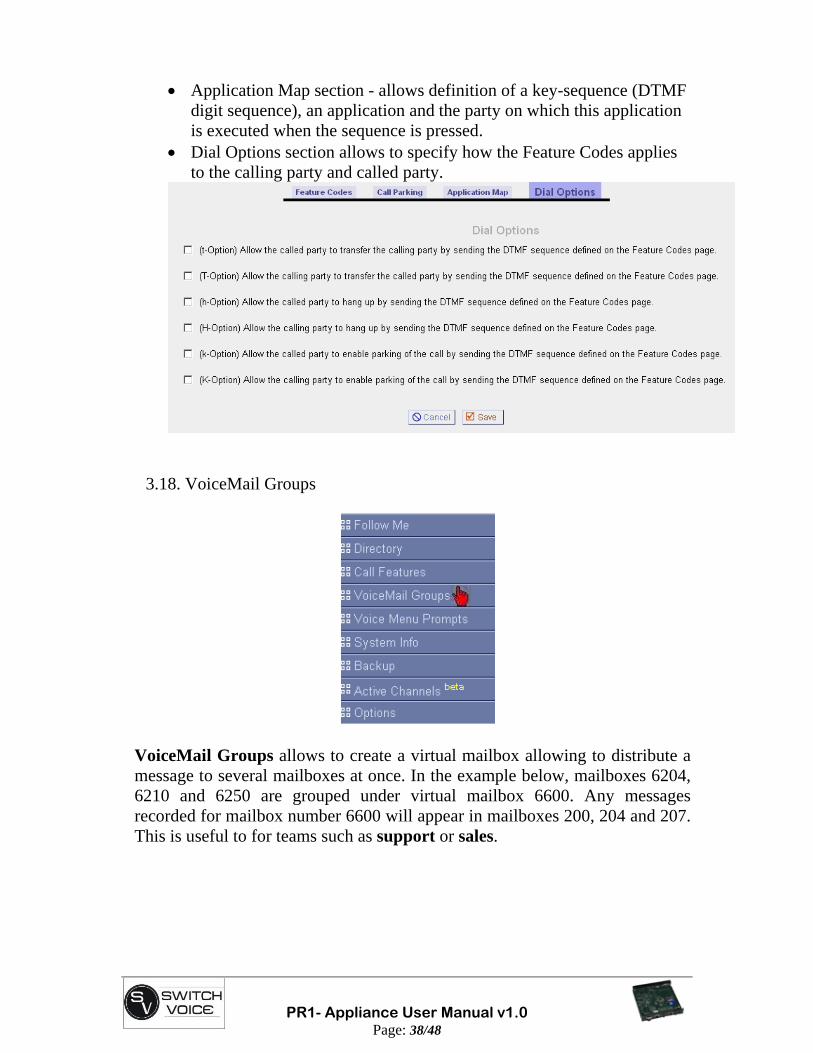
• Application Map section - allows definition of a key-sequence (DTMF digit sequence), an application and the party on which this application is executed when the sequence is pressed.
• Dial Options section allows to specify how the Feature Codes applies to the calling party and called party.
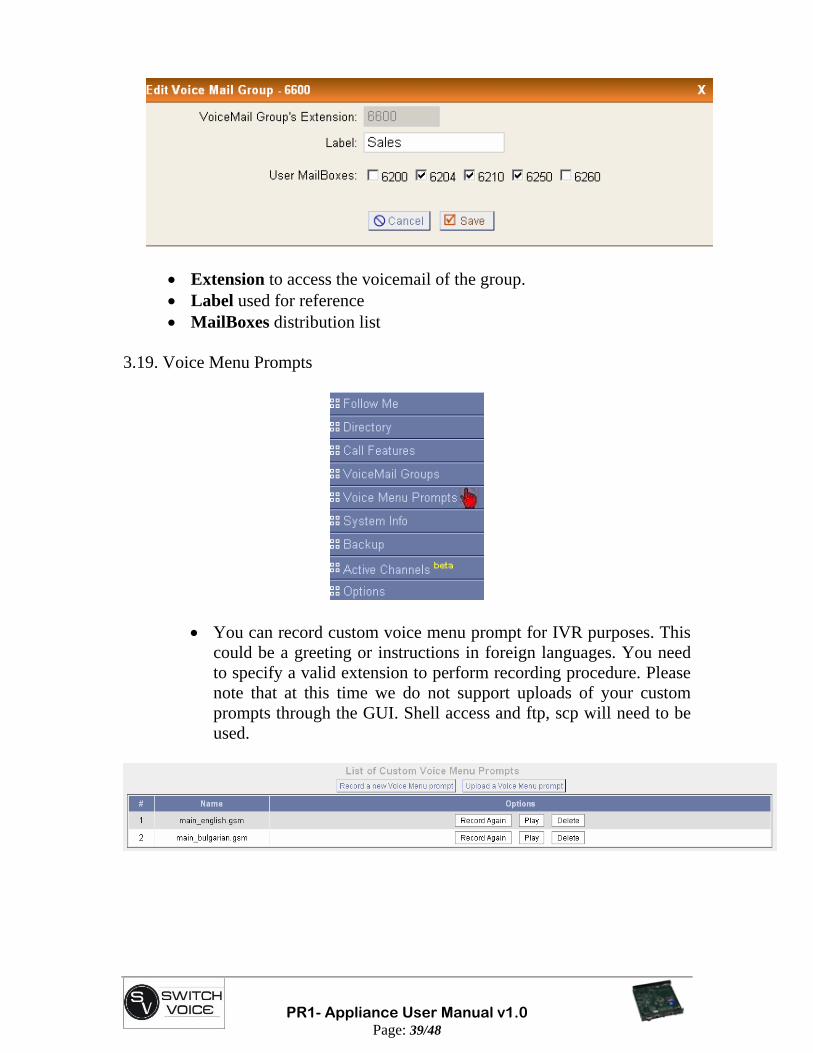
3.18. VoiceMail Groups
VoiceMail Groups allows to create a virtual mailbox allowing to distribute a message to several mailboxes at once. In the example below, mailboxes 6204, 6210 and 6250 are grouped under virtual mailbox 6600. Any messages recorded for mailbox number 6600 will appear in mailboxes 200, 204 and 207. This is useful to for teams such as support or sales.
PR1- Appliance User Manual v1.0
Page: 39/48
• Extension to access the voicemail of the group. • Label used for reference • MailBoxes distribution list
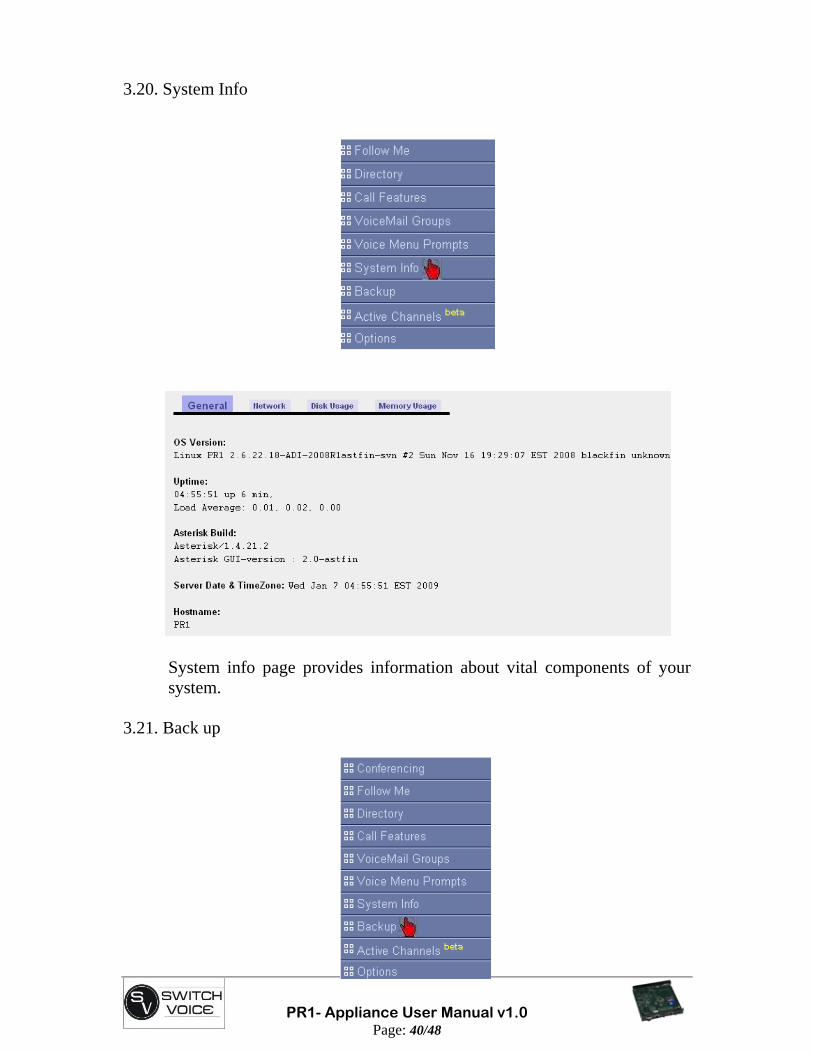
3.19. Voice Menu Prompts
• You can record custom voice menu prompt for IVR purposes. This could be a greeting or instructions in foreign languages. You need to specify a valid extension to perform recording procedure. Please note that at this time we do not support uploads of your custom prompts through the GUI. Shell access and ftp, scp will need to be used.
PR1- Appliance User Manual v1.0
Page: 40/48
3.20. System Info
System info page provides information about vital components of your system.
3.21. Back up

PR1- Appliance User Manual v1.0
Page: 41/48
With this option you can make a back up of your system configuration, saving all the settings of the PBX. All the previous back up files are visible in to window.
• If you press Create New Backup button all the PBX configurations will be stored in a single backup file stored in the PBX itself. Please note that at this point we will only backup the content of /etc/asterisk. Your voicemail, custom recordings and networking setup will not be saved.
• The backup file will be tagged with the current date and the backup will be displayed in the list of backups as it is shown below
• You can download the backup file from the PBX to your local PC for
even safer storage. Do this by pressing Download from Unit button
• If you want to restore the configurations which is backed up on the given date just press the corresponding button Restore Previous Config.
Please note that we do not provide upload functionality at this point.
PR1- Appliance User Manual v1.0
Page: 42/48
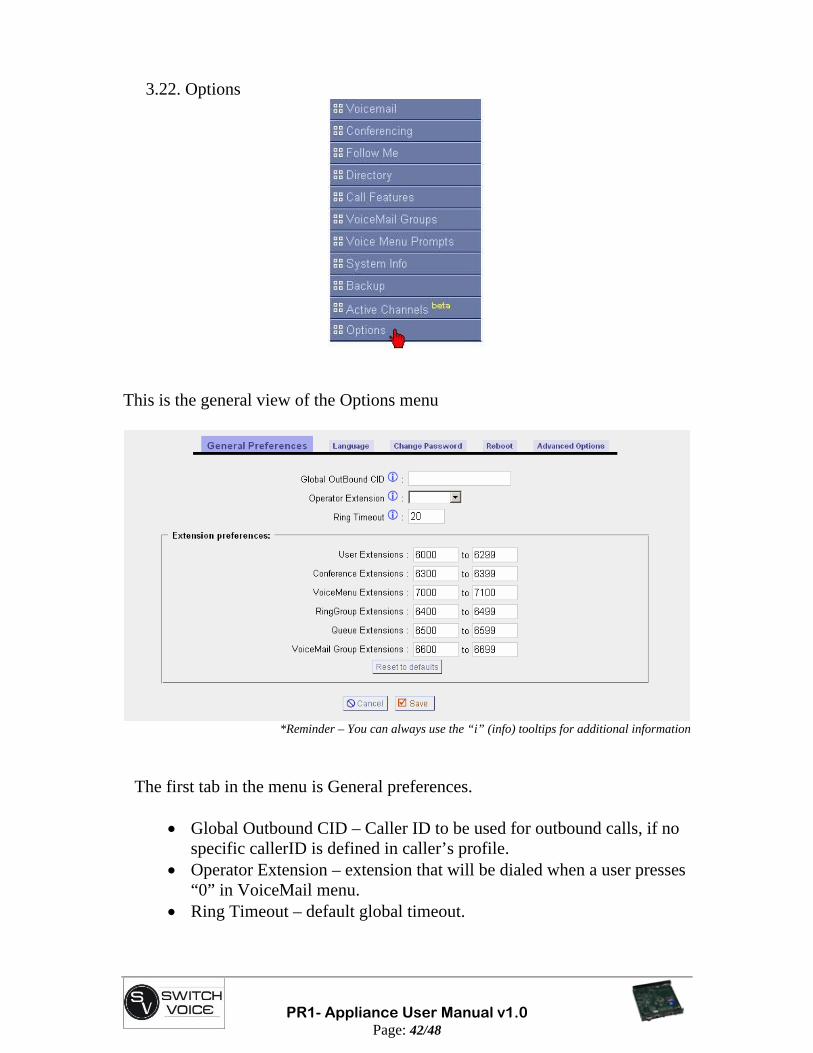
3.22. Options
This is the general view of the Options menu
*Reminder – You can always use the “i” (info) tooltips for additional information
The first tab in the menu is General preferences.
• Global Outbound CID – Caller ID to be used for outbound calls, if no specific callerID is defined in caller’s profile.
• Operator Extension – extension that will be dialed when a user presses “0” in VoiceMail menu.
• Ring Timeout – default global timeout.
PR1- Appliance User Manual v1.0
Page: 43/48
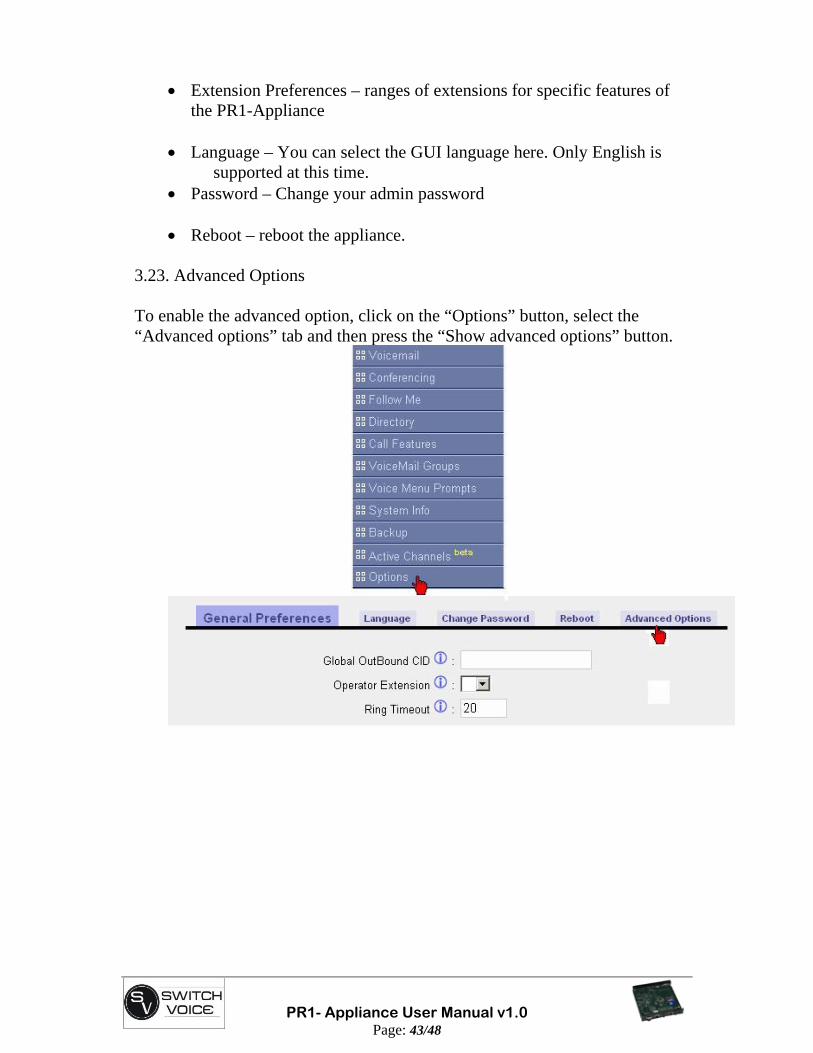
• Extension Preferences – ranges of extensions for specific features of the PR1-Appliance
• Language – You can select the GUI language here. Only English is
supported at this time. • Password – Change your admin password
• Reboot – reboot the appliance.
3.23. Advanced Options To enable the advanced option, click on the “Options” button, select the “Advanced options” tab and then press the “Show advanced options” button.

PR1- Appliance User Manual v1.0
Page: 44/48
You will see the following at the bottom left of your GUI main menu.
Network settings
PR1- Appliance User Manual v1.0
Page: 45/48
• DHCP - selection determines if the PBX will use static IP or it will obtain its IP from the DHCP server of the network PR1-Appliance is connected to.
• Hostname - is the hostname of the PBX. This is the name which will be used in any log and cdr files.
• IP address - is the Internet Protocol (IP) address of the PR1-Appliance. Please note that this field is only editable if static IP address is selected (no DHCP client)
• Subnet mask – Defines size of your LAN, please use xxx.xxx.xxx.xxx notification to specify your subnet.
• Gateway – Indicates IP address of the default router on your network. • DNS – Indicates Domain Name Server, to be used to resolve names to
IP addresses. • IP/host name of your preferred NTP server. If unsure specify
pool.ntp.org
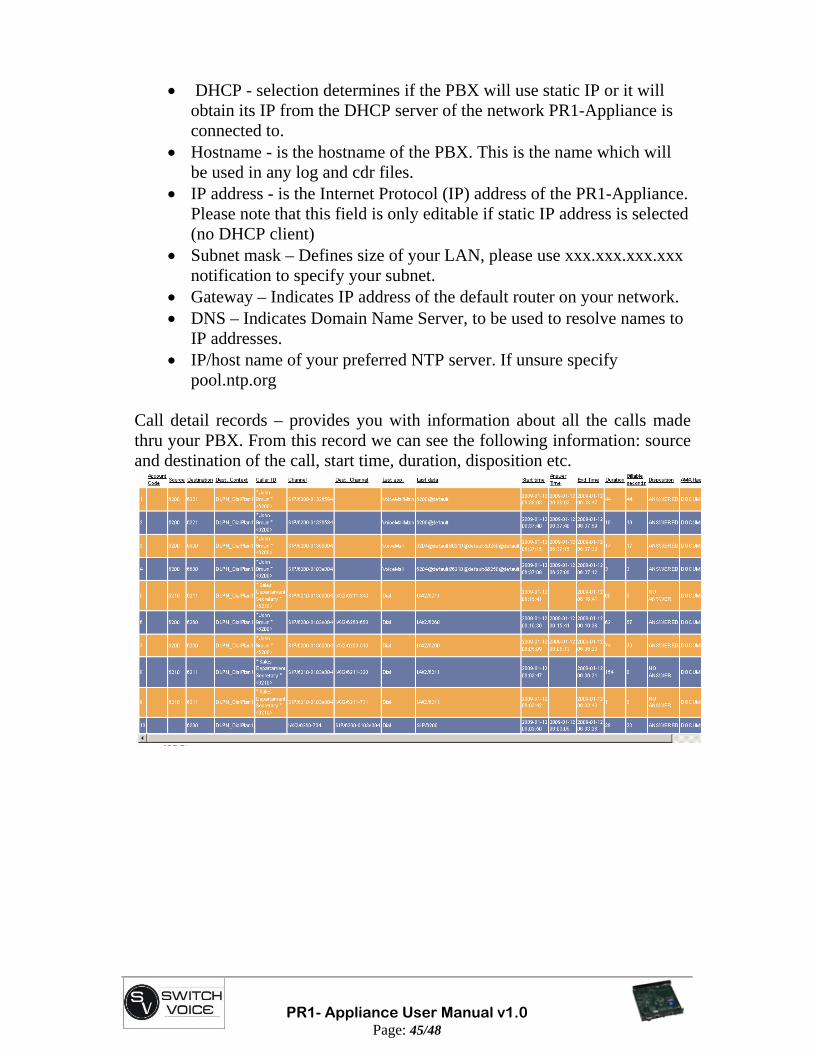
Call detail records – provides you with information about all the calls made thru your PBX. From this record we can see the following information: source and destination of the call, start time, duration, disposition etc.
PR1- Appliance User Manual v1.0
Page: 46/48
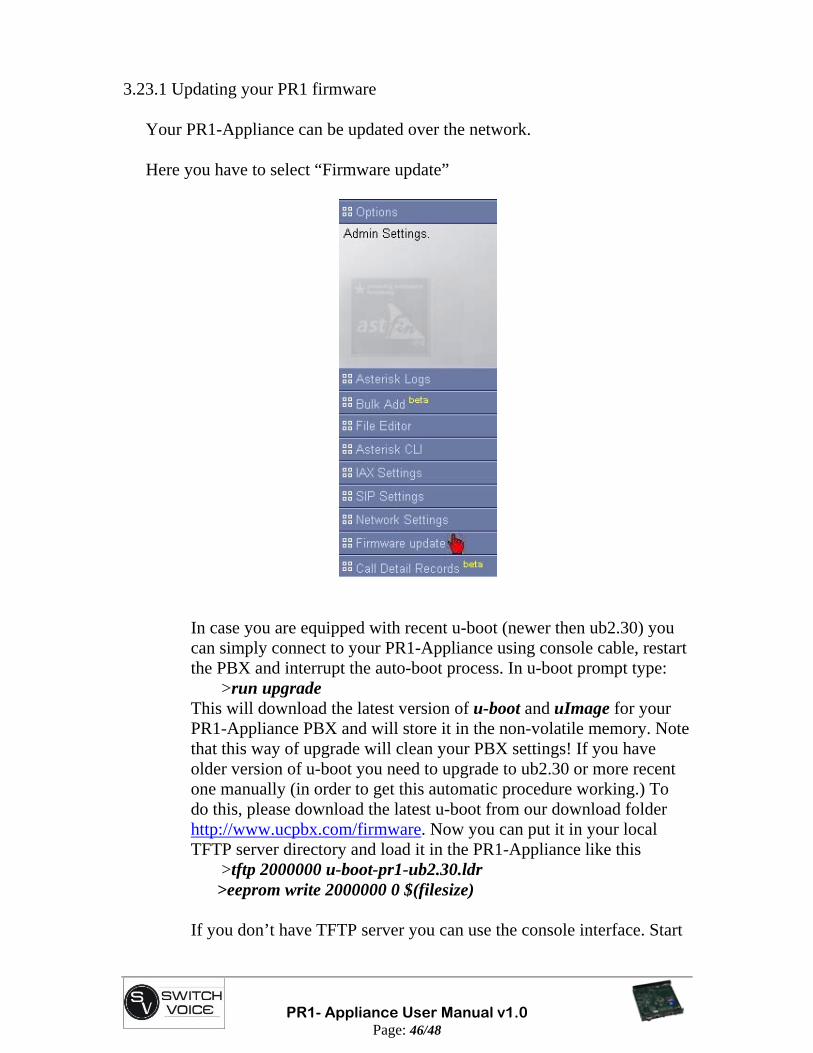
3.23.1 Updating your PR1 firmware
Your PR1-Appliance can be updated over the network. Here you have to select “Firmware update”
In case you are equipped with recent u-boot (newer then ub2.30) you can simply connect to your PR1-Appliance using console cable, restart the PBX and interrupt the auto-boot process. In u-boot prompt type: >run upgrade This will download the latest version of u-boot and uImage for your PR1-Appliance PBX and will store it in the non-volatile memory. Note that this way of upgrade will clean your PBX settings! If you have older version of u-boot you need to upgrade to ub2.30 or more recent one manually (in order to get this automatic procedure working.) To do this, please download the latest u-boot from our download folder http://www.ucpbx.com/firmware. Now you can put it in your local TFTP server directory and load it in the PR1-Appliance like this >tftp 2000000 u-boot-pr1-ub2.30.ldr >eeprom write 2000000 0 $(filesize) If you don’t have TFTP server you can use the console interface. Start
PR1- Appliance User Manual v1.0
Page: 47/48
the receiver, with the loadb command, and then escape to the terminal program's send file option, and send the file. When you load the file to your board, it'll go something like this:
>Loadb 2000000 Load Address: 0x2000000
Loading: ########################## done
Bytes Transfered = 131120 (20030 hex) >eeprom write 2000000 0 $(filesize) • Alternative approach to upgrade your uImage is to use the GUI and
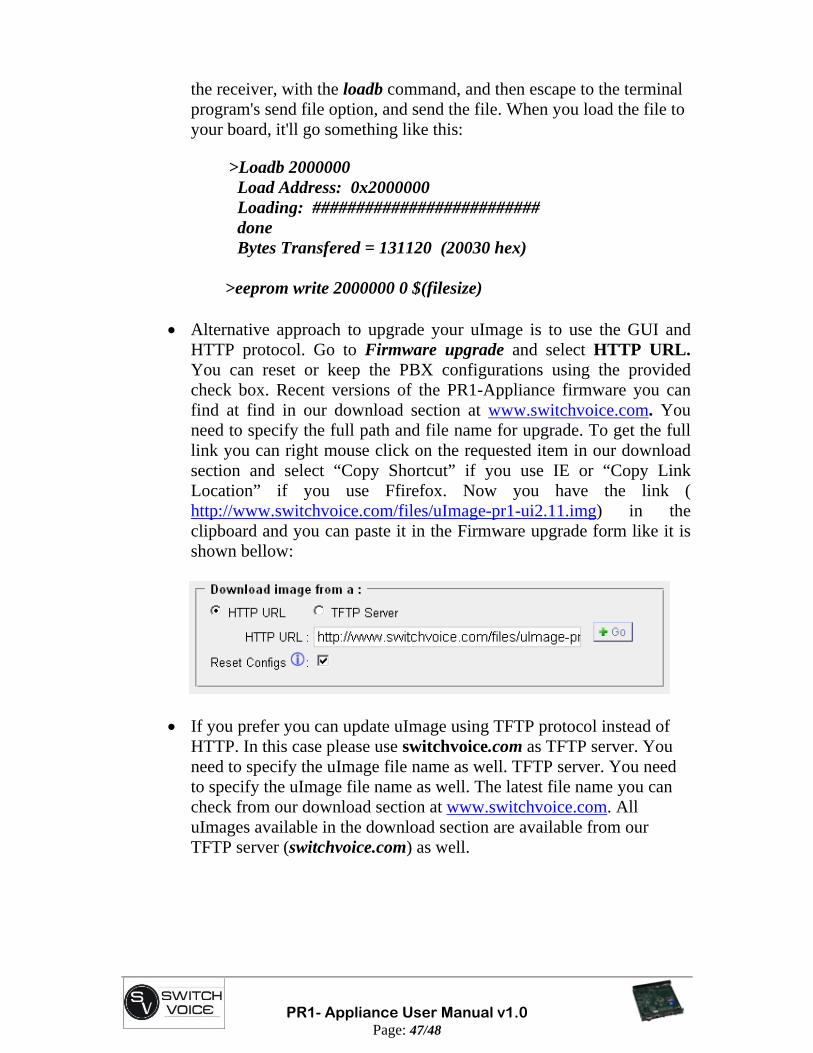
HTTP protocol. Go to Firmware upgrade and select HTTP URL. You can reset or keep the PBX configurations using the provided check box. Recent versions of the PR1-Appliance firmware you can find at find in our download section at www.switchvoice.com. You need to specify the full path and file name for upgrade. To get the full link you can right mouse click on the requested item in our download section and select “Copy Shortcut” if you use IE or “Copy Link Location” if you use Ffirefox. Now you have the link ( http://www.switchvoice.com/files/uImage-pr1-ui2.11.img) in the clipboard and you can paste it in the Firmware upgrade form like it is shown bellow:
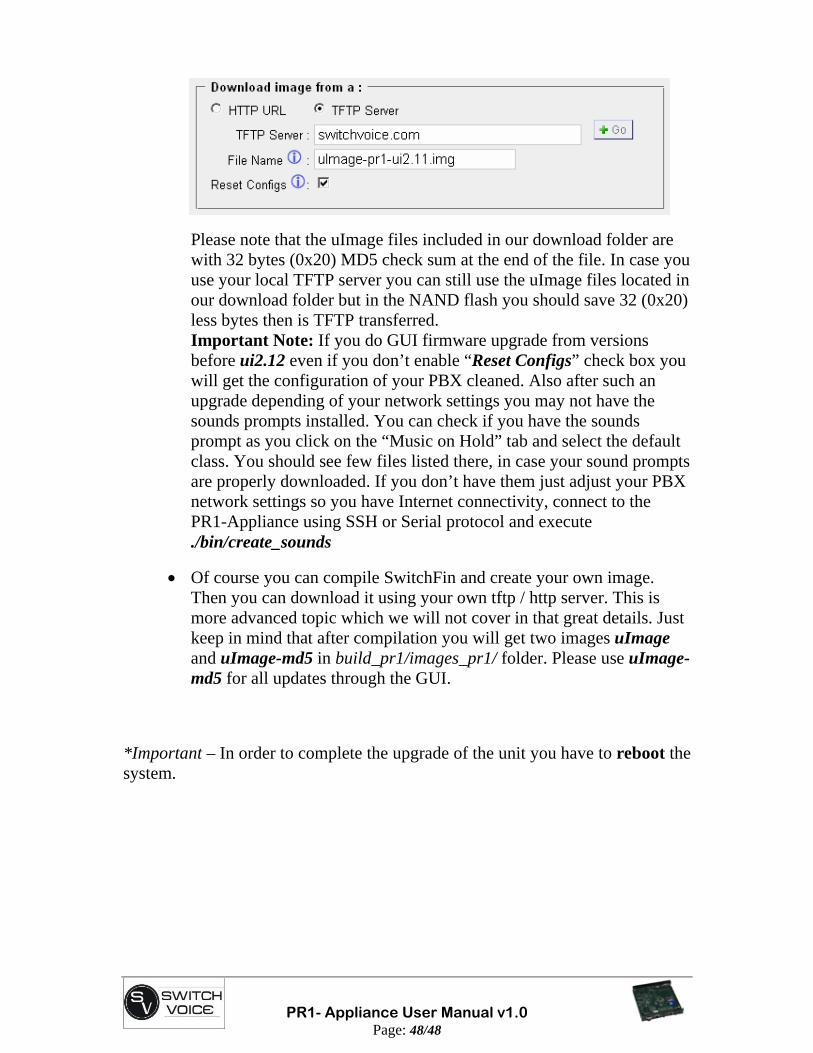
• If you prefer you can update uImage using TFTP protocol instead of HTTP. In this case please use switchvoice.com as TFTP server. You need to specify the uImage file name as well. TFTP server. You need to specify the uImage file name as well. The latest file name you can check from our download section at www.switchvoice.com. All uImages available in the download section are available from our TFTP server (switchvoice.com) as well.
PR1- Appliance User Manual v1.0
Page: 48/48
Please note that the uImage files included in our download folder are with 32 bytes (0x20) MD5 check sum at the end of the file. In case you use your local TFTP server you can still use the uImage files located in our download folder but in the NAND flash you should save 32 (0x20) less bytes then is TFTP transferred. Important Note: If you do GUI firmware upgrade from versions before ui2.12 even if you don’t enable “Reset Configs” check box you will get the configuration of your PBX cleaned. Also after such an upgrade depending of your network settings you may not have the sounds prompts installed. You can check if you have the sounds prompt as you click on the “Music on Hold” tab and select the default class. You should see few files listed there, in case your sound prompts are properly downloaded. If you don’t have them just adjust your PBX network settings so you have Internet connectivity, connect to the PR1-Appliance using SSH or Serial protocol and execute ./bin/create_sounds
• Of course you can compile SwitchFin and create your own image. Then you can download it using your own tftp / http server. This is more advanced topic which we will not cover in that great details. Just keep in mind that after compilation you will get two images uImage and uImage-md5 in build_pr1/images_pr1/ folder. Please use uImage-md5 for all updates through the GUI.
*Important – In order to complete the upgrade of the unit you have to reboot the system.