Embed Size (px)
Citation preview
www.resourcedm.com
`
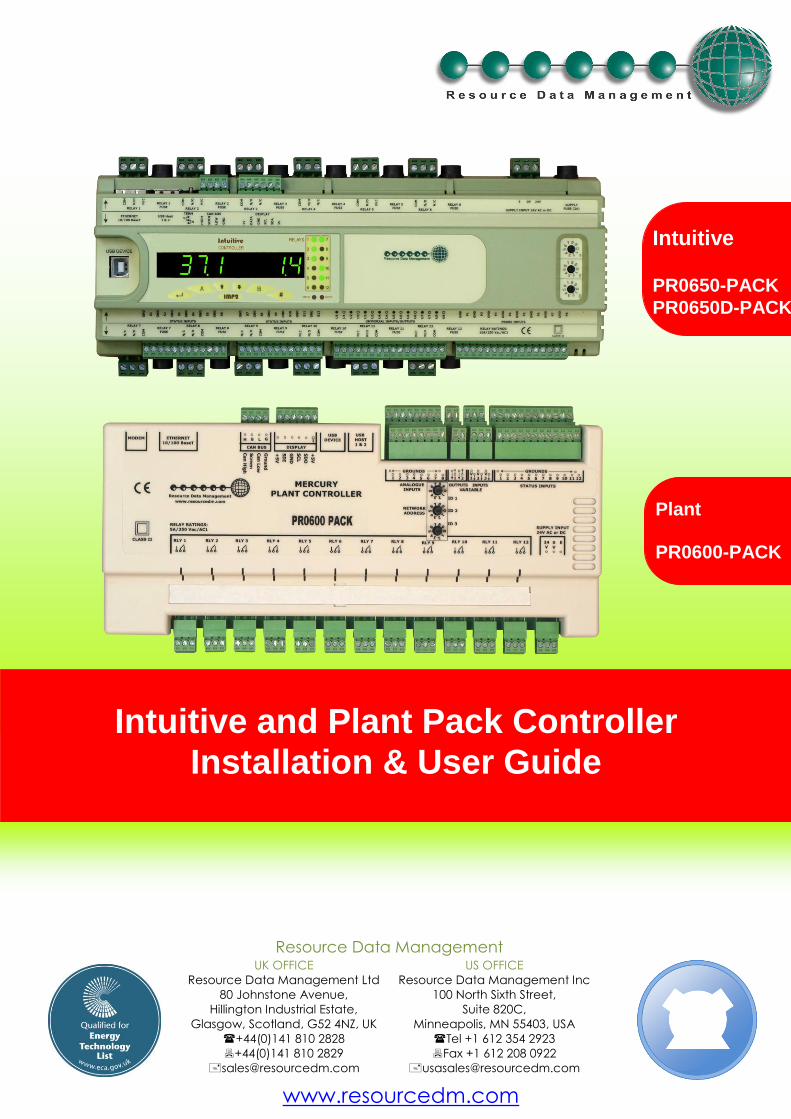
Intuitive and Plant Pack Controller
Installation & User Guide
For Products: - PR0710, PR0711, PR0720, PR0721
Intuitive PR0650-PACK
PR0650D-PACK
Plant PR0600-PACK
UK OFFICE
Resource Data Management Ltd
80 Johnstone Avenue,
Hillington Industrial Estate,
Glasgow, Scotland, G52 4NZ, UK
+44(0)141 810 2828
+44(0)141 810 2829
US OFFICE
Resource Data Management Inc
100 North Sixth Street,
Suite 820C,
Minneapolis, MN 55403, USA
Tel +1 612 354 2923
Fax +1 612 208 0922
Resource Data Management
Revision 2.9B Page 2 of 42
Warning
Please Note The specifications of the product detailed on this Set-Up Guide may change without notice. RDM Ltd. shall not be liable for errors or for incidental or consequential damages, directly and indirectly, in connection with the furnishing, performance or misuse of this product or document.
Ensure that all power is switched off before installing or maintaining this product
www.resourcedm.com
Intuitive / Plant Controller
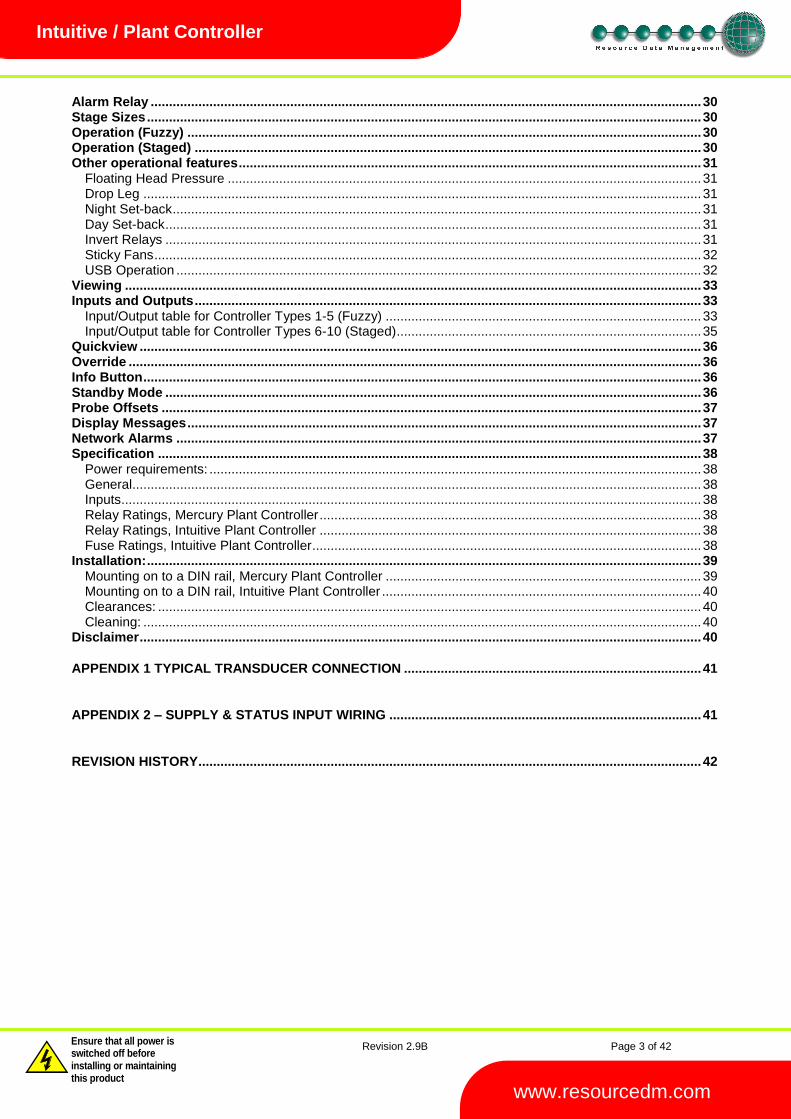
Table of Contents:
THE INTUITIVE AND MERCURY RANGE ......................................................................................................... 4
Description ......................................................................................................................................................... 4 Configuration ..................................................................................................................................................... 4 Types................................................................................................................................................................... 4 Front Panel ......................................................................................................................................................... 5 Remote Display (PR0620) ................................................................................................................................. 5 Integral Display (PR0650D-PACK) ................................................................................................................... 5
Section 1 Display ............................................................................................................................................. 6 Section 2 Display ............................................................................................................................................. 6 Front Panel Remote Display Buttons ............................................................................................................... 6 Front Panel, Integral display (Intuitive Range) Buttons ................................................................................... 6
Mercury Plant Controller I/O Connections ...................................................................................................... 7 Mercury Plant Controller I/O Connections ...................................................................................................... 7
Mercury Plant Controller Variable Analogue Input / Output Connections ........................................................ 7 Intuitive Plant Controller I/O Connections ...................................................................................................... 8
Intuitive Plant Controller, Universal Analogue Input / Output Connections ..................................................... 9 Input/s & Outputs ............................................................................................................................................... 9 Setting up the controller ................................................................................................................................... 9
Set-up Mode ..................................................................................................................................................... 9 Set-up through front buttons ............................................................................................................................ 9 Set-up Menu ................................................................................................................................................... 10
Recommended set-up method ....................................................................................................................... 10 Universal IO ................................................................................................................................................... 10 Input Type ...................................................................................................................................................... 10 Output Type ................................................................................................................................................... 10 Status Input Type ........................................................................................................................................... 11 rtc. Real time clock ......................................................................................................................................... 11 type. Set/view controller type ......................................................................................................................... 11
Broadcast ......................................................................................................................................................... 11 Set/View Probe Types & Units ....................................................................................................................... 11 Set/View Offset .............................................................................................................................................. 12
Network Configuration .................................................................................................................................... 12 IP-L ................................................................................................................................................................. 12 IP-r .................................................................................................................................................................. 12
PArA. Set/view parameters ............................................................................................................................. 13 Parameter Tables: ............................................................................................................................................ 13
Parameter table for Controller (Types 1-5, Fuzzy) ........................................................................................ 13 Parameter table for Controller (Types 6-10, Staged) ..................................................................................... 17
Parameter Description: ................................................................................................................................... 22 Run-Proof ......................................................................................................................................................... 24 Gas Dump ......................................................................................................................................................... 24 Compressor Loaders ....................................................................................................................................... 25 Equal Run Times .............................................................................................................................................. 25 Inverter Bypass ................................................................................................................................................ 26 Relay Run Hours .............................................................................................................................................. 26 Relay Starts ...................................................................................................................................................... 26 Setup via a PC .................................................................................................................................................. 26
Plant Controller home page ........................................................................................................................... 27 Change Configuration (PC) ............................................................................................................................ 28
Status Inputs .................................................................................................................................................... 29 External Target ................................................................................................................................................. 29
Pack Controller ............................................................................................................................................... 29 Condenser Controller ..................................................................................................................................... 29 Remote TDB Command for Heat Reclaim ..................................................................................................... 29
Relay Outputs – Configuration ....................................................................................................................... 30 Section Stages ................................................................................................................................................. 30
Revision 2.9B Page 3 of 42
Warning
Please Note The specifications of the product detailed on this Set-Up Guide may change without notice. RDM Ltd. shall not be liable for errors or for incidental or consequential damages, directly and indirectly, in connection with the furnishing, performance or misuse of this product or document.
Ensure that all power is switched off before installing or maintaining this product
www.resourcedm.com
Intuitive / Plant Controller
Alarm Relay ...................................................................................................................................................... 30 Stage Sizes ....................................................................................................................................................... 30 Operation (Fuzzy) ............................................................................................................................................ 30 Operation (Staged) .......................................................................................................................................... 30 Other operational features .............................................................................................................................. 31
Floating Head Pressure ................................................................................................................................. 31 Drop Leg ........................................................................................................................................................ 31 Night Set-back ................................................................................................................................................ 31 Day Set-back .................................................................................................................................................. 31 Invert Relays .................................................................................................................................................. 31 Sticky Fans ..................................................................................................................................................... 32 USB Operation ............................................................................................................................................... 32
Viewing ............................................................................................................................................................. 33 Inputs and Outputs .......................................................................................................................................... 33
Input/Output table for Controller Types 1-5 (Fuzzy) ...................................................................................... 33 Input/Output table for Controller Types 6-10 (Staged) ................................................................................... 35
Quickview ......................................................................................................................................................... 36 Override ............................................................................................................................................................ 36 Info Button ........................................................................................................................................................ 36 Standby Mode .................................................................................................................................................. 36 Probe Offsets ................................................................................................................................................... 37 Display Messages ............................................................................................................................................ 37 Network Alarms ............................................................................................................................................... 37 Specification .................................................................................................................................................... 38
Power requirements: ...................................................................................................................................... 38 General........................................................................................................................................................... 38 Inputs.............................................................................................................................................................. 38 Relay Ratings, Mercury Plant Controller ........................................................................................................ 38 Relay Ratings, Intuitive Plant Controller ........................................................................................................ 38 Fuse Ratings, Intuitive Plant Controller .......................................................................................................... 38
Installation: ....................................................................................................................................................... 39 Mounting on to a DIN rail, Mercury Plant Controller ...................................................................................... 39 Mounting on to a DIN rail, Intuitive Plant Controller ....................................................................................... 40 Clearances: .................................................................................................................................................... 40 Cleaning: ........................................................................................................................................................ 40
Disclaimer ......................................................................................................................................................... 40
APPENDIX 1 TYPICAL TRANSDUCER CONNECTION ................................................................................. 41
APPENDIX 2 – SUPPLY & STATUS INPUT WIRING ..................................................................................... 41
REVISION HISTORY ......................................................................................................................................... 42
Revision 2.9B Page 4 of 42
Warning
Please Note The specifications of the product detailed on this Set-Up Guide may change without notice. RDM Ltd. shall not be liable for errors or for incidental or consequential damages, directly and indirectly, in connection with the furnishing, performance or misuse of this product or document.
Ensure that all power is switched off before installing or maintaining this product
www.resourcedm.com
Intuitive / Plant Controller
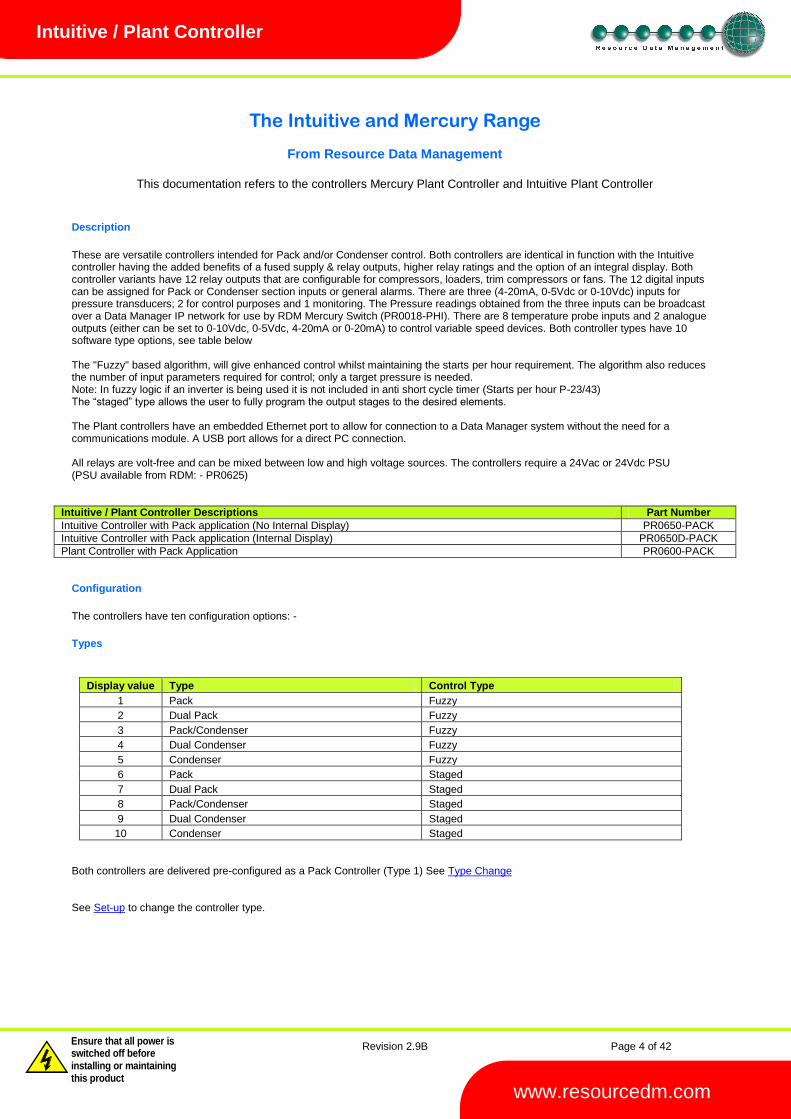
The Intuitive and Mercury Range
From Resource Data Management
This documentation refers to the controllers Mercury Plant Controller and Intuitive Plant Controller
Description
These are versatile controllers intended for Pack and/or Condenser control. Both controllers are identical in function with the Intuitive controller having the added benefits of a fused supply & relay outputs, higher relay ratings and the option of an integral display. Both controller variants have 12 relay outputs that are configurable for compressors, loaders, trim compressors or fans. The 12 digital inputs can be assigned for Pack or Condenser section inputs or general alarms. There are three (4-20mA, 0-5Vdc or 0-10Vdc) inputs for pressure transducers; 2 for control purposes and 1 monitoring. The Pressure readings obtained from the three inputs can be broadcast over a Data Manager IP network for use by RDM Mercury Switch (PR0018-PHI). There are 8 temperature probe inputs and 2 analogue outputs (either can be set to 0-10Vdc, 0-5Vdc, 4-20mA or 0-20mA) to control variable speed devices. Both controller types have 10 software type options, see table below The "Fuzzy" based algorithm, will give enhanced control whilst maintaining the starts per hour requirement. The algorithm also reduces the number of input parameters required for control; only a target pressure is needed. Note: In fuzzy logic if an inverter is being used it is not included in anti short cycle timer (Starts per hour P-23/43) The “staged” type allows the user to fully program the output stages to the desired elements. The Plant controllers have an embedded Ethernet port to allow for connection to a Data Manager system without the need for a communications module. A USB port allows for a direct PC connection. All relays are volt-free and can be mixed between low and high voltage sources. The controllers require a 24Vac or 24Vdc PSU (PSU available from RDM: - PR0625)
Intuitive / Plant Controller Descriptions Part Number
Intuitive Controller with Pack application (No Internal Display) PR0650-PACK
Intuitive Controller with Pack application (Internal Display) PR0650D-PACK
Plant Controller with Pack Application PR0600-PACK
Configuration
The controllers have ten configuration options: -
Types
Display value Type Control Type
1 Pack Fuzzy
2 Dual Pack Fuzzy
3 Pack/Condenser Fuzzy
4 Dual Condenser Fuzzy
5 Condenser Fuzzy
6 Pack Staged
7 Dual Pack Staged
8 Pack/Condenser Staged
9 Dual Condenser Staged
10 Condenser Staged
Both controllers are delivered pre-configured as a Pack Controller (Type 1) See Type Change See Set-up to change the controller type.
Revision 2.9B Page 5 of 42
Warning
Please Note The specifications of the product detailed on this Set-Up Guide may change without notice. RDM Ltd. shall not be liable for errors or for incidental or consequential damages, directly and indirectly, in connection with the furnishing, performance or misuse of this product or document.
Ensure that all power is switched off before installing or maintaining this product
www.resourcedm.com
Intuitive / Plant Controller
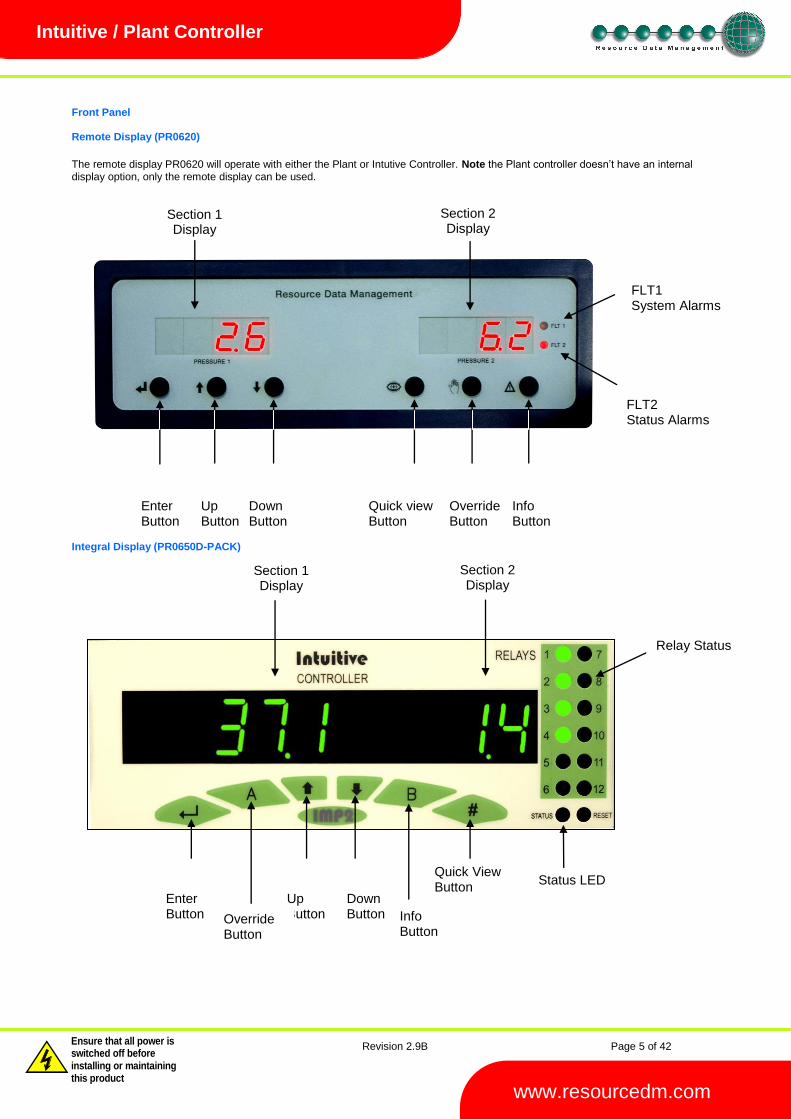
Front Panel Remote Display (PR0620)
The remote display PR0620 will operate with either the Plant or Intutive Controller. Note the Plant controller doesn’t have an internal display option, only the remote display can be used.
Integral Display (PR0650D-PACK)
Enter Button
Up Button
Down Button
Quick view Button
Override Button
Info Button
Section 1 Display
Section 2 Display
FLT1 System Alarms
FLT2 Status Alarms
Section 1 Display
Section 2 Display
Relay Status
Enter Button
Up Button
Down Button Override
Button
Info Button
Quick View Button
Status LED
Revision 2.9B Page 6 of 42
Warning
Please Note The specifications of the product detailed on this Set-Up Guide may change without notice. RDM Ltd. shall not be liable for errors or for incidental or consequential damages, directly and indirectly, in connection with the furnishing, performance or misuse of this product or document.
Ensure that all power is switched off before installing or maintaining this product
www.resourcedm.com
Intuitive / Plant Controller
Section 1 Display 4 character display, shows the pressure (suction for pack, discharge for condensers) In set-up mode, displays the set-up menu items In quick view mode, indicates the target pressure In Override mode, indicates and allows the relays to be forced on Section 2 Display 4 character display, shows the pressure (suction for pack, discharge for condensers) In set-up mode, display is blank In Override mode, display is blank
Front Panel Remote Display Buttons
Enter Button: - Used along with down button to enter menu items. Up Button: - Used to scroll up.
Down Button: - Used to scroll down. Quick View Button: - Used to view the target pressure (See Quickview section). Override Button: - Used with the "Enter" button, to go into the override mode. (See Override section). Info Button: - Used to view the current analogue outputs values. (See Info section). Front Panel, Integral display (Intuitive Range) Buttons Enter Button: - Used along with down button to enter menu items.
Override Button “A”: - Used with the "Enter" button, to go into the override mode. (See Override section). Up Button: - Used to scroll up. Down Button: - Used to scroll down. Info Button “B”: - Used to view the current analogue outputs. (See info section). Quick View Button “Hash”: - Used to view the target pressures (See Quickview section).
Revision 2.9B Page 7 of 42
Warning
Please Note The specifications of the product detailed on this Set-Up Guide may change without notice. RDM Ltd. shall not be liable for errors or for incidental or consequential damages, directly and indirectly, in connection with the furnishing, performance or misuse of this product or document.
Ensure that all power is switched off before installing or maintaining this product
www.resourcedm.com
Intuitive / Plant Controller
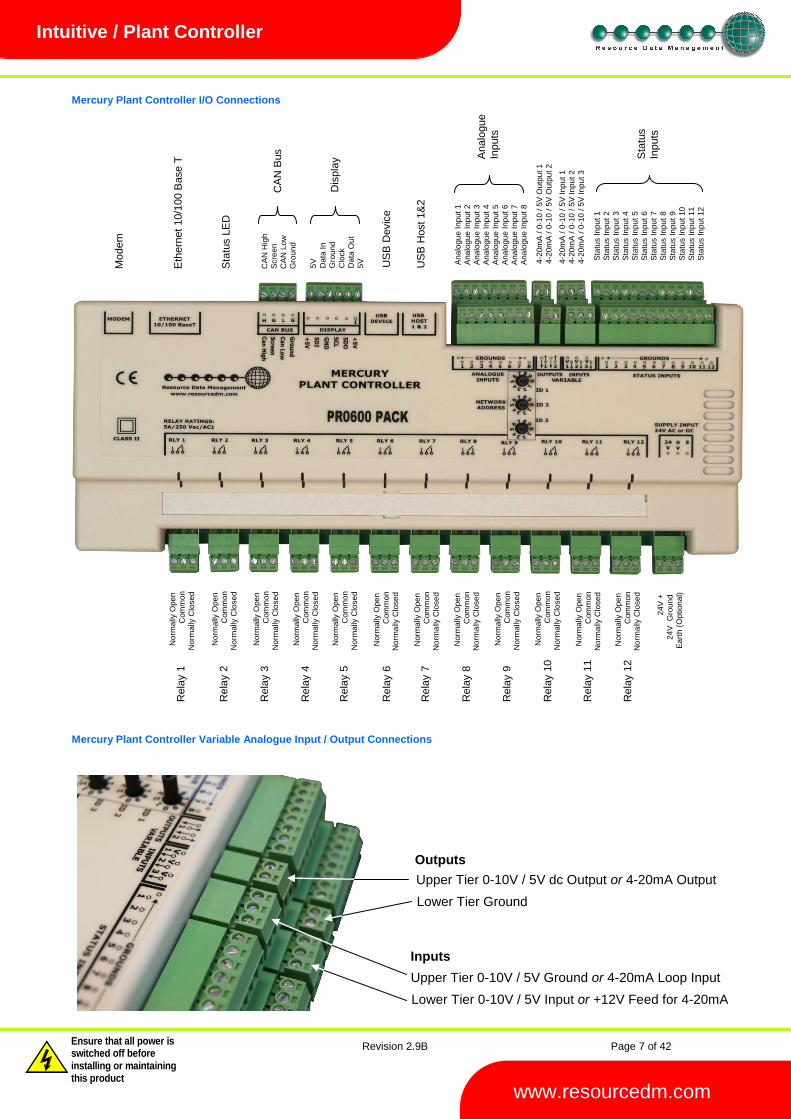
Mercury Plant Controller I/O Connections
Mercury Plant Controller Variable Analogue Input / Output Connections
Mo
dem
Eth
ern
et
10/1
00 B
ase T
Sta
tus L
ED
CA
N H
igh
Scre
en
CA
N L
ow
Gro
un
d
CA
N B
us
Dis
pla
y
5V
Data
In
Gro
un
d
Clo
ck
Data
Ou
t
5V
US
B D
evic
e
US
B H
ost 1&
2
Analo
gue
Inputs
Sta
tus
Inputs
An
alo
gu
e I
np
ut
1
An
alo
gu
e I
np
ut
2
An
alo
gu
e I
np
ut
3
An
alo
gu
e I
np
ut
4
An
alo
gu
e I
np
ut
5
An
alo
gu
e I
np
ut
6
An
alo
gu
e I
np
ut
7
An
alo
gu
e I
np
ut
8
4-2
0m
A /
0-1
0 /
5V
Ou
tpu
t 1
4-2
0m
A /
0-1
0 /
5V
Ou
tpu
t 2
4-2
0m
A /
0-1
0 /
5V
In
pu
t 1
4-2
0m
A /
0-1
0 /
5V
In
pu
t 2
4-2
0m
A /
0-1
0 /
5V
In
pu
t 3
Sta
tus I
np
ut
1
Sta
tus I
np
ut
2
Sta
tus I
np
ut
3
Sta
tus I
np
ut
4
Sta
tus I
np
ut
5
Sta
tus I
np
ut
6
Sta
tus I
np
ut
7
Sta
tus I
np
ut
8
Sta
tus I
np
ut
9
Sta
tus I
np
ut
10
Sta
tus I
np
ut
11
Sta
tus I
np
ut
12
Lower Tier 0-10V / 5V Input or +12V Feed for 4-20mA Loop
Upper Tier 0-10V / 5V Ground or 4-20mA Loop Input
Inputs
Lower Tier Ground
Upper Tier 0-10V / 5V dc Output or 4-20mA Output
Outputs
N
orm
ally
Ope
n
Com
mo
n
Norm
ally
Clo
se
d
2
4V
+
24
V
Gro
un
d
Ea
rth
(O
ption
al)
N
orm
ally
Ope
n
Com
mo
n
Norm
ally
Clo
se
d
N
orm
ally
Ope
n
Com
mo
n
Norm
ally
Clo
se
d
N
orm
ally
Ope
n
Com
mo
n
Norm
ally
Clo
se
d
N
orm
ally
Ope
n
Com
mo
n
Norm
ally
Clo
se
d
N
orm
ally
Ope
n
Com
mo
n
Norm
ally
Clo
se
d
N
orm
ally
Ope
n
Com
mo
n
Norm
ally
Clo
se
d
N
orm
ally
Ope
n
Com
mo
n
Norm
ally
Clo
se
d
N
orm
ally
Ope
n
Com
mo
n
Norm
ally
Clo
se
d
N
orm
ally
Ope
n
Com
mo
n
Norm
ally
Clo
se
d
N
orm
ally
Ope
n
Com
mo
n
Norm
ally
Clo
se
d
N
orm
ally
Ope
n
Com
mo
n
Norm
ally
Clo
se
d
Rela
y 1
Rela
y 2
Rela
y 3
Rela
y 5
Rela
y 4
Rela
y 6
Rela
y 8
Rela
y 7
Rela
y 1
2
Rela
y 1
1
Rela
y 1
0
Rela
y 9
Revision 2.9B Page 8 of 42
Warning
Please Note The specifications of the product detailed on this Set-Up Guide may change without notice. RDM Ltd. shall not be liable for errors or for incidental or consequential damages, directly and indirectly, in connection with the furnishing, performance or misuse of this product or document.
Ensure that all power is switched off before installing or maintaining this product
www.resourcedm.com
Intuitive / Plant Controller
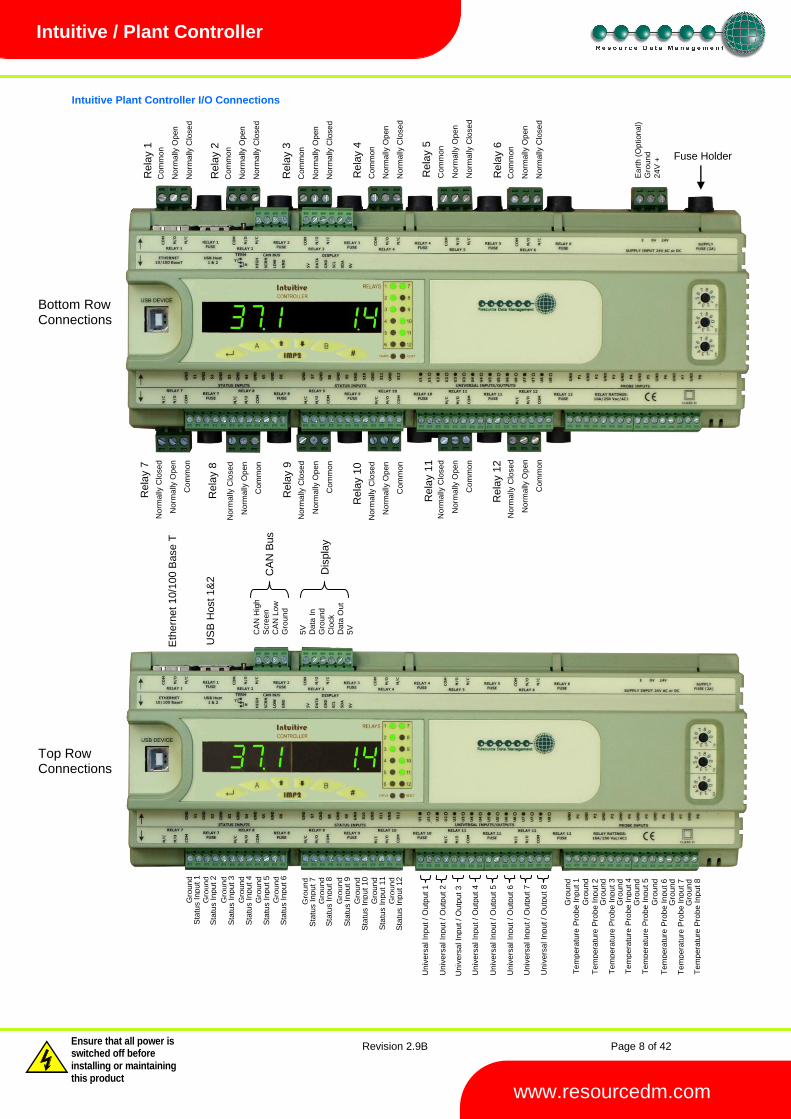
Intuitive Plant Controller I/O Connections
Bottom Row Connections
Top Row Connections
Rela
y 1
Ea
rth
(O
ption
al)
Gro
un
d
24
V +
N
orm
ally
Clo
se
d
Norm
ally
Op
en
Com
mo
n
Rela
y 7
Rela
y 1
2
Rela
y 1
1
Rela
y 1
0
Rela
y 9
N
orm
ally
Clo
se
d
Norm
ally
Op
en
Com
mo
n
N
orm
ally
Clo
se
d
Norm
ally
Op
en
Com
mo
n
N
orm
ally
Clo
se
d
Norm
ally
Op
en
Com
mo
n
N
orm
ally
Clo
se
d
Norm
ally
Op
en
Com
mo
n
N
orm
ally
Clo
se
d
Norm
ally
Op
en
Com
mo
n
Com
mo
n
Norm
ally
Op
en
Norm
ally
Clo
se
d
Com
mo
n
Norm
ally
Op
en
Norm
ally
Clo
se
d
Com
mo
n
Norm
ally
Op
en
Norm
ally
Clo
se
d
Com
mo
n
Norm
ally
Op
en
Norm
ally
Clo
se
d
Com
mo
n
Norm
ally
Op
en
Norm
ally
Clo
se
d
Com
mo
n
Norm
ally
Op
en
Norm
ally
Clo
se
d
Rela
y 2
Rela
y 3
Rela
y 4
Rela
y 5
Rela
y 6
Eth
ern
et
10/1
00 B
ase T
US
B H
ost 1&
2
CA
N H
igh
Scre
en
CA
N L
ow
Gro
un
d
CA
N B
us
Dis
pla
y
5V
Data
In
Gro
un
d
Clo
ck
Data
Ou
t
5V
Gro
un
d
Sta
tus I
np
ut
1
Gro
un
d
Sta
tus I
np
ut
6
Gro
un
d
Sta
tus I
np
ut
5
Gro
un
d
Sta
tus I
np
ut
4
Gro
un
d
Sta
tus I
np
ut
3
Gro
un
d
Sta
tus I
np
ut
2
Gro
un
d
Sta
tus I
np
ut
12
Gro
un
d
Sta
tus I
np
ut
11
Gro
un
d
Sta
tus I
np
ut
10
Gro
un
d
Sta
tus I
np
ut
9
Gro
un
d
Sta
tus I
np
ut
8
Gro
un
d
Sta
tus I
np
ut
7
Gro
un
d
Te
mp
era
ture
Pro
be I
np
ut 1
Gro
un
d
Te
mp
era
ture
Pro
be I
np
ut 2
Te
mp
era
ture
Pro
be I
np
ut 3
Gro
un
d
Gro
un
d
Te
mp
era
ture
Pro
be I
np
ut 4
Gro
un
d
Te
mp
era
ture
Pro
be I
np
ut 5
Gro
un
d
Te
mp
era
ture
Pro
be I
np
ut 6
Te
mp
era
ture
Pro
be I
np
ut 7
Gro
un
d
Gro
un
d
Te
mp
era
ture
Pro
be I
np
ut 8
Univ
ers
al In
pu
t /
Ou
tpu
t 1
Univ
ers
al In
pu
t /
Ou
tpu
t 2
Univ
ers
al In
pu
t /
Ou
tpu
t 3
Univ
ers
al In
pu
t /
Ou
tpu
t 4
Univ
ers
al In
pu
t /
Ou
tpu
t 5
Univ
ers
al In
pu
t /
Ou
tpu
t 6
Univ
ers
al In
pu
t /
Ou
tpu
t 7
Univ
ers
al In
pu
t /
Ou
tpu
t 8
Rela
y 8
Fuse Holder
Revision 2.9B Page 9 of 42
Warning
Please Note The specifications of the product detailed on this Set-Up Guide may change without notice. RDM Ltd. shall not be liable for errors or for incidental or consequential damages, directly and indirectly, in connection with the furnishing, performance or misuse of this product or document.
Ensure that all power is switched off before installing or maintaining this product
www.resourcedm.com
Intuitive / Plant Controller
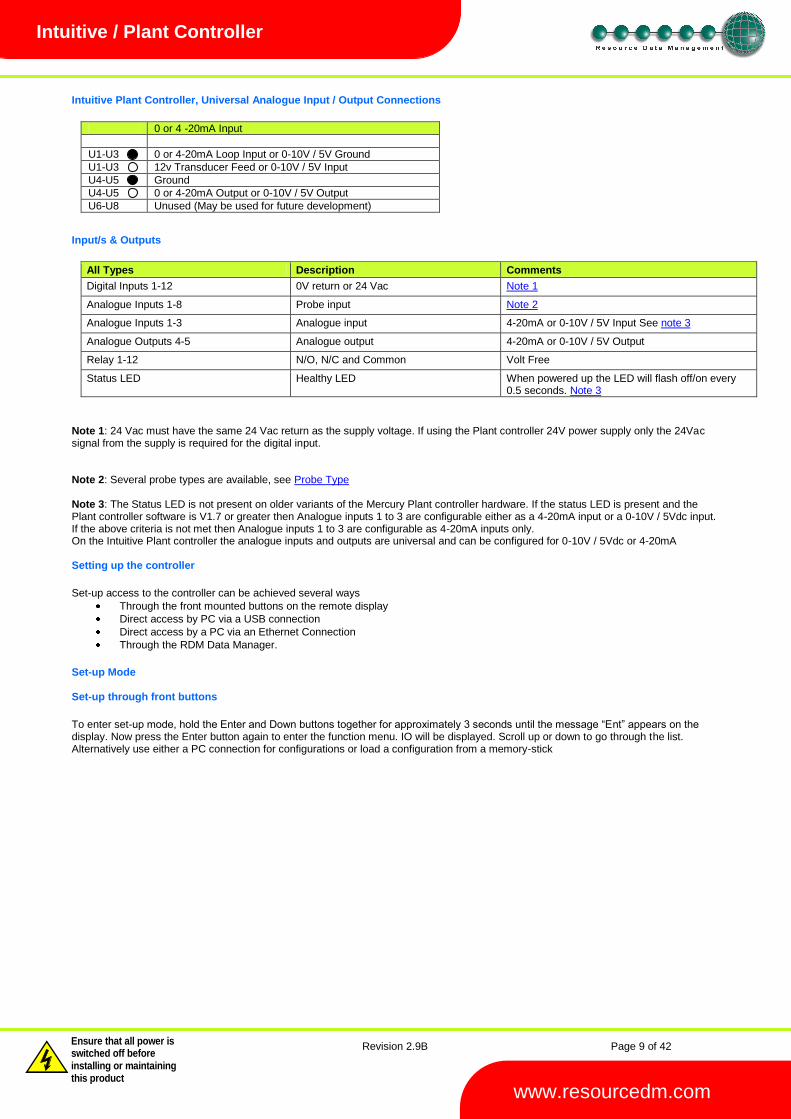
Intuitive Plant Controller, Universal Analogue Input / Output Connections
0 or 4 -20mA Input
U1-U3 0 or 4-20mA Loop Input or 0-10V / 5V Ground
U1-U3 12v Transducer Feed or 0-10V / 5V Input
U4-U5 Ground
U4-U5 0 or 4-20mA Output or 0-10V / 5V Output
U6-U8 Unused (May be used for future development)
Input/s & Outputs
All Types Description Comments
Digital Inputs 1-12 0V return or 24 Vac Note 1
Analogue Inputs 1-8 Probe input Note 2
Analogue Inputs 1-3 Analogue input 4-20mA or 0-10V / 5V Input See note 3
Analogue Outputs 4-5 Analogue output 4-20mA or 0-10V / 5V Output
Relay 1-12 N/O, N/C and Common Volt Free
Status LED Healthy LED When powered up the LED will flash off/on every 0.5 seconds. Note 3
Note 1: 24 Vac must have the same 24 Vac return as the supply voltage. If using the Plant controller 24V power supply only the 24Vac signal from the supply is required for the digital input. Note 2: Several probe types are available, see Probe Type Note 3: The Status LED is not present on older variants of the Mercury Plant controller hardware. If the status LED is present and the Plant controller software is V1.7 or greater then Analogue inputs 1 to 3 are configurable either as a 4-20mA input or a 0-10V / 5Vdc input. If the above criteria is not met then Analogue inputs 1 to 3 are configurable as 4-20mA inputs only. On the Intuitive Plant controller the analogue inputs and outputs are universal and can be configured for 0-10V / 5Vdc or 4-20mA Setting up the controller
Set-up access to the controller can be achieved several ways
Through the front mounted buttons on the remote display
Direct access by PC via a USB connection
Direct access by a PC via an Ethernet Connection
Through the RDM Data Manager.
Set-up Mode Set-up through front buttons
To enter set-up mode, hold the Enter and Down buttons together for approximately 3 seconds until the message “Ent” appears on the display. Now press the Enter button again to enter the function menu. IO will be displayed. Scroll up or down to go through the list. Alternatively use either a PC connection for configurations or load a configuration from a memory-stick
Revision 2.9B Page 10 of 42
Warning
Please Note The specifications of the product detailed on this Set-Up Guide may change without notice. RDM Ltd. shall not be liable for errors or for incidental or consequential damages, directly and indirectly, in connection with the furnishing, performance or misuse of this product or document.
Ensure that all power is switched off before installing or maintaining this product
www.resourcedm.com
Intuitive / Plant Controller
Set-up Menu
LH Display RH Display Option Explained in Paragraph
IO View Input/Output States View Input/Output States
PArA Set/view Parameters Set/view parameters
Unit Set/View Probe Type & Units Set/View Units
Uni Set Universal I/O Universal IO
StA Set Status Input Type Set Input Type
rLy Inverts the relay function Set Relay Output
TyPE Set/View Controller Type Set/view product type
rtc Set/view Clock (rtc = Real Time Clock)
Real Time Clock
nEt Set/view network configuration Network Configuration
bCSt Broadcast (Pressures) Broadcast
SoFt View software version
USb Save/Load onto USB device USB
OFSt Temperature probe offsets Set Probe Offsets
ESC Exit set-up mode
Recommended set-up method
It is recommended that this controller is set-up using a direct connection to a PC See Setup via a PC If you are not connecting to a network and want to set up the controller through the buttons we recommend you use the following order from the function menu. Universal IO
Setting up from controller display, navigate to the screen “Uni” and select from the following table for U-01 to U-08 This selects what Universal IO (U-01 to U-08) can be set for. NOTE: UniIO U-01 to U-03 can only be set as Inputs, UniIO U-04 and U-05 can only be set for Outputs and UniIO U-06 to U-08 are seen in settings but are not present on the controller hardware and are for future development. U-01 to U-03 (Variable Inputs) can be set to 0, 1 or 2. U-04 and U-05 (Variable Outputs) can be set to 3, 4, 5 or 6. U-06 to U-08 do not do anything. 0. 4-20mA Input 1. 0-10V Input 2. 0-5V Input 3. 4-20mA Output 4. 0-20mA Output 5. 0-10V Output 6. 0-5V Output NOTE: Universal I/O U-01 to U-03 can only be set as Inputs, Universal I/O U-04 and U-05 can only be set for Outputs and Universal I/O U-06 to U-08 are not used in this application and should not be changed. Input Type The 3 analogue inputs can be set to either of the following
0. 4 – 20mA Input (Default) 1. 0 – 10Vdc Input 2. 0 – 5Vdc Input
Output Type The 2 analogue outputs can be set to either of the following: -
3. 4 – 20mA Output (Default) 4. 0 – 20mA Output 5. 0 – 10V dc Output 6. 0 – 5V dc Output
Revision 2.9B Page 11 of 42
Warning
Please Note The specifications of the product detailed on this Set-Up Guide may change without notice. RDM Ltd. shall not be liable for errors or for incidental or consequential damages, directly and indirectly, in connection with the furnishing, performance or misuse of this product or document.
Ensure that all power is switched off before installing or maintaining this product
www.resourcedm.com
Intuitive / Plant Controller
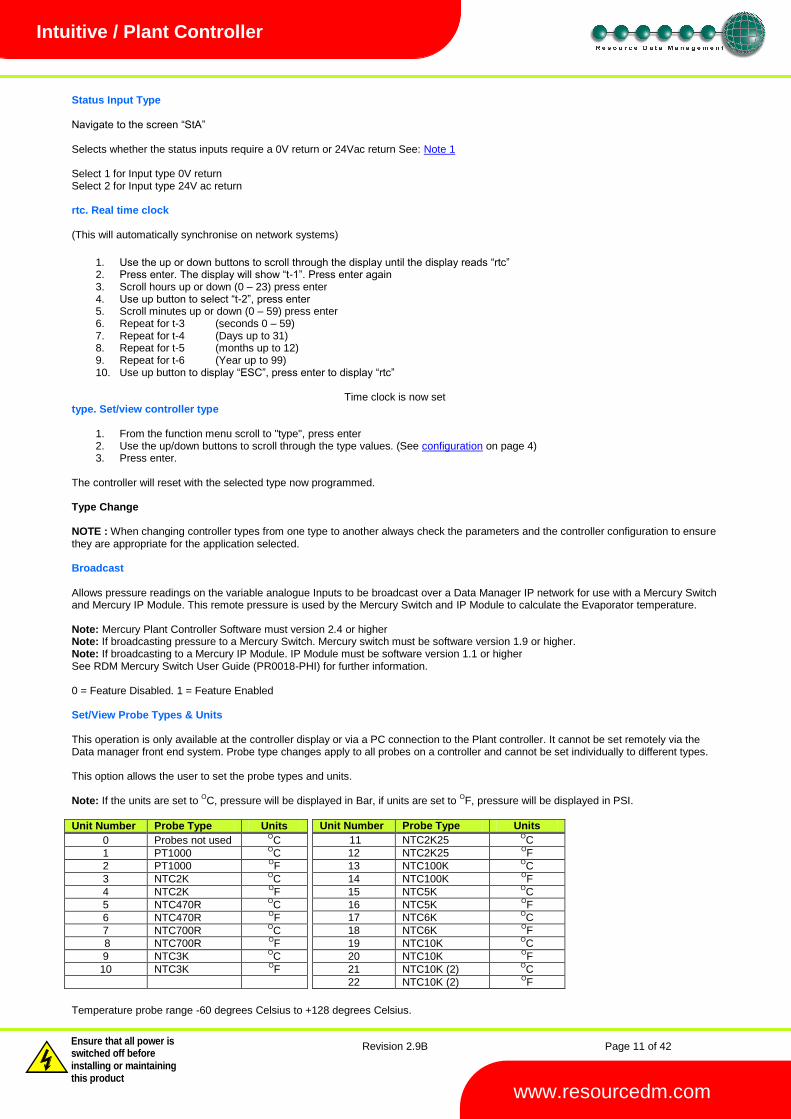
Status Input Type Navigate to the screen “StA” Selects whether the status inputs require a 0V return or 24Vac return See: Note 1 Select 1 for Input type 0V return Select 2 for Input type 24V ac return rtc. Real time clock (This will automatically synchronise on network systems)
1. Use the up or down buttons to scroll through the display until the display reads “rtc” 2. Press enter. The display will show “t-1”. Press enter again 3. Scroll hours up or down (0 – 23) press enter 4. Use up button to select “t-2”, press enter 5. Scroll minutes up or down (0 – 59) press enter 6. Repeat for t-3 (seconds 0 – 59) 7. Repeat for t-4 (Days up to 31) 8. Repeat for t-5 (months up to 12) 9. Repeat for t-6 (Year up to 99) 10. Use up button to display “ESC”, press enter to display “rtc”
Time clock is now set
type. Set/view controller type
1. From the function menu scroll to "type", press enter 2. Use the up/down buttons to scroll through the type values. (See configuration on page 4) 3. Press enter.
The controller will reset with the selected type now programmed. Type Change NOTE : When changing controller types from one type to another always check the parameters and the controller configuration to ensure they are appropriate for the application selected. Broadcast Allows pressure readings on the variable analogue Inputs to be broadcast over a Data Manager IP network for use with a Mercury Switch and Mercury IP Module. This remote pressure is used by the Mercury Switch and IP Module to calculate the Evaporator temperature. Note: Mercury Plant Controller Software must version 2.4 or higher Note: If broadcasting pressure to a Mercury Switch. Mercury switch must be software version 1.9 or higher. Note: If broadcasting to a Mercury IP Module. IP Module must be software version 1.1 or higher See RDM Mercury Switch User Guide (PR0018-PHI) for further information. 0 = Feature Disabled. 1 = Feature Enabled Set/View Probe Types & Units This operation is only available at the controller display or via a PC connection to the Plant controller. It cannot be set remotely via the Data manager front end system. Probe type changes apply to all probes on a controller and cannot be set individually to different types. This option allows the user to set the probe types and units. Note: If the units are set to
OC, pressure will be displayed in Bar, if units are set to
OF, pressure will be displayed in PSI.
Unit Number Probe Type Units
11 NTC2K25 OC
12 NTC2K25 OF
13 NTC100K OC
14 NTC100K OF
15 NTC5K OC
16 NTC5K OF
17 NTC6K OC
18 NTC6K OF
19 NTC10K OC
20 NTC10K OF
21 NTC10K (2) OC
22 NTC10K (2) OF
Temperature probe range -60 degrees Celsius to +128 degrees Celsius.
Unit Number Probe Type Units
0 Probes not used OC
1 PT1000 OC
2 PT1000 OF
3 NTC2K OC
4 NTC2K OF
5 NTC470R OC
6 NTC470R OF
7 NTC700R OC
8 NTC700R OF
9 NTC3K OC
10 NTC3K OF
Revision 2.9B Page 12 of 42
Warning
Please Note The specifications of the product detailed on this Set-Up Guide may change without notice. RDM Ltd. shall not be liable for errors or for incidental or consequential damages, directly and indirectly, in connection with the furnishing, performance or misuse of this product or document.
Ensure that all power is switched off before installing or maintaining this product
www.resourcedm.com
Intuitive / Plant Controller
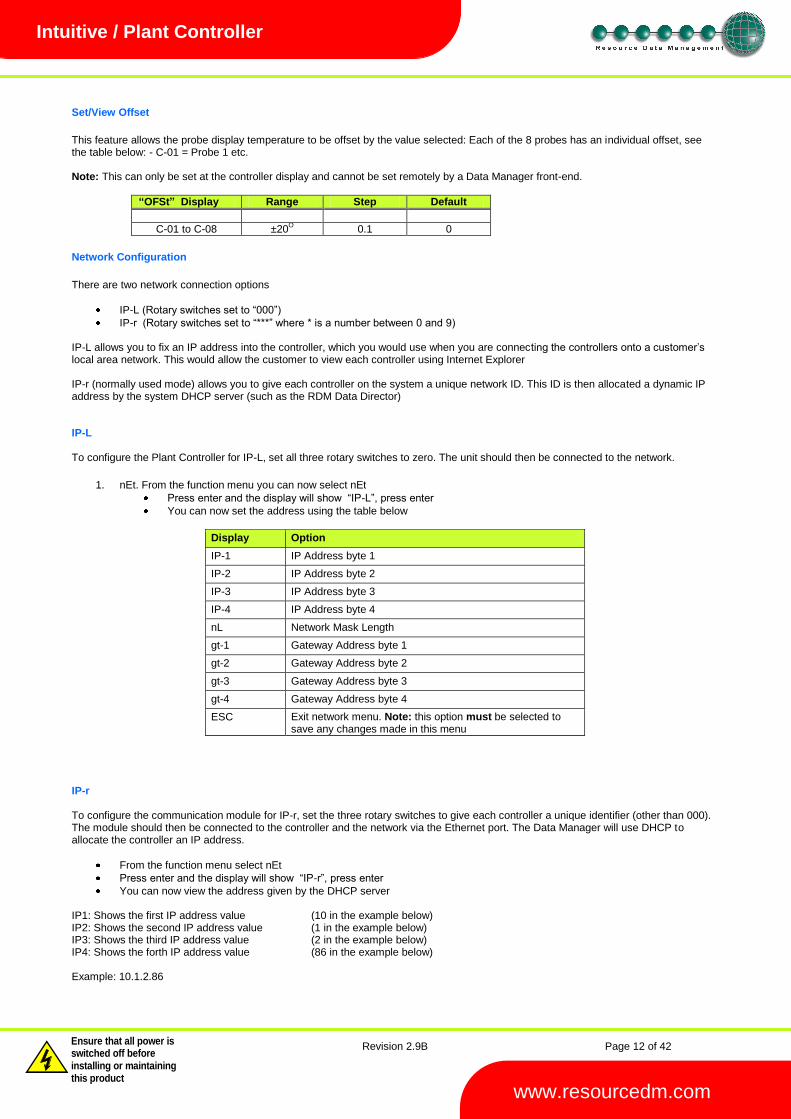
Set/View Offset
This feature allows the probe display temperature to be offset by the value selected: Each of the 8 probes has an individual offset, see the table below: - C-01 = Probe 1 etc. Note: This can only be set at the controller display and cannot be set remotely by a Data Manager front-end.
“OFSt” Display Range Step Default
C-01 to C-08 ±20O 0.1 0
Network Configuration
There are two network connection options
IP-L (Rotary switches set to “000”)
IP-r (Rotary switches set to “***” where * is a number between 0 and 9) IP-L allows you to fix an IP address into the controller, which you would use when you are connecting the controllers onto a customer’s local area network. This would allow the customer to view each controller using Internet Explorer IP-r (normally used mode) allows you to give each controller on the system a unique network ID. This ID is then allocated a dynamic IP address by the system DHCP server (such as the RDM Data Director)
IP-L To configure the Plant Controller for IP-L, set all three rotary switches to zero. The unit should then be connected to the network.
1. nEt. From the function menu you can now select nEt
Press enter and the display will show “IP-L”, press enter
You can now set the address using the table below
Display Option
IP-1 IP Address byte 1
IP-2 IP Address byte 2
IP-3 IP Address byte 3
IP-4 IP Address byte 4
nL Network Mask Length
gt-1 Gateway Address byte 1
gt-2 Gateway Address byte 2
gt-3 Gateway Address byte 3
gt-4 Gateway Address byte 4
ESC Exit network menu. Note: this option must be selected to save any changes made in this menu
IP-r To configure the communication module for IP-r, set the three rotary switches to give each controller a unique identifier (other than 000). The module should then be connected to the controller and the network via the Ethernet port. The Data Manager will use DHCP to allocate the controller an IP address.
From the function menu select nEt
Press enter and the display will show “IP-r”, press enter
You can now view the address given by the DHCP server IP1: Shows the first IP address value (10 in the example below) IP2: Shows the second IP address value (1 in the example below) IP3: Shows the third IP address value (2 in the example below) IP4: Shows the forth IP address value (86 in the example below) Example: 10.1.2.86
Revision 2.9B Page 13 of 42
Warning
Please Note The specifications of the product detailed on this Set-Up Guide may change without notice. RDM Ltd. shall not be liable for errors or for incidental or consequential damages, directly and indirectly, in connection with the furnishing, performance or misuse of this product or document.
Ensure that all power is switched off before installing or maintaining this product
www.resourcedm.com
Intuitive / Plant Controller
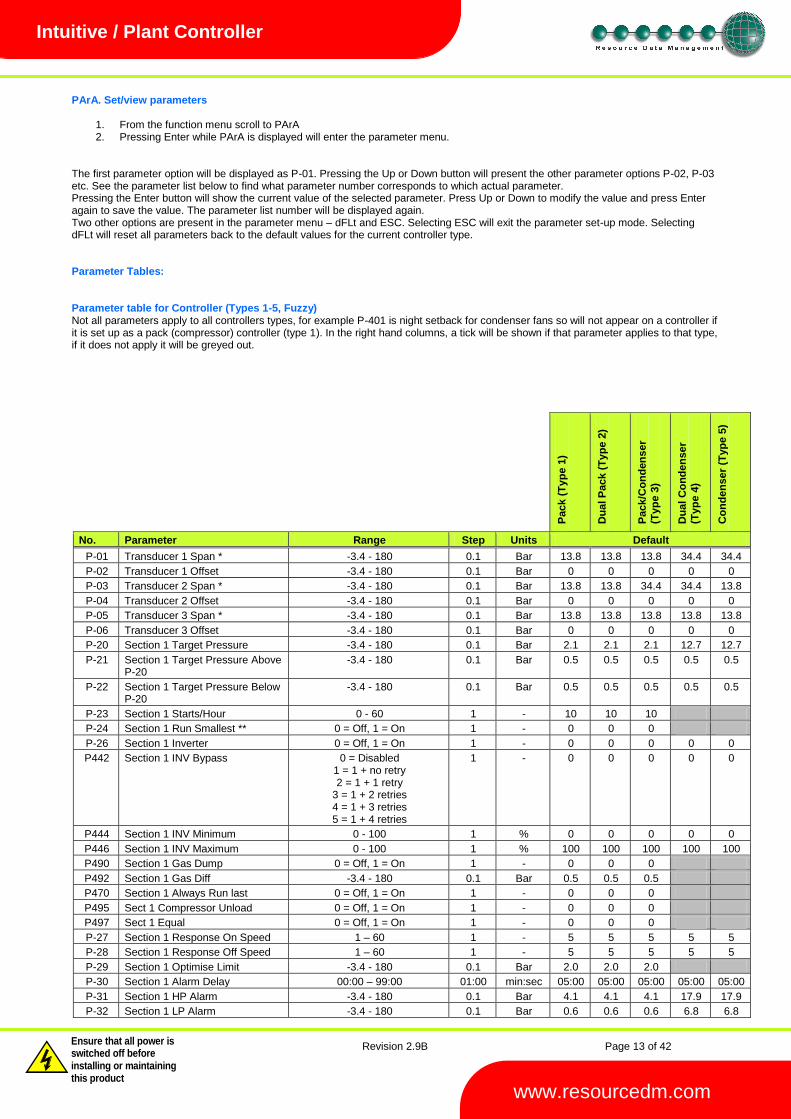
PArA. Set/view parameters
1. From the function menu scroll to PArA 2. Pressing Enter while PArA is displayed will enter the parameter menu.
The first parameter option will be displayed as P-01. Pressing the Up or Down button will present the other parameter options P-02, P-03 etc. See the parameter list below to find what parameter number corresponds to which actual parameter. Pressing the Enter button will show the current value of the selected parameter. Press Up or Down to modify the value and press Enter again to save the value. The parameter list number will be displayed again. Two other options are present in the parameter menu – dFLt and ESC. Selecting ESC will exit the parameter set-up mode. Selecting dFLt will reset all parameters back to the default values for the current controller type. Parameter Tables: Parameter table for Controller (Types 1-5, Fuzzy) Not all parameters apply to all controllers types, for example P-401 is night setback for condenser fans so will not appear on a controller if it is set up as a pack (compressor) controller (type 1). In the right hand columns, a tick will be shown if that parameter applies to that type, if it does not apply it will be greyed out.
Pack (
Ty
pe 1
)
Du
al P
ack (
Ty
pe 2
)
Pack/C
on
den
ser
(Ty
pe 3
)
Du
al
Co
nd
en
ser
(Ty
pe 4
)
Co
nd
en
ser
(Typ
e 5
)
No. Parameter Range Step Units Default
P-01 Transducer 1 Span * -3.4 - 180 0.1 Bar 13.8 13.8 13.8 34.4 34.4 P-02 Transducer 1 Offset -3.4 - 180 0.1 Bar 0 0 0 0 0 P-03 Transducer 2 Span * -3.4 - 180 0.1 Bar 13.8 13.8 34.4 34.4 13.8
P-04 Transducer 2 Offset -3.4 - 180 0.1 Bar 0 0 0 0 0 P-05 Transducer 3 Span * -3.4 - 180 0.1 Bar 13.8 13.8 13.8 13.8 13.8 P-06 Transducer 3 Offset -3.4 - 180 0.1 Bar 0 0 0 0 0 P-20 Section 1 Target Pressure -3.4 - 180 0.1 Bar 2.1 2.1 2.1 12.7 12.7 P-21 Section 1 Target Pressure Above
P-20 -3.4 - 180 0.1 Bar 0.5 0.5 0.5 0.5 0.5
P-22 Section 1 Target Pressure Below P-20
-3.4 - 180 0.1 Bar 0.5 0.5 0.5 0.5 0.5
P-23 Section 1 Starts/Hour 0 - 60 1 - 10 10 10
P-24 Section 1 Run Smallest ** 0 = Off, 1 = On 1 - 0 0 0
P-26 Section 1 Inverter 0 = Off, 1 = On 1 - 0 0 0 0 0 P442 Section 1 INV Bypass 0 = Disabled
1 = 1 + no retry 2 = 1 + 1 retry
3 = 1 + 2 retries 4 = 1 + 3 retries 5 = 1 + 4 retries
1 - 0 0 0 0 0
P444 Section 1 INV Minimum 0 - 100 1 % 0 0 0 0 0 P446 Section 1 INV Maximum 0 - 100 1 % 100 100 100 100 100 P490 Section 1 Gas Dump 0 = Off, 1 = On 1 - 0 0 0
P492 Section 1 Gas Diff -3.4 - 180 0.1 Bar 0.5 0.5 0.5
P470 Section 1 Always Run last 0 = Off, 1 = On 1 - 0 0 0
P495 Sect 1 Compressor Unload 0 = Off, 1 = On 1 - 0 0 0
P497 Sect 1 Equal 0 = Off, 1 = On 1 - 0 0 0
P-27 Section 1 Response On Speed 1 – 60 1 - 5 5 5 5 5 P-28 Section 1 Response Off Speed 1 – 60 1 - 5 5 5 5 5 P-29 Section 1 Optimise Limit -3.4 - 180 0.1 Bar 2.0 2.0 2.0
P-30 Section 1 Alarm Delay 00:00 – 99:00 01:00 min:sec 05:00 05:00 05:00 05:00 05:00 P-31 Section 1 HP Alarm -3.4 - 180 0.1 Bar 4.1 4.1 4.1 17.9 17.9 P-32 Section 1 LP Alarm -3.4 - 180 0.1 Bar 0.6 0.6 0.6 6.8 6.8
Revision 2.9B Page 14 of 42
Warning
Please Note The specifications of the product detailed on this Set-Up Guide may change without notice. RDM Ltd. shall not be liable for errors or for incidental or consequential damages, directly and indirectly, in connection with the furnishing, performance or misuse of this product or document.
Ensure that all power is switched off before installing or maintaining this product
www.resourcedm.com
Intuitive / Plant Controller
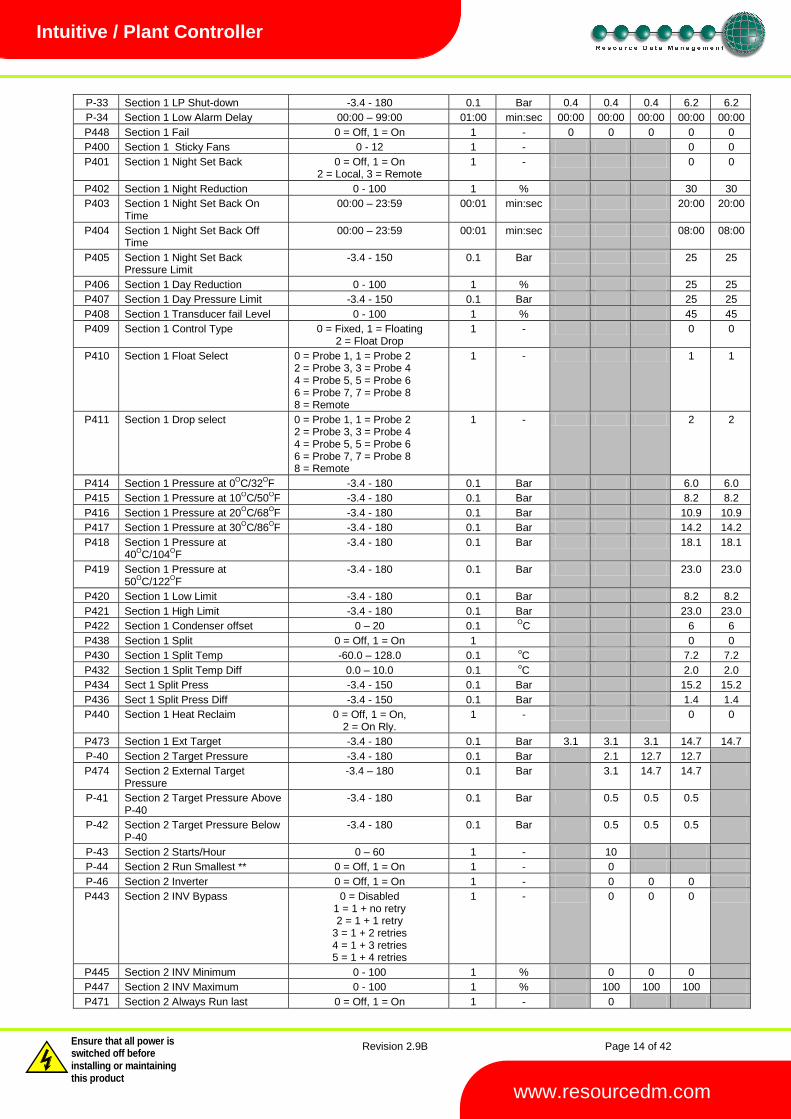
P-33 Section 1 LP Shut-down -3.4 - 180 0.1 Bar 0.4 0.4 0.4 6.2 6.2 P-34 Section 1 Low Alarm Delay 00:00 – 99:00 01:00 min:sec 00:00 00:00 00:00 00:00 00:00 P448 Section 1 Fail 0 = Off, 1 = On 1 - 0 0 0 0 0 P400 Section 1 Sticky Fans 0 - 12 1 - 0 0 P401 Section 1 Night Set Back 0 = Off, 1 = On
2 = Local, 3 = Remote 1 - 0 0
P402 Section 1 Night Reduction 0 - 100 1 % 30 30 P403 Section 1 Night Set Back On
Time 00:00 – 23:59 00:01 min:sec 20:00 20:00
P404 Section 1 Night Set Back Off Time
00:00 – 23:59 00:01 min:sec 08:00 08:00
P405 Section 1 Night Set Back Pressure Limit
-3.4 - 150 0.1 Bar 25 25
P406 Section 1 Day Reduction 0 - 100 1 % 25 25 P407 Section 1 Day Pressure Limit -3.4 - 150 0.1 Bar 25 25 P408 Section 1 Transducer fail Level 0 - 100 1 % 45 45 P409 Section 1 Control Type 0 = Fixed, 1 = Floating
2 = Float Drop 1 - 0 0
P410 Section 1 Float Select 0 = Probe 1, 1 = Probe 2 2 = Probe 3, 3 = Probe 4 4 = Probe 5, 5 = Probe 6 6 = Probe 7, 7 = Probe 8 8 = Remote
1 - 1 1
P411 Section 1 Drop select 0 = Probe 1, 1 = Probe 2 2 = Probe 3, 3 = Probe 4 4 = Probe 5, 5 = Probe 6 6 = Probe 7, 7 = Probe 8 8 = Remote
1 - 2 2
P414 Section 1 Pressure at 0OC/32
OF -3.4 - 180 0.1 Bar 6.0 6.0
P415 Section 1 Pressure at 10OC/50
OF -3.4 - 180 0.1 Bar 8.2 8.2
P416 Section 1 Pressure at 20OC/68
OF -3.4 - 180 0.1 Bar 10.9 10.9
P417 Section 1 Pressure at 30OC/86
OF -3.4 - 180 0.1 Bar 14.2 14.2
P418 Section 1 Pressure at 40
OC/104
OF
-3.4 - 180 0.1 Bar 18.1 18.1
P419 Section 1 Pressure at 50
OC/122
OF
-3.4 - 180 0.1 Bar 23.0 23.0
P420 Section 1 Low Limit -3.4 - 180 0.1 Bar 8.2 8.2 P421 Section 1 High Limit -3.4 - 180 0.1 Bar 23.0 23.0 P422 Section 1 Condenser offset 0 – 20 0.1
OC 6 6
P438 Section 1 Split 0 = Off, 1 = On 1
0 0 P430 Section 1 Split Temp -60.0 – 128.0 0.1
oC 7.2 7.2
P432 Section 1 Split Temp Diff 0.0 – 10.0 0.1 oC 2.0 2.0
P434 Sect 1 Split Press -3.4 - 150 0.1 Bar 15.2 15.2 P436 Sect 1 Split Press Diff -3.4 - 150 0.1 Bar 1.4 1.4 P440 Section 1 Heat Reclaim 0 = Off, 1 = On,
2 = On Rly. 1 - 0 0
P473 Section 1 Ext Target -3.4 - 180 0.1 Bar 3.1 3.1 3.1 14.7 14.7 P-40 Section 2 Target Pressure -3.4 - 180 0.1 Bar 2.1 12.7 12.7
P474 Section 2 External Target Pressure
-3.4 – 180 0.1 Bar 3.1 14.7 14.7
P-41 Section 2 Target Pressure Above P-40
-3.4 - 180 0.1 Bar 0.5 0.5 0.5
P-42 Section 2 Target Pressure Below P-40
-3.4 - 180 0.1 Bar 0.5 0.5 0.5
P-43 Section 2 Starts/Hour 0 – 60 1 - 10
P-44 Section 2 Run Smallest ** 0 = Off, 1 = On 1 - 0
P-46 Section 2 Inverter 0 = Off, 1 = On 1 - 0 0 0
P443 Section 2 INV Bypass 0 = Disabled 1 = 1 + no retry 2 = 1 + 1 retry
3 = 1 + 2 retries 4 = 1 + 3 retries 5 = 1 + 4 retries
1 - 0 0 0
P445 Section 2 INV Minimum 0 - 100 1 % 0 0 0
P447 Section 2 INV Maximum 0 - 100 1 % 100 100 100
P471 Section 2 Always Run last 0 = Off, 1 = On 1 - 0
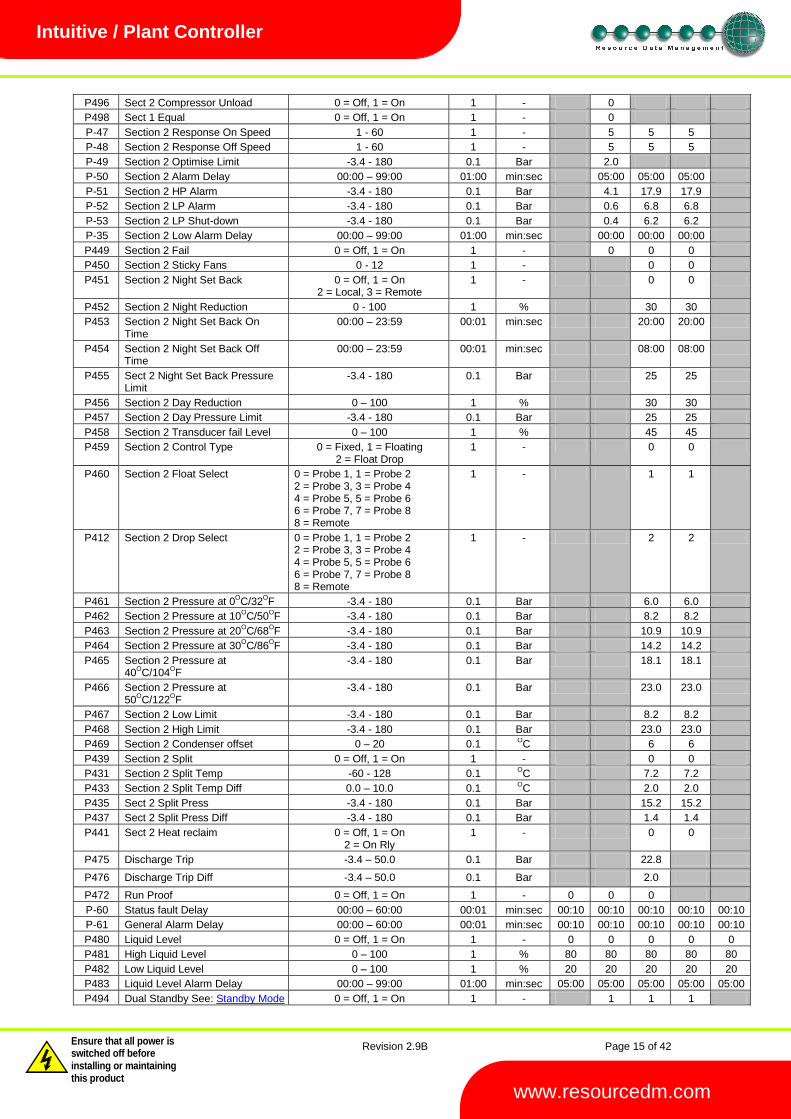
Revision 2.9B Page 15 of 42
Warning
Please Note The specifications of the product detailed on this Set-Up Guide may change without notice. RDM Ltd. shall not be liable for errors or for incidental or consequential damages, directly and indirectly, in connection with the furnishing, performance or misuse of this product or document.
Ensure that all power is switched off before installing or maintaining this product
www.resourcedm.com
Intuitive / Plant Controller
P496 Sect 2 Compressor Unload 0 = Off, 1 = On 1 - 0
P498 Sect 1 Equal 0 = Off, 1 = On 1 - 0
P-47 Section 2 Response On Speed 1 - 60 1 - 5 5 5
P-48 Section 2 Response Off Speed 1 - 60 1 - 5 5 5
P-49 Section 2 Optimise Limit -3.4 - 180 0.1 Bar 2.0
P-50 Section 2 Alarm Delay 00:00 – 99:00 01:00 min:sec 05:00 05:00 05:00
P-51 Section 2 HP Alarm -3.4 - 180 0.1 Bar 4.1 17.9 17.9
P-52 Section 2 LP Alarm -3.4 - 180 0.1 Bar 0.6 6.8 6.8
P-53 Section 2 LP Shut-down -3.4 - 180 0.1 Bar 0.4 6.2 6.2
P-35 Section 2 Low Alarm Delay 00:00 – 99:00 01:00 min:sec 00:00 00:00 00:00
P449 Section 2 Fail 0 = Off, 1 = On 1 - 0 0 0
P450 Section 2 Sticky Fans 0 - 12 1 - 0 0
P451 Section 2 Night Set Back 0 = Off, 1 = On 2 = Local, 3 = Remote
1 - 0 0
P452 Section 2 Night Reduction 0 - 100 1 % 30 30
P453 Section 2 Night Set Back On Time
00:00 – 23:59 00:01 min:sec 20:00 20:00
P454 Section 2 Night Set Back Off Time
00:00 – 23:59 00:01 min:sec 08:00 08:00
P455 Sect 2 Night Set Back Pressure Limit
-3.4 - 180 0.1 Bar 25 25
P456 Section 2 Day Reduction 0 – 100 1 % 30 30
P457 Section 2 Day Pressure Limit -3.4 - 180 0.1 Bar 25 25
P458 Section 2 Transducer fail Level 0 – 100 1 % 45 45
P459 Section 2 Control Type 0 = Fixed, 1 = Floating 2 = Float Drop
1 - 0 0
P460 Section 2 Float Select 0 = Probe 1, 1 = Probe 2 2 = Probe 3, 3 = Probe 4 4 = Probe 5, 5 = Probe 6 6 = Probe 7, 7 = Probe 8 8 = Remote
1 - 1 1
P412 Section 2 Drop Select 0 = Probe 1, 1 = Probe 2 2 = Probe 3, 3 = Probe 4 4 = Probe 5, 5 = Probe 6 6 = Probe 7, 7 = Probe 8 8 = Remote
1 - 2 2
P461 Section 2 Pressure at 0OC/32
OF -3.4 - 180 0.1 Bar 6.0 6.0
P462 Section 2 Pressure at 10OC/50
OF -3.4 - 180 0.1 Bar 8.2 8.2
P463 Section 2 Pressure at 20OC/68
OF -3.4 - 180 0.1 Bar 10.9 10.9
P464 Section 2 Pressure at 30OC/86
OF -3.4 - 180 0.1 Bar 14.2 14.2
P465 Section 2 Pressure at 40
OC/104
OF
-3.4 - 180 0.1 Bar 18.1 18.1
P466 Section 2 Pressure at 50
OC/122
OF
-3.4 - 180 0.1 Bar 23.0 23.0
P467 Section 2 Low Limit -3.4 - 180 0.1 Bar 8.2 8.2
P468 Section 2 High Limit -3.4 - 180 0.1 Bar 23.0 23.0
P469 Section 2 Condenser offset 0 – 20 0.1 OC 6 6
P439 Section 2 Split 0 = Off, 1 = On 1 - 0 0
P431 Section 2 Split Temp -60 - 128 0.1 OC 7.2 7.2
P433 Section 2 Split Temp Diff 0.0 – 10.0 0.1 OC 2.0 2.0
P435 Sect 2 Split Press -3.4 - 180 0.1 Bar 15.2 15.2
P437 Sect 2 Split Press Diff -3.4 - 180 0.1 Bar 1.4 1.4
P441 Sect 2 Heat reclaim 0 = Off, 1 = On 2 = On Rly
1 - 0 0
P475 Discharge Trip -3.4 – 50.0 0.1 Bar 22.8
P476 Discharge Trip Diff -3.4 – 50.0 0.1 Bar 2.0
P472 Run Proof 0 = Off, 1 = On 1 - 0 0 0
P-60 Status fault Delay 00:00 – 60:00 00:01 min:sec 00:10 00:10 00:10 00:10 00:10 P-61 General Alarm Delay 00:00 – 60:00 00:01 min:sec 00:10 00:10 00:10 00:10 00:10 P480 Liquid Level 0 = Off, 1 = On 1 - 0 0 0 0 0 P481 High Liquid Level 0 – 100 1 % 80 80 80 80 80 P482 Low Liquid Level 0 – 100 1 % 20 20 20 20 20 P483 Liquid Level Alarm Delay 00:00 – 99:00 01:00 min:sec 05:00 05:00 05:00 05:00 05:00 P494 Dual Standby See: Standby Mode 0 = Off, 1 = On 1 - 1 1 1
Revision 2.9B Page 16 of 42
Warning
Please Note The specifications of the product detailed on this Set-Up Guide may change without notice. RDM Ltd. shall not be liable for errors or for incidental or consequential damages, directly and indirectly, in connection with the furnishing, performance or misuse of this product or document.
Ensure that all power is switched off before installing or maintaining this product
www.resourcedm.com
Intuitive / Plant Controller
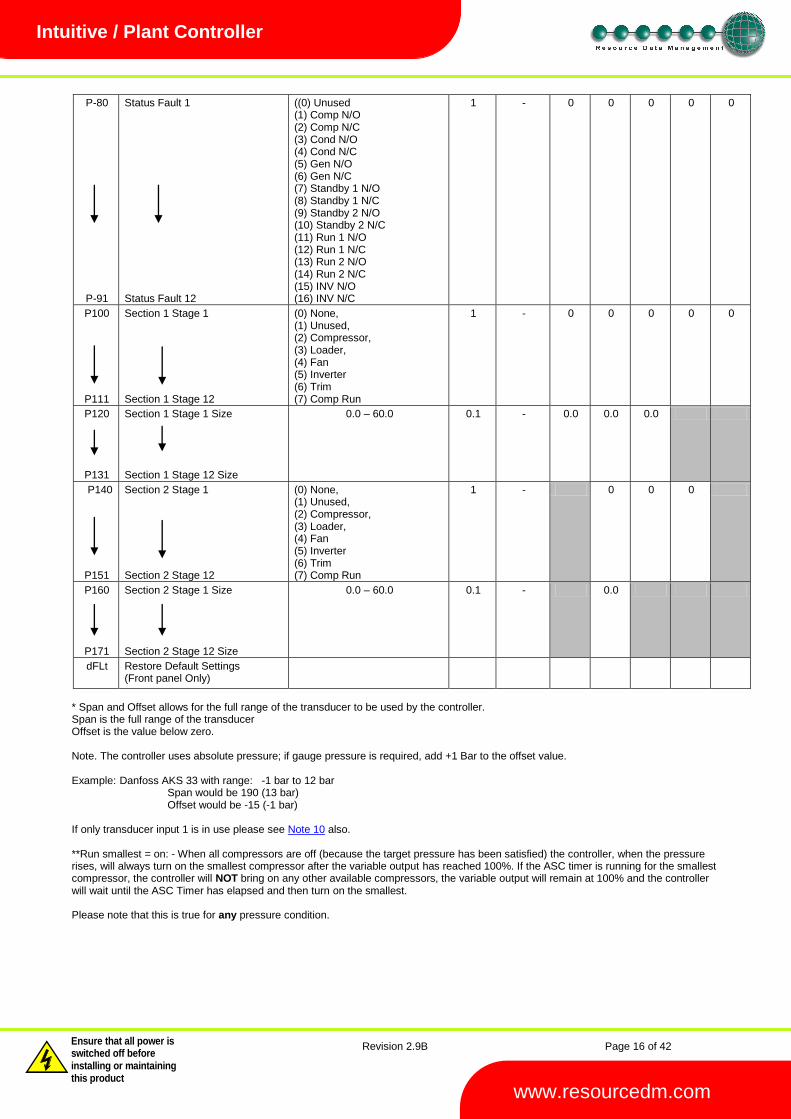
P-80
P-91
Status Fault 1 Status Fault 12
((0) Unused (1) Comp N/O (2) Comp N/C (3) Cond N/O (4) Cond N/C (5) Gen N/O (6) Gen N/C (7) Standby 1 N/O (8) Standby 1 N/C (9) Standby 2 N/O (10) Standby 2 N/C (11) Run 1 N/O (12) Run 1 N/C (13) Run 2 N/O (14) Run 2 N/C (15) INV N/O (16) INV N/C
1 - 0 0 0 0 0
P100
P111
Section 1 Stage 1 Section 1 Stage 12
(0) None, (1) Unused, (2) Compressor, (3) Loader, (4) Fan (5) Inverter (6) Trim (7) Comp Run
1 - 0 0 0 0 0
P120
P131
Section 1 Stage 1 Size Section 1 Stage 12 Size
0.0 – 60.0 0.1 - 0.0 0.0 0.0
P140
P151
Section 2 Stage 1 Section 2 Stage 12
(0) None, (1) Unused, (2) Compressor, (3) Loader, (4) Fan (5) Inverter (6) Trim (7) Comp Run
1 - 0 0 0
P160
P171
Section 2 Stage 1 Size Section 2 Stage 12 Size
0.0 – 60.0 0.1 - 0.0
dFLt Restore Default Settings (Front panel Only)
* Span and Offset allows for the full range of the transducer to be used by the controller. Span is the full range of the transducer Offset is the value below zero. Note. The controller uses absolute pressure; if gauge pressure is required, add +1 Bar to the offset value. Example: Danfoss AKS 33 with range: -1 bar to 12 bar Span would be 190 (13 bar) Offset would be -15 (-1 bar) If only transducer input 1 is in use please see Note 10 also. **Run smallest = on: - When all compressors are off (because the target pressure has been satisfied) the controller, when the pressure rises, will always turn on the smallest compressor after the variable output has reached 100%. If the ASC timer is running for the smallest compressor, the controller will NOT bring on any other available compressors, the variable output will remain at 100% and the controller will wait until the ASC Timer has elapsed and then turn on the smallest. Please note that this is true for any pressure condition.
Revision 2.9B Page 17 of 42
Warning
Please Note The specifications of the product detailed on this Set-Up Guide may change without notice. RDM Ltd. shall not be liable for errors or for incidental or consequential damages, directly and indirectly, in connection with the furnishing, performance or misuse of this product or document.
Ensure that all power is switched off before installing or maintaining this product
www.resourcedm.com
Intuitive / Plant Controller
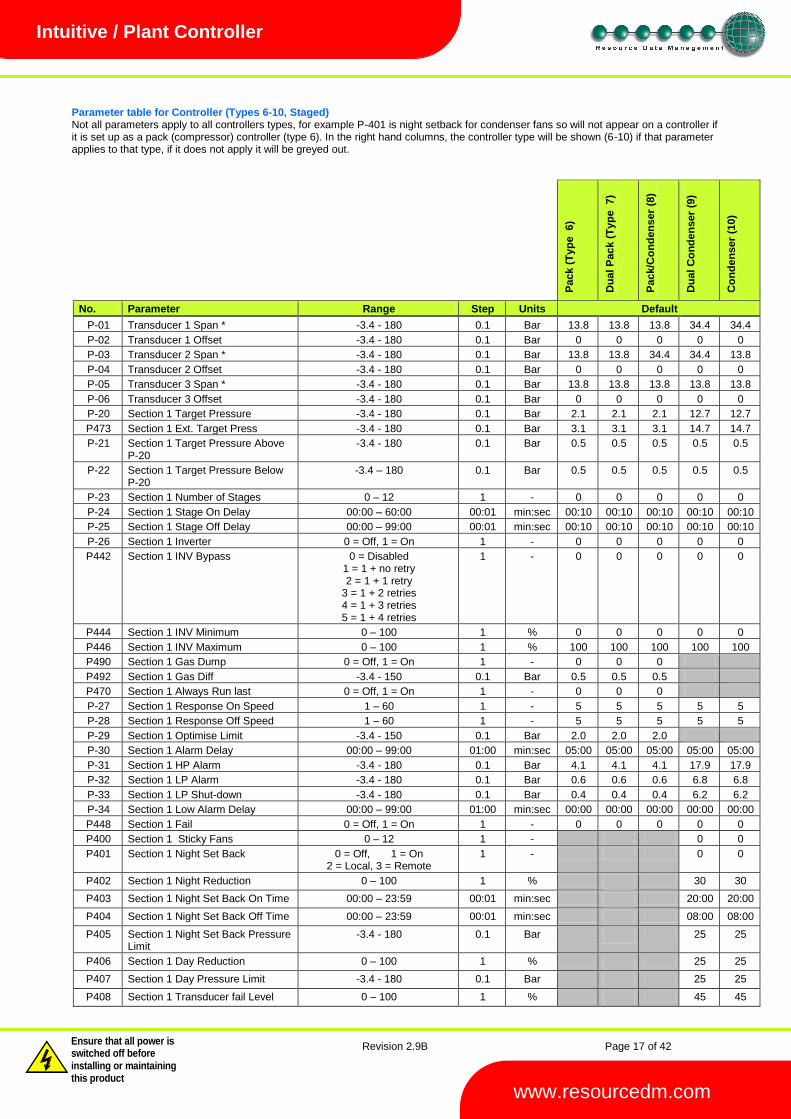
Parameter table for Controller (Types 6-10, Staged) Not all parameters apply to all controllers types, for example P-401 is night setback for condenser fans so will not appear on a controller if it is set up as a pack (compressor) controller (type 6). In the right hand columns, the controller type will be shown (6-10) if that parameter applies to that type, if it does not apply it will be greyed out.
Pack (
Ty
pe 6)
Du
al P
ack (
Ty
pe 7)
Pack/C
on
den
ser
(8)
Du
al
Co
nd
en
ser
(9)
Co
nd
en
ser
(10)
No. Parameter Range Step Units Default
P-01 Transducer 1 Span * -3.4 - 180 0.1 Bar 13.8 13.8 13.8 34.4 34.4 P-02 Transducer 1 Offset -3.4 - 180 0.1 Bar 0 0 0 0 0 P-03 Transducer 2 Span * -3.4 - 180 0.1 Bar 13.8 13.8 34.4 34.4 13.8 P-04 Transducer 2 Offset -3.4 - 180 0.1 Bar 0 0 0 0 0 P-05 Transducer 3 Span * -3.4 - 180 0.1 Bar 13.8 13.8 13.8 13.8 13.8 P-06 Transducer 3 Offset -3.4 - 180 0.1 Bar 0 0 0 0 0 P-20 Section 1 Target Pressure -3.4 - 180 0.1 Bar 2.1 2.1 2.1 12.7 12.7 P473 Section 1 Ext. Target Press -3.4 - 180 0.1 Bar 3.1 3.1 3.1 14.7 14.7 P-21 Section 1 Target Pressure Above
P-20 -3.4 - 180 0.1 Bar 0.5 0.5 0.5 0.5 0.5
P-22 Section 1 Target Pressure Below P-20
-3.4 – 180 0.1 Bar 0.5 0.5 0.5 0.5 0.5
P-23 Section 1 Number of Stages 0 – 12 1 - 0 0 0 0 0 P-24 Section 1 Stage On Delay 00:00 – 60:00 00:01 min:sec 00:10 00:10 00:10 00:10 00:10 P-25 Section 1 Stage Off Delay 00:00 – 99:00 00:01 min:sec 00:10 00:10 00:10 00:10 00:10 P-26 Section 1 Inverter 0 = Off, 1 = On 1 - 0 0 0 0 0 P442 Section 1 INV Bypass 0 = Disabled
1 = 1 + no retry 2 = 1 + 1 retry
3 = 1 + 2 retries 4 = 1 + 3 retries 5 = 1 + 4 retries
1 - 0 0 0 0 0
P444 Section 1 INV Minimum 0 – 100 1 % 0 0 0 0 0 P446 Section 1 INV Maximum 0 – 100 1 % 100 100 100 100 100 P490 Section 1 Gas Dump 0 = Off, 1 = On 1 - 0 0 0
P492 Section 1 Gas Diff -3.4 - 150 0.1 Bar 0.5 0.5 0.5
P470 Section 1 Always Run last 0 = Off, 1 = On 1 - 0 0 0
P-27 Section 1 Response On Speed 1 – 60 1 - 5 5 5 5 5 P-28 Section 1 Response Off Speed 1 – 60 1 - 5 5 5 5 5 P-29 Section 1 Optimise Limit -3.4 - 150 0.1 Bar 2.0 2.0 2.0
P-30 Section 1 Alarm Delay 00:00 – 99:00 01:00 min:sec 05:00 05:00 05:00 05:00 05:00 P-31 Section 1 HP Alarm -3.4 - 180 0.1 Bar 4.1 4.1 4.1 17.9 17.9 P-32 Section 1 LP Alarm -3.4 - 180 0.1 Bar 0.6 0.6 0.6 6.8 6.8 P-33 Section 1 LP Shut-down -3.4 - 180 0.1 Bar 0.4 0.4 0.4 6.2 6.2 P-34 Section 1 Low Alarm Delay 00:00 – 99:00 01:00 min:sec 00:00 00:00 00:00 00:00 00:00 P448 Section 1 Fail 0 = Off, 1 = On 1 - 0 0 0 0 0 P400 Section 1 Sticky Fans 0 – 12 1 - 0 0 P401 Section 1 Night Set Back 0 = Off, 1 = On
2 = Local, 3 = Remote 1 - 0 0
P402 Section 1 Night Reduction 0 – 100 1 % 30 30
P403 Section 1 Night Set Back On Time 00:00 – 23:59 00:01 min:sec 20:00 20:00
P404 Section 1 Night Set Back Off Time 00:00 – 23:59 00:01 min:sec 08:00 08:00
P405 Section 1 Night Set Back Pressure Limit
-3.4 - 180 0.1 Bar 25 25
P406 Section 1 Day Reduction 0 – 100 1 % 25 25
P407 Section 1 Day Pressure Limit -3.4 - 180 0.1 Bar 25 25
P408 Section 1 Transducer fail Level 0 – 100 1 % 45 45
Revision 2.9B Page 18 of 42
Warning
Please Note The specifications of the product detailed on this Set-Up Guide may change without notice. RDM Ltd. shall not be liable for errors or for incidental or consequential damages, directly and indirectly, in connection with the furnishing, performance or misuse of this product or document.
Ensure that all power is switched off before installing or maintaining this product
www.resourcedm.com
Intuitive / Plant Controller
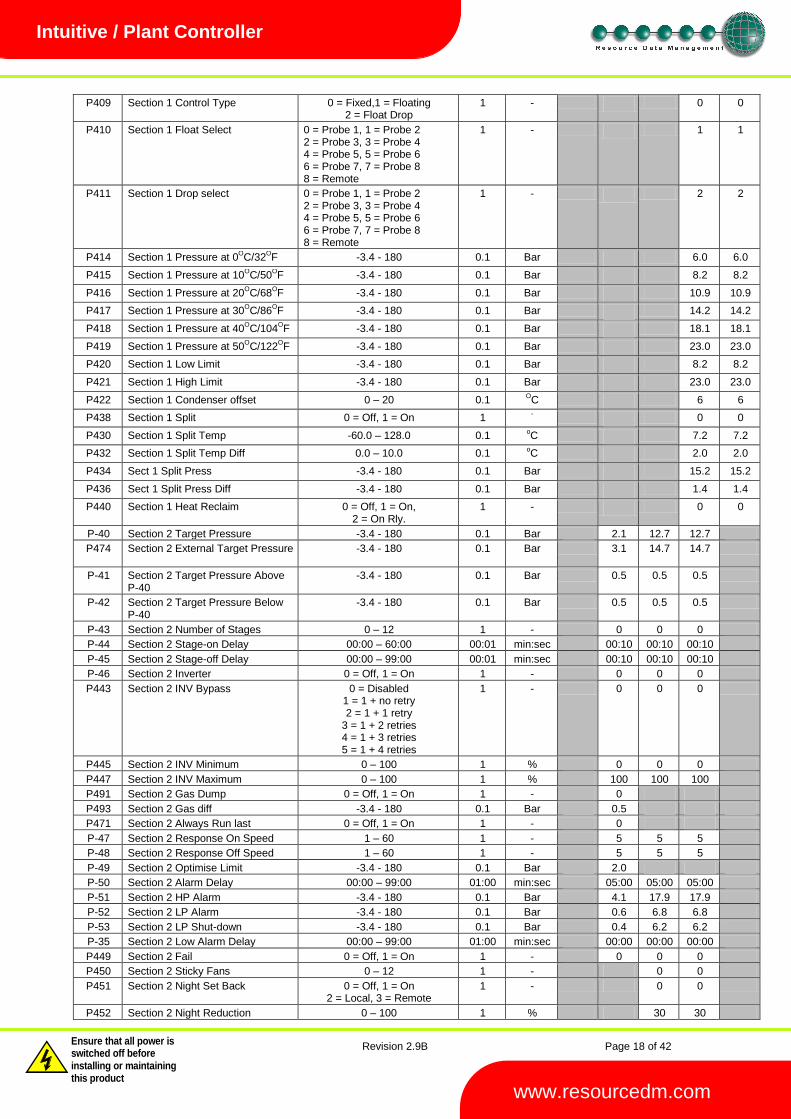
P409 Section 1 Control Type 0 = Fixed,1 = Floating 2 = Float Drop
1 - 0 0
P410 Section 1 Float Select 0 = Probe 1, 1 = Probe 2 2 = Probe 3, 3 = Probe 4 4 = Probe 5, 5 = Probe 6 6 = Probe 7, 7 = Probe 8 8 = Remote
1 - 1 1
P411 Section 1 Drop select 0 = Probe 1, 1 = Probe 2 2 = Probe 3, 3 = Probe 4 4 = Probe 5, 5 = Probe 6 6 = Probe 7, 7 = Probe 8 8 = Remote
1 - 2 2
P414 Section 1 Pressure at 0OC/32
OF -3.4 - 180 0.1 Bar 6.0 6.0
P415 Section 1 Pressure at 10OC/50
OF -3.4 - 180 0.1 Bar 8.2 8.2
P416 Section 1 Pressure at 20OC/68
OF -3.4 - 180 0.1 Bar 10.9 10.9
P417 Section 1 Pressure at 30OC/86
OF -3.4 - 180 0.1 Bar 14.2 14.2
P418 Section 1 Pressure at 40OC/104
OF -3.4 - 180 0.1 Bar 18.1 18.1
P419 Section 1 Pressure at 50OC/122
OF -3.4 - 180 0.1 Bar 23.0 23.0
P420 Section 1 Low Limit -3.4 - 180 0.1 Bar 8.2 8.2
P421 Section 1 High Limit -3.4 - 180 0.1 Bar 23.0 23.0
P422 Section 1 Condenser offset 0 – 20 0.1 OC 6 6
P438 Section 1 Split 0 = Off, 1 = On 1 -
0 0
P430 Section 1 Split Temp -60.0 – 128.0 0.1 oC 7.2 7.2
P432 Section 1 Split Temp Diff 0.0 – 10.0 0.1 oC 2.0 2.0
P434 Sect 1 Split Press -3.4 - 180 0.1 Bar 15.2 15.2
P436 Sect 1 Split Press Diff -3.4 - 180 0.1 Bar 1.4 1.4
P440 Section 1 Heat Reclaim 0 = Off, 1 = On, 2 = On Rly.
1 - 0 0
P-40 Section 2 Target Pressure -3.4 - 180 0.1 Bar 2.1 12.7 12.7
P474
Section 2 External Target Pressure -3.4 - 180 0.1 Bar 3.1 14.7 14.7
P-41 Section 2 Target Pressure Above P-40
-3.4 - 180 0.1 Bar 0.5 0.5 0.5
P-42 Section 2 Target Pressure Below P-40
-3.4 - 180 0.1 Bar 0.5 0.5 0.5
P-43 Section 2 Number of Stages 0 – 12 1 - 0 0 0
P-44 Section 2 Stage-on Delay 00:00 – 60:00 00:01 min:sec 00:10 00:10 00:10
P-45 Section 2 Stage-off Delay 00:00 – 99:00 00:01 min:sec 00:10 00:10 00:10
P-46 Section 2 Inverter 0 = Off, 1 = On 1 - 0 0 0
P443 Section 2 INV Bypass 0 = Disabled 1 = 1 + no retry 2 = 1 + 1 retry
3 = 1 + 2 retries 4 = 1 + 3 retries 5 = 1 + 4 retries
1 - 0 0 0
P445 Section 2 INV Minimum 0 – 100 1 % 0 0 0
P447 Section 2 INV Maximum 0 – 100 1 % 100 100 100
P491 Section 2 Gas Dump 0 = Off, 1 = On 1 - 0
P493 Section 2 Gas diff -3.4 - 180 0.1 Bar 0.5
P471 Section 2 Always Run last 0 = Off, 1 = On 1 - 0
P-47 Section 2 Response On Speed 1 – 60 1 - 5 5 5
P-48 Section 2 Response Off Speed 1 – 60 1 - 5 5 5
P-49 Section 2 Optimise Limit -3.4 - 180 0.1 Bar 2.0
P-50 Section 2 Alarm Delay 00:00 – 99:00 01:00 min:sec 05:00 05:00 05:00
P-51 Section 2 HP Alarm -3.4 - 180 0.1 Bar 4.1 17.9 17.9
P-52 Section 2 LP Alarm -3.4 - 180 0.1 Bar 0.6 6.8 6.8
P-53 Section 2 LP Shut-down -3.4 - 180 0.1 Bar 0.4 6.2 6.2
P-35 Section 2 Low Alarm Delay 00:00 – 99:00 01:00 min:sec 00:00 00:00 00:00
P449 Section 2 Fail 0 = Off, 1 = On 1 - 0 0 0
P450 Section 2 Sticky Fans 0 – 12 1 - 0 0
P451 Section 2 Night Set Back 0 = Off, 1 = On 2 = Local, 3 = Remote
1 - 0 0
P452 Section 2 Night Reduction 0 – 100 1 % 30 30
Revision 2.9B Page 19 of 42
Warning
Please Note The specifications of the product detailed on this Set-Up Guide may change without notice. RDM Ltd. shall not be liable for errors or for incidental or consequential damages, directly and indirectly, in connection with the furnishing, performance or misuse of this product or document.
Ensure that all power is switched off before installing or maintaining this product
www.resourcedm.com
Intuitive / Plant Controller
P453 Section 2 Night Set Back On Time 00:00 – 23:59 00:01 min:sec 20:00 20:00
P454 Section 2 Night Set Back Off Time 00:00 – 23:59 00:01 min:sec 08:00 08:00
P455 Section 2 Night Set Back Pressure Limit
-3.4 - 180 0.1 Bar 25 25
P456 Section 2 Day Reduction 0 - 100 1 % 25 25
P457 Section 2 Day Pressure Limit -3.4 - 180 0.1 Bar 25 25
P458 Section 2 Transducer fail Level 0 – 100 1 % 45 45
P459 Section 2 Control Type 0 = Fixed, 1 = Floating 2 = Float Drop
1 - 0 0
P460 Section 2 Float Select 0 = Probe 1, 1 = Probe 2 2 = Probe 3, 3 = Probe 4 4 = Probe 5, 5 = Probe 6 6 = Probe 7, 7 = Probe 8 8 = Remote
1 - 1 1
P412 Section 2 Drop Select 0 = Probe 1, 1 = Probe 2 2 = Probe 3, 3 = Probe 4 4 = Probe 5, 5 = Probe 6 6 = Probe 7, 7 = Probe 8 8 = Remote
1 - 2 2
P461 Section 2 Pressure at 0OC/32
OF -3.4 - 180 0.1 Bar 6.0 6.0
P462 Section 2 Pressure at 10OC/50
OF -3.4 - 180 0.1 Bar 8.2 8.2
P463 Section 2 Pressure at 20OC/68
OF -3.4 - 180 0.1 Bar 10.9 10.9
P464 Section 2 Pressure at 30OC/86
OF -3.4 - 180 0.1 Bar 14.2 14.2
P465 Section 2 Pressure at 40OC/104
OF -3.4 - 180 0.1 Bar 18.1 18.1
P466 Section 2 Pressure at 50OC/122
OF -3.4 - 180 0.1 Bar 23.0 23.0
P467 Section 2 Low Limit -3.4 - 180 0.1 Bar 8.2 8.2
P468 Section 2 High Limit -3.4 - 180 0.1 Bar 23.0 23.0
P469 Section 2 Condenser offset 0 - 20 0.1 OC 6 6
P439 Section 2 Split 0 = Off, 1 = On 1 - 0 0
P431 Section 2 Split Temp -60 - 128 0.1 OC 7.2 7.2
P433 Section 2 Split Temp Diff 0.0 – 10.0 0.1 OC 2.0 2.0
P435 Sect 2 Split Press -3.4 - 180 0.1 Bar 15.2 15.2
P437 Sect 2 Split Press Diff -3.4 - 180 0.1 Bar 1.4 1.4
P441 Sect 2 Heat reclaim 0 = Off 1 = On
2 = On Rly
1 - 0 0
P475 Discharge Trip -3.4 – 50.0 0.1 Bar 22.8
P476 Discharge Trip Diff -3.4 – 50.0 0.1 Bar 2.0
P472 Run Proof 0 = Off, 1 = On 1 - 0 0 0
P-60 Status fault Delay 00:00 – 60:00 00:01 min:sec 00:10 00:10 00:10 00:10 00:10 P-61 General Alarm Delay 00:00 – 60:00 00:01 min:sec 00:10 00:10 00:10 00:10 00:10 P480 Liquid Level 0 = Off, 1 = On 1 - 0 0 0 0 0 P481 High Liquid Level 0 – 100 1 % 80 80 80 80 80 P482 Low Liquid Level 0 – 100 1 % 20 20 20 20 20 P483 Liquid Level Alarm Delay 00:00 – 99:00 01:00 min:sec 05:00 05:00 05:00 05:00 05:00 P494 Dual Standby See Standby Mode 0 = Off, 1 = On 1 - 1 1 1
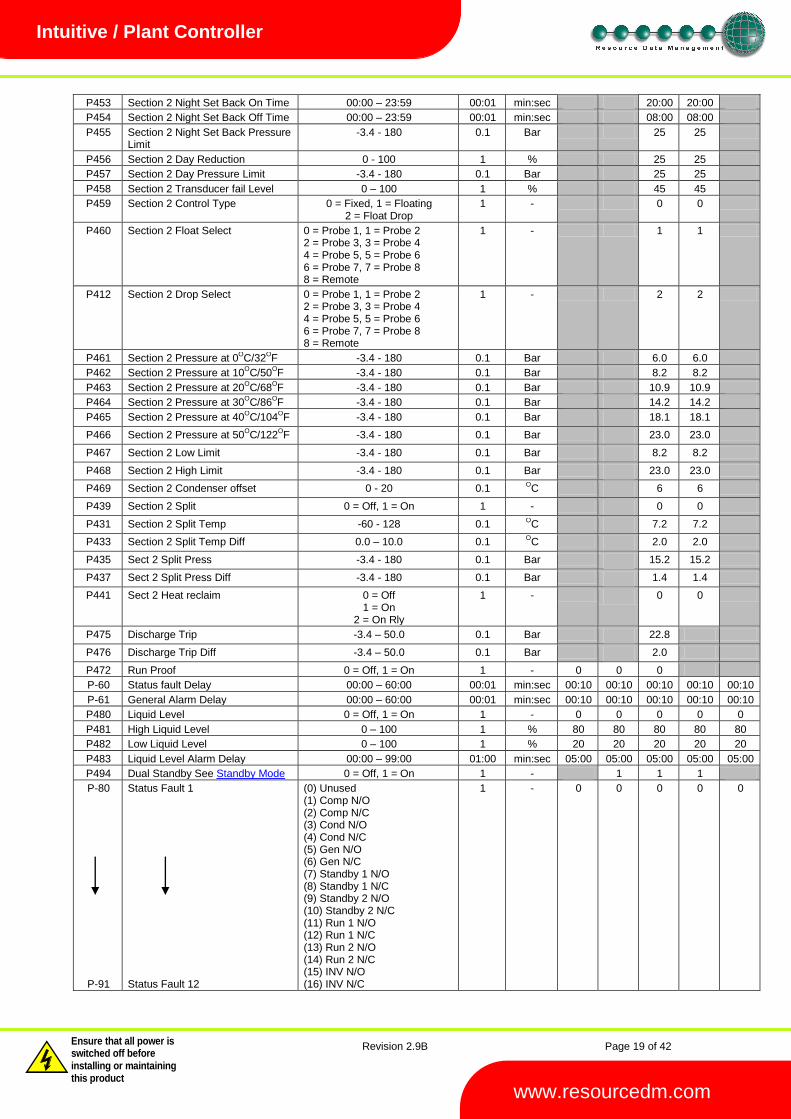
P-80
P-91
Status Fault 1 Status Fault 12
(0) Unused (1) Comp N/O (2) Comp N/C (3) Cond N/O (4) Cond N/C (5) Gen N/O (6) Gen N/C (7) Standby 1 N/O (8) Standby 1 N/C (9) Standby 2 N/O (10) Standby 2 N/C (11) Run 1 N/O (12) Run 1 N/C (13) Run 2 N/O (14) Run 2 N/C (15) INV N/O (16) INV N/C
1 - 0 0 0 0 0
Revision 2.9B Page 20 of 42
Warning
Please Note The specifications of the product detailed on this Set-Up Guide may change without notice. RDM Ltd. shall not be liable for errors or for incidental or consequential damages, directly and indirectly, in connection with the furnishing, performance or misuse of this product or document.
Ensure that all power is switched off before installing or maintaining this product
www.resourcedm.com
Intuitive / Plant Controller
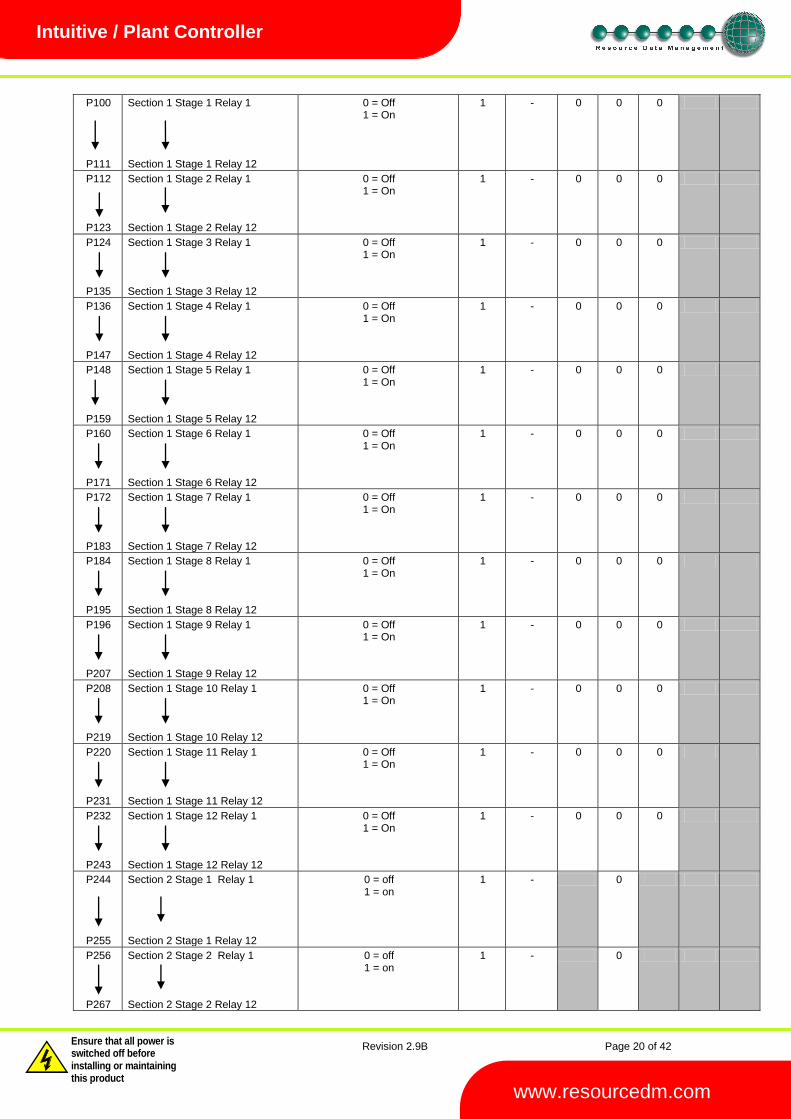
P100
P111
Section 1 Stage 1 Relay 1 Section 1 Stage 1 Relay 12
0 = Off 1 = On
1 - 0 0 0
P112
P123
Section 1 Stage 2 Relay 1 Section 1 Stage 2 Relay 12
0 = Off 1 = On
1 - 0 0 0
P124
P135
Section 1 Stage 3 Relay 1 Section 1 Stage 3 Relay 12
0 = Off 1 = On
1 - 0 0 0
P136
P147
Section 1 Stage 4 Relay 1 Section 1 Stage 4 Relay 12
0 = Off 1 = On
1 - 0 0 0
P148
P159
Section 1 Stage 5 Relay 1 Section 1 Stage 5 Relay 12
0 = Off 1 = On
1 - 0 0 0
P160
P171
Section 1 Stage 6 Relay 1 Section 1 Stage 6 Relay 12
0 = Off 1 = On
1 - 0 0 0
P172
P183
Section 1 Stage 7 Relay 1 Section 1 Stage 7 Relay 12
0 = Off 1 = On
1 - 0 0 0
P184
P195
Section 1 Stage 8 Relay 1 Section 1 Stage 8 Relay 12
0 = Off 1 = On
1 - 0 0 0
P196
P207
Section 1 Stage 9 Relay 1 Section 1 Stage 9 Relay 12
0 = Off 1 = On
1 - 0 0 0
P208
P219
Section 1 Stage 10 Relay 1 Section 1 Stage 10 Relay 12
0 = Off 1 = On
1 - 0 0 0
P220
P231
Section 1 Stage 11 Relay 1 Section 1 Stage 11 Relay 12
0 = Off 1 = On
1 - 0 0 0
P232
P243
Section 1 Stage 12 Relay 1 Section 1 Stage 12 Relay 12
0 = Off 1 = On
1 - 0 0 0
P244
P255
Section 2 Stage 1 Relay 1 Section 2 Stage 1 Relay 12
0 = off 1 = on
1 - 0
P256
P267
Section 2 Stage 2 Relay 1 Section 2 Stage 2 Relay 12
0 = off 1 = on
1 - 0
Revision 2.9B Page 21 of 42
Warning
Please Note The specifications of the product detailed on this Set-Up Guide may change without notice. RDM Ltd. shall not be liable for errors or for incidental or consequential damages, directly and indirectly, in connection with the furnishing, performance or misuse of this product or document.
Ensure that all power is switched off before installing or maintaining this product
www.resourcedm.com
Intuitive / Plant Controller
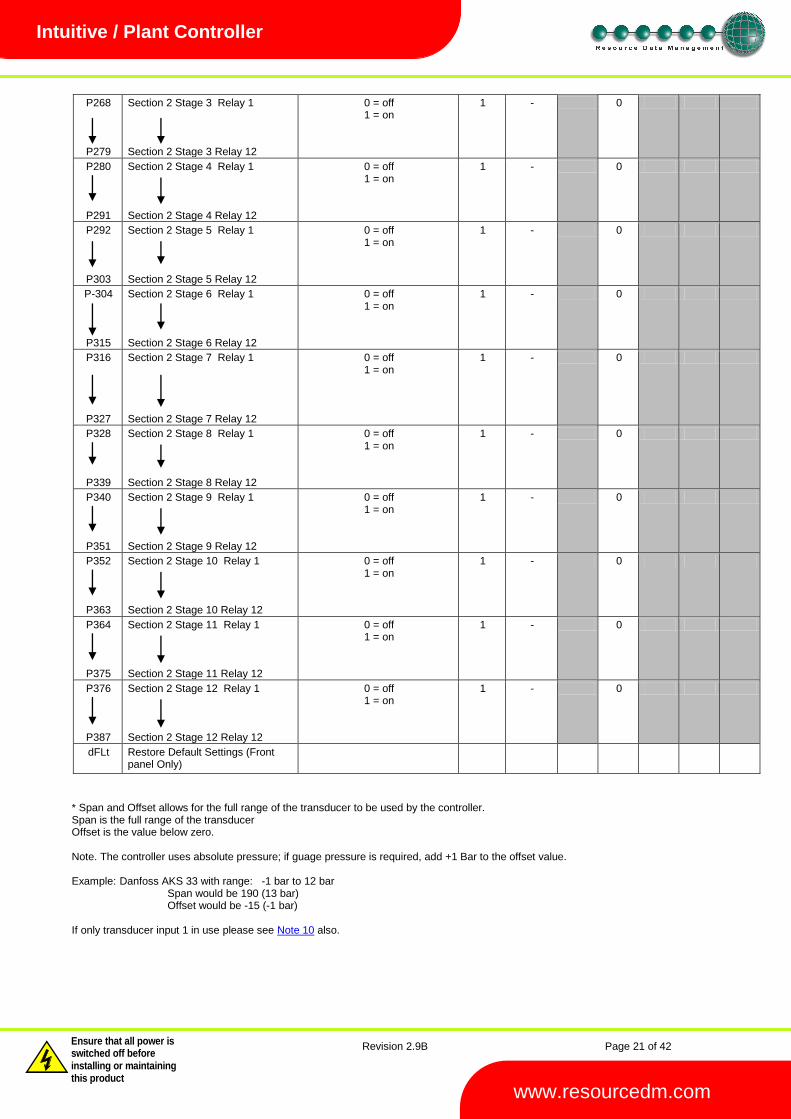
P268
P279
Section 2 Stage 3 Relay 1 Section 2 Stage 3 Relay 12
0 = off 1 = on
1 - 0
P280
P291
Section 2 Stage 4 Relay 1 Section 2 Stage 4 Relay 12
0 = off 1 = on
1 - 0
P292
P303
Section 2 Stage 5 Relay 1 Section 2 Stage 5 Relay 12
0 = off 1 = on
1 - 0
P-304
P315
Section 2 Stage 6 Relay 1 Section 2 Stage 6 Relay 12
0 = off 1 = on
1 - 0
P316
P327
Section 2 Stage 7 Relay 1 Section 2 Stage 7 Relay 12
0 = off 1 = on
1 - 0
P328
P339
Section 2 Stage 8 Relay 1 Section 2 Stage 8 Relay 12
0 = off 1 = on
1 - 0
P340
P351
Section 2 Stage 9 Relay 1 Section 2 Stage 9 Relay 12
0 = off 1 = on
1 - 0
P352
P363
Section 2 Stage 10 Relay 1 Section 2 Stage 10 Relay 12
0 = off 1 = on
1 - 0
P364
P375
Section 2 Stage 11 Relay 1 Section 2 Stage 11 Relay 12
0 = off 1 = on
1 - 0
P376
P387
Section 2 Stage 12 Relay 1 Section 2 Stage 12 Relay 12
0 = off 1 = on
1 - 0
dFLt Restore Default Settings (Front panel Only)
* Span and Offset allows for the full range of the transducer to be used by the controller. Span is the full range of the transducer Offset is the value below zero. Note. The controller uses absolute pressure; if guage pressure is required, add +1 Bar to the offset value. Example: Danfoss AKS 33 with range: -1 bar to 12 bar Span would be 190 (13 bar) Offset would be -15 (-1 bar) If only transducer input 1 in use please see Note 10 also.
Revision 2.9B Page 22 of 42
Warning
Please Note The specifications of the product detailed on this Set-Up Guide may change without notice. RDM Ltd. shall not be liable for errors or for incidental or consequential damages, directly and indirectly, in connection with the furnishing, performance or misuse of this product or document.
Ensure that all power is switched off before installing or maintaining this product
www.resourcedm.com
Intuitive / Plant Controller
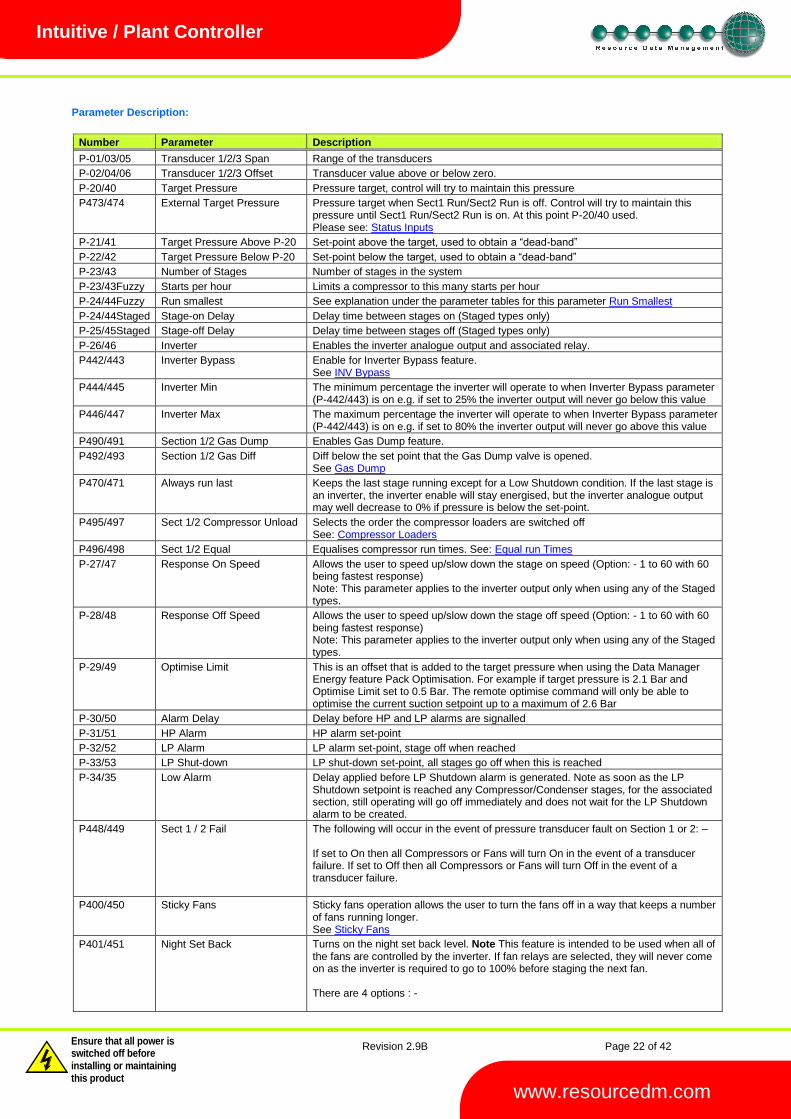
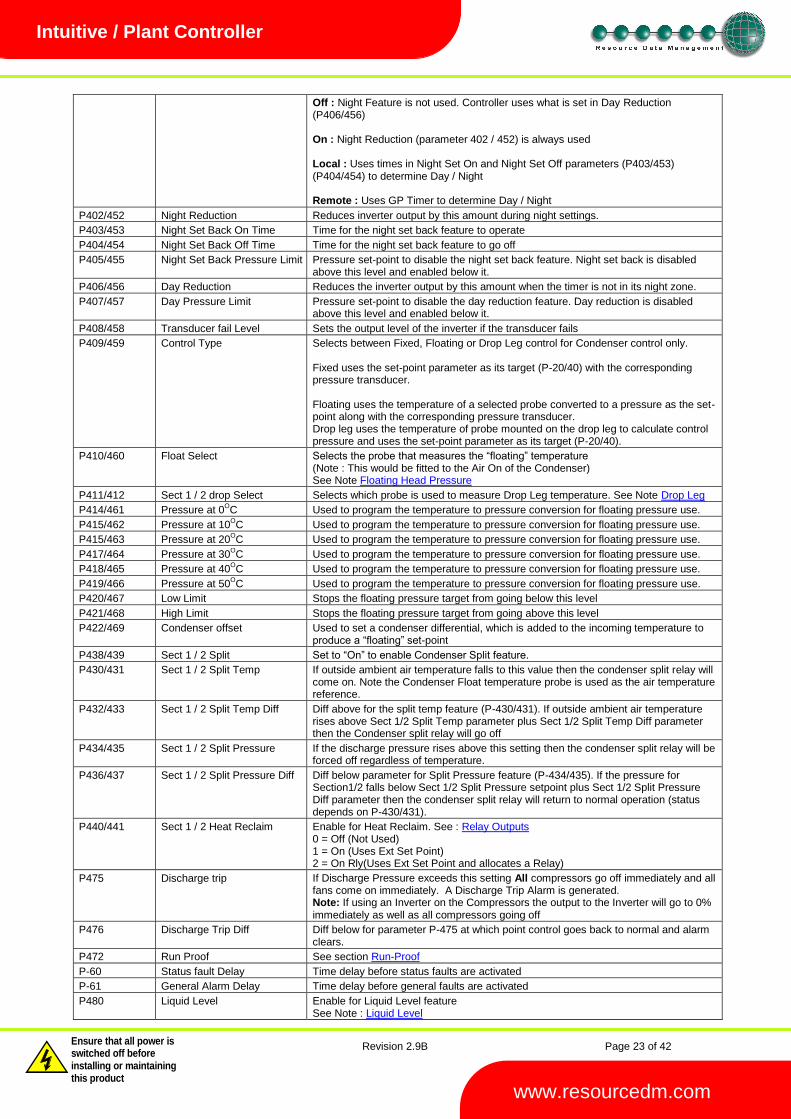
Parameter Description:
Number Parameter Description
P-01/03/05 Transducer 1/2/3 Span Range of the transducers
P-02/04/06 Transducer 1/2/3 Offset Transducer value above or below zero.
P-20/40 Target Pressure Pressure target, control will try to maintain this pressure
P473/474 External Target Pressure Pressure target when Sect1 Run/Sect2 Run is off. Control will try to maintain this pressure until Sect1 Run/Sect2 Run is on. At this point P-20/40 used. Please see: Status Inputs
P-21/41 Target Pressure Above P-20 Set-point above the target, used to obtain a “dead-band”
P-22/42 Target Pressure Below P-20 Set-point below the target, used to obtain a “dead-band”
P-23/43 Number of Stages Number of stages in the system
P-23/43Fuzzy Starts per hour Limits a compressor to this many starts per hour
P-24/44Fuzzy Run smallest See explanation under the parameter tables for this parameter Run Smallest
P-24/44Staged Stage-on Delay Delay time between stages on (Staged types only)
P-25/45Staged Stage-off Delay Delay time between stages off (Staged types only)
P-26/46 Inverter Enables the inverter analogue output and associated relay.
P442/443 Inverter Bypass Enable for Inverter Bypass feature. See INV Bypass
P444/445 Inverter Min The minimum percentage the inverter will operate to when Inverter Bypass parameter (P-442/443) is on e.g. if set to 25% the inverter output will never go below this value
P446/447 Inverter Max The maximum percentage the inverter will operate to when Inverter Bypass parameter (P-442/443) is on e.g. if set to 80% the inverter output will never go above this value
P490/491 Section 1/2 Gas Dump Enables Gas Dump feature.
P492/493 Section 1/2 Gas Diff Diff below the set point that the Gas Dump valve is opened. See Gas Dump
P470/471 Always run last Keeps the last stage running except for a Low Shutdown condition. If the last stage is an inverter, the inverter enable will stay energised, but the inverter analogue output may well decrease to 0% if pressure is below the set-point.
P495/497 Sect 1/2 Compressor Unload Selects the order the compressor loaders are switched off See: Compressor Loaders
P496/498 Sect 1/2 Equal Equalises compressor run times. See: Equal run Times
P-27/47 Response On Speed Allows the user to speed up/slow down the stage on speed (Option: - 1 to 60 with 60 being fastest response) Note: This parameter applies to the inverter output only when using any of the Staged types.
P-28/48 Response Off Speed Allows the user to speed up/slow down the stage off speed (Option: - 1 to 60 with 60 being fastest response) Note: This parameter applies to the inverter output only when using any of the Staged types.
P-29/49 Optimise Limit This is an offset that is added to the target pressure when using the Data Manager Energy feature Pack Optimisation. For example if target pressure is 2.1 Bar and Optimise Limit set to 0.5 Bar. The remote optimise command will only be able to optimise the current suction setpoint up to a maximum of 2.6 Bar
P-30/50 Alarm Delay Delay before HP and LP alarms are signalled
P-31/51 HP Alarm HP alarm set-point
P-32/52 LP Alarm LP alarm set-point, stage off when reached
P-33/53 LP Shut-down LP shut-down set-point, all stages go off when this is reached
P-34/35 Low Alarm Delay applied before LP Shutdown alarm is generated. Note as soon as the LP Shutdown setpoint is reached any Compressor/Condenser stages, for the associated section, still operating will go off immediately and does not wait for the LP Shutdown alarm to be created.
P448/449 Sect 1 / 2 Fail The following will occur in the event of pressure transducer fault on Section 1 or 2: – If set to On then all Compressors or Fans will turn On in the event of a transducer failure. If set to Off then all Compressors or Fans will turn Off in the event of a transducer failure.
P400/450 Sticky Fans Sticky fans operation allows the user to turn the fans off in a way that keeps a number of fans running longer. See Sticky Fans
P401/451 Night Set Back Turns on the night set back level. Note This feature is intended to be used when all of the fans are controlled by the inverter. If fan relays are selected, they will never come on as the inverter is required to go to 100% before staging the next fan. There are 4 options : -
Revision 2.9B Page 23 of 42
Warning
Please Note The specifications of the product detailed on this Set-Up Guide may change without notice. RDM Ltd. shall not be liable for errors or for incidental or consequential damages, directly and indirectly, in connection with the furnishing, performance or misuse of this product or document.
Ensure that all power is switched off before installing or maintaining this product
www.resourcedm.com
Intuitive / Plant Controller
Off : Night Feature is not used. Controller uses what is set in Day Reduction (P406/456) On : Night Reduction (parameter 402 / 452) is always used Local : Uses times in Night Set On and Night Set Off parameters (P403/453) (P404/454) to determine Day / Night Remote : Uses GP Timer to determine Day / Night
P402/452 Night Reduction Reduces inverter output by this amount during night settings.
P403/453 Night Set Back On Time Time for the night set back feature to operate
P404/454 Night Set Back Off Time Time for the night set back feature to go off
P405/455 Night Set Back Pressure Limit Pressure set-point to disable the night set back feature. Night set back is disabled above this level and enabled below it.
P406/456 Day Reduction Reduces the inverter output by this amount when the timer is not in its night zone.
P407/457 Day Pressure Limit Pressure set-point to disable the day reduction feature. Day reduction is disabled above this level and enabled below it.
P408/458 Transducer fail Level Sets the output level of the inverter if the transducer fails
P409/459 Control Type Selects between Fixed, Floating or Drop Leg control for Condenser control only. Fixed uses the set-point parameter as its target (P-20/40) with the corresponding pressure transducer. Floating uses the temperature of a selected probe converted to a pressure as the set-point along with the corresponding pressure transducer. Drop leg uses the temperature of probe mounted on the drop leg to calculate control pressure and uses the set-point parameter as its target (P-20/40).
P410/460 Float Select Selects the probe that measures the “floating” temperature (Note : This would be fitted to the Air On of the Condenser) See Note Floating Head Pressure
P411/412 Sect 1 / 2 drop Select Selects which probe is used to measure Drop Leg temperature. See Note Drop Leg
P414/461 Pressure at 0OC Used to program the temperature to pressure conversion for floating pressure use.
P415/462 Pressure at 10OC Used to program the temperature to pressure conversion for floating pressure use.
P415/463 Pressure at 20OC Used to program the temperature to pressure conversion for floating pressure use.
P417/464 Pressure at 30OC Used to program the temperature to pressure conversion for floating pressure use.
P418/465 Pressure at 40OC Used to program the temperature to pressure conversion for floating pressure use.
P419/466 Pressure at 50OC Used to program the temperature to pressure conversion for floating pressure use.
P420/467 Low Limit Stops the floating pressure target from going below this level
P421/468 High Limit Stops the floating pressure target from going above this level
P422/469 Condenser offset Used to set a condenser differential, which is added to the incoming temperature to produce a “floating” set-point
P438/439 Sect 1 / 2 Split Set to “On” to enable Condenser Split feature.
P430/431 Sect 1 / 2 Split Temp If outside ambient air temperature falls to this value then the condenser split relay will come on. Note the Condenser Float temperature probe is used as the air temperature reference.
P432/433 Sect 1 / 2 Split Temp Diff Diff above for the split temp feature (P-430/431). If outside ambient air temperature rises above Sect 1/2 Split Temp parameter plus Sect 1/2 Split Temp Diff parameter then the Condenser split relay will go off
P434/435 Sect 1 / 2 Split Pressure If the discharge pressure rises above this setting then the condenser split relay will be forced off regardless of temperature.
P436/437 Sect 1 / 2 Split Pressure Diff Diff below parameter for Split Pressure feature (P-434/435). If the pressure for Section1/2 falls below Sect 1/2 Split Pressure setpoint plus Sect 1/2 Split Pressure Diff parameter then the condenser split relay will return to normal operation (status depends on P-430/431).
P440/441 Sect 1 / 2 Heat Reclaim Enable for Heat Reclaim. See : Relay Outputs 0 = Off (Not Used) 1 = On (Uses Ext Set Point) 2 = On Rly(Uses Ext Set Point and allocates a Relay)
P475 Discharge trip If Discharge Pressure exceeds this setting All compressors go off immediately and all fans come on immediately. A Discharge Trip Alarm is generated. Note: If using an Inverter on the Compressors the output to the Inverter will go to 0% immediately as well as all compressors going off
P476 Discharge Trip Diff Diff below for parameter P-475 at which point control goes back to normal and alarm clears.
P472 Run Proof See section Run-Proof
P-60 Status fault Delay Time delay before status faults are activated
P-61 General Alarm Delay Time delay before general faults are activated
P480 Liquid Level Enable for Liquid Level feature See Note : Liquid Level
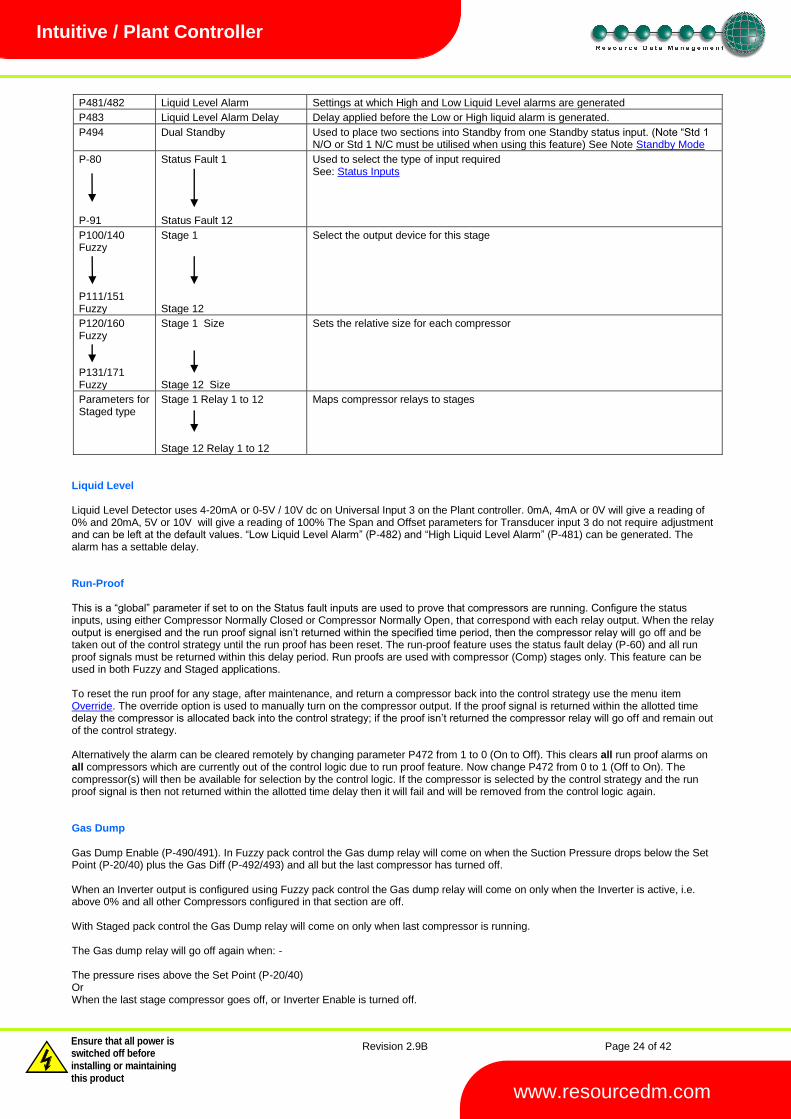
Revision 2.9B Page 24 of 42
Warning
Please Note The specifications of the product detailed on this Set-Up Guide may change without notice. RDM Ltd. shall not be liable for errors or for incidental or consequential damages, directly and indirectly, in connection with the furnishing, performance or misuse of this product or document.
Ensure that all power is switched off before installing or maintaining this product
www.resourcedm.com
Intuitive / Plant Controller
P481/482 Liquid Level Alarm Settings at which High and Low Liquid Level alarms are generated
P483 Liquid Level Alarm Delay Delay applied before the Low or High liquid alarm is generated.
P494 Dual Standby Used to place two sections into Standby from one Standby status input. (Note “Std 1 N/O or Std 1 N/C must be utilised when using this feature) See Note Standby Mode
P-80
P-91
Status Fault 1 Status Fault 12
Used to select the type of input required See: Status Inputs
P100/140 Fuzzy
P111/151 Fuzzy
Stage 1 Stage 12
Select the output device for this stage
P120/160 Fuzzy
P131/171 Fuzzy
Stage 1 Size Stage 12 Size
Sets the relative size for each compressor
Parameters for Staged type
Stage 1 Relay 1 to 12 Stage 12 Relay 1 to 12
Maps compressor relays to stages
Liquid Level Liquid Level Detector uses 4-20mA or 0-5V / 10V dc on Universal Input 3 on the Plant controller. 0mA, 4mA or 0V will give a reading of 0% and 20mA, 5V or 10V will give a reading of 100% The Span and Offset parameters for Transducer input 3 do not require adjustment and can be left at the default values. “Low Liquid Level Alarm” (P-482) and “High Liquid Level Alarm” (P-481) can be generated. The alarm has a settable delay. Run-Proof This is a “global” parameter if set to on the Status fault inputs are used to prove that compressors are running. Configure the status inputs, using either Compressor Normally Closed or Compressor Normally Open, that correspond with each relay output. When the relay output is energised and the run proof signal isn’t returned within the specified time period, then the compressor relay will go off and be taken out of the control strategy until the run proof has been reset. The run-proof feature uses the status fault delay (P-60) and all run proof signals must be returned within this delay period. Run proofs are used with compressor (Comp) stages only. This feature can be used in both Fuzzy and Staged applications. To reset the run proof for any stage, after maintenance, and return a compressor back into the control strategy use the menu item Override. The override option is used to manually turn on the compressor output. If the proof signal is returned within the allotted time delay the compressor is allocated back into the control strategy; if the proof isn’t returned the compressor relay will go off and remain out of the control strategy. Alternatively the alarm can be cleared remotely by changing parameter P472 from 1 to 0 (On to Off). This clears all run proof alarms on all compressors which are currently out of the control logic due to run proof feature. Now change P472 from 0 to 1 (Off to On). The compressor(s) will then be available for selection by the control logic. If the compressor is selected by the control strategy and the run proof signal is then not returned within the allotted time delay then it will fail and will be removed from the control logic again. Gas Dump Gas Dump Enable (P-490/491). In Fuzzy pack control the Gas dump relay will come on when the Suction Pressure drops below the Set Point (P-20/40) plus the Gas Diff (P-492/493) and all but the last compressor has turned off. When an Inverter output is configured using Fuzzy pack control the Gas dump relay will come on only when the Inverter is active, i.e. above 0% and all other Compressors configured in that section are off. With Staged pack control the Gas Dump relay will come on only when last compressor is running. The Gas dump relay will go off again when: - The pressure rises above the Set Point (P-20/40) Or When the last stage compressor goes off, or Inverter Enable is turned off.
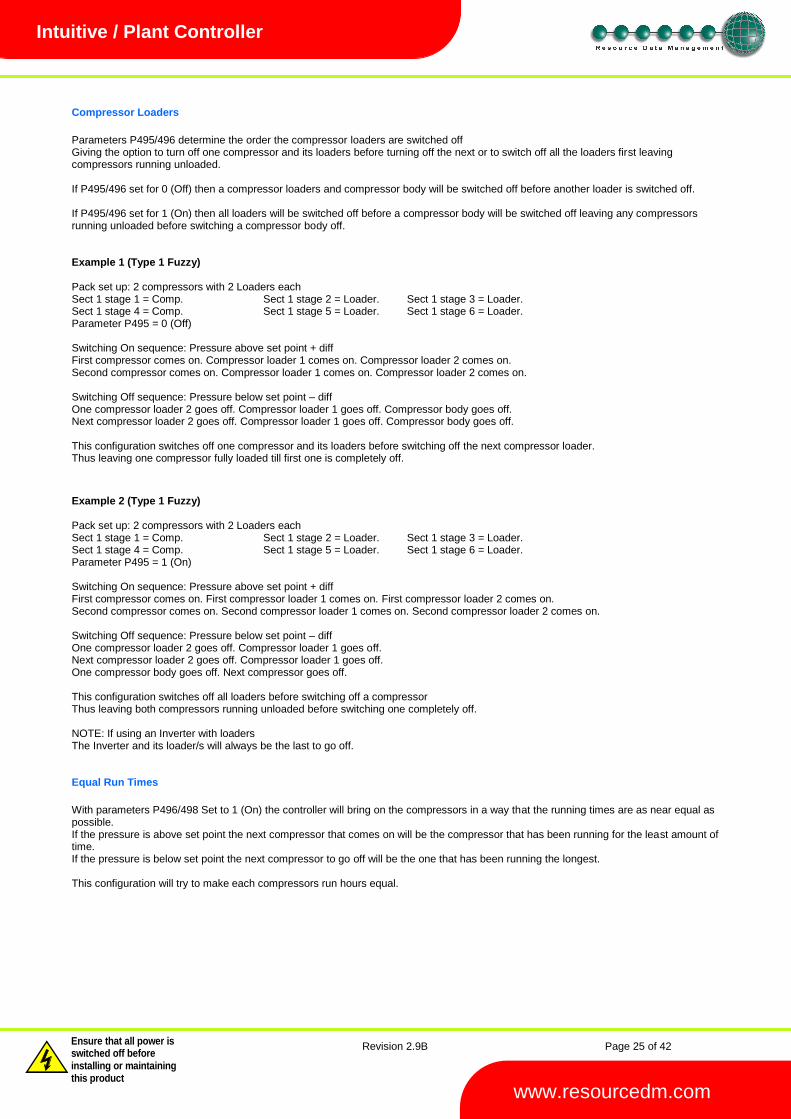
Revision 2.9B Page 25 of 42
Warning
Please Note The specifications of the product detailed on this Set-Up Guide may change without notice. RDM Ltd. shall not be liable for errors or for incidental or consequential damages, directly and indirectly, in connection with the furnishing, performance or misuse of this product or document.
Ensure that all power is switched off before installing or maintaining this product
www.resourcedm.com
Intuitive / Plant Controller
Compressor Loaders
Parameters P495/496 determine the order the compressor loaders are switched off Giving the option to turn off one compressor and its loaders before turning off the next or to switch off all the loaders first leaving compressors running unloaded. If P495/496 set for 0 (Off) then a compressor loaders and compressor body will be switched off before another loader is switched off. If P495/496 set for 1 (On) then all loaders will be switched off before a compressor body will be switched off leaving any compressors running unloaded before switching a compressor body off. Example 1 (Type 1 Fuzzy) Pack set up: 2 compressors with 2 Loaders each Sect 1 stage 1 = Comp. Sect 1 stage 2 = Loader. Sect 1 stage 3 = Loader. Sect 1 stage 4 = Comp. Sect 1 stage 5 = Loader. Sect 1 stage 6 = Loader. Parameter P495 = 0 (Off) Switching On sequence: Pressure above set point + diff First compressor comes on. Compressor loader 1 comes on. Compressor loader 2 comes on. Second compressor comes on. Compressor loader 1 comes on. Compressor loader 2 comes on. Switching Off sequence: Pressure below set point – diff One compressor loader 2 goes off. Compressor loader 1 goes off. Compressor body goes off. Next compressor loader 2 goes off. Compressor loader 1 goes off. Compressor body goes off. This configuration switches off one compressor and its loaders before switching off the next compressor loader. Thus leaving one compressor fully loaded till first one is completely off.
Example 2 (Type 1 Fuzzy) Pack set up: 2 compressors with 2 Loaders each Sect 1 stage 1 = Comp. Sect 1 stage 2 = Loader. Sect 1 stage 3 = Loader. Sect 1 stage 4 = Comp. Sect 1 stage 5 = Loader. Sect 1 stage 6 = Loader. Parameter P495 = 1 (On) Switching On sequence: Pressure above set point + diff First compressor comes on. First compressor loader 1 comes on. First compressor loader 2 comes on. Second compressor comes on. Second compressor loader 1 comes on. Second compressor loader 2 comes on. Switching Off sequence: Pressure below set point – diff One compressor loader 2 goes off. Compressor loader 1 goes off. Next compressor loader 2 goes off. Compressor loader 1 goes off. One compressor body goes off. Next compressor goes off. This configuration switches off all loaders before switching off a compressor Thus leaving both compressors running unloaded before switching one completely off. NOTE: If using an Inverter with loaders The Inverter and its loader/s will always be the last to go off. Equal Run Times
With parameters P496/498 Set to 1 (On) the controller will bring on the compressors in a way that the running times are as near equal as possible. If the pressure is above set point the next compressor that comes on will be the compressor that has been running for the least amount of time. If the pressure is below set point the next compressor to go off will be the one that has been running the longest. This configuration will try to make each compressors run hours equal.
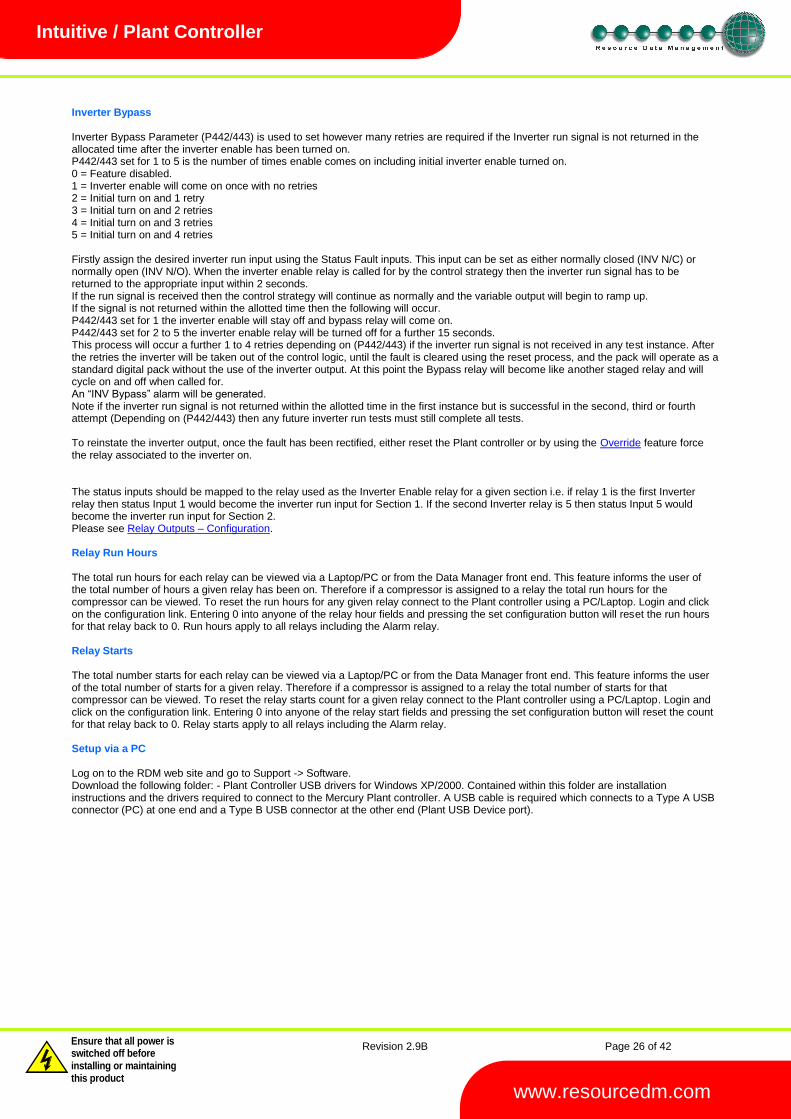
Revision 2.9B Page 26 of 42
Warning
Please Note The specifications of the product detailed on this Set-Up Guide may change without notice. RDM Ltd. shall not be liable for errors or for incidental or consequential damages, directly and indirectly, in connection with the furnishing, performance or misuse of this product or document.
Ensure that all power is switched off before installing or maintaining this product
www.resourcedm.com
Intuitive / Plant Controller
Inverter Bypass Inverter Bypass Parameter (P442/443) is used to set however many retries are required if the Inverter run signal is not returned in the allocated time after the inverter enable has been turned on. P442/443 set for 1 to 5 is the number of times enable comes on including initial inverter enable turned on. 0 = Feature disabled. 1 = Inverter enable will come on once with no retries 2 = Initial turn on and 1 retry 3 = Initial turn on and 2 retries 4 = Initial turn on and 3 retries 5 = Initial turn on and 4 retries Firstly assign the desired inverter run input using the Status Fault inputs. This input can be set as either normally closed (INV N/C) or normally open (INV N/O). When the inverter enable relay is called for by the control strategy then the inverter run signal has to be returned to the appropriate input within 2 seconds. If the run signal is received then the control strategy will continue as normally and the variable output will begin to ramp up. If the signal is not returned within the allotted time then the following will occur. P442/443 set for 1 the inverter enable will stay off and bypass relay will come on. P442/443 set for 2 to 5 the inverter enable relay will be turned off for a further 15 seconds. This process will occur a further 1 to 4 retries depending on (P442/443) if the inverter run signal is not received in any test instance. After the retries the inverter will be taken out of the control logic, until the fault is cleared using the reset process, and the pack will operate as a standard digital pack without the use of the inverter output. At this point the Bypass relay will become like another staged relay and will cycle on and off when called for. An “INV Bypass” alarm will be generated. Note if the inverter run signal is not returned within the allotted time in the first instance but is successful in the second, third or fourth attempt (Depending on (P442/443) then any future inverter run tests must still complete all tests. To reinstate the inverter output, once the fault has been rectified, either reset the Plant controller or by using the Override feature force the relay associated to the inverter on. The status inputs should be mapped to the relay used as the Inverter Enable relay for a given section i.e. if relay 1 is the first Inverter relay then status Input 1 would become the inverter run input for Section 1. If the second Inverter relay is 5 then status Input 5 would become the inverter run input for Section 2. Please see Relay Outputs – Configuration. Relay Run Hours The total run hours for each relay can be viewed via a Laptop/PC or from the Data Manager front end. This feature informs the user of the total number of hours a given relay has been on. Therefore if a compressor is assigned to a relay the total run hours for the compressor can be viewed. To reset the run hours for any given relay connect to the Plant controller using a PC/Laptop. Login and click on the configuration link. Entering 0 into anyone of the relay hour fields and pressing the set configuration button will reset the run hours for that relay back to 0. Run hours apply to all relays including the Alarm relay. Relay Starts The total number starts for each relay can be viewed via a Laptop/PC or from the Data Manager front end. This feature informs the user of the total number of starts for a given relay. Therefore if a compressor is assigned to a relay the total number of starts for that compressor can be viewed. To reset the relay starts count for a given relay connect to the Plant controller using a PC/Laptop. Login and click on the configuration link. Entering 0 into anyone of the relay start fields and pressing the set configuration button will reset the count for that relay back to 0. Relay starts apply to all relays including the Alarm relay. Setup via a PC Log on to the RDM web site and go to Support -> Software. Download the following folder: - Plant Controller USB drivers for Windows XP/2000. Contained within this folder are installation instructions and the drivers required to connect to the Mercury Plant controller. A USB cable is required which connects to a Type A USB connector (PC) at one end and a Type B USB connector at the other end (Plant USB Device port).

Revision 2.9B Page 27 of 42
Warning
Please Note The specifications of the product detailed on this Set-Up Guide may change without notice. RDM Ltd. shall not be liable for errors or for incidental or consequential damages, directly and indirectly, in connection with the furnishing, performance or misuse of this product or document.
Ensure that all power is switched off before installing or maintaining this product
www.resourcedm.com
Intuitive / Plant Controller
Plant Controller home page
Log in using an appropriate username and password; setup operations can then be used via the PC by clicking on the appropriate link: -
Link Operation
Values Shows the values being return on the controllers inputs and outputs
Settings Shows the controllers parameter settings
Alarm Log Shows the controllers alarm history; up to 1000 alarms are stored
Graph Shows the controller values in graphical format
Set Parameters Allows the user to change parameter values; see Set Parameters
System Log Shows the changes made to the controller in chronological order
Network Allows the user to setup: - IP Address Netmask Gateway
Time Allows the user to set the Time or synchronise with the PC
Reset Allows the user to reset the controller
Configuration Allows the user to change the controller configuration; See: changing configuration
Export Log Creates a log file of the controllers data for downloading onto a PC
Save Pack Setup Saves the current Configuration
Load pack Setup Allows the user to upload a pre-configuration (a stand-alone PC program is available to create Plant controller configuration files. Contact RDM for details
Clear Alarm Log Clears the controller alarm log completely (Yes/No choice)
Version Shows the controllers software version
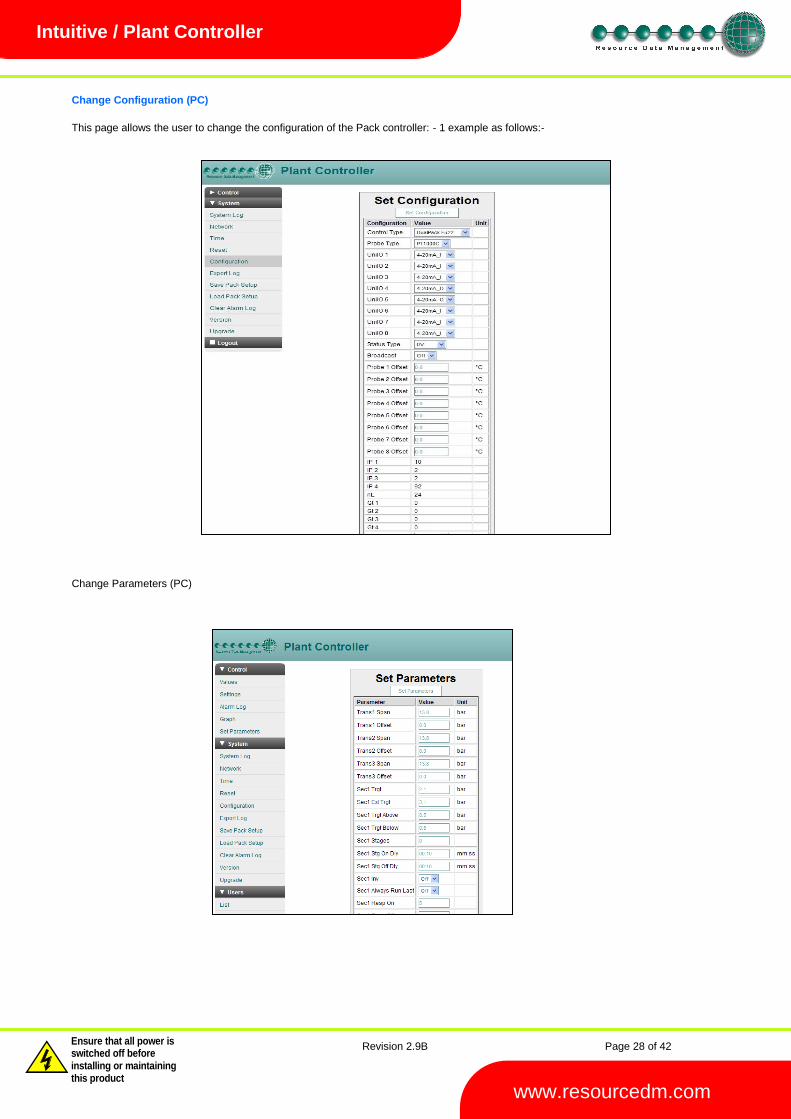
Revision 2.9B Page 28 of 42
Warning
Please Note The specifications of the product detailed on this Set-Up Guide may change without notice. RDM Ltd. shall not be liable for errors or for incidental or consequential damages, directly and indirectly, in connection with the furnishing, performance or misuse of this product or document.
Ensure that all power is switched off before installing or maintaining this product
www.resourcedm.com
Intuitive / Plant Controller
Change Configuration (PC)
This page allows the user to change the configuration of the Pack controller: - 1 example as follows:-
Change Parameters (PC)
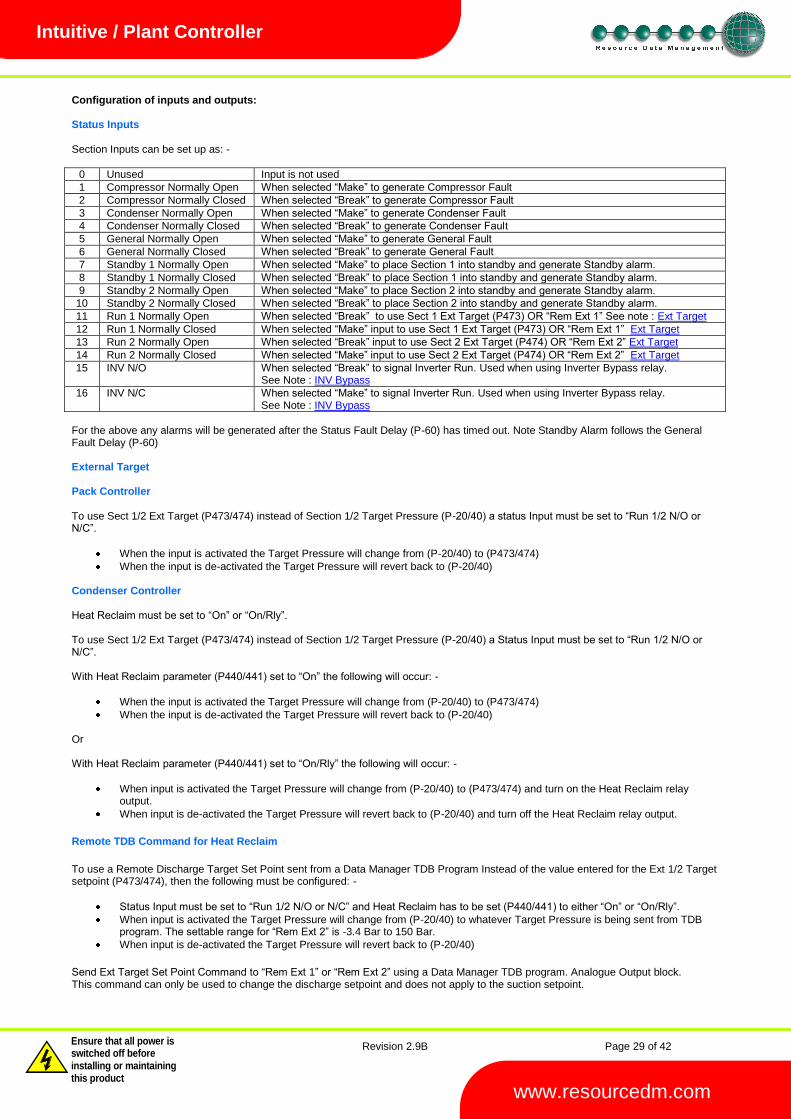
Revision 2.9B Page 29 of 42
Warning
Please Note The specifications of the product detailed on this Set-Up Guide may change without notice. RDM Ltd. shall not be liable for errors or for incidental or consequential damages, directly and indirectly, in connection with the furnishing, performance or misuse of this product or document.
Ensure that all power is switched off before installing or maintaining this product
www.resourcedm.com
Intuitive / Plant Controller
Configuration of inputs and outputs: Status Inputs Section Inputs can be set up as: -
0 Unused Input is not used
1 Compressor Normally Open When selected “Make” to generate Compressor Fault
2 Compressor Normally Closed When selected “Break” to generate Compressor Fault
3 Condenser Normally Open When selected “Make” to generate Condenser Fault
4 Condenser Normally Closed When selected “Break” to generate Condenser Fault
5 General Normally Open When selected “Make” to generate General Fault
6 General Normally Closed When selected “Break” to generate General Fault
7 Standby 1 Normally Open When selected “Make” to place Section 1 into standby and generate Standby alarm.
8 Standby 1 Normally Closed When selected “Break” to place Section 1 into standby and generate Standby alarm.
9 Standby 2 Normally Open When selected “Make” to place Section 2 into standby and generate Standby alarm.
10 Standby 2 Normally Closed When selected “Break” to place Section 2 into standby and generate Standby alarm.
11 Run 1 Normally Open When selected “Break” to use Sect 1 Ext Target (P473) OR “Rem Ext 1” See note : Ext Target
12 Run 1 Normally Closed When selected “Make” input to use Sect 1 Ext Target (P473) OR “Rem Ext 1” Ext Target
13 Run 2 Normally Open When selected “Break” input to use Sect 2 Ext Target (P474) OR “Rem Ext 2” Ext Target
14 Run 2 Normally Closed When selected “Make” input to use Sect 2 Ext Target (P474) OR “Rem Ext 2” Ext Target
15 INV N/O When selected “Break” to signal Inverter Run. Used when using Inverter Bypass relay. See Note : INV Bypass
16 INV N/C When selected “Make” to signal Inverter Run. Used when using Inverter Bypass relay. See Note : INV Bypass
For the above any alarms will be generated after the Status Fault Delay (P-60) has timed out. Note Standby Alarm follows the General Fault Delay (P-60) External Target Pack Controller To use Sect 1/2 Ext Target (P473/474) instead of Section 1/2 Target Pressure (P-20/40) a status Input must be set to “Run 1/2 N/O or N/C”.
When the input is activated the Target Pressure will change from (P-20/40) to (P473/474)
When the input is de-activated the Target Pressure will revert back to (P-20/40) Condenser Controller Heat Reclaim must be set to “On” or “On/Rly”. To use Sect 1/2 Ext Target (P473/474) instead of Section 1/2 Target Pressure (P-20/40) a Status Input must be set to “Run 1/2 N/O or N/C”. With Heat Reclaim parameter (P440/441) set to “On” the following will occur: -
When the input is activated the Target Pressure will change from (P-20/40) to (P473/474)
When the input is de-activated the Target Pressure will revert back to (P-20/40)
Or With Heat Reclaim parameter (P440/441) set to “On/Rly” the following will occur: -
When input is activated the Target Pressure will change from (P-20/40) to (P473/474) and turn on the Heat Reclaim relay output.
When input is de-activated the Target Pressure will revert back to (P-20/40) and turn off the Heat Reclaim relay output.
Remote TDB Command for Heat Reclaim
To use a Remote Discharge Target Set Point sent from a Data Manager TDB Program Instead of the value entered for the Ext 1/2 Target setpoint (P473/474), then the following must be configured: -
Status Input must be set to “Run 1/2 N/O or N/C” and Heat Reclaim has to be set (P440/441) to either “On” or “On/Rly”.
When input is activated the Target Pressure will change from (P-20/40) to whatever Target Pressure is being sent from TDB program. The settable range for “Rem Ext 2” is -3.4 Bar to 150 Bar.
When input is de-activated the Target Pressure will revert back to (P-20/40)
Send Ext Target Set Point Command to “Rem Ext 1” or “Rem Ext 2” using a Data Manager TDB program. Analogue Output block. This command can only be used to change the discharge setpoint and does not apply to the suction setpoint.
Revision 2.9B Page 30 of 42
Warning
Please Note The specifications of the product detailed on this Set-Up Guide may change without notice. RDM Ltd. shall not be liable for errors or for incidental or consequential damages, directly and indirectly, in connection with the furnishing, performance or misuse of this product or document.
Ensure that all power is switched off before installing or maintaining this product
www.resourcedm.com
Intuitive / Plant Controller
Relay Outputs – Configuration Compressor(s)/Loader(s)/Fan(s) relays are assigned using the Stage parameters for a given section. Additional relay outputs will be assigned (if they are required) in the following order once the Stage parameters have been configured Condenser Split Heat Reclaim INV Bypass Gas Dump Alarm (An alarm relay will always be allocated as long as a relay is available for it) Section Stages
Stage Description
None Use this option to end the number of stages in the controller
Unused Use this option to skip a relay output within a stage
Comp Use this option to assign a relay output to a compressor See note 5
Loader Use this option to assign a relay output to a compressor loader See note 9
Fan Use this option to assign a relay to a fan
Inverter Use this option to assign a relay to an Inverter
Trim Use this option to set a relay to a trim compressor See note 6
Comp Run Use this option to set a relay as a separate compressor used only when other compressors are running
See note 8
Note 5: In a pack configuration, at least 1 output must be assigned to a compressor. Loader outputs will not energise without a compressor being on. When assigning stages a Loader should follow the Compressor on which it is mounted. Note 6: This option can be used to delay the onset of the inverter output. The “Trim” relay will come on with the Inverter enable relay but will use the starts per hour parameter. Once the trim stage is on the inverter enable relay would be energised and the inverter analogue output would begin to ramp up. The trim relay would remain on until all other stages are off and the will go off with the inverter enable relay. Note 8: This option is used to bring on a separate compressor. This output is active when any of the other defined compressors (Comp stages) are running. This output is off when the last compressor in its section is turned off. Note if only the inverter output is configured and no other Comp stages then the Comp Run is active when the inverter output is active. Note 9 : Relays can be configured as Loaders, selected after a Compressor stage or a Compressor running on an Inverter Alarm Relay Note 7. The alarm relay is assigned automatically to the last available relay after the stage relays, condenser split, heat reclaim, inverter bypass and gas dump have been allocated. At first power on this is likely to be relay 1 until programming of the controller is complete. The relay is energised with no alarm and de-energised when in alarm. Stage Sizes Stage sizes will determine the order in which compressors or loaders are switched on and off. This is a relative number between 0 and 60, reflecting the size of the compressor (usually horse power) The default stage size is 0; stage sizes must be entered for correct operation. Operation (Fuzzy) Once the controller has been set-up and configured, normal operation will resume. If the appropriate Type has been selected the controller will operate using a “fuzzy logic” based control algorithm. The controller will determine the stages to bring on and off using the fuzzy logic rules and adhering to the starts/hr criteria. The response time for devices switching on and off can be varied by adjusting the response on and response off parameters (1 is the slowest response, 60 is the quickest). The fuzzy logic will attempt to optimise the compressor starts and keep them at a minimum. Before a compressor or fan is switched on, Relay 1 will energise and the variable output will ramp to 100%, when it reaches this point, the fixed device (compressor, loader or fan); will switch on and the variable output will begin its cycle again starting from 0%. When demand is satisfied, and all compressor relays are off, the variable output ramps down 0%, if demand is still satisfied, the enable relay de-energises. Operation (Staged) Staged operation requires the output relays to be “mapped” to a particular stage. Each stage (there are 12 stages) has to have at least 1 relay assigned for the controller to operate correctly. More than one relay can be assigned to stages in a given section and the same relay can be used in multiple stages. Note a relay cannot be assigned in both Section 1 and Section 2. As the pressure rises above the target setpoint, plus the target above value, the controller will enter Stage 1 after the stage on delay has expired. At this point any relay assigned in Stage 1 will come on and the stage on delay timer will be reset. If the pressure remains above the setpoint, plus the target above value, and the stage on delay has expired for a second time the controller will enter stage 2. At this point any relay assigned in Stage 2 will come on. Note if a relay has been assigned in Stage 1 but not used in Stage 2 then it will go off at this point. The reverse occurs when the pressure falls below the setpoint plus the target below value. The controller will step down the stages using the stage off delay (P-08) until all stages are off.
Revision 2.9B Page 31 of 42
Warning
Please Note The specifications of the product detailed on this Set-Up Guide may change without notice. RDM Ltd. shall not be liable for errors or for incidental or consequential damages, directly and indirectly, in connection with the furnishing, performance or misuse of this product or document.
Ensure that all power is switched off before installing or maintaining this product
www.resourcedm.com
Intuitive / Plant Controller
When using a variable output as the pressure rises above target setpoint, plus target above, the variable speed output will ramp up from 0% to 100% without following the stage on delay. If the pressure stays above the target setpoint and the variable output is at 100% and the stage on delay has timed out then the controller will enter Stage 1. At this point the variable output will reset to 0% and start ramping up again towards 100%. If the pressure stays above the target setpoint and the variable output is at 100% and the stage on delay has timed out then the controller will enter Stage 2. As the pressure drops below the setpoint, minus the target below, the variable output will ramp from 100% down to 0%, once the stage off delay expires the controller will stage down. Note if the variable output reaches 100% and the stage on delay has not expired the output will remain at 100% until the stage on delay has expired. For example if set to dual Pack and pack 1 has 4 Compressors the following could be set: - Sect1 Stg1 : Rly 1 =On, Sect1 Stg2 : Rly 1 and Rly 2 = On, Sect1 Stg 3 : Rly 1 ,Rly 2 and Rly 3 = On. Sect1 Stg 4 : Rly 1, Rly 2, Rly 3 and Rly 4 = On. This would stage relay 1 through to four on after the appropriate stage delay if the pressure is above the target setpoint and differentials. Pack 2 would start as follows:- Sect2 stg1: Rly 5 = On (Note: Starting at Relay 5 as the first 4 relays have already been allocated to Pack 1) Other operational features Floating Head Pressure When the condenser controller is used in the “Floating Head pressure” mode, the temperature to pressure parameters must be used to profile a pressure curve from the air on temperature probe for the condenser (P414 to P419 and P461 to P466). The value read from the temperature probe is added to a “Condenser Offset” (P422) and then converted to a pressure. This converted pressure replaces the “Target Setpoint” (P01) as the target pressure and P01 is only used as a default; for instance when the probe is disconnected or develops a fault. Low and high pressure levels allow for a lower and upper limit to be set for the pressure range. The air on temperature can be read from probe inputs 1 to 8 and is settable via parameter P-410/P-460. The float temperature can also be received as a TDB command sent from a Data Manager TDB program. This would allow for a single probe temperate to be shared with multiple Plant controllers. Please see the relevant Data Builder user guide with regards to creating a TDB program. The following commands would be used in TDB to send the temperature data to the Plant controller. If P-410 is set to Remote then “S1 Rem Float” would be used in TDB to send the remote temperature used for Section 1 condenser float or if P-460 is set to Remote then“S2 Rem Float” would be used in TDB to send the remote temperature used for Section 2 condenser float. Drop Leg When the condenser is used in the “Drop Leg” mode, the temperature measured from the condenser Drop Leg is converted to a pressure. This converted pressure replaces the condenser pressure transducer and is used in the control strategy. If the drop leg temperature is lost then the control strategy will revert to using the relevant pressure transducer. Drop Leg temperature can be read from probe inputs 1 to 8 or set to remote then read from another pack which is reading the Drop Leg Temperature and sending temperature via a TDB Program to Input “S1 Rem Drop Leg” or “S2 Rem Drop Leg”. This is then converted to a pressure and used as Control Pressure Drop Leg temperature can be read from probe inputs 1 to 8 and is settable via parameter P-41/P-412. The drop leg temperature can also be received as a TDB command sent from a Data Manager TDB program. Please see the relevant Data Builder user guide with regards to creating a TDB program. The following commands would be used in TDB to send the temperature data to the Plant controller. “S1 Rem Float” would be used in TDB to send the remote temperature used for Section 1 condenser drop leg or “S2 Rem Float” would be used in TDB to send the remote temperature used for Section 2 condenser drop leg. Night Set-back This controller; when in condenser mode has a “Night Set-back” feature for the condenser controller. The variable output can be set to reduce to a pre-determined level; either by an internal timer, or by times sent to the controller over the network. (Use a GP Timer channel in a data Manager or Data Director) There is a High pressure limit, over which the night set-back feature will be turned off. As the pressure reduces under this limit the night set-back feature is switched on again. Day Set-back Similarly, this controller; when in condenser mode has a day Set-Back feature. The Day Set-Back feature uses the local night Set-Back clock, (if it’s out of the night set-back time, day set-back will be on) Note: - When Set-Back mode is on, no further fan stages will come on unless the variable output reaches 100%, either by reaching the high pressure point or Set-Back going off. When configured as a condenser controller, loss of the pressure input will result in the variable output going to the value defined in P17. Invert Relays The operation of the relays can be inverted so that N/C contacts can be used for energisation. This can be done from the configure screen on web page. Choose the relay(s) you wish to invert and set them to on. This process can also be completed from the controller display. Navigate to the menu option rly and select the relay output you wish to invert for example r-05 is relay output 5. Change from “0” to “1” to invert the relay so that the N/C contact is in use. Please note: This operation does not invert the Alarm relay. The alarm relay is energised when there are no alarms present.
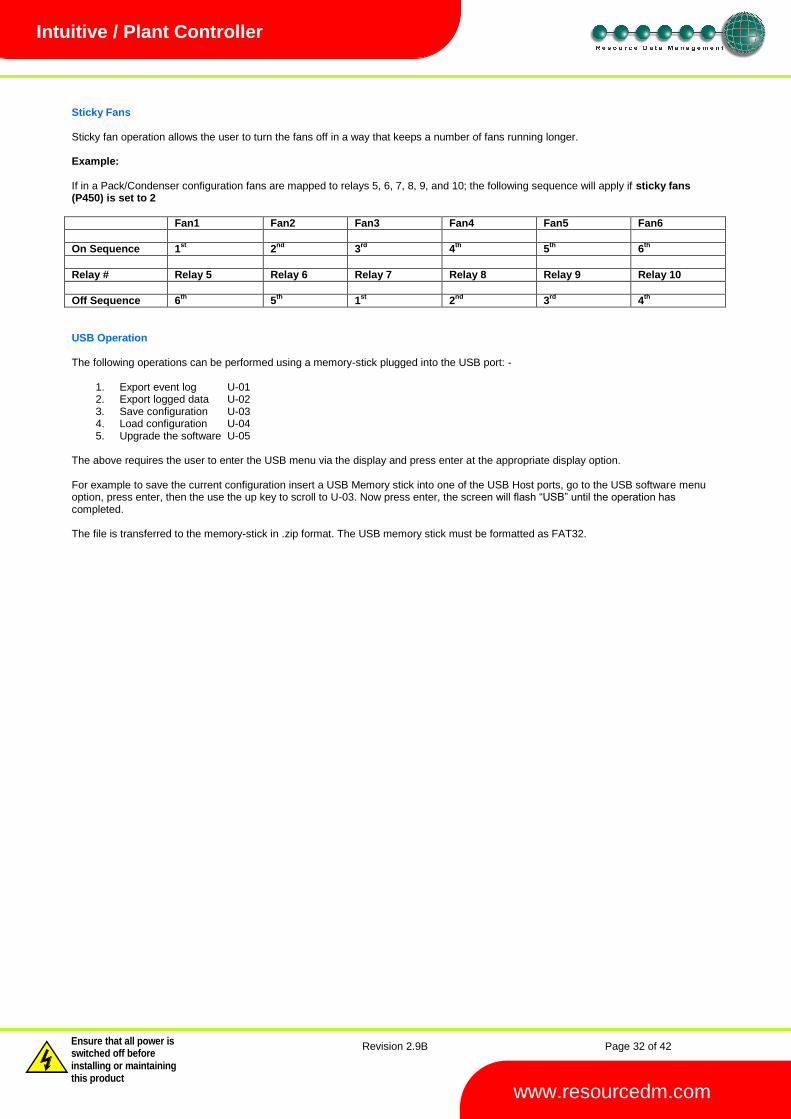
Revision 2.9B Page 32 of 42
Warning
Please Note The specifications of the product detailed on this Set-Up Guide may change without notice. RDM Ltd. shall not be liable for errors or for incidental or consequential damages, directly and indirectly, in connection with the furnishing, performance or misuse of this product or document.
Ensure that all power is switched off before installing or maintaining this product
www.resourcedm.com
Intuitive / Plant Controller
Sticky Fans Sticky fan operation allows the user to turn the fans off in a way that keeps a number of fans running longer. Example: If in a Pack/Condenser configuration fans are mapped to relays 5, 6, 7, 8, 9, and 10; the following sequence will apply if sticky fans (P450) is set to 2
Fan1 Fan2 Fan3 Fan4 Fan5 Fan6
On Sequence 1st 2
nd 3
rd 4
th 5
th 6
th
Relay # Relay 5 Relay 6 Relay 7 Relay 8 Relay 9 Relay 10
Off Sequence 6th
5th
1st 2
nd 3
rd 4
th
USB Operation The following operations can be performed using a memory-stick plugged into the USB port: -
1. Export event log U-01 2. Export logged data U-02 3. Save configuration U-03 4. Load configuration U-04 5. Upgrade the software U-05
The above requires the user to enter the USB menu via the display and press enter at the appropriate display option. For example to save the current configuration insert a USB Memory stick into one of the USB Host ports, go to the USB software menu option, press enter, then the use the up key to scroll to U-03. Now press enter, the screen will flash “USB” until the operation has completed. The file is transferred to the memory-stick in .zip format. The USB memory stick must be formatted as FAT32.
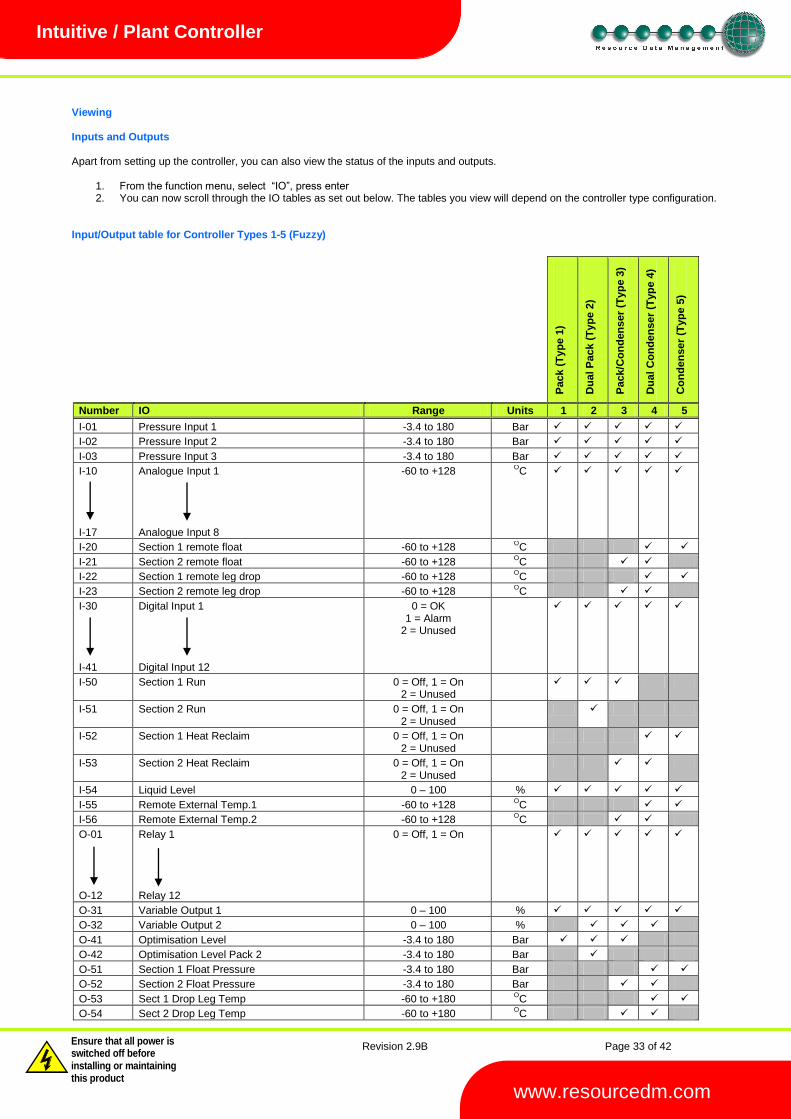
Revision 2.9B Page 33 of 42
Warning
Please Note The specifications of the product detailed on this Set-Up Guide may change without notice. RDM Ltd. shall not be liable for errors or for incidental or consequential damages, directly and indirectly, in connection with the furnishing, performance or misuse of this product or document.
Ensure that all power is switched off before installing or maintaining this product
www.resourcedm.com
Intuitive / Plant Controller
Viewing Inputs and Outputs Apart from setting up the controller, you can also view the status of the inputs and outputs.
1. From the function menu, select “IO”, press enter 2. You can now scroll through the IO tables as set out below. The tables you view will depend on the controller type configuration.
Input/Output table for Controller Types 1-5 (Fuzzy)
Pack (
Ty
pe 1
)
Du
al P
ack (
Ty
pe 2
)
Pack/C
on
den
ser
(Ty
pe 3
)
Du
al
Co
nd
en
ser
(Typ
e 4
)
Co
nd
en
ser
(Typ
e 5
)
Number IO Range Units 1 2 3 4 5
I-01 Pressure Input 1 -3.4 to 180 Bar I-02 Pressure Input 2 -3.4 to 180 Bar I-03 Pressure Input 3 -3.4 to 180 Bar I-10
I-17
Analogue Input 1 Analogue Input 8
-60 to +128 OC
I-20 Section 1 remote float -60 to +128 OC
I-21 Section 2 remote float -60 to +128 OC
I-22 Section 1 remote leg drop -60 to +128 OC
I-23 Section 2 remote leg drop -60 to +128 OC
I-30
I-41
Digital Input 1 Digital Input 12
0 = OK 1 = Alarm
2 = Unused
I-50 Section 1 Run 0 = Off, 1 = On 2 = Unused
I-51 Section 2 Run 0 = Off, 1 = On 2 = Unused
I-52 Section 1 Heat Reclaim 0 = Off, 1 = On 2 = Unused
I-53 Section 2 Heat Reclaim 0 = Off, 1 = On 2 = Unused
I-54 Liquid Level 0 – 100 % I-55 Remote External Temp.1 -60 to +128
OC
I-56 Remote External Temp.2 -60 to +128 OC
O-01
O-12
Relay 1
Relay 12
0 = Off, 1 = On
O-31 Variable Output 1 0 – 100 % O-32 Variable Output 2 0 – 100 %
O-41 Optimisation Level -3.4 to 180 Bar
O-42 Optimisation Level Pack 2 -3.4 to 180 Bar
O-51 Section 1 Float Pressure -3.4 to 180 Bar
O-52 Section 2 Float Pressure -3.4 to 180 Bar
O-53 Sect 1 Drop Leg Temp -60 to +180 OC
O-54 Sect 2 Drop Leg Temp -60 to +180 OC
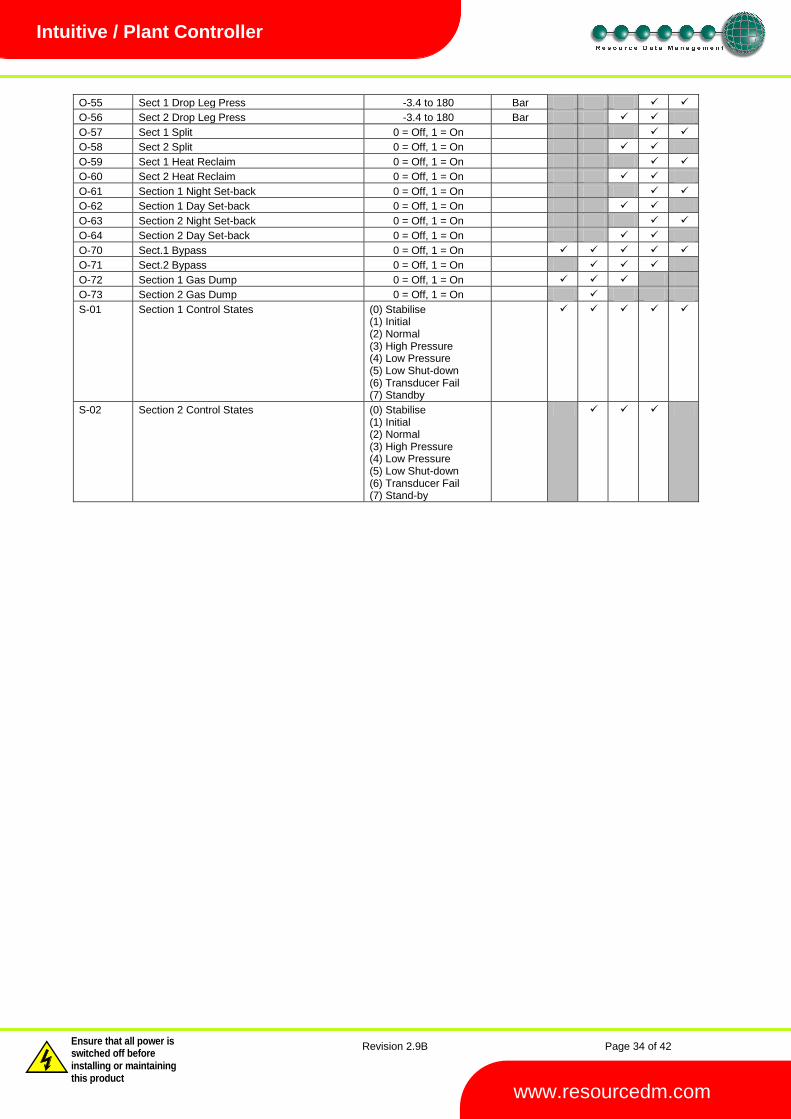
Revision 2.9B Page 34 of 42
Warning
Please Note The specifications of the product detailed on this Set-Up Guide may change without notice. RDM Ltd. shall not be liable for errors or for incidental or consequential damages, directly and indirectly, in connection with the furnishing, performance or misuse of this product or document.
Ensure that all power is switched off before installing or maintaining this product
www.resourcedm.com
Intuitive / Plant Controller
O-55 Sect 1 Drop Leg Press -3.4 to 180 Bar
O-56 Sect 2 Drop Leg Press -3.4 to 180 Bar
O-57 Sect 1 Split 0 = Off, 1 = On
O-58 Sect 2 Split 0 = Off, 1 = On
O-59 Sect 1 Heat Reclaim 0 = Off, 1 = On
O-60 Sect 2 Heat Reclaim 0 = Off, 1 = On
O-61 Section 1 Night Set-back 0 = Off, 1 = On
O-62 Section 1 Day Set-back 0 = Off, 1 = On
O-63 Section 2 Night Set-back 0 = Off, 1 = On
O-64 Section 2 Day Set-back 0 = Off, 1 = On
O-70 Sect.1 Bypass 0 = Off, 1 = On O-71 Sect.2 Bypass 0 = Off, 1 = On
O-72 Section 1 Gas Dump 0 = Off, 1 = On
O-73 Section 2 Gas Dump 0 = Off, 1 = On
S-01 Section 1 Control States (0) Stabilise (1) Initial (2) Normal (3) High Pressure (4) Low Pressure (5) Low Shut-down (6) Transducer Fail (7) Standby
S-02 Section 2 Control States (0) Stabilise (1) Initial (2) Normal (3) High Pressure (4) Low Pressure (5) Low Shut-down (6) Transducer Fail (7) Stand-by
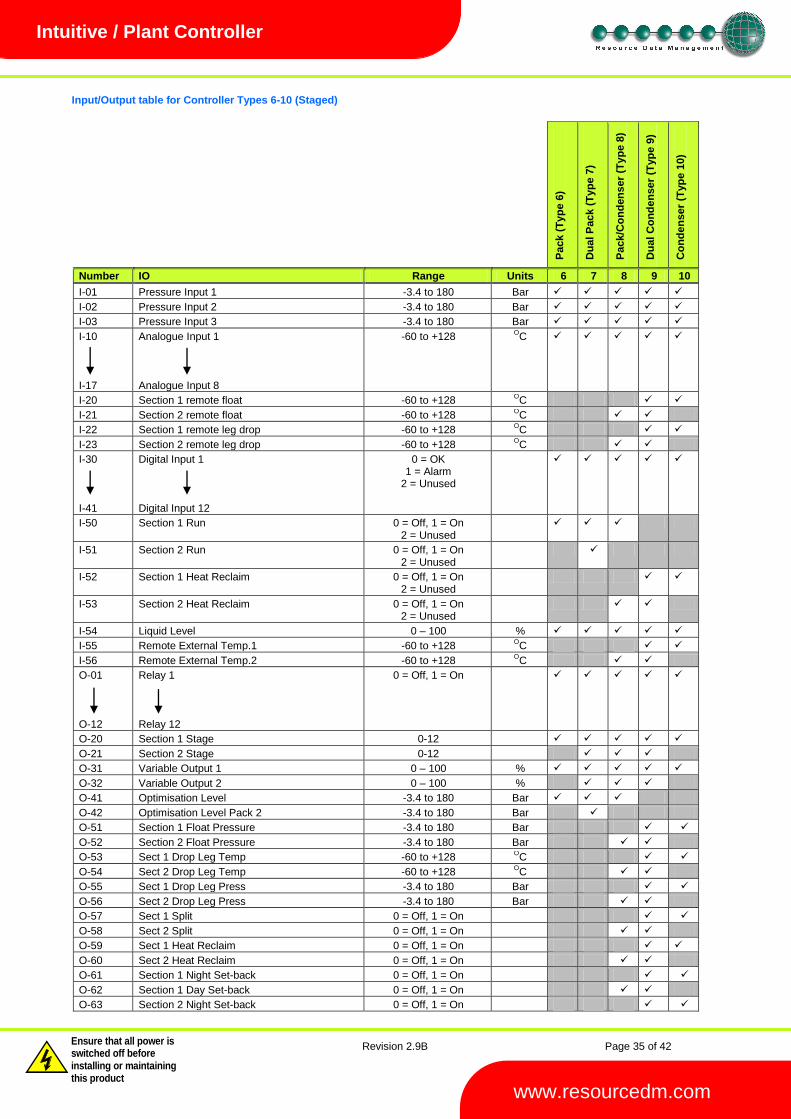
Revision 2.9B Page 35 of 42
Warning
Please Note The specifications of the product detailed on this Set-Up Guide may change without notice. RDM Ltd. shall not be liable for errors or for incidental or consequential damages, directly and indirectly, in connection with the furnishing, performance or misuse of this product or document.
Ensure that all power is switched off before installing or maintaining this product
www.resourcedm.com
Intuitive / Plant Controller
Input/Output table for Controller Types 6-10 (Staged)
Pack (
Ty
pe 6
)
Du
al P
ack (
Ty
pe 7
)
Pack/C
on
den
ser
(Ty
pe 8
)
Du
al
Co
nd
en
ser
(Typ
e 9
)
Co
nd
en
ser
(Typ
e 1
0)
Number IO Range Units 6 7 8 9 10
I-01 Pressure Input 1 -3.4 to 180 Bar I-02 Pressure Input 2 -3.4 to 180 Bar I-03 Pressure Input 3 -3.4 to 180 Bar I-10
I-17
Analogue Input 1 Analogue Input 8
-60 to +128 OC
I-20 Section 1 remote float -60 to +128 OC
I-21 Section 2 remote float -60 to +128 OC
I-22 Section 1 remote leg drop -60 to +128 OC
I-23 Section 2 remote leg drop -60 to +128 OC
I-30
I-41
Digital Input 1 Digital Input 12
0 = OK 1 = Alarm
2 = Unused
I-50 Section 1 Run 0 = Off, 1 = On 2 = Unused
I-51 Section 2 Run 0 = Off, 1 = On 2 = Unused
I-52 Section 1 Heat Reclaim 0 = Off, 1 = On 2 = Unused
I-53 Section 2 Heat Reclaim 0 = Off, 1 = On 2 = Unused
I-54 Liquid Level 0 – 100 % I-55 Remote External Temp.1 -60 to +128
OC
I-56 Remote External Temp.2 -60 to +128 OC
O-01
O-12
Relay 1
Relay 12
0 = Off, 1 = On
O-20 Section 1 Stage 0-12
O-21 Section 2 Stage 0-12
O-31 Variable Output 1 0 – 100 % O-32 Variable Output 2 0 – 100 %
O-41 Optimisation Level -3.4 to 180 Bar
O-42 Optimisation Level Pack 2 -3.4 to 180 Bar
O-51 Section 1 Float Pressure -3.4 to 180 Bar
O-52 Section 2 Float Pressure -3.4 to 180 Bar
O-53 Sect 1 Drop Leg Temp -60 to +128 OC
O-54 Sect 2 Drop Leg Temp -60 to +128 OC
O-55 Sect 1 Drop Leg Press -3.4 to 180 Bar
O-56 Sect 2 Drop Leg Press -3.4 to 180 Bar
O-57 Sect 1 Split 0 = Off, 1 = On
O-58 Sect 2 Split 0 = Off, 1 = On
O-59 Sect 1 Heat Reclaim 0 = Off, 1 = On O-60 Sect 2 Heat Reclaim 0 = Off, 1 = On
O-61 Section 1 Night Set-back 0 = Off, 1 = On
O-62 Section 1 Day Set-back 0 = Off, 1 = On
O-63 Section 2 Night Set-back 0 = Off, 1 = On
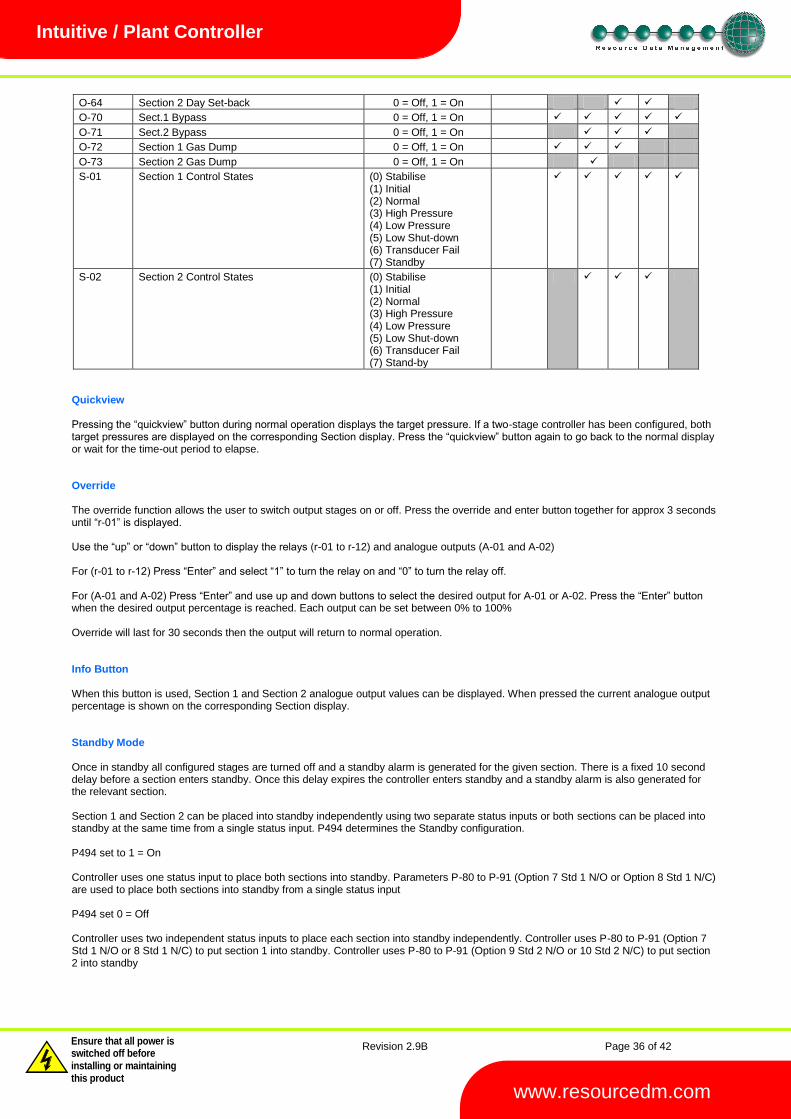
Revision 2.9B Page 36 of 42
Warning
Please Note The specifications of the product detailed on this Set-Up Guide may change without notice. RDM Ltd. shall not be liable for errors or for incidental or consequential damages, directly and indirectly, in connection with the furnishing, performance or misuse of this product or document.
Ensure that all power is switched off before installing or maintaining this product
www.resourcedm.com
Intuitive / Plant Controller
O-64 Section 2 Day Set-back 0 = Off, 1 = On
O-70 Sect.1 Bypass 0 = Off, 1 = On O-71 Sect.2 Bypass 0 = Off, 1 = On
O-72 Section 1 Gas Dump 0 = Off, 1 = On
O-73 Section 2 Gas Dump 0 = Off, 1 = On
S-01 Section 1 Control States (0) Stabilise (1) Initial (2) Normal (3) High Pressure (4) Low Pressure (5) Low Shut-down (6) Transducer Fail (7) Standby
S-02 Section 2 Control States (0) Stabilise (1) Initial (2) Normal (3) High Pressure (4) Low Pressure (5) Low Shut-down (6) Transducer Fail (7) Stand-by
Quickview Pressing the “quickview” button during normal operation displays the target pressure. If a two-stage controller has been configured, both target pressures are displayed on the corresponding Section display. Press the “quickview” button again to go back to the normal display or wait for the time-out period to elapse. Override The override function allows the user to switch output stages on or off. Press the override and enter button together for approx 3 seconds until “r-01” is displayed. Use the “up” or “down” button to display the relays (r-01 to r-12) and analogue outputs (A-01 and A-02) For (r-01 to r-12) Press “Enter” and select “1” to turn the relay on and “0” to turn the relay off. For (A-01 and A-02) Press “Enter” and use up and down buttons to select the desired output for A-01 or A-02. Press the “Enter” button when the desired output percentage is reached. Each output can be set between 0% to 100% Override will last for 30 seconds then the output will return to normal operation. Info Button When this button is used, Section 1 and Section 2 analogue output values can be displayed. When pressed the current analogue output percentage is shown on the corresponding Section display. Standby Mode Once in standby all configured stages are turned off and a standby alarm is generated for the given section. There is a fixed 10 second delay before a section enters standby. Once this delay expires the controller enters standby and a standby alarm is also generated for the relevant section. Section 1 and Section 2 can be placed into standby independently using two separate status inputs or both sections can be placed into standby at the same time from a single status input. P494 determines the Standby configuration. P494 set to 1 = On Controller uses one status input to place both sections into standby. Parameters P-80 to P-91 (Option 7 Std 1 N/O or Option 8 Std 1 N/C) are used to place both sections into standby from a single status input P494 set 0 = Off Controller uses two independent status inputs to place each section into standby independently. Controller uses P-80 to P-91 (Option 7 Std 1 N/O or 8 Std 1 N/C) to put section 1 into standby. Controller uses P-80 to P-91 (Option 9 Std 2 N/O or 10 Std 2 N/C) to put section 2 into standby
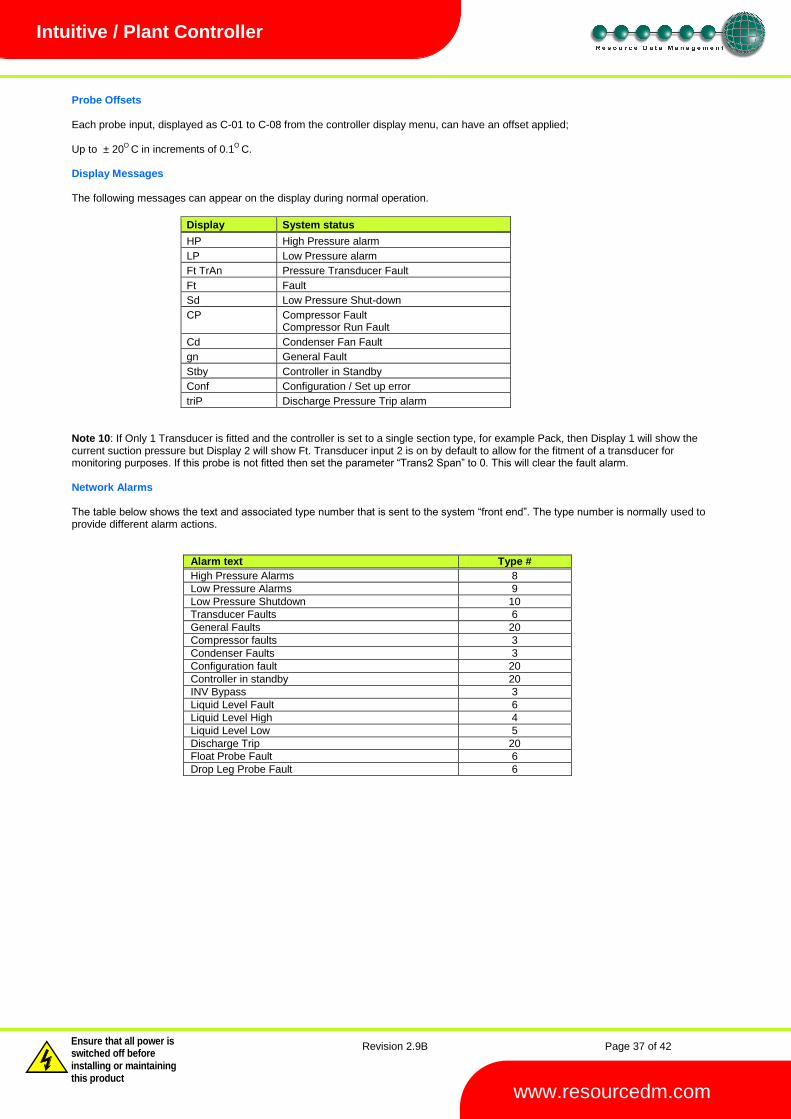
Revision 2.9B Page 37 of 42
Warning
Please Note The specifications of the product detailed on this Set-Up Guide may change without notice. RDM Ltd. shall not be liable for errors or for incidental or consequential damages, directly and indirectly, in connection with the furnishing, performance or misuse of this product or document.
Ensure that all power is switched off before installing or maintaining this product
www.resourcedm.com
Intuitive / Plant Controller
Probe Offsets Each probe input, displayed as C-01 to C-08 from the controller display menu, can have an offset applied; Up to ± 20
O C in increments of 0.1
O C.
Display Messages The following messages can appear on the display during normal operation.
Display System status
HP High Pressure alarm
LP Low Pressure alarm
Ft TrAn Pressure Transducer Fault
Ft Fault
Sd Low Pressure Shut-down
CP Compressor Fault Compressor Run Fault
Cd Condenser Fan Fault
gn General Fault
Stby Controller in Standby
Conf Configuration / Set up error
triP Discharge Pressure Trip alarm
Note 10: If Only 1 Transducer is fitted and the controller is set to a single section type, for example Pack, then Display 1 will show the current suction pressure but Display 2 will show Ft. Transducer input 2 is on by default to allow for the fitment of a transducer for monitoring purposes. If this probe is not fitted then set the parameter “Trans2 Span” to 0. This will clear the fault alarm. Network Alarms The table below shows the text and associated type number that is sent to the system “front end”. The type number is normally used to provide different alarm actions.
Alarm text Type #
High Pressure Alarms 8
Low Pressure Alarms 9
Low Pressure Shutdown 10
Transducer Faults 6
General Faults 20
Compressor faults 3
Condenser Faults 3
Configuration fault 20
Controller in standby 20
INV Bypass 3
Liquid Level Fault 6
Liquid Level High 4
Liquid Level Low 5
Discharge Trip 20
Float Probe Fault 6
Drop Leg Probe Fault 6
Revision 2.9B Page 38 of 42
Warning
Please Note The specifications of the product detailed on this Set-Up Guide may change without notice. RDM Ltd. shall not be liable for errors or for incidental or consequential damages, directly and indirectly, in connection with the furnishing, performance or misuse of this product or document.
Ensure that all power is switched off before installing or maintaining this product
www.resourcedm.com
Intuitive / Plant Controller
Specification Power requirements: Supply Voltage Range: 24 Vac ±10% or 24 Vdc ±10% Supply Frequency: 50 – 60 Hz ±10% Maximum supply current: <1 Amp Typical supply current: 0.3 Amp Class 2 Insulation: No protective Earth is required. A functional earth can be connected if the equipment is located in an
electrically noisy environment.
Note : The use of centre tapped to earth transformers is not allowed. This is to prevent damage to the transformer and/or controller.
The host equipment must provide adequate protection against contact to hazardous live parts. RDM advise the use of a suitable external over-current protection device on the Mercury Plant Controller. Warranty may be invalidated due to excess current being unlimited if there are no fuses/circuit breakers installed General Operating temperature range: +5
0C to +50
0C
Operating Humidity: 80% maximum Storage temperature range: -20
0C to +65
0C
Environmental: Indoor use at altitudes up to 2000m, Pollution Degree 1, Installation Category II. Voltage fluctuations not to exceed ±10% of nominal voltage Size: Mercury Plant Controller 270mm (L) x 115mm (W) x 50mm (H) Intuitive Plant Controller 280mm (L) x 122mm (W) x 67mm (H) Weight: Mercury Plant Controller 700 Grams Intuitive Plant Controller 750 Grams Safety: EN61010 EMC: EN61326; 1997 +Amdt. A1; 1998 Ventilation: There is no requirement for forced cooling ventilation Inputs Probe Input type See Set/change Units for probe types Digital Input type The preferred option is a 0 volt return through a volt free relay or 24 Vac referenced to the
supply voltage. If a 24Vac signal is being sourced from the Plant controller power supply then do not ground the Digital Input common rail, this is grounded internally.
Comms: Ethernet 4-20mA 4-20mA current loop, use the 12 Vdc output to feed the device. Analogue Outputs 0 to 10 Volts DC or 0/4-20mA, Selected in the Front Panel Menu. A 50mA fuse is recommended for each Analogue output.
The 4-20mA output will not operate correctly if the target device input impedance is > 75Ω The 0-10V output will not operate correctly if the target device input impedance is < 10KΩ
Relay Ratings, Mercury Plant Controller
5A/250 Vac/AC1 (Resistive load) 5A/30 Vdc (Resistive load) 2A/250 Vac cosφ=0.3 on N/O contact (Inductive Load)
Relay Ratings, Intuitive Plant Controller
10A/250 Vac/AC1 (Resistive load)
10A/30 Vdc (Resistive load) 5A/250 Vac cosφ=0.4
Fuse Ratings, Intuitive Plant Controller
Relay Fuses 10A Antisurge HRC, 32 x 6.3mm Supply Fuse 2A Antisurge HRC, 32 x 6.3mm
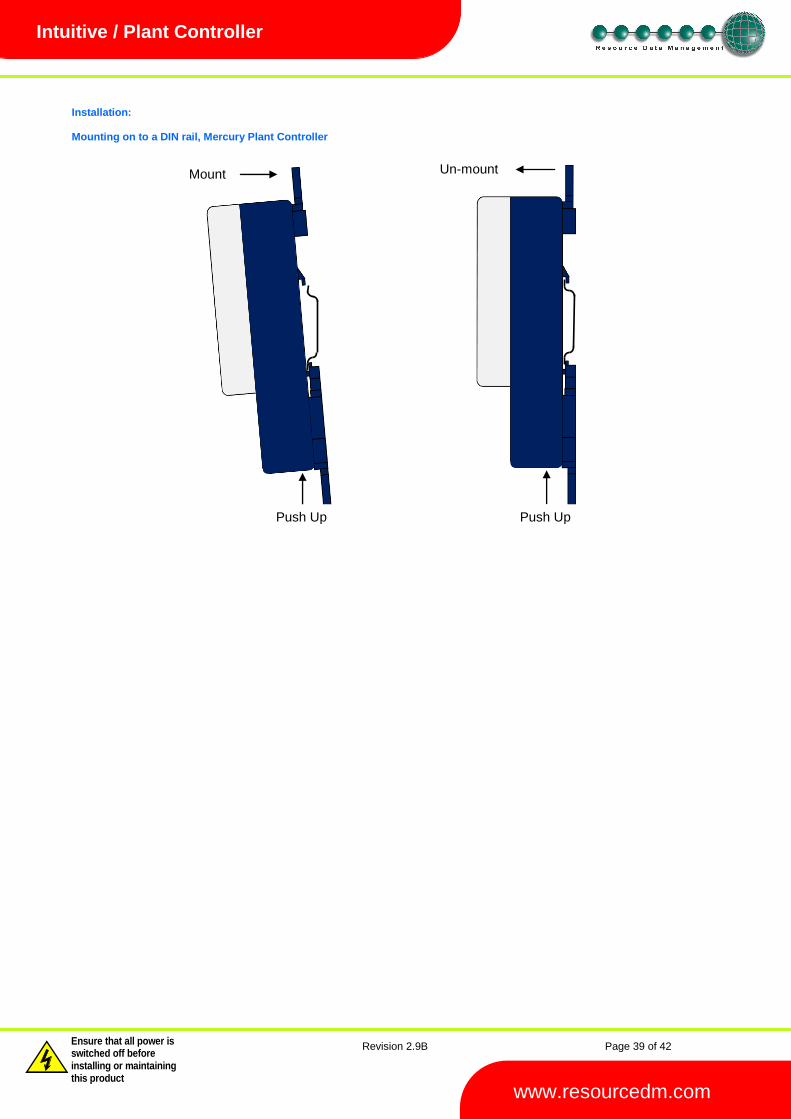
Revision 2.9B Page 39 of 42
Warning
Please Note The specifications of the product detailed on this Set-Up Guide may change without notice. RDM Ltd. shall not be liable for errors or for incidental or consequential damages, directly and indirectly, in connection with the furnishing, performance or misuse of this product or document.
Ensure that all power is switched off before installing or maintaining this product
www.resourcedm.com
Intuitive / Plant Controller
Installation: Mounting on to a DIN rail, Mercury Plant Controller
Push Up Push Up
Mount Un-mount
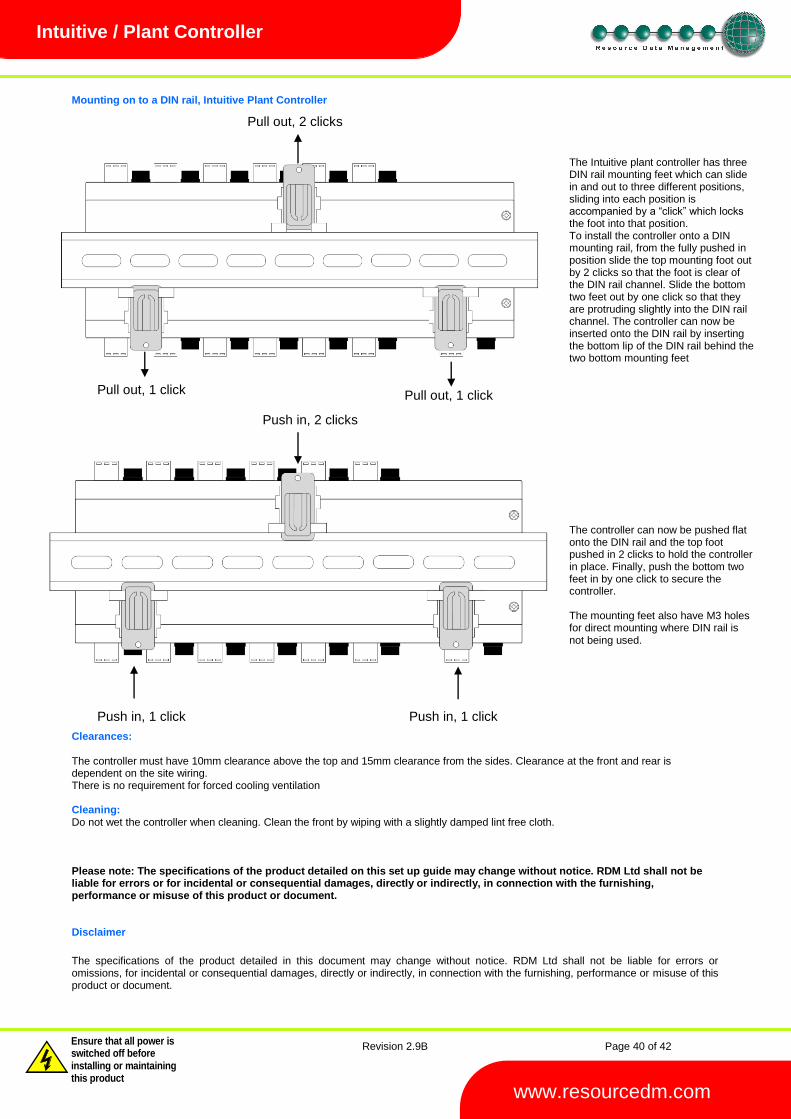
Revision 2.9B Page 40 of 42
Warning
Please Note The specifications of the product detailed on this Set-Up Guide may change without notice. RDM Ltd. shall not be liable for errors or for incidental or consequential damages, directly and indirectly, in connection with the furnishing, performance or misuse of this product or document.
Ensure that all power is switched off before installing or maintaining this product
www.resourcedm.com
Intuitive / Plant Controller
Mounting on to a DIN rail, Intuitive Plant Controller Clearances: The controller must have 10mm clearance above the top and 15mm clearance from the sides. Clearance at the front and rear is dependent on the site wiring. There is no requirement for forced cooling ventilation Cleaning: Do not wet the controller when cleaning. Clean the front by wiping with a slightly damped lint free cloth. Please note: The specifications of the product detailed on this set up guide may change without notice. RDM Ltd shall not be liable for errors or for incidental or consequential damages, directly or indirectly, in connection with the furnishing, performance or misuse of this product or document. Disclaimer
The specifications of the product detailed in this document may change without notice. RDM Ltd shall not be liable for errors or omissions, for incidental or consequential damages, directly or indirectly, in connection with the furnishing, performance or misuse of this product or document.
Pull out, 2 clicks
Pull out, 1 click Pull out, 1 click
Push in, 2 clicks
Push in, 1 click Push in, 1 click
The Intuitive plant controller has three DIN rail mounting feet which can slide in and out to three different positions, sliding into each position is accompanied by a “click” which locks the foot into that position. To install the controller onto a DIN mounting rail, from the fully pushed in position slide the top mounting foot out by 2 clicks so that the foot is clear of the DIN rail channel. Slide the bottom two feet out by one click so that they are protruding slightly into the DIN rail channel. The controller can now be inserted onto the DIN rail by inserting the bottom lip of the DIN rail behind the two bottom mounting feet
The controller can now be pushed flat onto the DIN rail and the top foot pushed in 2 clicks to hold the controller in place. Finally, push the bottom two feet in by one click to secure the controller. The mounting feet also have M3 holes for direct mounting where DIN rail is not being used.
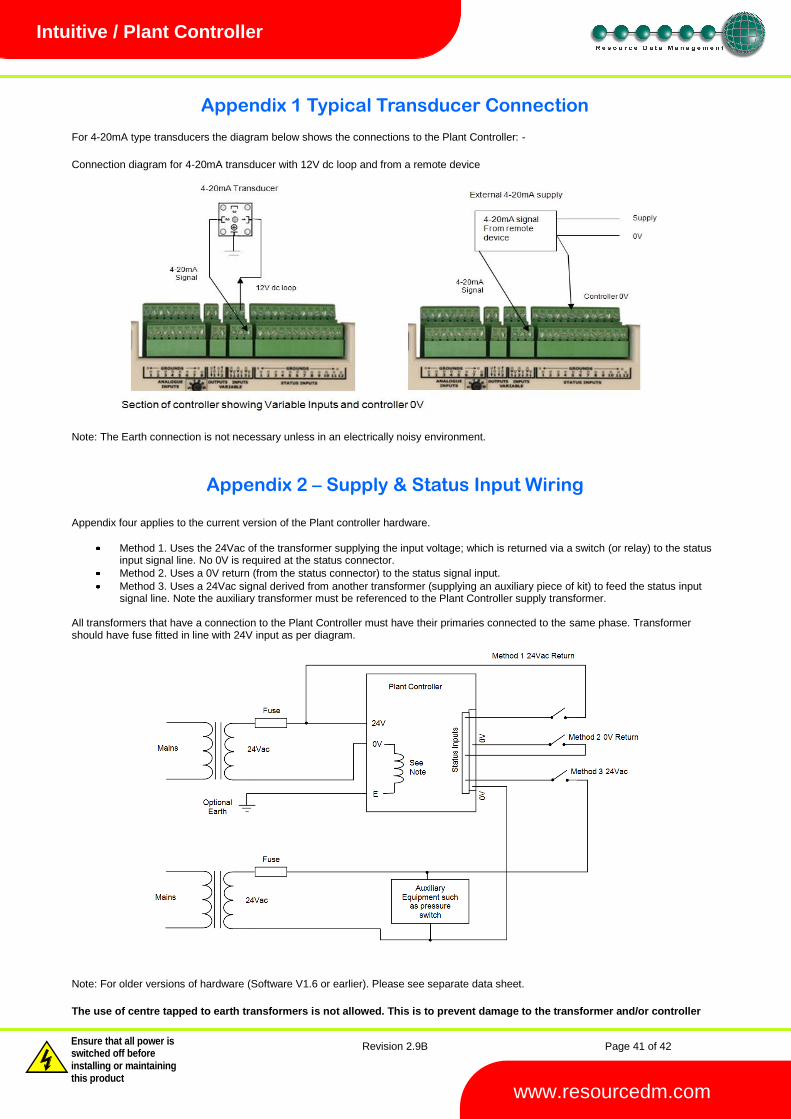
Revision 2.9B Page 41 of 42
Warning
Please Note The specifications of the product detailed on this Set-Up Guide may change without notice. RDM Ltd. shall not be liable for errors or for incidental or consequential damages, directly and indirectly, in connection with the furnishing, performance or misuse of this product or document.
Ensure that all power is switched off before installing or maintaining this product
www.resourcedm.com
Intuitive / Plant Controller
Appendix 1 Typical Transducer Connection For 4-20mA type transducers the diagram below shows the connections to the Plant Controller: -
Connection diagram for 4-20mA transducer with 12V dc loop and from a remote device
Note: The Earth connection is not necessary unless in an electrically noisy environment.
Appendix 2 – Supply & Status Input Wiring
Appendix four applies to the current version of the Plant controller hardware.
Method 1. Uses the 24Vac of the transformer supplying the input voltage; which is returned via a switch (or relay) to the status input signal line. No 0V is required at the status connector.
Method 2. Uses a 0V return (from the status connector) to the status signal input.
Method 3. Uses a 24Vac signal derived from another transformer (supplying an auxiliary piece of kit) to feed the status input signal line. Note the auxiliary transformer must be referenced to the Plant Controller supply transformer.
All transformers that have a connection to the Plant Controller must have their primaries connected to the same phase. Transformer should have fuse fitted in line with 24V input as per diagram.
Note: For older versions of hardware (Software V1.6 or earlier). Please see separate data sheet.
The use of centre tapped to earth transformers is not allowed. This is to prevent damage to the transformer and/or controller
Revision 2.9B Page 42 of 42
Warning
Please Note The specifications of the product detailed on this Set-Up Guide may change without notice. RDM Ltd. shall not be liable for errors or for incidental or consequential damages, directly and indirectly, in connection with the furnishing, performance or misuse of this product or document.
Ensure that all power is switched off before installing or maintaining this product
www.resourcedm.com
Intuitive / Plant Controller
Revision History Revision Date Changes
2.7 14/04/2011 Introduction of the Intuitive range 0–5Vdc Variable Input / Output option added New feature broadcast Pressure to Mercury IP Module PR0016 Pressure input range increased from 150 Bar to 180 Bar Loader operation enhanced. Equalise Run Times feature added Ability to change status input type via front panel display
2.9A 16/02/2012 Standby now has fixed 10 second delay Trim compressor now uses starts per hour parameter Inverter is now switched off with discharge trip alarm
2.9B 25/10/2012 Current Issue