Embed Size (px)
Citation preview

PowerShell Blog Week: Advanced Functions April 2015
PowerShell Blog Week April 2015 – Advanced Functions
1
CONTENTS
Introduction.................................................................................................................................................................................. 2
Standard vs Advanced Functions by François-Xavier Cat........................................................................................................... 3
Standard Function .................................................................................................................................................................... 3 Advanced Function .................................................................................................................................................................. 4 Resources on Advanced Functions .......................................................................................................................................... 8
PowerShell Advanced Functions: Can we build them better? By Mike F. Robbins .................................................................... 9
ValidateLength ........................................................................................................................................................................ 9 ValidatePattern ...................................................................................................................................................................... 10 ValidateScript ........................................................................................................................................................................ 11 ValidateCount ........................................................................................................................................................................ 11 ValidateRange........................................................................................................................................................................ 12 ValidateSet............................................................................................................................................................................. 12 ValidateNotNullorEmpty ....................................................................................................................................................... 13
Dynamic Parameters and Parameter Validation by Adam Bertram ........................................................................................... 15
Creating a Dynamic Validation Parameter the Hard Way ..................................................................................................... 16 Creating a Dynamic Validation Parameter the Easy Way ..................................................................................................... 17
Supporting WhatIf and Confirm by Jeff Hicks .......................................................................................................................... 19
SupportsShouldProcess = WhatIf .......................................................................................................................................... 19 Asking for Confirmation ........................................................................................................................................................ 22
Advanced Help for Advanced Functions by June Blender ........................................................................................................ 25
Description: Describe the function UI ................................................................................................................................... 25 Examples: Show how to use it ............................................................................................................................................... 26 Parameter Descriptions .......................................................................................................................................................... 27 Inputs and Outputs ................................................................................................................................................................. 28 Revise for the end-user .......................................................................................................................................................... 28
A Look at Try/Catch in PowerShell by Boe Prox ...................................................................................................................... 30
Try ......................................................................................................................................................................................... 30 Catch ...................................................................................................................................................................................... 30 Finally .................................................................................................................................................................................... 31 Putting it all together.............................................................................................................................................................. 31
About the Authors...................................................................................................................................................................... 32
All content in this publication is the copyrighted material (© 2015) of the respective author and is used with their permission.
Any referenced trademarks belong to their respective holders. All code or script examples are intended for educational
purposes only. No warranty or guarantee of any kind is implied.

PowerShell Blog Week April 2015 – Advanced Functions
2
INTRODUCTION
In early 2015, a group of PowerShell community members and MVPs decided to collaborate on a social media experiment.
Each person was already an active blogger and member of the PowerShell community on a number of social platforms such
as Facebook, Twitter and Google Plus. Using their individual blogs, they decided to post a series of articles centered on a
common topic. In this case that meant advanced PowerShell functions.
Each contributor was assigned a concept or topic. These topics were arranged in a reasonable learning curve with a new post
scheduled for each day. The intent was for a reader to follow the series of articles throughout the week and engage with each
contributor. The articles ran from March 30, 2105 through April 4, 2015. Announcements were made on social media using
the #PSBlogWeek hashtag. In addition, an ad-hoc Twitter chat was held on April 3, 2015 with several of the authors.
Based on blog comments and social media feedback, reception of this event was very positive and encouraging. A number of
other community members have expressed interest in participating in future events. Many readers enjoyed the material and
felt it was a valuable learning tool. Individual contributors to #PSBlogWeek saw an uptick in page view and social media
followers.
We would like to thank everyone who took the time to read our original posts, left a comment or tweeted about it. We are
creating this document as a free reference guide to PowerShell advanced functions, based on our #PSBlogWeek posts.
Obviously this is just scratching the surface so if you have questions we encourage you to ask them in forums such as
PowerShell.org or on social media. If you use Twitter, be sure to include the #PowerShell tag.
Thank you, enjoy and watch for future #PSBlogWeek events.
PowerShell Blog Week April 2015 – Advanced Functions
3
STANDARD VS ADVANCED FUNCTIONS BY FRANÇOIS-XAVIER CAT
This article was originally published at: http://www.lazywinadmin.com/2015/03/standard-and-advanced-powershell.html
When you have been working with PowerShell for some time, creating reusable tools is an obvious evolution to avoid writing
the same code over and over again. You will want to have modular pieces of code that only do one job and do it well - that’s
the role of functions.
Let's suppose you have to accomplish a task that requires multiple lines of code, for example:
# Computer System Get-WmiObject -Class Win32_ComputerSystem # Operating System Get-WmiObject -class win32_OperatingSystem # BIOS Get-WmiObject -class Win32_BIOS
STANDARD FUNCTION
A function is a list of statements wrapped into a scriptblock. A function has a name that you assign. You run those statements
by simply typing the function name.
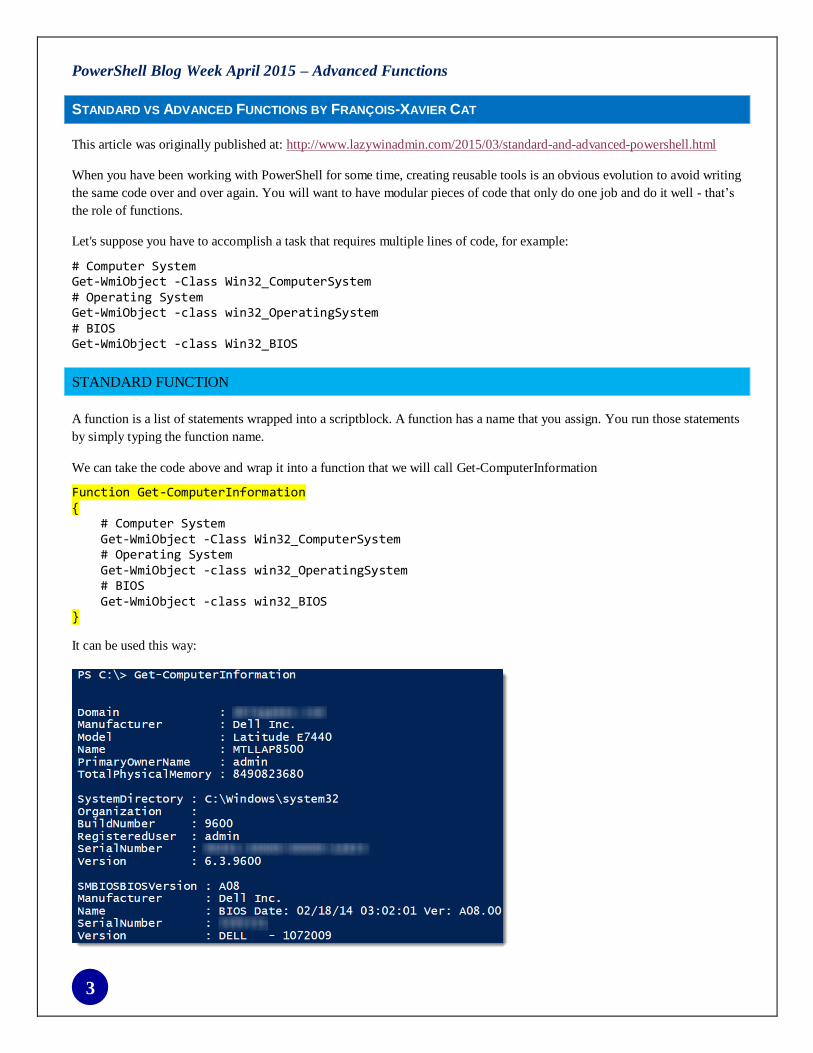
We can take the code above and wrap it into a function that we will call Get-ComputerInformation
Function Get-ComputerInformation { # Computer System Get-WmiObject -Class Win32_ComputerSystem # Operating System Get-WmiObject -class win32_OperatingSystem # BIOS Get-WmiObject -class win32_BIOS }
It can be used this way:

PowerShell Blog Week April 2015 – Advanced Functions
4
Now we can make our function more versatile by including a parameter that accepts different computer names. In the
following example I'm adding the parameter $ComputerName and some extra code on the WMI queries to pass the machine
name.
For the Output, I'm creating a new PowerShell object to only return some selected information.
Function Get-ComputerInformation { PARAM ($ComputerName) # Computer System $ComputerSystem = Get-WmiObject -Class Win32_ComputerSystem -ComputerName $ComputerName # Operating System $OperatingSystem = Get-WmiObject -class win32_OperatingSystem -ComputerName $ComputerName # BIOS $Bios = Get-WmiObject -class win32_BIOS -ComputerName $ComputerName # Prepare Output $Properties = @{ ComputerName = $ComputerName Manufacturer = $ComputerSystem.Manufacturer Model = $ComputerSystem.Model OperatingSystem = $OperatingSystem.Caption OperatingSystemVersion = $OperatingSystem.Version SerialNumber = $Bios.SerialNumber } # Output Information New-Object -TypeName PSobject -Property $Properties }
We created a very simple and nice tool that can query different machines by editing the ComputerName parameter. What can
we do to make this tool more efficient?
ADVANCED FUNCTION
Advanced functions allow you to write functions that can act like cmdlets. This means that you can make your functions
more robust, handle errors, support Verbose, Debug, Dynamic Parameters, Validate input, … just to name a few.
Those features would be typically available with compiled cmdlet using a Microsoft .NET Framework language (for example
with C#). However, Advanced Functions make it simple and are written in Windows PowerShell in the same way that other
functions or script blocks are written.

PowerShell Blog Week April 2015 – Advanced Functions
5
How do I make a function advanced?
Pretty simple, all you need is the attribute CmdletBinding.
Note: You can also use the [Parameter()] attribute to make it advanced, but for this example I'll stick with CmdletBinding.
Let’s apply this to our function.
Function Get-ComputerInformation { [CmdletBinding()] PARAM ($ComputerName) # Computer System $ComputerSystem = Get-WmiObject -Class Win32_ComputerSystem -ComputerName $ComputerName # Operating System $OperatingSystem = Get-WmiObject -Class win32_OperatingSystem -ComputerName $ComputerName # BIOS $Bios = Get-WmiObject -class win32_BIOS -ComputerName $ComputerName # Prepare Output $Properties = @{ ComputerName = $ComputerName Manufacturer = $ComputerSystem.Manufacturer Model = $ComputerSystem.Model OperatingSystem = $OperatingSystem.Caption OperatingSystemVersion = $OperatingSystem.Version SerialNumber = $Bios.SerialNumber } # Output Information New-Object -TypeName PSobject -Property $Properties }
That's it! This is all you need to make an Advanced Function.
If you take a look at the parameters available with and without the CmdletBinding attribute, you’ll be surprised by all the
greatness this little word enables to our function.
Standard Function (Without CmdletBinding)

PowerShell Blog Week April 2015 – Advanced Functions
6
Advanced Function (With CmdletBinding)
The common parameters are available with any cmdlet and on advanced functions that use the CmdletBinding attribute or the
Parameter attribute. They can, for example, help you handle different types of error, warnings or show some programmer-
level details about the operation performed.
I won’t go into too much detail about those, you can check this article about_CommonParameters for more information.
Why should you use Advanced Function over the Standard?
Standard functions are great for simple tasks that will make you save lines of code or as “helpers” for another advanced
function.
If you plan to create a tool that needs to work in many scenarios such as inside a pipeline, to validate the data passed to its
parameters, to handles errors, to be compatible with –confirm and –whatif switches, to show verbose messages, … or if you
simply plan to share and add this function into a module, then Advanced function is the way to go. As we saw earlier, making
your function “Advanced” is really simple and adds some really great features.
Using those useful features can help you create a really strong reusable tool.
Accept Pipeline Input and Verbose message
As a final example, here is how you can simply make your advanced function accept input from the pipeline and show some
verbose messages to keep track of your function’s progress. Adding support for pipeline can be done by adding the static
parameter “ValueFromPipeline” inside the Parameter attribute: [Parameter(ValueFromPipeline)]. In my example I added this
on the parameter we defined ComputerName.
Verbose messages are available using the Write-Verbose cmdlet. Remember that you will need to use the switch –verbose
when you call your function to show those messages.
Function Get-ComputerInformation { [CmdletBinding()] PARAM (

PowerShell Blog Week April 2015 – Advanced Functions
7
[Parameter(ValueFromPipeline)] $ComputerName = $env:COMPUTERNAME ) PROCESS { Write-Verbose -Message "$ComputerName" # Computer System $ComputerSystem = Get-WmiObject -Class Win32_ComputerSystem -ComputerName $ComputerName # Operating System $OperatingSystem = Get-WmiObject -class win32_OperatingSystem -ComputerName $ComputerName # BIOS $Bios = Get-WmiObject -class win32_BIOS -ComputerName $ComputerName # Prepare Output Write-Verbose -Message "$ComputerName - Preparing output" $Properties = @{ ComputerName = $ComputerName Manufacturer = $ComputerSystem.Manufacturer Model = $ComputerSystem.Model OperatingSystem = $OperatingSystem.Caption OperatingSystemVersion = $OperatingSystem.Version SerialNumber = $Bios.SerialNumber } #Properties # Output Information Write-Verbose -Message "$ComputerName - Output Information" New-Object -TypeName PSobject -Property $Properties } #PROCESS } #Function
In this example, I'm loading a list of machines inside the text file computers.txt. Those machines are passed to the parameter
"ComputerName". I also used the verbose switch which lets me follow the sequence of my tool.

PowerShell Blog Week April 2015 – Advanced Functions
8
RESOURCES ON ADVANCED FUNCTIONS
Here are some great resources if you want to learn more on PowerShell Functions:
about_Functions
about_Functions_Advanced
about_Functions_CmdletBindingAttribute
about_Functions_Advanced_Methods
about_Functions_Advanced_Parameters
about_Functions_OutputTypeAttribute

PowerShell Blog Week April 2015 – Advanced Functions
9
POWERSHELL ADVANCED FUNCTIONS: CAN WE BUILD THEM BETTER? BY MIKE F. ROBBINS
This article was originally posted at: http://mikefrobbins.com/2015/03/31/powershell-advanced-functions-can-we-build-
them-better-with-parameter-validation-yes-we-can/
With parameter validation, yes we can!
What is parameter validation? In PowerShell, parameter validation is the automated testing to validate the accuracy of
parameter values passed to a command.
Why validate parameter input? The question should be, can your function complete successfully without valid input being
provided? If not, parameter validation should be performed to catch problems early on and before your function performs any
actions. There could also be security risks associated with accepting input that isn't validated.
In this first example, no parameter validation is being performed:
function Test-NoValidation { [CmdletBinding()] param ( $FileName ) Write-Output $FileName }
This allows any number of values and any value including null, empty, or invalid file names to be provided for the FileName
parameter:
There are several different parameter validation attributes that can be used to validate the values that are provided for
parameter input.
VALIDATELENGTH
ValidateLength is one of those attributes. It validates that the number of characters are within a specified range as shown in
the following example where the value provided for the FileName parameter must be between one and twelve characters in
length:
function Test-ValidateLength { [CmdletBinding()] param ( [ValidateLength(1,12)] [string]$FileName ) Write-Output "$FileName is $($FileName.Length) characters long" }
PowerShell Blog Week April 2015 – Advanced Functions
10
Typing the FileName variable as a [string] prevents more than one value from being provided for it as shown in the previous
example.
Values outside the specified character length generate an error:
ValidateLength probably isn't the best parameter validation attribute for validating something like a file name since it allows
invalid file name characters to be specified.
VALIDATEPATTERN
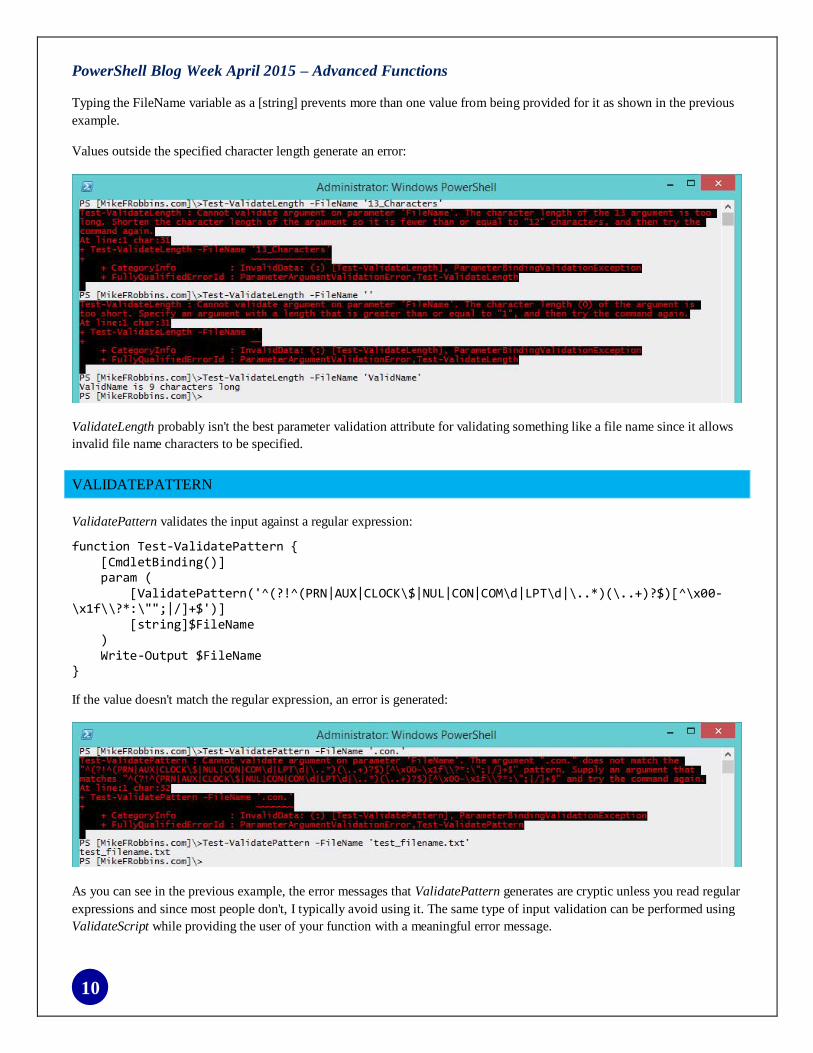
ValidatePattern validates the input against a regular expression:
function Test-ValidatePattern { [CmdletBinding()] param ( [ValidatePattern('^(?!^(PRN|AUX|CLOCK\$|NUL|CON|COM\d|LPT\d|\..*)(\..+)?$)[^\x00-\x1f\\?*:\"";|/]+$')] [string]$FileName ) Write-Output $FileName }
If the value doesn't match the regular expression, an error is generated:
As you can see in the previous example, the error messages that ValidatePattern generates are cryptic unless you read regular
expressions and since most people don't, I typically avoid using it. The same type of input validation can be performed using
ValidateScript while providing the user of your function with a meaningful error message.

PowerShell Blog Week April 2015 – Advanced Functions
11
VALIDATESCRIPT
ValidateScript uses a script to validate the value:
function Test-ValidateScript { [CmdletBinding()] param ( [ValidateScript({ If ($_ -match '^(?!^(PRN|AUX|CLOCK\$|NUL|CON|COM\d|LPT\d|\..*)(\..+)?$)[^\x00-\x1f\\?*:\"";|/]+$') { $True } else { Throw "$_ is either not a valid filename or it is not recommended." } })] [string]$FileName ) Write-Output $FileName }
Notice the meaningful error message:
VALIDATECOUNT
ValidateCount limits the number of values that can be provided:
function Test-ValidateCount { [CmdletBinding()] param ( [ValidateCount(2,6)] [string[]]$ComputerName ) Write-Output "The ComputerName array contains $($ComputerName.Count) items." }
Typing the variable as a [string[]] allows multiple values to be provided.
PowerShell Blog Week April 2015 – Advanced Functions
12
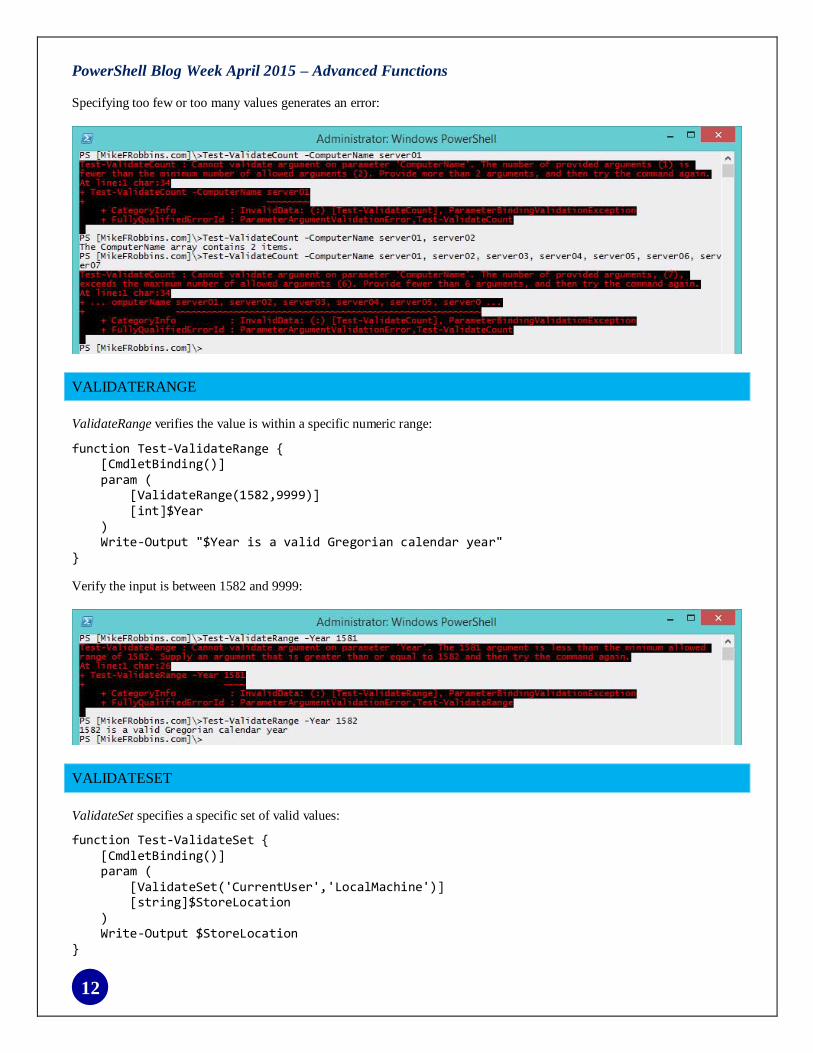
Specifying too few or too many values generates an error:
VALIDATERANGE
ValidateRange verifies the value is within a specific numeric range:
function Test-ValidateRange { [CmdletBinding()] param ( [ValidateRange(1582,9999)] [int]$Year ) Write-Output "$Year is a valid Gregorian calendar year" }
Verify the input is between 1582 and 9999:
VALIDATESET
ValidateSet specifies a specific set of valid values:
function Test-ValidateSet { [CmdletBinding()] param ( [ValidateSet('CurrentUser','LocalMachine')] [string]$StoreLocation ) Write-Output $StoreLocation }

PowerShell Blog Week April 2015 – Advanced Functions
13
Beginning with PowerShell version 3, those values will tab expand in the PowerShell console and they'll show up in
Intellisense in the PowerShell ISE (Integrated Scripting Environment) and most third party products such as SAPIEN
PowerShell Studio.
In the previous examples, the parameters weren't designated as being mandatory however. This means that they aren't
required to be specified:
Mandatory parameters require the user to provide a value:
#Requires -Version 3.0 function Test-ValidateSet { [CmdletBinding()] param ( [Parameter(Mandatory)] [ValidateSet('CurrentUser','LocalMachine')] [string]$StoreLocation ) Write-Output $StoreLocation }
If a mandatory parameter isn't specified, you're prompted for a value:
Default values can't be used with mandatory parameters. If a default value is specified with a mandatory parameter and the
parameter isn't specified when calling the function, you'll still be prompted for a value (the default value will never be used).
VALIDATENOTNULLOREMPTY
ValidateNotNullOrEmpty prevents null or empty values from being provided and default values can be used with this
particular validation attribute:
function Test-NotNullOrEmpty { [CmdletBinding()] param (

PowerShell Blog Week April 2015 – Advanced Functions
14
[ValidateNotNullOrEmpty()] [string]$ComputerName = $env:COMPUTERNAME ) Write-Output $ComputerName }
The default value is used when the parameter isn't specified:
I've demonstrated the more common parameter validation attributes in this blog article, to learn more see the
about_Functions_Advanced_Parameters help topic.

PowerShell Blog Week April 2015 – Advanced Functions
15
DYNAMIC PARAMETERS AND PARAMETER VALIDATION BY ADAM BERTRAM
This article was originally published at: http://www.adamtheautomator.com/psbloggingweek-dynamic-parameters-and-
parameter-validation/
One of the coolest yet complex features of advanced functions in PowerShell is dynamic parameters. Dynamic parameters
take your typical function parameters to a whole new level. Have you ever had a time when you created an advanced function
and wanted your parameters to depend on something else; to dynamically be created based on the criteria you choose at
runtime? How about wanting parameter validation and tab-completion on a parameter not based on a static set of strings but
generated at runtime? These are both doable with dynamic parameters.
There are a couple different ways to use dynamic parameters that I’ve seen. The first is the way that Ben Ten wrote about
them on Powershell Magazine. Using this method, Ben was able to create parameters on the fly based on if a different
parameter was used. Personally, I’ve never had a need to do this. I really like using dynamic parameters as a way to validate
input based on some criteria that’s available at runtime. This way I can write a script that gathers information on-the-fly
which allows me the beautiful parameter tab completion we all know and love. Let’s go over an example on how to create
parameter validation based on files in a folder.
“Normal” advanced function parameters allow you to use a few Validate options. You can validate the number of arguments
a parameter can accept, the minimum and maximum length of a parameter argument, a set of options in an array, matching a
regex string or a scriptblock and more. What I’m looking for here is to use the ValidateSet attribute for the tab-completion.
You’ll notice in the example above I’m using the Get-Item cmdlet and the default parameters for tab-completion which is to
be expected. I want that functionality but I want to tab-complete my own arguments so let’s create a simple function to do
that.
You’ll notice that I’ve highlighted the validation attribute that will allow us to tab-complete the MyParameter argument.
Now we’re able to get custom parameter argument tab-completion using the values specified in the ValidateSet attribute.
PowerShell Blog Week April 2015 – Advanced Functions
16
But now what if I want my tab-completion options to be generated on-the-fly based on some other criteria rather than a static
list? The only option is to use dynamic parameters. In my example, I want to tab-complete a list of files in a particular folder
at run-time. To get this done I’ll be using a dynamic parameter which will run Get-ChildItem whenever I try to tab-complete
the MyParameter parameter.
With that being said, let’s make the ValidateSet attribute of the MyParameter parameter dynamic, shall we?
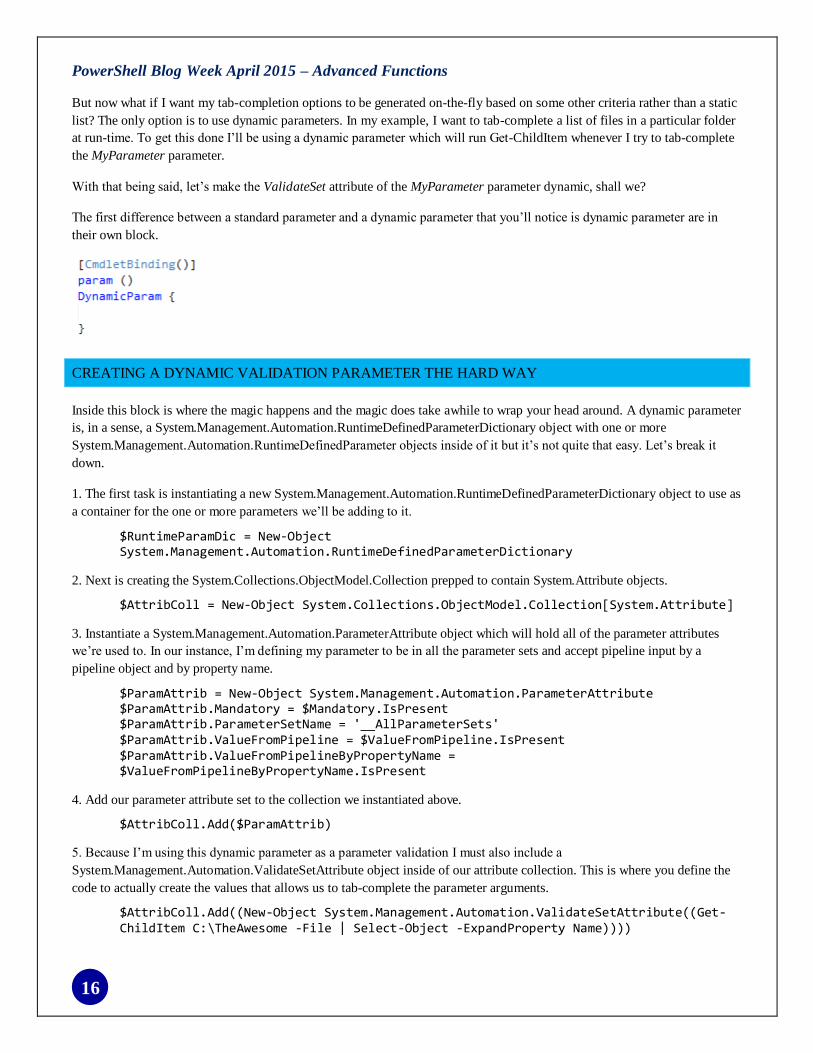
The first difference between a standard parameter and a dynamic parameter that you’ll notice is dynamic parameter are in
their own block.
CREATING A DYNAMIC VALIDATION PARAMETER THE HARD WAY
Inside this block is where the magic happens and the magic does take awhile to wrap your head around. A dynamic parameter
is, in a sense, a System.Management.Automation.RuntimeDefinedParameterDictionary object with one or more
System.Management.Automation.RuntimeDefinedParameter objects inside of it but it’s not quite that easy. Let’s break it
down.
1. The first task is instantiating a new System.Management.Automation.RuntimeDefinedParameterDictionary object to use as
a container for the one or more parameters we’ll be adding to it.
$RuntimeParamDic = New-Object System.Management.Automation.RuntimeDefinedParameterDictionary
2. Next is creating the System.Collections.ObjectModel.Collection prepped to contain System.Attribute objects.
$AttribColl = New-Object System.Collections.ObjectModel.Collection[System.Attribute]
3. Instantiate a System.Management.Automation.ParameterAttribute object which will hold all of the parameter attributes
we’re used to. In our instance, I’m defining my parameter to be in all the parameter sets and accept pipeline input by a
pipeline object and by property name.
$ParamAttrib = New-Object System.Management.Automation.ParameterAttribute $ParamAttrib.Mandatory = $Mandatory.IsPresent $ParamAttrib.ParameterSetName = '__AllParameterSets' $ParamAttrib.ValueFromPipeline = $ValueFromPipeline.IsPresent $ParamAttrib.ValueFromPipelineByPropertyName = $ValueFromPipelineByPropertyName.IsPresent
4. Add our parameter attribute set to the collection we instantiated above.
$AttribColl.Add($ParamAttrib)
5. Because I’m using this dynamic parameter as a parameter validation I must also include a
System.Management.Automation.ValidateSetAttribute object inside of our attribute collection. This is where you define the
code to actually create the values that allows us to tab-complete the parameter arguments.
$AttribColl.Add((New-Object System.Management.Automation.ValidateSetAttribute((Get-ChildItem C:\TheAwesome -File | Select-Object -ExpandProperty Name))))

PowerShell Blog Week April 2015 – Advanced Functions
17
6. We then have to instantiate a System.Management.Automation.RuntimeDefinedParameter object using the parameter
name, its type and the attribute collection we’ve been adding stuff to.
$RuntimeParam = New-Object System.Management.Automation.RuntimeDefinedParameter('MyParameter', [string], $AttribColl)
7. Once the run time parameter is finished we then come back to that original dictionary object we instantiated earlier using
the parameter name and the runtime parameter object we created.
$RuntimeParamDic.Add('MyParameter', $RuntimeParam)
8. We can then return this runtime dictionary object back to the dynamic parameter block and we’re done!
return $RuntimeDic
Are your eyes glazing over yet? Mine were when I first tried to figure this out. Being the lazy admin I am I created a function
called New-ValidationDynamicParam that does all this work for you. Simply pass in the parameter name, the attributes you’d
like the parameter to have and the code you’ll be using to create the validation and you’re done! The function does the rest.
Isn’t this a lot easier than following steps 1-7?
CREATING A DYNAMIC VALIDATION PARAMETER THE EASY WAY
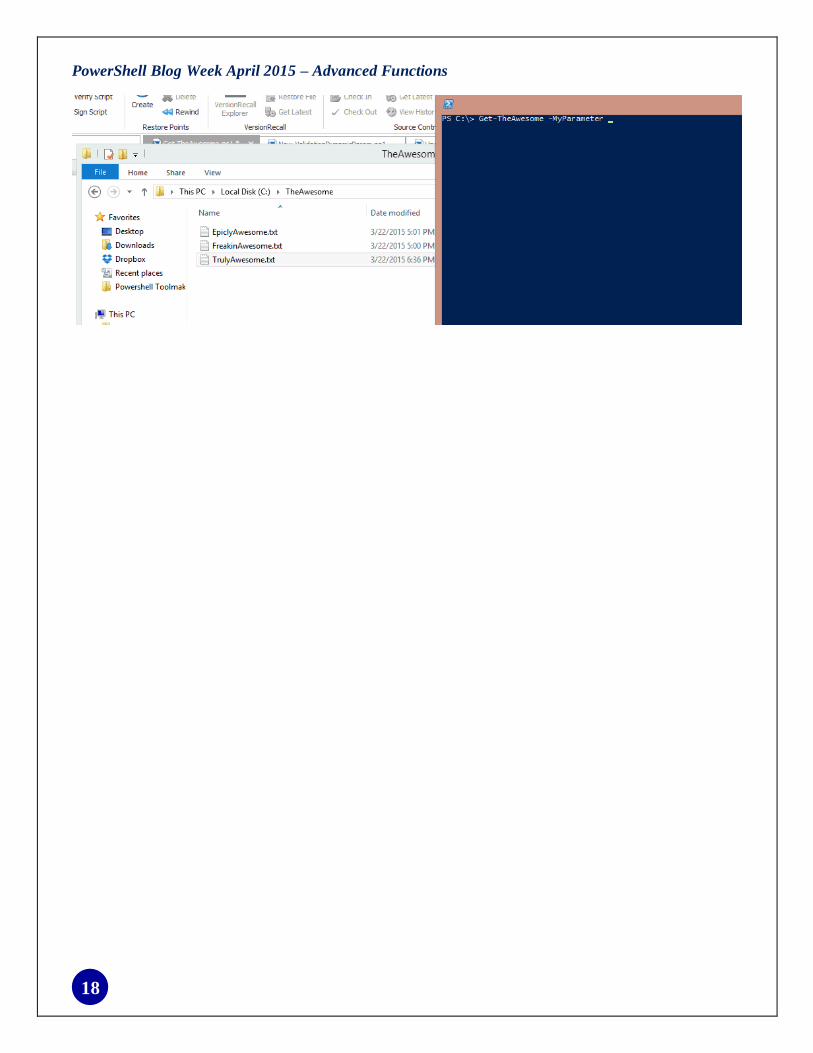
New-ValidationDynamicParam -Name 'MyParameter' -Mandatory -ValidateSetOptions (Get-ChildItem C:\TheAwesome -File | Select-Object -ExpandProperty Name)
My pain is your gain, people! Now, with our dynamic validation parameter created, let’s take it for test drive.
I’ve got some files in a directory on my computer that I only want to be passed to the MyParameter parameter.
Now all I have to do is run our script and voila! I’m now only able to use the file names as parameter arguments and they are
updated as the files comes in and out of the folder!
PowerShell Blog Week April 2015 – Advanced Functions
18

PowerShell Blog Week April 2015 – Advanced Functions
19
SUPPORTING WHATIF AND CONFIRM BY JEFF HICKS
This article was originally published at: http://jdhitsolutions.com/blog/2015/04/powershell-blogging-week-supporting-whatif-
and-confirm/
We hope you are enjoying this experiment in community blogging. In today’s contribution I want to demonstrate how you
can add support for WhatIf and Confirm to your advanced PowerShell functions. It is actually quite easy, especially if your
function is simply calling other PowerShell commands that already support –Whatif and –Confirm. The recommended best
practice is that if your function will do anything that changes something, it should support these parameters. Here’s how.
SUPPORTSSHOULDPROCESS = WHATIF
In your function you will need to use the cmdletbinding attribute and specify SupportsShouldProcess.
[cmdletbinding(SupportsShouldProcess)]
Beginning with PowerShell 3.0 this is all you need but you will see scripters explicitly setting this to $True.
[cmdletbinding(SupportsShouldProcess=$True)]
That’s fine, although personally I find it redundant. If SupportsShouldProcess is listed then by default it is True. There is no
need to explicitly set this to $False. Simply omit it. When you add this attribute, you will automatically get the –WhatIf and –
Confirm parameters. The best part is that if your function is simply calling PowerShell cmdlets that already support –WhatIf,
they will automatically inherit this setting. Here’s a sample function.
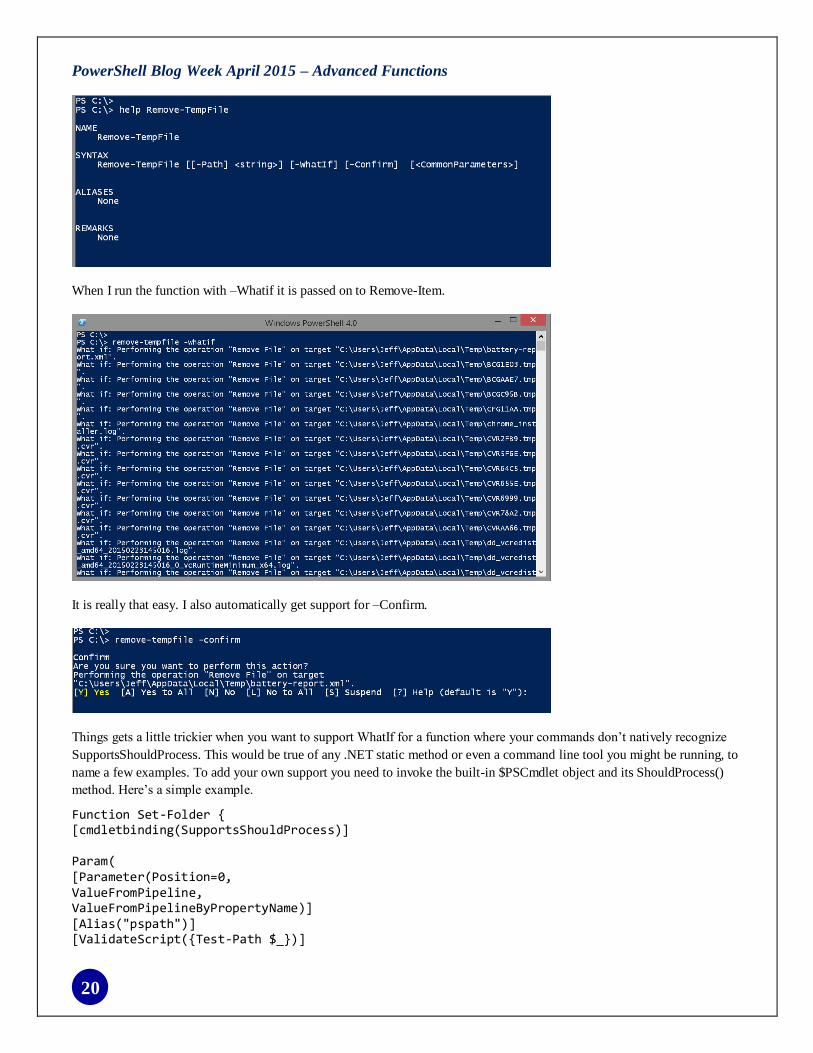
#requires –version 4.0 Function Remove-TempFile { [cmdletbinding(SupportsShouldProcess)] Param( [Parameter(Position=0)] [ValidateScript({Test-Path $_})] [string]$Path = $env:temp ) #get last bootup time $LastBoot = (Get-CimInstance -ClassName Win32_OperatingSystem).LastBootUptime Write-Verbose "Finding all files in $path modified before $lastboot" (Get-Childitem -path $path -File).Where({$_.lastWriteTime -le $lastboot}) | Remove-Item } #end function
The function deletes all files from the %TEMP% folder that have a last modified time older than the last boot up time. As
you can see in the help, PowerShell added the necessary parameters.
PowerShell Blog Week April 2015 – Advanced Functions
20
When I run the function with –Whatif it is passed on to Remove-Item.
It is really that easy. I also automatically get support for –Confirm.
Things gets a little trickier when you want to support WhatIf for a function where your commands don’t natively recognize
SupportsShouldProcess. This would be true of any .NET static method or even a command line tool you might be running, to
name a few examples. To add your own support you need to invoke the built-in $PSCmdlet object and its ShouldProcess()
method. Here’s a simple example.
Function Set-Folder { [cmdletbinding(SupportsShouldProcess)] Param( [Parameter(Position=0, ValueFromPipeline, ValueFromPipelineByPropertyName)] [Alias("pspath")] [ValidateScript({Test-Path $_})]

PowerShell Blog Week April 2015 – Advanced Functions
21
[string]$Path=".") Process { $Path = (Resolve-Path -Path $Path).ProviderPath if ($PSCmdlet.ShouldProcess($Path)) { #do the action $Path.ToUpper() } } #Process } #end function
This function hypothetically is going to perform some action on a folder and I’m simply displaying the folder name in upper
case. The important part is the If statement. This is the bare minimum that you need. If you specify –WhatIf you’ll be
prompted.
The operation will be the name of your script or function. The target is the ShouldProcess parameter value which in my
example is the path. But you can provide more specific information by specifying ShouldProcess parameters for the target
and action. Here’s a revised function.
Function Set-Folder2 { [cmdletbinding(SupportsShouldProcess)] Param( [Parameter(Position=0, ValueFromPipeline, ValueFromPipelineByPropertyName)] [Alias("pspath")] [ValidateScript({Test-Path $_})] [string]$Path=".") Process { $Path = (Resolve-Path -Path $Path).ProviderPath if ($PSCmdlet.ShouldProcess($Path,"Updating")) { #do the action $Path.ToUpper() } } #Process } #end function

PowerShell Blog Week April 2015 – Advanced Functions
22
You must have the code for ShouldProcess otherwise even if you set the cmdletbinding attribute, PowerShell won’t know
which commands need WhatIf. You can also have as many ShouldProcess statements as you need.
ASKING FOR CONFIRMATION
When it comes to confirmation, things get a little trickier and it might depend on what you really need. As you saw above,
any cmdlet that supports –Confirm should automatically inherit the setting. This works because there is another
cmdletbinding attribute called ConfirmImpact which has a default value of Medium. Other options are Low and High. My
first function could also have been written like this:
[cmdletbinding(SupportsShouldProcess,ConfirmImpact="medium ")]
Confirmation happens by comparing the value of ConfirmImpact with the built-in $ConfirmPreference variable which has a
default value of High. If the value of $ConfirmPreference is equal to or greater than ConfirmImpact, PowerShell will prompt
for confirmation. Let’s test this out.
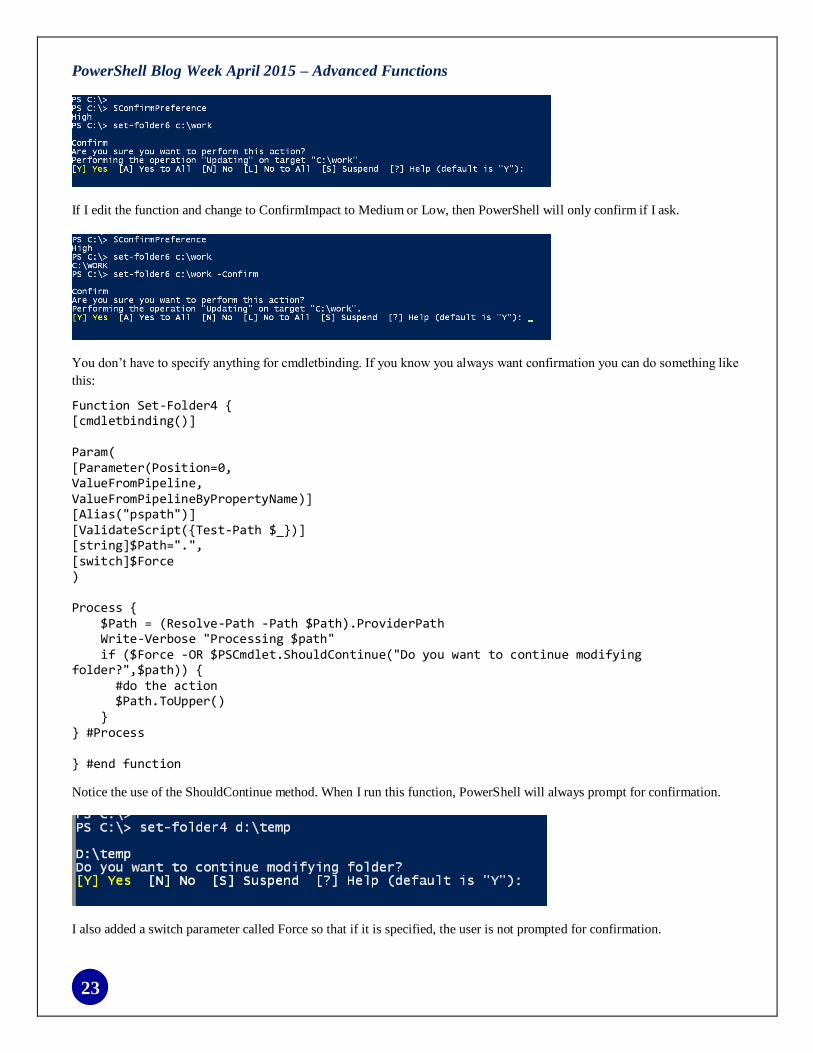
Function Set-Folder6 { [cmdletbinding(SupportsShouldProcess,ConfirmImpact="High")] Param( [Parameter(Position=0, ValueFromPipeline, ValueFromPipelineByPropertyName)] [Alias("pspath")] [ValidateScript({Test-Path $_})] [string]$Path="." ) Begin { Write-Verbose "Starting $($MyInvocation.Mycommand)" } #begin Process { $Path = (Resolve-Path -Path $Path).ProviderPath Write-Verbose "Processing $path" if ($PSCmdlet.ShouldProcess($Path,"Updating")) { #do the action $Path.ToUpper() } #ShouldProcess } #Process End { Write-Verbose "Ending $($MyInvocation.Mycommand)" } #end } #end function
Notice that I am also using for WhatIf. In this function the ConfirmImpact is set to high which means PowerShell will always
prompt.
PowerShell Blog Week April 2015 – Advanced Functions
23
If I edit the function and change to ConfirmImpact to Medium or Low, then PowerShell will only confirm if I ask.
You don’t have to specify anything for cmdletbinding. If you know you always want confirmation you can do something like
this:
Function Set-Folder4 { [cmdletbinding()] Param( [Parameter(Position=0, ValueFromPipeline, ValueFromPipelineByPropertyName)] [Alias("pspath")] [ValidateScript({Test-Path $_})] [string]$Path=".", [switch]$Force ) Process { $Path = (Resolve-Path -Path $Path).ProviderPath Write-Verbose "Processing $path" if ($Force -OR $PSCmdlet.ShouldContinue("Do you want to continue modifying folder?",$path)) { #do the action $Path.ToUpper() } } #Process } #end function
Notice the use of the ShouldContinue method. When I run this function, PowerShell will always prompt for confirmation.
I also added a switch parameter called Force so that if it is specified, the user is not prompted for confirmation.

PowerShell Blog Week April 2015 – Advanced Functions
24
The downside to this approach is that help doesn’t show anything.
Perhaps in special cases this is what you want. Personally, I think you are better off using the cmdletbinding attributes as I
did for my Set-Folder6 example.
Adding support for WhatIf and Confirm doesn’t take much effort and it will take your advanced function to the next level. Be
sure to read the about topics for more information.
About_preferenceVariables
about_Functions_Advanced_Methods
about_Functions_Advanced
about_Functions_CmdletBindingAttribute

PowerShell Blog Week April 2015 – Advanced Functions
25
ADVANCED HELP FOR ADVANCED FUNCTIONS BY JUNE BLENDER
This article was originally published at: http://www.sapien.com/blog/2015/04/03/advanced-help-for-advanced-functions/
Writing help is often the last thing you do for an advanced function. But, instead of treating it as a disposable chore, write
your help first — in advance — before you write your advanced function. Then, use the help as a design specification. The
result is a better designed function and a better user experience.
If you’re using a test framework, like Pester, you can also use your help examples as test cases.
In this post, I’ll write help for the New-ValidationDynamicParam function that Adam Bertram (@adbertram) shares in
#PSBloggingWeek – Dynamic Parameters and Parameter Validation. But we’ll write the help as a spec and revise it for the
end user later.
You can view Adam’s script, including the end-user version of function help, at Get-TheAwesomeWithHelp.ps1.zip.
DESCRIPTION: DESCRIBE THE FUNCTION UI
Begin your spec with a description of the function UI. Command-line tools, like advanced functions, don’t have a GUI, but
they certainly have a user interface. Use the Description section of your help topic to describe what the function does for the
user and how to use it.
Do not explain how the functions works. If you need to describe any aspect of the implementation, such as a security or
performance issue, save it for the Notes section.
This is also the place to disclose anything unexpected. Help should help users predict and avoid errors, so be generous with
your warnings.
Let’s describe the user experience of Adam Bertram’s New-ValidationDynamicParam function.
This is a really advanced function that is designed for function/script authors, not end-users, so I’ll mention the
audience immediately.
I want to associate this new thing with something familiar to this audience, like ValidateSet.
Adam’s function to be called in the DynamicParam block, which is novel, so I’ll explain that and remind users that
they need the function in scope.
Finally, this has a limited use-case, so I’ll explain that this function doesn’t create other types of dynamic
parameters.

PowerShell Blog Week April 2015 – Advanced Functions
26
EXAMPLES: SHOW HOW TO USE IT
Help is really show and tell. The description is the “tell”. The examples are the “show.” And, the examples are really the
most important part of help.
When writing help as a spec, write examples before parameters, because the examples really reveal which parameters you
need and what names they should have. Write several examples for different use cases and think about using the parameters
in combination.
Also, to use the examples as test cases, include expected output in the example.
To make the examples useful to readers, focus on one element in each example. For Adam’s function, the first example uses
only the mandatory parameters, the second (shown below) uses several optional parameters, the third explains how to
structure the DynamicParam block, and the final one explains how to refer to the dynamic parameter and its value outside of
the DynamicParam block.
Write examples in complexity order beginning with the simplest. And, to encourage users to try the examples, use resources
that all users have in their system, such as the C:\Windows directory.
Here is a relatively simple example. To see all the examples, see the help at Get-TheAwesomeWithHelp.ps1.zip.

PowerShell Blog Week April 2015 – Advanced Functions
27
PARAMETER DESCRIPTIONS
When you feel comfortable with the examples, add the parameter descriptions. Each parameter description should tell you:
The effect of the parameter, that is, how it changes the function behavior.
Information about the parameter values and how to enter them, including syntax.
(Think about your parameter validation, then tell users everything they need to know to avoid errors.)
If the parameter is optional, tell the default value.
PowerShell Blog Week April 2015 – Advanced Functions
28
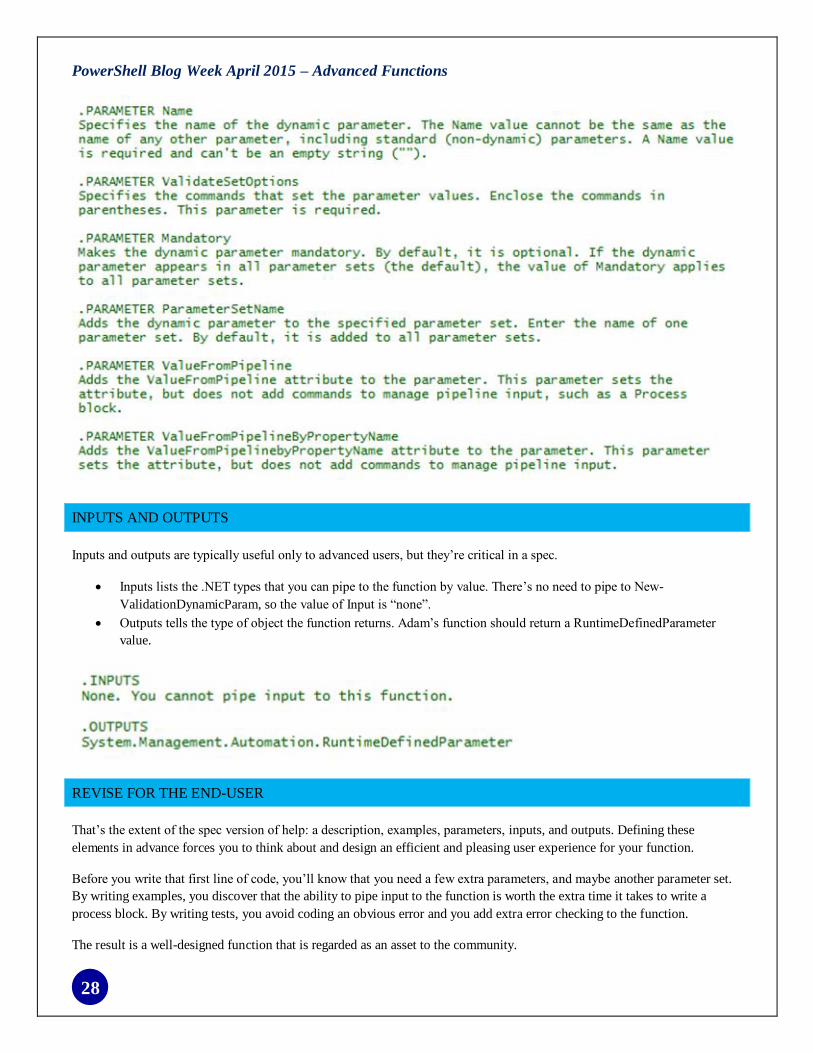
INPUTS AND OUTPUTS
Inputs and outputs are typically useful only to advanced users, but they’re critical in a spec.
Inputs lists the .NET types that you can pipe to the function by value. There’s no need to pipe to New-
ValidationDynamicParam, so the value of Input is “none”.
Outputs tells the type of object the function returns. Adam’s function should return a RuntimeDefinedParameter
value.
REVISE FOR THE END-USER
That’s the extent of the spec version of help: a description, examples, parameters, inputs, and outputs. Defining these
elements in advance forces you to think about and design an efficient and pleasing user experience for your function.
Before you write that first line of code, you’ll know that you need a few extra parameters, and maybe another parameter set.
By writing examples, you discover that the ability to pipe input to the function is worth the extra time it takes to write a
process block. By writing tests, you avoid coding an obvious error and you add extra error checking to the function.
The result is a well-designed function that is regarded as an asset to the community.

PowerShell Blog Week April 2015 – Advanced Functions
29
After the function is written and tested, add the synopsis, related links, etc. Also, consider deleting some of the input and
output in the examples, so each example is focused on a single idea.
In the end, you’ll realize that when you write it in advance, the help that you once regarded as a chore is a vital tool for
designing and testing advanced functions.
To view Adam Bertram’s function with comment-based help, see Get-TheAwesomeWithHelp.ps1.zip.
For information about the mechanics of function help, see:
about_Comment_Based_Help
Troubleshooting Comment-Based Help
Writing XML Help for Advanced Functions

PowerShell Blog Week April 2015 – Advanced Functions
30
A LOOK AT TRY/CATCH IN POWERSHELL BY BOE PROX
This article was originally posted at: http://learn-powershell.net/2015/04/04/a-look-at-trycatch-in-powershell/
When working with errors and trying to get a handle on them, you need to use what is available to not only catch them, but
also to determine what the next course of action is after you have caught them. In this article, I am focusing solely on
Try/Catch (along with Finally) and how you can use these to perform some essential error handing in your scripts.
Let’s break down each of these statements and what they accomplish.
TRY
Try is where you are going to place your code block in that you want to watch for errors that will be handled later on in the
script. Know that wherever the error occurs, it will immediately stop at that point and move onto the Catch keyword
(assuming that the error is a terminating error). During this you need to ensure that you either have
$ErrorActionPreference='Stop' so every error that occurs is considered a terminating error (useful when working with
outside commands that do not throw terminating errors by default) or you can make use of –ErrorAction 'Stop' in a cmdlet
to force the cmdlet to throw a terminating error.
Note: Did you know that using the Throw keyword says that the error being thrown is a terminating error? Try it in a
Try/Catch and see what happens!
Here is an action of what be in a Try statement:
Try { Write-Verbose "[TRY] Checking for OS" -Verbose $OS = Get-WmiObject -ComputerName RemoteServer -Class Win32_OperatingSystem -ErrorAction Stop Write-Verbose "[TRY] No issues found" -Verbose }
Assuming that I can connect to this remote system, I should see the Verbose output afterwards, otherwise based on the
ErrorAction of Stop, it will send the execution down to the Catch statement.
CATCH
Here is where the execution of code continues after an error occurs within the Try statement. One of the neat things about
using Catch is that you can have multiple Catch statements based on the error type that you want to handle. If you want to
take a different action on an Access Denied error, you can specify the System.UnauthorizedAccessException type and
anytime the error record relates to an unauthorized access exception, it will be handled in that statement while all other errors
will be handles by the Catch statement with no exception type defined. Think of this one as the ‘catch all’ Catch block. Here
is an example of such a Catch statement.
Catch [System.UnauthorizedAccessException] { Write-Warning "[CATCH] You do not have the proper access to this system!" BREAK } Catch [System.Runtime.InteropServices.COMException] { Write-Warning "[CATCH] Communications Exception occurred!" BREAK }

PowerShell Blog Week April 2015 – Advanced Functions
31
Catch { Write-Warning "[CATCH] Errors found during attempt:`n$_" BREAK }
FINALLY
This keyword performs an action regardless of what happens in the Try/Catch statements. This allows you to perform a sort
of cleanup of resources or anything else that you may want to do. Even if we specify BREAK in our Catch block, this will
still run any code that happens to be in the Finally block. In fact, even adding Exit to my Catch block will not prevent
anything in the Finally block from running before the session is closed.
Finally { Write-Verbose "[FINALLY] Performing cleanup actions." -Verbose }
Write-Verbose "Doing something outside of Try/Catch/Finally" -Verbose
Note that I added some verbose output to run outside of the Finally block. If something throws a terminating error, you will
see the Verbose output in the Finally block, but nothing beyond that.
PUTTING IT ALL TOGETHER
Putting this all together, we can see how these all come together to work just like we want them to. First, let’s see a good
attempt with our code:
Now let’s try this with a known issue happening:
Notice that we did not see the verbose output that exists outside of the Try/Catch/Finally blocks. You can also notice that it
caught the System.Runtime.InteropServices.ComException exception rather than the ‘catch all’ block. Had I run into an
issue where I was getting access denied, the System.UnauthorizedAccessException would have caught the error, otherwise
my last Catch block will get the error.
With that, you can see how to use Try/Catch/Finally to control the flow of your code in the event of errors during execution.
Of course, this wasn’t an exhaustive look at error handling but is still helpful to get your going!
Hungry for more information about Try/Catch and error handling? Check out the following links for more information about
this topic:
about_Try_Catch_Finally
The Big Book of Error Handling

PowerShell Blog Week April 2015 – Advanced Functions
32
ABOUT THE AUTHORS
François-Xavier Cat
François-Xavier Cat is an experienced System Administrator specializing in Microsoft and
VMware technologies from Montreal (Canada). He is a Microsoft MVP for Windows PowerShell, a SAPIEN Technologies MVP and a PowerShell.org Hero. He blogs on
www.lazywinadmin.com and you can follow him on twitter @lazywinadm
Mike F. Robbins
Mike F Robbins is a Microsoft MVP on Windows PowerShell and a SAPIEN Technologies
MVP. He is a co-author of Windows PowerShell TFM 4th Edition and is a contributing
author of a chapter in the PowerShell Deep Dives book. Mike has written guest blog articles
for the Hey, Scripting Guy! Blog, PowerShell Magazine, and PowerShell.org. He is the
winner of the advanced category in the 2013 PowerShell Scripting Games. Mike is also the leader and co-founder of the Mississippi PowerShell User Group. He blogs at
mikefrobbins.com and can be found on twitter @mikefrobbins.
Adam Bertram
Adam Bertram, AKA Adam, the Automator is a senior Microsoft systems consultant in the IT
industry since 1998. He has a passion for problem-solving, efficiency and ultimately
automation which led to him becoming a Windows Powershell MVP in 2015. Adam has
numerous Microsoft certifications and is a writer, trainer, and presenter. He authors IT pro
course content for sites like Pluralsight and Udemy, is a regular contributor to sites like
Tom’s IT Pro, MCPMag and Windows IT Pro among others and presents at various user
groups and conferences. You can find Adam at adamtheautomator.com or on Twitter at
@adbertram
Jeff Hicks
Jeffery Hicks is an IT veteran with over 25 years of experience, much of it spent as an IT
infrastructure consultant specializing in Microsoft server technologies with an emphasis in
automation and efficiency. He is a multi-year recipient of the Microsoft MVP Award in
Windows PowerShell. He works today as an independent author, trainer and consultant. Jeff
has written for numerous online sites and print publications, is a contributing editor at
Petri.com, and a frequent speaker at technology conferences and user groups. His latest book
is PowerShell In Depth: An Administrator's Guide 2nd Ed. You can follow Jeff on his blog and on Twitter.
June Blender
June Blender is a technology evangelist for SAPIEN Technologies, Inc, an honorary Scripting
Guy, and a PowerShell Hero In a previous life, she wrote the Get-Help content for Windows
PowerShell 1.0 - 3.0. She blogs, participates on forums, writes scripts and help, presents at
user groups, and offers on-site training. She's is also a frequent contributor to the Hey,
Scripting Guy! Blog and for PowerShell.org. She lives in magnificent Escalante, Utah, where
she works remotely when she's not out hiking, canyoneering, or convincing lost tourists to try
Windows PowerShell. She believes that outstanding solutions are a collaborative effort, and
she welcomes your comments and contributions. You can reach her at
mailto:[email protected] or follow her on Twitter at @juneb_get_help.

PowerShell Blog Week April 2015 – Advanced Functions
33
Boe Prox
Boe Prox is a Microsoft MVP in Windows PowerShell and a Senior Windows System
Administrator. He has worked in the IT field since 2003, and he supports a variety of
different platforms. He is a contributing author in PowerShell Deep Dives with chapters about
WSUS and TCP communication. He is a moderator on the Hey, Scripting Guy! forum, and he
has been a judge for the Scripting Games. He has presented talks on the topics of WSUS and
PowerShell as well as runspaces to PowerShell user groups. He is an Honorary Scripting
Guy, and he has submitted a number of posts as a to Microsoft's Hey, Scripting Guy! He also
has a number of open source projects available on Codeplex and GitHub. His personal blog is
at http://learn-powershell.net.