Embed Size (px)
Citation preview

POWERPOINT LEARNING STAGE1 Level 2 CONTENTS
Custom animation . 23,24
AutoContent Wizard 28
Slide Sorter view 29
Design Graphics . 30
Arrows . 32
Fill colour 34
Deleting and selecting multiple slides . 34,35,38
Spellchecker 37
Change Case 38
Presentation Animation . 38
Animation Effects 39,40,41
Animation Preview 42
LCN: QLD1206 - OUTBACK EDUCATION SERVICEPage 21
MICROSOFT POWERPOINT 2000LEARNING STAGE1 Level 2
LESSON 4.
Step 1. Switch On your computer and run the PowerPoint program. You will be presented with the PowerPoint window.
Step 2. Open the 'Look' presentation. (Click on Open an existing presentation, click on the Look file to select it, click on the Ok button)
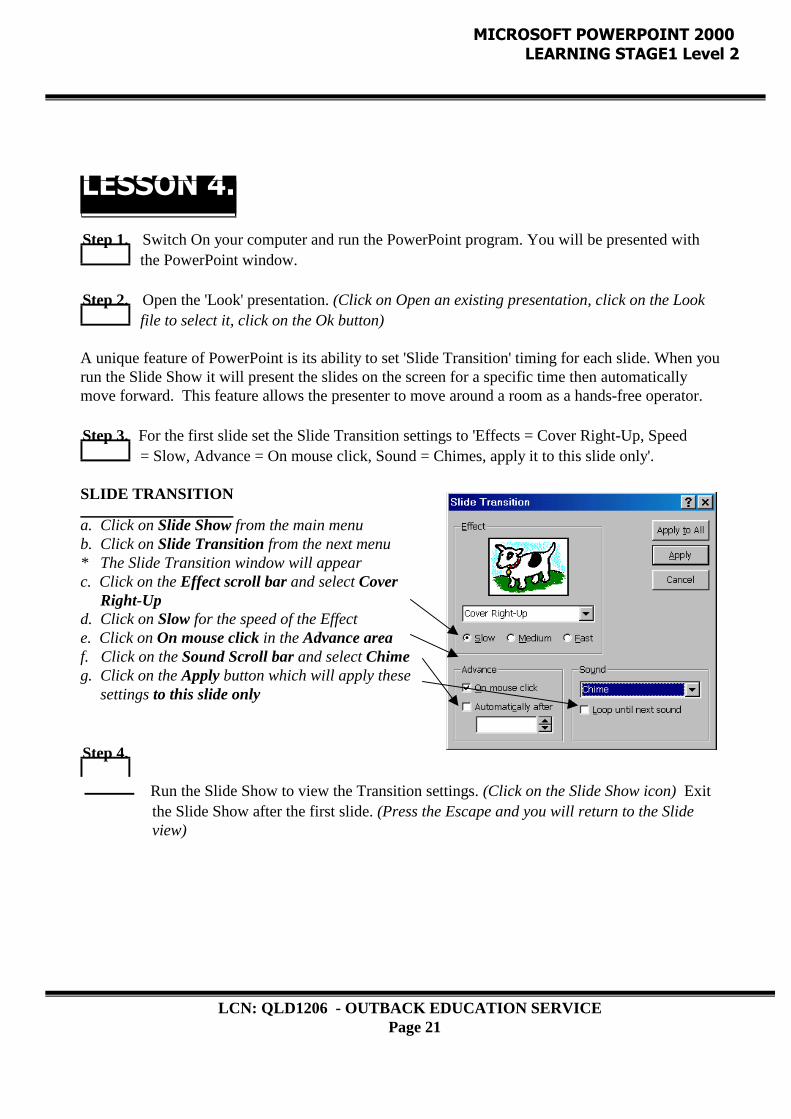
A unique feature of PowerPoint is its ability to set 'Slide Transition' timing for each slide. When yourun the Slide Show it will present the slides on the screen for a specific time then automaticallymove forward. This feature allows the presenter to move around a room as a hands-free operator.
Step 3. For the first slide set the Slide Transition settings to 'Effects = Cover Right-Up, Speed = Slow, Advance = On mouse click, Sound = Chimes, apply it to this slide only'.
SLIDE TRANSITION
a. Click on Slide Show from the main menub. Click on Slide Transition from the next menu* The Slide Transition window will appearc. Click on the Effect scroll bar and select Cover Right-Upd. Click on Slow for the speed of the Effecte. Click on On mouse click in the Advance areaf. Click on the Sound Scroll bar and select Chimeg. Click on the Apply button which will apply these settings to this slide only
Step 4.
Run the Slide Show to view the Transition settings. (Click on the Slide Show icon) Exit the Slide Show after the first slide. (Press the Escape and you will return to the Slide view)
LCN: QLD1206 - OUTBACK EDUCATION SERVICEPage 22
MICROSOFT POWERPOINT 2000LEARNING STAGE 1
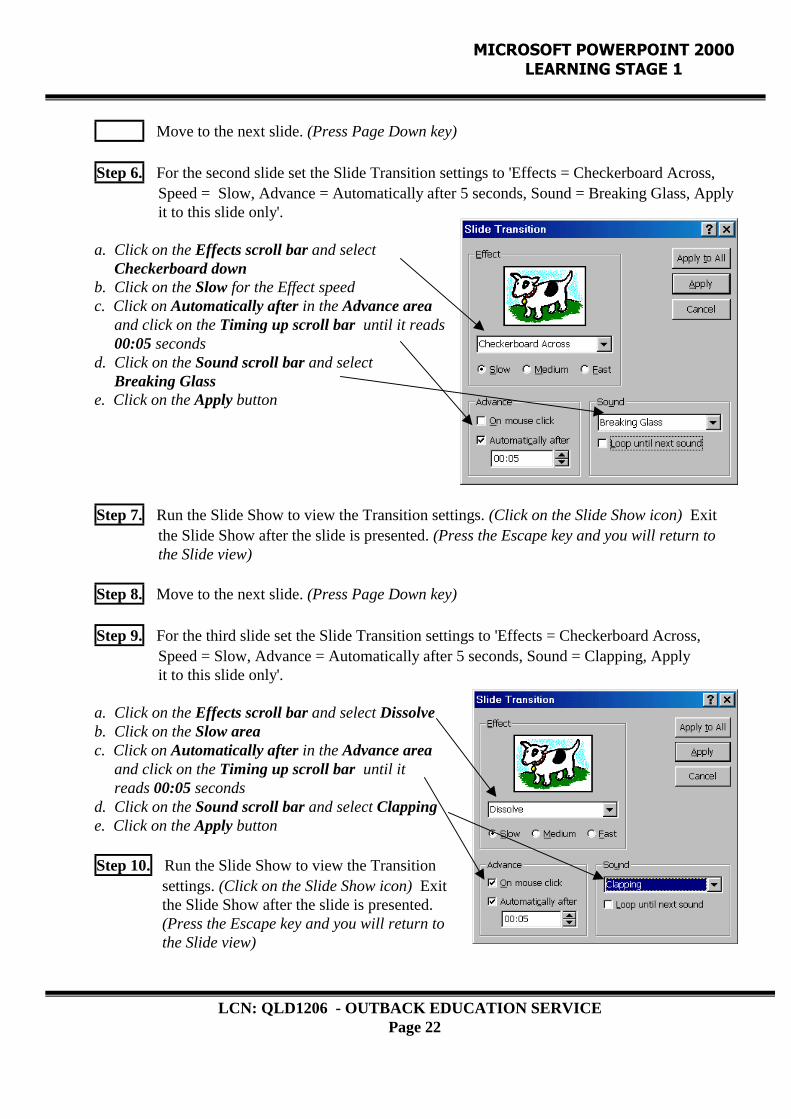
Move to the next slide. (Press Page Down key)
Step 6. For the second slide set the Slide Transition settings to 'Effects = Checkerboard Across, Speed = Slow, Advance = Automatically after 5 seconds, Sound = Breaking Glass, Apply it to this slide only'.
a. Click on the Effects scroll bar and select Checkerboard downb. Click on the Slow for the Effect speedc. Click on Automatically after in the Advance area and click on the Timing up scroll bar until it reads 00:05 secondsd. Click on the Sound scroll bar and select Breaking Glasse. Click on the Apply button
Step 7. Run the Slide Show to view the Transition settings. (Click on the Slide Show icon) Exit the Slide Show after the slide is presented. (Press the Escape key and you will return to the Slide view)
Step 8. Move to the next slide. (Press Page Down key)
Step 9. For the third slide set the Slide Transition settings to 'Effects = Checkerboard Across, Speed = Slow, Advance = Automatically after 5 seconds, Sound = Clapping, Apply it to this slide only'.
a. Click on the Effects scroll bar and select Dissolveb. Click on the Slow areac. Click on Automatically after in the Advance area and click on the Timing up scroll bar until it reads 00:05 secondsd. Click on the Sound scroll bar and select Clappinge. Click on the Apply button
Step 10. Run the Slide Show to view the Transition settings. (Click on the Slide Show icon) Exit
the Slide Show after the slide is presented. (Press the Escape key and you will return to the Slide view)
LCN: QLD1206 - OUTBACK EDUCATION SERVICEPage 23
MICROSOFT POWERPOINT 2000LEARNING STAGE 1
Move to the last slide. (Press Page Down key)
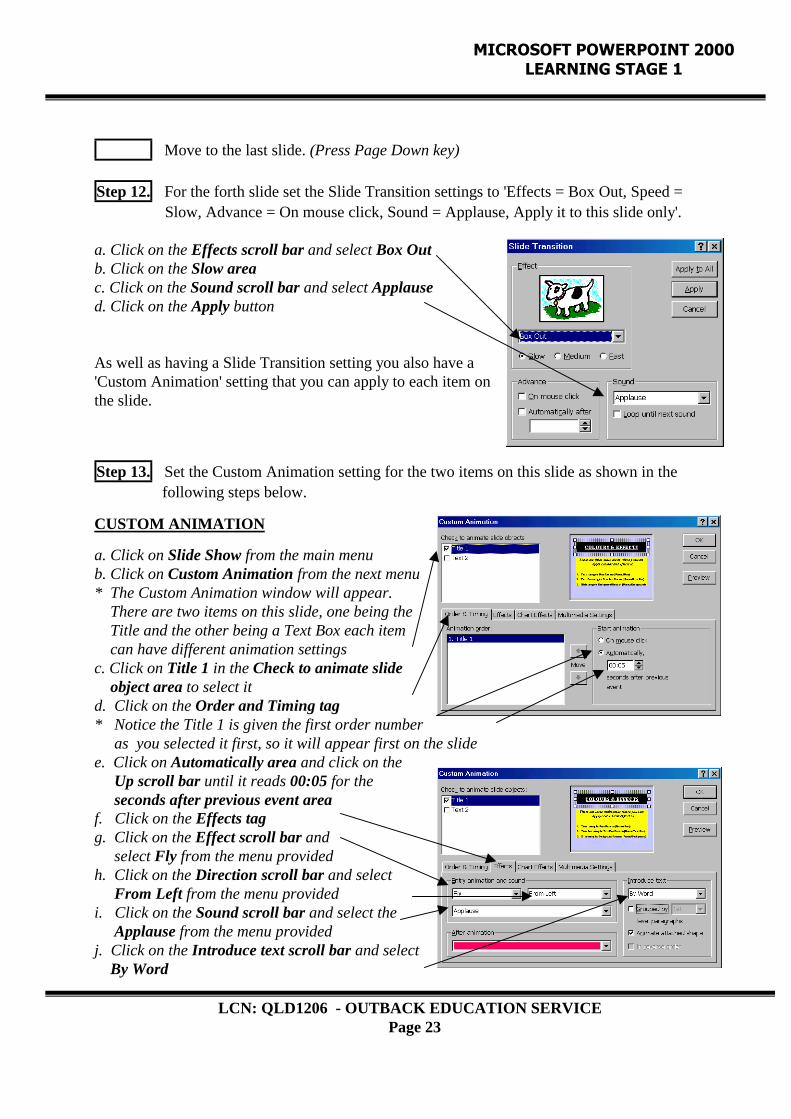
Step 12. For the forth slide set the Slide Transition settings to 'Effects = Box Out, Speed = Slow, Advance = On mouse click, Sound = Applause, Apply it to this slide only'.
a. Click on the Effects scroll bar and select Box Outb. Click on the Slow areac. Click on the Sound scroll bar and select Applaused. Click on the Apply button
As well as having a Slide Transition setting you also have a'Custom Animation' setting that you can apply to each item onthe slide.
Step 13. Set the Custom Animation setting for the two items on this slide as shown in the following steps below.
CUSTOM ANIMATION
a. Click on Slide Show from the main menub. Click on Custom Animation from the next menu* The Custom Animation window will appear. There are two items on this slide, one being the Title and the other being a Text Box each item can have different animation settingsc. Click on Title 1 in the Check to animate slide object area to select itd. Click on the Order and Timing tag* Notice the Title 1 is given the first order number as you selected it first, so it will appear first on the slidee. Click on Automatically area and click on the Up scroll bar until it reads 00:05 for the seconds after previous event areaf. Click on the Effects tagg. Click on the Effect scroll bar and select Fly from the menu providedh. Click on the Direction scroll bar and select From Left from the menu providedi. Click on the Sound scroll bar and select the Applause from the menu providedj. Click on the Introduce text scroll bar and select By Word
LCN: QLD1206 - OUTBACK EDUCATION SERVICEPage 24
MICROSOFT POWERPOINT 2000LEARNING STAGE 1
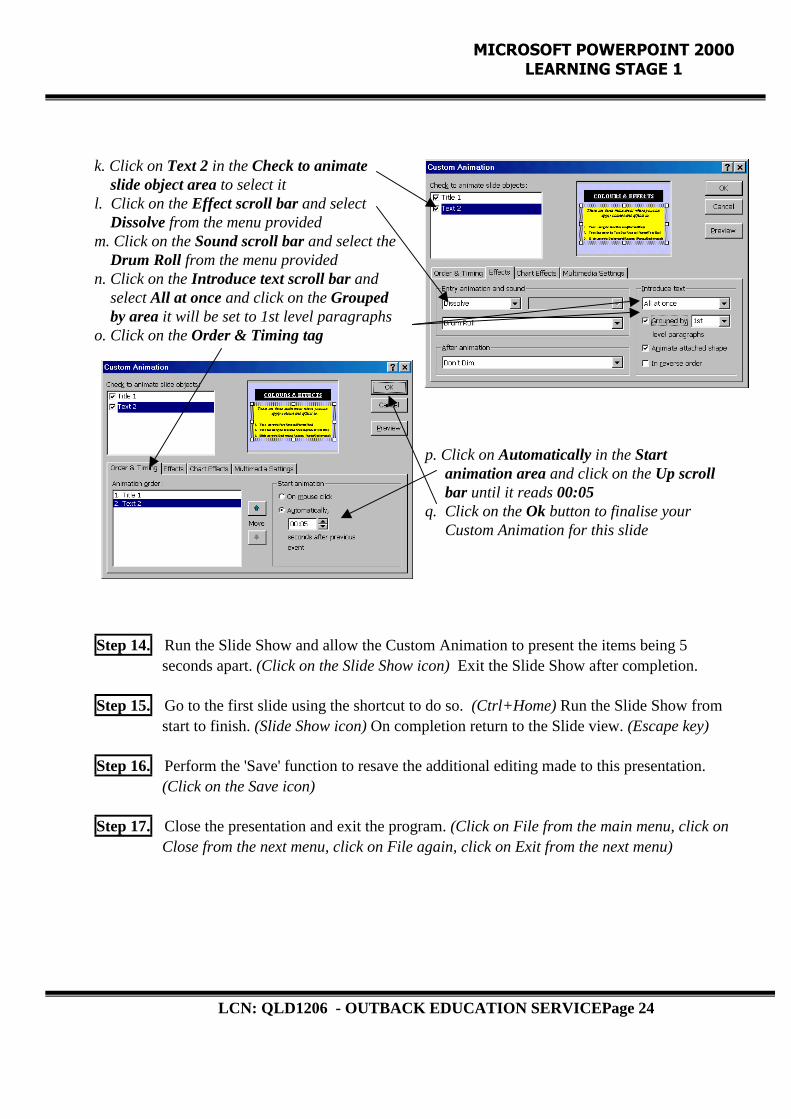
k. Click on Text 2 in the Check to animate slide object area to select itl. Click on the Effect scroll bar and select Dissolve from the menu providedm. Click on the Sound scroll bar and select the Drum Roll from the menu providedn. Click on the Introduce text scroll bar and select All at once and click on the Grouped by area it will be set to 1st level paragraphso. Click on the Order & Timing tag
p. Click on Automatically in the Start animation area and click on the Up scroll bar until it reads 00:05q. Click on the Ok button to finalise your Custom Animation for this slide
Step 14. Run the Slide Show and allow the Custom Animation to present the items being 5 seconds apart. (Click on the Slide Show icon) Exit the Slide Show after completion.
Step 15. Go to the first slide using the shortcut to do so. (Ctrl+Home) Run the Slide Show from start to finish. (Slide Show icon) On completion return to the Slide view. (Escape key)
Step 16. Perform the 'Save' function to resave the additional editing made to this presentation. (Click on the Save icon)
Step 17. Close the presentation and exit the program. (Click on File from the main menu, click on Close from the next menu, click on File again, click on Exit from the next menu)
LCN: QLD1206 - OUTBACK EDUCATION SERVICEPage 28
MICROSOFT POWERPOINT 2000LEARNING STAGE 1
LESSON 5.
Step 1. Switch On your computer and run the PowerPoint program. You will be presented with the PowerPoint window.
This time we will use the AutoContent Wizard to help createour presentation.
Step 2. Create a presentation using the AutoContent Wizard.
AUTOCONTENT WIZARD
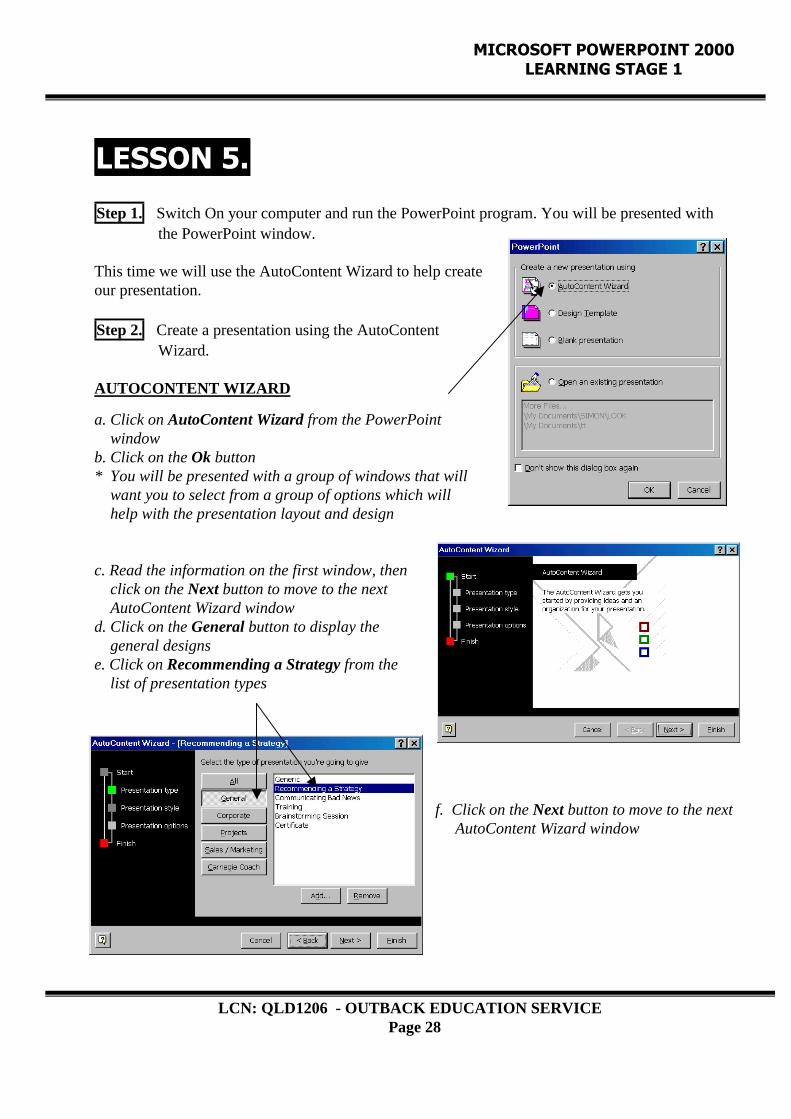
a. Click on AutoContent Wizard from the PowerPoint windowb. Click on the Ok button* You will be presented with a group of windows that will want you to select from a group of options which will help with the presentation layout and design
c. Read the information on the first window, then click on the Next button to move to the next AutoContent Wizard windowd. Click on the General button to display the general designse. Click on Recommending a Strategy from the list of presentation types
f. Click on the Next button to move to the next AutoContent Wizard window

LCN: QLD1206 - OUTBACK EDUCATION SERVICEPage 29
MICROSOFT POWERPOINT 2000LEARNING STAGE 1
g. Click on On-Screen presentation as this is the type of output you will be usingh. Click on the Next button to move to the next AutoContent Wizard windowi. Click in the Presentation title area and type Simon Gates, click in the Footer area and type SG & Sons Pty Ltd, click on the Date last updated to remove the tick, click on Slide number to remove the tick as shown in the diagram below
j. Click on the Next button to move to the last AutoContent Wizard windowk. Read the information on the last window and click on the Finish button
The AutoContent wizard will compile a group of slides with pre-designed backgrounds, text boxes,pictures, etc. Notice there are seven slides as the Status bar reads 1 of 7 slides. Currently the firstslide is displayed in the Normal view.
Step 3. Switch to the Slide Sorter view to display all the slides.
SLIDE SORTER VIEW
a. Click on the Slide Sorter view icon located bottom left of the PowerPoint window
The Slide Sorter view is handy when you want to view all your slides. As you can see all the slidesare displayed and they have the same background design. Each slide however has a different layoutwith varying Text Boxes inserted. Each Text Box is has a pre-designed layout with varying textformats.
LCN: QLD1206 - OUTBACK EDUCATION SERVICEPage 30
MICROSOFT POWERPOINT 2000LEARNING STAGE 1
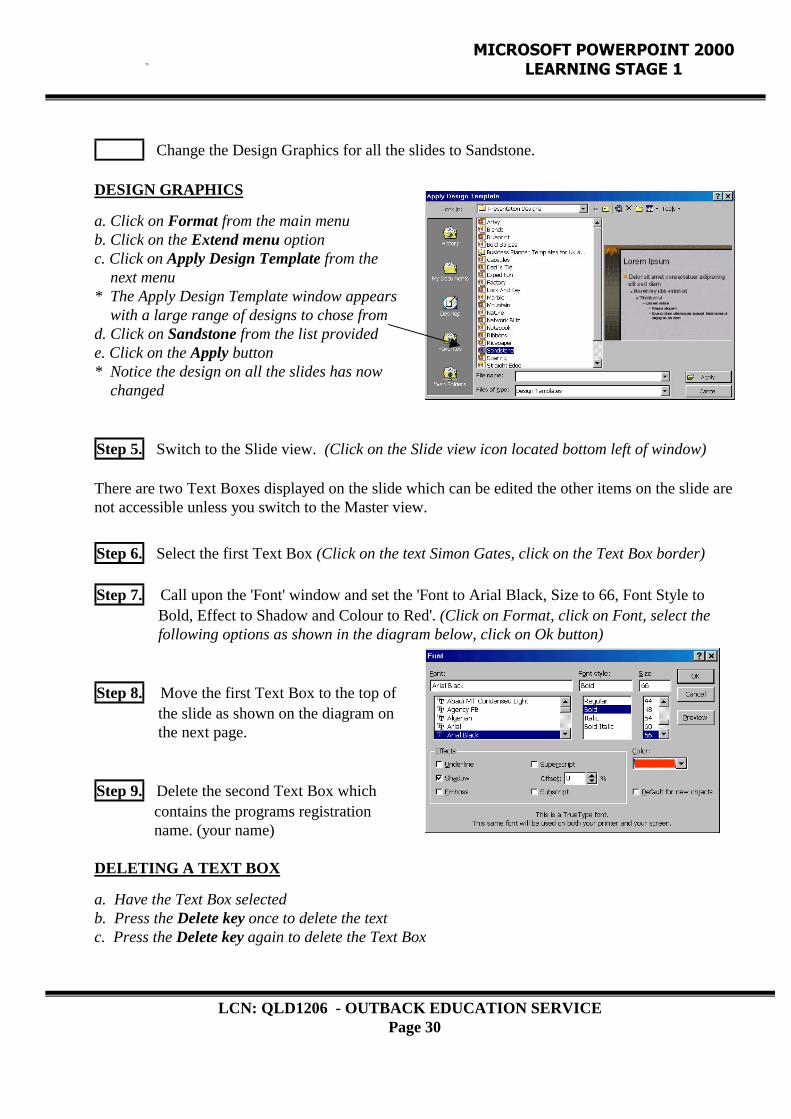
Change the Design Graphics for all the slides to Sandstone.
DESIGN GRAPHICS
a. Click on Format from the main menub. Click on the Extend menu optionc. Click on Apply Design Template from the next menu* The Apply Design Template window appears with a large range of designs to chose fromd. Click on Sandstone from the list providede. Click on the Apply button* Notice the design on all the slides has now changed
Step 5. Switch to the Slide view. (Click on the Slide view icon located bottom left of window)
There are two Text Boxes displayed on the slide which can be edited the other items on the slide arenot accessible unless you switch to the Master view.
Step 6. Select the first Text Box (Click on the text Simon Gates, click on the Text Box border)
Step 7. Call upon the 'Font' window and set the 'Font to Arial Black, Size to 66, Font Style to Bold, Effect to Shadow and Colour to Red'. (Click on Format, click on Font, select the following options as shown in the diagram below, click on Ok button)
Step 8. Move the first Text Box to the top of the slide as shown on the diagram on the next page.
Step 9. Delete the second Text Box which contains the programs registration name. (your name)
DELETING A TEXT BOX
a. Have the Text Box selectedb. Press the Delete key once to delete the textc. Press the Delete key again to delete the Text Box
LCN: QLD1206 - OUTBACK EDUCATION SERVICEPage 31
MICROSOFT POWERPOINT 2000LEARNING STAGE 1
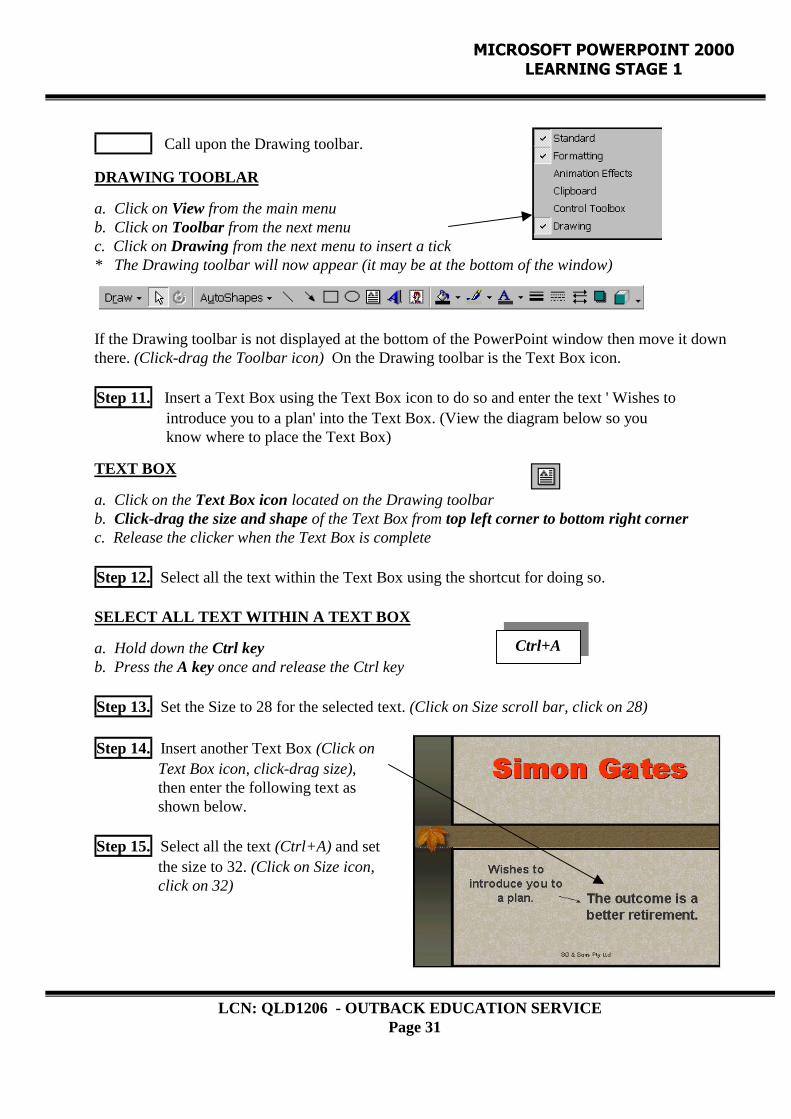
Call upon the Drawing toolbar.
DRAWING TOOBLAR
a. Click on View from the main menub. Click on Toolbar from the next menuc. Click on Drawing from the next menu to insert a tick* The Drawing toolbar will now appear (it may be at the bottom of the window)
If the Drawing toolbar is not displayed at the bottom of the PowerPoint window then move it downthere. (Click-drag the Toolbar icon) On the Drawing toolbar is the Text Box icon.
Step 11. Insert a Text Box using the Text Box icon to do so and enter the text ' Wishes to introduce you to a plan' into the Text Box. (View the diagram below so you know where to place the Text Box)
TEXT BOX
a. Click on the Text Box icon located on the Drawing toolbarb. Click-drag the size and shape of the Text Box from top left corner to bottom right cornerc. Release the clicker when the Text Box is complete
Step 12. Select all the text within the Text Box using the shortcut for doing so.
SELECT ALL TEXT WITHIN A TEXT BOX
a. Hold down the Ctrl keyb. Press the A key once and release the Ctrl key
Step 13. Set the Size to 28 for the selected text. (Click on Size scroll bar, click on 28)
Step 14. Insert another Text Box (Click on Text Box icon, click-drag size), then enter the following text as shown below.
Step 15. Select all the text (Ctrl+A) and set the size to 32. (Click on Size icon, click on 32)
Ctrl+A
LCN: QLD1206 - OUTBACK EDUCATION SERVICEPage 32
MICROSOFT POWERPOINT 2000LEARNING STAGE 1
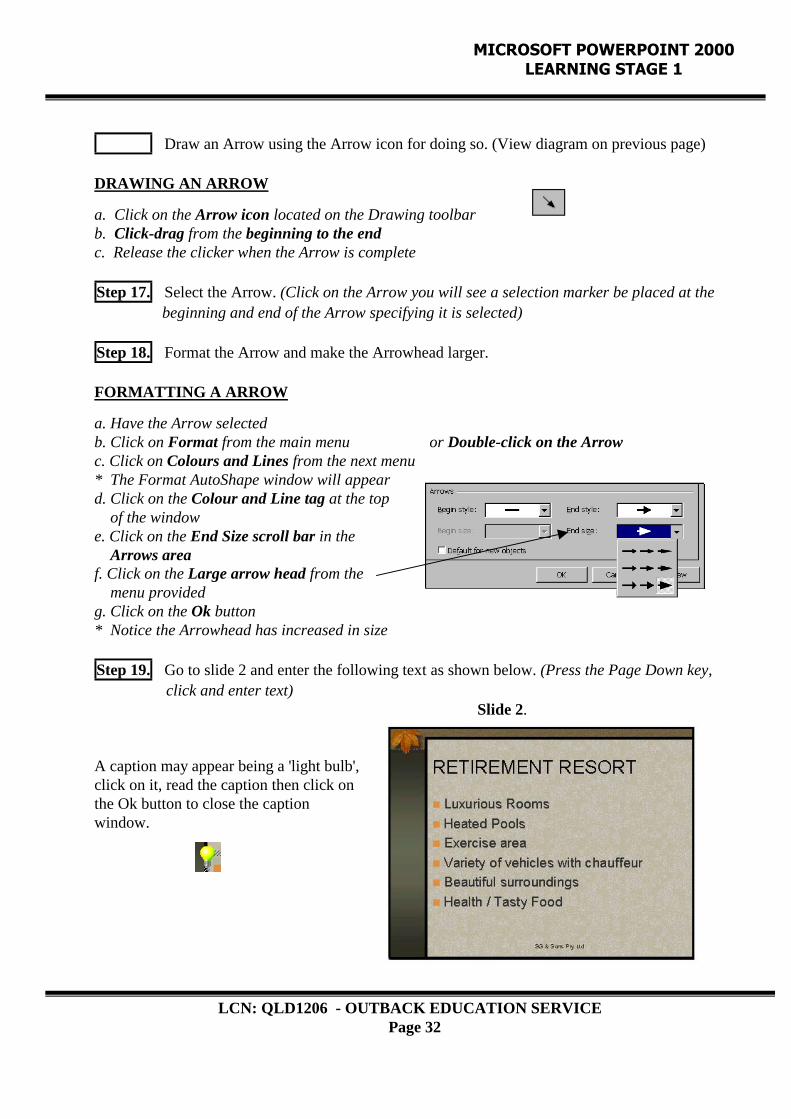
Draw an Arrow using the Arrow icon for doing so. (View diagram on previous page)
DRAWING AN ARROW
a. Click on the Arrow icon located on the Drawing toolbarb. Click-drag from the beginning to the endc. Release the clicker when the Arrow is complete
Step 17. Select the Arrow. (Click on the Arrow you will see a selection marker be placed at the beginning and end of the Arrow specifying it is selected)
Step 18. Format the Arrow and make the Arrowhead larger.
FORMATTING A ARROW
a. Have the Arrow selectedb. Click on Format from the main menu or Double-click on the Arrowc. Click on Colours and Lines from the next menu* The Format AutoShape window will appeard. Click on the Colour and Line tag at the top of the windowe. Click on the End Size scroll bar in the Arrows areaf. Click on the Large arrow head from the menu providedg. Click on the Ok button* Notice the Arrowhead has increased in size
Step 19. Go to slide 2 and enter the following text as shown below. (Press the Page Down key, click and enter text)
Slide 2.
A caption may appear being a 'light bulb',click on it, read the caption then click onthe Ok button to close the captionwindow.
LCN: QLD1206 - OUTBACK EDUCATION SERVICEPage 33
MICROSOFT POWERPOINT 2000LEARNING STAGE 1
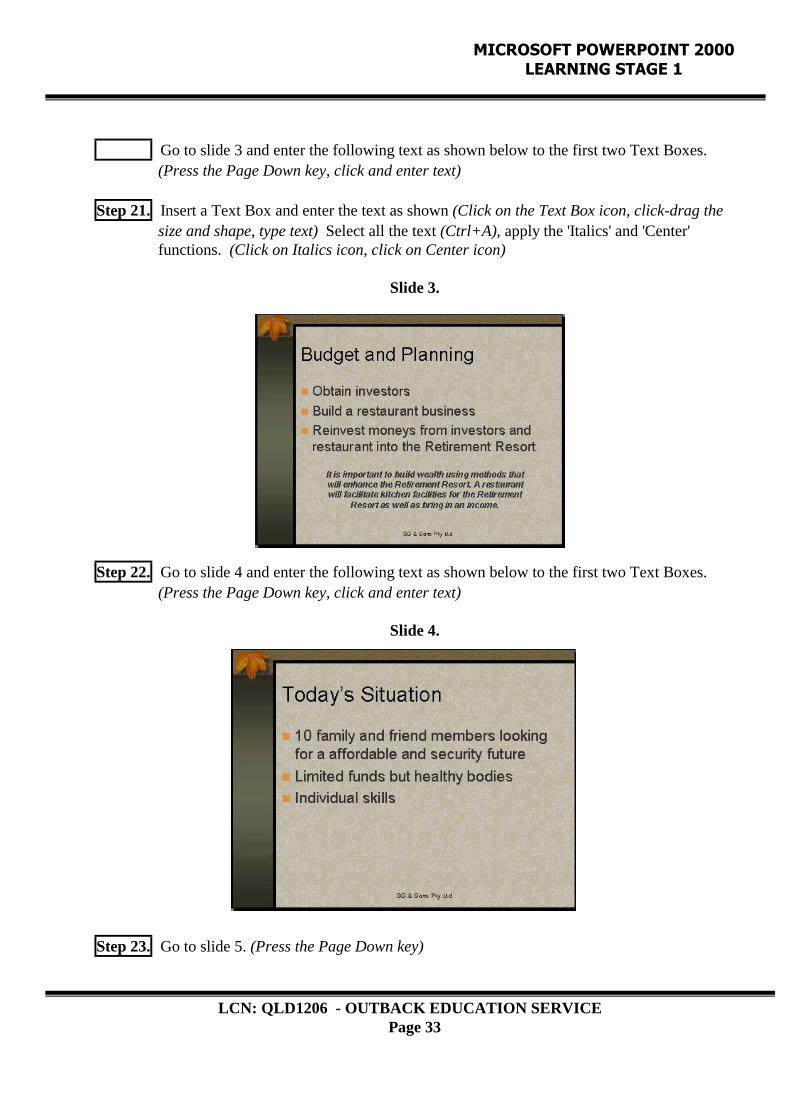
Go to slide 3 and enter the following text as shown below to the first two Text Boxes. (Press the Page Down key, click and enter text)
Step 21. Insert a Text Box and enter the text as shown (Click on the Text Box icon, click-drag the size and shape, type text) Select all the text (Ctrl+A), apply the 'Italics' and 'Center' functions. (Click on Italics icon, click on Center icon)
Slide 3.
Step 22. Go to slide 4 and enter the following text as shown below to the first two Text Boxes. (Press the Page Down key, click and enter text)
Slide 4.
Step 23. Go to slide 5. (Press the Page Down key)
LCN: QLD1206 - OUTBACK EDUCATION SERVICEPage 34
MICROSOFT POWERPOINT 2000LEARNING STAGE 1
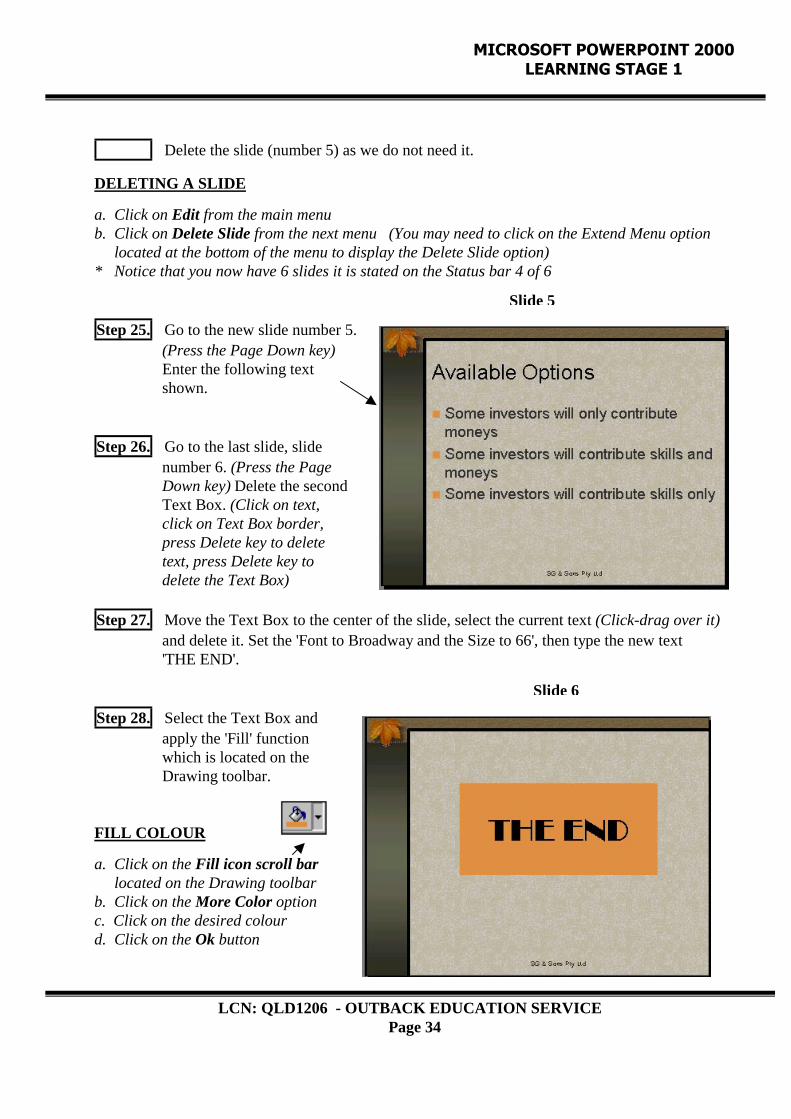
Delete the slide (number 5) as we do not need it.
DELETING A SLIDE
a. Click on Edit from the main menub. Click on Delete Slide from the next menu (You may need to click on the Extend Menu option located at the bottom of the menu to display the Delete Slide option)* Notice that you now have 6 slides it is stated on the Status bar 4 of 6
Step 25. Go to the new slide number 5. (Press the Page Down key) Enter the following text shown.
Step 26. Go to the last slide, slide number 6. (Press the Page Down key) Delete the second Text Box. (Click on text, click on Text Box border, press Delete key to delete text, press Delete key to delete the Text Box)
Step 27. Move the Text Box to the center of the slide, select the current text (Click-drag over it) and delete it. Set the 'Font to Broadway and the Size to 66', then type the new text 'THE END'.
Step 28. Select the Text Box and apply the 'Fill' function which is located on the Drawing toolbar.
FILL COLOUR
a. Click on the Fill icon scroll bar located on the Drawing toolbarb. Click on the More Color optionc. Click on the desired colourd. Click on the Ok button
Slide 5
Slide 6
LCN: QLD1206 - OUTBACK EDUCATION SERVICEPage 35
MICROSOFT POWERPOINT 2000LEARNING STAGE 1
Switch to the Slide Sorter view. (Click on Slide Sorter view icon)
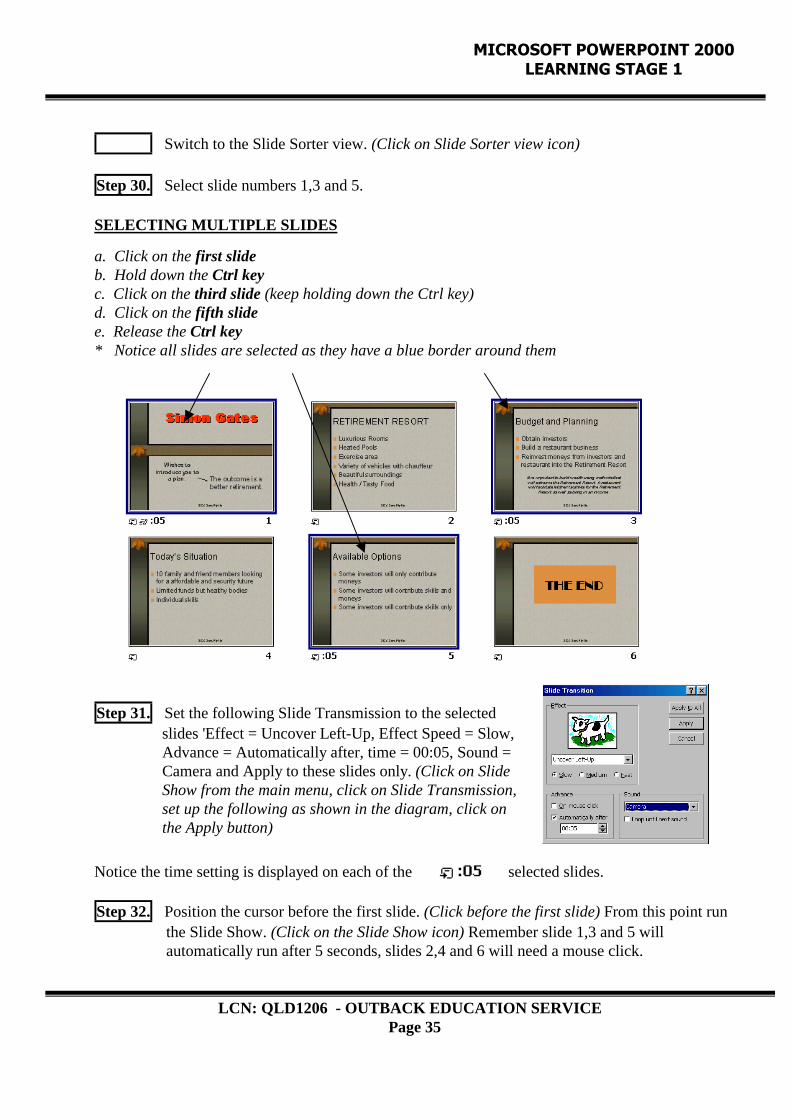
Step 30. Select slide numbers 1,3 and 5.
SELECTING MULTIPLE SLIDES
a. Click on the first slideb. Hold down the Ctrl keyc. Click on the third slide (keep holding down the Ctrl key)d. Click on the fifth slidee. Release the Ctrl key* Notice all slides are selected as they have a blue border around them
Step 31. Set the following Slide Transmission to the selected slides 'Effect = Uncover Left-Up, Effect Speed = Slow, Advance = Automatically after, time = 00:05, Sound = Camera and Apply to these slides only. (Click on Slide Show from the main menu, click on Slide Transmission, set up the following as shown in the diagram, click on the Apply button)
Notice the time setting is displayed on each of the selected slides.
Step 32. Position the cursor before the first slide. (Click before the first slide) From this point run the Slide Show. (Click on the Slide Show icon) Remember slide 1,3 and 5 will automatically run after 5 seconds, slides 2,4 and 6 will need a mouse click.
LCN: QLD1206 - OUTBACK EDUCATION SERVICEPage 36
MICROSOFT POWERPOINT 2000LEARNING STAGE 1
Save the presentation and call it 'Retirement'. Save the presentation into your folder. (Click on File, click on Save, click on the Save In scroll bar, click on C, click on the Save In scroll bar again, click on your folder, click in the Filename area, type the filename 'Retirement', click on the Save button)
Step 34. Close the presentation and exit the program. (Click on File from the main menu, click on Close from the next menu, click on File again, click on Exit from the next menu)
At this stage you can finalise your training or continue onto the next lesson.
LESSON 6.
Step 1. Switch On your computer and run the PowerPoint program. You will be presented with the PowerPoint window.
Step 2. Open the 'Retirement' presentation. (Click on Open an existing presentation, click on the Retirement file to select it, click on the Ok button)
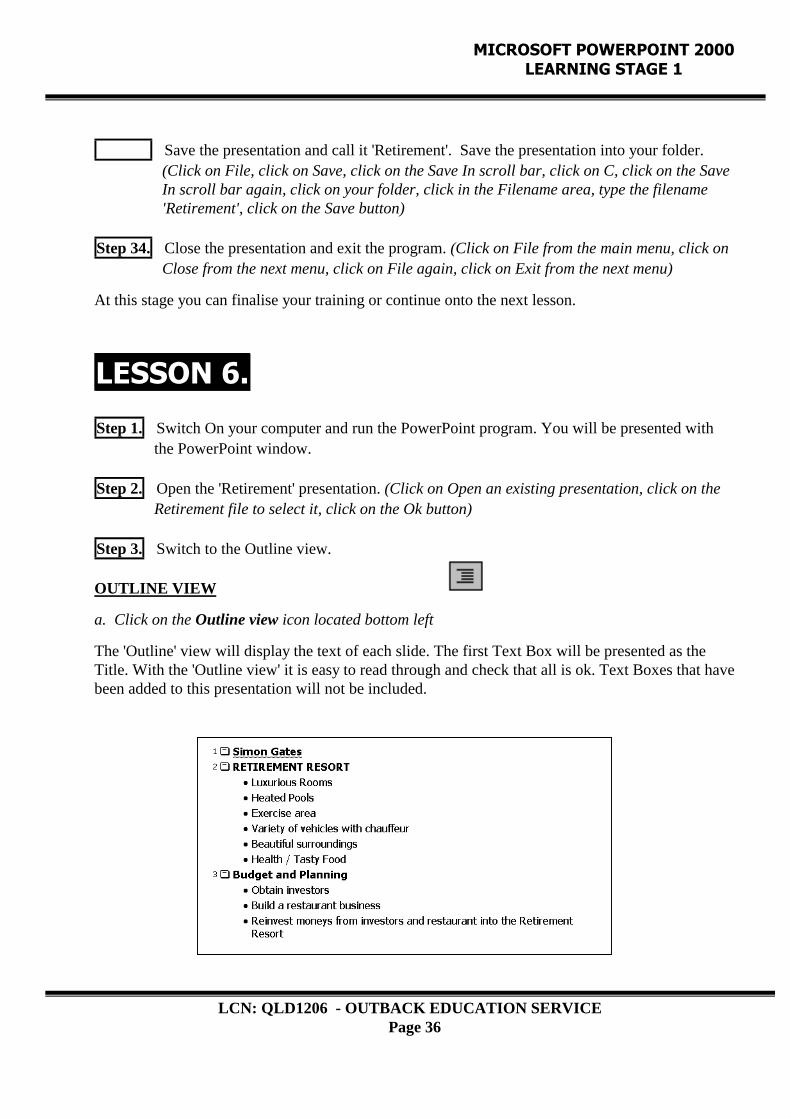
Step 3. Switch to the Outline view.
OUTLINE VIEW
a. Click on the Outline view icon located bottom left
The 'Outline' view will display the text of each slide. The first Text Box will be presented as theTitle. With the 'Outline view' it is easy to read through and check that all is ok. Text Boxes that havebeen added to this presentation will not be included.
LCN: QLD1206 - OUTBACK EDUCATION SERVICEPage 37
MICROSOFT POWERPOINT 2000LEARNING STAGE 1
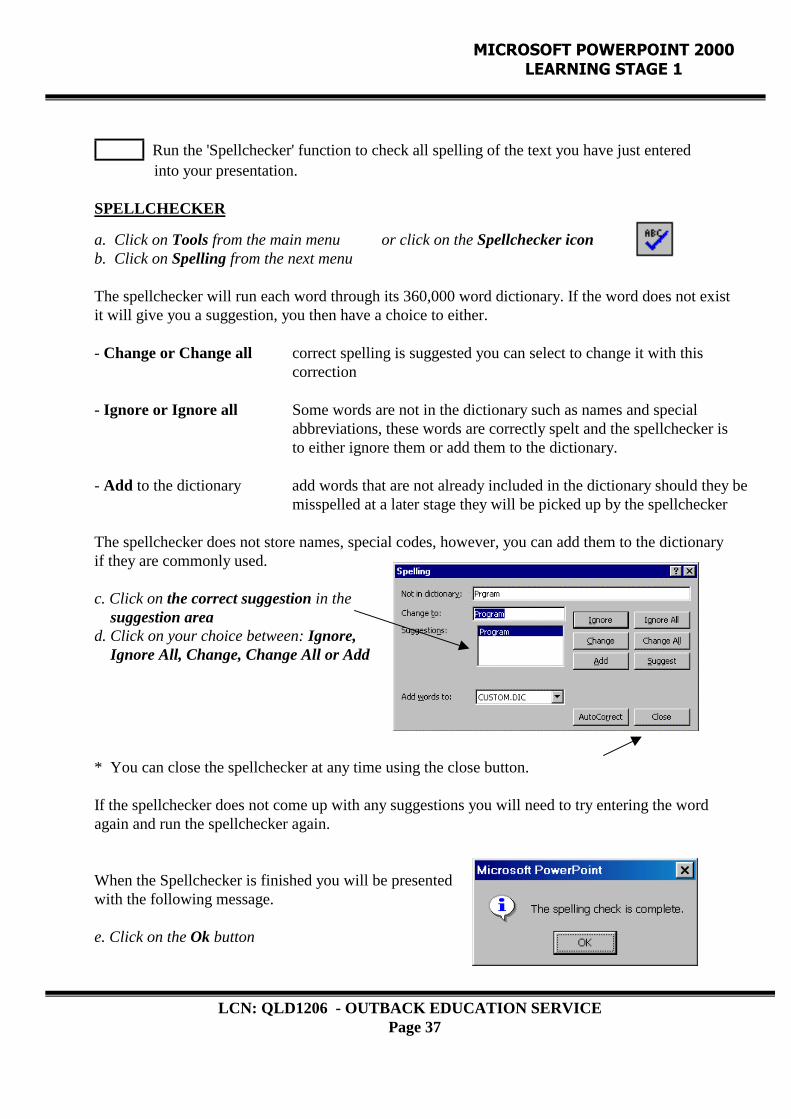
Run the 'Spellchecker' function to check all spelling of the text you have just entered into your presentation.
SPELLCHECKER
a. Click on Tools from the main menu or click on the Spellchecker iconb. Click on Spelling from the next menu
The spellchecker will run each word through its 360,000 word dictionary. If the word does not existit will give you a suggestion, you then have a choice to either.
- Change or Change all correct spelling is suggested you can select to change it with thiscorrection
- Ignore or Ignore all Some words are not in the dictionary such as names and specialabbreviations, these words are correctly spelt and the spellchecker isto either ignore them or add them to the dictionary.
- Add to the dictionary add words that are not already included in the dictionary should they bemisspelled at a later stage they will be picked up by the spellchecker
The spellchecker does not store names, special codes, however, you can add them to the dictionaryif they are commonly used.
c. Click on the correct suggestion in the suggestion aread. Click on your choice between: Ignore, Ignore All, Change, Change All or Add
* You can close the spellchecker at any time using the close button.
If the spellchecker does not come up with any suggestions you will need to try entering the wordagain and run the spellchecker again.
When the Spellchecker is finished you will be presentedwith the following message.
e. Click on the Ok button
LCN: QLD1206 - OUTBACK EDUCATION SERVICEPage 38
MICROSOFT POWERPOINT 2000LEARNING STAGE 1
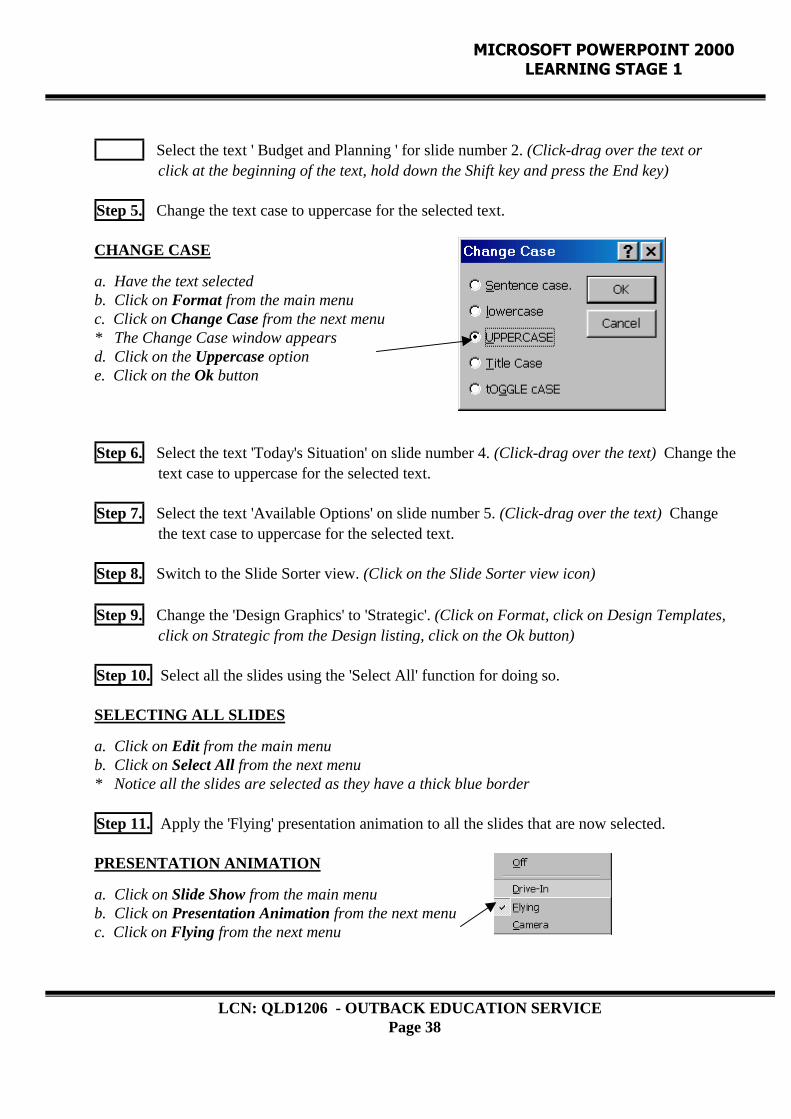
Select the text ' Budget and Planning ' for slide number 2. (Click-drag over the text or click at the beginning of the text, hold down the Shift key and press the End key)
Step 5. Change the text case to uppercase for the selected text.
CHANGE CASE
a. Have the text selectedb. Click on Format from the main menuc. Click on Change Case from the next menu* The Change Case window appearsd. Click on the Uppercase optione. Click on the Ok button
Step 6. Select the text 'Today's Situation' on slide number 4. (Click-drag over the text) Change the text case to uppercase for the selected text.
Step 7. Select the text 'Available Options' on slide number 5. (Click-drag over the text) Change the text case to uppercase for the selected text.
Step 8. Switch to the Slide Sorter view. (Click on the Slide Sorter view icon)
Step 9. Change the 'Design Graphics' to 'Strategic'. (Click on Format, click on Design Templates, click on Strategic from the Design listing, click on the Ok button)
Step 10. Select all the slides using the 'Select All' function for doing so.
SELECTING ALL SLIDES
a. Click on Edit from the main menub. Click on Select All from the next menu* Notice all the slides are selected as they have a thick blue border
Step 11. Apply the 'Flying' presentation animation to all the slides that are now selected.
PRESENTATION ANIMATION
a. Click on Slide Show from the main menub. Click on Presentation Animation from the next menuc. Click on Flying from the next menu
LCN: QLD1206 - OUTBACK EDUCATION SERVICEPage 39
MICROSOFT POWERPOINT 2000LEARNING STAGE 1
Position the cursor before the first slide (Click before the first slide), run the slide show from this point. (Click on Slide Show icon) Run the show to the very end and study what functions are used.
Slide number 1 has the Slide Transmission set to advance on five seconds, because the PresentationAnimation also applies the Title will come flying in from the left after five seconds.Slide number 2 has the Slide Transmission set to 'on mouse click', because the PresentationAnimation also applies each paragraph will come flying in form the left when you click the mouse.Slide 3 and 5 have the same Slide Transmission settings as slide number 1.Slide 4 and 6 have the same Slide Transmission settings as slide number 2.All slides have the Presentation Animation flying effect added to each paragraph.
Here you can see what the Slide Transmission settings control and what the Presentation Animationeffect control.
Step 13. Go to the first slide. (Press Ctrl+Home)
Step 14. Switch to the Slide view. (Click on Slide view)
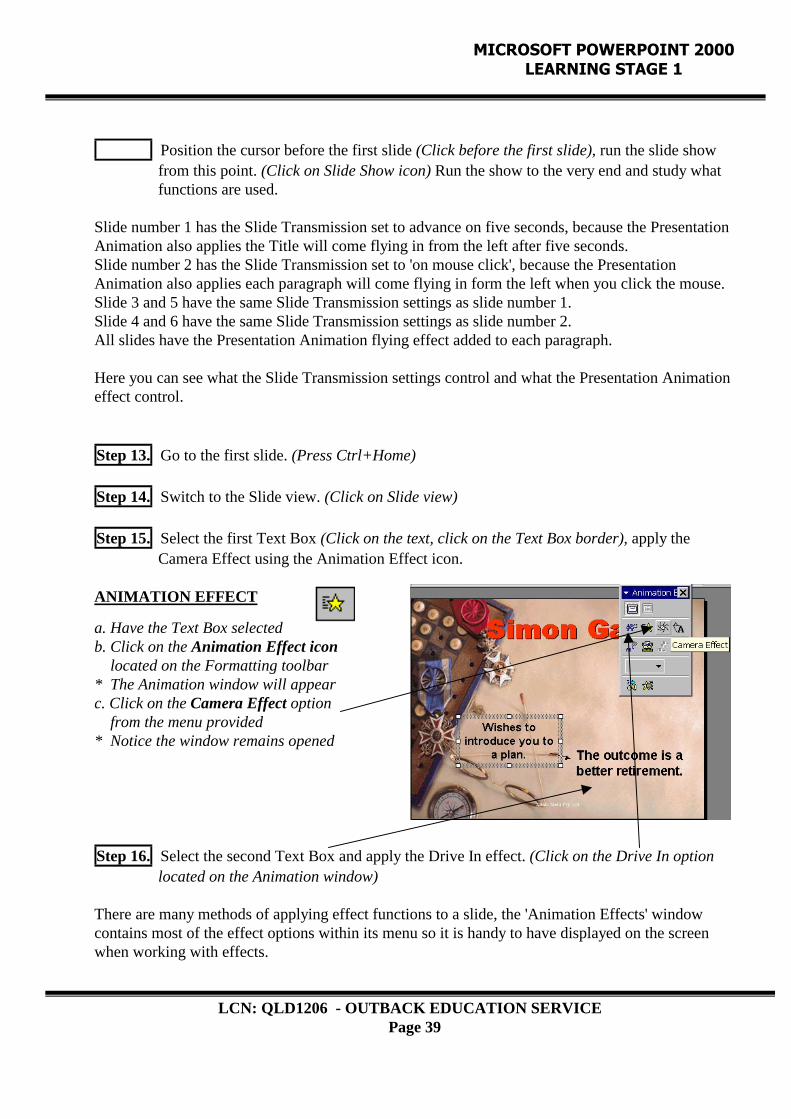
Step 15. Select the first Text Box (Click on the text, click on the Text Box border), apply the Camera Effect using the Animation Effect icon.
ANIMATION EFFECT
a. Have the Text Box selectedb. Click on the Animation Effect icon located on the Formatting toolbar* The Animation window will appearc. Click on the Camera Effect option from the menu provided* Notice the window remains opened
Step 16. Select the second Text Box and apply the Drive In effect. (Click on the Drive In option located on the Animation window)
There are many methods of applying effect functions to a slide, the 'Animation Effects' windowcontains most of the effect options within its menu so it is handy to have displayed on the screenwhen working with effects.

LCN: QLD1206 - OUTBACK EDUCATION SERVICEPage 40
MICROSOFT POWERPOINT 2000LEARNING STAGE 1
Preview the slide effects.
PREVIEW ANIMATION EFFECTS
a. Click on the Animation Preview option from the Animation Effects window* A small preview window will appear displaying the effects
Notice that the second Text Box has been given the third entry level. You can change the entrylevel for each item thus making the title appear last and the Text Boxes appearing first. The'Animation' function is also located in the 'Custom Animation' function.
Step 18. View the 'Custom Animations' for this slide.
CUSTOM ANIMATION
a. Click on the Custom Animation icon located bottom of the Animation Effect window* The Custom Animation window will appear
Step 19. Set the effects for the Arrow to 'Crawl in from bottom' with a clapping sound.
EFFECTS AND SOUNDS
a. Click on the Effects tag in the Custom Animation windowb. Click on the Line 4 option in the Check to animated slide objects areac. Click on the Effect scroll bar and select Crawl from the menud. Click on the Direction scroll bar and select From Bottom from the menue. Click on the Sound scroll bar and select Clapping from the menuf. Click on the Ok button
Step 20. Preview the slide show.
a. Click on the Preview button* View the Preview display
Step 21. Close the Custom Animation window. (Click on Close Window icon located top right corner of the window)
Notice the Arrow isselected
LCN: QLD1206 - OUTBACK EDUCATION SERVICEPage 41
MICROSOFT POWERPOINT 2000LEARNING STAGE 1
Keep the 'Animation Effects' window opened, switch to the 'Slide Sorter' view. (Click on Slide Sorter view icon), select the last slide. (Click on it)
Step 23. Switch to the Slide view. (Click on the Slide view icon) Select the Text Box that contains The text 'The End'. (Click on the text, click on the Text Box border)
Step 24. Apply the 'Laser Text' effect to the Text Box. (Have the Text Box selected, click on the Laser Text option from the Animation Effects window)
Step 25. Preview the slide with its new effect. (Click on the Animation Effects option from the Animation Effects window)
Step 26. Perform the 'Save' function to resave the file with its many new changes.
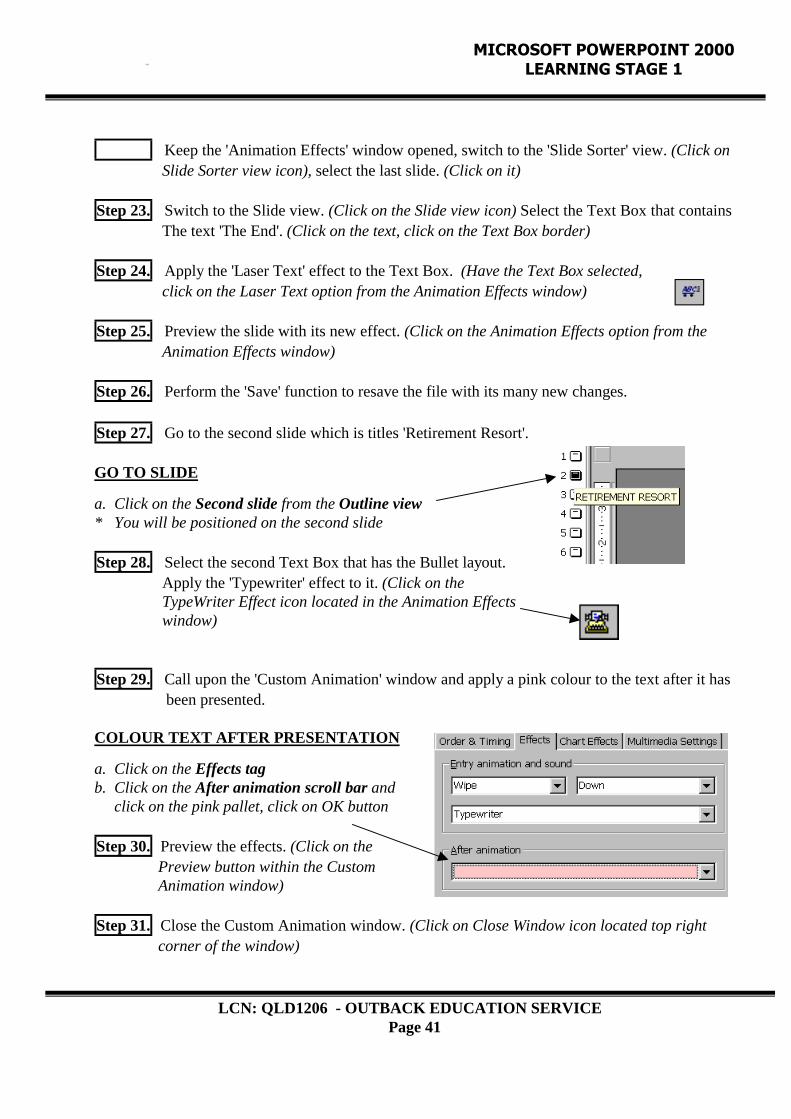
Step 27. Go to the second slide which is titles 'Retirement Resort'.
GO TO SLIDE
a. Click on the Second slide from the Outline view* You will be positioned on the second slide
Step 28. Select the second Text Box that has the Bullet layout. Apply the 'Typewriter' effect to it. (Click on the TypeWriter Effect icon located in the Animation Effects window)
Step 29. Call upon the 'Custom Animation' window and apply a pink colour to the text after it has been presented.
COLOUR TEXT AFTER PRESENTATION
a. Click on the Effects tagb. Click on the After animation scroll bar and click on the pink pallet, click on OK button
Step 30. Preview the effects. (Click on the Preview button within the Custom Animation window)
Step 31. Close the Custom Animation window. (Click on Close Window icon located top right corner of the window)
LCN: QLD1206 - OUTBACK EDUCATION SERVICEPage 42
MICROSOFT POWERPOINT 2000LEARNING STAGE 1
Go to slide 1 (Press Ctrl+Home key), run the Slide Show from this point. (Click on the Slide Show icon)
Step 33. Switch to the Slide Sorter view. (Click on Slide Sorter view icon) Select slide numbers 2,3,4 & 5. (Hold down the Ctrl key, click on each slide to select it)
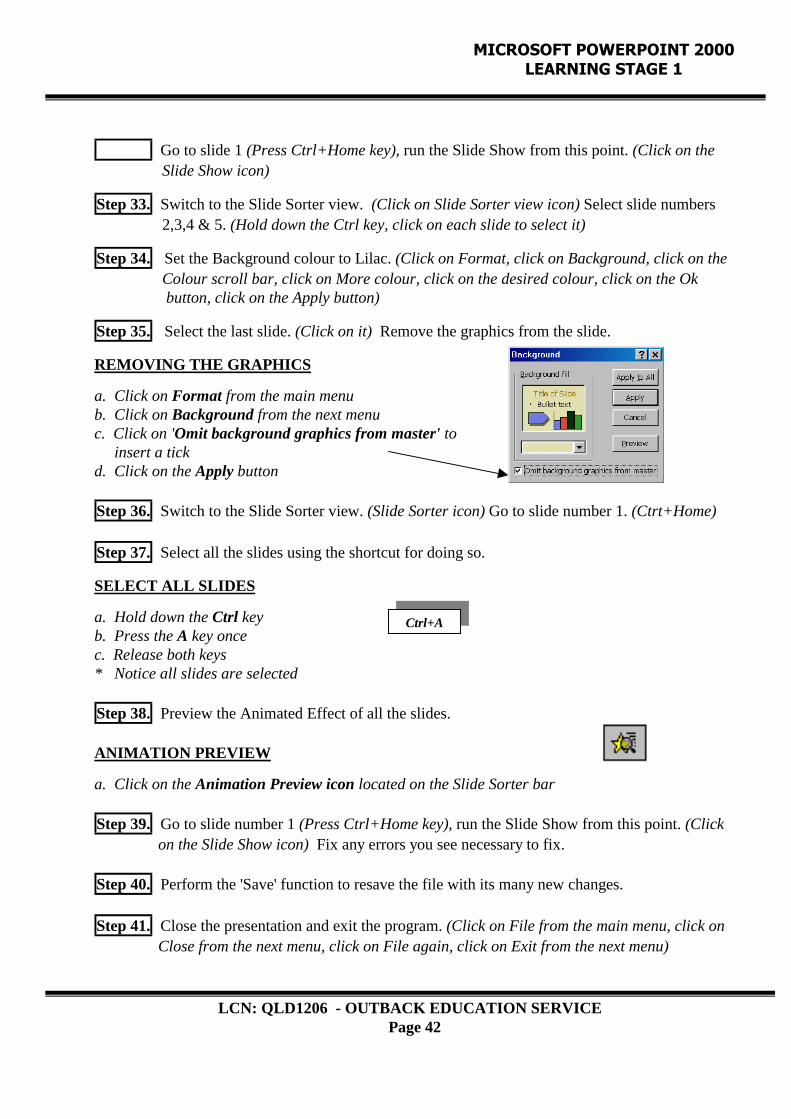
Step 34. Set the Background colour to Lilac. (Click on Format, click on Background, click on the Colour scroll bar, click on More colour, click on the desired colour, click on the Ok button, click on the Apply button)
Step 35. Select the last slide. (Click on it) Remove the graphics from the slide.
REMOVING THE GRAPHICS
a. Click on Format from the main menub. Click on Background from the next menuc. Click on 'Omit background graphics from master' to insert a tickd. Click on the Apply button
Step 36. Switch to the Slide Sorter view. (Slide Sorter icon) Go to slide number 1. (Ctrt+Home)
Step 37. Select all the slides using the shortcut for doing so.
SELECT ALL SLIDES
a. Hold down the Ctrl keyb. Press the A key oncec. Release both keys* Notice all slides are selected
Step 38. Preview the Animated Effect of all the slides.
ANIMATION PREVIEW
a. Click on the Animation Preview icon located on the Slide Sorter bar
Step 39. Go to slide number 1 (Press Ctrl+Home key), run the Slide Show from this point. (Click on the Slide Show icon) Fix any errors you see necessary to fix.
Step 40. Perform the 'Save' function to resave the file with its many new changes.
Step 41. Close the presentation and exit the program. (Click on File from the main menu, click on Close from the next menu, click on File again, click on Exit from the next menu)
Ctrl+A