Embed Size (px)
Citation preview
PowerPoint: Basic Drawing Techniques
Version: 1.0 October 18, 2004
Confidential Internal Use Only
A publication of the Archdiocese of Chicago
Office of Information Technology Technical Services Group
Duplication Prohibited without Permission of Archdiocese of Chicago Office of Information Technology, Technical Services Group
© 2004 by Chicago Archdiocese Office of Information Technology. All Rights Reserved.

Course Developer: Mike Riley

PPT Basic Drawing i October 18, 2004 Office of Information Technology Version: 1.0
Table of Contents Basics of Drawing......................................................................................................................................... 1 Drawing Basics ............................................................................................................................................. 1
Adding Basic Shapes ................................................................................................................................ 1 Drawing “Perfect” Shapes ........................................................................................................................ 2 Using AutoShapes..................................................................................................................................... 2
Selecting Objects .......................................................................................................................................... 3 Selecting a Single Object .......................................................................................................................... 3
Clicking................................................................................................................................................. 3 Tabbing ................................................................................................................................................. 3
Selecting Multiple Objects........................................................................................................................ 3 Lassoing Objects ................................................................................................................................... 3 Selecting Multiple Objects.................................................................................................................... 4 Deselecting Objects .............................................................................................................................. 4 Selecting All Objects on a Slide ........................................................................................................... 4
Moving Objects............................................................................................................................................. 4 Moving an Object ..................................................................................................................................... 4
Moving Horizontally/Vertically............................................................................................................ 5 Nudging an Object .................................................................................................................................... 5 Moving Objects to Another Slide ............................................................................................................. 5
Copying Objects............................................................................................................................................ 6 Within the Same Slide .............................................................................................................................. 6
Copy/Paste ............................................................................................................................................ 6 Drag Copying........................................................................................................................................ 6 Duplicating Objects .............................................................................................................................. 6
To Another Slide....................................................................................................................................... 7 Resizing ........................................................................................................................................................ 7
Adjusting the Height or Width.................................................................................................................. 7 Adjusting the Height and Width ............................................................................................................... 7 Resizing Proportionately........................................................................................................................... 8
Formatting Objects........................................................................................................................................ 8 Fill Color................................................................................................................................................... 8 Line Color ................................................................................................................................................. 8 Text Color ................................................................................................................................................. 9 Line Style .................................................................................................................................................. 9 Dash Style ................................................................................................................................................. 9 Arrow Style............................................................................................................................................... 9
Adding Text ................................................................................................................................................ 10 To Shapes................................................................................................................................................ 10 Text Boxes .............................................................................................................................................. 10
Layering Objects......................................................................................................................................... 11 Aligning Objects ......................................................................................................................................... 11 Grouping/Ungrouping Objects.................................................................................................................... 12
Grouping Objects .................................................................................................................................... 12 Ungrouping Objects ................................................................................................................................ 12 Regrouping Objects ................................................................................................................................ 12
Flipping and Rotating Objects .................................................................................................................... 13 Flipping Objects...................................................................................................................................... 13 Rotating Objects...................................................................................................................................... 13

PPT Basic Drawing ii October 18, 2004 Office of Information Technology Version: 1.0
Free Rotate .............................................................................................................................................. 13 Object Properties......................................................................................................................................... 14
Colors and Lines ..................................................................................................................................... 14 Size.......................................................................................................................................................... 14 Position ................................................................................................................................................... 15 Picture ..................................................................................................................................................... 15 Text Box.................................................................................................................................................. 15
Step-by-Step Instructions To display/hide the Drawing toolbar: ........................................................................................................... 1 To lasso objects:............................................................................................................................................ 3 To select multiple objects: ............................................................................................................................ 4 To deselect objects:....................................................................................................................................... 4 To select all objects on a slide: ..................................................................................................................... 4 To move an object:........................................................................................................................................ 4 To nudge an object:....................................................................................................................................... 5 To move objects to another slide: ................................................................................................................. 5 To copy/paste an object: ............................................................................................................................... 6 To copy/drag an object: ................................................................................................................................ 6 To create a duplicate: .................................................................................................................................... 6 To copy objects to another slide: .................................................................................................................. 7 To adjust just the height or width of an object:............................................................................................. 7 To adjust the height and width of an object: ................................................................................................. 7 To resize an object proportionately:.............................................................................................................. 8 To change the fill color: ................................................................................................................................ 8 To change the line color:............................................................................................................................... 8 To change text color: .................................................................................................................................... 9 To change the line style: ............................................................................................................................... 9 To change the dash style: .............................................................................................................................. 9 To change the arrow style: ............................................................................................................................ 9 To add text to a shape: ................................................................................................................................ 10 To add a text box: ....................................................................................................................................... 10 To change the layer of an object: ................................................................................................................ 11 To align objects:.......................................................................................................................................... 11 To group objects: ........................................................................................................................................ 12 To ungroup objects: .................................................................................................................................... 12 To regroup objects: ..................................................................................................................................... 12 To flip an object: ......................................................................................................................................... 13 To rotate an object: ..................................................................................................................................... 13 To open the object properties:..................................................................................................................... 14

PPT Basic Drawing 1 October 18, 2004 Office of Information Technology Version: 1.0
Basics of Drawing
Graphic objects are added to a PowerPoint presentation for a variety of reasons. Graphics can enhance specific items on a slide, add flavor to a presentation, or help define a concept. The Drawing tools within PowerPoint allow for great flexibility in presenting information. Using these tools effectively can separate the novice user from the expert.
The Drawing Toolbar is available in the Normal, Slide, Outline, Slide Master, Handout Master, and Notes Master Views. Drawing objects can be added to Slides, Notes pages, and the three masters.
The Drawing toolbar normally appears at the bottom of the screen.
To display/hide the Drawing toolbar: • Choose View, Toolbars, Drawing Adding the checkmark will display the toolbar. Removing the checkmark will hide the toolbar.
Drawing Basics
Adding Basic Shapes
PowerPoint makes it easy to add lines, arrows, rectangles, and ovals. These tools are available directly from the drawing toolbar.
To add a basic shape: • Click the tool for the desired shape (the button is depressed when active) • Position the cursor at the point where one corner of the shape will appear • Click and hold the left mouse button • Drag the mouse until the shape is the desired size • Release the mouse button Don’t try to drag the button onto the slide. You don’t try to drag the Bold icon when making text bold, do you?
Hint: If you are going to draw the same shape several times, double-click the toolbar button for that shape to keep it active. When you’re finished using that tool, tap the Esc key to deactivate it.

PPT Basic Drawing 2 October 18, 2004 Office of Information Technology Version: 1.0
Drawing “Perfect” Shapes
Drawing a perfect circle or square can be frustrating unless you are precise when moving the mouse. Luckily, PowerPoint makes it easy to draw “perfect” shapes.
A “perfect” shape is exactly as tall as it is wide. For lines and arrows, a perfect line or arrow is locked at different angles (horizontal, vertical, 90°, etc.).
To draw a perfect shape: • Click the tool for the desired shape (the button is depressed when active) • Position the cursor at the point where one corner of the shape will appear • Click and hold the left mouse button • Drag the mouse until the shape is the desired size • Hold down the Shift key and release the mouse button It’s important that the Shift key is held down when you release the mouse button. Some people like to hold down the Shift key while drawing the object so they can see it in its perfect form while they draw.
Using AutoShapes
PowerPoint includes several other preset drawing objects. These objects are available from the AutoShapes menu. The AutoShapes menu contains eight categories of drawing objects and a link to clip art categories that can be used as shapes.
To draw an AutoShape: • Select the AutoShapes menu • Select the desired category • Click on the desired shape • Position the cursor at the point where one
corner of the shape will appear • Click and hold the left mouse button • Drag the mouse until the shape is the
desired size • Release the mouse button You can use the Shift key to draw “perfect” AutoShapes.
Note: Connectors, Callouts and Action Buttons are special shapes that are covered in other courses (Advanced Drawing and Animated Presentations).

PPT Basic Drawing 3 October 18, 2004 Office of Information Technology Version: 1.0
Selecting Objects
If you need to change one or more objects on your slide, the first step is to select those objects. There are several techniques you can use to select a single object or multiple objects.
Selecting a Single Object
You can use two different techniques to select a single object. The technique you use normally depends on the size and position of the object.
Clicking The simplest way to select an object is to click on it. When the object is selected, sizing handles appear on the corners and edges of the object.
Tabbing If the object you’re trying to select is very small or obscured by another object, you can use the Tab key to easily select it.
To select an object using the Tab key: • Click on a neutral spot in the slide or on an existing object • Tap the Tab key to cycle to the next object • Continue tapping the Tab key until the desired object is selected • Hint: If you tab past the object, you can use Shift+Tab to cycle in the opposite direction.
Selecting Multiple Objects
You can also select more than one object at a time. This is helpful if you are moving objects as a “group”, applying the same formatting to several objects, and is required when grouping objects (See Grouping Objects on page 12).
Lassoing Objects If you want to select multiple objects that are close to each other but not near other objects, the easiest method of selecting is to “lasso” those objects.
To lasso objects: • Do NOT select any tools • Move your mouse to an empty part of your
slide • Click and drag to draw a box around the objects (the objects must be completely enclosed by
the box you draw) • Release the mouse button Remember, the box you draw must completely surround the objects you are selecting. You can overlap other objects without selecting them.

PPT Basic Drawing 4 October 18, 2004 Office of Information Technology Version: 1.0
Selecting Multiple Objects If you are selecting several large objects, or other objects on the slide are between the objects you need to select, you can still select multiple objects using the mouse and keyboard.
To select multiple objects: • Click on the first object you want to select • Hold down the Shift key and click any additional objects you need to select
Deselecting Objects If you select more objects than you want, rather than starting over, you can simply deselect the objects you don’t want. In some cases, it will be easier to select more than you need and remove the objects you don’t want.
To deselect objects: • Hold down the Shift key and click on the object you want to deselect
Selecting All Objects on a Slide In some cases, you may want to select ALL of the objects on the slide. This, in combination with deselecting objects, can be a fast way to select most objects on a slide.
To select all objects on a slide: • Choose Edit, Select All
OR • Hold down the Ctrl key and tap the letter A Note: This will also select any text placeholders on the slide (such as the slide title). You may need to deselect those objects.
Moving Objects
As you add objects to a slide, you may end up needing to move them to new locations on the slide. You can move objects within the same slide or to a completely different slide.
Moving an Object
You can freely move an object to any location in the current slide.
To move an object: • Select the object(s) to move • Move the cursor on top of the object (or over the edge of the border if you’re moving a text
object) until the move handle appears • Click and hold the mouse button • Move the mouse until the object is in the desired location • Release the mouse button Note: You can move several objects at the same time by selecting them all first.

PPT Basic Drawing 5 October 18, 2004 Office of Information Technology Version: 1.0
Moving Horizontally/Vertically Sometimes you’ll want to move an object straight up or down or to the left or right. Combining the keyboard and the mouse lets you move an object horizontally or vertically.
To move and object horizontally/vertically: • Select the object(s) to move • Move the cursor on top of the object (or over the edge of the border if you’re moving a text
object) until the move handle appears • Click and hold the mouse button • Hold down the Shift key • Move the mouse until the object is in the desired location • Release the mouse button Note: You need to keep the Shift key held down before you release the mouse button. Windows only detects if you were holding down the Shift key when you release the mouse button…not whether you held down the Shift key at any time.
Nudging an Object
Sometimes you may want to move an object a short distance or move an object without using the mouse. You can use the keyboard to nudge an object any distance.
To nudge an object: • Select the object to move • Tap the arrow key on the keyboard to nudge the object in that direction
OR • Hold down the arrow key on the keyboard to move the object a further distance
Moving Objects to Another Slide
You can also move objects to a completely different slide.
To move objects to another slide: • Select the objects to move • Choose Edit, Cut • Navigate to the new slide in Slide or Normal view • Click within the slide editing area if necessary • Choose Edit, Paste

PPT Basic Drawing 6 October 18, 2004 Office of Information Technology Version: 1.0
Copying Objects
You can copy objects within the same slide or to different slides.
Within the Same Slide
Copying an object within the same slide is a great way to make sure that objects are exactly the same (for instance, two rectangles that are the exact same size).
Copy/Paste One way to copy an object is with copy/paste.
To copy/paste an object: • Select the object • Choose Edit, Copy • Choose Edit, Paste The new object will appear almost exactly in the same location as the original. You will need to move the copy to the desired location within the slide.
Drag Copying You can also copy and object to the desired location in one step by using the mouse and keyboard.
To copy/drag an object: • Select the object • Hold down the Ctrl key on the keyboard • Drag the copy to the desired location • Release the mouse • Release the Ctrl key Tip: If you hold down both the Ctrl and Shift keys while dragging, you can position the copy in the exact same vertical/horizontal plane.
Duplicating Objects You can use the keyboard to quickly copy and paste an object on your slide by using the Duplicate command.
To create a duplicate: • Select the object • Hold down Ctrl and tap the letter D Tip: If you reposition the duplicate immediately after you duplicate it, then Ctrl+D will not only create another duplicate, but also position it in the same manner as the first duplicate.

PPT Basic Drawing 7 October 18, 2004 Office of Information Technology Version: 1.0
To Another Slide
If you need to have the same object appear on more than one slide, you should copy it rather than trying to add the object separately. When you copy an object from one slide to another, its location and size will remain consistent from one slide to the next.
To copy objects to another slide: • Select the objects to copy • Choose Edit, Copy • Navigate to the new slide in Slide or Normal view • Click within the slide editing area if necessary • Choose Edit, Paste
Resizing
After you have added an object to a slide, you can easily resize it.
Adjusting the Height or Width
To adjust just the height or width of an object: • Select the object • Move your mouse to one of the sizing
handles on the edge of the object • Click and drag with the mouse to resize the
object
Adjusting the Height and Width
You can also change the height and width of an object at the same time.
To adjust the height and width of an object: • Select the object • Move your mouse to one of the sizing handles at the corner of the object • Click and drag to resize the object Note: Some objects won’t let you distort them while resizing from a corner point—other objects will.

PPT Basic Drawing 8 October 18, 2004 Office of Information Technology Version: 1.0
Resizing Proportionately
If you want to change the size of an object but keep it’s original height/width ratio, use the following procedure.
To resize an object proportionately: • Select the object • Move your mouse to one of the corner sizing handles • Hold down the Shift key on your keyboard • Click and drag to resize the object • Release the mouse button • Release the Shift key Note: You should get in the habit of using the above method to resize proportionately. Some objects won’t let you distort them if you resize from a corner point, but using the Shift key and corner point will guarantee that you won’t distort the object.
Formatting Objects
Whenever you add an object to a slide, it will use the default settings for its formatting. In most casts, you will want to change the formatting of the object (most often, the fill color).
Fill Color
The fill color is the color inside an object.
To change the fill color: • Select the object • Click the drop-down arrow for the fill-color tool on the
drawing toolbar • Select one of the listed colors or choose More Colors for
additional options
Line Color
The line color is used for the color of lines and arrows and also the outline around objects.
To change the line color: • Select the object • Click the drop-down arrow for the line-color tool on the drawing
toolbar • Select one of the listed colors or choose More Colors for
additional options

PPT Basic Drawing 9 October 18, 2004 Office of Information Technology Version: 1.0
Text Color
You can easily change the color of text inside autoshapes or standalone text boxes (see page 10) or the main text in your presentation.
To change text color: • Click on the text to change • Click and drag to highlight the text to change
OR • Tap the Esc key once to select the entire text area • Click the text color-drop down in the Drawing toolbar • Select one of the listed colors or choose More Colors for
additional options
Line Style
Use the Line Style button to change the thickness of lines, arrows, and outlines around shapes or to change the line to a double or triple line.
To change the line style: • Select the object • Click the line style icon on the drawing toolbar • Select the desired style from the list Note: Changing an arrow’s line style to a thicker line will also make the arrowheads more noticeable.
Dash Style
You can also change a solid line, arrow, or border to a dashed one using the Dash Style icon.
To change the dash style: • Select the object • Click the dash style icon on the drawing toolbar • Select the desired style from the list
Arrow Style
Whenever you draw an arrow, the arrowhead appears at the end of the line. You can use the arrow style options to flip which side the arrowhead appears on or add arrowheads to any line/arrow.
To change the arrow style: • Select the line or arrow to change • Click the arrow style icon on the drawing toolbar • Select the desired style from the list

PPT Basic Drawing 10 October 18, 2004 Office of Information Technology Version: 1.0
Adding Text
You should always make sure that the main body of your presentation is added to text placeholders in the slide. Other text can be added to provide “flavor” in a presentation or used in diagrams.
To Shapes
Adding text to a shape on your slide is the fastest way to include flavoring text in a presentation.
To add text to a shape: • Click on the shape • Begin typing If you are adding text that should appear in a shape, you should always use this method whenever possible. You can change the object properties (see page 14) if you need to change the placement of the text inside the shape.
Text Boxes
You can also add stand-alone text boxes to a slide.
To add a text box: • Click on the Text Box tool in the Drawing toolbar • Click on your slide to position the upper-left corner of your text box
OR • Click and drag to set the width of your text box • Begin typing

PPT Basic Drawing 11 October 18, 2004 Office of Information Technology Version: 1.0
Layering Objects
Whenever you add an object to a slide, it is placed on a “layer” on your slide. Newer objects will, by default, appear on top of existing objects.
Sometimes, it’s easier to add the top-layer objects before the lower-layer objects. You can, however, change the layering of objects at any time.
To change the layer of an object: • Select the object(s) to change the layer of • Choose Draw, Order, and select the desired option • Repeat the Draw, Order steps until the object is in the desired
layer
Layer Option Result
Bring to Front Moves the object to the top-most layer
Send to Back Moves the object to the bottom-most layer
Bring Forward Moves the object one layer toward the top
Send Backward Moves the object one layer toward the bottom
Aligning Objects
Use the Align commands to line up objects relative to each other.
To align objects: • Select the objects you are aligning • Choose Draw, Align, and select the desired alignment option Note: If you choose the wrong option, click Undo to restore the original locations of the objects.

PPT Basic Drawing 12 October 18, 2004 Office of Information Technology Version: 1.0
Grouping/Ungrouping Objects
The drawing objects you add to a slide may be part of a larger “object” (for example, parts of a workflow diagram). You can group several objects together so that you can move/resize the group as a whole.
Grouping Objects
To group objects: • Select the objects that will become part of the group • Choose Draw, Group
Ungrouping Objects
Once a set of objects is grouped, any changes you make will affect the entire group. If you need to change properties of an individual object, you will first need to ungroup.
To ungroup objects: • Select the current group • Choose Draw, Ungroup • Tap the Esc key to deselect all objects (so that you can select
the specific object you need) Note: If the object you select isn’t currently a group, PowerPoint can break up the object into individual drawing components. The only object you should ever do this with is Clip Art (for the purpose of removing elements of that clip art). Converting other objects in a slide can wreak havoc with the object and make changes nearly impossible.
Regrouping Objects
After you have made the change to an individual element of a group, you should regroup the objects. You can only regroup if you have used the Ungroup command and the object was an actual group.
To regroup objects: • Choose Draw, Regroup Note: You don’t have to select the elements of that object.
Figure 1: Ungrouped
Figure 2: Grouped
Figure 3: Resizing without Grouping

PPT Basic Drawing 13 October 18, 2004 Office of Information Technology Version: 1.0
Flipping and Rotating Objects
When you add an object to a slide (especially an autoshape), the object might not be pointing in the desired direction. You can flip and rotate most objects on a slide to point them in the direction you want.
Flipping Objects
Flipping an object will “mirror” that object.
To flip an object: • Select the object • Choose Draw, Rotate or Flip • Choose Flip Horizontal or Flip Vertical
Rotating Objects
You can quickly rotate an object 90°.
To rotate an object: • Select the object • Choose Draw, Rotate or Flip • Choose Flip Left or Flip Right
Free Rotate
If you wish to rotate an object at an angle other than 90°, use the Free Rotate tool.
To rotate an object freely: • Select the object • Choose Draw, Rotate or Flip and choose Free Rotate
OR • Click the Free Rotate icon • Move your mouse to a rotation point at the corner of the object • Click the drag with the mouse to rotate the object • Tap the Esc key to exit rotation mode

PPT Basic Drawing 14 October 18, 2004 Office of Information Technology Version: 1.0
Object Properties
You can make additional choices about objects in a slide through the Object Properties dialog box. The properties vary depending on the type of object you are working with.
To open the object properties: • Select the object • Click the Format menu • Choose the last option from the Format menu
Colors and Lines
Use the colors and lines tab to choose additional options for colors, outlines, and arrows that aren’t available from the Drawing toolbar. The colors and lines tab lets you increase the size of arrowheads while keeping the thickness of the line at its original setting.
You can also make an object’s fill color semi-transparent so that other objects will display through that object.
Size
The size properties dialog lets you specify exact dimension for objects. This is very useful when you have several objects on a slide that you want the exact same dimensions.
Setting the Rotation to 0° resets an object to its original rotation.
PPT Basic Drawing 15 October 18, 2004 Office of Information Technology Version: 1.0
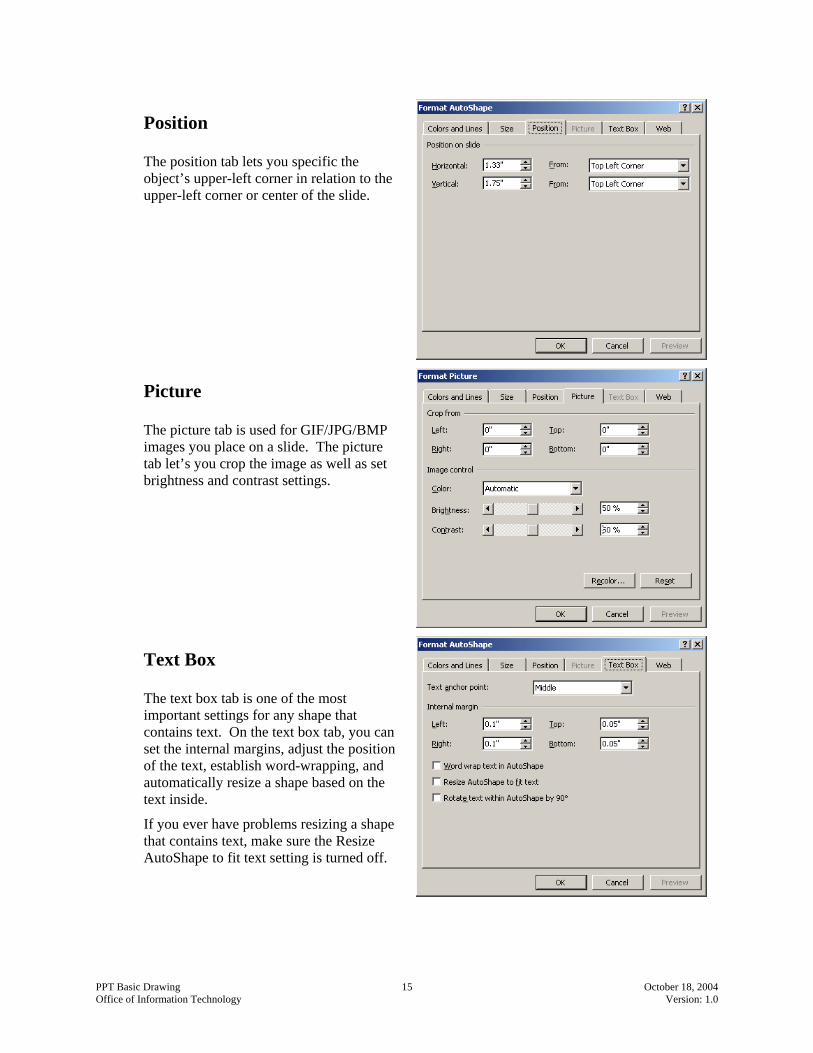
Position
The position tab lets you specific the object’s upper-left corner in relation to the upper-left corner or center of the slide.
Picture
The picture tab is used for GIF/JPG/BMP images you place on a slide. The picture tab let’s you crop the image as well as set brightness and contrast settings.
Text Box
The text box tab is one of the most important settings for any shape that contains text. On the text box tab, you can set the internal margins, adjust the position of the text, establish word-wrapping, and automatically resize a shape based on the text inside.
If you ever have problems resizing a shape that contains text, make sure the Resize AutoShape to fit text setting is turned off.


Any feedback concerning this guide, procedures,
or the PowerPoint Product
is to be directed to the IT Assistance Line at (312) 751-5227.
© 2004 by Chicago Archdiocese Office of Information Technology. All Rights Reserved.