Embed Size (px)
Citation preview

1
PowerPoint

2
PowerPoint
• Multiple OUTPUT types:– Paper– Onscreen– Web presentation
• 6 x 6 rule– no more than 6 points per slide– No more than 6 words per point
• Placeholder – area of a slide reserved for text or other content e.g. Content Placeholder

3
TEMPLATESFILE > NEW > BUSINESS link > PRESENTATIONS link

4
VIEWS• NORMAL• “Click to add notes” (Speaker Notes) at bottom of
window
• OUTLINE: 2ND tab at top left margin– To demote a level, click on the HOME tab >
PARAGRAPH group >
• SLIDE SORTER– “HIDE SLIDE”– Moving slides– Deleting slides– Transition effects

5
VIEWS cont.
• SLIDE SHOW (F5 - always starts show on Slide #1)• POINTER OPTIONS:
– Right-click anywhere on the slide > POINTER OPTIONS
– Click Highlighter in the pop up menu (or any other pen , ink, and/or arrow options)
– Click and Drag the Highlighter over desired text
– To END a slide show, hit ESCAPE button• NOTES page
– information for the speaker– Text that shouldn’t go on a slide

FIND & REPLACE TEXT• FIND:
– CTRL + F > key in the desired text > FIND NEXT button
• REPLACE:– At top-right > EDITING group >
REPLACE drop-down arrow >
key in the word you want to
replace > key in the replacement word
> REPLACE ALL

7
THEMES
• DESIGN tab > THEMES group > click on the MORE button to access more themes
• There are also themes for Colors, Fonts and Effects at the right of the Themes group

8
INSERTING, HIDING, & DELETING SLIDES
• INSERTING: HOME tab > SLIDES group > NEW SLIDE button or:
• At left margin, in SLIDE tab:– Right-mouse click in between 2 slides, and select NEW
SLIDE• When you select a slide, and then click on the NEW SLIDE
button , the new slide will be inserted after the selected slide
– HIDING: right-click the slide that you want to hide > HIDE SLIDE
– DELETING: select the slide, hit DELETE key

9
DISPLAY 2 PPTX. WINDOWS ON SCREEN AT ONCE• VIEW > WINDOW group > ARRANGE ALL
button

10
Inserting Slides From Another Presentation• From an existing Presentation
– New Slide dropdown andchoose Reuse Slides
– In Reuse Slides pane, clickBrowse, Browse to File thenclick open to locate pptx
– Click on slide(s) needed in Reuse Slide pane• To insert all slides right click any slide and choose Insert
All Slides
– May also keep source formatting

11
LAYOUT
• To change the layout of a slide:– Right-mouse click on the slide,(but not on an object)– Select : LAYOUT
• Select the typeof layout you want

SLIDE TRANSITION
• ANIMATIONS tab > TRANSITION• TO THIS SLIDE group > select a slide
transition effect. • To see more transition effects, in the• Quick Styles list, click the More button .• Transition SPEED• ANIMATIONS tab >
TRANSITION TO THIS SLIDE group >
TRANSITION SPEED drop-down arrow:
12

13
SLIDE TRANSITION TIMING/APPLY TO ALL
• APPLY TO ALL button
• Transition SLIDE TIMING”TRANSITION TO THIS SLIDE group >
TOP-RIGHT

14
ANIMATION• To add a special visual or sound effect to text or an object. • Includes entrance, exit, and sound effects applied to individual
bullets of text• ANIMATIONS tab > ANIMATIONS group >
button > button > • a window at the right will open > click on
the ADD EFFECT button• -if you select: MORE EFFECTS•
-a window appears

15
ANIMATION cont.• Each time you apply animation to an item• A textbox will appear in the CUSTOM• ANIMATION pane at the right• If you are applying “animation” to text• Click on the drop-down arrow at the end
Of this textbox > select EFFECT OPTIONS• Select the 3rd tab:
TEXT ANIMATION
Group text:
By 1st Level Paragraphs
OR:
select any level

16
HOW TEXT APPEARS ON SCREEN
• ANIMATIONS tab > CUSTOM ANIMATION button > ADD EFFECT button select an effect
• When you select an effect it will appear in a list in the CUSTOM ANIMATION pane

17
SLIDE TIMINGS
• SLIDE SHOW tab > SET UP group > REHEARSE TIMINGS
• The REHEARSAL toolbar appears & the SLIDE TIME box begins timing the presentation.
• Click on the NEXT button to advance to next ITEM on a slide• When “timing” i.e. 10 sec, if you have “applied” an
animation, each animated object is factored into the “timing”

18
FORMATTING & SPELL CHECK
• Change the font size and font style• FORMAT PAINTER
- SHAPE FILL
• It’s important to Spell check your presentation, as any spelling mistake will be magnified on the projection screen
• REVIEW tab > PROOFING group

19
REMOVE SHADOW FROM FONT & DOUBLE SPACING
• DRAWING TOOLS toolbar >
FORMAT tab >
TEXT EFFECTS button >
SHADOW > NO SHADOW
• DOUBLE-SPACING:• HOME tab > • PARAGRAPH Group >• LINE SPACING • button

20
CHANGE LINE SPACING OF TEXT
• HOME tab > PARAGRAPH group dialog launcher > click on the LINE SPACING drop-down arrow

21
Modifying Lists/Text in a Placeholder• Click directly on the dashed line around the
text placeholder, it turns solid– Click on the number list button– To modify text click the desired format option, e.g.
Bold• Modify a numbered list by clicking the drop
down arrow, and choosing a style– You may change subpoints by selecting them and
then choosing a different bullet style using the dropdown

22
CHANGE THE SIZE OF BULLETS TO 75% OF THE HEIGHT OF THE TEXT
• Home tab, Paragraph group, click drop-down arrow beside Bullets button, select: Bullets and Numbering
• in the Size box key in the % number needed

23
HEADERS/FOOTERS• INSERT tab > HEADER & FOOTER
– FOOTER: at the bottom: select the checkbox beside:
– If you would like headers/footers on both slide and the notes/handouts, you have to add/change the options to both tabs
– Slide numbers– FOOTERS
• IF you do not want a footer on the “Title Slide”, select the checkbox beside:
• NOTES/HANDOUTS SHEET tab• HEADERS
• To VIEW footer in SPEAKER NOTES without using PRINT PREVIEW: go to: VIEW > NOTES PAGES

24
SLIDE MASTER• SLIDE Master
– Controls the appearance of all slides simultaneously– Can also apply changes to individual layouts
• VIEW tab > PRESENTATION VIEWS group, click SLIDE MASTER button – Close by clicking Close Master View

25
INSERT DATE & CLIPART• INSERT tab >
Choose a format >
UPDATE AUTOMATICALLY > OK
• INSERT tab > ILLUSTRATIONS • group > button
• In the SEARCH FOR textbox, key in
The theme of pictures you desire >GO button• Hover your mouse to the right of the
Picture you wish to insert, and a drop
down arrow appears > click on it and select: INSERT

26
“Flowchart: Multidocument Shape”
• INSERT > SHAPE > FLOWCHART category >
1st row, 8th shape-in

27
Insert Picture (using content layout)• Click the Picture button
on the Content Layout• Navigate to picture• Click Insert

28
ARRANGING OBJECTS
Align selected objects by their right edges
without dragging the objects with the mouse:• DRAWING TOOLS toolbar > FORMAT tab >
ARRANGE button > ROTATE LEFT 90
Specify that the selected graphic will
appear behind the chart:• DRAWING TOOLS toolbar > FORMAT tab >
ARRANGE button > SEND BACKWARD

29
GROUP PICTURES
• PICTURE TOOLS toolbar >
FORMAT tab >
ARRANGE button >
click GROUP

30
Move and Size Pictures
• Click the picture to reveal handles• Click and drag a handle to resize
– Corner handles resize to properaspect ratio
– Center handles stretch without keeping aspect ratio– Alternately use the Size group in the Format tab of
the Picture Tools• Click and drag picture to move
– Tip - click in the middle of the picture

31
Applying Styles to Pictures
• Select the image so the handles show• Format tab, Picture Styles
group, choose a style showingor click More button to see more
• Click on style desired• To change shape
– Format tab, Picture Shape button, select a shape to display picture from

32
ROTATING AN OBJECT
• Make sure the object is selected (handles)• PICTURE TOOLS toolbar > FORMAT tab >
ARRANGE button > ROTATE > MORE ROTATION OPTIONS
• on the SIZE tab > ROTATION box > enter the amount that you want to rotate the object by
33
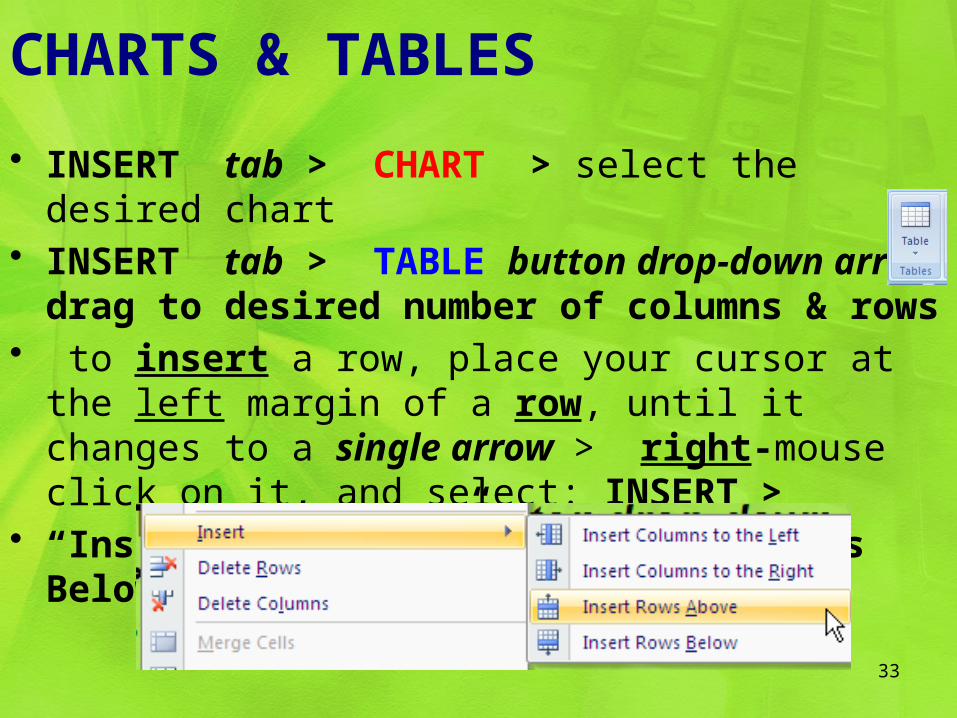
CHARTS & TABLES
• INSERT tab > CHART > select the desired chart• INSERT tab > TABLE button drop-down arrow
drag to desired number of columns & rows• to insert a row, place your cursor at the left margin of
a row, until it changes to a single arrow > right-mouse click on it, and select: INSERT >
• “Insert Rows Above”, or “Insert Rows Below”

34
TABLES cont.• TABLE STYLE:• Make sure the table is selected• TABLE TOOLS toolbar > • DESIGN Tab > TABLE STYLES group > MORE button
• TABLE LAYOUT:• Make sure the table is selected• TABLE TOOLS toolbar > DESIGN Tab >
TABLE STYLES group > EFFECTS button• Select: CELL BEVEL > hover your
mouse over each style to read the
title of it > choose the design i.e. “Relaxed Inset”
35
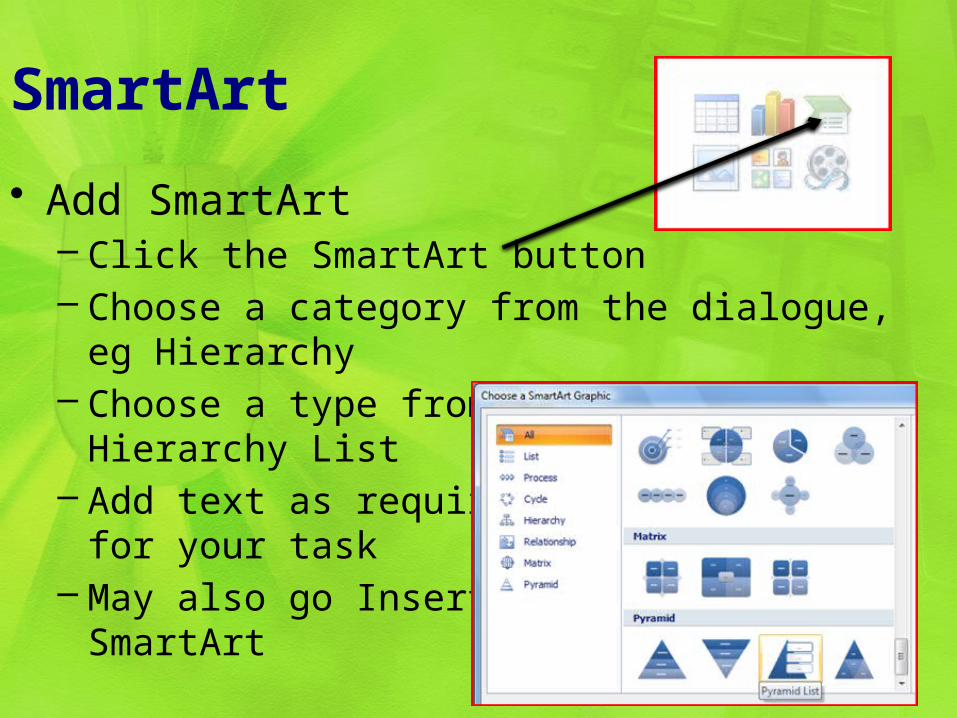
SmartArt
• Add SmartArt– Click the SmartArt button– Choose a category from the dialogue, eg Hierarchy– Choose a type from the selection, eg Hierarchy List– Add text as required
for your task– May also go Insert tab,
SmartArt

36
Modifying SmartArt Diagrams
Accounting VP’s
Janice Jackson
John Chu
• Add/Delete a shape– Select a shape with
text– Click SmartArt Tools,
Design tab, Add Shape button
– To Delete, select shape by clicking on border, press delete on keyboard

37
Modifying SmartArt Diagrams
Accounting VP’s
Janice Jackson
John Chu
• Changing type and size– Click on the diagram,
SmartArt Tools, Design tab, More button of the Layout group, and choose a new layout
– To change size select shape and drag handle

38
Modifying SmartArt Diagrams
Accounting VP’s
Janice Jackson
John Chu
• Changing Colour and Style– Click on the diagram,
choose SmartArt Tools, Design tab, SmartArt Styles Group, More button, choose a Style
– To change colour click Change Colors button

39
Convert Bullets to SmartArt
• Right click in list• Choose Convert to
SmartArt from pop up menu
• Choose a SmartArt graphic
• Try it here– First subpoint– Second subpoint– And so on

40
DISPLAY THE DRAWING TOOLS/FORMAT RIBBON & RULER
• Select the textbox (or title/subtitile placeholder), and the ribbon will appear at the upper-right
• > click on FORMAT tab (partial view below)
• VIEW tab > SHOW/HIDE groupadd check to Ruler box

41
Adding text boxes
• Insert tab, Text group, Text Box button– Are not placeholders– Automatically wraps– May resize box by grabbing handle and dragging– May move by grabbing border and dragging
Type text in box as needed, will automatically wrap

42
Backgrounds
Changing the Style Design tab, Background group, Background
Styles button Hover pointer over styles to see effect on
visible slide Right click chosen style to see options Apply
to All or Apply to Selected Hide the Background
Design tab, Background group, click checkbox Hide Background Graphics (look at this slide title)

Backgrounds
• Adding Pictures– Design tab, Backgrounds group, check Hide
Background Graphics, click Background Styles, Format background Styles
– In Format Background dialogueclick File button, navigate towhere picture file is stored,then click Insert• Note - you may also choose a
predefined texture

44
Backgrounds
• Background Fill Colour– Design tab, Backgrounds group, Background
Styles, Format background Styles– In Format Background dialogue click
Solid Fill, then click Color buttondropdown to choose a colour
– Return background to original byclicking Reset Background

45
PRINT & VIEW OPTIONS• PRINT: OFFICE button > PRINT > PRINT
– Print Slides
– HANDOUTS– SPEAKER NOTES– Allows you to choose number of slides to print
VIEW > ZOOM button
46
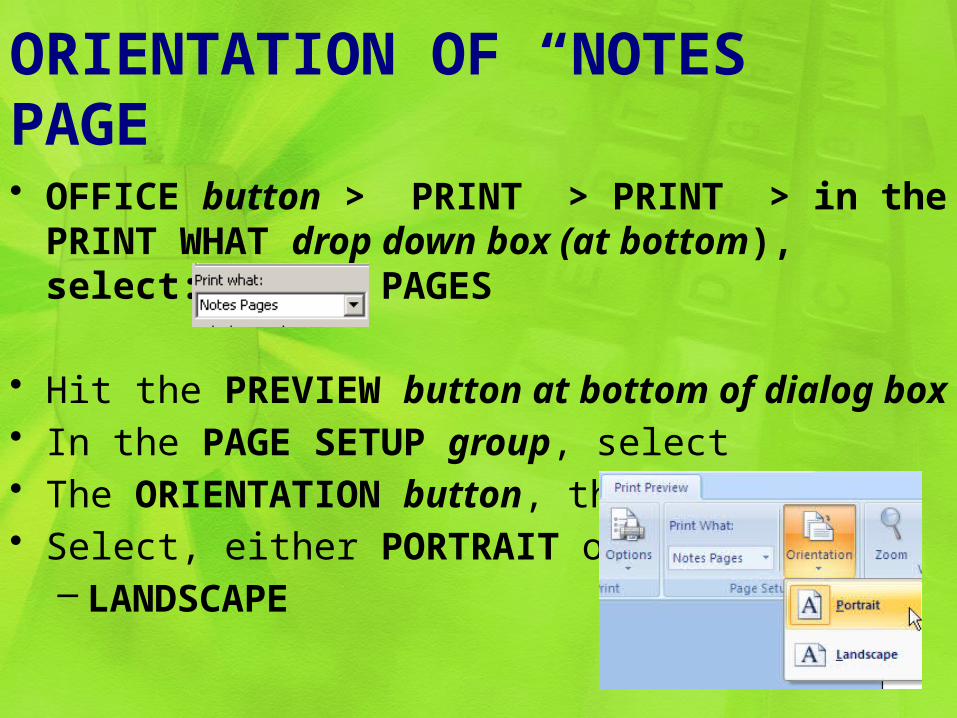
ORIENTATION OF “NOTES” PAGE• OFFICE button > PRINT > PRINT > in the PRINT
WHAT drop down box (at bottom), select: NOTES PAGES
• Hit the PREVIEW button at bottom of dialog box• In the PAGE SETUP group, select• The ORIENTATION button, then• Select, either PORTRAIT or
– LANDSCAPE