Embed Size (px)
Citation preview
Installation Guide --- for PowerPanel Business
PowerPanel Business® (PPB) on VMware vSphere ESXi Servers
Rev. 4

Table of Contents
‐ Scenario 1 – Without RMCARD Page 3 ‐ Scenario 2 – With RMCARD Page 4 ‐ Scenario 3 – UPS (with/without RMCARD) + PPB Management Page 5 ‐ Scenario 4 – UPS (with/without RMCARD) + PPB Management + VMware vCenter Page 6
‐ Configuration 1 – Install RMCARD on UPS Page 7 ‐ Configuration 2 – Install PPB VA Local Page 10 ‐ Configuration 3 – Install PPB VA Remote Page 19 ‐ Configuration 4 – Install PPB Management Page 29 ‐ Configuration 5 – Install PPB Management with the presence of VMware vCenter Server Page 37
1 Applicable Scenarios
2 Installation and Configuration Details
3 Appendix
‐ How to Find VM’s IP address? Page 51

© 2019 Cyber Power Systems, Inc. All rights reserved 3
1. APPLICABLE SCENARIOS
Scenario 1 is recommended if:
• You have a single UPS with less than 3 ESXi servers.
• Your UPS does NOT have an RMCARD installed.
• You do not need central monitoring so you won’t install PPB Management.
PPB Virtual Appliance (VA) Local needs to be installed in only one of the ESXi servers, the rest of the ESXi servers need to have PPB Virtual Appliance (VA) Remote installed.
Please refer to Configuration 2 and 3 for the installation and configuration details of PPB VA Local and Remote.
USB/Serial
UPS
Local
ESXi Servers
Remote Remote
2 3 3
Configuration 2
Configuration 3
UPS Input Power
Server Input Power
USB / Serial
Network
Scenario 1 – UPS without RMCARD
2
3
© 2019 Cyber Power Systems, Inc. All rights reserved 4
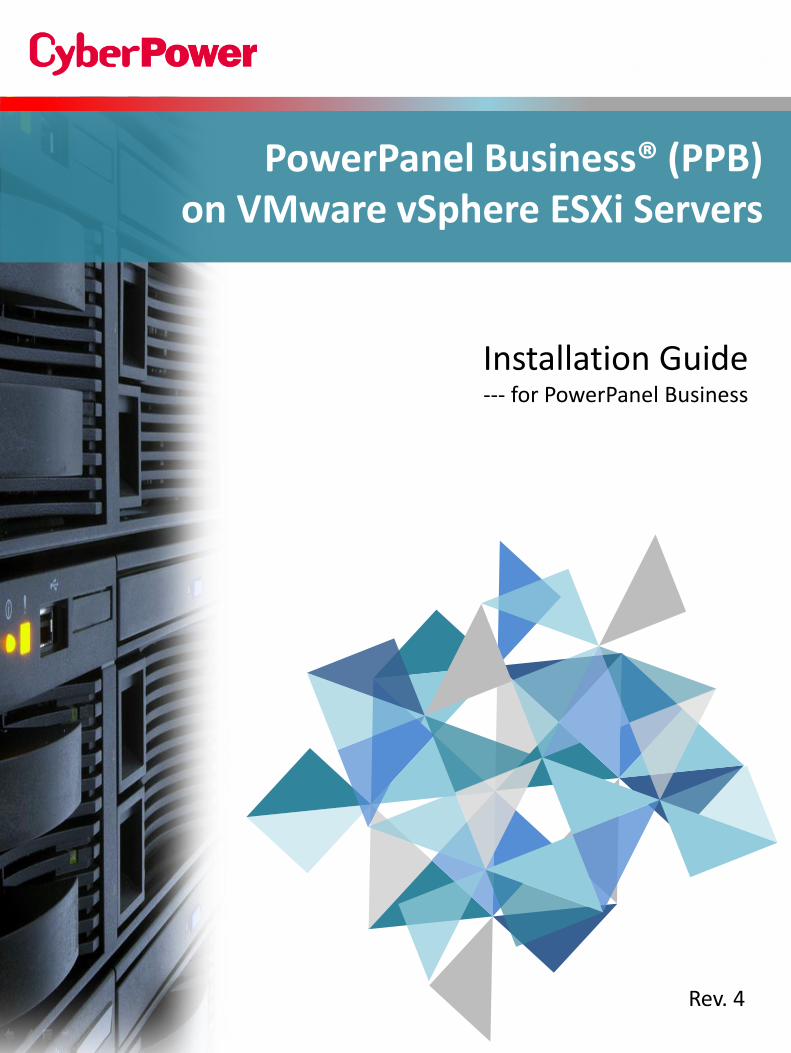
1. APPLICABLE SCENARIOS
Scenario 2 is recommended if:
• You have a single UPS with less than 3 ESXi servers.
• Your UPS has an RMCARD installed.
• You do not need central monitoring so you won’t install PPB Management.
All ESXi servers need to have PPB VA Remote installed.
Please refer to Configuration 1 and 3 for the installation and configuration details of the RMCARD and PPB VA Remote.
Configuration 1
Configuration 3
Input Utility Power
Output Power
USB / Serial
Network
Scenario 2 – UPS with RMCARD
UPS
Remote
ESXi Servers
1
3
RMCARD
3 3
Remote Remote
1
3

© 2019 Cyber Power Systems, Inc. All rights reserved 5
1. APPLICABLE SCENARIOS
Scenario 3 is recommended if:
• You have multiple UPSs or more than 3 ESXi servers.
• You do NOT have VMware vCenter server.
• You will install PPB Management for central monitoring (RECOMMENDED).
Scenario 3 – UPS (with/without RMCARD) + PPB Management
- With PPB Management, if UPS is without RMCARD like UPS #1, only one ESXi server needs to have PPB VA Local installed, and other ESXi servers DO NOT need to have PPB VA Remote installed.
- With PPB Management, if UPS is with RMCARD like UPS #2, NONE of the ESXi servers need to have PPB VA Remote installed.
Please refer to Configuration 1, 2, and 4 for the installation and configuration details of the RMCARD, PPB VA Local, and PPB Management.
PPB Management
USB / Serial
UPS #1
PPB Local
UPS #2
1
2
4
RMCARD
ESXi Servers
ESXi Servers
Standalone Server for Monitoring
Network
UPS Input Power
Server Input Power
USB / Serial
Network
Configuration 1
Configuration 2
Configuration 4
1
2
4

© 2019 Cyber Power Systems, Inc. All rights reserved 6
1. APPLICABLE SCENARIOS
Scenario 4 is recommended if:
• You have multiple UPSs or more than 3 ESXi servers.
• You have VMware vCenter server.
• You will/may have a cluster of ESXi hosts.
Scenario 4 – UPS (with/without RMCARD) + PPB Management + VMware vCenter
- With PPB Management, if UPS is without RMCARD like UPS #1, only one ESXi server needs to have PPB VA Local installed, and other ESXi servers DO NOT need to have PPB VA Remote installed.
- With PPB Management, if UPS is with RMCARD like UPS #2, NONE of the ESXi servers need to have PPB VA Remote installed.
Please refer to Configuration 1, 2, and 5 for the installation and configuration details of the RMCARD, PPB VA Local, and PPB Management.
Input Utility Power
Output Power
USB / Serial
Network
Configuration 1
Configuration 2
Configuration 5
PPB Management
USB / Serial
1
2
5
RMCARD
ESXi Servers
ESXi Servers
Standalone Server for Monitoring
VM vCenter
UPS #1 UPS #2
Network
PPB Local
1
2
5
Cluster

© 2019 Cyber Power Systems, Inc. All rights reserved 7
2. CONFIGURATION 1
Install RMCARD on UPS
UPS
1 RMCARD
1. Download “Power Device Network Utility” tool from CyberPower official
website and use it to discover the RMCARD on your network. Assign a static IP
address if necessary.
You will need to enter a username and password for authentication when you
modify the IP address. Default Username/Password for authentication is
cyber/cyber.
Double-click to configure the IP

© 2019 Cyber Power Systems, Inc. All rights reserved 8
2. CONFIGURATION 1
2. Log on to the web interface of the RMCARD by directing your web browser to its IP
address from step 1. Default login Username/Password is cyber/cyber.
3. You can check if your new IP address is correct in web interface.
Go to System → TCP/IPv4 → Manual section.
You can modify or re-assign another IP address if necessary.
© 2019 Cyber Power Systems, Inc. All rights reserved 9
2. CONFIGURATION 1
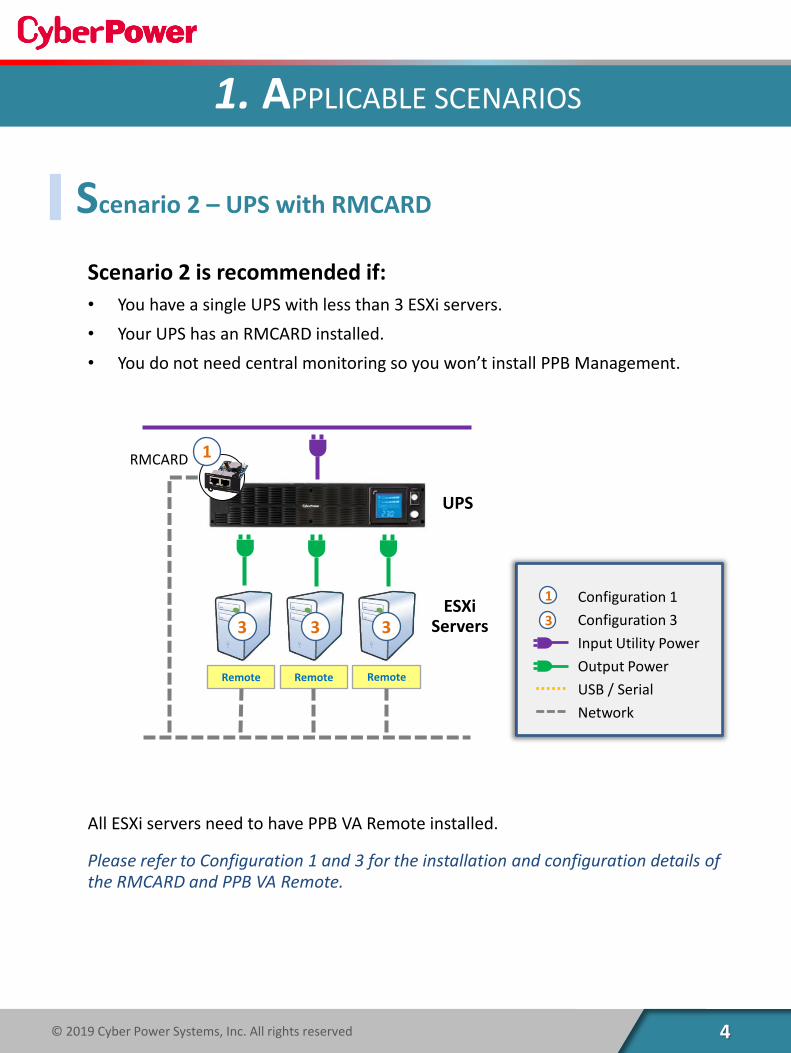
4. If the ESXi host with PPB VA Remote installed (and powered by this UPS) has been
setup correctly, it will be displayed on the UPS → PowerPanel List screen.
After all installation and configuration are done, you can return to check if all ESXi
hosts with PPB VA Remote are displayed on the list.

© 2019 Cyber Power Systems, Inc. All rights reserved 10
2. CONFIGURATION 2
Install PPB VA Local
1. Download the latest version of PPB Local Virtual Appliance from CyberPower
official website.
Host
VMware ESXi
VA VM2
APP
OS
APP
APP
VMx
PPB Local
CentOS
…… …… ……
APP
OS
APP
APP
PPB Local
2
2. Launch the vSphere Web Client. Deploy the virtual appliance from Virtual
Machines → Create / Register VM.
Note: If your VMware ESXi is v6.5 or above, please use vSphere Web Client
because vSphere Client is not supported.
Note: PPB is not supported on ESXi free edition.

© 2019 Cyber Power Systems, Inc. All rights reserved 11
2. CONFIGURATION 2
3. Choose Deploy a virtual machine from an OVF or OVA file and click Next to next
step.
4. Click to select or drag/drop files ppbXXX-local.ovf and ppbXXX-local.vmdk
extracted from the downloaded zip file, and enter a name for the deployed PPB
virtual machine. This name should be unique within the inventory and include
string “ppb”. Click Next to continue.
Note: The virtual machine name MUST include the string “ppb” to be recognized by PPB.

© 2019 Cyber Power Systems, Inc. All rights reserved 12
2. CONFIGURATION 2
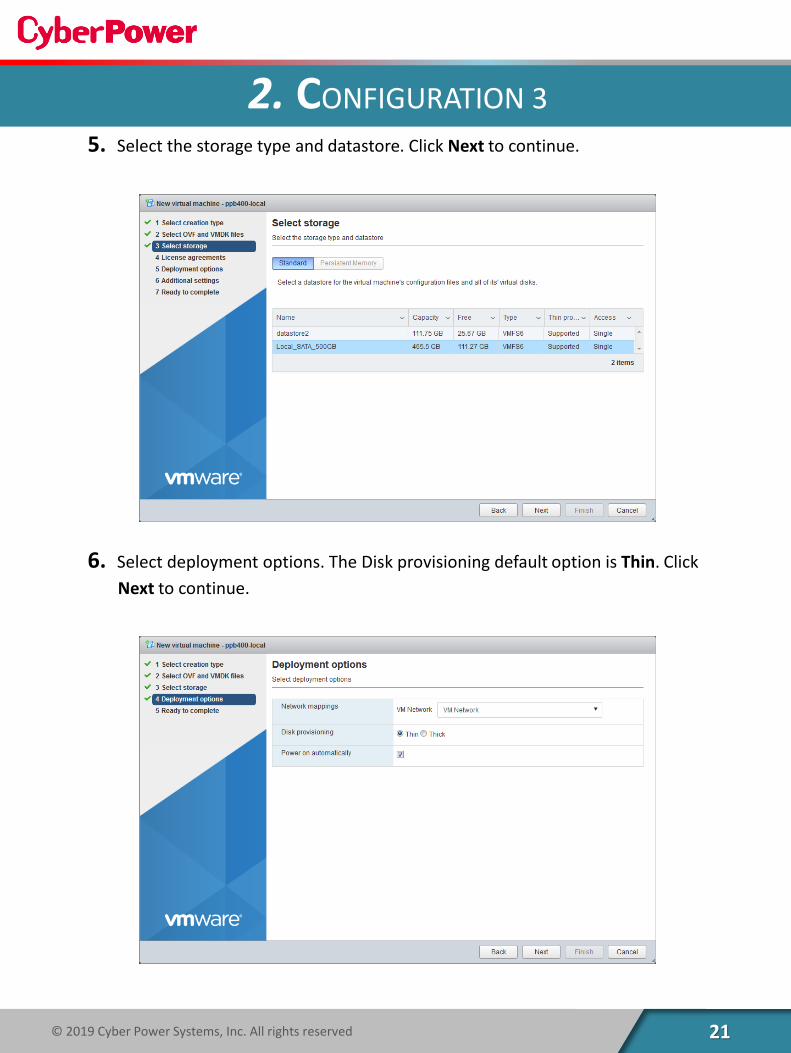
5. Select the storage type and datastore. Click Next to continue.
6. Select deployment options. The Disk provisioning default option is Thin. Click
Next to continue.

© 2019 Cyber Power Systems, Inc. All rights reserved 13
2. CONFIGURATION 2
7. Review your settings selection before finishing the setup. Click Finish to start the
deployment task.
8. After the deployment task is completed, the PPB virtual appliance will be added
into the inventory.

© 2019 Cyber Power Systems, Inc. All rights reserved 14
2. CONFIGURATION 2
9. Ensure the USB or serial port connection between the ESXi host and UPS is properly
connected. The PPB VA Local will not monitor the UPS status if the communication
is lost.
If PPB VA Local is installed on a virtual machine, then the USB or serial port will
need to be manually assigned to the virtual machine. To do this, please follow
these steps:.
9-1. Click Edit of the virtual machine. If the USB controller is available, go to step
9-6 to add a new USB device.

© 2019 Cyber Power Systems, Inc. All rights reserved 15
2. CONFIGURATION 2
9-2. Click Add other device and choose USB device to add a new USB device
9-3. Select the host USB device which is connected to the PPB virtual machine
and click Save.

© 2019 Cyber Power Systems, Inc. All rights reserved 16
2. CONFIGURATION 2
10. Follow the steps below to complete the PPB VA Local configuration.
10-1. In order to login to PPB VA Local, you will need to know the IP address of
the PPB virtual appliance.
(1) Login VMware vSphere Web Client with IP and ID/Password of the host.
(2) Open the Virtual Machine window and click Networking.
(3) The IP Address will be shown as below.

© 2019 Cyber Power Systems, Inc. All rights reserved 17
2. CONFIGURATION 2
10-2. Login to PPB VA Local through any supported web browser.
Go to http://xxx.xxx.xxx.xxx:3052/local where xxx.xxx.xxx.xxx is the IP
address of the PPB VA, and login with username/Password: admin/admin
(default).
10-3. Configure Shutdown Action for ESXi.
In order to ensure the ESXi host and all virtual machines can be shut down
correctly in case of power events, users have to configure the ESXi host
address, account and password of root user for the host shutdown from
the virtual machine running Local. Enter actual user name and password
for ESXi host in the IP Address, Account and Password fields on the
SETTING → Shutdown Events → Local Host Shutdown Requirements
page.
Note: IP Address is the IP address of the ESXi host computer.
10-4. In the same page SETTING → Shutdown Events → Local Host Shutdown
Requirements set necessary shutdown time for the ESXi host.

© 2019 Cyber Power Systems, Inc. All rights reserved 18
2. CONFIGURATION 2
11. Configure Startup and Shutdown of Virtual Machines on ESXi.
In order to ensure that all virtual machines shut down and restart gracefully,
check the “Autostart” setting through vSphere menu by going to Host → Mange
→ System
Note:
Shutdown Duration: Set the shutdown time for VMware ESXi host.
IP Address: The IP address of the host computer.
Account: The username that you use to access host via "VMware vSphere Client".
Password: The password that you use to access host via "VMware vSphere Client".
After clicking APPLY, you can test if the Account/Password can access the host by
clicking VERIFY.
10-5. Click Virtual Machine Shutdown and set Shutdown Duration if users want
PPB to shut down VMs before shutting down ESXi host.
Note: This shutdown option will shut down all VMs at the same time. If users
want to shut down VMs in a sequence, please leave this option unchecked and refer
to next step.
DONE! Now you can test and see if the host can work with the UPS properly.

© 2019 Cyber Power Systems, Inc. All rights reserved 19
2. CONFIGURATION 3
Install PPB VA Remote
Host
VMware ESXi
VA VM2
APP
OS
APP
APP
VMx
PPB Remote
CentOS
…… …… ……
APP
OS
APP
APP
PPB Remote
3
1. Download the latest version of PPB Remote Virtual Appliance from CyberPower
official website.
2. Launch the vShpere Web Client. Deploy the virtual appliance from Virtual
Machines → Create / Register VM.
Note: If your VMware ESXi is v6.5 or above, please use vSphere Web Client
because vSphere Client is not supported.
Note: PPB is not supported on ESXi free edition.

© 2019 Cyber Power Systems, Inc. All rights reserved 20
2. CONFIGURATION 3
3. Choose Deploy a virtual machine from an OVF or OVA file and click Next to next
step.
4. Click to select or drag/drop files ppbXXX-remote.ovf and ppbXXX-remote.vmdk
extracted from the downloaded zip file, and enter a name for the deployed PPB
virtual machine. This name should be unique within the inventory and include
string “ppb”. Click Next to continue.
Note: The virtual machine name MUST include the string “ppb” to be recognized by PPB.
© 2019 Cyber Power Systems, Inc. All rights reserved 21
2. CONFIGURATION 3
5. Select the storage type and datastore. Click Next to continue.
6. Select deployment options. The Disk provisioning default option is Thin. Click
Next to continue.

© 2019 Cyber Power Systems, Inc. All rights reserved 22
2. CONFIGURATION 3
7. Review your settings selection before finishing the setup. Click Finish to start the
deployment task.
8. After the deployment task is completed, the PPB virtual appliance will be added
into the inventory.
9. If your UPS has an RMCARD installed, use “Power Device Network Utility” to
discover the IP address of the RMCARD or to assign a static IP address.
Double click to configure the IP
© 2019 Cyber Power Systems, Inc. All rights reserved 23
2. CONFIGURATION 3
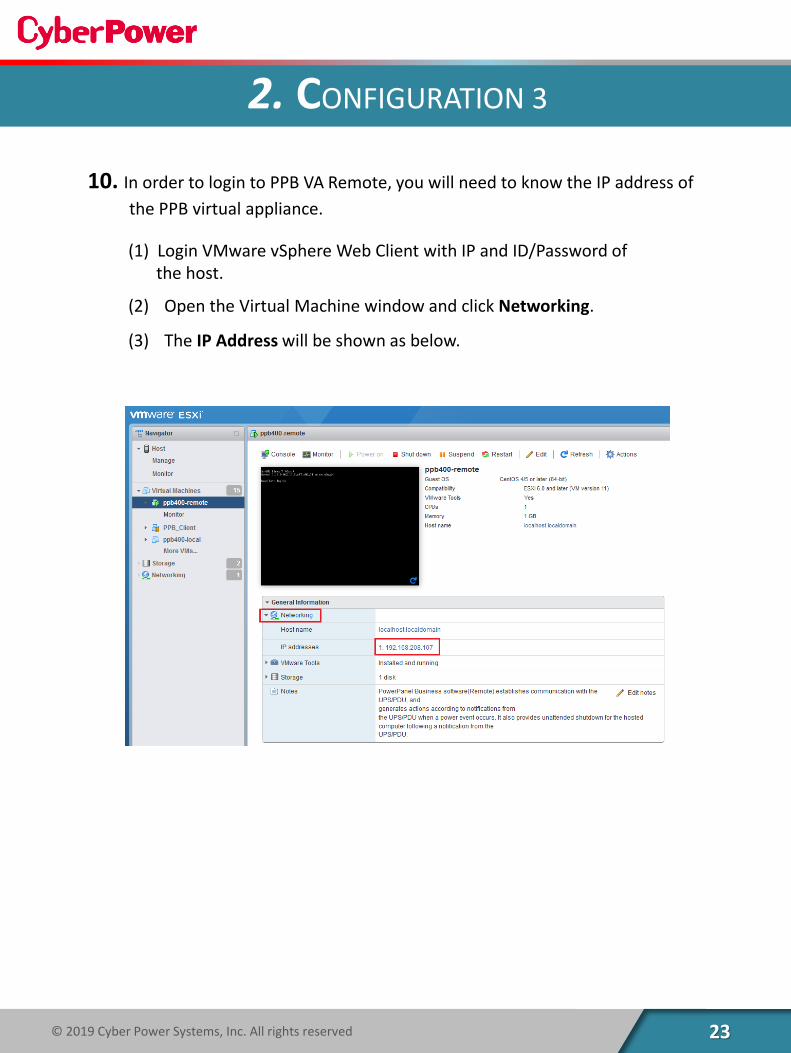
10. In order to login to PPB VA Remote, you will need to know the IP address of
the PPB virtual appliance.
(1) Login VMware vSphere Web Client with IP and ID/Password of
the host.
(2) Open the Virtual Machine window and click Networking.
(3) The IP Address will be shown as below.

© 2019 Cyber Power Systems, Inc. All rights reserved 24
2. CONFIGURATION 3
11. Follow the steps below to complete the PPB VA Remote configuration.
11-1. Login to PPB VA Remote through any supported web browser. Go to
http://xxx.xxx.xxx.xxx:3052/remote where xxx.xxx.xxx.xxx is the IP
address of the VA, and login with the default Username/Password:
admin/admin.
Note: If you don’t know the IP address of PPB virtual appliance, see
step 10.

© 2019 Cyber Power Systems, Inc. All rights reserved 25
2. CONFIGURATION 3
11-2. Go to the POWER CONFIGURATION screen and set the IP address of the
RMCARD (if the UPS has an RMCARD installed) and assign the UPS outlet
to which the ESXi host is connected to.
11-3. If the UPS does NOT have an RMCARD installed, set the IP address of a
neighbor ESXi host server which has PPB VA Local installed and is
powered by the same UPS (see below diagram).
After assigning the correct IP address, assign the UPS outlet to which the
ESXi host is connected to.

© 2019 Cyber Power Systems, Inc. All rights reserved 26
2. CONFIGURATION 3
11-4. Go to the DASHBOARD screen. If the correct IP address is assigned, the
corresponding UPS information will be displayed in PPB VA Remote.

© 2019 Cyber Power Systems, Inc. All rights reserved 27
2. CONFIGURATION 3
11-5. Go to SETTING → Shutdown Events to set the necessary shutdown time
for the ESXi host.
Note:
Shutdown Duration: Set the shutdown time for VMware ESXi host / VM.
Address: The IP address of the host computer.
Account: The account that you use to access host via "VMware vSphere Client".
Password: The password that you use to access host via "VMware vSphere
Client".
After clicking APPLY, you can test if the Account/Password can access the host
by clicking VERIFY.
11-6. Click Virtual Machine Shutdown and set Shutdown Duration if users want
PPB to shut down VMs before shutting down ESXi host.
Note: This shutdown option will shut down all VMs at the same time. If users
want to shut down VMs in a sequence, please leave this option unchecked and refer
to next step.

© 2019 Cyber Power Systems, Inc. All rights reserved 28
2. CONFIGURATION 3
12. Configure Startup and Shutdown of Virtual Machines on ESXi.
In order to ensure that all virtual machines shut down and restart gracefully,
check the “Autostart” setting through vSphere menu by going to Host → Mange
→ System
DONE! Now you can test and see if the host can work with the UPS properly.

© 2019 Cyber Power Systems, Inc. All rights reserved 29
2. CONFIGURATION 4
Install PPB Management
1. Download the latest version of PowerPanel Business Management from
CyberPower official website. Please select the correct download for the OS
running on the standalone computer that will be used for PPB Management.
PPB Management
USB / Serial
UPS #1
PPB Local
UPS #2
4
RMCARD
ESXi Servers
ESXi Servers
Standalone Server for Monitoring
Network
UPS Input Power
Server Input Power
USB / Serial
Network
Configuration 4 4
2. Login to PPB Management through any supported web browser.
Go to http://xxx.xxx.xxx.xxx:3052/management where xxx.xxx.xxx.xxx is the IP
address of the Management computer, and login with the default
Username/Password: admin/admin.

© 2019 Cyber Power Systems, Inc. All rights reserved 30
2. CONFIGURATION 4
3. To add a new ESXi server in PPB Management, go to the DASHBORAD screen,
click on the Add Device icon. From the pop-up window, chick Add Infrastructure.
Note: Before you add ESXi server, you must add all UPSs first on DASHBOARD.
Please refer to PPB Management user’s manual in the section “Using
PPB Management Device Management“.
Select VMware ESXi from the drop-down list of Product item and enter related information including access username and password of the ESXi server, and click SAVE.
Note: PPB is not supported on ESXi free edition.

© 2019 Cyber Power Systems, Inc. All rights reserved 31
2. CONFIGURATION 4
4. The icon of the new ESXi server will be displayed in DASHBOARD if the
configuration is successful.
The added VMware infrastructure will be shown in the Add Device window, then click SAVE to finish.

© 2019 Cyber Power Systems, Inc. All rights reserved 32
2. CONFIGURATION 4
5. To correctly set the power source (UPS) of all added ESXi hosts, click the Setting
Icon of the device (ESXi hosts) and select ”Setting Wizard”.
5-1. The “ESXi Setting Wizard” will appear. Please click “NEXT” to continue.

© 2019 Cyber Power Systems, Inc. All rights reserved 33
2. CONFIGURATION 4
5-2. To assign the power source (UPS) to the ESXi server, select it from the
drop-down list and assign the correct UPS outlet used by the ESXi server
and click NEXT to continue.
5-3. Next, select if the virtual machine and/or ESXi host will be shutdown,
and the respective amount of time needed for each to complete a
graceful shutdown. Click NEXT to continue. .

© 2019 Cyber Power Systems, Inc. All rights reserved 34
2. CONFIGURATION 4
5-4. The next step is to assign the shutdown behavior. Check “Custom” and
select the power event and graceful shutdown condition of ESXi server.
Click NEXT when the setting is done.
Note: If you skip this step and do not assign shutdown behavior, this
ESXi server will follow the shutdown behavior assigned in PPB
Management (refer to step 7).
Note: The Virtual Machine Shutdown option will shut down all VMs at the same
time. If users want to shut down VMs in a sequence, please leave this option
unchecked and configure the sequence in vSphere Client.

© 2019 Cyber Power Systems, Inc. All rights reserved 35
2. CONFIGURATION 4
5-5. After all setting details are checked and confirmed correct. Click FINISH
to complete the configuration of ESXi server.
6. If the setting is done correctly, you will see the UPS as well as the ESXi servers
connected to it in the DASHBOARD screen.
UPS
ESXi server

© 2019 Cyber Power Systems, Inc. All rights reserved 36
2. CONFIGURATION 4
7. You can define the “Shutdown Events” details as a graceful shutdown template.
All monitored ESXi servers which are not assigned individual shutdown behavior
in step 5-4 will be shutdown according to these settings (without having to
install PPB on each ESXi server).
Note: We recommend using PPB Management “Shutdown Events” template
for graceful shutdown of all monitored ESXi servers because it is
convenient and does not need PPB Remote installed on any ESXi server.

© 2019 Cyber Power Systems, Inc. All rights reserved 37
2. CONFIGURATION 5
Install PPB Management with the presence of VMware
vCenter
Input Utility Power
Output Power
USB / Serial
Network
Configuration 5 5 PPB Management
USB / Serial
1
2
5
RMCARD
ESXi Servers
ESXi Servers
Standalone Server for Monitoring
VM vCenter
UPS #1 UPS #2
Network
PPB Local
Cluster
1. Download the latest version of PowerPanel Business Management from
CyberPower official website. Please select the correct download for the OS
running on the standalone computer that will be used for PPB Management.
2. Login to PPB Management through any supported web browser.
Go to http://xxx.xxx.xxx.xxx:3052/management where xxx.xxx.xxx.xxx is the IP
address of the Management computer, and login with the default
Username/Password: admin/admin.

© 2019 Cyber Power Systems, Inc. All rights reserved 38
2. CONFIGURATION 5
3. To add a new vCenter server in PPB Management, go to the DASHBORAD screen,
click on the Add Device icon. From the pop-up window, chick Add Infrastructure.
Note: Before you add vCenter server, you must add all UPSs first on
DASHBOARD. Please refer to PPB Management user’s manual in the
section “Using PPB Management Device Management“.
Select VMware ESXi from the drop-down list of Product item and enter related information including access username and password of the vCenter server, and click SAVE.
Note: PPB is not supported on ESXi free edition.

© 2019 Cyber Power Systems, Inc. All rights reserved 39
2. CONFIGURATION 5
4. The icon of the new vCenter server will be displayed in DASHBOARD if
the configuration is successful.
The added VMware infrastructure will be shown in the Add Device window, then click SAVE to finish.

© 2019 Cyber Power Systems, Inc. All rights reserved 40
2. CONFIGURATION 5
5. To configure ESXi hosts under VMware vCenter:
Correctly set the power source (UPS) of all added ESXi hosts. To do this click the
Setting Icon of device icons (ESXi hosts) and select Setting Wizard.
5-1. The “ESXi Setting Wizard” will appear. Please click “NEXT” to continue.
© 2019 Cyber Power Systems, Inc. All rights reserved 41
2. CONFIGURATION 5
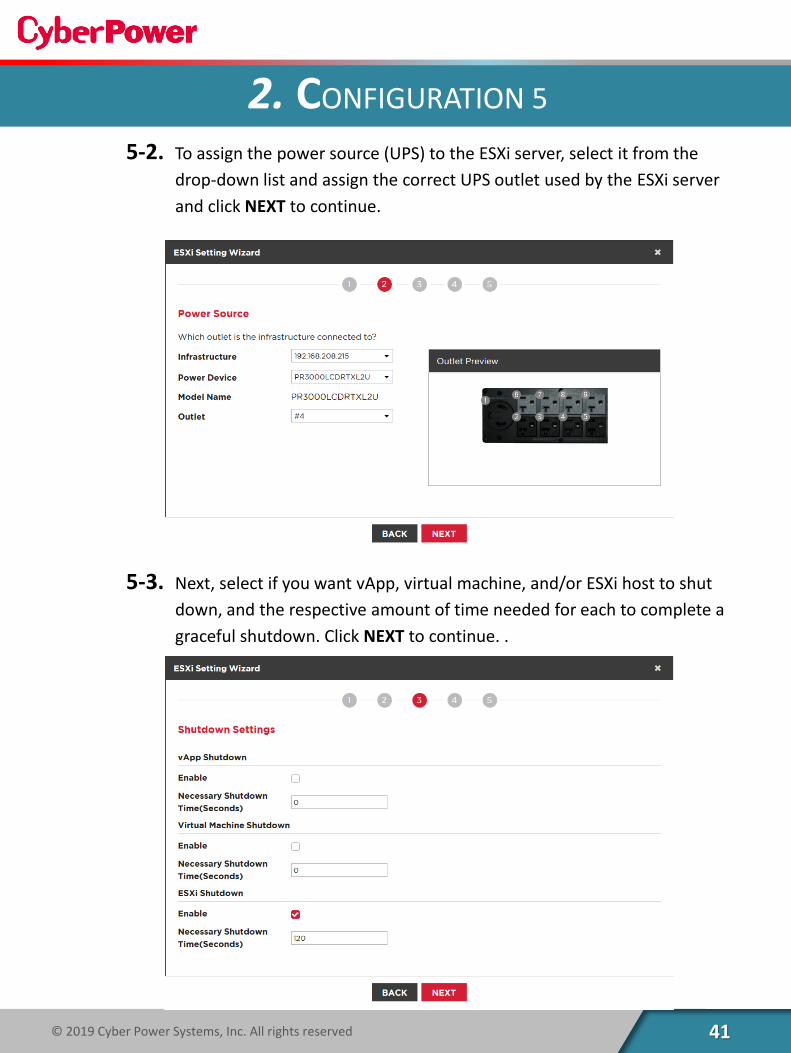
5-2. To assign the power source (UPS) to the ESXi server, select it from the
drop-down list and assign the correct UPS outlet used by the ESXi server
and click NEXT to continue.
5-3. Next, select if you want vApp, virtual machine, and/or ESXi host to shut
down, and the respective amount of time needed for each to complete a
graceful shutdown. Click NEXT to continue. .

© 2019 Cyber Power Systems, Inc. All rights reserved 42
2. CONFIGURATION 5
5-4. The next step is to assign the shutdown behavior. Check “Custom” and
select the power event and graceful shutdown condition of ESXi server.
Click NEXT when the setting is done.
Note: If you skip this step and do not assign shutdown behavior, this
ESXi server will follow the shutdown behavior assigned in PPB
Management.
5-5. After all setting details are checked and confirmed correct. Click FINISH
to complete the configuration of ESXi server.

© 2019 Cyber Power Systems, Inc. All rights reserved 43
2. CONFIGURATION 5
6. To configure shared storage within VMware vCenter:
Correctly set the power source (UPS) of all shared data storage, click the Setting
Icon of device (datastore) and select Setting Wizard.
6-1. The “Storage Setting Wizard” will appear. Please click NEXT to continue.

© 2019 Cyber Power Systems, Inc. All rights reserved 44
2. CONFIGURATION 5
6-2. In “Storage Type”, please check “Shared Storage” if the storage is a
shared storage and has a UPS power source. Click NEXT to continue.
6-3. If you check “Local Storage”, the setting wizard will end and because a
local storage is not powered by a separate UPS.

© 2019 Cyber Power Systems, Inc. All rights reserved 45
2. CONFIGURATION 5
6-4. To assign the power source (UPS) to the Storage, select it from the drop-
down list and assign the correct UPS outlet used by the Storage and click
NEXT to continue
6-5. Next, select if you want vApp, virtual machine, and/or ESXi host in the
Storage to shut down, and set the respective amount of time needed for
each to complete a graceful shutdown. Click NEXT to continue. .

© 2019 Cyber Power Systems, Inc. All rights reserved 46
2. CONFIGURATION 5
6-6. The next step is to assign the shutdown behavior. Check “Custom” and
select the power event and graceful shutdown condition of Storage.
Click NEXT when the setting is done.
Note: If you skip this step and do not assign shutdown behavior, this
Storage will follow the shutdown behavior assigned in PPB
Management.
6-7. After all setting details are checked and confirmed correct. Click FINISH
to complete the configuration of Storage.

© 2019 Cyber Power Systems, Inc. All rights reserved 47
2. CONFIGURATION 5
7. To configure a cluster within VMware vCenter:
To correctly set the power source (UPS) of cluster, click the Setting Icon of device
(Cluster) and select Setting Wizard.
7-1. The “Cluster Setting Wizard” will appear. Please click “NEXT” to continue.

© 2019 Cyber Power Systems, Inc. All rights reserved 48
2. CONFIGURATION 5
7-2. Assign the power source (UPS) of each ESXi host in the cluster, one by
one, by selecting from the Infrastructure drop-down list and assign
correct UPS and outlet, and click NEXT to continue.
Note: Each ESXi should be assigned correct UPS and outlet from the
drop-down list for graceful shutdown protection.

© 2019 Cyber Power Systems, Inc. All rights reserved 49
2. CONFIGURATION 5
7-3. After clicking “Next”, the shutdown settings will appear. In addition to
selecting virtual machine migration (vMotion), select if you want vApp,
virtual machine, and/or ESXi host to shutdown, and the respective
amount of time needed for each to complete. Click NEXT to continue.

© 2019 Cyber Power Systems, Inc. All rights reserved 50
2. CONFIGURATION 5
7-5. After all setting details are checked and confirmed. Click FINISH to
complete the configuration of cluster.
7-4. The next step is to assign the shutdown behavior. Check “Custom” and
select the power event and graceful shutdown condition of cluster. Click
NEXT when the setting is done.

© 2019 Cyber Power Systems, Inc. All rights reserved 51
3. APPENDIX
How to Find VM’s IP address?
You can find the VM’s IP address in vSphere Web Client interface: Virtual Machines
→ General Information → Networking → IP Addresses.
VM
IP address