Embed Size (px)
Citation preview

PowerLite®
G5000Multimedia Projector
User’s Guide

2
Important Safety InformationWARNING: Never look into the projector lens when the lamp is turned on; the bright light can damage your eyes. Never let children look into the lens when it is on. Never open any cover on the projector, except the lamp and filter covers. Dangerous electrical voltages inside the projector can severely injure you. Except as specifically explained in this User’s Guide, do not attempt to service this product yourself. Refer all servicing to qualified service personnel.
WARNING: The projector and its accessories come packaged in plastic bags. Keep plastic bags away from small children to avoid any risk of suffocation.
Caution: When you replace the lamp, never touch the new lamp with your bare hands; the invisible residue left by the oil on your hands may shorten the lamp life. Use a cloth or glove to handle the new lamp.
Copyright NoticeAll rights reserved. No part of this publication may be reproduced, stored in a retrieval system, or transmitted in any form or by any means, electronic, mechanical, photocopying, recording, or otherwise, without the prior written permission of Seiko Epson Corporation. The information contained herein is designed only for use with this Epson product. Epson is not responsible for any use of this information as applied to other products.
Neither Seiko Epson Corporation nor its affiliates shall be liable to the purchaser of this product or third parties for damages, losses, costs, or expenses incurred by purchaser or third parties as a result of: accident, misuse, or abuse of this product or unauthorized modifications, repairs, or alterations to this product, or (excluding the U.S.) failure to strictly comply with Seiko Epson Corporation’s operating and maintenance instructions.
Seiko Epson Corporation shall not be liable for any damages or problems arising from the use of any options or any consumable products other than those designated as Original Epson Products or Epson Approved Products by Seiko Epson Corporation.
TrademarksEpson, Quick Corner, and Instant Off are registered trademarks, and Epson Exceed Your Vision is a registered logomark of Seiko Epson Corporation.
PowerLite and PrivateLine are registered trademarks; SizeWise is a trademark; and Extra Care is a service mark of Epson America, Inc.
Pixelworks, DNX, and the DNX logo are trademarks of Pixelworks, Inc.
General Notice: Other product names used herein are for identification purposes only and may be trademarks of their respective owners. Epson disclaims any and all rights in those marks.
This information is subject to change without notice.
© 2008 Epson America, Inc. 11/08

3
Contents
Welcome . . . . . . . . . . . . . . . . . . . . . . . . . . . . . . . . . . . . . . 7Using Your Documentation . . . . . . . . . . . . . . . . . . . . . . . . . . 8
Getting More Information . . . . . . . . . . . . . . . . . . . . . . . . 8Registration and Warranty . . . . . . . . . . . . . . . . . . . . . . . . . . . 9Optional Accessories. . . . . . . . . . . . . . . . . . . . . . . . . . . . . . . 10
1 Setting Up the Projector . . . . . . . . . . . . . . . . . . . . . 11Unpacking the Projector. . . . . . . . . . . . . . . . . . . . . . . . . . . . 12
Additional Components. . . . . . . . . . . . . . . . . . . . . . . . . 12Positioning the Projector . . . . . . . . . . . . . . . . . . . . . . . . . . . 13Connecting to a Computer. . . . . . . . . . . . . . . . . . . . . . . . . . 15Connecting to Video Equipment . . . . . . . . . . . . . . . . . . . . . 16
Connecting a Composite Video Source . . . . . . . . . . . . . 17Connecting an S-Video Source . . . . . . . . . . . . . . . . . . . 18Connecting a Component Video Source . . . . . . . . . . . . 19Connecting an RGB Video Source. . . . . . . . . . . . . . . . . 20
Playing Sound . . . . . . . . . . . . . . . . . . . . . . . . . . . . . . . . . . . 21Connecting a Network Cable . . . . . . . . . . . . . . . . . . . . . . . . 23Turning the Projector On and Off . . . . . . . . . . . . . . . . . . . . 24
Using the Direct Power On Function . . . . . . . . . . . . . . 25Shutting Down the Projector . . . . . . . . . . . . . . . . . . . . . 26
2 Displaying and Adjusting the Image . . . . . . . . 27Displaying an Image . . . . . . . . . . . . . . . . . . . . . . . . . . . . . . 28Troubleshooting Display Problems. . . . . . . . . . . . . . . . . . . . 28
You Can’t Project an Image . . . . . . . . . . . . . . . . . . . . . . 28The Projector and Notebook Don’t Display the
Same Image . . . . . . . . . . . . . . . . . . . . . . . . . . . . . 29
4
Adjusting the Image . . . . . . . . . . . . . . . . . . . . . . . . . . . . . . . 30Adjusting the Position of the Image . . . . . . . . . . . . . . . . 31Focusing and Zooming the Image . . . . . . . . . . . . . . . . . 32Adjusting the Image Shape. . . . . . . . . . . . . . . . . . . . . . . 33Selecting the Color Mode . . . . . . . . . . . . . . . . . . . . . . . 35Resizing Video Images . . . . . . . . . . . . . . . . . . . . . . . . . . 36
3 Presenting With the Remote Control . . . . . . . . 37Using the Remote Control . . . . . . . . . . . . . . . . . . . . . . . . . . 38Controlling the Picture and Sound. . . . . . . . . . . . . . . . . . . . 38
Switching Between Picture Sources . . . . . . . . . . . . . . . . 38Turning Off the Picture and Sound . . . . . . . . . . . . . . . . 39Stopping Action. . . . . . . . . . . . . . . . . . . . . . . . . . . . . . . 39Zooming Part of Your Image . . . . . . . . . . . . . . . . . . . . . 40Controlling the Volume. . . . . . . . . . . . . . . . . . . . . . . . . 40
Highlighting Your Presentation . . . . . . . . . . . . . . . . . . . . . . 41Using the Pointer Tool . . . . . . . . . . . . . . . . . . . . . . . . . 41Choosing a Different Pointer Shape. . . . . . . . . . . . . . . . 41
Operating Your Computer With the Remote Control . . . . . 42Operating Two or More Projectors With the
Remote Control . . . . . . . . . . . . . . . . . . . . . . . . . . . . . 43Setting the Projector ID. . . . . . . . . . . . . . . . . . . . . . . . . 43Checking the Projector ID. . . . . . . . . . . . . . . . . . . . . . . 44Setting the Remote Control ID . . . . . . . . . . . . . . . . . . . 44
4 Fine-Tuning the Projector. . . . . . . . . . . . . . . . . . . 45Using the Menu System . . . . . . . . . . . . . . . . . . . . . . . . . . . . 46
Restoring the Default Settings . . . . . . . . . . . . . . . . . . . . 47Adjusting the Image . . . . . . . . . . . . . . . . . . . . . . . . . . . . . . 48
Six-Axis Color Adjustment. . . . . . . . . . . . . . . . . . . . . . . 49Adjusting Signal Settings . . . . . . . . . . . . . . . . . . . . . . . . . . . 50Customizing Projector Features . . . . . . . . . . . . . . . . . . . . . . 52Using the Projector Security Features . . . . . . . . . . . . . . . . . . 54
Enabling Password Protection . . . . . . . . . . . . . . . . . . . . 54Creating Your Own Startup Screen . . . . . . . . . . . . . . . . 56Disabling the Projector’s Buttons. . . . . . . . . . . . . . . . . . 58
Customizing Power and Operation . . . . . . . . . . . . . . . . . . . 59
5
Multi-screen Color Adjustment . . . . . . . . . . . . . . . . . . . . . . 61Projector Menu and Options List . . . . . . . . . . . . . . . . . . . . . 62
5 Managing Projectors . . . . . . . . . . . . . . . . . . . . . . . . . 65Connecting to a Wired Network . . . . . . . . . . . . . . . . . . . . . 65Using Projector E-mail Alerts . . . . . . . . . . . . . . . . . . . . . . . . 67
6 Maintaining the Projector . . . . . . . . . . . . . . . . . . . 69Cleaning the Lens . . . . . . . . . . . . . . . . . . . . . . . . . . . . . . . . . 70Cleaning the Projector Case . . . . . . . . . . . . . . . . . . . . . . . . . 70Cleaning the Air Filter . . . . . . . . . . . . . . . . . . . . . . . . . . . . . 70Replacing the Air Filter. . . . . . . . . . . . . . . . . . . . . . . . . . . . . 73Replacing the Lamp . . . . . . . . . . . . . . . . . . . . . . . . . . . . . . . 74
Resetting the Lamp Timer . . . . . . . . . . . . . . . . . . . . . . . 77Checking Lamp Usage . . . . . . . . . . . . . . . . . . . . . . . . . . 78
Replacing the Batteries . . . . . . . . . . . . . . . . . . . . . . . . . . . . . 78Transporting the Projector . . . . . . . . . . . . . . . . . . . . . . . . . . 79
7 Solving Problems . . . . . . . . . . . . . . . . . . . . . . . . . . . . 81Using On-Screen Help . . . . . . . . . . . . . . . . . . . . . . . . . . . . . 82Checking Projector Status. . . . . . . . . . . . . . . . . . . . . . . . . . . 83
What To Do When the Lights Flash . . . . . . . . . . . . . . . 83Solving Projector Operation Problems . . . . . . . . . . . . . . . . . 85Solving Problems With the Image or Sound . . . . . . . . . . . . . 85Solving Network Problems . . . . . . . . . . . . . . . . . . . . . . . . . . 91Solving Problems With the Remote Control. . . . . . . . . . . . . 92Where To Get Help . . . . . . . . . . . . . . . . . . . . . . . . . . . . . . . 93
Speak to a Support Representative . . . . . . . . . . . . . . . . . 93
A Projector Installation . . . . . . . . . . . . . . . . . . . . . . . . 95Installation Guidelines . . . . . . . . . . . . . . . . . . . . . . . . . . . . . 95Security Features. . . . . . . . . . . . . . . . . . . . . . . . . . . . . . . . . . 96Installing and Removing the Lens . . . . . . . . . . . . . . . . . . . . . 97
Removing the Lens. . . . . . . . . . . . . . . . . . . . . . . . . . . . . 97Installing the Lens . . . . . . . . . . . . . . . . . . . . . . . . . . . . . 98

6
B Technical Specifications . . . . . . . . . . . . . . . . . . . . . 99
C Notices . . . . . . . . . . . . . . . . . . . . . . . . . . . . . . . . . . . . . . 105Important Safety Instructions . . . . . . . . . . . . . . . . . . . . . . . 105FCC Compliance Statement. . . . . . . . . . . . . . . . . . . . . . . . 108
Index. . . . . . . . . . . . . . . . . . . . . . . . . . . . . . . . . . . . . . . . 111
7
-
WelcomeThe PowerLite® G5000 is an easy-to-use, flexible for installation projector. It offers up to 4000 lumens of brightness (white and color light output) and provides a native XGA resolution. You can connect it to a wide range of computers and video sources.
Your projector offers these easy setup, control, and security features:
■ Manual horizontal and vertical lens shift
■ Centered lens design
■ Instant Off ® feature for fast setup and shut down
■ Quick Corner® for easy image shape/size adjustment
■ 1.8x optical zoom lens for flexible placement and positioning
■ One-touch filter replacement
■ Side-loading easy lamp access
■ Security features include password, user’s logo, the ability to lock the projector buttons, a security cable attachment (cable not included), a slot for an optional Kensington® security lock, and a lens theft deterrent screw
Additional enhancements:
■ Closed captioning for the hearing impaired
■ 1000:1 contrast ratio
■ Perform six-axis color adjustment for fine art and photography

8 Welcome
Using Your DocumentationThis electronic User’s Guide contains all the information you need to set up and use your projector.
In addition, your projector CD-ROM includes the EMP Monitor Operation Guide. Refer to this manual for detailed instructions on monitoring the projector from a remote location.
Please follow these guidelines as you read through this manual:
■ Warnings must be followed carefully to avoid bodily injury.
■ Cautions must be observed to avoid damage to your equipment.
■ Notes contain important information about your projector.
■ Tips contain additional projection hints.
Getting More Information
Need quick steps for setting up your projector or other assistance? Here’s where you can look for help:
■ Quick Reference cardProvides information for connecting the projector to your equipment, displaying and adjusting the image, using the remote control, and solving display problems.
■ Built-in help systemProvides assistance for common problems. Available from the Help button on the projector or the remote control. See page 82 for details.
■ epson.com/supportDownload FAQs and e-mail your questions to Epson support.
■ PrivateLine supportIf you still need help after checking this User’s Guide and the sources listed in this section, you can use the Epson PrivateLine® Support service to get help fast. Call (800) 637-7661 and enter the PIN on the PrivateLine card. Or take advantage of Epson’s automated support services 24 hours a day. See page 93 for more information.
Welcome 9
Registration and WarrantyYour projector comes with a basic warranty that lets you project with confidence. For details, see the warranty brochure included with your projector.
In addition, Epson offers free Extra CareSM Road Service. In the unlikely event of an equipment failure, you won’t have to wait for your unit to be repaired. Instead, Epson will ship you a replacement unit anywhere in the United States or Canada, usually via next business day delivery. See the brochure included with your projector for details.
To register, simply fill out the registration card and mail it to Epson. Or you can register online at epson.com/webreg. Registering also lets you receive special updates on new accessories, products, and service.
10 Welcome
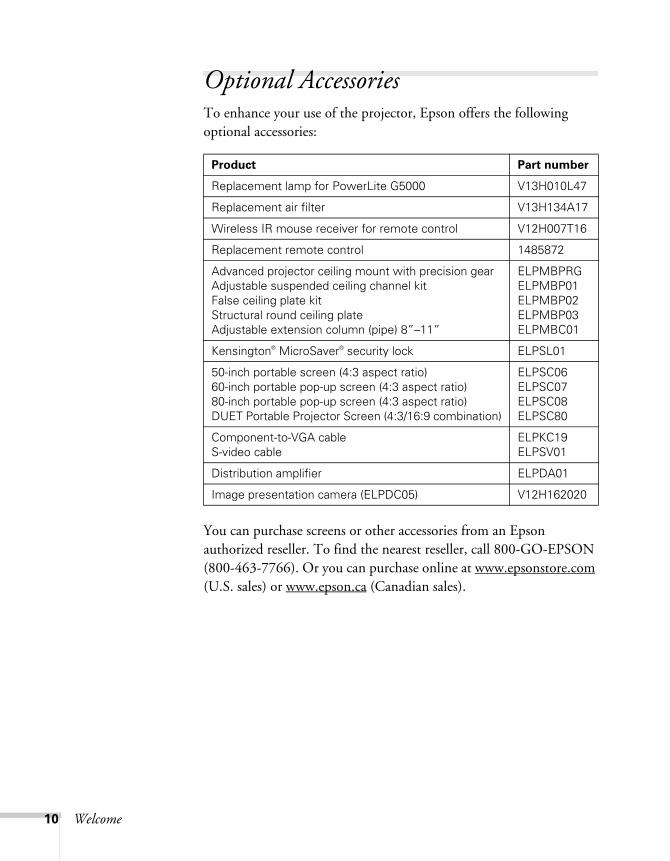
Optional AccessoriesTo enhance your use of the projector, Epson offers the following optional accessories:
You can purchase screens or other accessories from an Epson authorized reseller. To find the nearest reseller, call 800-GO-EPSON (800-463-7766). Or you can purchase online at www.epsonstore.com (U.S. sales) or www.epson.ca (Canadian sales).
Product Part number
Replacement lamp for PowerLite G5000 V13H010L47
Replacement air filter V13H134A17
Wireless IR mouse receiver for remote control V12H007T16
Replacement remote control 1485872
Advanced projector ceiling mount with precision gearAdjustable suspended ceiling channel kitFalse ceiling plate kitStructural round ceiling plateAdjustable extension column (pipe) 8”–11”
ELPMBPRGELPMBP01ELPMBP02ELPMBP03ELPMBC01
Kensington® MicroSaver® security lock ELPSL01
50-inch portable screen (4:3 aspect ratio)60-inch portable pop-up screen (4:3 aspect ratio)80-inch portable pop-up screen (4:3 aspect ratio)DUET Portable Projector Screen (4:3/16:9 combination)
ELPSC06ELPSC07ELPSC08ELPSC80
Component-to-VGA cableS-video cable
ELPKC19ELPSV01
Distribution amplifier ELPDA01
Image presentation camera (ELPDC05) V12H162020

11
1
Setting Up the ProjectorThis chapter tells you how to unpack the projector and connect it to a notebook or desktop computer, to video equipment (such as a VCR, DVD player, or video camera), and to a local area network.
Follow the instructions in this chapter for:
■ Unpacking the projector
■ Positioning the projector
■ Connecting to a computer
■ Connecting to video equipment
■ Playing Sound
■ Connecting a network cable
■ Turning the projector on and off
12 Setting Up the Projector
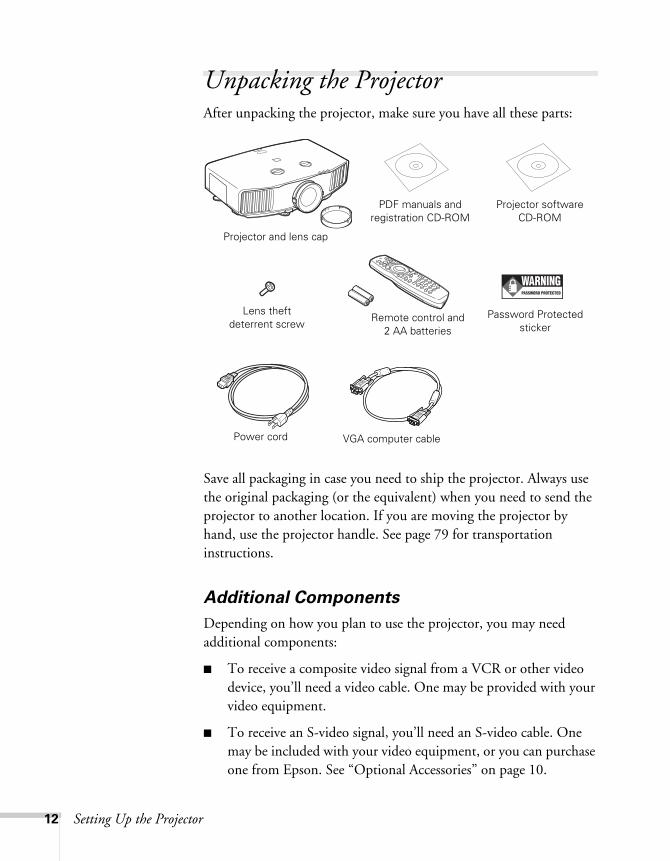
Unpacking the ProjectorAfter unpacking the projector, make sure you have all these parts:
Save all packaging in case you need to ship the projector. Always use the original packaging (or the equivalent) when you need to send the projector to another location. If you are moving the projector by hand, use the projector handle. See page 79 for transportation instructions.
Additional Components
Depending on how you plan to use the projector, you may need additional components:
■ To receive a composite video signal from a VCR or other video device, you’ll need a video cable. One may be provided with your video equipment.
■ To receive an S-video signal, you’ll need an S-video cable. One may be included with your video equipment, or you can purchase one from Epson. See “Optional Accessories” on page 10.
Projector and lens cap
Remote control and 2 AA batteries
PDF manuals and registration CD-ROM
Power cord VGA computer cable
Projector software CD-ROM
Password Protected sticker
Lens theft deterrent screw

Setting Up the Projector 13
Positioning the Projector If the projector isn’t already installed in the room you’re using, you’ll probably want to place it on a table in front of the screen. This lets you stand in the front of the room, face the audience, and remain close enough to the equipment to be able to control it. Try to leave as much space as possible between the projector and the screen to get a good-size image.
Use the illustration below to help you determine placement. Image size increases with distance, but can vary depending on how you position the zoom ring and whether you’ve adjusted the image with other settings.
(4:3 image)
Also keep these considerations in mind:
■ Place the projector on a sturdy, level surface.
■ Make sure there is plenty of space for ventilation around and under the projector.
■ Make sure the projector is within 10 feet (3 meters) of a grounded electrical outlet or extension cord.
noteYou can mount the projector on the ceiling, or place it behind a translucent screen for rear projection. See page 95 for details.
2.5 to 4.6 ft(0.8 to 1.4 m)
5.2 to 9.4 ft(1.6 to 2.9 m)
26.5 to 47.8 ft(8.1 to 14.6 m)
Distance from screen
TBD

14 Setting Up the Projector
Ideally, you should place the projector directly in front of the center of the screen, facing it toward the screen squarely. The base of the lens should be about level with the bottom of the screen.
If you place the projector below screen level, you can use the vertical lens shift dial to raise the lens (see page 32). You can also tilt the projector up by extending the front adjustable foot. Tilting the projector causes the image to become “keystone” shaped, but you can correct the distortion (see page 33).
For instructions on installing the projector in a permanent location, such as a theater or conference room, see page 95.
noteAfter positioning the projector, you may want to connect a Kensington MicroSaver® anti-theft device to the lock port on the projector. You can purchase this from Epson; see page 10.
Screen
Projector

Setting Up the Projector 15
Connecting to a ComputerYou can connect the projector to any computer that has a standard video output (monitor) port, including desktop models, PC notebook computers, MacBook®, PowerBook®, and iBook® computers, and hand-held devices.
If you have the optional wireless mouse receiver, you can use your remote control as a wireless mouse when projecting from a computer (page 42).
Follow these steps to connect to the projector using the VGA computer cable that came with it (the monitor port on your computer must be a mini D-sub 15-pin port).
1. Connect one end of the cable to the projector’s Computer1 or Computer 2 port, and the other end to your computer’s monitor port.
2. You may need to change the Input Signal setting in the projector’s Signal menu to RGB (see page 51).
3. To play sound, you can connect an optional stereo mini-jack audio cable and optional external speakers (see page 21).
4. When you’ve finished making any connections, see page 24 for instructions on turning on the projector and Chapter 2 for instructions on displaying and adjusting the image.
cautionDon’t try to force a connector to fit a port with a different shape or number of pins. You may damage the port or connector.
16 Setting Up the Projector
Connecting to Video Equipment
You can connect several video sources to the projector at the same time. Before starting, look at your video equipment to determine its available video output connections:
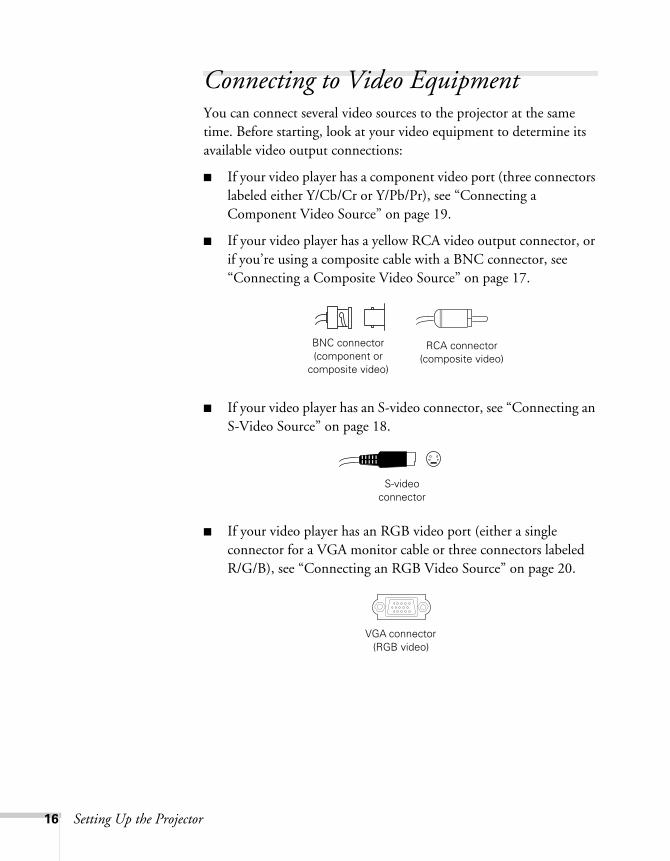
■ If your video player has a component video port (three connectors labeled either Y/Cb/Cr or Y/Pb/Pr), see “Connecting a Component Video Source” on page 19.
■ If your video player has a yellow RCA video output connector, or if you’re using a composite cable with a BNC connector, see “Connecting a Composite Video Source” on page 17.
■ If your video player has an S-video connector, see “Connecting an S-Video Source” on page 18.
■ If your video player has an RGB video port (either a single connector for a VGA monitor cable or three connectors labeled R/G/B), see “Connecting an RGB Video Source” on page 20.
BNC connector (component or
composite video)
RCA connector (composite video)
S-video connector
VGA connector (RGB video)

Setting Up the Projector 17
Connecting a Composite Video Source
1. If your video cable has an RCA connector, connect it to the yellow video output connector on your player and the yellow Video2 connector on the projector (as shown below). Or if you’re using a coax video cable, connect it to the Video1 connector on the projector.
2. To play sound, you can connect an optional stereo mini-jack audio cable and optional external speakers (see page 21).
3. When you’ve finished making any connections, see page 24 for instructions on turning on the projector and Chapter 2 for instructions on displaying and adjusting the image.
noteIf the video cable was not provided with your video device, you can purchase one from an electronics dealer.

18 Setting Up the Projector
Connecting an S-Video Source
1. Connect the S-video cable to the S-video connector on your player and the S-Video connector on the projector.
2. To play sound, you can connect an optional stereo mini-jack audio cable and optional external speakers (see page 21).
3. When you’ve finished making any connections, see page 24 for instructions on turning on the projector and Chapter 2 for instructions on displaying and adjusting the image.
noteIf the S-video cable was not provided with your video device, you can purchase one from Epson; see page 10.

Setting Up the Projector 19
Connecting a Component Video Source
You will need a special cable to connect your component video equipment to the VGA-style connector on the projector. You can order a component-to-VGA cable (part number ELPKC19) from Epson; see page 10 for more information.
1. Locate a component-to-VGA cable.
2. Connect the cable to your player and the Computer 1 or Computer 2 connector on the projector.
3. You may need to change the Input Signal setting in the projector’s Signal menu to Component (see page 51).
4. To play sound, you can connect an optional stereo mini-jack audio cable and optional external speakers (see page 21).
5. When you’ve finished making any connections, see page 24 for instructions on turning on the projector and Chapter 2 for instructions on displaying and adjusting the image.
noteBe sure your video player is not an RGB video source. If you select the wrong source, image quality may suffer. Check your video player’s documentation.
Also, make sure the Input Signal setting in the Signal menu is set to Auto or Component Video (see page 51).Component-to-VGA cable

20 Setting Up the Projector
Connecting an RGB Video Source
1. Locate the VGA computer cable provided with the projector (or if your video player has three connectors labeled R/G/B, locate a component-to-VGA cable as shown on page 19).
2. Connect the cable to the video port(s) on your player and the Computer1 or Computer2 port on the projector.
3. You may need to change the Input Signal setting in the projector’s Signal menu to RGB (see page 51).
4. To play sound, you can connect an optional stereo mini-jack audio cable and optional external speakers (see page 21).
5. When you’ve finished making any connections, see page 24 for instructions on turning on the projector and Chapter 2 for instructions on displaying and adjusting the image.
noteBe sure your video player is not a component video source. If you select the wrong source, image quality may suffer. Check your video player’s documentation.

Setting Up the Projector 21
Playing SoundYou can play sound by connecting external speakers with built-in amplifiers. You can use the remote control or the projector’s menu system to adjust the volume.
Follow these steps to connect your equipment and external speakers to the projector:
1. Locate the appropriate cable and connect it to the audio port(s) on the projector.
■ If you have equipment connected to the Computer1 or Computer2 ports, use a stereo mini-jack cable. Connect the cable to the Audio port beneath the Computer2 port.
■ If you have equipment connected to the Video1, Video2, or S-Video ports, connect an RCA audio cable to the L and R Audio (Video) ports.
22 Setting Up the Projector
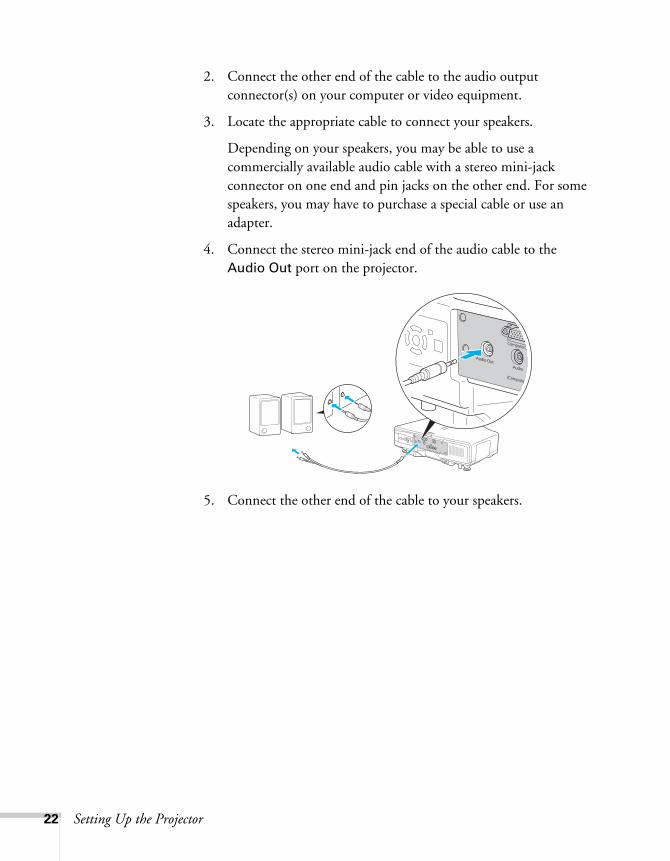
2. Connect the other end of the cable to the audio output connector(s) on your computer or video equipment.
3. Locate the appropriate cable to connect your speakers.
Depending on your speakers, you may be able to use a commercially available audio cable with a stereo mini-jack connector on one end and pin jacks on the other end. For some speakers, you may have to purchase a special cable or use an adapter.
4. Connect the stereo mini-jack end of the audio cable to the Audio Out port on the projector.
5. Connect the other end of the cable to your speakers.

Setting Up the Projector 23
Connecting a Network CableTo connect the projector to your local area network (LAN), use a commercially available 100BaseTX or 10BaseT network cable. To ensure proper data transmission, use a Category 5 shielded cable or better.
Connect the cable to the projector and your network port as shown:
LAN port
24 Setting Up the Projector
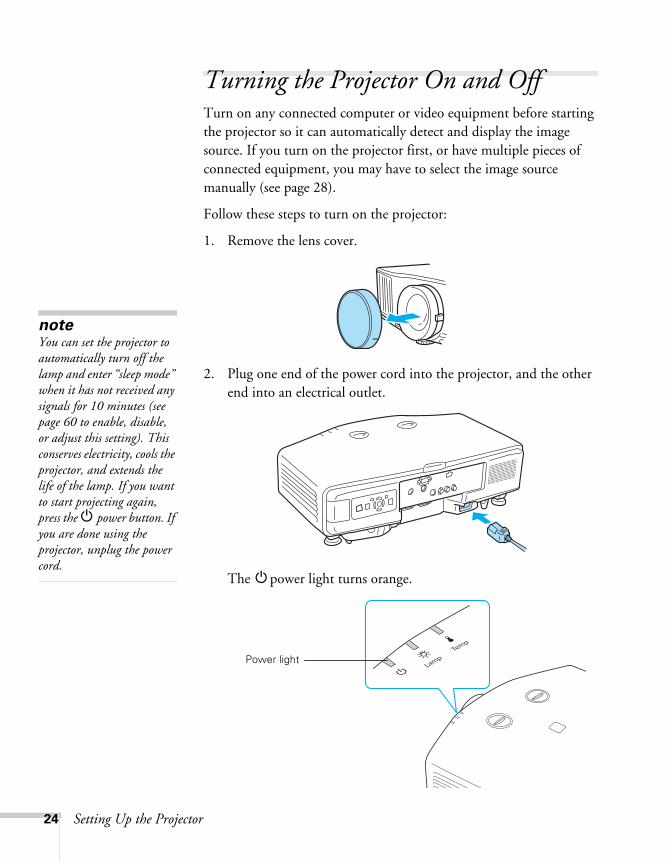
Turning the Projector On and Off Turn on any connected computer or video equipment before starting the projector so it can automatically detect and display the image source. If you turn on the projector first, or have multiple pieces of connected equipment, you may have to select the image source manually (see page 28).
Follow these steps to turn on the projector:
1. Remove the lens cover.
2. Plug one end of the power cord into the projector, and the other end into an electrical outlet.
The Ppower light turns orange.
noteYou can set the projector to automatically turn off the lamp and enter “sleep mode” when it has not received any signals for 10 minutes (see page 60 to enable, disable, or adjust this setting). This conserves electricity, cools the projector, and extends the life of the lamp. If you want to start projecting again, press the P power button. If you are done using the projector, unplug the power cord.
Power light

Setting Up the Projector 25
3. Press the Ppower button on the remote control or on the back of the projector.
The projector beeps once and the Ppower light flashes green as the projector warms up, then an image begins to appear. When the Ppower light stops flashing and remains green, the projector is ready for use.
4. If you are prompted to enter a password, see page 55.
Using the Direct Power On Function
The Direct Power On function enables faster setup. The projector starts up automatically when you plug it in or turn it on with a wall switch. You don’t have to press the Ppower button.
Follow these steps to enable Direct Power On:
1. Press the Menu button on the remote control or projector, then select the Extended menu and press Enter.
2. Choose Operation and press Enter.
3. Choose Direct Power On and press Enter.
4. Highlight On and press Enter.
5. Press Menu to exit. The setting will take effect the next time you plug in the projector.
Power button
warningNever look into the lens when the lamp is on. This can damage your eyes, and is especially dangerous for children.
noteIf a power outage occurs when Direct Power On is enabled and the projector is plugged in, the projector will restart when the power is restored.

26 Setting Up the Projector
Shutting Down the Projector
This projector incorporates Instant Off technology. To turn it off, you can press its Ppower button as described below, unplug it, or turn off a power switch that supplies power to the projector. You don’t have to wait for the projector to cool down first.
1. To turn off the projector, press the Ppower button on the remote control or projector.
You see a confirmation message. (If you don’t want to turn it off, press any other button.)
2. Press the Ppower button again. The projection lamp turns off and the projector beeps twice. You can unplug the power cord.
If you want to turn the projector on again, make sure the orange P power light is not flashing, then press the Ppower button.
noteLamp life results depend upon the Brightness Control setting you’ve selected, environmental conditions, and usage.
Turn off this product when not in use to prolong the life of the projector.
27
2
Displaying and Adjusting the ImageFollow the guidelines in this chapter for:
■ Displaying an image
■ Troubleshooting display problems
■ Adjusting the image

28 Displaying and Adjusting the Image
Displaying an ImageYou may need to select the image source if you have multiple video sources connected to the projector (such as a computer or DVD player). Selecting the image source lets you switch between images input from different pieces of connected equipment.
If you don’t see the image you want, press the Search button or one of the Source buttons on the remote control, or the Source Search button on the projector until you see the image you want to project.
You can also use the Source buttons on the remote control to switch between devices connected to the ports identified on each button.
Troubleshooting Display ProblemsFollow these guidelines if you’re having trouble displaying an image.
You Can’t Project an Image
If you don’t see the image you are trying to project, try the following:
■ Make sure the cables are connected correctly, as described beginning on page 11.
■ Make sure the P power light is green and not flashing and the lens cover is removed.
noteThe BNC, EasyMP, and HDMI buttons are not applicable to this projector.

Displaying and Adjusting the Image 29
■ If you’ve connected more than one computer and/or video source, you may need to press the Source Search button on the projector’s control panel, or the Search button or one of the Source buttons on the remote control to select the correct source. (Allow a few seconds for the projector to sync up after pressing the button.)
■ If you’re using a PC notebook, press the function key on your keyboard that lets you display on an external monitor. It may be labeled CRT/LCD or have an icon such as . You may have to hold down the Fn key while pressing it. Allow a few seconds for the projector to sync up after changing the setting.
The Projector and Notebook Don’t Display the Same Image
If you’re projecting from a notebook, and you can’t see your image on the projection screen and on your computer at the same time, follow these guidelines.
If you’re using a PC notebook:■ On most systems, there’s a function key that lets you toggle
between the LCD screen and the projector, or display on both at the same time. It may be labeled CRT/LCD or have an icon such as
. You may have to hold down the Fn key while pressing it. Allow a few seconds for the projector to sync up after changing the setting.
■ If the function key doesn’t permit you to display simultaneously on both screens, you should check your monitor settings to make sure both the LCD screen and the external monitor port are enabled.
From the Control Panel, open the Display utility. In the Display Properties dialog box, click the Settings tab, then click Advanced. The method for adjusting the settings varies by brand; you may need to click a Monitor tab, then make sure the external Monitor port is set as your primary display and/or enabled. See your computer’s documentation or online help for details.

30 Displaying and Adjusting the Image
If you’re using Mac OS X:You may need to set up your system to display on the projector screen as well as the LCD screen. Follow these steps:
1. From the Apple® menu, select System Preferences.
2. Select Displays, then click Detect Displays.
3. Make sure the VGA Display or Color LCD dialog box is selected.
4. Click the Arrangement or Arrange tab.
5. Make sure the Mirror Displays checkbox is selected.
Adjusting the ImageOnce you see your image, you need to make certain adjustments:
■ If the image is too high or too low, reposition it as described on page 31.
■ To focus or zoom your image, see page 32.
■ If the image isn’t square, see page 33.
■ To quickly adjust the color, brightness, or contrast, see page 35.
■ To change the image aspect ratio, see page 36.
■ If you need to fine-tune the image and/or sound, see Chapter 4.
Make sure Mirror Displays is checked
Displaying and Adjusting the Image 31
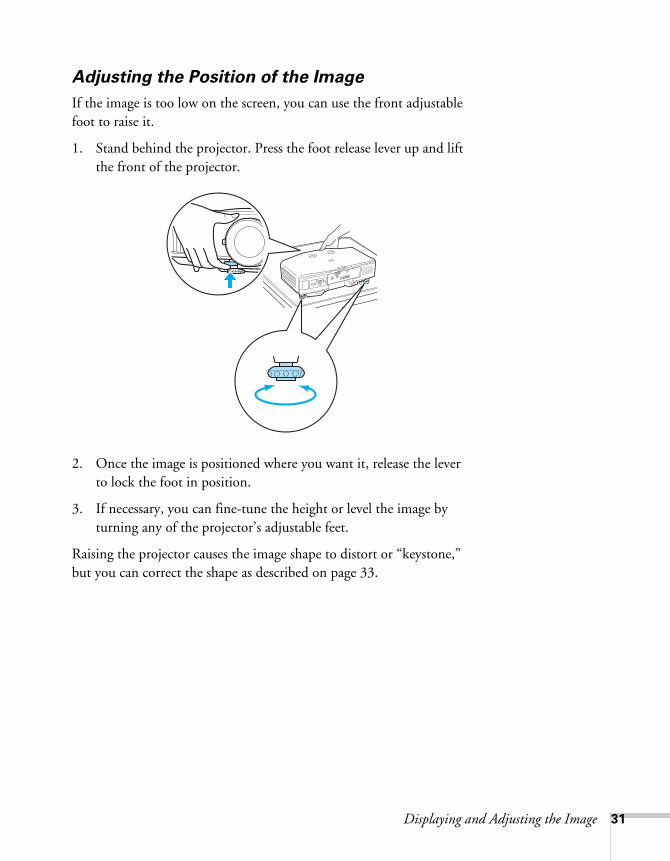
Adjusting the Position of the Image
If the image is too low on the screen, you can use the front adjustable foot to raise it.
1. Stand behind the projector. Press the foot release lever up and lift the front of the projector.
2. Once the image is positioned where you want it, release the lever to lock the foot in position.
3. If necessary, you can fine-tune the height or level the image by turning any of the projector’s adjustable feet.
Raising the projector causes the image shape to distort or “keystone,” but you can correct the shape as described on page 33.

32 Displaying and Adjusting the Image
Additionally, you can use the vertical lens shift dial on the top of the projector to move your image up or down, or you can use the horizontal lens shift dial to move your image left or right.
Focusing and Zooming the Image
Turn the focus ring on the projector to sharpen the image.
Turn the zoom ring (using the knobs on the ring) to reduce or enlarge the image.
If the image still isn’t large enough, you may need to move the projector farther away from the screen. You can also use the E-Zoom buttons on the remote control to zoom in on a portion of the image. See page 40 for instructions.
Vertical Horizontal
Focus Zoom
Displaying and Adjusting the Image 33
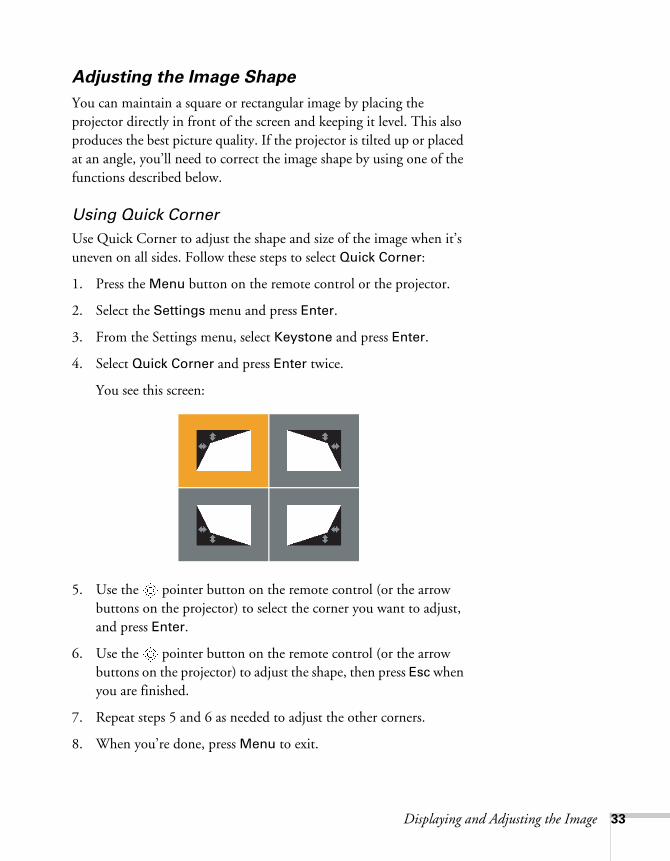
Adjusting the Image Shape
You can maintain a square or rectangular image by placing the projector directly in front of the screen and keeping it level. This also produces the best picture quality. If the projector is tilted up or placed at an angle, you’ll need to correct the image shape by using one of the functions described below.
Using Quick CornerUse Quick Corner to adjust the shape and size of the image when it’s uneven on all sides. Follow these steps to select Quick Corner:
1. Press the Menu button on the remote control or the projector.
2. Select the Settings menu and press Enter.
3. From the Settings menu, select Keystone and press Enter.
4. Select Quick Corner and press Enter twice.
You see this screen:
5. Use the pointer button on the remote control (or the arrow buttons on the projector) to select the corner you want to adjust, and press Enter.
6. Use the pointer button on the remote control (or the arrow buttons on the projector) to adjust the shape, then press Esc when you are finished.
7. Repeat steps 5 and 6 as needed to adjust the other corners.
8. When you’re done, press Menu to exit.

34 Displaying and Adjusting the Image
Using Keystone CorrectionYou can manually adjust the shape of the image to compensate for vertical and horizontal keystone distortion. First make sure the Keystone setting in the projector’s menu system is set to H-Keystone or V-Keystone:
1. Press the Menu button on the remote control or projector.
2. Select the Settings menu and press Enter.
3. From the Settings menu, select Keystone and press Enter.
4. Select H/V-Keystone and press Enter.
5. Select H-Keystone (for horizontal adjustment) or V-Keystone (for vertical adjustment) and use the pointer button on the remote control to adjust the shape of the image.
If the image becomes smaller, use the zoom ring to enlarge the image so it fits the screen. If the image contains faint lines or a gridlike pattern, decrease the sharpness setting (see page 49).
6. When you’re done, press Menu to exit.
noteUse can also use the projector’s arrow buttons to perform keystone correction as long as the projector’s Keystone setting is set to H/V-Keystone.
Vertical keystone adjustment
Horizontal keystone adjustment
Displaying and Adjusting the Image 35
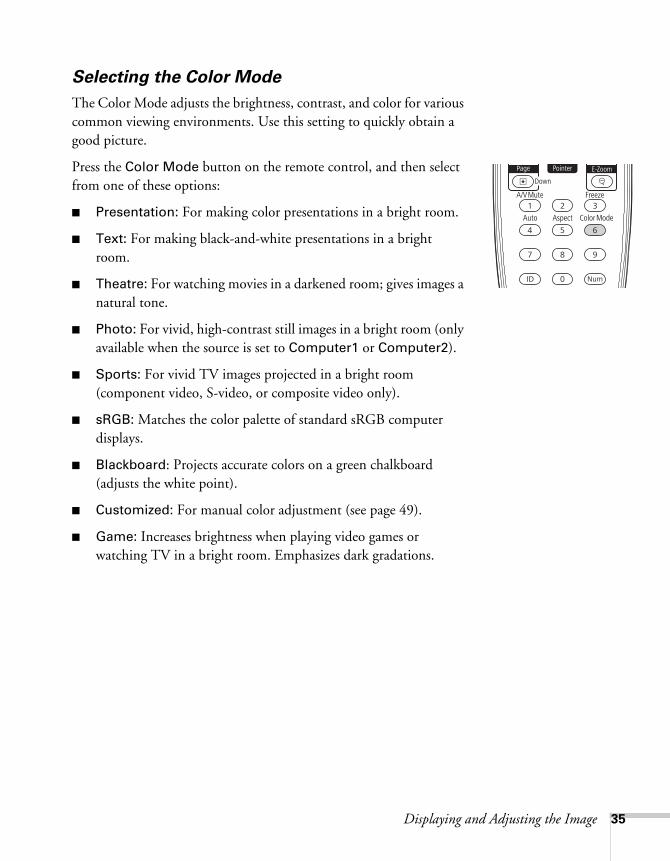
Selecting the Color Mode
The Color Mode adjusts the brightness, contrast, and color for various common viewing environments. Use this setting to quickly obtain a good picture.
Press the Color Mode button on the remote control, and then select from one of these options:
■ Presentation: For making color presentations in a bright room.
■ Text: For making black-and-white presentations in a bright room.
■ Theatre: For watching movies in a darkened room; gives images a natural tone.
■ Photo: For vivid, high-contrast still images in a bright room (only available when the source is set to Computer1 or Computer2).
■ Sports: For vivid TV images projected in a bright room (component video, S-video, or composite video only).
■ sRGB: Matches the color palette of standard sRGB computer displays.
■ Blackboard: Projects accurate colors on a green chalkboard (adjusts the white point).
■ Customized: For manual color adjustment (see page 49).
■ Game: Increases brightness when playing video games or watching TV in a bright room. Emphasizes dark gradations.

36 Displaying and Adjusting the Image
Resizing Video Images
You can use the Aspect button on the remote control to change the aspect (width to height) ratio, depending on the input signal.
■ Normal (for images sent through the Computer1 or Computer2 ports only): Displays images using the full projection area and maintains the aspect ratio of the image. Choose this setting to automatically resize the image and make the best use of the display area.
■ 4:3: Displays images using the full projection area at an aspect ratio of 4:3.
■ 16:9: Converts the aspect ratio of the image to 16:9. 4:3 ratio images are elongated horizontally to fit.
■ Through: Displays images as is (aspect ratio and resolution are maintained). Black bands appear if the resolution is less than 1024 × 768; images are cut off if the resolution is over1024 × 768.
Press the Aspect button repeatedly to cycle through the available options.
You can also change the aspect ratio using the projector’s Signal menu. See page 50 for details.

37
3
Presenting With the Remote ControlThe projector includes a number of tools to enhance your presentation. All of them can be accessed using the remote control, which lets you operate the projector from anywhere in the room—up to 49 feet (15 meters) away.
You can use the remote control to adjust the picture and sound (page 38), as a pointer to highlight your presentation (page 41), or to control two or more projectors at the same time (page 43). If you have the optional wireless mouse receiver, you can also use your remote control as a wireless mouse when projecting from a computer (page 42).
This chapter covers:
■ Using the remote control
■ Controlling the picture and sound
■ Highlighting your presentation
■ Operating your computer with the remote control
■ Operating two or more projectors with the remote control
38 Presenting With the Remote Control
Using the Remote ControlMake sure batteries are installed as described on page 78. Follow these tips for using the remote control:
■ Point the remote control at the front of the projector or at the screen.
■ Stand within 49 feet (15 meters) of the projector.
Controlling the Picture and SoundYou can use the remote control to preview and select your picture sources, temporarily turn off the picture and sound, freeze the action, zoom in on the picture, and adjust the volume.
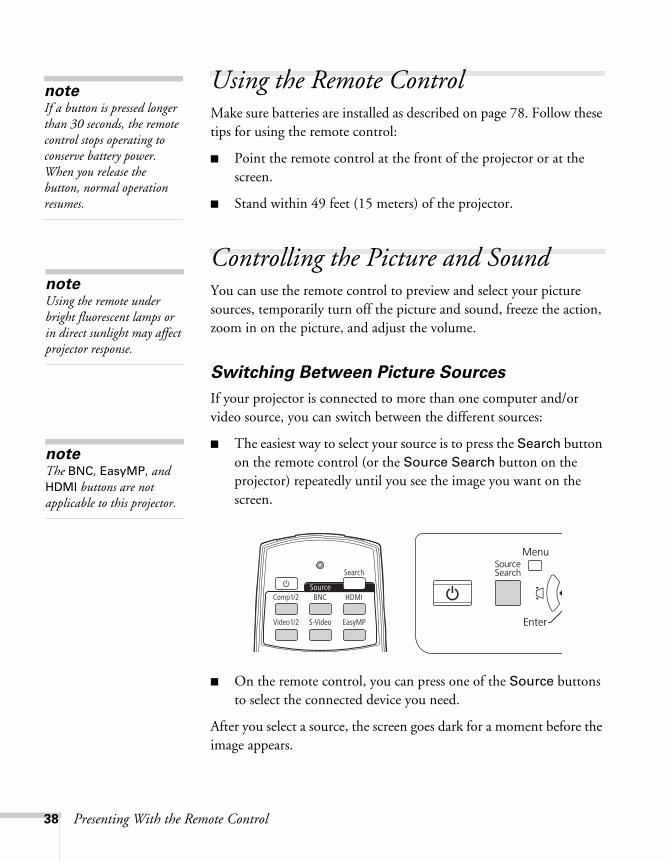
Switching Between Picture Sources
If your projector is connected to more than one computer and/or video source, you can switch between the different sources:
■ The easiest way to select your source is to press the Search button on the remote control (or the Source Search button on the projector) repeatedly until you see the image you want on the screen.
■ On the remote control, you can press one of the Source buttons to select the connected device you need.
After you select a source, the screen goes dark for a moment before the image appears.
noteIf a button is pressed longer than 30 seconds, the remote control stops operating to conserve battery power. When you release the button, normal operation resumes.
noteUsing the remote under bright fluorescent lamps or in direct sunlight may affect projector response.
noteThe BNC, EasyMP, and HDMI buttons are not applicable to this projector.
Presenting With the Remote Control 39
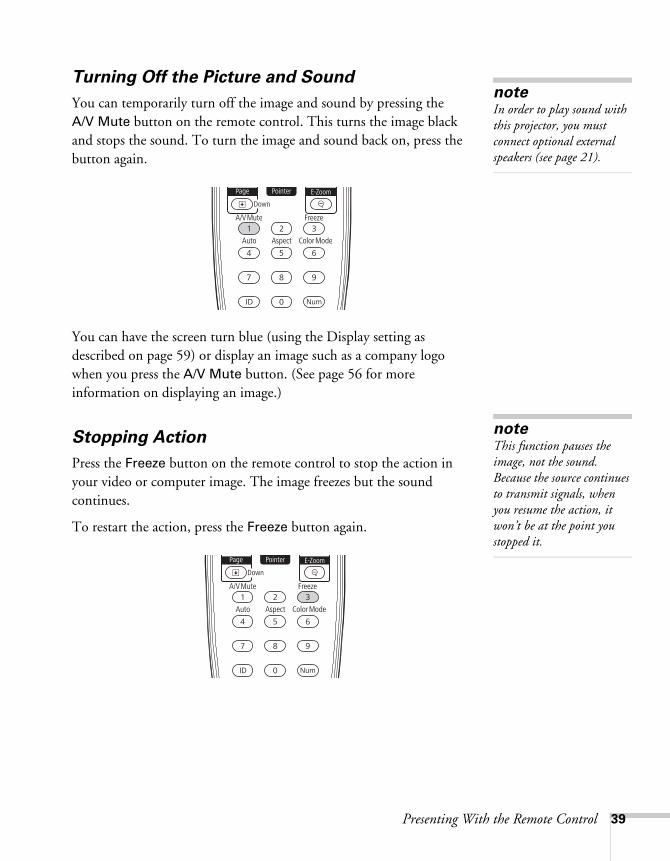
Turning Off the Picture and Sound
You can temporarily turn off the image and sound by pressing the A/V Mute button on the remote control. This turns the image black and stops the sound. To turn the image and sound back on, press the button again.
You can have the screen turn blue (using the Display setting as described on page 59) or display an image such as a company logo when you press the A/V Mute button. (See page 56 for more information on displaying an image.)
Stopping Action
Press the Freeze button on the remote control to stop the action in your video or computer image. The image freezes but the sound continues.
To restart the action, press the Freeze button again.
noteIn order to play sound with this projector, you must connect optional external speakers (see page 21).
noteThis function pauses the image, not the sound. Because the source continues to transmit signals, when you resume the action, it won’t be at the point you stopped it.

40 Presenting With the Remote Control
Zooming Part of Your Image
You can zoom in on a portion of the image using the E-Zoom buttons on the remote control.
1. Press the E-Zoom button on the remote control.
You see a crosshair indicating the center of the zoom-in area.
2. Use the pointer button to position the crosshair.
3. Continue pressing the E-Zoom button to enlarge the selected area up to 4 times.
4. While the image is enlarged, you can:
■ Use the pointer button to move around the screen.
■ Press the E-Zoom button to zoom out.
5. When done, press the ESC button to return the image to its original size.
Controlling the Volume
To change the volume, press the or button on the remote control.
You can also adjust the volume using the projector’s menu system. See page 53.
noteYou cannot use the Progressive or Noise Reduction features (see page 50) while you are using E-Zoom.
noteTo temporarily shut off the sound and picture, press the A/V Mute button.

Presenting With the Remote Control 41
Highlighting Your PresentationYou can display a pointer to call out important information on the screen, and you can choose from three shapes for the pointer.
Using the Pointer Tool
1. To activate the pointer tool, press the Pointer button on the remote control. A pointer appears on the screen.
If you prefer to use a different style of pointer, see the instructions in the next section.
2. Use the pointer button on the remote control to position the pointer on the screen.
3. When you’re done using the pointer, press the Pointer button to clear the screen.
Choosing a Different Pointer Shape
Follow these steps to select a different pointer shape:
1. Press the Menu button on the remote control, highlight the Settings menu, highlight Pointer Shape, and press Enter. You can select one of the pointer shapes shown at the right.
2. Select the shape you want and press Enter.
3. Press Menu to exit.
Pointer

42 Presenting With the Remote Control
Operating Your Computer With the Remote ControlWith the optional wireless mouse receiver (see page 10), you can use the remote control in place of your computer’s mouse. This gives you more flexibility when delivering slideshow-style presentations, since you won’t have to stand next to the computer to change slides.
■ Use the Up and Down buttons to move through a Microsoft® PowerPoint slideshow.
■ Use the pointer button to move the pointer on the screen.
■ Press the Enter button once to left-click, or twice to double-click. Press the Esc button to right-click.
■ To drag-and-drop, hold down the Enter button. Then use the pointer button to drag the object. When it’s where you want
it, release the Enter button.
Page up or down to change slides in PowerPoint
Right-click
Use to move pointer on screen
Left-click

Presenting With the Remote Control 43
Operating Two or More Projectors With the Remote ControlIf you’re using more than one projector, you can control all the projectors—or just selected ones—by using the projector ID system. To operate a projector, set the remote control’s ID to match that of the projector. Or you can control all the projectors at once by setting the remote control’s ID to zero.
Setting the Projector ID
The projector’s default ID is set to Off. This lets it respond to commands from any remote control. To change the ID, follow these steps:
1. Press the Menu button on the remote control. You see the projector’s menu screen.
2. Select Extended, then Projector ID.
3. Use the pointer button to highlight the new ID, and press Enter to select it.
4. When you’re done, press Menu to exit.
44 Presenting With the Remote Control
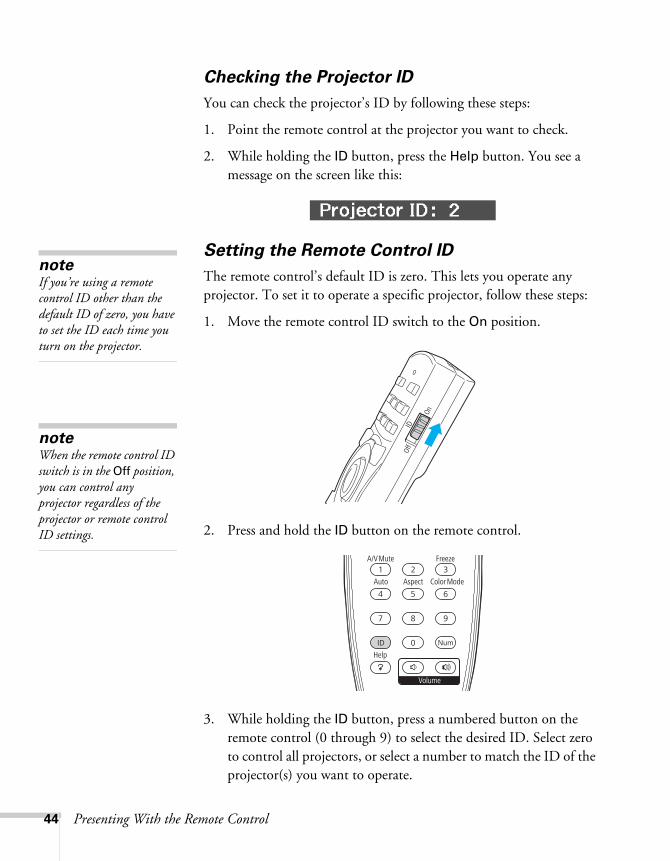
Checking the Projector ID
You can check the projector’s ID by following these steps:
1. Point the remote control at the projector you want to check.
2. While holding the ID button, press the Help button. You see a message on the screen like this:
Setting the Remote Control ID
The remote control’s default ID is zero. This lets you operate any projector. To set it to operate a specific projector, follow these steps:
1. Move the remote control ID switch to the On position.
2. Press and hold the ID button on the remote control.
3. While holding the ID button, press a numbered button on the remote control (0 through 9) to select the desired ID. Select zero to control all projectors, or select a number to match the ID of the projector(s) you want to operate.
noteIf you’re using a remote control ID other than the default ID of zero, you have to set the ID each time you turn on the projector.
noteWhen the remote control ID switch is in the Off position, you can control any projector regardless of the projector or remote control ID settings.

45
4
Fine-Tuning the ProjectorYou can use the projector’s on-screen menus to adjust the image, sound, and other features. This chapter covers the following information:
■ Using the menu system
■ Adjusting the image
■ Adjusting signal settings
■ Customizing projector features
■ Using the projector security features
■ Customizing power and operation
■ Multi-screen color adjustment
■ Projector menu and options list

46 Fine-Tuning the Projector
Using the Menu SystemYou can use the remote control or the projector’s control panel to access the menus and change settings. Follow these steps:
1. To display the menu screen, press the Menu button on the remote control or on the projector.
You see a menu screen similar to the one below:
The menus are listed on the left and the options available for the highlighted menu are shown on the right.
2. Use the pointer button on the remote control (or the navigational buttons on the projector) to scroll through the menu list. When you’ve highlighted the desired menu, press the Enter button to select it.
3. Once you’ve selected the menu, use the pointer button to scroll through the list of options. (Some of the options may be grayed out or unavailable, depending on the selected source.)
Menu list
Options
noteFor a complete list of menus and options, see page 62. For more information on these menus and options, continue reading this chapter.

Fine-Tuning the Projector 47
4. After highlighting the option you want to adjust, use the pointer button to change the setting. In some cases, you may
have to press the Enter button to view a sub-screen for changing the setting.
■ Press the left or right side of the pointer button to adjusta slider bar.
■ To select from two or more settings, use the pointer button to highlight the desired setting and press Enter.
5. After changing the settings, press the Esc button to save your changes and return to the previous menu (or press it repeatedly to exit the menu system).
You can also press the Menu button to exit.
Restoring the Default Settings
You can use the menu system’s Reset options to restore the factory-default settings for all the settings listed in a specific menu, or all the settings in all menus.
To restore the settings in a specific menu, open that menu, select Reset, and confirm as needed. (The example below shows how to reset the Image menu.)
To restore all the projector settings to their factory-default values, select the Reset menu, highlight Reset All, and press Enter.
Reset settingsfor current menu
Reset settings forall menus
noteWhen you select Reset All in the Reset menu, it does not reset the Input Signal, User’s Logo, Multi-screen, Language, Lamp Hours, or Network settings.

48 Fine-Tuning the Projector
Adjusting the Image You can use the Image menu to adjust the brightness, sharpness, color, tint, and contrast.
1. Press the Menu button on the projector or remote control and select the Image menu.
You see a screen similar to one of those below. (The settings will be different depending on the source you are projecting from.)
2. Use the pointer button to highlight the desired option, then adjust it as needed:
■ Color ModeLets you quickly adjust the color and brightness for various environments. Use either the remote control or the Color Mode setting in the Image menu. You can save a different setting for each source. See page 35 for more information on each color mode.
■ Brightness Lightens or darkens the overall image.
■ ContrastAdjusts the difference between light and dark areas.
■ Color SaturationAdjusts the color depth of the image.
■ TintAdjusts the balance of green to magenta in the image.
Computer/RGB Video Component Video/Composite Video/
S-Video
noteThe available settings vary depending on the input source selected.
noteThe Brightness setting changes the opacity of the projector’s LCD panels. You can also change the lamp’s brightness. Select Brightness Control in the Settings menu, then choose High or Low (the default setting is High).
Fine-Tuning the Projector 49
■ SharpnessAdjusts the sharpness of the image.
■ Abs. Color Temp.Sets a color temperature between 5000 and 10000 °K. (Not available if sRGB is selected as the Color Mode setting.)
■ Color AdjustmentAdjusts the color values. For Customized color mode, select R, G, B, C, M, Y to adjust individual red, green, blue, cyan, magenta, and yellow hue, saturation, and brightness values. For other color modes, RGB may be selected to adjust red, green, and blue saturation values. (Not available if sRGB is selected as the Color Mode setting.)
Six-Axis Color Adjustment
For special projection material, such as high-quality photographs or artwork, you can adjust the hue, saturation, and brightness for six different color axes.
1. Follow the instructions on page 48 to open the Image menu and select Color Mode.
2. Press the Enter button to select Customized, then press Esc to return to the Image menu.
3. Select Color Adjustment and press Enter. You see hue, saturation, and brightness controls on the screen for six colors: R, G, B, C, M, Y (red, green, blue, cyan, magenta, and yellow).
4. Select the color axis you want to adjust and press Enter. You see color controls for hue, saturation, and brightness.
Hue changes the balance of color, and saturation changes the strength of the color.
5. Use the pointer button to adjust the hue, saturation, and brightness. You see the adjustments reflected on the screen. When you are satisfied with the color, press Esc.
6. Repeat steps 4 and 5 for each color axis you want to adjust.

50 Fine-Tuning the Projector
You may need to readjust the color as the lamp in your projector changes over time.
Adjusting Signal SettingsAlthough the projector normally detects and optimizes the input signal automatically, you can use the Signal menu to make manual adjustments. In addition to changing the position of the projected image, you can correct tracking and sync for computer images, or change the aspect ratio to widescreen format for video images.
1. Press the Menu button and select the Signal menu.
You see a screen similar to one of those below. (The settings will be different depending on the source you are projecting from.)
2. Use the pointer button to highlight the desired option, then adjust it as needed:
■ Auto Setup Leave this setting On to automatically optimize computer images. Turn it off if you want to save adjustments you have made to the Tracking, Sync, and Position settings.
■ ResolutionSet to Auto to have the projector automatically identify the resolution of the input signal. If necessary (because some of the image is missing, for example), adjust to Wide or Normal. You can also select Manual and specify a resolution.
Computer/RGB Video Component Video/S-Video
Fine-Tuning the Projector 51
■ Tracking Adjust this value to eliminate vertical stripes in computer images.
■ SyncAdjust this value if computer images appear blurry or flicker.
■ PositionIf the image is slightly cut off on one or more sides, it may not be centered exactly. Select this setting and use the pointer button to center it.
■ ProgressiveFor composite video, S-video, and component video signals only. Turn this setting on to convert interlaced signals into progressive signals (best for still images). Select Video for viewing general video images. Select Film/Auto for movie images, CG, and animated images. Leave the setting Off for moving images.
■ Noise ReductionSmooths out rough images. Select your favorite setting. Epson recommends that you select Off when viewing image sources with very low noise, such as DVDs.
■ Input SignalIf the colors don’t look right on the Auto setting, select the setting for the type of equipment you’ve connected to the Computer1 or Computer2 ports. Choose RGB for a computer or RGB-video connection, and Component for a video player that outputs a component video signal (with connectors labeled Y/Cb/Cr or Y/Pb/Pr).
noteYou can also use the remote control’s Auto button to automatically reset the projector’s Tracking, Sync, and Position settings. See page 89 for details.
noteThe Noise Reduction setting cannot be set for digital RGB signals.

52 Fine-Tuning the Projector
■ Video Signal Select the setting for the type of equipment you’ve connected to the Video1 or Video2 ports. Leave this setting at Auto unless you are using a 60-Hz PAL system (then select PAL60).
■ AspectSets the image’s aspect ratio (ratio of width to height). Depending on your projector model and input source, you can select Normal, 4:3, 16:9, or Through; see page 36 for more information.
Customizing Projector FeaturesYou can use the Settings menu to lock the buttons on the projector, adjust audio volume, and customize several other features.
■ Keystone Adjusts the shape of the image if the projector has been tilted upward or placed at an angle to the screen.
Select H/V-Keystone to correct horizontal and vertical keystone distortion.
Select Quick Corner to adjust the shape and position of the projected image.

Fine-Tuning the Projector 53
■ Control Panel LockLets you disable all of the buttons on the projector, or all of the buttons except the Ppower button. See page 58 for more information.
■ Pointer ShapeLets you choose from three pointer shapes. See page 41 for more information.
■ Brightness ControlLets you select from two levels of brightness. The Low setting reduces power consumption and noise, and extends the lamp’s operating life.
■ VolumeRaises or lowers the volume if you have connected optional external speakers.
■ Remote ReceiverDeactivates the projector’s front and/or back sensors that detect signals from the remote control. Use this setting to prevent use of the remote control or to stop interference from bright fluorescent lights.
■ User ButtonYou can assign one of the following six menus to the User button: Brightness Control, Info, Progressive, Test Pattern, Multi-screen, or Resolution. By pressing the button, the assigned menu item selection/adjustment screen is displayed, allowing you to make one-touch settings/adjustments.
■ Test PatternDisplays a test pattern for use when adjusting the zoom and focus, and when performing keystone correction.
noteYou can also adjust the volume using the remote control.
54 Fine-Tuning the Projector
Using the Projector Security FeaturesTo prevent unauthorized use of the projector, you can do the following:
■ Assign a password. You can use the password to prevent the projector from being turned on, prevent your custom startup screen from being changed, and lock network settings.
■ Create a custom screen that is displayed at startup and/or when the A/V Mute button is pressed. The screen can be locked with a password to discourage theft and provides a way to identify the projector should it be stolen. See page 56.
■ Disable the projector’s buttons; this is useful, for example, if you’re projecting in a classroom and you want to ensure that no one touches the projector’s buttons while you’re using the remote control. See page 58.
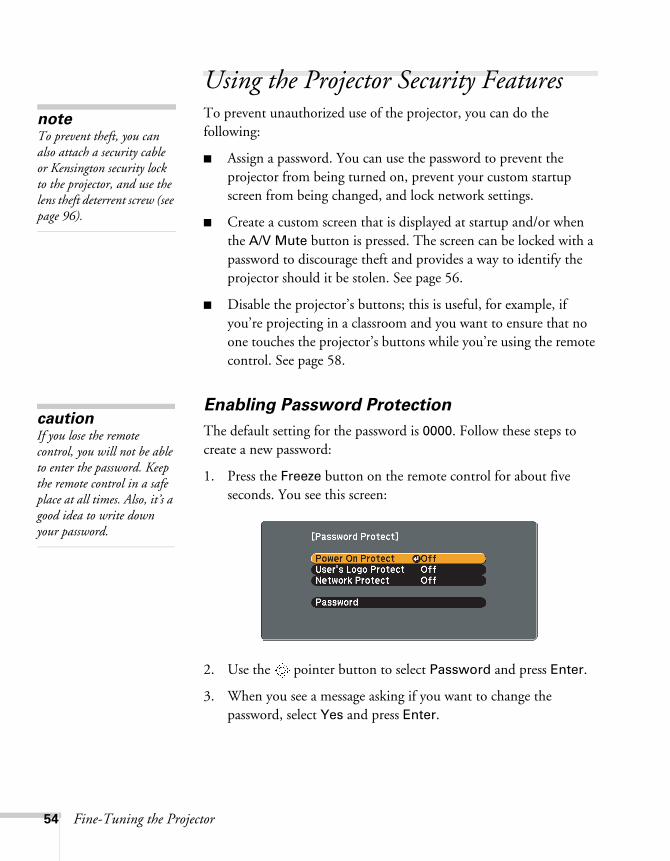
Enabling Password Protection
The default setting for the password is 0000. Follow these steps to create a new password:
1. Press the Freeze button on the remote control for about five seconds. You see this screen:
2. Use the pointer button to select Password and press Enter.
3. When you see a message asking if you want to change the password, select Yes and press Enter.
noteTo prevent theft, you can also attach a security cable or Kensington security lock to the projector, and use the lens theft deterrent screw (see page 96).
cautionIf you lose the remote control, you will not be able to enter the password. Keep the remote control in a safe place at all times. Also, it’s a good idea to write down your password.
Fine-Tuning the Projector 55
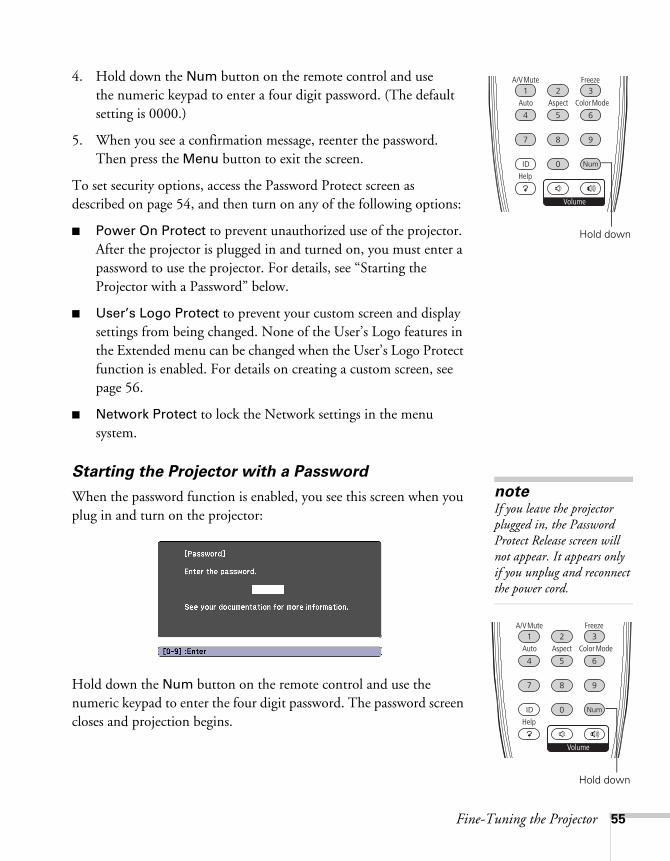
4. Hold down the Num button on the remote control and use the numeric keypad to enter a four digit password. (The default setting is 0000.)
5. When you see a confirmation message, reenter the password. Then press the Menu button to exit the screen.
To set security options, access the Password Protect screen as described on page 54, and then turn on any of the following options:
■ Power On Protect to prevent unauthorized use of the projector. After the projector is plugged in and turned on, you must enter a password to use the projector. For details, see “Starting the Projector with a Password” below.
■ User’s Logo Protect to prevent your custom screen and display settings from being changed. None of the User’s Logo features in the Extended menu can be changed when the User’s Logo Protect function is enabled. For details on creating a custom screen, see page 56.
■ Network Protect to lock the Network settings in the menu system.
Starting the Projector with a Password
When the password function is enabled, you see this screen when you plug in and turn on the projector:
Hold down the Num button on the remote control and use the numeric keypad to enter the four digit password. The password screen closes and projection begins.
Hold down
noteIf you leave the projector plugged in, the Password Protect Release screen will not appear. It appears only if you unplug and reconnect the power cord.
Hold down

56 Fine-Tuning the Projector
If the password is not correct, you see a message prompting you to re-enter the password. If you enter an incorrect password three times in succession, you see the message The projector’s operation will be locked and the projector switches to standby mode. Disconnect the projector’s power cord from the electrical outlet, reconnect it, and turn the projector back on.
When you see the Password screen again, you can try to enter the correct password.
If you enter an incorrect password 30 times in succession, the projector remains locked and you must contact Epson to unlock it.
If you have forgotten the password, contact Epson with the request code number that appears in the Password screen for assistance. See “Where To Get Help” on page 93.
Creating Your Own Startup Screen
You can transfer any image from your computer or video source to the projector and then use it as your startup screen. You can also use it as the screen displayed when the projector is not receiving a signal or when you press the A/V Mute button. The image can be a company logo, slogan, photograph, or any other image you want to use.

Fine-Tuning the Projector 57
Capturing the Image
Start by displaying the image you want to use from either a computer or video source, such as a DVD player or digital camera. Then follow these steps to capture the image and transfer it to the projector:
1. Press the Menu button on the remote control, highlight the Extended menu, and press Enter.
2. Highlight User’s Logo and press Enter.
3. When you see the message Choose this image as the User’s Logo?, select Yes and press Enter. A selection box displays over the image.
4. Use the pointer button to select the area of the image you want to use. Then press Enter.
5. When you see the message Select this image?, highlight Yes and press Enter.
6. Use the arrow buttons to select a zoom factor (display size) and press Enter.
7. When the message Save this image as the User’s Logo? appears, select Yes and press Enter. Saving the logo may take a few moments. Do not use your projector, remote control, or video source while the logo is being saved.
8. When you see the message Completed, press Menu to exit.
noteWhen you choose an image for the user’s logo, it erases any previously used image. You can save an image up to 300 × 400 pixels in size. Once you have saved a new user’s logo, you cannot return to the factory default logo.

58 Fine-Tuning the Projector
Choosing When to Display the Image
After your image is saved, you can set it to display as the startup screen, the screen you see when there’s no signal, or the screen you see when you press the A/V Mute button (see page 39).
1. Press the Menu button, highlight the Extended menu, and press Enter.
2. Select Display and press Enter.
3. Choose from these display options:
■ Set Display Background to Logo to display your image when there is no signal.
■ Set Startup Screen to On to display your image when the projector is warming up.
■ Set A/V Mute to Logo to display your image when you press the A/V Mute button.
4. When you’re finished, press Menu to exit.
Disabling the Projector’s Buttons
When you enable the Control Panel Lock function, you can lock all of the projector’s buttons, or all of the buttons except the Ppower button. The remote control can still be used to operate the projector.
1. Press the Menu button, highlight the Settings menu, and press Enter.
2. Select Control Panel Lock and press the Enter button.
3. Select Full Lock (to lock all projector buttons) or Partial Lock (to lock all buttons except the Power button) and press Enter.
4. Select Yes and press Enter to confirm the setting.
5. Press the Menu button to exit.
To disable the Control Panel Lock function, select Off in the Control Panel Lock menu. Or press and hold the Enter button on the projector’s control panel for 7 seconds. A message is displayed and the lock is released.
noteYou can lock these settings to prevent them from being changed without a password (see page 54).

Fine-Tuning the Projector 59
Customizing Power and OperationYou can use the Extended menu to customize the way the projector displays images, enable quick startup, turn sleep mode on or off, and customize other projector operations.
■ DisplayUse this setting to turn off the display of messages, change the background color, enable logo display, or turn off the startup screen display.
■ Closed CaptionEnables or disables closed captions. Select CC1, CC2, or OFF. The captions are not visible when the menu is displayed or when you use EMP Monitor to access the projector through your network.
■ User’s LogoCreate a custom startup screen, as described on page 56.
■ Projection Select Front (to project from the front of a screen and right side up), Front/Ceiling (when the projector is mounted upside-down from the ceiling), Rear (to project from behind onto a transparent screen), or Rear/Ceiling (to project from behind onto a transparent screen when the projector is mounted upside-down from the ceiling).
noteIf you hold down the A/V Mute button on the remote control for about five seconds, you switch between Front and Front/Ceiling or Rear and Rear/Ceiling.

60 Fine-Tuning the Projector
■ OperationEnable Direct Power On if you want to be able to start the projector when you connect the power cord (without pressing the Ppower button). Enable Sleep Mode if you want the projector to turn off automatically if it is idle (and no signal is received) for 10 minutes (you can adjust the amount of time using the Sleep Mode Timer setting). Enable High Altitude Mode when you are using the projector above 4,900 feet (1,500 meters).
■ Standby ModeSelect Network On to enable monitoring of the projector over a network when it is in standby mode (the power light is orange).
■ Projector IDLets you assign a numeric ID to each projector. When you are using multiple projectors, you can use the ID to select the one you want to operate with the remote control. See page 43 for instructions.
■ Multi-screenUse this option if you want to color-match two or more projectors that are being used to display images near each other. You can make image adjustments at each of five adjustment levels. First choose an Adjustment Level and then adjust the settings for each level: Brightness Correct to adjust the brightness, and Color Correct to adjust the balance between red and green, or blue and yellow. See page 61 for more information about multi-screen color adjustment.
■ Language Select from 27 languages to be used for the projector menus.
noteIf a power outage occurs when Direct Power On is enabled and the power cord is connected, the projector will start when the power is restored.
Do not use the projector at altitudes above 7,500 feet (2,286 meters).

Fine-Tuning the Projector 61
Multi-screen Color AdjustmentYou can match the color of projected images when two or more projectors are being used to display images near each other. For each screen, you can set five levels of brightness and color correction.
1. Before starting, you may want to assign a numeric ID to each projector. This lets you use the remote control to select the projector you want to adjust. See page 43 for instructions.
To match the display colors as closely as possible, make sure that all the projectors are set to the same color mode before starting. See page 48 for instructions.
2. Press the Menu button on the remote control. You see the projector’s menu screen.
3. Press the Menu button, highlight the Extended menu, and press Enter.
4. Select Multi-screen and press Enter.
5. Start by setting the Adjustment Level to 1 for two projectors. Then use Brightness Correct to match the darker projector to the lighter one. Press Enter to see the effects of your adjustments.
6. Next, adjust the brightness of Level 5 for the same two projectors. Match the brighter projector to the darker one.
7. Adjust and match the brightness of Levels 2, 3, and 4.
8. Adjust and match the G/R color correction for all levels. Then adjust and match the B/Y correction for all levels.
9. If you are using three or more projectors, repeat steps 5 through 8 to match projector 3 to projector 2, then match projector 4 to projector 3, and so on.
cautionIf you use two or more projectors side-by-side, exhaust from adjacent projectors might cause overheating. Leave at least 2 feet (60 centimeters) of space between projectors.

62 Fine-Tuning the Projector
Projector Menu and Options ListThe table below summarizes the options you can select based on the projector menu you are viewing. Some options may not be available depending on the input source you are using.
For more information on these menus and options, read this chapter.
Menu Options
Image Color ModeBrightnessContrastColor SaturationTintSharpnessAbs. Color Temp.Color AdjustmentReset
Signal Auto SetupResolutionTrackingSync.PositionProgressiveNoise ReductionInput SignalVideo SignalAspectReset
Settings KeystoneControl Panel LockPointer ShapeBrightness ControlVolumeRemote ReceiverUser ButtonTest PatternReset
Fine-Tuning the Projector 63
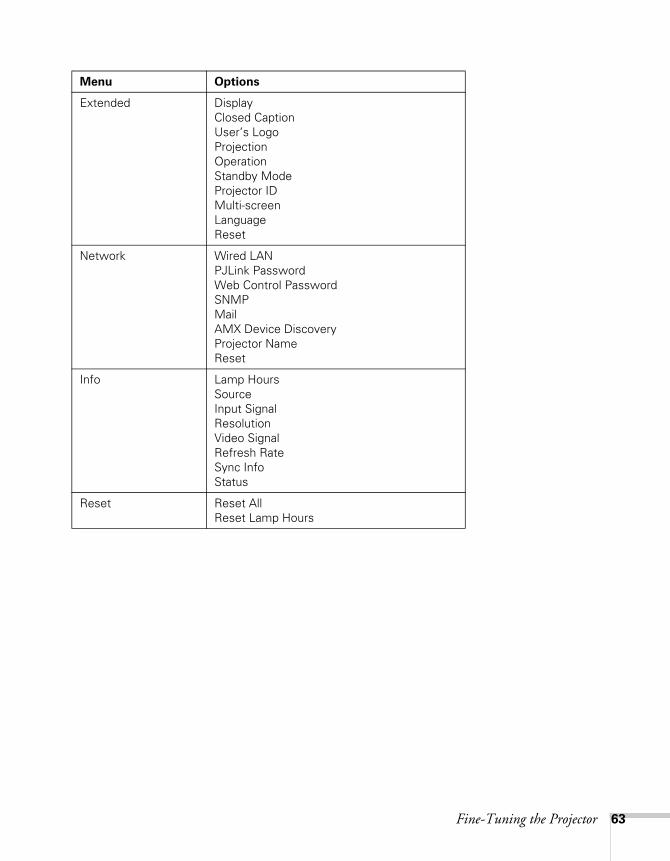
Extended DisplayClosed CaptionUser’s LogoProjectionOperationStandby ModeProjector IDMulti-screenLanguageReset
Network Wired LANPJLink PasswordWeb Control PasswordSNMPMailAMX Device DiscoveryProjector NameReset
Info Lamp HoursSourceInput SignalResolutionVideo SignalRefresh RateSync InfoStatus
Reset Reset AllReset Lamp Hours
Menu Options

64 Fine-Tuning the Projector

65
5
Managing ProjectorsThe software included with your projector lets you monitor and control your projectors from a remote computer.
First connect and configure each projector you want to monitor. You can connect the projector over a wired network as described in this chapter.
Once you’ve connected the projectors to the network, you can use any of these tools to manage your projectors:
■ Use EMP Monitor (available for Windows® only) to see your projectors’ status, switch image sources, turn projectors on and off, control basic settings, and register projectors and projector groups. See the EMP Monitor Operation Guide for more information.
■ Use the mail notification function to receive e-mail alerts about possible problems. See page 67 for more information.
This chapter covers the following information:
■ Connecting your projector to a wired network
■ Using e-mail alerts to warn you of problems
Connecting to a Wired NetworkFollow these steps to connect the projector to your network and configure it with an IP address:
1. Connect the projector to your network using a commercially available 100BaseTX or 10BaseT network cable. Connect the cable to the LAN port on the projector. See page 23.
2. Turn on the projector.

66 Managing Projectors
3. Press the Menu button on the remote control, select the Network menu, then press Enter. You see the following screen:
4. Choose Wired LAN and press Enter.
5. Do one of the following:
■ If your network assigns addresses automatically, turn on the DHCP setting.
■ If your network does not assign addresses automatically, turn off DHCP and enter the projector’s IP Address, Subnet Mask, and Gateway Address.
To enter numbers, use the pointer button on the remote control to highlight the number you want to input, then press Enter.
6. When you’re done making all necessary changes, select Return, Setup complete, and then Yes to confirm that you want to save the changes. Press Menu to exit.
noteIf you’re a network administrator, you can use the SNMP option to enter a trap IP address. This lets you receive trap alerts for the projectors you’re monitoring.
Managing Projectors 67
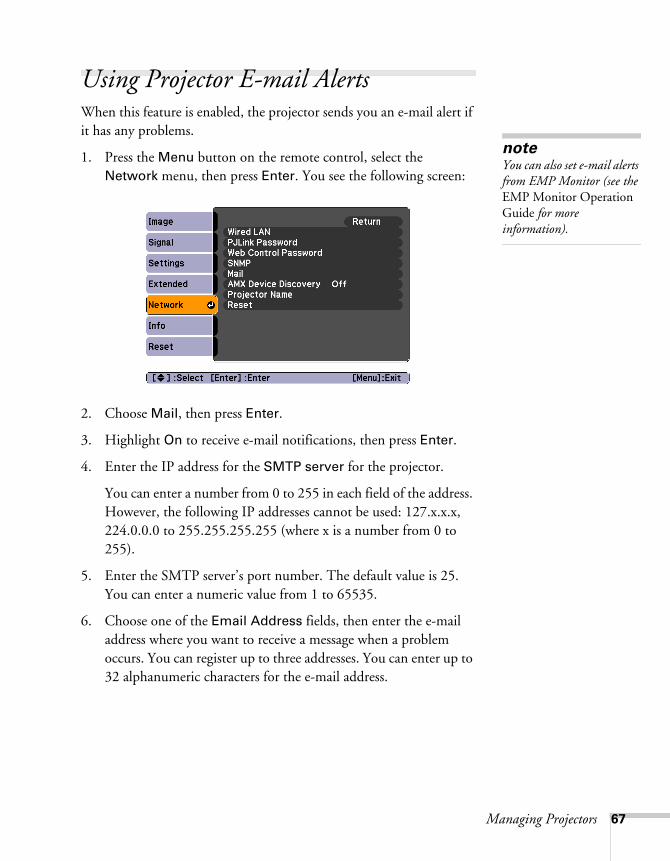
Using Projector E-mail AlertsWhen this feature is enabled, the projector sends you an e-mail alert if it has any problems.
1. Press the Menu button on the remote control, select the Network menu, then press Enter. You see the following screen:
2. Choose Mail, then press Enter.
3. Highlight On to receive e-mail notifications, then press Enter.
4. Enter the IP address for the SMTP server for the projector.
You can enter a number from 0 to 255 in each field of the address. However, the following IP addresses cannot be used: 127.x.x.x, 224.0.0.0 to 255.255.255.255 (where x is a number from 0 to 255).
5. Enter the SMTP server’s port number. The default value is 25. You can enter a numeric value from 1 to 65535.
6. Choose one of the Email Address fields, then enter the e-mail address where you want to receive a message when a problem occurs. You can register up to three addresses. You can enter up to 32 alphanumeric characters for the e-mail address.
noteYou can also set e-mail alerts from EMP Monitor (see the EMP Monitor Operation Guide for more information).

68 Managing Projectors
7. Select problems or warnings to be notified about by e-mail. (Numbers 1 through 3 in this section correspond to the e-mail addresses you entered.)
8. When you’re done making all necessary changes, select Return, select Setup complete, and then select Yes to confirm that you want to save the changes. Press Menu to exit the menu system.
When the selected problem or warning occurs, an e-mail message is sent to the specified notification addresses. The subject line of the e-mail is EPSON Projector. The e-mail includes the following information:
■ Line 1: The name of the projector where the problem has occurred
■ Line 2: The IP address of the projector where the problem has occurred
■ Line 3: Details of the problem
noteIf a critical problem develops with a projector which causes it to suddenly stop working, it may not be possible for the projector to send a message.
If Standby Mode is set to Network On in the Extended menu, the projector can still be monitored even if the projector is in standby mode (when the power is off).

69
6
Maintaining the ProjectorYour projector needs little maintenance. All you have to do is keep the lens clean. You may also need to clean the air filter and vent. A clogged air filter or vent can block ventilation needed to cool the projector.
The only parts you should replace are the lamp and air filter. If any other part needs replacing, contact your dealer or a qualified servicer.
This chapter covers the following:
■ Cleaning the lens
■ Cleaning the projector case
■ Cleaning the air filter
■ Replacing the air filter
■ Replacing the lamp
■ Replacing the remote control batteries
■ Transporting the projector
warningBefore you clean any part of the projector, turn it off and unplug the power cord. Never open any cover on the projector, except the lamp cover. Dangerous electrical voltages in the projector can injure you severely. Do not try to service this product yourself, except as specifically explained in this User’s Guide. Refer all other servicing to qualified service personnel.

70 Maintaining the Projector
Cleaning the LensClean the lens whenever you notice dirt or dust on the surface.
To remove dirt or smears on the lens, use a commercially available cloth for cleaning glasses.
Cleaning the Projector CaseBefore you clean the case, turn off the projector and unplug the power cord.
■ To remove dirt or dust, wipe the case with a soft, dry, lint-free cloth.
■ To remove stubborn dirt or stains, moisten a soft cloth with water and a neutral detergent and firmly wring the cloth dry. Then wipe the case.
Cleaning the Air Filter Your projector includes an air filter to ensure the best performance. If dust collects on the air filter (on the side of the projector), clean it as described below. Dust clogs prevent proper ventilation and can cause overheating, which can damage the projector.
Follow these steps:
1. Turn off the projector and unplug the power cord.
2. Grip the air filter cover tab and remove the air filter cover as shown.
cautionDo not rub the lens with harsh materials or subject the lens to shocks, as it can easily become damaged.
cautionDo not use wax, alcohol, benzene, paint thinner, or other chemical detergents. These can damage the case.
noteTo order replacement air filters, request part number V13H134A17. See page 10 for ordering information.

Maintaining the Projector 71
3. Place your finger into the groove and remove the air filter as shown.
4. With the front of the air filter facing down, tap it four or five times to shake off the dust. Turn it over and tap the other side in the same way to shake off the dust.
5. To clean any dust remaining on the air filter, use a small vacuum cleaner designed for computers and other office equipment to clean the front. If you don’t have one, gently clean the vent with a soft brush (such as an artist’s paintbrush).

72 Maintaining the Projector
6. Insert the air filter back into the holes in the cover, then press it firmly into place.
7. Slide the air filter cover in until you feel resistance.
8. If the dirt is difficult to remove or the filter is broken, replace the filter as described on page 73. Contact your dealer or call Epson at 800-GO-EPSON (800-463-7766) to obtain a new filter.
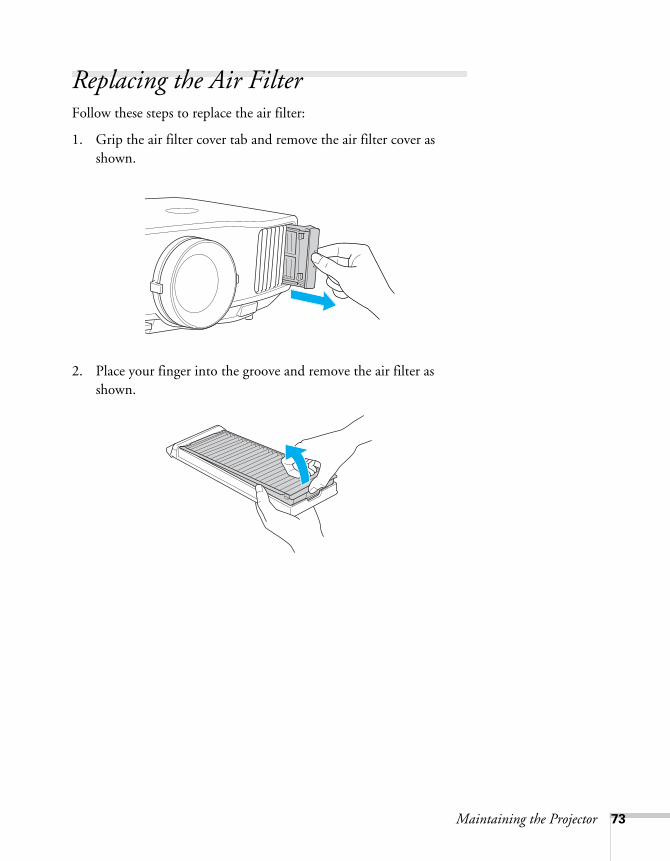
Maintaining the Projector 73
Replacing the Air FilterFollow these steps to replace the air filter:
1. Grip the air filter cover tab and remove the air filter cover as shown.
2. Place your finger into the groove and remove the air filter as shown.
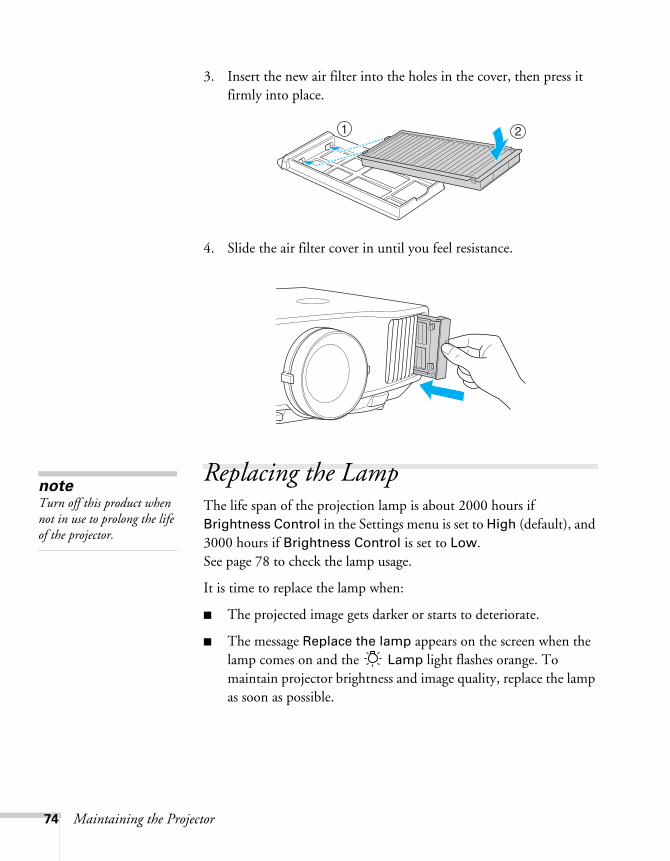
74 Maintaining the Projector
3. Insert the new air filter into the holes in the cover, then press it firmly into place.
4. Slide the air filter cover in until you feel resistance.
Replacing the LampThe life span of the projection lamp is about 2000 hours if Brightness Control in the Settings menu is set to High (default), and 3000 hours if Brightness Control is set to Low. See page 78 to check the lamp usage.
It is time to replace the lamp when:
■ The projected image gets darker or starts to deteriorate.
■ The message Replace the lamp appears on the screen when the lamp comes on and the Lamp light flashes orange. To maintain projector brightness and image quality, replace the lamp as soon as possible.
noteTurn off this product when not in use to prolong the life of the projector.

Maintaining the Projector 75
You may also need to replace the lamp if the Lamp light flashes red. See page 83.
Contact your dealer or call Epson at 800-GO-EPSON (800-463-7766). Request part number V13H010L47.
Follow these steps to replace the lamp:
1. Turn off the projector and, after the projector beeps twice, unplug the power cord.
2. Let the projector cool for at least an hour (if it has been on). The lamp is extremely hot immediately after use.
3. Loosen the lamp cover screws (you don’t need to remove them). Then remove the lamp cover.
Lamp lightwarningLet the lamp cool fully before replacing it.
In the unlikely event that the lamp has broken, small glass fragments may be present and should be removed carefully to avoid injury. If the projector has been installed on the ceiling, you should stand to the side of the lamp cover, not underneath it.
If the lamp is used after the replacement period has passed, the possibility that the lamp may break increases. When a lamp replacement message appears, replace the lamp with a new one as soon as possible, even if it is still working.
noteEven when the lamp cover is removed, it is still attached to the projector to prevent it from falling when the projector is mounted on the ceiling.

76 Maintaining the Projector
4. Loosen the two screws holding the lamp in place (you can’t remove them).
5. Hold the lamp as shown and pull it straight out.
6. Gently insert the new lamp. (If it doesn’t fit easily, make sure it is facing the right way.)
7. Once the lamp is fully inserted, tighten its screws.
Loosen, but don’t remove these screws
noteThe lamp(s) in this
product contain mercury. Please consult your state and local regulations regarding disposal or recycling. Do not put in the trash.

Maintaining the Projector 77
8. Replace the lamp cover, then tighten its screws.
9. Reset the lamp timer as described in the next section.
Resetting the Lamp Timer
After you replace the lamp, you need to reset the lamp timer using the projector’s menu.
1. Press the Menu button on the remote control or on the projector’s control panel. You see the main menu.
2. Use the pointer button on the remote control (or the arrow buttons on the projector) to highlight Reset, then press Enter.
You see this screen:
3. Select Reset Lamp Hours and press Enter.
4. When you see the prompt, select Yes and press Enter.
5. When you’re finished, press Menu to exit.
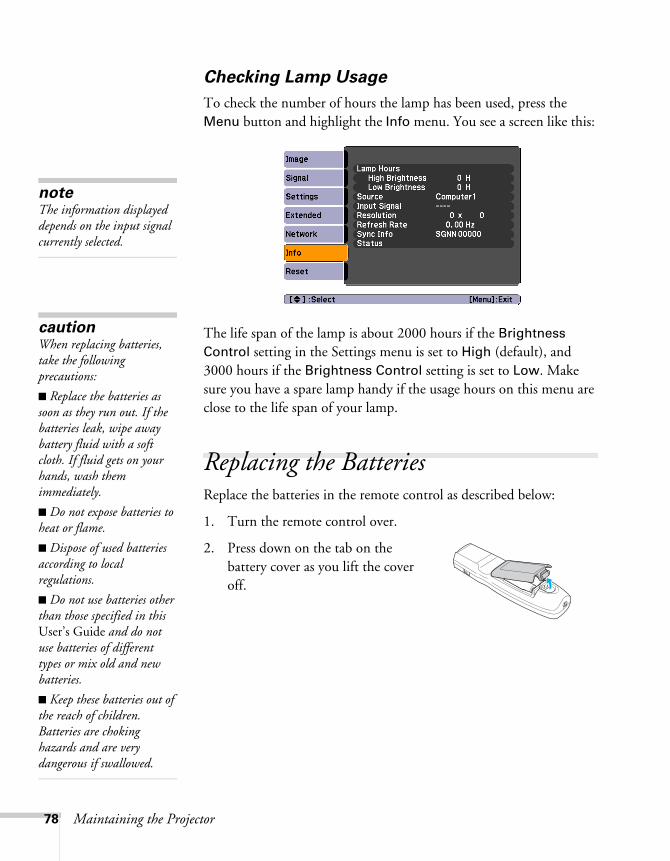
78 Maintaining the Projector
Checking Lamp Usage
To check the number of hours the lamp has been used, press the Menu button and highlight the Info menu. You see a screen like this:
The life span of the lamp is about 2000 hours if the Brightness Control setting in the Settings menu is set to High (default), and 3000 hours if the Brightness Control setting is set to Low. Make sure you have a spare lamp handy if the usage hours on this menu are close to the life span of your lamp.
Replacing the BatteriesReplace the batteries in the remote control as described below:
1. Turn the remote control over.
2. Press down on the tab on the battery cover as you lift the cover off.
noteThe information displayed depends on the input signal currently selected.
cautionWhen replacing batteries, take the following precautions:
■ Replace the batteries as soon as they run out. If the batteries leak, wipe away battery fluid with a soft cloth. If fluid gets on your hands, wash them immediately.
■ Do not expose batteries to heat or flame.
■ Dispose of used batteries according to local regulations.
■ Do not use batteries other than those specified in this User’s Guide and do not use batteries of different types or mix old and new batteries.
■ Keep these batteries out of the reach of children. Batteries are choking hazards and are very dangerous if swallowed.
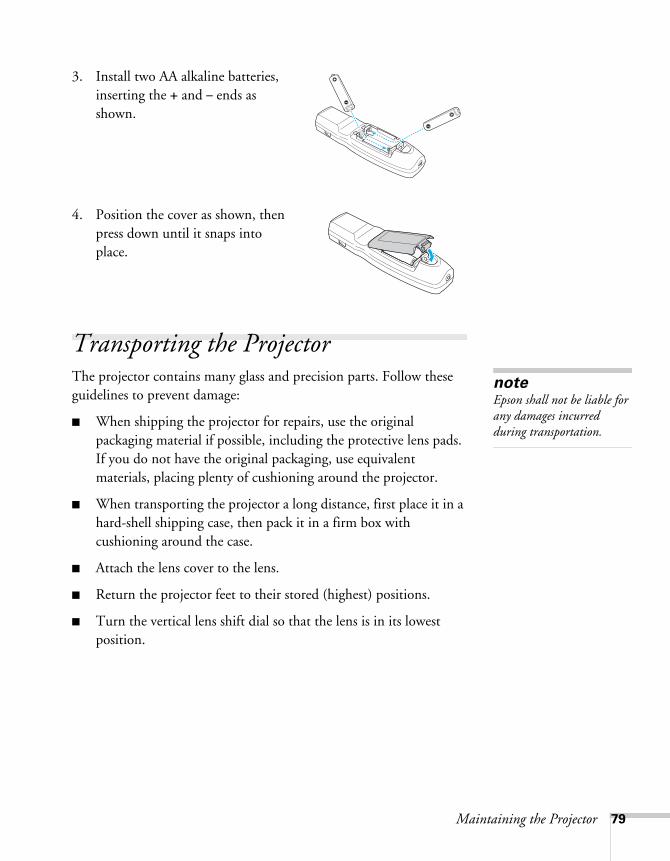
Maintaining the Projector 79
3. Install two AA alkaline batteries, inserting the + and – ends as shown.
4. Position the cover as shown, then press down until it snaps into place.
Transporting the ProjectorThe projector contains many glass and precision parts. Follow these guidelines to prevent damage:
■ When shipping the projector for repairs, use the original packaging material if possible, including the protective lens pads. If you do not have the original packaging, use equivalent materials, placing plenty of cushioning around the projector.
■ When transporting the projector a long distance, first place it in a hard-shell shipping case, then pack it in a firm box with cushioning around the case.
■ Attach the lens cover to the lens.
■ Return the projector feet to their stored (highest) positions.
■ Turn the vertical lens shift dial so that the lens is in its lowest position.
noteEpson shall not be liable for any damages incurred during transportation.

80 Maintaining the Projector

81
7
Solving ProblemsThis chapter helps you solve problems with your projector, and tells you how to contact technical support for problems you can’t solve yourself. The following information is included:
■ Using the projector’s on-screen help system
■ What to do when the projector’s status lights flash
■ Solving projector operation problems
■ Solving problems with the image or sound
■ Solving network problems
■ Solving problems with the remote control
■ Contacting technical support
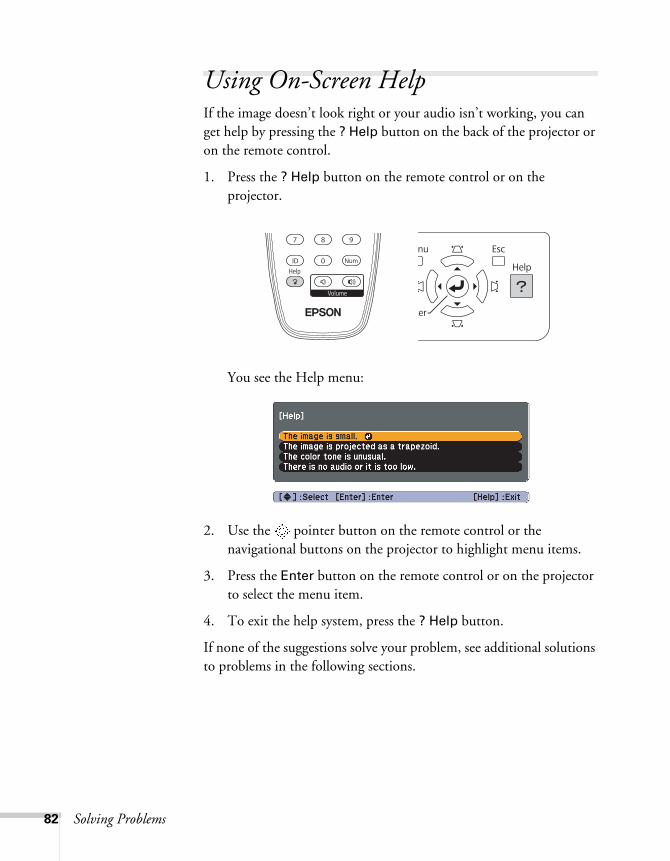
82 Solving Problems
Using On-Screen HelpIf the image doesn’t look right or your audio isn’t working, you can get help by pressing the ? Help button on the back of the projector or on the remote control.
1. Press the ? Help button on the remote control or on the projector.
You see the Help menu:
2. Use the pointer button on the remote control or the navigational buttons on the projector to highlight menu items.
3. Press the Enter button on the remote control or on the projector to select the menu item.
4. To exit the help system, press the ? Help button.
If none of the suggestions solve your problem, see additional solutions to problems in the following sections.

Solving Problems 83
Checking Projector StatusIf your projector isn’t working correctly, first turn it off and unplug it. Then plug the power cord back in and turn on the projector. If this doesn’t solve the problem, check the lights on top of the projector.
What To Do When the Lights Flash
The lights on top of the projector indicate the projector’s status.
Refer to the following table for a complete description of the projector’s status lights:
Temperature lightLamp light
Power light
Status lights
Light Status Description
Orange The projector is in sleep or standby mode. You can unplug it or press the P power button to turn it on.
Flashing green The projector is warming up. Wait for the image to appear.
Green The projector is operating normally.
Flashing orange The projector is cooling down. You can’t turn it back on (and you should not unplug it) until the light stops flashing and remains orange.
The projector is setting itself up for network monitoring.
Red or flashing red
There is a problem with the projector. Check the other two lights and the information on page 84 to diagnose the problem.

84 Solving Problems
Flashing orange It’s time to replace the lamp. See page 74 for instructions. If you continue to use the lamp after the replacement warning, there is an increased possibility that the lamp may break.
Flashing orange Rapid cooling is in progress. Although this is not an abnormal condition, projection will stop automatically if the temperature rises higher. Make sure there is plenty of space around and under the projector for ventilation, and that the air filter and vents are clear.
Red The projector is overheating, which turns the lamp off automatically. Wait until the projector switches to standby mode (about 5 minutes). Make sure the room temperature is not above 95 °F (35 °C), and there is plenty of space around and under the projector for ventilation.
The air filter may be clogged. Clean or replace the air filter as described on pages 70 to 74.
If you’re using the projector above an altitude of 4,900 feet (1,500 meters), turn on High Altitude Mode in the Operation menu (see page 60).
If the projector continues to overheat after you clean the air filter, the problem may be caused by damage to the cooling fan or temperature sensor. Contact Epson for help as described on page 93.
Warning: Except as specifically explained in this User’s Guide, do not attempt to service this product yourself.
Flashing red Power is cut off because of an internal problem. Unplug the power cord and contact Epson for help, as described on page 93.
Flashing red There is a problem with the fan or temperature sensor. Stop using the projector, disconnect the power cord, and contact Epson as described on page 93.
Flashing red The lamp may be burnt out. First make sure the lamp cover is securely installed. If that’s not the problem, the air filter may be clogged. Clean or replace the air filter as described on pages 70 to 74.
If this does not resolve the problem, let the lamp cool and then remove it. If the lamp is cracked, replace it as described on page 74. If the lamp is not cracked, reinstall it. If reinstalling doesn’t work, replace the lamp.
If you’re using the projector above an altitude of 4,900 feet (1,500 meters), turn on High Altitude Mode in the Operation menu (see page 60).
If none of these suggestions resolves the problem, contact Epson as described on page 93.
Status lights (continued)
Light Status Description

Solving Problems 85
Solving Projector Operation Problems
The power doesn’t turn on.
■ If the projector doesn’t turn on when you press the Ppower button, make sure the power cord is connected to the projector and plugged into a working electrical outlet.
■ The power cord may be defective. Disconnect the cord from the outlet and contact Epson as described on page 93.
■ If the Direct Power On function is enabled and you immediately plug the power cord back in after unplugging it, the power may not turn back on. Press the Ppower button to turn the projector back on.
The buttons on the projector don’t work.
If the Control Panel Lock function has been enabled, you can’t use the buttons on the projector. Try using the remote control instead (make sure it is set to the correct ID). See page 58 for information about the Control Panel Lock function.
Solving Problems With the Image or Sound
No image appears on the screen.
■ Check that the Ppower light is green, not flashing.
■ The projector may be in standby or sleep mode. If the Ppower light is orange, press the Ppower button to turn the projector on.
■ If the power was switched off and then on again, the projector may be cooling down. Wait until the Ppower light stops flashing and remains orange; then press the Ppower button again.
■ Press the A/V Mute button on the remote control to make sure the picture has not been turned off temporarily.
86 Solving Problems
■ The attached computer may be in sleep mode or displaying a black screen saver. Try pressing a key on the computer.
■ If you are projecting from a DVD player or other video source, make sure you turn it on and press its Play button.
■ If you are projecting from a video source, make sure the Video Signal setting is correct (see page 50).
■ You can also try resetting all of the configuration menu settings. See page 47.
You’ve connected a computer and see a blue screen with the message No Signal displayed.
■ Make sure the cables are connected correctly, as described on page 15.
■ If you’ve connected a computer and one or more video sources, you may need to press the Source Search button on the projector or one of the source buttons on the remote control to select the correct source. Allow a few seconds for the projector to sync up after pressing the button.
■ Make sure the power for your connected equipment is turned on.
If you’re using a PC notebook:
■ Hold down the Fn key on the keyboard and press the function key that lets you display on an external monitor. It may have an icon such as , or it may be labelled CRT/LCD. Allow a few seconds for the projector to sync up after pressing it. Check your notebook’s manual or online help for details.
On most systems, the key lets you toggle between the LCD screen and the projector, or display on both at the same time.
If you connect the notebook while the projector or computer are already turned on, the function Fn key that changes the computer’s image signal to external output may not work. Turn the computer and the projector off and then back on.

Solving Problems 87
■ Depending on your computer’s video card, you might need to use the Display utility in the Control Panel to make sure that both the LCD screen and external monitor port are enabled. See your computer’s documentation or online help for details.
If you’re using Mac OS X:
1. Open System Preferences.
2. Click Displays.
3. Click Detect Displays.
4. Make sure the VGA Display or Color LCD dialog box is selected.
5. Click the Arrangement or Arrange tab.
6. Make sure the Mirror Displays checkbox is selected.
The message Not Supported is displayed.
■ Make sure the correct input signal is selected in the Signal menu (see page 50).
■ Make sure your computer’s resolution and frequency or refresh rate is supported by the projector (see page 101). If necessary, change your computer’s settings.
Only part of the computer image is displayed.
■ Press the Auto button on the remote control or the Enter button on the projector.
■ Make sure the image Position setting is correct in the Signal menu. See page 51 for more information.
■ Press the Aspect button on the remote control.
■ Press the Esc button on the remote control to cancel the E-Zoom function.
■ Make sure your computer’s resolution setting is correct. See the compatible video formats listed on page 101.
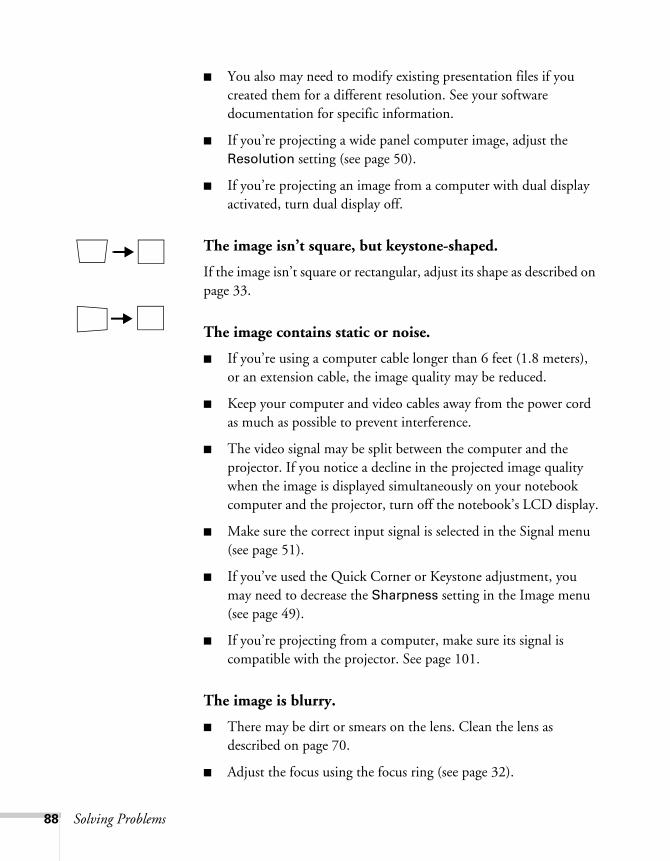
88 Solving Problems
■ You also may need to modify existing presentation files if you created them for a different resolution. See your software documentation for specific information.
■ If you’re projecting a wide panel computer image, adjust the Resolution setting (see page 50).
■ If you’re projecting an image from a computer with dual display activated, turn dual display off.
The image isn’t square, but keystone-shaped.
If the image isn’t square or rectangular, adjust its shape as described on page 33.
The image contains static or noise.
■ If you’re using a computer cable longer than 6 feet (1.8 meters), or an extension cable, the image quality may be reduced.
■ Keep your computer and video cables away from the power cord as much as possible to prevent interference.
■ The video signal may be split between the computer and the projector. If you notice a decline in the projected image quality when the image is displayed simultaneously on your notebook computer and the projector, turn off the notebook’s LCD display.
■ Make sure the correct input signal is selected in the Signal menu (see page 51).
■ If you’ve used the Quick Corner or Keystone adjustment, you may need to decrease the Sharpness setting in the Image menu (see page 49).
■ If you’re projecting from a computer, make sure its signal is compatible with the projector. See page 101.
The image is blurry.
■ There may be dirt or smears on the lens. Clean the lens as described on page 70.
■ Adjust the focus using the focus ring (see page 32).

Solving Problems 89
■ If the projector is angled sharply toward the screen, it may not be possible to focus the entire image. Move the projector to position it more directly in front of the screen.
■ Lower the projection angle to reduce the amount of keystone correction required.
■ Make sure the projector is within the proper range (projection distance) from the screen (see page 99).
■ Make sure the lens is not fogged by condensation. You may need to wait before using the projector after moving it from a cold environment to a warm environment.
■ If you’re projecting from a computer, you may need to adjust the tracking and sync settings as described in the next section.
You see vertical bands or the image still looks blurry after trying the solutions in the previous section.
■ If you’re projecting from a computer and displaying an image that contains a lot of fine detail, you may notice vertical bands or some of the characters may look heavy or blurred. Press the Auto button on the remote control or the Enter button on the projector to reset the projector’s Tracking, Sync, and Position settings.
■ If further adjustment is needed, you can fine-tune the Tracking and Sync settings manually using the Signal menu, as described on page 51.
1. Fill the screen with an image containing fine detail, such as a pattern to appear as your desktop background, or try projecting black text on a white background.
2. Adjust the Tracking to eliminate vertical bands.
noteYou must be projecting an image for the Auto button to have any effect. It works only with computer images projected through the VGA port.

90 Solving Problems
3. Adjust the Sync setting to increase the image sharpness.
The image is too light or dark, or colors are incorrect.
■ Use the Color Mode option in the projector’s Image menu to adjust the color (see page 48).
■ If you’re displaying video, adjust the Color Adjustment and Color Mode settings on the Image menu. You can also try adjusting the Color Saturation, ABS Color Temp, and Tint settings on the Image menu.
■ Try adjusting the Brightness and Contrast settings on the Image menu.
■ Try adjusting the Brightness Control setting (see page 52).
■ Check your computer display settings to correct the color balance.
■ The projector’s lamp may need to be replaced. See page 74 for instructions.
■ Make sure the correct input signal is selected in the Signal menu (see page 51).
■ Make sure that all cables are connected to the proper ports and connected securely.
There is no sound, or the sound is not loud enough.
■ In order to play sound, you must connect optional external speakers (see page 21).
■ Use the Volume buttons on the remote control to adjust the volume, or adjust the Volume setting in the Settings menu (see page 53).
■ Make sure A/V Mute is not enabled. (The A/V Mute button may have been pressed.)
noteBecause of the different technologies used, your projected image may not exactly match the colors on your notebook or computer monitor.

Solving Problems 91
■ If your presentation includes computer audio, make sure the volume control on your computer is not turned all the way down or muted. In Windows, you may be able to check this by clicking the volume control in your Windows system tray (lower right corner of the screen). On a Mac®, you may be able to adjust the volume from your menu bar (top right corner of the screen) or via the volume control function keys.
■ If you’re using a DVD player or other video source, make sure the cables are connected correctly, as described on page 21.
■ If you’re using a computer audio cable, make sure it is connected to your computer’s headphone jack or audio out jack. Connect the other end to the projector’s Audio port (beneath the Computer2 port) when the computer’s video cable is connected to the Computer1 or Computer2 ports.
Solving Network Problems
The projector does not send e-mail alerts even though the e-mail notification function has been turned on.
■ Make sure the mail notification function is set correctly in the configuration menu. See page 67.
■ Set Standby Mode to Network On in the Extended menu. Otherwise, the projector cannot send e-mails when it is in Standby mode (when the power is off).
■ If a critical problem develops with a projector which causes it to suddenly stop working, it may not be possible for the projector to send a message.
■ Make sure the projector is plugged in.
■ Make sure the LAN cable is connected correctly. Reconnect it if it is not connected or it is not connected correctly (see page 23).
For problems with EMP Monitor, see the EMP Monitor Operation Guide.

92 Solving Problems
Solving Problems With the Remote Control
The projector doesn’t respond to remote control commands.
■ Point the remote control towards the receiver.
■ Make sure the projector and remote control IDs match. To operate all projectors by remote control regardless of ID settings, set the ID switch on the side of the remote control to Off.
■ The remote control’s batteries may not be installed correctly or may be low on power. To change the batteries, see page 78.
■ Make sure you are within about 49 feet (15 meters) of the projector and within range of the projector’s front or back sensor.
■ Dim the room lights and turn off any fluorescent lights. Make sure the projector is not in direct sunlight. Strong lighting, especially fluorescent lights, may affect the projector’s infrared receivers. Also, turn off any nearby equipment that emits infrared energy, such as a radiant room heater. If necessary, use the Remote Receiver setting to disable the projector’s front or back sensor if it continues to pick up interference (see page 53).
■ Make sure the Remote Receiver setting isn’t disabling both of the projector’s sensors (see page 53).
■ If any buttons are held for longer than 30 seconds, the remote enters sleep mode. Release any button that is held to wake the remote.
■ When the optional remote control cable is connected, the remote control light-emitting area and the projector’s remote receiver are disabled. If you’re not using the cable, make sure it is disconnected from both the remote control and the projector.

Solving Problems 93
Where To Get HelpEpson provides these technical support services:
Internet Support
Visit Epson’s support website for solutions to common problems with the PowerLite G5000. You can download utilities and documentation, get FAQs and troubleshooting advice, or e-mail Epson with your questions.
Speak to a Support Representative
To use the Epson PrivateLine Support service, call (800) 637-7661 and enter the PIN on the included Epson PrivateLine Support card. This is the fastest way of speaking to a live representative, and it’s free. This service is available 6 AM to 6 PM, Pacific Time, Monday through Friday, for the duration of your warranty period.
You may also speak with a projector support specialist by dialing one of these numbers:
■ U.S.: (562) 276-4394, 6 AM to 6 PM, Pacific Time, Monday through Friday.
■ Canada: (905) 709-3839, 6 AM to 6 PM, Pacific Time, Monday through Friday.
Days and hours of support are subject to change without notice. Toll or long distance charges may apply.

94 Solving Problems
Before you call for support, please have the following information ready:
■ Product name (PowerLite G5000)
■ Product serial number (located on the projector)
■ Proof of purchase (such as a store receipt) and date of purchase
■ Computer or video configuration
■ Description of the problem
Purchase Supplies and Accessories
You can purchase screens and other accessories from an Epson authorized reseller. To find the nearest reseller, call 800-GO-EPSON (800-463-7766). Or you can purchase online at www.epsonstore.com (U.S. sales) or www.epson.ca (Canadian sales).
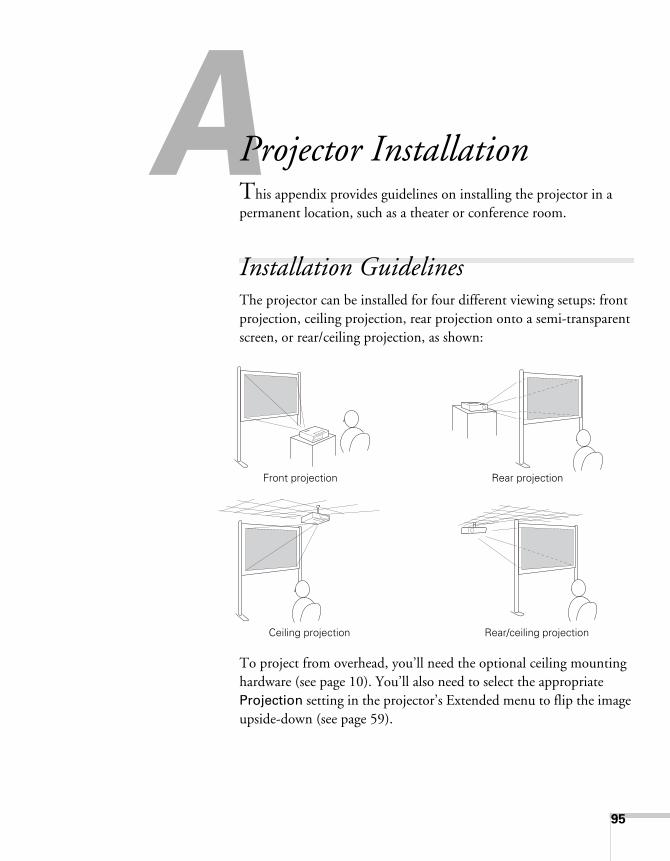
95
A
Projector InstallationThis appendix provides guidelines on installing the projector in a permanent location, such as a theater or conference room.
Installation GuidelinesThe projector can be installed for four different viewing setups: front projection, ceiling projection, rear projection onto a semi-transparent screen, or rear/ceiling projection, as shown:
To project from overhead, you’ll need the optional ceiling mounting hardware (see page 10). You’ll also need to select the appropriate Projection setting in the projector’s Extended menu to flip the image upside-down (see page 59).
Front projection Rear projection
Rear/ceiling projectionCeiling projection

96 Projector Installation
If you’re mounting the projector on the ceiling and you place it above screen level, you’ll have to tilt the projector down to position the image on the screen. This causes the image to lose its square shape. You can correct the image using the projector’s Quick Corner and/or Keystone functions, as described on page 33.
Security FeaturesThe projector includes security features to prevent its theft when installed or used in public locations:
■ Security cable attachment. You can attach a commercially available security cable as shown below to secure the projector to a table or ceiling mount.
■ Kensington security slot. The security slot (located above the power inlet) is compatible with the MicroSaver security systems manufactured by Kensington. You can purchase this lock from Epson (see page 10).
Security cable attachment
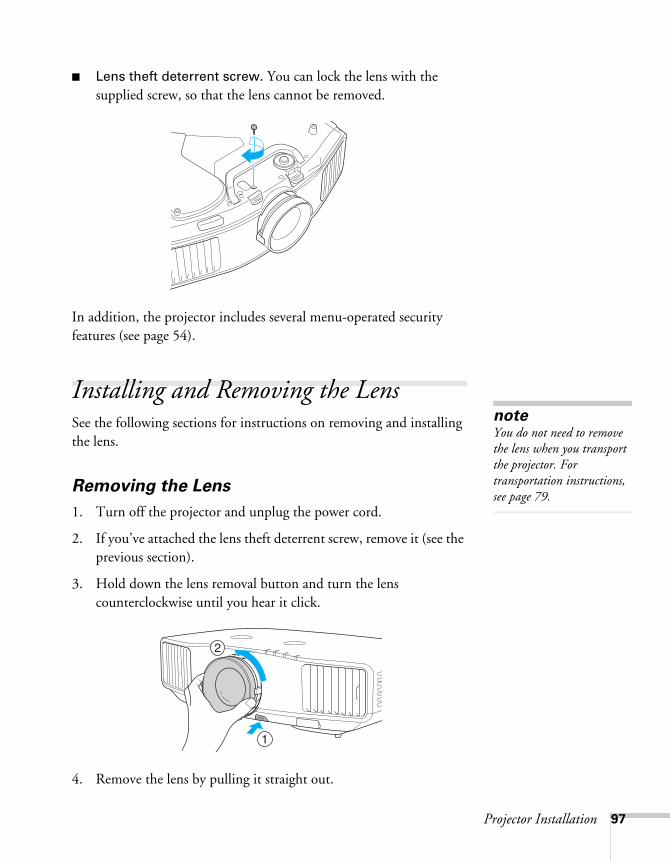
Projector Installation 97
■ Lens theft deterrent screw. You can lock the lens with the supplied screw, so that the lens cannot be removed.
In addition, the projector includes several menu-operated security features (see page 54).
Installing and Removing the LensSee the following sections for instructions on removing and installing the lens.
Removing the Lens
1. Turn off the projector and unplug the power cord.
2. If you’ve attached the lens theft deterrent screw, remove it (see the previous section).
3. Hold down the lens removal button and turn the lens counterclockwise until you hear it click.
4. Remove the lens by pulling it straight out.
noteYou do not need to remove the lens when you transport the projector. For transportation instructions, see page 79.

98 Projector Installation
Installing the Lens
1. Turn off the projector and unplug the power cord.
2. Turn the focus ring clockwise until it stops moving.
3. Make sure the white dot on the lens is facing up. Insert the lens straight into the projector, then turn clockwise until you hear it click into place.
4. If necessary, attach the lens theft deterrent screw (see page 97).
cautionOnly install or remove the lens when necessary. If dust enters the projector, projection quality may deteriorate and/or the projector may malfunction.
Do not install or remove the lens when the projector’s lens insertion section is facing up. Dust could enter the projector.
Do not touch the lens with your hand or fingers. If fingerprints or oils are left on the surface of the lens, projection quality will deteriorate.
White dot

99
B
Technical SpecificationsGeneral
Type of display Epson poly-silicon TFT active matrix
Resolution (native format) 1024 × 768 pixels (XGA)
Color reproduction 16.8 million colors
Brightness High mode:White light output 4000 lumens(ISO 21118 standard)Color light output 4000 lumensLow mode:White light output 3200 lumens(ISO 21118 standard)Color light output 3200 lumens
Contrast ratio 1000:1
Image size 30 to 300 inches (76.2 to 762 centimeters)
Projection distance 2.7 to 47.8 feet (0.8 to 14.6 meters)
Projection methods Front, rear, upside-down (ceiling mount)
Optical aspect ratio 4:3 (horizontal:vertical)
Zoom ratio 1:1.8
Noise level 29 dB in Low Brightness mode35 dB in High Brightness mode
Keystone correction ±40° vertical, ±20° horizontal
Mouse compatibility Requires optional Wireless IR Mouse Receiver (part number V12H007T16)

100 Technical Specifications
Projection Lamp
Type UHE (Ultra High Efficiency)
Power consumption 210 W
Lamp life Approx. 2000 hours (High Brightness mode)Approx. 3000 hours (Low Brightness mode)
Part number V13H010L47
Remote Control
Range 49.2 feet (15 meters)
Batteries (2) Alkaline AA
Dimensions
Height 5.3 inches (135 mm), feet retracted
Width 18.5 inches (470 mm)
Depth 13.3 inches (336.8 mm), without lens
Weight 14.5 lb (6.6 kg)
Electrical
Rated frequency 50/60 Hz AC
Power supply 100/240 VAC, 3.8A/1.7 A
Power consumption Operating: 100 to 120 VAC, 343 W220 to 240 VAC, 327 WStandby: 100 to 120 VAC, 0.4 W (network off)10 W (network on)220 to 240 VAC, 0.6 W (network off)12 W (network on)
noteLamp life will vary depending upon mode selected, environmental conditions, and usage. Brightness decreases over time.
Turn off this product when not in use to prolong the life of the projector.
Technical Specifications 101
Environmental
Temperature Operating: 32 to 104 °F (0 to 40 °C)32 to 95 °F (0 to 35 °C) (over 1,500 m/4,921 ft, with High Altitude Mode and High Brightness mode active)Storage: 14 to 140 °F (–10 to 60 °C)
Humidity(non-condensing) Operating: 20 to 80% RH
Operating altitude 0 to 9,843 feet (0 to 3,000 meters) (over 4,921 feet/1,500 meters, with High Altitude Mode active)
Safety and Approvals
United States FCC 47CFR Part 15B Class B (DoC)UL60950-1 First Edition (cTUVus Mark)
Canada ICES-003 Class BCSA C22.2 No. 60950-1
CE Marking EMC Directive (2004/108/EC)IEC 60950-1 First edition
Pixelworks™ DNX™ ICs are used in this projector.
Compatible Video Formats
The projector supports the high definition video and computer display formats listed beginning on page 102, as well as traditional NTSC, PAL, and SECAM video standards.
To project images output from a computer, the computer’s video card must be set at a refresh rate (vertical frequency) that’s compatible with the projector. Some images are automatically resized using Epson’s SizeWize™ technology to display in the projector’s native format. The frequencies of some computers may not allow images to display correctly; see your computer’s documentation for details.

102 Technical Specifications
Compatible video formats
Mode Refresh Rate (Hz) Resolution
VGA EGA* 70 640 × 350
VGA—60VESA—72*VESA—75*VESA—85*
60727585
640 × 480640 × 480640 × 480640 × 480
SVGA—56*SVGA—60SVGA—72*SVGA—75*SVGA—85*
5660727585
800 × 600800 × 600800 × 600800 × 600800 × 600
XGA—60*XGA—70*XGA—75*XGA—85*
60707585
1024 × 7681024 × 7681024 × 7681024 × 768
SXGA1—70*SXGA1—75*SXGA1—85*
707585
1152 × 8641152 × 8641152 × 864
WXGA—60WXGA—75*WXGA—85*
607585
1280 × 8001280 × 8001280 × 800
SXGA2—60SXGA2—75*SXGA2—85*
607585
1280 × 9601280 × 9601280 × 960
SXGA3—60SXGA3—75*SXGA3—85*
607585
1280 × 10241280 × 10241280 × 1024
WXGA1—60*WXGA2—60*
6060
1280 × 7681360 × 768
WXGA+60**WXGA+75**WXGA+85**
607585
1440 × 9001440 × 9001440 × 900
SXGA+60SXGA+75*SXGA+85*
607585
1400 × 10501400 × 10501400 × 1050
UXGA—60 60 1600 × 1200

Technical Specifications 103
*Analog only** Analog only, iMac must have a VGA output port
iMAC VGA**iMAC SVGA**iMAC XGA**MAC13*MAC16*MAC19*MAC19-60*MAC21*
11795756775755975
640 × 480800 × 6001024 × 768640 × 480832 × 6241024 × 7681024 × 7681152 × 870
NTSCNTSC 4:43PALN-PALM-PALPAL—60SECAM
60605050606050
———————
TV525i (480i)TV625i (576i)SDTV525p (480p)SDTV625p (576p)HDTV750p (720p)HDTV750p (720p)HDTV1125i (1080i)HDTV1125i (1080i)HDTV1125p (1080p)HDTV1125p (1080p)
60506050605060506050
——————————
Compatible video formats (continued)
Mode Refresh Rate (Hz) Resolution

104 Technical Specifications

105
C
NoticesThis appendix includes safety instructions and other important information about your projector.
Important Safety InstructionsFollow these safety instructions when setting up and using the projector:
■ Do not look into the lens when the projector is on. The bright light can damage your eyes.
■ Do not place the projector on an unstable cart, stand, or table.
■ Do not operate the projector on its side, or while tilted to one side. Do not tilt the projector forward or back at a greater angle than that specified for vertical keystone correction (see page 99).
■ If the projector is mounted on a ceiling, it should be installed by qualified technicians using mounting hardware designed for use with this projector.
■ If you use a ceiling mount and apply adhesives to the mount to prevent the screws from loosening, or if you use lubricants or oils on the projector, the projector case may crack and the projector may fall from its ceiling mount. This could cause serious injury to anyone under the mount and could damage the projector. When installing or adjusting a ceiling mount, do not use adhesives to prevent the screws from loosening and do not use oils or lubricants.
■ Do not stand on the projector or place heavy objects on it.
■ Do not use the projector where it may be exposed to rain, water, or excessive humidity.
■ Unplug the projector from the wall outlet before cleaning. Use a dry cloth (or, for stubborn dirt or stains, a moist cloth that has been wrung dry) for cleaning. Do not use liquid or aerosol cleaners.
■ Never spill liquid of any kind into the projector.
■ Do not use the projector where it may be exposed to excessive dust or smoke.
106 Notices
■ Never push objects of any kind through the cabinet slots.
■ Do not use or store the projector or remote control in a hot location, such as near a heater, in direct sunlight, or in a closed vehicle.
■ Do not block the slots and openings in the projector case. They provide ventilation and prevent the projector from overheating. Do not operate the projector on a sofa, rug, or other soft surface, or set it on top of loose papers, which could block vents underneath your projector. If you are setting up the projector near a wall, leave at least 7.9 inches (20 cm) of space between the wall and the air exhaust vent.
■ Do not operate the projector in a closed-in cabinet unless proper ventilation is provided.
■ If you are using two or more projectors side-by-side, leave at least 2 feet (60 cm) of space between the projectors to allow for proper ventilation.
■ You may need to clean the air filter and vent. A clogged air filter or vent can block ventilation needed to cool the projector.
■ Do not store the projector outdoors for an extended length of time.
■ Do not use the projector outside the required temperature range of 32 to 104 °F (0 to 40 °C). Doing so may cause an unstable display and could lead to projector damage.
■ Do not store the projector outside the required temperature range of 14 to 140 °F (–10 to 60 °C) or in direct sunlight for long periods of time. Doing so may cause damage to the case.
■ Do not touch the plug during an electrical storm. Otherwise, you may receive an electric shock.
■ Unplug the projector when it will not be used for extended periods.
■ Unplug the projector from the wall outlet and refer servicing to qualified service personnel under the following conditions: If it does not operate normally when you follow the operating instructions, or exhibits a distinct change in performance; If smoke, strange odors, or strange noises come from the projector; If the power cord or plug is damaged or frayed; If liquid or foreign objects get inside the projector, or if it has been exposed to rain or water; If it has been dropped or the housing has been damaged.
■ Except as specifically explained in this User’s Guide, do not attempt to service this product yourself. Refer all servicing to qualified personnel. Opening or removing covers may expose you to dangerous voltages and other hazards.
■ Never open any covers on the projector except as specifically explained in this User’s Guide. Never attempt to disassemble or modify the projector. Refer all repairs to qualified service personnel.
Notices 107
■ Use the type of power source indicated on the projector. Use of a different power source may result in fire or electric shock. If you are not sure of the power available, consult your dealer or power company.
■ If you use the projector in a country other than where you purchased it, use the correct power cord for that country.
■ Do not overload wall outlets, extension cords, or power strips. Do not insert the plug into a dusty outlet. This can cause fire or electric shock.
■ Take the following precautions when handling the plug: Do not hold the plug with wet hands. Do not insert the plug into an outlet with dust present. Insert the plug firmly into the outlet. Do not pull the power cord when disconnecting the plug; always be sure to hold the plug when disconnecting it. Failure to comply with these precautions could result in fire or electric shock.
■ Do not place the projector where the cord can be walked on.
■ The lamp(s) in this product contain mercury. Please consult your state and local regulations regarding disposal or recycling. Do not put in the trash.
■ Do not place anything that can become warped or damaged by heat near the exhaust vents. Do not bring your hands or face close to the vents while projection is in progress.
■ Before you move the projector, make sure its power is turned off, the plug is disconnected from the outlet, and all cables are disconnected.
■ Do not project images while the detachable lens cover is still attached. Heat may cause the lens cover to melt, and if you touch the lens cover you could get burned.
■ Never try to remove the lamp immediately after use because it will be extremely hot. Before removing the lamp, turn off the power and wait at least an hour to allow the lamp to cool completely.
■ Do not place the source of an open flame, such as a lit candle, on or near the projector.
■ Do not modify the power cord. Do not place heavy objects on top of the power cord or bend, twist, or pull it excessively. Keep the power cord away from hot electrical appliances.
■ If the lamp breaks, ventilate the room to prevent gases contained in the lamp from being inhaled or coming in contact with the eyes or mouth.
■ If the projector is mounted overhead and the lamp breaks, be careful to prevent pieces of glass from falling into your eyes when you open the lamp cover.
108 Notices
WARNING: The cords included with this product contain chemicals, including lead, known to the State of California to cause birth defects or other reproductive harm. Wash hands after handling. (This notice is provided in accordance with Proposition 65 in Cal. Health & Safety Code § 25249.5 and following.)
FCC Compliance Statement
For United States Users
This equipment has been tested and found to comply with the limits for a Class B digital device, pursuant to Part 15 of the FCC Rules. These limits are designed to provide reasonable protection against harmful interference in a residential installation. This equipment generates, uses, and can radiate radio frequency energy and, if not installed and used in accordance with the instructions, may cause harmful interference to radio or television reception. However, there is no guarantee that interference will not occur in a particular installation. If this equipment does cause interference to radio and television reception, which can be determined by turning the equipment off and on, the user is encouraged to try to correct the interference by one or more of the following measures:
■ Reorient or relocate the receiving antenna.
■ Increase the separation between the equipment and receiver.
■ Connect the equipment into an outlet on a circuit different from that to which the receiver is connected.
■ Consult the dealer or an experienced radio/TV technician for help.
WARNING
The connection of a non-shielded equipment interface cable to this equipment will invalidate the FCC Certification of this device and may cause interference levels which exceed the limits established by the FCC for this equipment. It is the responsibility of the user to obtain and use a shielded equipment interface cable with this device. If this equipment has more than one interface connector, do not leave cables connected to unused interfaces. Changes or modifications not expressly approved by the manufacturer could void the user’s authority to operate the equipment.

Notices 109
For Canadian Users
This Class B digital apparatus meets all requirements of the Canadian Interference-Causing Equipment Regulations.
Cet appareil numérique de la classe B respecte toutes les exigences du Règlement sur le materiel brouilleur du Canada.

110 Notices

111
Index
AA/V Mute
button, 39display settings, 58
Accessories, 10Air filter
cleaning, 70 to 72ordering, 10replacing, 73 to 74
Altitude, 60, 84, 101Anti-theft device, 10, 14, 96 to 97Aspect ratio, 99Audio
connecting equipment, 21 to 22controlling volume, 40, 53problems, troubleshooting, 90 to 91turning off (using A/V Mute), 39
Auto Setup setting, 50
BBackground screen settings, 58Bands, vertical, 89Blackboard color mode, 35Blank screen, 28 to 30Blurry image, 88 to 89Brightness, 99Brightness control, 53Brightness setting, 48
CCables
component-to-VGA, 10, 19composite, 16, 17illustrations, 12network, 23ordering, 10security, 96S-video, 10, 18VGA, 15, 20
Capturing image, 57Ceiling mount, 10, 95 to 96Chalkboard, projecting on, 35Cleaning
air filter, 70 to 72lens, 70projector case, 70
Closed captions, 59Color
correcting, 35, 48 to 50multi-screen adjustment, 61problems, 90saturation, 48settings, 48 to 49temperature, 49
Color Mode, 35, 48Component-to-VGA cable, 10, 19Composite video cable, 16, 17Computer
connecting to, 15selecting source, 28
Connecting projectorto audio equipment, 21 to 22to computer, 15to speakers, 21 to 22to video equipment, 16 to 20
Contrast setting, 48Control Panel Lock setting, 53, 58Custom screen, see User’s LogoCustomized color mode, 35
DDefault settings, restoring, 47DHCP, 66Direct Power On, 25Distance from projector to screen, 13, 99Documentation, 8DVD player, connecting, 16 to 20

112 Index
EElectrical specifications, 100E-mail alerts, 67 to 68EMP Monitor, problems, 91Environmental specifications, 101Epson
accessories, 10PrivateLine Support, 8technical support, 8, 93 to 94warranty, 9
Ethernet connection, 65 to 66Extended menu, 59 to 60E-Zoom button, 40
FFCC compliance statement, 108Filter, see Air filterFocusing image, 32Freeze button, 39
GGame color mode, 35Gateway address, 66
HHDTV images, video formats, 103Height of image, adjusting, 31 to 32Help, 93 to 94Help system, using, 82Help, Epson, 8High altitude, 60, 84, 101
IImage
adjusting, 30 to 36, 48 to 50blurry, 88 to 89capturing and saving in projector, 57correcting shape, 33 to 34, 52, 88fitting on screen, 50, 87 to 88height, adjusting, 31 to 32problems with, 85 to 90projecting on chalkboard, 35raising, 31 to 32selecting source, 28, 38shape, correcting, 33 to 34size and projection distance, 13, 99turning off (using A/V Mute), 39turning off temporarily, 39zooming, 32, 40
Image menu, 48 to 49Info menu, 78Input Signal setting, 51Input signal, selecting, 28, 38Installing, projector, 95 to 96Instant Off, 26
KKensington anti-theft device, 10, 14, 96Keystone correction, 33 to 34, 52, 88, 99
LLamp
number of hours used, 78ordering, 10replacing, 74 to 77specifications, 100status light, 83 to 84
Lamp timer, resetting, 77Language setting, 60Laptop computer
connecting to, 15display problems, 29 to 30, 85 to 87selecting source, 28, 38
Lens theft deterrent screw, 97Lens, cleaning, 70

Index 113
Lights, status, 83 to 84Logo, saving on projector, 56 to 58
MMac, display problems, 87Manuals, 8Menus
changing settings, 46 to 47default settings, restoring, 47Extended, 59 to 60Image, 48 to 49Info, 78network, 66, 67Settings, 52 to 53Signal, 50 to 52User’s Logo, 57
Monitoring projector, e-mail notifications, 67 to 68
Mousecompatibility, 99using remote control as, 42
Multiple projectors, controlling, 43 to 44Multi-screen color adjustment, 61
NNetwork
cable, 23managing projector remotely, 65 to 68problems, 91wired, 65 to 66
Network settings, configuring, 66No Signal message, 28 to 29, 86 to 87Noise level, 99Noise Reduction setting, 51Not Supported message, 87Numeric keypad, using, 55
OOptical aspect ratio, 99Options for projector, 10
PPassword
protection, 54 to 56request code, 56
Photo color mode, 35Picture source, selecting, 28, 38Picture, see ImagePointer shape, 53Pointer tool, using, 41Positioning
image, 31 to 32projector, 13 to 14, 95 to 96
Powerbutton, 25specifications, 100status light, 25, 83 to 84
Presentation color mode, 35Presentations
computer, 15room conditions, 13, 38using the pointer tool, 41video, 16 to 20
PrivateLine Support, 8Problems
color, 90image, 85 to 90monitoring projector, 91no signal, 28 to 29, 86 to 87remote control, 92sound, 90 to 91using on-screen help, 82
Progressive format, 51Projecting without screen, 35Projection lamp, see Lamp
114 Index
Projectorcleaning, 70disabling buttons, 58distance from screen, 13, 99installing, 95 to 96lamp specifications, 100Menu and Options List, 62 to 63monitoring remotely, 65 to 68options, 10password protection, 54 to 56positioning, 13 to 14, 95 to 96resolution, 99security features, 54 to 58, 96 to 97specifications, 99 to 101transporting, 79troubleshooting, 81 to 94turning off, 26turning on, 24 to 25unpacking, 12viewing information about, 78
Projector IDchecking, 44setting, 43
QQuick Corner, 33, 52
RRaising image, 31 to 32Rear-screen projection, 59, 95 to 96Registration, 9
Remote controlA/V Mute button, 39as wireless mouse, 42battery used, 100controlling multiple projectors, 43 to 44correcting color, 35, 48 to 50E-Zoom button, 40Freeze button, 39ID, 44numeric keypad, using, 55pointer tool, using, 41problems, 92range, 100specifications, 100switching sources, 38troubleshooting, 92
Remote Receiver setting, 53Replacing lamp, 74 to 77Request code, password, 56Resetting lamp timer, 77Resetting menu options, 47Resize image, 36Resolution, 36, 87, 99Resolution setting, 50
SSafety
instructions, 105 to 108specifications, 101
Saturation setting, 48Screen
blank, 28 to 30distance from projector, 13, 99ordering, 10startup screen, creating, 56 to 57
Screen image, see ImageSecurity
cables, 96Control Panel Lock, 58identifying logo, 57 to 58Kensington lock, 10, 96password protection, 54 to 56
Settings menu, 52 to 53Sharpness setting, 49

Index 115
Signal menu, 50 to 52Six-axis color adjustment, 49 to 50Sleep mode, 24, 60Sound, troubleshooting, 90 to 91Source, selecting, 28, 38Speakers, connecting, 21 to 22Specifications
brightness, 99dimensions, 100electrical, 100environmental, 101general, 99lamp, 100remote control, 100resolution, 99safety, 101
Sports color mode, 35sRGB color mode, 35Startup screen
creating, 56 to 58settings, 58user’s logo, see User’s Logo
Status lights, 83 to 84Support, see Technical supportS-video cable, 10, 18Switching picture source, 28, 38Sync setting, 51Synchronization, adjusting, 89 to 90
TTechnical support, 8, 93 to 94Temperature
requirements, 101status light, 83 to 84
Temperature, color, 49Test pattern, displaying, 53Text color mode, 35Theatre color mode, 35Tint setting, 48Tracking, adjusting, 89 to 90Transporting projector, 79
Troubleshootingblank screen, 28 to 30, 85 to 87cut-off image, 87 to 88distorted image, 33 to 34EMP Monitor problems, 91image and sound problems, 85 to 91network problems, 91no signal, 28 to 29, 86 to 87projector problems, 81 to 94remote control problems, 92tapered image, 33 to 34
Turning off picture (using A/V Mute), 39Turning off projector, 26
UUnpacking projector, 12User’s Logo
creating, 57display settings, 58
VVCR, connecting, 16 to 20VGA video cable, 15, 20Video
cables, 10, 12, 16connecting video equipment, 16 to 20formats, supported, 101 to 103selecting source, 28, 38
Video Signal setting, 52Volume, controlling, 40, 53
WWarning lights, 83 to 84Warranty, 9Windows, display problems, 86Wired network, 65 to 66Wireless, mouse, 42
ZZoom ratio, 99Zooming image, 32, 40