Embed Size (px)
Citation preview
PORTABLE MINIDISC RECORDER
XM-R70SL/BK
LVT0335-004A[B]
INSTRUCTIONS
XM-R70(B)_Cover.p65 6/23/99, 3:10 PM1

G-1
CLASS 1
LASER PRODUCT
1. CLASS 1 LASER PRODUCT2. DANGER: Invisible laser radiation when open and inter-
lock failed or defeated. Avoid direct exposure to beam.3. CAUTION: Do not open the top cover. There are no user
serviceable parts inside the Unit; leave all servicing to quali-fied service personnel.
CAUTION! THIS PRODUCT UTILIZES A LASER.USE OF CONTROLS OR ADJUSTMENTS OR PERFORMANCE OF PROCEDURES OTHER THAN THOSE SPEC-IFIED HEREIN MAY RESULT IN HAZARDOUS RADIATION EXPOSURE.DO NOT OPEN COVERS AND DO NOT REPAIR YOURSELF. REFER SERVICING TO QUALIFIED PERSONNEL.
WARNING : TO REDUCE THE RISK OF FIRE OR ELECTRIC SHOCK, DO NOT EXPOSE THIS APPLIANCE TORAIN OR MOISTURE.
IMPORTANT for the U.K.DO NOT cut off the mains plug from this equipment. If the plug fitted is not suitable for the power points inyour home or the cable is too short to reach a power point, then obtain an appropriate safety approvedextension lead or consult your dealer.BE SURE to replace the fuse only with an identical approved type, as originally fitted.If nontheless the mains plug is cut off ensure to remove the fuse and dispose of the plug immediately, to avoida possible shock hazard by inadvertent connection to the mains supply.If this product is not supplied fitted with a mains plug then follow the instructions given below:IMPORTANT:DO NOT make any connection to the terminal which is marked with the letter E or by the safety earth symbolor coloured green or green-and-yellow.The wires in the mains lead on this product are coloured in accordance with the following code:
Blue : NeutralBrown : Live
As these colours may not correspond with the coloured markings identifying the terminals in your plug proceedas follows:The wire which is coloured blue must be connected to the terminal which is marked with the letter N orcoloured black.The wire which is coloured brown must be connected to the terminal which is marked with the letter L orcoloured red.IF IN DOUBT - CONSULT A COMPETENT ELECTRICIAN.
● WARNING LABEL, PLACED INSIDE THE UNIT
NEVER TOUCH THE LENS.
XM-R70(B)_Safety.p65 6/23/99, 3:07 PM1

SAFETY INSTRUCTIONS“SOME DOS AND DON’TS ON THE SAFE USE OF EQUIPMENT”
This equipment has been disigned and manufactured to meet international safety standards but, like any electricalequipment, care must be taken if you are to obtain the best results and safety is to be assured.
Do read the operating instructions before you attempt to use the equipment.
Do ensure that all electrical connections (including the mains plug, extension leads and interconnections betweenpieces of equipment) are properly made and in accordance with the manufacturer’s instructions. Switch off and withdrawthe mains plug when making or changing connections.
Do consult your dealer if you are ever in doubt about the installation, operation or safety of your equipment.
Do be careful with glass panels or doors on equipment.
DON’T continue to operate the equipment if you are in any doubt about it working normally, or if it is damaged in anyway–switch off, withdraw the mains plug and consult your dealer.
DON’T remove any fixed cover as this may expose dangerous voltages.
DON’T leave equipment switched on when it is unattended unless it is specifically stated that it is designed for unattendedoperation or has a standby mode.Switch off using the switch on the equipment and make sure that your family know how to do this.
Special arrangements may need to be made for infirm or handicapped people.
DON’T use equipment such as personal stereos or radios so that you are distracted from the requirements of trafficsafety. It is illegal to watch television whilst driving.
DON’T listen to headphones at high volume as such use can permanently damage your hearing.
DON’T obstruct the ventilation of the equipment, for example with curtains or soft furnishings.
Overheating will cause damage and shorten the life of the equipment.
DON’T use makeshift stands and NEVER fix legs with wood screws — to ensure complete safety always fit themanufacturer’s approved stand or legs with the fixings provided according to the instructions.
DON’T allow electrical equipment to be exposed to rain or moisture.
ABOVE ALL
— NEVER let anyone, especially children, push anything into holes, slots or any other opening in the case -thiscould result in a fatal electrical shock.;
— NEVER guess or take chances with electrical equipment of any kind— it is better to be safe than sorry!
G-2
✮✮✮✮✮✮✮✮✮✮✮✮✮✮✮✮✮✮✮✮✮✮✮✮✮✮✮✮✮✮✮✮✮✮✮✮✮✮✮✮✮✮✮✮✮✮✮
✮✮✮✮✮✮✮✮✮✮✮✮✮✮✮✮✮✮✮✮✮✮✮✮✮✮✮✮✮✮✮✮✮✮✮✮✮✮✮✮✮✮✮✮✮✮✮
XM-R70(B)_Safety.p65 6/23/99, 3:07 PM2

1
Thank you for purchasing this JVC product. Please read these instructions carefully before starting operation to besure to obtain optimum performance and a longer service life from the unit.
Table of ContentsSupplied Accessories .................................................... 1Location of Controls ..................................................... 1Power Supply Preparations ........................................... 2Accidental Operation Prevention Function
(Hold Mode) ............................................................ 3Normal Play .................................................................. 3Showing the Disc Information ...................................... 5Repeat Play and Random Play ..................................... 5Selecting the Operational Options of Remote Control . 6Preparation Before Recording ...................................... 6Check Items Before Starting Recording ....................... 7Standard Recording (MONO/STEREO) ...................... 7SYNCHRO Recording (SYNCHRO) ........................... 8Editing the MD ............................................................. 8Dividing Tracks (DIVIDE Function) ............................ 9
Joining Tracks (JOIN Function) ................................... 9Moving Tracks (MOVE Function) ............................. 10Erasing Tracks (ERASE Function) ............................. 10Erasing All the Tracks (ALL ERASE Function) ........ 10Giving Titles to MD (TITLE Function) ..................... 11Using the Unit with Optional Accessories ................. 12Cautions ...................................................................... 12Information on MDs (Minidiscs) ............................... 13MD (Minidisc) Messages ........................................... 14Minidisc Limitations .................................................. 15Rules of Digital Dubbing ........................................... 15Maintenance ............................................................... 15Troubleshooting Guide ............................................... 16Specifications ............................................................. 16
Supplied AccessoriesAC adaptor (AA-R554) ......................................... 1 pc.Headphones ........................................................... 1 pc.Remote controller .................................................. 1 pc.
Lithium–ion battery (rechargeable) (BN-R3610) .. 1 pc.External Battery case ............................................. 1 pc.Carrying pouch ...................................................... 1 pc.
Location of Controls
[Display on the unit]
RECMONO
SynchroA.C.
BASS Battery
Peak Level MeterRANDOM Disc Mark
RepeatTOC
-dB 1240 OVER
[Display on the remote control]
A.C. BASS MONORandom
BatteryDisc Mark Repeat
[On the unit]
A DISPLAY / CHARA. buttonB EDIT/ENTER buttonC VOLUME +, – buttonD DisplayE Skip / search button (¢)F Skip / search button (4)G Stop (7)/CHARGE buttonH Play / pause button (6)I JOG dial
J SET buttonK REC switchL OPEN switchM HOLD switchN REC MODE switchO MIC (PLUG IN POWER) jackP LINE IN (OPTICAL) jackQ Headphones jack ()R DC IN 6V jack ( )
[On the remote control]
S A.C.BASS (Active Clear Bass)button
T P.MODE (Play Mode) buttonU HOLD switchV VOLUME +, – buttonW Skip / search buttons (4 ¢),
Play / pause button (6)X Stop button (7)Y DisplayZ DISPLAY button
REC
XM-R70(B)_P1-8.p65 6/23/99, 3:09 PM1

2
Power Supply PreparationsAs a power supply source, you can use the rechargeable battery and/or dry-cell batteries, or AC adaptor.For information on operating times of batteries, refer to the specifications (page 16).
Using lithium–ion battery (rechargeable battery) (BN-R3610)
1 Insert the rechargeable battery into the unit.
2 To charge the rechargeable battery, connect the supplied AC adaptor.
3 Press the 7/CHARGE button twice on the unit.“CHARGE” appears on the display and charging starts. When charging is completed, “CHARGE” will disap-pear.• “CHARGE” will appear for 5 seconds even when no lithium-ion battery is inserted.
4 Disconnect the AC adaptor.Notes
• Recharging is not made if the unit is being used.• It takes approximately 2 hours to recharge the rechargeable battery.• Rechargeable battery has a service life of approximately 500 charge-discharge cycles. If the operating time on one
full charge becomes noticeably shorter than it used to be, the battery has reached the end of its service life andshould be replaced.
• The AC adaptor may become warm while recharging is in progress. This is not a malfunction.• Before starting recording, fully charge the rechargeable battery. Otherwise, the unit may shut off during recording.• Recharging with this unit shall be made at the temperature from +5°C to +35°C. Otherwise, “HIGH TEMP” or
“LOW TEMP” will appear on the display.
Using dry-cell batteries (not included)
1 As explained below, open the battery cover of the battery case and insert three LR6 (UM-3) alkaline batteries into the battery compartment.
2 Turn the knob of the battery case in the direction as shown by the arrow until it stops.(To detach the battery case, turn the knob toward in reverse until the battery case is re-moved.)
Note
To lengthen the battery life, you can use both rechargeable battery and the dry-cell batteries.
Using the AC adaptor
Connect the supplied AC adaptor to the unit.Refer to the connecting diagram in “Using lithium-ion battery (rechargeable battery)”When the unit is turned off with a lithium-ion battery inserted, “CHARGE” is displayed and recharging automati-cally starts.
Firmly close the cover.Insert the battery with its “–” ter-minal facing you and its cut partfacing up.
Slide the cover and open it.
Cut part
To AC power outlet
AC adaptor
(Bottom View)
XM-R70(B)_P1-8.p65 6/23/99, 3:09 PM2

3
Rechargeable battery: Recharge it.Dry-cell batteries: Replace them with new ones.
Bottom of the unitTop of the remote control
Note
The unit is in the standby condition when the AC adaptor is connected. The primary circuit is always “live” as longas the AC adaptor is connected to an electrical outlet.
Battery indicatorThe battery indicator appears on the display of the unit and remote control. When the indication changes as follows,power will be shut off a short while after.
Note
The battery indicator also appears when the AC adaptor is connected, though it has no meaning.
Accidental Operation Prevention Function (Hold Mode)This function prevents accidental operation of buttons on the unit.The unit and remote control have the HOLD switches, each of which works independently.
Slide the HOLD switch in the direction shown by the arrow to activate it.When the HOLD switch of the unit or remote control is activated, no button operation is possible on the unit or theremote control.• Once the HOLD switch of the unit has been activated, “HOLD” will appear each time a button on the unit is
pressed.To operate the unit or remote control normally, release the HOLD switch.
Normal PlayFollow the numbers in the figure to perform normal-play.
1 Connect the headphones plug firmly.
2 Connect the remote control plug firmly.
3 Release the HOLD switches.
4 Load an MD.1 Slide the OPEN switch to open the lid.2 Open the lid by hand.3 Insert the MD into the MD slot beneath the lid, with its label side facing up. Insert the MD until it stops. Be
sure % or ] mark on the MD are oriented as shown in the figure.4 Close the lid.
“TOC Reading” appears on the display. Then the track number and playback time appear.
5 Adjust the volume level between 0 and 25.Press the VOLUME+, – button on the unit or remote control. To continuously change the volume level, de-press the VOLUME button.
XM-R70(B)_P1-8.p65 6/23/99, 3:09 PM3

4
6 Press the 6 button on the unit or remote control.Playback will start from the first track and ends after playing all the tracks of the MD.
[Unit’s display] [Remote control’s display]
To eject the MD, slide the OPEN switch to open the lid and open it by hand. Then, the MD comes out.
Notes
• If no MD is loaded, “NO DISC” appears on the display and the power will be automatically shut off after approx.10 seconds.
• If the MD is recorded in Monaural mode, “MONO” will appear on the display.
Operation
Press during play.
Push in Stop mode, orpress for more than 1 sec-ond in any other mode.
Press again to restart play.If nothing is done for 2 minutes, thepower will be automatically shut off.
or
Stops. Press the 6 button to restart play.The current track will be played fromthe beginning (Resume Play).If nothing is done for 45 seconds, thepower will be automatically shut off.In this case, to restart play, press the6 button for more than one second.
The power is shut off after “POWEROFF” appears on the display.To turn on the unit, press the 6 but-ton. Then, the last track before turningoff the power will be played from thebeginning (Resume Play).
or
Button
Press during play.
Display/reference
Blinks.
To turn off the unit
(Off mode)
To pause play
To stop play
(Stop mode)
or
Blinks.
Stops.
(Blank display)
Reinforcing the Bass Sound (A.C.BASS)Press the A.C.BASS button on the remote control to activate the active clear bass function.The “BASS” indicator appears on the display. The bass level is automatically controlled in conjunction with thesound volume.To cancel the function, press the same button again to light off the “BASS” indicator.
Track title
Number of tracks being played
Playing time
Number of tracks being played Playing time
Disc mark turns. Peak Level MeterDisc mark turns.
• During Random Play, theskip buttons cannot be usedto skip back to tracks thatwere played previously in therandom sequence.
Operation Button Display/reference
Fast forward/reverse
Skip function (unit)Press during play or in Stop mode.Search function (unit)Keep depressed during play.
Skip function (remote control)Turn to the right or left during play or in Stop mode.Search function (remote control)Continuously turn to the right or left during play or in Stopmode.
Forward
Reverse Forward
Reverse
XM-R70(B)_P1-8.p65 6/23/99, 3:09 PM4

5
Showing the Disc InformationEach time you press the DISPLAY / CHARA. (or DISPLAY) button in Stop mode or during playback, the disc in-formation is displayed as follows.The DISPLAY / CHARA. button on the unit and the DISPLAY button on the remote control work independently.
Display change on the unit:In Stop mode:Disc title*, total track number, and total playback timeof the MD = Recordable capacity (remaining time) ofthe MD (e.g. REMAIN -69:20) = Normal display =(back to the beginning)During Playback:Playback remaining time of the track = Normal dis-play = (back to the beginning)
Display change on the remote control:In Stop mode:Disc title* = Total track number and total playbacktime of the MD = Track title* = Normal display =(back to the beginning)During Playback:Track title* = Normal display = (back to the begin-ning)
*: The disc title or track title will scroll if it consists of 11 characters or more. If no title is given, “NO TITLE”appears on the display.
Repeat Play and Random Play (Using the Remote Control)You can select Repeat Play or Random Play. In Repeat Play, you can repeat all the tracks or individual track asmany times as you like. In Random Play, you can play all the tracks in random order.
Selecting Repeat Play and Random Play in Stop modeIn Stop mode, press the P.MODE button on the remote control. Each time you press the button, the play modechanges as follows.P1 = P = RDM = P1 RDM = PRDM = Original display = (back to the beginning)P1: Repeats 1 track.P: Repeats all the tracks.RDM: Random playP1 RDM: Repeats one track randomly selected.PRDM: Repeats all the tracks in random order.(On the unit’s display, “RANDOM” indicator lights up instead of “RDM”.)
After selecting one of the above modes, press the 6 button.For example, to start Random Play, press the P.MODE button until “RDM” indicator appears and then press the 6button.To exit Repeat Play or Random Play, stop the MD and then press the P.MODE button until the display returns tothe original one.
Repeat Play during PlaybackDuring Normal Play:Each time you press the P.MODE button, the play mode changes as follows.P1 = P = Original display = (back to the beginning)Select “P1” to repeatedly play the current track. Select “P” to repeat all the tracks.During Random Play:Each time you press the P.MODE button, the play mode changes as follows.P1 RDM = PRDM = Original display = (back to the beginning)Select “P1 RDM” to repeatedly play a randomly selected track. Select “PRDM” to repeat all the tracks in randomorder.(On the unit’s display, “RANDOM” indicator lights up instead of “RDM”.)To exit Repeat Play, stop the MD and then press the P.MODE button until the display returns to the original one.
or
XM-R70(B)_P1-8.p65 6/23/99, 3:09 PM5
6
MD player,tape deck, etc.
CD player, etc.
Stereo connection cable (not supplied)
Optical digital cable (not supplied)
Microphone (not supplied)
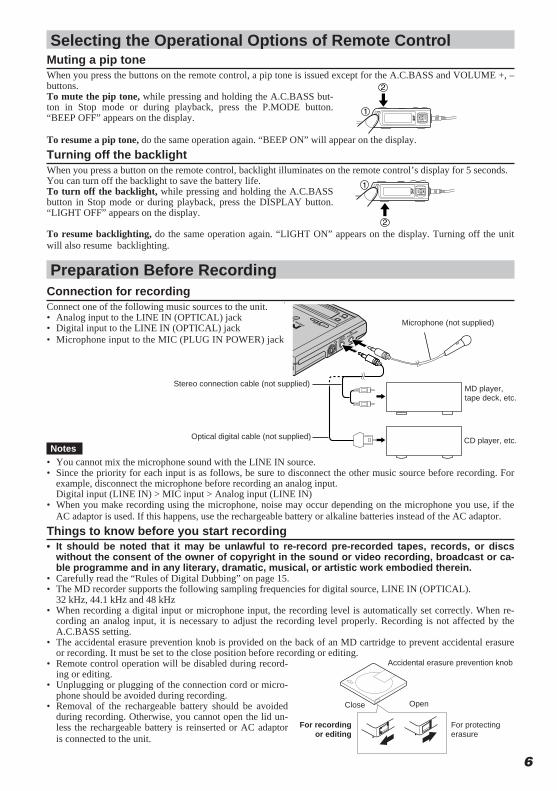
Selecting the Operational Options of Remote ControlMuting a pip toneWhen you press the buttons on the remote control, a pip tone is issued except for the A.C.BASS and VOLUME +, –buttons.To mute the pip tone, while pressing and holding the A.C.BASS but-ton in Stop mode or during playback, press the P.MODE button.“BEEP OFF” appears on the display.
To resume a pip tone, do the same operation again. “BEEP ON” will appear on the display.
Turning off the backlightWhen you press a button on the remote control, backlight illuminates on the remote control’s display for 5 seconds.You can turn off the backlight to save the battery life.To turn off the backlight, while pressing and holding the A.C.BASSbutton in Stop mode or during playback, press the DISPLAY button.“LIGHT OFF” appears on the display.
To resume backlighting, do the same operation again. “LIGHT ON” appears on the display. Turning off the unitwill also resume backlighting.
Preparation Before RecordingConnection for recordingConnect one of the following music sources to the unit.• Analog input to the LINE IN (OPTICAL) jack• Digital input to the LINE IN (OPTICAL) jack• Microphone input to the MIC (PLUG IN POWER) jack
Notes• You cannot mix the microphone sound with the LINE IN source.• Since the priority for each input is as follows, be sure to disconnect the other music source before recording. For
example, disconnect the microphone before recording an analog input.Digital input (LINE IN) > MIC input > Analog input (LINE IN)
• When you make recording using the microphone, noise may occur depending on the microphone you use, if theAC adaptor is used. If this happens, use the rechargeable battery or alkaline batteries instead of the AC adaptor.
Things to know before you start recording• It should be noted that it may be unlawful to re-record pre-recorded tapes, records, or discs
without the consent of the owner of copyright in the sound or video recording, broadcast or ca-ble programme and in any literary, dramatic, musical, or artistic work embodied therein.
• Carefully read the “Rules of Digital Dubbing” on page 15.• The MD recorder supports the following sampling frequencies for digital source, LINE IN (OPTICAL).
32 kHz, 44.1 kHz and 48 kHz• When recording a digital input or microphone input, the recording level is automatically set correctly. When re-
cording an analog input, it is necessary to adjust the recording level properly. Recording is not affected by theA.C.BASS setting.
• The accidental erasure prevention knob is provided on the back of an MD cartridge to prevent accidental erasureor recording. It must be set to the close position before recording or editing.
• Remote control operation will be disabled during record-ing or editing.
• Unplugging or plugging of the connection cord or micro-phone should be avoided during recording.
• Removal of the rechargeable battery should be avoidedduring recording. Otherwise, you cannot open the lid un-less the rechargeable battery is reinserted or AC adaptoris connected to the unit.
For protectingerasure
Accidental erasure prevention knob
For recordingor editing
Close Open
XM-R70(B)_P1-8.p65 6/23/99, 3:09 PM6

7
Check Items Before Starting Recording• The MD is not the Play-only type one.• The accidental erasure prevention knob of the MD cartridge is set to the close position.• The MD has enough space for recording. If not, carry out ALL ERASE or ERASE function mentioned later to
erase all the tracks or desired tracks in the MD. You can check the recordable remaining time of the MD by re-peatedly pressing the DISPLAY/CHARA. button on the unit in Standby mode. (See “Showing the Disc Informa-tion” on page 5.)
• The REC MODE switch is set correctly. MONO for monaural recording,STEREO for stereo recording, and SYNCHRO for synchro recording inwhich recording automatically starts when an input is detected.
Standard Recording (MONO/STEREO)CAUTIONS:• Be sure that the rechargeable battery is fully charged. Otherwise, the unit may shut off, leaving recording unfinished.• While “UTOC Writing” is displayed, do not disconnect the power source or subject the unit to the vibration to
avoid incorrect recording.Notes
• The recording operation is possible only with the buttons on the unit.• When a stereo signal is recorded in MONO mode, stereo sound will be heard though the signal is correctly recorded in
MONO mode.In MONO mode, the recordable time becomes two times longer than the recording time labeled on the MD.
1 Check the things before recording.See “Check items before starting recording” above.
2 Insert an MD with its label side facing up.3 Select the recording mode with the REC MODE switch (either MONO or STEREO).4 Slide the REC switch.
The unit enters Rec/Standby mode, the REC indicator lights up, and the disc mark blinks. The track number isincreased by one.
• To cancel Rec/Standby mode, press the 7/CHARGE button.
5 Play the recording source.6 Adjust the recording level for analog input only.
See “Adjusting the recording level” below.
7 Press the 6 button to start recording.When the MD becomes full, “UTOC Writing” appears on the display, indicating that the recording is success-fully completed. The “TOC” indicator will light up during this period. Then, the MD stops. (The “TOC” indica-tor goes out.)
To pause, press the 6 button. (The track number is increased by one.)To cancel pause, press the 6 button again.To stop recording, press the 7/CHARGE button. “UTOC Writing” appears on the display and then the MD stops.(The “TOC” indicator goes out.)
Adjusting the recording level (for analog input only)The recording level should be adjusted so that the peak level meter does not reach the OVER mark to avoid distort-ing the recording signal.
Press the 4 or ¢ buttons on the unit to decrease or increase the recording level.You can change the recording level between “REC LEVEL 01” to “REC LEVEL 24”.Note
Even if the recording level is set to “REC LEVEL 01”, the input signal is recorded at a minimum level.
Track marking• Whenever playback at the source side advances from one track to another during digital recording, the track
number of the MD is automatically incremented by 1.• Whenever no sound at the playback side continues for 3 or more seconds during analog/digital or microphone
recording, the track number of the MD is automatically incremented by 1.• During analog/digital or microphone recording, you can increment the track number by 1 by sliding the REC button.
(By adding the track number in this way, you can edit the recording contents later using the edit functions, such aserase, move, and join. Also, you can quickly locate the desired track using the fast forward or reverse button.)
(Appears only if MONO is selected.)
Remaining time
Total track number
XM-R70(B)_P1-8.p65 6/23/99, 3:09 PM7

8
Erasing tracks (ERASE function)This enables unnecessary tracks. Narration, etc. to beerased speedily. The erased parts do not remain as si-lences but are closed up by the subsequent tracks.
Erasing all the tracks (ALL ERASEfunction)All the tracks can be erased at once without recordingfresh material over them.
Giving titles to discs and tracks(TITLE function)A title consisting of up to 64 characters can be given toa disc and a track. The title given appears in the displaywindow.
Dividing tracks (DIVIDE function)This involves adding a track mark (see Note) at somepoint during the track which is to be made into the startof an additional track so that the original track is di-vided into two tracks.
Joining tracks (JOIN function)This involves erasing a track mark and turning two ad-joining tracks into one track.
Moving tracks (MOVE function)Tracks can be moved around so that they are in the de-sired sequence.
SYNCHRO Recording (SYNCHRO)The synchro recording automatically starts when an input signal is given and ends if no signal condition continues for 30 seconds.
1 Insert an MD with its label side facing up.2 Set the REC MODE switch to SYNCHRO.3 Slide the REC button.
“SYNCHRO REC ON” appears and the “SYNC” indicator lights up on the display. Then, the disc mark blinks.
4 Press the 6 button.The “SYNC” indicator blinks, indicating that the unit enters Rec/Standby mode.
5 Play the recording source.When an input signal is detected by the unit, recording automatically starts.The recording will automatically end if no signal condition continues for 30 seconds.
Note
Once the 6 button is pressed during the SYNCHRO recording, the unit enters Rec/Pause mode and the SYN-CHRO recording is disabled. To restart the SYNCHRO recording, repeat the above steps.
Editing the MD (Using the unit)In addition to its recording and play functions, the unit comes with editing functions. You can divide, join, move, orerase the recorded tracks in the MD as required. Also, you can give a disc title to the MD and track titles to thetracks in the MD.Note that you cannot edit the MD in Random Play mode.
MOVE
JOIN
DIVIDE
Track No.
Track A Track B Track C Track D
Track A Track B Track C Track D
Track No.
New tracks can be recorded.
ALLERASE
ErasingTrack B
Track A Track B Track C Track D
Track A Track C Track DNew tracks canbe recorded.
Track No.
Track A Track B Track C Track D
Track No.
Track A Track B Track C Track D
Track A + Track B Track C Track D
Track No.
Track A Track B Track C Track D
Track A Track C Track D Track BNote
Track marks: These marks are provided to locate the start of each track. Whatever lies between one track mark andthe next is considered to a track and the numbers of the tracks (called “track numbers”) are displayed in the sequencein which they are to be played.
XM-R70(B)_P1-8.p65 6/23/99, 3:09 PM8

9
Dividing Tracks (DIVIDE Function)Use the unit to carry out this function.
1 In Stop mode, press the EDIT/ENTER button and turn the JOG dial until “DIVIDE?” is dis-played.
2 Press the SET button and then press the 6 button.
3 Turn the JOG dial (or press the 4 or ¢ button) to select the track number to be di-vided.
4 Press the SET button at the point where the track is to be divided.
• The recording lasting for 4 seconds starting where the track was divided is repeatedly played for your refer-ence.
• Movement is possible within the POSITION-128 to +128 range (about 8 seconds before or after the position).To move the point, turn the JOG dial while listening the music.
5 Press the EDIT/ENTER button.“COMPLETE” and “TOC” appear, indicating successful recording.• The selected track is divided into two tracks and the track number will increase by 1.
• When you turn off the power by pressing the 7/CHARGE button, “UTOC Writing” will be displayed and theedited contents are written. (The “TOC” indicator goes out.)
To cancel the operation, press the 7/CHARGE button in step 1 through 4 until the display returns to the originaldisplay.
Joining Tracks (JOIN Function)Use the unit to carry out this function.
1 In Stop mode, press the EDIT/ENTER button and turn the JOG dial until “JOIN?” is dis-played.
2 Press the SET button.
• You can listen to the track by pressing the 6 button. The selected track is repeatedly played.
3 Turn the JOG dial (or press the 4 or ¢ button) to select the track number to be joined.
4 Press the SET button.“PUSH ENTER” appears.
5 Press the EDIT/ENTER button.“COMPLETE” and “TOC” appear, indicating successful recording.The selected track and the previous track are joined and the track number is decreased by 1.
• When you turn off the power by pressing the 7/CHARGE button, “UTOC Writing” will be displayed and theedited contents are written. (The “TOC” indicator goes out.)
To cancel the operation, press the 7/CHARGE button in step 1 through 4 until the display returns to the originaldisplay.
JOG dialSelected track
Track to be divided Playing time
JOG dial
Selected trackTrack to be joined
XM-R70(B)_P9-16.p65 6/23/99, 3:08 PM9

10
1 In Stop mode, press the EDIT/ENTERbutton and turn the JOG dial until“ERASE?” is displayed.
2 Press the SET button.
• You can listen to the track by pressing the 6button. The track to be erased is repeatedlyplayed.
3 Turn the JOG dial (or press the 4 or¢ button) to select the track number tobe erased.
1 In Stop mode, press the EDIT/ENTERbutton and turn the JOG dial until“MOVE?” is displayed.
2 Press the SET button.
• You can listen to the track by pressing the 6button. The track to be moved is repeatedlyplayed.
3 Turn the JOG dial (or press the 4 or¢ button) to select the track numberto be moved.
4 Press the SET button.
5 Turn the JOG dial (or press the 4 or¢ button) to select the destination towhich the track is to be moved.
• If you are playing back the MD, the destinationtrack is repeatedly played.
6 Press the SET button.“PUSH ENTER” appears.
7 Press the EDIT/ENTER button.“COMPLETE” and “TOC” appear, indicating suc-cessful recording.
• When you turn off the power by pressing the 7/CHARGE button, “UTOC Writing” will be displayedand the edited contents are written. (The “TOC” indi-cator goes out.)
To cancel the operation, press the 7/CHARGE buttonin step 1 through 6 until the display returns to the origi-nal display.
Moving Tracks (MOVE Function)Use the unit to carry out this function.
Track to be moved Destination trackJOG dial
Track to moved
Erasing Tracks (ERASE Function)Use the unit to carry out this function.
JOG dial
Track to be erased
4 Press the SET button.“ERASE OK? PUSH ENTER” appears.
5 Press the EDIT/ENTER button.“COMPLETE” appears, indicating successful eras-ing.The selected track is erased and the track numberis decreased by 1.
• When you turn off the power by pressing the 7/CHARGE button, “UTOC Writing” will be displayedand the edited contents are written.
To cancel the operation, press the 7/CHARGE buttonin step 1 through 4 until the display returns to the origi-nal display.
Erasing All the Tracks (ALL ERASE Function)Use the unit to carry out this function.
1 In Stop mode, press the EDIT/ENTER button and turn the JOG dial until “ALL ERASE?”is displayed.
2 Press the SET button.“ERASE OK? PUSH ENTER” appears.
3 Press the EDIT/ENTER button.“COMPLETE” appears, indicating successful erasing.All the tracks in the MD are erased and “BLANK DISC” is displayed.
• When you turn off the power by pressing the 7/CHARGE button, “UTOC Writing” will be displayed and theedited contents are written.
To cancel the operation, press the 7/CHARGE button in step 1 or 2.
XM-R70(B)_P9-16.p65 6/23/99, 3:08 PM10

11
[Title editing buttons on the unit]
Button FunctionChanges the type of characters to be input as follows.Upper-case letters (ABC) = Lower-case letters (abc) = Symbols (space, !”) = Numbers (012) =(back to the beginning)
Adds the character being selected to the title name area.
Moves the cursor for the character to be input to the right. When continue turning, the characters scroll tothe left.
Moves the cursor for the character to be input to the left. When continue turning, the characters scroll tothe right.
Moves the cursor for the title name to the right.Moves the cursor for the title name to the left.
Example: When input the title “M1”1) Select “M” (put the cursor to the letter M using the JOG dial).2) Press the SET button. The letter M is now displayed in the title name area.3) Press the DISPLAY / CHARA. button until the numbers are displayed.4) Select “1” and press the SET button. The title name “M1” will be displayed.• If the wrong character has been input, clear it by pressing the 7/CHARGE button.• To clear a particular character which has been input, use the ¢ or 4 button to align the cursor with the
character, and press the 7 /CHARGE button. Then, select the correct character and press the SET button.
6. Press the EDIT/ENTER button.“COMPLETE” and “TOC” appear, indicating successful recording.
• When you turn off the power by pressing the 7/CHARGE button, “UTOC Writing” will be displayed and theedited contents are written. (The “TOC” indicator goes out.)
To cancel the operation, press the 7/CHARGE button in step 1 through 3 or depress it in step 4 or 5, until thedisplay returns to the original display.
[Character sets table]
1 In Stop mode, press the EDIT/ENTERbutton.“TITLE?” is displayed.
2 Press the SET button.
• You can listen to the track by pressing the 6 but-ton. The track to be entitled is repeatedly played.
3 Turn the JOG dial (or press the 4 or¢ button) to select the track numberto be entitled.To select the disc title, turn the JOG dial reverse
(or press the 4 button) until the following discmark is shown on the display.
4 Press the SET button.
5 Input a preferred title (up to 64 charac-ters).Use the following title editing buttons to input a title.
Giving Titles to MD (TITLE Function)Use the unit to carry out this function.• You can give a disc title to the MD and a track title to the tracks in the MD. Any title name can be give up to 64
characters using the provided character sets.
¢
Z
P Q R S T
K L M N O
F G H I J
A B C D E
U V W X Y
Upper-case letters Lower-case letters
z
p q r s t
k l m n o
f g h i ja b c d e
u v w x y
Symbols
/ : ; < =
> ? @ _ `
+ , – .
% & ’ ( )
! ” # $
5 6 7 8 9
0 1 2 3 4
Numbers
(space)
Disc mark
Track to be entitled
Characters to be input
Cursor Title name area
4
JOG(forward)
JOG(reverse)
XM-R70(B)_P9-16.p65 6/23/99, 3:08 PM11

12
Using the Unit with Optional AccessoriesListening to MDs with an audio systemYou can listen to MDs through your audio system.• Connect a stereo connection cable (not supplied) as
shown on the right after turning off the amplifier.• Adjust the volume level of the unit to an appropriate
level.• Adjust the volume level on the amplifier.• Use the unit’s buttons for operation. (The remote
control will issue a pip tone.)
Listening to MDs with a car audio systemYou can listen to MDs through your car audio system. The following options are available for your car audio system.• Car adaptor (CA-R553)• Car audio cassette adaptor
CAUTION:Before connecting the car adaptor, remove the rechargeable battery from the unit. Also remove the battery case.• Connect the car adaptor to the DC input jack as
shown on the right.• Connect the car audio cassette adaptor between the
remote control and the cassette slot of your car au-dio system.
• Adjust the volume level of the unit to an appropri-ate level.
Notes
• Since the insertion direction of the car audio cassette adaptor is limited, be sure whether it can be inserted into thecassette slot of your car audio system.
• Depending on the vehicle used, noise may occur. In this case, it is recommended to connect a noise filter availableon the market between the remote control and car audio cassette adaptor.
• If your car audio system is equipped with a LINE IN or AUX IN jack, you can connect the output of the remotecontrol to the jack using a stereo mini plug signal cord (not supplied). In this case, you do not need the optionalcar audio cassette adaptor.
CautionsBatteries• Before replacing batteries, always turn off the unit.Rechargeable lithium–ion battery (BN-R3610):• Use only the rechargeable battery (BN-R3610) supplied with the unit.• If the power delivered by the battery lasts for a very short time after recharging, it means that the battery’s service
life is over. Do not use it any more.• Recharging already charged battery will shorten its service life.• When recharging battery for the first time or when it has not been used for a long period of time, the play time
may be shorter than usual. In a case like this, repeatedly recharge and discharge the battery. This will restore it toits regular state.
• Do not allow any metal objects to touch the terminals of rechargeable battery since this may cause short-circuitingwhich is dangerous.
• Recharging shall be made at the temperature from 0°C to 40°C.Dry cell battery and rechargeable battery:To prevent damage to the batteries and electrolyte leakage, heed the following points.• Align the ª and · polarities properly when inserting the batteries.• Remove the batteries if you do not plan to use the unit for a long period of time.• Do not throw batteries into a fire, and do not short-circuit, disassemble or subject them to excessive heat.• Do not attempt to recharge dry cell batteries.
Stereo connection cable(not supplied)
Amplifier
Car audio cassette adaptor(3.5 mm dia. stereo plug)
Car adaptor (CA-R553)
or
XM-R70(B)_P9-16.p65 6/23/99, 3:08 PM12

13
Carrying batteries:When putting dry cell or rechargeable battery in a pocket or bag, ensure that no other metal objects such as a neck-lace are placed together with them. Contact with metal may cause short-circuiting which, in turn, may cause a fire.
Notice about the rechargeable battery.The battery is designated recyclable.Please follow your local recycling regulations.
AC adaptor• Handle the AC adaptor carefully. Improper handling is dangerous.
• Do not touch it with wet hands.• Do not place heavy objects on top of it.• Do not forcibly bend it.
• Be sure to connect only the AC adaptor provided with the unit.• Disconnect the AC adaptor from the power outlet if the unit is not going to be used for a long time.
UnitNo altering or remodellingThis can cause malfunctioning.No dropping or strong impactsThis may damage the unit.Locations to be avoidedAvoid using the unit in the following locations since they can cause malfunctioning.1. Bathrooms and other moisture-prone places.2. Warehouses and other dusty places.3. Very hot places near heating appliances, etc.Do not leave the unit exposed to direct sunlight for long periods of timeThis may deform or discolor the cabinet and may also cause malfunctioning.
Precautions for Listening with the headphones• Do not play your headset at a high volume. Hearing experts advise against continuous extended play.• If you experience a ringing in your ears, reduce volume or discontinue use.• Do not use while operating a motorized vehicle. It may create traffic hazard and is illegal in many areas.• You should use extreme caution or temporarily discontinue use in potentially hazardous situations.• Even if your headphones is an open-air type designed to let you hear outside sounds, don’t turn up the volume so
high that you can’t hear what’s around you.
When driving a carIn the interest of traffic safety, do not operate the unit while driving.
Information on MDs (Minidiscs)This is a new digital audio disc format: it has a diameter of 64 mm and enables up to 80 minutes of playback and recording.
The cartridgeThe diameter of the disc itself is 64 mm, smaller than a CDsingle. The disc sits inside a 68 × 72 mm cartridge, whichalso being pocket size, makes minidiscs extremely handyfor carrying and storage. Since the disc is protected by thecartridge, dust and dirt cannot easily get into it. And thanksto a shutter which is closed at all times except during use,there is no need to worry about scratches or finger marks,making the handling of minidiscs very simple.
Two types of minidiscThere are two types of minidisc, “recordable MDs” and“playback-only MDs.” The playback method for each is thesame: a laser irradiates the disc and the signal is read fromthe beam which comes back. However, the recordingmethod for each type is different.
Playback-only MDThis is the type used for commercially-available pre-re-corded MDs, on which recording cannot be done. Like aCD, data is recorded based on the presence or absence ofsmall indentations called pits. A disc recorded with this for-mat is called an “optical disc.”
Recordable MDsThese are the so-called “blank” MDs you can use to makeyour own recordings. Data is recorded by magnetism,which is easily processed, so that recording can be doneagain and again. By using a laser to heat the disc, the mag-netism is erased and the magnetic head records the newdata. Discs with this type of recording method are calledmagneto-optical (MO) discs.
XM-R70(B)_P9-16.p65 6/24/99, 11:49 AM13

14
ATRAC (Adaptive Transform AcousticCoding)Within recordings, there are sounds which cannot be readilyheard. For example, as the volume decreases, high-pitchedsounds and low-pitched sounds become difficult to hear. Also, ifa quiet sound comes at the same time as or just after a loudsound, it will not be heard. With minidiscs, data is compressedusing a technology called ATRAC (Adaptive Transform Acous-tic Coding) which selectively chooses sounds based on humansense of hearing characteristics. With this technology, the re-corded data is about one-fifth the volume of the original data, al-lowing it to fit on a compact minidisc.
0
+20
-20
-40
-60
(dB)
20 50 100 500 1k 5k 15k10k(Hz)
Sound skip guard memoryWith the minidisc, the data of the track being played can betemporarily stored up using a function called “sound skipguard memory”. Even when data cannot be collected prop-erly from the disc due to shaking or vibrations, informationis stored in the “sound skip guard memory”, so that there isno break in the sound which is actually delivered.
UTOC (User Table Of Contents)In a minidisc, apart from the recorded tracks, there is the“UTOC”. In this area, information such as the positionwhere each track is recorded, the track divisions, and trackorder are listed. When music search is done, the UTOC isconsulted, and the tracks are quickly found and playedback. When editing is done, only the UTOC is changed, sothere is no need to re-record the tracks.Snap
»Sensitivity of
our ears«
Dull
Low | Sound range \ HighSound range and sensitivity of our ears
MD (Minidisc) MessagesMeaning/Action
A disc has been inserted with nothing recorded on it.
You have tried to join tracks which cannot be joined.
There is a problem (damage) with the disc.(Replace the disc.)
There is not enough space left on the disc.There are over 254 tracks.
The disc is in accidental erasure protection mode.(Slide the accidental erasure protection tab so that the hole is covered.)
A malfunction occurred during recording.(Stop the disc by pressing the 7 button and redo the operation.)
There is no disc in the unit.
You have tried to digitally dub a CD-ROM.(Stop recording.)
You have tried to record or edit on a playback-only disc.
The track is protected. (This unit cannot undo track protection. Undo the pro-tection using the appliance that created it.)
You have tried to make a copy of a copy by digital dubbing.(Dub using analog input (LINE IN).)
The digital cable is disconnected.
The life of battery has ended.
The temperature of rechargeable battery is out of acceptable range.
Message
DIGITAL INUNLOCK
TRACKPROTECTED
PLAYBACK DISC
NON AUDIOCANNOT COPY
NO DISC
EMERGENCY STOP
DISCPROTECTED
DISC ERROR
BLANK DISC
CANNOT JOIN
DISC FULL
SCMSCANNOT COPY
BATT ERROR
HIGH TEMPLOW TEMP
XM-R70(B)_P9-16.p65 6/23/99, 3:08 PM14

15
Minidisc LimitationsThe minidisc records information in an original format that differs from that of conventional cassette tapes or DATs.Since there are some limitations with this recording format, the following types of conditions may arise. These condi-tions are not malfunctions.
Condition CauseWith the minidisc, there is a maximum number of tracks whichcan be recorded, regardless of time. More than 254 tracks cannotbe recorded on a disc.When parts of the disc are erased and re-recorded, blank spots arecreated on the disc. When recording to such a disc, one track ofdata is divided and recorded in the blank areas. During recording,when these divided parts become numerous, the “DISC FULL”message may be displayed. When a part of 8 seconds or less iscreated by division, that track cannot be joined by the JOIN func-tion, and even if it is erased, the remaining usable time on the discdoes not increase. Tracks divided into small pieces may skip whenfast forward or fast rewind is done.Minidiscs must have at least 2 seconds of continuous space in or-der to record. For this reason, the actual recording time of discswith a lot of short blank areas becomes shorter.
Rules of Digital DubbingThe following rules regarding copyright exist for dubbing to MDs from CDs or DATs through digital terminals.
SCMS (Serial Copy Management System)Minidiscs can record clear sound with low loss of quality from CDs or DATs through each component’s digital input/outputterminal. However, minidiscs are set up so that a disc recorded in this way cannot be recorded onto another minidisc throughdigital input/output terminals. In other words, you can not make a copy of a copy. This rule is called SCMS (Serial CopyManagement System).The recorder is designed in compliance with this rule. If you try to make a copy of a copy the error message “SCMSCANNOT COPY” is displayed, and dubbing can not be done.
It should be noted that it may be unlawful to re-record pre-recorded tapes, records, or discs without the consent of the ownerof copyright in the sound or video recording, broadcast or cable programme and in any literary, dramatic, musical, or artisticwork embodied therein.
MaintenanceUnit:Wipe the unit and remote control with a soft cloth. Remove stubborn dirt using a cloth which has been dipped inwater or soapy water and wrung out, and then wipe dry.• If you intend to use a chemically treated cleaning cloth, read its directions first.• Do not use alcohol or paint thinners.
MDs:If the MD cartridge is dirty, wipe it with a damp cloth and then wipe dry.
When storing MDs, avoid locations which are• Exposed to direct sunlight.• Susceptible to high levels of humidity or dust.• Directly exposed to heat from a heating appliance.• On top of a car dashboard or near the rear window.
Handling the MDs• Do not open the shutter. The shutter is usually locked to prevent opening. Do not force to open it or the disc may
be destroyed.
“DISC FULL” is displayed, even though the pos-sible recording time is not used up.
“DISC FULL” is displayed, even though the num-ber of tracks and recording time are not at the limit.The JOIN function sometimes does not work.The remaining usable time on the disc does not in-crease even when tracks are erased.The sound skip during fast forward or fast rewind.
The amount of recorded time on the disc added tothe amount of remaining time falls shout of thedisc’s total possible recording time.
OK
DIGITAL
NO
DIGITAL
XM-R70(B)_P9-16.p65 6/23/99, 3:08 PM15

16
SpecificationsPortable minidisc recorderType : Minidisc digital audio systemSampling frequency : 44.1 kHz
Troubleshooting GuideBefore requesting service for this unit, check the chart below for a possible cause of the problem you are experiencing.Some simple checks or a minor adjustment on your part may eliminate the problem and restore proper operation.If you are in doubt about some of the check points, or if the remedies indicated in the chart do not solve the problem,refer to the directory of Authorized Service Centers (enclosed with this unit) to locate a convenient service center, orconsult your dealer for instructions.
Check thisIs the MD loaded? If not loaded, “NO DISC” will appear.• Is the HOLD switch released?• Is the battery low?• Is the MD faulty? (Play other MD.)• Is there moisture condensation on the lens?
(Wait for about an hour and then try again.)Is the Repeat Play or Random Play selected?Is the accidental erasure prevention knob of the MD set to the open position?(Set it to the close position.)• Is the headphones plug inserted all the way?• Is the plug dirty? (Wipe away dirt on the plug.)• Is music recorded on the MD? If not, “BLANK DISC” will appear.Is the unit too near a TV or tuner? (If the TV or tuner is connected to a simpleindoor antenna, connect it to an outdoor antenna.)Was the power source removed from the unit with the HOLD switches activated?(Release both HOLD switches and try to operate again.)
ProblemCannot operate.Cannot play the MD.
Tracks on MD do not play in order.Recording cannot be made on MD.
Cannot hear music—too noisy.
TV picture is distorted.
Power is not turned on.
Compression / : ATRAC methodexpansion method
Number of channels: : 2 channels (stereo) / 1 channel (mono)Frequency response : 20 Hz to 20,000 HzWow & flutter : UnmeasurableInput : LINE IN: 100 mV / 47 kohms,
OPTICAL: -23 to -14 dBm,(*Same jack is used for LINE INand OPTICAL)MIC: 1.3 mV / 200 ohms to 2kohms
Output : Headphones (3.5 mm dia. stereo × 1)5 mW / ch at 10% THD / 16 ohmsto 47 kohms
Duration of battery :
* Above duration may differ depending on the ambi-ent temperature and conditions.
* A rechargeable battery (BN-R3610) is charged for 2hours.
Power requirements : DC 3.6 V (rechargeable battery), DC4.5 V (R6 size battery × 3), DC IN 6 V
Dimensions : 81.7 × 19.5 × 88.9 mm (W × H × D) (excluding buttons and controls)Mass : Approx. 155 g (without battery)AC adaptor (AA-R554)Input power source : AC 230 V, 50 HzOutput voltage : DC 6 V, 0.6 A
Design and specifications are subject to change without notice.US and foreign patents licensed from Dolby LaboratoriesLicensing Corporation.
When Playing back
10 hours
25 hours
38 hours
Rechargeable battery(BN-R3610)
Alkaline batteries(LR6-Panasonic)
Rechargeable battery+
Alkaline batteries
When recording
5 hours
12 hours
18 hours
XM-R70(B)_P9-16.p65 6/23/99, 3:08 PM16

VICTOR COMPANY OF JAPAN, LIMITED
Printed in Japan
0699MNMCREOZK EN
XM-R70(B)_Cover.p65 6/23/99, 3:10 PM2