Embed Size (px)
Citation preview
Portable Air Conditioner
Owner's Manual
Model:3 in 1 12,000 Btu/h Series 3
Please read this owner’s manual carefully before
operation and retain it for future reference.
CONTENTS 1. SUMMARY .......................................................................................1
2. PORTABLE AIR CONDITIONER......................................................2
3. OPERATING THE UNIT... .............................................................3-6
4. REMOTE CONTROLLER FUNCTIONS…………………… ............7-8
5. ACCESSORIES AND INSTALLATION OF HEAT EXHAUST HOSE ............................................................................................9-11
6. CARE AND MAINTENANCE .....................................................12 -13
7. TROUBLESHOOTING.....................................................................14
SUMMARY
-1
This portable air conditioner provides the following functions air conditioning, dehumidifying and fan only
options. Perfect for domestic and light commercial use such as offices, shops and reception areas where
permanently installed air conditioning systems may be too inflexible and expensive.
Please read all these instructions carefully before operating the unit.
-2
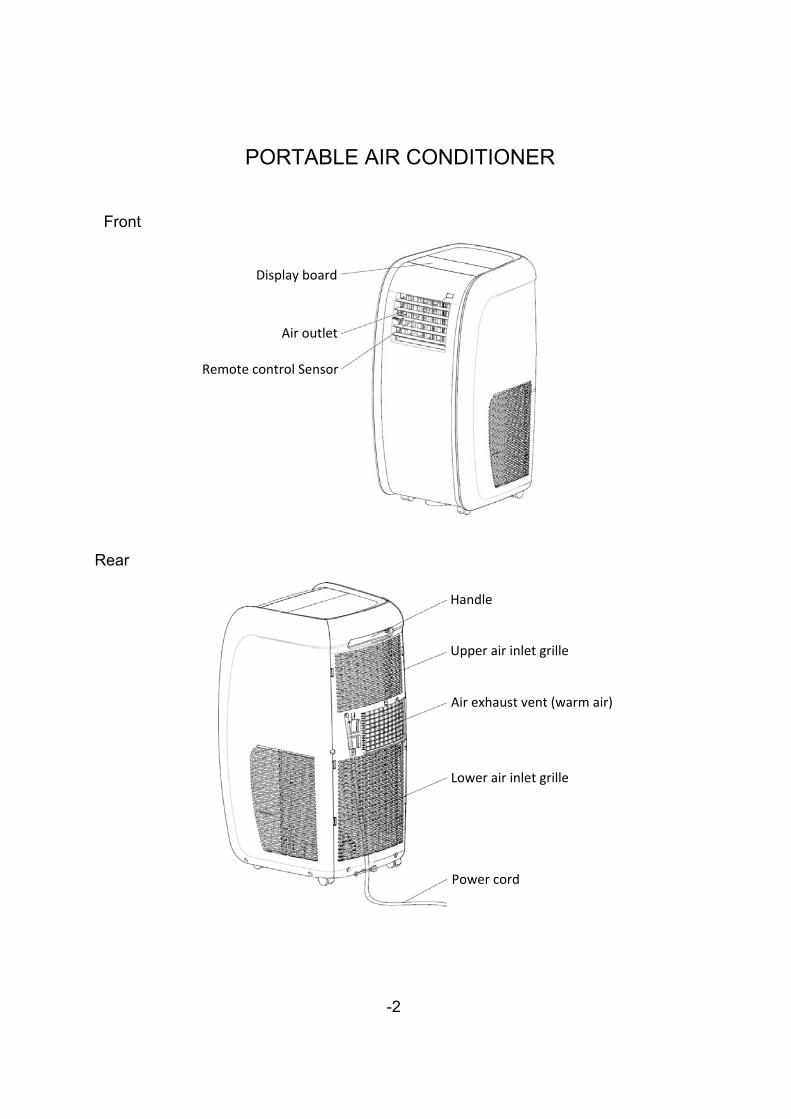
PORTABLE AIR CONDITIONER
Display board
Air outlet
Remote control Sensor
Front
Rear
Handle
Upper air inlet grille
Air exhaust vent (warm air)
Lower air inlet grille
Power cord
OPERATING
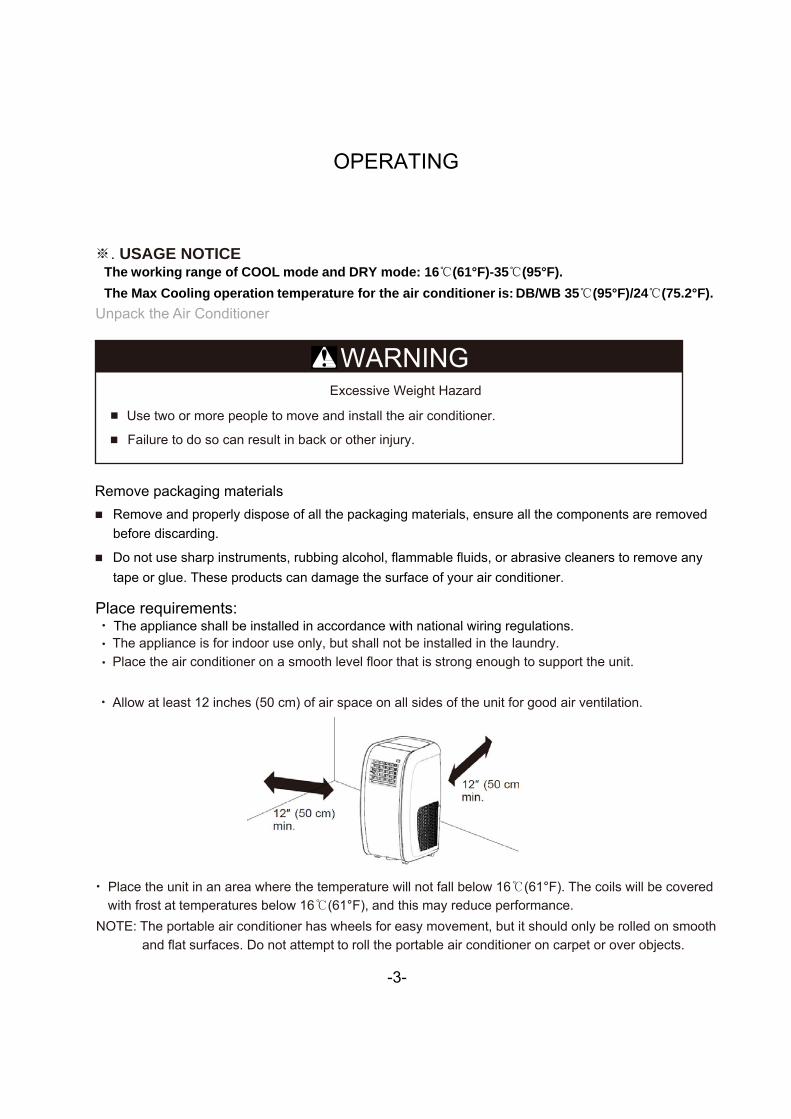
※. USAGE NOTICE
The working range of COOL mode and DRY mode: 16℃(61°F)-35℃(95°F).
The Max Cooling operation temperature for the air conditioner is: DB/WB 35℃(95°F)/24℃(75.2°F).
Unpack the Air Conditioner
WARNING
Excessive Weight Hazard
Use two or more people to move and install the air conditioner.
Failure to do so can result in back or other injury.
Remove packaging materials
Remove and properly dispose of all the packaging materials, ensure all the components are removed
before discarding.
Do not use sharp instruments, rubbing alcohol, flammable fluids, or abrasive cleaners to remove any
tape or glue. These products can damage the surface of your air conditioner.
Place requirements: • The appliance shall be installed in accordance with national wiring regulations. • The appliance is for indoor use only, but shall not be installed in the laundry.
• Place the air conditioner on a smooth level floor that is strong enough to support the unit.
• Allow at least 12 inches (50 cm) of air space on all sides of the unit for good air ventilation.
• Place the unit in an area where the temperature will not fall below 16℃(61°F). The coils will be covered
with frost at temperatures below 16℃(61°F), and this may reduce performance.
NOTE: The portable air conditioner has wheels for easy movement, but it should only be rolled on smooth
and flat surfaces. Do not attempt to roll the portable air conditioner on carpet or over objects.
-3-
OPERATING
-4-
※. USAGE NOTICE
Electrical Requirements
WARNING
Electrical Shock Hazard
Plug into an earthed socket outlet.
The unit must be earthed.
Failure to follow these instructions can result in
death, fire, or electric shock.
Do not use an extension cord.
Do not use with an adapter.
IMPORTANT Do not install and use your portable air conditioner unit before carefully reading this instruction guide. Please retain this manual brochure for product warranty and future reference Safety & Guidance notes
Ensure that the voltage marked on the unit agrees with your mains voltage. The unit installation must comply with all applicable local and national regulations. The Air conditioner is a class 1 appliance and MUST BE EARTHED The manufacturer does not accept any liability if the safety standards are not observed. Please make sure the unit air inlets and outlet are not blocked at all times. Operate this unit on a flat horizontal surface to avoid water leakage. Do not operate this unit in an explosive or corrosive atmosphere. Operate this unit in an ambient temperature of 32 degree centigrade or less. Clean the air filter periodically to achieve the most efficient cooling. When the unit is switched off, please wait at least 3 minutes before restarting (this is to prevent the
compressor from being damaged). Please do not use any extension cord for this unit. This unit is for indoor cooling only. Make sure the adjustable air vent on the front of the unit is open, and also the exhaust hose is extended
to the closest open window/door before using. Never insert fingers or any other objects into the air outlet grille. This appliance is not intended for use by young children or infirm persons unless they have been
adequately supervised by a responsible person to ensure that they can use the appliance safely. Young children should be supervised to ensure that they do not play with the appliance
NOTE:- This unit can evaporate the condensate and pass it out through the exhaust hose automatically, when the unit is running. You do not need to install a drain hose. Please ensure that the rubber plug is well pushed into the drain pipe, when the unit is running. **In extremely humid weather conditions the unit will display the message “H8”, and will stop operating. The drain plug will need to be removed to drain off any excess condensate. (Refer to page 13 for details)
OPERATING
-5
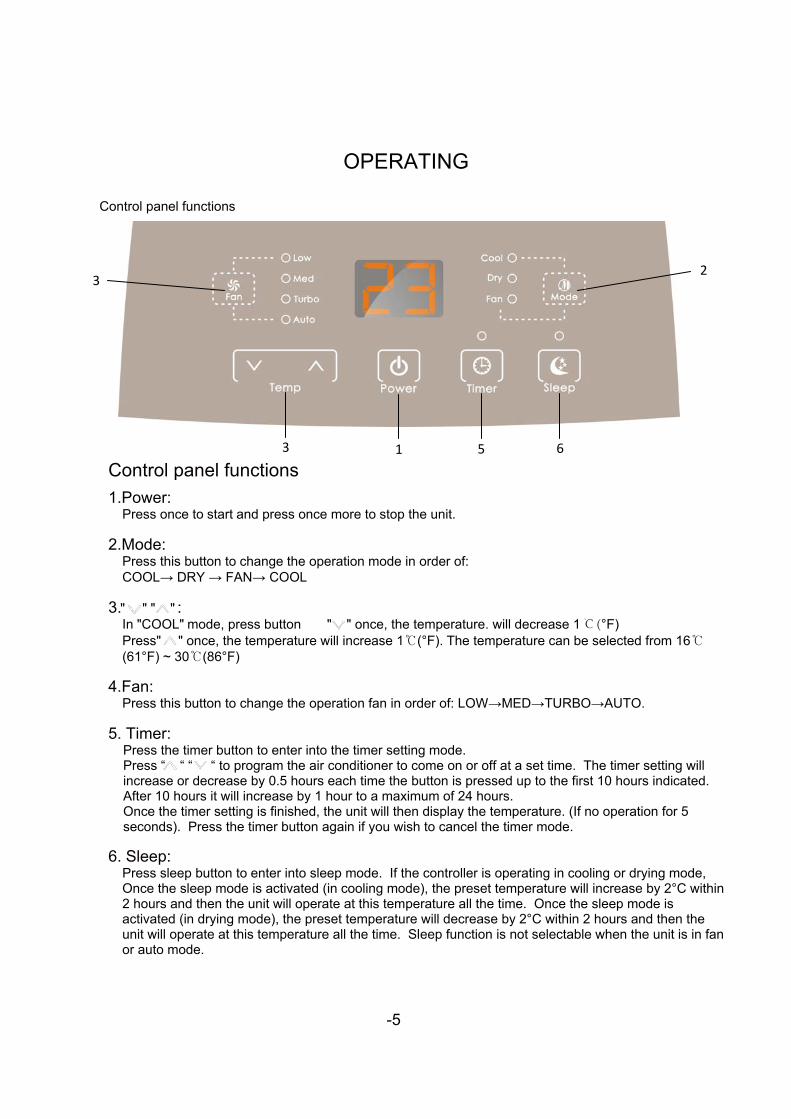
Control panel functions
Control panel functions
1.Power: Press once to start and press once more to stop the unit.
2.Mode:
Press this button to change the operation mode in order of: COOL→ DRY → FAN→ COOL
3." " " " :
In "COOL" mode, press button " " once, the temperature. will decrease 1 °F) Press" " once, the temperature will increase 1℃(°F). The temperature can be selected from 16℃ (61°F) ~ 30℃(86°F)
4.Fan:
Press this button to change the operation fan in order of: LOW→MED→TURBO→AUTO.
5. Timer: Press the timer button to enter into the timer setting mode.
Press “ “ “ “ to program the air conditioner to come on or off at a set time. The timer setting will increase or decrease by 0.5 hours each time the button is pressed up to the first 10 hours indicated. After 10 hours it will increase by 1 hour to a maximum of 24 hours. Once the timer setting is finished, the unit will then display the temperature. (If no operation for 5 seconds). Press the timer button again if you wish to cancel the timer mode.
6. Sleep:
Press sleep button to enter into sleep mode. If the controller is operating in cooling or drying mode, Once the sleep mode is activated (in cooling mode), the preset temperature will increase by 2°C within 2 hours and then the unit will operate at this temperature all the time. Once the sleep mode is activated (in drying mode), the preset temperature will decrease by 2°C within 2 hours and then the unit will operate at this temperature all the time. Sleep function is not selectable when the unit is in fan or auto mode.
1 5 6 3
3 2

-6
OPERATING
COOL mode 1). Select a place near a door and window, install the exhaust duct.
2). Press "MODE" key to select "COOL" mode.
3). Press" "or " " key to set the suitable temp.16℃( 61°F )~30℃(86°F)
DRY mode
FAN mode
Close all the doors and windows, in order to obtain the best dehumidifying effect:
Press "MODE" key, select the "DRY" mode, the unit will run in the "DRY" mode, at
the same time, the upper fan in the unit will run at the low speed, it is not adjustable. When the unit is running in FAN mode, you can select 3 speeds.
-7
REMOTE CONTROLLER FUNCTIONS
1 2
3 4
5
7 8
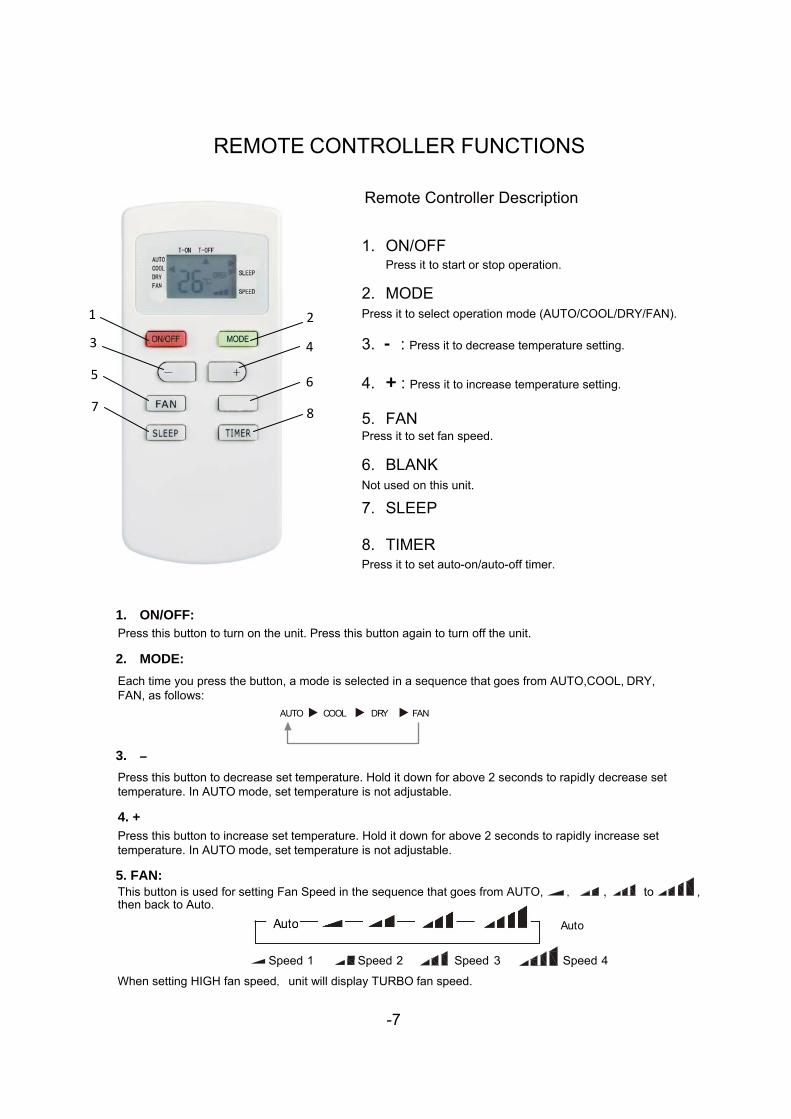
Remote Controller Description
1. ON/OFF Press it to start or stop operation.
2. MODE Press it to select operation mode (AUTO/COOL/DRY/FAN).
3. - : Press it to decrease temperature setting.
4. + : Press it to increase temperature setting.
5. FAN Press it to set fan speed.
6. BLANK Not used on this unit.
7. SLEEP
8. TIMER Press it to set auto-on/auto-off timer.
1. ON/OFF: Press this button to turn on the unit. Press this button again to turn off the unit.
2. MODE:
Each time you press the button, a mode is selected in a sequence that goes from AUTO,COOL, DRY, FAN, as follows:
AUTO COOL DRY FAN
3. –
Press this button to decrease set temperature. Hold it down for above 2 seconds to rapidly decrease set temperature. In AUTO mode, set temperature is not adjustable.
4. + Press this button to increase set temperature. Hold it down for above 2 seconds to rapidly increase set temperature. In AUTO mode, set temperature is not adjustable.
5. FAN: This button is used for setting Fan Speed in the sequence that goes from AUTO, , to , then back to Auto.
Auto
Speed 1 Speed 2 Speed 3 Speed 4
When setting HIGH fan speed,unit will display TURBO fan speed.
1
3
2
4
5
7
6
8
-8
REMOTE CONTROLLER FUNCTIONS
6. BLANK: Not used on this unit. 7. SLEEP:
Press this button to go into the SLEEP operation mode. Press it again to cancel this function. This function is available in COOL or DRY mode to maintain the most comfortable temperature for you. 8. TIMER:
Press this button to initiate auto-on/auto-off timer. To cancel auto-timer program, press this button twice.
9. CHANGING THE DISPLAY FROM °C TO °F
With the unit OFF, press "MODE" and " - " buttons simultaneously to switch between °C and °F . To change back press “MODE” and “-“ buttons again.
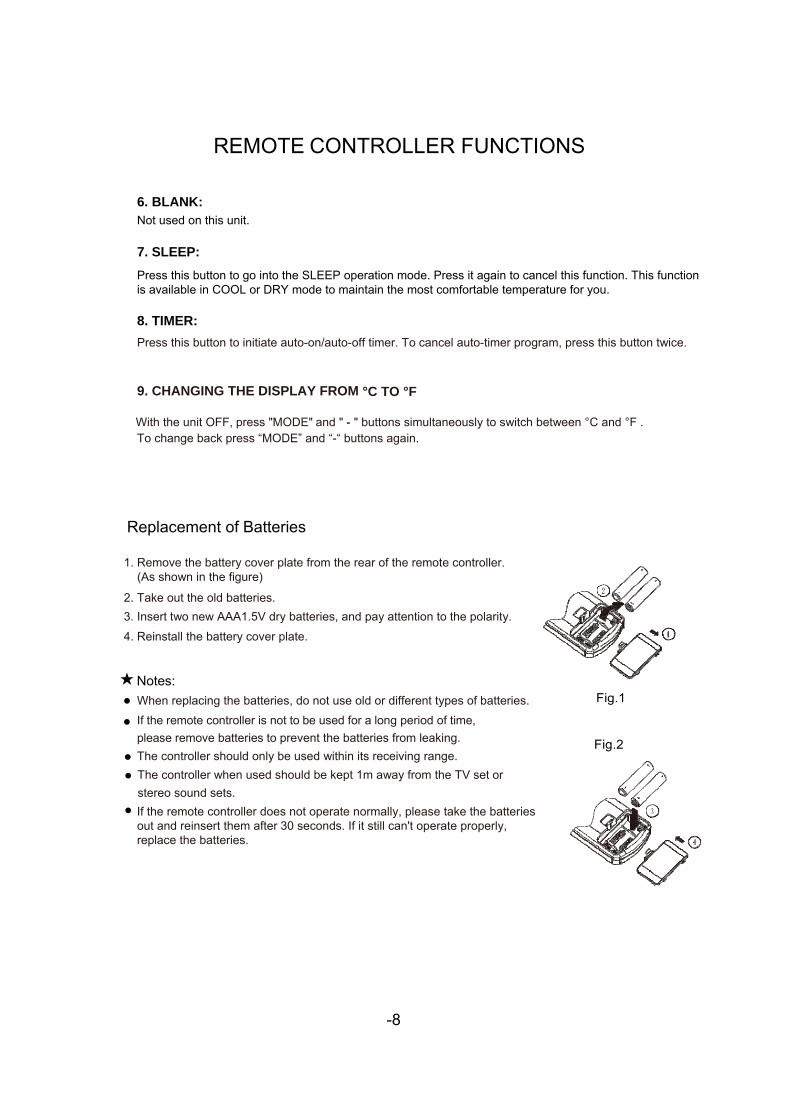
Replacement of Batteries
1. Remove the battery cover plate from the rear of the remote controller. (As shown in the figure)
2. Take out the old batteries.
3. Insert two new AAA1.5V dry batteries, and pay attention to the polarity.
4. Reinstall the battery cover plate.
★ Notes:
● When replacing the batteries, do not use old or different types of batteries.
● If the remote controller is not to be used for a long period of time,
please remove batteries to prevent the batteries from leaking.
● The controller should only be used within its receiving range.
● The controller when used should be kept 1m away from the TV set or
stereo sound sets. ● If the remote controller does not operate normally, please take the batteries
out and reinsert them after 30 seconds. If it still can't operate properly, replace the batteries.
Fig.1
Fig.2
-9
ACCESSORIES AND INSTALLATION OF HEAT EXHAUST HOSE
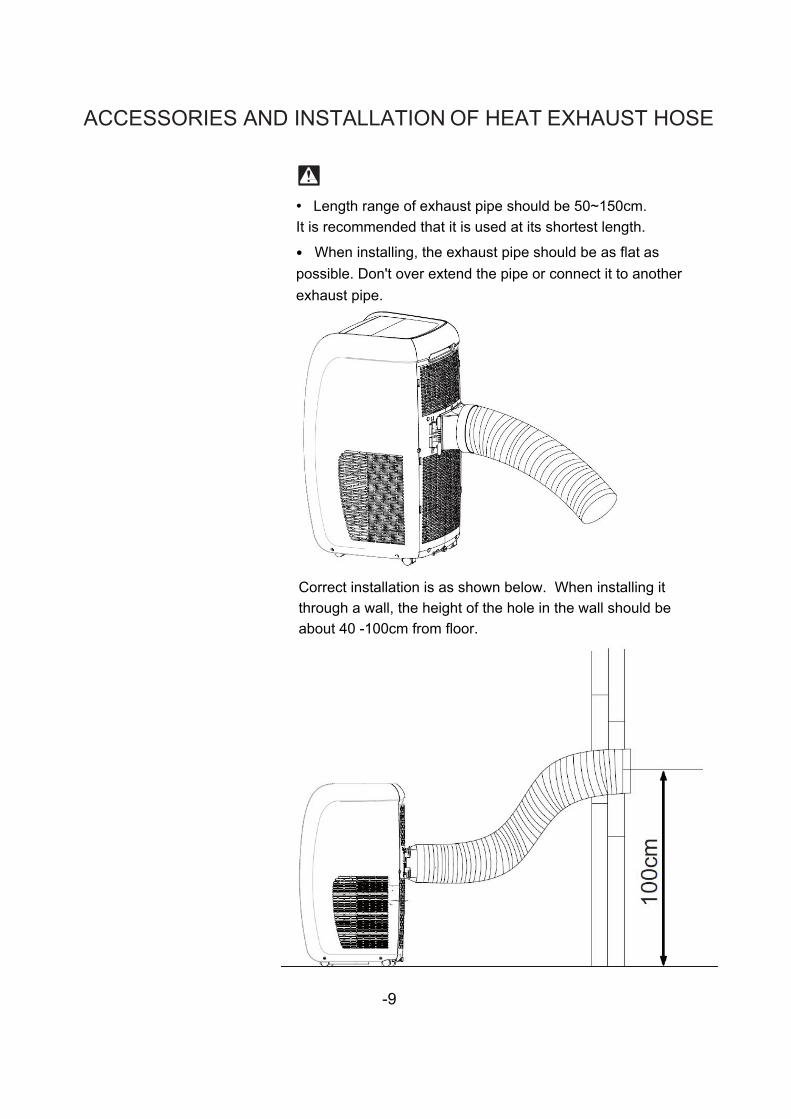
● Length range of exhaust pipe should be 50~150cm.
It is recommended that it is used at its shortest length.
● When installing, the exhaust pipe should be as flat as
possible. Don't over extend the pipe or connect it to another
exhaust pipe.
Correct installation is as shown below. When installing it
through a wall, the height of the hole in the wall should be
about 40 -100cm from floor.
-10
ACCESSORIES AND INSTALLATION OF HEAT EXHAUST HOSE
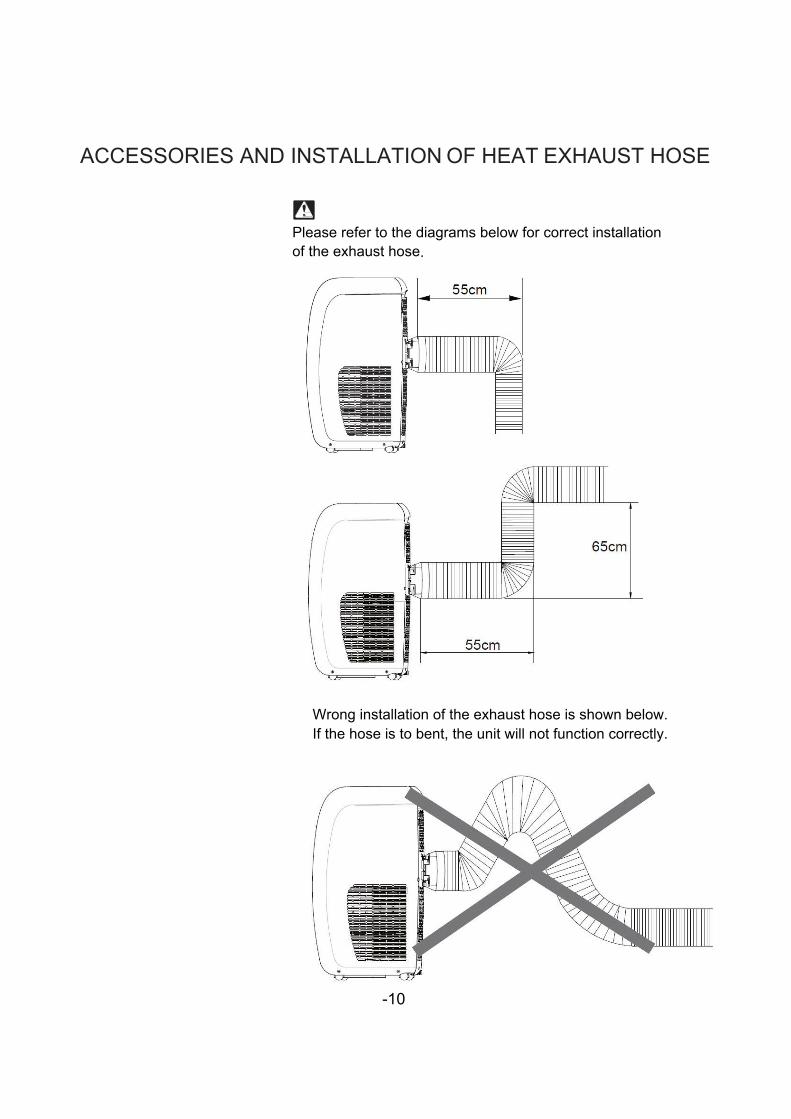
Please refer to the diagrams below for correct installation of the exhaust hose.
Wrong installation of the exhaust hose is shown below. If the hose is to bent, the unit will not function correctly.
ACCESSORIES AND INSTALLATION OF HEAT EXHAUST HOSE
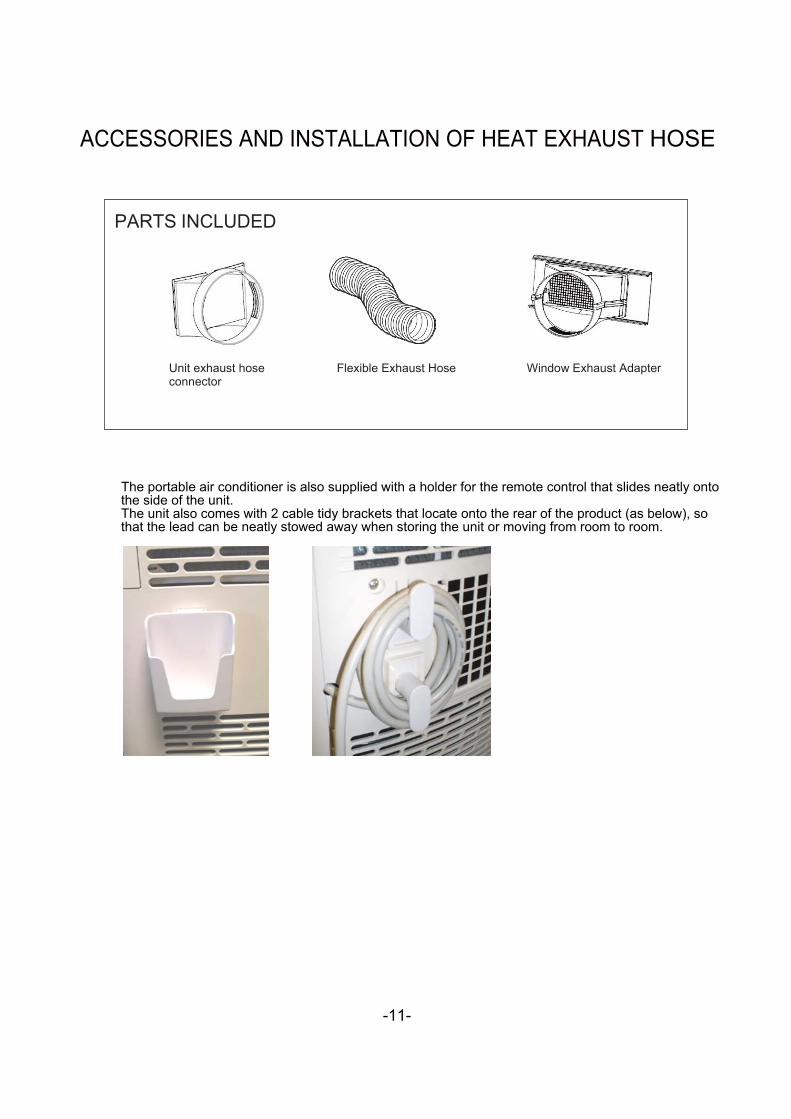
PARTS INCLUDED
Unit exhaust hose connector
Flexible Exhaust Hose Window Exhaust Adapter
The portable air conditioner is also supplied with a holder for the remote control that slides neatly onto the side of the unit. The unit also comes with 2 cable tidy brackets that locate onto the rear of the product (as below), so that the lead can be neatly stowed away when storing the unit or moving from room to room.
-11-
CARE AND MAINTENANCE
-12
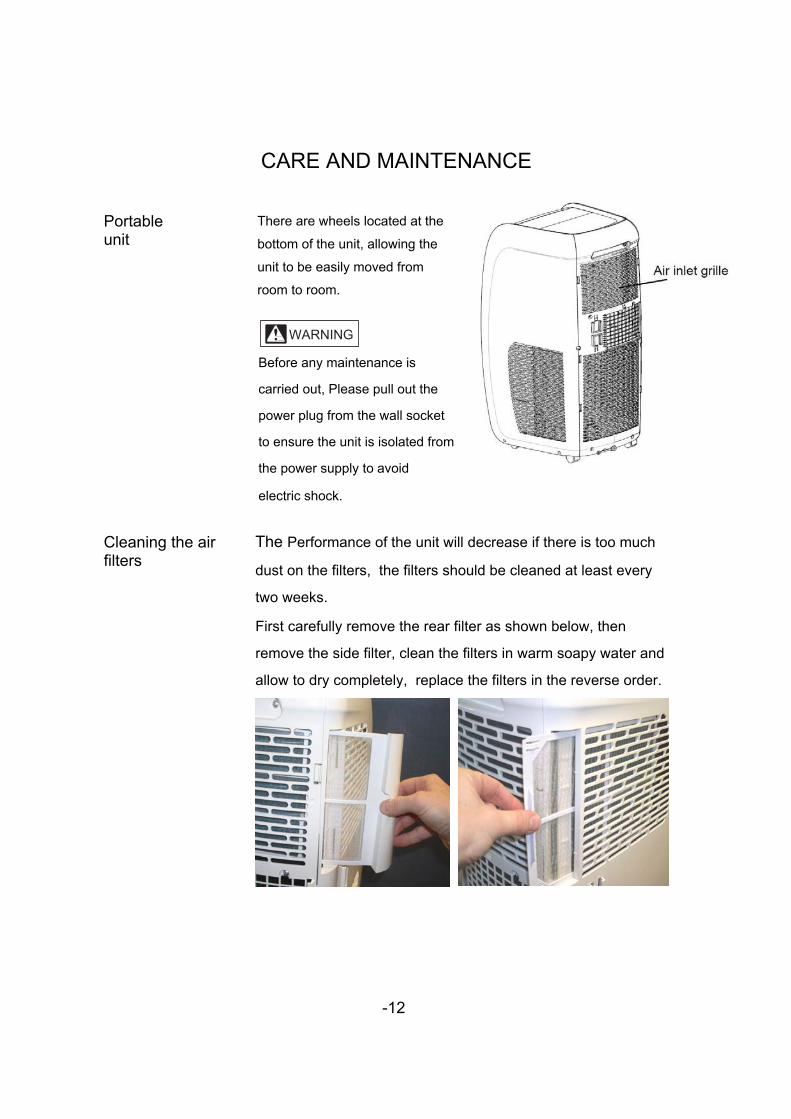
Portable unit
There are wheels located at the
bottom of the unit, allowing the
unit to be easily moved from
room to room.
WARNING
Before any maintenance is
carried out, Please pull out the
power plug from the wall socket
to ensure the unit is isolated from
the power supply to avoid
electric shock.
Cleaning the air filters
The Performance of the unit will decrease if there is too much
dust on the filters, the filters should be cleaned at least every
two weeks.
First carefully remove the rear filter as shown below, then
remove the side filter, clean the filters in warm soapy water and
allow to dry completely, replace the filters in the reverse order.
CARE AND MAINTENANCE
-13
Ensure that the unit is isolated from the power supply before cleaning. Wipe the outside of the unit with a damp cloth and dry with a soft cloth.
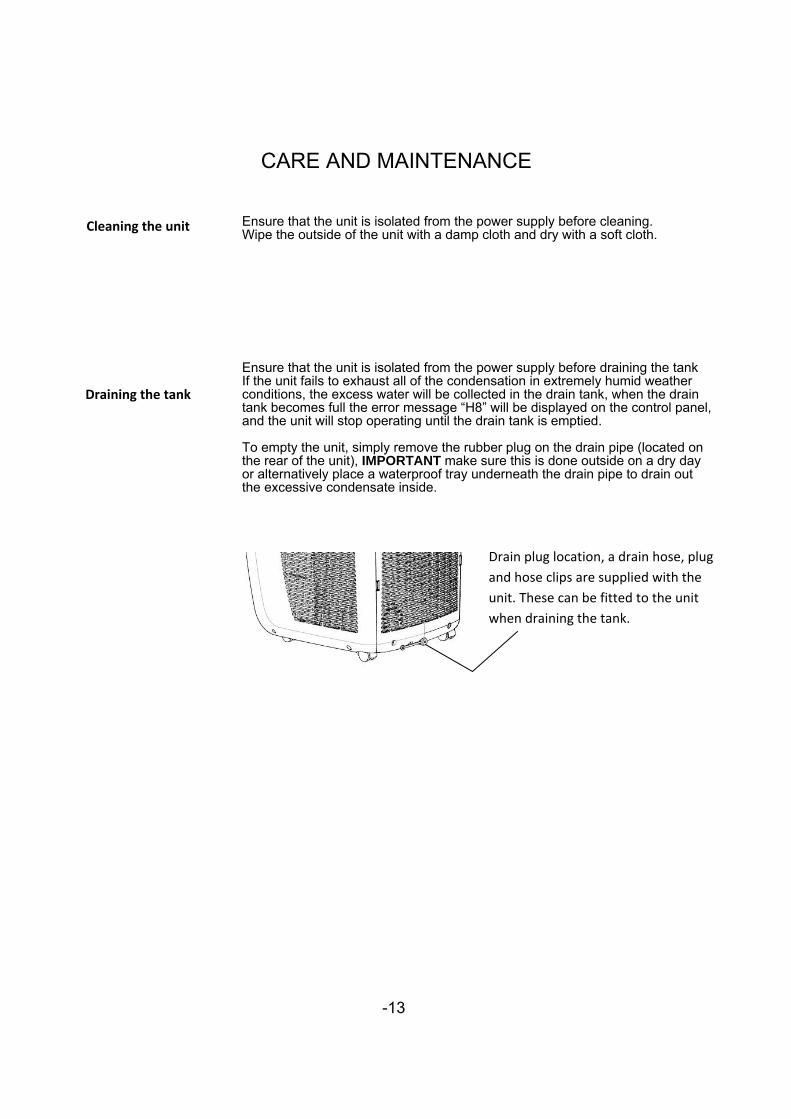
Ensure that the unit is isolated from the power supply before draining the tank If the unit fails to exhaust all of the condensation in extremely humid weather conditions, the excess water will be collected in the drain tank, when the drain tank becomes full the error message “H8” will be displayed on the control panel, and the unit will stop operating until the drain tank is emptied. To empty the unit, simply remove the rubber plug on the drain pipe (located on the rear of the unit), IMPORTANT make sure this is done outside on a dry day or alternatively place a waterproof tray underneath the drain pipe to drain out the excessive condensate inside.
Draining the tank
Drain plug location, a drain hose, plug
and hose clips are supplied with the
unit. These can be fitted to the unit
when draining the tank.
Cleaning the unit
TROUBLESHOOTING
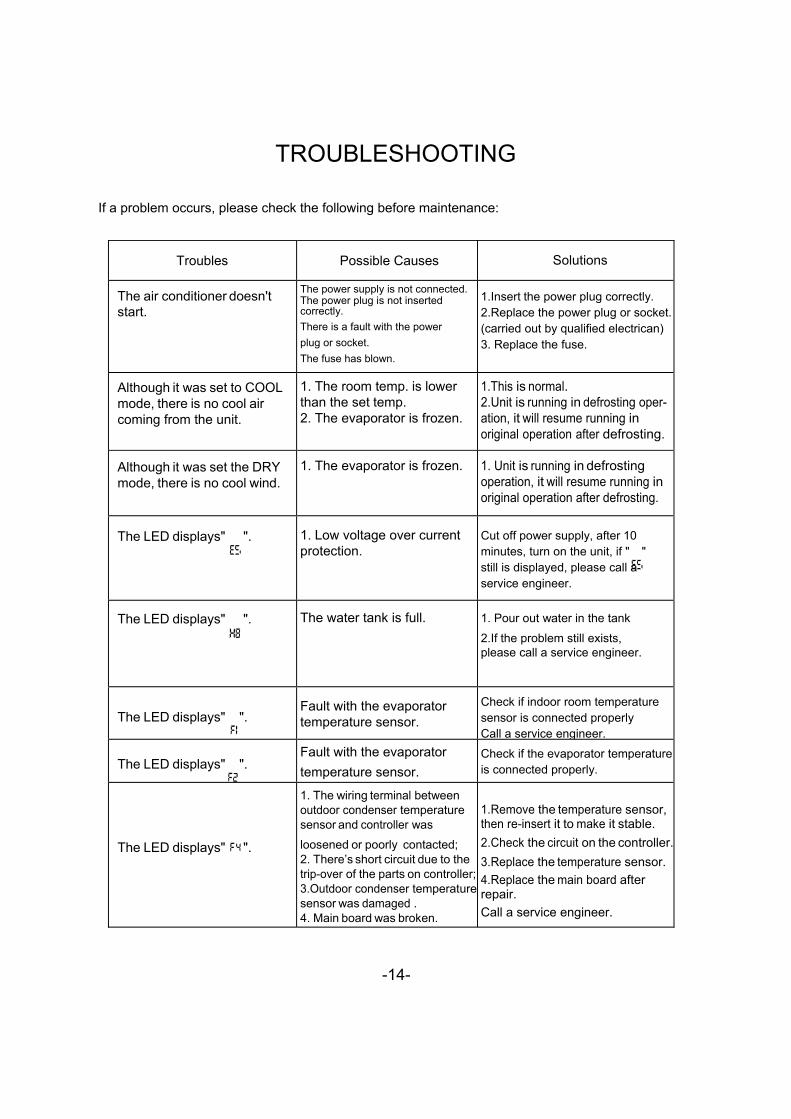
If a problem occurs, please check the following before maintenance:
Troubles
Possible Causes Solutions
The air conditioner doesn't start.
The power supply is not connected. The power plug is not inserted correctly.
There is a fault with the power
plug or socket.
The fuse has blown.
1.Insert the power plug correctly. 2.Replace the power plug or socket.(carried out by qualified electrican) 3. Replace the fuse.
Although it was set to COOL mode, there is no cool air coming from the unit.
1. The room temp. is lower than the set temp. 2. The evaporator is frozen.
1.This is normal. 2.Unit is running in defrosting oper- ation, it will resume running in original operation after defrosting.
Although it was set the DRY mode, there is no cool wind.
1. The evaporator is frozen. 1. Unit is running in defrosting operation, it will resume running in original operation after defrosting.
The LED displays" ".
1. Low voltage over current protection.
Cut off power supply, after 10 minutes, turn on the unit, if " " still is displayed, please call a service engineer.
The LED displays" ".
The water tank is full. 1. Pour out water in the tank
2.If the problem still exists, please call a service engineer.
The LED displays" ".
Fault with the evaporator temperature sensor.
Check if indoor room temperature sensor is connected properly Call a service engineer.
The LED displays" ".
Fault with the evaporator
temperature sensor. Check if the evaporator temperature is connected properly.
The LED displays" ".
1. The wiring terminal between outdoor condenser temperature sensor and controller was
loosened or poorly contacted; 2. There’s short circuit due to the trip-over of the parts on controller;3.Outdoor condenser temperature sensor was damaged . 4. Main board was broken.
1.Remove the temperature sensor, then re-insert it to make it stable.
2.Check the circuit on the controller.
3.Replace the temperature sensor.
4.Replace the main board after repair.
Call a service engineer.
-14-
-15
This product should not be disposed of with household waste. Please recycle where facilities exist. Check with your local authority for recycling advice.
-16
449010A Supplied by APL UK 0212