Embed Size (px)
Citation preview
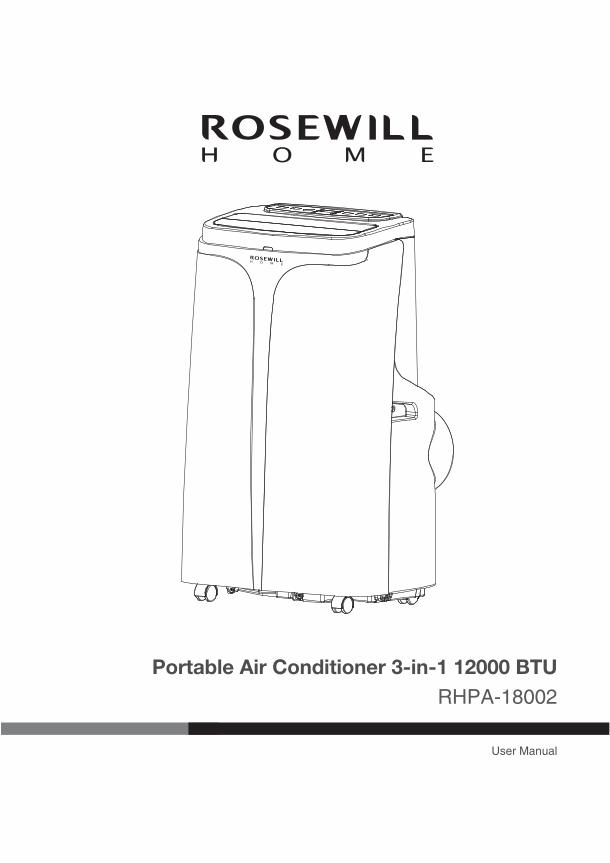
Portable Air Conditioner 3-in-1 12000 BTU
User Manual
RHPA-18002

Table of Contents
Page
I. Notes ..................................................... 1
II. Specifications ........................................ 2
III. Features and Components .................... 2-3
IV. Installation and Adjustment ................... 4-5
V. Control Setting ...................................... 6-7
VI. Drainage Instructions ............................ 8
VII.Maintenance.......................................... 9-10
VIII.Troubleshooting .................................... 11
IX. Appendix ............................................... 12
RHPA-18002
1
Portable Air Conditioner3-in-1 12000 BTU
• The air conditioner is suitable for indoor use only. Not suitable for other applications.
• Follow local grid interconnection rules while installing the air conditioner and ensure it is properly grounded. If you have any questions about electrical installation, follow our installation guide, and if necessary, ask a professional electrician for help.
• Place the machine on a flat and dry surface. Maintain a distance of at least 2 feet between the unit and surrounding objects or walls.
• After the air conditioner is installed, ensure the power plug is intact and firmly plugged into the power outlet. Bundle up or tie the remaining cord to prevent tripping over and accidental pulling of the plug.
• Do not place objects into the air inlet and outlet of the air conditioning unit. Keep these areas free from obstruction.
• When drainage pipes are installed, ensure they are properly connected and are not distorted or bent.
• While adjusting the upper and lower fan-guide strips of the air outlet, be gentle to avoid damaging the strips.
• When moving the machine, make sure it remains in an upright position.
• Keep the unit away from gasoline, flammable gas, stoves and other heat sources.
• Do not disassemble, overhaul and modify the machine arbitrarily, otherwise it will cause malfunction or even bring harm to people and property. To avoid danger, if a machine failure occurs, contact Rosewill Tech Support or seek a professional for repairs.
• Do not install and use the air conditioner in bathrooms or other humid environments.
• Do not pull the plug to turn off the machine.
• Do not place cups and other objects on the body to avoid water or other liquids from spilling into the air conditioner.
• Do not use insecticide sprays or other flammable substances near the unit.
• Do not wipe or wash the air conditioner with chemical solvents such as gasoline and alcohol. Before cleaning, you must disconnect the power supply and clean it with a soft, moist cloth. If the machine is extremely dirty, scrub with a mild detergent.
• With adult supervision, children 8 years old and up may operate this air conditioner. Children should not play with this machine, nor clean it without supervision. Persons with reduced physical, sensory or mental capabilities can operate this unit under supervision or after receiving instructions concerning safety and potential hazards.
I. Notes
Thank you for choosing Rosewill’s portable air conditioner. Please read the manual carefully before use and retain for future reference.
2
RHPA-18002Portable Air Conditioner3-in-1 12000 BTU
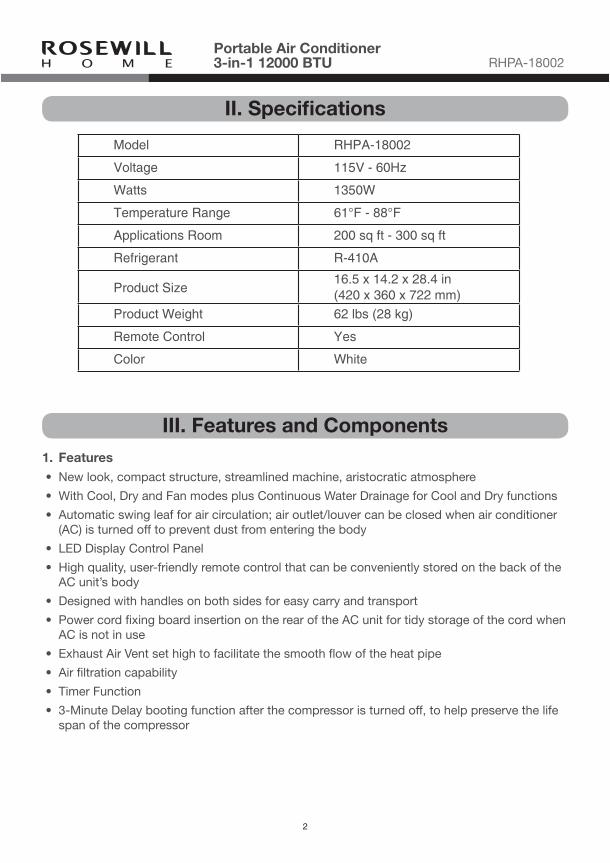
1. Features • New look, compact structure, streamlined machine, aristocratic atmosphere
• With Cool, Dry and Fan modes plus Continuous Water Drainage for Cool and Dry functions
• Automatic swing leaf for air circulation; air outlet/louver can be closed when air conditioner (AC) is turned off to prevent dust from entering the body
• LED Display Control Panel
• High quality, user-friendly remote control that can be conveniently stored on the back of the AC unit’s body
• Designed with handles on both sides for easy carry and transport
• Power cord fixing board insertion on the rear of the AC unit for tidy storage of the cord when AC is not in use
• Exhaust Air Vent set high to facilitate the smooth flow of the heat pipe
• Air filtration capability
• Timer Function
• 3-Minute Delay booting function after the compressor is turned off, to help preserve the life span of the compressor
III. Features and Components
II. Specifications
Model RHPA-18002
Voltage 115V - 60Hz
Watts 1350W
Temperature Range 61°F - 88°F
Applications Room 200 sq ft - 300 sq ft
Refrigerant R-410A
Product Size16.5 x 14.2 x 28.4 in (420 x 360 x 722 mm)
Product Weight 62 lbs (28 kg)
Remote Control Yes
Color White
RHPA-18002
3
Portable Air Conditioner3-in-1 12000 BTU
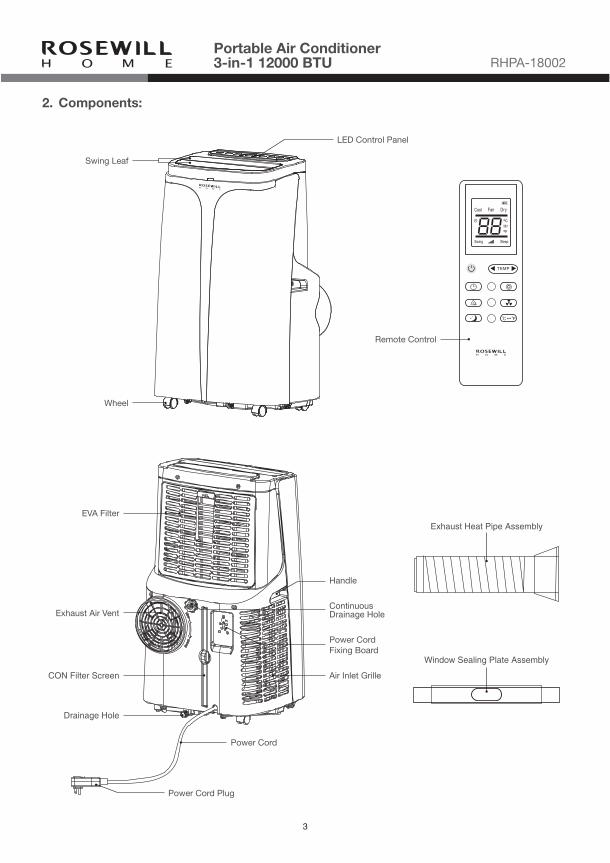
2. Components:
Power Cord Plug
EVA Filter
Exhaust Air Vent
CON Filter Screen
Drainage Hole
Exhaust Heat Pipe Assembly
Remote Control
LED Control Panel
Window Sealing Plate Assembly
Swing Leaf
Wheel
Power Cord
Handle
Power Cord Fixing Board
Air Inlet Grille
Continuous Drainage Hole
4
RHPA-18002Portable Air Conditioner3-in-1 12000 BTU
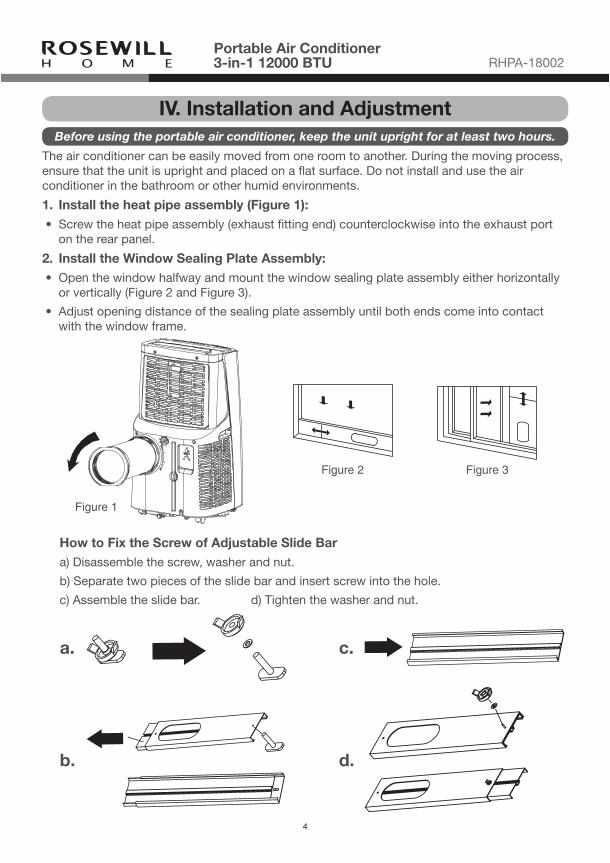
IV. Installation and Adjustment
The air conditioner can be easily moved from one room to another. During the moving process, ensure that the unit is upright and placed on a flat surface. Do not install and use the air conditioner in the bathroom or other humid environments.
1. Install the heat pipe assembly (Figure 1): • Screw the heat pipe assembly (exhaust fitting end) counterclockwise into the exhaust port
on the rear panel.
2. Install the Window Sealing Plate Assembly: • Open the window halfway and mount the window sealing plate assembly either horizontally
or vertically (Figure 2 and Figure 3).
• Adjust opening distance of the sealing plate assembly until both ends come into contact with the window frame.
Figure 1
Before using the portable air conditioner, keep the unit upright for at least two hours.
Figure 2 Figure 3
How to Fix the Screw of Adjustable Slide Bar a) Disassemble the screw, washer and nut.
b) Separate two pieces of the slide bar and insert screw into the hole.
c) Assemble the slide bar. d) Tighten the washer and nut.
a.
b.
c.
d.
RHPA-18002
5
Portable Air Conditioner3-in-1 12000 BTU
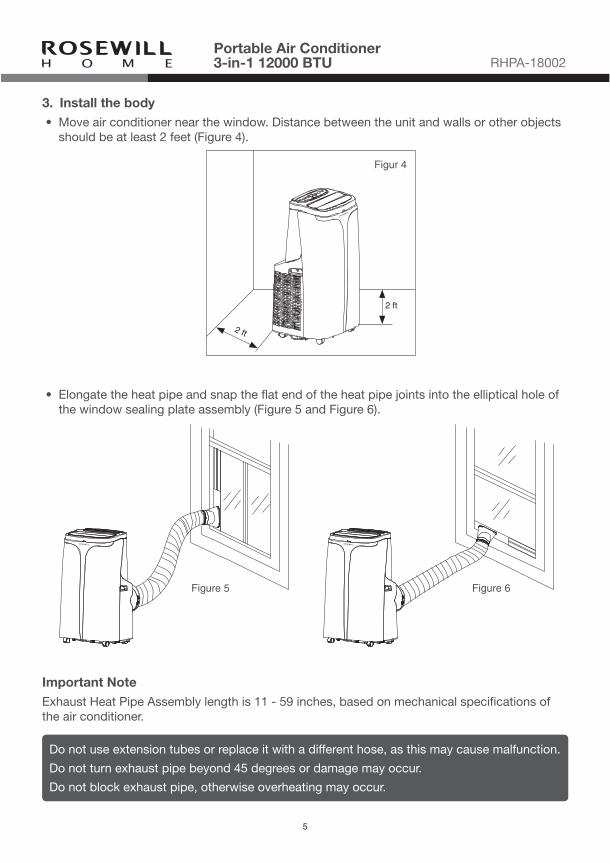
Important NoteExhaust Heat Pipe Assembly length is 11 - 59 inches, based on mechanical specifications of the air conditioner.
Figure 5 Figure 6
Figur 4
2 ft
2 ft
3. Install the body • Move air conditioner near the window. Distance between the unit and walls or other objects
should be at least 2 feet (Figure 4).
• Elongate the heat pipe and snap the flat end of the heat pipe joints into the elliptical hole of the window sealing plate assembly (Figure 5 and Figure 6).
Do not use extension tubes or replace it with a different hose, as this may cause malfunction.
Do not turn exhaust pipe beyond 45 degrees or damage may occur.
Do not block exhaust pipe, otherwise overheating may occur.

6
RHPA-18002Portable Air Conditioner3-in-1 12000 BTU
V. Control Setting
LED Control Panel Operating Instructions:
1 32 5 764
1 Timer Function 4 Display Window2 Fan Speed Selection
5 Down 6 Mode Selection 7 Power On/Off
3 Up
When the air conditioner is powered on for the first time, the buzzer will play power-on music. Then the unit will go into standby mode.
• Timer: Before setting the Timer, press this key and wait until the symbol flashes. Then increase or decrease desired time with the Up or Down buttons in increments of 1 hour. While the unit is on, set the time until auto shutoff between 1 to 24 hours. While the unit is off, set when you want the air conditioner to turn on. Ideal for cooling your home before you walk through the door, up to 24 hours in advance.
• Fan Speed Selection: Press to select high, medium or low speed during Cool or Fan mode. Not applicable to Dry mode; pressing will cause the fan to default to low speed operation. Fan speed adjustments are limited by the unit’s anti-cold, frost protection and may not run according to set fan speeds when activated. For more details, refer to Safety Features (Page 7).
• Up and Down Buttons: Increase and decrease Cool temperature or Timer settings with these keys. Temperature adjustment not available in Fan or Dry modes. Simultaneously press both keys to switch between Celsius (°C) and Fahrenheit (°F).
• Mode Selection: Switch between Cool > Dry > Fan mode.
• Sleep Mode: In Cool mode, turn on the Sleep function by pressing the Up and Fan Speed Selection; the unit will then operate in an energy-saving, quiet manner at low fan speed that cannot be adjusted. Sleep mode set temperatures will increase by 2 degrees every 30 minutes for up to 1 hour. This temperature will then be maintained for the next 7 hours before the Sleep mode ends. This setting is not available in Fan or Dry modes.
• Power: Press to turn the air conditioner on or off.
RHPA-18002
7
Portable Air Conditioner3-in-1 12000 BTU
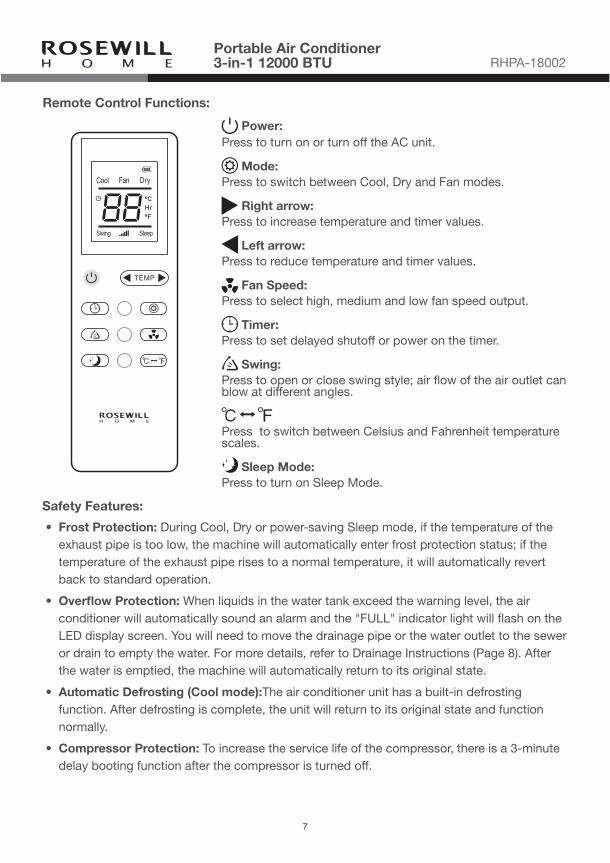
Remote Control Functions:
Power:Press to turn on or turn off the AC unit.
Mode:Press to switch between Cool, Dry and Fan modes.
Right arrow:Press to increase temperature and timer values.
Left arrow:Press to reduce temperature and timer values.
Fan Speed:Press to select high, medium and low fan speed output.
Timer:Press to set delayed shutoff or power on the timer.
Swing:Press to open or close swing style; air flow of the air outlet can blow at different angles.
Press to switch between Celsius and Fahrenheit temperature scales.
Sleep Mode:Press to turn on Sleep Mode.
Safety Features:
• Frost Protection: During Cool, Dry or power-saving Sleep mode, if the temperature of the exhaust pipe is too low, the machine will automatically enter frost protection status; if the temperature of the exhaust pipe rises to a normal temperature, it will automatically revert back to standard operation.
• Overflow Protection: When liquids in the water tank exceed the warning level, the air conditioner will automatically sound an alarm and the "FULL" indicator light will flash on the LED display screen. You will need to move the drainage pipe or the water outlet to the sewer or drain to empty the water. For more details, refer to Drainage Instructions (Page 8). After the water is emptied, the machine will automatically return to its original state.
• Automatic Defrosting (Cool mode):The air conditioner unit has a built-in defrosting function. After defrosting is complete, the unit will return to its original state and function normally.
• Compressor Protection: To increase the service life of the compressor, there is a 3-minute delay booting function after the compressor is turned off.
8
RHPA-18002Portable Air Conditioner3-in-1 12000 BTU
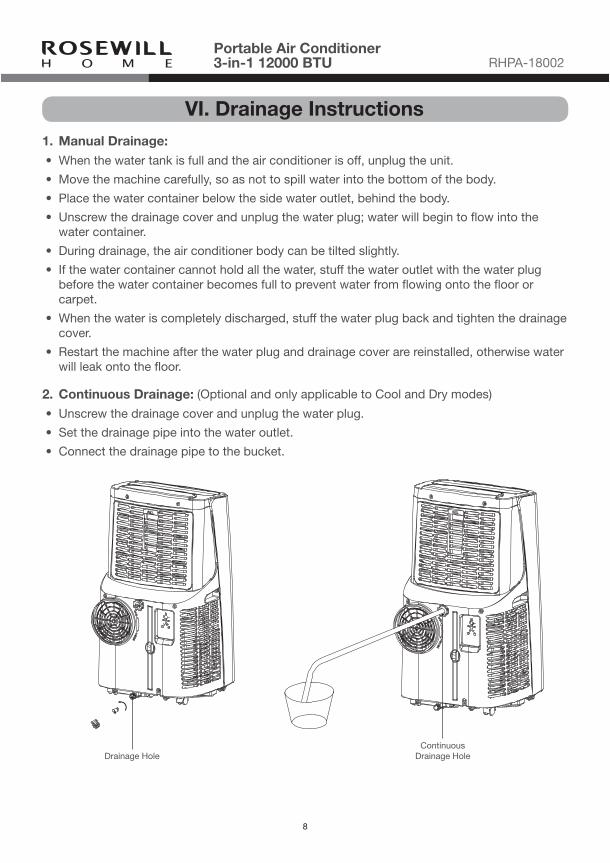
VI. Drainage Instructions1. Manual Drainage: • When the water tank is full and the air conditioner is off, unplug the unit.
• Move the machine carefully, so as not to spill water into the bottom of the body.
• Place the water container below the side water outlet, behind the body.
• Unscrew the drainage cover and unplug the water plug; water will begin to flow into the water container.
• During drainage, the air conditioner body can be tilted slightly.
• If the water container cannot hold all the water, stuff the water outlet with the water plug before the water container becomes full to prevent water from flowing onto the floor or carpet.
• When the water is completely discharged, stuff the water plug back and tighten the drainage cover.
• Restart the machine after the water plug and drainage cover are reinstalled, otherwise water will leak onto the floor.
2. Continuous Drainage: (Optional and only applicable to Cool and Dry modes)
• Unscrew the drainage cover and unplug the water plug.
• Set the drainage pipe into the water outlet.
• Connect the drainage pipe to the bucket.
Drainage HoleContinuous
Drainage Hole
RHPA-18002
9
Portable Air Conditioner3-in-1 12000 BTU
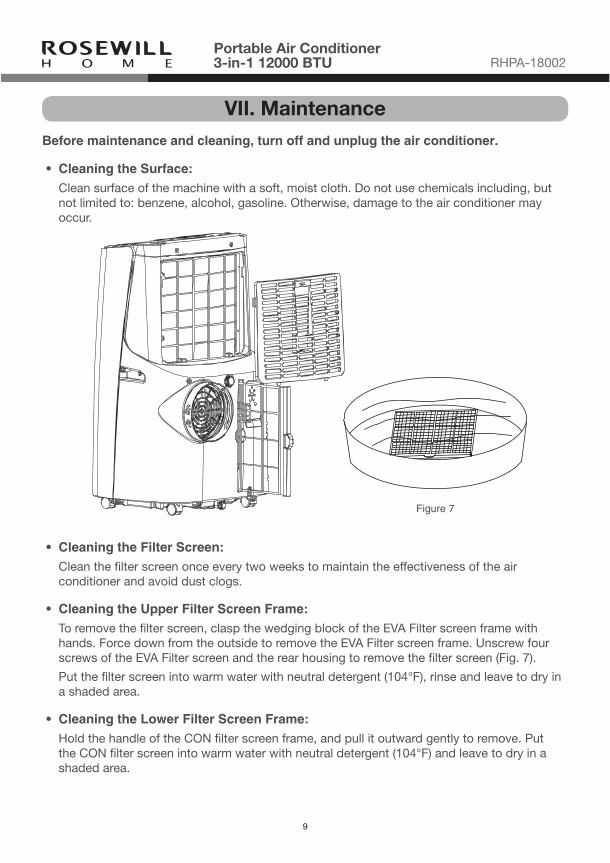
VII. MaintenanceBefore maintenance and cleaning, turn off and unplug the air conditioner.
• Cleaning the Surface: Clean surface of the machine with a soft, moist cloth. Do not use chemicals including, but
not limited to: benzene, alcohol, gasoline. Otherwise, damage to the air conditioner may occur.
• Cleaning the Filter Screen: Clean the filter screen once every two weeks to maintain the effectiveness of the air
conditioner and avoid dust clogs.
• Cleaning the Upper Filter Screen Frame: To remove the filter screen, clasp the wedging block of the EVA Filter screen frame with
hands. Force down from the outside to remove the EVA Filter screen frame. Unscrew four screws of the EVA Filter screen and the rear housing to remove the filter screen (Fig. 7).
Put the filter screen into warm water with neutral detergent (104°F), rinse and leave to dry in a shaded area.
• Cleaning the Lower Filter Screen Frame: Hold the handle of the CON filter screen frame, and pull it outward gently to remove. Put
the CON filter screen into warm water with neutral detergent (104°F) and leave to dry in a shaded area.
Figure 7
10
RHPA-18002Portable Air Conditioner3-in-1 12000 BTU
Postseason Storage: • Unscrew the drainage cover, unplug the water plug and empty the water from the water tank
into other water containers, or directly tilt the body to discharge water into a drain.
• Turn on the machine, adjust it to low speed ventilation mode and maintain this state until the drainage pipe becomes dry. This will keep the inside of the body in a dry state and prevent mildew.
• Turn off the machine, unplug the power plug and wrap the power cord around the wrapping post. Then reinstall the water plug and drainage cover.
• Remove the exhaust pipe before storage.
• Cover the air conditioner with a plastic bag. Store all components in a dry place, away from dust and out of the reach of children.
• Remove batteries of the remote control and store for later use.

RHPA-18002
11
Portable Air Conditioner3-in-1 12000 BTU
VIII. TroubleshootingDo not repair or disassemble the air conditioner on your own. Unqualified repairs will lead to voided warranty and may cause damage to people or property.
Note: If problems not listed in the table occur or recommended solutions do not work, please contact Rosewill Tech Support.
Issue Likely Cause Solution
Air Conditioner does not work
There is no electricity.Turn it on after connecting it to a socketwith electricity
The Water "Full" indicator is flashing. Discharge the water inside.
The ambient temperature is toolow or too high.
Use the air conditioner in recommended temperatures of 44-95°F
In Cool mode, the room temperature is lower than the set temperature. Change the set temperature.
In Dry mode, the ambient temperature is low.
Use in a room with ambienttemperatures greater than 62°F
Cool mode is not cold
There is direct sunlight. Move unit to a room with curtains orshade.
Doors or windows are open, there are a lot of people, or there areother sources of heat.
Close doors and windows or add moreair conditioners.
The filter screen is dirty. Clean or replace the filter screen.
The air inlet or outlet is blocked. Clear obstructions.
Noisy The air conditioning unit is notplaced on a flat surface.
Put the air conditioner on a flat, hardsurface to reduce noise.
Compressor doesnot work Frost protection has started. Wait 3 minutes until the temperature is
lowered, then restart the machine.
The remote control does not work
Too much distance between theair conditioner and remote control. Position the remote control closer to
the air conditioner and make surethe remote control directly faces theremote control receiver.
The remote control is not alignedwith the direction of the remotecontrol receiver.
Need new batteries. Replace batteries.
Displays 'E1' The room temperature sensor isabnormal.
Check the room temperature sensorand related circuitry.
Displays 'E2' The pipe temperature sensor isabnormal.
Check the pipe temperature sensorand related circuitry.
12
RHPA-18002Portable Air Conditioner3-in-1 12000 BTU
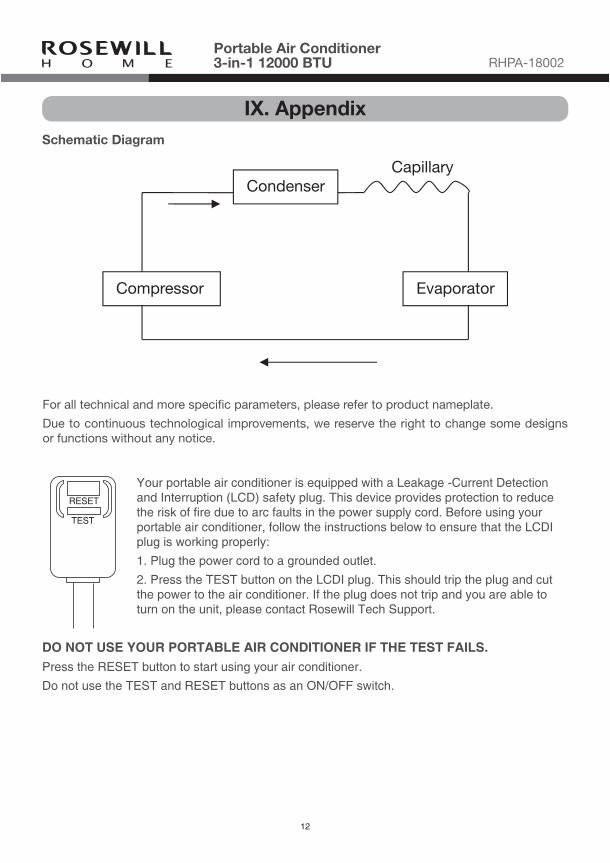
IX. AppendixSchematic Diagram
Your portable air conditioner is equipped with a Leakage -Current Detection and Interruption (LCD) safety plug. This device provides protection to reduce the risk of fire due to arc faults in the power supply cord. Before using your portable air conditioner, follow the instructions below to ensure that the LCDI plug is working properly:
1. Plug the power cord to a grounded outlet.
2. Press the TEST button on the LCDI plug. This should trip the plug and cut the power to the air conditioner. If the plug does not trip and you are able to turn on the unit, please contact Rosewill Tech Support.
DO NOT USE YOUR PORTABLE AIR CONDITIONER IF THE TEST FAILS.Press the RESET button to start using your air conditioner.
Do not use the TEST and RESET buttons as an ON/OFF switch.
RESET
TEST
For all technical and more specific parameters, please refer to product nameplate.
Due to continuous technological improvements, we reserve the right to change some designs or functions without any notice.
CapillaryCondenser
Compressor Evaporator
RHPA-18002_A
Technical Support [email protected] 1-800-575-9885
----------------------------------------------------------------------------------Thank you for purchasing a quality Rosewill product.
Please register your product at www.rosewill.comfor complete warranty information and support for your product.
For disposal of the air conditioner, consult with your local e-waste recycling program.