Embed Size (px)
Citation preview
Popup Workshop Version 2.0 DocumentationFebruary 2007
Susan Hendrix, [email protected] Technology Group
http://l3d.cs.colorado.edu/~ctg
IntroductionPopup Workshop is a program to help you design simple pop-up books and cards, and print apattern on your printer to cut and fold.
Although this software creates only a limited set of pop-up forms, we hope that using thisapplication will start you on your way to learning about pop-up design. See the “For FurtherReading” section to get more information on how to add to these pop-ups, or create your owndesigns using additional forms, or, if you are a teacher, how to incorporate pop-ups in yourclasses.
We hope to be updating the software to add more features, fix bugs, and to add new pop-up formsin the future.
System RequirementsVersion 2.0 of Popup Workshop requires Java 1.5 or later, and Java3D.
If you have a Mac, this means that you must have OS X, and if you are running an earlier Javaversion, you may have to upgrade Java. (Java 1.5 is available via Software Update.)
We have provided a Windows Version 2.0. You may have to upgrade Java to version1.5 if you do not have it currently. You may also have to obtain Java3D. This will depend on yourversion of Windows. See http://www.sun.com/software/learnabout/java/.
Note that development of this application has been on Mac. The Windows version has not beentested. It should function as the Mac version does, but it is possible that this is not the case. Wewould like to hear about any problems encountered that we may have missed.
A color printer is desirable, but is not required.
Downloading, Installing and Running Popup WorkshopWe ask that you fill out a registration form to download Popup Workshop. There is no charge forthe application. We appreciate your bug reports, ideas for additions and improvements, andpictures of your creations to put on our web page.
For Mac: Click on the download link on the website, and wait for the download to complete. Thedownloaded disk image should automatically open and mount. If it does not, double click the.dmg file that you downloaded to open and mount the disk image containing the Popup Workshopfolder. Drag the Popup Workshop folder to your Applications folder. Double-click the Workshopicon to start Popup Workshop.
For Windows: Click on the download link, and choose "Save" to download the zip folder.Double-click the resulting folder to obtain the .jar file. (If the file is an .exe file, and not a .zip
file, change the extension to .zip before double-clicking.) Double-click the .jar file to run PopupWorkshop.
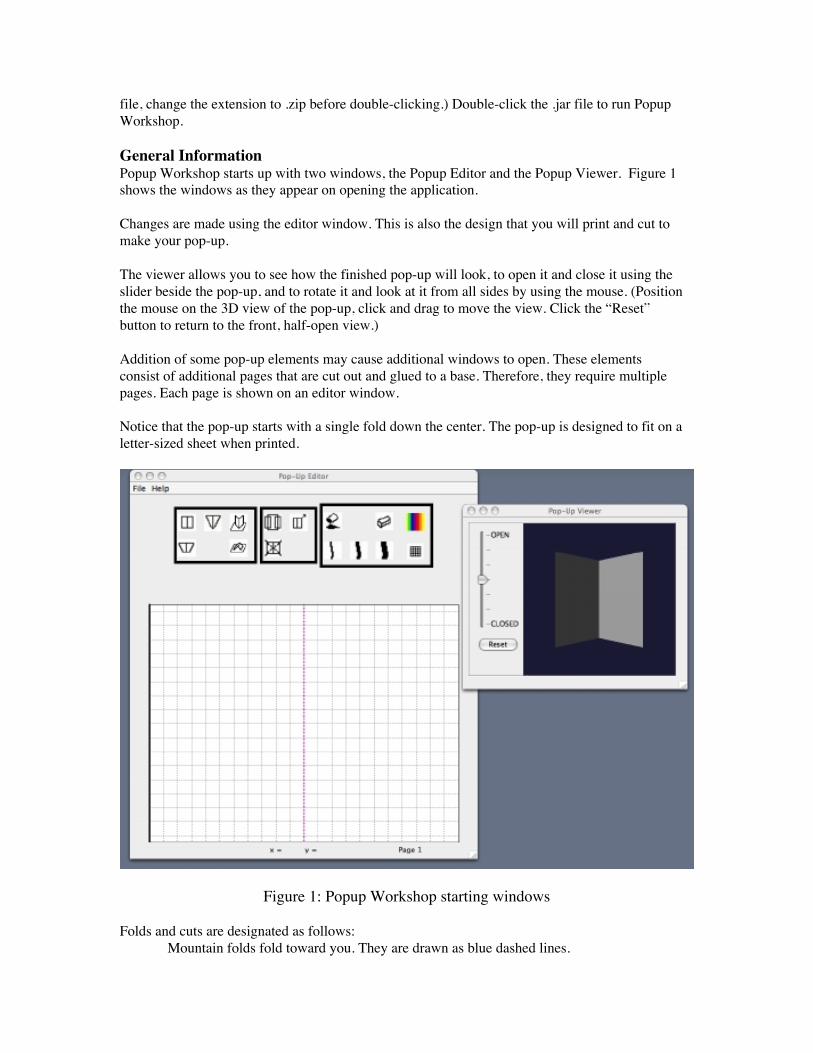
General InformationPopup Workshop starts up with two windows, the Popup Editor and the Popup Viewer. Figure 1shows the windows as they appear on opening the application.
Changes are made using the editor window. This is also the design that you will print and cut tomake your pop-up.
The viewer allows you to see how the finished pop-up will look, to open it and close it using theslider beside the pop-up, and to rotate it and look at it from all sides by using the mouse. (Positionthe mouse on the 3D view of the pop-up, click and drag to move the view. Click the “Reset”button to return to the front, half-open view.)
Addition of some pop-up elements may cause additional windows to open. These elementsconsist of additional pages that are cut out and glued to a base. Therefore, they require multiplepages. Each page is shown on an editor window.
Notice that the pop-up starts with a single fold down the center. The pop-up is designed to fit on aletter-sized sheet when printed.
Figure 1: Popup Workshop starting windows
Folds and cuts are designated as follows:Mountain folds fold toward you. They are drawn as blue dashed lines.
Valley folds fold away from you. (The starting centerfold is a valley fold.) They aredrawn as magenta dashed lines.
Cuts are drawn as red solid lines.Seams are lines where two sheets meet when glued together. They are drawn as black,
Irregularly dashed lines.
The Editor starts with a grid of black dashed lines to help you line up your design. You can turnthe grid off and on by clicking on the grid button, which looks like this:
Other actions are chosen with other buttons. The chosen button turns yellow to let you knowwhich one it is.
There is a position indicator at the bottom of the Editor Window. This gives the x- and y-coordinates of the cursor when it is in the page area.
Adding ElementsPop-ups, even very complicated ones, are made up of simpler forms or elements. In this versionof Popup Workshop, we support 5 such elements. Three of them are made up of cuts and folds inthe original page. There are 2 other elements that are made by applying forms cut from additionalsheets of paper.
Let’s talk about the 3 simpler elements first. All of these elements are placed on top of a fold.This can be the centerfold that you start with when you start the application, or a fold created byanother element. In this way, you can build up more complex designs. You can place elements onmountain folds or valley folds.
In each case, add an element by first selecting the button representing the type of element youwish to add. Then click and hold the mouse button near the fold on which you want to place theelement. Drag the mouse to make the element the size you want.
The leftmost area of buttons is where you look to choose elements to add. The elements wesupport are:
Step: This element has two cuts (at the top and bottom) and two folds at the sides, along with afold in the center. The folds are all parallel.
Beak: This element has only one cut, and three folds. It can be placed point up or point down.
Angled Step: This element is just a beak with the point cut off. It has two cuts and two folds likethe step, but the sides are not parallel.
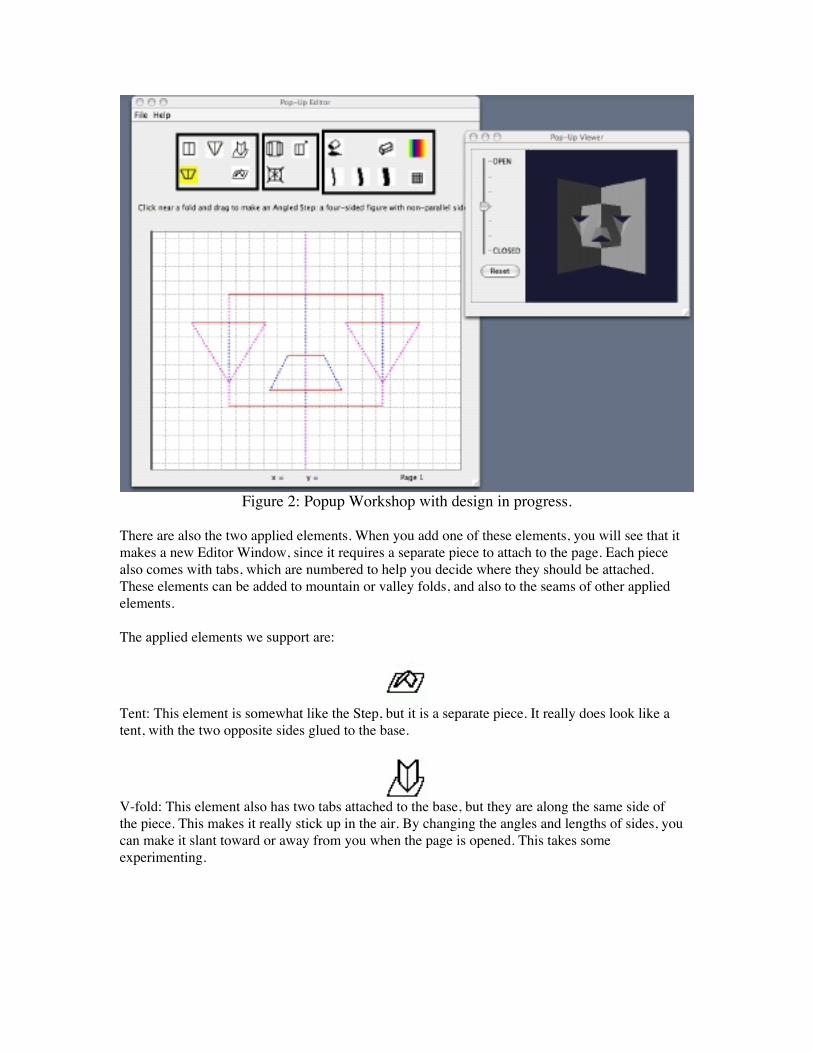
Figure 2: Popup Workshop with design in progress.
There are also the two applied elements. When you add one of these elements, you will see that itmakes a new Editor Window, since it requires a separate piece to attach to the page. Each piecealso comes with tabs, which are numbered to help you decide where they should be attached.These elements can be added to mountain or valley folds, and also to the seams of other appliedelements.
The applied elements we support are:
Tent: This element is somewhat like the Step, but it is a separate piece. It really does look like atent, with the two opposite sides glued to the base.
V-fold: This element also has two tabs attached to the base, but they are along the same side ofthe piece. This makes it really stick up in the air. By changing the angles and lengths of sides, youcan make it slant toward or away from you when the page is opened. This takes someexperimenting.
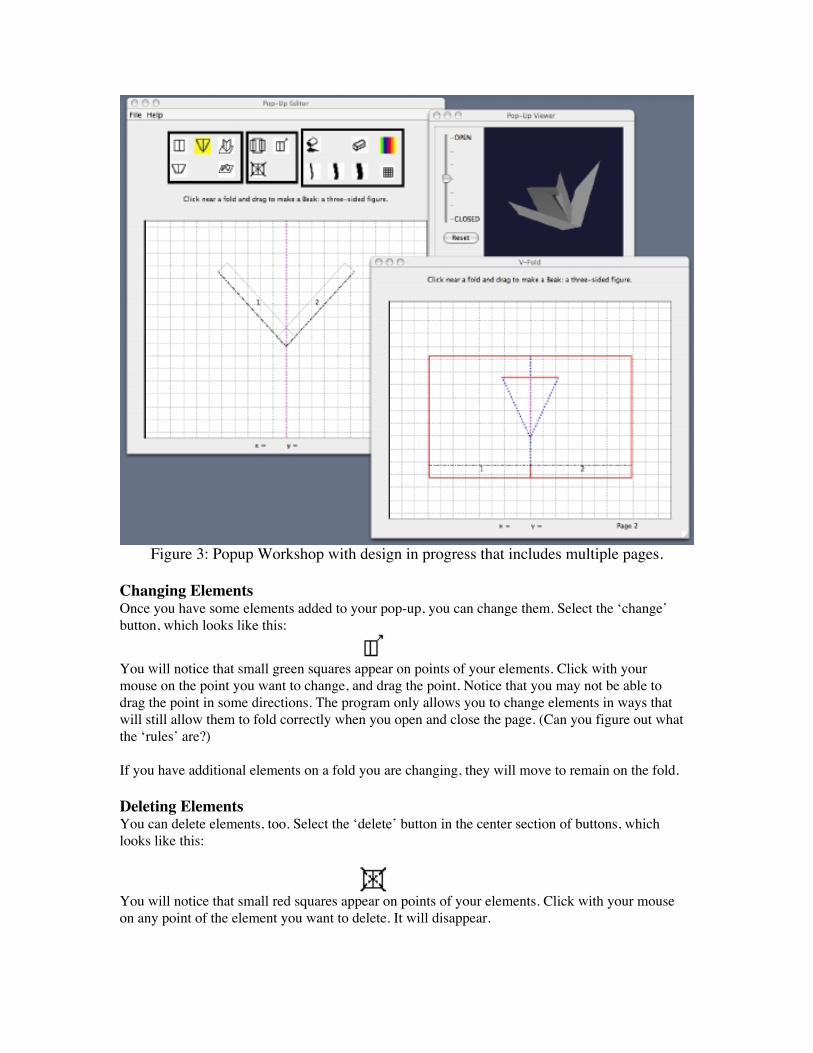
Figure 3: Popup Workshop with design in progress that includes multiple pages.
Changing ElementsOnce you have some elements added to your pop-up, you can change them. Select the ‘change’button, which looks like this:
You will notice that small green squares appear on points of your elements. Click with yourmouse on the point you want to change, and drag the point. Notice that you may not be able todrag the point in some directions. The program only allows you to change elements in ways thatwill still allow them to fold correctly when you open and close the page. (Can you figure out whatthe ‘rules’ are?)
If you have additional elements on a fold you are changing, they will move to remain on the fold.
Deleting ElementsYou can delete elements, too. Select the ‘delete’ button in the center section of buttons, whichlooks like this:
You will notice that small red squares appear on points of your elements. Click with your mouseon any point of the element you want to delete. It will disappear.
If you delete an element that has more elements on top of its folds, the ones on top will be deletedas well. If you delete an element that has additional pages for the attached pieces, the windowswith those pages will go away.
Replicating ElementsSometimes you want to have the same (or similar) elements on opposite sides of another element.You can make this easy by replicating. Select the ‘replicate’ button, which looks like this:
You will notice that small blue squares appear on points of your elements. Click with your mouseon any point of the element you want to replicate. If it is on the outside fold of another element, acopy will be placed on the other outside fold. (Elements placed on folds of the replicated elementwill not be replicated.)
Decorating ElementsThere are several decorating tools available. Bring up a color palette to select a color to use withthe ‘color’ button, which looks like this:
After you select a color, the color of the borders of the button areas will change to remind you ofthe color you are using.
You can fill an area of an element with color by using the ‘fill’ button, which looks like this:
After selecting the ‘fill’ button, click in each area you wish to fill with the current color. If youwish to erase fill color, select white in the color palette, and use another fill to erase the previouscolor.
You can draw lines with three pen tools (small, medium and large). The buttons look like this:
Use your mouse to draw after you pick the pen thickness you want.
To erase the drawing you have done, use the ‘erase’ button, which looks like this:
You will notice that small red squares appear on the ends of the lines you have drawn. Click withyour mouse on any red square to remove that line.
Saving and Printing Your PopupWhen you have a pop-up that you want to print, use File -> Print to bring up the system printdialog. (Do you have the grid turned off?)
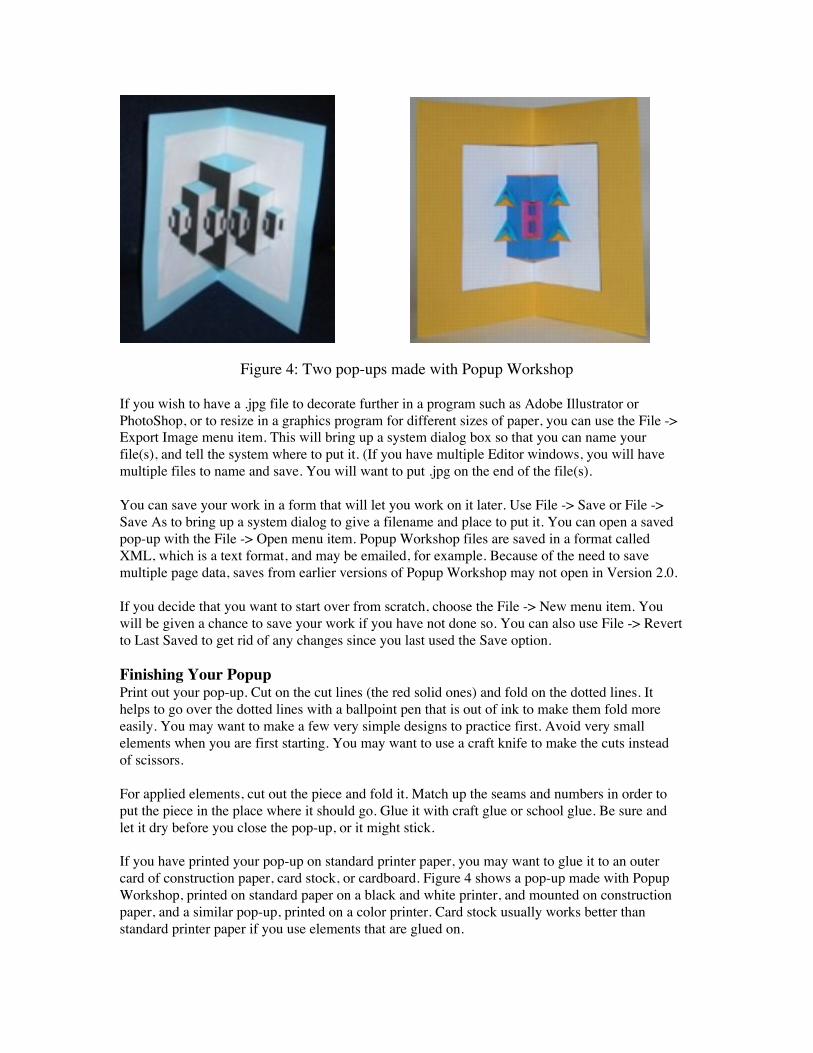
Figure 4: Two pop-ups made with Popup Workshop
If you wish to have a .jpg file to decorate further in a program such as Adobe Illustrator orPhotoShop, or to resize in a graphics program for different sizes of paper, you can use the File ->Export Image menu item. This will bring up a system dialog box so that you can name yourfile(s), and tell the system where to put it. (If you have multiple Editor windows, you will havemultiple files to name and save. You will want to put .jpg on the end of the file(s).
You can save your work in a form that will let you work on it later. Use File -> Save or File ->Save As to bring up a system dialog to give a filename and place to put it. You can open a savedpop-up with the File -> Open menu item. Popup Workshop files are saved in a format calledXML, which is a text format, and may be emailed, for example. Because of the need to savemultiple page data, saves from earlier versions of Popup Workshop may not open in Version 2.0.
If you decide that you want to start over from scratch, choose the File -> New menu item. Youwill be given a chance to save your work if you have not done so. You can also use File -> Revertto Last Saved to get rid of any changes since you last used the Save option.
Finishing Your PopupPrint out your pop-up. Cut on the cut lines (the red solid ones) and fold on the dotted lines. Ithelps to go over the dotted lines with a ballpoint pen that is out of ink to make them fold moreeasily. You may want to make a few very simple designs to practice first. Avoid very smallelements when you are first starting. You may want to use a craft knife to make the cuts insteadof scissors.
For applied elements, cut out the piece and fold it. Match up the seams and numbers in order toput the piece in the place where it should go. Glue it with craft glue or school glue. Be sure andlet it dry before you close the pop-up, or it might stick.
If you have printed your pop-up on standard printer paper, you may want to glue it to an outercard of construction paper, card stock, or cardboard. Figure 4 shows a pop-up made with PopupWorkshop, printed on standard paper on a black and white printer, and mounted on constructionpaper, and a similar pop-up, printed on a color printer. Card stock usually works better thanstandard printer paper if you use elements that are glued on.
Try decorating your pop-ups with foil, different colored papers, stickers, your own pictures, orpictures cut from magazines or newspapers. You can change the shape of almost any cut. You canadd pictures on the sides of elements that stick up beyond the centerfold of the element and theywill still fold. In fact, in many cases, you can cut away part of an element, or add to it, and stillhave a pop-up that will open and close properly. You may add other elements or pieces made byhand, like flaps to lift. Experiment!
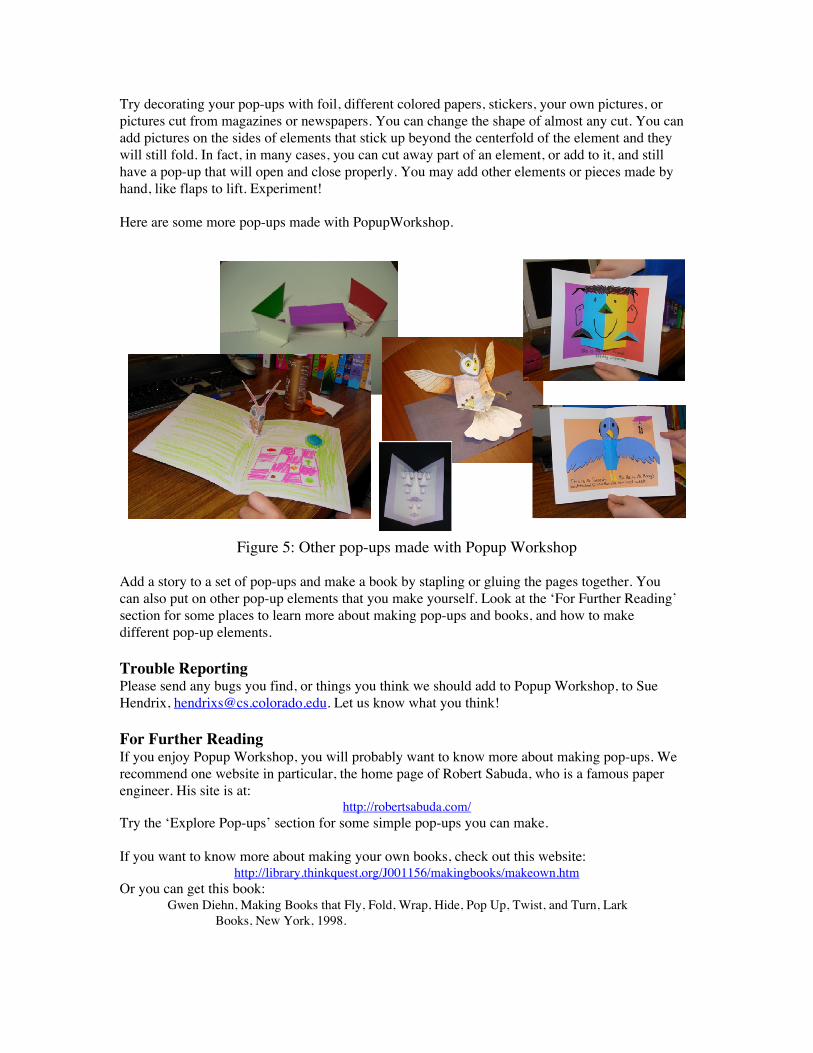
Here are some more pop-ups made with PopupWorkshop.
Figure 5: Other pop-ups made with Popup Workshop
Add a story to a set of pop-ups and make a book by stapling or gluing the pages together. Youcan also put on other pop-up elements that you make yourself. Look at the ‘For Further Reading’section for some places to learn more about making pop-ups and books, and how to makedifferent pop-up elements.
Trouble ReportingPlease send any bugs you find, or things you think we should add to Popup Workshop, to SueHendrix, [email protected]. Let us know what you think!
For Further ReadingIf you enjoy Popup Workshop, you will probably want to know more about making pop-ups. Werecommend one website in particular, the home page of Robert Sabuda, who is a famous paperengineer. His site is at:
http://robertsabuda.com/Try the ‘Explore Pop-ups’ section for some simple pop-ups you can make.
If you want to know more about making your own books, check out this website:http://library.thinkquest.org/J001156/makingbooks/makeown.htm
Or you can get this book:Gwen Diehn, Making Books that Fly, Fold, Wrap, Hide, Pop Up, Twist, and Turn, Lark
Books, New York, 1998.
There are some good books for young people on pop-up making. Try these:Duncan Birmingham, Pop Up! : A Manual of Paper Mechanisms, Tarquin Pubns,
Norfolk, 2000.Barbara Valenta, Pop-O-Mania: How to Create Your Own Pop-Ups,
Hamlyn, London, 1997.
If you are a teacher, and want to incorporate pop-ups in your classes, try these resources:Paul Johnson, Pop-up Paper Engineering: Cross-Curricular Activities in Design
Technology, English, and ArtSimmt, Elaine and Brent Davis. "Fractal Cards: A Space for Exploration in
Geometry and Discrete Mathematics." Mathematics Teacher, 91(February 1998):102-108.
Diego Uribe, Fractal Cuts, Tarquin Publications, 1999.
And for more complex projects:David A. Carter, James Diaz, The Elements of Pop-Up : A Pop-Up Book for Aspiring
Paper Engineers, Little Simon, New York, 1999.Masahiro Chatani, Pop-up Greeting Cards, Ondori/Japan Publications, Tokyo, 1986.Paul Jackson, Paul Forrester, The Pop-Up Book : Step-By-Step Instructions for Creating
over 100 Original Paper Projects, Henry Holt and Co., New York, 1996.
Known Bugs in This Version1. Saved popups from earlier versions of Popup Workshop may not open in version 2.0.2. Vfold tab occasionally goes the wrong way.3. The Viewer image looks bad sometimes. This can happen with a tent or vfold—they will be on the
wrong side of the sheet. Sometimes doesn’t open up a structure properly that is on a tent or vfold.4. The Windows version has not been tested.
Changes in Version 2.01. Added 2 applied elements (V-folds and Tents). This allows multiple Editor windows and support
for multiple pages.2. Viewer changed to Java3D.3. Added rotate ability to viewer, and a reset button.4. When areas are cut out of the paper, the viewer now shows them as cut out.5. Changed names of the elements to be more child-friendly (Step instead of Parallel Double Slit, for
example).6. Added help area on editor to suggest what action can be taken with currently selected button.7. Added Java generics to code. This makes it more robust going forward, but requires Java 1.5 or
greater.
AcknowledgementsThe work described in this documentation has been supported in part by National ScienceFoundation grant REC0125363, and by a gift from Mitsubishi Electric Research Laboratories(MERL) in Cambridge, Massachusetts.