Embed Size (px)
Citation preview

Pool FROG CYCLERMINERAL PURIFIER FOR POOLS
Instruction Manual
REPLACE
MINERAL
RESERVOIR
EVERY
SEASON.
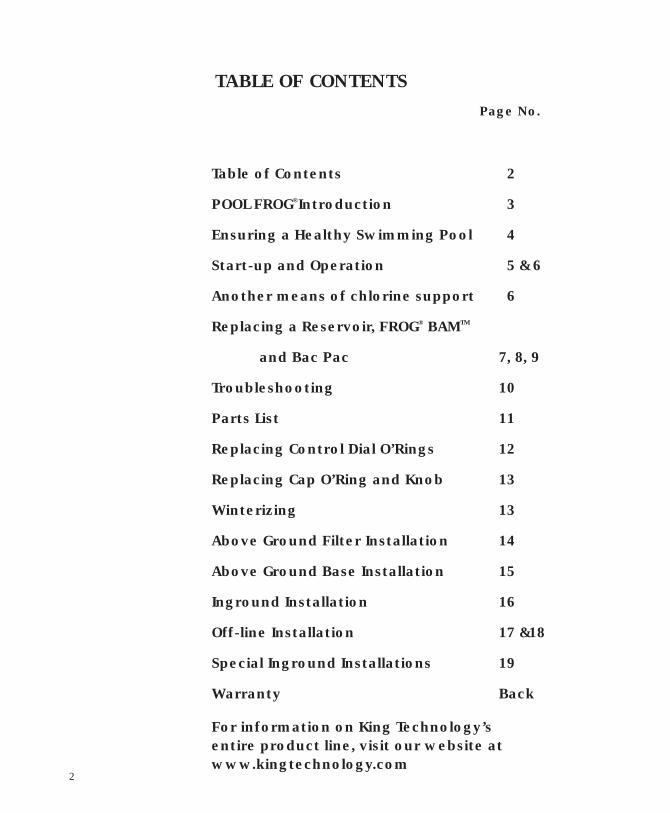
TABLE OF CONTENTS
Page No.
2
Table of Contents 2
POOL FROG®Introduction 3
Ensuring a Healthy Swimming Pool 4
Start-up and Operation 5 & 6
Another means of chlorine support 6
Replacing a Reservoir, FROG® BAMTM
and Bac Pac 7, 8, 9
Troubleshooting 10
Parts List 11
Replacing Control Dial O’Rings 12
Replacing Cap O’Ring and Knob 13
Winterizing 13
Above Ground Filter Installation 14
Above Ground Base Installation 15
Inground Installation 16
Off-line Installation 17 &18
Special Inground Installations 19
Warranty Back
For information on King Technology’sentire product line, visit our website atwww.kingtechnology.com

Welcome to easier pool care courtesy of POOL FROG®. With POOL FROG®,
your pool water will look and feel better without a lot of work or a lot
of chemicals. This system eliminates bacteria and prevents algae growth
using a combination of minerals and reduced chlorine levels. There are
4 parts to the FROG® Purifying System, The Cycler in above ground and
inground models, the Mineral Reservoir, FROG® BAMTM 90-day algae
protection and the chlorine Bac Pac.
Part IPOOL FROG® CyclerThe water treatment center thatcontrols the flow of water throughthe system. Available in aboveground and inground models.
Part IIPOOL FROG®
MineralReservoir
Holds the mineralsand fits inside theCycler. Available inabove ground andinground sizes to fitthe correspondingPOOL FROG® Cyclers.*REMEMBER TOREPLACE YOURMINERAL RESERVOIREVERY SEASON.
For Inground Poolsup to 40,000 gallons
For Above Ground Poolsup to 18,000 gallons
POOLFROG
®
3
Two sizesfor Inground and
Above Ground Pools
Bac PacOne size fits all
FlowControl
Pac
MineralReservoir
Part IVPOOL FROG®
Bac Pac
Use the Bac Paclow-level chlorine
support to benefitfrom a completesystem. Use Flow
Control Pac whenusing another formof chlorine support.
Part IIIFROG® BAMTM
A unique mineral formulatailor-made for preventing algae
up to 90-days. Use with thePOOL FROG® System for a
No-Algae Guarantee. FROG® BAMTM
One size fits all
(Mineral Reservoir sold inside Cycler and separately for replacements. Bac Pac and FROG® BAMTM sold separately.)
See Setting Chart in Manual
12
34 5 6
78
PRECISE METERING FOR MODEL 5400
PacRemoval Maximum
PRECISE METERING FOR MODEL 5100

4
• Make sure the pool hasadequate circulation. Thepool water must completelycirculate through the pumpand filter at least 1 to 2 timesper day. This usually requires8 to 12 hours. Check withyour dealer for the propercirculation time for your pool.
Ensuring a Healthy Swimming Pool
Start-up and Yearly Maintenance
• Before beginning with anypool care program,including POOL FROG®, youmust first balance your poolwater. Take a water sampleto your local pool profes-sional or use a complete testkit that will test for the fol-lowing important elements.
• If your fill water is high in metals, check with yourpool professional on how to maintain proper levels. Itmay require shocking the pool and cleaning the filter.
• Check the pool's filtergauge often and periodicallyclean filter per the manufac-turer's directions. A dirtyfilter will slow the flow ofwater which could hamperproper circulation.
• After your pool is up andrunning smoothly, continueto test your water for pH,total alkalinity and chlorineand maintain it's balance byadding any necessary adjust-ment products (see yourdealer for details).
Water Balance Guidelines
pH: 7.2 – 7.8
Total Alkalinity: 60 – 120
Calcium Hardness: 150 – 300
Total Dissolved Solids: <2000
Stabilizer: 20 –50 ppm
Free Chlorine: .5 – 1 ppm
VACUUMIN. Hg.
1. 2.
3. 4. 5.

5
FROG® – Start-up and Operation
• Do not add shock in or near the skimmer or into the Cycleras it could damage equipment, risk potential explosion ordiscolor your pool surface.• THIS STEP IS VERY IMPORTANT TO START-UP.USE CHLORINE SHOCK ONLY.
• Add a stabilizer orconditioner to the pool atthe beginning of the seasonif the stabilizer level is below20 ppm. This will preventchlorine burn off. Followmanufacturer’s directionscarefully.
• Install aPOOL FROG®
Mineral Reservoirinto the Cycler.(Follow Directionson Page 7.)REMEMBER TOREPLACE YOURMINERALRESERVOIR EVERYSEASON.
• When chlorinereading is downto 1 ppm, whichmay take a fewdays, insertchlorine Bac Pac.(Followdirections onpage 9.)
NR NR 6.5 5.5
Start-up ...........continued page 6
35,000 NR 6.5 5.5 5 5.5 4.5 4 3.5
12 Hour Pump Run Time 24 Hour Pump Run Time
PUMP SIZE PUMP SIZE
1/2 hp 3/4 hp 1 hp 1 1/2 hp 1/2 hp 3/4 hp 1 hp 1 1/2 hp
4.5 4 3 5 3.5 3 2.5 4
5 4.5 4 5.5 4 3.5 3 4.5
5.5 5 4.5 4 4.5 4 3.5 5
6 5.5 5 4.5 5 4.5 4 3.5
NR 6 5.5 5 5.5 5 4.5 4
7,000 (18')
9,000 (21')
12,000 (24')
15,000
20,000
Gallons
**
***
* – Bypass installation recommended.NR – This pump size is not recommended for this size pool.
Diameter
8 Hour Pump Run Time
PUMP SIZE
1/2 hp 3/4 hp 1 hp 1 1/2 hp
5 4.5 4 3.5
5.5 5 4.5 4
6 5.5 5 4.5
NR 6 5.5 5
NR NR 6 5.5
12 Hour Pump Run Time 24 Hour Pump Run Time
PUMP SIZE PUMP SIZE
3/4 hp 1 hp 1 1/2 hp 2 hp 3/4 hp 1 hp 1 1/2 hp 2 hp
3 2.5 4 3.5 1.5 3.5 3 2.5
3.5 3 2.5 4 2.5 4 3.5 3
4 3.5 3 2.5 3 2.5 1.5 3.5
5 4 3.5 3 3.5 3 2.5 2
IngroundPOOL SIZE
**
***
8 Hour Pump Run Time
PUMP SIZE 3/4 hp 1 hp 1 1/2 hp 2 hp
3.5 3 2.5 2.5
4 3.5 3 2.5
4.5 4 3.5 3
NR 4.5 4 3.5
NR NR 4.5 3.5
NR NR 5.5 4.5
7,000
9,000
12,000
18,000
25,000
Gallons
30,000
Above Grd.POOL SIZE
NR 5.5 5 4 4.5 4 3.5 3
* * **
**
NR 5 4 3.5 4 3.5 3 2.5
NR NR 6.5 5.5 6.5 5.5 4.5 4NR NR NR 6.640,000
Most common pool sizes
1.
6.
2.
3.4.
7.
5.• Run Cycler, withReservoir inserted, for10 minutes on settingMaximum.
• Insert FROG®
BAMTM, intoMineralReservoir inCycler. (Seepage 8 fordirections.)
SETTING CONTROL DIAL• Set control dial by matching up the parameters of your pool on thecharts below. THIS IS A STARTING POINT ONLY and may need to be adjustedto fit your individual pool needs. See Page 6 for adjusting directions.
• Shock the pool withchlorine to rid the water ofall contaminants beforebeginning with POOLFROG®. Followmanufacturer's directionscarefully.
See Setting Chart in Manual
12
34 5 6
78
PRECISE METERING FOR MODEL
PacRemoval Maximum

6
Start Up ...........continued from page 5
If using another means of chlorine support
Test
Str
ips Pool
StripsTest
andSpa
9.8.
7.
8. 9.
6.
• For the firstweek testthe poolwater dailyfor freechlorine toensurecorrectdial setting.Continue totest weekly throughoutthe season. Test stripsrecommended.
• After each testing, adjust thedial up by 1/2 increment if thefree chlorine reading hasdropped below .5 ppm oradjust down by 1/2 incrementif the reading has risen above1 ppm. Continue this processeach day until the free chlorinereading stabilizes between.5 and 1 ppm.
• Shock pool once a weekduring the swimming seasonor every other week duringcooler weather. Use a non-chlorine shock to reducechlorine usage or use achlorine shock. Add 1 poundper 10,000 gallons.
• Make sure Flow ControlPac is inserted inside theReservoir by lining up thePac’s legs with the openingsinside the Reservoir. This Pacacts to divert all waterthrough the minerals.
• Set dial to maximum.No adjustments needed.
• Maintain a minimumchlorine reading of .5 ppmto 1 ppm with a chlorinator,floater or hand feeding.
Follow steps 1-5 on page 5 then continue below.
• Shock pool once a week during the swimming season orevery other week during cooler weather. Use a non-chlorineshock to reduce chlorine usage or use a chlorine shock. Add1 pound per 10,000 gallons.
Remember to adjust dial ONLYby 1/2 increments, in order toprevent over chlorination whichmay bleach pool surfaces.
See Setting Chart in Manual
12
34 5 6
78
PRECISE METERING FOR MODEL
PacRemoval Maximum

7
Replacing a Reservoir, FROG® BAMTM
and Bac PacReservoirs MUST be Replaced Every Season
Replacing a Reservoir, FROG® BAMTM and Bac Pac ...........continued page 8
SLOT INRESERVOIR
FIN INSIDEOF CYCLER
1.
6.
8.
2. 3.
4. 5.
7. 9.
REPLACEMENT
MINERAL RESERVOIRREPLACEMENT
MINERAL RESERVOIR
• Check the back of theReservoir box and back labelof Reservoir itself to makesure you have the correctPOOL FROG® Reservoir to fityour POOL FROG® Cycler.* RESERVOIRS MUST BEREPLACED EVERY SEASON.
• Openthe boxand pullout theFlowControlPac.
• Then reach in and remove theReservoir. Please note: completeinstructions for inserting a Reservoir,FROG® BAMTM and Bac Pac are includedinside the Reservoir box.
CAUTION read carefully -
• USE ONLY the factory recommended replacement Reservoir,FROG® BAMTM and Bac Pac. DO NOT USE any other Pac or bulkchemical tablets in the Cycler. Use of any other productcould result in damage to pool equipment or surface, unsafepool conditions, fire or explosion. Warranty will be void ifthe correct Reservoir, FROG® BAMTM and Bac Pac are not used. • Turn off pump.
• Unscrew drain valve torelieve pressure. • Use the cap tool included
with Cycler to loosen capby hitting the handle withthe flat of your handcounter clockwise. If usingthe Bac Pac stand back toavoid inhaling chlorinefumes.
• Find slot on side ofReservoir and line up withfin inside the Cycler. LowerReservoir into Cycler untilsecure.
• Turn dial to Pac Removal.This reduces the flow ofwater into the unit when thecap is open.
Contents: Series #5100 (up to 20,000 gallons) Series #5200 (up to 20,000 gallons) Series #5400 (up to 40,000 gallons) Series #5600 (up to 40,000 gallons)

PacRemoval
10. 11.
12.
13. 14. 15.
16.
17.
• Turn pump on for 90 minutesallowing FROG® BAMTM tocirculate through pool.
90 DAY ALGAE PROTECTION
Maximum
See Setting Chart in Manual
12
34 5
6
78
PRECISE METERING FOR MODEL 5400
PacRemoval Maximum
8
Remove cap fromFROG® BAMTM
without removingseal.
Insert upside downinto center of Mineral
Reservoir pushingdown gently on key to
puncture seal.
Replace cap by hand only.DO NOT OVER TIGHTEN.
Using FROG® BAMTM for a No-Algae GuaranteeIf you are not using FROG® BAMTM, proceed to Step 18.
• To remove FROG® BAMTM. . . .
• Lift FROG® BAMTM up and allow any water in the containerto drain through the Cycler before discarding in trash.
NOTE: If water shows more than a hint of blue inside Cycler,replace the Cycler cap, turn dial to Maximum and run thepump for one minute.
17a. If pool size requires additional FROG® BAMTM,repeat steps 10-17.
17b. When water is clear in Cycler, proceed to step 18.
• Replace drain valve onCycler.
• Turn control dial on Cyclerto Maximum.
90 DAY ALGAE PROTECTION
• One FROG® BAMTM for up to 15,000 gallons.• Two FROG® BAMTM for up to 30,000 gallons.
Turn pump off.
90 DAY ALGAE PROTECTION
Remove Cycler cap.Turn dial to Pac Removalor Minimum.

PACTOWERS
PACTOWERS
19. 20. 21.
22. 23.
24. 25.
18.• To removeBac Pac endcaps, grabonto the lip ofone cap witha pliers andpull up untilcap releases.Repeat theprocess to theother cap.
• Turn Bac Pac over andshake slightly until tabletsfall into tower areas.
• Line up the small leg of the BacPac with the small opening in theReservoir and the large leg withthe large opening. Lower Bac Pacinto Reservoir until secure.
• Avoid sparks, open flameor smoking when handlingthe Bac Pac.
• Replace cap by hand only.DO NOT OVER TIGHTEN.
• DO NOT USE CAP TOOL TOTIGHTEN CAP.Use for removal only.
• Check that drain valve isscrewed in.
• For easy reminders, place a POOL FROG® reminder stickeron your calendar to mark the six month replacement of theReservoir and approximate replacement times for the BacPac. Reminder stickers found in Reservoir box.
For winter climate pools, replace Reservoir next spring.DO NOT use the same Reservoir from season to season. TheReservoir will be ineffective if dried out and used later, evenif it was not used for a full 6 months.
Using the Bac Pac
• For lowlevel chlorinesupport,discard orrecycle theFlow ControlPac andreplace witha Bac Pac.
9
BAC PAC
RESERVOIR
End caps

Trouble Shooting
What do I doif the waterlooks cloudy?
What do I doif the waterturns color?
1. Make sure your filtrationsystem is working properly(i.e. clean filter and/orskimmer).
2. Make sure circulationtime is adequate – increasepump time if not.
3. Make sure total alkalinityis within 60-120. Adjust withacid if needed.
4. Shock the water toeliminate build up of anyorganic matter.
5. Make sure pool has afree chlorine reading of.5 to 1 ppm.
6. Check with your dealerfor more information.
1. Metals in the fill watermay have been oxidized.Have the pool tested. Shockthe pool and clean the filteruntil water clarity returns.
2. Algae may be trying toform – shock the pool,increase circulation time ifneeded and clean the filter.
3. Check with your dealerfor more information.
What do I doif algae formsin or on mypool?
1. Use a nonmetallic (polyquat)algaecide per the directionson the bottle and brush thesides of the pool often.
2. Clean the filter and shockthe pool with chlorine dailyuntil water clarity returns.
3. If you are in an area ofthe country that struggleswith algae growth, see yourdealer regarding a 90-dayNo-Algae Guarantee usingFROG® BAMTM. See producthang tag for guaranteedetails.
4. Check with your dealerfor more information.
What do I doif I am underchlorinatingwith theBac Pac?
1. If you are unable tomaintain .5 to 1 ppm, firstmake sure there are chlorinetablets in the tower areasof the Bac Pac and it isinstalled properly. If acorrection was made, testthe water in 24 hours.
2. If still low, turn the dialup 1/2 setting and test thewater again in 24 hours.Continue raising the settingby 1/2 increment each dayuntil the proper reading isachieved.
3. Shock the pool if thereading has been lower than.5 for more than one day.
4. Increase pump time ifpossible.
What do I doif I am overchlorinatingwith theBac Pac?
1. If the chlorine reading isover 3 ppm, remove the BacPac from the Reservoir andtest the water daily until thereading is down to 1 ppm.
2. Reinsert the Bac Pac, lowerthe dial 1/2 setting and testthe water again in 24 hours.If the reading has risen,lower the dial 1/2 setting
again. Continue this processuntil proper reading isachieved.
3. If over-chlorinating at thelowest possible setting,consider decreasing thecirculation time. Dependingon your pump size, you maybe circulating the watermore than is necessary
What do I doif the cap is ontoo tight?
2. Lubricate cap o’ring withsilicone lubricant every timeyou replace a Bac Pac orReservoir.
3. Cap toolcan also beused if thedial is hardto turn.
Problem Remedy
See Setting Chart in Manual
12
34 5 6
78
PRECISE METERING FOR MODEL 5400
PacRemoval Maximum
1.
2.
3.
4.
5.
6.
10
which results in morechlorine than is necessary.
4. If decreasing circulationtime is not enough, theinstallation may need to bereviewed for a potentialby-pass (see page 19).
1. Use the cap tool to loosencap by hitting the handlecounterclockwise.

CYCLER DIAGRAM/PARTS LIST • 5100/5200 SERIES
REF. # PART NUMBER DESCRIPTION QTY. REQ.
1 & 2 01-22-1412 Cap w/O'Ring 12 01-22-1920 Cap O'Ring 13 N/A Body 14 01-22-9480 Pressure Relief Valve 15, 6, 7 01-22-1441 Control Dial
with Assembly Kit 16 01-22-1450 Control Dial O'Ring Set 17 01-22-1461 Control Dial Locking Pin 18 & 9 01-22-9941 Knob with O'Ring 210 01-22-1710 Nipple Kit 111 01-22-9790 Cap/Control Dial Tool 112 01-22-9970 Silicone Lubricant 1
11
Parts List
CYCLER DIAGRAM/PARTS LIST • 5400/5600 SERIES
REF. # PART NUMBER DESCRIPTION QTY. REQ.
1 & 2 01-22-9412 Cap w/O'Ring 12 01-22-9920 Cap O'Ring 13 N/A Body 14 01-22-9480 Pressure Relief Valve 15, 6, 7 01-22-9441 Control Dial
with Assembly Kit 16 & 7 01-22-9450 Control Dial O'Ring Kit 18 & 9 01-22-9941 Knob with O'Ring 210 01-22-9490 2" Male Adapter 218 01-22-8870 Cap/Control Dial Tool 119 01-22-9970 Silicone Lubricant 1
10
OFF-LINE PARTS Included with 5430/5630 Series
REF. # PART NUMBER DESCRIPTION QTY. REQ.
11* 01-22-8620 2" X 1/2" Bushing 212 01-22-7800 90 Degree Elbow 213 01-22-7690 Small Clamp 414 01-22-7700 6’ PVC Tubing 115 01-22-7850 Scoop Gasket 216 01-22-7790 Venturi Scoop 217 01-22-7910 Scoop Clamp 2
COPYCOPY
COPY
COPY
OTHER COPY?
SILICONELUBRICANT
11 12
7
9
1
2
3
4
8 & 9
8
6 5
1
2
3
4
5
7
6
89
1011
12
13
14
COPYCOPY
COPY
COPY
OTHER COPY?
SILICONELUBRICANT
1819
17
16
15
98

12
Cycler Maintenance
1.To replace, locate thecontrol dial locking pinin the back of the Cycler.
3. Turn control dial backand forth as you pull itout of the housing.
2. Depress tab at end oflocking pin with a pen orscrewdriver and pull pinout of valve.
Replacing the Control Dial O'Rings for Above Ground Cyclers 5100/5200 Series
4. Replace both o'rings.Please note: the back o'ringhas a loose fit in the groove.Upon replacement squeezea little silicone lubricant thatcame with your Cycler ono'rings. Use your finger tospread over surface.
5. Carefully insert control dialback into housing.
6. Replace locking pin bypushing it through the slotson the valve until it locks intoplace.
1. Using a needle nose pliers,find the snap ring tail locatedat approximately the fiveo'clock position under thecontrol dial.
2. Pull down and outof the groove.
3. Using a large screwdriver,loosen the control dial bycarefully prying each sidea little at a time.
6. Insert the non-lipped endof snap ring into the grooveopening beginning at the5 o'clock position and pushit up so that it threads itselfaround the control dial.
7. Using a small screwdriveror pointed tool to help guideit, make sure the snap ringstays in the groove as it isinserted.
Then pull dial out of thehousing.
4. Carefully replace the rubbero'ring without stretching it.Squeeze a little siliconelubricant that came with yourCycler directly on the o'ringand spread it over the o'ringsurface with your finger.
Replacing the Control Dial O'Ring Kit for Inground Cyclers 5400/5600 Series
5. Push control dialcompletely into the housingand turn the dial tosetting 2.
COPYCOPY
COPY
COPY
OTHER COPY?
SILICONELUBRICANT
COPYCOPY
COPY
COPY
OTHER COPY?
SILICONELUBRICANT
Locking Pin(Back ofCycler)
PORTControlDial(Front ofCycler)

1. Turn pump off and turndial to Pac Removal.
Winterizing
2. Unscrew side drain valveto relieve pressure.
3. Remove cap.
5. If the Bac Pac still contains chlorine at winterizing, wrapin a plastic bag and store in shed or garage away from children,pets, open flame or anything metal.
4. Unscrew drain drain valvein back of Cycler (5400/5600)or from the front of Cycler(5100/5200). Allow all water todrain.
6. Remove theReservoir anddiscard in trash.Once activated bywater, theminerals will holdtheir purifyingpower for sixmonths. Do notattempt to re-usethe Reservoir thefollowing season.
Replacing Cap O'Ring
To replace, simply unscrewold drain valve and replacewith the new one.
Back and side of 5400/5600 Cycler
1. Hold cap in front of youupside down with the o'ringgroove facing up. Place oneend of o'ring into cap grooveat the point closest to you.Hold o'ring down with thethumb and forefinger of onehand.
2. Take hold of the far end ofthe o'ring with the thumb andindex finger of the other hand.Roll o'ring slightly backtowards you
as you stretch the o'ring intothe remainder of the capgroove.
3. Lubricate o'ring often withsilicone lubricant that camewith your Cycler. DO NOT USEpetroleum based lubricants.
Replacing Drain Valve
Front of 5100/5200 Cycler Side of 5100/5200 Cycler
COPYCOPY
COPY
COPY
OTHER COPY?
SILICONELUBRICANT
7. Replace the cap and drainvalves loosely.
13

14
Above Ground Filter Installation - Models 5100/5200
Apply teflon tape to eachthreaded end of nipple.
Screw one end of nippleinto the filter return.
Screw the left port ofCycler on to open nippleend until upright andsecure.
Tighten turning1 to 2 revolutions withwrench. Do NOT over tighten.
Tighten turning1 to 2 revolutionswith wrench.Do NOT over tighten.
4.
5.
6.
1.
2.
3.
7.
MATERIALS NEEDED:
OneHoseClamp
Check ValveRainbow #172288
RECOMMENDED:
INCLUDED WITH CYCLER-Nipple Kit
Apply teflon tape tothreaded end of hoseadapter.
Screw adapter into theright port of Cycler.
Attach return section ofhose to the adapter withclamp. Tighten clamp withscrewdriver.
TOOLS NEEDED
Screwdriver
If using a chlorine Bac Pacinstalling a corrosionresistant check valve isrecommended.
Teflon Tape
One Hose Adapter1 1/2" X 1 1/2" X 1 1/4"
One 6" X 1 1/2" TBE
PVC Nipple
One Section of1 1/2" Flex Hose(provided with filter)
Wrench
HOSEADAPTER
HOSEADAPTER
HOSE ADAPTER

15
Apply teflon tape to thethreaded end of both hoseadapters.
Screw adapters intoeach end of Cycler.Tighten turning 1 to 2
Attach the filter section offlex hose to one hoseadapter and the returnsection of flex hose to theother hose adapter withclamps and tighten withscrewdriver.
Above Ground, Base Installation – Models 5100/5200
TOE NIPPLE
CHECKVALVE
BUSHING
HOSECLAMP
HOSEADAPTER HOSE
CLAMP
HOSEADAPTER
TO POOL
1 1/2" OR 1 1/4"FLEX HOSE
1 1/2" X 1 1/2" X 1 1/4"HOSE ADAPTER
HOSECLAMP
FILTER &PUMP
The Cycler should always be installedbetween the filter and pool (or betweenheater and pool if applicable).TO POOL
PUMP
FILTER
revolutions with wrench.Do Not over tighten.
1. 2.
3.
4. 5.
MATERIALS NEEDED:
TwoHoseClamps
Check ValveRainbow #172288
RECOMMENDED:
OPTION:
1 1/2" Threaded by1 1/2" Slip Bushing.
When installing withhard PVC pipe, useeither a half union onthe outside portthreads or a bushingon the inside portthreads.
#10 X 1 1/4" PhillipsPan Head Screws withWashers
HalfUnion
or
TOOLS NEEDED
If using a chlorine Bac Pac installing a corrosion resistant checkvalve is recommended.
Teflon Tape
Two Hose Adapters1 1/2" X 1 1/2" X 1 1/4"
Two Sections ofof 1 1/2" Flex Hose(one provided withfilter)
For better stability, Cyclermay be mounted on a baseusing Phillips pan head screws.
Screwdriver
Wrench

COPPER PIPE
Inground Installation – Models 5400/5600
PVCCEMENT
Check ValveRainbow#172288
WaterCYCLER
Metered Pool Purifier
PVCCEMENT
See Setting Chart in Manual
12
34 5 6
78
PRECISE
METERING FOR MODEL 5400
PacRemoval Maximum
16
1. 2.
3. 4.
MATERIALS NEEDED:
PVC Cement
#10 X 1 1/4" Phillips PanHead Screws withWashers
RECOMMENDED:
Use Phillips pan headscrews through themounting holes at theCycler base to securethe Cycler into a treatedwood base.
See Setting Chart in Manual
12
34 5 6
78
PRECISE
METERING FOR MODEL 5400
PacRemoval Maximum
See Setting Char t in Manual
12
34 5 6
78
PRECISE METERING FOR MODEL 5400
PacRemoval Maximum
See Setting Char t in Manual
12
34 5 6
78
PRECISE METERING FOR MODEL 5400
PacRemoval Maximum
See Setting Char t in Manual
12
34 5 6
78
PRECISE METERING FOR MODEL 5400
PacRemoval Maximum
Can be installed with thewater flow in either direct-ion due to its bi-flow valve.
TOOLS NEEDED
Wrench
Hacksaw
Measure the distancebetween Cycler bushingsand cut out a section of pipe1” less than that dimension.
Insert PVC pipe intobushings with a twistingaction. Hold in place5 to 10 seconds to bond.
If using a chlorine Bac Pac, isolating the Cycler by installinga corrosion resistant check valve is recommended.
Tape Measure
Following PVC cement directions brush PVC cement onthe inside of the bushings and to ends of the pipe .
Do NOT install this Cycleroff-line.
Install after all equipment and as far as possible from heater.
Do NOT install in copper pipeif using Bac Pac as chemicalcorrosion occurs.
Leave 12" to15" above andaround Cyclerto allow roomfor easyreplacementof Reservoirand Pac.
12" to 15"
12" to 15"

PVCCEMENT
PIPETHREADSEALANT
400 SERIES
WaterCYCLERMeteredPool Purifier
PVCCEMENT
PIPETHREADSEALANT
Off-line Installation – Models 5430/5630
TwoScoops
1. 2. 3.
4. 5. 6.
MATERIALS NEEDED:
#10 X 1 1/4" Phillips PanHead Screws withWashers
PVCCement
Pipe ThreadSealant
Check ValveRainbow #172288
RECOMMENDED:
Two90 Degree Elbows
Two MaleAdapters
Two ReducerBushings
Four HoseClamps
OFF-LINE KIT
6' of Tubing
Two ScoopGaskets
Two ScoopClamps
Included with Cycler
Can be installed with the water flow in eitherdirection due to its bi-flow valve.
TOOLS NEEDED
Wrench
BatteryOperated Drillwith 5/8" or 19/32" Bit
Following pipe threadsealant directions, brushsealant on to elbow threads.
Following pipe threadsealant directions, brushsealant on to Cycler threadsin both ports.
Brush sealant on threads ofboth male adapters.
DO NOT USE TEFLON TAPEas the threads on these unitsare not suitable forthis use andleaking or bushingfailure could result.
Screw a maleadapter into eachport of Cyclerand hand tighten.
Completelytightenturning 1 to 2revolutionswith a wrench.DO NOT OVER TIGHTEN.
Following PVC cementdirections, brush PVCcement on reducerbushings and inside ofmale adapters.
Insert reducer bushinginto male adapter on bothsides. Hold in place 5 to 10seconds to bond.
Screwdriver
Do NOT install an off-lineCycler in-line as this Cycleris different than an in-lineunit.
Install off-line when insufficient roomfor an in-line application. Install as farfrom heater as possible.
PIPETHREADSEALANT
DeliverySYSTEM
PIPETHREADSEALANT
17

18
400 SERIES
WaterCYCLERMeteredPool Purifier
400 SERIES
WaterCYCLERMeteredPool Purifier
400 SERIES
WaterCYCLERMeteredPool Purifier
7. 8. 9. 10.
11. 12. 13.
14. 16.15.
17.
For best results use Phillipspan head screws through themounting holes at the Cyclerbase to secure the Cycler intoa treated wood base.
If using the chlorine Bac Pac, isolating the Cyclerby installing a corrosion resistant check valve isrecommended.
2 Inches apart
Attach a gasket toeach scoop.
Place scoopsinside holes so theinlet scoop facesthe water flow andthe outlet scoopfaces away fromthe water flow.Scoop arrowsshould be facingeach other whencorrect.
Tighten scoop clampswith a screwdriver.
When pipe istotally dry,drill two 19/32" or5/8" holes2" apart on thereturn line. Becareful not to gothrough other sideof pipe.
Screw elbow into reducerbushings on both sides.
Cut tubingto size foreach Cyclerconnectionand attachone toeachelbow withclamps.
Attach scoop clamps over thescoops and around the pipe.
Attach each hoseto venturi scoopmale nipple with asmall clamp andtighten withscrewdriver.
Tighten clampswith screwdriver.
Arrows on scoops mustface each other.
WaterCYCLERMeteredPool Purifier
See Setting Chart in Manual
12
34 5
6
78
PRECISE METERING FOR MODEL 5400
PacRemoval Maximum

19
Special IngroundInstallations
B. With In-floor Cleaners
A. With High GPMSInstall T-fittings exactly asshown.
If using POOL FROG® withthe chlorine Bac Pac,special installationsshould be consideredwhen:
1. Water flow is higher than80 gpm.
2. In-floor cleaner is includedwith pool.
3. Pool and spa combinationwith common equipment.
NOTE: Over chlorination ordamage to the Cycler orother equipment could resultif these special installationsare not used in thesesituations.
C. Pool and Spillover Spa Combination
TO P
OO
L
TO S
PA
3-WAY
CYCLER
CHECK VALVE
PUMP
SUCTIONFROMPOOL/SPA
➜
➜
➜
➜
➜ ➜ ➜
➜
➜
➜ ➜
➜
➜ ➜
➜ ➜ ➜
➜
CYCLER
PUMP
3-WAY VALVE
TO POOLCYCLER
SUCTIONFROMPOOL/SPA
CHECKVALVE
BACK PRESSURE
3 to 8 psi is therecommended backpressure for this system.Higher back pressures resultin over chlorination. Adjusteye ball fittings in the returnjets to a larger size todecrease back pressure or asmaller size to increase backpressure.
IN-FLOORVALVE
POOL WATER LEVEL
See Se tt ing Chart in Manual
12
34 5 6
78
PR ECISE
METERING FOR MODEL 5400
PacRemoval Maximum

For a FREE warranty extension to 10 years, completewarranty card and return postage paid, within 60 days ofinstallation date.
KING TECHNOLOGY, Inc.530 11th Avenue South, Hopkins, MN 55343 U.S.A. (952) 933-6118 • FAX (952) 933-2206www.kingtechnology.com
Made in U.S.A.Cycler: US Patent Numbers 4,662,387; 5,076,315; 5,218,983
Foreign Patents PendingReservoir: US Patent Numbers 6,210,566; 6,190,547; D391,624 and
Foreign Patents Pending
PN #20-48-0127FROGOPMAN 553110143
Limited Two-Year Warranty
King Technology will warrant this unit with a completereplacement for the original purchaser should it provedefective by reason of improper workmanship and/or material,for a period of two (2) years from the date of original purchase. This warranty covers body, cap and control dial excludingo'rings. King Technology holds the option of replacing anydefective part without charge if it is determined to be all thatis needed to correct any situation. Parts used for replacementwith the exception of o'rings are warranted for the remainderof the original warranty.
1. To obtain warranty service, you must deliver productto King Technology or its nearest authorized dealer. Shippingexpense are the purchaser's responsibility. The name ofthe nearest authorized dealer can be obtained by writingor calling King Technology at the address and telephonenumber provided on back page. Proof of purchase isrequired when requesting warranty service. Purchasermust present the sales receipt or other document whichestablishes proof of purchase. To validate your warranty,complete the warranty card that came with your unit andreturn it to King Technology within 30 days of purchaseand installation.
2. This warranty does not cover defects caused by:Modification, alteration, repair or service of the productcontrary to the accompanying instructions; physicalabuse to or misuse of the product or operation orinstallation in a manner contrary to the accompanyinginstructions. This warranty also excludes all costs arisingfrom the installation, adjustment, removal or replacementof defective units or parts. This warranty also excludesany and all claims arising out of the chemicals used inthe product or their characteristics.
3. CAUTION - Read carefully - Do not add shock in or nearskimmer. A. This unit is not designed for shock treatment ofpools. See your pool dealer or distributor for furtherinformation concerning shock treatments.
B. Control dial settings in excess of the recommendedsetting levels for trichlor can result in excess sanitizersbeing discharged into the pool. This can result in bleach-ing or discoloration of areas around the pool inlet or insome cases bleaching or discoloration of the entire poolliner or paint.
C. Excess trichlor in the pool can create health hazardsto bathers. Consult each chemical manufacturer'swarnings and cautions for specifics.
4. Any express warranty not provided for herein, andany remedy for breach of warranty or breach of contractwhich, but for this provision, might arise by implicationor operation of law, is hereby expressly excluded anddisclaimed. Any express warranty not provided herein,and any remedy for breach of contract but which for thisprovision might arise by implication or operation of lawis hereby excluded and disclaimed. The implied warrantiesof merchantability and of fitness for any particular pur-pose are expressly limited to a term of one year. Somestates do not allow limitation on how long an impliedwarranty lasts, so the above limitation may not apply toyou.
5. Under no circumstance shall King Technology be liableto purchaser or any other person for any damage orloss incurred because of any chemicals used in theproduct or their physical characteristics, or interruptionof service of the product, or any special, incidental orconsequential damages or losses, whether arising outof breach of warranty, breach of contract or otherwise. Some states do not allow the exclusion or limitation ofincidental consequential damages, so the abovelimitation or exclusion may not apply to you.
6. Misuse or failure to use the proper Reservoir and Pacmay cause damage to equipment or personal injury. Allwarranty null and void if this product is not used withthe recommended Reservoir and Pac.