Embed Size (px)
Citation preview
3.1 | January 2014 | 3725-69929-002/A
Online Help
Polycom® RealPresence® Mobile for Apple® iPad

© 2013 Polycom, Inc. All rights reserved.
Polycom, Inc. 6001 America Center Drive San Jose CA 95002 USA
No part of this document may be reproduced or transmitted in any form or by any means, electronic or mechanical, for any purpose, without the express written permission of Polycom, Inc. Under the law, reproducing includes translating into another language or format.
As between the parties, Polycom, Inc., retains title to and ownership of all proprietary rights with respect to the software contained within its products. The software is protected by United States copyright laws and international treaty provision. Therefore, you must treat the software like any other copyrighted material (e.g., a book or sound recording).
Every effort has been made to ensure that the information in this manual is accurate. Polycom, Inc., is not responsible for printing or clerical errors. Information in this document is subject to change without notice.
2
Trademark Information POLYCOM® and the names and marks associated with Polycom's products are trademarks and/or service marks of Polycom, Inc., and are registered and/or common law marks in the United States and various other countries.
All other trademarks are the property of their respective owners.
Patent Information The accompanying product may be protected by one or more U.S. and foreign patents and/or pending patent applications held by Polycom, Inc.
Polycom, Inc. 3
Contents
Polycom RealPresence Mobile Modes of Operation . . . . . . . . . . . . . . . . . . . . . . . . . . . . . . . . . 4
Configure the RealPresence Mobile Application . . . . . . . . . . . . . . . . . . . . . . . . . . . . . . . . . . . . 4
Place and Receive Calls . . . . . . . . . . . . . . . . . . . . . . . . . . . . . . . . . . . . . . . . . . . . . . . . . . . . . . 7
Place Calls . . . . . . . . . . . . . . . . . . . . . . . . . . . . . . . . . . . . . . . . . . . . . . . . . . . . . . . . . . . . . 8
Place Calls from Your Corporate Directory or Local Address Book . . . . . . . . . . . . . . . 8
Manage Calls . . . . . . . . . . . . . . . . . . . . . . . . . . . . . . . . . . . . . . . . . . . . . . . . . . . . . . . . . . . 9
Enable and Use SmartPairing . . . . . . . . . . . . . . . . . . . . . . . . . . . . . . . . . . . . . . . . . . . . . . . 9
Use the In-Call Toolbar . . . . . . . . . . . . . . . . . . . . . . . . . . . . . . . . . . . . . . . . . . . . . . . . . . . 12
Toolbar Call Icons . . . . . . . . . . . . . . . . . . . . . . . . . . . . . . . . . . . . . . . . . . . . . . . . . . . . 12
Work with Content . . . . . . . . . . . . . . . . . . . . . . . . . . . . . . . . . . . . . . . . . . . . . . . . . . . 13
Manage Contacts . . . . . . . . . . . . . . . . . . . . . . . . . . . . . . . . . . . . . . . . . . . . . . . . . . . . . . . . . . 14
Manage Cameras . . . . . . . . . . . . . . . . . . . . . . . . . . . . . . . . . . . . . . . . . . . . . . . . . . . . . . . . . . 16
Use Far End Camera Control (FECC) . . . . . . . . . . . . . . . . . . . . . . . . . . . . . . . . . . . . . . . 17
Solve Problems . . . . . . . . . . . . . . . . . . . . . . . . . . . . . . . . . . . . . . . . . . . . . . . . . . . . . . . . . . . . 17

RealPresence Mobile for Apple iPad Online Help
Polycom RealPresence Mobile Modes of OperationYou can use RealPresence Mobile in basic or professional mode.
● Basic mode enables basic calling, but does not include professional features such as provisioning, Advanced Encryption Standard (AES), Lightweight Directory Access Protocol (LDAP), and content sharing.
● Professional mode provides provisioned features. To use these features, you must register to a Polycom provisioning server, such as Polycom Converged Management Application™ (CMA®) 4000/5000 or Polycom RealPresence Resource Manager. Provisioned features are available when your RealPresence Mobile is connected to the CMA 4000/5000 or RealPresence Resource Manager.
Configure the RealPresence Mobile ApplicationBefore you begin configure RealPresence Mobile, get familiar with the application’s user interface. The following figures show the RealPresence Mobile main window and the in-call toolbar. See Use the In-Call Toolbar for more specific information.
Figure: iPad main Window user interface
Polycom, Inc. 4
RealPresence Mobile for Apple iPad Online Help
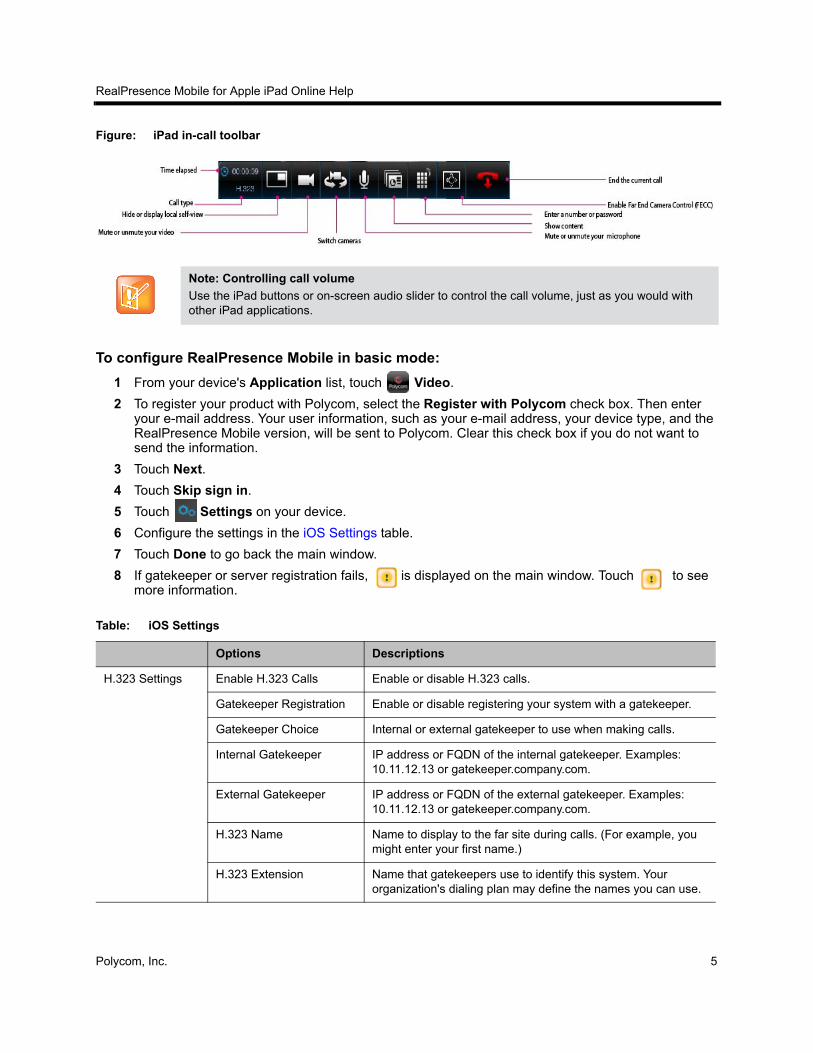
Figure: iPad in-call toolbar
Note: Controlling call volume
Use the iPad buttons or on-screen audio slider to control the call volume, just as you would with other iPad applications.
To configure RealPresence Mobile in basic mode:
1 From your device's Application list, touch Video.
2 To register your product with Polycom, select the Register with Polycom check box. Then enter your e-mail address. Your user information, such as your e-mail address, your device type, and the RealPresence Mobile version, will be sent to Polycom. Clear this check box if you do not want to send the information.
3 Touch Next.
4 Touch Skip sign in.
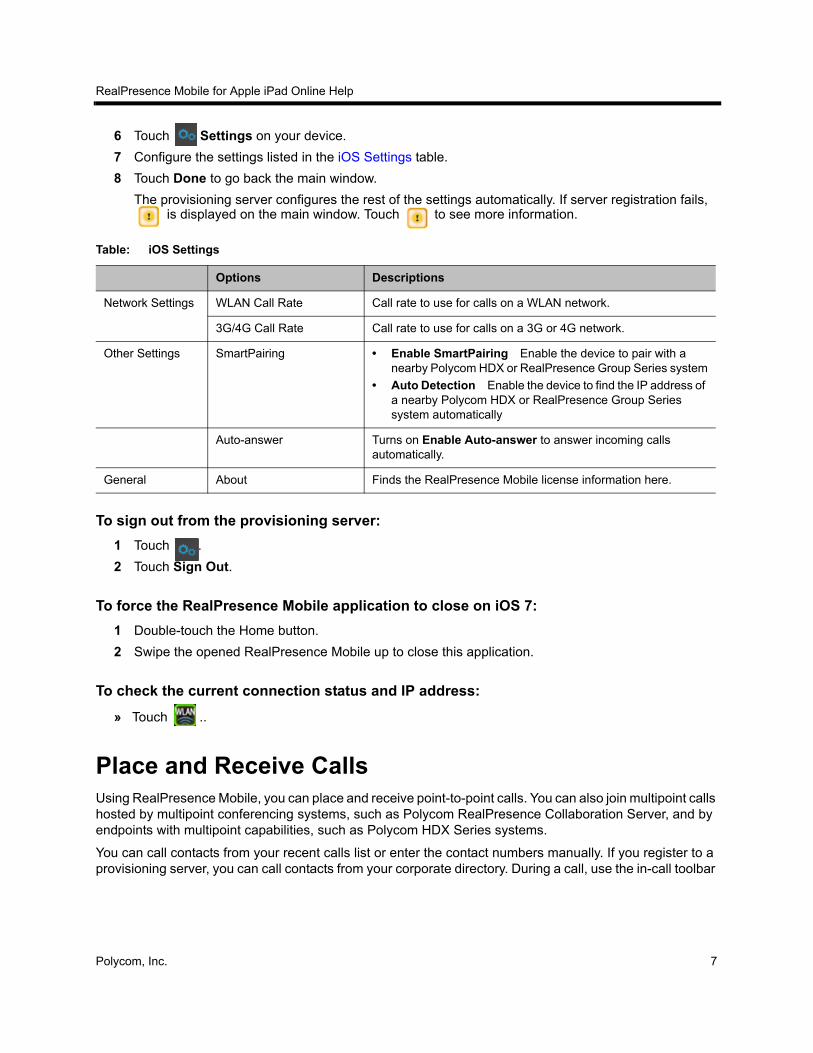
5 Touch Settings on your device.
6 Configure the settings in the iOS Settings table.
7 Touch Done to go back the main window.
8 If gatekeeper or server registration fails, is displayed on the main window. Touch to see more information.
Table: iOS Settings
Options Descriptions
H.323 Settings Enable H.323 Calls Enable or disable H.323 calls.
Gatekeeper Registration Enable or disable registering your system with a gatekeeper.
Gatekeeper Choice Internal or external gatekeeper to use when making calls.
Internal Gatekeeper IP address or FQDN of the internal gatekeeper. Examples: 10.11.12.13 or gatekeeper.company.com.
External Gatekeeper IP address or FQDN of the external gatekeeper. Examples: 10.11.12.13 or gatekeeper.company.com.
H.323 Name Name to display to the far site during calls. (For example, you might enter your first name.)
H.323 Extension Name that gatekeepers use to identify this system. Your organization's dialing plan may define the names you can use.
Polycom, Inc. 5

RealPresence Mobile for Apple iPad Online Help
To configure the RealPresence Mobile application in professional mode:
1 From your device's Application list, touch Video.
2 Enter your e-mail address. By default, your e-mail address, your device type, and the RealPresence Mobile version, will be sent to Polycom. When you deselect the Register with Polycom check box, RealPresence Mobile will not send this information.
3 Touch Next.
4 Enter your user name and password. The provisioning server address is populated based on your e-mail address.
5 Touch Sign In.
SIP Settings Enable SIP Calls Enable or disable SIP calls.
Transport Protocol Protocol the system uses for SIP signaling:
• TCP: reliable transport.
• UDP: best-effort transport.
SIP Registration Enable or disable registering your system with a SIP server.
SIP Proxy Server IP address or FQDN of the SIP proxy server.
SIP Registrar Server IP address of the SIP registrar server.
Domain Domain name for authentication with SIP registrar server:
• If you use a Polycom DMA server as the SIP server, leave this field empty.
• If you use a third-party SIP server, enter the domain name for authentication with the registrar server.
SIP User Name User name for authentication with a registrar server.
Enable SIP Calls Enable or disable SIP calls.
Transport Protocol Protocol the system uses for SIP signaling:
• TCP: reliable transport.
• UDP: best-effort transport.
Network Settings
WLAN Call Rate Call rate to use for calls on a WLAN network.
3G/4G Call Rate Call rate to use for calls on a 3G or 4G network.
Other Settings SmartPairing • Enable SmartPairing Enable the device to pair with a nearby Polycom HDX or RealPresence Group Series system
• Auto Detection Enable the device to find the IP address of a nearby Polycom HDX or RealPresence Group Series system automatically
Auto-answer Turns on Enable Auto-answer to answer incoming calls automatically.
General About Finds the RealPresence Mobile license information here.
Table: iOS Settings
Options Descriptions
Polycom, Inc. 6
RealPresence Mobile for Apple iPad Online Help
6 Touch Settings on your device.
7 Configure the settings listed in the iOS Settings table.
8 Touch Done to go back the main window.
The provisioning server configures the rest of the settings automatically. If server registration fails, is displayed on the main window. Touch to see more information.
Table: iOS Settings
Options Descriptions
Network Settings WLAN Call Rate Call rate to use for calls on a WLAN network.
3G/4G Call Rate Call rate to use for calls on a 3G or 4G network.
Other Settings SmartPairing • Enable SmartPairing Enable the device to pair with a nearby Polycom HDX or RealPresence Group Series system
• Auto Detection Enable the device to find the IP address of a nearby Polycom HDX or RealPresence Group Series system automatically
Auto-answer Turns on Enable Auto-answer to answer incoming calls automatically.
General About Finds the RealPresence Mobile license information here.
To sign out from the provisioning server:
1 Touch .
2 Touch Sign Out.
To force the RealPresence Mobile application to close on iOS 7:
1 Double-touch the Home button.
2 Swipe the opened RealPresence Mobile up to close this application.
To check the current connection status and IP address:
» Touch ..
Place and Receive CallsUsing RealPresence Mobile, you can place and receive point-to-point calls. You can also join multipoint calls hosted by multipoint conferencing systems, such as Polycom RealPresence Collaboration Server, and by endpoints with multipoint capabilities, such as Polycom HDX Series systems.
You can call contacts from your recent calls list or enter the contact numbers manually. If you register to a provisioning server, you can call contacts from your corporate directory. During a call, use the in-call toolbar
Polycom, Inc. 7
RealPresence Mobile for Apple iPad Online Help
to control your video, volume, and camera. You can also transfer calls to a paired Polycom HDX or RealPresence Group Series system.
Note: Check Your Service Plan
Participating in a video call in a 3G or 4G network requires sending and receiving large amounts of data. Be sure that your service plan allows a sufficient level of data transfer to support video calling.
Place CallsYou can place calls by entering a contact number directly or by using your recent calls list.
To place a call by entering a number:
1 Touch and then enter the name or number to call. You can use any of the formats shown here:
2555 (SIP user name or E.164 extension for H.323)
stereo.polycom.com (FQDN name)
[email protected] ([email protected])
10.11.12.13##1234 (signaling IP##conference ID for H.323)
10.11.12.13 (IP address, including the dots)
[email protected] (SIP user name@IP address)
2 Select the call type, SIP or H.323.
3 To enter an extension or password, touch .
4 Touch to start the call.
To place a call from your recent calls list:
1 Touch .
2 Touch an entry to call.
Your recent calls list can hold up to 100 entries.
Place Calls from Your Corporate Directory or Local Address Book
When using RealPresence Mobile in professional mode, which provides LDAP service, you can place calls in several additional ways. Place calls from your corporate directory or from your local address book.
Note: Registration Problem
If a registration problem occurs, is displayed at the bottom of the screen. Touch for more information.
To place a call from your corporate directory:
1 Touch .
2 Enter the name or part of the name of the contact you want to call, and then touch Search.
3 Touch the contact name from the search results.
4 Touch the device name and then touch .
Polycom, Inc. 8
RealPresence Mobile for Apple iPad Online Help
5 Touch Place Call (H.323) or Place Call (SIP). If you cannot find the option Place Call (H.323) or Place Call (SIP), the contact may have no H.323 extension or SIP URI configured. Contact your IT administrator.
To place a call from your local address book:
1 Touch and then touch a contact or a number.
2 Touch the contact name from the search results.
3 Touch Place Call (H.323) or Place Call (SIP). If you cannot find the option Place Call (H.323) or Place Call (SIP), the contact may have no H.323 extension or SIP URI configured. Contact your IT administrator.
Manage CallsYou can use RealPresence Mobile to make, answer, reject, or end calls.
To answer a call:
» Touch .
To reject an incoming call:
» Touch .
To end the current call:
» Touch .
Note: Incoming Call Notification Display
Incoming call notification is displayed only when RealPresence Mobile is the active application.
To clear the Recent Calls list:
1 Touch .
2 Do one of the following:
To clear all recent calls, touch , and then touch Clear All.
To delete one recent call entry, swipe right on the desired entry, and then touch Delete.
Enable and Use SmartPairingYou can pair your device with a Polycom HDX or RealPresence Group Series system and then do one of the following:
● Share your monitor or application with the paired system You can share your monitor or application with paired Polycom HDX or RealPresence Group Series system.
Polycom, Inc. 9

RealPresence Mobile for Apple iPad Online Help
● Use your device as the paired system’s remote controller You can control the paired Polycom HDX or RealPresence Group Series system, (for example, to place a call, adjust the call volume or end the call) using RealPresence Mobile. You can also transfer an ongoing call from your RealPresence Mobile to the paired HDX or RealPresence Group Series system.
Note: Enable SmartPairing and Telnet First
You need to enable the SmartPairing feature and Telnet on the paired HDX or RealPresence Group Series systems for this feature to operate.
Before using this feature, you first need to enable SmartPairing on your RealPresence Mobile.
To enable SmartPairing:
1 Touch Settings.
2 Touch SmartPairing and turn on Enable SmartPairing.
If Auto Detection is turned on, IP addresses of nearby Polycom HDX or RealPresence Group Series system that have been detected will be listed automatically.
To share content on paired HDX or RealPresence Group Series System:
1 From the top menu, touch .
2 Touch Content.
3 Select a device from either the Detected, or the Recent Connections list. You also can enter a device address in the Manual Pairing field.
4 Enter a pairing password if needed.
5 Select the content to be shared. You can select the following content:
— Local Documents Select a local file from your device.
— Photos Select a photo from your device.
— Website Type a URL that you want to share in the address bar.
— Dropbox Select a file from your Dropbox files.
— Whiteboard Open an empty whiteboard.
— Blackboard Open an empty blackboard.
You can add annotations on any shared content, such as a PDF file or a photo, using the whiteboard tools. You also can open an empty whiteboard. See Work with Content for details.
6 Touch to start sharing.
7 Touch to stop sharing after you are done.
To place a call from the Polycom HDX or RealPresence Group Series System:
1 From the top menu, touch .
2 Touch Room Control.
Polycom, Inc. 10

RealPresence Mobile for Apple iPad Online Help
3 Select a device from either the Detected, or the Recent Connections list. You also can enter a device address in the Manual Pairing field. To delete a paired device from the Recent Connections list, wipe the item and touch Delete.
4 Enter a pairing password. After paired with the desired device, touch .Place a call.
5 Enter a number from the soft keyboard on the right.
6 Touch Call.
To transfer calls to a paired Polycom HDX or RealPresence Group Series system:
1 During a call, touch on the bottom of the screen. The moves to the middle of the screen.
This icon appears when the system detects a Polycom HDX or RealPresence Group Series system, or has manually paired to Polycom HDX or RealPresence Group Series systems recently.
2 Flip upward to transfer the call to the Polycom HDX or RealPresence Group Series system. If you do not want to transfer a call, flip downward.
3 Select a desired device, if more than one device appears. The call is disconnected from your RealPresence Mobile application and is transferred to the selected Polycom HDX or RealPresence Group Series system
If the call transferring fails, the call will be redirected to your RealPresence Mobile application.
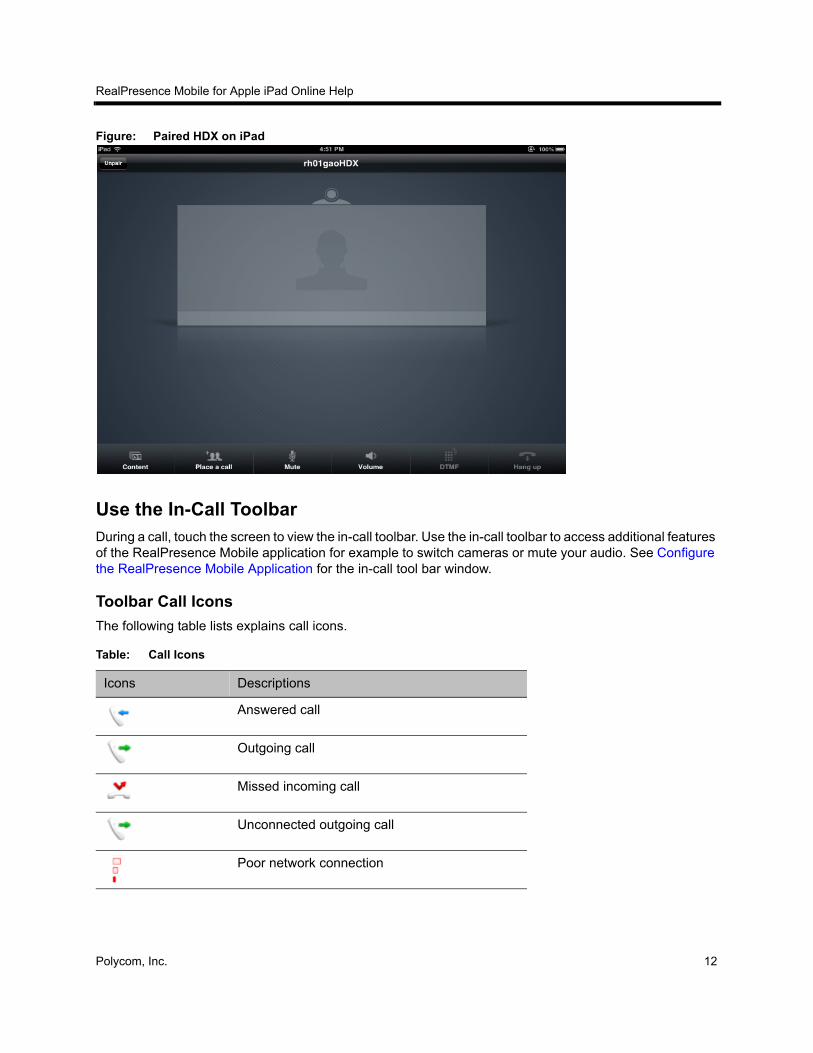
To control calls on the Paired Polycom HDX or RealPresence Group Series System:
1 Use the in-call toolbar to control calls on the paired Polycom HDX or RealPresence Group series system as shown in Paired HDX on iPad.
Content Click this button to share your content with the paired device. You can select either a monitor or an application to share.
Place a call Click this button and enter a desired number on the right soft keypad to place a call on the paired device
Mute Mute or unmute the call.
Volume Adjust the call volume.
DTMF Open the DTMF keypad.
Hang up End the call form the paired device.
2 Touch Unpair to end the control.
Polycom, Inc. 11
RealPresence Mobile for Apple iPad Online Help
Figure: Paired HDX on iPad
Use the In-Call ToolbarDuring a call, touch the screen to view the in-call toolbar. Use the in-call toolbar to access additional features of the RealPresence Mobile application for example to switch cameras or mute your audio. See Configure the RealPresence Mobile Application for the in-call tool bar window.
Toolbar Call Icons
The following table lists explains call icons.
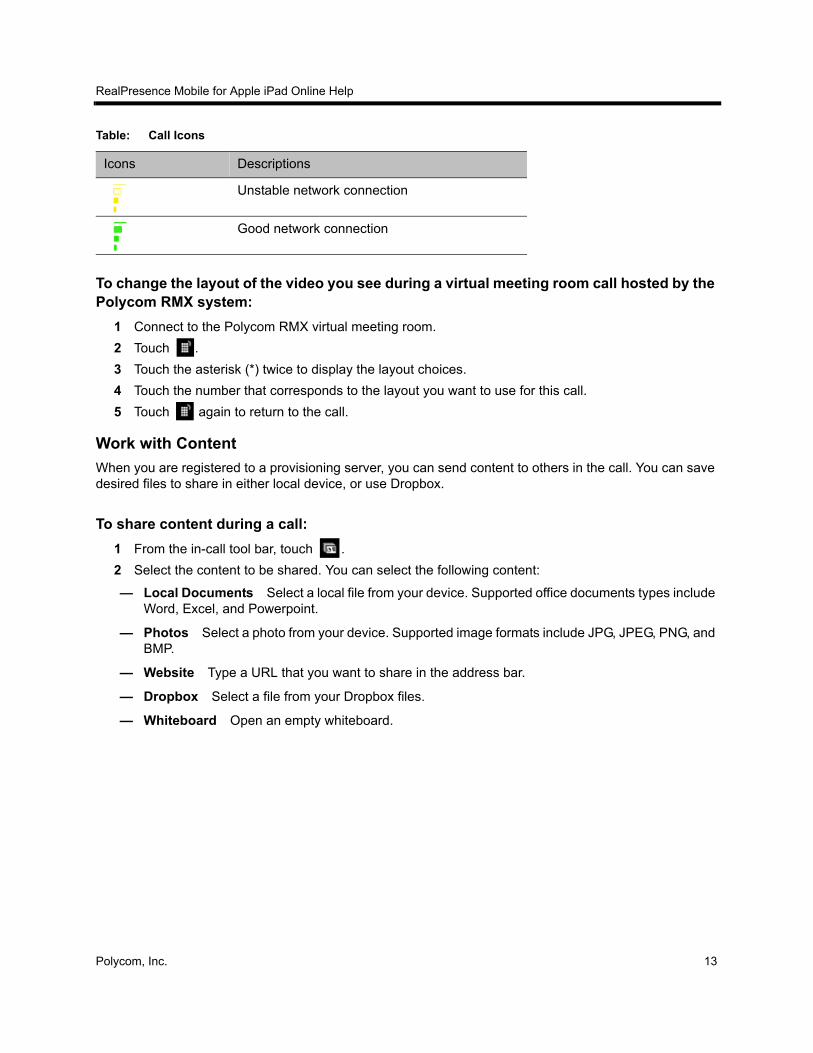
Table: Call Icons
Icons Descriptions
Answered call
Outgoing call
Missed incoming call
Unconnected outgoing call
Poor network connection
Polycom, Inc. 12
RealPresence Mobile for Apple iPad Online Help
To change the layout of the video you see during a virtual meeting room call hosted by the Polycom RMX system:
1 Connect to the Polycom RMX virtual meeting room.
2 Touch .
3 Touch the asterisk (*) twice to display the layout choices.
4 Touch the number that corresponds to the layout you want to use for this call.
5 Touch again to return to the call.
Work with Content
When you are registered to a provisioning server, you can send content to others in the call. You can save desired files to share in either local device, or use Dropbox.
To share content during a call:
1 From the in-call tool bar, touch .
2 Select the content to be shared. You can select the following content:
— Local Documents Select a local file from your device. Supported office documents types include Word, Excel, and Powerpoint.
— Photos Select a photo from your device. Supported image formats include JPG, JPEG, PNG, and BMP.
— Website Type a URL that you want to share in the address bar.
— Dropbox Select a file from your Dropbox files.
— Whiteboard Open an empty whiteboard.
Unstable network connection
Good network connection
Table: Call Icons
Icons Descriptions
Polycom, Inc. 13
RealPresence Mobile for Apple iPad Online Help
— Blackboard Open an empty blackboard.
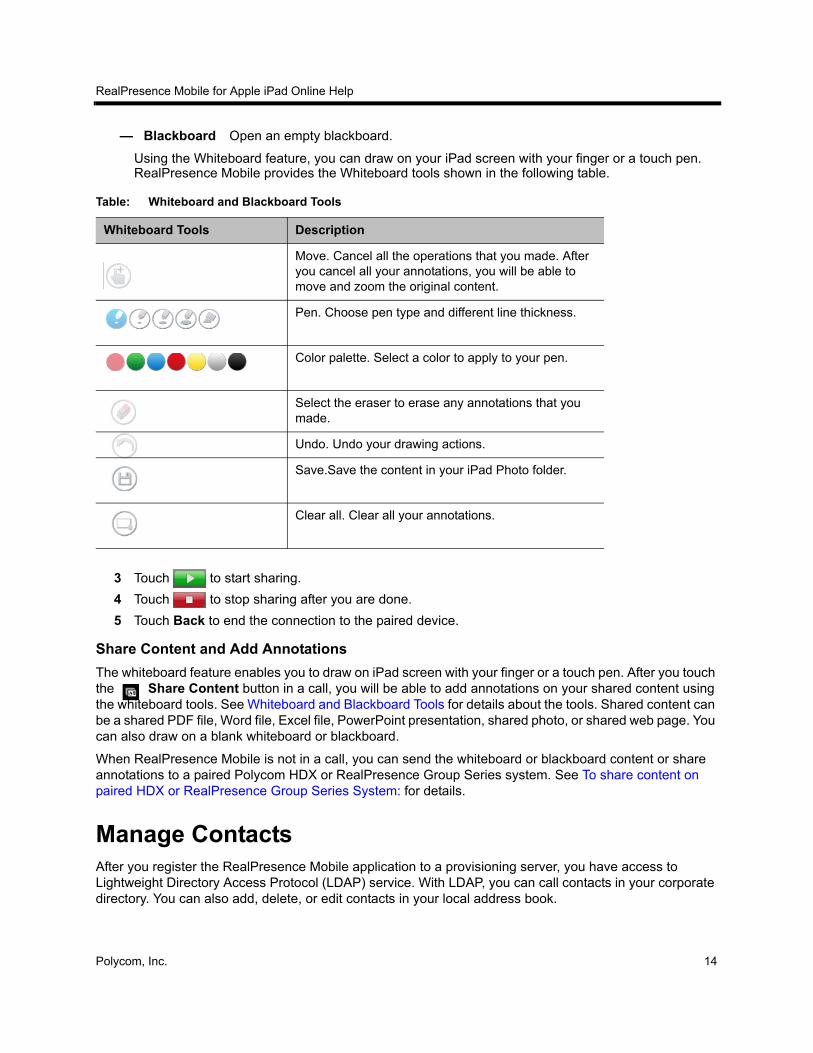
Using the Whiteboard feature, you can draw on your iPad screen with your finger or a touch pen. RealPresence Mobile provides the Whiteboard tools shown in the following table.
Table: Whiteboard and Blackboard Tools
Whiteboard Tools Description
Move. Cancel all the operations that you made. After you cancel all your annotations, you will be able to move and zoom the original content.
Pen. Choose pen type and different line thickness.
Color palette. Select a color to apply to your pen.
Select the eraser to erase any annotations that you made.
Undo. Undo your drawing actions.
Save.Save the content in your iPad Photo folder.
Clear all. Clear all your annotations.
3 Touch to start sharing.
4 Touch to stop sharing after you are done.
5 Touch Back to end the connection to the paired device.
Share Content and Add Annotations
The whiteboard feature enables you to draw on iPad screen with your finger or a touch pen. After you touch the Share Content button in a call, you will be able to add annotations on your shared content using the whiteboard tools. See Whiteboard and Blackboard Tools for details about the tools. Shared content can be a shared PDF file, Word file, Excel file, PowerPoint presentation, shared photo, or shared web page. You can also draw on a blank whiteboard or blackboard.
When RealPresence Mobile is not in a call, you can send the whiteboard or blackboard content or share annotations to a paired Polycom HDX or RealPresence Group Series system. See To share content on paired HDX or RealPresence Group Series System: for details.
Manage ContactsAfter you register the RealPresence Mobile application to a provisioning server, you have access to Lightweight Directory Access Protocol (LDAP) service. With LDAP, you can call contacts in your corporate directory. You can also add, delete, or edit contacts in your local address book.
Polycom, Inc. 14

RealPresence Mobile for Apple iPad Online Help
To add a contact from a corporate directory to your local address book:
1 .Touch
2 Enter the name or part of the name of the contact you want to find, and then touch Search.
3 Touch the contact name from the search results.
4 Touch the device name of the contact, and then touch .
5 Touch .
6 Touch Add.
To add contacts from recent calls list to your local address book:
1 Touch .
2 Touch of the contact number you want to add.
3 Touch to add the contact to your local address book.
4 Complete contact information and then touch Done.
Note: Cannot Add IP Addresses to Your Address Book
If the most recent call number is an IP address, you cannot add it to your local address book.
To add a new contact to your local address book manually:
1 Touch ,and then touch .
2 Specify the contact information.
3 Only the display name is required. However, you must enter at least one of following before you can call this contact:
H.323 Extension
H.323 Name
SIP UR
The following table explains the contact information fields.
4 Touch Done.I
Table: Contact Information
Fields Descriptions
Display Name Name you use to identify the contact, the display name appears only on your screen, so it can be any name that is meaningful to you.
Title Contact's job title.
Phone Contact's phone number.
E-mail Contact's e-mail address.
Location Contact's location.
Polycom, Inc. 15

RealPresence Mobile for Apple iPad Online Help
To edit a contact in your local address book:
1 Touch .
2 Touch the contact number you want to edit.
3 Touch Edit.
4 Edit the contact information, and then touch Done
Note: Re-adding Contact from Another Directory
If you add this contact again from your corporate directory to your local address book, your edits will be lost.
.
To delete a contact from your local address book:
1 Touch .
2 Touch the contact number you want to delete.
3 Touch Edit.
4 Touch Delete Contact.
5 Touch Delete.
To locate a contact quickly:
» Touch a letter to view names that start with that letter.
Manage CamerasThe RealPresence Mobile application also enables you to switch cameras and switch among windows during a call.
To switch cameras:
» While viewing your local video, touch to switch between your front and rear cameras.
Device Name Name or type of system.
H.323 Extension Number that gatekeepers use to identify this system, your organization's dialing plan may define the numbers you can use.
H.323 Name Name that gatekeepers use to identify this system, your organization's dialing plan may define the names you can use.
SIP URI SIP URI of the system.
Table: Contact Information
Fields Descriptions
Polycom, Inc. 16
RealPresence Mobile for Apple iPad Online Help
To switch among windows:
» To switch among local, people, and content windows, swipe left or right.
Note: Maximized Content and Window Switching
When the content is maximized, you cannot switch windows.
Use Far End Camera Control (FECC)In calls that support FECC, you can adjust the far-end camera to give you a better view.
To use FECC:
» Touch .
To zoom the far-end camera:
1 Pinch the screen to zoom in and zoom out.
2 Touch to zoom in or to zoom out.
To navigate the far-end camera:
» Use the arrow keys on to navigate the far-end camera.
Solve ProblemsThe following table lists the problems that you may encounter and the possible solutions.
Table: Solving Problems
Problem Description Solution
Video quality is poor. Try the call again using a lower call rate. See Configure the RealPresence Mobile Application.
You can also set up a private wireless network with a private key for the RealPresence Mobile application:
1 From the Applications list, touch Settings > WLAN.
2 Choose your private wireless network.
3 Enter your user name and password, and touch Join.
Cannot see the content shared by the far end.
Make sure that your RealPresence Mobile software version supports using a provisioning service and that you are registered to a provisioning server.
Audio is noisy in calls from one device to another.
If the two devices are near to each other, mute the audio of one of them.
Video is not available. Ensure that you are connected to a mobile network and registered to a provisioning server. Then try the call again.
Polycom, Inc. 17
RealPresence Mobile for Apple iPad Online Help
Unable to place a call. Do one of the following:
• Check whether your WLAN connection is lost. If so, turn off the WLAN, and then turn it on again.
• Wait three minutes or longer, then turn off the gatekeeper or SIP registration. Then turn it on again.
• Check whether your far end has a connection problem.
Registration fails. Do one of the following:
• Check to be sure your WLAN is connected. If the connection has been lost, turn off the WLAN, and then turn it on again.
• Wait for at least three minutes. Turn off the gatekeeper or SIP registration and then turn it on again.
• Change the H.323 name and H.323 extension and then register again.
• Force close the AT&T Business Video application and then try again.
• If the registration fails when you are signed in to a provisioning server, sign out and then sign in again.
Cannot sign in to the provisioning server.
Do one of the following:
• Make sure the provisioning server address is correct.
• The DNS server may be unable to resolve your domain name. Contact your network administrator for help.
• Check your network connection.
No Polycom HDX or RealPresence Group Series System is detected for SmartPairing.
If no room system is detected, you need to Ensure SmartPairing and Telnet are enabled on the Group Series and HDX system.
You can use the Telnet command systemsetting uspairingenabled <Disabled|Manual|Auto> to configure the SmartPairing on a Polycom HDX or RealPresence Group Series system first. For more information, contact your HDX or RealPresence Group Series system administrator.
Table: Solving Problems
Problem Description Solution
Polycom, Inc. 18