Embed Size (px)
Citation preview

11035 Walden Avenue Phone:(716) 901-7020
Alden, NY 14004 Fax: (716) 901-7015
www.rjwatson.com
1
Poly-Tron Elastomeric Concrete
Installation Procedures
A. Create and Prepare Block-Out
Saw cut and demo the substrate to the dimensions desired for the area that will receive the
elastomeric concrete header system. Substrate must be clean, dry to touch (<5% moisture),
sound, and free of incompatible substrates such as unapproved patching materials,
delaminated concrete, salt, oil, or chemical saturation, degraded steel, asphalt, bitumen, etc. If
the substrate is suspicious the on-site tech rep &/or manufacturer shall be notified for
recommendations prior to placement. The bottom interface of the Poly-Tron must be placed
on a structural member. Any deviations from any of these instructions require manufacturer’s
approval and recommendations. New concrete should be 85% cured (10-14 days for 28-day
concrete) prior to application. Sandblast all surfaces against which the Poly-Tron is to be
placed. Metalized steel may require only a “brush blast” to insure a clean surface. All non-
metalized steel shall be blasted to SSPC-10 (near-white finish). Remove all sand and debris
with oil-free compressed air. Be sure the temporary form for the joint opening is set per plans
and specifications. Insure a tight fit to prevent elastomeric concrete from leaking into the joint
opening. Do not use any form release agents.
*Apply Duck-Tape to both outside areas of the block-out to create a neat margin during the
pour and trowel portion of the installation. Remove immediately after installation is complete.
B. Primer Application
Prepare the primer by Mixing 1 Can-A & 1 Can-B without aggregate thoroughly for 30 to
60 seconds. Apply with protective gloved hand using a brush. The coated area need only be
thick enough so as not to see through to the concrete substrate. DO NOT allow the primer
mix to puddle in the block-out. Prime all surfaces that are to be in contact with the Poly-Tron
elastomeric concrete. Place the mixed Poly-Tron elastomeric concrete immediately after
priming. No waiting time is needed.
C. Elastomeric Concrete Installation
Mix Poly-Tron according to proper ratio: Mix 1 Can-A & 1-Can B for approximately 30 to
60 seconds. As you continue to mix both parts, add the supplied aggregate and mix
thoroughly. All aggregate should be saturated completely with the resin mixture. Place the
mixed elastomeric concrete into the prepared area per plans and specifications. Make sure that
it is thoroughly compacted under any steel angles, around all anchors, re-bar, and within the
block out. Trowel flush with existing deck. Working time of mixed material varies, depending
on mass and temperatures. Average placement time of the Poly-Tron material is about 3-5
minutes per kit from beginning of mixing. After cure, remove temporary forms and grind a
¼” bevel to the two opposing top edges of the new Poly-Tron header system. Please view
installation photos starting on page three of these instructions.
Poly-Tron will cure and can be open to traffic in the following time intervals:
At 45-65°F (7-18°C) the cure time is approximately 3-5 ½ hours.
At 65-80°F (18-27°C) the cure time is approximately 2-3 ½ hours.
At 80-95°F (27-35°C) the cure time is approximately 1-2 ½ hours.

11035 Walden Avenue Phone:(716) 901-7020
Alden, NY 14004 Fax: (716) 901-7015
www.rjwatson.com
2
Required Equipment & Product Check List
Concrete trowels - Large and small - paint thinner to clean them.
An air compressor along with sand blasting equipment with air attachment to clean the joint.
Bring the entire inventory that was shipped to you making sure that everything listed on the
packing slip matches what you received - (See the packing slip and instructions that
were enclosed with your shipment). KEEP ALL the product inside in a warm & dry
environment! Do not allow it to get wet or freeze!
All your foam forms to prepare the block-out.
A large hand held electric power mortar mixer with 2 to 3 Universal Thin-set and Helix
Mixing Paddles that fit into the mixer.
Four to five mixing pales – 5 to 8-gallon clean pales - These also can be purchased from
Home Depot or similar store.
A large tarp to be used as a mixing station for the PolyTron. Adhere duct tape to both sides
of the block-out to create a neat margin during the pour and trowel portion of the installation.
Removed immediately after installation.
There CANNOT be any rain forecasted for the installation day! The joint area must be
completely dry!
Please review the installation instructions to familiarize yourselves on the proper method
and placement techniques for this product prior to your actual installation date. Should
you require any further information or have any questions, please contact us.

11035 Walden Avenue Phone:(716) 901-7020
Alden, NY 14004 Fax: (716) 901-7015
www.rjwatson.com
3
Job Site Preparation
Make sure all concrete repairs are completed prior to the installation of PolyTron – Note:
If concrete repairs are made with standard concrete, you must wait 10-14 days before
installing PolyTron. “A Rapid-Set DOT” concrete may also be used which would allow
the installation of PolyTron within 2-3 hours.
Measure the width of both sides of the Block-Out as well as the Depth to ensure you have
the proper quantity of material. Make sure there is NO loose substrate.

11035 Walden Avenue Phone:(716) 901-7020
Alden, NY 14004 Fax: (716) 901-7015
www.rjwatson.com
4
Here is a properly
cleaned and formed
Block-Out, ready
for the installation
of the PolyTron
header system
Thoroughly sand
blast and clean the
entire Block-Out,
then insert all joint
forms.
11035 Walden Avenue Phone:(716) 901-7020
Alden, NY 14004 Fax: (716) 901-7015
www.rjwatson.com
5
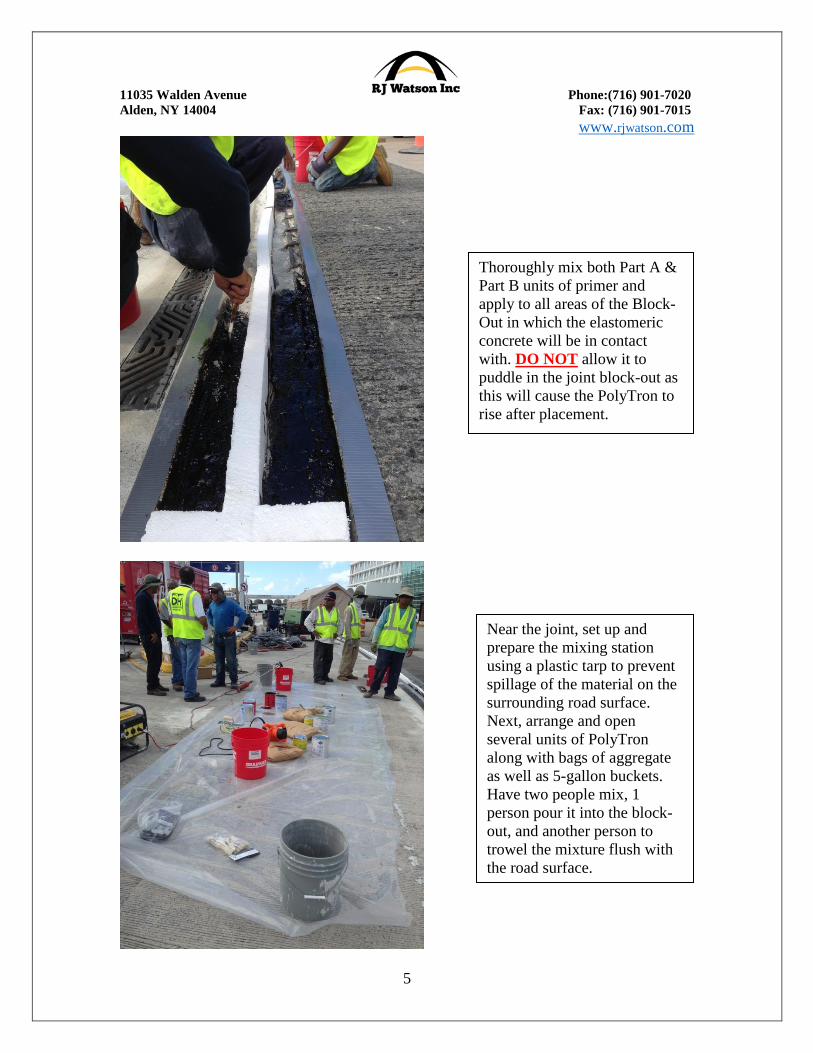
Thoroughly mix both Part A &
Part B units of primer and
apply to all areas of the Block-
Out in which the elastomeric
concrete will be in contact
with. DO NOT allow it to
puddle in the joint block-out as
this will cause the PolyTron to
rise after placement.
Near the joint, set up and
prepare the mixing station
using a plastic tarp to prevent
spillage of the material on the
surrounding road surface.
Next, arrange and open
several units of PolyTron
along with bags of aggregate
as well as 5-gallon buckets.
Have two people mix, 1
person pour it into the block-
out, and another person to
trowel the mixture flush with
the road surface.

11035 Walden Avenue Phone:(716) 901-7020
Alden, NY 14004 Fax: (716) 901-7015
www.rjwatson.com
6
After the material is placed in
the block-out, immediately
begin troweling the mixture
flush with the road surface
Note the tape used to provide
a neat, clean margin
throughout the entire length
of the joint.

11035 Walden Avenue Phone:(716) 901-7020
Alden, NY 14004 Fax: (716) 901-7015
www.rjwatson.com
7
Properly placed and fully cured systems
Here is a properly formed
upturn. Once the form in the
road is removed, there is a
perfect transition into the
side-walk for the installation
of the sealing system.
This is a typical directional
change using PolyTron
elastomeric concrete.

11035 Walden Avenue Phone:(716) 901-7020
Alden, NY 14004 Fax: (716) 901-7015
www.rjwatson.com
8
In this example, half of the joint
header system was installed in one
day with the second half installed the
next day utilizing a “Bevel” method.
Simply bevel the one section that you
will complete that day. The next
day, apply the primer mixture down
the bevel face and along the other
half of the joint, and pour the mixed
PolyTron on top of the bevel,
troweling it flush with the road
surface. A “Key” method may also
be used. Pour the PolyTron flush
one day, then the next day, simply
channel out a “Key” slot into the
cured section of the PolyTron, then
pour the new section making sure it
flows into the key hole. This will
ensure that both sections will lock
together.
This is a fully cured section of the
PolyTron system with the Silicoflex
joint sealing system installed –
Note: The seal in this case is dry-fit
to ensure proper fit.

11035 Walden Avenue Phone:(716) 901-7020
Alden, NY 14004 Fax: (716) 901-7015
www.rjwatson.com
9
This is a completely installed,
fully cured section of the
PolyTron elastomeric header
system with the Silicoflex
sealing system being installed
the same day.
This is another section of a
completed joint section to include
the Silicoflex SF225 Seal installed
and ready for road traffic.
Note the transition from one side of
the road surface to the other.