Embed Size (px)
Citation preview
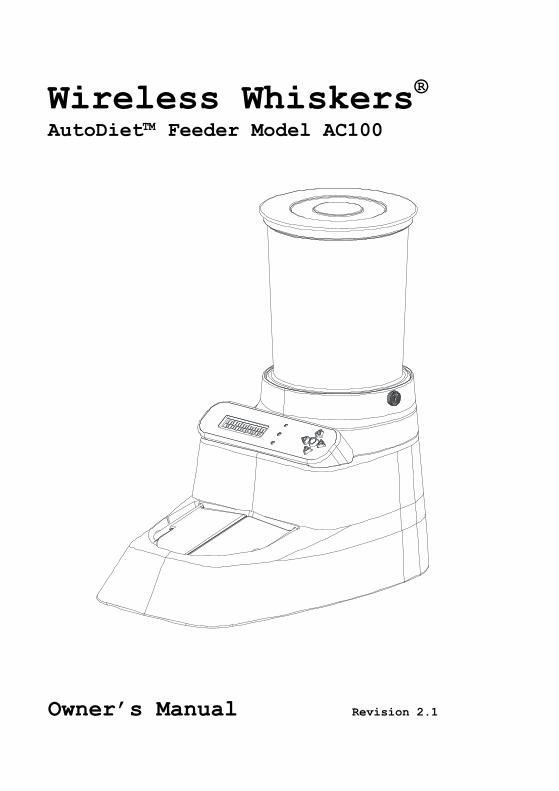
Wireless Whiskers®
AutoDiet™ Feeder Model AC100
Owner’s Manual Revision 2.1
© Encaya Corporation 2010-2016. All rights reserved.
ii
CONTENTS OF PRODUCT BOX
Wireless Whiskers® Model AC100 unit
Feed tube
Top cover
AC adapter
Wireless tags (2)
Sample Paw Guard (1)
Owner’s Manual and Warranty
© Encaya Corporation 2010-2016. All rights reserved.
iii
OWNER’S MANUAL TABLE OF CONTENTS
CONTENTS OF PRODUCT BOX ....................... ii
INTRODUCTION ................................... 1
PREPARING YOUR NEW FEEDER ...................... 4
HOW IT WORKS 5
PRODUCT DESCRIPTION ............................ 6 AUTODIET
TM FEEDER CONTROLS 8
Keypad .............................. 8
LED Lights .......................... 9
LCD Display ......................... 9
ON/OFF .............................. 9
SYSTEM OPERATING MODES 10 DISPLAY MODE ....................... 10
FEEDING MODE ....................... 10
MENU MODE .......................... 10
INITIAL SET UP ................................ 11
SET TIME AND DATE 11
REGISTERING WIRELESS TAGS 12
PROPER FITTING OF WIRELESS TAGS 13 OPTIONAL SET UP ............................... 14
EDITING PET NAME 14
DOOR CONTROL SETTINGS 14
SET PORTION CONTROL PROGRAM 16
DAILY ALLOWANCE 17
Automatically Setting .............. 17 Manually Setting ................... 17
Unlimited Feeding .................. 18
Kittens and Puppies ................ 18
Locking Out a Pet (Access Control) . 18
SET AUTODIET WIZARDTM PROGRAM 19
ATTACH PAW GUARD. 20 DIET MANAGEMENT ............................... 20
FOOD TYPES 20
PUTTING YOUR PET ON A DIET 21
TREATS AND ADDITIONAL FOOD SOURCES 21
MONITOR YOUR PETS’ FEEDING AND HEALTH 21
MULTIPLE FEEDING STATIONS 22 TIME TO FORGET ABOUT CUPS 22
Converting Cups to TIME ............ 24
© Encaya Corporation 2010-2016. All rights reserved.
iv
MORE ON OPERATING MODES ....................... 24
DISPLAY MODE 24
Alerts ............................. 25
Time and Date Display .............. 26 System Settings Display ............ 26
Pet Stats .......................... 26
FEEDING MODE 28
Available Allowance ................ 28
MENU MODE 29
Accessing MENU MODE ................ 29 MENU MODE Timeout .................. 30
AVAILABLE SETTINGS ............................ 30
TIME AND DATE 34
Time ............................... 34
Date ............................... 34
AUTODIETTM SET UP 35
AutoDiet WizardTM ................... 35
Adjust AutoDietTM ................... 35
Daily Allowance .................... 36
Portion Control .................... 36
Cycle Start Hour ................... 36
SYSTEM CONTROL 36
Show Settings ...................... 36 Show Pet Stats ..................... 36
Backlight .......................... 37
Door Control ....................... 37
Detection Window ................... 37
System Reset ....................... 38
REV. SERIAL NO: 38 EDIT/DELETE PET 39
Edit Pet Name ...................... 39
Delete Pet ......................... 39
SELECT PET 39
SYSTEM POWER FEATURES ......................... 39
AC Power 39 Battery Power 40
Low Battery 40
Power Outage 41
PET Activated Power Up 41
© Encaya Corporation 2010-2016. All rights reserved.
v
MAINTENANCE ................................... 42
Cleaning 42
Packaging 42
Batteries 42 TROUBLESHOOTING ............................... 43
WARRANTY ...................................... 46
PARTS AND ACCESSORIES ......................... 47
FCC COMPLIANCE STATEMENTS ..................... 47
COPYRIGHTS, TRADEMARKS AND PATENTS ............ 48
FEEDING RECORD ................................. a QUICK REFERENCE MENU GUIDE ..................... c
© Encaya Corporation 2010-2016. All rights reserved.
1
INTRODUCTION
Welcome Congratulations on your purchase of Wireless
Whiskers® AutoDiet™ Feeder. This revolutionary
product designed in Silicon Valley California is the
world’s most advanced diet management system for
pets. It offers the very latest technology to
finally triumph over your pets’ wayward feeding
behavior. Sophisticated access control capabilities
let you decide which pets can use the feeder and how
much. You can set up separate feeding stations for
different food types. If a pet needs to go on a
diet, no problem, the feeder will automatically and
independently control diets of up to 8 cats or small
dogs. Your AutoDiet™ feeder is packed with features
available on no other feeder. You can lock out
specific pets. Prevent gorging or unwanted night
feeding. Monitor your pets’ intake. It will even
alert you if a pet is underfeeding. The AutoDiet™
Feeder is simply amazing!
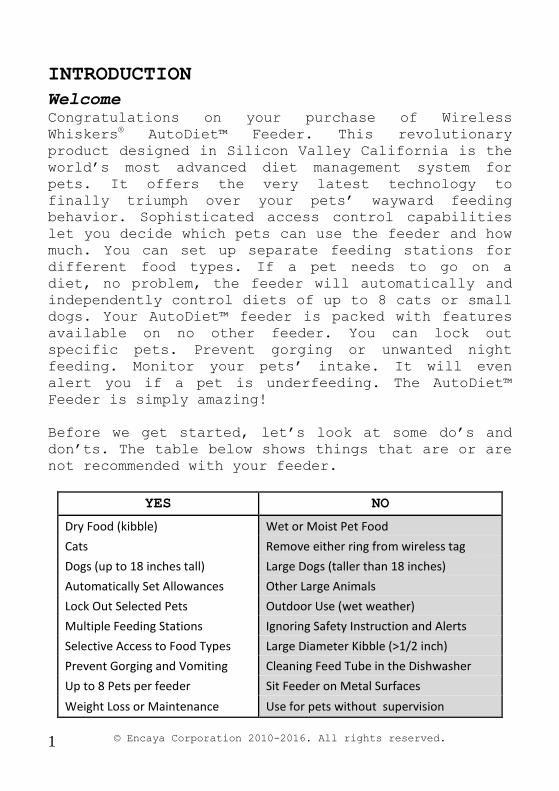
Before we get started, let’s look at some do’s and
don’ts. The table below shows things that are or are
not recommended with your feeder.
YES NO
Dry Food (kibble) Wet or Moist Pet Food
Cats Remove either ring from wireless tag
Dogs (up to 18 inches tall) Large Dogs (taller than 18 inches)
Automatically Set Allowances Other Large Animals
Lock Out Selected Pets Outdoor Use (wet weather)
Multiple Feeding Stations Ignoring Safety Instruction and Alerts
Selective Access to Food Types Large Diameter Kibble (>1/2 inch)
Prevent Gorging and Vomiting Cleaning Feed Tube in the Dishwasher
Up to 8 Pets per feeder Sit Feeder on Metal Surfaces
Weight Loss or Maintenance Use for pets without supervision
© Encaya Corporation 2010-2016. All rights reserved.
2
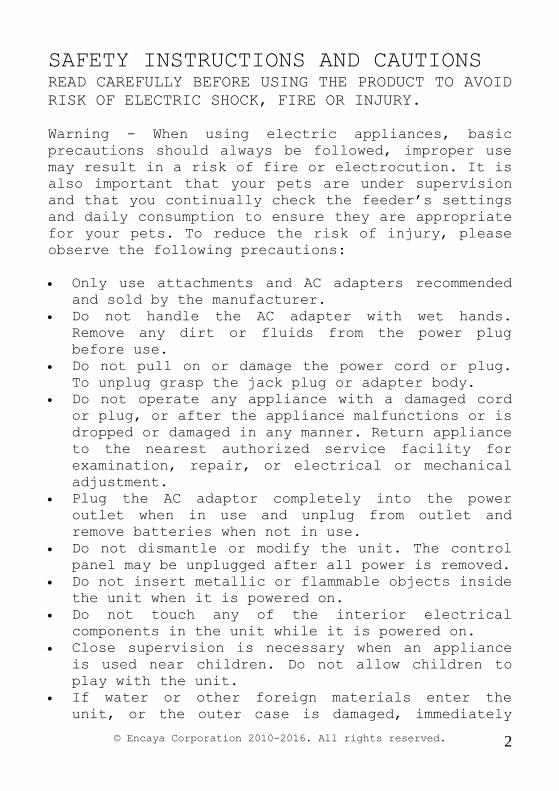
SAFETY INSTRUCTIONS AND CAUTIONS READ CAREFULLY BEFORE USING THE PRODUCT TO AVOID
RISK OF ELECTRIC SHOCK, FIRE OR INJURY.
Warning - When using electric appliances, basic
precautions should always be followed, improper use
may result in a risk of fire or electrocution. It is
also important that your pets are under supervision
and that you continually check the feeder’s settings
and daily consumption to ensure they are appropriate
for your pets. To reduce the risk of injury, please
observe the following precautions:
Only use attachments and AC adapters recommended
and sold by the manufacturer.
Do not handle the AC adapter with wet hands.
Remove any dirt or fluids from the power plug
before use.
Do not pull on or damage the power cord or plug.
To unplug grasp the jack plug or adapter body.
Do not operate any appliance with a damaged cord
or plug, or after the appliance malfunctions or is
dropped or damaged in any manner. Return appliance
to the nearest authorized service facility for
examination, repair, or electrical or mechanical
adjustment.
Plug the AC adaptor completely into the power
outlet when in use and unplug from outlet and
remove batteries when not in use.
Do not dismantle or modify the unit. The control
panel may be unplugged after all power is removed.
Do not insert metallic or flammable objects inside
the unit when it is powered on.
Do not touch any of the interior electrical
components in the unit while it is powered on.
Close supervision is necessary when an appliance
is used near children. Do not allow children to
play with the unit.
If water or other foreign materials enter the
unit, or the outer case is damaged, immediately
© Encaya Corporation 2010-2016. All rights reserved.
3
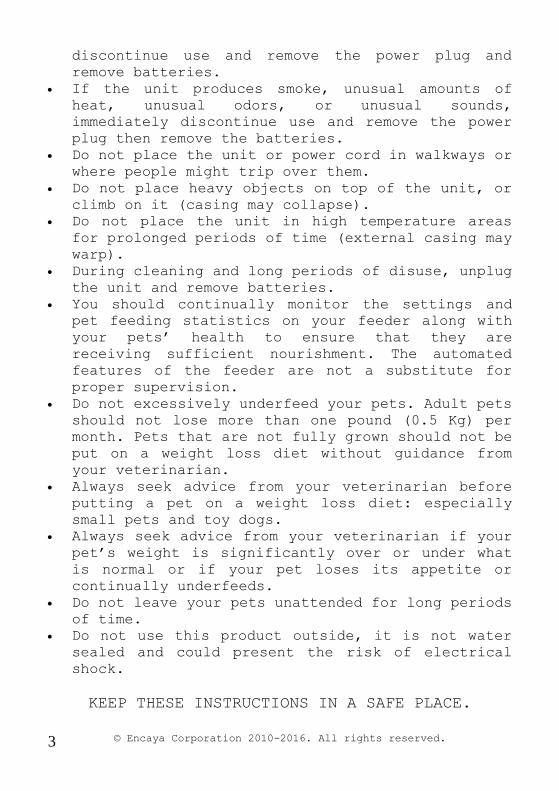
discontinue use and remove the power plug and
remove batteries.
If the unit produces smoke, unusual amounts of
heat, unusual odors, or unusual sounds,
immediately discontinue use and remove the power
plug then remove the batteries.
Do not place the unit or power cord in walkways or
where people might trip over them.
Do not place heavy objects on top of the unit, or
climb on it (casing may collapse).
Do not place the unit in high temperature areas
for prolonged periods of time (external casing may
warp).
During cleaning and long periods of disuse, unplug
the unit and remove batteries.
You should continually monitor the settings and
pet feeding statistics on your feeder along with
your pets’ health to ensure that they are
receiving sufficient nourishment. The automated
features of the feeder are not a substitute for
proper supervision.
Do not excessively underfeed your pets. Adult pets
should not lose more than one pound (0.5 Kg) per
month. Pets that are not fully grown should not be
put on a weight loss diet without guidance from
your veterinarian.
Always seek advice from your veterinarian before
putting a pet on a weight loss diet: especially
small pets and toy dogs.
Always seek advice from your veterinarian if your
pet’s weight is significantly over or under what
is normal or if your pet loses its appetite or
continually underfeeds.
Do not leave your pets unattended for long periods
of time.
Do not use this product outside, it is not water
sealed and could present the risk of electrical
shock.
KEEP THESE INSTRUCTIONS IN A SAFE PLACE.
© Encaya Corporation 2010-2016. All rights reserved.
4
PREPARING YOUR NEW FEEDER
Please follow the Initial and Optional Set Up
instructions in this manual. (See p.11 and
p.14). Or if you prefer visit our website for a
VIDEO GUIDE that takes you step by step through
the set up and features of your new feeder.
First review the SAFETY INSTRUCTIONS AND
CAUTIONS.
Remove all items from the product box.
Remove shipping tape and protective packing
from the feeder.
If you will be using batteries they can be
installed underneath the feeder. Take care to
insert them with the correct polarity.
Installing batteries will provide backup in the
event of a power outage.
Next, loosen the screws at the top of the
feeder and install the Feed Tube, then re-
tighten the screws.
The approximate dimensions of your assembled
feeder are: 16 x 9 x 16 inches (l x w x h).
Locate the feeder in a suitable place such as a
corner, so as not to create a walkway hazard.
Plug the power adapter into an outlet and into
the back of the feeder. The green LED will
light.
Carefully remove the cover and pour in your
preferred dry pet food. Press the cover back
into place.
Your feeder is now ready for use! Turn on the
feeder by pressing then releasing the center
(●) key. Do not hold down the button for more than 10 seconds or this will reset the feeder
to factory settings.
The feeder will perform a Welcome and test boot
and enter the DISPLAY mode.
© Encaya Corporation 2010-2016. All rights reserved.
5
HOW IT WORKS
Pets using the AutoDiet™ Feeder are fitted with a
Wireless tag that uniquely identifies them. Whenever
a pet tries to feed it is welcomed by name and the
feeder measures, then sets their daily allowance
automatically (up to 8 pets). When a pet reaches its
available allowance the feeder doors shut! You can
allow or lock out pets as desired by controlling
access and also set up multiple feeding stations
with different food types. You decide what your pets
eat, how much and at which feeder. This is great for
cats and dogs in the same household or for
dispensing special/prescription diets.
The AutoDiet™ Feeder has tons of features to manage
your pets’ diet. You can quickly and easily put
selected pets on a weight loss diet with just a few
keystrokes. The Portion Control program spreads the
allowance throughout the day to prevent gorging and
can be set to restrict feeding during night time
hours if desired. The feeder even alerts you if any
of your pets are underfeeding (a common early
warning sign of illness). The display keeps you
informed about you pets feeding and you can see how
much they have fed today and on the prior day as a
percentage of their daily allowance. The advanced
features let you adapt to the challenges of multi-
pet households. No more messing around with
measuring cups or filling bowls at meal times! This
comprehensive diet management system saves you so
much time as it effortlessly controls your pets’
individual diets. You will wonder how you ever did
without it!
© Encaya Corporation 2010-2016. All rights reserved.
6
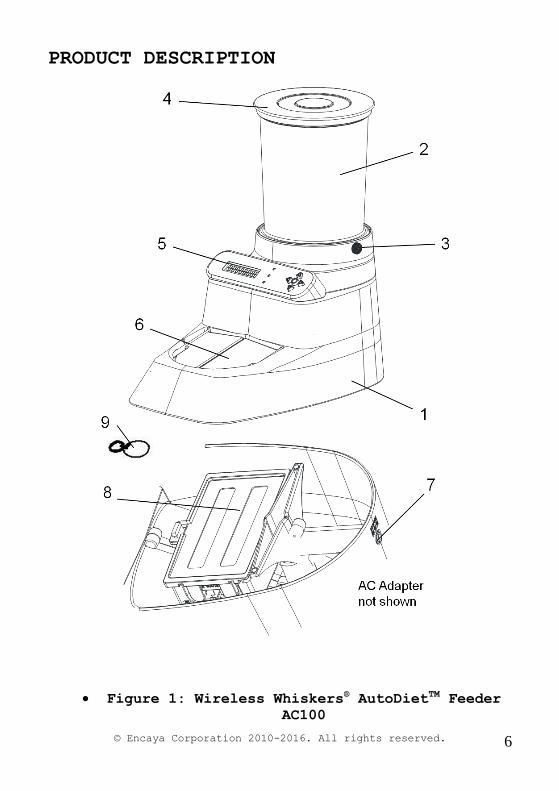
PRODUCT DESCRIPTION
Figure 1: Wireless Whiskers® AutoDietTM Feeder
AC100
© Encaya Corporation 2010-2016. All rights reserved.
7
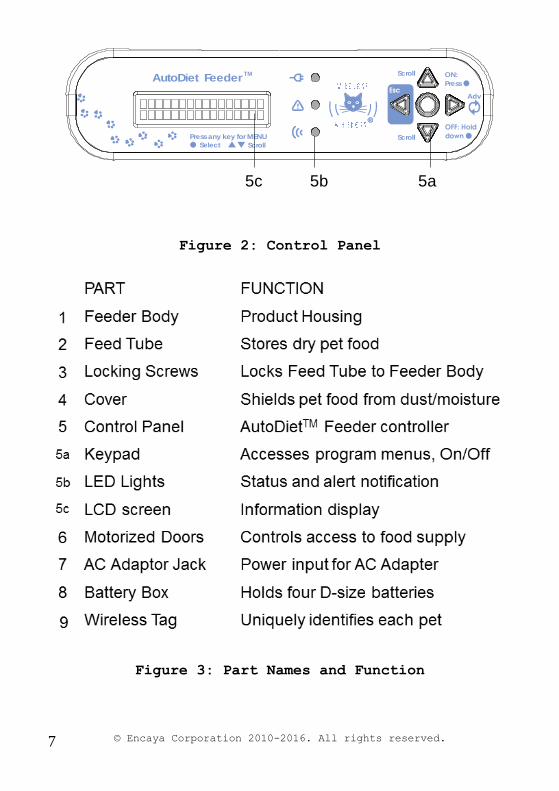
Figure 2: Control Panel
Figure 3: Part Names and Function
AutoDiet Feeder TM ON:
Press
Scroll
ScrollPress any key for MENU
●
●
Adv
● Select Scroll
5c 5b 5a
© Encaya Corporation 2010-2016. All rights reserved.
8
AUTODIETTM FEEDER CONTROLS
Operating and programming the AutoDietTM Feeder is
very easy. Let’s first become familiar with the
Control Panel. It consists of a 5 button keypad, 3
LED indicator lights and a LCD display.
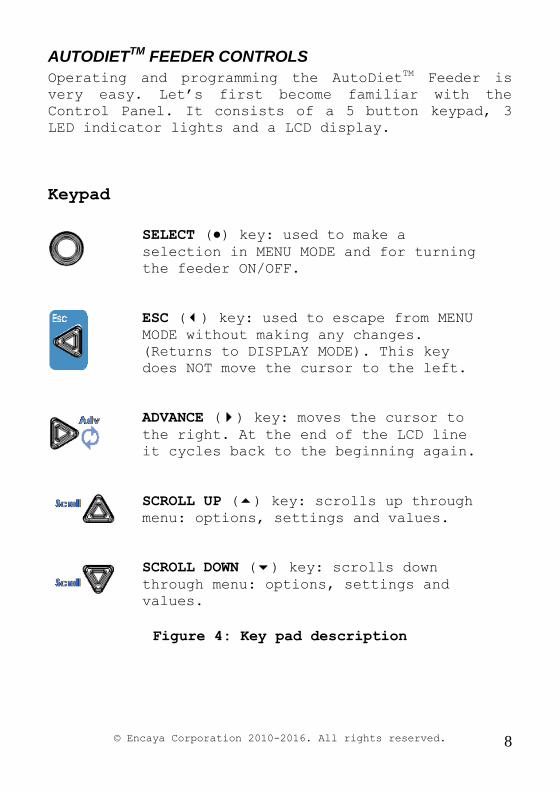
Keypad
SELECT (●) key: used to make a selection in MENU MODE and for turning
the feeder ON/OFF.
ESC () key: used to escape from MENU
MODE without making any changes.
(Returns to DISPLAY MODE). This key
does NOT move the cursor to the left.
ADVANCE () key: moves the cursor to
the right. At the end of the LCD line
it cycles back to the beginning again.
SCROLL UP () key: scrolls up through
menu: options, settings and values.
SCROLL DOWN () key: scrolls down
through menu: options, settings and
values.
Figure 4: Key pad description
© Encaya Corporation 2010-2016. All rights reserved.
9
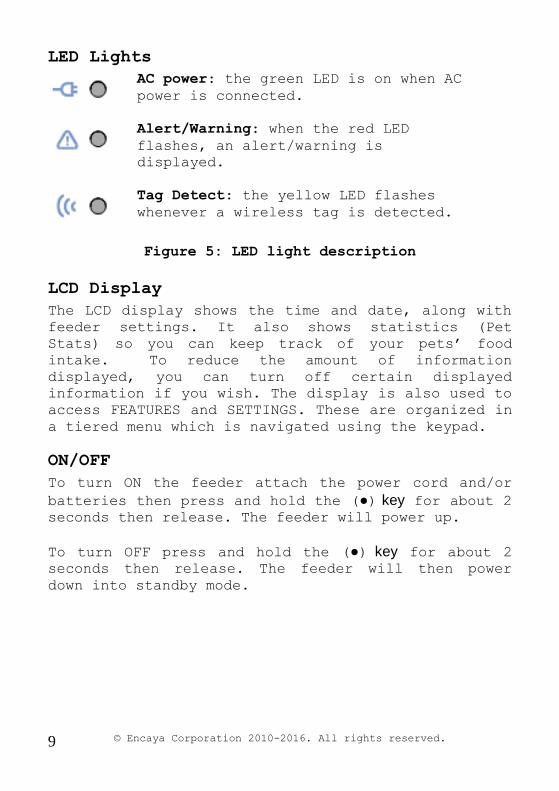
LED Lights
AC power: the green LED is on when AC
power is connected.
Alert/Warning: when the red LED
flashes, an alert/warning is
displayed.
Tag Detect: the yellow LED flashes
whenever a wireless tag is detected.
Figure 5: LED light description
LCD Display
The LCD display shows the time and date, along with
feeder settings. It also shows statistics (Pet
Stats) so you can keep track of your pets’ food
intake. To reduce the amount of information
displayed, you can turn off certain displayed
information if you wish. The display is also used to
access FEATURES and SETTINGS. These are organized in
a tiered menu which is navigated using the keypad.
ON/OFF
To turn ON the feeder attach the power cord and/or
batteries then press and hold the (●) key for about 2 seconds then release. The feeder will power up.
To turn OFF press and hold the (●) key for about 2 seconds then release. The feeder will then power
down into standby mode.
© Encaya Corporation 2010-2016. All rights reserved.
10
SYSTEM OPERATING MODES
The feeder has 3 basic operating modes: DISPLAY
MODE, FEEDING MODE and MENU MODE (for programming).
DISPLAY MODE
When the feeder is idle it enters DISPLAY MODE. In
this mode the display cycles the TIME/DATE, System
Settings and Pet Statistics (for the last pet
detected or selected using the keypad).
FEEDING MODE
Whenever a pet tries to feed the display enters
FEEDING MODE. In this mode it welcomes pets by name
and Pet Stats indicate feeding data for the current
day and yesterday. The data is shown in terms of
time and as a percentage of its daily allowance, so
you can quickly assess your pets’ intake. If a pet
reaches its available allowance the doors will close
with a message: “Sorry! No More Until Later!”. If a
pet is locked out the display will indicate: “Sorry!
No Access. Locked Out.”
MENU MODE
To enter MENU MODE simply press and release the (●)
key twice (the first press activates the backlight). In this mode you can access all feeder SETTINGS. The
menu is like a tree: starting at the trunk which
lists the OPTIONS, branching out to FEATURES and
finally the SETTINGS, each with a list of selectable
VALUES. To Program your feeder you simply select a
VALUE for each SETTING you wish to change.
A quick reference guide for the menu tree can be
found at the back of this Owner’s Manual.
© Encaya Corporation 2010-2016. All rights reserved.
11
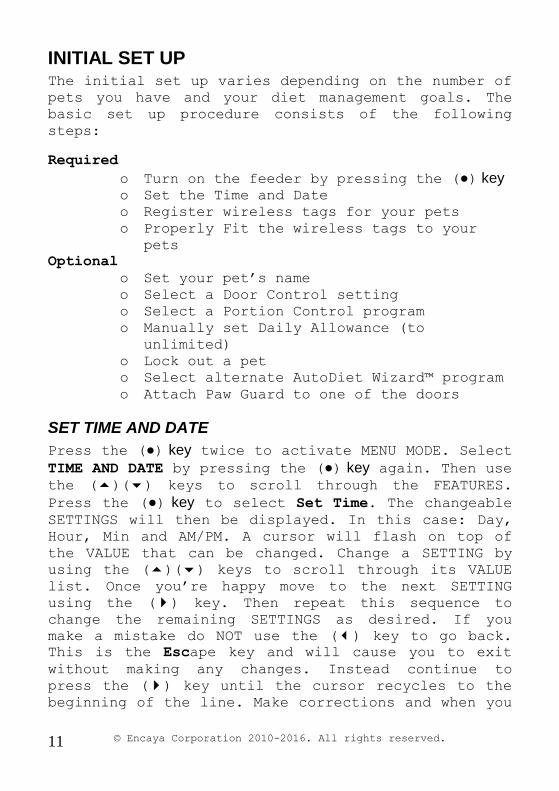
INITIAL SET UP The initial set up varies depending on the number of
pets you have and your diet management goals. The
basic set up procedure consists of the following
steps:
Required
o Turn on the feeder by pressing the (●) key o Set the Time and Date
o Register wireless tags for your pets
o Properly Fit the wireless tags to your
pets
Optional
o Set your pet’s name
o Select a Door Control setting
o Select a Portion Control program
o Manually set Daily Allowance (to
unlimited)
o Lock out a pet
o Select alternate AutoDiet Wizard™ program
o Attach Paw Guard to one of the doors
SET TIME AND DATE
Press the (●) key twice to activate MENU MODE. Select
TIME AND DATE by pressing the (●) key again. Then use the ()() keys to scroll through the FEATURES.
Press the (●) key to select Set Time. The changeable SETTINGS will then be displayed. In this case: Day,
Hour, Min and AM/PM. A cursor will flash on top of
the VALUE that can be changed. Change a SETTING by
using the ()() keys to scroll through its VALUE
list. Once you’re happy move to the next SETTING
using the () key. Then repeat this sequence to
change the remaining SETTINGS as desired. If you
make a mistake do NOT use the () key to go back.
This is the Escape key and will cause you to exit
without making any changes. Instead continue to
press the () key until the cursor recycles to the
beginning of the line. Make corrections and when you
© Encaya Corporation 2010-2016. All rights reserved.
12
are happy, press the (●) key to program the SETTINGS and exit MENU MODE.
The following short hand is used in the Owner’s
manual to indicate a navigation path. In the example
above the path to change time is: >TIME AND DATE>Set
Time>. The > symbol means go down one menu level by
pressing the (●) key.
Using this shorthand to change the date, navigate
to: >TIME AND DATE>Set Date>. Then repeat the same
steps as in the previous example, except select Set
Date instead. The display will show the appropriate
SETTINGS to be changed: Month, Date, Year (two
digits: decade first followed by year).
REGISTERING WIRELESS TAGS
Registering Wireless tags is simple! All you need to
do is press the tag against the lower face of the
feeder. The yellow light will flash and the display
will indicate Welcome Pet A, and then Hello Pet A.
This tag is now registered. Optionally you can
change Pet A to your pet’s actual name (see p.14).
To register additional tags just repeat this
process. Anytime you register a new tag the AutoDiet
Wizard™ will be automatically launched which
measures the allowance of all pets registered at the
feeder.
IMPORTANT: Any tags that will not be fitted to pets
should be kept well away from the feeder. Otherwise
you may unintentionally register them and restart
the AutoDiet Wizard™. This will reset your pets’
allowances and subsequently alert you that a
“phantom” pet is underfeeding!
© Encaya Corporation 2010-2016. All rights reserved.
13
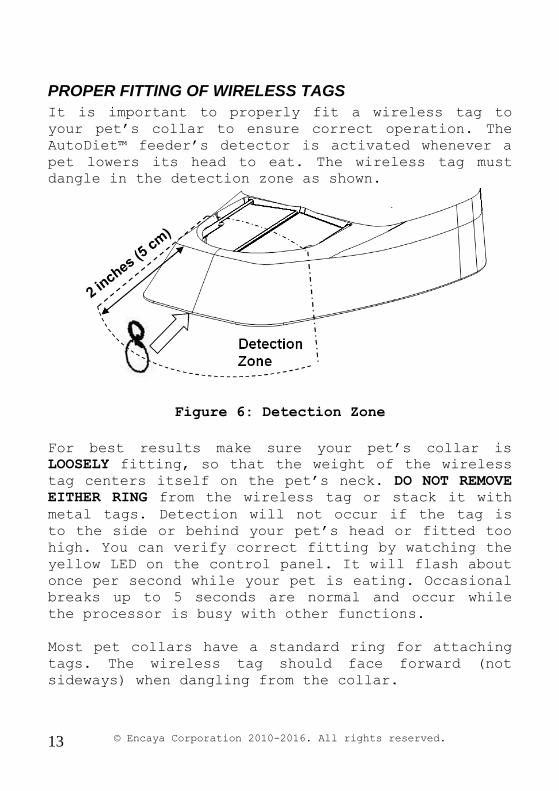
PROPER FITTING OF WIRELESS TAGS
It is important to properly fit a wireless tag to
your pet’s collar to ensure correct operation. The
AutoDiet™ feeder’s detector is activated whenever a
pet lowers its head to eat. The wireless tag must
dangle in the detection zone as shown.
Figure 6: Detection Zone
For best results make sure your pet’s collar is
LOOSELY fitting, so that the weight of the wireless
tag centers itself on the pet’s neck. DO NOT REMOVE
EITHER RING from the wireless tag or stack it with
metal tags. Detection will not occur if the tag is
to the side or behind your pet’s head or fitted too
high. You can verify correct fitting by watching the
yellow LED on the control panel. It will flash about
once per second while your pet is eating. Occasional
breaks up to 5 seconds are normal and occur while
the processor is busy with other functions.
Most pet collars have a standard ring for attaching
tags. The wireless tag should face forward (not
sideways) when dangling from the collar.
© Encaya Corporation 2010-2016. All rights reserved.
14
Wireless tags are very low maintenance: they do not
require batteries and are water resistant. Each tag
has a unique ID that is not dependent on color.
Additional tags may be obtained on our website.
IMPORTANT NOTE: THE DETECTION ZONE IS DESIGNED TO
ACTIVATE WHEN A PET LOWERS ITS HEAD TO EAT. IT IS
DESIGNED NOT TO DETECT IF A PET IS SIMPLY STANDING
OR SITTING NEARBY (OTHERWISE IT WOULD INACCURATELY
MEASURE THE PET’S ACTUAL FEEDING BEHAVIOR).
OPTIONAL SET UP
EDITING PET NAME
Any changes you make relating to a specific pet are
individual and apply only to the last pet detected
by the feeder (or manually selected using the
keypad). To select a pet using the keypad: navigate
to: >Select Pet and scroll through the pet list and
press the (●) key when the desired pet is displayed.
Next edit the pet’s name by navigating to:
>EDIT/DELETE PET>Edit Pet Name>. The cursor flashes
on the first letter. Use the ()() keys to change
the letter VALUE. Then move to the next letter using
the () key. Repeat this procedure until the pet
name is entered. Finally press the (●) key to
program the name and exit MENU MODE. Do not center
the name with spaces; this is done automatically
when displayed.
DOOR CONTROL SETTINGS
The AutoDiet™ feeder can be operated with the doors
normally open or closed depending on your
preference. The default SETTING is Default Open. In
this case the feeder doors remain open and close
whenever a pet reaches its available allowance or a
locked out pet is detected. An alternative SETTING
is Default Shut. In this case the doors remain
closed unless a pet with an available allowance is
© Encaya Corporation 2010-2016. All rights reserved.
15
detected, then the doors open. The doors will
immediately shut when a pet reaches its available
allowance or an excluded pet is detected.
The Default Shut mode is particularly useful if
there are other pets in the house that you wish to
exclude from the feeder that are not fitted with a
wireless tag. The Extreme Shut mode works the same
as the Default Shut mode, except it is used to
combat aggressive pets that may try to interfere
with normal door closure. In this mode the doors try
to close repeatedly even when obstructed. The
Extreme Shut mode uses more power than the Default
Shut mode so should only be used if you have an
interfering pet (which is quite rare). The Detection
Window feature (see p. 37) is also helpful for
combating pet interference by allowing you to reduce
the time to door closure after an allowed pet
vacates the bowl.
The feeder detects only the pet with its head in the
bowl area. If another pet pushes it out of the way,
this is instantly detected and the feeder allocates
feeding to the new pet (or shuts the door: if it has
exceeded its available allowance or is locked out).
There are two override SETTINGS: Permanently Open
and Permanently Shut. If selected the feeder doors
remain open or shut regardless of the status of
tags. If Permanently Shut is selected: Pet Activated
Power Up is disabled when the feeder is in standby
mode (see p. 41).
To change the Door Control SETTING, navigate to:
>SYSTEM CONTROL>Door Control> and make a selection.
IMPORTANT: The AutoDiet™ detection system is
activated whenever a pet lowers its head to feed,
NOT when a pet is simply nearby (otherwise it would
inaccurately measure the pet’s actual feeding
behavior). In the Default Shut/Extreme modes, pets
must learn to lower their head to open the doors.
© Encaya Corporation 2010-2016. All rights reserved.
16
Typically pets learn this behavior very quickly, as
the food is visible beneath the transparent doors.
During this learning period you can optionally raise
the feeder by placing it on a phonebook to make the
detection zone higher, until your pet learns to
lower its head. In contrast, in the Default Open
mode: the doors are already open before a pet
approaches, so no learning is required. The owner
can select a Door Control SETTING that best suits
their pets.
SET PORTION CONTROL PROGRAM
The Portion Control feature allows you to manage how
your pet’s allowance is made available during the
day. This is useful for preventing gorging by
spreading the allowance throughout the day and/or
for restricting night feeding. Access to food is
determined by a pet’s available allowance. In simple
terms you can think of this as: what portion of its
total Daily Allowance a pet can access at any
specific instant during the day. (See p.28 for more
details).
The default Portion Control setting is Hourly
Portions. This setting divides the Daily Allowance
into 24 portions. These portions are made available
incrementally throughout the day (in this case one
per hour). So by the end of the day your pet’s
entire allowance is available. This prevents pets
from gorging and enforces healthy grazing behavior.
6 Hour Portions works similarly except: the interval
is 6 hours and the day is divided into 4 portions.
In addition there are two No Night Feed SETTINGS.
These prevent feeding during the night hours (10pm
to 6am). No Night Feed 1: applies no additional
portion control restrictions. Alternatively, No
Night Feed 2: divides the Daily Allowance into
hourly portions during daytime hours when feeding is
permitted.
© Encaya Corporation 2010-2016. All rights reserved.
17
No Night Feed hours can be adjusted using the Cycle
Start Hour which is set to 12 am by default. Setting
the Cycle Start Hour to 3 am will delay No Night
Feed hours by 3 hours to: 1am to 9 am. It also moves
the daily cycle starting time (when all allowances
are tallied and refreshed) from midnight to 3 am.
The Portion Control feature can be disabled using
the OFF setting. In which case there is no control
over how the Daily Allowance is spread throughout
the day. This allows the entire Daily Allowance to
be consumed before the doors will close. Pets then
have to wait until their allowances are refreshed at
the start of the next day (determined by the Cycle
Start Hour).
The AutoDiet WizardTM must be OFF before you can
change the Portion Control SETTING.
IMPORTANT: Unless the Portion Control SETTING is
turned OFF, you should expect your pet’s feeding to
be interrupted frequently by the doors closing
throughout the day as a pet is restricted by its
available allowance at any instant (see p. 28).
DAILY ALLOWANCE
Automatically Setting
The AutoDiet WizardTM automatically measures and sets
each pet’s Daily Allowance. (For more information
see p.19).
Manually Setting
In general we always recommend that you use the
AutoDiet WizardTM to set a pet’s allowance because in
practice the magnitude of the setting is not
intuitive. Large pets do not necessarily have a
larger Daily Allowance. This is because there are a
lot of behavioral variables to incorporate that are
not immediately obvious. If you do manually set the
Daily Allowance you should use the Y’day feeding
© Encaya Corporation 2010-2016. All rights reserved.
18
statistics in DISPLAY MODE to guide you. This is a
measurement of how much each pet fed on the prior
day and is a good indication of its typical Daily
Allowance.
You should not manually set the Daily Allowance too
high, otherwise the Underfeed Alert will be
triggered. This happens whenever a pet eats less
than 65% of its set Daily Allowance on the prior
day.
Note. The AutoDiet WizardTM must be OFF before you
can change the Daily Allowance.
Unlimited Feeding
If you wish to allow a pet to have unlimited
feeding, then set its Daily Allowance to 999m. This
value is a special case and will not trigger the
underfeed alert.
Kittens and Puppies
If any puppies or kittens are using the feeder;
after the AutoDiet WizardTM calibration is complete
you should reset their Daily Allowance to unlimited
(999 m). This is because the diet of growing animals
should not be restricted without your veterinarian’s
guidance. To do these simply detect its tag and set
the Daily Allowance to 999m.
Note. The AutoDiet WizardTM must be off in order to
access most AUTODIETTM SET UP settings, including the
Daily Allowance.
Locking Out a Pet (Access Control)
The simplest method to lock out pets is to set the
Door Control to Default Shut and do not fit a
wireless tag to the pets you wish to exclude. This
is useful for locking out dogs or other unauthorized
pets without tags. Alternatively, you can register
the tag of a pet you wish to lock out and then set
© Encaya Corporation 2010-2016. All rights reserved.
19
their Daily Allowance to 000m. This will cause them
to be detected and locked out.
To accommodate an unlimited number of pets and
feeding stations you should register only the pets
that will use a particular feeder. Then set all
remaining unregistered slots (Pet ?…Pet H) to 000m.
Once this is done, all the slots on the feeder are
occupied and no additional pets can be registered.
Thereafter, if a pet with an unregistered tag tries
to access the feeder it will be locked out and the
feeder will display the message “Sorry! No Access.
System Full”.
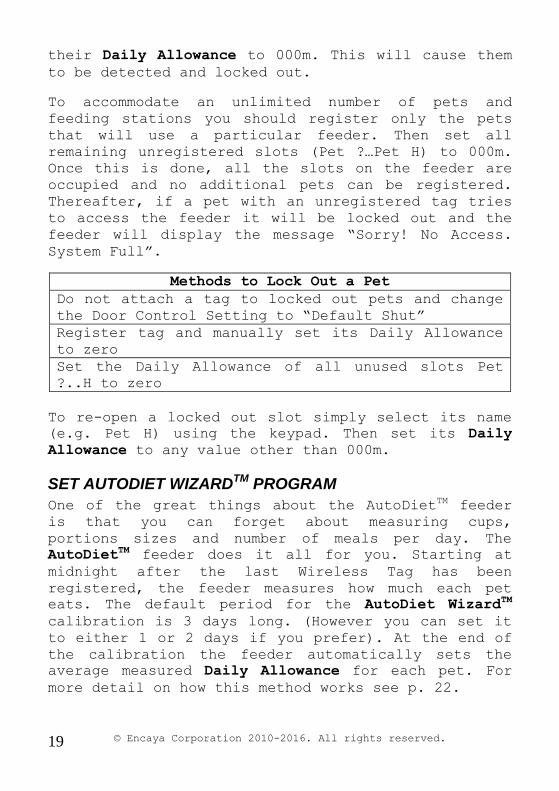
Methods to Lock Out a Pet
Do not attach a tag to locked out pets and change
the Door Control Setting to “Default Shut”
Register tag and manually set its Daily Allowance
to zero
Set the Daily Allowance of all unused slots Pet
?..H to zero
To re-open a locked out slot simply select its name
(e.g. Pet H) using the keypad. Then set its Daily
Allowance to any value other than 000m.
SET AUTODIET WIZARDTM PROGRAM
One of the great things about the AutoDietTM feeder
is that you can forget about measuring cups,
portions sizes and number of meals per day. The
AutoDietTM feeder does it all for you. Starting at
midnight after the last Wireless Tag has been
registered, the feeder measures how much each pet
eats. The default period for the AutoDiet WizardTM
calibration is 3 days long. (However you can set it
to either 1 or 2 days if you prefer). At the end of
the calibration the feeder automatically sets the
average measured Daily Allowance for each pet. For
more detail on how this method works see p. 22.
© Encaya Corporation 2010-2016. All rights reserved.
20
The AutoDiet WizardTM settings can be selected by
navigating to: >AUTODIET SET UP> AutoDiet WizardTM>.
IMPORTANT: Do not feed your pets with treats or
other food during the AutoDiet Wizard™ calibration
unless you intend to do exactly the same every day
thereafter. If you do so, the feeder will calculate
a lower Daily Allowance than normal. As a result you
will continually underfeed your pet.
ATTACH PAW GUARD.
In rare cases pets may try to open the doors by
hooking their claws in the gap between them. This
can be prevented by attaching a Paw Guard to one of
the doors so that it sits ON TOP of the gap when the
doors are closed. If you find the paw guard closes
under the door, move it to the other door.
DIET MANAGEMENT
FOOD TYPES
You feeder will hold approximately 5 lbs. (2.3 kg)
of dry kibble. Do NOT put wet or canned food inside
the feeder or it will spoil. Anytime you change the
food type or brand of pet food you should reactivate
the AutoDiet Wizard™ to recalibrate for a new food
type. This will incorporate the variation in calorie
content of the different formulation into the
allowance calibration. You can use multiple feeders
to control access to different food types within the
same household.
Some manufactures of dry food put coupons, special
offers and toys in their bags of feed. Such objects
can interfere with flow of food through the feeder.
Always check and remove such objects when filling
your feeder.
© Encaya Corporation 2010-2016. All rights reserved.
21
PUTTING YOUR PET ON A DIET
If you have a pet that needs to lose or gain weight,
use the Adjust AutoDiet feature to increase or
decrease their allowance in 10% increments. To
navigate to this feature >AUTODIET TM SET UP>Adjust
AutoDietTM > and select a SETTING. All changes apply
only to the last pet detected or selected using the
keypad.
TREATS AND ADDITIONAL FOOD SOURCES
If you allow your pets to access additional sources
of food or treats, this will affect the AutoDiet
WizardTM calibration. If you give frequent treats,
this situation can be accomodated, provided you
continually feed your pet exactly the same amount of
treats both during the AutoDiet WizardTM calibration
and continually thereafter. In this way additional
food is incorporated as habitual behavior and will
be included in the calibration. You can then control
your pet’s overall diet, simply by regulating the
food managed by the feeder.
If you give your pets a small amount of treats once
a week, this will not significantly affect your pets
overall allowance and need not be included in the
calibration period.
Caution: DO NOT excessively underfeed your pets. Too
rapid weight loss and/or starvation diets are
dangerous. In cats, this may lead to hepatic
lipidosis (liver failure). Do not ignore underfeed
warnings or excessively override allowances
calculated by the AutoDiet WizardTM. Pets should not
lose more than 1 lb (0.5 kg) per month.
MONITOR YOUR PETS’ FEEDING AND HEALTH
Always monitor your pets’ health and frequently
review the SETTINGS and feeding statistics (Pet
Stats) to make sure they remain appropriate. Your
feeder measures how much your pet is eating, so use
© Encaya Corporation 2010-2016. All rights reserved.
22
this information to monitor them. If a pet appears
excessively hungry or the allowance appears to be
inappropriate, reactivate the AutoDiet WizardTM to
recalculate the Daily Allowance or carefully set it
manually.
Do not set your pet’s allowance too high or the
Underfeed Alert will not operate properly. Do not
ignore Underfeed warnings as it can be an early
warning sign of illness or an indication that the
feeder is not operating correctly. Make sure that
the Wireless tags are properly fitted as improper
fitting can affect the accuracy of the feeding
measurements. Finally, you should consult your
veterinarian for help in selecting an appropriate
diet for your pets.
MULTIPLE FEEDING STATIONS
An unlimited number of AutoDietTM feeders can be set
up, with an unlimited number of different food types
and an unlimited number of pets. A different feeder
must be used for each food type. Each feeder can
accommodate up to 8 pets. All the feeder’s features
are available for each pet on an individual basis,
regardless of how many feeders are used in the same
household. Simply register the pets you want to use
a specific feeder and then lock out other pets by
one of the 3 methods outlined in Locking Out a Pet
p.18. The AutoDietTM feeder’s access control
capabilities are very useful for keeping cats and
dogs out of each other’s food or for feeding special
or prescription diets to certain pets.
TIME TO FORGET ABOUT CUPS
Traditionally veterinarians have specified
allowances in terms of cups, mL, ounces or grams.
These measures are simply a guess based on an
estimate of how average your pet is, an assumption
of the calorie content of your pet food, and an
estimate of its age and activity. Kind of like
© Encaya Corporation 2010-2016. All rights reserved.
23
saying you should eat the same amount as your friend
or neighbor! Veterinarians realize this and will
weigh your pet every visit and compare it to a
baseline established at your first visit. Thereafter
changes in allowance are recommended based on
changes in your pet’s actual weight.
The AutoDiet WizardTM establishes a more accurate
baseline for your pet’s daily allowance because it
is an individual measurement based on TIME and
behavioral statistics taking into account all
variables. It is not a guess or a stereotype but a
measurement. It does not matter if your pet is a
fast or slow eater, or if it takes large or small
mouthfuls. Nor does it matter if your pet is large
or small, young or old, active or inactive. Whatever
behavior and characteristics are habitual for each
pet are taken into account during the calibration.
The AutoDiet WizardTM automatically measures and sets
each pet’s Normal Allowance at the end of the
calibration including all these factors.
Thereafter controlling your pet’s intake is trivial.
Do nothing and your pet will be allowed to eat the
same as set after the calibration to maintain its
present weight. If you want a pet to gain or lose
weight: simply adjust their allowance in 10%
increments using the Adjust AutoDietTM FEATURE. This
is the same as your veterinarian would do, but
without all the fuss. No more worrying about cups,
portions sizes or meal times.
You should not be unduly concerned that a pet might
learn to eat faster, attempting to defeat the diet
control method. Pets are very habitual and do not
generally do that. However, even if they tried: you
can simply cut back their Daily Allowance. For
example: cutting back by a factor of 10 takes just a
few keystrokes. Your pet could never keep up no
matter how much they try! In reality a much small
factor would be sufficient.
© Encaya Corporation 2010-2016. All rights reserved.
24
Converting Cups to TIME
If you really insist on using cups, converting to
equivalent TIME is fairly easy. It is done by
loading one day’s food into an empty feeder just
before midnight (or the Cycle Start Hour). Then
restart the AutoDiet WizardTM using the 1 Day
setting. This will automatically measure and set the
equivalent Daily Allowance. It will only work for
one pet at a time. If you want to do more pets,
repeat this procedure and note all their Daily
Allowances at the end of each calibration. You can
then manually enter the allowances all at one time.
Regardless of whether you use equivalent cups or the
AutoDiet WizardTM calibration as your baseline Normal
Allowance, you will adjust it based on your pet’s
weight change. Therefore both approaches will
converge on the same adjusted allowance for your
pet’s ideal weight. So why go to all the trouble of
converting to cups? Let the AutoDiet WizardTM manage
your pet’s baseline allowance for you!
MORE ON OPERATING MODES
DISPLAY MODE
This mode is active whenever a feeder has been idle
for more than one minute. Idle means a pet is not
feeding or the keypad is not in use. In DISPLAY MODE
three types of information are rotated.
Alerts
Time/Date
System Settings
Pet Stats
Alerts are shown at the beginning of each rotation.
Alerts and Time/Date displays cannot be turned off.
System settings are shown alternately with
Time/Date, while Pet Stats are separated by a
display of paw prints across the screen. To reduce
© Encaya Corporation 2010-2016. All rights reserved.
25
the information displayed, System Settings and/or
Pet Stats displays can be turned ON or OFF.
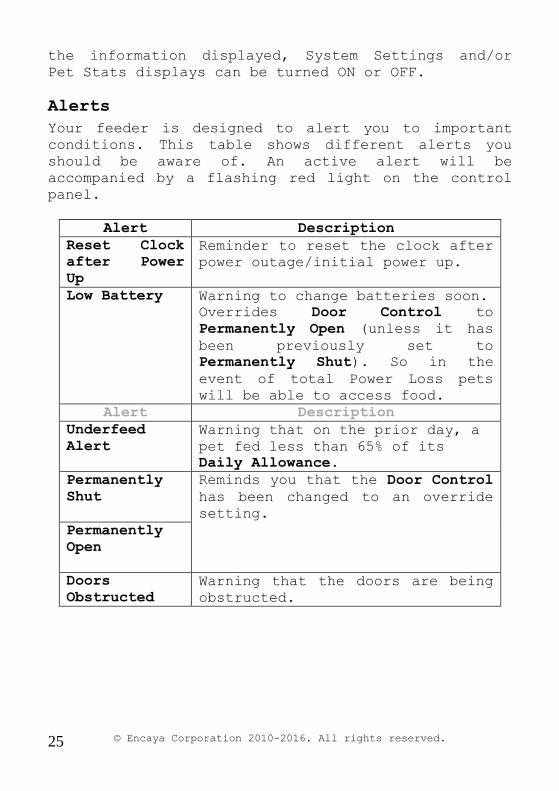
Alerts
Your feeder is designed to alert you to important
conditions. This table shows different alerts you
should be aware of. An active alert will be
accompanied by a flashing red light on the control
panel.
Alert Description
Reset Clock
after Power
Up
Reminder to reset the clock after
power outage/initial power up.
Low Battery
Warning to change batteries soon.
Overrides Door Control to
Permanently Open (unless it has
been previously set to
Permanently Shut). So in the
event of total Power Loss pets
will be able to access food.
Alert Description
Underfeed
Alert
Warning that on the prior day, a
pet fed less than 65% of its
Daily Allowance.
Permanently
Shut
Reminds you that the Door Control
has been changed to an override
setting.
Permanently
Open
Doors
Obstructed
Warning that the doors are being
obstructed.

© Encaya Corporation 2010-2016. All rights reserved.
26
Time and Date Display
This self-explanatory display is shown below:
In the event of total power loss, all the feeder
settings will be saved. However when power is
restored time, date and today’s feeding statistics
will be lost. Time/Date will have to be reset.
Battery backup will prevent this loss of data.
System Settings Display
There are five different system settings status
screens. These screens give you a quick overview of
your system settings.
DOOR CONTROL
Default Open
DETECTION WINDOW
12 Seconds
CYCLE START HOUR
12 AM
AutoDiet WizardTM
3 Days
PORTION CONTROL
Hourly Portions
The System Settings display can be turned off in
MENU MODE by navigating to: >SYSTEM CONTROL>Show
Settings>Off. The diagram above shows the default
values for these SETTINGS.
Pet Stats
There are 3 statistic displays (Pet Stats). The
stats shown are for the last pet detected at the
Thu 12:00 AM
Jan 1, 2010
© Encaya Corporation 2010-2016. All rights reserved.
27
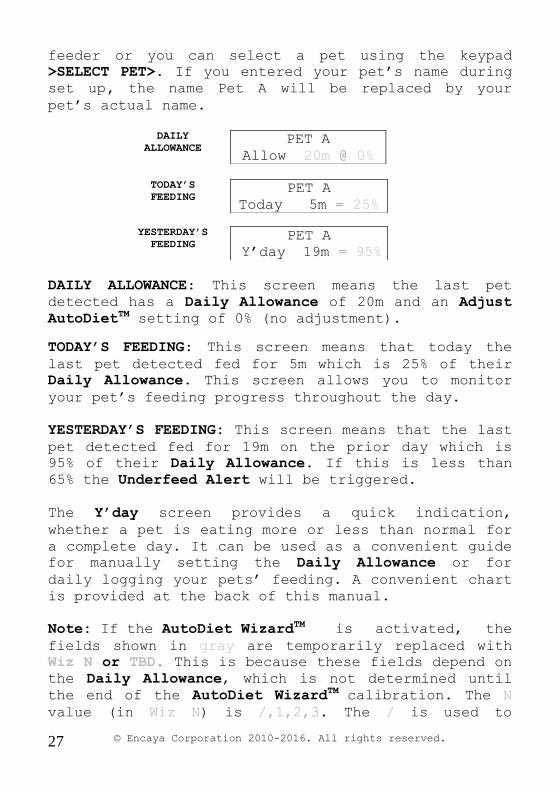
feeder or you can select a pet using the keypad
>SELECT PET>. If you entered your pet’s name during
set up, the name Pet A will be replaced by your
pet’s actual name.
DAILY
ALLOWANCE
PET A
Allow 20m @ 0%
TODAY’S
FEEDING
PET A
Today 5m = 25%
YESTERDAY’S
FEEDING
PET A
Y’day 19m = 95%
DAILY ALLOWANCE: This screen means the last pet
detected has a Daily Allowance of 20m and an Adjust
AutoDietTM setting of 0% (no adjustment).
TODAY’S FEEDING: This screen means that today the
last pet detected fed for 5m which is 25% of their
Daily Allowance. This screen allows you to monitor
your pet’s feeding progress throughout the day.
YESTERDAY’S FEEDING: This screen means that the last
pet detected fed for 19m on the prior day which is
95% of their Daily Allowance. If this is less than
65% the Underfeed Alert will be triggered.
The Y’day screen provides a quick indication,
whether a pet is eating more or less than normal for
a complete day. It can be used as a convenient guide
for manually setting the Daily Allowance or for
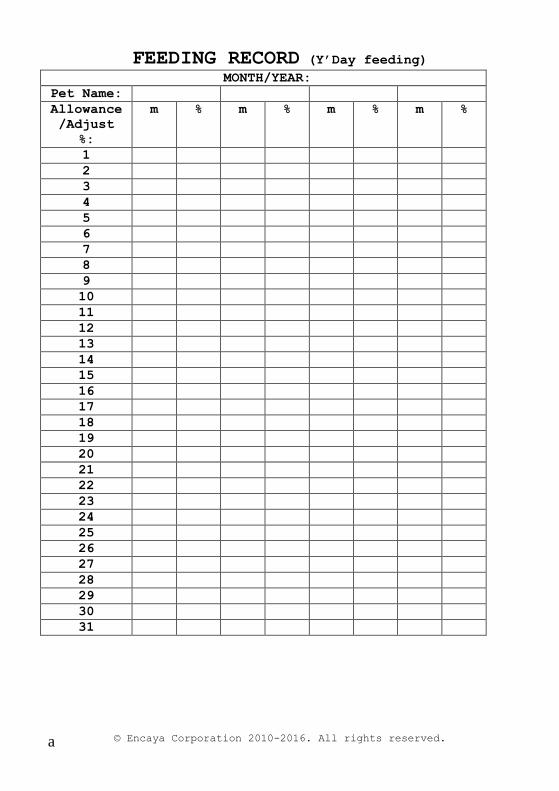
daily logging your pets’ feeding. A convenient chart
is provided at the back of this manual.
Note: If the AutoDiet WizardTM is activated, the
fields shown in gray are temporarily replaced with
Wiz N or TBD. This is because these fields depend on
the Daily Allowance, which is not determined until
the end of the AutoDiet WizardTM calibration. The N
value (in Wiz N) is /,1,2,3. The / is used to
© Encaya Corporation 2010-2016. All rights reserved.
28
indicate the day that the AutoDiet WizardTM is
activated. Since this is a partial day, feeding data
is not used in the calibration. The numbers 1-3
indicate the day count in the actual calibration.
Pet Stats can be turned off in MENU MODE by
navigating to: >SYSTEM CONTROL>Show Pet Stats>Off.
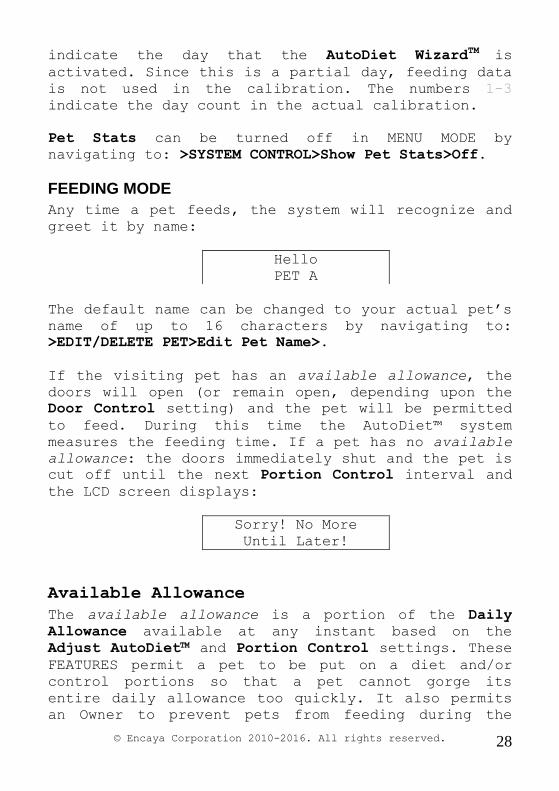
FEEDING MODE
Any time a pet feeds, the system will recognize and
greet it by name:
The default name can be changed to your actual pet’s
name of up to 16 characters by navigating to:
>EDIT/DELETE PET>Edit Pet Name>.
If the visiting pet has an available allowance, the
doors will open (or remain open, depending upon the
Door Control setting) and the pet will be permitted
to feed. During this time the AutoDiet™ system
measures the feeding time. If a pet has no available
allowance: the doors immediately shut and the pet is
cut off until the next Portion Control interval and
the LCD screen displays:
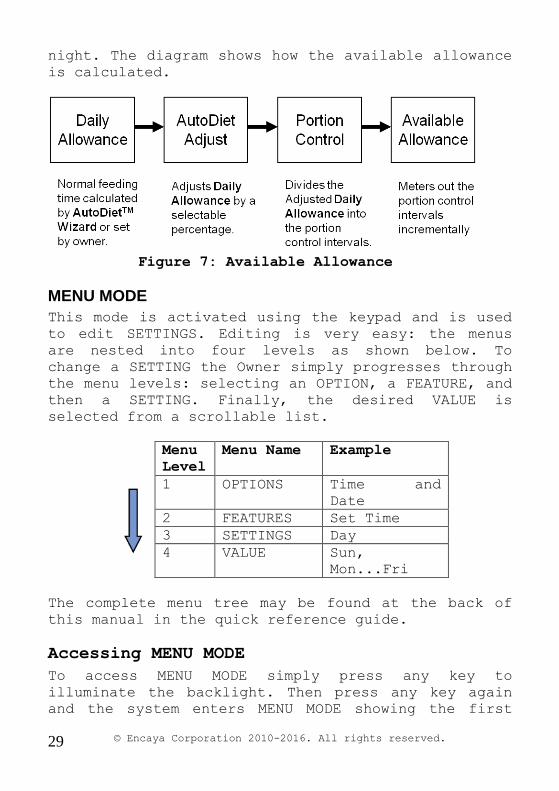
Available Allowance
The available allowance is a portion of the Daily
Allowance available at any instant based on the
Adjust AutoDiet™ and Portion Control settings. These
FEATURES permit a pet to be put on a diet and/or
control portions so that a pet cannot gorge its
entire daily allowance too quickly. It also permits
an Owner to prevent pets from feeding during the
Hello
PET A
Sorry! No More
Until Later!
© Encaya Corporation 2010-2016. All rights reserved.
29
night. The diagram shows how the available allowance
is calculated.
Figure 7: Available Allowance
MENU MODE
This mode is activated using the keypad and is used
to edit SETTINGS. Editing is very easy: the menus
are nested into four levels as shown below. To
change a SETTING the Owner simply progresses through
the menu levels: selecting an OPTION, a FEATURE, and
then a SETTING. Finally, the desired VALUE is
selected from a scrollable list.
Menu
Level
Menu Name Example
1 OPTIONS Time and
Date
2 FEATURES Set Time
3 SETTINGS Day
4 VALUE Sun,
Mon...Fri
The complete menu tree may be found at the back of
this manual in the quick reference guide.
Accessing MENU MODE
To access MENU MODE simply press any key to
illuminate the backlight. Then press any key again
and the system enters MENU MODE showing the first
© Encaya Corporation 2010-2016. All rights reserved.
30
entry in the OPTION menu. Use the keypad as shown in
the Menu tree to navigate through the OPTIONS and
FEATURES.
MENU MODE Timeout
If 60 seconds elapse in MENU MODE without a key
being pressed, the system returns to DISPLAY MODE.
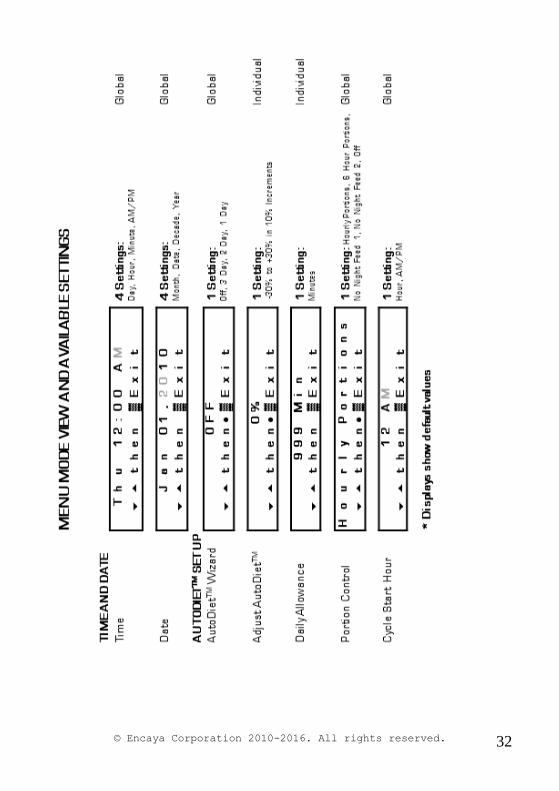
AVAILABLE SETTINGS The table on p.32-33 shows the screen views for
editing each SETTING when in MENU MODE. The default
values are shown for each SETTING. The right side of
the table shows the number of settings along with
typical SETTING VALUES. A SETTING is global if it
applies to entire system and all pets. It is
individual if it applies only to individual pets.
To find a SETTING simply navigate to it using the
keypad. When you have reached the SETTING, the upper
line of the display shows its current VALUE. When
you reach an editable SETTING in MENU MODE the lower
line guides you how to change the setting:
Example 1 then ▓Exit
Example 2 then ● ▓Exit
Example 1 means for the current SETTING, use the
()() keys to scroll through available VALUES.
Then use the () key to advance the cursor to the
next SETTING.
When you reach the last SETTING to be changed, the
guide will be as shown in Example 2. This means the
same as the prior example, but instead of using the
() key to advance to the next SETTING, you press
the (●) key to select and program the SETTING(s) and exit MENU MODE. If instead you continue to press the
() key, the cursor will recycle back to the first
SETTING, allowing you to make changes.
© Encaya Corporation 2010-2016. All rights reserved.
31
In both examples ▓Exitmeans that if you press the
() key you will exit MENU MODE without saving any
settings. The () key does NOT move the cursor to
the left, it is the escape key.
If you hold down the ()() keys the VALUES will
fast scroll. This is convenient for scrolling
through long VALUE lists.
© Encaya Corporation 2010-2016. All rights reserved.
32
© Encaya Corporation 2010-2016. All rights reserved.
33
© Encaya Corporation 2010-2016. All rights reserved.
34
DESCRIPTION OF FEATURES
TIME AND DATE
Wireless Whiskers® AutoDiet™ Feeder has a built-in
clock and calendar. Time is displayed in 12 hour
AM/PM format. The day of the week is not directly
linked to the calendar and must be set at initial
power up.
Time
The clock must be reset after initial power up or
power outage. If not the system will provide a
periodic reminder: the red LED will flash and the
display will prompt you to Reset Clock After Power
Up. Otherwise the feeder will operate normally
without correct time. All timing will be offset
compared to actual time by the difference in clock
time and actual time.
Synchronizing Clocks
When setting the time you may wish to
synchronize to another clock. To synchronize
the second count: adjust the clock to the
correct time at the start of the next minute.
Then wait until the instant the external clock
advances to a new minute and then
simultaneously press the (●) key to synchronize clocks.
Date
To speed up editing the year, it is split into two
digits: a decade field and a year field. The century
and millennium digits are not adjustable. Month
length and leap years are programmed into the
calendar and will adjust automatically. However Day
Light Savings time changes (if observed) must be
made manually. The date is provided as a useful
utility, it is not used in any feeder functionality.
© Encaya Corporation 2010-2016. All rights reserved.
35
AUTODIETTM SET UP
These FEATURES allow you to select and customize the
automatic and manual diet control programs. Some
FEATURES can be set individually, while others are
global and apply to all pets. When adjusting the
SETTINGS for an individual pet, the desired pet must
be selected in advance. Otherwise any changes will
default to the last pet using the feeder.
AutoDiet WizardTM
This is described in OPTIONAL SET UP.(See p.19).
Adjust AutoDietTM
Once the Daily Allowance has been set, either
manually or automatically you can increase or
decrease each pet’s diet as a percentage of its
Daily Allowance. This is very convenient and
eliminates messing around with measuring cups or
worrying if the intended pet is getting the right
amount of food.
For example: To reduce a pet’s intake by 20%, simply
change the Adjust AutoDietTM to -20%. Conversely if
want to increase a pet’s intake: selecting +20% will
increase it accordingly.
All pets have an individual Adjust AutoDietTM setting
that can be independently adjusted. Before changing
this setting you must first detect the pet or select
it using the keypad. The default value is 0% (no
adjustment).
This setting is temporarily disabled during the
AutoDiet Wizard™ calibration.
© Encaya Corporation 2010-2016. All rights reserved.
36
Daily Allowance
This is described in OPTIONAL SET UP. (See p.17).
Portion Control
This is described in OPTIONAL SET UP. (See p.16).
Cycle Start Hour
The start of each feeding day and when all
allowances are refreshed is by default set to 12 am
(midnight). If desired, you may shift to a different
start hour. All allowances and Portion Control
settings are referenced to the Cycle Start Hour.
Example: if the Cycle Start Hour is changed
from 12 AM (default) to 3 AM. The AutoDiet™
system delays the daily reset by 3 hours and
renews all allowances at 3 a.m. instead of
midnight. This also delays No Night Feed period
by 3 hours.
The Cycle Start Hour setting is temporarily disabled
during the AutoDiet Wizard™ calibration.
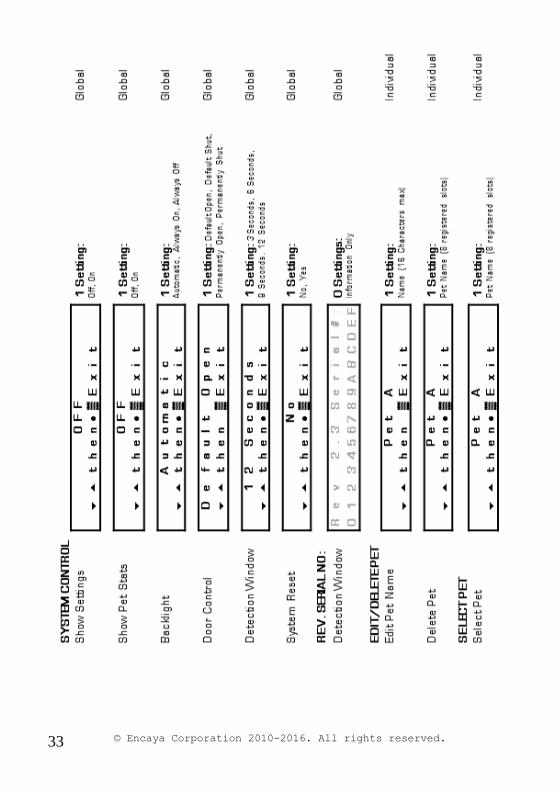
SYSTEM CONTROL
System controls allow you to modify system SETTINGS
and FEATURES. Also the AutoDiet™ Feeder can be reset
to factory default using the System Reset feature.
Show Settings
This allows System Settings to be displayed or not.
Navigate as follows: >SYSTEM CONTROL>Show Settings>.
Show Pet Stats
This allows Pet Stats to be displayed or not.
Navigate as follows: >SYSTEM CONTROL>Show Pet
Stats>.
© Encaya Corporation 2010-2016. All rights reserved.
37
Backlight
Controls the operation of the display backlight.
There are 3 settings available: Automatic, Always On
and Always Off. Navigate as follows: >SYSTEM
CONTROL>Backlight>.
Door Control
This is described in OPTIONAL SET UP. (See p.14).
Detection Window
This FEATURE allows you to adjust the time allowed
for a detection to occur before ending the current
feeding session. At the end of a feeding session the
doors will operate according to the Door Control
SETTING. This FEATURE is useful if you want the
doors to close quickly after a pet finishes feeding.
For example if you are trying to keep the dog out of
the cat’s food and the dog has no wireless tag
fitted.
There is a tradeoff: the shorter the Detection
Window, the less time the feeder has to detect the
tag. So if a pet stands back from the feeder for a
short time or its tag is not facing the feeder,
detection may not occur causing the feeding session
to end and the doors to close if set to Default
Shut. Provided a pet has an available allowance a
new session will begin the next time it is detected,
but in some cases there may be excessive opening and
closing of the doors. The Extreme Shut setting for
the Door Control (see p. 14) is also helpful for
combating pet interference; it causes the doors to
repeatedly attempt to shut, even when a pet is
interfering with normal door closure operation.
Also note a shorter Detection Window will affect the
measuring of your pet’s feeding behavior. It is
normal for Daily Allowances to be shorter with a
shorter Detection Window because the time when a pet
stands back is not measured. Therefore you should
© Encaya Corporation 2010-2016. All rights reserved.
38
restart the AutoDiet WizardTM if you change the
Detection Window, so that this is calibrated into
the Normal Allowance.
Generally we recommend using the longest Detection
Window that meets your needs. However, if you do
reduce the Detection Window you should monitor your
pet’s feeding closely to ensure they are eating
enough.
This feature can be found by navigating to: >SYSTEM
CONTROL> Detection Window>. There are 4 settings: 3,
6, 9 and 12 seconds. The latter is the default..
System Reset
There are two ways to reset the feeder back to
factory default values (factory reset):
1. Use the System Reset feature in MENU MODE by navigating to: >SYSTEM CONTROL>System
Reset>.
2. Turn off the feeder by holding down the (●)
key for 2 seconds until Powering Down is
displayed. When complete: hold down the (●)
key again for at least 10 seconds (counting slowly).
If the system is unresponsive due to a crash of the
processor, remove all power sources, including
batteries. Then re-plug the AC adapter and hold down
the (●) key again for at least 10 seconds (counting
slowly).
REV. SERIAL NO:
This provides information about the firmware
revision and the Electronic Serial Number (ESN) of
your feeder. The ESN is an encrypted security
feature to verify the authenticity of your product
and it is required for warranty registration. When
© Encaya Corporation 2010-2016. All rights reserved.
39
selected this FEATURE it will display information
for one minute or until any key is pressed. The same
information is displayed during the power up welcome
sequence. There are no editable VALUES for this
FEATURE.
EDIT/DELETE PET
Edit Pet Name
This is described in OPTIONAL SET UP. (See p.14).
Delete Pet
If you wish to delete a pet from the feeder you can
do this at any time using the Delete Pet feature.
Simply navigate to: >EDIT DELETE PET>Delete Pet>Yes
and then press the (●) key to delete.
SELECT PET
This allows the owner to select a pet. Manually
selecting a pet makes it the default pet for editing
and display purposes. Otherwise, the default pet is
the last one detected by the feeder. If you wish to
change settings or display information for a
different pet, the Select Pet SETTING must be
changed to the desired pet in advance
SYSTEM POWER FEATURES The system can operate using either AC power or
alkaline batteries or both.
AC Power
The AutoDiet™ feeder is supplied with an AC adapter
to allow operation from a standard power outlet.
When connected to AC power the green LED will
illuminate. Never use a substitute adapter as it
could potentially damage your product and pose a
safety hazard. Genuine replacement parts are
available on our website.
© Encaya Corporation 2010-2016. All rights reserved.
40
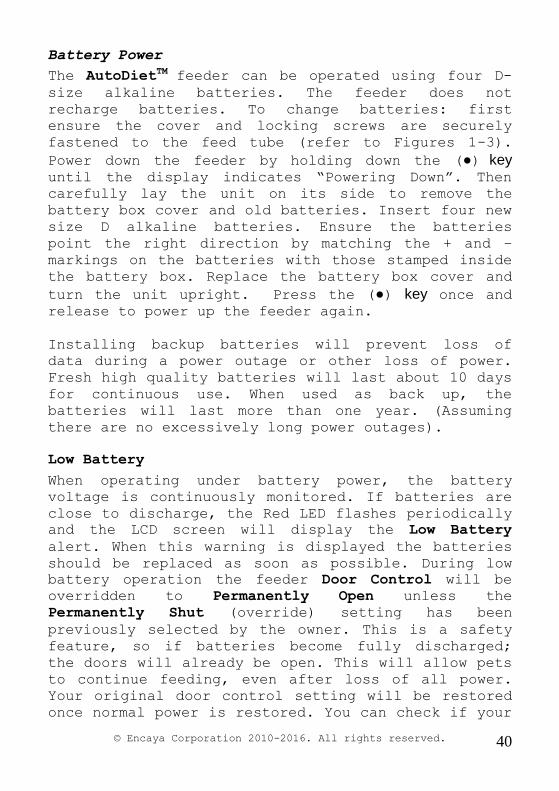
Battery Power
The AutoDietTM feeder can be operated using four D-
size alkaline batteries. The feeder does not
recharge batteries. To change batteries: first
ensure the cover and locking screws are securely
fastened to the feed tube (refer to Figures 1-3).
Power down the feeder by holding down the (●) key until the display indicates “Powering Down”. Then
carefully lay the unit on its side to remove the
battery box cover and old batteries. Insert four new
size D alkaline batteries. Ensure the batteries
point the right direction by matching the + and –
markings on the batteries with those stamped inside
the battery box. Replace the battery box cover and
turn the unit upright. Press the (●) key once and release to power up the feeder again.
Installing backup batteries will prevent loss of
data during a power outage or other loss of power.
Fresh high quality batteries will last about 10 days
for continuous use. When used as back up, the
batteries will last more than one year. (Assuming
there are no excessively long power outages).
Low Battery
When operating under battery power, the battery
voltage is continuously monitored. If batteries are
close to discharge, the Red LED flashes periodically
and the LCD screen will display the Low Battery
alert. When this warning is displayed the batteries
should be replaced as soon as possible. During low
battery operation the feeder Door Control will be
overridden to Permanently Open unless the
Permanently Shut (override) setting has been
previously selected by the owner. This is a safety
feature, so if batteries become fully discharged;
the doors will already be open. This will allow pets
to continue feeding, even after loss of all power.
Your original door control setting will be restored
once normal power is restored. You can check if your
© Encaya Corporation 2010-2016. All rights reserved.
41
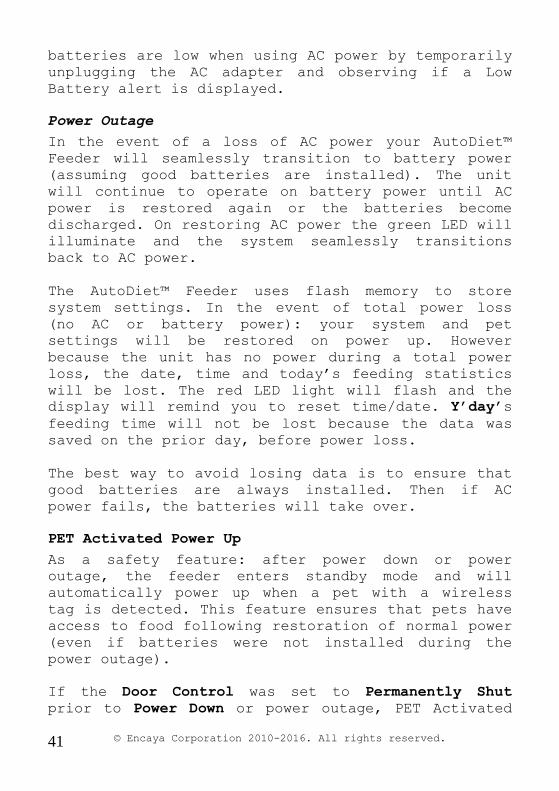
batteries are low when using AC power by temporarily
unplugging the AC adapter and observing if a Low
Battery alert is displayed.
Power Outage
In the event of a loss of AC power your AutoDiet™
Feeder will seamlessly transition to battery power
(assuming good batteries are installed). The unit
will continue to operate on battery power until AC
power is restored again or the batteries become
discharged. On restoring AC power the green LED will
illuminate and the system seamlessly transitions
back to AC power.
The AutoDiet™ Feeder uses flash memory to store
system settings. In the event of total power loss
(no AC or battery power): your system and pet
settings will be restored on power up. However
because the unit has no power during a total power
loss, the date, time and today’s feeding statistics
will be lost. The red LED light will flash and the
display will remind you to reset time/date. Y’day’s
feeding time will not be lost because the data was
saved on the prior day, before power loss.
The best way to avoid losing data is to ensure that
good batteries are always installed. Then if AC
power fails, the batteries will take over.
PET Activated Power Up
As a safety feature: after power down or power
outage, the feeder enters standby mode and will
automatically power up when a pet with a wireless
tag is detected. This feature ensures that pets have
access to food following restoration of normal power
(even if batteries were not installed during the
power outage).
If the Door Control was set to Permanently Shut
prior to Power Down or power outage, PET Activated
© Encaya Corporation 2010-2016. All rights reserved.
42
Power Up is disabled and the feeder will power up
only in response to Owner intervention by pressing
the (●) key.
MAINTENANCE
There are no owner serviceable components inside the
unit other than replaceable D-size alkaline
batteries (purchased separately).
Cleaning
• Unplug the product before cleaning.
• Do not use benzene, thinners, or other solvents to
clean the product. Wipe down the unit with a damp,
lint-free cloth with a diluted soap solution, and
then with a dry lint-free cloth.
• Do not allow liquid to flow into the control panel
or battery box.
Packaging
Keep packing materials and the product box as they
may be needed to protect the unit in case shipping
or transport becomes necessary.
Batteries
Do not leave old discharged batteries inside the
unit. Old batteries are prone to leakage and
corrosion.
© Encaya Corporation 2010-2016. All rights reserved.
43
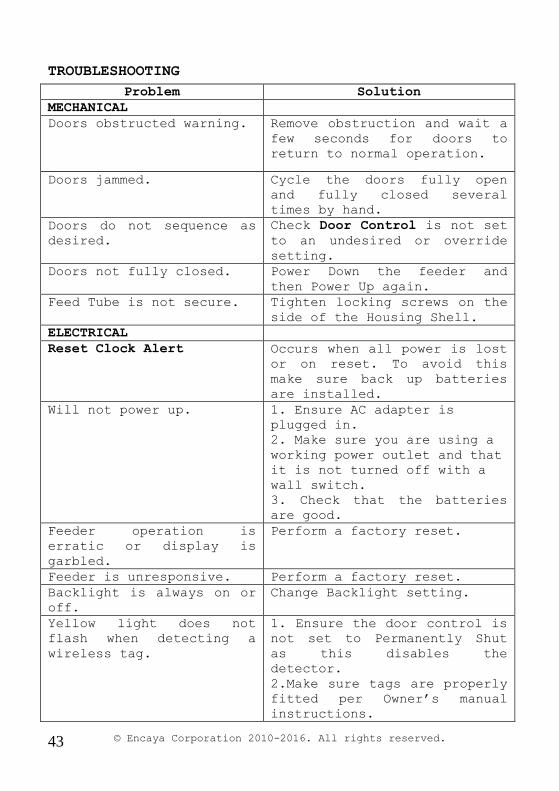
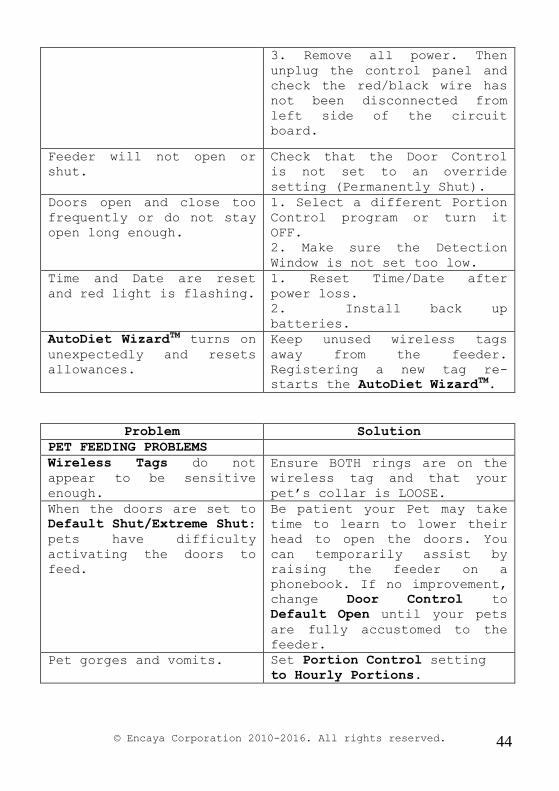
TROUBLESHOOTING
Problem Solution
MECHANICAL
Doors obstructed warning. Remove obstruction and wait a
few seconds for doors to
return to normal operation.
Doors jammed. Cycle the doors fully open
and fully closed several
times by hand.
Doors do not sequence as
desired.
Check Door Control is not set
to an undesired or override
setting.
Doors not fully closed. Power Down the feeder and
then Power Up again.
Feed Tube is not secure. Tighten locking screws on the
side of the Housing Shell.
ELECTRICAL
Reset Clock Alert Occurs when all power is lost
or on reset. To avoid this
make sure back up batteries
are installed.
Will not power up. 1. Ensure AC adapter is
plugged in.
2. Make sure you are using a
working power outlet and that
it is not turned off with a
wall switch.
3. Check that the batteries
are good.
Feeder operation is
erratic or display is
garbled.
Perform a factory reset.
Feeder is unresponsive. Perform a factory reset.
Backlight is always on or
off.
Change Backlight setting.
Yellow light does not
flash when detecting a
wireless tag.
1. Ensure the door control is
not set to Permanently Shut
as this disables the
detector.
2.Make sure tags are properly
fitted per Owner’s manual
instructions.
© Encaya Corporation 2010-2016. All rights reserved.
44
3. Remove all power. Then
unplug the control panel and
check the red/black wire has
not been disconnected from
left side of the circuit
board.
Feeder will not open or
shut.
Check that the Door Control
is not set to an override
setting (Permanently Shut).
Doors open and close too
frequently or do not stay
open long enough.
1. Select a different Portion
Control program or turn it
OFF.
2. Make sure the Detection
Window is not set too low.
Time and Date are reset
and red light is flashing.
1. Reset Time/Date after
power loss.
2. Install back up
batteries.
AutoDiet WizardTM turns on
unexpectedly and resets
allowances.
Keep unused wireless tags
away from the feeder.
Registering a new tag re-
starts the AutoDiet WizardTM.
Problem Solution
PET FEEDING PROBLEMS
Wireless Tags do not
appear to be sensitive
enough.
Ensure BOTH rings are on the
wireless tag and that your
pet’s collar is LOOSE.
When the doors are set to
Default Shut/Extreme Shut:
pets have difficulty
activating the doors to
feed.
Be patient your Pet may take
time to learn to lower their
head to open the doors. You
can temporarily assist by
raising the feeder on a
phonebook. If no improvement,
change Door Control to
Default Open until your pets
are fully accustomed to the
feeder.
Pet gorges and vomits. Set Portion Control setting
to Hourly Portions.
© Encaya Corporation 2010-2016. All rights reserved.
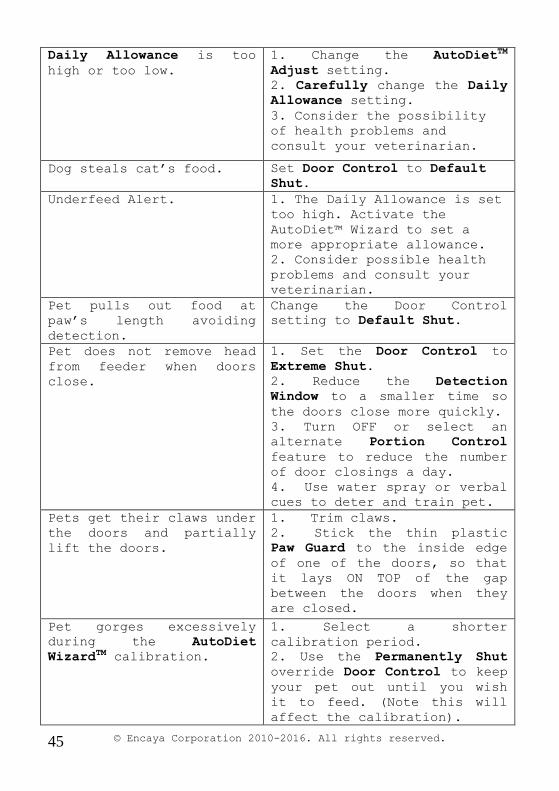
45
Daily Allowance is too
high or too low.
1. Change the AutoDietTM
Adjust setting.
2. Carefully change the Daily
Allowance setting.
3. Consider the possibility
of health problems and
consult your veterinarian.
Dog steals cat’s food. Set Door Control to Default
Shut.
Underfeed Alert. 1. The Daily Allowance is set
too high. Activate the
AutoDiet™ Wizard to set a
more appropriate allowance.
2. Consider possible health
problems and consult your
veterinarian.
Pet pulls out food at
paw’s length avoiding
detection.
Change the Door Control
setting to Default Shut.
Pet does not remove head
from feeder when doors
close.
1. Set the Door Control to
Extreme Shut.
2. Reduce the Detection
Window to a smaller time so
the doors close more quickly.
3. Turn OFF or select an
alternate Portion Control
feature to reduce the number
of door closings a day.
4. Use water spray or verbal
cues to deter and train pet.
Pets get their claws under
the doors and partially
lift the doors.
1. Trim claws.
2. Stick the thin plastic
Paw Guard to the inside edge
of one of the doors, so that
it lays ON TOP of the gap
between the doors when they
are closed.
Pet gorges excessively
during the AutoDiet
WizardTM calibration.
1. Select a shorter
calibration period.
2. Use the Permanently Shut
override Door Control to keep
your pet out until you wish
it to feed. (Note this will
affect the calibration).
© Encaya Corporation 2010-2016. All rights reserved.
46
WARRANTY
We are very proud of our products and back up each
one with the following warranty. This warranty
offers free repairs of defects or failures in the
product, provided that the product is used in
accordance with the instructions in the Owner's
Manual and all cautions, warnings, and indications.
Warranty Period is 180 days from date of purchase.
In order to validate your warranty, please register
your warranty within 15 days of purchase at
www.wirelesswhiskers.com. To receive service, please
visit our website for instructions.
You will need to make a note of the product Model
Number on the underside of the product and the
unique ESN Electronic Serial Number which can be
viewed by selecting it >REV. SERIAL NO:>.
Except as specified below, this Warranty covers all
defects in material or workmanship of the product.
All costs of shipping for repairs shall be borne by
the customer. The following are not covered by the
warranty:
Damage resulting from improper usage, or any
attempt, by any person other than authorized
personnel to modify or repair the product
without written permission from Encaya
Corporation.
Damage resulting from dropping or other
shipping related damages after purchase.
Damage caused by fire, earthquake, flood, or
other act of God, or damages due to abnormal
operating conditions including pollution,
salt damage, gas damage (sulfides), or
irregular power voltage.
Any warranty claims made without proper
online registration.
© Encaya Corporation 2010-2016. All rights reserved.
47
This warranty is only valid within the country of
purchase and requires a valid proof of purchase.
Note: this warranty covers free repairs as described
herein, and does not impair or affect the legal
rights of the customer. In the event that any
provision of this Warranty is invalid under
prevailing law, the remaining provisions shall
remain in effect. Please visit
www.wirelesswhiskers.com to obtain information
regarding repairs after the warranty period expires.
PARTS AND ACCESSORIES
Additional wireless tags, other accessories and
replacement parts are available. Please visit
www.wirelesswhiskers.com for detail.
FCC COMPLIANCE STATEMENTS
This equipment has been tested and found to comply
with the limits for a Class B digital device,
pursuant to Part 15 of the FCC Rules. These limits
are designed to provide reasonable protection
against harmful interference in a residential
installation. This equipment generates, uses and can
radiate radio frequency energy and, if not installed
and used in accordance with the instructions, may
cause harmful interference to radio communications.
However, there is no guarantee that interference
will not occur in a particular installation. If this
equipment does cause harmful interference to radio
or television reception, which can be determined by
turning the equipment off and on, the user is
encouraged to try to correct the interference by one
or more of the following measures:
-- Reorient or relocate the product.
-- Consult the dealer or an experienced
radio/TV technician for help.
Modifications (CFR 47 Section 15.21).
© Encaya Corporation 2010-2016. All rights reserved.
48
Changes or modifications to the electronics or
antenna of this product not expressly approved
by Encaya Corporation could void the user's
authority to operate the equipment.
COPYRIGHTS, TRADEMARKS AND PATENTS
Any redistribution or reproduction or resale in part
or in whole of the contents of this document in any
form is prohibited. Wireless Whiskers® and associated
logo, AutoDietTM and AutoDiet Wizard
TM are protected
trademarks.
Wireless Whiskers® AutoDiet™ Feeder is protected by
U.S. and foreign patents, design registrations,
copyrights and trademarks. All rights reserved.
Vector Wireless is a division of Encaya Corporation,
Clearwater, FL. USA.
© Encaya Corporation 2010-2016. All rights reserved.
a
FEEDING RECORD (Y’Day feeding) MONTH/YEAR:
Pet Name:
Allowance
/Adjust
%:
m % m % m % m %
1
2
3
4
5
6
7
8
9
10
11
12
13
14
15
16
17
18
19
20
21
22
23
24
25
26
27
28
29
30
31

© Encaya Corporation 2010-2016. All rights reserved.
b
FEEDING RECORD (Y’Day feeding) MONTH/YEAR:
Pet Name:
Allowance
/Adjust
%:
m % m % m % m %
1
2
3
4
5
6
7
8
9
10
11
12
13
14
15
16
17
18
19
20
21
22
23
24
25
26
27
28
29
30
31
© Encaya Corporation 2010-2016. All rights reserved.
c
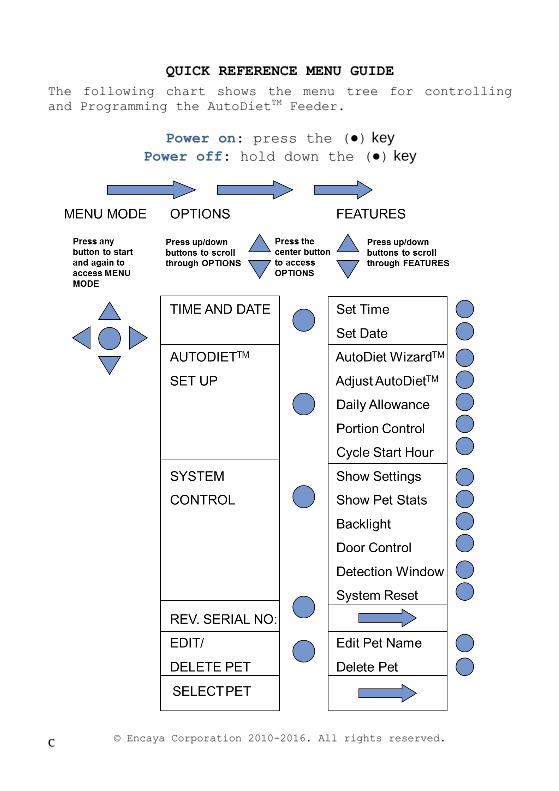
QUICK REFERENCE MENU GUIDE
The following chart shows the menu tree for controlling
and Programming the AutoDietTM Feeder.
Power on: press the (●) key
Power off: hold down the (●) key