Embed Size (px)
Citation preview

PointWrite User Manual
Table of contents2
Table of contentsShipping Contents........ 3
Attaching the PointWrite to the Projector....................... 4
Connecting the PointWrite to PC......... 5
Pen Action .................... 5Exchanging the Pen Tip............................5
Driver Installation........ 6
Configuration Setting .. 8The PointWrite Configuration ..............8Alignment View .........................................9PointWrite Calibration..........................10
Running the PointWrite.................. 12
Specifications.............. 13
Trouble Shooting ....... 14
3
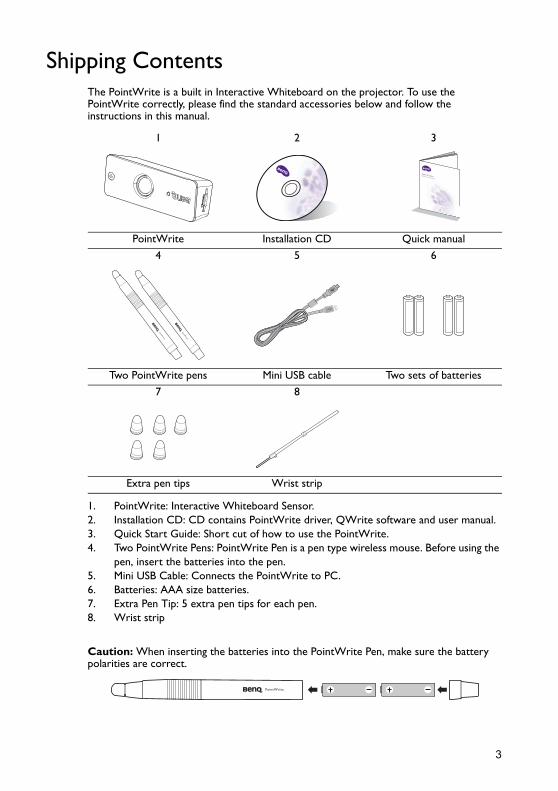
Shipping ContentsThe PointWrite is a built in Interactive Whiteboard on the projector. To use the PointWrite correctly, please find the standard accessories below and follow the instructions in this manual.
1. PointWrite: Interactive Whiteboard Sensor.2. Installation CD: CD contains PointWrite driver, QWrite software and user manual.3. Quick Start Guide: Short cut of how to use the PointWrite.4. Two PointWrite Pens: PointWrite Pen is a pen type wireless mouse. Before using the
pen, insert the batteries into the pen.5. Mini USB Cable: Connects the PointWrite to PC.6. Batteries: AAA size batteries.7. Extra Pen Tip: 5 extra pen tips for each pen.8. Wrist strip
Caution: When inserting the batteries into the PointWrite Pen, make sure the battery polarities are correct.
1 2 3
PointWrite Installation CD Quick manual
4 5 6
Two PointWrite pens Mini USB cable Two sets of batteries
7 8
Extra pen tips Wrist strip
Digital ProjectorQuick Start Guide
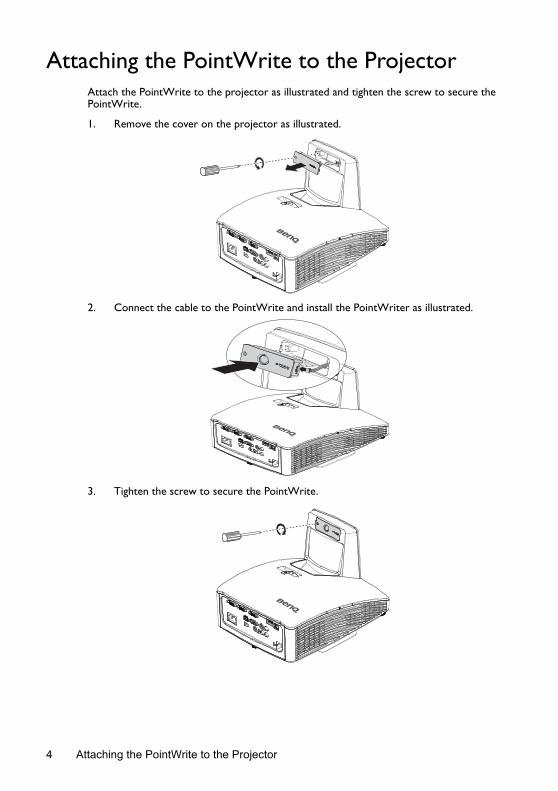
Attaching the PointWrite to the ProjectorAttach the PointWrite to the projector as illustrated and tighten the screw to secure the PointWrite.
1. Remove the cover on the projector as illustrated.
2. Connect the cable to the PointWrite and install the PointWriter as illustrated.
3. Tighten the screw to secure the PointWrite.
Attaching the PointWrite to the Projector4
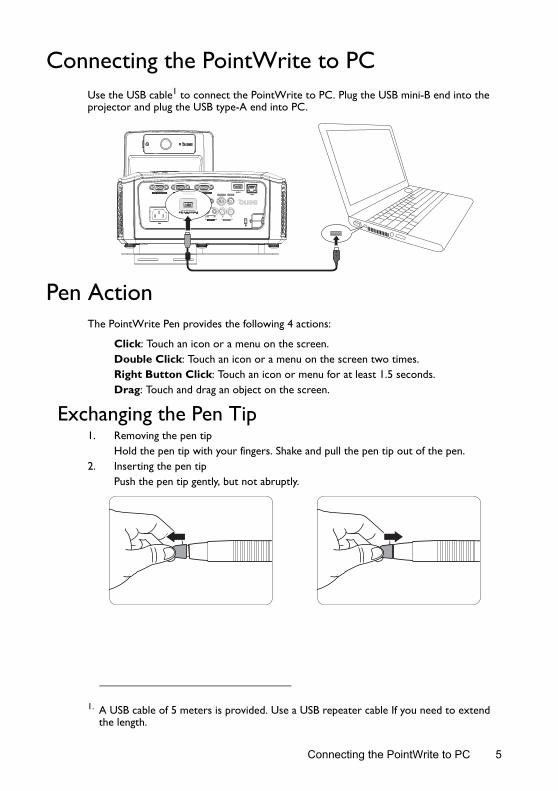
Connecting the PointWrite to PCUse the USB cable1 to connect the PointWrite to PC. Plug the USB mini-B end into the projector and plug the USB type-A end into PC.
Pen ActionThe PointWrite Pen provides the following 4 actions:
Click: Touch an icon or a menu on the screen.Double Click: Touch an icon or a menu on the screen two times.Right Button Click: Touch an icon or menu for at least 1.5 seconds.Drag: Touch and drag an object on the screen.
Exchanging the Pen Tip1. Removing the pen tip
Hold the pen tip with your fingers. Shake and pull the pen tip out of the pen.2. Inserting the pen tip
Push the pen tip gently, but not abruptly.
1. A USB cable of 5 meters is provided. Use a USB repeater cable If you need to extend the length.
Connecting the PointWrite to PC 5
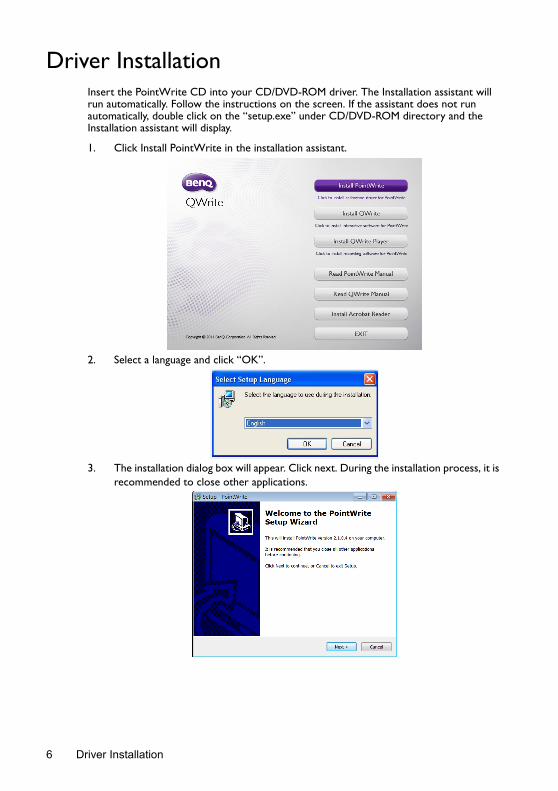
Driver InstallationInsert the PointWrite CD into your CD/DVD-ROM driver. The Installation assistant will run automatically. Follow the instructions on the screen. If the assistant does not run automatically, double click on the “setup.exe” under CD/DVD-ROM directory and the Installation assistant will display.
1. Click Install PointWrite in the installation assistant.
2. Select a language and click “OK”.
3. The installation dialog box will appear. Click next. During the installation process, it is recommended to close other applications.
Driver Installation6
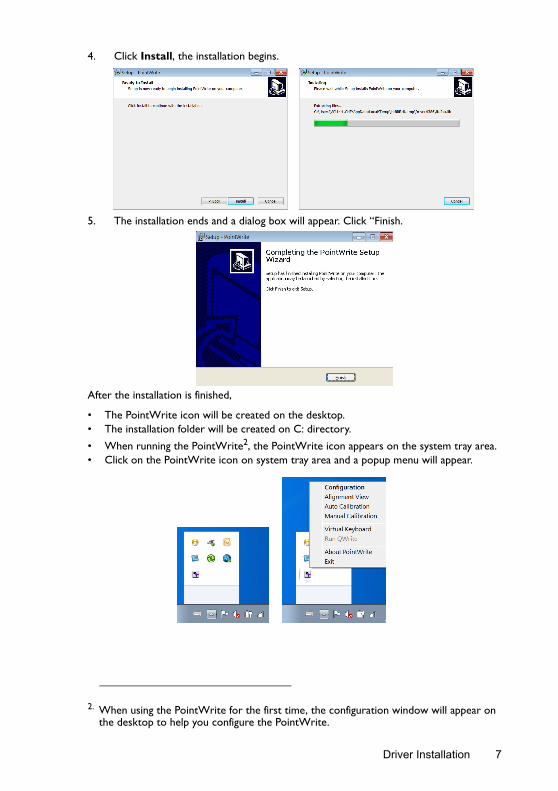
4. Click Install, the installation begins.
5. The installation ends and a dialog box will appear. Click “Finish.
After the installation is finished,
• The PointWrite icon will be created on the desktop.• The installation folder will be created on C: directory.
• When running the PointWrite2, the PointWrite icon appears on the system tray area.• Click on the PointWrite icon on system tray area and a popup menu will appear.
2. When using the PointWrite for the first time, the configuration window will appear on the desktop to help you configure the PointWrite.
Driver Installation 7
Configuration SettingThe PointWrite Configuration
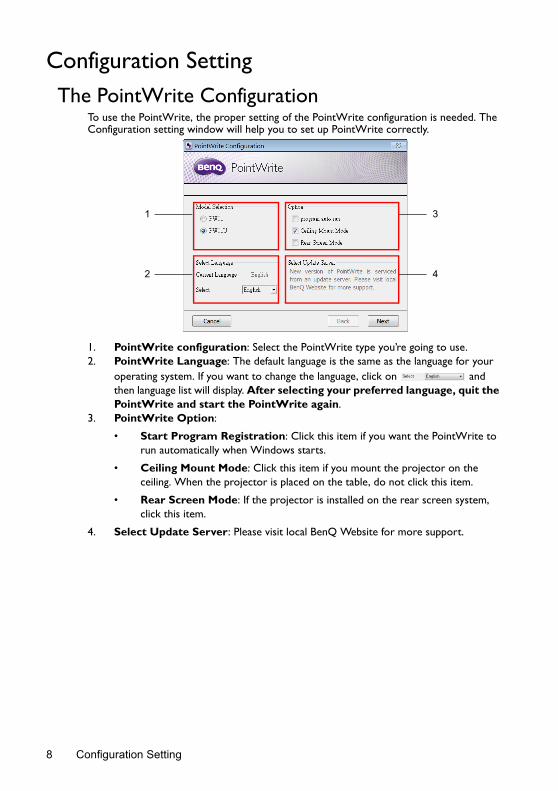
To use the PointWrite, the proper setting of the PointWrite configuration is needed. The Configuration setting window will help you to set up PointWrite correctly.
1. PointWrite configuration: Select the PointWrite type you’re going to use.2. PointWrite Language: The default language is the same as the language for your
operating system. If you want to change the language, click on and then language list will display. After selecting your preferred language, quit the PointWrite and start the PointWrite again.
3. PointWrite Option:
• Start Program Registration: Click this item if you want the PointWrite to run automatically when Windows starts.
• Ceiling Mount Mode: Click this item if you mount the projector on the ceiling. When the projector is placed on the table, do not click this item.
• Rear Screen Mode: If the projector is installed on the rear screen system, click this item.
4. Select Update Server: Please visit local BenQ Website for more support.
1
2
3
4
Configuration Setting8
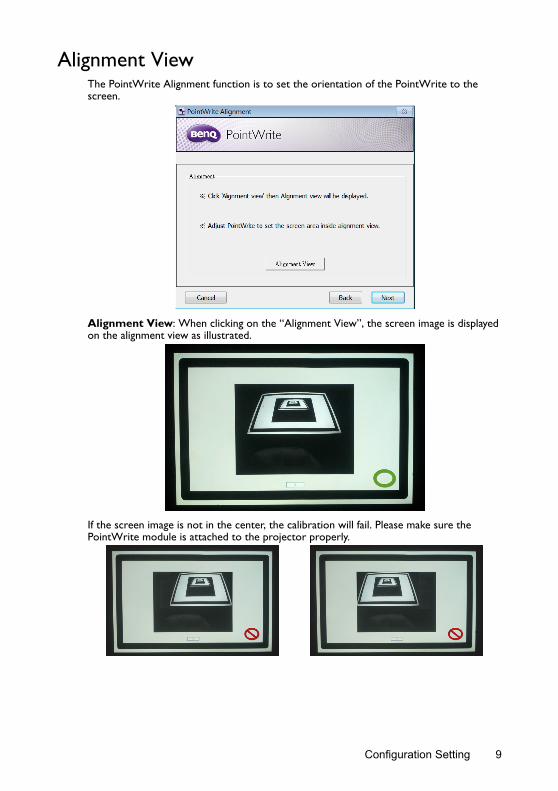
Alignment ViewThe PointWrite Alignment function is to set the orientation of the PointWrite to the screen.
Alignment View: When clicking on the “Alignment View”, the screen image is displayed on the alignment view as illustrated.
If the screen image is not in the center, the calibration will fail. Please make sure the PointWrite module is attached to the projector properly.
Configuration Setting 9
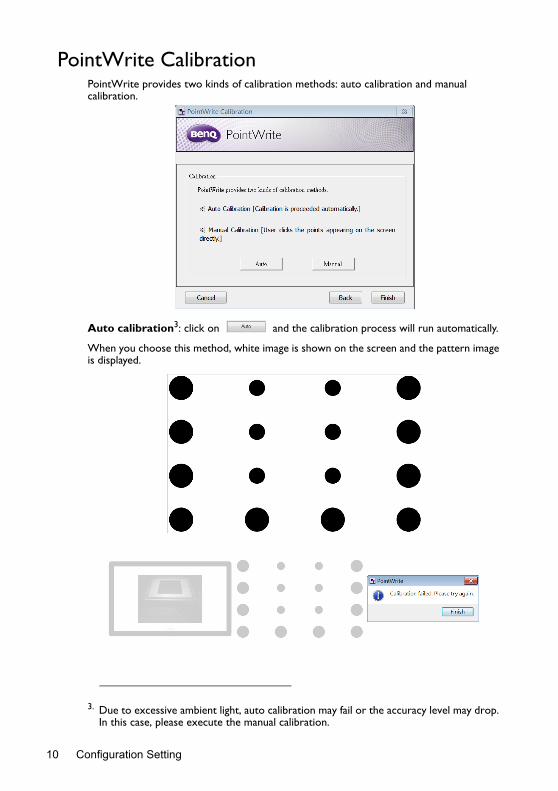
PointWrite CalibrationPointWrite provides two kinds of calibration methods: auto calibration and manual calibration.
Auto calibration3: click on and the calibration process will run automatically.
When you choose this method, white image is shown on the screen and the pattern image is displayed.
3. Due to excessive ambient light, auto calibration may fail or the accuracy level may drop. In this case, please execute the manual calibration.
Configuration Setting10
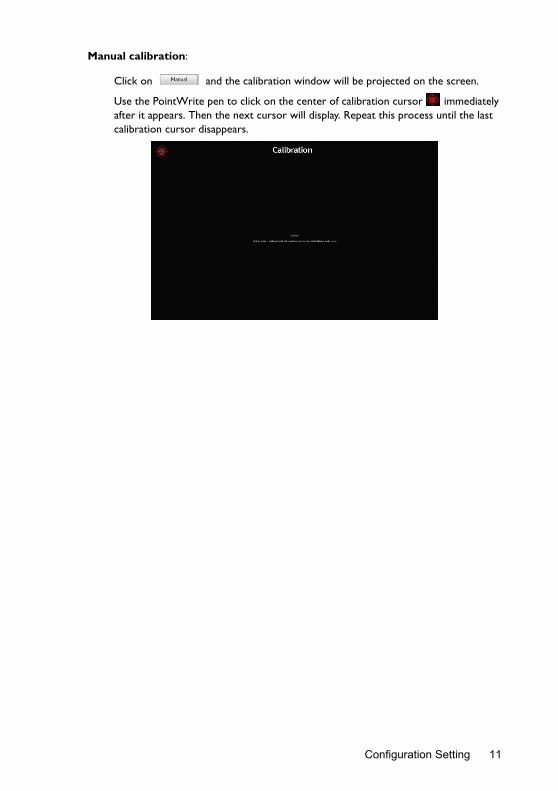
Manual calibration:
Click on and the calibration window will be projected on the screen.
Use the PointWrite pen to click on the center of calibration cursor immediately after it appears. Then the next cursor will display. Repeat this process until the last calibration cursor disappears.
Configuration Setting 11

PointWrite Pull-up Menu
Running the PointWrite
After you double click on the PointWrite icon on the desktop, the PointWrite will initiate and the PointWrite icon will be created on the system tray area.
Right click on the PointWrite icon on the system tray area and a pull-up menu appears.
1. Configuration: Choose this when you want to change the installation position of the projector. To change the language, click on this menu and follow the steps on page 8.
2. Alignment View: See "Alignment View" on page 9 for details.3. Auto Calibration: If the accuracy is not enough when using the PointWrite,
execute the auto calibration again.4. Manual Calibration: If the accuracy is not enough when using the PointWrite or
the auto calibration fails, execute the manual calibration.5. Virtual Keyboard: If keyboard input is needed, click on the “Virtual Keyboard” and
then keyboard will appear on the screen.6. Run QWrite: Choose this when you want to run the “QWrite”. 7. About PointWrite: This menu provides the PointWrite version information. Click
this menu, and then version information window will appear.
123456
7
PointWrite Version Information
Configuration Setting12
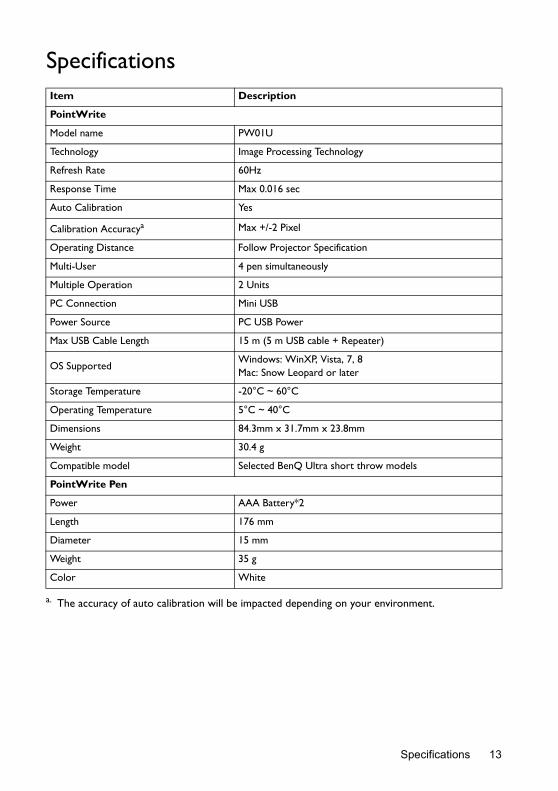
SpecificationsItem Description
PointWrite
Model name PW01U
Technology Image Processing Technology
Refresh Rate 60Hz
Response Time Max 0.016 sec
Auto Calibration Yes
Calibration Accuracya
a. The accuracy of auto calibration will be impacted depending on your environment.
Max +/-2 Pixel
Operating Distance Follow Projector Specification
Multi-User 4 pen simultaneously
Multiple Operation 2 Units
PC Connection Mini USB
Power Source PC USB Power
Max USB Cable Length 15 m (5 m USB cable + Repeater)
OS SupportedWindows: WinXP, Vista, 7, 8Mac: Snow Leopard or later
Storage Temperature -20°C ~ 60°C
Operating Temperature 5°C ~ 40°C
Dimensions 84.3mm x 31.7mm x 23.8mm
Weight 30.4 g
Compatible model Selected BenQ Ultra short throw models
PointWrite Pen
Power AAA Battery*2
Length 176 mm
Diameter 15 mm
Weight 35 g
Color White
Specifications 13
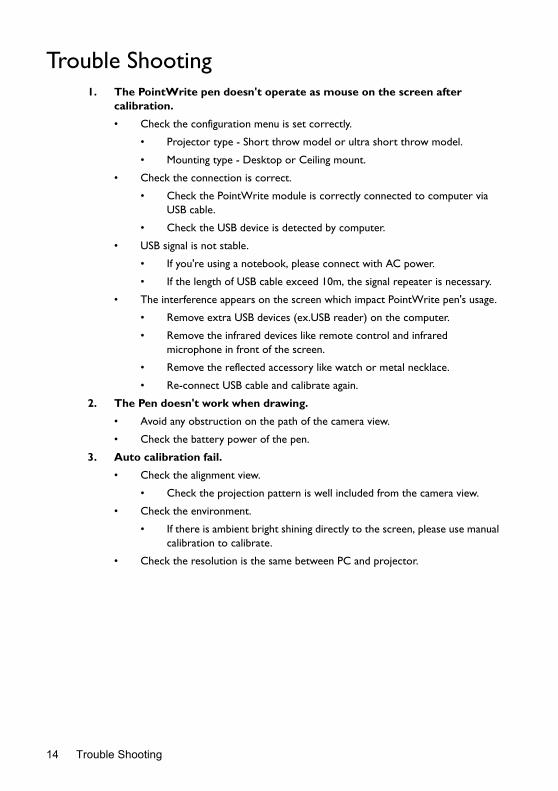
Trouble Shooting1. The PointWrite pen doesn't operate as mouse on the screen after
calibration.
• Check the configuration menu is set correctly.
• Projector type - Short throw model or ultra short throw model.
• Mounting type - Desktop or Ceiling mount.
• Check the connection is correct.
• Check the PointWrite module is correctly connected to computer viaUSB cable.
• Check the USB device is detected by computer.
• USB signal is not stable.
• If you're using a notebook, please connect with AC power.
• If the length of USB cable exceed 10m, the signal repeater is necessary.
• The interference appears on the screen which impact PointWrite pen's usage.
• Remove extra USB devices (ex.USB reader) on the computer.
• Remove the infrared devices like remote control and infraredmicrophone in front of the screen.
• Remove the reflected accessory like watch or metal necklace.
• Re-connect USB cable and calibrate again.
2. The Pen doesn't work when drawing.
• Avoid any obstruction on the path of the camera view.
• Check the battery power of the pen.
3. Auto calibration fail.
• Check the alignment view.
• Check the projection pattern is well included from the camera view.
• Check the environment.
• If there is ambient bright shining directly to the screen, please use manualcalibration to calibrate.
• Check the resolution is the same between PC and projector.
Trouble Shooting14