Embed Size (px)
Citation preview
Pointshop 2 DocumentationRelease 2.2.10
Kamshak
Apr 29, 2018

Contents
1 Getting Started 21.1 Installation . . . . . . . . . . . . . . . . . . . . . . . . . . . . . . . . . . . . . . . . . . . . . . . . 21.2 Installing Workshop Content to the Server . . . . . . . . . . . . . . . . . . . . . . . . . . . . . . . . 21.3 Configuration . . . . . . . . . . . . . . . . . . . . . . . . . . . . . . . . . . . . . . . . . . . . . . . 31.4 Advanced Configuration . . . . . . . . . . . . . . . . . . . . . . . . . . . . . . . . . . . . . . . . . 3
1.4.1 MySQL Setup . . . . . . . . . . . . . . . . . . . . . . . . . . . . . . . . . . . . . . . . . . 31.5 Troubleshooting and reporting bugs . . . . . . . . . . . . . . . . . . . . . . . . . . . . . . . . . . . 31.6 Importing and exporting items and categories . . . . . . . . . . . . . . . . . . . . . . . . . . . . . . 4
2 Item Creation 52.1 Trail Creation . . . . . . . . . . . . . . . . . . . . . . . . . . . . . . . . . . . . . . . . . . . . . . . 52.2 Adding custom playermodels . . . . . . . . . . . . . . . . . . . . . . . . . . . . . . . . . . . . . . 52.3 Accessory/Hat Creation . . . . . . . . . . . . . . . . . . . . . . . . . . . . . . . . . . . . . . . . . 6
2.3.1 Introduction into PAC . . . . . . . . . . . . . . . . . . . . . . . . . . . . . . . . . . . . . . 62.3.2 The Accessory/Hat Maker . . . . . . . . . . . . . . . . . . . . . . . . . . . . . . . . . . . 72.3.3 Slots . . . . . . . . . . . . . . . . . . . . . . . . . . . . . . . . . . . . . . . . . . . . . . . 7
3 Developer Information 83.1 Developer License . . . . . . . . . . . . . . . . . . . . . . . . . . . . . . . . . . . . . . . . . . . . 8
3.1.1 Modification Guidelines . . . . . . . . . . . . . . . . . . . . . . . . . . . . . . . . . . . . 83.1.2 Getting Started . . . . . . . . . . . . . . . . . . . . . . . . . . . . . . . . . . . . . . . . . 9
3.2 Developer Options . . . . . . . . . . . . . . . . . . . . . . . . . . . . . . . . . . . . . . . . . . . . 93.2.1 Defaults . . . . . . . . . . . . . . . . . . . . . . . . . . . . . . . . . . . . . . . . . . . . . 93.2.2 Developer . . . . . . . . . . . . . . . . . . . . . . . . . . . . . . . . . . . . . . . . . . . . 93.2.3 The reload command . . . . . . . . . . . . . . . . . . . . . . . . . . . . . . . . . . . . . . 93.2.4 Examples . . . . . . . . . . . . . . . . . . . . . . . . . . . . . . . . . . . . . . . . . . . . 9
4 Module Creation 104.1 Structure . . . . . . . . . . . . . . . . . . . . . . . . . . . . . . . . . . . . . . . . . . . . . . . . . 104.2 Adding custom Item Types . . . . . . . . . . . . . . . . . . . . . . . . . . . . . . . . . . . . . . . . 104.3 Creating a persistence . . . . . . . . . . . . . . . . . . . . . . . . . . . . . . . . . . . . . . . . . . 11
4.3.1 Implementing saving and updating logic . . . . . . . . . . . . . . . . . . . . . . . . . . . . 124.4 Creating the item base . . . . . . . . . . . . . . . . . . . . . . . . . . . . . . . . . . . . . . . . . . 134.5 Adding the clientside creator . . . . . . . . . . . . . . . . . . . . . . . . . . . . . . . . . . . . . . . 134.6 Putting it all together: The blueprint . . . . . . . . . . . . . . . . . . . . . . . . . . . . . . . . . . . 144.7 Creating a slot for your item . . . . . . . . . . . . . . . . . . . . . . . . . . . . . . . . . . . . . . . 144.8 OPTIONAL: Adding custom Settings . . . . . . . . . . . . . . . . . . . . . . . . . . . . . . . . . . 14
i

4.8.1 The Settings Table . . . . . . . . . . . . . . . . . . . . . . . . . . . . . . . . . . . . . . . 154.8.2 Settings Button . . . . . . . . . . . . . . . . . . . . . . . . . . . . . . . . . . . . . . . . . 154.8.3 Adding the Configurator . . . . . . . . . . . . . . . . . . . . . . . . . . . . . . . . . . . . 154.8.4 Accessing the Settings . . . . . . . . . . . . . . . . . . . . . . . . . . . . . . . . . . . . . 16
4.9 Adding custom Tabs . . . . . . . . . . . . . . . . . . . . . . . . . . . . . . . . . . . . . . . . . . . 16
5 Getting and Setting player points 175.1 Getting via MySQL (for loadingscreens etc) . . . . . . . . . . . . . . . . . . . . . . . . . . . . . . 17
6 Giving Items 196.1 Examples . . . . . . . . . . . . . . . . . . . . . . . . . . . . . . . . . . . . . . . . . . . . . . . . . 19
7 Creating Pointshop Skins 217.1 Example Skins . . . . . . . . . . . . . . . . . . . . . . . . . . . . . . . . . . . . . . . . . . . . . . 217.2 Types of Hooks . . . . . . . . . . . . . . . . . . . . . . . . . . . . . . . . . . . . . . . . . . . . . . 217.3 Fonts . . . . . . . . . . . . . . . . . . . . . . . . . . . . . . . . . . . . . . . . . . . . . . . . . . . 21
8 Addings slots to existing modules 228.1 Using the customizing addon . . . . . . . . . . . . . . . . . . . . . . . . . . . . . . . . . . . . . . 228.2 Adding accessory slots . . . . . . . . . . . . . . . . . . . . . . . . . . . . . . . . . . . . . . . . . . 228.3 Adding weapon slots . . . . . . . . . . . . . . . . . . . . . . . . . . . . . . . . . . . . . . . . . . . 228.4 Adding other slot types . . . . . . . . . . . . . . . . . . . . . . . . . . . . . . . . . . . . . . . . . . 23
9 Developer API Reference 249.1 Modules . . . . . . . . . . . . . . . . . . . . . . . . . . . . . . . . . . . . . . . . . . . . . . . . . 249.2 Player integration . . . . . . . . . . . . . . . . . . . . . . . . . . . . . . . . . . . . . . . . . . . . . 269.3 Export & Import . . . . . . . . . . . . . . . . . . . . . . . . . . . . . . . . . . . . . . . . . . . . . 26
ii

Pointshop 2 Documentation, Release 2.2.10
Pointshop 2 is the next generation shop system for Garry’s Mod. Its features include:
• Live item editing
• Lua-less creation of items
• Inventory and Item slots
• PAC3 Integration
The official website where you can buy discounted packages is https://www.pointshop2.com/
The script can be found at https://scriptfodder.com/scripts/view/596
DLCs available:
• Boosters: https://scriptfodder.com/scripts/view/648
• Gambling: https://scriptfodder.com/scripts/view/645
• Masks: https://scriptfodder.com/scripts/view/12
• Permanent Weapons: https://scriptfodder.com/scripts/view/677
• Crates & Drops: https://scriptfodder.com/scripts/view/1104
• Achievements: https://scriptfodder.com/scripts/view/11
• Gambling: https://scriptfodder.com/scripts/view/645
• Advent Calendar: https://scriptfodder.com/scripts/view/1799
This is the documentation site for Pointshop 2. You can find guides and explanation of various options here. If youare a developer you will also find detailed instructions for interacting with the script.
Contents 1

CHAPTER 1
Getting Started
1.1 Installation
To install Pointshop2 simply extract the zip you downloaded into the addons folder. This will give you two folders:addons/pointshop2 and addons/libk.
Next install PAC3, the newest version can always be found here. Download and extract the zip, too. This will give youaddons/pac3-master.
Final structure when everything is installed:
• garrysmod
– addons
* libk
* pac3
* pointshop2
1.2 Installing Workshop Content to the Server
Installing the workshop content is required to use the airdrops addon. You can skip this step if you do not useairdrops.
You need to add the Content Addon to you server’s workshop collection airdrops to work.
If you have not set up a server workshop collection, follow these steps:
1. Generating a web api authorization key: In order to use a workshop collection on your server, it must firsthave a web api authorization key. You can get one here. Once you have your key, add a new launch parameterto your srcds.exe command line: -authkey YOURAUTHKEYHERE.
2. Creating a workshop collection: Next create a workshop collection here. Select Server Content as Type andfill the rest of the fields. Next add the Content Addon. It’s easier to find if you subscribe/fav it first.
2

Pointshop 2 Documentation, Release 2.2.10
3. Publish the collection: On the last page when creating the collection, click “Publish”. You might have to agreeto the Steam TOS to proceed. The URL of the collection should look something like this when you are finished:http://steamcommunity.com/sharedfiles/filedetails/?id=913621233. Write down thenumbers from the URL.
4. Add the collection to your server: Once you have written down the workshop id from the previousstep, add a new launch parameter to your srcds.exe command line: +host_workshop_collection123123123, replacing the numbers with the id. Your launch parameters should now include both, the work-shop collection and the authkey from step 1: +host_workshop_collection 123123123 -authkeyYOURAUTHKEYHERE.
1.3 Configuration
Pointshop2 requires no initial configuration! Once it is installed you are ready to go! Restart your server and press F3to open the menu. You can find all settings under the “Management” tab.
1.4 Advanced Configuration
There are a few options in Pointshop2 that can be used to integrate the script more tightly into your system.
1.4.1 MySQL Setup
By default SQLite (via sv.db) is used to store all player and pointshop data. If you have a MySQL server you can alsouse MySQL with the script. This has the advantage of being more efficient for large amounts of data, enabling you toshare items across multiple servers and allowing you to display data on the web.
If you want to switch from SQLite to MySQL you need to convert your database. We have created a tool where youcan upload your SQLite database (located in your server’s garrysmod folder) and download a .sql.gz file that you canimport with phpmyadmin. SQLite to MySQL
To enable MySQL please follow these steps:
1. Install the gmsv_mysqloo module: Download the module from facepunch and follow the installation instruc-tions for your operating system at the bottom of the post.
2. Enable MySQL within LibK: LibK is used for all database operations of Pointshop2. To enable MySQL sup-port go into the configuration file addons/libk/lua/libk/server/sv_libk_config.lua. Set LibK.SQL.UseMysql= true and update the remaining settings with your database connection details. If you are hosting thedatabase on a different machine than the gamemserver, make sure to allow external connections to the database.
3. Test the configuration: After a server restart Pointshop2 will now connect to MySQL. If there are anyerrors when connecting to the database they will be shown in the server console and logged to gar-rysmod/data/LibK_Error.txt serverside.
1.5 Troubleshooting and reporting bugs
When you are experiencing issues with pointshop 2 please follow these steps. For a fast solution include as muchinformation as possible. Report bugs and problems only through scriptfodder tickets.
1. Turn on debug mode: Follow the steps outlined here to enable verbose logging: Developer Options.
1.3. Configuration 3

Pointshop 2 Documentation, Release 2.2.10
2. Create a minimal test case: Try to reduce the steps needed to create the problem. Once you have found thequickest reliable way to create a problem note down the steps in a step by step fashion.
3. Capture the load log: When the script loads it outputs a lot of information to the console. In your report includethis, from both server and client console. If something goes wrong during load other errors can happen. Theload log is printed on connect (clientside) and after a map change (serverside).
4. Include client and server console logs: Include the client and server console logs from when the issue happens.Include a bit before and after, including too much is not a problem. Use a pastebin like http://hastebin.com/ forstoring the information.
5. Include server configuration: Are you using MySQL or SQLite? Do you use any custom extensions or anyDLC? Which administration mod do you use? Which gamemode do you run?
1.6 Importing and exporting items and categories
Pointshop 2 allows importing and exporting items to text. You can use this feature to make backups of the shop or totransfer the item and category setup between servers.
Exporting and importing items can only be done trough lua commands. You can however run these through the serverconsole by prefixing them with lua_run. Check Export & Import
Example workflow:
-- On Server 1:Pointshop2Controller:getInstance():exportItems() -- A filename is printed to
→˓the consolePointshop2Controller:getInstance():exportCategoryOrganization() -- A filename
→˓is printed to the console
-- You would now go into the data directory and transfer files from the first to the→˓second server
-- On Server 2:Pointshop2Controller:getInstance():importItemsFromFile( "filename_1.txt" ) --
→˓The filename from the first commandPointshop2Controller:getInstance():importCategoriesFromFile( "filename_2.txt"
→˓) -- The filename from the second command
Note: Graphical import/export features and importing/exporting of wallets and inventories is planned and will beadded in a future update.
1.6. Importing and exporting items and categories 4

CHAPTER 2
Item Creation
2.1 Trail Creation
The pointshop comes with a few trails readily available and it is very easy to add your own. If you wish to do this,simply place the files inside materials/trails and as long as this is correct, they will be picked up. When making yourown, it is recommended to use a size of 128x128 and in VTF format, as .png can lead to crashes. When handling the.VMT, use these specifics to avoid blurring or blocky previews:
"UnlitGeneric"{"$basetexture" "trails/dollar""$vertexalpha" 1"$vertexcolor" 1}
To get your image to an actual Pointshop item, go to the second tab called Management. Now you should be on a tabcalled ‘Create Items’, with options to select the type. Go to Trail to bring up the basic settings menu, where you canpersonalize the item you are going to make. Once you are happy with the name and price, click the image previewnext to the file path. This will bring up a box displaying all functioning materials inside /trails. Hover over them toplay an animated preview, which will give some indication of how they look in-game. Once happy, save the item andif successful, will be found in Uncategorised Items, located inside the Manage Items tab. The last step is to move itinto a category, which can achieved via drag and drop.
2.2 Adding custom playermodels
To create a playermodel simply go to Mangement -> Create Item -> Playermodel. Click on the playermodel previewto bring up the selector. You can then pick a playermodel and change bodygroups and skin, if the model providesthem.
To add new playermodels to the shop from workshop, simply install the workshop addon to the server collection (seeGMod wiki). The addon is now installed to the server. To make sure that players download the addon on join you needto have a matching resource.AddWorkshop in your lua/autorun/server directory. (Details see Xenonservers’ Guide
5

Pointshop 2 Documentation, Release 2.2.10
to Workshop). When you bring up the playermodel creator the model can now be picked. Sometimes addons don’tregister the models as playermodels so the picker cannot find them. In this case you can extract the workshop addonto find out the model path and put the path into the manual entry text field next to the preview entry. Press enter onceyou’ve entered the model to apply it.
2.3 Accessory/Hat Creation
Hats in pointshop2 are PAC3 items. As well as the ordinary single prop-based hats you’ll find in any Pointshop, hereyou also have the ability use PAC. This allows you to create animated hats, add particles, position hats interactivelyonto different models and even create full armor or accessories. This can all be done without any lua knowledge andallows you to easily create hats that are absolutely unique to your server.
When creating a hat you have two options:
1. Using the ordinary PAC3 editor and importing the outfits into Pointshop 2
2. Using the PAC3 editor embedded within the Pointshop2 hat editor
Generally it is recommended to use the first way, this allows you to use the full editor and gives you more options.The best approach is to first create the PAC outfits in sandbox and then use the Hat Creator within the ManagementTab to create a pointshop item from it. In gamemodes that do not derive from sandbox (for example TTT or Murder)the PAC editor cannot be used. In this case you can still use the Pointshop2 Hat Editor to create and position hats.
2.3.1 Introduction into PAC
PAC (short for Player Appearance Customizer) is an addon made by CapsAdmin. It allows you to fully customizeyour looks.
First of all, grab the addon from the Workshop here. Once it’s installed, load up Garry’s Mod in sandbox and pressc (or whatever key is bound to open the context menu). Underneath the small button to change your player model,you’ll find another that opens up the PAC editor.
In short, PAC is an addon that allows you to build costumes out of props and various other tools available, such aslighting, particles and even text. To use it, you choose a prop from the sandbox spawn menu, use sliders to move itinto a location you’re happy with and repeat until finished. The first thing you’ll want to do after installing is turningon advanced features. Do this by going to third tab, options, and hitting the second part down, you’ll then have easyaccess to everything.
From here, what you make with PAC is entirely up to you, so it’s recommended to just play around until you feelfamiliar. One aspect that makes costume creation a lot easier is the ability to t-pose your model, meaning they do notmove around which can cause issues getting positions exactly right. Access this via the fourth tab, players. It’s thefirst button and can be changed upon demand, if you wish to preview your costume in an animated manner.
When working on PAC items that are not head-based, it is vital to change the bone to one that correctly suits theposition of your costume. For example, if you are placing a model on the player’s chest, go the orange orientationtab of PAC and click the button for it, which will bring up a list of bones that the prop can be attached to. In thisscenario, you would click ‘chest’ or ‘amulet’ although it will really depend on what you are making. Failure to do sowill usually cause costumes to fall out of place when moving around or in different standing positions.
Further information, tutorials and example items:
• The official Facepunch thread
• The official Github repository
• PAC3 Beginners FAQ
• Tutorials and information
2.3. Accessory/Hat Creation 6

Pointshop 2 Documentation, Release 2.2.10
2.3.2 The Accessory/Hat Maker
One of the main features of Pointshop2 is to make item creation much easier and fluid. The Accessory/Hat Makeris the tool used to create PAC3 powered Hats and Accessories. This includes Pets, Hats and various other items thatmodify the look of the player.
The editor can be accessed within the Management tab under “Create Items”. Select Accessory/Hat and the editor willopen. To create an item follow these steps:
1. Fill out the basic information: Fill out the basic fields such as name, point costs and a description.
2. Create or import the base outfit: To do this, simply click on the Open Editor button and select the respectiveoption. This outfit is applied to all models by default. CS:S Playermodels usually require slightly differentpositioning of the items.
3. Add model specific outfits: To modify the item positions for CS:S or other playermodels, click the “Add”button beneath the main editor button. You can now choose to create an outfit for all CS:S models or choose amodel manually. After selecting this option you can clone the base outfit and adapt the positions. Please not thatthe outfit is only cloned when you click this button, if you change the main outfit after cloning the changes willnot automatically apply to all model specific outfits. In order to fix this simple reclone the outfit by selectiongthe option within the model specific outfits table.
4. Create a shop icon: Icons for PAC items are automatically generated. To specify from where the icon shouldlook at the item you can use the icon editor. Within the item positioner you will usually click on the “IconSnapshot” button. This will initialize the icon for you. To fine tune the icon’s view you can use the sliders nextto the icon.
5. Create an inventory icon: To update the inventory icon follow the same procedure as for the shop icon. Pleasenote that creating a new icon snapshot will overwrite previous changes. It is recommended that you use thesliders for the inventory icon after creating the shop icon.
2.3.3 Slots
To avoid clipping and keep everything organized, items are categorized by different slots, which can be viewed via theinventory tab. This allows for multiple accessories on the player, such as head, pets, etc. Items are not set to a singleslot, meaning they can be used in multiple areas if the user wishes to do so.
To assign an item to a slot simply check the checkboxes in the item editor. Only slots that were created for Acces-sory/Hat items can be used, so a PAC item cannot be put into a Trail slot.
2.3. Accessory/Hat Creation 7

CHAPTER 3
Developer Information
Pointshop2 was designed with modification, customization and extension in mind. You are welcome to modify or addto the script through coderhire jobs, scripts or private modifications. The following pages are designed to help youwork with the addon. Whether you are extending or modifying the script, please follow the guildelines explained here.
3.1 Developer License
If you do not plan to use pointshop 2 on a server but want to create an addon for it, you can request a free developerlicense. To request a license please contact Kamshak via PM on scriptfodder. Please include your experience/previouswork and a rough description of what you plan to add to the shop.
3.1.1 Modification Guidelines
1. Never modify code files: When extending or modifying pointshop 2 the first guideline is to never modify any ofthe core files. You can use hooks and global functions to extend the script or modify functionality. This makessure that there are as little conflicts between addons as possible. If you need a specific hook or if modificationof core files is a much easier solution to a general problem, please get in touch.
2. Skin your panels only in derma skins: To make sure that skins can provide a consistent experience, it isimportant that Paint functions are never directly overwritten. Instead use Derma_Hook and extend the baseskin. This gives skin creator the chance to support your addon without messy hooks and overwrites.
3. Avoid global variables: Use local variables or create a single global table for your addon to store globals. Thisavoids cluttering the global namespace, is faster and avoids conflicts.
4. Avoid direct database queries: Pointshop 2 makes heavy use of LibK as a database abstraction layer. Thisenables easy swapping of the databases and makes it possible to avoid many security issues. While you are notrequired to use LibK models you are encouraged to do so as it automates table creation and removal and allowsyou to hook into the export, import and backup mechanisms of Pointshop 2 without additional work.
5. Allow users to reset the DLC: Add an option that will reset the DLC. In case there are problems this create aneasy fallback.
8

Pointshop 2 Documentation, Release 2.2.10
3.1.2 Getting Started
To get started with Pointshop 2 development, first read the information on module creation. Modules are the main wayto modify and extend Pointshop 2. They provide many automated facilities that make it very easy to extend the script.
After that a good way to start is to check out the examples.
3.2 Developer Options
To make development and debugging of the script easier there are a few options for developers. If you experience anyerrors please also turn these settings on as it will help track errors down.
Within addons/libk/lua/libk/shared/2_sh_libk.lua LibK developer settings can be configured.
3.2.1 Defaults
LibK.Debug = false
LibK.LogLevel = 2 –Requires Debug
LibK.LogSQL = false
3.2.2 Developer
LibK.Debug = true
LibK.LogLevel = 4 –Requires Debug
LibK.LogSQL = true
LibK.LogSQL logs every query that is generated and sent to the database. This can slow down the server significantlyand creates large log files. Only use it if needed.
3.2.3 The reload command
For easier development the pointshop2_reload command to fully reload the script was added. It requires LibKto be in debug mode as well as the user to be an administrator. The command will reload every part of the script,including the database. You can use this to quickly test changes without having to change the map. The commandonly works for existing files, when adding new files you have to do a map change.
Note: The pointshop2_reload command is currently broken on linux as file changes are not properly pickedup by the game.
3.2.4 Examples
• Bodygroups Chooser by AlphaWolf: https://github.com/snowywolf/Pointshop-2-Bodygroups
• Blur Skin by AlphaWolf: https://github.com/snowywolf/Pointshop-2-Skin
• Full tutorial on how to create a low gravity item: Tutorial Code
3.2. Developer Options 9

CHAPTER 4
Module Creation
Modules are the best way to extend pointshop. Through them new item creators can be added.
Note: This is a very technical description with very little example code. It is intended for reference use. You can finda step-by-step tutorial here: Learn how to create a Pointshop 2 item in 3 easy steps
4.1 Structure
The module structure is very simple. Each module is a folder within the lua/ps2/modules folder. Every file in thisfolder is recursively loaded by the module loader. The realm is determined by the file prefix (sh, cl, sv). Client filesare automatically AddCSLuaFile’d.
Within this folder the module description file sh_module.lua needs to be placed. Here you set up the moduletable (MODULE) which contains information such as the author and name of the module, then register it usingPoinsthop2.RegisterModule().
4.2 Adding custom Item Types
Note: Creating custom item types is an advanced topic and requires an understanding of object oriented patterns.It is recommended to look at the items included in the script as an example when reading this section. Good candi-dates are the Trail and Playermodel items, which show very simple items. A complex example is provided with theAccessory/Hat, which uses multiple data models and a complex item creator.
Users should be able to create and modify items through the ingame gui.
To understand the way items are created in Pointshop2 it is important to know that each item is handled on it’s ownand is unique. This means that even if the user owns ten items of the same type each is saved and handled individually.
10

Pointshop 2 Documentation, Release 2.2.10
Technically, each item is an instance of a item class. Thus each “item” that is displayed for purchase at a shop isactually an item class. Instances of this class are the items which can be found in a player’s inventory.
Internally this is achieved using the following components:
• Persistence: The persistence is the data model that is used to save all user defined properties (for example themodel for a playermodel item, but also the item name and description). On server start the persistence is readand classes are dynamically generated.
• Item Base: The item base defines the functionality of an item. This is defined in a lua file withinlua/kinv/items/pointshop. Item bases can use mixins and extend existing bases. All item bases should ex-tend base_pointshop_item.
• Item Creator: This is the derma control which is used to create or modify an item. It inherits fromDPointshopItemCreator.
Note: Unlike in pointshop 1, in pointshop 2 an item is an instance of an item class. A shop item is the representationof that class.
4.3 Creating a persistence
The first step when creating a custom item type is to create it’s persistence. A persistence needs to be a LibK model,which is done by including the DatabaseModel mixin.
Create a new file within your module called sh_model_<itemname>persistence.lua:
Pointshop2.ExamplePersistence = class( "Pointshop2.ExamplePersistence" )local ExamplePersistence = Pointshop2.ExamplePersistence
ExamplePersistence.static.DB = "Pointshop2" --Use the database configured for→˓Pointshop2
ExamplePersistence.static.model = {tableName = "ps2_examplepersistence", --needs to be unique. This is the table the
→˓fields are stored infields = {
--holds the reference to the basic information (description, name, price)itemPersistenceId = "int",
--Define your custom fields here. You can use all of the libk fieldtypes here.→˓ Usually you will need int or string
property1 = "string",property2 = "int",--To save a table: e.g. item.property3 = { hello: 123 }property3 = "luadata",
},belongsTo = {
-- Makes LibK automatically join the basic information table each time-- it is received from the database.
ItemPersistence = {class = "Pointshop2.ItemPersistence",foreignKey = "itemPersistenceId",onDelete = "CASCADE" --Persistence is deleted when the base is
→˓deleted. This is required.}
}
4.3. Creating a persistence 11

Pointshop 2 Documentation, Release 2.2.10
}
ExamplePersistence:include( DatabaseModel ) --include the DatabaseModel mixin
The model can be customized to contain as many fields as you need. If you need to save tables or nested data, considerjoining another model (and creating a new belongsTo relationship) or simply use a field type that is serialized (json orluadata).
After doing this, a table will automatically be created and the model can now be used with LibK, which means that noqueries have to be written to save or update items.
4.3.1 Implementing saving and updating logic
Note: LibK makes heavy use of promises. Using promises is required when saving or modifying models. Theyallow easy handling of asynchronous processes wihtout the need of messy nested callback chains. The promises scriptused (by Lexic) follows the javascript promises specification and the jQuery interface. More information: Generalintroduction, The jQuery interface documentation
When a pointshop item is created using an Item Creator, the persistence is passed a “save table”. This table’s structureis filled by the Item Creator Derma Control. Usually it simply contains the model fields. The same function is calledfor updating items once they are modified. For this the static function createOrUpdateFromSaveTable has tobe added. It creates (or on update retrieves) an instance of the own and any required models and then saves it to thedatabase. All fields that the user can configure when creating a custom item need to be included into the model.
Add the following to your persistence file you created in the last step:
function ExamplePersistence.static.createOrUpdateFromSaveTable( saveTable, doUpdate )-- Firstly, save or update the basic item information.local promise = Pointshop2.ItemPersistence.createOrUpdateFromSaveTable( saveTable,
→˓ doUpdate ):Then( function( itemPersistence )
// First we fetch or create our persistence instance.if doUpdate then
--We need to update an existing item.--Find the instance by using the itemPersistenceId and return it.
return ExamplePersistence.findByItemPersistenceId(→˓itemPersistence.id )
elselocal exampleInstance = ExamplePersistence:new( )exampleInstance.itemPersistenceId = itemPersistence.idreturn exampleInstance
endend ):Then( function( exampleInstance )
// Then we update all fieldsexampleInstance.property1 = saveTable.property1
// And save changes to the databasereturn exampleInstance:save( )
end )
return promiseend
This concludes all of the serverside code that is needed for handling the creation and modification of items.
4.3. Creating a persistence 12

Pointshop 2 Documentation, Release 2.2.10
4.4 Creating the item base
The next step is to create the item base for your item type. To do this, create a new file withinlua/kinv/items/pointshop. The name should be sh_base_<itemname>.lua you can also put your file into asubdirectory. Inside of the item base you can now overwrite any of the pointshop base functions and add item hooksas required.
The file contains:
ITEM.PrintName = "Pointshop Example Item Type"ITEM.baseClass = "base_pointshop_item"
function ITEM.static.getPersistence( )return Pointshop2.ExamplePersistence --The name of the persistence model created
→˓in the last stepend
function ITEM:OnEquip( )-- Your logic.local itemOnwer = self:GetOwner()
end
function ITEM:OnHolster()end
function ITEM.static.generateFromPersistence( itemTable, persistenceItem )ITEM.super.generateFromPersistence( itemTable, persistenceItem.ItemPersistence )itemTable.property1 = persistenceItem.property1
end
Please note the function generateFromPersistence. In this function you load all data from the item persisence into theitem class.
To generate the item class first call the super class’ method by invoking ITEM.super.generateFromPersistence( itemTable, persistenceItem.ItemPersistence ). Thenyou simply copy your item’s properties over to the item class. You should set these to to the itemTable.statictable since they belong to a class itself and not an instance (which would be an instantiated item in the player’sinventory).
ITEM.static.generateFromPersistence(itemTable, persistenceItem)Decodes all information from the persistenceItem and adds fields and methods to the itemTable field.
itemTable: A table containing the created class. persistenceItem: An instance of this item’s persistence.
Within the item base you can also specify your own, custom icon controls for both, the shop and the inventory.
4.5 Adding the clientside creator
The last step is to create a custom editor control, which is shown when clicking the create item button. This is veryeasy to do, simply create a new file inside your module, called D<youritem>Creator. It should inherit fromDPointshopItemCreator and overwrite the SaveItem(saveTable) and EditItem(persistence,itemClass) methods. The SaveItem method populates the save table passed as argument with the settings set inthe item creator. The EditItem method poulates the editor with the settings stored in the persistence. For ease ofaccess the relevant itemClass is also passed as data from the persistence might be accessible easier in there.
Example template:
4.4. Creating the item base 13

Pointshop 2 Documentation, Release 2.2.10
local PANEL = {}
function PANEL:Init()self.textEntry = vgui.Create( "DTextEntry" )self:addFormItem( "Property 1", self.textEntry )
end
function PANEL:SaveItem( saveTable )self.BaseClass.SaveItem( self, saveTable )saveTable.property1 = self.textEntry:GetText( )
end
function PANEL:EditItem( persistence, itemClass )self.BaseClass.EditItem( self, persistence.ItemPersistence, itemClass )
self.textEntry:SetText( persistence.property1 )endvgui.Register( "DExampleCreator", PANEL, "DItemCreator" )
4.6 Putting it all together: The blueprint
The only thing left to do now is to link the item to the menu and register it with the modules. This is done withinsh_module.lua. Simply define all of your components in a Blueprint.
Example:
MODULE.Blueprints = {{
label = "Example Item",base = "base_example", --The name is deduced from the filenameicon = "pointshop2/playermodel.png", --Iconcreator = "DExampleCreator"
},
4.7 Creating a slot for your item
Slots are created using the function Pointshop2.AddEquipmentSlot()
Example:
Pointshop2.AddEquipmentSlot( "Example", function( item )--Check if the item is an example itemreturn instanceOf( Pointshop2.GetItemClassByName( "base_example" ), item )
end )
4.8 OPTIONAL: Adding custom Settings
Pointshop 2 has a builtin, extensible settings system. A module can add custom settings buttons to the builtin settingstab (Management -> Settings) which can then be used to create a GUI. The system first initializes the settings fromthe Lua table and copies the defaults, then reads settings from the database. To create custom settings you need thefollowing components: the settings table, a settings button and a settings editor.
4.6. Putting it all together: The blueprint 14
Pointshop 2 Documentation, Release 2.2.10
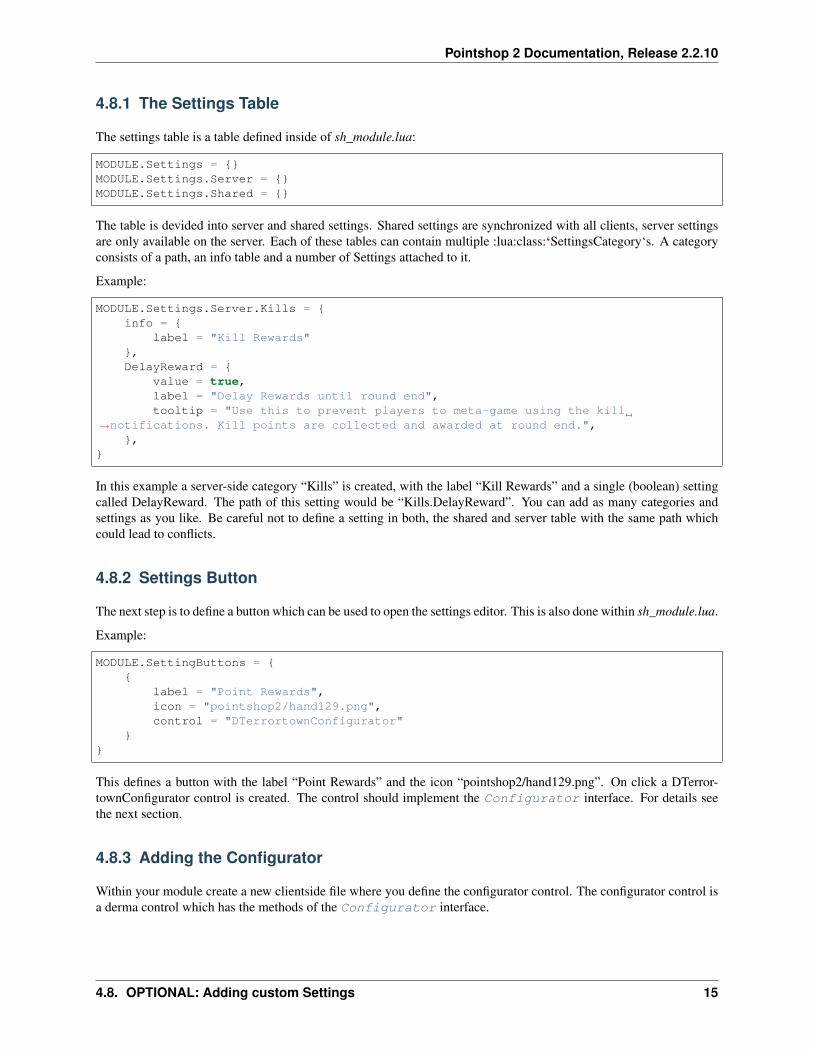
4.8.1 The Settings Table
The settings table is a table defined inside of sh_module.lua:
MODULE.Settings = {}MODULE.Settings.Server = {}MODULE.Settings.Shared = {}
The table is devided into server and shared settings. Shared settings are synchronized with all clients, server settingsare only available on the server. Each of these tables can contain multiple :lua:class:‘SettingsCategory‘s. A categoryconsists of a path, an info table and a number of Settings attached to it.
Example:
MODULE.Settings.Server.Kills = {info = {
label = "Kill Rewards"},DelayReward = {
value = true,label = "Delay Rewards until round end",tooltip = "Use this to prevent players to meta-game using the kill
→˓notifications. Kill points are collected and awarded at round end.",},
}
In this example a server-side category “Kills” is created, with the label “Kill Rewards” and a single (boolean) settingcalled DelayReward. The path of this setting would be “Kills.DelayReward”. You can add as many categories andsettings as you like. Be careful not to define a setting in both, the shared and server table with the same path whichcould lead to conflicts.
4.8.2 Settings Button
The next step is to define a button which can be used to open the settings editor. This is also done within sh_module.lua.
Example:
MODULE.SettingButtons = {{
label = "Point Rewards",icon = "pointshop2/hand129.png",control = "DTerrortownConfigurator"
}}
This defines a button with the label “Point Rewards” and the icon “pointshop2/hand129.png”. On click a DTerror-townConfigurator control is created. The control should implement the Configurator interface. For details seethe next section.
4.8.3 Adding the Configurator
Within your module create a new clientside file where you define the configurator control. The configurator control isa derma control which has the methods of the Configurator interface.
4.8. OPTIONAL: Adding custom Settings 15

Pointshop 2 Documentation, Release 2.2.10
The easiest way is to simply create a control inheriting from DSettingsEditor and using the methodAutoAddSettingsTable. This automatically populates the settings window with the appropriate input elementsfor each type you supplied in the settings table.
Example:
local PANEL = {}
function PANEL:Init( )self:SetSkin( Pointshop2.Config.DermaSkin )self:SetTitle( "TTT Reward Settings" )self:SetSize( 300, 600 )
self:AutoAddSettingsTable( Pointshop2.GetModule( "TTT Integration" ).Settings.→˓Server, self )
self:AutoAddSettingsTable( Pointshop2.GetModule( "TTT Integration" ).Settings.→˓Shared, self )end
function PANEL:DoSave( )Pointshop2View:getInstance( ):saveSettings( self.mod, "Shared", self.settings )
end
derma.DefineControl( "DTerrortownConfigurator", "", PANEL, "DSettingsEditor" )
This example adds all, shared and server settings to the configurator and sends them to the server on save. This is allthat is needed to create modifiable, synchronized settings that are saved to the database and can be changed using aningame editor.
4.8.4 Accessing the Settings
To use the settings in your script simply use Pointshop2.GetSetting().
4.9 Adding custom Tabs
It is possible to add new tabs to various sections of the shop. You can add a tab to the top navigation by us-ing Pointshop2:AddTab(). Inside of the inventory tab you can add pages to the side navigation by usingPointshop2:AddInventoryPanel(). It is also possible to add new pages to the side nav of the managementtab by using Pointshop2:AddManagementPanel().
4.9. Adding custom Tabs 16

CHAPTER 5
Getting and Setting player points
In Pointshop 2 points are stored in a player’s wallet (Wallet). A wallet is a table that contains points and premium-Points.
Wallets are only networked to their owner and to all admins by default. If you want to display points on a scoreboard,you need to tick the setting “Broadcast Wallets” in the General Settings. This will send everyone’s wallet to everyone.
Use ply.PS2_Wallet to access a player’s wallet.
local points, premiumPoints = 0, 0if ply.PS2_Wallet then
points, premiumPoints = ply.PS2_Wallet.points, ply.PS2_Wallet.premiumPointsendprint( points, premiumPoints )
To manipulate a wallet use
PLAYER:PS2_AddPremiumPoints()
PLAYER:PS2_AddStandardPoints()
There is also a console command available to give points to a specific steamid. You can use this with your donationsystem:
ps2_addpoints <steamId> <currencyType> <points>Gives points to a specific SteamID. Works even if the player has never joined the server.
steamId: SteamID of the player in the STEAM_x_x:xxxxxxxxxx format
currencyType: Currency to give. Can be points or premiumPoints
points: Amount of points to give
5.1 Getting via MySQL (for loadingscreens etc)
To get a player’s points from a pointshop2 mysql database you can use the following query:
17

Pointshop 2 Documentation, Release 2.2.10
SELECT w.points AS points, w.premiumPoints AS premiumPointsFROM ps2_wallet w, libk_player pWHERE w.ownerId = p.idAND p.player = "STEAM_0:0:19299911"
To get points via steamid64 you can use this query:
SELECT w.points AS points, w.premiumPoints AS premiumPointsFROM ps2_wallet w, libk_player pWHERE w.ownerId = p.idAND p.steam64 = "76561197998865550"
The result row of these queries will contain a points and premiumPoints collumn.
5.1. Getting via MySQL (for loadingscreens etc) 18

CHAPTER 6
Giving Items
To give an item to a player you can use
PLAYER:PS2_EasyAddItem(itemClassName, purchaseData, suppressNotify)Gives an item to the player.
itemClassName: Class name of the item
purchaseData: [OPTIONAL] A table in the format { time = os.time(), amount = 123, currency = “points”,origin = “LUA” }. amount is a number, currency can be “points” or “premiumPoints”. This is used to calculatethe sell price of the item. Origin is a string to track how the item was given. It has no set format.
suppressNotify: [OPTIONAL] If set to true the “New Item Received” popup doesn’t show up.
6.1 Examples
In these examples please note that there can be multiple items with the same print name. It is better to give an item byclass name. To determine the class name you either look at the database directly (className is the persistence id ofthe item) or use PrintTable(Pointshop2.GetRegisteredItems())
/** Gives a random item from the shop to a player
*/function GiveRandomItem( ply )
local items = Pointshop2.GetRegisteredItems( )local itemClass = table.Random( items )return ply:PS2_EasyAddItem( itemClass.className )
endGiveRandomItem( player.GetByID( 1 ) )
/** Gives a item with the specified name to the player
*/function GiveItemByPrintName( ply, printName )
local itemClass = Pointshop2.GetItemClassByPrintName( printName )
19

Pointshop 2 Documentation, Release 2.2.10
if not itemClass thenerror( "Invalid item " .. tostring( printName ) )
endreturn ply:PS2_EasyAddItem( itemClass.className )
endGiveItemByPrintName( player.GetByID( 1 ), "Gas Mask" )
6.1. Examples 20
CHAPTER 7
Creating Pointshop Skins
Pointshop 2 skins are implemented as derma skins. This means that the Paint functions of Panels are passed to a skin.If you are creating a skin you cannot overwrite or modify any of the files but have to do your skinning entirely througha skin.
The name of the skin which is used is set within the main configuration file at lua/ps2/shared/sh_config.lua. Thedefault flatui skin can be found in lua/ps2/client/cl_dermaskin_flatui.lua. The inventory is seperately skinned throughthe skin configured in lua/kinv/shared/sh_config.lua, the default skin can be found in lua/kinv/client/cl_dermaskin.lua
7.1 Example Skins
• Blur Skin by AlphaWolf: https://github.com/snowywolf/Pointshop-2-Skin
7.2 Types of Hooks
There are two types of hooks that you can use to customize looks and behaviour:
1. Layout Hooks: These are always called after initialization of the component. You can use this hook to replacecomponents with custom components or to reposition components.
2. Paint Hooks: These work like the normal panel:Paint hooks, use this to customize the appearance of the differ-ent panels.
If you are missing a hook on a component that you want to customize, please send Kamshak a pm on scriptfodder.
7.3 Fonts
Fonts are defined as skin properties and can be customized through a custom skin as well.
21

CHAPTER 8
Addings slots to existing modules
Sometimes you will want an extra accessory or other type of slot. Since it is not recommended to create slots directlywithin the files that define them, a way to create new slots is described here.
8.1 Using the customizing addon
It is recommended to extend Pointshop 2 using a seperate addon. Simply download this addon and extract it into youraddons folder: Download. Put your new slot code into pointshop2-customizing/lua/ps2/modules/pointshop2/sh_customslots.lua. As an example code to create a new accessory slot is already included(see below for code explanation).
8.2 Adding accessory slots
To add an accessory slot, use the function Pointshop2.AddHatSlot(). This requires the Accessory/Hat moduleto be fully loaded, which is why the function should be called inside of the hook PS2_ModulesLoaded.
Example:
-- Adds a new Accessory slothook.Add( "PS2_ModulesLoaded", "AddCustomSlots", function( )
Pointshop2.AddHatSlot( "Accessory 3" )end )
8.3 Adding weapon slots
To add a weapon slot, use the function Pointshop2.AddWeaponsSlot(). This requires the Permanent Weaponsmodule to be fully loaded, which is why the function should be called inside of the hook PS2_ModulesLoaded.
Example:
22

Pointshop 2 Documentation, Release 2.2.10
-- Adds a new Accessory slothook.Add( "PS2_ModulesLoaded", "AddKnifeSlot", function( )
Pointshop2.AddWeaponsSlot( "Knife" )end )
8.4 Adding other slot types
Other slot types usually do not have convenience functions like the Accessory type. It is still possible to add theseslots by duplicating the code. The slot code is defined in the file sh_slots.lua which can be found in the module’smain folder.
It is also possible to define entirely custom slot types (for example VIP slots, universal slots, etc.) usingPointshop2.AddEquipmentSlot()
8.4. Adding other slot types 23

CHAPTER 9
Developer API Reference
Use this to look up classes or methods.
Note: Not every class is documented here. Look at the source code for usage examples. This is intended to explaindata structures that might not be obvious at first as well as documenting the public interface.
9.1 Modules
class BlueprintA blueprint defines all properties needed for a custom item.
class SettingsCategoryA table representing a category that contains one or more settings. The category’s path is indicated by it’s keyin the table. The info key is used to provide a readable name for the category to be used in the configuratorcomponent. It contains multiple Settings, the path is again provided by the key.
class MODULEThe module information table. Contains information such as a module’s blueprints and settings. This is to bedefined in the module’s sh_module.lua
NameThe name of the module.
AuthorThe author of the module
RestrictGamemodesA table containing gamemodes that this module is restricted to. The module will only be loaded if theactive gamemode is in the list.
BlueprintsA table containing Blueprint s that players can use.
24
Pointshop 2 Documentation, Release 2.2.10
SettingsA table containing the settings of the module. A seperate table for each realm exists. Settings.Serveris only sent to admins when changing the settings, Settings.Shared is synced with all clients. Ac-cessing Settings is done by calling Pointshop2.GetSetting() . Each realm settings table definesSettings that can be accessed and configured easily and can contain multiple SettingsCategory s.Settings registered this way are automatically saved the the database when changed.
SettingsButtonA table containing information about the settings button that will show up in the management tab. Thetable has three elements:
label: The label of the button icon: The icon of the button control: The derma control that is createdwhen clicking the button
Poinsthop2.RegisterModule(MODULE)Registers a MODULE to be used with Pointshop 2.
Pointshop2.GetSetting(moduleName, path)Retrieves a setting value that was defined in MODULE.Settings. Automatically uses the default or databasesaved value.
• modName: The MODULE.Name of the module where the setting is defined
• path: The category and name of the setting, seperated by a “.”
Example:
print(Pointshop2.GetSetting("TTTIntegration", "RoundWin.Innocent"))
Pointshop2.AddEquipmentSlot(name, itemValidFunction)Registers a new equipment slot.
Name:label of the slot that is shown underneath the slot’s panel in the inventory. itemValidFunction: A functionthat takes an item as an argument and returns whether or not it can be equipped in the slot.
Pointshop2.AddHatSlot(name)Adds a new slot that behaves exactly like the existing Hat/Accessory slots.
Pointshop2:AddTab(label, controlName, shouldShow)Adds a new tab to the top navigation of the pointshop.
• label: The label of the tab.
• controlName: The derma control that is created as panel.
• shouldShow: optional A function returning whether or not the player should be able to see this tab.
Pointshop2:AddManagementPanel(label, icon, controlName, shouldShow)Adds a new tab to the side navigation of the management panel.
• label: The label of the tab
• icon: The tab’s icon
• controlName: The derma control that is created as panel
• shouldShow: optional A function returning whether or not the player should be able to see this tab
Example:
derma.DefineControl( "DPointshopManagementTab_Settings", "", PANEL, "DPanel" )
Pointshop2:AddManagementPanel( "Settings", "pointshop2/advanced.png",→˓"DPointshopManagementTab_Settings", function( )
9.1. Modules 25

Pointshop 2 Documentation, Release 2.2.10
return PermissionInterface.query( LocalPlayer(), "pointshop2 managemodules" )end )
Pointshop2:AddInventoryPanel(label, icon, controlName, shouldShow)Adds a new tab to the side navigation of the management panel.
• label: The label of the tab
• icon: The tab’s icon
• controlName: The derma control that is created as panel
• shouldShow: optional A function returning whether or not the player should be able to see this tab
class ConfiguratorInterface for Configurator controls. Used by the settings section.
SetModule(module)Passes the MODULE table to the control.
SetData(data)Passes the Settings as retrieved from the server to the control. data contains Server and Shared settingsmerged together.
9.2 Player integration
class WalletIn Pointshop 2 points are stored in a player’s wallet. A wallet is a LibK model instance, you can use :save() onit after changing it.
pointsThe standard points of a player.
premiumPointsThe premium (donator) points of a player
PLAYER:PS2_AddStandardPoints(points, message, small)Awards points to a player. If a message is specified it will show up in their pointfeed.
points: Amount of points given message: Message displayed to the pointfeed small: Use the small print (forbonus points related to a primary event)
PLAYER:PS2_AddPremiumPoints(points)Adds premium points to a player’s wallet.
points: Amount of points given
9.3 Export & Import
Pointshop2Controller:exportItems()Exports all items of the shop into a timestamped text file. The name of the file is written to console. The file iswritten into the data directory.
Pointshop2Controller:exportCategoryOrganization()Exports all categories and item->category mappings of the shop into a timestamped text file. The name of thefile is written to console. The file is written into the data directory.
9.2. Player integration 26

Pointshop 2 Documentation, Release 2.2.10
Pointshop2Controller:importCategoriesFromFile(filename)Imports categories and item->category mappings of the shop from a text file.
filename: Name/path of the file to import from as string, relative to the data directory.
Pointshop2Controller:importItemsFromFile(filename)Imports items from a text file.
filename: Name/path of the file to import from as string, relative to the data directory.
9.3. Export & Import 27

Index
BBlueprint (class), 24
CConfigurator (class), 26Configurator:SetData(), 26Configurator:SetModule(), 26
IITEM.static.generateFromPersistence() (global function),
13
MMODULE (class), 24
PPLAYER:PS2_AddPremiumPoints() (global function),
26PLAYER:PS2_AddStandardPoints() (global function), 26PLAYER:PS2_EasyAddItem() (global function), 19Poinsthop2.RegisterModule() (global function), 25Pointshop2.AddEquipmentSlot() (global function), 25Pointshop2.AddHatSlot() (global function), 25Pointshop2.GetSetting() (global function), 25Pointshop2:AddInventoryPanel() (global function), 26Pointshop2:AddManagementPanel() (global function), 25Pointshop2:AddTab() (global function), 25Pointshop2Controller:exportCategoryOrganization()
(global function), 26Pointshop2Controller:exportItems() (global function), 26Pointshop2Controller:importCategoriesFromFile()
(global function), 26Pointshop2Controller:importItemsFromFile() (global
function), 27
SSettingsCategory (class), 24
WWallet (class), 26
28


![The Use of XMLSpy - Hong Kong Polytechnic …Click [Schema design] Ł[Generate Documentation… ] Select [HTML], if you want to have an html document. Or, you may have a Microsoft](https://img.pdfslide.us/doc/110x75/5e7a767c98e62c61474c8e25/the-use-of-xmlspy-hong-kong-polytechnic-click-schema-design-generate-documentation.jpg)