Embed Size (px)
Citation preview
Podcasting with Elluminate Live!® Recordings
January 2008 Elluminate Live!, vTutor, vMentor, Jinx, Active Objects, Direct Messaging and AppSnap are all Trademarks of Elluminate, Inc., Calgary, Alberta, Canada. PowerPoint and Windows are registered trademarks of Microsoft Corporation. Mac and Macintosh is a registered trademarks of Apple Computer, Inc. Other brands are trademarks of their respective holder(s). (c) 2008 Elluminate, Inc. All Rights Reserved.
1

Contents Section 1 Introduction ................................................... 4
Section 2 Podcast vs. Video Podcast .......................... 5
Section 3 Important Recording Considerations.......... 6
Section 4 Using Elluminate Publish!............................ 8 Converting recordings.............................................................. 9
Conversion progress messages .............................. 10 Section 5 Steps in a Nutshell… Third Party Tools .... 12
Basic Steps ............................................................................ 12 Section 6 Creating a Video Podcast from an
Elluminate Live! Recording using Camtasia Studio 4........................................................ 13 Steps to Recording with Camtasia ......................................... 13 Steps to Producing with Camtasia ......................................... 16
Section 7 Creating a Video Podcast from an Elluminate Live! Recording using Snapz Pro X............................................................. 18 Steps for Recording ............................................................... 18 Steps for using QuickTime Pro .............................................. 21
Section 8 How to Create an Audio Podcast using Audacity....................................................... 22 Steps……………………………………………………………….22
Section 9 Posting and Distributing Podcast.............. 24 Basic Steps ............................................................................ 24 References............................................................................. 24
Section 10 Appendix: Creating a Video Podcast from an Elluminate Live! Recording using Camtasia Studio 3....................................... 25 Steps to Recording with Camtasia ......................................... 25 Steps to Producing with Camtasia ......................................... 28 Steps for using QuickTime Pro .............................................. 31
2

Section 11 Quick Reference Guide: Using Elluminate Publish!........................................................ 32
Section 12 Quick Reference Guide: Creating a Podcast from a Recording for PC Users.................. 35
Section 13 Quick Reference Guide: Creating a Podcast from a Recording for Mac Users................ 37
3

Section 1 Introduction
The goal of this document is to outline the steps required to convert an Elluminate Live! recording into an audio or video podcast. The world of podcasting is vast and this document is in no way an attempt to explain all of the methods for creating and distributing podcasts. A list of resources is provided at the end of this document for customers who wish to learn more on this topic. To view some examples of Elluminate video podcasts, visit http://www.elluminate.com/podcasts/. What this document will provide is a description of audio podcasts and video podcasts and instructions for PC users and Mac users for creating podcasts from your existing Elluminate Live! recordings. This paper includes instructions on using several different tools for creating podcasts. Elluminate Publish! is available from Elluminate. The other tools are popular software applications, which are available from their particular manufacturer. This is not a step-by-step guide to using third part tools to create podcasts. Therefore, assumptions have been made that the reader knows how to use Camtasia, Audacity, Snapz Pro and/or QuickTime Pro or is prepared to learn the basics of those tools on their own. Finally, a brand new version of Camtasia was released by TechSmith while this document was being written. The new version of Camtasia makes creating podcasts easy. Understanding that many customers will not be able to upgrade their software immediately, this document outlines the method for using version 3 of the Camtasia software in the Appendix.
4
Section 2 Podcast vs. Video Podcast
The New Oxford American Dictionary defines Podcast as “a digital recording of a radio broadcast or similar program, made available on the Internet for downloading to a personal audio player.” Wikipedia’s definition is “a podcast is a multimedia file distributed over the Internet using syndication feeds, for playback on mobile devices and personal computers.” The second definition is more accurate because to listen to a podcast you do not have to have a personal audio player such as an iPod. There is software available for your PC or Mac that will play a podcast. Software such as iTunes is one example. The traditional audio only podcast is now sharing the stage with video podcasts. Also known as v-casting or video blogging, these podcasts include video. Your Elluminate recording can be converted into a podcast, a video podcast or both. This document will step you through the process.
5
Section 3 Important Recording Considerations
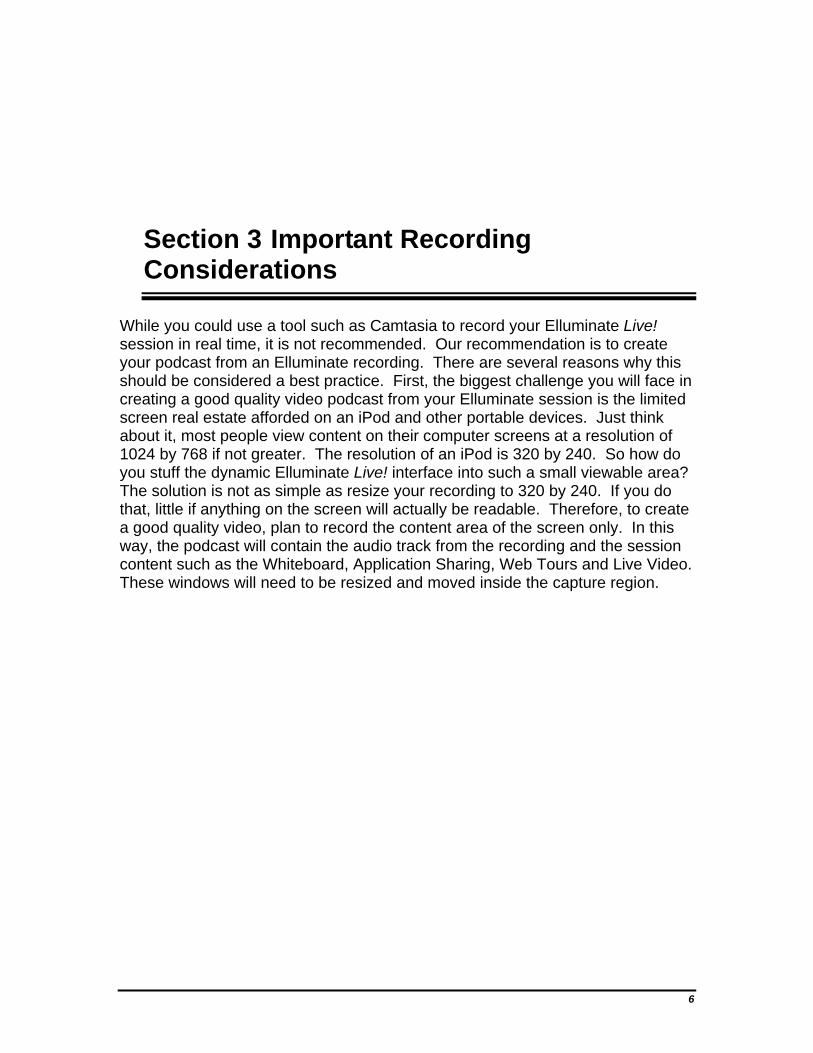
While you could use a tool such as Camtasia to record your Elluminate Live! session in real time, it is not recommended. Our recommendation is to create your podcast from an Elluminate recording. There are several reasons why this should be considered a best practice. First, the biggest challenge you will face in creating a good quality video podcast from your Elluminate session is the limited screen real estate afforded on an iPod and other portable devices. Just think about it, most people view content on their computer screens at a resolution of 1024 by 768 if not greater. The resolution of an iPod is 320 by 240. So how do you stuff the dynamic Elluminate Live! interface into such a small viewable area? The solution is not as simple as resize your recording to 320 by 240. If you do that, little if anything on the screen will actually be readable. Therefore, to create a good quality video, plan to record the content area of the screen only. In this way, the podcast will contain the audio track from the recording and the session content such as the Whiteboard, Application Sharing, Web Tours and Live Video. These windows will need to be resized and moved inside the capture region.
6
iPod with Full Elluminate Live!
Interface iPod with Whiteboard Only
Ideally, you should watch the entire Elluminate recording and make note of when certain things happen, for example, live video is used for introductions. Determine if that element is something you will include in the podcast. If so, during the recording process you will have to monitor the recording to ensure the video window is in the capture area. Likewise you will want to monitor for the use of application sharing, and the other tools to ensure the content is displaying inside the capture region. Another tip to creating good quality video podcasts is to create clean, simple presentation slides. Limit the number of bullets per slide and use a readable font type and size. This will improve you podcasts as well as enhance your Elluminate Live! session.
7
Section 4 Using Elluminate Publish!
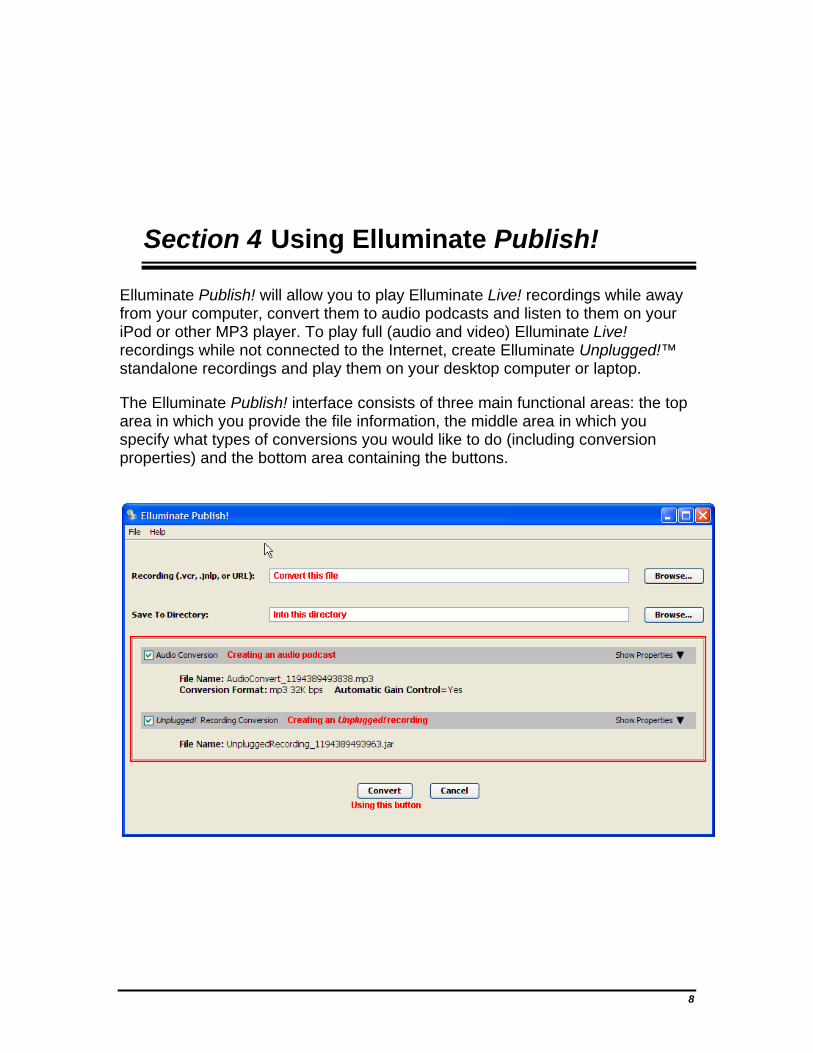
Elluminate Publish! will allow you to play Elluminate Live! recordings while away from your computer, convert them to audio podcasts and listen to them on your iPod or other MP3 player. To play full (audio and video) Elluminate Live! recordings while not connected to the Internet, create Elluminate Unplugged!™ standalone recordings and play them on your desktop computer or laptop.
The Elluminate Publish! interface consists of three main functional areas: the top area in which you provide the file information, the middle area in which you specify what types of conversions you would like to do (including conversion properties) and the bottom area containing the buttons.
8
Converting recordings
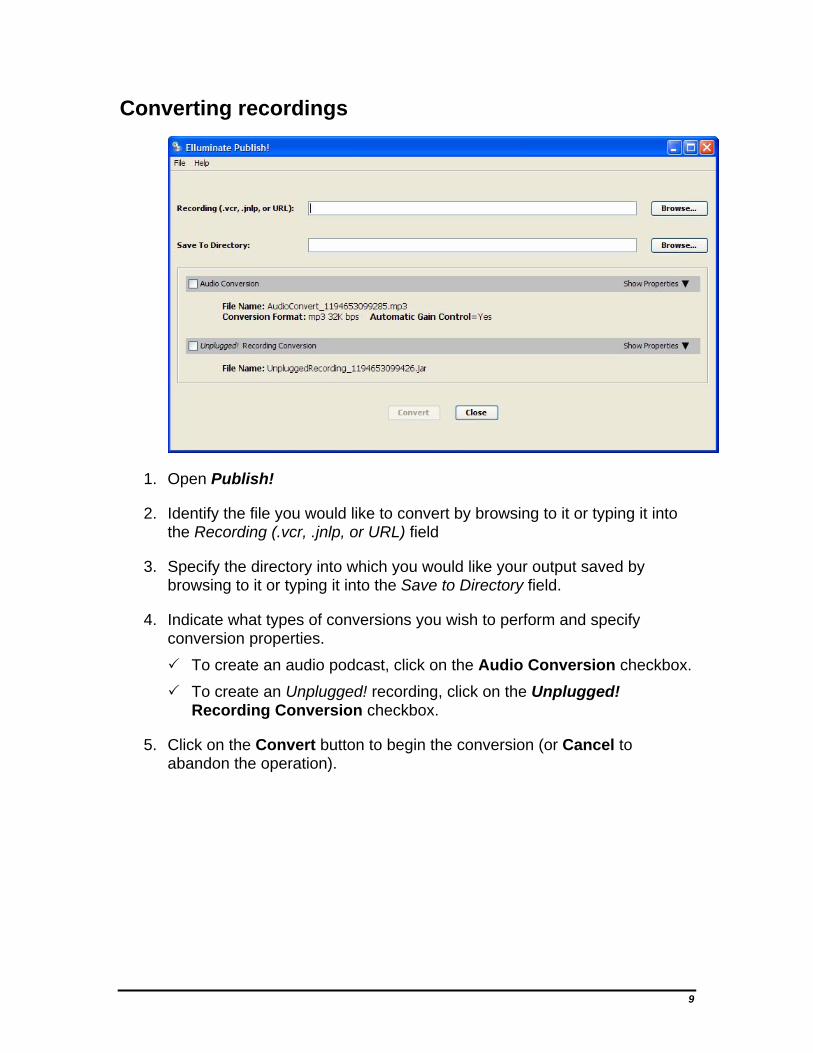
1. Open Publish!
2. Identify the file you would like to convert by browsing to it or typing it into the Recording (.vcr, .jnlp, or URL) field
3. Specify the directory into which you would like your output saved by browsing to it or typing it into the Save to Directory field.
4. Indicate what types of conversions you wish to perform and specify conversion properties.
To create an audio podcast, click on the Audio Conversion checkbox.
To create an Unplugged! recording, click on the Unplugged! Recording Conversion checkbox.
5. Click on the Convert button to begin the conversion (or Cancel to abandon the operation).
9
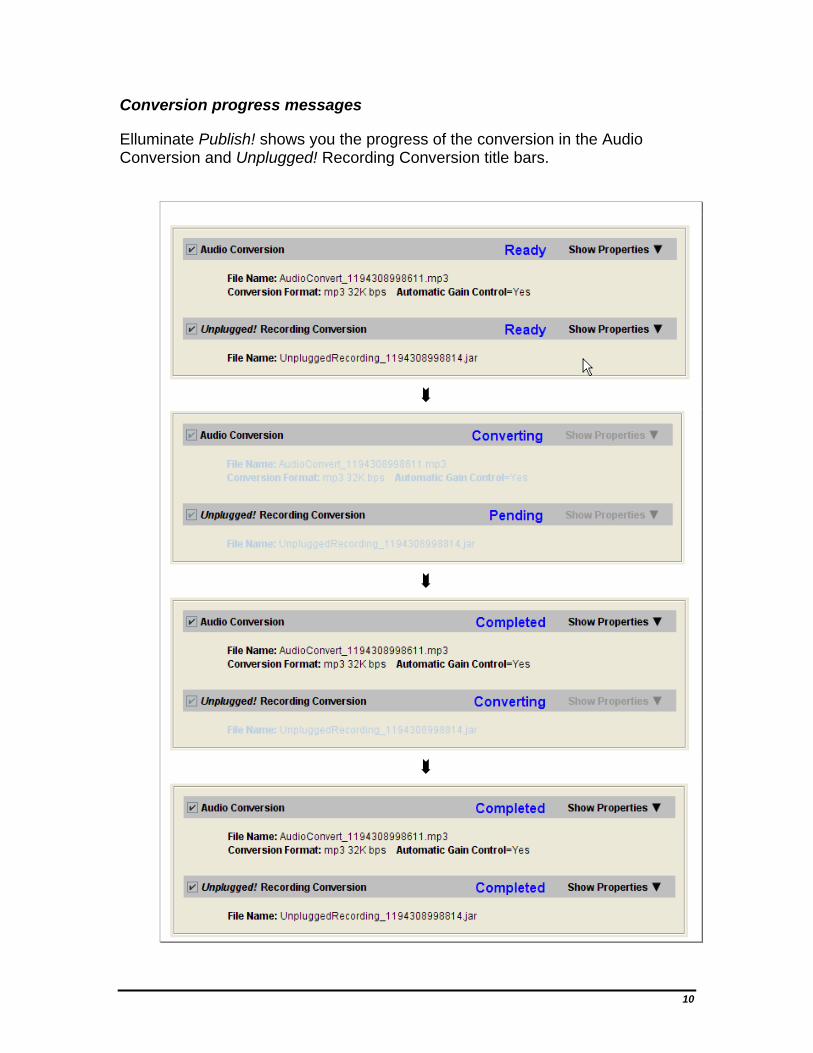
Conversion progress messages
Elluminate Publish! shows you the progress of the conversion in the Audio Conversion and Unplugged! Recording Conversion title bars.
10
6. When the conversion is done, the Audio Conversion and Unplugged! Recording Conversion title bars will show the conversion was successful by displaying the word “Complete.”
11
Section 5 Steps in a Nutshell… Third Party Tools
There are seven basic steps to create a video podcast from an Elluminate recording. The next section of this document gives a more detailed description of each of these steps.
Basic Steps
1. Using Camtasia or Snapz Pro to record the Elluminate Live! recording. 2. Capture only the content region of the screen. 3. Edit the recording if desired. 4. Produce recording to MOV format (produce to MV4 in Camtasia Studio 4). 5. Change size to 320 x 240 and reduce frame rate to 1 fps. 6. Convert MOV file to MV4 format in QuickTime Pro. 7. Distribute Podcast.
12
Section 6 Creating a Video Podcast from an Elluminate Live! Recording using Camtasia Studio 4
Brand new (October 2006) from TechSmith is Camtasia Studio 4 and the option to produce directly to the video podcast format and to the audio podcast format of MP3. What a time saver and great new tool. Camtasia offers many advanced options which you may choose to include in your podcast; options such as the ability to add live video, sound effects, callouts, and indexing. Camtasia also produces to Flash.
Steps to Recording with Camtasia
1. Open the Elluminate Live! Recording. 2. Click the Pause button. 3. Open Camtasia Studio. 4. Select Start a new project by recording the screen. 5. Click OK. 6. Step through the New Recording Wizard, starting with the Screen
Recording Setup screen, select Region of the screen. 7. Click Next.
13
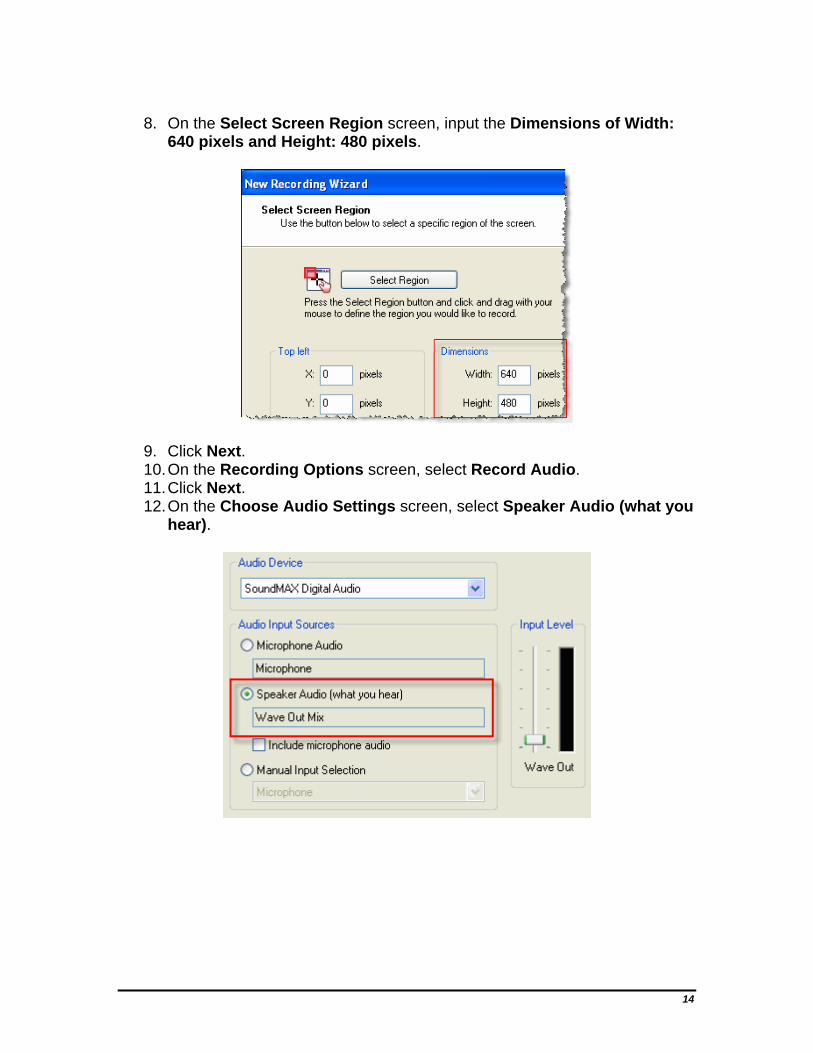
8. On the Select Screen Region screen, input the Dimensions of Width:
640 pixels and Height: 480 pixels.
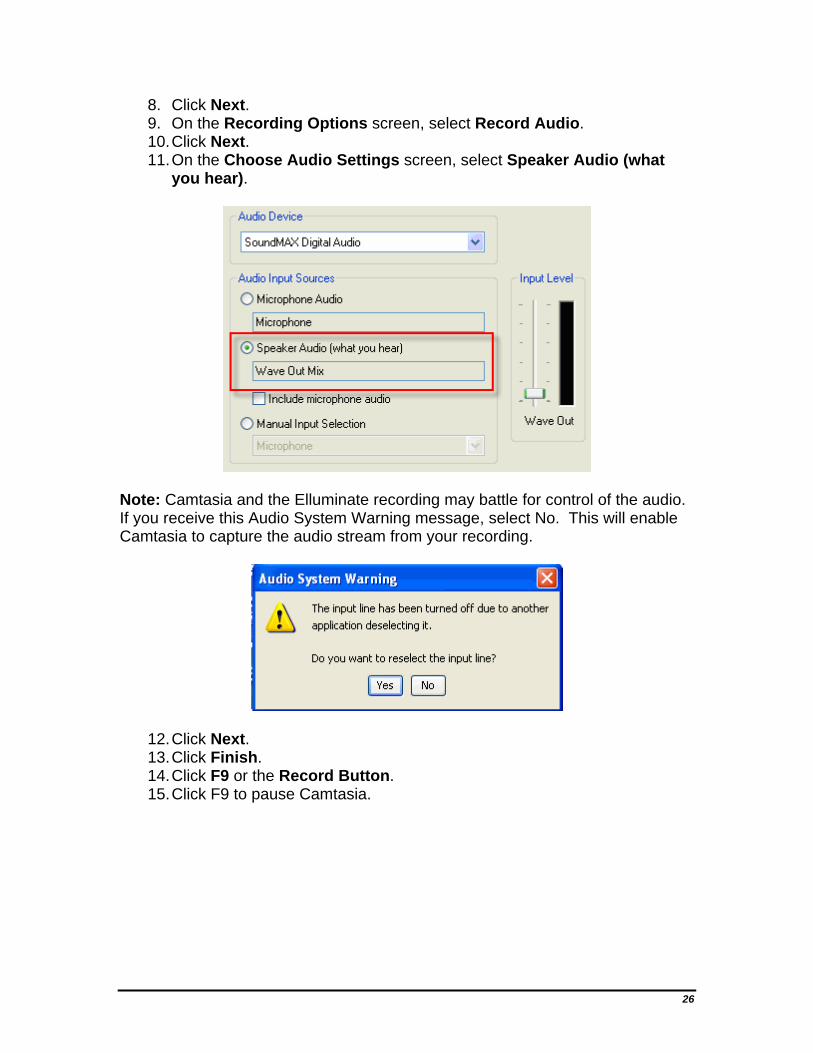
9. Click Next. 10. On the Recording Options screen, select Record Audio. 11. Click Next. 12. On the Choose Audio Settings screen, select Speaker Audio (what you
hear).
14

Note: Camtasia and the Elluminate recording may battle for control of the audio. If you receive this Audio System Warning message, select No. This will enable Camtasia to capture the audio stream from your recording.
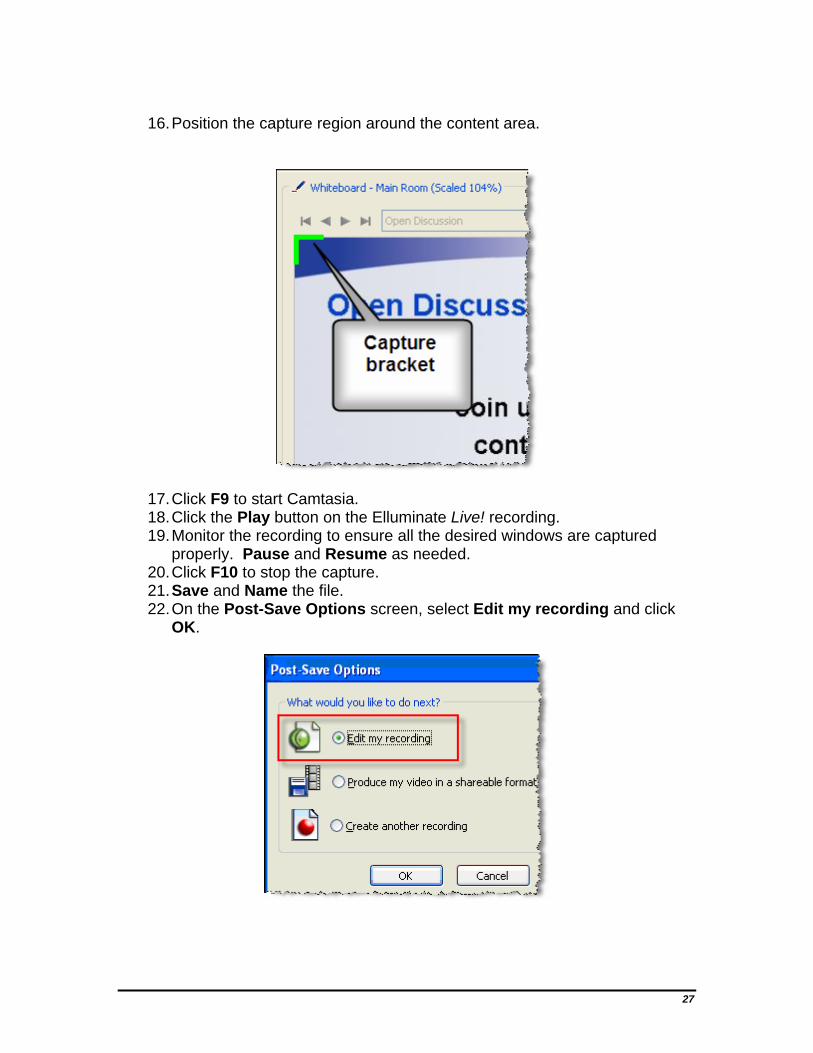
13. Click Next two times. 14. Click Finish. 15. Click F9 or the Record Button. 16. Click F9 to pause Camtasia. 17. Position the capture region around the content area.
18. Click F9 to start Camtasia. 19. Click the Play button on the Elluminate Live! recording. 20. Monitor the recording to ensure all the desired windows are captured
properly. Pause and Resume as needed.
15
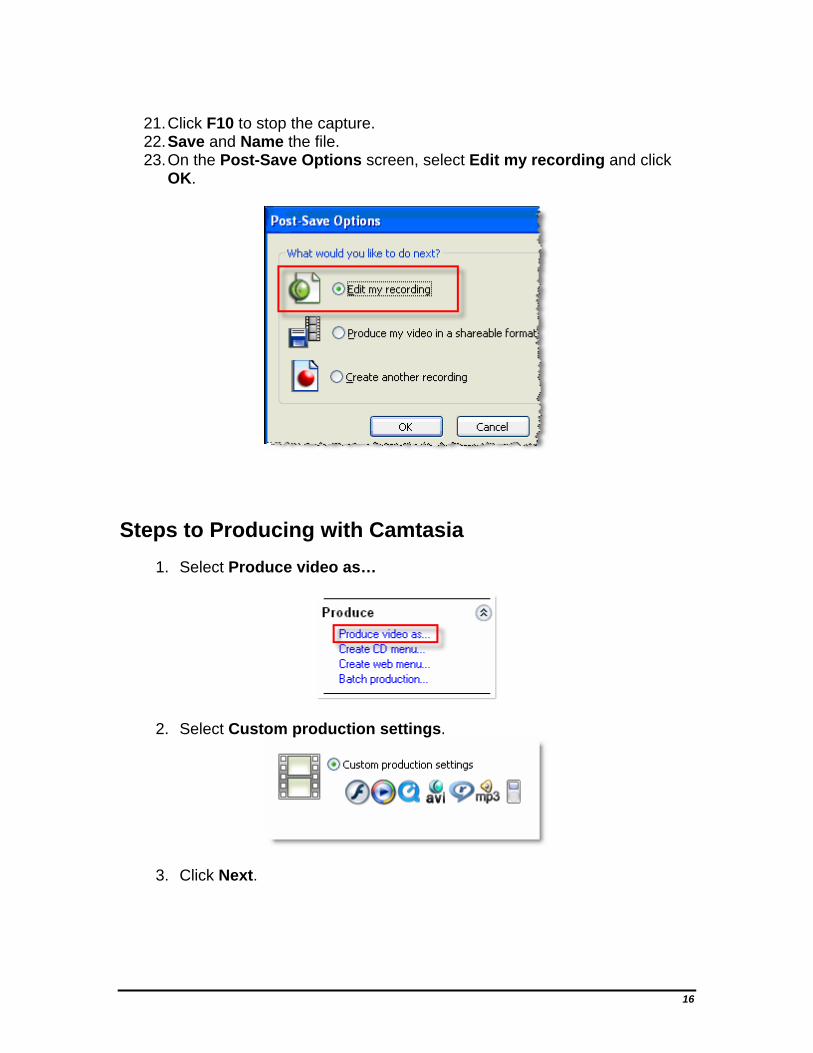
21. Click F10 to stop the capture. 22. Save and Name the file. 23. On the Post-Save Options screen, select Edit my recording and click
OK.
Steps to Producing with Camtasia 1. Select Produce video as…
2. Select Custom production settings.
3. Click Next.
16
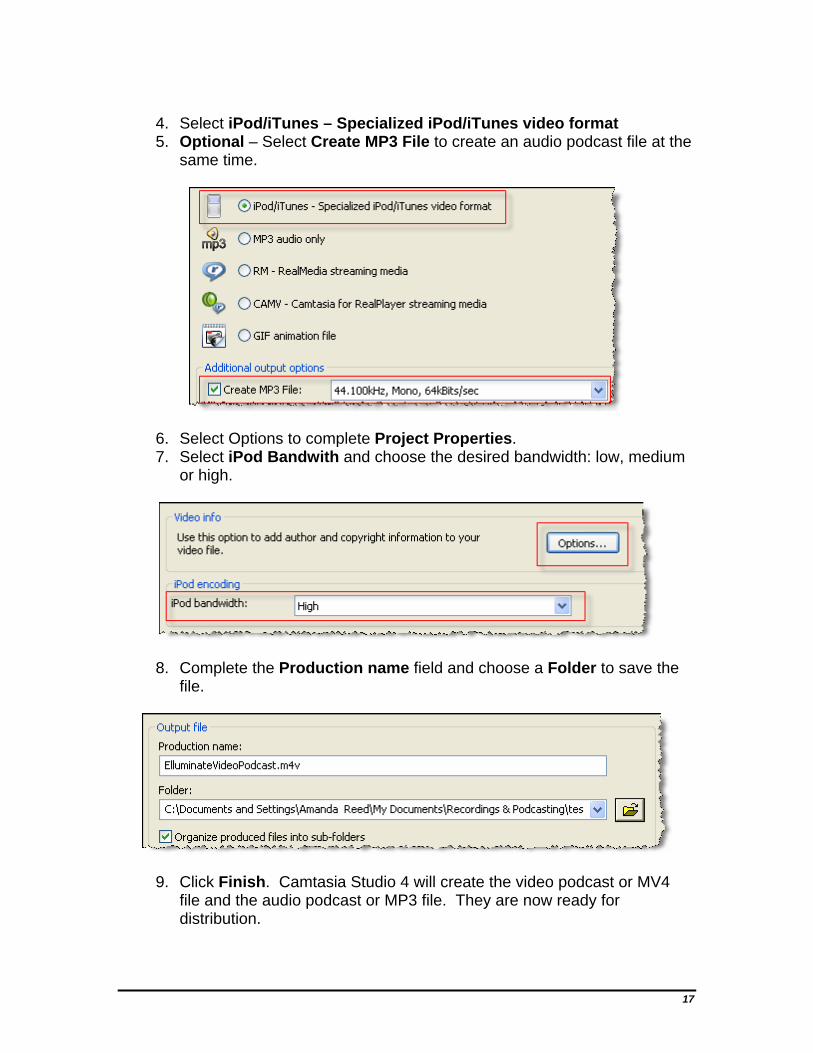
4. Select iPod/iTunes – Specialized iPod/iTunes video format 5. Optional – Select Create MP3 File to create an audio podcast file at the
same time.
6. Select Options to complete Project Properties. 7. Select iPod Bandwith and choose the desired bandwidth: low, medium
or high.
8. Complete the Production name field and choose a Folder to save the file.
9. Click Finish. Camtasia Studio 4 will create the video podcast or MV4 file and the audio podcast or MP3 file. They are now ready for distribution.
17
Section 7 Creating a Video Podcast from an Elluminate Live! Recording using Snapz Pro X
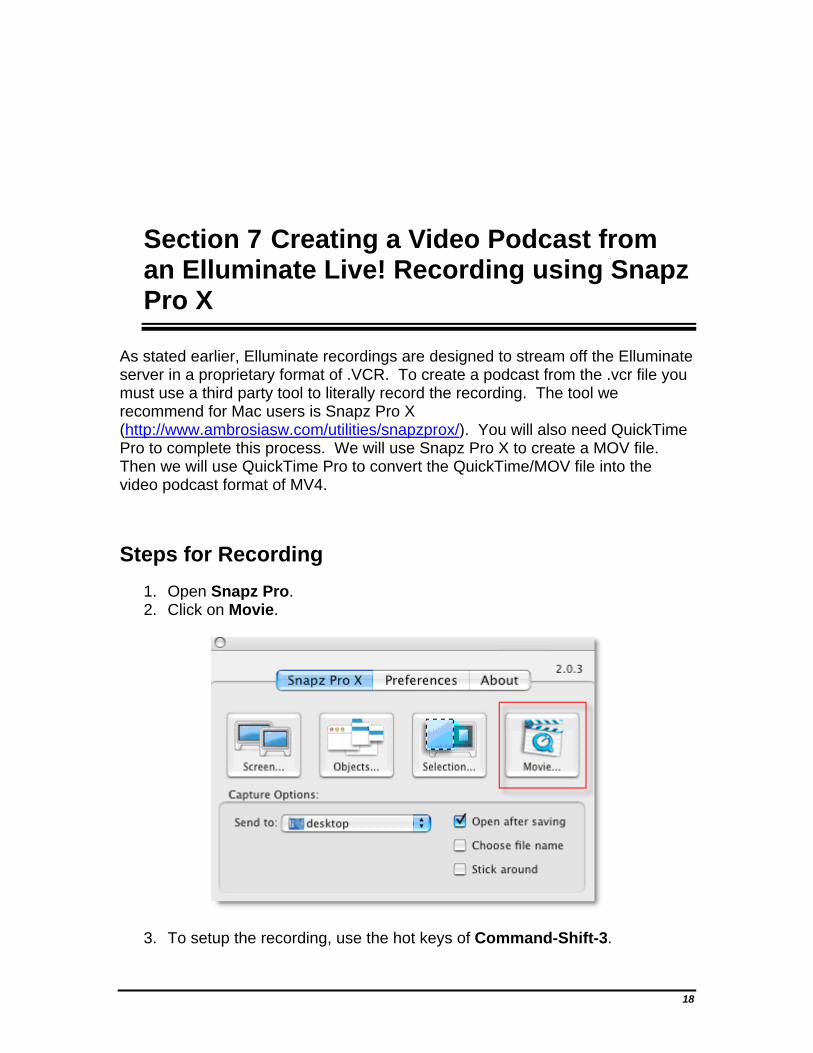
As stated earlier, Elluminate recordings are designed to stream off the Elluminate server in a proprietary format of .VCR. To create a podcast from the .vcr file you must use a third party tool to literally record the recording. The tool we recommend for Mac users is Snapz Pro X (http://www.ambrosiasw.com/utilities/snapzprox/). You will also need QuickTime Pro to complete this process. We will use Snapz Pro X to create a MOV file. Then we will use QuickTime Pro to convert the QuickTime/MOV file into the video podcast format of MV4.
Steps for Recording 1. Open Snapz Pro. 2. Click on Movie.
3. To setup the recording, use the hot keys of Command-Shift-3.
18
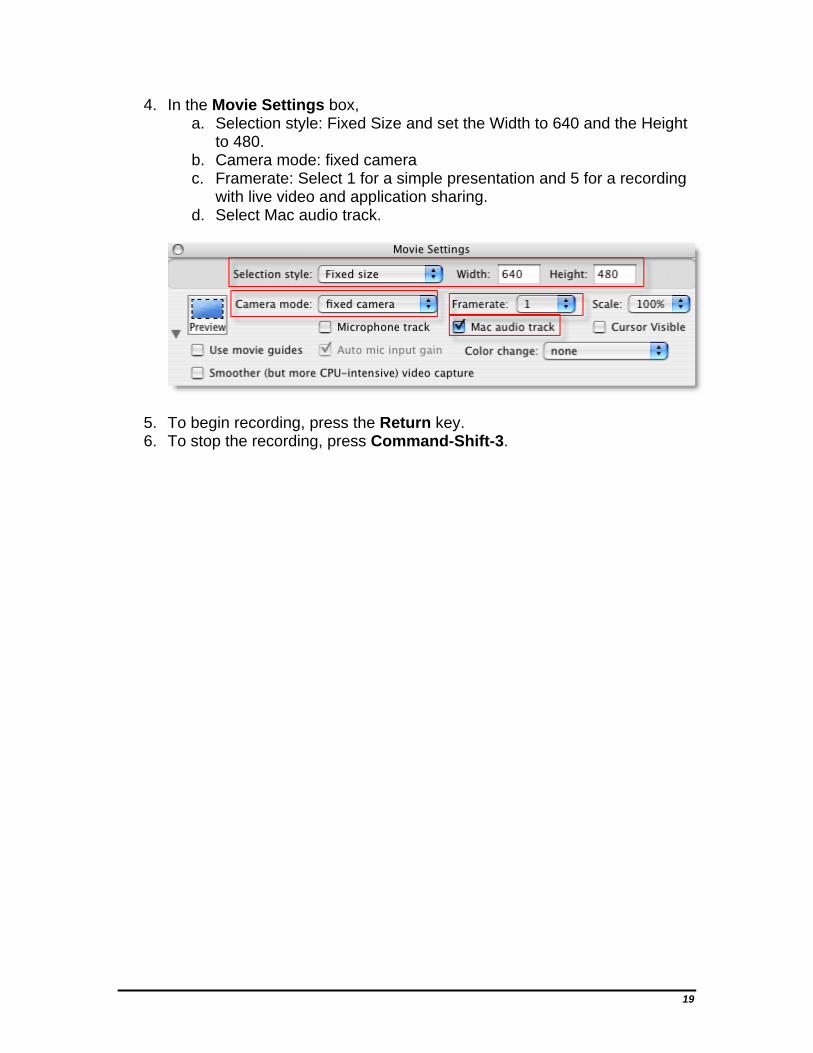
4. In the Movie Settings box, a. Selection style: Fixed Size and set the Width to 640 and the Height
to 480. b. Camera mode: fixed camera c. Framerate: Select 1 for a simple presentation and 5 for a recording
with live video and application sharing. d. Select Mac audio track.
5. To begin recording, press the Return key. 6. To stop the recording, press Command-Shift-3.
19
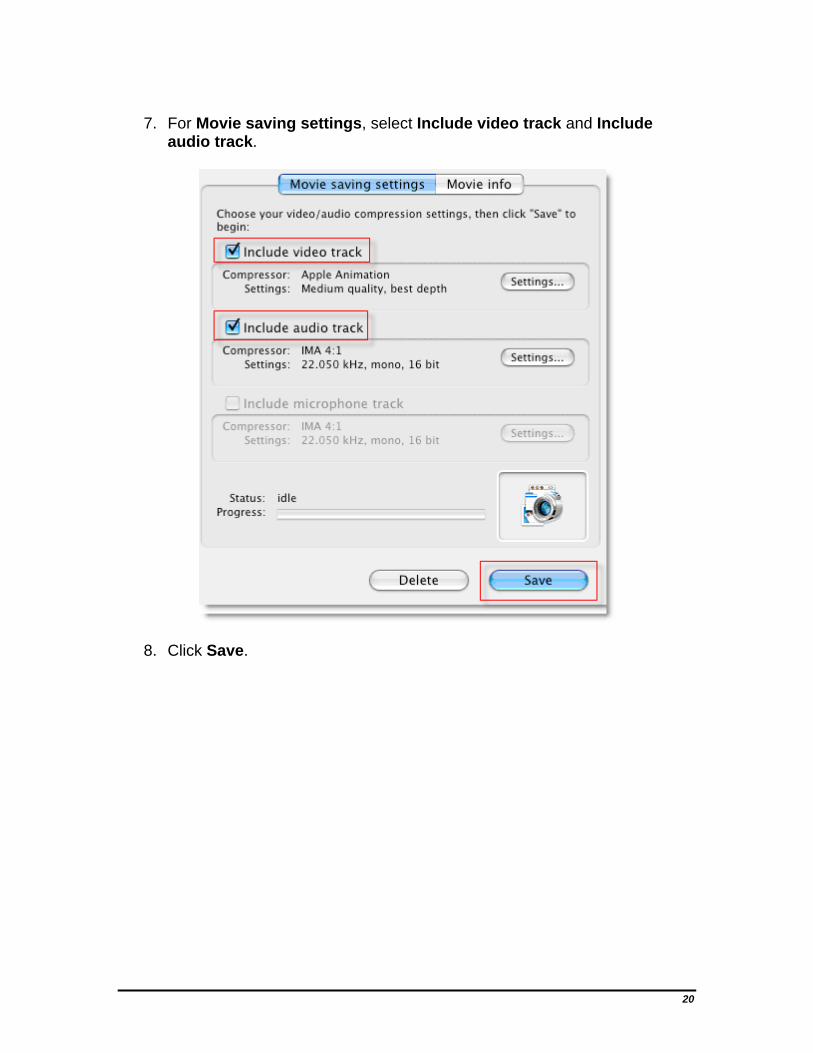
7. For Movie saving settings, select Include video track and Include
audio track.
8. Click Save.
20

Steps for using QuickTime Pro The next step is to convert the QuickTime movie which is a MOV file into a video podcast file format which is .mv4. QuickTime Pro is the tool we will use. It is a relatively inexpensive and easy to use tool which is available at www.apple.com. The process is very straightforward.
1. Open the .mov file in QuickTime Pro. 2. Select File > Export. 3. Enter a File name 4. From the Export drop-down list, select Movie to iPod. 5. Click Save.
6. Open the .mov file in QuickTime Pro. 7. Select File > Export. 8. Select Movie to iPod. 9. Click Save.
21
Section 8 How to Create an Audio Podcast using Audacity
Traditional podcasts are audio only. The easiest way to get an audio only podcast from an Elluminate recording is to follow the steps Section 5 and use Camtasia Studio 4. In Camtasia Studio 4, produce the movie directly to MP3. If you do not have Camtasia Studio 4, then use Camtasia Studio 3 as outlined in the Appendix or SnapZ Pro to create a movie of your Elluminate recording. The next step is to output the audio track only of your recording and then to convert the audio track to the MP3 format. We recommend Audacity (http://audacity.sourceforge.net) because it is free and a nice tool for creating audio podcasts. Audacity does require the installation of the LAME MP3 Encoder so be sure to download and install that at the same time you get Audacity.
Steps 1. In Camtasia, select File > Save audio as.
2. Name and Save the WAV file.
3. Open Audacity.
4. Select File > Open.
5. Select the WAV file which is the audio track of the Elluminate recording.
22
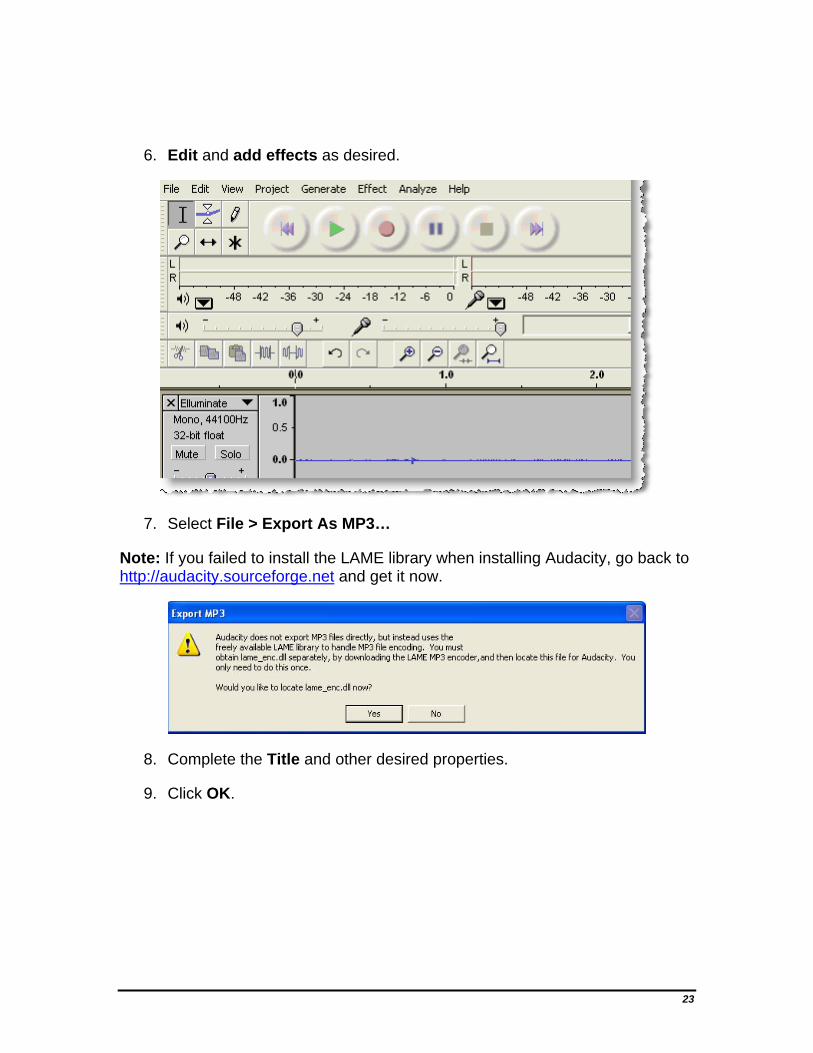
6. Edit and add effects as desired.
7. Select File > Export As MP3…
Note: If you failed to install the LAME library when installing Audacity, go back to http://audacity.sourceforge.net and get it now.
8. Complete the Title and other desired properties.
9. Click OK.
23
Section 9 Posting and Distributing Podcast
It is beyond the scope of this document to provide step-by-step instructions for posting and distributing your Podcast.
Basic Steps 1. Create the audio or video podcast (.mp3 or .mv4) 2. Upload the file to a web server. 3. Create an RSS feed. 4. Announce the availability of the podcast.
References
• http://www.elluminate.com/podcasts/ • http://www.podcastalley.com • http://en.wikipedia.org/wiki/Podcasting • http://www.podcasting-tools.com/what-is-podcasting.htm • http://www.apple.com/itunes/store/podcasts.html • http://wiki.ucalgary.ca/index.php/Podcasting • http://www.apple.com/itunes/store/podcaststechspecs.html • http://www.screencast.com/users/Screencast.com/media/25f531aa-
da14-4936-b8e7-af8111bdccc5
24

Section 10 Appendix: Creating a Video Podcast from an Elluminate Live! Recording using Camtasia Studio 3
This section covers the steps for creating a video podcast using Camtasia Studio 3.
Steps to Recording with Camtasia
1. Open the Elluminate Live! Recording. 2. Open Camtasia Studio. 3. Select Start new project by recording the screen. 4. Click OK. 5. Step through the New Recording Wizard, starting with the Screen
Recording Setup screen, select Region of the screen. 6. Click Next.
7. On the Select Screen Region screen, input the Dimensions of Width:
640 pixels and Height: 480 pixels.
25
8. Click Next. 9. On the Recording Options screen, select Record Audio. 10. Click Next. 11. On the Choose Audio Settings screen, select Speaker Audio (what
you hear).
Note: Camtasia and the Elluminate recording may battle for control of the audio. If you receive this Audio System Warning message, select No. This will enable Camtasia to capture the audio stream from your recording.
12. Click Next. 13. Click Finish. 14. Click F9 or the Record Button. 15. Click F9 to pause Camtasia.
26
16. Position the capture region around the content area.
17. Click F9 to start Camtasia. 18. Click the Play button on the Elluminate Live! recording. 19. Monitor the recording to ensure all the desired windows are captured
properly. Pause and Resume as needed. 20. Click F10 to stop the capture. 21. Save and Name the file. 22. On the Post-Save Options screen, select Edit my recording and click
OK.
27
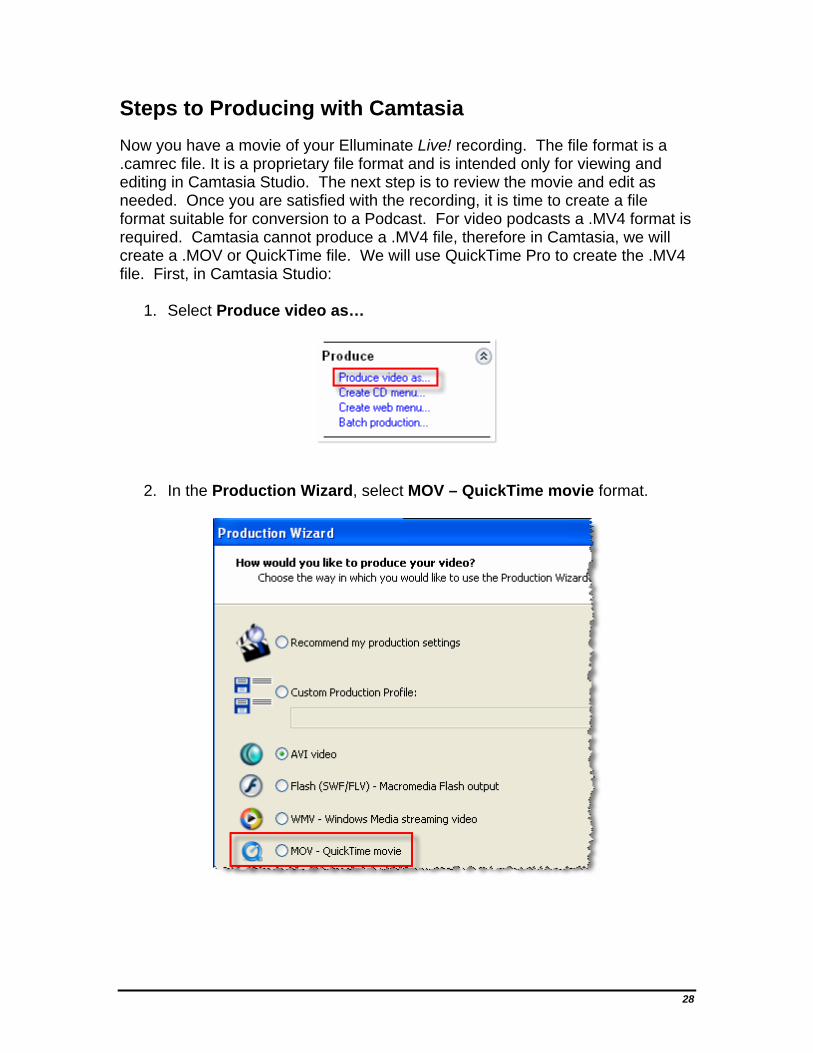
Steps to Producing with Camtasia Now you have a movie of your Elluminate Live! recording. The file format is a .camrec file. It is a proprietary file format and is intended only for viewing and editing in Camtasia Studio. The next step is to review the movie and edit as needed. Once you are satisfied with the recording, it is time to create a file format suitable for conversion to a Podcast. For video podcasts a .MV4 format is required. Camtasia cannot produce a .MV4 file, therefore in Camtasia, we will create a .MOV or QuickTime file. We will use QuickTime Pro to create the .MV4 file. First, in Camtasia Studio:
1. Select Produce video as…
2. In the Production Wizard, select MOV – QuickTime movie format.
28
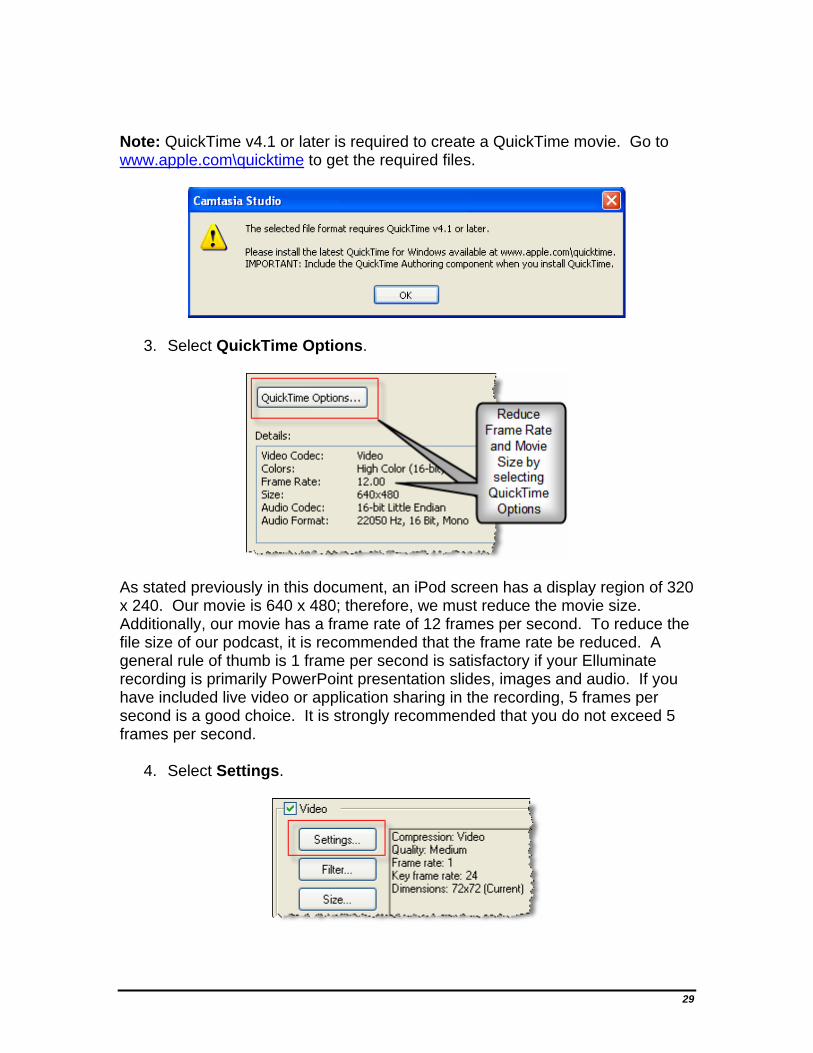
Note: QuickTime v4.1 or later is required to create a QuickTime movie. Go to www.apple.com\quicktime to get the required files.
3. Select QuickTime Options.
As stated previously in this document, an iPod screen has a display region of 320 x 240. Our movie is 640 x 480; therefore, we must reduce the movie size. Additionally, our movie has a frame rate of 12 frames per second. To reduce the file size of our podcast, it is recommended that the frame rate be reduced. A general rule of thumb is 1 frame per second is satisfactory if your Elluminate recording is primarily PowerPoint presentation slides, images and audio. If you have included live video or application sharing in the recording, 5 frames per second is a good choice. It is strongly recommended that you do not exceed 5 frames per second.
4. Select Settings.
29
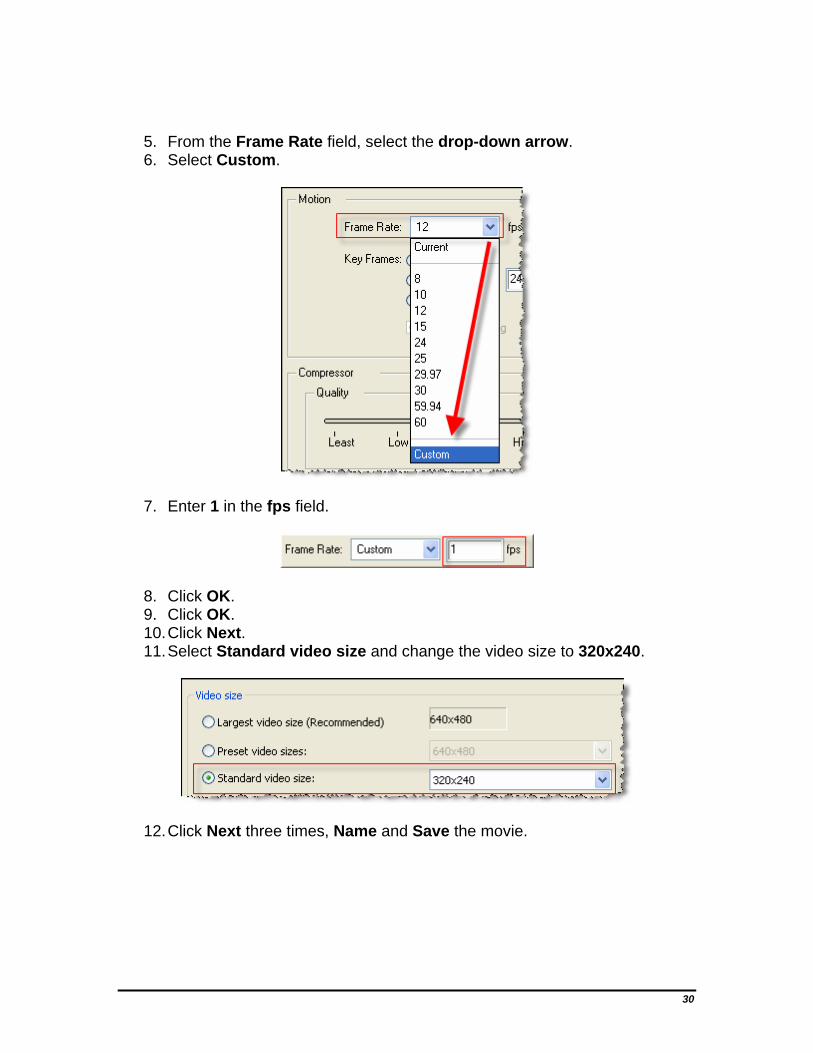
5. From the Frame Rate field, select the drop-down arrow. 6. Select Custom.
7. Enter 1 in the fps field.
8. Click OK. 9. Click OK. 10. Click Next. 11. Select Standard video size and change the video size to 320x240.
12. Click Next three times, Name and Save the movie.
30
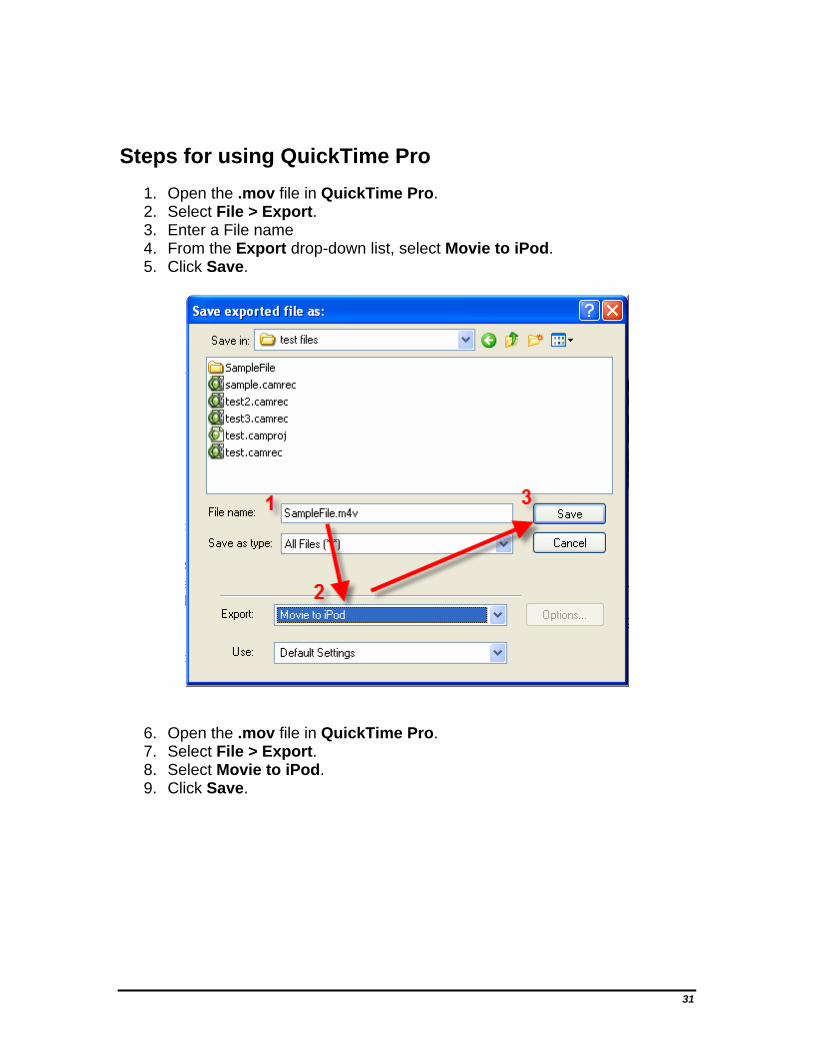
Steps for using QuickTime Pro 1. Open the .mov file in QuickTime Pro. 2. Select File > Export. 3. Enter a File name 4. From the Export drop-down list, select Movie to iPod. 5. Click Save.
6. Open the .mov file in QuickTime Pro. 7. Select File > Export. 8. Select Movie to iPod. 9. Click Save.
31

Section 11 Quick Reference Guide: Using Elluminate Publish!
To play Elluminate Live! recordings while away from your computer, convert them to audio podcasts and listen to them on your iPod or other MP3 player. To play full (audio and video) Elluminate Live! recordings while not connected to the Internet, create Elluminate Unplugged! standalone recordings and play them on your desktop computer or laptop.
Elluminate Publish!
1. Click Start > All Programs > Elluminate > Publish! > Publish!.
2. Identify the file you would like to convert by browsing to it or typing it into the
Recording (.vcr, .jnlp, or URL) field.
3. Specify the directory into which you would like your output saved by browsing
to it or typing it into the Save to Directory field.
32
4. Indicate what types of conversions you wish to perform. To create an audio podcast, click the checkbox next to Audio Conversion.
To create an Unplugged! recording, click on the checkbox next to
Unplugged! Recording Conversion. 5. Optional: Specify conversion properties by selecting Show Properties.
On the PC choose from mp3, Ogg Vorbis or Uncompressed WAV On the Mac choose from mp3 or Uncompressed WAV.
6. Click on the button to begin the conversion.
Conversion Progress Messages Elluminate Publish! will notify you regarding the status of the conversion process:
- Publish! is ready to start working. Click the Convert button.
- Publish! is working on the Audio Conversion and the Unplugged! conversion is next in line.
- Publish! is working.
- the conversion is done.
Properties
When converting your Elluminate Live! recording to an audio file format, there are several Conversion Formats from which you may choose. They are:
mp3 16k bps – lowest quality with the smallest file size mp3 32k bps – provides a balance between quality and file size. This is
the default format. mp3 64k bps – best quality with the largest file size Ogg Vorbis (PC only) – open source audio format Uncompressed WAV – large file size and editable
Accessing Recordings
You need to supply Elluminate Publish! with either a .vcr file name, a .jnlp file name or a URL of the recording you with to convert.
33
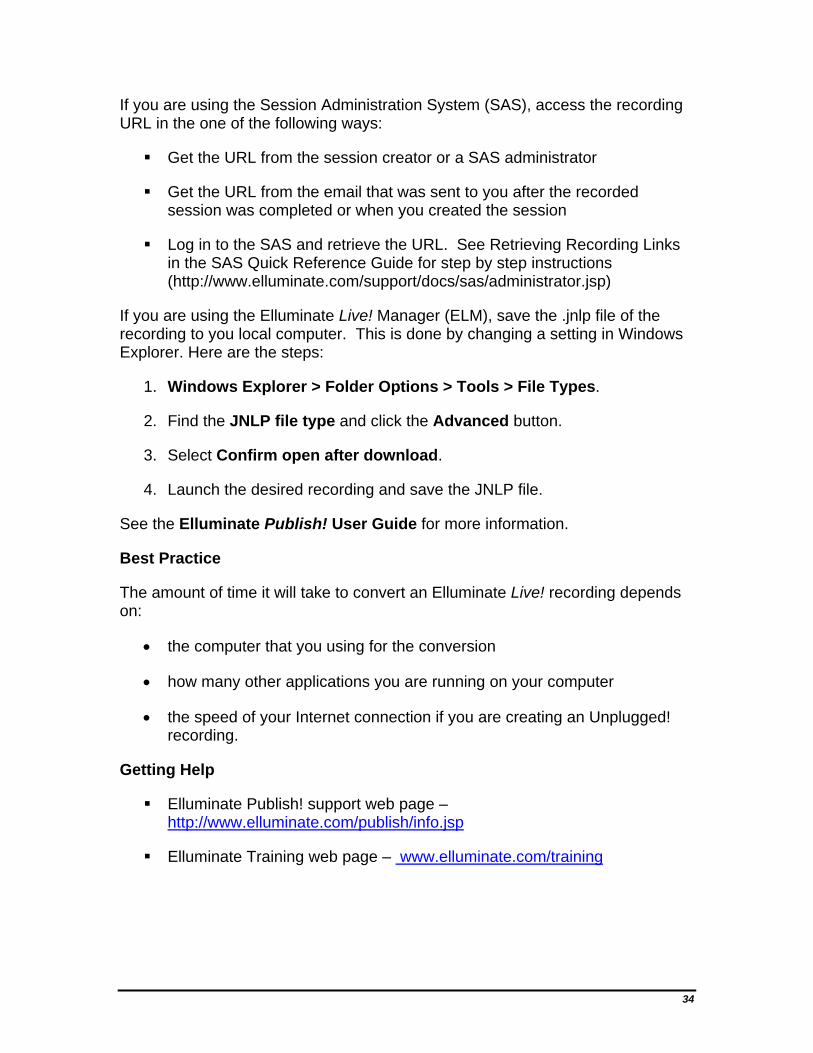
If you are using the Session Administration System (SAS), access the recording URL in the one of the following ways:
Get the URL from the session creator or a SAS administrator
Get the URL from the email that was sent to you after the recorded session was completed or when you created the session
Log in to the SAS and retrieve the URL. See Retrieving Recording Links in the SAS Quick Reference Guide for step by step instructions (http://www.elluminate.com/support/docs/sas/administrator.jsp)
If you are using the Elluminate Live! Manager (ELM), save the .jnlp file of the recording to you local computer. This is done by changing a setting in Windows Explorer. Here are the steps:
1. Windows Explorer > Folder Options > Tools > File Types.
2. Find the JNLP file type and click the Advanced button.
3. Select Confirm open after download.
4. Launch the desired recording and save the JNLP file.
See the Elluminate Publish! User Guide for more information.
Best Practice
The amount of time it will take to convert an Elluminate Live! recording depends on:
• the computer that you using for the conversion
• how many other applications you are running on your computer
• the speed of your Internet connection if you are creating an Unplugged! recording.
Getting Help
Elluminate Publish! support web page – http://www.elluminate.com/publish/info.jsp
Elluminate Training web page – www.elluminate.com/training
34
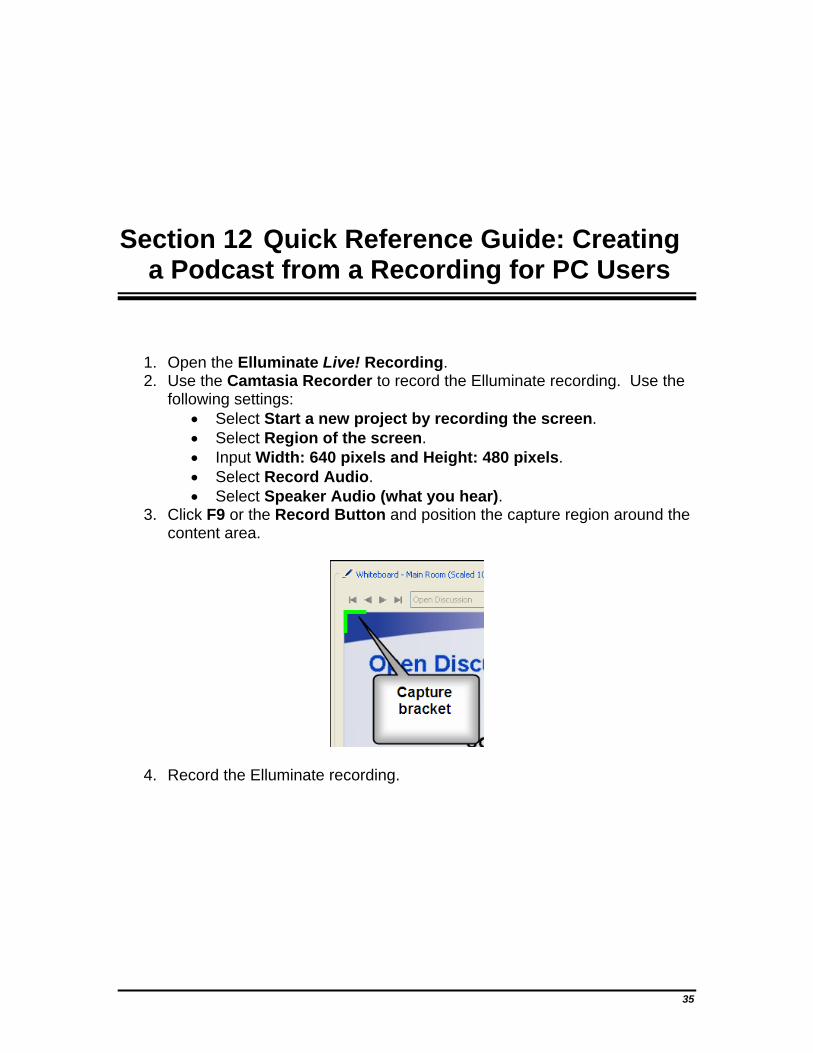
Section 12 Quick Reference Guide: Creating a Podcast from a Recording for PC Users
1. Open the Elluminate Live! Recording. 2. Use the Camtasia Recorder to record the Elluminate recording. Use the
following settings: • Select Start a new project by recording the screen. • Select Region of the screen. • Input Width: 640 pixels and Height: 480 pixels. • Select Record Audio. • Select Speaker Audio (what you hear).
3. Click F9 or the Record Button and position the capture region around the content area.
4. Record the Elluminate recording.
35
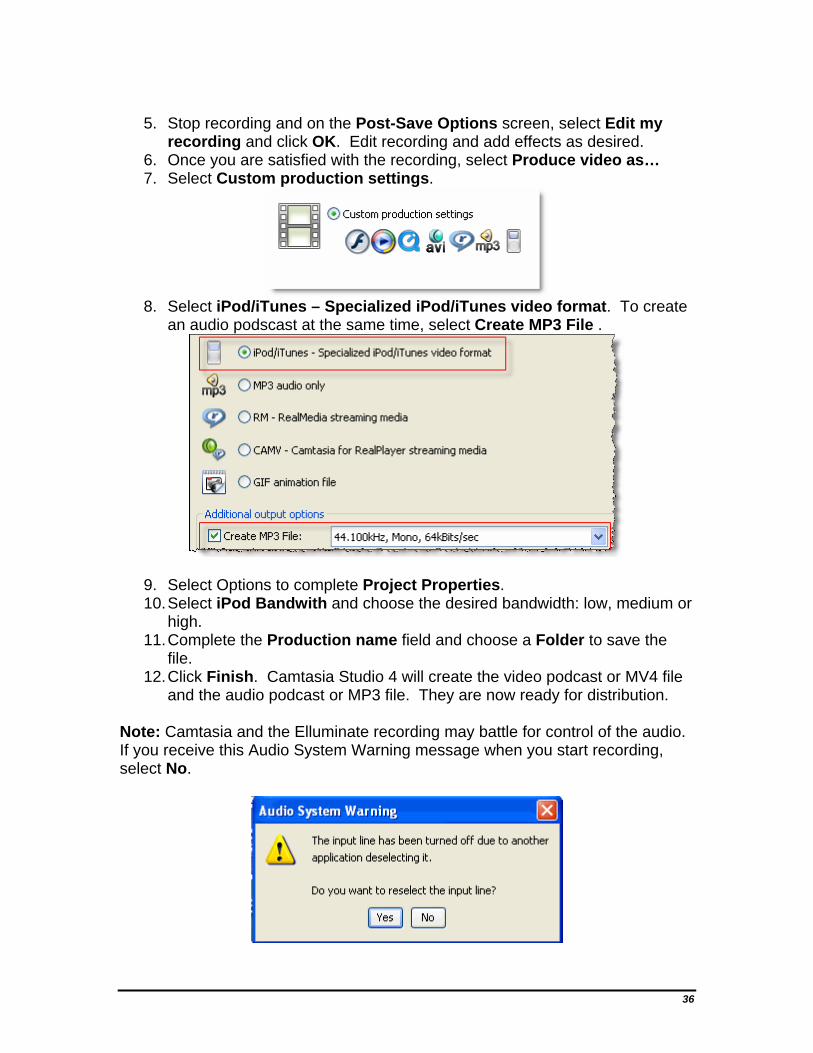
5. Stop recording and on the Post-Save Options screen, select Edit my
recording and click OK. Edit recording and add effects as desired. 6. Once you are satisfied with the recording, select Produce video as… 7. Select Custom production settings.
8. Select iPod/iTunes – Specialized iPod/iTunes video format. To create
an audio podscast at the same time, select Create MP3 File .
9. Select Options to complete Project Properties. 10. Select iPod Bandwith and choose the desired bandwidth: low, medium or
high. 11. Complete the Production name field and choose a Folder to save the
file. 12. Click Finish. Camtasia Studio 4 will create the video podcast or MV4 file
and the audio podcast or MP3 file. They are now ready for distribution. Note: Camtasia and the Elluminate recording may battle for control of the audio. If you receive this Audio System Warning message when you start recording, select No.
36

Section 13 Quick Reference Guide: Creating a Podcast from a Recording for Mac Users
Mac users should use Snapz Pro X to create a MOV file. Then use QuickTime Pro to convert the QuickTime/MOV file into the video podcast format of MV4.
1. Open Snapz Pro and click on Movie.
2. Use the hot keys of Command-Shift-3 to open the Movie Settings box. Use the following settings:
a. Selection style: Fixed Size and set the Width to 640 and the Height to 480.
b. Camera mode: fixed camera c. Framerate: Select 1 for a simple presentation and 5 for a recording
with live video and application sharing. d. Select Mac audio track.
3. Record the Elluminate recording.
37
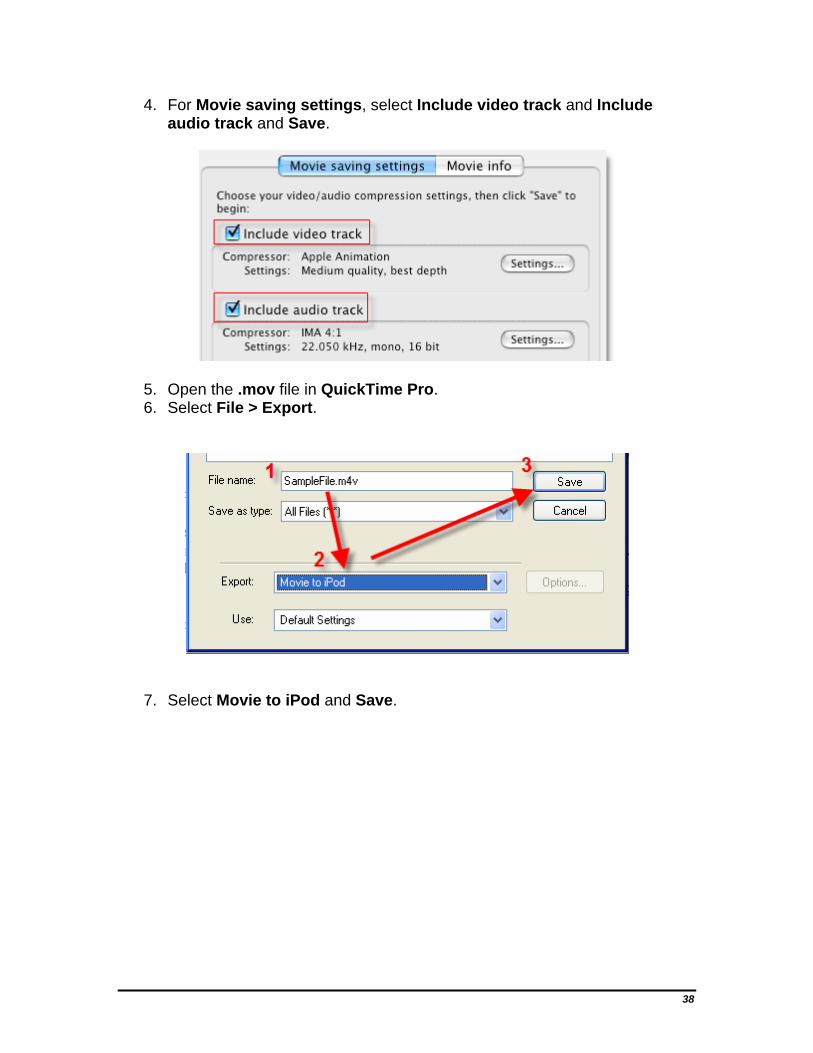
4. For Movie saving settings, select Include video track and Include audio track and Save.
5. Open the .mov file in QuickTime Pro. 6. Select File > Export.
7. Select Movie to iPod and Save.
38