Embed Size (px)
Citation preview
Preven
tative Main
tenan
ce
www.comlaundry.com
PocketHardmount
Part No. 7-04-49November 2005

© Copyright 2005, Alliance Laundry Systems LLC
All rights reserved. No part of the contents of this book may be reproduced or transmitted in any form or by any means without the expressed written consent of the publisher.
Table of Contents
© Copyright, Alliance Laundry Systems LLC – DO NOT COPY or TRANSMIT7-04-49 1
Daily............................................................................................................................................................................2Beginning of the Day............................................................................................................................................2End of the Day ......................................................................................................................................................4
Weekly ........................................................................................................................................................................6
Monthly ......................................................................................................................................................................7
Quarterly..................................................................................................................................................................11
Care of Stainless Steel .............................................................................................................................................13
Daily Preventative Maintenance Checklist ...........................................................................................................15Beginning of the Day:.........................................................................................................................................15End of the Day:...................................................................................................................................................16
Weekly Preventative Maintenance Checklist........................................................................................................17
Monthly Preventative Maintenance Checklist......................................................................................................18
Quarterly Preventative Maintenance Checklist ...................................................................................................19
IMPORTANT: Replace all panels that are removed to perform maintenance procedures. Do not operate the washer-extractor with missing guards or with broken or missing parts. Do not bypass any safety devices.
© Copyright, Alliance Laundry Systems LLC – DO NOT COPY or TRANSMIT2 7-04-49
DailyIMPORTANT: The door lock should be checked daily to ensure proper operation. Also check that all safety and instruction stickers are on the machine. Any missing or illegible safety and/or instruction stickers should be replaced immediately.
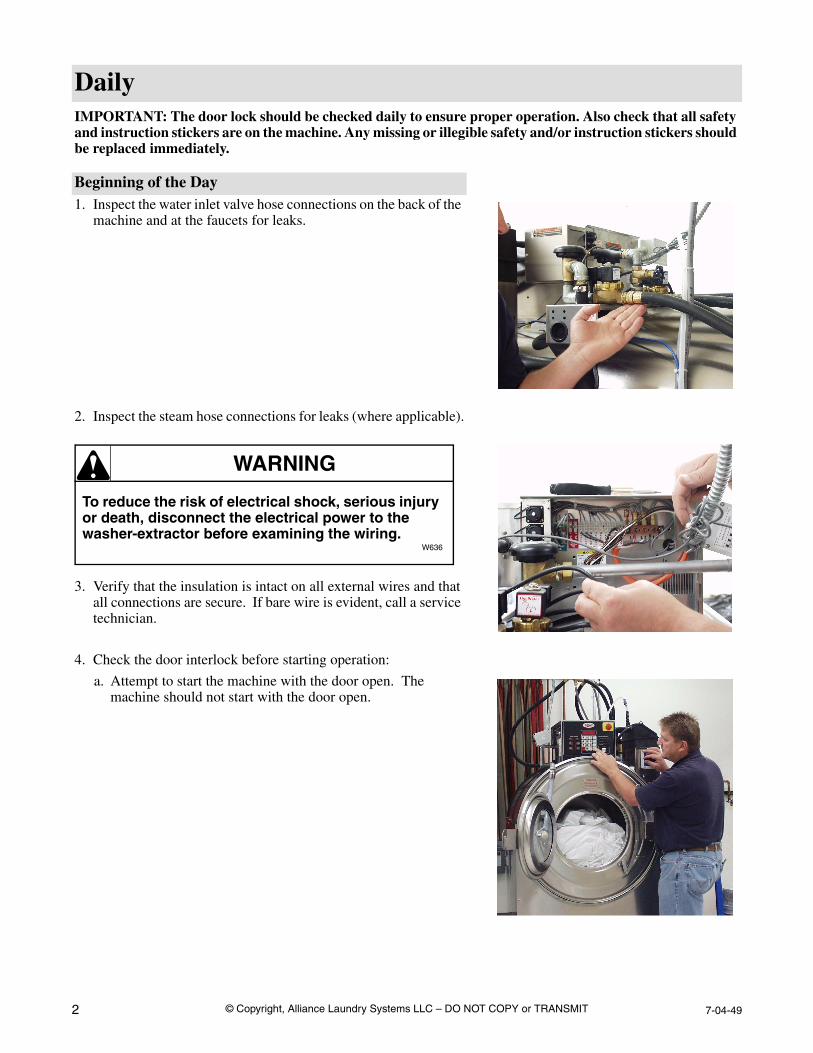
Beginning of the Day1. Inspect the water inlet valve hose connections on the back of the
machine and at the faucets for leaks.
2. Inspect the steam hose connections for leaks (where applicable).
3. Verify that the insulation is intact on all external wires and that all connections are secure. If bare wire is evident, call a service technician.
4. Check the door interlock before starting operation:
a. Attempt to start the machine with the door open. The machine should not start with the door open.
To reduce the risk of electrical shock, serious injury or death, disconnect the electrical power to the washer-extractor before examining the wiring.
W636
WARNING

© Copyright, Alliance Laundry Systems LLC – DO NOT COPY or TRANSMIT7-04-49 3
Daily
b. Close the door without locking it and attempt to start the machine. The machine should not start with the door unlocked.
c. Close and lock the door and start a cycle. Attempt to open the door while the cycle is in progress. The door should not open.
If the door lock and interlock are not functioning properly, call a service technician.
5. If the washer-extractor is equipped with a premium Wet Clean module, inspect the water recirculation pipe connections to make sure that they are tight and do not leak.

© Copyright, Alliance Laundry Systems LLC – DO NOT COPY or TRANSMIT4 7-04-49
Daily
End of the Day1. For variable-speed models only, clean the AC drive filter:
a. Remove the external plastic cover.
b. Remove the foam filter from the cover.
c. Wash the filter with warm water and allow it to air dry. The filter may also be vacuumed clean.
2. Clean the door gasket of residual detergent and all foreign matter.
© Copyright, Alliance Laundry Systems LLC – DO NOT COPY or TRANSMIT7-04-49 5
Daily
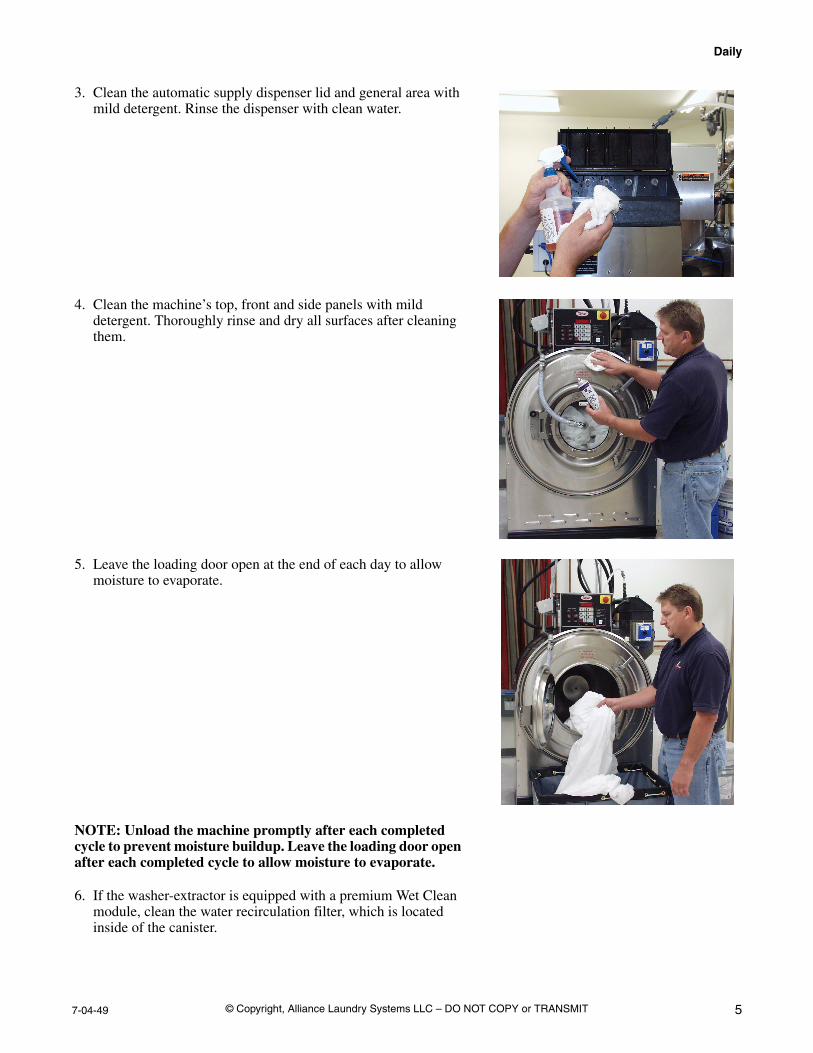
3. Clean the automatic supply dispenser lid and general area with mild detergent. Rinse the dispenser with clean water.
4. Clean the machine’s top, front and side panels with mild detergent. Thoroughly rinse and dry all surfaces after cleaning them.
5. Leave the loading door open at the end of each day to allow moisture to evaporate.
NOTE: Unload the machine promptly after each completed cycle to prevent moisture buildup. Leave the loading door open after each completed cycle to allow moisture to evaporate.
6. If the washer-extractor is equipped with a premium Wet Clean module, clean the water recirculation filter, which is located inside of the canister.
© Copyright, Alliance Laundry Systems LLC – DO NOT COPY or TRANSMIT6 7-04-49
Weekly1. Check the washer-extractor for leaks:
a. Start an unloaded cycle to fill the washer-extractor.
b. Verify that the door and door gasket do not leak.
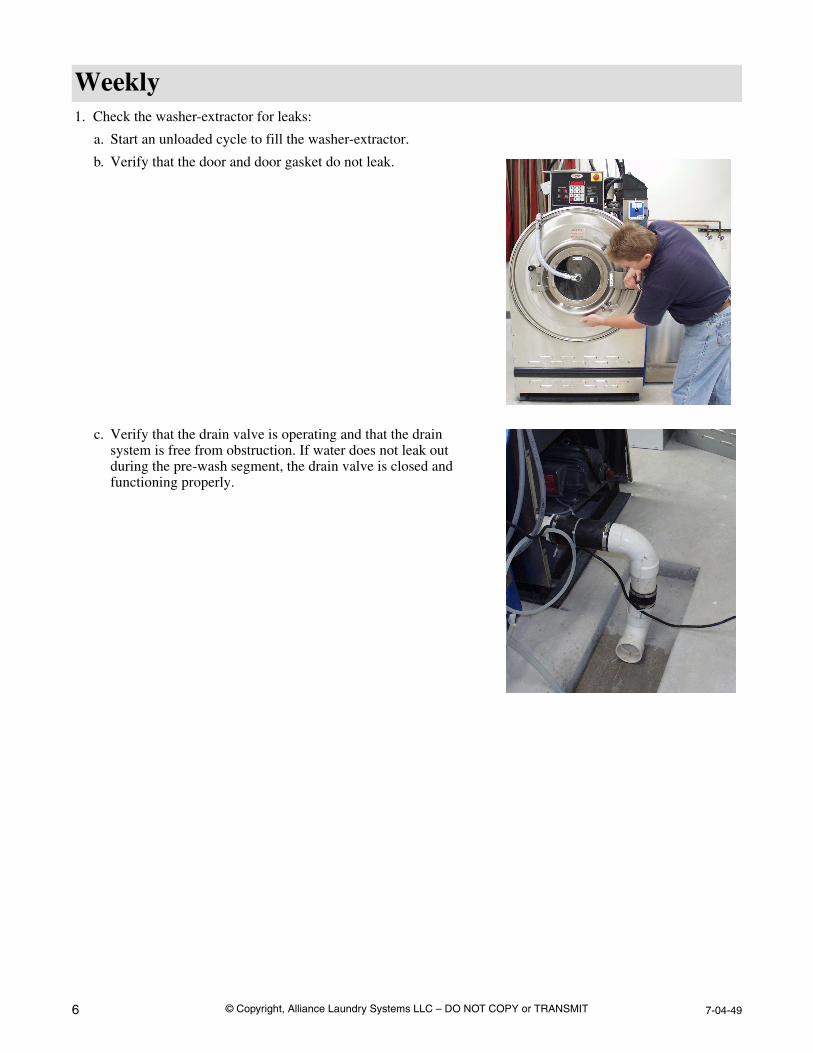
c. Verify that the drain valve is operating and that the drain system is free from obstruction. If water does not leak out during the pre-wash segment, the drain valve is closed and functioning properly.
© Copyright, Alliance Laundry Systems LLC – DO NOT COPY or TRANSMIT7-04-49 7
MonthlyNOTE: Disconnect power to the machine at its source before performing the monthly maintenance procedures.
1. Each month or after every 200 hours of operation, lubricate the bearings. Locate the bearing lubrication decal on the rear, right of the washer-extractor.
a. The lubricant must have the following characteristics:- NLGI Grade 2 - Water-insoluble - Anti-oxidizing- Lithium-based - Anti-rusting - Mechanically stableThe lubricant must have adequate base oil viscosity with one of the following ratings:- ISO VG150 (135-165 CST at 40°C or 709-871 SUS at 100°F- ISO VG 220 (198-242 CST at 40°C or 1047-1283 SUS at 100°F- An SAE 40 rating is also acceptable as long as the CST orSUS values are within the specified ranges
b. Pump the grease gun slowly, permitting only 2 strokes.
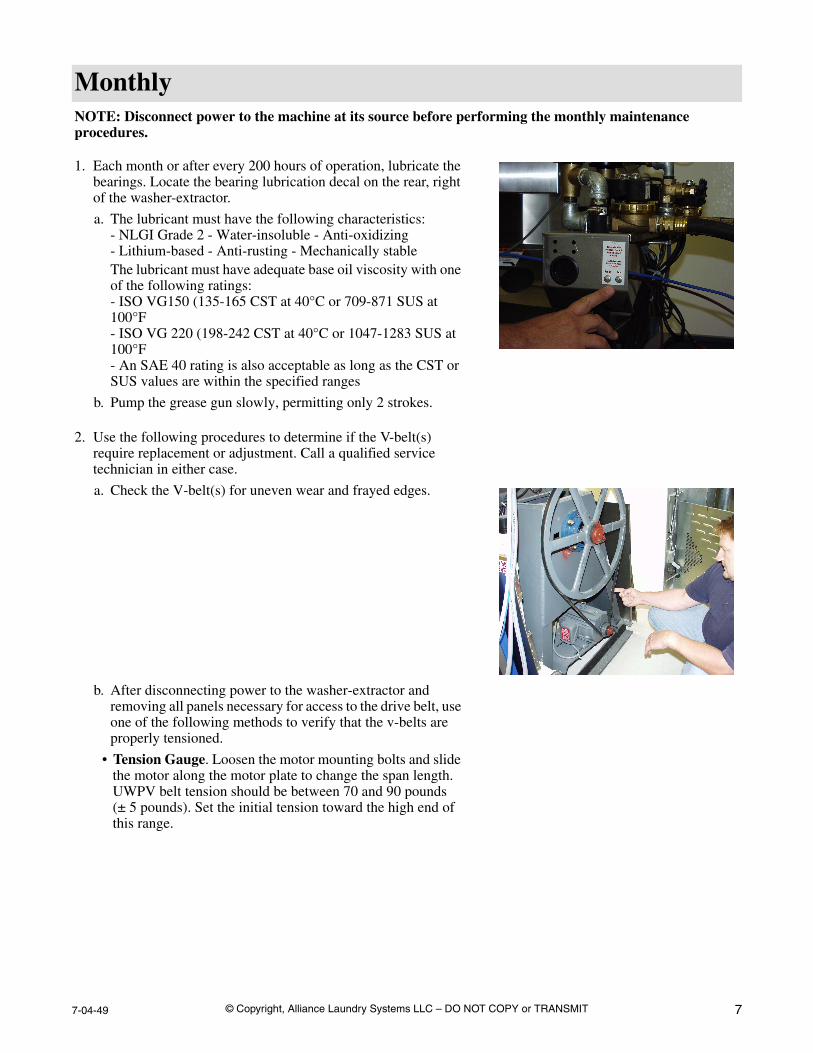
2. Use the following procedures to determine if the V-belt(s) require replacement or adjustment. Call a qualified service technician in either case.
a. Check the V-belt(s) for uneven wear and frayed edges.
b. After disconnecting power to the washer-extractor and removing all panels necessary for access to the drive belt, use one of the following methods to verify that the v-belts are properly tensioned.
• Tension Gauge. Loosen the motor mounting bolts and slide the motor along the motor plate to change the span length. UWPV belt tension should be between 70 and 90 pounds (± 5 pounds). Set the initial tension toward the high end of this range.

© Copyright, Alliance Laundry Systems LLC – DO NOT COPY or TRANSMIT8 7-04-49
Monthly
• Deflection. Loosen the motor mounting bolts and slide the motor along the motor plate to change the belt span length. Belt tension measurements should be taken as close to the center of the belt span as possible. For every inch of span length, the belt should deflect 1/64 inch (0.40mm). For example, a belt with a span length of 50 inches should deflect 50/64 inches (19.84mm). An initial (run-in) force of 5.25 pounds should be used to set the belt tension. An operating (normal) force of 3.5 pounds should be used after the washer-extractor has operated for a few hours.
c. Verify that the V-belts are properly aligned by checking the pulley alignment. Place a straightedge across both pulley faces. The straightedge should make contact with the pulleys in four places.
3. Remove the back panel and check the overflow hose and drain hose for leaks.
4. Unlock the hinged lid and check the supply dispenser hoses and hose connections.
H039I
Span Length
Deflection
H040I
Motor
MotorPulley
Straightedge
BasketPulley
© Copyright, Alliance Laundry Systems LLC – DO NOT COPY or TRANSMIT7-04-49 9
Monthly
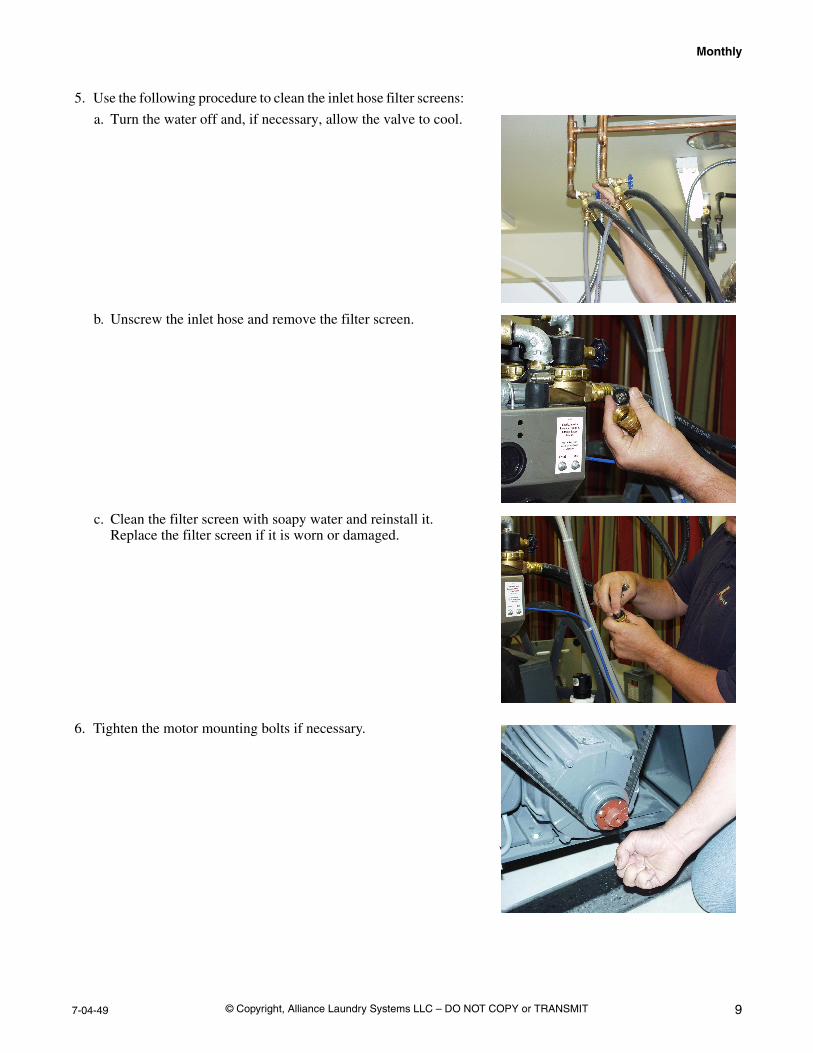
5. Use the following procedure to clean the inlet hose filter screens:
a. Turn the water off and, if necessary, allow the valve to cool.
b. Unscrew the inlet hose and remove the filter screen.
c. Clean the filter screen with soapy water and reinstall it. Replace the filter screen if it is worn or damaged.
6. Tighten the motor mounting bolts if necessary.
Pin
Motor PulleyMotor Spring
© Copyright, Alliance Laundry Systems LLC – DO NOT COPY or TRANSMIT10 7-04-49
Monthly
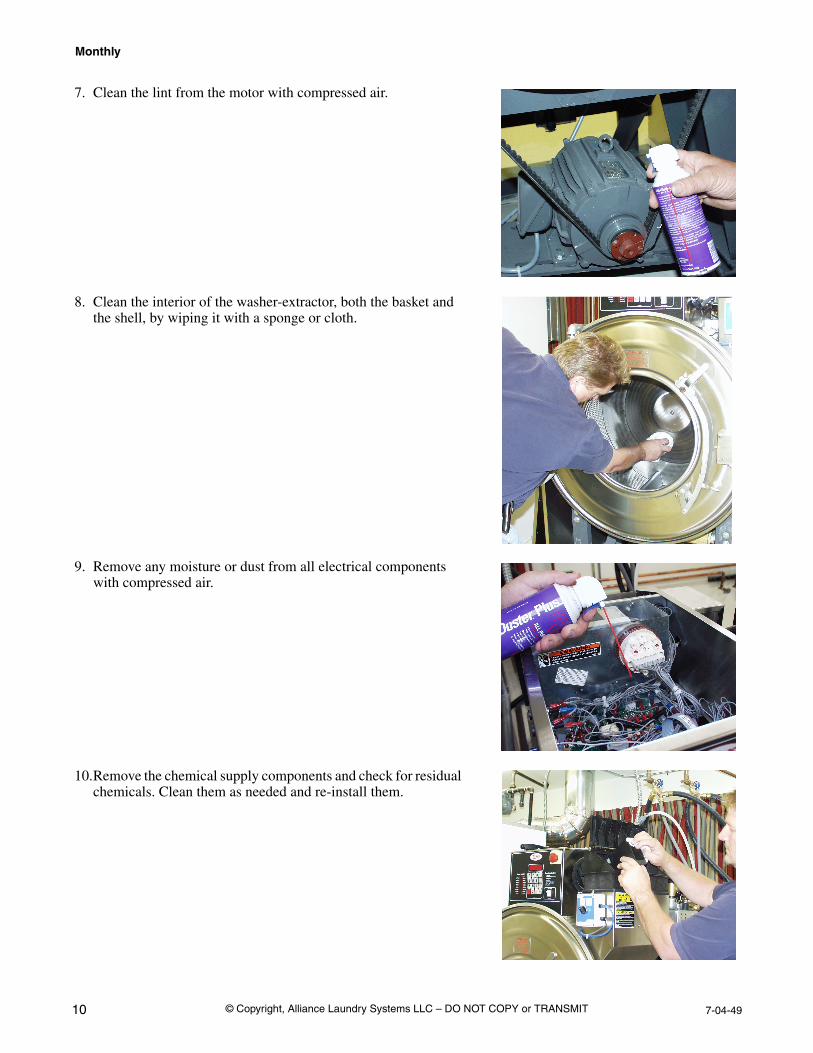
7. Clean the lint from the motor with compressed air.
8. Clean the interior of the washer-extractor, both the basket and the shell, by wiping it with a sponge or cloth.
9. Remove any moisture or dust from all electrical components with compressed air.
10.Remove the chemical supply components and check for residual chemicals. Clean them as needed and re-install them.

© Copyright, Alliance Laundry Systems LLC – DO NOT COPY or TRANSMIT7-04-49 11
QuarterlyNOTE: Disconnect power to the machine before performing the quarterly maintenance procedures.
1. If necessary, tighten the door hinges and fasteners.
2. If necessary, tighten the anchor bolts.
3. Verify that the drain motor shield is in place and is secure.
© Copyright, Alliance Laundry Systems LLC – DO NOT COPY or TRANSMIT12 7-04-49
Quarterly
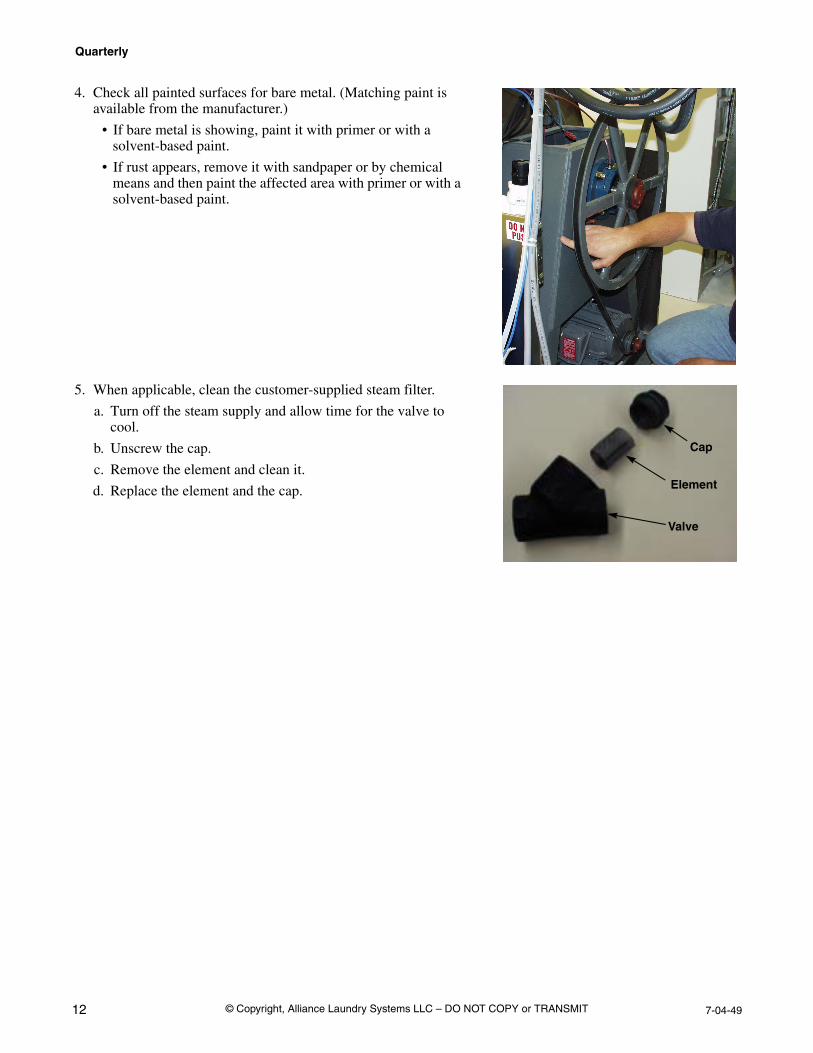
4. Check all painted surfaces for bare metal. (Matching paint is available from the manufacturer.)
• If bare metal is showing, paint it with primer or with a solvent-based paint.
• If rust appears, remove it with sandpaper or by chemical means and then paint the affected area with primer or with a solvent-based paint.
5. When applicable, clean the customer-supplied steam filter.
a. Turn off the steam supply and allow time for the valve to cool.
b. Unscrew the cap.
c. Remove the element and clean it.
d. Replace the element and the cap.
Valve
Element
Cap
© Copyright, Alliance Laundry Systems LLC – DO NOT COPY or TRANSMIT7-04-49 13
✓ Remove dirt and grease with detergent and water. Thoroughly rinse and dry after washing.
✓ Avoid contact with dissimilar metals to prevent galvanic corrosion when salty or acidic solutions are present.
✓ Do not allow salty or acidic solutions to evaporate and dry on stainless steel. Wipe clean of any residues.
✓ Rub in the direction of the polish lines or “grain” of the stainless steel to avoid scratch marks when using abrasive cleaners. Use stainless steel wool or soft, non-metal bristle brushes. Do not use ordinary steel wool or steel brushes.
✓ If the stainless steel appears to be rusting, the source of the rust may be an iron or steel part not made of stainless steel, such as a nail or screw. Tip: Paint all carbon steel parts with a heavy protective coating. Stainless steel fasteners should be used whenever possible.
✓ Remove discoloration or heat tint from overheating by scouring with a powder or by employing special chemical solutions.
✓ Do not leave sterilizing solutions on stainless steel equipment for prolonged periods of time.
✓ When an external chemical supply is used, ensure no siphoning of chemicals occurs when the washer-extractor is not in use. Highly concentrated chemicals can cause severe damage to stainless steel and other components within the machine. Damage of this kind is not covered by the manufacturer’s warranty. Locate the pump and tubing below the washer-extractor’s injection point to prevent siphoning of chemicals into the machine.
Care of Stainless Steel

© Copyright, Alliance Laundry Systems LLC – DO NOT COPY or TRANSMIT14 7-04-49

© Copyright, Alliance Laundry Systems LLC – DO NOT COPY or TRANSMIT7-04-49 15
DailyPreventative Maintenance ChecklistMachine: Week of:
Operator: Days
Checks 1 2 3 4 5 6 7
Observe All Safety Warnings!
Beginning of the Day:1. Inspect the water inlet valve hose connections on the back of
the machine and at the faucets for leaks.
2. Inspect the steam hose connections for leaks (where applicable).
3. Verify that the insulation is intact on all external wires and that all connections are secure. If bare wire is evident, contact a service technician.
4. Check the door interlock before starting operation:
a. Attempt to start the machine with the door open. The machine should not start with the door open.
b. Close the door without locking it and attempt to start the machine. The machine should not start with the door unlocked.
c. Close and lock the door and start a cycle. Attempt to open the door while the cycle is in progress. The door should not open.
5. If the washer-extractor is equipped with a premium Wet Clean module, inspect the water recirculation pipe connections to make sure that they are tight and do not leak.
Laminate this checklist so that it can be re-used.
To reduce the risk of electrical shock, serious injury or death, disconnect the electrical power to the washer-extractor before examining the wiring.
W636
WARNING
(continued)
© Copyright, Alliance Laundry Systems LLC – DO NOT COPY or TRANSMIT16 7-04-49
DailyPreventative Maintenance ChecklistMachine: Week of:
Operator: Days
Checks 1 2 3 4 5 6 7
Observe All Safety Warnings!
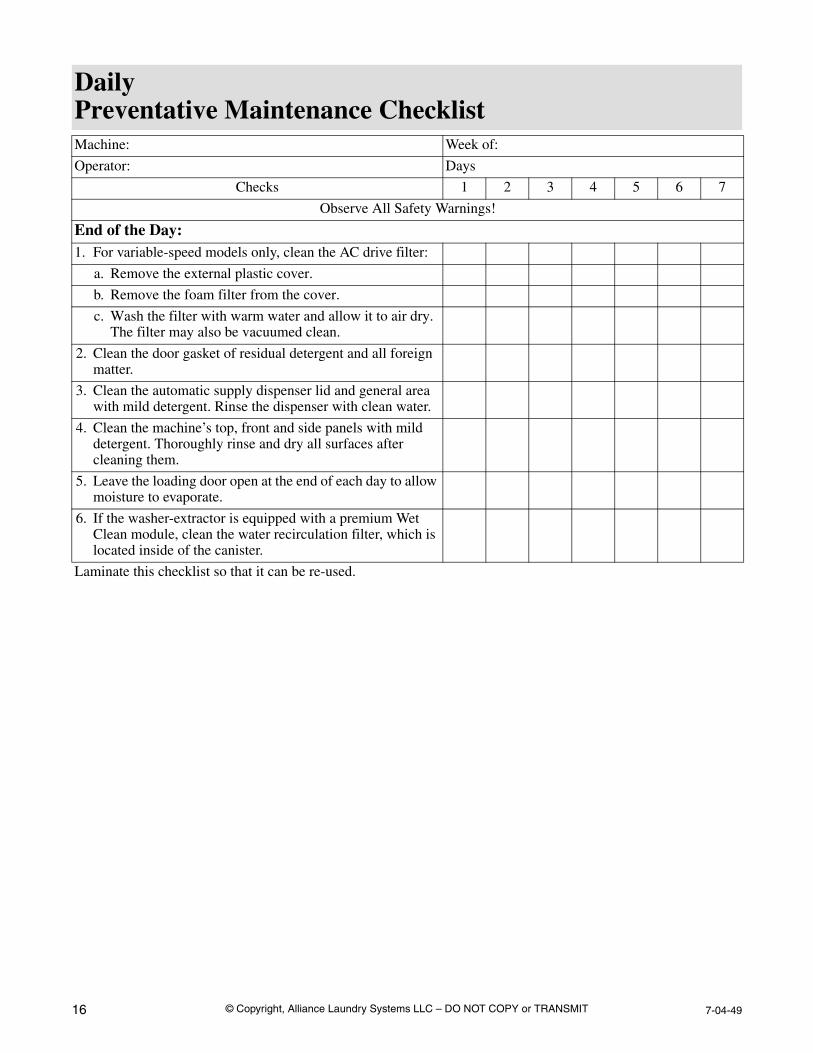
End of the Day:1. For variable-speed models only, clean the AC drive filter:
a. Remove the external plastic cover.
b. Remove the foam filter from the cover.
c. Wash the filter with warm water and allow it to air dry. The filter may also be vacuumed clean.
2. Clean the door gasket of residual detergent and all foreign matter.
3. Clean the automatic supply dispenser lid and general area with mild detergent. Rinse the dispenser with clean water.
4. Clean the machine’s top, front and side panels with mild detergent. Thoroughly rinse and dry all surfaces after cleaning them.
5. Leave the loading door open at the end of each day to allow moisture to evaporate.
6. If the washer-extractor is equipped with a premium Wet Clean module, clean the water recirculation filter, which is located inside of the canister.
Laminate this checklist so that it can be re-used.
© Copyright, Alliance Laundry Systems LLC – DO NOT COPY or TRANSMIT7-04-49 17
WeeklyPreventative Maintenance ChecklistMachine: Week of:
Operator: Week Ending:
Checks / / / / / / /
Observe All Safety Warnings!
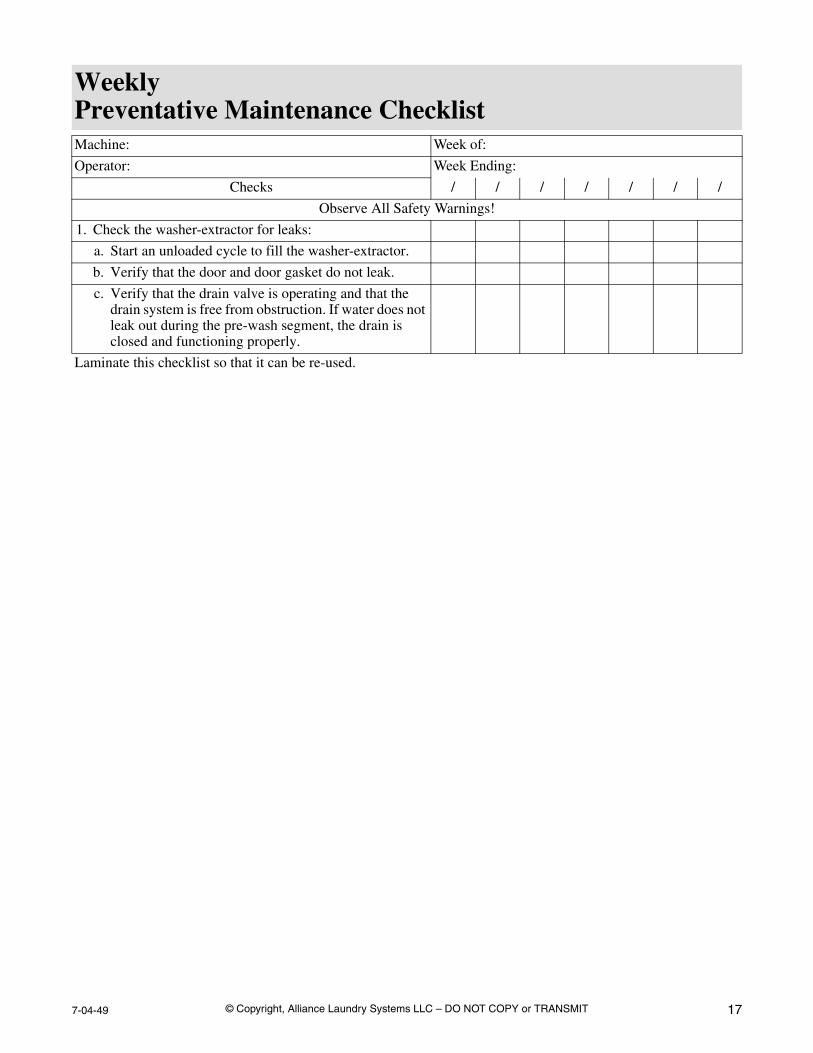
1. Check the washer-extractor for leaks:
a. Start an unloaded cycle to fill the washer-extractor.
b. Verify that the door and door gasket do not leak.
c. Verify that the drain valve is operating and that the drain system is free from obstruction. If water does not leak out during the pre-wash segment, the drain is closed and functioning properly.
Laminate this checklist so that it can be re-used.
© Copyright, Alliance Laundry Systems LLC – DO NOT COPY or TRANSMIT18 7-04-49
Monthly Preventative Maintenance ChecklistMachine: Month:
Operator:
Checks
Observe All Safety Warnings!
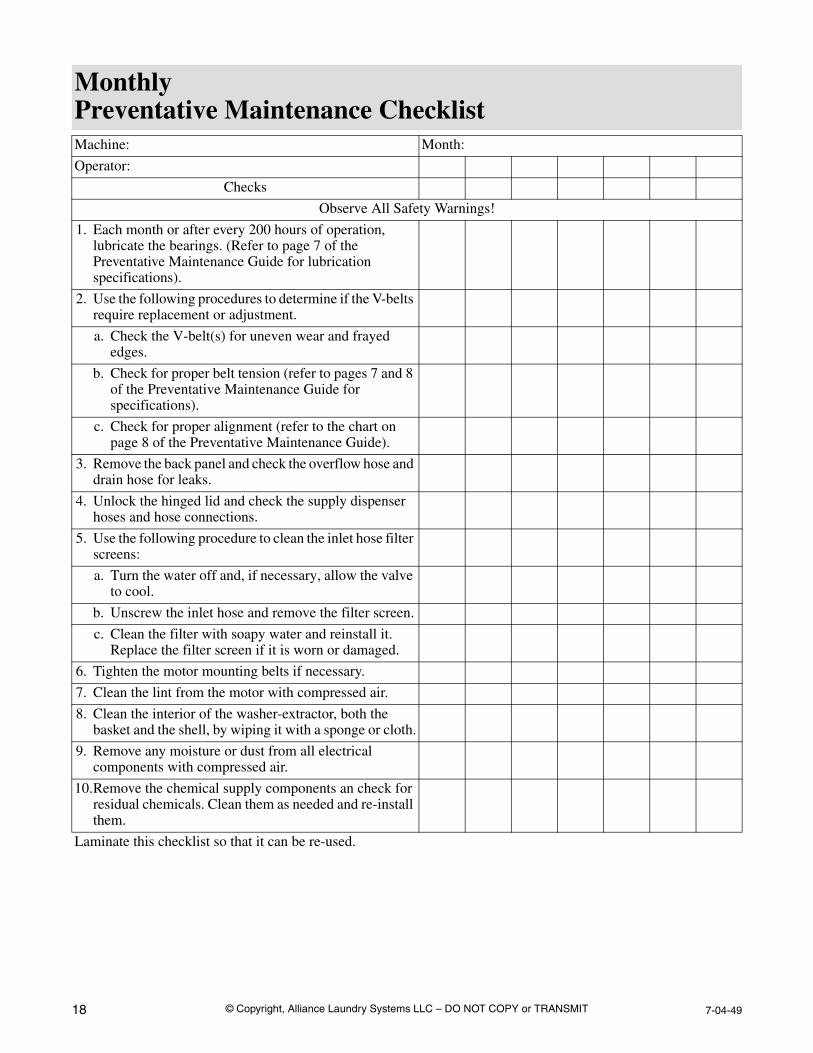
1. Each month or after every 200 hours of operation, lubricate the bearings. (Refer to page 7 of the Preventative Maintenance Guide for lubrication specifications).
2. Use the following procedures to determine if the V-belts require replacement or adjustment.
a. Check the V-belt(s) for uneven wear and frayed edges.
b. Check for proper belt tension (refer to pages 7 and 8 of the Preventative Maintenance Guide for specifications).
c. Check for proper alignment (refer to the chart on page 8 of the Preventative Maintenance Guide).
3. Remove the back panel and check the overflow hose and drain hose for leaks.
4. Unlock the hinged lid and check the supply dispenser hoses and hose connections.
5. Use the following procedure to clean the inlet hose filter screens:
a. Turn the water off and, if necessary, allow the valve to cool.
b. Unscrew the inlet hose and remove the filter screen.
c. Clean the filter with soapy water and reinstall it. Replace the filter screen if it is worn or damaged.
6. Tighten the motor mounting belts if necessary.
7. Clean the lint from the motor with compressed air.
8. Clean the interior of the washer-extractor, both the basket and the shell, by wiping it with a sponge or cloth.
9. Remove any moisture or dust from all electrical components with compressed air.
10.Remove the chemical supply components an check for residual chemicals. Clean them as needed and re-install them.
Laminate this checklist so that it can be re-used.
© Copyright, Alliance Laundry Systems LLC – DO NOT COPY or TRANSMIT7-04-49 19
Quarterly Preventative Maintenance ChecklistMachine: Quarter:
Operator:
Checks
Observe All Safety Warnings!
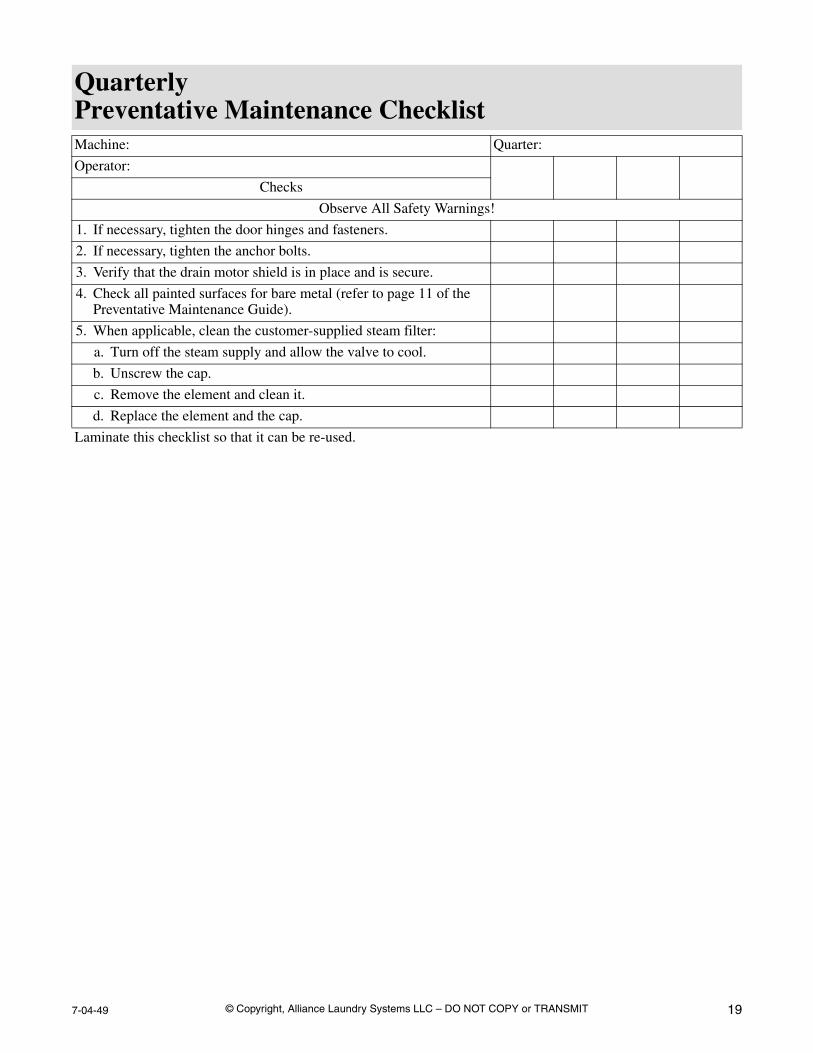
1. If necessary, tighten the door hinges and fasteners.
2. If necessary, tighten the anchor bolts.
3. Verify that the drain motor shield is in place and is secure.
4. Check all painted surfaces for bare metal (refer to page 11 of the Preventative Maintenance Guide).
5. When applicable, clean the customer-supplied steam filter:
a. Turn off the steam supply and allow the valve to cool.
b. Unscrew the cap.
c. Remove the element and clean it.
d. Replace the element and the cap.
Laminate this checklist so that it can be re-used.