Embed Size (px)
Citation preview

Congratulations!
You are the proud owner of a new Gulf Stream Coach recreational vehicle, a remarkable product that has been engineered, tested, and built by our highly skilled and dedicated team to meet your traveling and relaxation needs for many pleasurable years to come.
Many thousands of individuals have preceded you onto the highways of North America in Gulf Stream Coach RVs, enjoying the beauty of nature, the thrill of exploration, and the companionship of good people.
Through personal contacts on the road, online, at RV shows, and by phone, the people who design, engineer, and manufacture Gulf Stream Coach products have learned a lot about how our customers use their RVs. Many of us are campers who have traveled thousands of miles testing and enjoying our units, talking with owners in countless campgrounds.
It’s been our experience that if Gulf Stream Coach owners plan well, follow basic rules of the road, perform regular inspections and maintenance, and respect the design limitations of their RV and its components, they will enjoy thousands of enjoyable miles and countless unforgettable memories.
That’s why we’ve included this Owner’s Manual and instruction books for key appliances and components in your Owner’s Packet. We strongly encourage you to read through these materials to become familiar with the safe operation of your RV, along with the operation and maintenance of its many systems and features.
Note too that we maintain a copy of this Owner’s Manual and a library of instruction books in the “Owner Resources” area of Gulf Stream Coach Web Site, under the “Owner’s Manuals” tab.
Good traveling and good camping! Perhaps we’ll see you on the road somewhere.
Sincerely,
The People of Gulf Stream Coach
Gulf Stream Coach, Inc.PO Box 1005 Nappanee, IN 46550

TABLE OF CONTENTS
Copy of Warranty Statement . . . . . . . . . . . . . . . . . . . . . . . . . . . . . . . . . . . . . . . . . . 5 What Is Covered What is Not Covered Exclusions from this Warranty Important FactsWhen Traveling - Highlights . . . . . . . . . . . . . . . . . . . . . . . . . . . . . . . . . . . . . . . . . . . . . . . . . 9 Important Safety Information . . . . . . . . . . . . . . . . . . . . . . . . . . . . . . . . . . . . . . . . . . 9Maintenance, Dealer Service, and Warranty Guidelines . . . . . . . . . . . . . . . . . . . . . 10 Owner Responsibilities Retail Selling Responsibilities Warranty Service Modifications Permanent Dwelling Defective Part Reporting Safety Defects Appliances and ComponentsIdentification and Safety . . . . . . . . . . . . . . . . . . . . . . . . . . . . . . . . . . . . . . . . . . . . . . 12 Indoor Air Quality Formaldehyde Mold Condensation Fire Safety Smoke Detector Carbon Monoxide LP Gas Safety LP Gas Heating SystemTowing a Travel Trailer . . . . . . . . . . . . . . . . . . . . . . . . . . . . . . . . . . . . . . . . . . . . . . . . 19Tow Vehicle Requirements . . . . . . . . . . . . . . . . . . . . . . . . . . . . . . . . . . . . . . . . . . . . 20Travel Trailer Brake Systems . . . . . . . . . . . . . . . . . . . . . . . . . . . . . . . . . . . . . . . . . . . 21 Electric Brake System Brake Controller Tow Vehicle Battery/Electrical System 7-Way Wire Harness Breakaway SwitchTravel Trailer Hitch Systems . . . . . . . . . . . . . . . . . . . . . . . . . . . . . . . . . . . . . . . . . . . 23 Tow Vehicle Hitch Equalizing/Weight Distributing Hitches Equalizing Hitch Load Comparison Hitch Weight Sway Controller If you encounter trailer sway Safety Chains Hitch Locking Devices Stabilizer JacksHitching Up - General Information . . . . . . . . . . . . . . . . . . . . . . . . . . . . . . . . . . . . . . 26 UnhitchingHitching Up - Fifth Wheels . . . . . . . . . . . . . . . . . . . . . . . . . . . . . . . . . . . . . . . . . . . . 27 Fifth Wheel HitchesVehicle Loading . . . . . . . . . . . . . . . . . . . . . . . . . . . . . . . . . . . . . . . . . . . . . . . . . . . . . 28 Carrying Capacity Loading Tips
�1

Weighing Your Trailer . . . . . . . . . . . . . . . . . . . . . . . . . . . . . . . . . . . . . . . . . . . . . . . . . 31 Travel Trailers Fifth Wheels Manufacturer’s Labels Vehicle Weight Information Label Federal Weight Definitions Dangers of OverloadingTires . . . . . . . . . . . . . . . . . . . . . . . . . . . . . . . . . . . . . . . . . . . . . . . . . . . . . . . . . . . . . . 35 Tire Markings Tire Load Ratings Tire Air Pressure Tire Maintenance Wheel Nut TorqueTravel Trailer “House Systems” . . . . . . . . . . . . . . . . . . . . . . . . . . . . . . . . . . . . . . . . . 38 Safety Emergency Window Exit Fire Extinguisher Smoke Detector LP Gas Detector Carbon Monoxide (CO) Detector Electrical Systems . . . . . . . . . . . . . . . . . . . . . . . . . . . . . . . . . . . . . . . . . . . . . . . . . . . 39 12 Volt DC Service 110-V Shoreline Connection 30-Amp and 50-Amp 110-Volt AC Service Approximate Power Draws Power Converter Ground Fault Interrupter (GFI) Battery Battery Types and Charging Monitor PanelLP Gas Systems . . . . . . . . . . . . . . . . . . . . . . . . . . . . . . . . . . . . . . . . . . . . . . . . . . . . 45 General Info Climate Differences Operation Filling the LP Tank Gas Line Check Regulator Pressure Gas Tank and Regulator Freeze-Up Hose Replacement Regulator Vent MaintenancePlumbing . . . . . . . . . . . . . . . . . . . . . . . . . . . . . . . . . . . . . . . . . . . . . . . . . . . . . . . . . . 48 Fresh Water City Water Fresh Water Tank Water Systems Convenience Center Sanitizing the Water Tank Water Pump Secondary Water Pump Switch Winterizing the Water Pump Drainage and Sewer System Drainage P-Traps Holding Tanks Emptying Holding Tanks Holding Tank Maintenance
�2

Plumbing (continued) Do’s and Don’ts of Holding Tank Use Holding Tank Flush System Water System WinterizingAppliances . . . . . . . . . . . . . . . . . . . . . . . . . . . . . . . . . . . . . . . . . . . . . . . . . . . . . . . . . 55 Water Heater Range Range Hood LP Gas Oven Microwave RefrigeratorVideo and Audio System . . . . . . . . . . . . . . . . . . . . . . . . . . . . . . . . . . . . . . . . . . . . . . 58 Home Theater Stereo Video Hookups and TV/Monitor Over The Air TV Cable/Satellite ConnectionHeating and Cooling . . . . . . . . . . . . . . . . . . . . . . . . . . . . . . . . . . . . . . . . . . . . . . . . . 59 Furnace Air Conditioner Thermostat Roof Exhaust Fan FireplaceSlide-Out Systems . . . . . . . . . . . . . . . . . . . . . . . . . . . . . . . . . . . . . . . . . . . . . . . . . . . 63 Owner’s Manuals and Troubleshooting Lippert Electric Through Frame Slide-Out System Schwintek Slide-Out Systems Slide-Out Weather SealsAwnings . . . . . . . . . . . . . . . . . . . . . . . . . . . . . . . . . . . . . . . . . . . . . . . . . . . . . . . . . . . 67 Power Awning Operation Manual AwningCaring for Your Travel Trailer Interior . . . . . . . . . . . . . . . . . . . . . . . . . . . . . . . . . . . . . 71Caring for Your Travel Trailer Exterior . . . . . . . . . . . . . . . . . . . . . . . . . . . . . . . . . . . . . 73Roof Maintenance . . . . . . . . . . . . .. . . . . . . . . . . . . . . . . . . . . . . . . . . . . . . . . . . . . . . 75 Roof Membrane and Roof Seals EPDM (“Rubber”) Roof Roof SealsExterior Wall Maintenance . . . . . . . . . . . . . . . . . . . . . . . . . . . . . . . . . . . . . . . . . . . . . 76Effects of Long-Term Occupancy . . . . . . . . . . . . . . . . . . . . . . . . . . . . . . . . . . . . . . . . 78 Formaldehyde Full-Time Use Condensation and MoldReporting Possible Safety Defects . . . . . . . . . . . . . . . . . . . . . . . . . . . . . . . . . . . . . . . 81Component Suppliers Contact Information . . . . . . . . . . . . . . . . . . . . . . . . . . . . . . . . . 83Suggested Maintenance Schedule . . . . . . . . . . . . . . . . . . . . . . . . . . . . . . . . . . . . . . . 85Basic Wiring Information . . . . . . . . . . . . . . . . . . . . . . . . . . . . . . . . . . . . . . . . . . . . . . . 87Pre-Trip Checklist (Leaving Home) . . . . . . . . . . . . . . . . . . . . . . . . . . . . . . . . . . . . . . . . 89Leaving Campsite Checklist . . . . . . . . . . . . . . . . . . . . . . . . . . . . . . . . . . . . . . . . . . . . . 91
�3

�4
Ver. 01112018GULF STREAM COACH, INC. LIMITED WARRANTY
IN THE UNITED STATES AND CANADA Valid on Model Year 2018 or later travel trailers delivered to Retail Customers on or after July 1, 2018
1. LIMITED WARRANTY COVERS Gulf Stream Coach, Inc. (“Gulf Stream”) provides this Limited Warranty on the recreational vehicle to the original retail Purchaser (“Purchaser”) beginning on the original date of purchase from an Independent Authorized Retail Dealer when used for its intended purpose for occasional camping and recreational traveling as stated herein. Subject to all the here-in detailed terms, conditions, disclaimers, limitations, and exclusions, the Gulf Stream Limited Warranties are as follows:A. One-Year General Limited Warranty. For a period of 1 year form the date of purchase by the Purchaser, covers the
recreational vehicle defects in workmanship and assembly attributable to Gulf Stream manufacturing when the recreational vehicle is properly used in accordance with this Limited Warranty.
B. Three-Year Concurrent Structural Limited Warranty. For a period of 3 years from the date of purchase by the Purchaser, covers structural recreational vehicle defects in workmanship and assembly attributable to Gulf Stream manufacturing when the recreational vehicle is properly used in accordance with this Limited Warranty. The struc-tural includes and is specifically limited to: (1) Walls - Structural exterior sidewalls and wall studs; (2) Floor - Decking and floor joists; and (3) Roof - Decking, rafters, and installation of roof membrane and/or fiberglass material.
2. DISCLAIMER OF WARRANTIES THIS LIMITED WARRANTY IS THE EXCLUSIVE REMEDY FOR ANY AND ALL DEFECTS OF GULF STREAM WORK-MANSHIP AND ASSEMBLY OF THE RECREATION VEHICLE AND IS IN LIEU OF ANY AND ALL OTHER EXPRESS OR IMPLIED WARRANTIES. THERE ARE NO OTHER GULF STREAM EXPRESS WARRANTIES OTHER THAN THIS WAR-RANTY. This Limited Warranty consisted of 4 pages. The Limited Warranty coverage starts on the date the original retail Purchaser takes possession of the recreational vehicle, this Limited Warranty is NOT ASSIGNABLE. This Limited Warranty covers ONLY those covered defects which occur or exist within the applicable period(s) referenced above, that are communicated and specifically relate to Gulf Stream’s workmanship and assembly of the recreational vehicle. The sole remedy for a breach of this Limited Warranty is that the assembly and/or workmanship will be repaired or replaced by either Gulf Stream, or Gulf Stream’s designated authorized repair facility. Gulf Stream is ready, willing, and able to make every effort for the reasonable and timely warranty repairs; however, it is the sole responsibility and obligation of the recreational vehicle Purchaser to transport and/or deliver the recreational vehicle to either Gulf Stream or its designated authorized repair facility for repair(s). This Limited Warranty reserves that Gulf Stream shall have the final opportunity to remedy any and all warranty issue(s). No action can be commenced with-out prior written notice to Gulf Stream. Furthermore, benefits granted and received under this Limited Warranty are in accordance with consideration and information provided by the Purchaser to Gulf Stream to make a determination of warranty service and/or repair in accordance with the herein detailed terms, conditions, disclaimers, limitations, and ex-clusions of this Limited Warranty. The Purchaser understands and agrees to:a. Notify Gulf Stream within 10 days when a defect or problem is reasonably discovered or should have been discov-
ered; b. The warranty service and/or repair requested is within the Warranty period;c. The warranty repairs and/or service requested pertains to the workmanship and/or assembly or Gulf Stream; d. Schedule an appointment for the warranty service and/or repair, including responsibility to arrange for freight or
transport to service center or manufacturing facility, import duties, fees including any and all incidental expenses re-lated thereto.
e. Gulf Stream shall have the final opportunity to remedy and/or resolve any warranty issue. Any performance of re-pairs after the warranty has expired is excluded from coverage under this Limited Warranty and shall be considered “good will” repairs and not an alteration of the express terms of this Limited Warranty, nor shall it extend the warran-ty period.
3. EXCLUDED FROM THE GENERAL LIMITED WARRANTY AND STRUCTURAL LIMITED WARRANTY:
THE LIMITED WARRANTY(S) DOES NOT COVER: a. THIS WARRANTY DOES NOT APPLY TO ANY RECREATIONAL VEHICLE SOLD TO THE ORIGINAL RETAIL PUR-
CHASER MORE THAN TWO (2) YEARS AFTER SHIPMENT TO AN INDEPENDENT AUTHORIZED GULF STREAM RETAIL DEALER.
b. Any commercial use, rental, business use, disaster relief purposes;c. Any permanent or semi-permanent resident is excluded as is any use other than occasional camping and recreation
travel;

Ver. 01112018d. If Purchaser files a tax form claiming a business or commercial tax benefit relating to the recreation vehicle, or if the
recreational vehicle is registered or titled in a business name, then this Limited Warranty is void;e. Purchase through an auction, wholesale, or by any unauthorized dealer, seller, or private person;f. Damages resulting from neglect, negligence, misuse, abuse, accident, alteration, and/or failure to timely perform
and/or adhere to all reasonable and necessary maintenance, repair, and adjustments;g. Defects in chassis, appliances, and/or component parts or labor (i.e., refrigerator, furnace, air conditioner, generator,
inverter) which are covered by separate warranty(s) from the original manufacturer of the product which is contained in the recreational vehicle but not manufactured by Gulf Stream;
h. Vehicles registered and/or used outside the United States or Canada;i. Damages from normal wear and tear, exposure, fading, discoloring, and/or aging of interior or exterior materials
(paint, plastic, decals) from UV, sunlight, or weather exposure, rust, and corrosion. j. Loss or damage from acts of nature and environment, including but not limited to, atmospheric elements, ash, flood-
ing, high winds, acid rain, land or rock slide, hail, lightning, high heat, extreme temperatures and weather changes, snow and/or snow accumulation, blizzard, rain, riot, explosions, fire, corrosive chemicals, fumes, tornados, hurri-canes, storms, sand, gravel, off-road travel, road surface conditions or debris, and salt.
k. Damages due to unregulated water pressure, tank over-fill, or plumbing system modifications, unprotected electrical hookup (home or campground), power surges, lightning, circuit overload, electric modifications;
l. Damages due to overloading, improper weight distribution, tow capacity, excess or weight load ratings;m. Damages due to pest infestation, insects or wild and/or domestic animals;n. Damages to interior or exterior caused by improper ventilation, condensation, water damage, mold, mildew, standing
water, water leaks, and/or fungi;o. Damages from tow vehicle hitch, equalizer, stabilizer, electric or brake controller system, sway control;p. Damages to the tow vehicle;q. Deterioration of exterior plastic or fiberglass, broken glass, soft goods, (upholstery, drapery, carpet, vinyl, fabrics,
screens, cushions, mattresses), tears, punctures, soiling, and other imperfections that do not affect the use of the recreational vehicle;
r. Future use, value, including any diminution in value, and/or performance of recreational vehicle; s. Damages resulting from transit, accident, road condition, off-road, tires, batteries, generators, appliances, media and
electronic equipment, and other matter that are neither manufactured nor within the control of Gulf Stream;t. Non-structural defects in the exterior paint, decals, fiberglass sidewall panels, including, but not limited to, caulking,
checking, crazing, cracking, chalking, scratches, and/or porosity; u. Maintenance and limited-life items, including, but not limited to, tires, batteries, light bulbs, fuses, wiper blades, lu-
bricants, minor adjustments, wheel alignments; v. Defects or shortages at the time of delivery to the Purchaser;w. Costs and/or responsibility for transportation to and from Dealer, service center, or manufacturing facility location;
ANDx. Consequential and/or incidental expenses such as, but not limited to, loss of use, time, commercial loss, expenses,
emotional distress, towing, insurance, storage, rental, subscription fees, association, camping or park fees, service calls, transportation, freight, lodging, food, fuel, import/export fees, and/or personal contents in the recreation vehi-cle.
4. PURCHASER’S OBLIGATIONS The Purchaser must timely perform or cause to be performed on the recreational vehicle any and all regular recom-mended, reasonable, and necessary maintenance and use the recreational vehicle in accordance with Gulf Stream’s rec-ommendations, directions, warnings, and other guidance contained in the Owner’s Manual. In addition, Purchaser shall note and adhere to the owner’s manuals of appliances, materials and systems not manufactured by Gulf Stream, sup-plied by manufacturers other than Gulf Stream which are installed in the recreational vehicle. In addition, Purchaser MUST:a. Responsible for adjustments to doors, drawers, regulators, cabinet latches, antenna, controls, slide-outs;b. Regularly and seasonally (especially with change in weather), inspect and maintain seals and sealing for gaps, voids,
and reapplication when needed to roof, windows, doors, and other external and internal areas of the recreational vehicle; and
c. Read, review, and retain this Limited Warranty and the Owner’s Manual for regular reference.
If an issue occurs which the Purchaser believes is covered by this Limited Warranty, then locate and contact your Selling Dealer or nearest Authorized Service Dealer to schedule an appointment. Provide identification of your recreational vehicle, including the VIN, date of purchase, and description of the issue, including when it first occurred. If you cannot find a Service Dealer, then Purchaser is responsible to promptly contact

Ver. 01112018Gulf Stream by certified mail, return receipt requested, giving specific notice of the issue(s) being experienced with the recreational vehicle. Such notice must be addressed to the Director of Service, Gulf Stream Coach, Inc., PO Box 1005, Nappanee, Indiana 46550, and must be received by Gulf Stream within the earlier of 20 days after the issue is first know to the Purchaser but no time later than 10 days subsequent to the expiration of this Limited Warranty. Similar to an au-tomobile, Purchaser shall provide evidence including receipts and documentation of all regular required and rec-ommended maintenance for the recreational vehicle to date which MUST be submitted with any warranty claim. After proper notification has been received by Gulf Stream Coach, Inc., Purchaser’s failure to initiate prompt service of the warranty repairs approved by Gulf Stream within 30 days of approval WILL VOID ANY WARRANTABLE CLAIM FOR SUCH DEFECT OR DAMAGE. In its sole determination, Gulf Stream will arrange for repair or replacement of the Gulf Stream manufactured parts and/or workmanship identified as defective by Gulf Stream and such parts replaced, if any, shall then be property of Gulf Stream. Gulf Stream is ready, willing, and able to make every effort for a reasonable timely response. If for any reason the recreational vehicle is out of service, or is anticipated to be out of service for a cumulative total of seven (7) calendar days during the applicable warranty period, regardless of whether the cause of such out of service time is covered by the Limited Warranty, the Purchaser is to immediately contact Gulf Stream by certified mail, return receipt requested, setting forth the service issue(s). Gulf Stream reserves the right to cure any and all bona fide warranty claims. Warranty service work conducted by any party not specifically authorized by Gulf Stream shall be considered as unauthorized and WILL VOID THIS LIMITED WARRANTY. Further failure of the Purchaser to comply with the notification provisions of this section WILL VOID THIS LIMITED WARRANTY.
5. DISCLAIMER OF CONSEQUENTIAL, PUNITIVE, AND INCIDENTAL DAMAGES The original Purchaser and any other person occupying, intentional, or unintentional user, beneficiary, or was trans-ferred on given the recreational vehicle, shall NOT be entitled to recover from Gulf Stream any CONSEQUENTIAL, PUNITIVE, OR INCIDENTAL DAMAGES resulting from any breach of this Limited Warranty or any implied warranty, de-fect in the recreational vehicle, or from loss of use, time, commercial loss, expenses, emotional distress, towing, insur-ance, storage, rental, subscription fees, association, camping or park fees, service calls, transportation, freight, lodging, food, fuel, import/export fees, and/or personal contents in the recreational vehicle. This exclusion shall survive any de-termination or possibility that the Limited Warranty or implied warranty has failed its essential purpose and all such ex-penses relating thereto. Gulf Stream disclaims and is not responsible for any and all other representations, promises, guaranties, warranties, aftermarket warranties, or any other warranty beyond what is expressly set forth in this Limited Warranty for the recre-ational vehicle.
6. IMPORTANT FACTS The Purchaser must inspect the recreational vehicle at the time of delivery to ensure that it is acceptable as deliv-ered. This recreational vehicle has been sold to an Independent Authorized Dealer (NOTE: The Dealer nor its employees is not a representative and/or an agent of Gulf Stream), for resale in the ordinary course of the Dealer’s business, on terms and conditions and equipped as the Dealer and the Purchaser determine, and the Retail Purchase Agreement is between the Purchaser and the Dealer. Gulf Stream is not a party to the retail purchase and/or contract of the recre-ational vehicle. Gulf Stream reserves the unrestricted right any time and from time to time to make design changes and/or improve-ments upon its recreational vehicles without thereby imposing any obligation of Gulf Stream to make corresponding changes or improvements in or upon recreational vehicles previously manufactured. Gulf Stream further reserves the right to substitute parts or components substantially equal quality in any warranty service required by operation of this Limited Warranty. Like any other product, a recreational vehicle and the products installed in it requires continuous attention including regular, periodic care and maintenance for the life fo the recreational vehicle. IT IS THE PURCHASER’S DUTY TO READ AND FOLLOW ALL CARE AND MAINTENANCE REQUIREMENTS, REC-OMMENDATIONS, AND GUIDELINES IN THE MANUALS, WARNING LABLES, SAFETY NOTICES, AND INSTRUCTIONS TO THIS RECREATIONAL VEHICLE.
ALL DEALERS AND SERVICE CENTERS ARE INDEPENDENTLY-OWNED BUSINESSES FOR WHICH GULF STREAM HAS NO INTEREST OR CONTROL.
7. ATTORNEY FEES Any warranty claim asserted or brought in connection with this Limited Warranty, or any claim brought against Gulf Stream, directly or indirectly, under which the Purchaser or any other person or entity (“Claimant”) seeks either enlarge or avoid the terms, conditions, and/or exclusions of the Limited Warranty or which the Claimant fails to prevail on any issue or matter of any type, nature or condition shall entitle Gulf Stream to recover any and all of its costs, damages, and rea-sonable attorney fees in connection with the matter.
Ver. 01112018
8. JURISDICTION AND APPLICABLE LAW Exclusive jurisdiction for deciding any claims, demands, or causes of action for defects or representations of any nature or damages due from such defects or representations shall be in the courts in the State of Manufacture. The laws applicable to any litigation, dispute, mediation, arbitration, or any claim whatsoever arising from the sale, purchase, or use of the recreational vehicle shall be those of the State of Manufacture unless otherwise contrary to a state statute. The State of Manufacture of the recreational vehicle is Indiana.
Any action shall be commenced within six (6) months of warranty expiration.
This Limited Warranty gives Purchaser specific legal rights and the Purchaser may also have other rights that may vary from state to state. Gulf Stream is not responsible for any representation or warranty that is not herein stated unless required by applicable state or federal law. Some states may prohibit certain exclusions from express warranty cover-age, and/or the excluding of remedies and implied warranties. Some states do not allow limitations on how long the Purchaser’s remedies are available or an implied warranty lasts, so, to the extent applicable state law permits a remedy or an implied warranty obligation on the part Gulf Stream, the above limitation of remedies herein may not apply. Some states do not allow the exclusion or limitation of damages, so, to the extent applicable state law does not permit such limitation or exclusion, the limitation and exclusions may not apply. Rights under the state and federal consumer laws may offer remedies in addition to or different from this Limited Warranty.
I/WE HEREBY ACKNOWLEDGE THAT I/WE HAVE READ AND RECEIVED THIS LIMITED WARRANTY PRIOR TO ENTERING INTO ANY CONTRACT TO PURCHASE THE GULF STREAM RECREATIONAL VEHICLE. WE UNDER-STAND AND AGREE THAT THE IMPLIED WARRANTY FOR MERCHANTABILITY, AN UNWRITTEN WARRANTY THAT THE PRODUCT IS FIT FOR ORDINARY USE, IS LIMITED TO THE WARRANTY PERIOD OF THIS WRITTEN WARRANTY AND ANY OTHER IMPLIED WARRANTY ARISING OUT OF THE OPERATION OF LAW ARE SPECIFI-CALLY LIMITED TO THE WARRANTY PERIOD OF THIS WRITTEN WARRANTY TO THE EXTENT NOT ACTUALLY EXCLUDED IN THIS LIMITED WARRANTY.
IF ANY MODEL, SAMPLE, BROCHURE, OR WEBSITE IS SHOWN OR VIEWED BY THE PURCHASER PRIOR OR SUBSEQUENT TO THE PURCHASE OF THE RECREATIONAL VEHICLE, THE MODEL AND/OR INFORMATION WAS ILLUSTRATIVE, NOT SPECIFIC REPRESENTATIVE OF THE RECREATIONAL VEHICLE, AS SOME HAVE ADDED FEATURES AND OPTIONS THAT MAY NOT BE AVAILABLE AND/OR WERE NOT PURCHASED FOR THE RECRE-ATIONAL VEHICLE SAMPLE OR MODEL OR ILLUSTRATION; THEREFORE, SUCH MODEL OR INFORMATION SHALL NOT BE DEEMED TO BE PART OF THE BASIS OF THE BARGAIN OR CREATE ANY EXPRESS WARRANTY, AFFIRMATION, OR PROMISE CONCERNING THE PURCHASED RECREATIONAL VEHICLE.
ANY AND ALL EXPRESS AND IMPLIED WARRANTIES NOT HEREIN AFFIRMED ARE DISCLAIMED. GULF STREAM SPECIFICALLY DISCLAIMS ALL IMPLIED WARRANTIES OF MERCHANTABILITY AND FITNESS FOR A PARTICULAR PURPOSE AND ALL OTHER IMPLIED WARRANTIES.
ORIGINAL RETAIL PURCHASER(S) _____________________________________________________________________ (PLEASE PRINT)
SIGN _______________________________ DATE ________ SIGN _______________________________ DATE ________ (ORIGINAL RETAIL PURCHASER) (ORIGINAL RETAIL PURCHASER)
MODEL __________________________ SERIAL # __________________________________ ODOMETER ____________
DEALERSHIP REPRESENTATIVE: _______________________________________________________________________
Original Retail Purchaser(s): Keep this warranty document in your travel trailer.Dealership Representative: Give this original warranty document to the Retail Purchasers; also make a copy of this signature page of the warranty document and forward it to: Gulf Stream Coach Customer Service PO Box 1005 Nappanee, IN 46550
GULF STREAM COACH, INC. LIMITED WARRANTY IN THE UNITED STATES AND CANADA
Valid on Model Year 2018 or later travel trailers delivered to Retail Customers on or after July 1, 2018 • Ver. 01112018

WHEN TRAVELING: HIGHLIGHTS
Riding in a Travel Trailer When underway, do not allow passengers (perhaps pets too) to ride in the travel trailer as there are no safety belts. In addition, passengers riding in a travel trailer may be prohibited by state law.
Tires Properly maintained tires improve steering, stopping, traction and load-carrying capability. Under inflated tires and overloading can cause tire failure.
Towing and Weight Distribution Prior to towing any vehicle, check the limits and use of suitable tow vehicles. Even weight distribution is essential to safe towing of the travel trailer.
Sway or Fishtailing Sway or fishtailing is when the trailer is moving side to side that could be caused by road conditions, weather or another matter. Excessive sway can cause the trailer to rollover which may include the vehicle towing the trailer resulting in serious injury or death.
This manual includes many additional warnings, recommendations, and guides to safe operation of your RV. You are strongly encouraged to become familiar with all of them.
IMPORTANT SAFETY INFORMATION
Throughout this Owner’s Manual we have used the following notations, please give special attention and extra care to follow the warning symbols:
DANGER warns of imminent safety hazard that, if not avoided, will result in death or serious injury.
WARNING warns of a potentially hazardous condition, that, if not avoided, could result in death or serious injury.
CAUTION wants of a potentially hazardous situation that, if not avoided, may result in a minor injury.
NOTICE concerns use and practices relating to conditions that could result in property damage.
REPAIR and important maintenance information.
�9

MAINTENANCE, DEALER SERVICE, AND WARRANTY GUIDELINES
Owner
The Owner of a recreational vehicle is responsible for regular care, inspections and proper maintenance. Performing regular maintenance is necessary for the safety, beauty, care and ownership of your recreational vehicle. Maintenance and inspections should be done on a regular basis as required or recommended in this manual and other component manuals.
The owner has the responsibility and obligation to make sure the recreational vehicle is repaired, maintained and protected at all times. If there is a need for warranty service, the Owner has a duty to timely report, get an appointment at an authorized repair dealer and see that the warranty repairs are completed.
Additionally, Owner is responsible for:
• Reading and reviewing this manual and all other supplied manuals for components and appliances, and completing all warranty cards;
• All proper safety, maintenance, care and protection as outlined in this manual and component manufacturer’s instructions of use and service of their products;
• Obtaining timely warranty repairs by an authorized repair dealer, and retaining any and all records and receipts of maintenance, repair, and/or other work on the recreational vehicle
Retail Selling Dealer will:
• Perform a Pre-Delivery Inspection, check and make repairs, if needed;
• Do New Owner Walk-Through and Orientation of the recreational vehicle for operation and care;
• Provide Owner with Gulf Stream Limited Warranty and Owner’s Manual and other manuals; and
• Register the sale of the recreational vehicle to Gulf Stream Coach, Inc.
Warranty Service
Warranty service is best accomplished by your selling authorized dealer. When you have or suspect that you require warranty service, contact the dealer and schedule an appointment for the repairs, as parts and labor availability may not be readily available. If you are out of town and need service, an authorized dealer locator is on our website: www.gulfstreamcoach.com. Be sure to inspect the repairs performed then signed the work order.
�10

If you have any questions or concerns after you picked up your recreational vehicle, contact the dealer who performed the repairs immediately.
Gulf Stream Coach, Inc. should be contacted if there is any issue obtaining warranty service from an authorized dealer: 503 S. Oakland Avenue PO Box 1005 Nappanee, IN 46550 Toll-Free (800) 289-8787 www.gulfstreamcoach.com
Modifications
Modifications to your recreational vehicle, without prior written authorization from Gulf Stream Coach, Inc. could result in voiding the Gulf Stream warranty. Contact the authorized Dealer before making changes.
Permanent Dwelling
This recreational vehicle was not designed to be used as a permanent dwelling, but rather for short-term and occasional recreational use. Should you use this recreational vehicle as permanent and/or long-term dwelling, be advised that it could cause premature wear on the recreational vehicle, including but not limited to, appliances, furnace, water systems, flooring, window coverings, furniture, bedding, interior services. The premature wear may be considered excessive and/or abusive use, and therefore, could void your warranty coverage for those items.
Defective Part
If you have warranty repairs performed by an unauthorized repair facility, the defective part must be returned to Gulf Stream Coach to be considered for warranty reimbursement before reimbursement will be made.
Reporting Safety Defects
If you believe that your vehicle has a defect which could cause a crash or could cause injury or death, you should immediately inform the National Highway Traffic Safety Administration (NHTSA) in addition to notifying the manufacturer. If NHTSA receives similar complaints, it may open an investigation and if it finds that a safety defect exists in a group of vehicles, it may order a recall and remedy campaign. However, NHTSA cannot become involved in individual problems between you, your dealer, or the manufacturer.
�11

To contact NHTSA, you may either call the auto safety hotline, toll-free at (888) 327-4236, hearing impaired (800) 424-9153, (or 366-0123 in Washington, DC area). You can also obtain additional information about vehicle safety from NHTSA’s website www.safercar.gov.
Appliances and Components
Your recreational vehicle is equipped with several appliances and components manufactured and provided by companies other than Gulf Stream Coach, Inc. Maintenance, care, instructions for operation including the manufacturer’s warranties are provided directly by the appliance and/or component company.
Gulf Stream disclaims any and all warranties for appliances and/or components. Appliance and component manufacturers may require product registration, maintenance, and other conditions to make a warranty claim, so review all the appliance and component warranties for your duties as an Owner of these products.
Where feasible, owner’s manuals and other user information for third-party appliances and components have been posted on the Gulf Stream Coach Web site.
Identification and Safety
Your RV has a unique Vehicle Identification number (VIN). It is important to reference the VIN along with the model and year whenever you have an inquiry or require service.
Indoor Air Quality
Good air quality in your RV requires proper ventilation, regular cleaning and avoiding air pollutants. Indoor air pollutants are introduced or are a byproduct through your use of the recreational vehicle, and may include but are not limited to, mold, mildew, pollen, dust, dander, bacteria, viruses, smoke, smoke, carbon monoxide, household cleaners or other hygiene products.
To increase ventilation and reduce indoor air pollutants: • utilize ceiling vents and exhaust fans • open windows and doors • clean the bathroom and kitchen often • identify and fix water leaks • close windows and run the A/C or dehumidifier to control mold • run the vent hood fan when cooking • remove dust and pet dander • do not smoke inside the recreational vehicle
�12

People with asthma, allergies, lung diseases tend to be more effected by poor indoor air quality issues. For more information and ideas to improve your air quality visit: www.epa.gov and www.cdc.gov
Formaldehyde
Formaldehyde is naturally occurring in the environment and may be released from smoking, cooking, use of soap, detergents, cosmetics, and many other household products and activities. It also can be derived from combustion or other natural processes, so it can be both indoors and outside in nature. Formaldehyde is also used as a binder in some of the building materials used to manufacture the recreational vehicle. Formaldehyde is unstable so high heat and humidity will have an effect on the concentration of formaldehyde, fresh air ventilation will exchange the air and decrease the level of airborne pollutants.
Some people may be sensitive to formaldehyde, so good indoor air quality is important to maintain, see above section how to ventilate and create good air quality.
Mold
Mold is a pollutant. It is organisms that naturally occur both indoors and in natural environments. Mold growth indoors must be cleaned and the water source identified, since when the water source (humidity, standing water, damp clothes or towels) is eliminated, mold will not grow.
Condensation
People, pets, plants continually release water vapor into the ambient air. So, in a contained living area of a recreational vehicle, condensation gathers from the various sources of released water vapor which needs to be ventilated outside or reduced by using a dehumidifier, otherwise the moisture will be retained in the recreational vehicle and may cause moisture issues with the recreational vehicle. Here are some tips that will help you reduce condensation: • When showering, keep bathroom door closed and vent open • When using any water i.e., dishes, laundry, cooking turn on
the exhaust fan • Hang wet clothes outside Use the air conditioner as it
removes excess humidity and lowers the temperature • While cooking, try to cover all pots and pans and avoid
leaving anything on the boil for too long. • Check sealants regularly and reseal when necessary to
avoid leaks, i.e. kitchen counters, doors, windows, to dry
�13
Fire Safety
Fire safety is an important part of owning a recreational vehicle. The following are basic rules for fire prevention:
• Do not smoke in bed or when sleeping • Always use a fire proof ashtray • Do not leave cooking food unattended and keep cooking
surfaces and counters clean and free of debris • Do not use cooking appliances for comfort heating • Do not use an open flame within the recreational vehicle • Do not use fireworks in the recreational vehicle • Do not store flammable liquids in the recreational vehicle • Do not overload electrical outlets or circuits • Do not clean with flammable products • Repair any faulty or damaged electrical wiring • Repair immediately any LP leaks • Make sure children keep away from LP Gas controls or
container
Keep emergency exits clear. Make a pre-planned escape route and aware of all emergency exits including windows and review periodically with the occupants of the recreational vehicle.
Your recreational vehicle is equipped with a fire extinguisher. Make sure everyone knows where it is located, how to operate it and what types of fires it is designed to handle. Do not attempt to use water to put out a fire. Water can spread some types of fire. Check the operation of the fire extinguisher on a regular basis (every 6 months minimum) to make sure it is charged and ready for use.
If a fire does start within the recreational vehicle, get all occupants out immediately. If it is a small fire, use the fire extinguisher. If the fire is not quickly put out, get out of the vehicle. Contact the fire department. If possible, close the LP gas service valve. Move a safe distance from the vehicle.
Smoke Detector
Your recreational vehicle is equipped with a smoke detector. Check its operation on a regular basis. If it does not check properly, get it serviced or replaced prior to using your recreational vehicle again.
Carbon Monoxide
Carbon Monoxide is a colorless, odorless, tasteless gas, which can be fatal if a high concentration builds up in a sealed area over a period of time. Carbon Monoxide is a by-product of burning fuel, and is found in high concentrations in exhaust from gas burning engines. A water heater or furnace operating improperly can
�14
also produce Carbon Monoxide. Under normal conditions your coach should be free from Carbon Monoxide at any given time. Due to the safety hazards of Carbon Monoxide (CO), each Gulf Stream motor home is equipped with a CO Detector.
Carefully read the instructions included with your CO detector to ensure proper use and maintenance. Most CO detectors require only occasional dusting and weekly testing. DO NOT use any type of cleaner when dusting your CO detector. Doing so may render the unit useless without warning.
Carbon Monoxide is often confused with illness such as “flu like symptoms”. (Headaches, Nausea, Dizziness). Such symptoms should be discussed with all vehicle occupants. RV certified CO detectors will sound an alarm if 100 PPM (parts per million) of CO is present within 90 minutes. 50 PPM is allowed in a work place for up to 8 hours. Cigarette smoke contains about 5 PPM Carbon Monoxide.
If your CO alarm sounds, exit the vehicle immediately. After exiting the vehicle take a head count and make sure everyone is accounted for. Air out the vehicle and check again to ensure that the alarm came from the CO detector, as your vehicle is also equipped with a smoke detector and LP gas detector (optional). Following instructions included with your CO detector is recommended.
LP Gas Safety
WARNING: SHUT OFF ALL LP GAS SYSTEMS BEFORE FILLING THE GASOLINE TANK. LP appliances should never be operated while the vehicle is in motion. If the pungent odor of LP gas is detected, immediately shut off the LP gas valve and check the LP gas label for further instructions. Your unit may be equipped with an LP gas leak detector that will help you detect the presence of LP gas. However, this detector should not be relied upon solely; if you detect the smell of LP gas, shut off the gas valve immediately. Check other sections of this manual for more information on the LP gas system.
LP gas heating system and LP gas appliance safety regulations
The United States Government requires that the manufacturer of this recreational vehicle provide the following safety information that has been provided by the National Fire Prevention Association (NFPA) and the American National Standards Institute (ANSI). The information contained below will also be found, along with
�15
additional information, in other appropriate sections of this operator’s manual. Refer to the Table of Contents and the Index.
LP-Gas cylinders shall not be stored inside the vehicle. LP-Gas cylinders are equipped with safety devices that relieve excessive pressure by discharging gas to the atmosphere. FAILURE TO COMPLY COULD RESULT IN DEATH OR SERIOUS INJURY.
A warning label has been located near the LP-Gas container. This label reads as follows.
DO NOT FILL CONTAINER(S) TO MORE THAN 80 PERCENT OF CAPACITY.
• Overfilling the LP-Gas container can result in uncontrolled gas flow, which can cause fire or explosion.
• A properly filled container will contain approximately 80 percent of its volume as liquid LP-Gas.
IT IS NOT SAFE TO USE COOKING APPLIANCES FOR COMFORT HEATING.
Cooking appliances need fresh air for safe operation. Before operation:
a. Open the overhead vent or turn on the exhaust fan. b. Open a nearby window.
Unlike homes, the amount of oxygen supply is limited due to the size of the recreational vehicle, and proper ventilation when using cooking appliance(s) will avoid the dangers of asphyxiation. It is especially important that cooking appliances not be used for comfort heating, as the danger of asphyxiation is greater when the appliance is used for long periods of time. FAILURE TO COMPLY COULD RESULT IN DEATH OR SERIOUS INJURY.
Portable fuel-burning equipment, including wood, charcoal grills and stoves, shall not be used inside the recreational vehicle. The use of this of this equipment inside the recreational vehicle can cause fires and asphyxiation.
Do not bring or store LP-Gas cylinders, gasoline or other flammable liquids inside the vehicle because a fire or explosion can result.
The following label has been placed in the cooking area of the vehicle:
�16

If you smell gas: • Extinguish any open flame, pilot light and smoking
material. • Do not touch electrical switches. • Shut off the LP gas supply at the tank valve(s) or gas
supply connection. • Open doors and other ventilating openings. • Leave the area until the odor clears. • Have the gas system checked and leakage source
corrected before using again.
LP gas regulators must always be installed with the regulator vent facing downward. Regulators that are not in compartments have been equipped with a protective cover. Make sure that the regulator vent faces down and that the cover is kept in place to minimize vent blockage that could result in excessive gas pressure causing fire or explosion.
Notice: All LP gas regulators are factory tested for proper pressure output. Pressure output should be checked periodically by a qualified LP dealer. Only qualified persons should install, adjust or service LP gas regulators. If service is needed contact a qualified LP dealer.
�17

�18

TOWING A TRAVEL TRAILER
Driving a vehicle that is towing a travel trailer requires concentration, care, and awareness that goes beyond normal driving. Your attention to these considerations will make towing a travel trailer safer and more rewarding. We encourage you to keep these factors in mind:
• Never drive when you are sleepy or too tired to react properly to emergencies. Never drive if your reflexes or judgement are under the influence of alcohol or drugs.
• Make sure all tires are inflated to proper levels. Carry a tire pressure gauge in your vehicle. Inspect tires for wear and replace them before wear is excessive.
• Pay extra attention to the actions of other drivers on the road. Drive with the assumption that they are not aware that you are towing a trailer. Allow extra space between you and other vehicles for every move, including lane changes, turns, etc.
• Understand that the added weight of your trailer will affect every movement of your vehicle. Accelerating to highway speeds will take more time, braking distances will be longer, and turns must be wider and slower. Develop a sense of the way your vehicle and trailer handle on lightly traveled roads before approaching long-distance, high-traffic situations.
• Learn how your tow vehicle and trailer move through turns and curves, noting that the travel trailer turns through a tighter arc than the tow vehicle. Make sure you allow for this tighter turning circle.
• Note the total overall height of your travel trailer, including roof-top accessories like the air conditioner, and avoid any overhead obstacles that might possibly contact the roof or roof-mounted items. Be especially cautious around overhangs, canopies, drive-throughs, hanging signage, and overhanging trees.
• Practice using your external rear view mirrors for on-road maneuvers, as your on-dash mirror will have limited usefulness when towing on the road.
�19

• Make a habit of driving with your running lights on. Studies show that lights make other drivers more aware of your presence.
• Take extra care to stow all cargo, gear, and supplies so they will not be disturbed by the motion of the trailer. For added safety, shut off propane flow to the trailer by closing the valve at the propane tank(s).
• Use seatbelts for all passengers at all times while on the road. NEVER allow passengers to travel inside a travel trailer while it is being towed. Follow all applicable state and local safety laws, speed limits, posted warnings, and directional information. Many states have lower speed limits and/or designated lanes for tow vehicles.
• Pay attention to weather and road conditions when making travel plans. Avoid towing your trailer in high winds, on icy roads, up and down extreme hills, on extremely bumpy roads, or anywhere where your control and safety cannot be assured.
• Switch to a lower gear or lower range when descending long hills, to reduce strain on the braking system. Anticipate brake usage in advance of long descents and adjust speed accordingly. Use the brakes intermittently on long descents to allow them to cool.
TOW VEHICLE REQUIREMENTS
Prior to hitching and pulling your travel trailer or fifth wheel, make sure your tow vehicle is properly suited and equipped for such use. Read your tow vehicle’s owner’s manual sections on trailer towing, Gross Combined Weight Rating, hitch requirements, sway control requirements, braking requirements, and all related areas for proper towing. Gulf Stream Coach, Inc. is not responsible for problems associated with insufficient towing capabilities of the tow vehicle or hitching systems.
�20

TRAVEL TRAILER BRAKE SYSTEMS
Electric Brake System
The electric brakes on your travel trailer of fifth wheel are similar to those on your automobile; the difference being that they are activated by 12 volt electrical impulse instead of a hydraulic system. The impulse comes from a brake controller, which regulates the flow of electrical current to the trailer brakes.
Brakes are usually maintenance free; however, road and driving conditions may at times cause them to grab, drag, or fade. Also, improper grounding of the trailer to the tow vehicle, irregular current, or a short circuit in the wiring system will cause electric brakes to malfunction. We recommend that you consult your dealer or local trailer brake specialist on these problems.
Electric brakes should be checked periodically to determine the condition of the magnets and drums, and whether wiring connections are still secure (see manufacturer’s instructions). Brakes can be adjusted to activate ahead of the tow vehicle brakes for best road control. Consult the manufacturer’s instructions or your dealer for detailed maintenance and service procedures.
Allow approximately 1,000 miles of use to break in the shoes on the trailer brakes. After the break-in period, have the brake shoes adjusted professionally to provide ideal performance and maximum useful life.
Your travel trailer braking system requires several components to provide safe, effective braking. Make sure all components are in good working order to ensure proper braking. Braking system components include:
• Brake Controller • Tow Vehicle Battery/Electrical System • 7-Way Wire Harness • Breakaway Switch
Brake Controller (Owner Supplied)
Your new travel trailer is equipped with electric brakes. A brake controller should be installed in the tow vehicle to work with the travel trailer brakes. There are several different manufacturers of brake controllers. Each controller has adjustable settings to provide safe, effective stopping when properly adjusted. Read the instruction manual for the brake controller and learn about its proper use prior to pulling your travel trailer.
�21
Check with your RV dealer or brake controller manufacturers to decide what controller is best for your combination of tow vehicle and trailer.
Test your Trailer Brakes with your Brake Controller prior to each trip to ensure proper operation.
Tow Vehicle Battery/Electrical System
The battery in your tow vehicle provides the power needed by your travel trailer brakes. Make sure your vehicle battery and charging system are working properly to ensure power is available for safe, reliable braking.
7-Way Wire Harness
An industry-standard 7-Way Wire Harness attached to your travel trailer provides 12 volt electrical current from your tow vehicle battery and electrical system to power travel trailer brakes, clearance lights, brake lights, turn signals, and tail lights. This harness, connector, wiring and lights must be in working order for your tow vehicle/trailer combination to operate safely and legally on public roads.
It is not unusual for corrosion and dirt to accumulate in the connector. Make a point of cleaning the connector on a regular basis to ensure a reliable electrical connection, and protect it from road debris when possible.
Breakaway Switch
The Breakaway Switch provides a key safety function, applying the trailer brakes in the event the trailer is detached from the tow vehicle while in motion. The Breakaway Switch is activated by an owner-supplied Auxiliary Battery mounted on the trailer. Make sure the cable that activates the Breakaway Switch is attached firmly to the tow vehicle when the trailer is hitched, and check that the battery is adequately charged to power the switch. Adjust the cable so both vehicles may turn freely without pulling the pin from the switch. Lubricate the breakaway pin periodically to ensure good operation. Make sure the pin is securely in place each time before using the trailer. DO NOT USE THE BREAKAWAY SWITCH AS A PARKING BRAKE, AS IT IS INTENDED FOR EMERGENCY USE ONLY AND SUCH USE WILL DRAIN YOUR RV BATTERY.
�22

TRAVEL TRAILER HITCH SYSTEMS
Tow Vehicle Hitch (Owner Supplied)
The hitch you choose for your tow vehicle and travel trailer will have a major affect on towing and handling. There are many types of hitches on the market, so it is worth your time to study the available options and discuss your requirements with your dealer.
A travel trailer requires a frame-mounted hitch. Check with your dealer to determine the right class and type of hitch for your particular tow vehicle and travel trailer. Frame-mounted hitches are rated by the manufacturer to establish their towing and weight capacity. To choose the right hitch class rating, you need to know your travel trailer’s GVWR (gross vehicle weight rating) and its hitch weight (or tongue weight).
Equalizing/Weight Distributing Hitches (Owner supplied)
In addition to the pulling weight of a trailer, a tow vehicle must also support approximately 9-15% of the actual weight of the trailer at the hitch point. With a 6,000 lb. trailer, this additional weight might be 700 to 800 lbs. This much weight added to your rear bumper could cause the car to be out of balance, and reduce traction. This may result in poor steering control, poor braking control, and can be potentially dangerous. Use of heavier springs, spring helpers or stiffer tires will not correct the basic out-of-balance condition. The problems from this condition are compounded when traveling over bumps and dips in the road. The balance problem is solved by the addition of a suitable matched “equalizing hitch,” sometimes called a “weight distributing hitch.”
The effect of an equalizing hitch is to distribute the hitch load equally between the front and rear tow vehicles axles and the trailer axle(s). If the weight at the hitch is 450 lbs., the effect of the equalizing hitch would be to distribute this weight in approximately equal portions to both tow vehicle axles and all trailer axles. Thus, your tow vehicle can remain relatively level. This not only will give you better steering and brake control, but also will insure that your headlight beams remain down on the road where they belong. Equalizing hitches also afford help in sway control. Equalizing Hitch Load Comparison
�23

Most hitch manufacturers offer equalizing hitches in several sizes designed to handle trailers of various hitch-weight classes. Get the hitch size that is right for your requirements. Your dealer will help you select one on the basis of your trailer weight and tow vehicle. Improperly sized equalizing hitches can damage your trailer frame.
Please consult your tow vehicle’s owner’s manual for requirements on using load equalizing hitches.
Hitch Weight
This is the portion of the total trailer weight that is carried by the hitch, and typically ranges from 9% to 15% of the total weight of the trailer and all contents.
Be aware that hitch weight can vary significantly if cargo is not properly distributed in the travel trailer. When too much cargo is stowed toward the front of the trailer, hitch weight tends to increase; when too much cargo is stowed in the rear, hitch weight tends to be reduced. Either condition significantly affects the control and handling of the trailer when towed, and these unsafe conditions are magnified at highway speeds and when making maneuvers.
Hitch Height
Determine the static height of your travel trailer hitch with the trailer fully loaded and hitched to your tow vehicle on a level surface. Visually inspect how level the tow vehicle/trailer combination is and adjust the chain link selection accordingly. In order to have a level tow vehicle/trailer combination you may have to raise or lower the hitch ball on the tow vehicle. Most, if not all, equalizer hitches allow for height adjustments of the hitch ball.
Next, adjust the equalizing bars of the hitch so that the trailer and the tow vehicle are essentially level. Refer to the instructions provided by the hitch manufacturer to adjust the weight-distributing hitch to the correct height. Check with your dealer if you need additional assistance. Remember which chain link is used on the equalizer hitch spring bar for your most common load conditions. This will save time in future use!
Depending on the trailer load each time the trailer is used, you may have to go up or down one link to have a level tow vehicle/trailer combination. Towing with the hitch either too high or too low may result in handling issues that make the system unsafe.
Sway Control (Owner Supplied)
Most trailers should employ some type of sway control device. There are several types of these devices available, operating on
�24
different principles such as friction, cam action, and computer operated braking of the trailer wheels. Each has its advantages. They will all decrease or eliminate the sway affects induced by passing trucks, strong winds, and down-hill grades. They will make your towing safer when driving under adverse conditions.
Please consult your tow vehicle’s owner’s manual for requirements on using sway control devices.
If you encounter a situation where the trailer is swaying
• Accelerate slightly then gradually slow down • Do not “hit” the brakes • Turn the steering wheel as little as possible. Trying to
counter-steer may make the swaying worse. • Use the Brake Controller manual switch to help keep tow
vehicle and trailer aligned. If your trailer still sways, slowly pull off the road and check your weight distribution hitch, then your tow vehicle and trailer tire pressures.
Safety Chains
There are different safety chain requirements in the various states. When delivered by your dealer, your trailer is equipped to meet SAE standards and the state requirements where purchased. You may choose to upgrade to heavier and/or additional chains with case-hardened, quick-connect links.
• Always have the safety chains attached when towing. • Connect the chains to the safety chain loops on the tow
vehicle hitch, crossing them under the trailer tongue. • Make sure the chains are long enough not to restrict
sharp turns of the tow vehicle, but tight enough so they do not drag on the ground.
Hitch Locking Devices
Make sure that locking devices and/or safety pins are in place before beginning your travels. Your failure to secure the hitch may be costly. If your hitch utilizes a pin for securing the safety latch, carry a spare.
Stabilizer Jacks
Stabilizer Jacks (manual or power) are permanently mounted to the travel trailer frame. When lowered to the ground, they provide a stabilizing effect and a firm setting that reduces the motion of the travel trailer when occupants are moving inside.
Stabilizer Jacks should not be used to level the trailer, to elevate a wheel, or to change a tire.
�25

HITCHING UP - GENERAL INFORMATION These steps will help you securely hitch your travel trailer to your tow vehicle.
1. Use wood or other blocks to block the travel trailer wheels.
2. Use the Power Hitch Jack or Manual Crank to raise the trailer hitch receiver above the height of the tow vehicle hitch ball.
3. Open the coupler latch on the travel trailer hitch. 4. Back the tow vehicle into position. Ask for help from a
spotter, and/or check the position between each move. Be sure you can see and hear your spotter. Make small, slow moves until the ball is directly under the hitch receiver.
5. Use the power hitch jack or manual crank to lower the hitch onto the ball. Make sure the ball is fully enclosed by the receiver and the receiver is fully seated over the ball.
6. Close the coupler latch and install the safety pin. 7. Raise the hitch jack to its highest position; remove and
stow the hitch jack foot. 8. Install equalizer bars as directed by the manufacturer. 9. Connect the Breakaway Switch cable to the tow vehicle. 10.Connect the Safety Chains by crossing them under the
hitch. 11. Connect the 7-Way Connector from the trailer to the 7-
Way Outlet on the tow vehicle. 12.Retract all Stabilizer Jacks 13.Make sure all exterior doors and access panels are
secured. 14.Check the function of all exterior lights.
Remove and stow the wheel blocks. Double-check the coupler latch and safety pin.
15.Check for any obstacles that obstruct your path before you pull away.
16.Test your brakes as soon as possible once you are on your way.
Unhitching
The site for parking your trailer should be as level as possible so less jacking will be necessary to level the trailer. The ground should also be firm enough that the jacks will not sink.
Before unhitching, the trailer should be immobilized by use of wheel chocks placed both in front of and behind the wheels on both sides of the trailer. This is important to keep the trailer from moving downhill if the site is not exactly level.
�26
After removing the safety chains, the breakaway switch tether and the trailer electrical plug, place a block or hitch jack foot under the hitch jack and extend the jack to meet it firmly, and raise the hitch a few inches with the coupler and equalizer hitch still attached to the hitch ball. This will remove pressure on the equalizer hitch. Next, carefully remove the equalizer hitch spring bar in accordance with the hitch manufacturer’s instructions. Lower the hitch back down to where it barely has pressure on the ground. The safety latch on the hitch coupler should now be released and the hitch jacked back up until it just clears the hitch ball. With all hitch items detached, you can now remove the tow vehicle and proceed to level the trailer. Remember that such leveling is not only important to your comfort, but also for proper functioning of the refrigerator and the plumbing drain lines.
HITCHING UP - FIFTH WHEELS Hitches
There are several types of fifth wheel hitches available. Be certain to use the one recommended by your vehicle manufacturer and that meets the weight requirements of your fifth wheel. The one described here is typical, but have your dealer demonstrate and explain the proper hitching and unhitching procedure for your hitch.
NOTE! MAKE SURE YOUR FIFTH WHEEL HITCH IS INSTALLED IN A LOCATION THAT ALLOWS PROPER TURNING CLEARANCE OF THE FIFTH WHEEL AND THE TRUCK CAB!
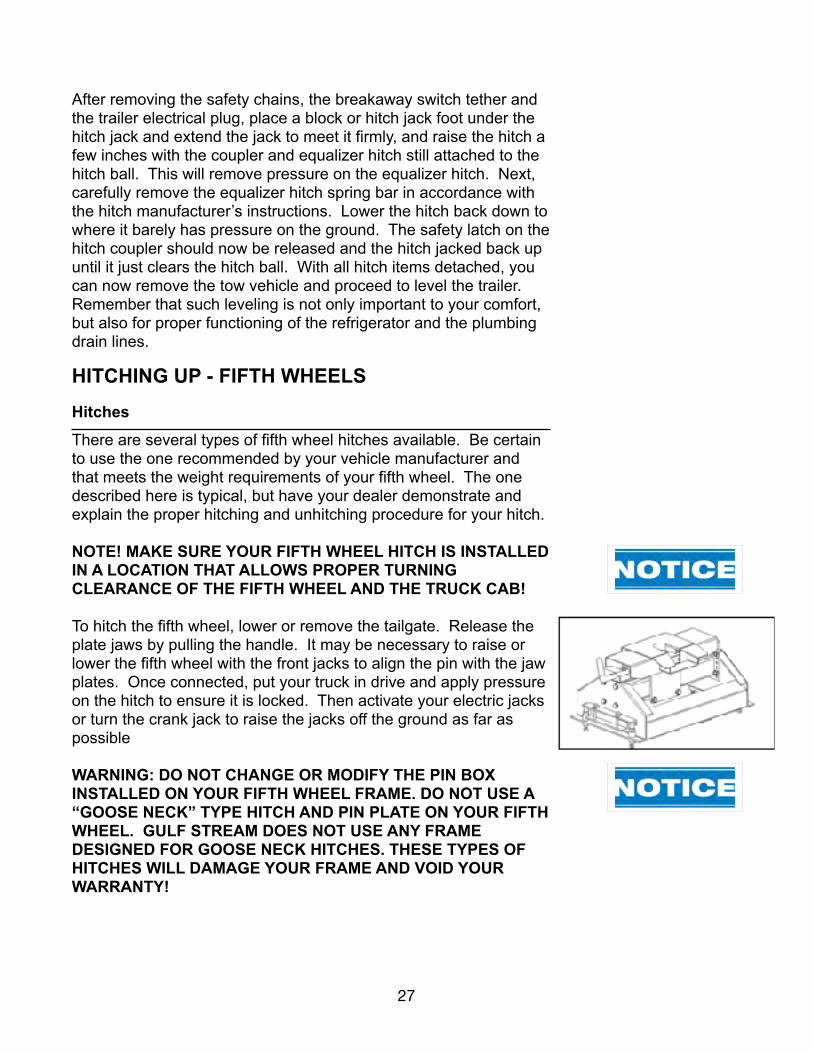
To hitch the fifth wheel, lower or remove the tailgate. Release the plate jaws by pulling the handle. It may be necessary to raise or lower the fifth wheel with the front jacks to align the pin with the jaw plates. Once connected, put your truck in drive and apply pressure on the hitch to ensure it is locked. Then activate your electric jacks or turn the crank jack to raise the jacks off the ground as far as possible
WARNING: DO NOT CHANGE OR MODIFY THE PIN BOX INSTALLED ON YOUR FIFTH WHEEL FRAME. DO NOT USE A “GOOSE NECK” TYPE HITCH AND PIN PLATE ON YOUR FIFTH WHEEL. GULF STREAM DOES NOT USE ANY FRAME DESIGNED FOR GOOSE NECK HITCHES. THESE TYPES OF HITCHES WILL DAMAGE YOUR FRAME AND VOID YOUR WARRANTY!
�27

Ride Height of Fifth Wheel – Clearance
When the fifth wheel is connected to the tow vehicle, check the ground clearance and front to rear pitch of the fifth wheel. If the front of the unit is too high, weight will be transferred behind the axles, causing the unit to fishtail and the rear axle tires to prematurely wear. If the front of the unit is too low, additional weight will be transferred to the truck. To achieve proper ride height, adjust the pinbox by removing the bolts on each side and raising or lowering the box until the proper holes are aligned, then reinsert and tighten the bolts. Re-tighten the pinbox bolts after the first 50 miles.
WARNING: MODIFYING THE SUSPENSION OF YOUR FIFTH WHEEL OR TRAVEL TRAILER TO MEET A LEVEL RIDE HEIGHT OF YOUR TOW VEHICLE IS NOT RECOMMENDED AND WILL VOID THE WARRANTY OF YOUR GULF STREAM PRODUCT. SUSPENSION MODIFICATION CAN CAUSE ADVERSE HANDLING, WHICH COULD RESULT IN AN ACCIDENT CAUSING INJURY OR DEATH.
VEHICLE LOADING
Carrying Capacity
During the design and development of our travel trailer and fifth wheels, the number and size of storage compartments and the liquid tank capacities are maximized for value and convenience. However, be mindful that if all holding tanks are filled to capacity, and all storage compartments and cupboards are filled to the maximum volume, the travel trailer or fifth wheel could be overloaded. Refer to the manufacturer’s labels posted inside and outside of the unit for unit weight information
The amount and placement of cargo will also affect the amount of water and LP gas that you can carry. Water weighs 8.3 pounds per gallon and propane weighs 4.2 pounds per gallon. Periodically reweigh your unit. Different traveling configurations may change your loading and weight pattern.
WARNING! DO NOT EXCEED THE RATED LOAD OF THE RV OR THE RATED LOAD OF ANY AXLE! EMPTY ALL HOLDING TANKS BEFORE FILLING FRESH WATER TANK OTHERWISE YOU WILL LIMIT CARGO CAPACITY. CAMPGROUNDS SUPPLY DUMP STATIONS WHICH CAN BE UTILIZED.
�28

Loading Tips
After you have determined how much weight you can safely carry and selected those items to make up that weight, make a list and keep it for future reference. Load the RV and distribute the load so that you get proper weight on the axles and hitch. Do not load upper cabinets with heavy items. Secure and brace items so they won’t move during travel, thereby shifting the load in the RV. Do not load heavy items near either end of the RV or on the rear bumper. Adjust cargo storage to keep the side to side wheel loads as equal as possible. Carry only as much water as needed for travel use or to balance the load. Always empty your waste water and sewage holding tanks before traveling.
WARNING! ONLY FACTORY INSTALLED REAR BUMPER ACCESSORY RECEIVERS (OPTIONAL) ARE APPROVED FOR USE ON THIS PRODUCT. DO NOT INSTALL ANY ADDITIONAL TYPE OF WEIGHT CARRYING RACK OR FRAME TO THE REAR BUMPER OR ANY CHASSIS OR BODY COMPONENT OF THE RV. DAMAGE TO THE RV AND UNSTABLE HANDLING CHARACTERISTICS MAY RESULT.
WARNING! TOWING ADDITIONAL TRAILERS BEHIND YOUR FIFTH WHEEL OR TRAVEL TRAILER (TANDEM TOWING) IS STRICTLY PROHIBITED. CHECK WITH YOUR STATE OR ANY STATE YOU PLAN ON TRAVELING THROUGH TO ENSURE STATE LAW IS BEING FOLLOWED. MANY STATES HAVE SPECIFIC LENGTH RESTRICTIONS THAT MAY BE VIOLATED IF “TANDEM TOWING”.
WARNING: EXCEEDING THE GAWR, GVWR, OR GCWR OF YOUR RV/TRUCK COMBINATION CAN CAUSE UNDESIRABLE HANDLING CHARACTERISTICS AND MAY CREATE A SAFETY HAZARD. MODIFICATION OF YOUR VEHICLE BY ADDITION OF RACKS NOT SPECIFIED BY THE MANUFACTURER TO CARRY ADDITIONAL EQUIPMENT OR VEHICLES/TRAILERS IS STRICTLY PROHIBITED, MAY CREATE A SAFETY HAZARD, AND MAY VOID YOUR WARRANTY.
Make a loading diagram of your properly loaded RV. It will help you locate where specific items are stored, and will help speed the loading process. Store emergency items in a readily accessible location. Include tools, first-aid kit, rain gear, flashlight, highway warning devices, and an electric cord or light.
The difference between the empty weight and the weight of the RV in traveling configuration is your usable load. If the loaded weight of your RV exceeds the GVWR or the weight on any axle exceeds
�29

that axle’s GAWR, the RV is overloaded and you’ll have to remove items to bring the weight down to or below the GVWR and GAWR.
All items must be considered for their weight and stored according to how heavy they are. Heavy items should be placed close to the floor and in the center of the vehicle. DON’T FORGET TO INCLUDE THE ITEMS YOU PURCHASE ON YOUR TRIP.
Luggage and similar cargo carried inside the vehicle must be secured to prevent possible damage in the case of a sudden stop or an accident.
�30

WEIGHING YOUR TRAILER
In order to make sure the trailer is not overloaded you should periodically weigh it in a loaded condition. You will want to check the weight on the axles on travel trailers with the trailer hitched to the vehicle as well as when not hitched if you are using a weight distribution hitch. On fifth wheels you will need the weight of the truck to determine the pin weight of the fifth wheel. Please review the following guidelines for weighing your trailer.
Travel Trailers
Pull your fully loaded travel trailer onto the scale and leave it hitched to the vehicle as shown in Diagram A. This will give you the actual Gross Axle Weight (GAW) as pulled down the road. Check your Federal ID label to see what the maximum rating for your axles is and make sure they are not overloaded. If necessary, redistribute or remove weight within the trailer.
Diagram A.
Diagram B. Lower your front jack and unhitch the trailer as shown in diagram B. Record this weight. This weight is necessary to determine the hitch weight.
Diagram C. Next, move the trailer so that the front jack and the axles are on the scale as shown at left. This will give you the Gross Vehicle Weight (GVW). This weight must not exceed the trailer’s GVWR. If it does you will need to remove some cargo from your trailer.
To determine your hitch weight, take the final GVW and subtract the axle weight recorded per diagram B. Most hitch weights should fall between 9-15% of the total trailer weight. You may have to shift some of your cargo to remain within this parameter.
�31

Fifth Wheels
Diagram D. Pull your fully loaded fifth wheel onto the scale as shown here. This will give you the actual Gross Axle Weight (GAW) as pulled down the road. Check your Federal ID label to see what the maximum rating for your axles is and make sure they are not overloaded. If necessary, redistribute or remove weight within the fifth wheel.
Diagram E. To determine the pin weight of the fifth wheel you must weigh the truck with the fifth wheel hitched as shown in Diagram E. Record this weight. Then disconnect the fifth wheel and weigh the truck again as shown in Diagram F. Subtract the difference between the two weights and you will arrive at your pin/hitch weight. Adjust your cargo accordingly to remain within 23-25% of the GVW of the fifth wheel. The GVW is the GAW added to the pin/hitch weight.
Diagram F.
Manufacturer’s Labels.
Your vehicle is equipped with several federally required labels pertaining to the vehicle’s weight, load capacity and operating limitations. On the front, left exterior wall is the Federal ID label that lists the unit’s manufacturer’s serial number, the front and rear GROSS AXLE WEIGHT RATING (GAWR), the vehicle’s GROSS VEHICLE WEIGHT RATING (GVWR), tire and wheel rim sizes, tire operating pressure, chassis serial number and the VEHICLE IDENTIFICATION NUMBER (VIN).
�32
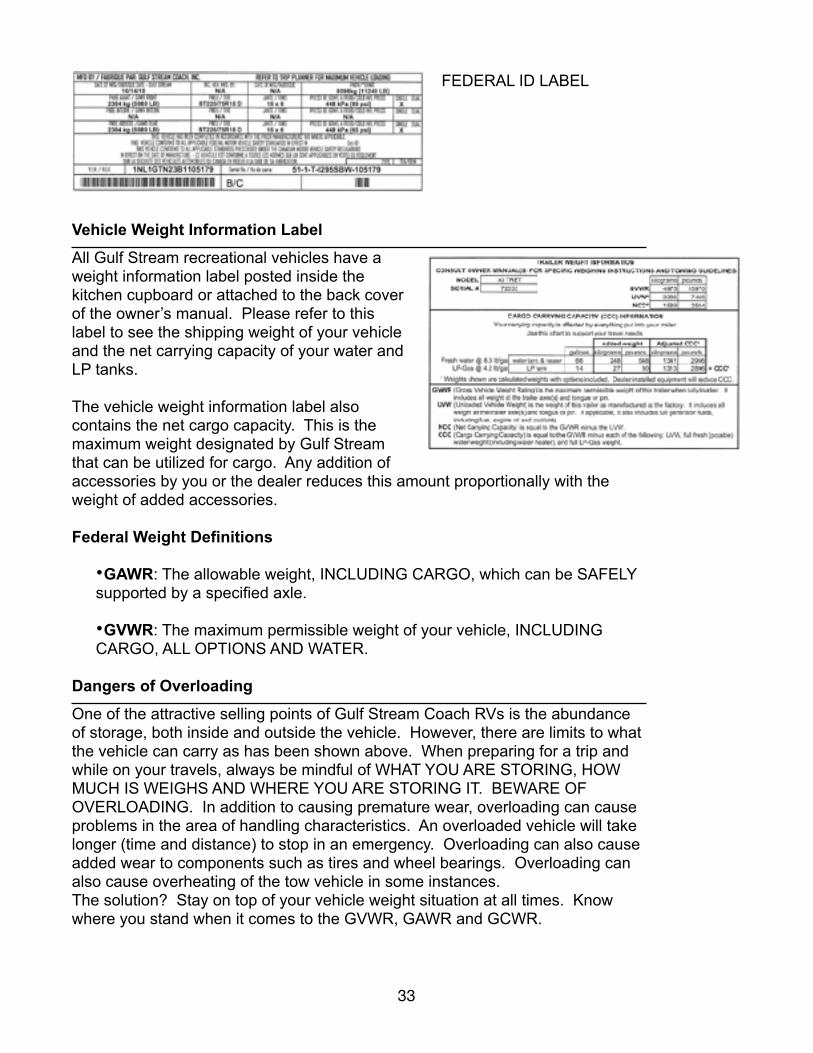
FEDERAL ID LABEL
Vehicle Weight Information Label
All Gulf Stream recreational vehicles have a weight information label posted inside the kitchen cupboard or attached to the back cover of the owner’s manual. Please refer to this label to see the shipping weight of your vehicle and the net carrying capacity of your water and LP tanks.
The vehicle weight information label also contains the net cargo capacity. This is the maximum weight designated by Gulf Stream that can be utilized for cargo. Any addition of accessories by you or the dealer reduces this amount proportionally with the weight of added accessories.
Federal Weight Definitions
•GAWR: The allowable weight, INCLUDING CARGO, which can be SAFELY supported by a specified axle.
•GVWR: The maximum permissible weight of your vehicle, INCLUDING CARGO, ALL OPTIONS AND WATER.
Dangers of Overloading
One of the attractive selling points of Gulf Stream Coach RVs is the abundance of storage, both inside and outside the vehicle. However, there are limits to what the vehicle can carry as has been shown above. When preparing for a trip and while on your travels, always be mindful of WHAT YOU ARE STORING, HOW MUCH IS WEIGHS AND WHERE YOU ARE STORING IT. BEWARE OF OVERLOADING. In addition to causing premature wear, overloading can cause problems in the area of handling characteristics. An overloaded vehicle will take longer (time and distance) to stop in an emergency. Overloading can also cause added wear to components such as tires and wheel bearings. Overloading can also cause overheating of the tow vehicle in some instances. The solution? Stay on top of your vehicle weight situation at all times. Know where you stand when it comes to the GVWR, GAWR and GCWR.
�33

�34
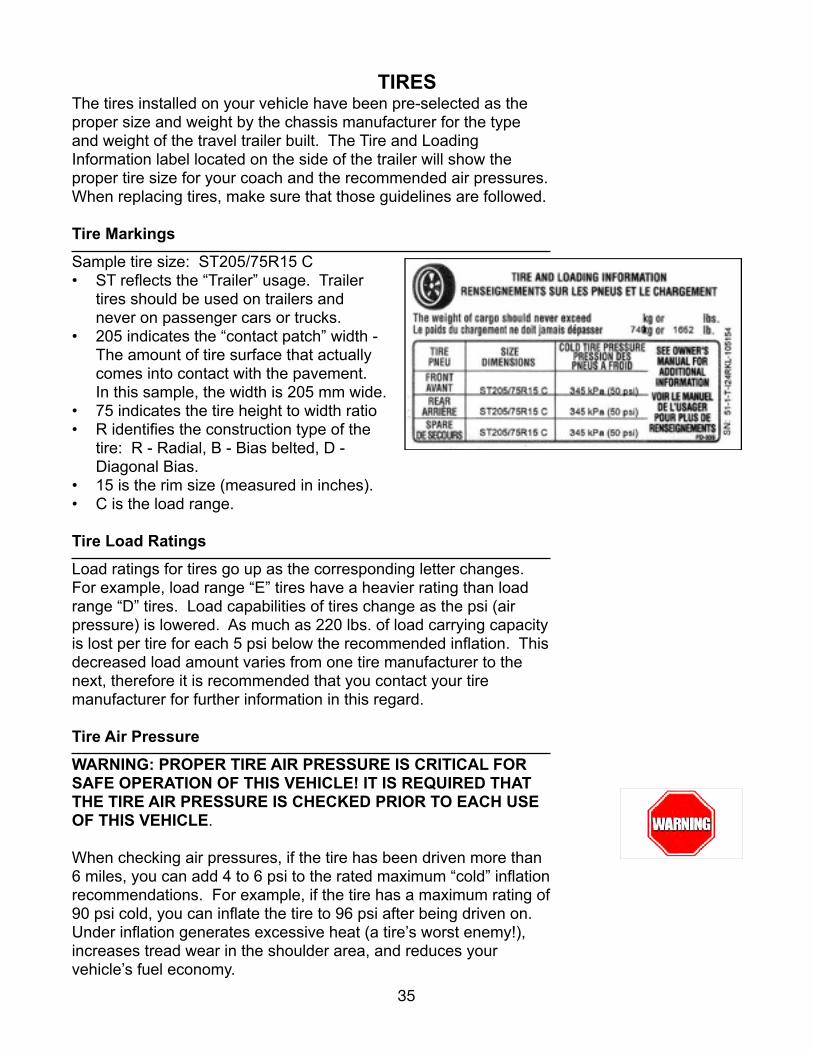
TIRES The tires installed on your vehicle have been pre-selected as the proper size and weight by the chassis manufacturer for the type and weight of the travel trailer built. The Tire and Loading Information label located on the side of the trailer will show the proper tire size for your coach and the recommended air pressures. When replacing tires, make sure that those guidelines are followed. Tire Markings
Sample tire size: ST205/75R15 C • ST reflects the “Trailer” usage. Trailer
tires should be used on trailers and never on passenger cars or trucks.
• 205 indicates the “contact patch” width - The amount of tire surface that actually comes into contact with the pavement. In this sample, the width is 205 mm wide.
• 75 indicates the tire height to width ratio • R identifies the construction type of the
tire: R - Radial, B - Bias belted, D - Diagonal Bias.
• 15 is the rim size (measured in inches). • C is the load range.
Tire Load Ratings
Load ratings for tires go up as the corresponding letter changes. For example, load range “E” tires have a heavier rating than load range “D” tires. Load capabilities of tires change as the psi (air pressure) is lowered. As much as 220 lbs. of load carrying capacity is lost per tire for each 5 psi below the recommended inflation. This decreased load amount varies from one tire manufacturer to the next, therefore it is recommended that you contact your tire manufacturer for further information in this regard.
Tire Air Pressure
WARNING: PROPER TIRE AIR PRESSURE IS CRITICAL FOR SAFE OPERATION OF THIS VEHICLE! IT IS REQUIRED THAT THE TIRE AIR PRESSURE IS CHECKED PRIOR TO EACH USE OF THIS VEHICLE.
When checking air pressures, if the tire has been driven more than 6 miles, you can add 4 to 6 psi to the rated maximum “cold” inflation recommendations. For example, if the tire has a maximum rating of 90 psi cold, you can inflate the tire to 96 psi after being driven on. Under inflation generates excessive heat (a tire’s worst enemy!), increases tread wear in the shoulder area, and reduces your vehicle’s fuel economy.
�35

Never mix radial, bias belted or bias type tires. Never mix brands. This can adversely affect vehicle handling and stability. Use only the tire size that is listed on the Safety Compliance Certification Label. If you have a question about the label, call Gulf Stream.
Tire Maintenance
When cleaning tires, try to use a tire-cleaning agent. Never use any cleaner that contains solvents. Solvents will draw oil from tires and cause them to prematurely crack. Inspect your tires prior to each trip, looking for bulges or cracks in the sidewalls.
When storing your recreational vehicle for long periods of time, you should completely unload the vehicle so that a minimum weight will be placed on the tires. Make sure the tires are inflated to the recommended operating pressure. Avoid moving the vehicle during extremely cold weather. Move the vehicle at least every three months to prevent ozone cracking in the tire bulge area as well as “flat spotting” from prolonged strain of sidewall and tread deflection. Make sure you check the inflation and adjust to the recommended operating pressure before putting the vehicle back into service.
Tire life expectancy varies. Some tires reach their life expectancy and may need to be replaced in as little as six years regardless of tread wear. Please refer to the tire manufacturer for recommendations in regard to tire life expectancy.
Wheel Nut Torque
Wheel nut torque is a very important safety measure that should be checked often. Travel trailer tires may carry higher loads than typical passenger car tires. Further, travel trailer tires on tandem axle trailers are subject to high side-to-side load stress when making slow or tight turns. These circumstances require extra maintenance on the wheel bearings and brakes, and also extra care when checking your wheel lug nut torque. To properly check your wheel lug nut torque you will need a torque wrench.
�36

WARNING! ON YOUR INITIAL TRIP, CHECK THE LUG NUT TORQUE AT 50, 100, AND 150 MILES. ALWAYS CHECK MORE OFTEN IF YOU HAVE OPTIONAL ALUMINUM WHEELS.
WARNING! BEFORE EACH TRIP AND EACH TIME A WHEEL IS REMOVED BE SURE TO TIGHTEN YOUR WHEEL LUG NUTS AS PER THE FOLLOWING GUIDELINES:
“Lite” Towables: 50 – 75 ft. lbs. All other Towables: 85 – 95 ft. lbs.
WARNING! DO NOT OVER TIGHTEN THE LUG NUTS! OVER TIGHTENING MAY CAUSE THE LUG STUDS TO SHEER OFF UNDER CERTAIN DRIVING CONDITIONS.
�37

TRAVEL TRAILER “HOUSE SYSTEMS”
Safety
Your new vehicle has been provided with numerous safety features. Review the detailed safety information elsewhere in this manual. Please review all features and familiarize yourself with their proper operation prior to using this recreational vehicle.
Emergency Window Exit
All Gulf Stream vehicles are equipped with two exit paths from any sleeping area. One exit path is the entry door and the second one can be an emergency exit window or roof hatch. Inspect your unit to find each emergency exit window or roof hatch. They are identified by a red decal that reads “EXIT” and will have a red handle on the window. Some emergency exit windows slide open to the side and some open from the bottom with a hinged top. Test your emergency exit windows for proper operation before each trip.
Fire Extinguisher
This is required equipment with all new Gulf Stream recreational vehicles and is usually located just inside side entry door. It is activated by pulling the ring-pin and squeezing the handle. Direct contents at the base of the fire. Read instructions on bottle. Check regularly to insure that charge is adequate.
Smoke Detector
Located in kitchen area or between kitchen and sleeping areas. Sounds alarm if it detects smoke. Test regularly and replace battery at least twice a year. Consult smoke detector manual.
LP Gas Detector
Located in kitchen/dining area near floor. Sounds alarm if it detects LP gas. Test regularly. Consult LP gas detector owner’s manual. False alarms or “beeping” can be an indication of a low “coach” or “house” battery. Remember, LP gas is heavier than air and will float at floor level. DO NOT block your LP gas detector by leaving items lying in front of it on the floor.
Carbon Monoxide (CO) Detector
Located in rear hall or sleeping area. Sounds alarm if it detects Carbon Monoxide at a dangerous level. Test regularly. Consult CO detector manual. Replace batteries at least twice a year. The function of this alarm should never be defeated. If the alarm sounds, assume there is a leak and consult an expert to find the source of the leak.
�38

ELECTRICAL SYSTEMS
Your GULF STREAM is equipped with two (2) separate electrical systems that provide your vehicle with power on the road and in camp. A chassis 12 volt DC system and a 110 volt AC system are installed.
12 Volt DC Service
The house 12-volt system is used for running most interior lights and appliances. Even though your refrigerator has an option to run on 110-volts AC, the refrigerator circuit board uses 12 volt DC for its operation. Also, the roof mounted air conditioner(s) are powered by 110-volts AC, but also need 12 volts DC to power the thermostats. The 12 volt DC power is provided by one or more “house” batteries. The house batteries are charged by a convertor/charger when the recreational vehicle is plugged into shore power or when the generator is running. Other items in the coach that run on 12 volt DC power include: water pump, water heater, furnace, slide out systems, powered vents, etc.
110-V Shoreline Connection at left (30 Amp shown)
Like your home, the vehicle has a 110-volt alternating current (AC) system that requires an external source of 110-volt electricity. A shoreline connection (extension cord) or an optional electrical on-board power generator or an inverter can provide this power. In order to use your 110-volt electrical system, your shoreline (power cord) should be plugged into either a properly rated external power source or the generator should be running, or in some cases the inverter should be turned on. TO CONSERVE BATTERY POWER, USE OF THE SHORELINE IS RECOMMENDED WHENEVER POSSIBLE.
SHORELINE GROUND WARNING: IF YOUR POWER SUPPLY IS NOT PROPERLY GROUNDED, YOU MAY EXPERIENCE A DANGEROUS SHOCK WHEN STANDING ON THE GROUND AND TOUCHING A METAL PORTION OF THE RV. USE A CONTINUITY TESTER TO ENSURE PROPER GROUNDING.
EXTENSION CORD WARNING: DO NOT USE AN EXTENSION CORD WITH A CURRENT RATING LESS THAN THE AMPERAGE YOUR RV REQUIRES. EXTRA EXTENSION CORDS REDUCE THE AMPERAGE AND VOLTAGE BEING SUPPLIED TO THE RV AND MAY CAUSE DAMAGE TO ELECTRICAL COMPONENTS!
�39

30-Amp and 50-Amp 110-Volt AC Service
Your recreational vehicle is provided with either 30 amp or 50 amp electrical service, depending on the size of the RV and the electrical options installed.
30-amp service is 110-volt service limited to a total of 30 amps of draw. A large three pronged power supply cord identifies this type of power supply. Each appliance in your vehicle is capable of working by itself with this type of service. However, you may not be able to operate all your appliances at the same time without causing a circuit breaker to blow.
A typical component in your vehicle such as a TV or VCR will draw only about 1 amp. Other items such as coffee makers and microwaves will draw 10-15 amps when used. Roof air conditioners usually draw the most, pulling up to 15 amps when the compressor is running. The amperage available with 30 amp service will limit you to the use of one air conditioner and certain other electrical appliances.
If your travel trailer is equipped with two air conditioners and you limited to 30 amp service, use the air conditioner that provides cooling in the most appropriate area of the unit. This approach will also allow you to use 110-volt service for other small appliances.
30-amp service is the most common electrical service in the RV industry and can be found at most, if not all, RV campgrounds. This makes 30-amp service the most user friendly as far as availability. If your vehicle is equipped with 50-amp service, you will be able to run any installed appliance at any time when 50-amp service is available. or you are running your generator.
50-amp service is characterized by a unique 4-pronged outlet, with each pair of the four prongs carrying 110-volts of AC power. Each of the 110-volt lines in a 50-amp cord supplies power to a designated part of your RV. In doing this, when AC powered components are installed they can be put on separate power feeds according to how much amperage they draw. One example of this method consists of installing two air conditioners for use at the same time. Each one is powered by a different power supply feed; therefore they both can be used simultaneously.
Think of 50-amp service as having two shoreline power cords in one casing as opposed to only one in 30-amp service.
�40

If you travel to an RV park that does not offer 50-amp service you will have to use an adapter to hook up to shore power. While use of an adapter is not recommended, it may be unavoidable. When using an adapter, remember that your coach will not have sufficient power to run as many options as with 50-amp service. You may be able to run both your air conditioners for a limited time; however, this will cause damage to both your air conditioning units as well as other components by operating them on insufficient power.
Approximate Power Draws
Listed below are components that might be used in Gulf Stream vehicles and the maximum amperage draw each one has. This chart may help you decide which components you can safely use for an extended period without damage.
Components Amperage Roof air conditioners (each) 15 Electric water heater 12 Microwaves 15 Hair dryer 2 Washer/dryer 10 Vacuum 5 TV 1.0 Engine block heater 10 Heart Inverter/Charger 22 Refrigerators 3.5 Space heaters 10-15 110-volt lamp 1.0 Power Converter
Your vehicle is equipped with an electrical power converter that changes 110-volt power to 12-volt power to run 12-volt appliances in your vehicle. It gets the 110-volt power from the shoreline or t optional generator. The power converter will be located either under the side of the rear bed, under the refrigerator or at the base of a cabinet.
The circuits in the vehicle are protected by circuit breakers and fuses. Locate the converter and see where the fuses are located. If you blow a fuse, turn off the appliance. Unplug the fuse. Check the fuse for breakage and replace it with a new fuse of the proper rating. If the fuse continues to fail, contact your nearest dealer. NEVER REPLACE A FUSE WITH A HIGHER RATED FUSE THAN WHAT IS DESIGNATED!
�41

Ground Fault Interrupter (GFI)
Your unit is equipped with a Ground Fault Interrupter that will stop the current in the event of a short. If you find that 110v AC power is missing at any receptacle of the motor home, first check to see if the GFI button has been tripped. Then check the breaker panel. If the GFI button has been tripped, or trips repeatedly after being reset, you may have a short in your circuit. Please have a professional test and repair as needed.
The GFI receptacles are located near the kitchen sink, the bath sink and/or the exterior receptacle location.
Battery (Dealer or Owner Supplied)
The travel trailer uses one or more deep cycle 12V batteries on board (as equipped by dealer or owner). Both are maintained in the same manner. Check the electrolyte fluid levels on a regular basis, especially during hot weather. Refill as necessary with either distilled water or clean tap water in an emergency. Do not allow the fluid levels in the batteries to fall below the internal battery plates. Damage to the batteries may result and shorten the life of the batteries.
When charging the batteries, do not charge at such a fast rate as to cause spewing of the electrolyte from the cells. However, do charge the battery with the cell vent caps off.
WARNING: NEVER USE AN OPEN FLAME AROUND BATTERIES. AVOID MAKING ELECTRICAL SPARKS. FUMES FROM THE BATTERY ARE COMBUSTABLE. KEEP AN EYE OUT FOR CORROSION ON THE BATTERY TERMINALS. CORRODED TERMINALS CAN CAUSE A LOSS OF AVAILABLE POWER AS WELL AS CUT DOWN ON THE EFFICIENCY OF THE CHARGING/ELECTRICAL SYSTEM. THIS COULD LEAD TO A SITUATION WHERE THE BATTERY ISN’T CHARGED ENOUGH TO START THE VEHICLE. ALWAYS WEAR EYE PROTECTION AND GLOVES WHEN WORKING WITH BATTERIES.
If your batteries have problems prior to the end of their warranty period, consult the a representative of the battery manufacturer.
When it is time to replace the batteries, be sure to replace them with quality batteries of equal electrical and physical properties. Contact your nearest dealer for advice in the selection of new batteries.
�42

Battery Types and Charging
Only similar batteries should be connected together in one bank. Do not connect old and new batteries, or wet and gel cell batteries together. Deep-cycle batteries are usually rated in Amp-hours, which is based on a 20-hour discharge rate. Therefore, a 100 amp-hour battery can deliver 5 amps for 20 hours. Deep-cycle batteries can be discharged about 80% of capacity before damage occurs. Shallow cycling (50%-60% drain before recharge) will result in much longer battery life.
To find out how long your batteries will last when using various equipment in your coach, research the amperage of the items in use, and use that number to gauge what size amp-hour battery you think you need. Keep in mind that you should recharge your batteries when they are 50% discharged, so only half of the amp-hour rating is actually used.
Completely charging wet cell deep-cycle batteries requires the battery voltage to be raised beyond what is known as the gassing point. This is the voltage at which the battery begins to bubble and gas is given off. If charging stops short of this point, sulfate is left on the plates and deterioration of the battery begins. The gassing point will vary with battery temperature. At 77 degrees F, the gassing point of a 12-volt battery is about 14.0 volts.
Monitor Panel
Your vehicle has an electrical panel that can provide you with important information about various systems on the RV including the condition of your batteries. The panel is most often located above the stove or on the wall near the stove. The monitor panel will give you information including:
• How much potable (fresh) water remains. • How full your black (sewage) tank is. • How full your gray (waste water) tank is. • How much LP gas is in your LP tank. • How much charge your battery has.
The monitor panel may give a false reading on the waste tank (black and gray) levels if those tanks have not been properly flushed or recently cleaned.
�43

�44

LP GAS SYSTEM
General
Liquid Petroleum (LP) gas is used by systems in your unit as fuel for various appliances. It is comprised of propane (LP) gas. LP gas provides an efficient and inexpensive source of energy.
The gas is stored in a pressure tank located on or under the chassis of your unit. Under pressure, the LP gas turns to vapor; it is this vapor that burns.
Each tank has an automatic eighty percent stop-fill valve that allows space in the tank for vapor expansion. The high pressure of the vapor in the tank is reduced in two stages as it makes its way to your appliance. The tank pressure will vary with temperature and altitude, but it may be in the range of 100 to 250 pounds per square inch (psi) or more. It is reduced by a pressure regulator to about 12 psi in the first stage and then to about 6.25 ounces in the second stage. The 6.25 ounces psi can also be expressed as 11 inches of water column.
The LP gas system is designed and built to rigid standards and tested before leaving the factory. Your dealer also tests the system prior to customer delivery.
NOTE: YOUR DEALER IS RESPONSIBLE FOR A THOROUGH LP GAS SYSTEM CHECK PRIOR TO DELIVERY. DO NOT ACCEPT THE UNIT UNTIL THIS CHECK HAS BEEN COMPLETED.
Except for simple maintenance and occasionally tightening a connection, you should take your unit to an authorized dealer for LP gas problems. The LP gas tank should always be filled by an authorized LP supplier.
NOTE: YOUR UNIT’S MANUFACTURER IS NOT RESPONSIBLE FOR PERSONAL INJURY OR PROPERTY DAMAGE RESULTING FROM IMPROPERLY MAINTAINED LP GAS APPLIANCES AND SYSTEMS.
CAUTIONS: READ LP GAS PRECAUTIONS IN THE FRONT OF THIS MANUAL. BECOME FAMILIAR WITH THEM AND MAKE SURE YOUR ENTIRE FAMILY IS COMPLETELY AWARE OF THE SAFETY ASPECTS OF LIVING AROUND LP GAS.
�45
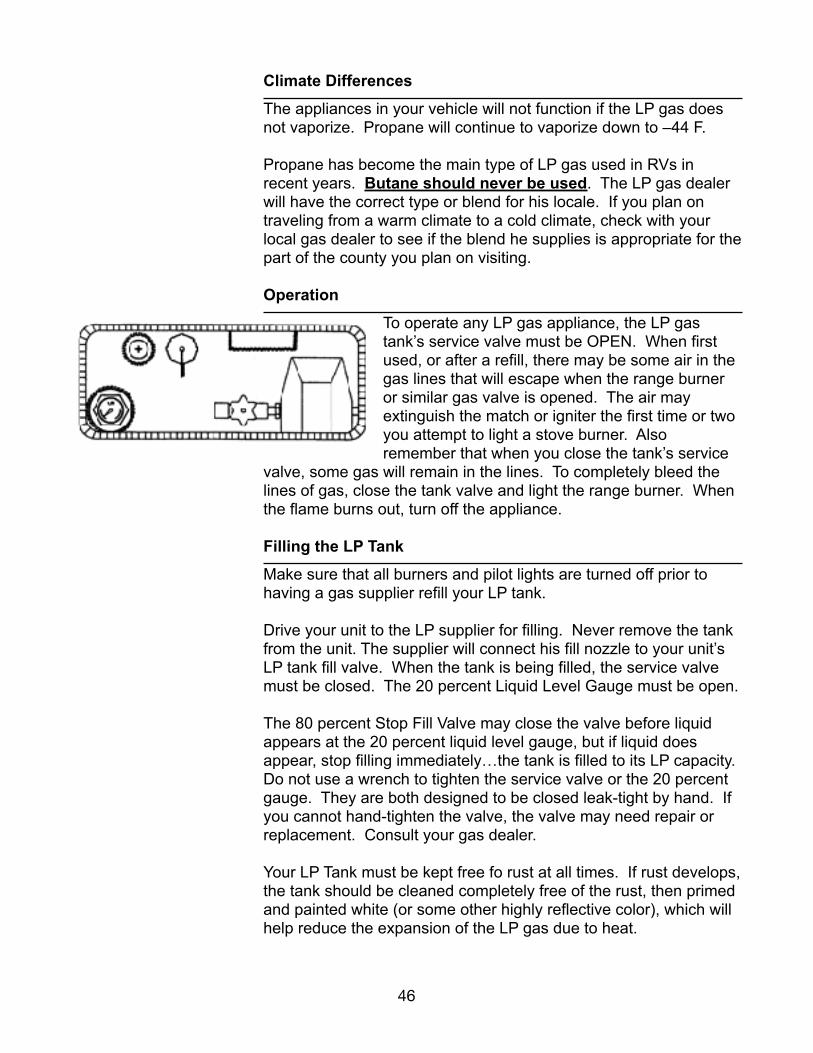
Climate Differences
The appliances in your vehicle will not function if the LP gas does not vaporize. Propane will continue to vaporize down to –44 F.
Propane has become the main type of LP gas used in RVs in recent years. Butane should never be used. The LP gas dealer will have the correct type or blend for his locale. If you plan on traveling from a warm climate to a cold climate, check with your local gas dealer to see if the blend he supplies is appropriate for the part of the county you plan on visiting.
Operation
To operate any LP gas appliance, the LP gas tank’s service valve must be OPEN. When first used, or after a refill, there may be some air in the gas lines that will escape when the range burner or similar gas valve is opened. The air may extinguish the match or igniter the first time or two you attempt to light a stove burner. Also remember that when you close the tank’s service
valve, some gas will remain in the lines. To completely bleed the lines of gas, close the tank valve and light the range burner. When the flame burns out, turn off the appliance.
Filling the LP Tank
Make sure that all burners and pilot lights are turned off prior to having a gas supplier refill your LP tank.
Drive your unit to the LP supplier for filling. Never remove the tank from the unit. The supplier will connect his fill nozzle to your unit’s LP tank fill valve. When the tank is being filled, the service valve must be closed. The 20 percent Liquid Level Gauge must be open.
The 80 percent Stop Fill Valve may close the valve before liquid appears at the 20 percent liquid level gauge, but if liquid does appear, stop filling immediately…the tank is filled to its LP capacity. Do not use a wrench to tighten the service valve or the 20 percent gauge. They are both designed to be closed leak-tight by hand. If you cannot hand-tighten the valve, the valve may need repair or replacement. Consult your gas dealer.
Your LP Tank must be kept free fo rust at all times. If rust develops, the tank should be cleaned completely free of the rust, then primed and painted white (or some other highly reflective color), which will help reduce the expansion of the LP gas due to heat.
�46
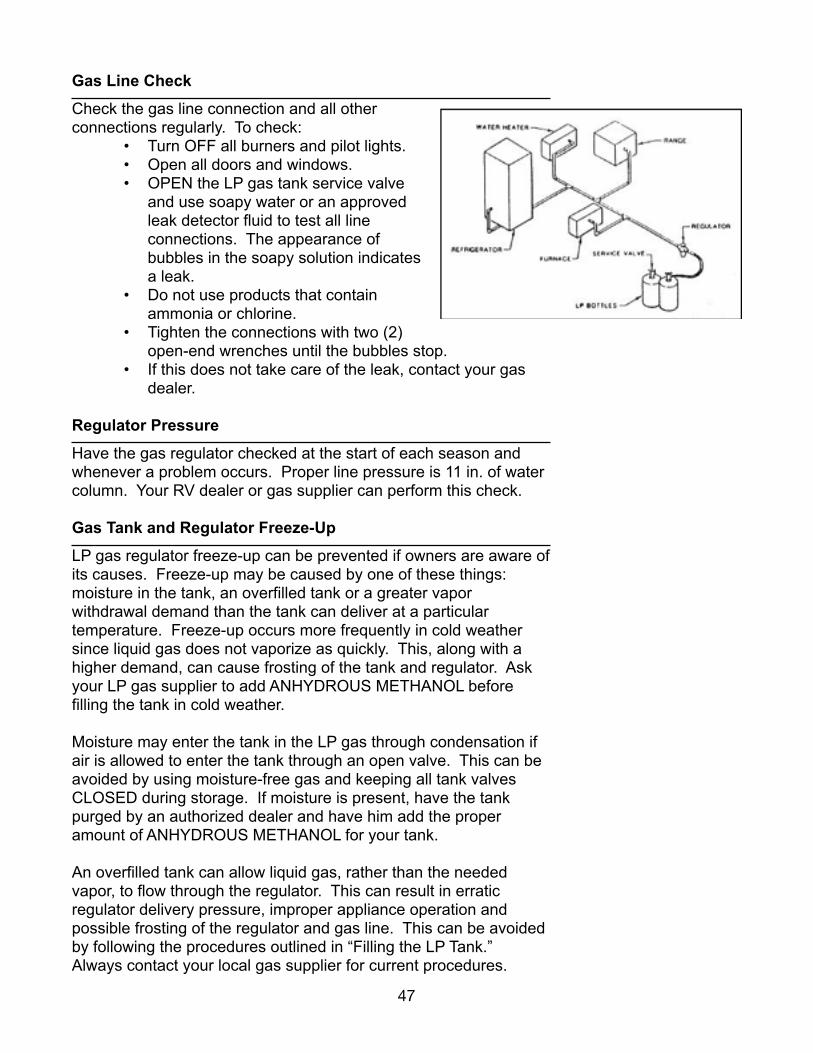
Gas Line Check
Check the gas line connection and all other connections regularly. To check:
• Turn OFF all burners and pilot lights. • Open all doors and windows. • OPEN the LP gas tank service valve
and use soapy water or an approved leak detector fluid to test all line connections. The appearance of bubbles in the soapy solution indicates a leak.
• Do not use products that contain ammonia or chlorine.
• Tighten the connections with two (2) open-end wrenches until the bubbles stop.
• If this does not take care of the leak, contact your gas dealer.
Regulator Pressure
Have the gas regulator checked at the start of each season and whenever a problem occurs. Proper line pressure is 11 in. of water column. Your RV dealer or gas supplier can perform this check.
Gas Tank and Regulator Freeze-Up
LP gas regulator freeze-up can be prevented if owners are aware of its causes. Freeze-up may be caused by one of these things: moisture in the tank, an overfilled tank or a greater vapor withdrawal demand than the tank can deliver at a particular temperature. Freeze-up occurs more frequently in cold weather since liquid gas does not vaporize as quickly. This, along with a higher demand, can cause frosting of the tank and regulator. Ask your LP gas supplier to add ANHYDROUS METHANOL before filling the tank in cold weather.
Moisture may enter the tank in the LP gas through condensation if air is allowed to enter the tank through an open valve. This can be avoided by using moisture-free gas and keeping all tank valves CLOSED during storage. If moisture is present, have the tank purged by an authorized dealer and have him add the proper amount of ANHYDROUS METHANOL for your tank.
An overfilled tank can allow liquid gas, rather than the needed vapor, to flow through the regulator. This can result in erratic regulator delivery pressure, improper appliance operation and possible frosting of the regulator and gas line. This can be avoided by following the procedures outlined in “Filling the LP Tank.” Always contact your local gas supplier for current procedures.
�47
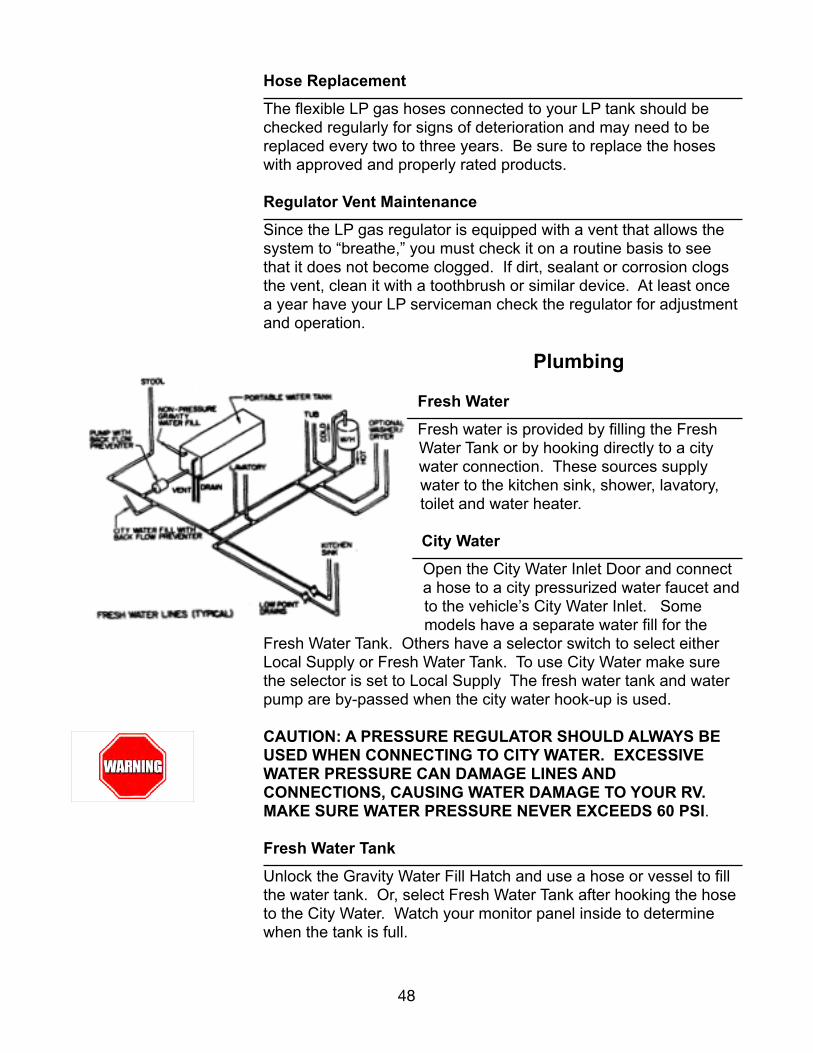
Hose Replacement
The flexible LP gas hoses connected to your LP tank should be checked regularly for signs of deterioration and may need to be replaced every two to three years. Be sure to replace the hoses with approved and properly rated products.
Regulator Vent Maintenance
Since the LP gas regulator is equipped with a vent that allows the system to “breathe,” you must check it on a routine basis to see that it does not become clogged. If dirt, sealant or corrosion clogs the vent, clean it with a toothbrush or similar device. At least once a year have your LP serviceman check the regulator for adjustment and operation.
Plumbing
Fresh Water
Fresh water is provided by filling the Fresh Water Tank or by hooking directly to a city water connection. These sources supply water to the kitchen sink, shower, lavatory, toilet and water heater.
City Water
Open the City Water Inlet Door and connect a hose to a city pressurized water faucet and to the vehicle’s City Water Inlet. Some models have a separate water fill for the
Fresh Water Tank. Others have a selector switch to select either Local Supply or Fresh Water Tank. To use City Water make sure the selector is set to Local Supply The fresh water tank and water pump are by-passed when the city water hook-up is used.
CAUTION: A PRESSURE REGULATOR SHOULD ALWAYS BE USED WHEN CONNECTING TO CITY WATER. EXCESSIVE WATER PRESSURE CAN DAMAGE LINES AND CONNECTIONS, CAUSING WATER DAMAGE TO YOUR RV. MAKE SURE WATER PRESSURE NEVER EXCEEDS 60 PSI.
Fresh Water Tank
Unlock the Gravity Water Fill Hatch and use a hose or vessel to fill the water tank. Or, select Fresh Water Tank after hooking the hose to the City Water. Watch your monitor panel inside to determine when the tank is full.
�48

WARNING: NEVER LEAVE YOUR COACH UNATTENDED WHEN FILLING THE FRESH WATER TANK! ALTHOUGH PROPER VENTING IS ALLOWED FOR OVERFLOW, THE WATER PRESSURE CAN EXPAND THE TANK AND CAUSE STRUCTURAL DAMAGE AND A POSSIBLE EXPLOSION RESULTING IN DEATH OR INJURY!
Use only fresh, potable water in the storage tank. To insure that the tank is clean, drain after each trip. Sanitize the tank when new, whenever contamination is suspected, or whenever it has not been used for a long period of time.
Water Systems Convenience Center
Some models are equipped with a Water Systems Convenience Center located on the exterior road side of the trailer. This area allows for supplying local city water, filling the water holding tank and draining the sewage holding tanks in one, convenient location.
The Water Systems Convenience Center may contain: • City water hookup • Selector switch for filling water tank, normal usage or
winterizing the water lines. • Black holding tank flush hookup (optional) • Valves for waste water and sewage holding tanks • Water heater bypass valve for winterizing (optional) • Fresh water filtration system (optional) • Hot and cold water line low point drains • Rally kit (exterior shower)
Sanitizing the Water Tank
As approved by the U.S. Public Health Service
To assure complete disinfection of your potable water system, it is recommended that the following procedures be followed on a new system, one that has not been used for a period of time, or one that may have been contaminated. This procedure is also recommended before long storage periods such as over the winter.
1. Prepare a chlorine solution using 1 gallon of water and ¼ cup of household bleach (sodium hypochlorite solution). With tank empty, pour chlorine solution into the tank. use 1 gallon solution for each 15 gallons of tank capacity. This procedure will result in a residual chlorine concentration of 50 PPM in the water system. If a 100 PPM concentration is required as discussed in item 3, use ½ cup of household bleach with 1 gallon of water to prepare the chlorine solution. One gallon of the solution should be used for each 15 gallons of tank capacity.
�49
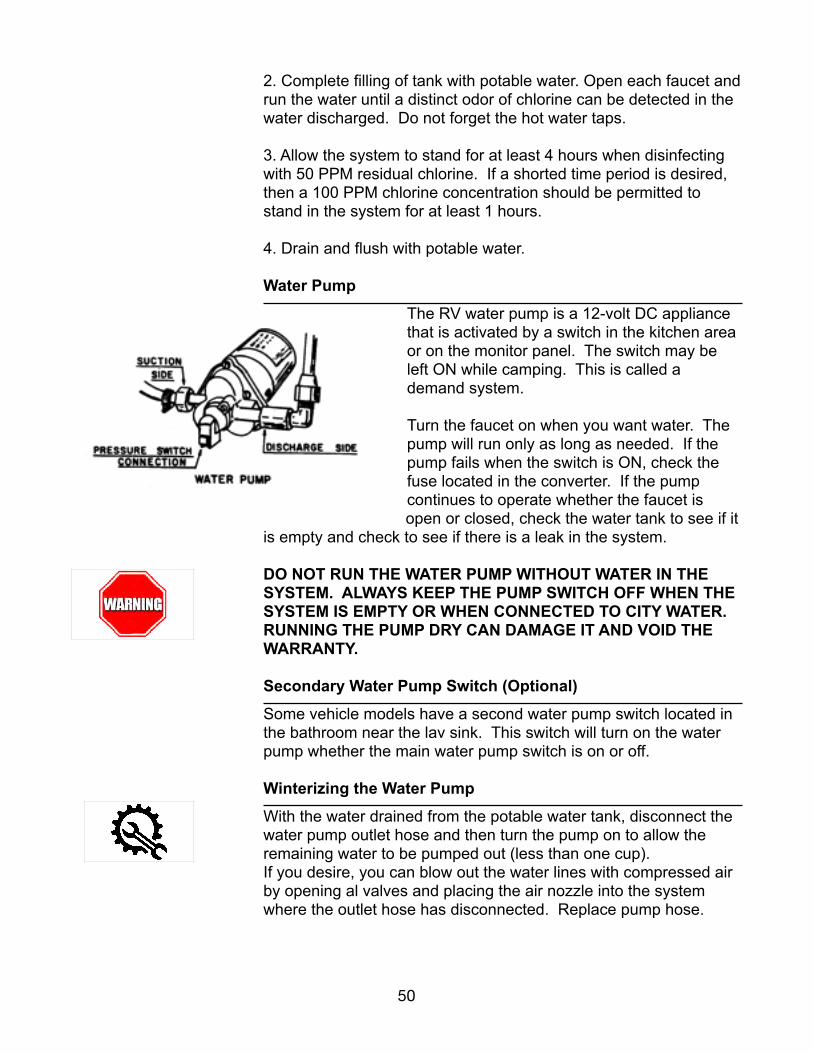
2. Complete filling of tank with potable water. Open each faucet and run the water until a distinct odor of chlorine can be detected in the water discharged. Do not forget the hot water taps.
3. Allow the system to stand for at least 4 hours when disinfecting with 50 PPM residual chlorine. If a shorted time period is desired, then a 100 PPM chlorine concentration should be permitted to stand in the system for at least 1 hours.
4. Drain and flush with potable water.
Water Pump
The RV water pump is a 12-volt DC appliance that is activated by a switch in the kitchen area or on the monitor panel. The switch may be left ON while camping. This is called a demand system.
Turn the faucet on when you want water. The pump will run only as long as needed. If the pump fails when the switch is ON, check the fuse located in the converter. If the pump continues to operate whether the faucet is open or closed, check the water tank to see if it
is empty and check to see if there is a leak in the system.
DO NOT RUN THE WATER PUMP WITHOUT WATER IN THE SYSTEM. ALWAYS KEEP THE PUMP SWITCH OFF WHEN THE SYSTEM IS EMPTY OR WHEN CONNECTED TO CITY WATER. RUNNING THE PUMP DRY CAN DAMAGE IT AND VOID THE WARRANTY.
Secondary Water Pump Switch (Optional)
Some vehicle models have a second water pump switch located in the bathroom near the lav sink. This switch will turn on the water pump whether the main water pump switch is on or off.
Winterizing the Water Pump
With the water drained from the potable water tank, disconnect the water pump outlet hose and then turn the pump on to allow the remaining water to be pumped out (less than one cup). If you desire, you can blow out the water lines with compressed air by opening al valves and placing the air nozzle into the system where the outlet hose has disconnected. Replace pump hose.
�50
Drainage and Sewer System
Your RV has a Drainage/Sewer system that operates much the same way as the one in your home. How extensive the system depends on your unit model and the options you obtained. It includes a drain line from the kitchen sink and shower to a Gray Water Holding Tank (may vary). There is also a marine toilet and lavatory that empties into a separate Black Water Holding Tank. Some models may have a second Gray Water Holding Tank to accommodate various floorplans and features. Which tank each sink drains into may vary from one model to another.
The drainage system also includes vents that carry odors caused by drain water and waste out of the RV, while also equalizing air pressure. Drain clean outs are provided to clean lines between fixtures and holding tanks.
Drainage P-Traps
By code, all drains are equipped with P-traps to keep holding tank odors from entering the vehicle. If you detect a foul odor, which you believe is from your holding tanks, add water to all drains to ensure that your P-traps water hasn’t evaporated from long term storage. Places to add water include the Kitchen sink, Bathroom sink, shower/tub, wet bar sink, and the washer/dryer drain.
Holding Tanks
The Gray Water Holding Tank(s) and Black Water Holding Tank should be emptied frequently, or as indicated on the monitor panel. The tanks should always be emptied at a special Dumping Station. Most campgrounds and highway rest stops and many gasoline stations are equipped with proper Dumping Stations.
NOTE: MOST STATES HAVE LAWS PROHIBITING EMPTYING SEWAGE ANYWHERE BUT AN APPROVED DUMPING STATION. THIS INCLUDES BOTH, GRAY AND BLACK WATER.
While camping, it is a normal practice to leave your Gray Water Holding Tank valve open if your campsite is equipped with sewer hook-up. NEVER leave the Black Water Tank valve open while using the coach. Since the system utilizes gravity to empty, the Black Water Tank will not drain properly unless is has sufficient liquid to help drain out the solids. On some models the bath sink drains into the black holding tank to assist with flushing. Some models may also have the shower draining into the black holding tank.
�51

On models equipped with two gray holding tanks, you must use the dump lever for each tank to empty its contents. Pulling the dump lever for one tank WILL NOT empty the other. Each holding tank fluid level is represented on the monitor panel.
Emptying Holding Tanks
WARNING: PROPER PRECAUTIONS MUST BE UNDERTAKEN WHEN WORKING IN AN UNSANITARY ENVIRONMENT SUCH AS EMPTYING SEWAGE TANKS. PROPER GEAR (RUBBER GLOVES, SHOES, ETC.) MUST BE WORN. USE HAND SANITIZER OR OTHER PRECAUTIONS WHEN FINISHED.
To empty the holding tanks, be certain that your RV is level since this process depends upon gravity.
1. Remove the sewage drain hose from its storage location. 2. Pull out the Termination Valve by pulling out the dump valve slide handle 3. Flush or power about two gallons of water through the toilet and drain again. This flushes the tank and helps clean the drain hose. 4. Repeat as necessary 5. Follow the same procedure for the GRAY WATER HOLDING TANK. A repeat flush is not necessary. 6. When the gray tank is empty, push the
dump valve handle in until it seats. 7. Remove the hose, wash and replace it in its storage
location. 8. Replace termination outlet cap.
Holding Tank Maintenance
Keep your tanks well flushed out when the vehicle is not in use. Allowing the tank to sit with any contents for more than a couple of days will ensure some sort of build-up on the monitor probes in the side of the tank and future monitor reading problems, even if this is the first time you have used your RV. One way to help flush them out is to drain them at the campground, then fill each tank half full of water for the trip home. The constant agitation while driving home usually does a good job of cleaning the tanks. Then, before you arrive at home, stop at a local approved dumping station and drain the tanks completely.
�52
When camping, there are a few things you can do to help facilitate the cleaning process later. First, you should always use some type of chemical additive in your holding tanks specifically designed for RV use. These types of chemicals will break down the contents of the tanks and help ensure good drainage. In addition, try using tissue designed for recreational vehicles. It will break down more than residential style tissues, and usually never clogs your drain valves. DO’S and DON’Ts of Holding Tank Use
DO Clean the holding tank with an approved cleaner. DO Add a special chemical additive to sanitize and improve tank action. DO Guard the tank against Freeze-up. DO Keep the dump valves closed to allow the tanks to get as full as possible to facilitate drainage. DO Keep the dump valve closed and the drain cap in place to allow the use of the system when not parked at a campsite. DON’T Put facial tissues, paper, automotive type anti-freeze, sanitary napkins, diapers or household toilet cleaners in your holding tank. DON’T Put foreign objects in the system that could clog or damage it in any way. DON’T Use the toilet while driving down the road. All occupants must remain seated with a secure seatbelt while the vehicle is moving. Further, the vacuum caused by the high-speed movement of the vehicle will cause the toilet to act as a vent when flushed, causing severe odors in the vehicle and possibly spraying waste into the interior of the coach.
Holding Tank Flush System (Optional)
The optional holding tank flush kit can be installed on the gray and black water holding tank systems. To use this system, connect a water hose to the flush kit hose located inside the holding tank dump valve compartment. Note that the lever used on this system is not an “on/off” lever, but rather a selector for which tank you wish to flush. After connecting your water hose, turn on the water to begin flushing your tank. For best results leave the dump valves closed until you have flushed each tank. Do not leave the flush system unattended, unless you decide to leave your dump valves open.
The optional glass container on the flush system hose is used to house a sanitation tablet for sanitizing each tank. Tablets are available at most RV dealers or RV parts stores.
�53
Water System Winterizing
READ THIS BEFORE WINTERIZING YOUR WATER SYSTEM. If your RV is going to be stored unheated in temperatures that COULD GO BELOW FREEZING, the fresh water and waste systems must be winterized. Follow this procedure:
• Drain the fresh water tank. • Drain pipes by turning the water pump ON and opening
a cold water faucet. • Wait for the water flow to stop. Turn pump OFF. Leave
faucets OPEN. • Turn ON all faucets and OPEN the HOT and COLD
Water Pipe Drain Valves. Leave these valves in the OPEN position. These valves are located either under the galley sink or in an exterior compartment, and permit the water to drain onto the ground below the RV.
• Open the Water Heater drain valve located at the bottom of the heater (or remove plug). Let the tank drain.
• Open the heater Safety Valve. • Flush the toilet. • After each faucet has been opened, drained and closed,
Close the Water Line Drain Valves. • Drain the Waste Water Holding Tank. • Double check that ALL WATER has been drained. • Secure all protective caps including the water tank filler,
city water inlet and waste drain outlet.
CAUTION: DRAINING THE WATER SYSTEM ALONE MAY NOT BE ENOUGH TO PROVIDE COMPLETE COLD WEATHER PROTECTION FOR AN RV UNIT THAT WILL BE STORED IN AN UNHEATED ENVIRONMENT WHERE TEMPERATURES DROP BELOW FREEZING. CONSULT YOUR DEALER FOR MORE INFORMATION ON THE BEST METHOD OF WINTERIZING YOUR VEHICLE.
Units equipped with a winterization siphon hose should use it to pump RV anti-freeze into the plumbing system. Always pour a cupful of RV anti-freeze into each drain after your coach has been winterized.
WARNING: DO NOT USE AUTOMOTIVE ANTI-FREEZE OR WINDSHIELD WASHER FLUID ANTI-FREEZE IN THE RV POTABLE WATER SYSTEM. THESE CAN BE HARMFUL OR FATAL IF SWALLOWED. YOUR DEALER CAN PROVIDE YOU WITH SPECIAL ANTI-FREEZE THAT IS SAFE AND APPROVED FOR RV WATER SYSTEMS. ALWAYS FOLLOW MANUFACTURER’S INSTRUCTIONS FOR THESE ADDITIVES.
�54
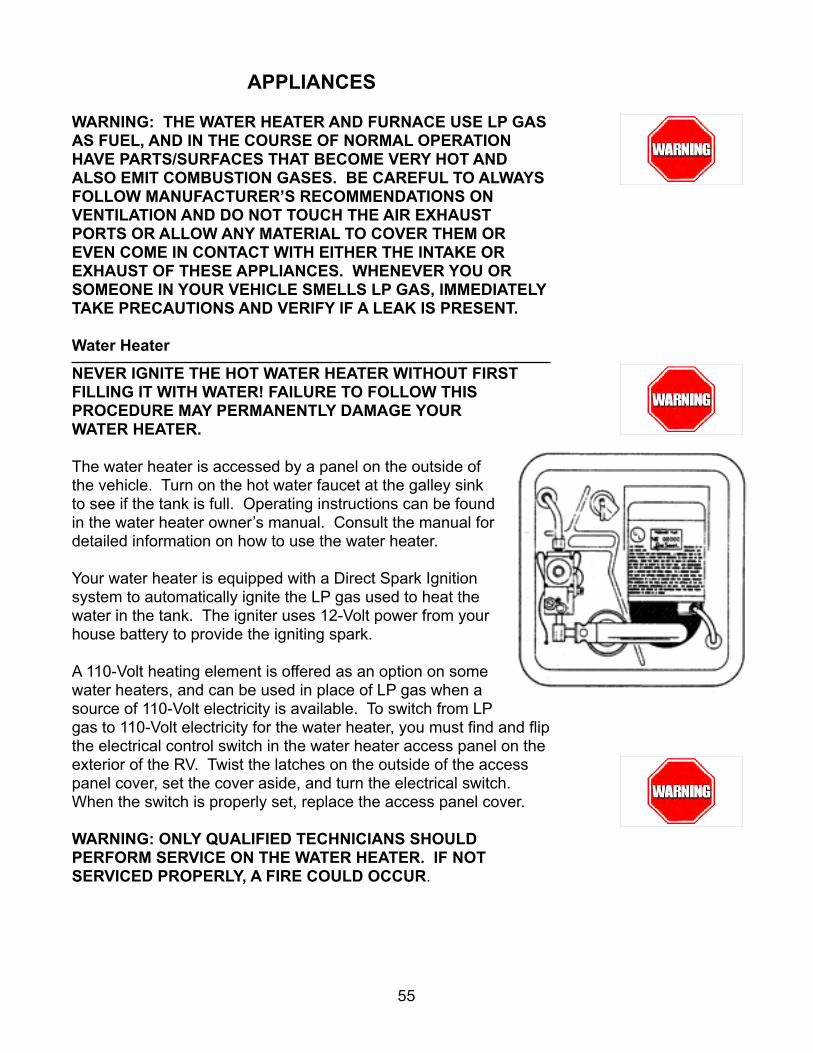
APPLIANCES
WARNING: THE WATER HEATER AND FURNACE USE LP GAS AS FUEL, AND IN THE COURSE OF NORMAL OPERATION HAVE PARTS/SURFACES THAT BECOME VERY HOT AND ALSO EMIT COMBUSTION GASES. BE CAREFUL TO ALWAYS FOLLOW MANUFACTURER’S RECOMMENDATIONS ON VENTILATION AND DO NOT TOUCH THE AIR EXHAUST PORTS OR ALLOW ANY MATERIAL TO COVER THEM OR EVEN COME IN CONTACT WITH EITHER THE INTAKE OR EXHAUST OF THESE APPLIANCES. WHENEVER YOU OR SOMEONE IN YOUR VEHICLE SMELLS LP GAS, IMMEDIATELY TAKE PRECAUTIONS AND VERIFY IF A LEAK IS PRESENT.
Water Heater
NEVER IGNITE THE HOT WATER HEATER WITHOUT FIRST FILLING IT WITH WATER! FAILURE TO FOLLOW THIS PROCEDURE MAY PERMANENTLY DAMAGE YOUR WATER HEATER.
The water heater is accessed by a panel on the outside of the vehicle. Turn on the hot water faucet at the galley sink to see if the tank is full. Operating instructions can be found in the water heater owner’s manual. Consult the manual for detailed information on how to use the water heater.
Your water heater is equipped with a Direct Spark Ignition system to automatically ignite the LP gas used to heat the water in the tank. The igniter uses 12-Volt power from your house battery to provide the igniting spark.
A 110-Volt heating element is offered as an option on some water heaters, and can be used in place of LP gas when a source of 110-Volt electricity is available. To switch from LP gas to 110-Volt electricity for the water heater, you must find and flip the electrical control switch in the water heater access panel on the exterior of the RV. Twist the latches on the outside of the access panel cover, set the cover aside, and turn the electrical switch. When the switch is properly set, replace the access panel cover.
WARNING: ONLY QUALIFIED TECHNICIANS SHOULD PERFORM SERVICE ON THE WATER HEATER. IF NOT SERVICED PROPERLY, A FIRE COULD OCCUR.
�55

Range
Also operated with LP gas are the range burners and the oven (optional). The basic operation is the same as the units in your home except that extra care must be taken to provide adequate ventilation in your RV. Unlike your home, the RV has limited air space, thus, a limited amount of oxygen available for combustion.
WARNING: DO NOT USE OPEN FLAMES, SUCH AS THE RANGE BURNERS, TO WARM THE LIVING AREA OF THE RV. THE FLAMES CONSUME THE OXYGEN IN THE VEHICLE AND COULD RESULT IN ASPHYXIATION.
Always provide adequate ventilation when using the range and oven. It is always best to use the range exhaust hood and open a window slightly. Your owner’s packet contains owner’s manuals for the range and optional oven. Read these over carefully to become familiar with the safe operation of these appliances.
Range Hood
Most travel trailers include a range hood that includes a light and powered vent above the range. The vent draws hot air and cooking odors out of the kitchen and exhausts them to the outside. The aluminum screen filter in the range hood should be soaked in soapy water, then rinsed gently to remove accumulated grease. The exterior vent should be kept free of obstructions to maximize air flow.
LP Gas Oven (if so equipped)
The LP gas oven can be used much like a household oven for baking and roasting. Be aware that generally smaller pans are needed. To reduce risk of accidental fire, the oven should not be used for storage. For further instructions on its use, consult the owner’s manual provided by the manufacturer.
Microwave
The optional microwave is similar to microwaves sold for household use. It relies on 110-volt power for operation. Read over the microwave oven’s owner’s manual to find all the information on its operation and cleaning. Due to the limited amount of electrical power commonly found in RV’s, you may not be able to use your microwave unless other electronic devices with a heavy electrical load (air conditioners) are first turned off. Please refer to the 30 amp and 50 amp 110 volt section of this manual for more information on electrical loads.
�56
Refrigerator
The refrigerator in your RV can be operated on LP gas and 120-volt AC electricity. Read over the owner’s manual provided in your owner’s packet before putting the refrigerator into operation.
The refrigerator will not operate correctly if the vehicle is not level while parked. The refrigerator coolant will not circulate properly if the unit is not level.
For best results, make sure the outside sidewall vent and roof vent are always clear of debris. Without proper circulation around the rear coils, the unit will not keep food cold.
Upon initial operation, or after being stored, the refrigerator could take up to 24 hours before the unit is cool enough for use. Expect items to take somewhat longer to chill in the travel trailer refrigerator than they would take at home. You can greatly increase the effectiveness of the refrigerator by:
• Minimizing the number of times the refrigerator is opened
• Minimizing the length of time the refrigerator door is left open
• Allowing hot items to cool before putting them in the refrigerator
• Storing cold items in the refrigerator promptly, before they warm up
When being used on the 110 volt AC setting, the refrigerator circuit board still requires 12 volt operation. Make sure your batteries have sufficient charge prior to operation. For further information about the operation and maintenance of the refrigerator, consult the owner’s manual provided by the manufacturer.
�57

VIDEO AND AUDIO SYSTEM
Specific and detailed information about the operation of the video and audio components in your travel trailer are included in the owner’s manual provided by the component manufacturers. Several general guidelines are included here.
Home Theater Stereo
• The POWER button to turn the home theater system on and off is located in the upper left corner of the home theater system
• The home theater system allows you to select multiple sources: AM, FM, CD, DVD, Video/TV, Blue Tooth, and SD Card. Use the “SOURCE” button to choose the source you want.
• The system also lets you choose to direct audio output to any combination of built-in speakers, using the buttons marked “A, B, and C.”
• Audio volume is controlled by the large center knob • Broadcast stations can be selected with the “FAST
FORWARD” and “FAST REVERSE” arrow buttons. • The system will play audio CDs or DVDs inserted in the
disc slot • The system will play mp3 music files found on an SD
Card inserted in the card slot. • The system can be paired with Blue Tooth music players
using the pairing instructions provided with the player.
Video Hookups and TV/Monitor (if equipped)
A variety of high-definition flat-screen TV/video monitors are available from Gulf Stream Coach and other sources for installation in your travel trailer. Your travel trailer is pre-wired to accept these additions with AC outlets, a cable/satellite coaxial cable, and audio connections to the Home Theater Stereo. TV hookups are located adjacent to designated mounting points in the travel trailer. These mounting points include the structural reinforcement needed to support the TV/video monitor, and are in various locations depending upon the travel trailer floor plan.
Over The Air TV
Over the air TV signals may provide TV programming where cable and internet video sources are unavailable. Picture quality varies, depending on the power of the source, the distance from the broadcast antenna, and obstructions in the signal’s “line of sight.”
�58

Over the air TV signals are received by the roof-mounted TV antenna. To maximize signal quality, raise the TV antenna by turning the ceiling-mounted crank inside the travel trailer. Once raised, the antenna can be further tuned to improve reception by rotating the antenna base. The TV antenna includes a powered signal booster that also strengthens the signal. Note that it will usually be necessary to re-scan for broadcast channels whenever you relocate your travel trailer.
Cable/Satellite Connection
A coaxial cable is provided as part of the TV/monitor hookup. This cable should be connected to the “IN” port on the TV. The other end of the cable is located on the exterior wall of the travel trailer, and is to be connected to a cable programming source, as provided by many campgrounds, or an owner-installed satellite dish.
HEATING AND COOLING
Your travel trailer is expected to provide a comfortable living environment for its occupants throughout an incredibly wide range of temperature and environmental conditions. While like your home in many ways, a travel trailer has to provide comfort in a multitude of locations, often when weather conditions are extreme - And it has to do its job while being compact, affordable, and mobile.
The effectiveness of the heating and cooling appliances in your travel trailer can be greatly enhanced by some common-sense factors, including these:
• On hot days, find shady parking places whenever possible, to reduce the heating effect of the sun.
• Conversely, find sunny places on cold days to take advantage of the sun’s warming effect.
• When hot temperatures are expected, begin the air conditioner early in the day.
• Close shades and blinds to keep direct sun from heating up the interior.
• Take advantage of natural cooling and air flow by opening windows and vents whenever feasible.
• Use powered vent fans to help the air conditioner move air through the unit.
• Move cooking tasks outside when possible to reduce the amount of heat inside.
• Make sure all vents are unobstructed so air flow is not impeded.
• Keep your furnace and air conditioner(s) working at peak efficiency.
• NOTE: Never use the range or oven for space heating, or the refrigerator for space cooling.
�59
Furnace
Your travel trailer is equipped with a forced-air furnace similar to the type found in most homes with the exception that it is fueled by LP gas. Each unit is equipped with a wall mounted thermostat that controls the temperature. An operating manual for the furnace is included in your owner’s packet.
The furnace is designed to have un-obstructed airflow from all its vents, including interior and exterior. If any vent is blocked the furnace may shut itself off.
Because warm air rises, furnace ducts run through the floor of the travel trailer, and ducts are typically at or just above floor level.
The furnace igniter is powered by your 12-volt battery system. If the system battery is low the furnace blower will come on, however the furnace will not ignite. Make sure you have sufficient battery power before operating the furnace.
Your furnace is designed to sustain a desired temperature in the vehicle at most times. Due to varying weather conditions, the furnace may not be able to keep up with sub-freezing temperatures. The amount of vehicle occupants and the position the vehicle is parked may help or hinder the furnace’s ability to keep up with freeze conditions. Consult the furnace owner’s manual for more information.
WARNING: DO NOT SUPPLEMENT THE FURNACE WITH ANY PORTABLE FUEL-BURNING APPLIANCE FOR HEATING THE INTERIOR OF THE RV. THESE APPLIANCES ARE NOT SAFE; ASPHYXIATION/CARBON MONOXIDE POISONING IS POSSIBLE IN ANY SMALL, WELL-SEALED SPACE.
�60

Air Conditioner
Thoroughly read the owner’s manual supplied by the air conditioner manufacturer for proper use, care and maintenance of the roof mounted air conditioner. Air conditioners are capable of reducing air temperature a maximum of 18 to 22 degrees in a 50% humidity environment. As the humidity goes up, the cooling difference goes down. If the temperature inside your coach is 100 degrees when you turn on the air conditioner, it is capable of reducing the temperature to approximately 80 degrees.
Eventually the air inside the coach will cool, and as it cools the air put out by the air conditioner will also cool. However, when starting out at 100 degrees, this cooling could take several hours before it reaches your desired temperature. Therefore, if you know the weather will be hot, turn your air conditioner on early.
The two most common complaints with roof air conditioners are they won’t turn on at all, or when they do turn on, they won’t put out cold air. If the unit won’t turn on you may have a problem with something other than the air conditioner. Always make sure you have sufficient power to run each air conditioner you plan on using. If your power source has only 30-amp service, you can run only one (1) air conditioner at a time. Using an adapter to plug in your 50-amp cord to 30-amp service doesn’t allow the use of both air conditioners either.
Most air conditioners require a minimum of 13 amps to operate properly. Although the amperage of two AC’s running at the same time doesn’t add up to 30 amps, other components in the coach, such as the converter, refrigerator, video, etc., draw enough amperage to push the total amp load over the 30 amp mark. If you desire to run both air conditioners in a 30-amp environment, try running your generator instead of using shore power.
Run both air conditioners off the generator until the coach cools off, then use shore power to run only one air conditioner, which by itself will usually maintain a cool temperature inside the coach.
CAUTION: THE USE OF EXTENSION CORDS, “CHEATER” CORDS OR ADAPTORS TO REDUCE THE SIZE OF THE RECEPTACLE BEING USED TO PLUG IN YOUR RV WILL CAUSE EXCESS AMPERAGE AND STRAIN ON YOUR RV ELECTRICAL SYSTEM. THIS MAY RESULT IN TRIPPING BREAKERS, PREMATURE FAILURE OF 110-VOLT AC APPLIANCES, HOT OR MELTING CORD CONNECTIONS, OR FIRE. ALWAYS PLUG YOUR SHORE POWER INTO A POWER SUPPLY PROPERLY RATED FOR YOUR RV (30 or 50 amp service).
�61

Thermostat
A single wall-mounted thermostat is installed to control both the furnace and the air conditioner. (If a second air conditioner is installed, it will have its own thermostat.) Choose the mode (heating or cooling) with the slider switch, and then set the preferred temperature. The thermostat will start and stop the furnace/air conditioner as needed to maintain the setting.
Roof Exhaust Fan
The ceiling fan used in your coach is designed to ventilate the interior when cooking or if the use of your air conditioner is not desired. If used properly the roof fan can cool the interior by as much as 15 degrees within a short period of time. When used in the exhaust mode, the fan pulls hot air from high inside the coach and will pull fresh air from an open window. This fan is usually controlled by a wall-mounted thermostat (some models have a thermostat built right on the fan), which must be turned on and adjusted to your desired temperature before use. The wall-mounted thermostat is not the same that is used for the furnace or air conditioners. Please review the supplied fan owner’s manual for additional operating instructions.
Fireplace (if so equipped)
An optional electric fireplace can be ordered and factory-installed in certain travel trailers. The fireplace provides a warm orange glow like a traditional fireplace, and can provide warm forced-air heat that can take the chill off of cool mornings, and extend a comfortable environment on cool evenings.
The fireplace has a control panel on the upper right with simple pushbuttons to control the ‘flame’ and warm air output. It is strongly recommended that the fireplace be turned off when you leave the travel trailer.
�62

SLIDE OUT SYSTEMS
If your vehicle is equipped with a slide out there are several precautions that should be taken before operation of the slide room.
• Make sure you have clearance on the exterior. • Make sure that all interior items are clear. • Make sure that you have sufficient battery power.
If heavy snow or ice loads are expected, consider closing the slide-out to avoid the possibility of it freezing in the open position. It is also recommended that the slide-out be left in the closed position if the travel trailer is stored/unused for a long period of time.
Slide Out Systems Owner’s Manuals & Troubleshooting
Gulf Stream products carry a variety of electrically operated slide out products. The electrical slide out product installed in your particular RV is accompanied by an owner’s manual from the slide out system manufacturer. For troubleshooting, maintenance and proper use of your particular slide out, please refer to the slide out owner’s manual supplied by the slide out system manufacturer. Most slide out system owner’s manuals and troubleshooting guides can also be found on the slide out system manufacturers websites.
Lippert Electric Through Frame Slide-Out System
Extending Slide-out Room 1. Level Unit 2. Verify the battery is fully charged and hooked up to the
electrical system. 3. Remove transit bars (if so equipped). 4. Press and hold the IN/OUT switch in the OUT position
until room is fully extended and stops moving. 5. Release switch, which will lock the room into position.
NOTE: Only hold OUT switch until room stops. Retracting Slide-out Room
1. Verify the battery is fully charged and hooked up to the electrical system.
2. Press and hold the IN/OUT switch in the IN position until the room is fully retracted and stops moving.
3. Release the switch. This will lock the room into position. NOTE: Only hold IN switch until room stops.
4. Install the transit bars (if so equipped).
�63
Maintenance
Upon delivery and after any professional service of the slide-out system, be sure to have the technician check the following:
1. Slide-out stops are installed and adjusted properly. 2. System is mounted properly. 3. Cross shafts are mounted properly and clear all other
components. 4. Gear packs function properly. 5. Manual override is accessible. 6. Outside seals compress when slide-out is retracted. 7. Inside seals compress when slide-out is extended. 8. 9. Slide-out extends and retracts smoothly. 9. Both sides of slide-out are synchronized. 10. Any dirt or debris is cleaned from the interior or exterior
of the coach.
It is recommended that when operating in harsh environments (road salt, ice build up, etc) the moving parts be kept clean. They can be washed with mild soap and water. No grease or lubrication is necessary and in some situations may be detrimental to the environment and long term dependability of the system.
All adjustments to the mechanism, length of slide-out travel, leveling of slide-room when extended, etc. must be conducted by a certified professional. Failure to follow this requirement may void the owner’s warranty.
Manual Override
NOTE: Always disconnect battery from system prior to manually operating system. Failure to disconnect battery can cause electricity to backfeed through the motor and cause serious damage to the system as well as void the warranty.
The Lippert Through Frame Slide-out comes with a Manual Override system. There are two methods for manually extending and retracting the slide-out room. A crank handle extension or 3/4" socket and ratchet can be used outside the chassis main rail at the crank extension with pin. A socket and ratchet can be used inside the main frame on the hex head crank extension.
Manual Override-Outside Frame
Locate the crank extension with pin outside of the chassis main rail. This is where the crank handle fits on to allow the manual extension/retraction of the room. Rotate the crank handle clockwise to retract and counterclockwise to extend slide-out. It is important to note that you DO NOT need to attempt to disengage the motor as the actuator is “manual ready.” Just hook up and crank.
�64

Manual Override - Inside Frame
Locate the hex head crank extension at the top of the actuator inside the chassis main frame. Using a 3/4 socket and ratchet, rotate the extension clockwise to retract the slide-out and counter clockwise to extend the slide-out. It is important to note that you DO NOT need to attempt to disengage the motor as the actuator is “manual ready.”
NOTE: Use EXTREME CAUTION when extending and/or retracting room using the manual override feature. It is possible to operate the slide-out beyond the maximum extension and/or retraction and damage the slide components, slide room structure or trim components.
NOTE: The gears can be stripped out if the room is manually retracted/extended to its fullest extent and the operator continues to rotate manual override. Any damage due to misuse of the Manual Override feature will disqualify any and all claims to the Limited Warranty.
Electrical System Maintenance
For optimum performance, the slide-out system requires full battery current and voltage. The battery MUST be maintained at full capacity. Other than good battery maintenance, check the terminals and other connections at the battery, the control switch, and the system for corrosion, and loose or damaged terminals. Check motor leads under the trailer chassis. Since these connections are subject to damage from road debris, be sure they are in good condition.
�65
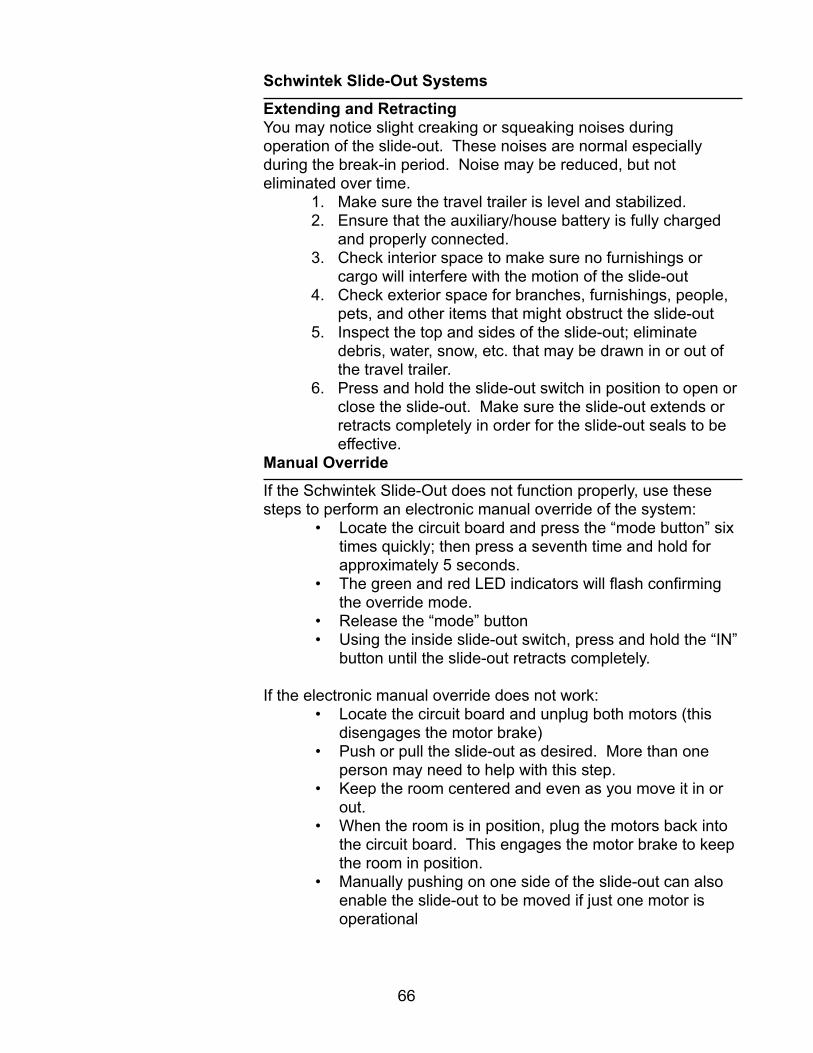
Schwintek Slide-Out Systems
Extending and Retracting You may notice slight creaking or squeaking noises during operation of the slide-out. These noises are normal especially during the break-in period. Noise may be reduced, but not eliminated over time.
1. Make sure the travel trailer is level and stabilized. 2. Ensure that the auxiliary/house battery is fully charged
and properly connected. 3. Check interior space to make sure no furnishings or
cargo will interfere with the motion of the slide-out 4. Check exterior space for branches, furnishings, people,
pets, and other items that might obstruct the slide-out 5. Inspect the top and sides of the slide-out; eliminate
debris, water, snow, etc. that may be drawn in or out of the travel trailer.
6. Press and hold the slide-out switch in position to open or close the slide-out. Make sure the slide-out extends or retracts completely in order for the slide-out seals to be effective.
Manual Override
If the Schwintek Slide-Out does not function properly, use these steps to perform an electronic manual override of the system:
• Locate the circuit board and press the “mode button” six times quickly; then press a seventh time and hold for approximately 5 seconds.
• The green and red LED indicators will flash confirming the override mode.
• Release the “mode” button • Using the inside slide-out switch, press and hold the “IN”
button until the slide-out retracts completely.
If the electronic manual override does not work: • Locate the circuit board and unplug both motors (this
disengages the motor brake) • Push or pull the slide-out as desired. More than one
person may need to help with this step. • Keep the room centered and even as you move it in or
out. • When the room is in position, plug the motors back into
the circuit board. This engages the motor brake to keep the room in position.
• Manually pushing on one side of the slide-out can also enable the slide-out to be moved if just one motor is operational
�66

Slide Out Weather Seals
Periodically check all seals and gaskets on the slide out walls for proper fit and operation. Check the condition of the slide tubes (not the hydraulic ram) under the slide out, and if needed use bearing grease for ease of operation.
Slide outs are not designed to have a 100% air-tight seal. However, you will find that the best seal possible can be achieved with pro-active maintenance and proper use. Occasional adjustment of the slide out room to prevent water or air intrusion may be necessary under normal operation.
With normal adjustments, the slide out may not appear to be perfectly level within the slide out opening of the RV sidewall. This is a normal occurrence. Further, slide out adjustments may result in decal or paint line alignment concerns. The failure of paint or decals to line up after slide out adjustments does not require attention and repainting or applying new decals is not necessary or covered under the Gulf Stream Coach, Inc. Limited Warranty.
AWNINGS
Manually-operated or electric awnings installed on your RV are optional and/or may have been added at the factory or by your dealer. Proper use, care, and maintenance procedures for awnings are included in the literature provided with the awning. Complete operation, maintenance, and troubleshooting information on your awning is available from the awning manufacturer’s Web site.
Awnings are designed to provide shade and protection from the sun. The effects of wind and rain on an awning are unpredictable and can cause severe damage to the awning and/or the vehicle. If wind or extended periods of rain are expected, roll up the awning. It is recommended that if leaving the RV unattended for a length of time, retract the awning to avoid unexpected weather conditions.
Power Awning Operation
Press and hold the “OUT” Patio Awning switch until the awning is extended to the desired position, then release the switch. Press and hold the “IN” switch to retract the awning, making sure it is fully retracted and snug against the exterior wall.
�67

Some awnings include a range of six pitch positions that can be selected by pressing the pins on either side of the main extension arm, and sliding the arm in or out. You can adjusts each arm individually, but it is recommended that the two extension arms be no more that three stops apart.
Note that the awning should not be over-extended. This allows the awning fabric to form a V-shaped trough along the roller that can trap water, snow, and debris; and put excessive stress on the awning fabric.
The awning is, by nature, exposed to high levels of sun and environmental hazards. The best way to protect and extend the life of the awning is to flush it frequently with fresh water. This fresh water flush helps to dislodge dirt and grime that can work their way into awning fibers and degrade them over time.
WARNING: SOME AWNINGS CONTAIN PINCH POINTS, WHICH IF USED IMPROPERLY CAN CAUSE INJURY. PLEASE READ AND UNDERSTAND ALL OPERATOR INSTRUCTIONS INCLUDED WITH YOUR AWNING(S) PRIOR TO USE OF THE PRODUCT.
Manual Awning
To open your manual awning: • Make sure that you have sufficient clearance from
obstructions. • Unlock the awning using the provided wand by pulling
down the locking latch located on the top of the right awning arm.
• Unlock the travel lock on the awning arm, if equipped. • Loosen the rafter arm knobs located in each awning arm. • Using the wand, hook the loop hanging in the center of
the awning and pull the awning completely out. • Slide each rafter arm to the top of each awning arm and
tighten the rafter knobs, making sure the awning fabric is not loose.
• Near the base of each awning arm is a flip-out lever/handle, which is also an awning arm slide lock. When the lever is flipped out, the awning arm can be slid up to raise the awning. Flipping the lever back down will allow the arm to lock.
• Your awning is now in place. You may choose to use anchor straps for extra support in windy conditions.
�68

To close the awning: • Flip the awning arm levers out and slide the awning arms
back down, being careful not to let the awning drop down, as flipping the levers out will unlock the arm and allow it to slide down.
• Loosen the rafter arm knobs and slide the rafter arm as far down as it will go. Do not re-tighten the rafter arm knobs as this time.
• While holding the wand strap in the awning tube, push the awning main latch located on the top of the right arm to “locked.” BE CAREFUL! This will cause the awning to roll up if you don’t have a good hold of the awning tube strap.
• Holding the awning tube strap, allow the awning to roll up until you can use the wand in the strap. Using the wand, allow the awning to roll all the way up. Do not allow the strap to get rolled all the way in the awning fabric.
• Lock the awning arm travel latches. • Re-tighten the rafter arm knobs located in each awning
arm.
�69

�70
CARING FOR YOUR TRAVEL TRAILER INTERIOR
Regular cleaning and maintenance using appropriate cleaning products will help maintain the look, appeal, and value of your travel trailer. In addition to the information provided here, check the owner’s manuals of appliances, electronics, and other components to see the cleaning and maintenance recommendations provided by the component manufacturers.
Fabric Upholstery
Fabric style upholstery should be vacuumed regularly to remove dust, dirt, crumbs, and other elements that cause abrasion and premature wear. Our fabric suppliers recommend that fabrics be professionally cleaned. For additional information, consult the care instructions provided by the fabric manufacturer.
Vinyl Upholstery
Use mild water-based detergents or products specifically designed for cleaning vinyl upholstery. Avoid solvent-based cleaners as they may damage the vinyl or its backing.
Vinyl Flooring
Use a broom or vacuum to remove dust and dirt. Sweep or vacuum regularly to reduce wear from abrasive dirt, sand, etc. For overall clean-ups, mop with a damp (not soaking) sponge or string mop and a mild solution of water-based detergent designed for vinyl flooring. Compact, wand-style mops like “Swiffer” are very good. Wipe up spills promptly to reduce the likelihood of permanent stains. Avoid oil-based cleaners and dish detergents, as these may cause the vinyl to yellow. Note - Take care when mopping as the vinyl floor can be slippery when wet.
Carpeting
Regular and frequent vacuuming is the best way to prolong the life of your carpeting. The camp environment subjects carpeting to high levels of abrasive dirt, sand, and mud that can work their way into carpet fibers and accelerate wear. Commercial spray-on spot treatments are useful for small stains and traffic areas. Commercial (or residential) “steam” carpet cleaning equipment is recommended for overall cleaning.
Vinyl Wall Panels
Use mild, non-abrasive water-based soap or detergent and a soft cloth or sponge to gently remove stains and dirt. Be careful to clean gently so the vinyl covering wall panels isn’t torn or damaged.
�71
Shower Surround, Sinks, Wash Basins
Use mild spray cleaners or soap solutions with soft cloths or sponges for these surfaces. Do not use scouring pads or abrasive cleansers.
Faucets, Plumbing Fixtures
Use damp soft cloths to clean and polish these surfaces. Water spots can be eliminated with a weak solution of vinegar and water.
Wood and wood-grain cabinetry
Dust with soft dry cloths frequently. To remove dirt or stains, use a soft cloth dampened with a non-abrasive wood polish or mild soap solution.
Windows, Mirrors, and Decorative Glass
Use common spray window cleaner and lint-free cloths for windows and other glass surfaces. Take care to keep spray from the cleaner off other surfaces, and quickly wipe up any over-spray. Take care with decorative glass, as some designs are applied decals that may be affected by glass cleaners.
Window Treatments, Pleated Shades, Curtains
Remove dust with light vacuuming. For overall cleaning, professionally clean only.
Laminated Countertops
Protect and extend the life of your countertops by keeping these recommendations in mind:
• Always use a trivet or other protection under hot pans that are set on the counter.
• Clean spills promptly to reduce the chance of staining. • Never use the counter as a cutting surface - Keep a
cutting board handy and use it. Be careful when using bleaches, cleansers, oven cleaners, and other harsh chemicals near the countertops, as they can damage the surfaces.
Solid-Surface Countertops
Soapy water and a soft towel or sponge will take care of virtually all surface dirt and grease. Commercial spray cleaners designed for solid surfaces provide excellent results. A mild bleach solution (1/2 bleach, 1/2 water) can be used periodically to disinfect solid surface countertops.
�72

CARING FOR YOUR TRAVEL TRAILER EXTERIOR
Regular washing and waxing of the exterior surface of your travel trailer will improve its appearance, protect the surface from incidental stains, and help retain its value.
Frequent Washing is Important
The world that your travel trailer faces includes many environmental conditions and materials that can cause staining, corrosion, and spotting, including:
• Road salt • Acid rain • Road tar, grease • Sand, gravel • Bird droppings, insects • Leaves, twigs, tree sap, etc.
The best remedy for this potential damage is thorough washing. Generally, the longer the foreign material remains in contact with the travel trailer surface, the more extensive and permanent the damage, so it makes sense to inspect the surface frequently and wash often.
There are many commercially available water-soluble detergents and tools designed specifically for washing RV exteriors. When using these materials, keep these things in mind: Take care around doors, cargo bay openings, and vents, to keep water from possibly damaging interior components.
• Avoid washing the travel trailer in direct sunlight. • Choose a shady spot and use plenty of plain water to
rinse off dust. • Working from top to bottom, using a soft brush, car wash
mitt or long-handled tool. • Rinse frequently so soap film does not dry on surfaces. • Pay special attention to seals, joints, and edges, using
plenty of soapy water to flush out accumulated dirt and grime.
• Take care with plastic trim, using only mild water-based cleaners and non- abrasive cloths or sponges.
• Allow to air-dry; alternatively, dry surfaces with a chamois or large soft towel.
• Check door openings and cargo compartments for any water intrusion, and dry up any accumulated water.
�73
Care must be exercised if a pressure washer is used for exterior cleaning, as the high-pressure water can damage seams, seals, and graphics. Keep the wash nozzle at least 16 inches from the surface and avoid aiming the water jet directly into joints, seals, or gaps. We advise you to avoid automated car washes as the pressures, dimensions, and configuration of the automated equipment are not suitable for travel trailers.
Pay special attention to the undercarriage of your unit, where road debris, salt, and other harmful materials can accumulate. Thoroughly flush the undercarriage with plenty of fresh water whenever you wash the exterior, and when mud, snow, or ice are likely to have collected underneath.
Wax Once or Twice a Year
Wax your travel trailer once or twice a year, applying wax with a damp soft cloth or foam pad. Marine wax is recommended for fiberglass surfaces, and automotive wax is recommended for painted and metal surfaces. Buff the area when the wax dries with a large soft cloth. Work in the shade, in small sections.
Chrome-finished trim and molded plastic parts also benefits from an application of wax. Do not use wax on gaskets, weather stripping, or seals. Avoid buffing compounds and other surface protectants that include abrasives, as these may damage the finish.
Appliance Vents
Through-wall vents for furnace, water heater, range, refrigerator, etc. should be checked for any obstruction to air-flow, including insect nests, spider webs, dry leaves, etc.
Windows
Glass windows can be cleaned with standard household glass cleaners. Avoid spraying gaskets, seals, or exterior walls with these materials.
Awnings, Slide-Toppers
Be sure to clean off all debris as you roll up your awnings. Periodically wash off the awning fabric with a soapy water solution. Long term exposure to the sun may cause some fading over time, which is normal. Harsh exposure can cause the awning fabric to delaminate.
�74

ROOF MAINTENANCE
Regular maintenance of your RV is key to the ongoing enjoyment of your RVing experience. Maintenance improves the useful life and reliability of all systems.
ROOF MEMBRANE AND ROOF SEALS
Make a point of inspecting the RV roof at least twice a year looking for any damage to the roof membrane or deterioration of the seal between the roof and the side walls.
If you decide to access the roof via the rear mounted ladder, we recommend that you stay low and/or near the middle of the roof. When accessing the roof, use extreme caution and avoid movement on areas near the roof air conditioner ducting (some models) and/or between the rafters on light (lite) models. While it is ok to apply pressure in these areas and a slight dipping may be visible, this does not indicate a structural problem with the roof. Use of plywood to displace your weight on the roof may be required on some lighter weight models.
WARNING! ACCESS TO THE ROOF IS FOR MAINTENANCE ONLY. THE ROOF IS NOT DESIGNED FOR RECREATIONAL USE. FURTHER, THE ROOF IS NOT EQUIPPED WITH SAFETY RAILING FOR RECREATIONAL USE. DO NOT ACCESS THE ROOF IF: WET, ICY OR SLIPPERY CONDITIONS ARE PRESENT, THE VEHICLE IS UNSTABLE OR SUBJECT TO MOVEMENT, WINDY CONDITIONS ARE PRESENT, OR ANY OTHER SITUATION THAT RENDERS ROOF ACCESS UNSAFE.
EPDM (“Rubber”) Roof
Small tears or punctures in the rubber roof membrane can easily be repaired and will have the same life span as the rest of the rubber roof. Most RV dealers carry rubber roof repair kits at a nominal price. Please refer to your specific repair kit for proper applications
Roof Seals
Inspect the seals around all roof cut-outs for vents, skylights, etc. for deterioration. Deterioration may include dry, cracked seals, loss of material, or loose seal material. Remove deteriorated seal material by hand - Do not use sharp tools that may damage the seal or the roof itself. If the seal cannot be removed by hand, the adhesion is still effective and the seal should not be disturbed.
Clean the area where seal has been removed with a water-based household cleaner. Allow the area to dry thoroughly, then apply sealant to the damaged area, overlapping the existing seal.
�75

EXTERIOR WALL MAINTENANCE
Aluminum Sidewalls
If your RV has aluminum walls, the exterior surface has a baked-on enamel paint finish with vinyl decals. When clean, (see recommendations for washing above) and at least once a year, the exterior surface should be waxed with an automotive style wax. Work in the shade, applying wax to small areas with a damp cloth or sponge. When dry, buff the wax with a clean soft cloth.
Fiberglass Sidewalls and Painted Surfaces
If your RV has laminated walls, the exterior surface is a combination of fiberglass, paint and vinyl decals. When clean, (see recommendations above), the exterior surface should be waxed using a marine type wax on the unpainted portions of the coach. Marine wax is best suited for fiberglass surfaces. Regular automotive wax is suitable for painted surfaces of the RV. Work in the shade, applying wax to small areas with a damp cloth or sponge. When dry, buff the wax with a clean soft cloth.
Reduce Sun Fading
Avoid storing your RV in the same spot facing the same direction for extended periods of time. The sun can literally bake the finish off of your RV if it is not properly rotated during prolonged use and/or storage.
Sidewall Trim and Component Sealants
Check all sealants when washing or at least two (2) times a year, whichever is more frequent. In warmer climates some normal expansion of the aluminum siding may occur, causing slight protrusions of the skin. Do not attempt to press down on the skin to correct this normal condition.
Other areas that will need attention include the moldings used on the side walls and the compartment door edge moldings. Since these areas are more accessible for periodical checks, It is recommended to inspect the side walls and compartment doors every time you wash your vehicle. Sometimes washing the side walls can actually remove loose sealants that should be replaced. If you find an area on your side walls that needs to be resealed, a clear silicone, or one that matches the color of your side walls should be used. When resealing compartment doors, only a clear silicone sealant is recommended, as these doors are usually painted and the color would be difficult to match.
�76

Additional areas needing inspection are those around the clearance lights, tail lights, rear view mirrors, and around accessories and windows. All these areas can be resealed using a common silicone based sealant/adhesive. However, when sealing windows and the base of rear view mirrors, be careful as to keep from sealing over any weep holes. These holes are designed to drain any water that may have found its way to the inside of a window or mirror.
Keeping up on the maintenance of your sealants will keep your RV looking beautiful for a long time. If you are not sure what types of sealants should be used on any part of your RV, check with your local dealer for advice and materials.
Corrosion Protection
Your RV has been designed to withstand normal environmental conditions. But, the sand and salt used on the highways and the salt spray in the air near oceans can cause the metal components on your recreational vehicle to corrode.
To protect your recreational vehicle from this corrosion, it must be thoroughly cleaned as soon as possible after exposure to these elements. Washing the undercarriage with a high-pressure washer will remove the majority of the salt. But, this will not replace the paint that is literally sand-blasted off the undercarriage by the road salt and sand.
Sand-blasted and corroded frame components must be refinished. This can be done with readily available rust preventive paint and undercoating. This is necessary to properly maintain your recreational vehicle.
We have also found generators to be affected by salt spray. Since the generator requires air for operation and cooling, the generator compartment cannot be completely sealed from the elements. Therefore, whenever the recreational vehicle is exposed to salt spray, the generator should also be cleaned.
Aftermarket undercoating processes are also beneficial in rust prevention. But, to remain effective, these treatments must be inspected and renewed annually as most undercoating agents can dry and peel with age. Therefore, regularly scheduled inspections and maintenance is necessary to protect your recreational vehicle and its various components and fixtures from the elements and keep it corrosion-free.
�77

In addition to maintenance, you should keep from storing your vehicle in grassy areas for long periods of time. The stagnant, moist air developed under the coach will speed up the corrosion process. Always store your vehicle on pebble, concrete or asphalt.
Some components used by Gulf Stream and the chassis manufacturer, by nature, will appear to be “rusty” or corroded on the surface. These components are not required to be rust free for normal operation. These components may include axle housings, brake caliper housings, LP black pipe fittings, etc.
EFFECTS OF LONG TERM OCCUPANCY
Formaldehyde
If you notice an odor in your recreational vehicle – it could be formaldehyde
Gulf Stream is an industry leader in reducing emissions of formaldehyde from the products used in constructing its RV’s.
Formaldehyde is commonly found in nearly all homes and buildings. It is a colorless gas that is released into the home from a variety of indoor sources. Formaldehyde can be found in a variety of everyday products in your home, such as:
• Household Products: cleaning solutions, dishwashing liquids, fabric softeners, shoe-care agents, carpet cleaning solutions, adhesives
• Personal Care Products: nail polish, cosmetics, shampoos, antiperspirants
• Fabrics: clothing, linens, draperies • Appliances: gas appliances, kerosene stoves • Tobacco Products: cigarettes, cigars • Building Materials: particleboard, plywood cabinets,
and wall and floor materials, wallpaper, some other paper goods, paint coatings
As a result, recreational vehicles, mobile homes, manufactured homes, new homes, and recently remodeled homes are more likely to contain higher levels of formaldehyde. Over time, formaldehyde goes away and the odors and the effects decrease or disappear.
�78

What can I do to reduce my exposure to formaldehyde in my recreational vehicle?
• Increase ventilation. Adequate ventilation normally reduces or eliminates any or all of the above stated symptoms. Always be sure to ventilate your recreational vehicle prior to and during use, especially after storage and during hot, humid weather. We recommend opening windows and running ventilation fans as much as possible during the initial break-in period.
• Keep indoor temperatures moderate. As the temperature rises, the effects of formaldehyde may be more noticeable. You can use the air conditioner to keep temperatures relatively low, which will help lower the formaldehyde effects and odors.
• Lower the humidity. You can decrease the rate at which formaldehyde is released from pressed wood and other products by lowering the humidity in your recreational vehicle. Humidity should be maintained at about 40% to 50% relative humidity in the home.
• Do not smoke inside. Tobacco smoking produces formaldehyde and other toxic chemicals.
WARNING: ALL RECREATIONAL VEHICLES ARE BUILT WITH SOME MATERIALS THAT EMIT FORMALDEHYDE. EYE, NOSE AND THROAT IRRITATIONS, HEADACHE, NAUSEA AND A VARIETY OF ASTHMA-LIKE SYMPTOMS, INCLUDING SHORTNESS OF BREATH, HAVE BEEN REPORTED AS A RESULT OF FORMALDEHYDE EXPOSURE. ELDERLY PERSONS AND YOUNG CHILDREN, AS WELL AS ANYONE WITH A HISTORY OF ASTHMA, ALLERGIES, OR LUNG PROBLEMS MAY BE AT GREATER RISK. RESEARCH IS CONTINUING ON THE POSSIBLE LONG-TERM EFFECTS OF EXPOSURE TO FORMALDEHYDE.
If you have questions regarding the health effects of formaldehyde, consult your doctor or local heath department. Adequate ventilation normally reduces or eliminates any or all of the above problems. Always be sure to ventilate your RV prior to and during use, especially after storage and during hot, humid weather. Generally, levels of formaldehyde emitted diminish over time.
“Full-Time” Use
Accelerated wear and tear can be expected from “full-time” use of this product, as this product is designed for recreational camping. Wear and tear issues cannot be considered under any factory assistance program.
�79
Condensation and Mold
If you that intend to use this RV for extended periods of time, you must be prepared to deal with condensation and the humid conditions that may be encountered. The normal activities of even a small number of occupants in the relatively small volume of a modern recreational vehicle and its tight construction, will lead to rapid saturation of the air inside the vehicle and the appearance of visible moisture on walls and glass, especially during cold weather.
Estimates indicate that a family of four can vaporize up to three gallons of water daily through its breathing, cooking, bathing and washing. Unless this vapor is carried outside by ventilation, or removed from the air by a dehumidifier, it will condense on the inside of the windows and walls as moisture. In cold weather it will appear as frost or ice. It may also condense in the walls or ceiling and appear as stains on paneling. This will increase the heating load on the furnace somewhat, but it will greatly reduce condensation. You should increase ventilation when large numbers of people are present.
WARNING: RECREATIONAL VEHICLES ARE SUBJECTED TO BEING CLOSED UP FOR LONG PERIODS OF TIME, WHICH CAN RESULT IN EXCESSIVE HUMIDITY, AN AVERAGE CONDITION THAT CAN LEAD TO THE FORMING OF MOLD. IF MOISTURE PENETRATION OCCURS, IT IS ABSOLUTELY IMPERATIVE TO HAVE IT REPAIRED TO AVOID DETERIORATION OF MATERIALS AND THE ENVIRONMENT THROUGH THE INTRODUCTION OF MOLD OR BACTERIA. MOLD AND BACTERIA ARE ALWAYS PRESENT IN A HABITAT.
WARNING: DO NOT USE COOKING APPLIANCES FOR COMFORT HEATING. IN ADDITION TO THE TOXIC FUMES AND OXYGEN DEPLETION, OPEN FLAMES ADD MOISTURE TO THE AIR INCREASING CONDENSATION AND THE POSSIBILITY OF MOLD.
�80

REPORTING POSSIBLE SAFETY DEFECTS
United States
If you believe that your vehicle has a defect, which could cause a crash or could cause injury or death, you should immediatelyinform the National Highway Traffic Safety Administration(NHTSA) in addition to notifying Gulf Stream Coach.
If NHTSA receives similar complaints, it may open an investigation,and if it finds that a safety defect exists in a group of vehicles, it may order a recall and remedy campaign. However, NHTSA cannot become involved in individual problems between you, your dealer, or Gulf Stream Coach.
To contact NHTSA, you may either call the Vehicle SafetyHotline toll-free at 1-888-327-4236 (TTY: 1-800-424-9153); goto www.safercar.gov; or write to:
NHTSA HeadquartersAttn: Administrator1200 New Jersey Avenue, SEWashington DC 20590
You can also obtain other information about motor vehicle safety from www.safercar.gov.
CanadaIf you believe that your vehicle has a defect, which could cause a crash or could cause injury or death, you should immediately contact the Transport Canada's Defect Investigations and Recalls Division, and Gulf Stream Coach.
To contact Transport Canada, call 1-800-333-0510 toll-freein Canada (or call 1-819-994-3328 if calling from the Gatineau-Ottawa area or internationally); go to www.tc.gc.ca; or write to:
Transport CanadaDefect Investigations and Recalls Division330 Sparks StreetOttawa ON K1A 0N5Canada
�81

�82

COMPONENT SUPPLIERS CONTACT INFORMATION Most component manufacturers and suppliers provide owner’s manuals and other information online - Check their Web sites for the specific component (have model # on hand).
Component Supplier Web Site Phone Number
Air Conditioner Dometic www.dometic.com (800) 544-4881Awnings Carefree www.carefreeofcolorado.com
Axles Lippert Components www.lci1.com (574) 537-8900Dexter Axle www.dexteraxle.com (574) 295-7888
Bath Vent Fan Heng’s Industries www.hengsindustries.com (877) 295-1205Converter/Inverter WFCO www.wfcoelectronics.com (877) 294-8997Cooktop (2-burner) Suburban www.airxcel.com (423) 775-8900Entry Door Challenger Door www.challengerdoor.com (574) 773-8169
Lippert Components www.lci1.com (574) 537-8900Entry Steps Hickory Springs www.hickoryrvsteps.com (574) 264-9656Fireplace Way Inter-global www.wayinterglobal.com (574) 971-4490Flooring LaSalle/Congoleum www.lasallebristol.com (574) 295-8400
Dehco/Armstrong www.dehco.com (800) 621-2278Frame/Chassis Lippert Components www.lci1.com (574) 537-8900Furnace Dometic www.dometic.com (800) 544-4881
Suburban www.airxcel.com (423) 775-8900Generator Onan www.cumminsengines.com (800) 286-6467Home Theater Stereo Way Interglobal www.wayinterglobal.com (574) 971-4490LP Detector Dometic www.dometic.com (800) 544-4881Microwave Oven Way Interglobal www.wayinterglobal.com (574) 971-4490Range (3/4 burner) Dometic www.dometic.com (800) 544-4881Range Hood Ventline? www.dexteraxle.com (574) 295-7888Range/Oven Combo Dometic www.dometic.com (800) 544-4881Refrigerator (compact) Way Interglobal www.wayinterglobal.com (574) 971-4490Refrigerator (6 cu. ft.) Dometic www.dometic.com (800) 544-4881Refrigerator (8 cu. ft.) Dometic www.dometic.com (800) 544-4881Roof Membrane Alpha Systems LLC www.alphasystemsinc.com (800) 462-4698Slide Outs Lippert Components www.lci1.com (574) 537-8900Solar Panel/Prep Zamp Solar www.zampsolar.com (541) 728-0924Speakers Way Interglobal www.wayinterglobal.com (574) 971-4490TV Way Interglobal www.wayinterglobal.com (574) 971-4490Tires Americana Tire & Wheel (574) 522-9450Toilet Thetford thetford.com (800) 543-1219Water Heater Dometic www.dometic.com (800) 544-4881
Suburban www.airxcel.com (423) 775-8900Water Pump Wesco buy.wesco.com (877) 237-9238Windows Lippert Components www.lci1.com (574) 537-8900
Statewide Aluminum www.state-wide.com (574) 262-2594
�83

�84

SUGGESTED MAINTENANCE SCHEDULE Use this list as a guideline for regular inspection and maintenance of your RV.
Inspect/Test before
each trip MonthlyEvery 3Months
Every 6 Months or
3,500 Miles
Yearly or 7,000 Miles
As Required by Manu-facturer
Axle & Springs X X
Batteries X X
Brakes X X
Exterior Lighting X X
Fresh Water System X
Appliance Service X
LP Gas System X
Pigtail/Shore Power Cord
X X
Roof Membrane
Roof Seals X
Roof Vents X X
Safety Breakaway Switch
XX
Safety Chains X
Sidewall Seals X X
Tire Lug Nuts (after first 500 mile check)
X
Tire Condition, Pressure
X
Underbelly Tears/Leaks
X
Wheel Bearings X
Window Seals X X
�85

�86
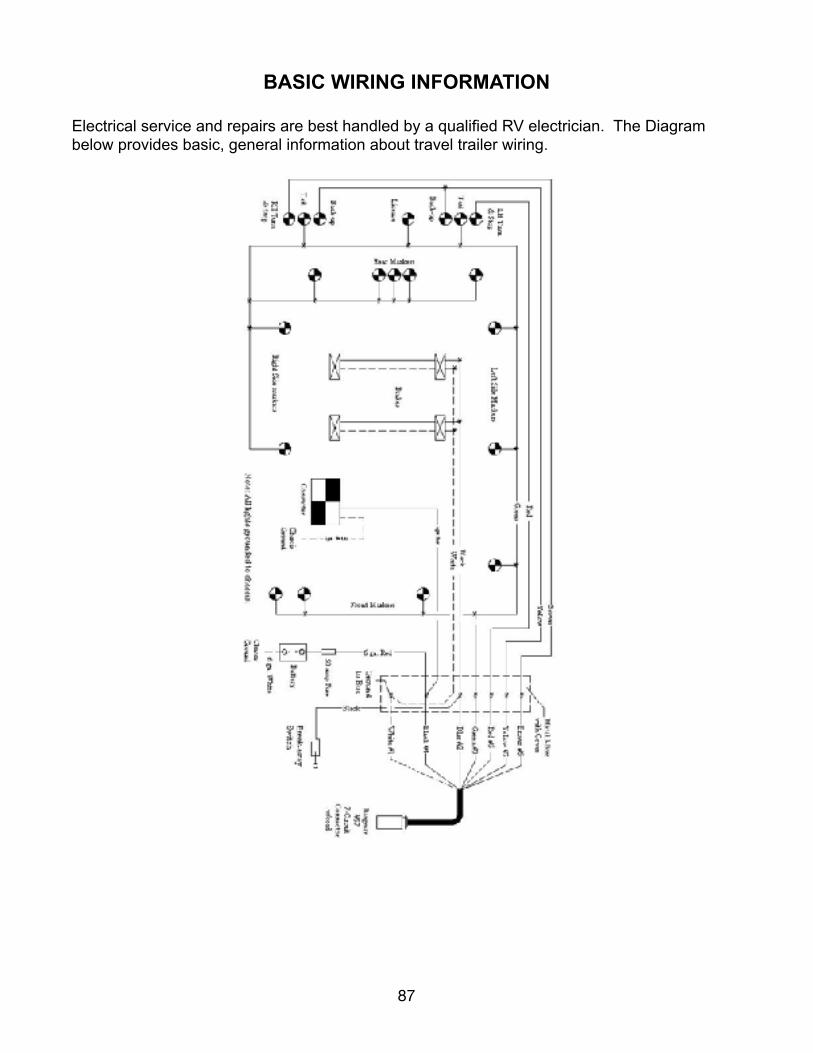
BASIC WIRING INFORMATION
Electrical service and repairs are best handled by a qualified RV electrician. The Diagram below provides basic, general information about travel trailer wiring.
�87

�88

PRE-TRIP CHECKLIST (LEAVING HOME)
(Feel free to copy this checklist as needed for each trip) Date:_______________________________ Time: _______________________
Weather: _________________________________ Temperature: ___________ Destination: ______________________________________________________
Interior
____ Refrigerator door locked ____ Water heater OFF ____ Water pump OFF ____ Fresh water tank filled ____ Waste water tanks checked, emptied as needed ____ Range/Cooktop cover closed ____ Drawers, closets, cabinet doors closed ____ Windows closed/latched ____ Dinette table stowed ____ Slide Out retracted, checked
Exterior
____ Secure all cargo in storage compartments ____ Latch and lock all compartment doors ____ Stow any bumper-mounted accessories ____ Check bike carrier/cargo carrier (if equipped) ____ Retract awning (and Slide Toppers), making sure they are snug ____ Check and adjust tires (including spare) to proper pressure ____ Check tires for excessive wear ____ Check wheel lug nuts for proper torque ____ Secure hitch and hitch ball ____ Make sure all exterior lights are operational ____ Check that batteries are charged, fluid level OK ____ Raise stabilizer jacks ____ Check and adjust brakes as needed ____ Lower crank-up roof antenna ____ Close roof vents ____ Adjust view/angle of backup camera (if equipped) ____ Adjust outside rear view mirrors ____ Stow entry steps ____ Lock entry door(s)
�89

�90
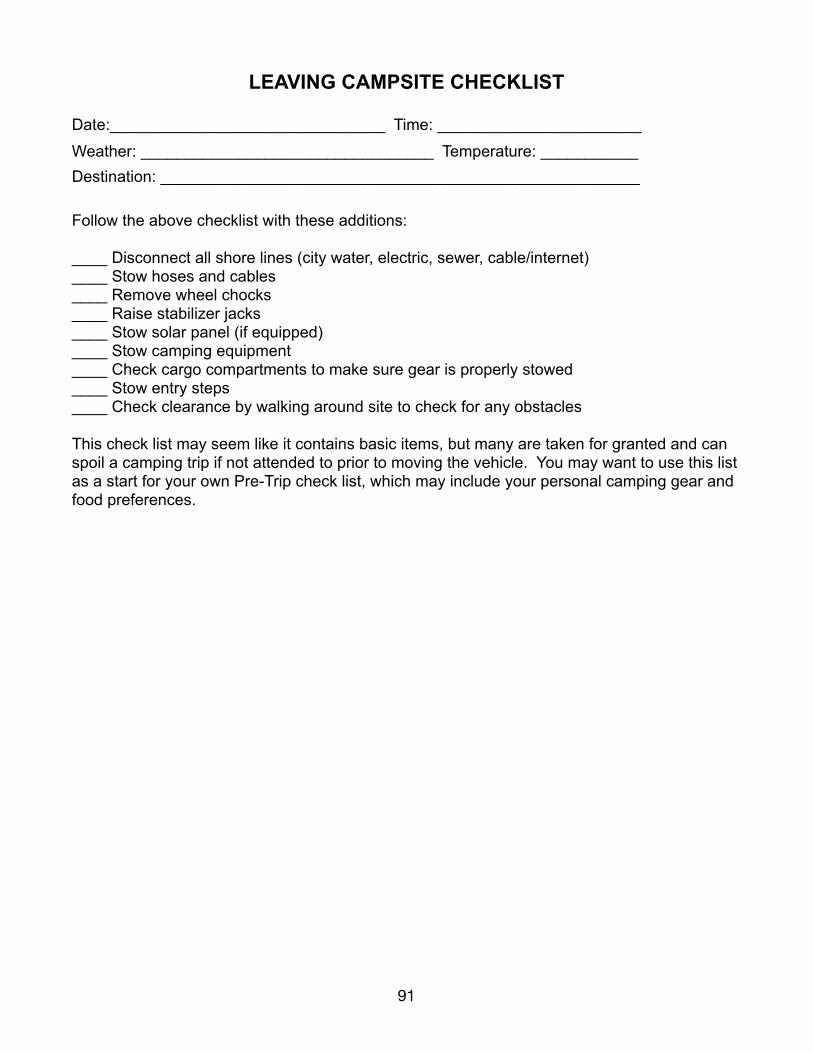
LEAVING CAMPSITE CHECKLIST
Date:_______________________________ Time: _______________________
Weather: _________________________________ Temperature: ___________ Destination: ______________________________________________________
Follow the above checklist with these additions:
____ Disconnect all shore lines (city water, electric, sewer, cable/internet) ____ Stow hoses and cables ____ Remove wheel chocks ____ Raise stabilizer jacks ____ Stow solar panel (if equipped) ____ Stow camping equipment ____ Check cargo compartments to make sure gear is properly stowed ____ Stow entry steps ____ Check clearance by walking around site to check for any obstacles
This check list may seem like it contains basic items, but many are taken for granted and can spoil a camping trip if not attended to prior to moving the vehicle. You may want to use this list as a start for your own Pre-Trip check list, which may include your personal camping gear and food preferences.
�91

Notes
___________________________________________________________________________
___________________________________________________________________________
___________________________________________________________________________
___________________________________________________________________________
___________________________________________________________________________
___________________________________________________________________________
___________________________________________________________________________
___________________________________________________________________________
___________________________________________________________________________
___________________________________________________________________________
___________________________________________________________________________
___________________________________________________________________________
___________________________________________________________________________
___________________________________________________________________________
___________________________________________________________________________
___________________________________________________________________________
___________________________________________________________________________
___________________________________________________________________________
___________________________________________________________________________
___________________________________________________________________________
___________________________________________________________________________
___________________________________________________________________________
___________________________________________________________________________
�92

Notes
___________________________________________________________________________
___________________________________________________________________________
___________________________________________________________________________
___________________________________________________________________________
___________________________________________________________________________
___________________________________________________________________________
___________________________________________________________________________
___________________________________________________________________________
___________________________________________________________________________
___________________________________________________________________________
___________________________________________________________________________
___________________________________________________________________________
___________________________________________________________________________
___________________________________________________________________________
___________________________________________________________________________
___________________________________________________________________________
___________________________________________________________________________
___________________________________________________________________________
___________________________________________________________________________
___________________________________________________________________________
___________________________________________________________________________
___________________________________________________________________________
___________________________________________________________________________
�93

___________________________________________________________________________
___________________________________________________________________________
___________________________________________________________________________
___________________________________________________________________________
___________________________________________________________________________
___________________________________________________________________________
___________________________________________________________________________
___________________________________________________________________________
___________________________________________________________________________
___________________________________________________________________________
___________________________________________________________________________
___________________________________________________________________________
___________________________________________________________________________
___________________________________________________________________________
___________________________________________________________________________
___________________________________________________________________________
___________________________________________________________________________
___________________________________________________________________________
___________________________________________________________________________
___________________________________________________________________________
___________________________________________________________________________
___________________________________________________________________________
___________________________________________________________________________
�94

___________________________________________________________________________
___________________________________________________________________________
___________________________________________________________________________
___________________________________________________________________________
___________________________________________________________________________
___________________________________________________________________________
___________________________________________________________________________
___________________________________________________________________________
___________________________________________________________________________
___________________________________________________________________________
___________________________________________________________________________
___________________________________________________________________________
___________________________________________________________________________
___________________________________________________________________________
___________________________________________________________________________
___________________________________________________________________________
___________________________________________________________________________
___________________________________________________________________________
___________________________________________________________________________
___________________________________________________________________________
___________________________________________________________________________
___________________________________________________________________________
___________________________________________________________________________
�95