Embed Size (px)
Citation preview
PlayStation 2 Slimline SCPH-7500x FanReplacement
This is a step-by-step guide on how to replace and install the fan in the PlayStation 2 Slimline.
Escrito por: Jared Hirata
PlayStation 2 Slimline SCPH-7500x Fan Replacement
© iFixit — CC BY-NC-SA es.iFixit.com Página 1 de 8
INTRODUCCIÓN
This guide will walk you through step-by-step on how to properly remove and install the fan in thePlayStation 2 Slimline.
HERRAMIENTAS:Tweezers (1)
Phillips #1 Screwdriver (1)
Spudger (1)
PlayStation 2 Slimline SCPH-7500x Fan Replacement
© iFixit — CC BY-NC-SA es.iFixit.com Página 2 de 8
Paso 1 — Removing Playstation 2 Slimline SCPH-7500x Outer Shell
Turn off the PlayStation 2 (or PS2) and carefully unplug from the power source. Check to see thereare no discs inside the console before flipping the game system upside-down.
Paso 2
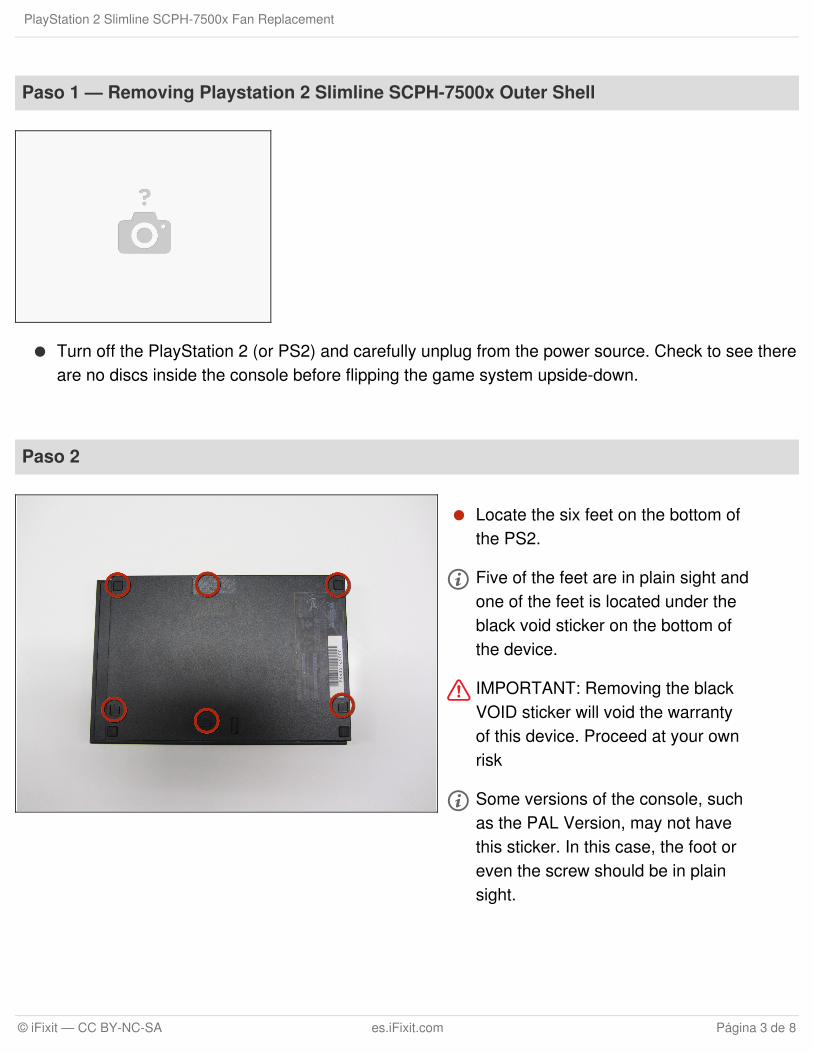
Locate the six feet on the bottom ofthe PS2.
Five of the feet are in plain sight andone of the feet is located under theblack void sticker on the bottom ofthe device.
IMPORTANT: Removing the blackVOID sticker will void the warrantyof this device. Proceed at your ownrisk
Some versions of the console, suchas the PAL Version, may not havethis sticker. In this case, the foot oreven the screw should be in plainsight.
PlayStation 2 Slimline SCPH-7500x Fan Replacement
© iFixit — CC BY-NC-SA es.iFixit.com Página 3 de 8
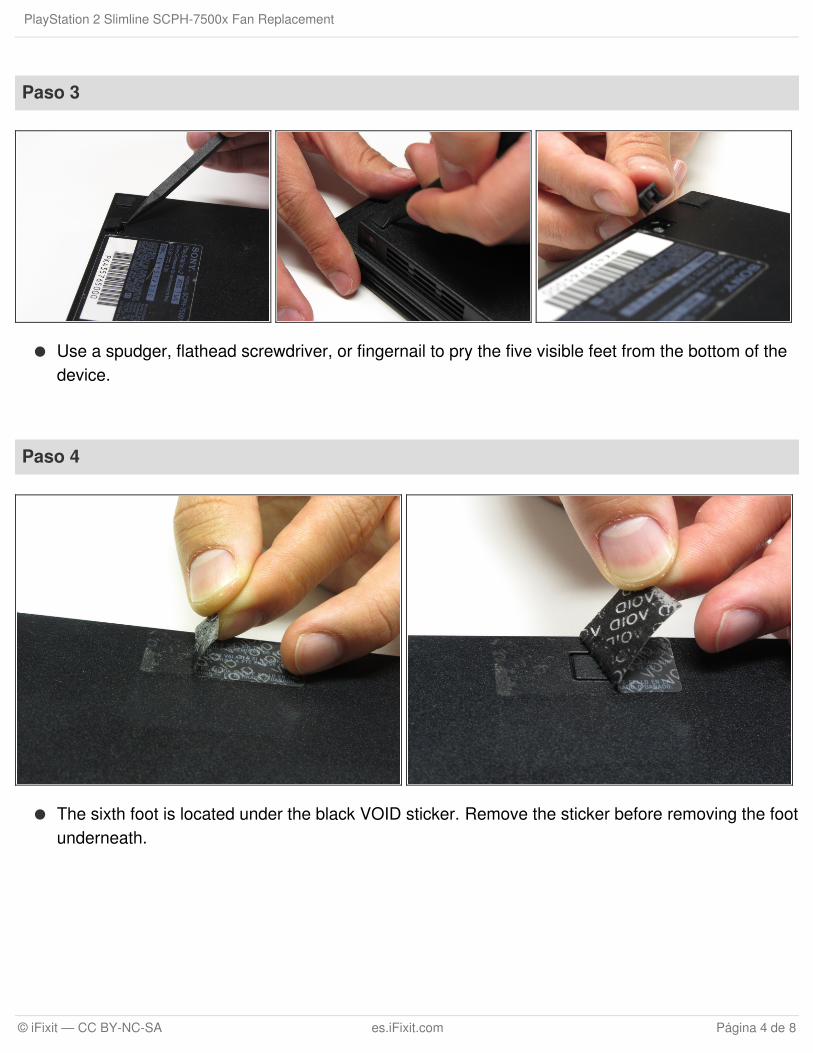
Paso 3
Use a spudger, flathead screwdriver, or fingernail to pry the five visible feet from the bottom of thedevice.
Paso 4
The sixth foot is located under the black VOID sticker. Remove the sticker before removing the footunderneath.
PlayStation 2 Slimline SCPH-7500x Fan Replacement
© iFixit — CC BY-NC-SA es.iFixit.com Página 4 de 8
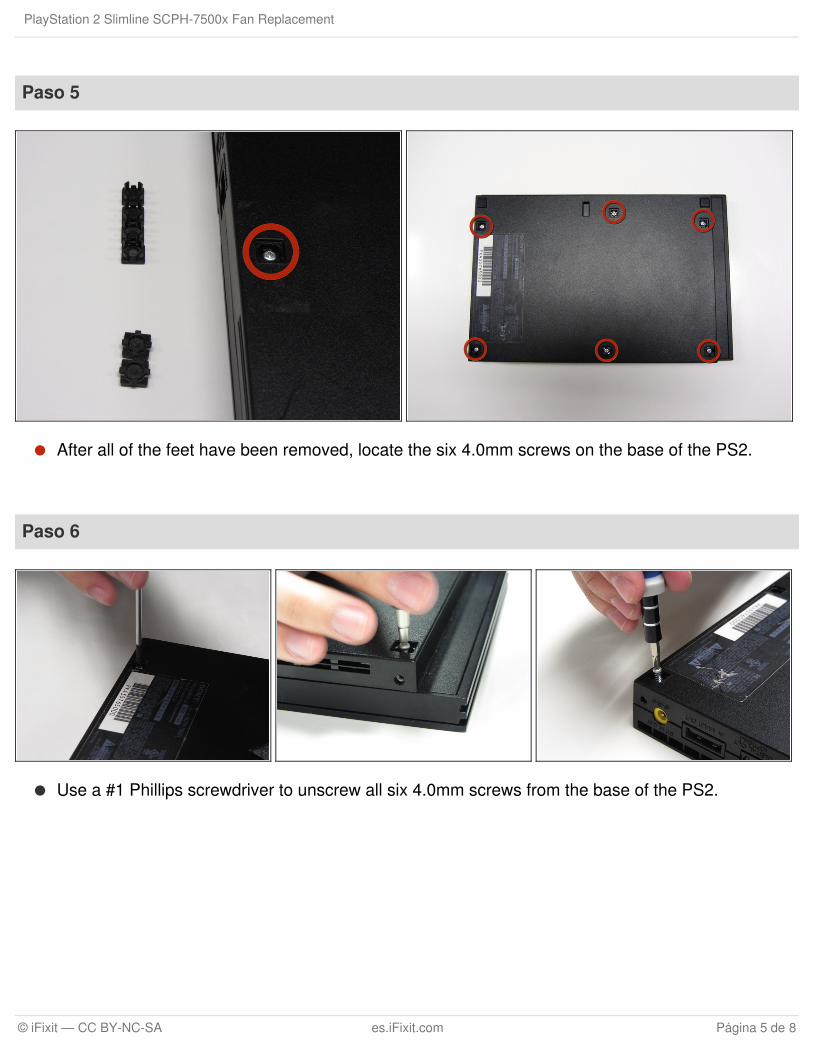
Paso 5
After all of the feet have been removed, locate the six 4.0mm screws on the base of the PS2.
Paso 6
Use a #1 Phillips screwdriver to unscrew all six 4.0mm screws from the base of the PS2.
PlayStation 2 Slimline SCPH-7500x Fan Replacement
© iFixit — CC BY-NC-SA es.iFixit.com Página 5 de 8
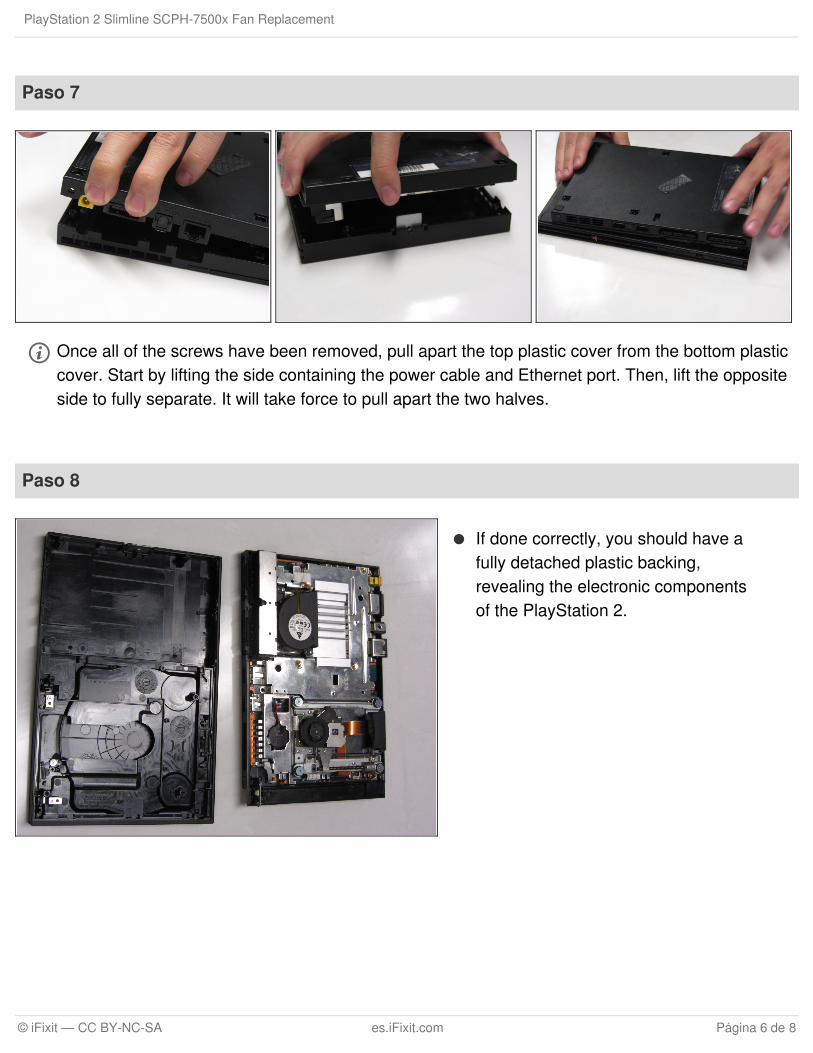
Paso 7
Once all of the screws have been removed, pull apart the top plastic cover from the bottom plasticcover. Start by lifting the side containing the power cable and Ethernet port. Then, lift the oppositeside to fully separate. It will take force to pull apart the two halves.
Paso 8
If done correctly, you should have afully detached plastic backing,revealing the electronic componentsof the PlayStation 2.
PlayStation 2 Slimline SCPH-7500x Fan Replacement
© iFixit — CC BY-NC-SA es.iFixit.com Página 6 de 8
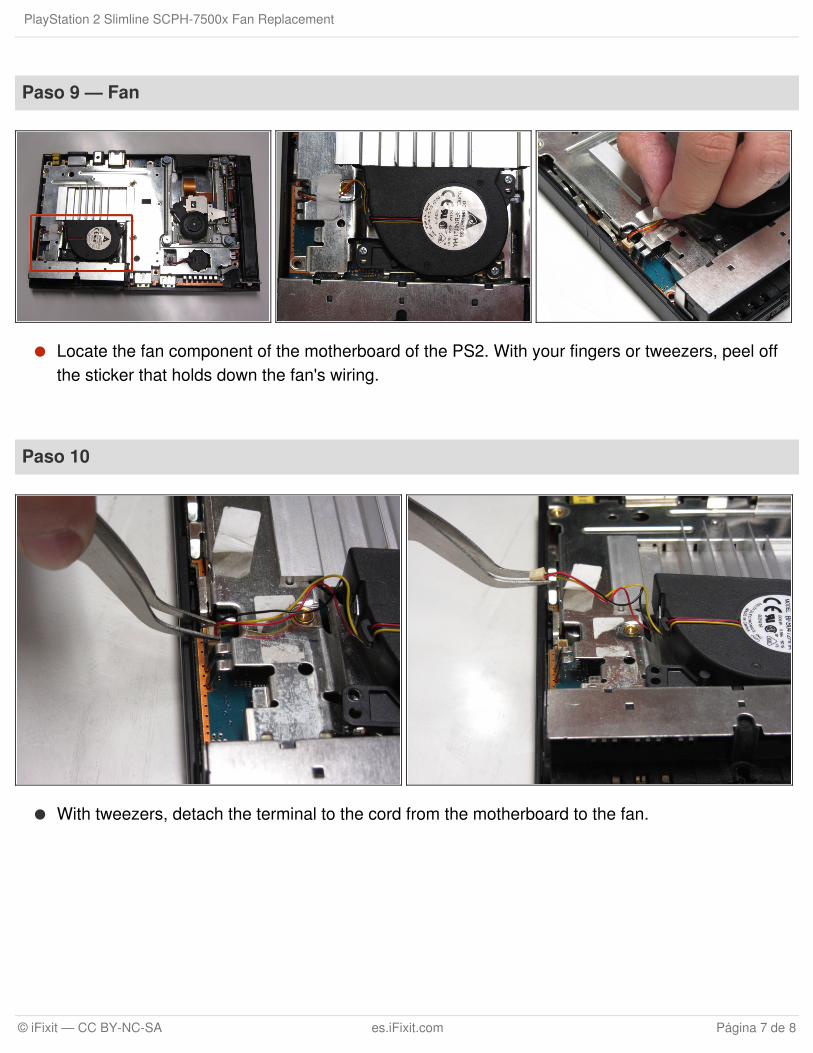
Paso 9 — Fan
Locate the fan component of the motherboard of the PS2. With your fingers or tweezers, peel offthe sticker that holds down the fan's wiring.
Paso 10
With tweezers, detach the terminal to the cord from the motherboard to the fan.
PlayStation 2 Slimline SCPH-7500x Fan Replacement
© iFixit — CC BY-NC-SA es.iFixit.com Página 7 de 8
To reassemble your device, follow these instructions in reverse order.
La versión más reciente de este documento fue generada en 2018-07-15 10:25:44 AM .
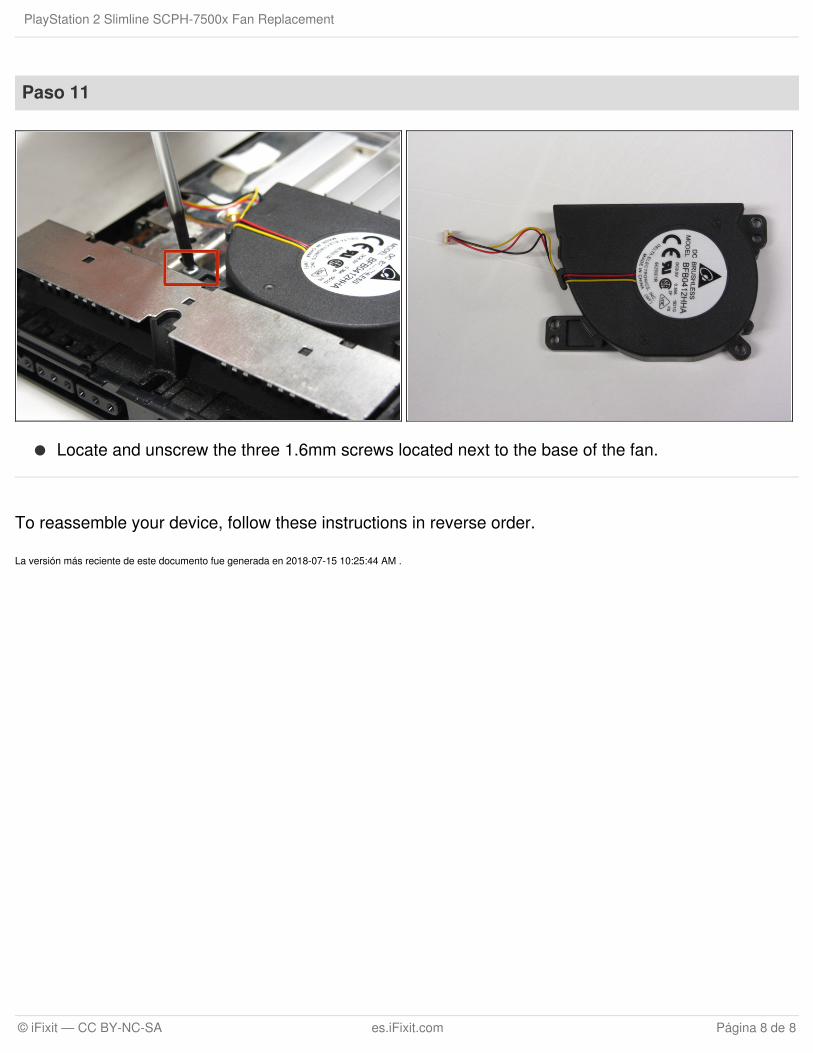
Paso 11
Locate and unscrew the three 1.6mm screws located next to the base of the fan.
PlayStation 2 Slimline SCPH-7500x Fan Replacement
© iFixit — CC BY-NC-SA es.iFixit.com Página 8 de 8

![SCPH-9002 B - PlayStation · You can enjoy playing CD-ROM discs with both the “PlayStation” logo and [PAL] designation, and audio CDs with ... Inc. expressly prohibits the analysis](https://img.pdfslide.us/doc/110x75/5f6acc3e0a76e724cf64a868/scph-9002-b-playstation-you-can-enjoy-playing-cd-rom-discs-with-both-the-aoeplaystationa.jpg)