Embed Size (px)
Citation preview
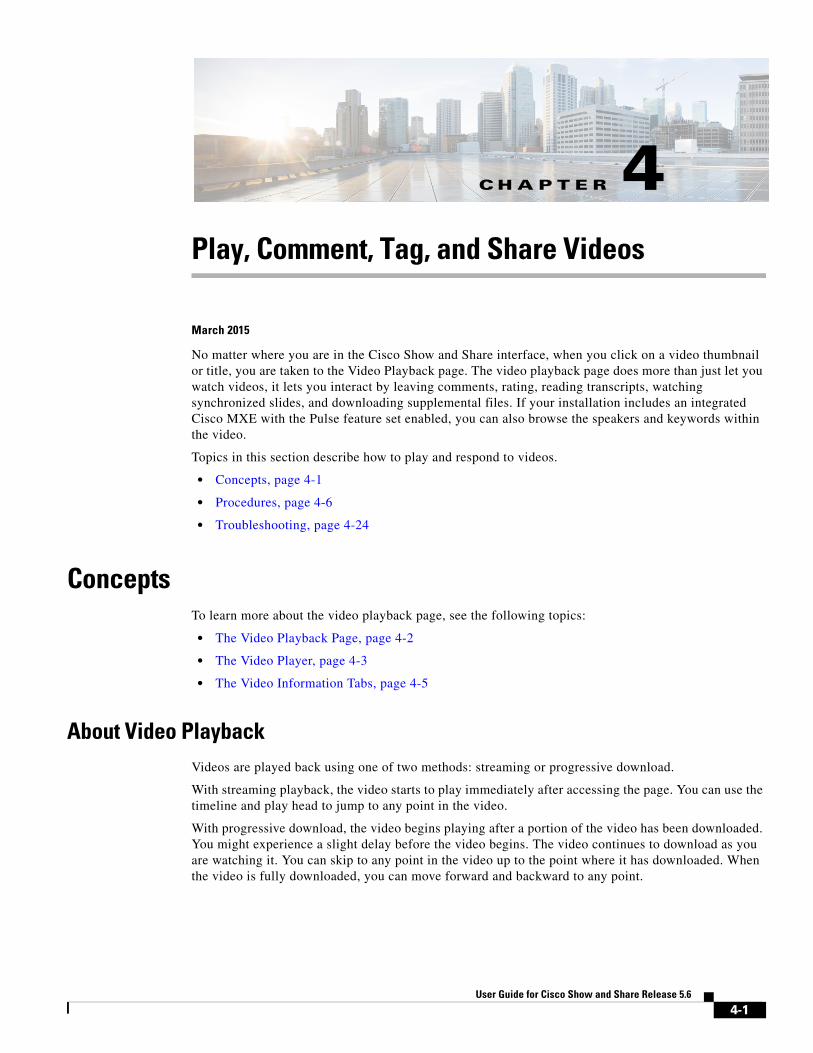
C H A P T E R 4
Play, Comment, Tag, and Share VideosMarch 2015
No matter where you are in the Cisco Show and Share interface, when you click on a video thumbnail or title, you are taken to the Video Playback page. The video playback page does more than just let you watch videos, it lets you interact by leaving comments, rating, reading transcripts, watching synchronized slides, and downloading supplemental files. If your installation includes an integrated Cisco MXE with the Pulse feature set enabled, you can also browse the speakers and keywords within the video.
Topics in this section describe how to play and respond to videos.
• Concepts, page 4-1
• Procedures, page 4-6
• Troubleshooting, page 4-24
ConceptsTo learn more about the video playback page, see the following topics:
• The Video Playback Page, page 4-2
• The Video Player, page 4-3
• The Video Information Tabs, page 4-5
About Video PlaybackVideos are played back using one of two methods: streaming or progressive download.
With streaming playback, the video starts to play immediately after accessing the page. You can use the timeline and play head to jump to any point in the video.
With progressive download, the video begins playing after a portion of the video has been downloaded. You might experience a slight delay before the video begins. The video continues to download as you are watching it. You can skip to any point in the video up to the point where it has downloaded. When the video is fully downloaded, you can move forward and backward to any point.
4-1User Guide for Cisco Show and Share Release 5.6
Chapter 4 Play, Comment, Tag, and Share Videos Concepts
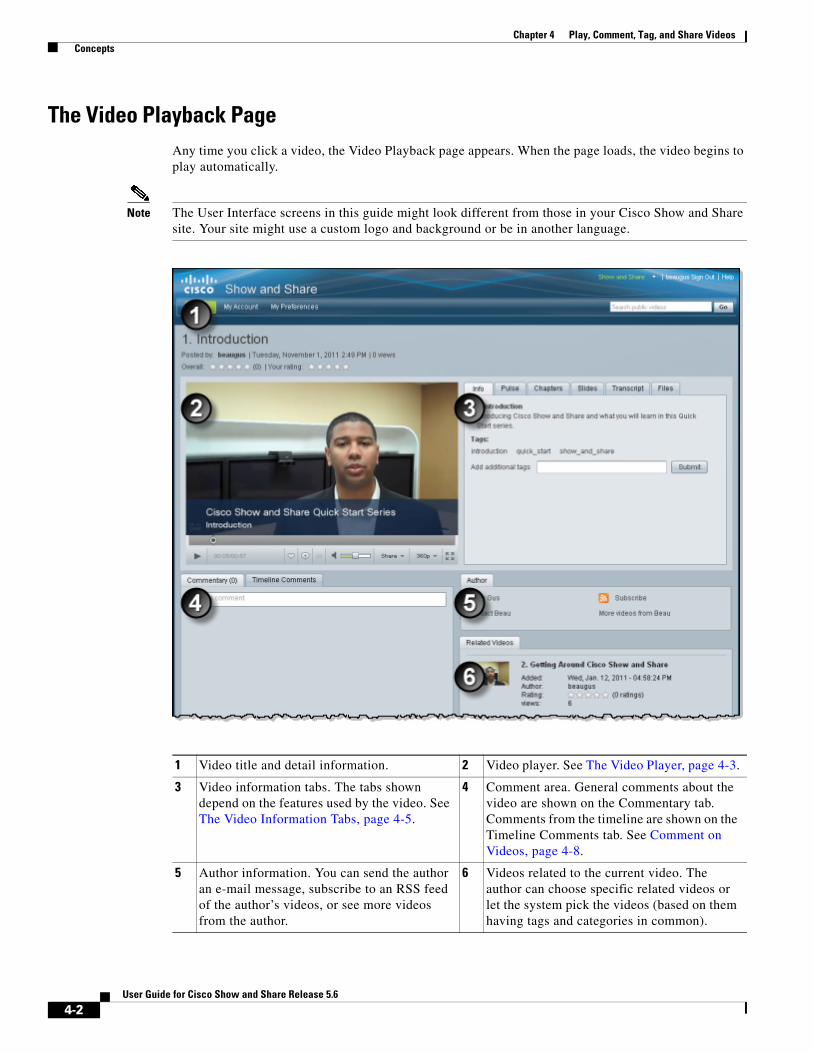
The Video Playback PageAny time you click a video, the Video Playback page appears. When the page loads, the video begins to play automatically.
Note The User Interface screens in this guide might look different from those in your Cisco Show and Share site. Your site might use a custom logo and background or be in another language.
1 Video title and detail information. 2 Video player. See The Video Player, page 4-3.
3 Video information tabs. The tabs shown depend on the features used by the video. See The Video Information Tabs, page 4-5.
4 Comment area. General comments about the video are shown on the Commentary tab. Comments from the timeline are shown on the Timeline Comments tab. See Comment on Videos, page 4-8.
5 Author information. You can send the author an e-mail message, subscribe to an RSS feed of the author’s videos, or see more videos from the author.
6 Videos related to the current video. The author can choose specific related videos or let the system pick the videos (based on them having tags and categories in common).
4-2User Guide for Cisco Show and Share Release 5.6
Chapter 4 Play, Comment, Tag, and Share Videos Concepts
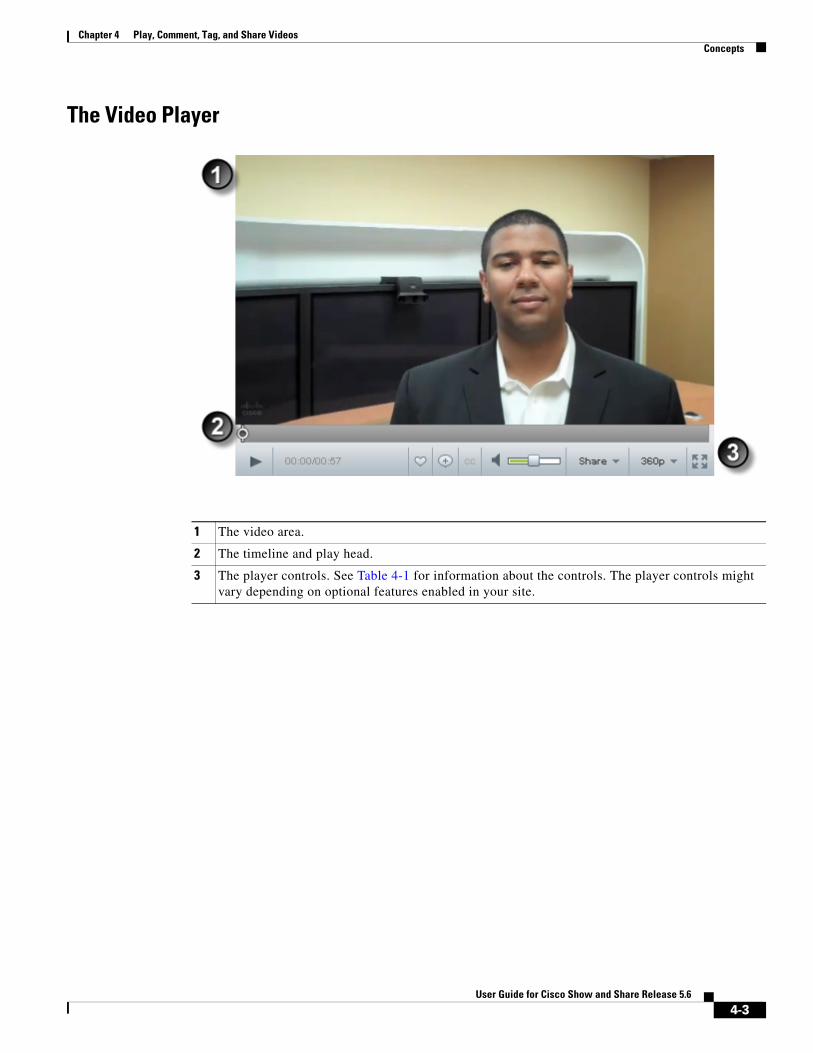
The Video Player
1 The video area.
2 The timeline and play head.
3 The player controls. See Table 4-1 for information about the controls. The player controls might vary depending on optional features enabled in your site.
4-3User Guide for Cisco Show and Share Release 5.6
Chapter 4 Play, Comment, Tag, and Share Videos Concepts
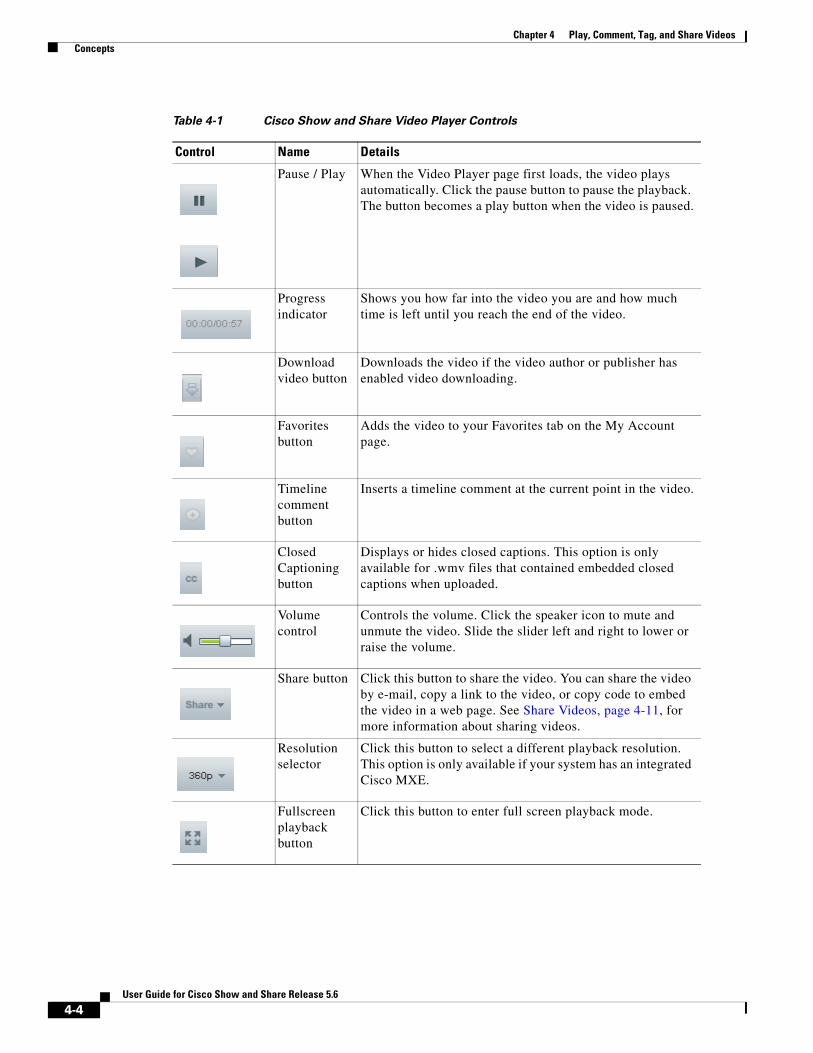
Table 4-1 Cisco Show and Share Video Player Controls
Control Name Details
Pause / Play When the Video Player page first loads, the video plays automatically. Click the pause button to pause the playback. The button becomes a play button when the video is paused.
Progress indicator
Shows you how far into the video you are and how much time is left until you reach the end of the video.
Download video button
Downloads the video if the video author or publisher has enabled video downloading.
Favorites button
Adds the video to your Favorites tab on the My Account page.
Timeline comment button
Inserts a timeline comment at the current point in the video.
Closed Captioning button
Displays or hides closed captions. This option is only available for .wmv files that contained embedded closed captions when uploaded.
Volume control
Controls the volume. Click the speaker icon to mute and unmute the video. Slide the slider left and right to lower or raise the volume.
Share button Click this button to share the video. You can share the video by e-mail, copy a link to the video, or copy code to embed the video in a web page. See Share Videos, page 4-11, for more information about sharing videos.
Resolution selector
Click this button to select a different playback resolution. This option is only available if your system has an integrated Cisco MXE.
Fullscreen playback button
Click this button to enter full screen playback mode.
4-4User Guide for Cisco Show and Share Release 5.6
Chapter 4 Play, Comment, Tag, and Share Videos Concepts
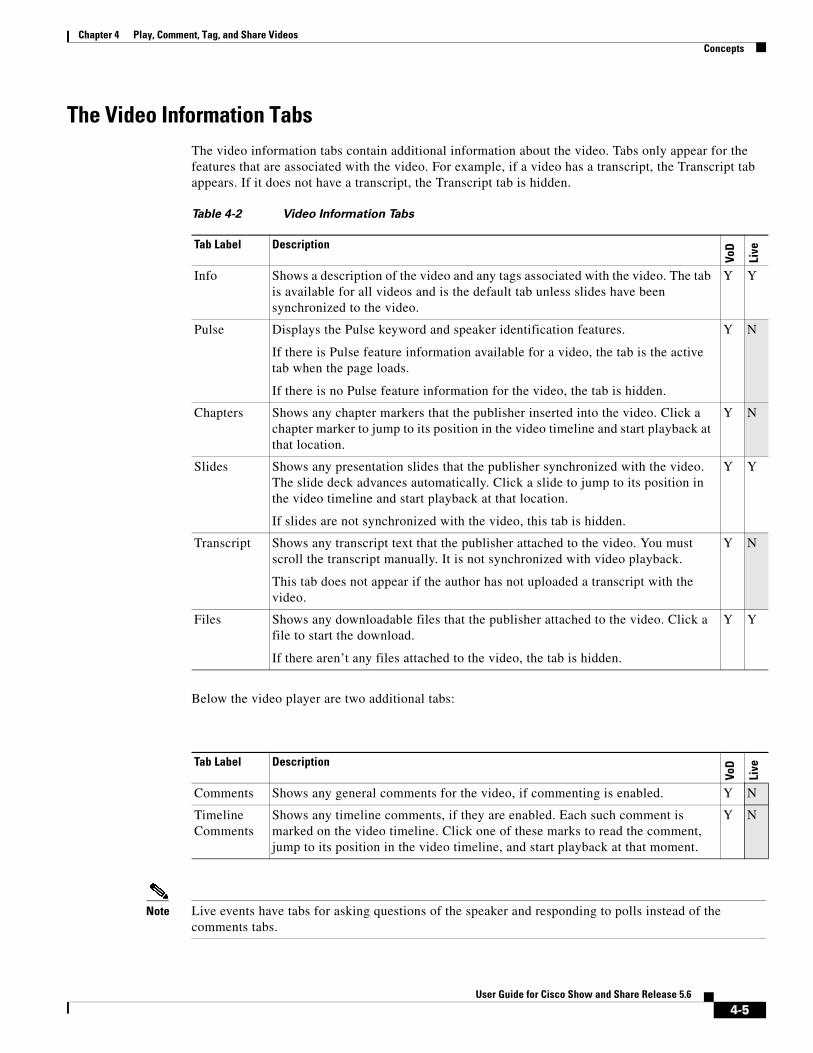
The Video Information TabsThe video information tabs contain additional information about the video. Tabs only appear for the features that are associated with the video. For example, if a video has a transcript, the Transcript tab appears. If it does not have a transcript, the Transcript tab is hidden.
Below the video player are two additional tabs:
Note Live events have tabs for asking questions of the speaker and responding to polls instead of the comments tabs.
Table 4-2 Video Information Tabs
Tab Label Description
VoD
Live
Info Shows a description of the video and any tags associated with the video. The tab is available for all videos and is the default tab unless slides have been synchronized to the video.
Y Y
Pulse Displays the Pulse keyword and speaker identification features.
If there is Pulse feature information available for a video, the tab is the active tab when the page loads.
If there is no Pulse feature information for the video, the tab is hidden.
Y N
Chapters Shows any chapter markers that the publisher inserted into the video. Click a chapter marker to jump to its position in the video timeline and start playback at that location.
Y N
Slides Shows any presentation slides that the publisher synchronized with the video. The slide deck advances automatically. Click a slide to jump to its position in the video timeline and start playback at that location.
If slides are not synchronized with the video, this tab is hidden.
Y Y
Transcript Shows any transcript text that the publisher attached to the video. You must scroll the transcript manually. It is not synchronized with video playback.
This tab does not appear if the author has not uploaded a transcript with the video.
Y N
Files Shows any downloadable files that the publisher attached to the video. Click a file to start the download.
If there aren’t any files attached to the video, the tab is hidden.
Y Y
Tab Label Description
VoD
Live
Comments Shows any general comments for the video, if commenting is enabled. Y N
Timeline Comments
Shows any timeline comments, if they are enabled. Each such comment is marked on the video timeline. Click one of these marks to read the comment, jump to its position in the video timeline, and start playback at that moment.
Y N
4-5User Guide for Cisco Show and Share Release 5.6
Chapter 4 Play, Comment, Tag, and Share Videos Procedures
Procedures• Pause and Play Videos, page 4-6
• Play Videos Full Screen, page 4-7
• Download a Video, page 4-7
• Add a Video to Your Favorites List, page 4-8
• Change the Video Resolution, page 4-8
• Comment on Videos, page 4-8
• Add Tags to Videos, page 4-10
• Rate Videos, page 4-11
• Share Videos, page 4-11
• Play Embedded Videos, page 4-17
• View Pulse Information, page 4-18
• Jump to a Chapter, page 4-23
• Watch Slides, page 4-23
• Read a Transcript, page 4-23
• Download Files, page 4-23
Pause and Play VideosWhen you first access a video, it begins to play by default. You can pause and restart the video at any time.
Procedure
Step 1 Click the pause button to pause the video.
Step 2 To resume playback, click the play button.
Step 3 To skip to a specific point in the video, drag the play head to the point in the timeline.
Note See Control Video Playback, page 2-14, for information about using the keyboard controls for the video player.
4-6User Guide for Cisco Show and Share Release 5.6
Chapter 4 Play, Comment, Tag, and Share Videos Procedures
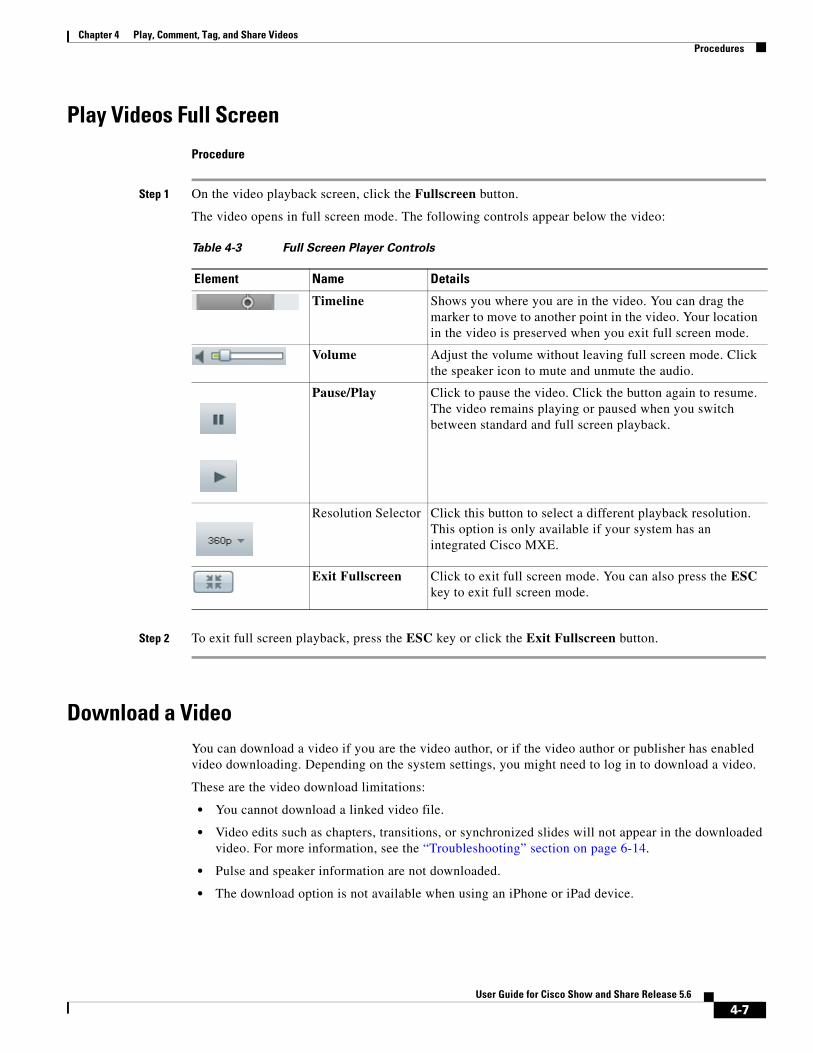
Play Videos Full Screen
Procedure
Step 1 On the video playback screen, click the Fullscreen button.
The video opens in full screen mode. The following controls appear below the video:
Step 2 To exit full screen playback, press the ESC key or click the Exit Fullscreen button.
Download a VideoYou can download a video if you are the video author, or if the video author or publisher has enabled video downloading. Depending on the system settings, you might need to log in to download a video.
These are the video download limitations:
• You cannot download a linked video file.
• Video edits such as chapters, transitions, or synchronized slides will not appear in the downloaded video. For more information, see the “Troubleshooting” section on page 6-14.
• Pulse and speaker information are not downloaded.
• The download option is not available when using an iPhone or iPad device.
Table 4-3 Full Screen Player Controls
Element Name Details
Timeline Shows you where you are in the video. You can drag the marker to move to another point in the video. Your location in the video is preserved when you exit full screen mode.
Volume Adjust the volume without leaving full screen mode. Click the speaker icon to mute and unmute the audio.
Pause/Play Click to pause the video. Click the button again to resume. The video remains playing or paused when you switch between standard and full screen playback.
Resolution Selector Click this button to select a different playback resolution. This option is only available if your system has an integrated Cisco MXE.
Exit Fullscreen Click to exit full screen mode. You can also press the ESC key to exit full screen mode.
4-7User Guide for Cisco Show and Share Release 5.6
Chapter 4 Play, Comment, Tag, and Share Videos Procedures
Procedure
Step 1 On the video player, click the download button.
Step 2 Specify the location for the downloaded file and click Save.
Add a Video to Your Favorites ListYou can add a video to your Favorites list. Your Favorites list appears as a tab in the Videos drawer on the My Account page. You must be logged in to add a video to your Favorites list.
Procedure
Step 1 On the video playback screen, click the Favorites button.
The video now appears in your My Favorites list on the My Account page.
Step 2 To view your favorite videos, go to My Account > Videos > Favorites.
Change the Video ResolutionYou can change the resolution of the video while viewing it. This option is only available if your Cisco Show and Share has an integrated Cisco MXE that transcodes the uploaded video and your system administrator has enabled multiple resolutions.
You might want to select a lower resolution when playing a video on slower network connections or if the playback pauses often.
The following resolutions might be available: 360p, 480p, and 720p. The available resolutions depend on the resolution of the original video and the system settings.
Procedure
Step 1 On the video player, click the resolution selector button. The button displays the current resolution of the video.
Step 2 Select the resolution that you want to view.
Comment on VideosYou can comment on videos in two different ways:
• General comments that apply to the whole video. These comments appear below the video on the video playback page. See Adding a General Comment, page 4-9.
4-8User Guide for Cisco Show and Share Release 5.6
Chapter 4 Play, Comment, Tag, and Share Videos Procedures
• Timeline comment that apply to a specific point in the video. These comments appear in the Timeline Comments tab below the video. Additionally, vertical bar in the video timeline indicates where timeline comments have been entered. See Adding a Timeline Comment, page 4-9.
Both types of comments count towards the total number of comments for a video.
Commenting on videos might not be available if the system administrator has disabled this feature at the system level or if the video author has disabled the feature for the video.
If you re-publish a video with comments, you are given the option to retain the comments when the video is republished.
You can also flag comments as inappropriate. See Flag a Comment as Inappropriate, page 4-9.
Adding a General Comment
Step 1 Click in the comment box in the Commentary tab below the video. If comments have been added by other users, the comment box appears above the existing comments.
Step 2 Type your comment.
Step 3 Click Add Comment.
Your comment appears at the top of the list. If you are logged in to Cisco Show and Share, your user name, along with the date and time of the comment, appears above your comment. If you are not logged in, ANONYMOUS_USER appears as the user name.
Adding a Timeline Comment
Step 1 Play the video.
Step 2 When the video reaches the point where you want to add a timeline comment, click the Add Timeline Comment button.
The video pauses and the Timeline Comment box appears.
Note Timeline comments are not supported with videos in Windows Media format. The Add Timeline Comment button does not appear in the playback screen for videos in Windows Media format.
Step 3 Type your comment and click OK.
Your timeline comment appears in the Timeline Comment tab.
Flag a Comment as Inappropriate
Step 1 Click the Commentary or Timeline Comments tab.
Step 2 Click Report Abuse next to the inappropriate comment.
The system administrators are notified that the comment has been flagged.
4-9User Guide for Cisco Show and Share Release 5.6
Chapter 4 Play, Comment, Tag, and Share Videos Procedures
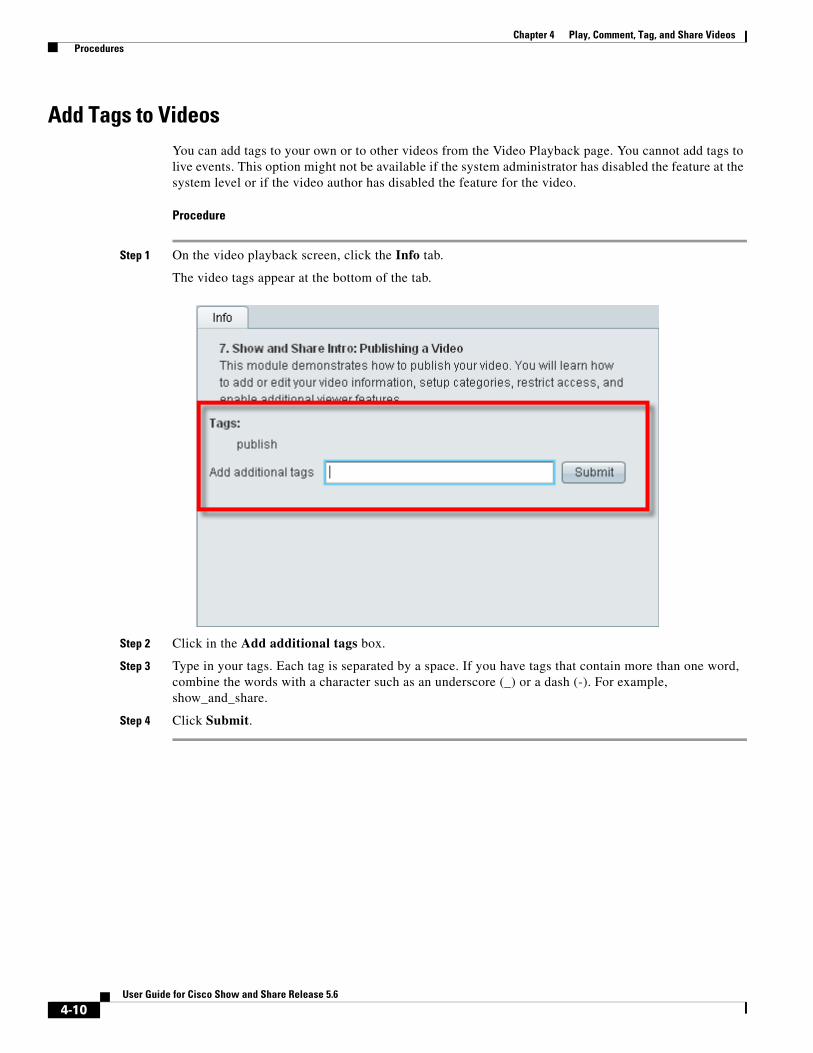
Add Tags to VideosYou can add tags to your own or to other videos from the Video Playback page. You cannot add tags to live events. This option might not be available if the system administrator has disabled the feature at the system level or if the video author has disabled the feature for the video.
Procedure
Step 1 On the video playback screen, click the Info tab.
The video tags appear at the bottom of the tab.
Step 2 Click in the Add additional tags box.
Step 3 Type in your tags. Each tag is separated by a space. If you have tags that contain more than one word, combine the words with a character such as an underscore (_) or a dash (-). For example, show_and_share.
Step 4 Click Submit.
4-10User Guide for Cisco Show and Share Release 5.6
Chapter 4 Play, Comment, Tag, and Share Videos Procedures
Rate VideosYou can rate your own and other videos. Ratings range from a low of zero stars to a high of five stars.
Because ratings increment by one-half star, there are 10 possible ratings available. The average all of the submitted ratings for a video appears to everyone.
This option might not be available if the system administrator has disabled the feature at the system level or if the video author has disabled the feature for the video.
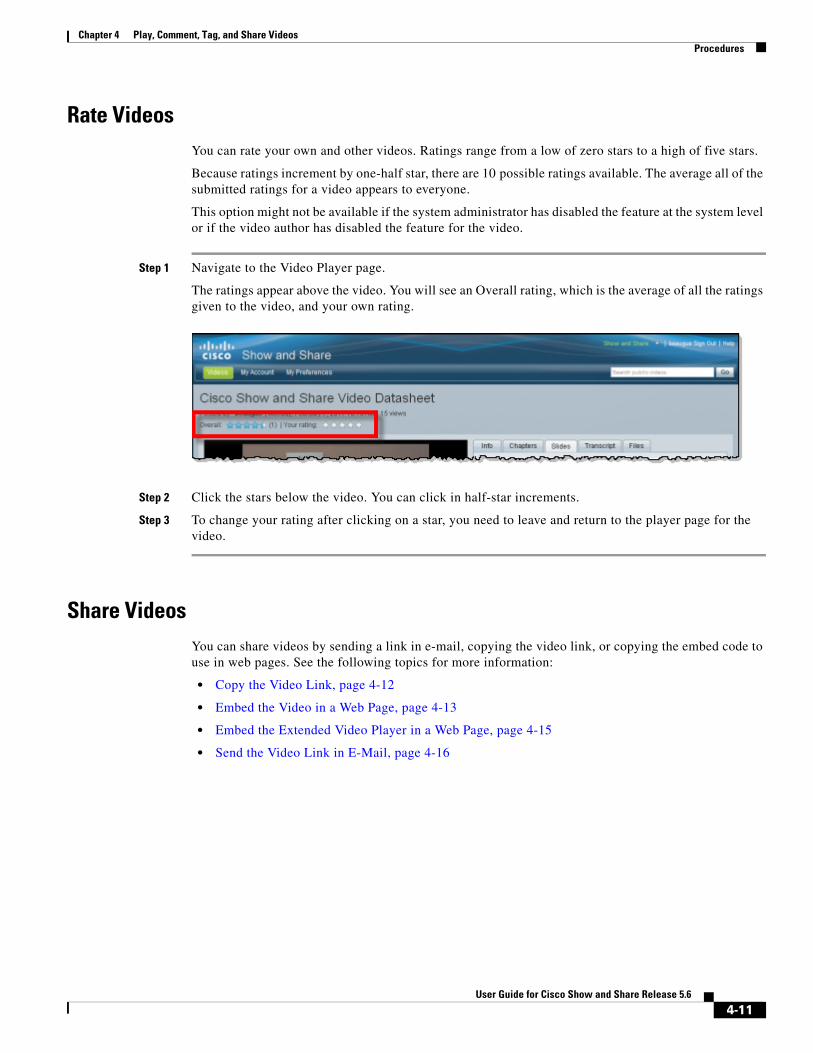
Step 1 Navigate to the Video Player page.
The ratings appear above the video. You will see an Overall rating, which is the average of all the ratings given to the video, and your own rating.
Step 2 Click the stars below the video. You can click in half-star increments.
Step 3 To change your rating after clicking on a star, you need to leave and return to the player page for the video.
Share VideosYou can share videos by sending a link in e-mail, copying the video link, or copying the embed code to use in web pages. See the following topics for more information:
• Copy the Video Link, page 4-12
• Embed the Video in a Web Page, page 4-13
• Embed the Extended Video Player in a Web Page, page 4-15
• Send the Video Link in E-Mail, page 4-16
4-11User Guide for Cisco Show and Share Release 5.6
Chapter 4 Play, Comment, Tag, and Share Videos Procedures
Copy the Video Link
You can copy the video URL to share in documents, web pages, or chat sessions.
Procedure
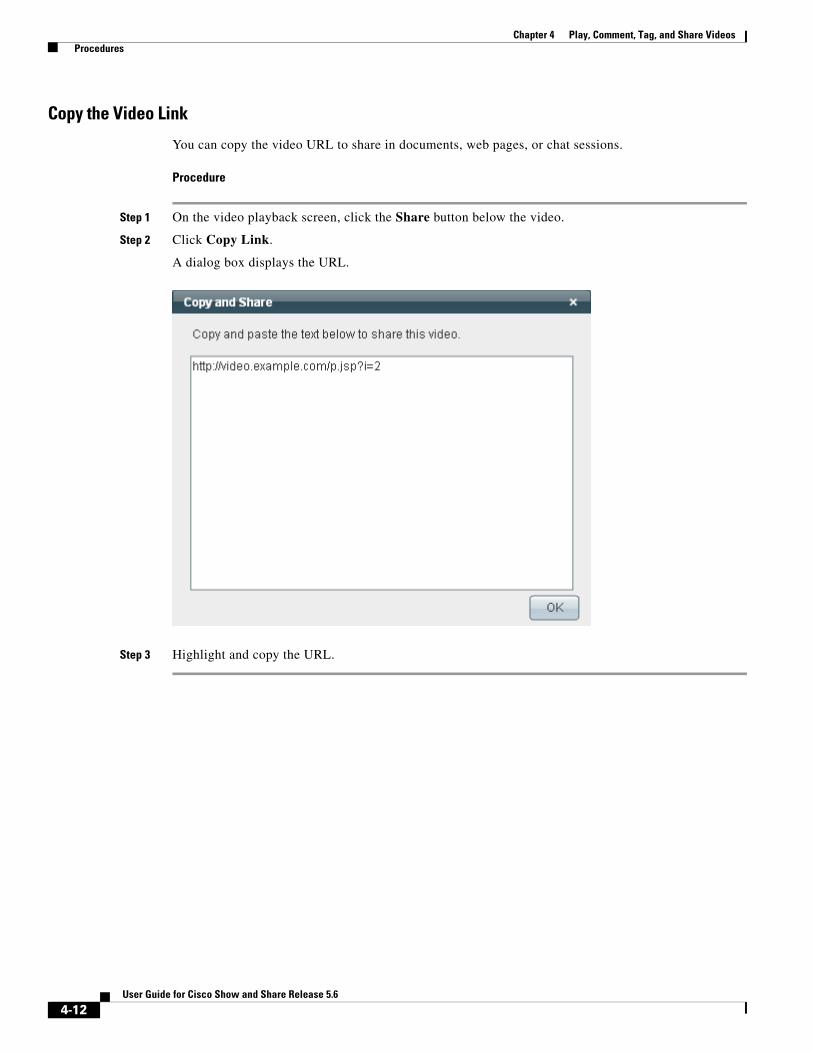
Step 1 On the video playback screen, click the Share button below the video.
Step 2 Click Copy Link.
A dialog box displays the URL.
Step 3 Highlight and copy the URL.
4-12User Guide for Cisco Show and Share Release 5.6
Chapter 4 Play, Comment, Tag, and Share Videos Procedures
Embed the Video in a Web Page
You can embed your video in a web page or other type of document that accepts HTML code, such as a blog, a wiki, or a simple HTML page.
There are two types of embed code available: Javascript and Flash. The Flash embed code is only available for videos in one of the Flash formats. For videos in a Windows format, only the Javascript code is available.
Use the Javascript embed code unless the page you are embedding the video into does not support Javascript. Some blogging and wiki products do not allow Javascript to run on their pages. Using the Javascript embed code allows you to track video views for videos embedded in HTML pages. See About the Video View Report, page 9-3, for more information about tracking video views.
The Flash embed code does not allow you to track video views. Use the Flash embed code if the page you are embedding the video into does not support Javascript or if tracking the number of video view is not important.
Procedure
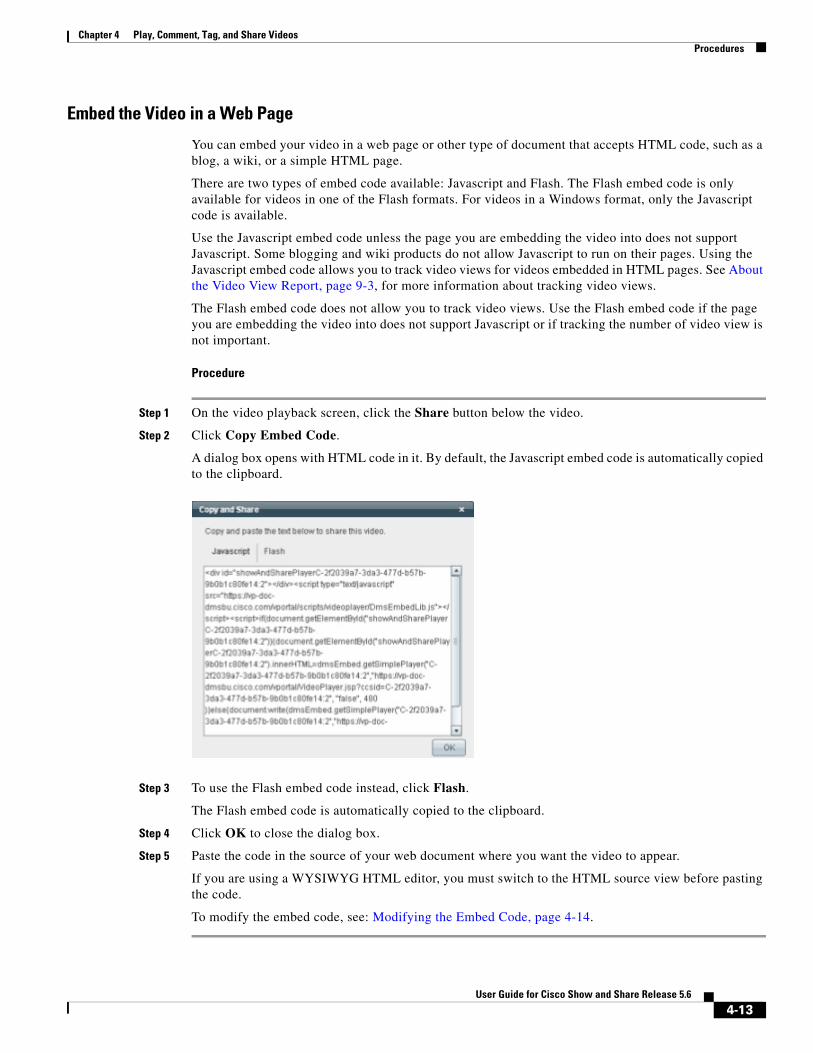
Step 1 On the video playback screen, click the Share button below the video.
Step 2 Click Copy Embed Code.
A dialog box opens with HTML code in it. By default, the Javascript embed code is automatically copied to the clipboard.
Step 3 To use the Flash embed code instead, click Flash.
The Flash embed code is automatically copied to the clipboard.
Step 4 Click OK to close the dialog box.
Step 5 Paste the code in the source of your web document where you want the video to appear.
If you are using a WYSIWYG HTML editor, you must switch to the HTML source view before pasting the code.
To modify the embed code, see: Modifying the Embed Code, page 4-14.
4-13User Guide for Cisco Show and Share Release 5.6
Chapter 4 Play, Comment, Tag, and Share Videos Procedures
Modifying the Embed Code
You can modify the size of the embedded video and whether or not the video automatically plays when the web page loads. When planning your web page, note that the player controls add another 50 pixels to the height of your video.
Javascript Embed Code
To modify the width of the embedded video, change the value “480” in the embed code, shown in the example below. The height of the video is automatically adjusted to maintain the aspect ratio.
<script type="text/javascript" src="https://video.example.com/vportal/scripts/videoplayer/DmsEmbedLib.js"></script><script>document.write(dmsEmbed.getSimplePlayer("C-ccc14127-f1a7-4b58-b967-5efc307d568d:4","https://video.example.com/vportal/VideoPlayer.jsp?ccsid=C-ccc14127-f1a7-4b58-b967-5efc307d568d:4#","false",480));</script>
To control the automatic playback of the video when the web page loads, change the value “false” (shown in bold text, below) to one of the following values:
• “false”—The video is paused when the page loads.
• “true”—The video plays automatically when the page loads.
<script type="text/javascript" src="https://video.example.com/vportal/scripts/videoplayer/DmsEmbedLib.js"></script><script>document.write(dmsEmbed.getSimplePlayer("C-ccc14127-f1a7-4b58-b967-5efc307d568d:4","https://video.example.com/vportal/VideoPlayer.jsp?ccsid=C-ccc14127-f1a7-4b58-b967-5efc307d568d:4#","false",480));</script>
Flash Embed Code
To modify the width of the embedded video, change the value "480" in the embed code, shown in the example below. To maintain aspect ratio, add a value for height. Ensure that the height and width values match in object classid and embed src.
object classid="clsid:D27CDB6E-AE6D-11cf-96B8-444553540000"id="Embed-1.0-SNAPSHOTC-7f126f39-1a38-4f4f-8a7c-b2542098a979:2" width="480px" height="320px">
<embed src="https://video.example.com/vportal/swf/Embed-1.0-SNAPSHOT.swf" quality="high" bgcolor="#FFFFFF" width="480px" height="320px" id="Embed-1.0-SNAPSHOTC-7f126f39-1a38-4f4f-8a7c-b2542098a979:2" name="Embed-1.0-SNAPSHOTC-7f126f39-1a38-4f4f-8a7c-b2542098a979:2" align="middle" play="true" loop="false" flashVars="baseurl=https://video.example.com/vportal/VideoPlayer.jsp?ccsid=C-7f126f39-1a38-4f4f-8a7c-b2542098a979:2#&play=false&embedurl= quality="high" allowfullscreen="true" wmode="transparent" allowScriptAccess="always" type="application/x-shockwave-flash" pluginspage="http://www.adobe.com/go/getflashplayer" /></object>
You can disable full screen view by changing “true” to “false” in the following line of the Flash embed code:
<param name="allowFullScreen" value="true" />
4-14User Guide for Cisco Show and Share Release 5.6
Chapter 4 Play, Comment, Tag, and Share Videos Procedures
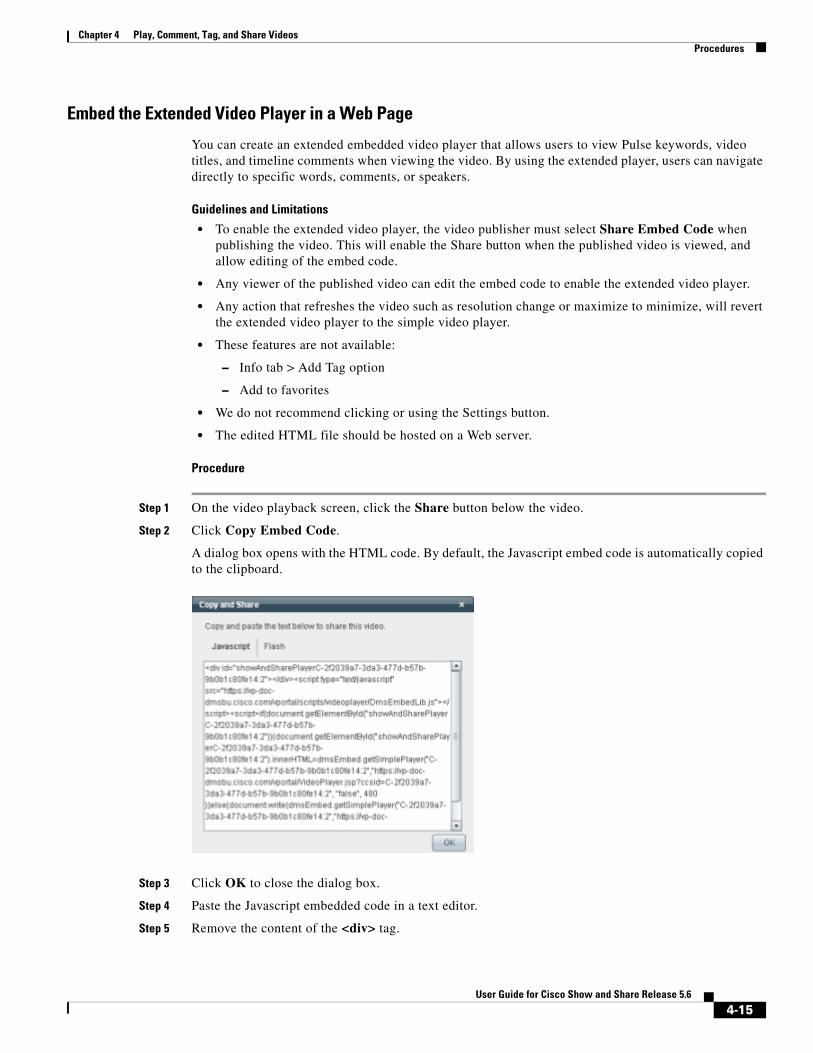
Embed the Extended Video Player in a Web Page
You can create an extended embedded video player that allows users to view Pulse keywords, video titles, and timeline comments when viewing the video. By using the extended player, users can navigate directly to specific words, comments, or speakers.
Guidelines and Limitations
• To enable the extended video player, the video publisher must select Share Embed Code when publishing the video. This will enable the Share button when the published video is viewed, and allow editing of the embed code.
• Any viewer of the published video can edit the embed code to enable the extended video player.
• Any action that refreshes the video such as resolution change or maximize to minimize, will revert the extended video player to the simple video player.
• These features are not available:
– Info tab > Add Tag option
– Add to favorites
• We do not recommend clicking or using the Settings button.
• The edited HTML file should be hosted on a Web server.
Procedure
Step 1 On the video playback screen, click the Share button below the video.
Step 2 Click Copy Embed Code.
A dialog box opens with the HTML code. By default, the Javascript embed code is automatically copied to the clipboard.
Step 3 Click OK to close the dialog box.
Step 4 Paste the Javascript embedded code in a text editor.
Step 5 Remove the content of the <div> tag.
4-15User Guide for Cisco Show and Share Release 5.6
Chapter 4 Play, Comment, Tag, and Share Videos Procedures
Step 6 Remove the tags named <div> and </div>
Step 7 Replace the getSimplePlayer text with getExtendedPlayer.
Step 8 Save the file as an HTML file and deploy the file on a web server. Or, copy and paste the code in the source of your web document where you want the video to appear.
Step 9 Access the web server and click the file to load the video.
Send the Video Link in E-Mail
You can send a link to the video in an e-mail message.
Prerequisites
• You must have an e-mail account and an e-mail application configured on your system.
• Your e-mail must support UTF-8 character encoding.
Procedure
Step 1 On the video playback screen, click the Share button below the video.
Step 2 Click Send Email.
An e-mail message opens with a link to the video in the body of the message.
Step 3 Add your message and send the e-mail.
4-16User Guide for Cisco Show and Share Release 5.6

Chapter 4 Play, Comment, Tag, and Share Videos Procedures
Play Embedded VideosWhen you watch a Cisco Show and Share video that is embedded in a website, only a few of the player controls are available to you: play/pause, the timeline, volume, and full screen.
If you are viewing an embedded video that has restrictions, you will be prompted to log in to watch the video. Enter your Cisco Show and Share login information and click Log In to watch the video.
Embedded videos do not include any information or resources that are available on the tabs of the video player page. For example, synchronized slides, Pulse keyword and speaker information, chapters, transcripts, and downloadable files are not available. You also cannot submit general comments or timeline comments for an embedded video.
When you embed a video with the extended video player, some of the original information and resources are available for viewers. See Embed the Extended Video Player in a Web Page, page 4-15 for more information.
4-17User Guide for Cisco Show and Share Release 5.6
Chapter 4 Play, Comment, Tag, and Share Videos Procedures
See Troubleshooting, page 4-24, for information about issues you may encounter when playing videos embedded in web pages.
View Pulse InformationThe Pulse tab contains speaker and keyword information extracted from the video. You can use this information to navigate to specific points in the video. Additionally, the information is used when searching and filtering videos.
This section contains the following topics:
• Guidelines and Limitations, page 4-18
• About Pulse Keyword Identification, page 4-18
• About Pulse Speaker Identification, page 4-19
• Navigate the Video Using the Speakers List, page 4-20
• Navigate the Video Using the Keywords List, page 4-21
• Re-Upload a Published Video, page 4-22
Guidelines and Limitations
• The Pulse keyword and speaker identification features are only available if your system has an integrated Cisco MXE and your system administrator has enabled the Pulse features.
• Videos that were uploaded or recorded in previous versions of Cisco Show and Share, or that were uploaded before the Pulse features were enabled, will not contain the Pulse information. You must re-upload those videos to obtain the Pulse information. See Re-Upload a Published Video, page 4-22.
About Pulse Keyword Identification
The Pulse engine can identify specific keywords spoken within videos. It does not identify all words in a video. Instead, your system administrator provides and maintains a list of keywords on the Cisco MXE. The Pulse engine scans the video for those keywords and places markers in the video timeline where they appear. When you select a keyword from the list, all instances of that keyword appear as markers in the timeline. You can jump to a specific marker or navigate forward and backward through the markers.
4-18User Guide for Cisco Show and Share Release 5.6
Chapter 4 Play, Comment, Tag, and Share Videos Procedures
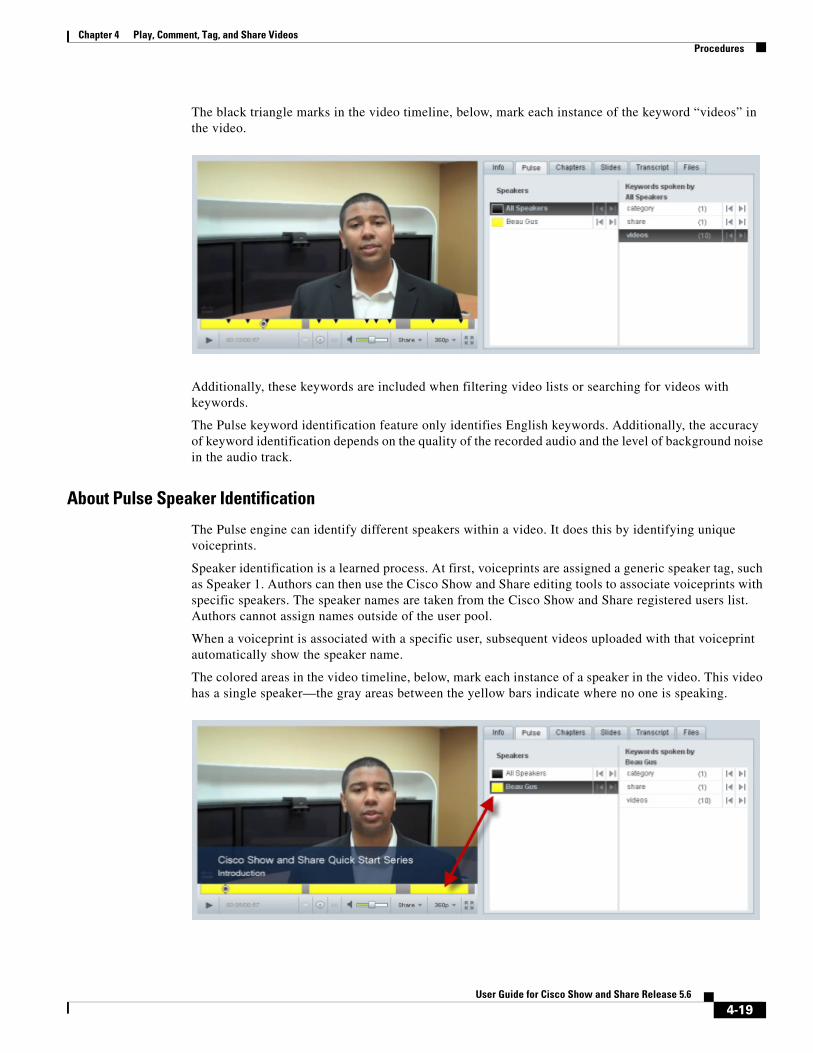
The black triangle marks in the video timeline, below, mark each instance of the keyword “videos” in the video.
Additionally, these keywords are included when filtering video lists or searching for videos with keywords.
The Pulse keyword identification feature only identifies English keywords. Additionally, the accuracy of keyword identification depends on the quality of the recorded audio and the level of background noise in the audio track.
About Pulse Speaker Identification
The Pulse engine can identify different speakers within a video. It does this by identifying unique voiceprints.
Speaker identification is a learned process. At first, voiceprints are assigned a generic speaker tag, such as Speaker 1. Authors can then use the Cisco Show and Share editing tools to associate voiceprints with specific speakers. The speaker names are taken from the Cisco Show and Share registered users list. Authors cannot assign names outside of the user pool.
When a voiceprint is associated with a specific user, subsequent videos uploaded with that voiceprint automatically show the speaker name.
The colored areas in the video timeline, below, mark each instance of a speaker in the video. This video has a single speaker—the gray areas between the yellow bars indicate where no one is speaking.
4-19User Guide for Cisco Show and Share Release 5.6
Chapter 4 Play, Comment, Tag, and Share Videos Procedures
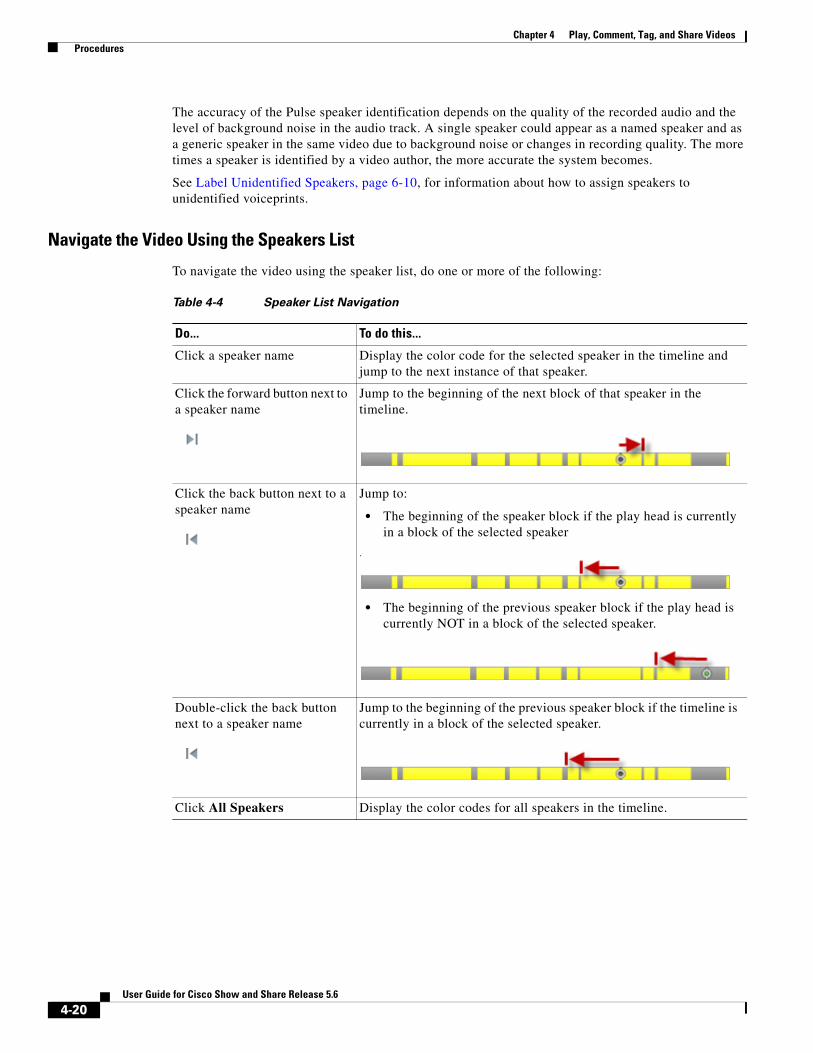
The accuracy of the Pulse speaker identification depends on the quality of the recorded audio and the level of background noise in the audio track. A single speaker could appear as a named speaker and as a generic speaker in the same video due to background noise or changes in recording quality. The more times a speaker is identified by a video author, the more accurate the system becomes.
See Label Unidentified Speakers, page 6-10, for information about how to assign speakers to unidentified voiceprints.
Navigate the Video Using the Speakers List
To navigate the video using the speaker list, do one or more of the following:
Table 4-4 Speaker List Navigation
Do... To do this...
Click a speaker name Display the color code for the selected speaker in the timeline and jump to the next instance of that speaker.
Click the forward button next to a speaker name
Jump to the beginning of the next block of that speaker in the timeline.
Click the back button next to a speaker name
Jump to:
• The beginning of the speaker block if the play head is currently in a block of the selected speaker
.
• The beginning of the previous speaker block if the play head is currently NOT in a block of the selected speaker.
Double-click the back button next to a speaker name
Jump to the beginning of the previous speaker block if the timeline is currently in a block of the selected speaker.
Click All Speakers Display the color codes for all speakers in the timeline.
4-20User Guide for Cisco Show and Share Release 5.6
Chapter 4 Play, Comment, Tag, and Share Videos Procedures
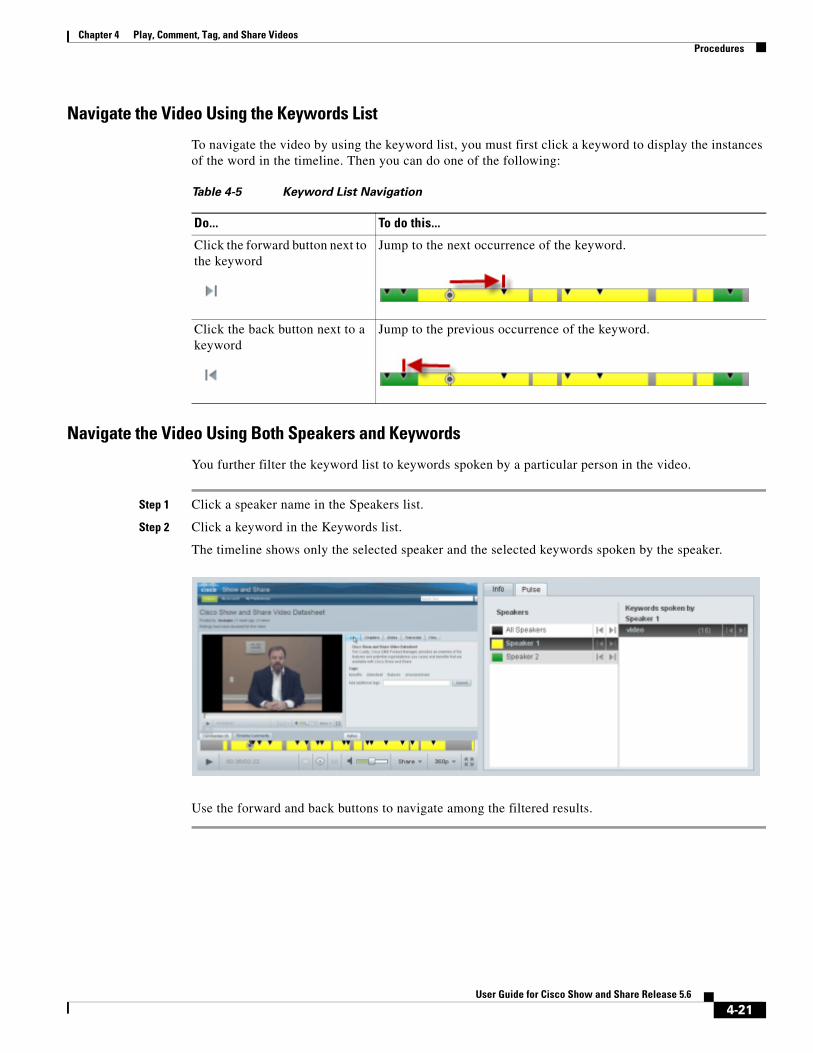
Navigate the Video Using the Keywords List
To navigate the video by using the keyword list, you must first click a keyword to display the instances of the word in the timeline. Then you can do one of the following:
Navigate the Video Using Both Speakers and Keywords
You further filter the keyword list to keywords spoken by a particular person in the video.
Step 1 Click a speaker name in the Speakers list.
Step 2 Click a keyword in the Keywords list.
The timeline shows only the selected speaker and the selected keywords spoken by the speaker.
Use the forward and back buttons to navigate among the filtered results.
Table 4-5 Keyword List Navigation
Do... To do this...
Click the forward button next to the keyword
Jump to the next occurrence of the keyword.
Click the back button next to a keyword
Jump to the previous occurrence of the keyword.
4-21User Guide for Cisco Show and Share Release 5.6
Chapter 4 Play, Comment, Tag, and Share Videos Procedures
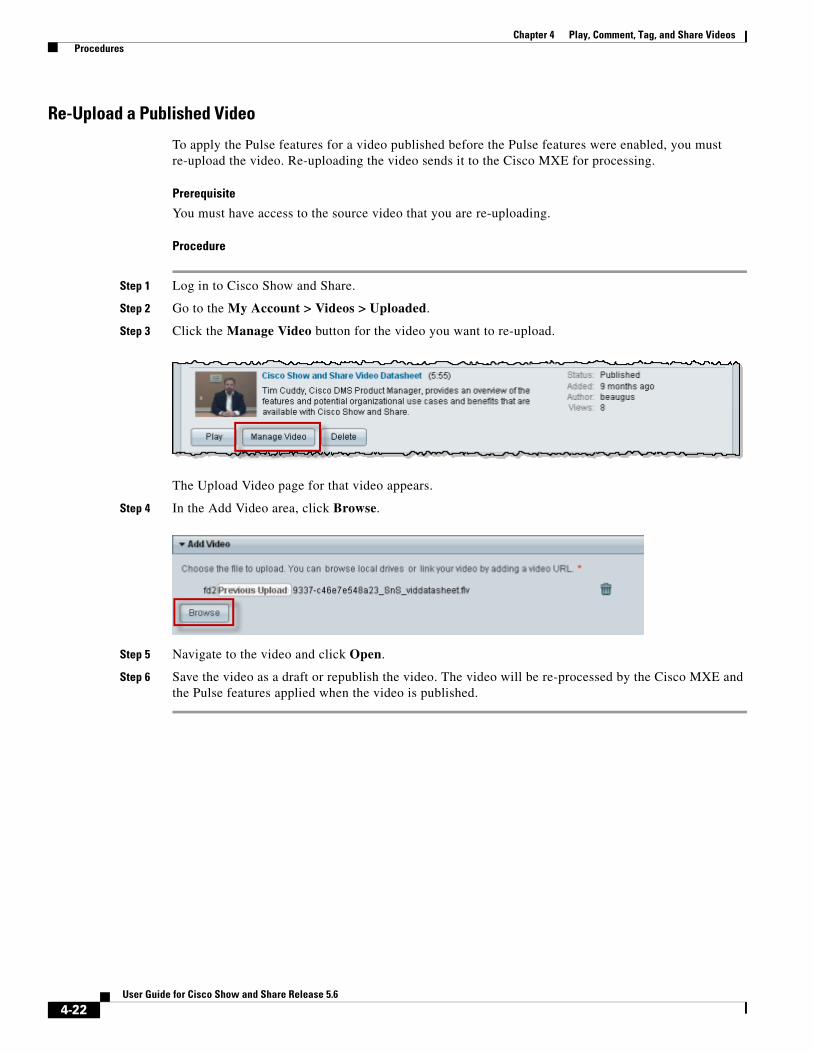
Re-Upload a Published Video
To apply the Pulse features for a video published before the Pulse features were enabled, you must re-upload the video. Re-uploading the video sends it to the Cisco MXE for processing.
Prerequisite
You must have access to the source video that you are re-uploading.
Procedure
Step 1 Log in to Cisco Show and Share.
Step 2 Go to the My Account > Videos > Uploaded.
Step 3 Click the Manage Video button for the video you want to re-upload.
The Upload Video page for that video appears.
Step 4 In the Add Video area, click Browse.
Step 5 Navigate to the video and click Open.
Step 6 Save the video as a draft or republish the video. The video will be re-processed by the Cisco MXE and the Pulse features applied when the video is published.
4-22User Guide for Cisco Show and Share Release 5.6
Chapter 4 Play, Comment, Tag, and Share Videos Procedures
Jump to a Chapter
Procedure
Step 1 Click the Chapters tab.
Step 2 Click a chapter in the list to jump to that point in the video.
Watch Slides
Procedure
Step 1 Click the Slides tab.
The slides appear on the tab. They will change automatically as the video plays.
Step 2 To go through the presentation manually, use the scroll bar to see additional slides.
Step 3 Double click a slide to jump to that point in the video.
Step 4 If the slides are difficult to read, hover your mouse over the slides and click the popout button.
Read a TranscriptTranscripts are text files that are uploaded by the video author. They are not synchronized with the video and you cannot use them to navigate through the video.
Procedure
Step 1 Click the Transcript tab.
Step 2 To search the transcript, enter a word or phrase in the Find field and click go. You can continue searching through the transcript by clicking the Next and Previous buttons.
Note Searching the transcript does not navigate you through the video.
Step 3 Click the Hide arrow at the end of the search bar to hide it. You can expand it again later if needed.
Download Files
Procedure
Step 1 Click the Files tab.
4-23User Guide for Cisco Show and Share Release 5.6
Chapter 4 Play, Comment, Tag, and Share Videos Troubleshooting
Step 2 Click a filename to download the file.
Note You cannot right-click (Windows) or Ctrl-Click (Mac OS X) a file to download it.
TroubleshootingWhen I download an attached Microsoft Word, PowerPoint, or Excel file from the Files tab, the saved file has a .zip extension instead of a .docx, .xlsx, or .pptx extension.
This can occur when you download a .docx, .xlsx, or .pptx file from Cisco Show and Share by using Microsoft Internet Explorer 8.
To fix the problem, simply change the .zip file extension to the correct file extension after downloading the file.
The aspect ratio of my embedded Flash video is not maintained on the web page.
To preserve aspect ratio, the Flash embed code requires width and height values for object classid and embed src.
My embedded video appears as a black box on the web page.
This can have several causes.
1. First use the same web browser you used to access the web page with the embedded video to access Cisco Show and Share. If you receive a security warning, follow the steps for your browser to accept the security certificate. Then try to access the page with the embedded video again.
2. If you did not receive a security warning, this may be caused by opening the HTML page with the embedded video as a file rather than a web page (for example, double-clicking the HTML document in your file system). The HTML page must be served by an HTML server for the embedded video to show correctly.
You can determine whether or not you opened the HTML page as a file by looking at the address bar in your web browser. If you see a standard file path, such as c:\documents\example\index.htm, rather than a URL, such as http://example.com/example/index.htm, then you opened the HTML page as a file rather than a web page served by an HTML server.
When I click on an embedded video to play it, it disappears.When I click on and embedded video to play it, I receive the message “Windows media plugin not installed click here to install.”
This occurs on Mac OS. The video you are trying to play is in a Windows media format and playback is not supported on your OS.
The bottom of my video is cut off.
This may happen with some videos that are played back with the Quicktime plugin.
When I use my browser to zoom in during video playback, the video player controls disappear behind the video.
For the best viewing experience, we recommend that you use the video player controls for video playback. To increase the size of the video, use the fullscreen playback button.
4-24User Guide for Cisco Show and Share Release 5.6
Chapter 4 Play, Comment, Tag, and Share Videos Troubleshooting
I cannot fast forward, rewind, or use the play head to skip ahead or go back.
There are several possible causes for this:
• The video is not hosted on a streaming server. When a video is not hosted on a streaming server, it is supplied to you by “progressive download”. In this case, the video starts playing while it is still downloading. You cannot fast forward past the point of where the download is reached.
• You are watching a .wmv video. The Windows media plugin for Firefox doe not allow you to use the fast forward, rewind, or play head to move around the video. If you are using the Internet Explorer browser, you can use the play head to move forward and backwards in the video.
I receive a security warning in my browser when I try to add a comment.
This can happen if the system administrator or the video publisher has prevented anonymous comments for the video and you are not yet logged into the system. This warning is not harmful. To continue, accept the certificate, log into the system, and then leave your comment.
There is a delay when I try to replay a video.
Trying to replay an FLV video right after it finishes can result in a 20-40 second delay before it starts again.
I do not see the 720p option for the video I am watching
The different resolutions available depend on several factors:
• The original resolution of the video being uploaded. If the resolution was below 720p, a 720p version will not be created for it.
• The system settings. Your system administrator may not have enabled that resolution.
4-25User Guide for Cisco Show and Share Release 5.6

Chapter 4 Play, Comment, Tag, and Share Videos Troubleshooting
4-26User Guide for Cisco Show and Share Release 5.6