Embed Size (px)
Citation preview

Plastic�AndComposite
Repair
Text
book
Version:�13.2
©�2011-2014�Inter-Industry�Conference�On�Auto�Collision�Repair
PLA03-STMAN1-E

This�page�is�intentionally�left�blank.

Plastic�And�Composite�RepairTextbook
Table�of�Contents 3
Contents
Introduction..............................................................................................................................7Obligations�To�The�Customer�And�Liability.......................................................................... 7
Module�1�-�Plastic�Identification�And�Repair�Considerations..................................................13Identifying�Plastics.............................................................................................................. 13Repair�Considerations......................................................................................................... 16Definitions.......................................................................................................................... 18Module�Wrap�Up............................................................................................................... 21
Module�2�-�Adhesive�Bumper�Repair..................................................................................... 25Adhesive�Repair�Definitions................................................................................................25Two-Sided�Repair................................................................................................................31One-Sided�Repair............................................................................................................... 35Tab�Repair.......................................................................................................................... 37Module�Wrap�Up............................................................................................................... 40
Module�3�-�Fiber�Reinforced�Plastic�(FRP)�Repair...................................................................43FRP�Definitions...................................................................................................................43FRP�Repair..........................................................................................................................44Carbon�Fiber.......................................................................................................................48Module�Wrap�Up............................................................................................................... 51
Module�4�-�Plastic�Welding�Repairs.......................................................................................55Plastic�Welding�Process......................................................................................................55Plastic� ID�For�Welding........................................................................................................56Weld�Equipment�And�Types�Of�Welds............................................................................... 57Airless�Welding�Repair�Procedure...................................................................................... 60Hot�Air�Welds.................................................................................................................... 60Weld�Repairs...................................................................................................................... 61Module�Wrap�Up............................................................................................................... 62

This�page�is�intentionally�left�blank.

Introduction

This�page�is�intentionally�left�blank.

IntroductionTextbook
Plastic�And�Composite�Repair 7
Obligations�To�The�Customer�And�Liability
The�collision�repair�industry�has�anobligation�to�correctly�repair�thecustomer’s�vehicle.�Collision�repairs�mustbe�performed�using:
• recommended�or�testedprocedures�from�vehicle�makers,I-CAR,�and�other�research�andtesting�organizations.
• quality�replacement�parts�andmaterials.
• repair�processes�and�parts�aswritten�and�agreed�upon�in�therepair�order.�If�items�on�the�repairagreement�are�not�consistentwith�the�repair�order,�it�can�beconsidered�fraud.
Performing�proper�collision�repairsrequires�using�parts�and�procedures�thatkeep�remaining�warranties�intact.
Collision�repairs�must�restore:
• safety.• structural�integrity.• durability.• performance.
• fit.• finish.
Throughout�the�damage�analysis�andrepair�process�the�repairer�and�insurermust:
• communicate�with�each�other.• maintain�constant�communication
with�the�customer.• be�in�agreement�with�each�other
and�the�customer�on�how�repairswill�be�performed.
• inform�the�customer�of�anychanges�in�the�repair�plan�fromthe�original�repair�agreement,�andexplain�the�changes�and�why�theyhave�to�be�made.
To�reduce�liability:
• make�sure�that�all�repairs�areperformed�thoroughly,�correctlyand�as�listed�in�the�damage�report.
• follow�proper�procedures.• have�documentation�of�required
repairs�with�detailed�recordkeeping�available�for�customers.

IntroductionTextbook
Plastic�And�Composite�Repair 8
Technicians�are�considered�theexperts�and�are�expected�to�beknowledgeable�on�how�to�performa�quality�repair.
Liability�insurance�that�covers�the�repairfacility�may�not�always�cover�all�damages.For�example:
• the�policy�may�not�coverfaulty�repairs,�leaving�liabilityresponsibility�completely�on�thefacility.
• a�shop�owner�may�find�that�repairfacility�liability�coverage�may�notcover�the�full�amount�awarded�ina�lawsuit.�The�shop�owner�wouldhave�to�pay�the�difference.
It�is�difficult�to�reduce�the�risk�of�liabilityexposure.�The�part�that�the�repairer�cancontrol�is�the�chance�of�being�found�atfault.�Chances�can�be�minimized�by:
• using�recommended�or�testedprocedures�from�the�vehiclemakers,�I�CAR,�or�other�researchand�testing�organizations.
• using�quality�replacement�partsand�materials�that�restore�fit,
finish,�durability,�and�perform�atleast�as�well�as�the�original.
• keeping�thorough�records.
Keeping�thorough�records�includes�morethan�recording�the�date,�mileage,�and�pre-existing�damage.�Record�keeping�alsoincludes:
• making�sure�all�notes�are�legible.• verifying�the�repairs�that�were
made�or�not�made.• having�the�customer�sign�a
waiver�for�repairs�that�they�donot�want�performed.�Repairersmust�determine�their�liability�onnot�repairing�safety�systems�suchas�restraint�and�anti-lock�brakesystems.
• keeping�computer�printouts�orworksheets�on�file�showing�wheelalignment�readings�or�vehicledimensions�before�and�afterrepairs.
• keeping�scan�tool�printouts�andrecords�of�computer�codes�forairbag,�anti-lock�brake,�emission,and�powertrain�control�module(PCM)�systems.

IntroductionTextbook
Plastic�And�Composite�Repair 9
• attaching�the�OEM�or�other�testedprocedure�printout�to�the�vehiclerepair�order.
• keeping�receipts�for�all�subletwork�performed.
Refer�to�"Video:�Topics�Off�Limits"�in�thepresentation.�This�video�identifies�topicsthat�should�not�be�brought�up�in�class.

This�page�is�intentionally�left�blank.

Module�1�-�PlasticIdentification�And
RepairConsiderations

This�page�is�intentionally�left�blank.
Module�1�-�Plastic�Identification�And�Repair�ConsiderationsTextbook
Plastic�And�Composite�Repair 13
Identifying�Plastics
The�learning�objectives�for�this�moduleinclude:
• identifying�the�type�of�plastic�by�itscharacteristics.
• determining�the�level�of�plasticidentification�that�is�required�toperform�the�repair.
• identifying�the�different�typesof�repair�for�plastics�and�fiber-reinforced�plastic�(FRP).
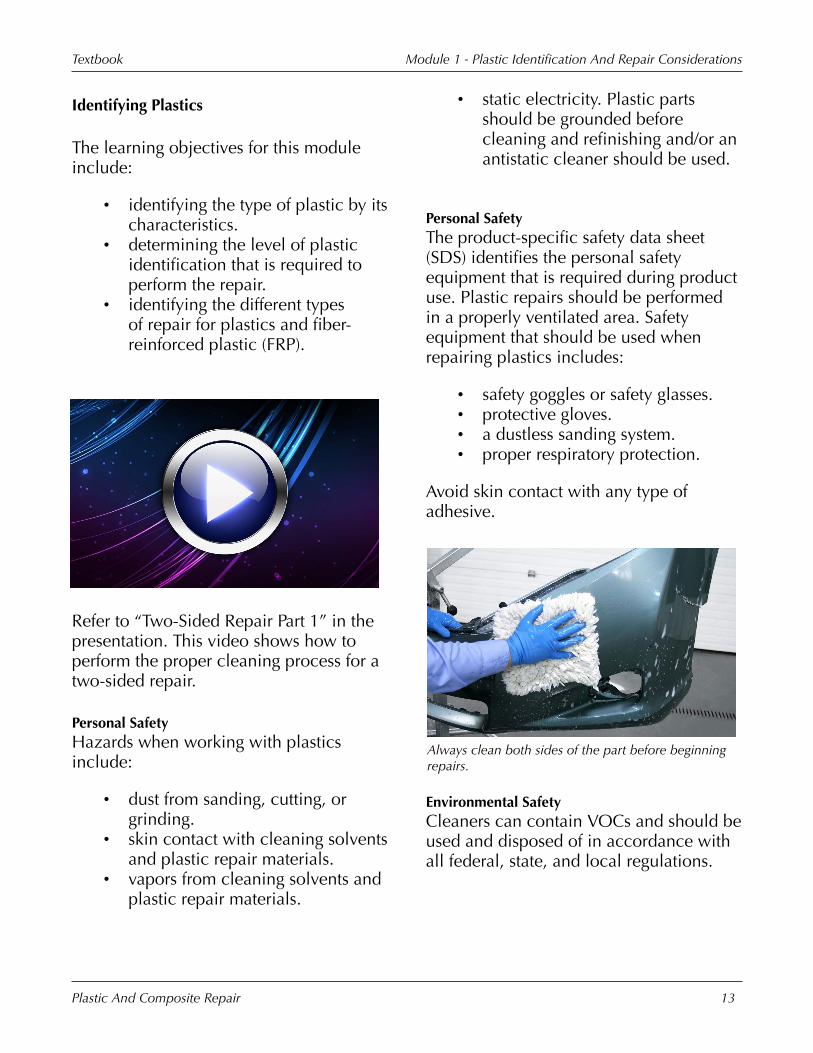
Refer�to�“Two-Sided�Repair�Part�1”�in�thepresentation.�This�video�shows�how�toperform�the�proper�cleaning�process�for�atwo-sided�repair.
Personal�SafetyHazards�when�working�with�plasticsinclude:
• dust�from�sanding,�cutting,�orgrinding.
• skin�contact�with�cleaning�solventsand�plastic�repair�materials.
• vapors�from�cleaning�solvents�andplastic�repair�materials.
• static�electricity.�Plastic�partsshould�be�grounded�beforecleaning�and�refinishing�and/or�anantistatic�cleaner�should�be�used.
Personal�SafetyThe�product-specific�safety�data�sheet(SDS)�identifies�the�personal�safetyequipment�that�is�required�during�productuse.�Plastic�repairs�should�be�performedin�a�properly�ventilated�area.�Safetyequipment�that�should�be�used�whenrepairing�plastics�includes:
• safety�goggles�or�safety�glasses.• protective�gloves.• a�dustless�sanding�system.• proper�respiratory�protection.
Avoid�skin�contact�with�any�type�ofadhesive.
Always�clean�both�sides�of�the�part�before�beginningrepairs.
Environmental�SafetyCleaners�can�contain�VOCs�and�should�beused�and�disposed�of�in�accordance�withall�federal,�state,�and�local�regulations.
Module�1�-�Plastic�Identification�And�Repair�ConsiderationsTextbook
Plastic�And�Composite�Repair 14
When�prepping�for�a�two-sided�repair:
• always�wash�both�sides�withsilicone-free�soap�and�waterto�remove�any�water-solublecontaminants.�This�is�a�criticalstep�and�cannot�be�skipped�or�theresult�will�be�a�poor�repair.
• clean�with�the�recommendedcleaner�or�water-based�cleaner.You�must�clean�the�repair�areato�remove�any�petroleum-basedcontaminants.�This�is�the�only�timea�solvent-based�cleaner�may�beused,�and�only�before�abrading�therepair�area.
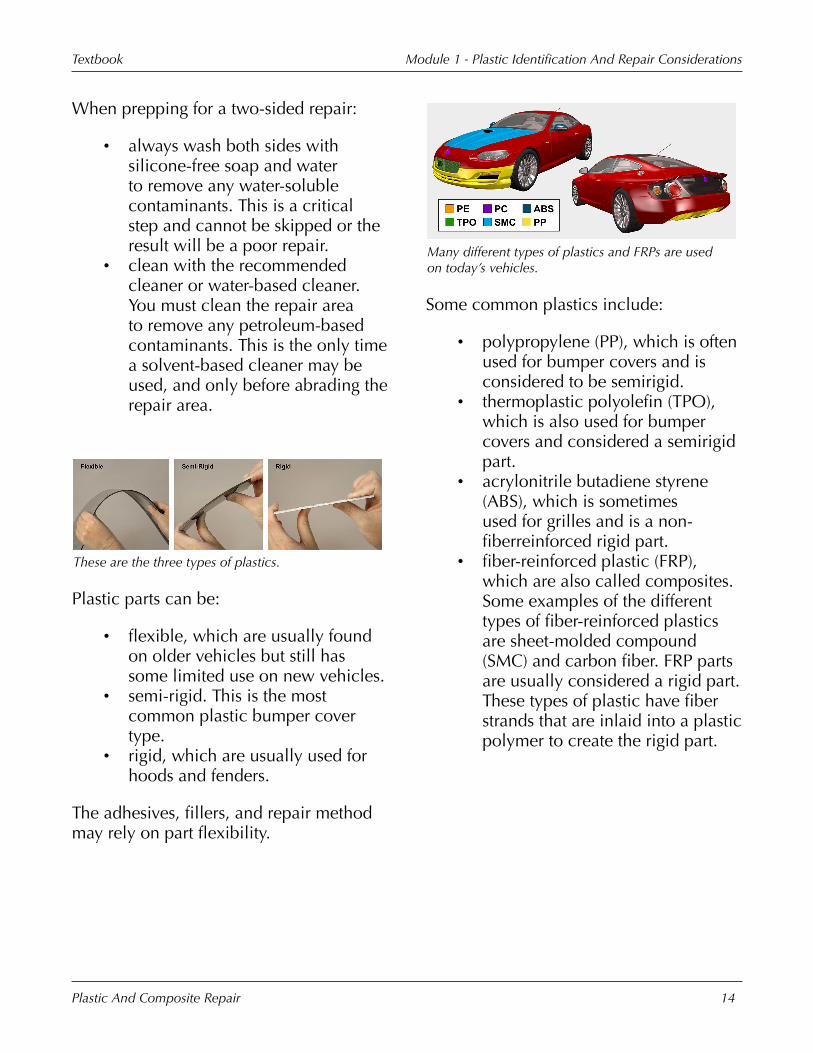
These�are�the�three�types�of�plastics.
Plastic�parts�can�be:
• flexible,�which�are�usually�foundon�older�vehicles�but�still�hassome�limited�use�on�new�vehicles.
• semi-rigid.�This�is�the�mostcommon�plastic�bumper�covertype.
• rigid,�which�are�usually�used�forhoods�and�fenders.
The�adhesives,�fillers,�and�repair�methodmay�rely�on�part�flexibility.
Many�different�types�of�plastics�and�FRPs�are�usedon�today’s�vehicles.
Some�common�plastics�include:
• polypropylene�(PP),�which�is�oftenused�for�bumper�covers�and�isconsidered�to�be�semirigid.
• thermoplastic�polyolefin�(TPO),which�is�also�used�for�bumpercovers�and�considered�a�semirigidpart.
• acrylonitrile�butadiene�styrene(ABS),�which�is�sometimesused�for�grilles�and�is�a�non-fiberreinforced�rigid�part.
• fiber-reinforced�plastic�(FRP),which�are�also�called�composites.Some�examples�of�the�differenttypes�of�fiber-reinforced�plasticsare�sheet-molded�compound(SMC)�and�carbon�fiber.�FRP�partsare�usually�considered�a�rigid�part.These�types�of�plastic�have�fiberstrands�that�are�inlaid�into�a�plasticpolymer�to�create�the�rigid�part.

Module�1�-�Plastic�Identification�And�Repair�ConsiderationsTextbook
Plastic�And�Composite�Repair 15
Thermoplastic�and�thermoset�plastics�are�formedusing�two�different�methods.
Plastics�are�generally�classified�as:
• thermoplastics,�which�are�formedby�injecting�molten�pellets�into�amold.�These�are�the�most�commontypes�of�plastic�that�can�be�meltedand�recycled.�Both�PP�and�TPOare�thermoplastic.
• thermosets,�which�are�formedby�a�two-part�product,�whichtakes�on�a�permanent�shape�whenformed.�This�type�cannot�bemelted�or�recycled.�An�example�ofa�thermoset�plastic�is�polyurethane(PUR)�bumper�covers.
This�RRIM�cutaway�has�no�visible�fibers�and�issmooth�on�both�sides.
Reinforced�reaction�injection�molding(RRIM)�can�be�repaired�using�plastic
repair�adhesives�or�by�welding.�An�RRIMpart�is�often�made�using�PUR�and�is�anexception�for�a�thermoset�in�that�it�canbe�repaired�using�an�adhesion�weld.�Itcontains�microfibers�that�are�so�smallit�may�be�difficult�to�see�them.�RRIM�isused�for�fascias,�exterior�trim,�and�bodypanels.
A�polyolefin�part�smears�when�sanded,�but�a�non-polyolefin�will�powder�when�sanded.
Plastics�can�be�grouped�into�families�of:
• non-polyolefins.�These�usuallyturn�powdery�with�a�dual�action(DA)�sander�and�typically�do�notrequire�an�adhesion�promoterfor�repair�adhesives�or�topcoats.However�most�product�makerstypically�do�not�have�a�problemwith�adhesion�promoter�beingapplied�on�a�nonpolyolefin�if�itcannot�be�identified.
• polyolefins.�These�usually�smearor�are�greasy�when�ground�athigh�speed�with�a�grinder.�Also,they�typically�require�an�adhesionpromoter�before�any�plastic�repairadhesives�or�topcoats�can�beapplied.

Module�1�-�Plastic�Identification�And�Repair�ConsiderationsTextbook
Plastic�And�Composite�Repair 16
Some�examples�of�a�polyolefin�plasticare�PP�and�TPO.�An�example�of�a�non-polyolefin�plastic�is�ABS.
ISO�codes�are�a�standard�letter�code�for�the�blend�ofplastic�that�the�part�is�made�of.
The�International�Organization�forStandardization�(ISO)�code�is�a�standardset�of�letter�codes�that�identify�the�typeand�blends�of�plastic.
Due�to�the�fact�that�ISO�is�an�internationalorganization,�it�was�decided�to�usethe�“ISO”�acronym.�So�no�matter�whatlanguage�it�was�translated�to,�it�would�bethe�same�acronym�in�every�country.
The�use�of�ISO�codes�is�not�consistent.They�are�not�always�on�the�plastic�part.Different�blends�will�have�a�combinationcode.�For�example,�the�codes�PP,�PE,�andTPO�may�all�be�on�the�same�part.
ISO�codes�are�found�on�the�backside�of�the�part.
An�ISO�code,�if�placed�on�a�plastic�part,is�molded�into�the�backside�in�an�unseenarea.�However,�this�may�require�that�thepart�be�removed�in�order�to�locate�thecode.
Repair�Considerations
Sheet�metal�and�plastic�parts�may�be�repaired�usingsimilar�techniques.
Some�of�the�similarities�with�sheet�metaland�plastic�regarding�repair�prep�andrepairs�include:
• proper�cleaning.�This�is�one�of�themost�important�steps�of�any�repairprocess�and�should�NEVER�beskipped.
• appropriate�sanding�grits.�If�thesanding�grit�is�too�coarse,�thescratches�will�be�difficult�toremove.�Sandpaper�grit�that�is
Module�1�-�Plastic�Identification�And�Repair�ConsiderationsTextbook
Plastic�And�Composite�Repair 17
too�fine�may�lead�to�adhesionproblems.
• proper�cure�times�must�beobserved.�If�cure�times�are�notfollowed,�it�may�lead�to�peelingand�delaminating�of�the�product.
• the�need�for�featheredging.�If�thereis�not�a�good�featheredge�whensanding,�it�will�lead�to�a�bullseyethat�will�show�up�in�the�finish.
• the�need�for�a�primer�coat.�Youwould�not�apply�a�basecoat�overa�bare�metal�part�and�this�alsoapplies�to�plastics.
Regarding�straightening,�the�“first�in,�lastout”�and�“last�in,�first�out”�rules�apply�toplastics�exactly�like�when�repairing�sheetmetal.
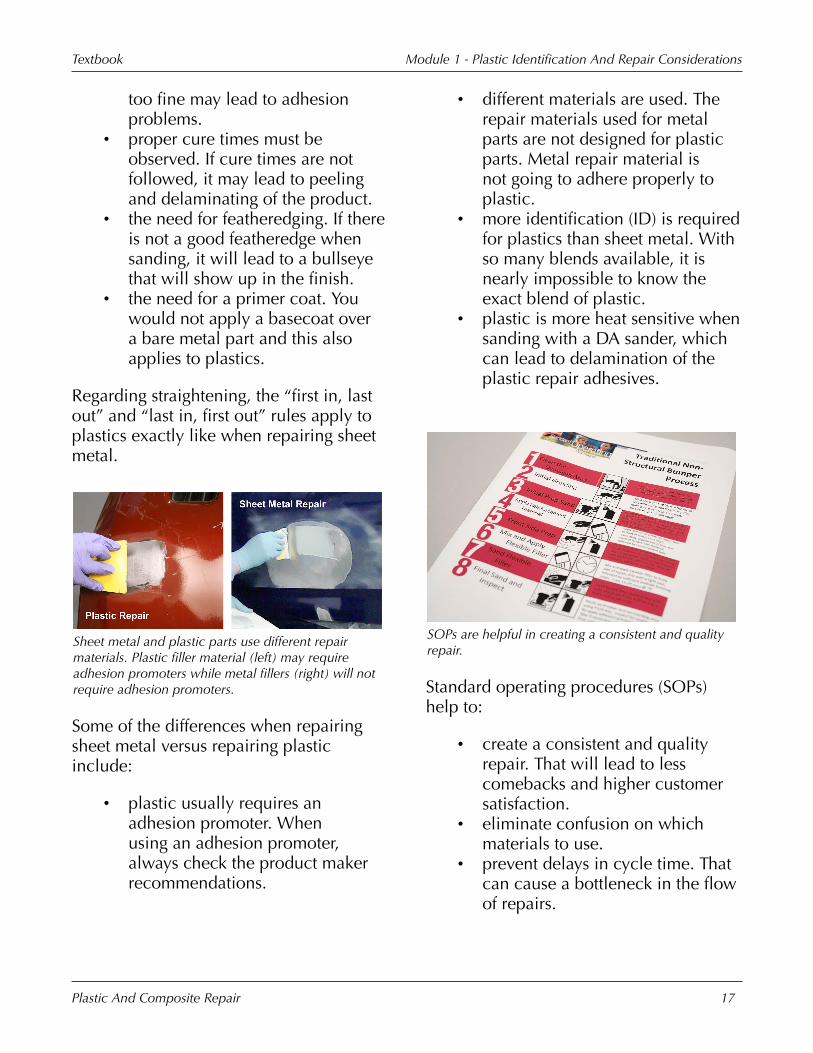
Sheet�metal�and�plastic�parts�use�different�repairmaterials.�Plastic�filler�material�(left)�may�requireadhesion�promoters�while�metal�fillers�(right)�will�notrequire�adhesion�promoters.
Some�of�the�differences�when�repairingsheet�metal�versus�repairing�plasticinclude:
• plastic�usually�requires�anadhesion�promoter.�Whenusing�an�adhesion�promoter,always�check�the�product�makerrecommendations.
• different�materials�are�used.�Therepair�materials�used�for�metalparts�are�not�designed�for�plasticparts.�Metal�repair�material�isnot�going�to�adhere�properly�toplastic.
• more�identification�(ID)�is�requiredfor�plastics�than�sheet�metal.�Withso�many�blends�available,�it�isnearly�impossible�to�know�theexact�blend�of�plastic.
• plastic�is�more�heat�sensitive�whensanding�with�a�DA�sander,�whichcan�lead�to�delamination�of�theplastic�repair�adhesives.
SOPs�are�helpful�in�creating�a�consistent�and�qualityrepair.
Standard�operating�procedures�(SOPs)help�to:
• create�a�consistent�and�qualityrepair.�That�will�lead�to�lesscomebacks�and�higher�customersatisfaction.
• eliminate�confusion�on�whichmaterials�to�use.
• prevent�delays�in�cycle�time.�Thatcan�cause�a�bottleneck�in�the�flowof�repairs.

Module�1�-�Plastic�Identification�And�Repair�ConsiderationsTextbook
Plastic�And�Composite�Repair 18
Refer�to�Module�1,�“Demonstration:Example�Of�SOP”�in�the�presentation�foran�example�of�a�SOP.
Definitions
Types�of�repairs�on�plastics�includes�heating�toreshape�(top�left),�plastic�welding�(bottom�left),one-sided�repairs�(top�right),�and�two-sided�repairs(bottom�right).
One�type�of�repair�done�on�plastic�partsthat�are�dented�or�twisted�is�reshapingwith�heat.�With�the�exception�of�FRP,�thiscan�be�done�on�most�plastics.�Wheneverdoing�plastic�repairs,�reshaping�should�bedone�before�all�other�plastic�repairs.
Other�types�of�repairs�done�with�plasticsand�fiber-reinforced�plastics�include:
• one-sided�repairs.• two-sided�repairs.• tab�repair.
All�these�repairs�can�be�done�with�plasticwelding�or�by�using�a�plastic�repairadhesive.
An�infrared�heater�may�be�used�to�heat�and�reshapeplastic�parts.
Heating�and�reshaping:
• reforms�distortion.�Part�of�thereason�this�can�be�done�is�thatsome�plastic�parts�have�a�memory,and�like�to�return�to�their�originalshape.
• process�can�be�done�by�using�aninfrared�lamp�or�heat�gun.�Anotherway�to�heat�and�reshape�a�plasticpart�is�to�submerge�the�part�ina�hot�water�tank.�This�is�doneprimarily�at�a�bumper�recyclerfacility�and�is�not�common�in�acollision�repair�facility.
• cannot�be�done�on�fiber-reinforcedparts�because�they�are�a�thermosetplastic.�The�exceptions�to�thisrule�are�polyurethane�(PUR)and�reinforced�reaction�injectedmolding�(RRIM)�parts.
• has�to�be�done�before�plasticrepair�adhesives�or�weld�repairs

Module�1�-�Plastic�Identification�And�Repair�ConsiderationsTextbook
Plastic�And�Composite�Repair 19
are�started.�If�this�step�is�not�donefirst,�when�the�part�is�refinishedand�heated�by�the�sun,�the�repairmay�show�through.�For�example,the�damaged�area�that�was�lowmay�become�a�high�spot�and�showa�halo.�It�may�even�crack�the�filleror�paint.
Refer�to�“Video:�Reshaping�Plastic�UsingHeat”�in�the�presentation.�This�videoshows�the�steps�necessary�to�heat�andreshape�a�dented�bumper�cover.
Environmental�SafetyCleaners�can�contain�VOCs�and�should�beused�and�disposed�of�in�accordance�withall�federal,�state,�and�local�regulations.
The�scratches�in�this�bumper�cover�will�require�one-sided�repairs.
Cosmetic�or�one-sided�repairs:
• primarily�include�scratches�orgouges.�This�type�of�damage�maynot�require�a�filler.
• are�for�damage�that�does�not�gothrough�to�the�backside�of�thepart.
• are�sometimes�done�in�multipleareas�on�the�same�part.
This�part�is�cracked�through�to�the�backside�andrequires�a�two-sided�repair.
Two-sided�repairs:
• include�cracks,�tears,�or�puncturesthat�go�through�to�the�backside.
• require�a�filler�on�the�front�side.• require�a�backing�material�on�the
backside.• may�need�a�hole�drilled�at�the
ends�of�the�crack�or�tear.

Module�1�-�Plastic�Identification�And�Repair�ConsiderationsTextbook
Plastic�And�Composite�Repair 20
Broken-mounting�tabs�can�be�recreated�if�a�portionis�missing.
With�mounting�tab�repairs:
• a�two-sided�repair�is�necessary�inmost�cases.
• missing�or�torn,�tabs�can�berecreated�or�repaired.
• the�repair�may�be�done�along�withother�repairs.
Pinning�is�most�commonly�used�for�tab�repairs.
Pinning�the�repair:
• involves�drilling�holes�along�theedge�of�the�repair�in�the�taperarea.�The�first�hole�should�bestarted�about�¼"�from�the�edge,
with�the�remaining�holes�drilledaround�the�perimeter�of�the�repairtaper�with�even�spacing�betweeneach�hole.�This�allows�the�plasticrepair�adhesive�to�form�rivet-likepins�in�the�part,�which�is�anotherform�of�bonding.
• allows�the�product�to�adhere�toitself,�which�provides�the�strongestbond.
• can�be�used�on�tab�repairs�andtwo-sided�repairs,�but�care�mustbe�taken�not�to�drill�too�manyholes�as�this�may�weaken�therepair.
• adds�to�overall�repair�strength.Some�product�makers,�such�as3M,�Crest,�and�SEM�recommendpinning.�Other�product�makers�donot�have�recommendations�on�thisprocess.
The�two�types�of�plastic�welders�are�airless�andnitrogen�/�hot�air�welders.
Plastic�welding�can�be�used�to�repaircuts,�gouges,�and�tears.�There�are�severaltypes�of�plastic�welding�equipment,including�airless�and�hot�air.�For�someof�the�welding�methods,�a�welding�rodis�needed�for�use�as�a�filler.�With�two-

Module�1�-�Plastic�Identification�And�Repair�ConsiderationsTextbook
Plastic�And�Composite�Repair 21
sided�repairs,�a�screen�on�the�backside�isrecommended.
Module�Wrap�Up
Topics�discussed�in�this�moduleincluded:
• plastic�identification�by�itscharacteristics.
• plastic�identification�that�isrequired�to�perform�the�repair.
• identifying�the�different�typesof�repair�for�plastics�and�fiber-reinforced�plastic�(FRP).

This�page�is�intentionally�left�blank.
Module�2�-�AdhesiveBumper�Repair

This�page�is�intentionally�left�blank.

Module�2�-�Adhesive�Bumper�RepairTextbook
Plastic�And�Composite�Repair 25
Adhesive�Repair�Definitions
Learning�objectives�for�this�moduleinclude:
• identifying�the�correct�adhesive�touse.
• identifying�when�to�use�adhesionpromoter.
• preparing�plastics�for�adhesiverepair.
• performing�one-sided�and�two-sided�adhesive�repairs.
• performing�a�mounting�tab�repair.• identifying�plastic�refinishing
considerations.
Adhesives�may�be�used�to�repair�the�front�andbackside�of�the�repair.
Personal�SafetyAvoid�skin�contact�with�any�type�ofadhesive.�If�using�a�cyanoacrylate,�it�isadvisable�to�have�the�de-bonding�solutionavailable�in�case�of�accidental�contact.
Adhesives�used�for�plastic�repair:
• are�two-part�materials.• include�epoxies,�urethanes,�or
acrylics.
• may�be�the�same�for�both�thebackside�and�front�side�repairs.
• typically�cure�by�“exothermal”chemical�reaction.�This�curingprocess�creates�heat.�Thehotter�the�product�gets,�thefaster�it�will�cure.�When�usingthese�adhesives,�the�ambienttemperature�will�affect�the�worktime�of�the�product.�If�the�productis�designed�to�work�at�75°F�andthe�temperature�of�the�product�is55°F,�the�work�time�will�usuallyabout�double.�If�the�producttemperature�is�95°F,�then�thework�time�will�be�cut�in�abouthalf.�Also,�the�thicker�the�productis�applied,�the�more�heat�it�willbuild�up�and�the�faster�it�will�cure.However,�no�matter�how�thickthe�product�is�applied,�sand�timesstill�need�to�be�observed�becausethe�product�still�needs�time�toadhesively�bond�to�the�part.
Cyanoacrylates�(super�glue)�may�be�usedas�a�two-part�product�with�an�acceleratoror�as�a�one-part�product�without�theaccelerator.�A�cyanoacrylate�is�used�tohold�the�edges�of�a�tear�together�whilerepairs�are�made�with�an�epoxy,�urethane,or�acrylic.�A�cyanoacrylate�product�doesnot�have�the�strength�to�be�used�alone.

Module�2�-�Adhesive�Bumper�RepairTextbook
Plastic�And�Composite�Repair 26
A�backing�material�is�required�on�two-sided�repairs.
Backing�(reinforcement)�material:
• should�be�used�on�any�two-sidedrepair,�especially�when�it�is�in�anarea�that�can�flex.�It�also�helps�addstrength�to�the�repair�area�whenthe�plastic�expands�and�contractswith�the�change�in�temperature.
• can�be�a�wire�mesh,�a�fiber�meshor�tape,�or�an�adhesive�patch.�Itmay�also�be�recommended�to�usemultiple�layers�of�fiber�mesh�ortape.
• adds�to�overall�repair�strength.�It�isalso�sometimes�recommended�toapply�the�backing�material�in�an“X”�pattern�to�give�the�repair�morestrength.
An�adhesive�patch�may�be�used�as�a�backing�fortwo-sided�repairs.
An�adhesive�patch�is:
• an�alternative�for�the�backsideon�two-sided�repairs.�One�of�thelimitations�of�an�adhesive�patchis�that�the�damage�should�notbe�larger�than�the�repair�patch.Another�limitation�is�that�adhesivepatches�may�not�be�recommendedto�repair�damage�that�extends�toan�edge.
• fast,�with�no�cure�time�required.The�patch�is�simply�applied�andpressed�on.
• able�to�be�used�on�curved�areas.In�order�for�the�patch�to�conformto�a�curve,�it�may�be�necessary�toapply�some�heat�from�a�heat�gunto�make�it�more�pliable.
• not�for�the�front�side,�as�it�willremain�visible.�The�front�sideneeds�to�be�repaired�using�plasticrepair�adhesives�or�fillers.
One�precaution�when�using�an�adhesivepatch�is�that�some�product�makers�havea�different�adhesion�promoter�for�theadhesive�patch�than�for�the�regular�repair

Module�2�-�Adhesive�Bumper�RepairTextbook
Plastic�And�Composite�Repair 27
material.�Always�follow�product�makerguidelines.
Refer�to�Module�2,�"Demonstration:Adhesive�Patch"�in�the�presentation�to�seean�example�of�an�adhesive�patch.
Fillers�are�used�only�on�the�front�side�of�the�repair.
Fillers�used�for�plastic�repairs:
• are�one-part�or�two-part.�One-partmaterials�are�not�very�common,but�with�one-part�materials,�payclose�attention�to�the�cure�timeas�the�filler�may�shrink�more�aftersanding.
• are�either�acrylic,�epoxy,�polyester,or�urethane.�Do�not�use�metalbody�fillers�or�metal�polyesterglazes�on�plastics,�as�they�werenot�designed�for�use�on�plastic
parts.�They�also�lack�the�correctflexibility�needed�on�plastics.Flexible�plastic�polyester�fillers�areused�only�to�fill�minor�scratchesor�gouges�on�plastics.�Also,�someproduct�makers�warn�againstusing�flexible�plastic�polyesterglazes�over�their�materials�becausethey�are�not�compatible�with�thechemical�makeup.
• have�good�sanding�characteristics.While�some�of�the�product�makershave�a�separate�two-part�fillerfor�the�front�side,�others�use�thesame�plastic�repair�adhesive�onthe�backside.
The�companies�that�use�the�same�productfront�to�back�are�Crest,�Fusor,�Kent,�IES,Ashland�Inc.�(PLIOGRIP),�and�SEM.�Fusor,IES,�and�Ashland�Inc.�(PLIOGRIP)�alsohave�a�separate�product�for�applying�aglaze�coat�over�the�repair�area.�3M�has�aseparate�product�for�front�side�repairs.
There�are�a�variety�of�applicator�guns�used�todispense�repair�adhesive.
Plastic�repair�adhesive�mixing�optionsinclude:
Module�2�-�Adhesive�Bumper�RepairTextbook
Plastic�And�Composite�Repair 28
• dual�mixing�tubes�with�a�manualapplicator�gun.�A�pneumaticapplicator�gun�is�also�available.
• caulk�gun�cartridges�that,�withan�adapter,�can�be�used�in�atraditional�caulk�gun.
• A�and�B�hand�mixing�tubes�thatneed�to�be�mixed�thoroughly.
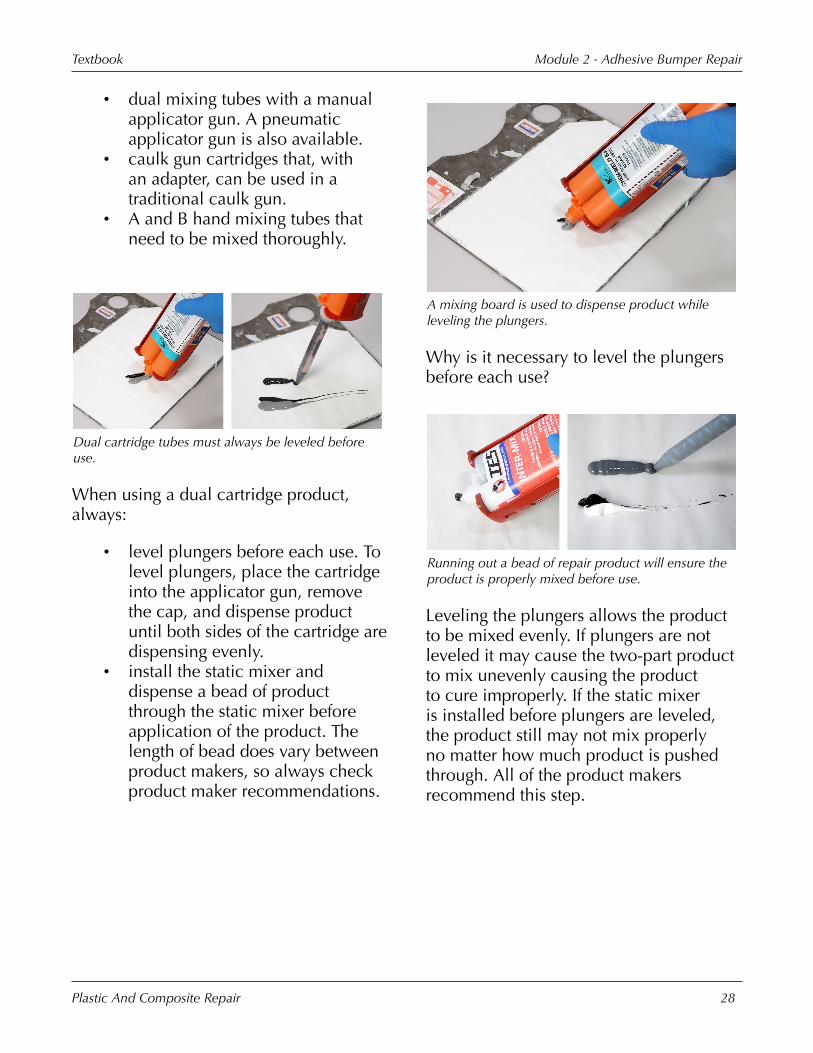
Dual�cartridge�tubes�must�always�be�leveled�beforeuse.
When�using�a�dual�cartridge�product,always:
• level�plungers�before�each�use.�Tolevel�plungers,�place�the�cartridgeinto�the�applicator�gun,�removethe�cap,�and�dispense�productuntil�both�sides�of�the�cartridge�aredispensing�evenly.
• install�the�static�mixer�anddispense�a�bead�of�productthrough�the�static�mixer�beforeapplication�of�the�product.�Thelength�of�bead�does�vary�betweenproduct�makers,�so�always�checkproduct�maker�recommendations.
A�mixing�board�is�used�to�dispense�product�whileleveling�the�plungers.
Why�is�it�necessary�to�level�the�plungersbefore�each�use?
Running�out�a�bead�of�repair�product�will�ensure�theproduct�is�properly�mixed�before�use.
Leveling�the�plungers�allows�the�productto�be�mixed�evenly.�If�plungers�are�notleveled�it�may�cause�the�two-part�productto�mix�unevenly�causing�the�productto�cure�improperly.�If�the�static�mixeris�installed�before�plungers�are�leveled,the�product�still�may�not�mix�properlyno�matter�how�much�product�is�pushedthrough.�All�of�the�product�makersrecommend�this�step.

Module�2�-�Adhesive�Bumper�RepairTextbook
Plastic�And�Composite�Repair 29
Static�mixing�tips�vary�in�length�and�mixing�ratio.
Some�product�makers�require�theirproduct�be�mixed�using�a�static�mixingtip.�A�static�mixing�tip:
• mixes�the�product�uniformlywithout�causing�air�bubbles.
• wastes�very�little�of�the�product.�Insome�cases,�only�about�a�teaspoonis�left�in�the�static�mixer.�While�itmay�look�like�there�is�more�waste,this�it�is�not�the�case.�The�mixingchannels�take�up�most�of�thespace�in�the�static�mixer.�It�is�alsoimportant�to�note�that�the�staticmixers�are�not�interchangeablebetween�product�lines,�as�thelength�and�mix�ratio�of�the�staticmixer�may�vary.
Refer�to�Module�2,�“Demonstration:Video:�Static�Mixing�Tip”�in�thepresentation�for�an�example�of�a�staticmixing�tip.
It�is�important�to�always�follow�product�makerinstructions.
Precautions�to�take�when�using�plasticrepair�adhesives�include:
• never�intermix�different�plasticrepair�systems,�as�this�may�lead�tocompatibility�issues.
• always�follow�product�makerinstructions.�Failure�to�do�so�willlead�to�repair�failure.
• choose�the�product�with�thesame�flexibility�as�the�part�beingrepaired.
For�example,�do�not�use�a�rigid�repairproduct�on�a�semi-rigid�part�because�thesemi-rigid�part�needs�to�be�somewhatflexible.

Module�2�-�Adhesive�Bumper�RepairTextbook
Plastic�And�Composite�Repair 30
Adhesion�promoters�are�used�to�form�a�chemicalbond�to�the�plastic�part.
Adhesion�promoters�or�surface�modifiersare:
• applied�after�the�surface�has�beensanded�with�a�DA�sander,�butbefore�any�plastic�repair�adhesivesare�applied.�Caution�must�be�usedto�avoid�melting�the�plastic,�asrepair�materials�will�not�stick�tomelted�plastic�or�plastic�that�hasnot�been�sanded.
• used�to�form�a�chemical�bond�toplastic.�In�simple�terms,�adhesionpromoters�give�the�repair�materialsomething�to�stick�to�when�theplastic�is�a�poor�adhesion�plasticlike�TPO�or�PP.�Most�productmakers�say�that�when�not�sureif�the�plastic�will�need�adhesionpromoter,�use�it�and�it�will�nothave�any�adverse�affects.
• not�required�by�all�productmakers.�Some�materials�haveadhesion�promoters�built�into�theproduct,�so�no�additional�adhesionpromoter�is�necessary.�The�repairarea�must�still�be�cleaned�andsanded�with�a�DA�sander.
Never�use�a�paint�maker’s�adhesionpromoter�instead�of�a�product�maker’sadhesion�promoter�as�they�are�made�tocreate�adhesion�for�different�materials.
Flame�treatment�is�another�option�topromote�adhesion.�It�is�not�widely�usedor�recommended�by�product�makers.�Thisis�accomplished�by�passing�a�butane�orpropane�(not�oxyacetylene)�flame�overthe�repair�area.�The�difficulty�in�usingflame�treatment�is�that�the�distance�to�theplastic�and�travel�speed�will�affect�thelevel�of�heat�being�applied.�If�too�muchheat�is�applied�and�the�plastic�melts,�itwill�actually�cause�poor�adhesion.�If�notenough�heat�is�applied,�it�will�not�providethe�proper�adhesion�promotion.
Crest�recommends�flame�treatment�butalso�has�an�adhesion�promoter.
Personal�SafetyHazards�when�working�with�adhesionpromoter/surface�modifier�include:
• skin�contact�with�cleaning�solventsand�plastic�repair�materials.
• vapors�from�cleaning�solvents�andplastic�repair�materials.
• static�electricity.�Plastic�partsshould�be�grounded�beforecleaning�and�refinishing�and�/�or�aantistatic�cleaner�should�be�used.
The�product-specific�SDS�identifies�thepersonal�safety�equipment�that�is�requiredduring�product�use.�Plastic�repairs�shouldbe�performed�in�a�properly�ventilated
Module�2�-�Adhesive�Bumper�RepairTextbook
Plastic�And�Composite�Repair 31
area.�Safety�equipment�that�should�beused�when�repairing�plastics�includes:
• safety�goggles�or�safety�glasses.• protective�gloves.• proper�respiratory�protection.
Two-Sided�Repair
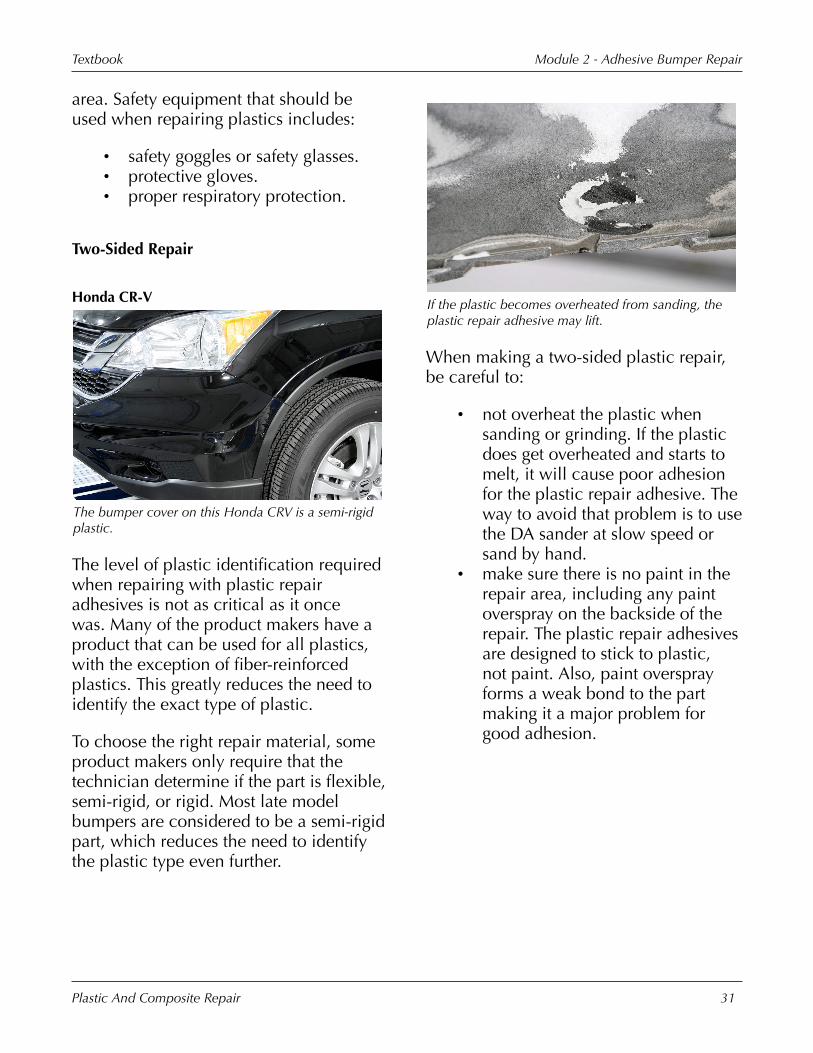
Honda�CR-V
The�bumper�cover�on�this�Honda�CRV�is�a�semi-rigidplastic.
The�level�of�plastic�identification�requiredwhen�repairing�with�plastic�repairadhesives�is�not�as�critical�as�it�oncewas.�Many�of�the�product�makers�have�aproduct�that�can�be�used�for�all�plastics,with�the�exception�of�fiber-reinforcedplastics.�This�greatly�reduces�the�need�toidentify�the�exact�type�of�plastic.
To�choose�the�right�repair�material,�someproduct�makers�only�require�that�thetechnician�determine�if�the�part�is�flexible,semi-rigid,�or�rigid.�Most�late�modelbumpers�are�considered�to�be�a�semi-rigidpart,�which�reduces�the�need�to�identifythe�plastic�type�even�further.
If�the�plastic�becomes�overheated�from�sanding,�theplastic�repair�adhesive�may�lift.
When�making�a�two-sided�plastic�repair,be�careful�to:
• not�overheat�the�plastic�whensanding�or�grinding.�If�the�plasticdoes�get�overheated�and�starts�tomelt,�it�will�cause�poor�adhesionfor�the�plastic�repair�adhesive.�Theway�to�avoid�that�problem�is�to�usethe�DA�sander�at�slow�speed�orsand�by�hand.
• make�sure�there�is�no�paint�in�therepair�area,�including�any�paintoverspray�on�the�backside�of�therepair.�The�plastic�repair�adhesivesare�designed�to�stick�to�plastic,not�paint.�Also,�paint�oversprayforms�a�weak�bond�to�the�partmaking�it�a�major�problem�forgood�adhesion.
Module�2�-�Adhesive�Bumper�RepairTextbook
Plastic�And�Composite�Repair 32
Refer�to�“Video:�Two-Sided�Repair�Part�2”in�the�presentation.�This�video�shows�howto�perform�a�proper�two-sided�repair�usingplastic�repair�adhesives�with�a�backingmaterial.
A�tear�may�be�held�together�by�applying�aluminumtape�to�the�front�side�of�the�repair.
Any�heating�and�reshaping�should�bedone�before�beginning�a�two-sided�repair.When�starting�a�two-sided�repair:
• remove�any�broken�or�loose�piecesto�provide�an�even�surface�forthe�repair.�If�this�is�not�done,�thepart�may�not�have�the�properalignment.
• temporarily�align�the�front�sideof�the�repair�and�hold�it�togetherwith�aluminum�tape,�body�tape,or�cyanoacrylate.�It�is�important
to�align�the�pieces�and�hold�themtogether�so�that�after�the�backsiderepair�is�complete,�everything�is�inproper�alignment.
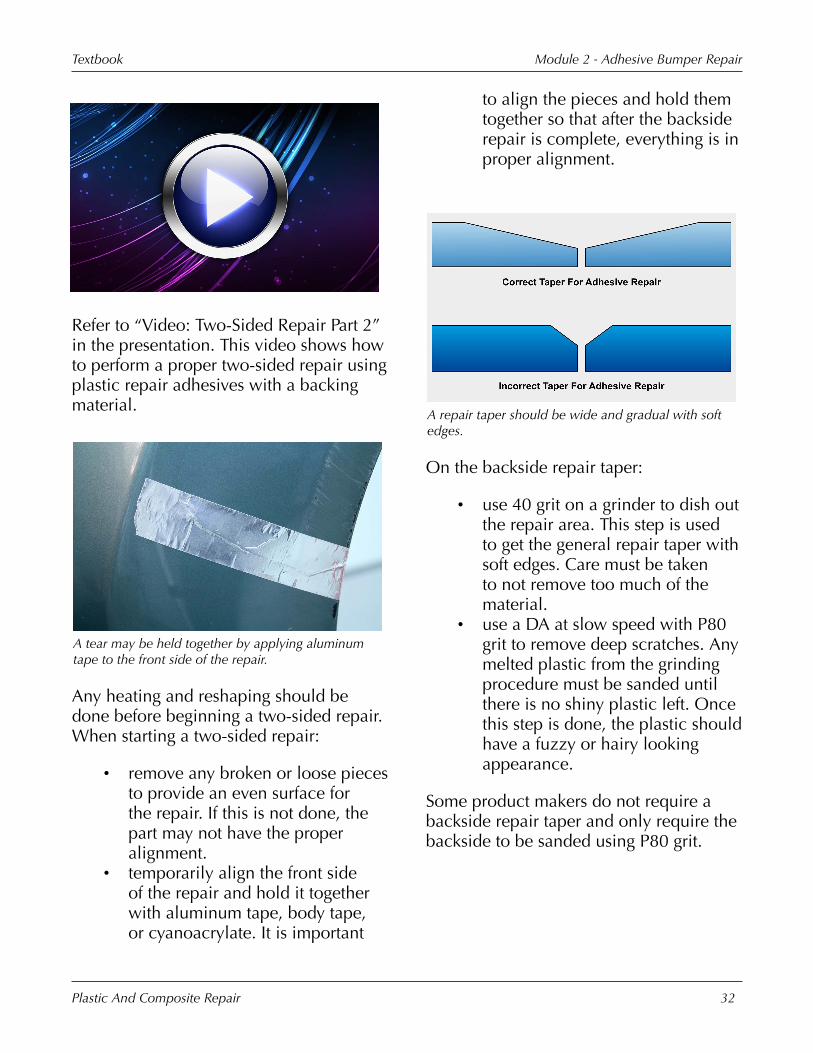
A�repair�taper�should�be�wide�and�gradual�with�softedges.
On�the�backside�repair�taper:
• use�40�grit�on�a�grinder�to�dish�outthe�repair�area.�This�step�is�usedto�get�the�general�repair�taper�withsoft�edges.�Care�must�be�takento�not�remove�too�much�of�thematerial.
• use�a�DA�at�slow�speed�with�P80grit�to�remove�deep�scratches.�Anymelted�plastic�from�the�grindingprocedure�must�be�sanded�untilthere�is�no�shiny�plastic�left.�Oncethis�step�is�done,�the�plastic�shouldhave�a�fuzzy�or�hairy�lookingappearance.
Some�product�makers�do�not�require�abackside�repair�taper�and�only�require�thebackside�to�be�sanded�using�P80�grit.

Module�2�-�Adhesive�Bumper�RepairTextbook
Plastic�And�Composite�Repair 33
It�is�also�recommended�to�clean�thearea�with�the�appropriate�cleaner�beforeany�sanding�can�be�done.�Do�not�use�asolvent�once�the�plastic�surface�has�beenabraded.�If�a�solvent�is�applied�to�theabraded�plastic,�it�may�absorb�into�theplastic,�causing�the�solvent�to�be�releasedin�the�bake�cycle�of�the�paint�process.�Thiscould�cause�the�plastic�repair�adhesive�toblister�and�the�repair�to�fail.�This�may�alsooccur�once�the�repair�is�exposed�to�thesun.
Refer�to�Module�2,�"Demonstration:Incorrect�/�Correct�Taper"�to�see�anexample�of�an�incorrect�and�correct�repairtaper.
This�tab�has�1/8"�pinning�holes�that�will�providestrength�for�the�repair.
Pinning�may�be�used�for�added�strength.This�is�a�recommendation�by�Crest�for
a�two-sided�repair.�Most�other�productmakers�use�pinning�only�for�tab�repair.
When�using�pinning�on�a�two-sidedrepair:
• drill�1/8"�holes�about�1/4�-�1/2"apart.�It�is�a�good�idea�to�drillholes�in�a�pattern�instead�oferratically�drilling�the�holes,�Thisensures�that�not�too�much�of�theplastic�is�removed�from�the�repairarea,�unnecessarily�weakening�thepart.
• it�is�recommended�to�stay�1/4�-1/2"�away�from�the�edge.�Thisallows�for�a�full�hole�and�not�just�apartial�hole�when�the�repair�taperis�completed.
• it�may�be�recommended�to�drill�asmall�hole�at�each�end�of�the�crackin�order�to�prevent�the�crack�fromcontinuing�further.
Make�sure�that�all�pinning�holes�arewithin�the�repair�taper.
Most�adhesion�promoter�/�surface�modifiers�shouldbe�applied�in�a�light�mist�coat.
When�using�an�adhesion�promoter:

Module�2�-�Adhesive�Bumper�RepairTextbook
Plastic�And�Composite�Repair 34
• use�a�mist�coat.�If�a�heavy�coat�isapplied,�it�may�cause�adhesionproblems.�The�adhesion�promotershould�make�the�plastic�look�dulland�not�glossy.�The�exceptionto�this�rule�is�when�the�productmaker’s�adhesion�promoter�isapplied�with�a�spray�gun�or�adauber.
• follow�the�product�makerinstructions�for�flash�times.�If�theadhesion�promoter�has�productapplied�over�it�too�soon,�there�willbe�adhesion�problems.
• make�sure�the�adhesion�promoteris�for�the�plastic�repair�adhesivethat�is�being�used.�Do�not�usea�paint�manufacturer’s�plasticadhesion�promoter�beforeapplying�plastic�repair�adhesivematerials,�as�they�might�not�becompatible�for�this�step.�Also�donot�intermix�an�adhesion�promoterfrom�another�plastic�repair�system,as�some�are�made�for�urethanematerials�while�others�are�madefor�epoxy�materials.
There�are�some�product�makers�that�donot�have�an�adhesion�promoter.
The�adhesive�should�be�applied�using�firm�pressure.
When�applying�plastic�repair�adhesives:
• make�sure�to�use�firm�pressureto�prevent�any�air�pockets�fromforming.�This�should�be�a�thinskim�coat�to�ensure�that�the�repairmaterial�fully�adheres�to�theplastic�part.
• make�sure�to�check�the�work�timeof�the�product.�Work�time�variesdepending�on�the�type�of�productand�temperature.�Some�materialshave�a�work�time�that�is�onlyseconds�long.
• the�longer�that�the�adhesive�cancure,�the�better�the�bond�will�be.The�reason�for�this�is�that�withmost�adhesives,�the�chemicalbond�increases�over�time.�Oncethey�can�be�sanded,�most�of�thecuring�is�done.�However,�mostcontinue�to�cure�after�the�sandingwindow�for�about�24�hours.�This�isthe�time�it�takes�for�the�product�toachieve�its�full�bonding�strength.It�is�also�okay�to�topcoat�becausemost�two-part�materials�are�anexothermic�cure,�so�there�is�noreal�shrinkage�after�the�mixedproduct�cools.
It�is�also�important�to�keep�the�mixing�tipsubmerged�in�the�plastic�repair�adhesivewhile�dispensing�the�product�to�avoidputting�air�into�the�product,�which�willcreate�pinholes.
Module�2�-�Adhesive�Bumper�RepairTextbook
Plastic�And�Composite�Repair 35
One-Sided�Repair
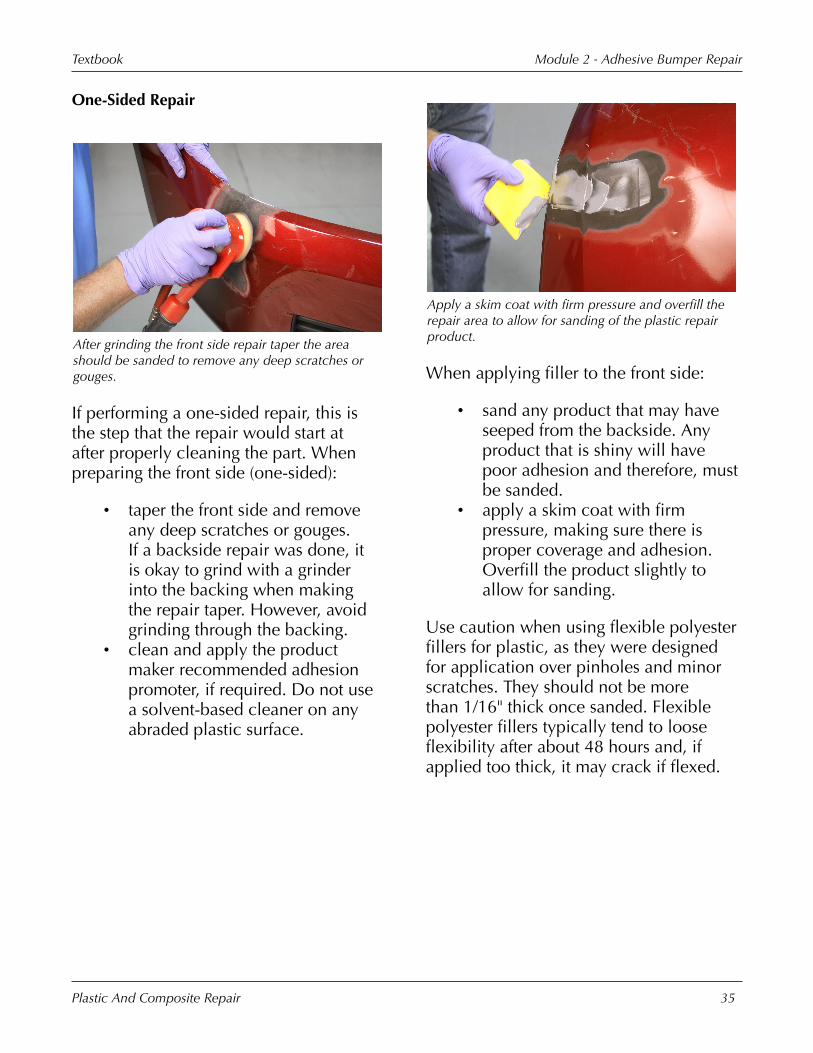
After�grinding�the�front�side�repair�taper�the�areashould�be�sanded�to�remove�any�deep�scratches�orgouges.
If�performing�a�one-sided�repair,�this�isthe�step�that�the�repair�would�start�atafter�properly�cleaning�the�part.�Whenpreparing�the�front�side�(one-sided):
• taper�the�front�side�and�removeany�deep�scratches�or�gouges.If�a�backside�repair�was�done,�itis�okay�to�grind�with�a�grinderinto�the�backing�when�makingthe�repair�taper.�However,�avoidgrinding�through�the�backing.
• clean�and�apply�the�productmaker�recommended�adhesionpromoter,�if�required.�Do�not�usea�solvent-based�cleaner�on�anyabraded�plastic�surface.
Apply�a�skim�coat�with�firm�pressure�and�overfill�therepair�area�to�allow�for�sanding�of�the�plastic�repairproduct.
When�applying�filler�to�the�front�side:
• sand�any�product�that�may�haveseeped�from�the�backside.�Anyproduct�that�is�shiny�will�havepoor�adhesion�and�therefore,�mustbe�sanded.
• apply�a�skim�coat�with�firmpressure,�making�sure�there�isproper�coverage�and�adhesion.Overfill�the�product�slightly�toallow�for�sanding.
Use�caution�when�using�flexible�polyesterfillers�for�plastic,�as�they�were�designedfor�application�over�pinholes�and�minorscratches.�They�should�not�be�morethan�1/16"�thick�once�sanded.�Flexiblepolyester�fillers�typically�tend�to�looseflexibility�after�about�48�hours�and,�ifapplied�too�thick,�it�may�crack�if�flexed.
Module�2�-�Adhesive�Bumper�RepairTextbook
Plastic�And�Composite�Repair 36
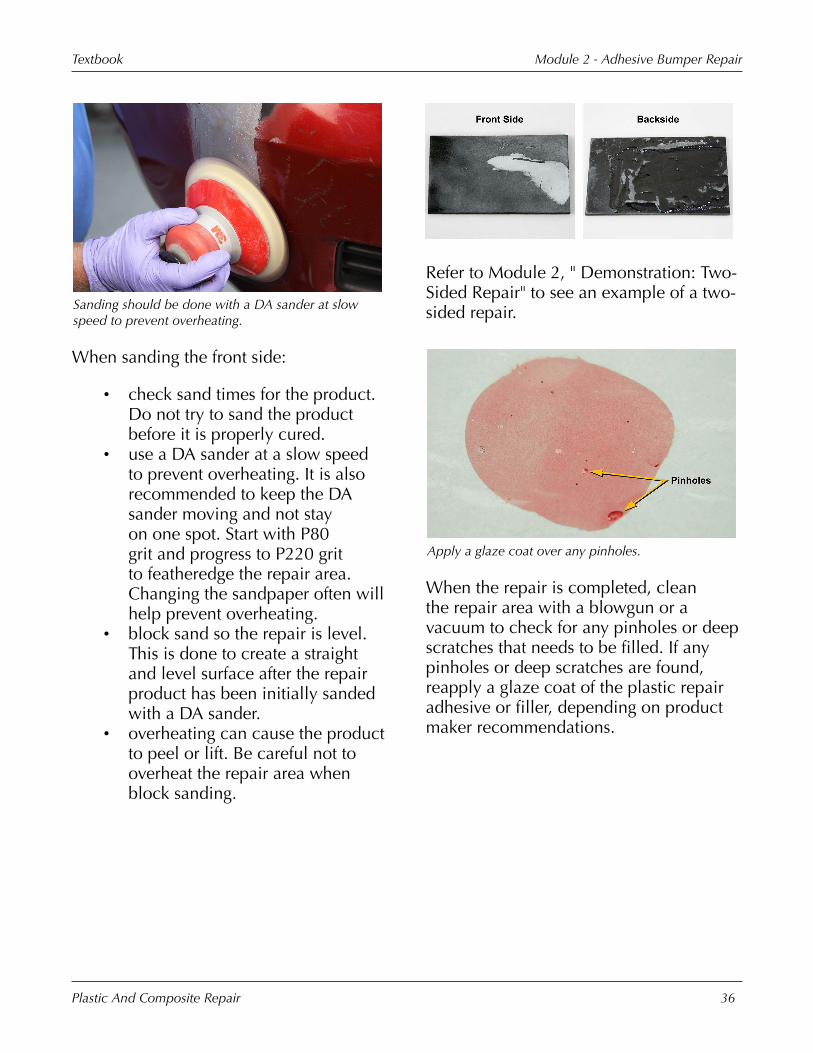
Sanding�should�be�done�with�a�DA�sander�at�slowspeed�to�prevent�overheating.
When�sanding�the�front�side:
• check�sand�times�for�the�product.Do�not�try�to�sand�the�productbefore�it�is�properly�cured.
• use�a�DA�sander�at�a�slow�speedto�prevent�overheating.�It�is�alsorecommended�to�keep�the�DAsander�moving�and�not�stayon�one�spot.�Start�with�P80grit�and�progress�to�P220�gritto�featheredge�the�repair�area.Changing�the�sandpaper�often�willhelp�prevent�overheating.
• block�sand�so�the�repair�is�level.This�is�done�to�create�a�straightand�level�surface�after�the�repairproduct�has�been�initially�sandedwith�a�DA�sander.
• overheating�can�cause�the�productto�peel�or�lift.�Be�careful�not�tooverheat�the�repair�area�whenblock�sanding.
Refer�to�Module�2,�"�Demonstration:�Two-Sided�Repair"�to�see�an�example�of�a�two-sided�repair.
Apply�a�glaze�coat�over�any�pinholes.
When�the�repair�is�completed,�cleanthe�repair�area�with�a�blowgun�or�avacuum�to�check�for�any�pinholes�or�deepscratches�that�needs�to�be�filled.�If�anypinholes�or�deep�scratches�are�found,reapply�a�glaze�coat�of�the�plastic�repairadhesive�or�filler,�depending�on�productmaker�recommendations.

Module�2�-�Adhesive�Bumper�RepairTextbook
Plastic�And�Composite�Repair 37
The�repaired�surface�should�be�smooth�aftersanding.
When�the�part�is�ready�for�primer,�itis�a�good�idea�to�remove�the�fuzzyplastic�residue�created�from�the�sandingprocedures.�One-way�to�do�this�is�byblock�sanding�the�fuzzy�plastic�with�P320grit.�Next,�blow�off�or�wipe�the�area�witha�dry�rag.�Then�vacuum�the�area�andcheck�again�for�any�pinholes�or�deepscratches�that�need�to�be�filled.
If�the�vehicle�is�equipped�with�adaptivecruise�control�or�parallel�park�assistsystem,�no�repair�can�be�done�in�front�ofa�sensor�if�it�impedes�the�sensors�abilityto�function.�Typically�the�only�repair�thatcan�be�done�is�refinishing�and�that�canonly�be�done�once�because�excessive�filmthickness�can�affect�the�sensors.�Checkwith�the�OEM�before�painting�any�partsthat�have�these�systems.
Another�consideration�is�if�there�is�anypaint�cracking�(spider�webbing).�Thisrequires�the�finish�to�be�sanded�with�a�DAsander�until�all�the�cracking�is�removed.�Ifthis�is�not�done,�the�cracking�will�show�upagain�after�refinishing.
Tab�Repair
This�partially-torn�tab�is�repairable.
When�performing�tab�repairs:
• multiple�tabs�can�be�repairedat�the�same�time.�It�is�importantto�check�the�cure�time�of�theproduct.�If�not�enough�time�isgiven�for�each�tab,�the�plasticrepair�adhesive�may�harden�beforethe�tab�can�be�shaped.
• most�tabs�will�only�be�partiallytorn�out.�Typically�this�happens�onthe�thinnest�part�of�the�tab.
• complex�tab�shapes�can�berecreated.�One�of�the�ways�to�dothis�is�by�tracing�the�outline�of�agood�existing�tab�onto�a�piece�ofplastic�film�and�then�transferringthe�outline�to�the�new�adhesivetab.

Module�2�-�Adhesive�Bumper�RepairTextbook
Plastic�And�Composite�Repair 38
Refer�to�“Bumper�Cover�Tab�Repair”�inthe�presentation.�This�video�shows�howto�make�a�pinning�tab�repair�on�a�bumpercover�using�plastic�repair�adhesive.
The�finish�is�being�removed�from�the�repair�taperarea.
Environmental�SafetyCleaners�can�contain�VOCs�and�should�beused�and�disposed�of�in�accordance�withall�federal,�state,�and�local�regulations.
In�order�to�prepare�a�tab�for�repair,�the:
• part�must�be�cleaned�on�bothsides�with�soap�and�water�andwith�the�appropriate�cleaner.�Anycontaminants�left�on�the�part�maycause�adhesion�failure.
• finish�must�be�removed�from�therepair�area.�If�it�is�not�removed,�it
may�lead�to�an�adhesion�failure,especially�with�the�overspray�onthe�backside�of�the�part.
1/8"�pinning�holes�are�being�made�to�help�anchor�areplacement�tab.
When�a�tab�is�missing�or�torn,�pinningis�sometimes�recommended�to�increaserepair�strength�and�durability.�This�processis�another�way�to�anchor�the�tab�to�thepart.
The�repair�area�must�have�a�taper�that�isgradual�and�not�a�sharp�line.�This�is�sothat�the�product�has�more�surface�area�tobe�applied�to�and�is�able�to�expand�andcontract.
It�is�also�important�to�measure�a�goodexisting�tab�to�ensure�correct�appearanceand�position�of�the�repaired�tab.
Module�2�-�Adhesive�Bumper�RepairTextbook
Plastic�And�Composite�Repair 39
Refer�to�Module�2,�"Demonstration:Tab�Repair"�to�see�an�example�of�a�tabrepair.
Any�broken�or�loose�plastic�should�be�removed�priorto�applying�an�adhesive.
When�starting�a�tab�repair:
• remove�any�loose�or�brokenplastic�from�the�repair�area�toensure�the�integrity�of�the�tab.
• taper�the�front�and�backside�ofthe�repair�area�so�that�the�plasticrepair�adhesive�has�enough�area�toadhere�to�the�plastic.
• drill�the�pinning�holes,�ifrecommended.
• add�backings�for�strength,�ifrecommended�by�the�productmaker.
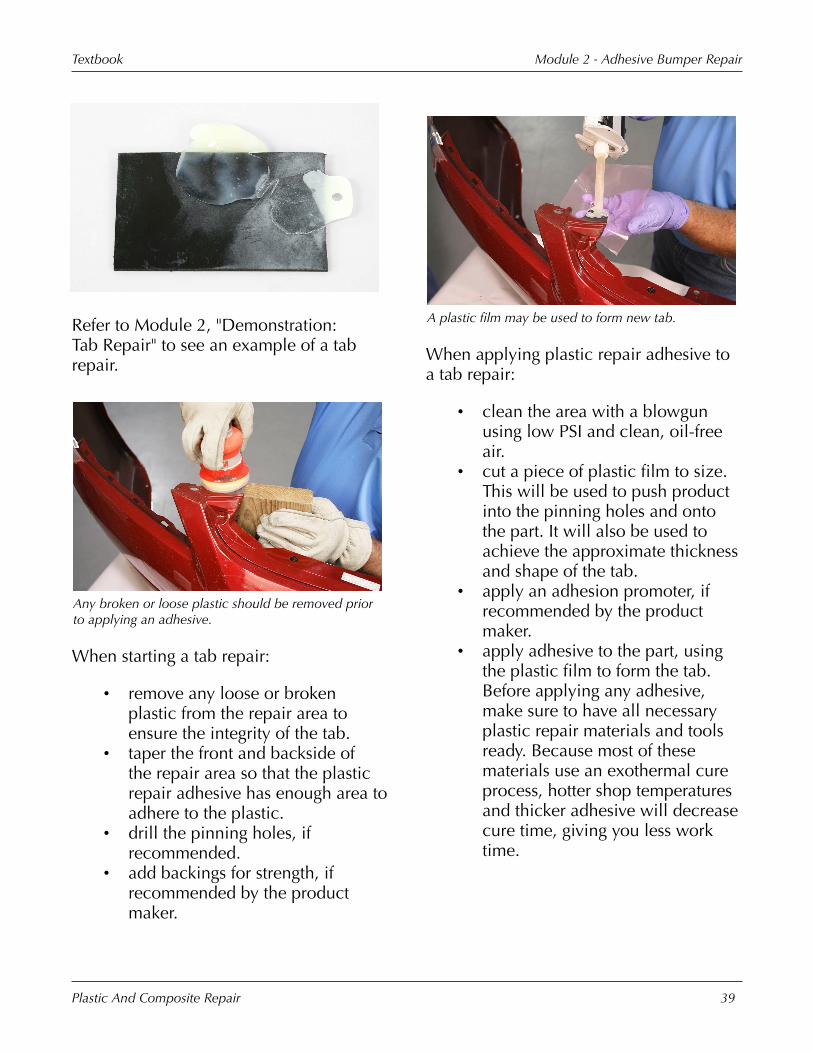
A�plastic�film�may�be�used�to�form�new�tab.
When�applying�plastic�repair�adhesive�toa�tab�repair:
• clean�the�area�with�a�blowgunusing�low�PSI�and�clean,�oil-freeair.
• cut�a�piece�of�plastic�film�to�size.This�will�be�used�to�push�productinto�the�pinning�holes�and�ontothe�part.�It�will�also�be�used�toachieve�the�approximate�thicknessand�shape�of�the�tab.
• apply�an�adhesion�promoter,�ifrecommended�by�the�productmaker.
• apply�adhesive�to�the�part,�usingthe�plastic�film�to�form�the�tab.Before�applying�any�adhesive,make�sure�to�have�all�necessaryplastic�repair�materials�and�toolsready.�Because�most�of�thesematerials�use�an�exothermal�cureprocess,�hotter�shop�temperaturesand�thicker�adhesive�will�decreasecure�time,�giving�you�less�worktime.
Module�2�-�Adhesive�Bumper�RepairTextbook
Plastic�And�Composite�Repair 40
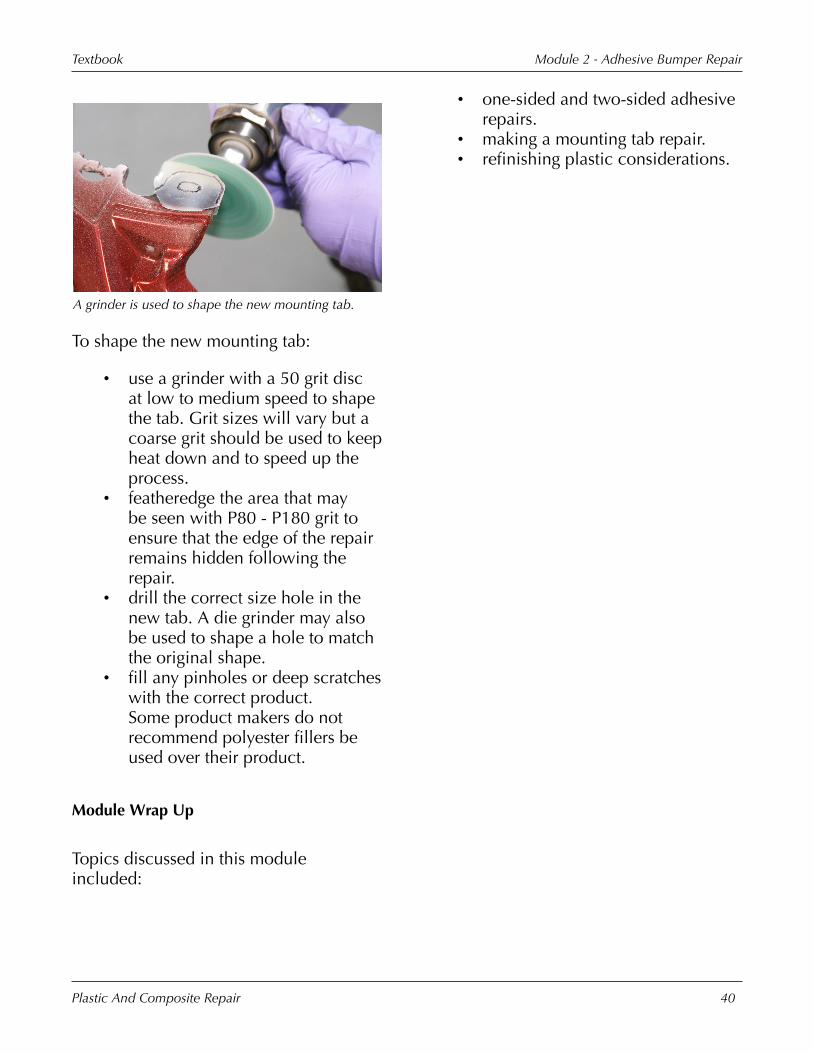
A�grinder�is�used�to�shape�the�new�mounting�tab.
To�shape�the�new�mounting�tab:
• use�a�grinder�with�a�50�grit�discat�low�to�medium�speed�to�shapethe�tab.�Grit�sizes�will�vary�but�acoarse�grit�should�be�used�to�keepheat�down�and�to�speed�up�theprocess.
• featheredge�the�area�that�maybe�seen�with�P80�-�P180�grit�toensure�that�the�edge�of�the�repairremains�hidden�following�therepair.
• drill�the�correct�size�hole�in�thenew�tab.�A�die�grinder�may�alsobe�used�to�shape�a�hole�to�matchthe�original�shape.
• fill�any�pinholes�or�deep�scratcheswith�the�correct�product.Some�product�makers�do�notrecommend�polyester�fillers�beused�over�their�product.
Module�Wrap�Up
Topics�discussed�in�this�moduleincluded:
• one-sided�and�two-sided�adhesiverepairs.
• making�a�mounting�tab�repair.• refinishing�plastic�considerations.
Module�3�-�FiberReinforced�Plastic
(FRP)�Repair

This�page�is�intentionally�left�blank.
Module�3�-�Fiber�Reinforced�Plastic�(FRP)�RepairTextbook
Plastic�And�Composite�Repair 43
FRP�Definitions
The�learning�objectives�for�this�moduleinclude:
• identify�some�of�the�fiberreinforced�plastics�(FRP)�used�onvehicles�today.
• identifying�the�correct�repairmethod�to�repair�FRP.
• performing�proper�preparation�ofFRP.
• performing�one-sided�and�two-sided�FRP�repairs.
• identifying�refinishingconsiderations�for�FRP.
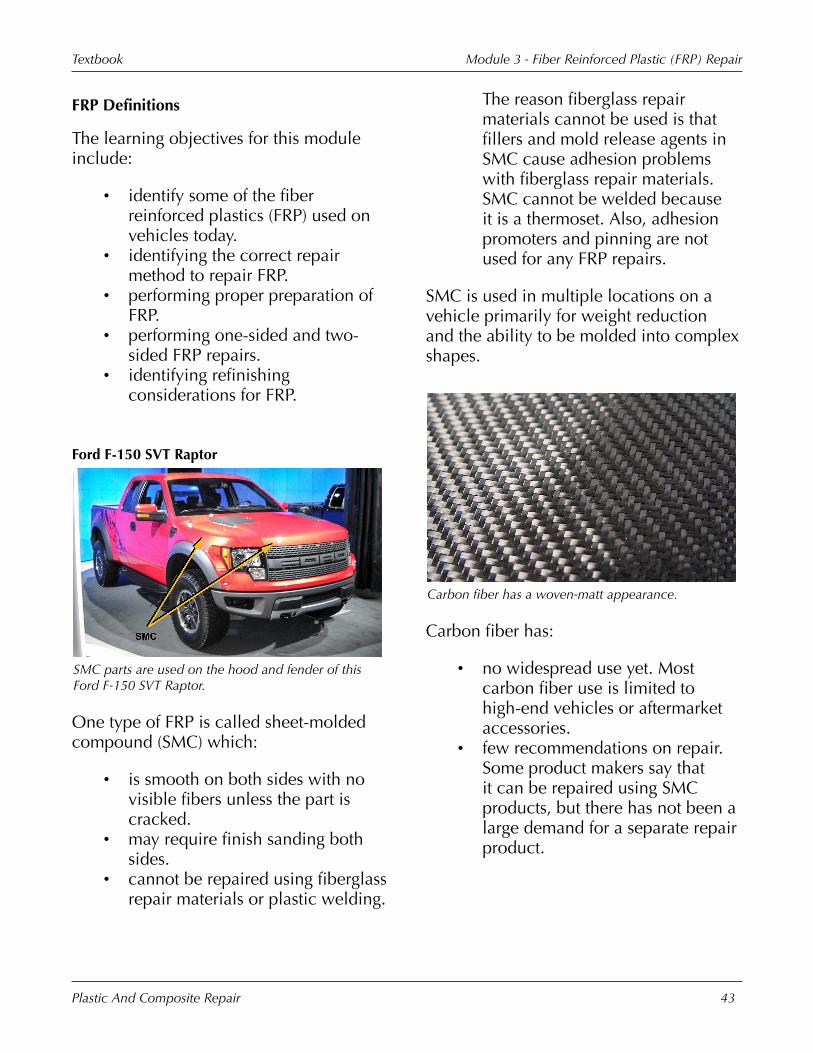
Ford�F-150�SVT�Raptor
SMC�parts�are�used�on�the�hood�and�fender�of�thisFord�F-150�SVT�Raptor.
One�type�of�FRP�is�called�sheet-moldedcompound�(SMC)�which:
• is�smooth�on�both�sides�with�novisible�fibers�unless�the�part�iscracked.
• may�require�finish�sanding�bothsides.
• cannot�be�repaired�using�fiberglassrepair�materials�or�plastic�welding.
The�reason�fiberglass�repairmaterials�cannot�be�used�is�thatfillers�and�mold�release�agents�inSMC�cause�adhesion�problemswith�fiberglass�repair�materials.SMC�cannot�be�welded�becauseit�is�a�thermoset.�Also,�adhesionpromoters�and�pinning�are�notused�for�any�FRP�repairs.
SMC�is�used�in�multiple�locations�on�avehicle�primarily�for�weight�reductionand�the�ability�to�be�molded�into�complexshapes.
Carbon�fiber�has�a�woven-matt�appearance.
Carbon�fiber�has:
• no�widespread�use�yet.�Mostcarbon�fiber�use�is�limited�tohigh-end�vehicles�or�aftermarketaccessories.
• few�recommendations�on�repair.Some�product�makers�say�thatit�can�be�repaired�using�SMCproducts,�but�there�has�not�been�alarge�demand�for�a�separate�repairproduct.

Module�3�-�Fiber�Reinforced�Plastic�(FRP)�RepairTextbook
Plastic�And�Composite�Repair 44
Raw�carbon�fiber�itself�is�not�a�plastic.It�is�a�type�of�woven,�or�unidirectional,fiber�cloth�that�is�imbedded�within�aresin�or�a�plastic.�The�resin�or�plastic�thatis�used�can�be�made�of�many�differentmaterials.�Some�examples�include�epoxy,vinyl�ester,�polyester,�and�nylon.�There�arealso�several�different�types�of�carbon�fiberfinishes.�The�first�is�called�tooled�face.This�means�that�the�carbon�fiber�weaveis�exposed�but�has�a�smooth�and�shinyor�clear-coated�surface.�Another�finish�iscalled�a�bag�surface.�This�has�a�dull�roughlooking�surface.�The�third�finish�type�is�apainted�surface.
FRP�Repair
FRP�panels�will�not�dent�but�may�be�punctured.
An�FRP:
• does�not�dent�or�crush�but�willcrack�when�struck�with�enoughforce.
• must�be�checked�for�secondarydamage�in�the�form�of�crackingoutside�of�the�direct�impact�area,usually�at�mounting�points.�Makesure�to�inspect�backside�of�the�partfor�any�microcracking.
Refer�to�“Video:�Sheet�Molded�Compound(SMC)�Repair”�in�the�presentation.�Thisvideo�shows�a�two-sided�repair�on�anSMC�door.
Personal�SafetyHazards�when�working�with�compositesinclude:
• dust�from�sanding,�cutting,�orgrinding.
• skin�contact�with�cleaning�solventsand�composites�repair�materials.
• vapors�from�cleaning�solvents�andcomposites�repair�materials.
Personal�SafetyThe�product-specific�SDS�identifiesthe�personal�safety�equipment�that�isrequired�during�product�use.�Compositerepairs�should�be�performed�in�a�properlyventilated�area.�Safety�equipmentthat�should�be�used�when�repairingcomposites�includes:
• safety�goggles�or�safety�glasses.• protective�gloves.• a�dustless�sanding�system.• proper�respiratory�protection.

Module�3�-�Fiber�Reinforced�Plastic�(FRP)�RepairTextbook
Plastic�And�Composite�Repair 45
Avoid�skin�contact�with�any�type�ofadhesive.
Environmental�SafetyCleaners�can�contain�VOCs�and�should�beused�and�disposed�of�in�accordance�withall�federal,�state,�and�local�regulations.
The�backing�material�can�be�a�fiberglass�cloth�(left)or�a�scrap�piece�of�the�same�material�(right).
An�FRP�backing:
• can�be�a�scrap�piece�of�the�samematerial.
• can�be�made�of�a�fiberglass�clothor�a�backing�tape.
• is�needed�on�any�two-sided�FRPrepair.
• must�overlap�the�damaged�area.The�amount�of�backing�overlapvaries�by�product�maker.�A�goodgeneral�recommendation�is�a�3/4-�2"�overlap�on�all�sides�of�thedamage.
Damaged�SMC�parts�should�be�cleaned�beforemaking�any�repairs.
Prepping�FRP�for�a�two-sided�repairrequires:
• washing�the�area�with�soap�andwater.
• taping�off�any�exposed�fibersbefore�using�wax�and�greaseremover.�If�the�fibers�are�nottaped�off,�the�fibers�can�wick�thesolvents�and�trap�them�underrepair�materials,�which�can�lead�todelamination.
All�damaged�fibers�should�be�removed.
To�start�a�two-sided�repair:

Module�3�-�Fiber�Reinforced�Plastic�(FRP)�RepairTextbook
Plastic�And�Composite�Repair 46
• remove�any�loose�or�damagedfibers�with�an�air�saw�or�diegrinder.
• taper�the�front�side�of�the�repair.• sand�and�/�or�taper�the�backside�of
the�repair,�if�recommended.�Startby�using�a�grinder�with�40�grit.Then�sand�with�a�DA�sander�andP80�grit.
• clean�the�area�with�a�dry�cloth,a�vacuum,�or�clean,�oil-freecompressed�air.
The�backing�should�be�pressed�into�the�compositerepair�adhesive.
To�apply�the�FRP�backing:
• apply�aluminum�tape�or�plasticfilm�on�the�front�side�to�preventthe�repair�material�from�fallingthrough�the�front�of�the�repairarea.
• apply�a�layer�of�composite�repairadhesive�onto�the�repair�areain�a�pool,�keeping�the�static�tipsubmerged�in�product.�Spreadthe�product�using�firm�pressureto�ensure�the�composite�repairadhesive�is�applied�tightly.
• press�the�backing�material�into�thecomposite�repair�adhesive,�makingsure�to�use�firm�pressure.
• put�another�layer�of�compositerepair�adhesive�over�the�backingand�cover�it,�making�sure�to�coverall�edges�with�adhesive.
Some�product�makers�have�specialinstructions�for�their�composite�repairadhesive.�For�example,�Fusor�and�AshlandInc.�(PLIOGRIP)�have�some�compositerepair�adhesives�that�need�to�be�heated�inorder�to�cure.
Alternating�the�composite�repair�adhesive�andbacking�material�make�the�pyramid�patch.
An�alternative�repair�method�is�a�pyramidpatch,�which�is�a�patch�built�up�withalternate�layers�of�the�repair�product�anda�fiber�cloth�or�mesh.�To�make�a�pyramidpatch:
1. Clean�and�taper�the�backside�andfront�side�of�the�repair�area.�Cleanthe�repair�area�with�a�vacuum.
2. Place�aluminum�tape�onto�thefront�side�and�apply�the�compositerepair�adhesive�to�the�backsideand�to�the�backing,�making�sureto�cover�the�entire�backing�patch.Allow�this�layer�to�cure.
3. Sand�the�front�side�where�thecomposite�repair�adhesive�is

Module�3�-�Fiber�Reinforced�Plastic�(FRP)�RepairTextbook
Plastic�And�Composite�Repair 47
exposed,�and�clean�the�area�with�avacuum.
4. Apply�another�layer�of�compositerepair�adhesive,�followed�by�morecloth�or�mesh,�and�then�anotherlayer�of�composite�repair�adhesive.Continue�to�add�layers�in�thismanner�increasing�the�size�of�thebacking�with�each�layer�until�thedesired�thickness�is�reached.
5. Allow�the�patch�to�cure�and�sandit�level.
Some�vehicle�makers,�like�GM,recommend�the�pyramid�patch.
A�backing�material�must�be�used�even�if�thebackside�of�the�repair�is�seen.
When�applying�a�backing�that�is�exposed,there�still�must�be�backing�material�usedto�ensure�repair�strength�and�stability.�Thebacking�material�must�be�below�the�finallevel�of�the�repair.�Otherwise,�the�backingmaterial�may�be�visible�and�the�repairwould�have�to�be�redone.
The�composite�repair�material�should�be�filledslightly�higher�than�the�part�surface�to�allow�forsanding.
When�performing�a�front�side�repair:
• remove�the�plastic�film�or�tape.• sand�any�exposed�repair�material
that�came�through�from�thebackside.
• clean�the�area.�Do�not�usesolvents�because�the�fibers�are�stillexposed�and�can�wick�the�solventsinto�the�FRP.
• overfill�the�repair�material�to�allowfor�sanding.�The�material�usedfor�the�front�side�repair�may�bedifferent�than�the�material�used�forthe�backside�repair.
Some�product�makers�have�differentmaterials�for�front�side�and�backsiderepairs�for�example,�Kent�and�AshlandInc.�(PLIOGRIP).

Module�3�-�Fiber�Reinforced�Plastic�(FRP)�RepairTextbook
Plastic�And�Composite�Repair 48
The�repair�area�is�sanded�smooth�with�progressivegrits,�making�sure�to�featheredge�the�repair.
Once�the�repair�material�has�cured,�beginby�sanding�with�a�DA�sander.�Typicallyprogress�from�P80�to�P220�grit�with�a�DAsander�to�featheredge�the�repair�area,�andthen�with�a�block�sander�to�featheredgeand�ensure�even�panel�lines.�Once�therepair�area�has�been�block�sanded,�cleanthe�area�with�a�dry�cloth�or�a�vacuum.Check�the�area�for�pinholes�and�apply�aglaze�coat�of�the�appropriate�product�ifneeded.
Carbon�Fiber
Lexus�LFA�Roadster
Many�body�panels�on�the�Lexus�LFA�are�made�ofcarbon�fiber�likethe�hood�for�example.
Some�challenges�with�a�carbon�fiberrepair�include�that�the�material:
• may�not�be�able�to�be�repaired�ifthe�damage�extends�to�an�edge.This�recommendation�comes�fromGM�on�the�ZR1�/�Z06�ChevroletCorvette�fender�repair�procedures.
• cannot�be�duplicated�if�exposedcarbon�fiber�weave�is�cracked.There�is�no�way�to�recreate�theexact�weave�pattern�of�a�tool-faced�surface.
• cannot�be�buffed�if�damage�goesthrough�the�clearcoat�on�tooled-faced�surfaces.
Chevrolet�Corvette�ZR1�Hood
One�of�the�reasons�that�carbon�fiber�is�used�is�that�itis�lightweight.
The�reasons�why�carbon�fiber�is�beingused�is�that�it:
• is�lightweight.�Carbon�fiberis�lighter�than�both�steel�andaluminum,�which�helps�with�thecorporate�average�fuel�economy(CAFÉ)�standards�by�reducingoverall�vehicle�weight.
• has�high�impact�strength�andis�stronger�than�steel.�It�is�also

Module�3�-�Fiber�Reinforced�Plastic�(FRP)�RepairTextbook
Plastic�And�Composite�Repair 49
resistant�to�weather�conditionssuch�as�hail.
• has�a�unique�appearance.• can�be�formed�into�more�complex
shapes�than�metal�and�SMC�partsdue�to�the�thin�but�strong�carbonfiber�reinforcement.
Carbon�fiber�parts�are�typically�produced�in�anautoclave.
In�the�carbon�fiber�manufacturingprocess:
• the�resin�can�be�made�up�of�manydifferent�types�of�resin�that�mayinclude�an�epoxy,�vinyl�ester,polyester,�or�nylon.��
• the�resin�and�carbon�fiber�arecured�in�an�autoclave�with�highheat�(300°F)�and�pressure�at�100psi.�An�autoclave�is�kind�of�like�apressurized�oven�that�can�be�usedto�create�a�carbon�fiber�part.�Theparts�can�also�be�made�withoutthe�use�of�an�autoclave,�but�mostof�the�vehicle�makers�use�theautoclave�to�produce�their�parts.
The�following�websites�all�containgeneral�information�on�carbon�fiber,such�as�how�it�is�made,�applicationsof�use,�and�how�strong�it�is.�Go�towww.compositesworld.com,�do�asearch�for�“carbon�fiber,”�or�go�towww.dragonplate.com,�and�click�on�theword�“Technical.”
Mercedes-Benz�SLR�McLaren
Most�of�the�body�panels�on�the�Mercedes-Benz�SLRMcLaren�are�made�of�carbon�fiber.
Downfalls�with�carbon�fiber�is�that:
• it�is�expensive�to�manufacture.�Theraw�carbon�fiber�is�much�moreexpensive�than�steel�or�aluminum.
• it�is�not�mass-produced�yet.�Mostcarbon�fiber�parts�are�made�byhand�with�little�automation.�So�thequantities�necessary�for�a�mass-produced�vehicle�are�limited.
• the�carbon�fiber�dust�can�shortcircuit�electric�tools�because�it�isa�conductive�material.�The�dustis�also�very�hazardous�to�breathe,so�the�appropriate�particulaterespirator�should�be�used.
• the�raw�or�exposed�carbon�fibercan�cause�galvanic�corrosionwhen�it�comes�into�contactwith�metal.�But�once�it�has

Module�3�-�Fiber�Reinforced�Plastic�(FRP)�RepairTextbook
Plastic�And�Composite�Repair 50
been�imbedded�in�the�resin,�iteliminates�the�galvanic�corrosionproblem.
Chevrolet�Corvette�ZR1
An�exposed-weave�carbon�fiber�body�panel�is�usedfor�the�roof�panel�on�the�Corvette�ZR1.
Carbon�fiber�is�used�for�many�differentapplications�including:
• body�panels�such�as�hoods,fenders,�and�roofs.�An�example�ofa�vehicle�with�carbon�fiber�bodypanels�is�the�2011�ZR1�ChevroletCorvette,�which�has�a�carbonfiber�hood,�roof,�and�fenders.�The2011�Lexus�LFA�and�the�2009Mercedes-Benz�SLR�McLaren�havea�full�carbon�fiber�body.
• interior�/�exterior�trim,�suchas�rocker�panel�moldings�andinstrument�cluster�bezels.�Someexamples�include�the�2008�AudiRS4�and�the�2011�ZR1�ChevroletCorvette.�There�are�also�a�widevariety�of�aftermarket�trim�pieces.
• radiator�core�supports.�Anexample�of�this�can�be�found�onthe�2009�Nissan�GTR.
• pillars�on�the�2006�Aston�MartinV12�Vanquish�and�rail�parts�on�the2011�Lexus�LFA.
• powertrain�parts,�such�as�thedriveshaft.�Some�of�the�reasonsthat�carbon�fiber�driveshafts�areused�are�that�the�shaft�is�lighter,stronger,�can�put�out�more�torque,and�if�the�shaft�does�come�off�theyoke,�it�will�broom�out�(spreadout�like�the�bristles�of�a�broom)unlike�steel�driveshafts�that�canshatter.�One�of�the�first�placesthat�carbon�fiber�driveshafts�wereused�was�in�racing�cars,�for�safetyreasons�and�weight�savings.The�2010�Mitsubishi�Montero,2010�Nissan�370Z,�and�2010Mazda�RX-8�all�have�carbon�fiberdriveshafts�that�weigh�40�–�50%less�than�comparable�two-piecesteel�designs.
Minor�scratches�in�an�exposed-weave�carbon�fiberbody�panel�may�be�removed�by�buffing�the�area.
When�repairing�carbon�fiber,�it�isimportant�to�inspect�the�rest�of�the�partfor�secondary�damage.�Just�like�whenrepairing�fiberglass�or�SMC,�carbon�fiberrepair�possibilities�include:

Module�3�-�Fiber�Reinforced�Plastic�(FRP)�RepairTextbook
Plastic�And�Composite�Repair 51
• repairing�using�SMC�repairmaterial�and�methods.�It�may�berecommended�to�use�a�pyramidpatch.
• buffing�the�tool-faced�surface.
Personal�SafetyWhen�working�with�carbon�fiber,�leathergloves�should�be�worn�because�thefibers�are�very�sharp.�Carbon�fiber�dustis�a�conductive�material�and�can�shortcircuit�electric�tools.�A�NIOSH�P100combination�respirator�should�be�worn�toprevent�fibers�from�getting�into�the�lungsand�to�prevent�any�gases�from�entering�thelungs�from�grinding�or�cutting�of�carbonfiber�parts.
Module�Wrap�Up
Topics�covered�in�this�module�included:
• some�of�the�FRP�used�on�vehiclestoday.
• the�correct�repair�method�to�repairFRP.
• proper�preparation�of�FRP.• one-sided�and�two-sided�FRP
repairs.• FRP�refinishing�considerations.

This�page�is�intentionally�left�blank.

Module�4�-�PlasticWelding�Repairs

This�page�is�intentionally�left�blank.
Module�4�-�Plastic�Welding�RepairsTextbook
Plastic�And�Composite�Repair 55
Plastic�Welding�Process
The�learning�objectives�for�this�moduleinclude:
• identifying�the�types�of�plasticwelds�in�automotive�applications.
• identifying�differences�betweena�fusion�weld�and�an�adhesionweld.
• identifying�welding�equipment.• explaining�how�a�rod�adhesion
test�is�done.• explaining�how�airless�welds�are
made.• explaining�how�hot�air�welds�are
made.
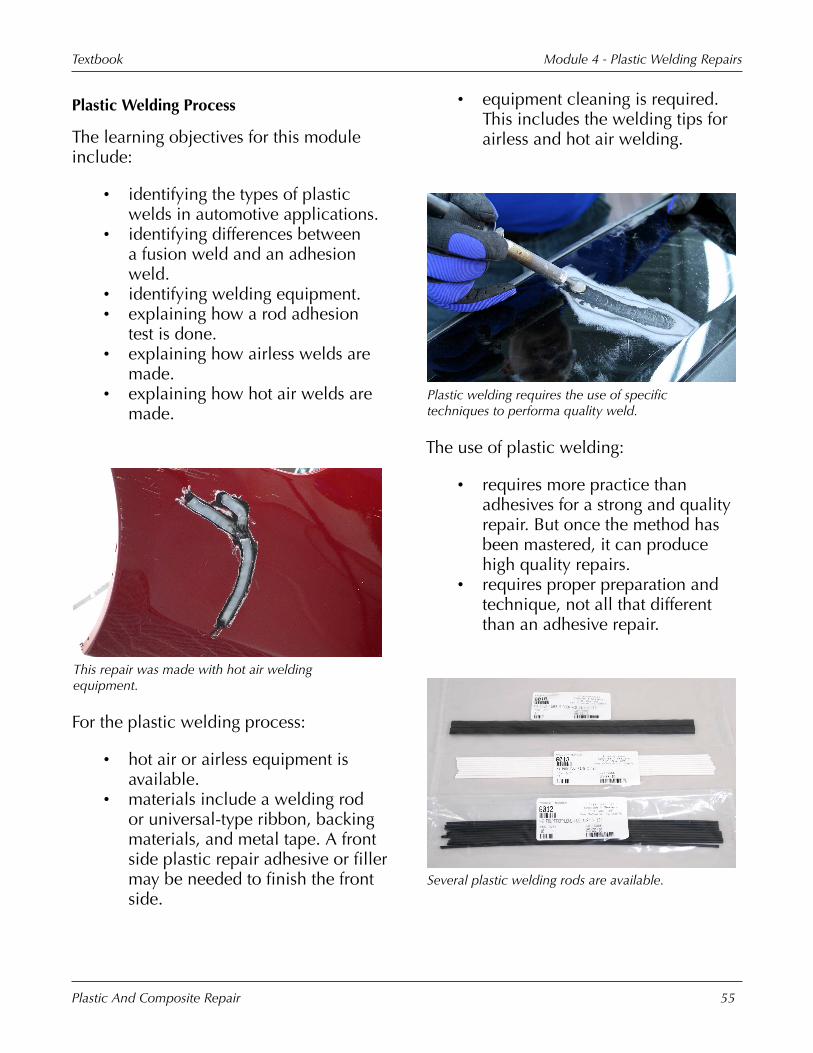
This�repair�was�made�with�hot�air�weldingequipment.
For�the�plastic�welding�process:
• hot�air�or�airless�equipment�isavailable.
• materials�include�a�welding�rodor�universal-type�ribbon,�backingmaterials,�and�metal�tape.�A�frontside�plastic�repair�adhesive�or�fillermay�be�needed�to�finish�the�frontside.
• equipment�cleaning�is�required.This�includes�the�welding�tips�forairless�and�hot�air�welding.
Plastic�welding�requires�the�use�of�specifictechniques�to�performa�quality�weld.
The�use�of�plastic�welding:
• requires�more�practice�thanadhesives�for�a�strong�and�qualityrepair.�But�once�the�method�hasbeen�mastered,�it�can�producehigh�quality�repairs.
• requires�proper�preparation�andtechnique,�not�all�that�differentthan�an�adhesive�repair.
Several�plastic�welding�rods�are�available.

Module�4�-�Plastic�Welding�RepairsTextbook
Plastic�And�Composite�Repair 56
Plastic�welding�rods:
• are�usually�made�of�a�pure�plasticlike�PP,�ABS,�or�TPO.�Therefore,they�may�not�match�a�specificblend�of�plastic�base�material.
• are�available�in�different�diametersand�shapes.�Some�are�round�rodsand�others�are�a�flat�ribbon.�Thereis�also�a�universal�ribbon�availablethat�bonds�most�plastics.�If�aspecific�filler�rod�will�work�on�thatpart,�it�should�be�used.
Plastic�ID�For�Welding
Plastic�welding�rod�codes�may�be�matched�to�theISO�code�on�the�part.
The�need�for�plastic�identification�is:
• more�important�for�plastic�weldingthan�it�is�when�using�adhesives.
• primarily�used�to�determine�whichrod�will�match�the�plastic�part.
• helpful�to�know�how�the�plasticwill�melt�because�different�plasticswill�melt�at�different�temperatures.
A�rod�adhesion�test�may�be�used�if�the�ISO�code�isnot�available.
A�rod�adhesion�test�is�available�if�an�ISOcode�cannot�be�found�or�is�not�available.To�perform�a�rod�adhesion�test,�cleanand�scuff�a�hidden�area�of�the�part�to�berepaired.�Next,�melt�a�rod�on�the�part,allow�it�to�cool,�and�try�to�pull�it�off.Try�the�other�rods�at�different�locations.Determine�which�rod�sticks�best.�If�noneof�the�rods�stick�well,�there�is�also�auniversal�ribbon�that�may�be�an�option.
Personal�SafetyHazards�when�working�with�plasticinclude:
• dust�from�sanding,�cutting,�orgrinding.
• skin�contact�with�cleaning�solventsand�plastic�repair�materials.
• vapors�from�cleaning�solvents�andplastic�repair�materials.
• vapors�from�melting�plastics.• hot�welding�tips.
Personal�SafetyThe�product-specific�SDS�identifies�thepersonal�safety�equipment�that�is�requiredduring�product�use.�Plastic�repairs�should
Module�4�-�Plastic�Welding�RepairsTextbook
Plastic�And�Composite�Repair 57
be�performed�in�a�properly�ventilatedarea.�Safety�equipment�that�should�beused�when�repairing�plastics�includes:
• safety�goggles�or�safety�glasses.• protective�gloves.• a�dustless�sanding�system.• proper�respiratory�protection.
Avoid�skin�contact�with�any�type�ofadhesive.
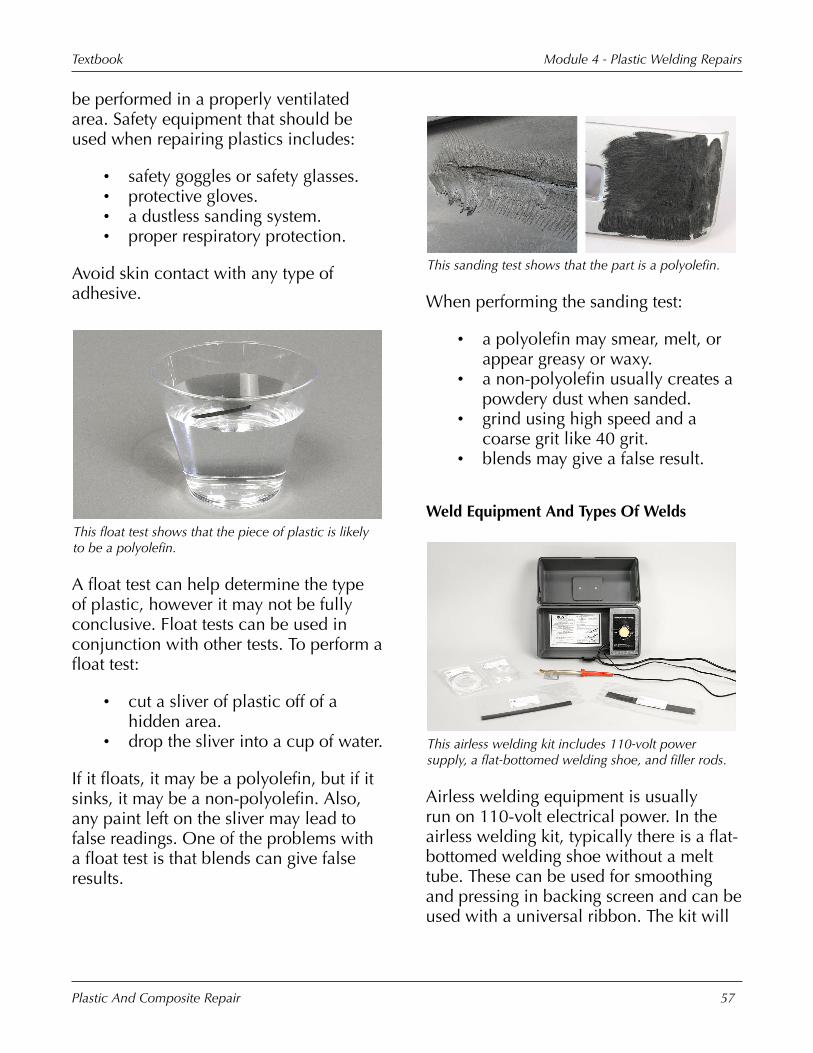
This�float�test�shows�that�the�piece�of�plastic�is�likelyto�be�a�polyolefin.
A�float�test�can�help�determine�the�typeof�plastic,�however�it�may�not�be�fullyconclusive.�Float�tests�can�be�used�inconjunction�with�other�tests.�To�perform�afloat�test:
• cut�a�sliver�of�plastic�off�of�ahidden�area.
• drop�the�sliver�into�a�cup�of�water.
If�it�floats,�it�may�be�a�polyolefin,�but�if�itsinks,�it�may�be�a�non-polyolefin.�Also,any�paint�left�on�the�sliver�may�lead�tofalse�readings.�One�of�the�problems�witha�float�test�is�that�blends�can�give�falseresults.
This�sanding�test�shows�that�the�part�is�a�polyolefin.
When�performing�the�sanding�test:
• a�polyolefin�may�smear,�melt,�orappear�greasy�or�waxy.
• a�non-polyolefin�usually�creates�apowdery�dust�when�sanded.
• grind�using�high�speed�and�acoarse�grit�like�40�grit.
• blends�may�give�a�false�result.
Weld�Equipment�And�Types�Of�Welds
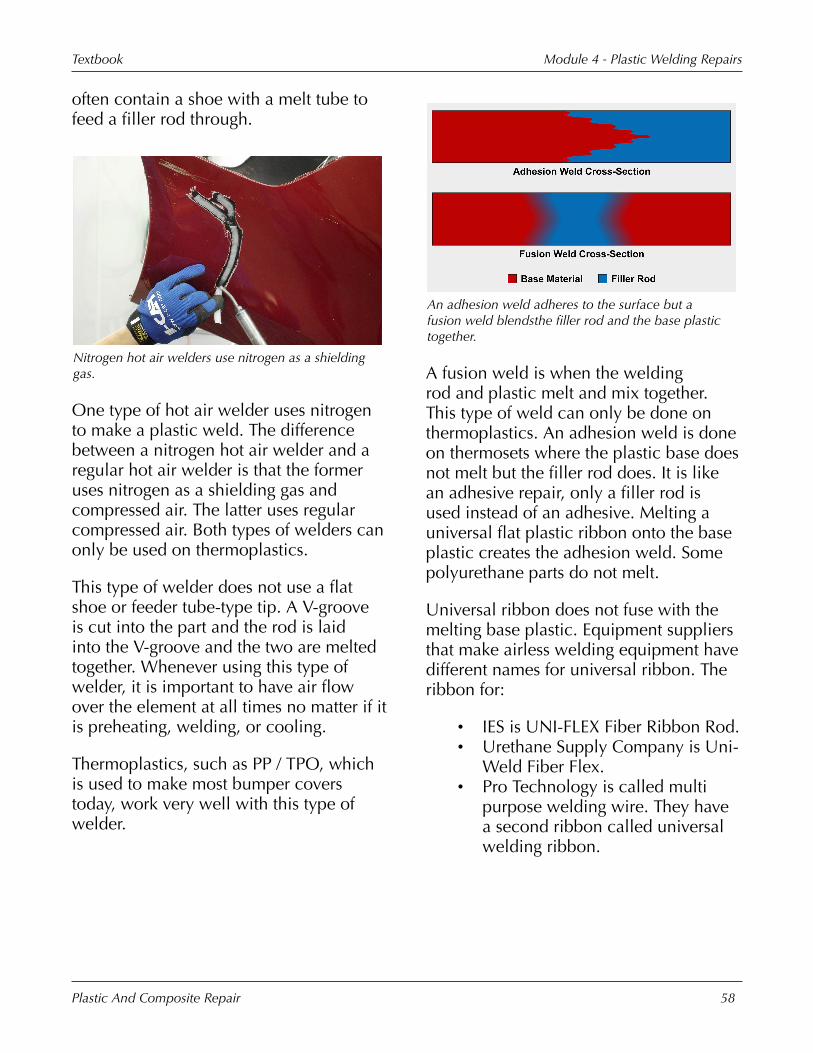
This�airless�welding�kit�includes�110-volt�powersupply,�a�flat-bottomed�welding�shoe,�and�filler�rods.
Airless�welding�equipment�is�usuallyrun�on�110-volt�electrical�power.�In�theairless�welding�kit,�typically�there�is�a�flat-bottomed�welding�shoe�without�a�melttube.�These�can�be�used�for�smoothingand�pressing�in�backing�screen�and�can�beused�with�a�universal�ribbon.�The�kit�will
Module�4�-�Plastic�Welding�RepairsTextbook
Plastic�And�Composite�Repair 58
often�contain�a�shoe�with�a�melt�tube�tofeed�a�filler�rod�through.
Nitrogen�hot�air�welders�use�nitrogen�as�a�shieldinggas.
One�type�of�hot�air�welder�uses�nitrogento�make�a�plastic�weld.�The�differencebetween�a�nitrogen�hot�air�welder�and�aregular�hot�air�welder�is�that�the�formeruses�nitrogen�as�a�shielding�gas�andcompressed�air.�The�latter�uses�regularcompressed�air.�Both�types�of�welders�canonly�be�used�on�thermoplastics.
This�type�of�welder�does�not�use�a�flatshoe�or�feeder�tube-type�tip.�A�V-grooveis�cut�into�the�part�and�the�rod�is�laidinto�the�V-groove�and�the�two�are�meltedtogether.�Whenever�using�this�type�ofwelder,�it�is�important�to�have�air�flowover�the�element�at�all�times�no�matter�if�itis�preheating,�welding,�or�cooling.
Thermoplastics,�such�as�PP�/�TPO,�whichis�used�to�make�most�bumper�coverstoday,�work�very�well�with�this�type�ofwelder.
An�adhesion�weld�adheres�to�the�surface�but�afusion�weld�blendsthe�filler�rod�and�the�base�plastictogether.
A�fusion�weld�is�when�the�weldingrod�and�plastic�melt�and�mix�together.This�type�of�weld�can�only�be�done�onthermoplastics.�An�adhesion�weld�is�doneon�thermosets�where�the�plastic�base�doesnot�melt�but�the�filler�rod�does.�It�is�likean�adhesive�repair,�only�a�filler�rod�isused�instead�of�an�adhesive.�Melting�auniversal�flat�plastic�ribbon�onto�the�baseplastic�creates�the�adhesion�weld.�Somepolyurethane�parts�do�not�melt.
Universal�ribbon�does�not�fuse�with�themelting�base�plastic.�Equipment�suppliersthat�make�airless�welding�equipment�havedifferent�names�for�universal�ribbon.�Theribbon�for:
• IES�is�UNI-FLEX�Fiber�Ribbon�Rod.• Urethane�Supply�Company�is�Uni-
Weld�Fiber�Flex.• Pro�Technology�is�called�multi
purpose�welding�wire.�They�havea�second�ribbon�called�universalwelding�ribbon.

Module�4�-�Plastic�Welding�RepairsTextbook
Plastic�And�Composite�Repair 59
A�hot�staple�welder�is�being�used�to�repair�a�plasticpart.
It�is�important�to�know�that�a�repair�usinga�hot�staple�procedure�needs�to�have�thewelded�area�finished�with�an�appropriateplastic�repair�method.
A�hot�staple�welder�is�used�in�conjunctionwith�other�plastic�repair�methods�bymelting�a�staple�into�the�crack�or�tearto�fuse�them�back�together.�After�thestaple�cools,�the�wire�not�included�in�therepair�is�clipped�off�and�the�repair�can�befinished.�Hot�staple�welding�provides�aflexible�yet�structural�repair.
Hot�staple�welders�typically�have�anadjustable�heat�control�to�manage�themelt�rate.�There�are�four�main�staplesused�for�plastic�repair.�"Z"�style�for�straightpanel�repairs,�"W"�style�for�outsidecorners�and�tight�curves,�"S"�style�forcurved�surfaces,�and�a�"V"�style�for�insidecorners.
Airless�welders�use�the�stitch�tamp�method,�whilehot�air�welders�use�the�melt�flow�method.
Some�of�the�most�common�weldingtechniques�are:
• stitch�tamp.�To�perform�a�stitchtamp,�use�an�airless�welder�tip�tomix�a�filler�rod�with�base�material,then�tamp�with�a�second�pass.This�technique�can�also�be�donewith�a�flat�shoe�and�without�a�fillerrod.�The�stitch�tamp�method�iscommonly�used�on�hard�plasticssuch�as�ABS,�but�will�also�workwell�on�PP�and�TPO.
• melt�flow.�To�perform�the�meltflow�technique,�preheat�thetaper�with�a�heat�gun�or�hot�airwelder�and�melt�the�filler�rod�ontothe�melted�plastic�in�the�repairtaper.�Melt�flow�is�sometimesnecessary�on�thicker�material�withhigh�melting�temperature�likepolycarbonate�(PC)�and�polyamide(PA).

Module�4�-�Plastic�Welding�RepairsTextbook
Plastic�And�Composite�Repair 60
Airless�Welding�Repair�Procedure
When�using�an�airless�welder,�the�filler�rod�isblended�into�the�base�material.
When�performing�airless�welds,�a�backingis�needed�on�any�two-sided�repair.�A�V-groove�can�be�used�when�using�a�fillerrod�in�order�to�get�better�penetration.�It�isalso�critical�to�use�a�rod�that�is�as�close�aspossible�to�the�base�material�in�chemicalmakeup�to�ensure�a�strong�fusion�weld.When�using�a�universal�ribbon,�it�hasproperties�that�allow�it�to�stick�to�multipleplastics�and�is�mainly�used�for�adhesion-type�welds.
The�welding�shoe�can�be�cleaned�with�P220�gritsandpaper�while�the�tip�is�hot.
Cleaning�the�welding�shoe�avoidscontaminating�the�weld�with�otherplastics�that�may�be�on�the�shoe.�It�alsohelps�ensure�enough�heat�is�generatedto�effectively�perform�the�weld.�If�the
welding�shoe�has�a�melt�tube,�it�is�alsoimportant�to�remove�melted�plastic�fromthe�melt�tube.�When�cleaning�the�tip,use�P220�grit�sandpaper�while�the�tip�ishot,�or�a�stainless�steel�wire�brush.�It�isalso�important�to�keep�the�tip�tightened�toensure�proper�heat�transfer.
Refer�to�“Video:�Airless�Welding”�in�thepresentation.�This�video�shows�how�tomake�an�airless�plastic�weld�without�usinga�welding�rod.
Hot�Air�Welds
A�nitrogen�hot�air�welder�can�only�be�used�onthermoplastic�parts.
A�nitrogen�hot�air�welder�uses�compressednitrogen�gas�to�eliminate�oxygen�from�theweld�area.�The�nitrogen�acts�as�a�shieldinggas�and�allows�for�a�contaminate-freeweld�with�less�smoke,�which�creates�a

Module�4�-�Plastic�Welding�RepairsTextbook
Plastic�And�Composite�Repair 61
stronger�weld.�This�type�of�welder�canalso�switch�to�compressed�air�so�thatwhen�preheating�or�cooling�down�theheating�element,�it�does�not�waste�thenitrogen.
A�hot�air�welder�uses�the�same�processesas�the�nitrogen�hot�air�welder�except�thatit�runs�exclusively�on�compressed�air.
E-Z�Weld�Hot�Air�Welder�is�the�nameof�Urethane�Supply�Company’s�(USC)hot�air�welding�equipment,�along�with�anitrogen-air�controller.
Refer�to�“Video:�Nitrogen�Hot�AirWelding”�in�the�presentation.This�videoshows�a�plastic�weld�being�made�with�anitrogen�hot�air�welder.
TAPS�is�an�acronym�to�remember�all�of�the�things�towatch�when�making�a�hot�air�weld.
TAPS�stand�for:
• temperature,�which�must�be�at�thecorrect�setting�to�melt�the�part�andthe�rod.
• angle,�which�should�be�about�45°to�the�part.
• pressure,�which�should�be�firmand�constant.
• speed,�which�should�allow�for�4-�6"�of�material�to�be�welded�perminute.
Weld�Repairs
Before�welding�repairs�begin�the�part�should�becleaned�with�the�appropriate�cleaner.
Preparation�for�welding�include:
Module�4�-�Plastic�Welding�RepairsTextbook
Plastic�And�Composite�Repair 62
• cleaning�with�soap�and�water.• cleaning�with�recommended
cleaner.• wiping�in�one�direction�to�help
reduce�static.
Refer�to�Module�4,�"Demonstration:Plastic�Weld"�to�see�an�example�of�aplastic�weld.
A�metal�window�screen�may�be�used�as�a�backingmaterial.
When�performing�an�airless�weld,�backingis�needed�to�increase�the�strength�of�therepair�especially�in�a�flexible�area.�Thisbacking�can�be�made�of�regular�metalwindow�screen.�Aluminum�tape�is�thenapplied�on�the�front�side�while�making�a
weld�on�the�backside�to�hold�the�pieces�inalignment.
Also,�if�the�vehicle�is�equipped�with�anadaptive�cruise�control�or�parallel�parkassist�systems,�no�repair�can�be�done�infront�of�a�sensor�if�it�impedes�the�sensorsability�to�function.
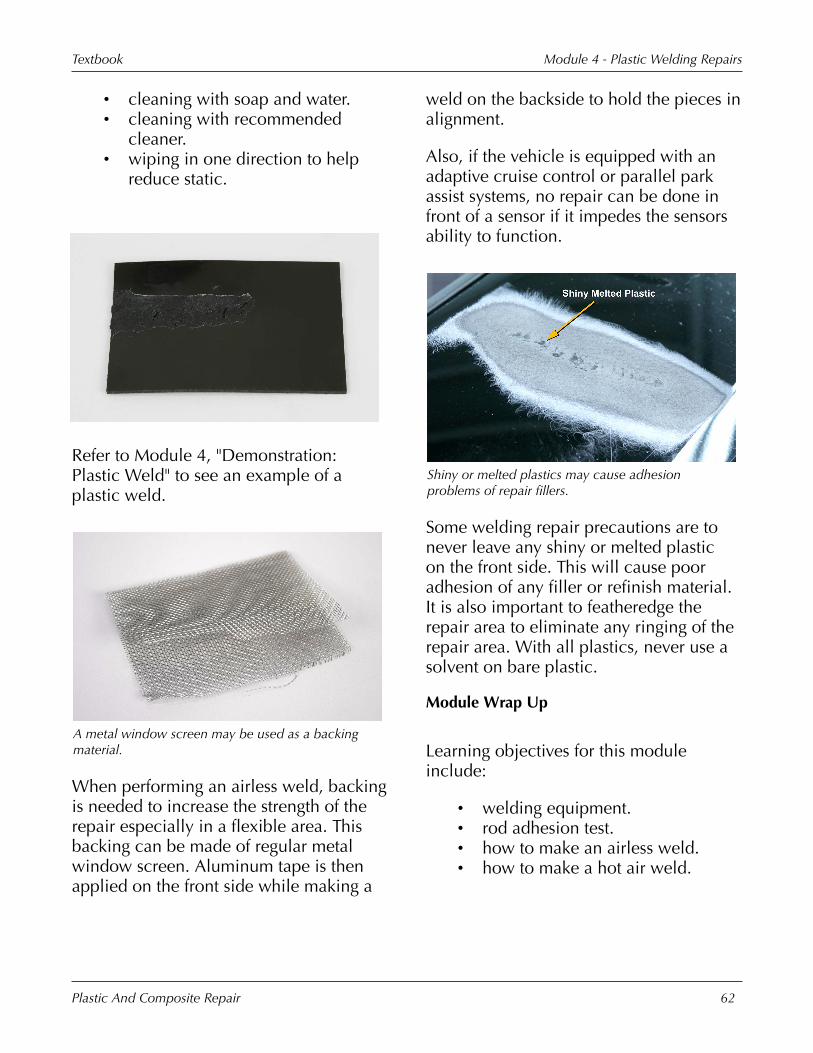
Shiny�or�melted�plastics�may�cause�adhesionproblems�of�repair�fillers.
Some�welding�repair�precautions�are�tonever�leave�any�shiny�or�melted�plasticon�the�front�side.�This�will�cause�pooradhesion�of�any�filler�or�refinish�material.It�is�also�important�to�featheredge�therepair�area�to�eliminate�any�ringing�of�therepair�area.�With�all�plastics,�never�use�asolvent�on�bare�plastic.
Module�Wrap�Up
Learning�objectives�for�this�moduleinclude:
• welding�equipment.• rod�adhesion�test.• how�to�make�an�airless�weld.• how�to�make�a�hot�air�weld.