Embed Size (px)
Citation preview
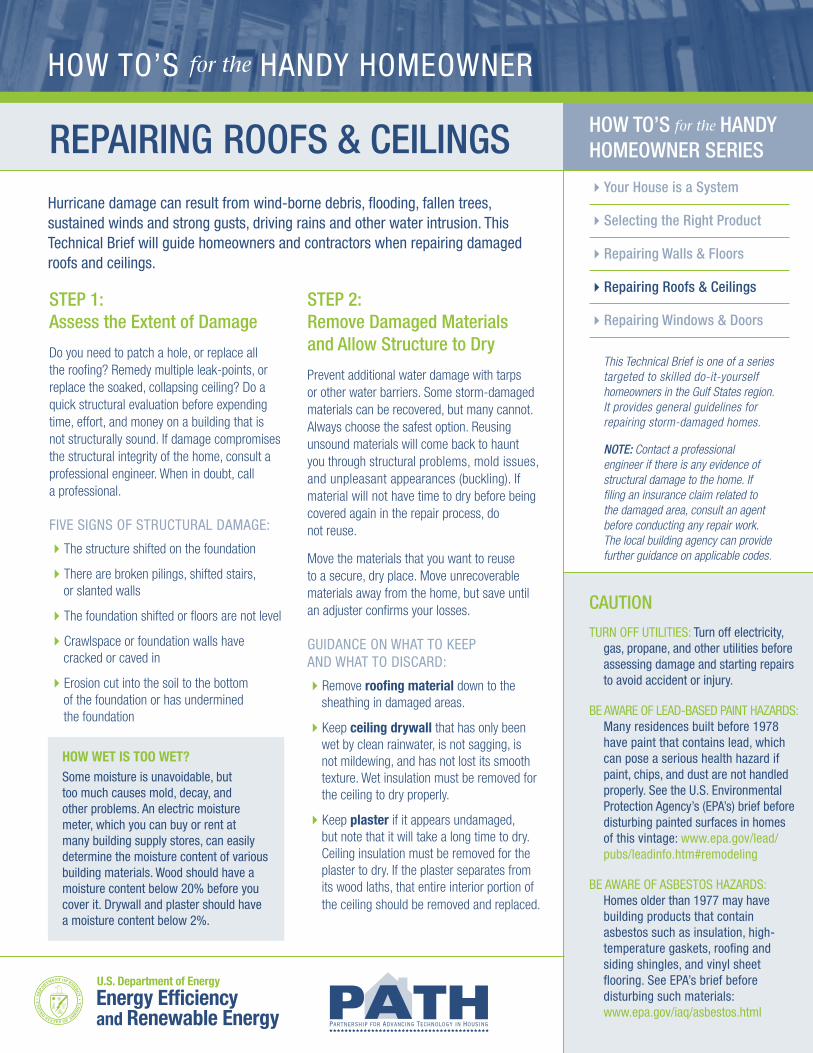
STEP 1: Assess the Extent of Damage
Do you need to patch a hole, or replace all the roofing? Remedy multiple leak-points, or replace the soaked, collapsing ceiling? Do a quick structural evaluation before expending time, effort, and money on a building that is not structurally sound. If damage compromises the structural integrity of the home, consult a professional engineer. When in doubt, call a professional.
FIVE SIGNS OF STRUCTURAL DAMAGE:
4The structure shifted on the foundation
4There are broken pilings, shifted stairs, or slanted walls
4The foundation shifted or floors are not level
4Crawlspace or foundation walls have cracked or caved in
4Erosion cut into the soil to the bottom of the foundation or has undermined the foundation
STEP 2: Remove Damaged Materials and Allow Structure to Dry
Prevent additional water damage with tarps or other water barriers. Some storm-damaged materials can be recovered, but many cannot. Always choose the safest option. Reusing unsound materials will come back to haunt you through structural problems, mold issues, and unpleasant appearances (buckling). If material will not have time to dry before being covered again in the repair process, do not reuse.
Move the materials that you want to reuse to a secure, dry place. Move unrecoverable materials away from the home, but save until an adjuster confirms your losses.
GUIDANCE ON WHAT TO KEEP AND WHAT TO DISCARD:
4Remove roofing material down to the sheathing in damaged areas.
4Keep ceiling drywall that has only been wet by clean rainwater, is not sagging, is not mildewing, and has not lost its smooth texture. Wet insulation must be removed for the ceiling to dry properly.
4Keep plaster if it appears undamaged, but note that it will take a long time to dry. Ceiling insulation must be removed for the plaster to dry. If the plaster separates from its wood laths, that entire interior portion of the ceiling should be removed and replaced.
HOW TO’S for the HANDY HOMEOWNER
REPAIRING ROOFS & CEILINGS HOW TO’S for the HANDY HOMEOWNER SERIES
4Your House is a System
4Selecting the Right Product
4Repairing Walls & Floors
4Repairing Roofs & Ceilings
4Repairing Windows & Doors
This Technical Brief is one of a series targeted to skilled do-it-yourself homeowners in the Gulf States region. It provides general guidelines for repairing storm-damaged homes.
NOTE: Contact a professional engineer if there is any evidence of structural damage to the home. If filing an insurance claim related to the damaged area, consult an agent before conducting any repair work. The local building agency can provide further guidance on applicable codes.
Hurricane damage can result from wind-borne debris, flooding, fallen trees, sustained winds and strong gusts, driving rains and other water intrusion. This Technical Brief will guide homeowners and contractors when repairing damaged roofs and ceilings.
CAUTION
TURN OFF UTILITIES: Turn off electricity, gas, propane, and other utilities before assessing damage and starting repairs to avoid accident or injury.
BE AWARE OF LEAD-BASED PAINT HAZARDS: Many residences built before 1978 have paint that contains lead, which can pose a serious health hazard if paint, chips, and dust are not handled properly. See the U.S. Environmental Protection Agency’s (EPA’s) brief before disturbing painted surfaces in homes of this vintage: www.epa.gov/lead/pubs/leadinfo.htm#remodeling
BE AWARE OF ASBESTOS HAZARDS: Homes older than 1977 may have building products that contain asbestos such as insulation, high-temperature gaskets, roofing and siding shingles, and vinyl sheet flooring. See EPA’s brief before disturbing such materials: www.epa.gov/iaq/asbestos.html
HOW WET IS TOO WET? Some moisture is unavoidable, but too much causes mold, decay, and other problems. An electric moisture meter, which you can buy or rent at many building supply stores, can easily determine the moisture content of various building materials. Wood should have a moisture content below 20% before you cover it. Drywall and plaster should have a moisture content below 2%.

P. 2
4Remove and discard fiberglass batt insulation and cellulose insulation that has been soaked. Rigid insulation can be washed off and kept.
4Keep wet framing members and trusses, which will retain their shape if allowed to dry naturally, unless they are obviously damaged or warped. Though they may swell when soaked, they usually dry back to their original shape. Sheathing (plywood and oriented strand board [OSB]—OSB looks similar to fiberboard and particle board, but OSB has structural capability) might be kept if it is not soaked for too long. Pay careful attention to plywood and, especially, to OSB, because they may peel or fall apart as they dry.
4Use fans or heaters to speed the drying process after removing damaged materials.
STEP 3: Wind-Proof Damaged Roof
Add bracing to the attic structure to strengthen the home against future storms. Line up bracing and tie-downs at critical load points to maintain the integrity of the load path. (During Hurricane Andrew, hurricane ties had a 92% success rate.) Extend fascia board to terminate below
the underside of the soffit. This helps keep water out of the eaves. The Institute for Business and Home Safety (IBHS) suggests the following bracing plan for homes with gable ends:
4Install lateral bracing of the bottom chord (see Figure 1), running perpendicular to the bottom chords of the roof trusses, at 4 feet on center and extending back 8 feet from the gable end wall with 2x4’s, fastened with two 16d (16 penny) nails at each truss chord or ceiling joist and four 16d nails into blocking in gable end truss or rafter end wall assembly. Make sure the bottom chord of the gable truss or end ceiling joist is anchored to the wall below. If you have a wood-frame house and the interior finish on the wall below is being removed, try to ensure that the lateral braces are aligned with studs in the end wall below so it is possible to connect the braces to wall studs using metal strapping. This metal strapping, when properly installed, helps to resist both lateral forces and uplift on the gable end wall.
4Install bottom chord anchoring for uplift to transfer the loads from the gable truss/frame wall to the end wall below. In order to ensure complete load paths at these points, install metal straps rated for a minimum tensile load of 770 pounds at each lateral
REPAIRING ROOFS & CEILINGS
7 STEPS FOR ROOF & CEILING REPAIR
STEP 1: Assess the extent of damage
STEP 2: Remove damaged materials
and allow structure to dry
STEP 3: Wind-proof damaged roof
STEP 4: Install weather-resistant barrier
STEP 5: Install wind-resistant roofing in
high-wind zones
STEP 6: Weatherize
STEP 7: Repair drywall and plaster
Truss or ceiling joist
2"x4"x8' continuous lateral brace @ 4' o.c.
Gable end truss
2-16d nails
End wall studsNails
Gypsum boardno furring
2-16d nails@ each truss
2-16d nails @ 12" o.c.
2"x4" block nailed to eachbrace with 4-10d nails
Metal strap satisfiesuplift requirementof gable truss
Figure 1. Lateral Bracing of Bottom Chord
Source: Fortified…for safer living®, Builder’s Guide, Institute for Business & Home Safety

brace. In addition, if the exterior sheathing has been damaged or removed, install new wall sheathing so that it overlaps the connection between the end wall and gable truss/frame by at least 12 inches.
4Cross Bracing will transfer lateral loads from gable truss or gable framing to the ceiling and roof sheathing planes where loads can be effectively transferred to the walls. Cross-brace all gable ends with flat ceilings at the same spacing as the lateral bottom chord braces described in Figure 1 (every 4 feet). Keep the orientation of the X in the vertical plane. Make sure the connection between the cross braces and trusses or rafters is made into the side of the top chord and bottom chord of the trusses or rafters.
4Install top chord bracing like the bottom chord bracing, with the exception that the metal strapping is not required. Install 2"x4"x8-foot blocking along the underside of the top chords of gable ends at all locations where cross bracing is installed (i.e., with a horizontal projection of not more than 48" on center).
STEP 4: Install Weather-Resistant Barrier
Repair localized damage to sheathing by replacing it with panels of the same thickness. Attach the new sheathing and re-nail
the existing sheathing with 8d ring shank (2.5"x0.120" diameter) nails at 6 inches on center to all framing members.
If you have to replace all the sheathing, consider using 32/16-rated roof deck sheathing (plywood or OSB) with a minimum thickness of 5/8" and a nailing pattern of 8d ring shank nails at 4" on center on any panel adjacent to a gable end. (See Figure 2.) The same nails are required at 6 inches on center everywhere else. If required due to roof geometry, piecework (panels ripped lengthwise to a width less than 4 feet) should be located in a strip at least 4 feet away from the ridge or eaves.
Use hurricane clips, which offer an extra connection between sheets of sheathing in the gap between trusses.
Use baffled ridge vents and off-ridge vents instead of unbaffled vents. Unbaffled vents tend to allow wind-driven moisture to enter attic spaces or the cavities of cathedral ceilings, causing moisture damage and mold growth.
Seal all roof-sheathing joints with a self-adhered asphalt/rubber tape (modified bitumen) at least 4" wide to provide a secondary moisture barrier. As an alternative, consider applying an ice and water shield type of product over the entire roof deck. These products are widely used in roof valleys and will provide an excellent backup protection from
P. 3
Source: Rebuilding After a Hurricane, Recommendations from the Institute for Business & Home Safety
4" nail spacing in green panels
6" nail spacing in light panels
Figure 2. Roof Sheathing

water intrusion if the primary roof covering is damaged or blown off. If you use the ice and water shield, the felt paper underlayment is not required, but you must ensure the attic is vented.
Roofing underlayment should be either a single layer of 30# felt with a minimum 2" overlap, or two layers of 15# felt. Install in accordance with manufacturer’s instructions. (See Figure 3.) Underlayment requires a minimum 6" end lap (note that this can be omitted if you cover the entire deck with an ice and water shield type of product). Peel-and-stick roof underlayment reduces water intrusion if roof shingles are lost. These rubber or asphalt sheets cost $700 to $1,000 more than standard roofing felt for a 2,400-square-foot house.
STEP 5: Install Wind-Resistant Roofing in High-Wind Zones
Install shingles or other roof covering per building requirements. If more than 10% of the old roof needs repair, the Journal of Light Construction Field Guide recommends a new roof.
Follow a proper nailing schedule. Size, type, and placement are all factors. Sheathing durability is sensitive to nails too close to the edge of the sheet; follow manufacturer’s recommendations. Overdriving nails can significantly reduce uplift strength of the connection. Thicker sheathing can offset sensitivity to overdriving.
P. 4
REPAIRING ROOFS & CEILINGS
RECESSED LIGHTS
If you have standard recessed fixtures, then you have gaps in your insulation (safety requirement) and
air leaking between the attic and the rest of the house. Even IC-rated
fixtures, which have a heat sensor switch and can be covered with
insulation, allow air to leak.
Airtight, IC-rated fixtures are recommended for optimum
energy efficiency, and required by the Residential Energy Code of Alabama. Alternatives to recessed
lights include surface-mounted ceiling fixtures and track lighting.
Figure 3: Roof Underlayment
Source: Rebuilding After a Hurricane, Recommendations from the Institute for Business & Home Safety
Underlayment(15# asphalt impregnatedfelt paper)
Deck(hot asphalt mop optional)
NOTE: Nail with 1"diameter tin tags
Drip edge along eavenailed maximum 10" o.c.
6" spacingalong laps
12" end lap
12" spacingin field
2" lap
Gable end 36"
19"
17"
Drywall or plywoodcovers air leakage path
Figure 4a. Soffits
Source: Alabama Builder’s Field Guide, Energy Efficient Building Envelope, prepared for the Alabama Department of Economic and Community Affairs by Southface Energy Institute, Inc., September 2004

P. 5
Figure 4b. Chases
Sheet-good
Sealant
Figure 4c. Kneewalls
Source: Alabama Builder’s Field Guide, Energy Efficient Building Envelope, prepared for the Alabama Department of Economic and Community Affairs by Southface Energy Institute, Inc., September 2004
Caulk and seal rough opening
Weather-strip door opening and thresholdRigid insulation
CONDITIONEDSPACE
CONDITIONED SPACE
UNCONDITIONEDSPACE
Caulk
BlockingGlue
Rigid board(recommended)
STEP 6: Weatherize
Air seal and insulate the home to maximize comfort, minimize energy bills, avoid moisture problems, and minimize fire hazards. Reducing air leakage is an inseparable part of insulating: you should not do one without doing the other.
Seal Leaks If you stop conditioned air from leaking out of the top of the house, you stop outside air from leaking into the house through the basement or crawl space. It pays to spend time sealing air leaks in the attic. (See Figures 4 a,b,c,d.)
Spray foam insulation can seal many of the smaller leaks. For larger holes, cut a patch from rigid insulation board and seal the edges with caulk or spray foam. Recessed lighting fixtures require special handling and careful compliance with applicable codes because they generate so much heat. (See Figure 5 for recommended clearances around lighting and other penetrations.) Sealing a chase around a furnace exhaust vent requires sheet metal and high-temperature caulk. (See Figure 6.)
WIRING IN OLDER HOMES Older homes may have “knob-and-tube” wiring, where two separate wires run through ceramic posts (knobs) attached to the top of ceiling joists or through ceramic tubes inserted into holes drilled in the roof framing. Since this type of wiring was designed to dissipate heat to the attic air, insulating over knob-and-tube wiring can cause dangerous overheating. Consider having an electrician modernize your wiring so that the entire attic can be insulated.
Source: Alabama Builder’s Field Guide, Energy Efficient Building Envelope, prepared for the Alabama Department of Economic and Community Affairs by Southface Energy Institute, Inc., September 2004
P. 6
REPAIRING ROOFS & CEILINGS
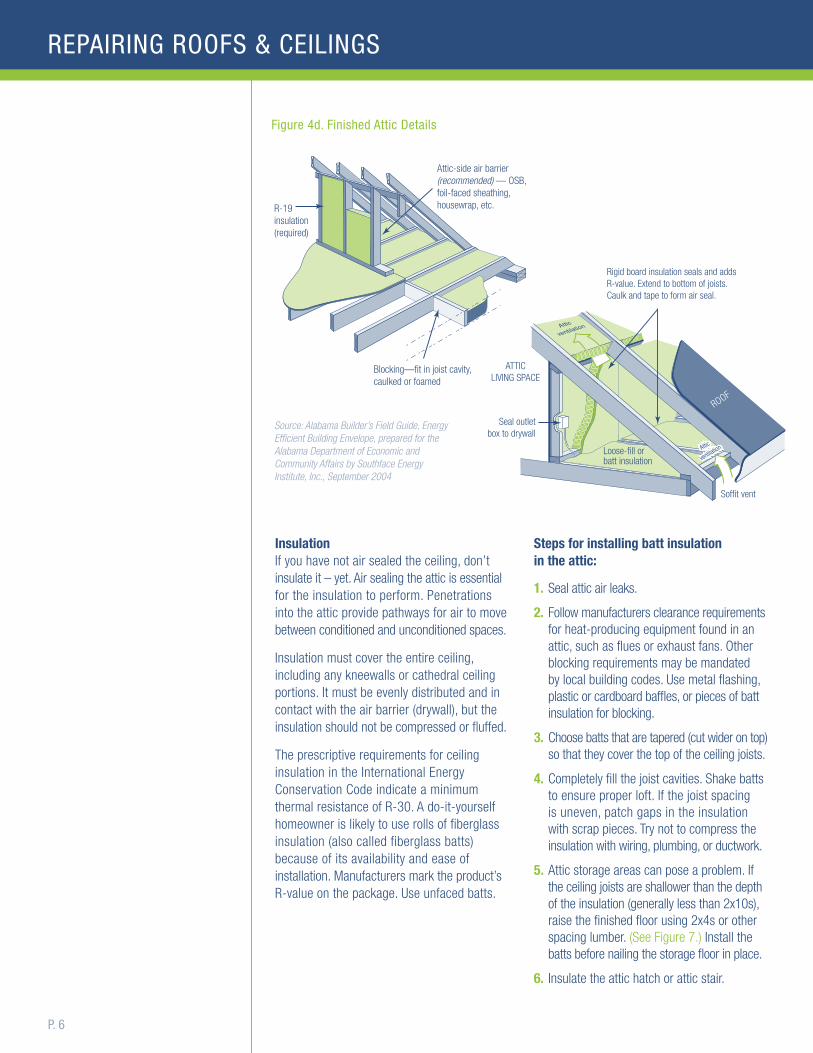
Insulation If you have not air sealed the ceiling, don’t insulate it – yet. Air sealing the attic is essential for the insulation to perform. Penetrations into the attic provide pathways for air to move between conditioned and unconditioned spaces.
Insulation must cover the entire ceiling, including any kneewalls or cathedral ceiling portions. It must be evenly distributed and in contact with the air barrier (drywall), but the insulation should not be compressed or fluffed.
The prescriptive requirements for ceiling insulation in the International Energy Conservation Code indicate a minimum thermal resistance of R-30. A do-it-yourself homeowner is likely to use rolls of fiberglass insulation (also called fiberglass batts) because of its availability and ease of installation. Manufacturers mark the product’s R-value on the package. Use unfaced batts.
Steps for installing batt insulation in the attic:
1. Seal attic air leaks.
2. Follow manufacturers clearance requirements for heat-producing equipment found in an attic, such as flues or exhaust fans. Other blocking requirements may be mandated by local building codes. Use metal flashing, plastic or cardboard baffles, or pieces of batt insulation for blocking.
3. Choose batts that are tapered (cut wider on top) so that they cover the top of the ceiling joists.
4. Completely fill the joist cavities. Shake batts to ensure proper loft. If the joist spacing is uneven, patch gaps in the insulation with scrap pieces. Try not to compress the insulation with wiring, plumbing, or ductwork.
5. Attic storage areas can pose a problem. If the ceiling joists are shallower than the depth of the insulation (generally less than 2x10s), raise the finished floor using 2x4s or other spacing lumber. (See Figure 7.) Install the batts before nailing the storage floor in place.
6. Insulate the attic hatch or attic stair.
Figure 4d. Finished Attic Details
Blocking—fit in joist cavity, caulked or foamed
R-19 insulation (required)
Attic-side air barrier (recommended) — OSB, foil-faced sheathing, housewrap, etc.
Source: Alabama Builder’s Field Guide, Energy Efficient Building Envelope, prepared for the Alabama Department of Economic and Community Affairs by Southface Energy Institute, Inc., September 2004
Loose-fill orbatt insulation
ATTICLIVING SPACE
Seal outletbox to drywall
Soffit vent
Attic
ventilation
Attic
ventilationAttic
ventilation
ROOF
Rigid board insulation seals and adds R-value. Extend to bottom of joists. Caulk and tape to form air seal.

P. 7
Figure 5. Insulation Clearances
Source: Alabama Builder’s Field Guide, Energy Efficient Building Envelope, prepared for the Alabama Department of Economic and Community Affairs by Southface Energy Institute, Inc., September 2004
������������������������������������������
2" clearance around double-wall insulated or triple-wall metal
chimney, or follow manufacturer’s recommendations
2" clearance around masonry chimney
Kitchen/bath exhaust fanmay require clearance
Put covers on all electric junction boxes and insulate over. If uncovered,
maintain 3" clearance
OBJECT RECOMMENDED ACTION*
Recessed light 3" clearance on all sides, unless rated as Insulated Coverage (IC)
Doorbell transformer
Do not cover, no clearance on sides required
Masonry chimney 2" clearance
Metal chimney 2" clearance or follow manufacturer’s recommendations
Vent pipes from fuel-burning equipment
Follow manufacturer’s recommendations
Kitchen/bath exhaust
Duct to the outside; leave 3" clearance for all kitchen exhausts and for bathroom exhausts with attached lighting
Heat/light/ventilation
3" clearance on all sides
Uncovered electric Cover the box and insulate junction boxes over it; if it is left uncovered, leave a 3" clearance
Whole house fan Install blocking up to the fan housing; leave 3" clearance around the fan motor
Attic access door Block around the door if blowing in loose-fill insulation
*These are general guidelines. Follow specific manufacturer’s recommendations.

JANUARY 2006
FOR MORE INFORMATION SEE:
Building America Best Practices Series: Volume 1: Builders and Buyers Handbook for Improving New Home Efficiency, Comfort, and Durability in the Hot and Humid Climate www.buildingamerica.gov
Energy Efficient Rehab Advisor www.rehabadvisor.com
Practices for Improving Hurricane Resistance www.pathnet.org/hurricane
ENERGY STAR www.energystar.gov
For comprehensive information from the Center for Disease Control on how to limit exposure to mold and how to identify and prevent mold-related health effects, visit: www.bt.cdc.gov/disasters/mold/report/pdf/2005_moldreport.pdf
REPAIRING ROOFS & CEILINGS
The material in this Tech Brief was adapted from the following sources:
Alabama Builder’s Field Guide: Energy Efficient Building Envelope prepared for the Alabama Department of Economic and Community Affairs by Southface Energy Institute, Inc., September 2004
Durability by Design: A Guide for Residential Builders and Designers Partnership for Advancing Technology in Housing, U.S. Department of Housing and Urban Development, May 2002
Field Guide Journal of Light Construction, 2003
Field Testing of Energy-Efficient Flood-Damage-Resistant Residential Envelope Systems, Summary Report Oak Ridge National Laboratory, 2004
Rebuilding After a Hurricane Institute for Business & Home Safety (undated)
Repairing Your Flooded Home American Red Cross, 1992
The Rehab Guide Volume 3: Roofs prepared for the U.S. Department of Housing and Urban Development, August 1999
The Rehab Guide Volume 5: Partitions, Ceilings, Floors, and Stairs prepared for the U.S. Department of Housing and Urban Development, August 1999
P. 8
STEP 7: Repair Drywall and Plaster
Repair large holes or water-damaged areas of ceiling drywall with a US Gypsum repair kit or equal. To replace large sections of ceiling, nail or screw drywall to existing or newly replaced joists. Mold-resistant drywall is now available, though it is more expensive than standard drywall. Scrape excess glue, if any, from the existing joists or studs so that the new drywall is flat and plumb.
If joists do not adequately back the drywall throughout the entire area, frame the opening with blocking to support new drywall. Cut new drywall panel section to fit damaged area, leaving approximately 1/8" gap all around. Use quick-setting joint compound and fiberglass tape, which perform much better under flood conditions than standard drywall compound and paper joint tape.
The least expensive and most desirable way to repair old plaster ceilings after they dry is to carefully patch and then paint them. Covering cracked or deteriorated ceilings with an additional layer of gypsum board is the next most cost-effective option. The most expensive option is to tear out old plaster in its entirety and replace it with new drywall and trim. Generally, it is less expensive to repair up to 50% of walls and ceilings that have otherwise sound plaster, than to remove all the existing plaster and replace it with drywall.
Figure 7. Raised Ceiling Floor
Source for Figures 6 and 7: Alabama Builder’s Field Guide, Energy Efficient Building Envelope, prepared for the Alabama Department of Economic and Community Affairs
by Southface Energy Institute, Inc., September 2004
2x6 Ceiling joist
2x4 Spacer
Plywood floor2x4 on edge allows
for full insulation
Seal penetrations at ceiling
Figure 6: Flues and Exhaust Vents
FLUE
PlywoodNon-combustibleflue collar (sheet metal)Use high-temperature caulk between flue and collar